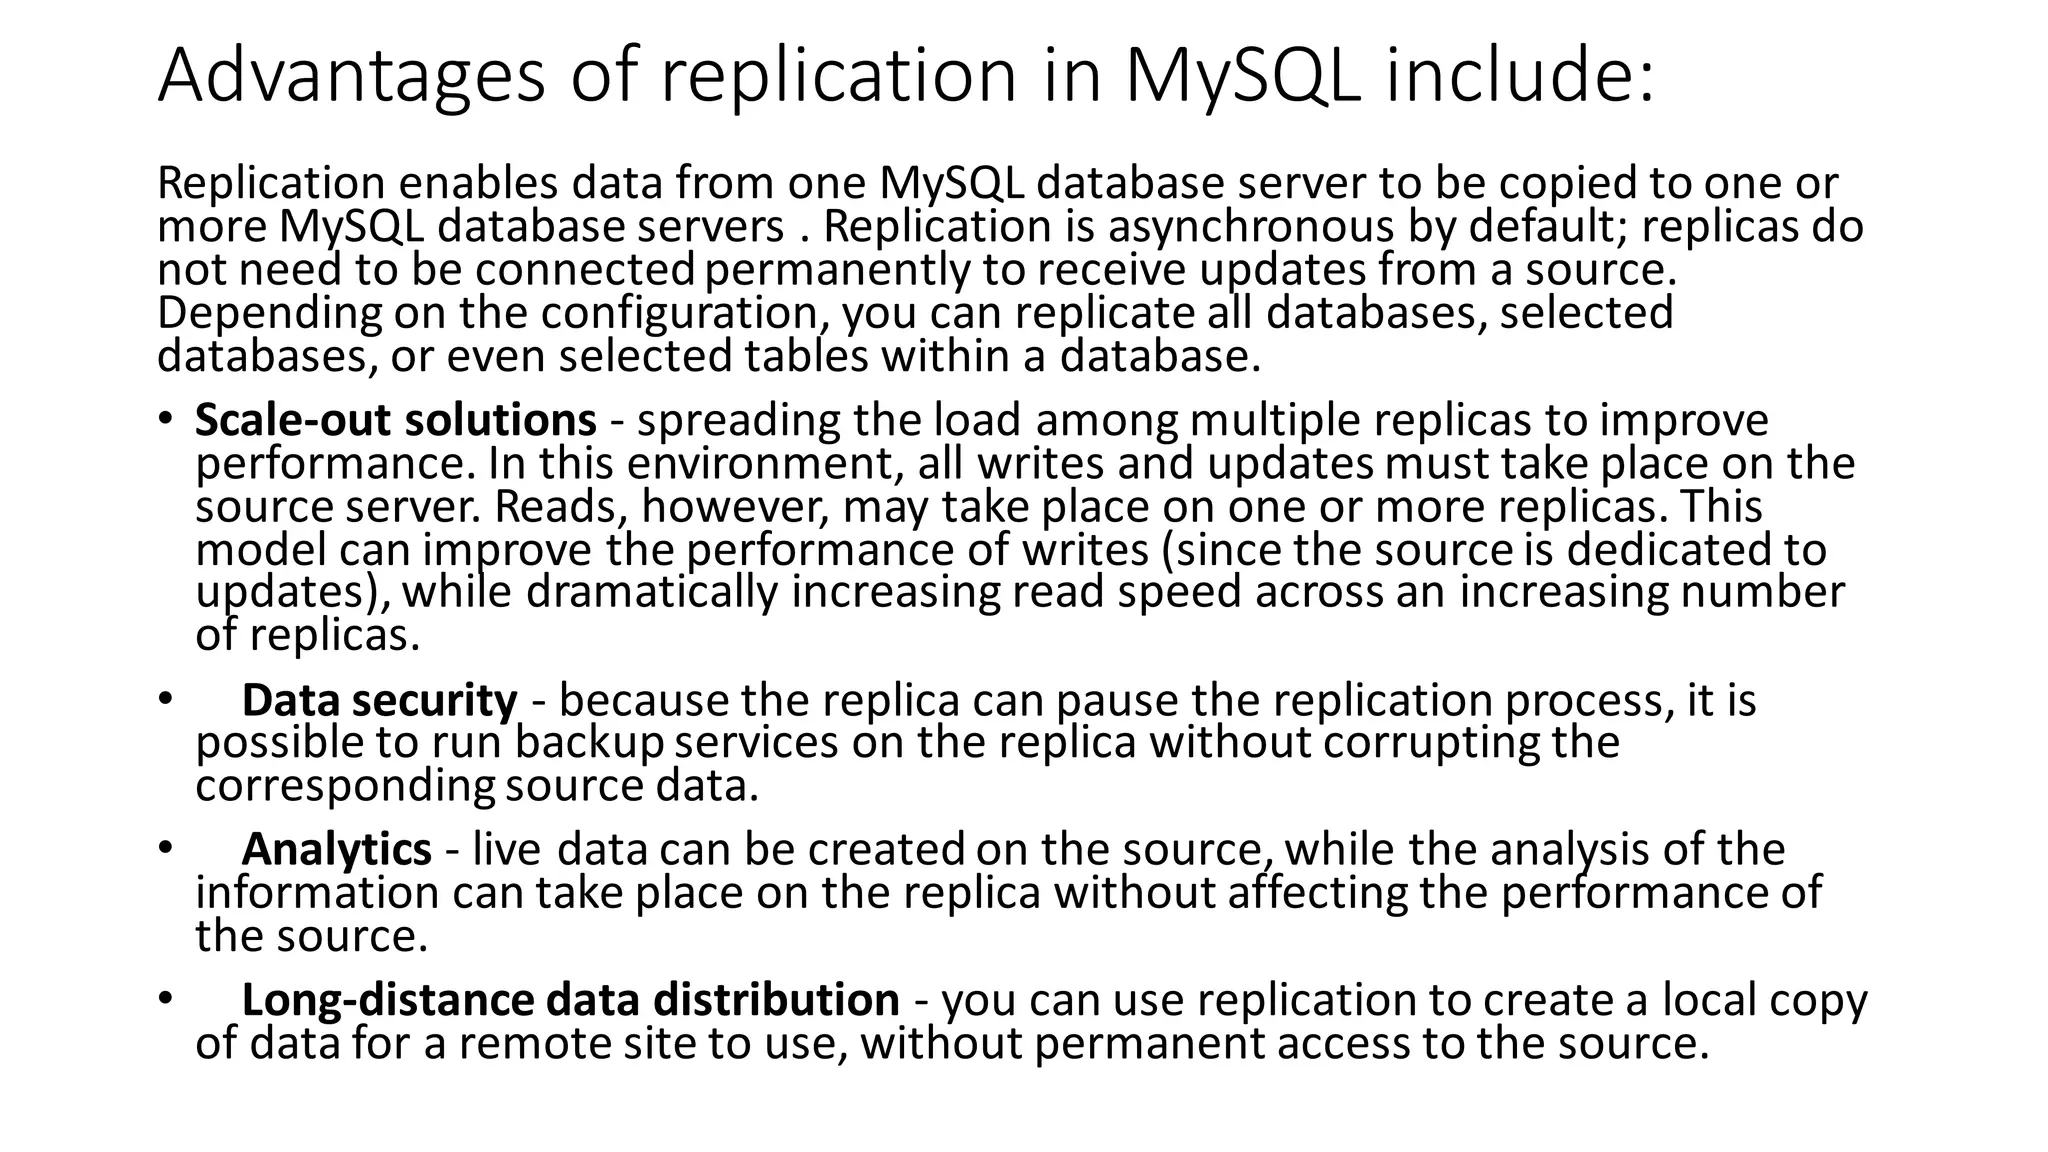
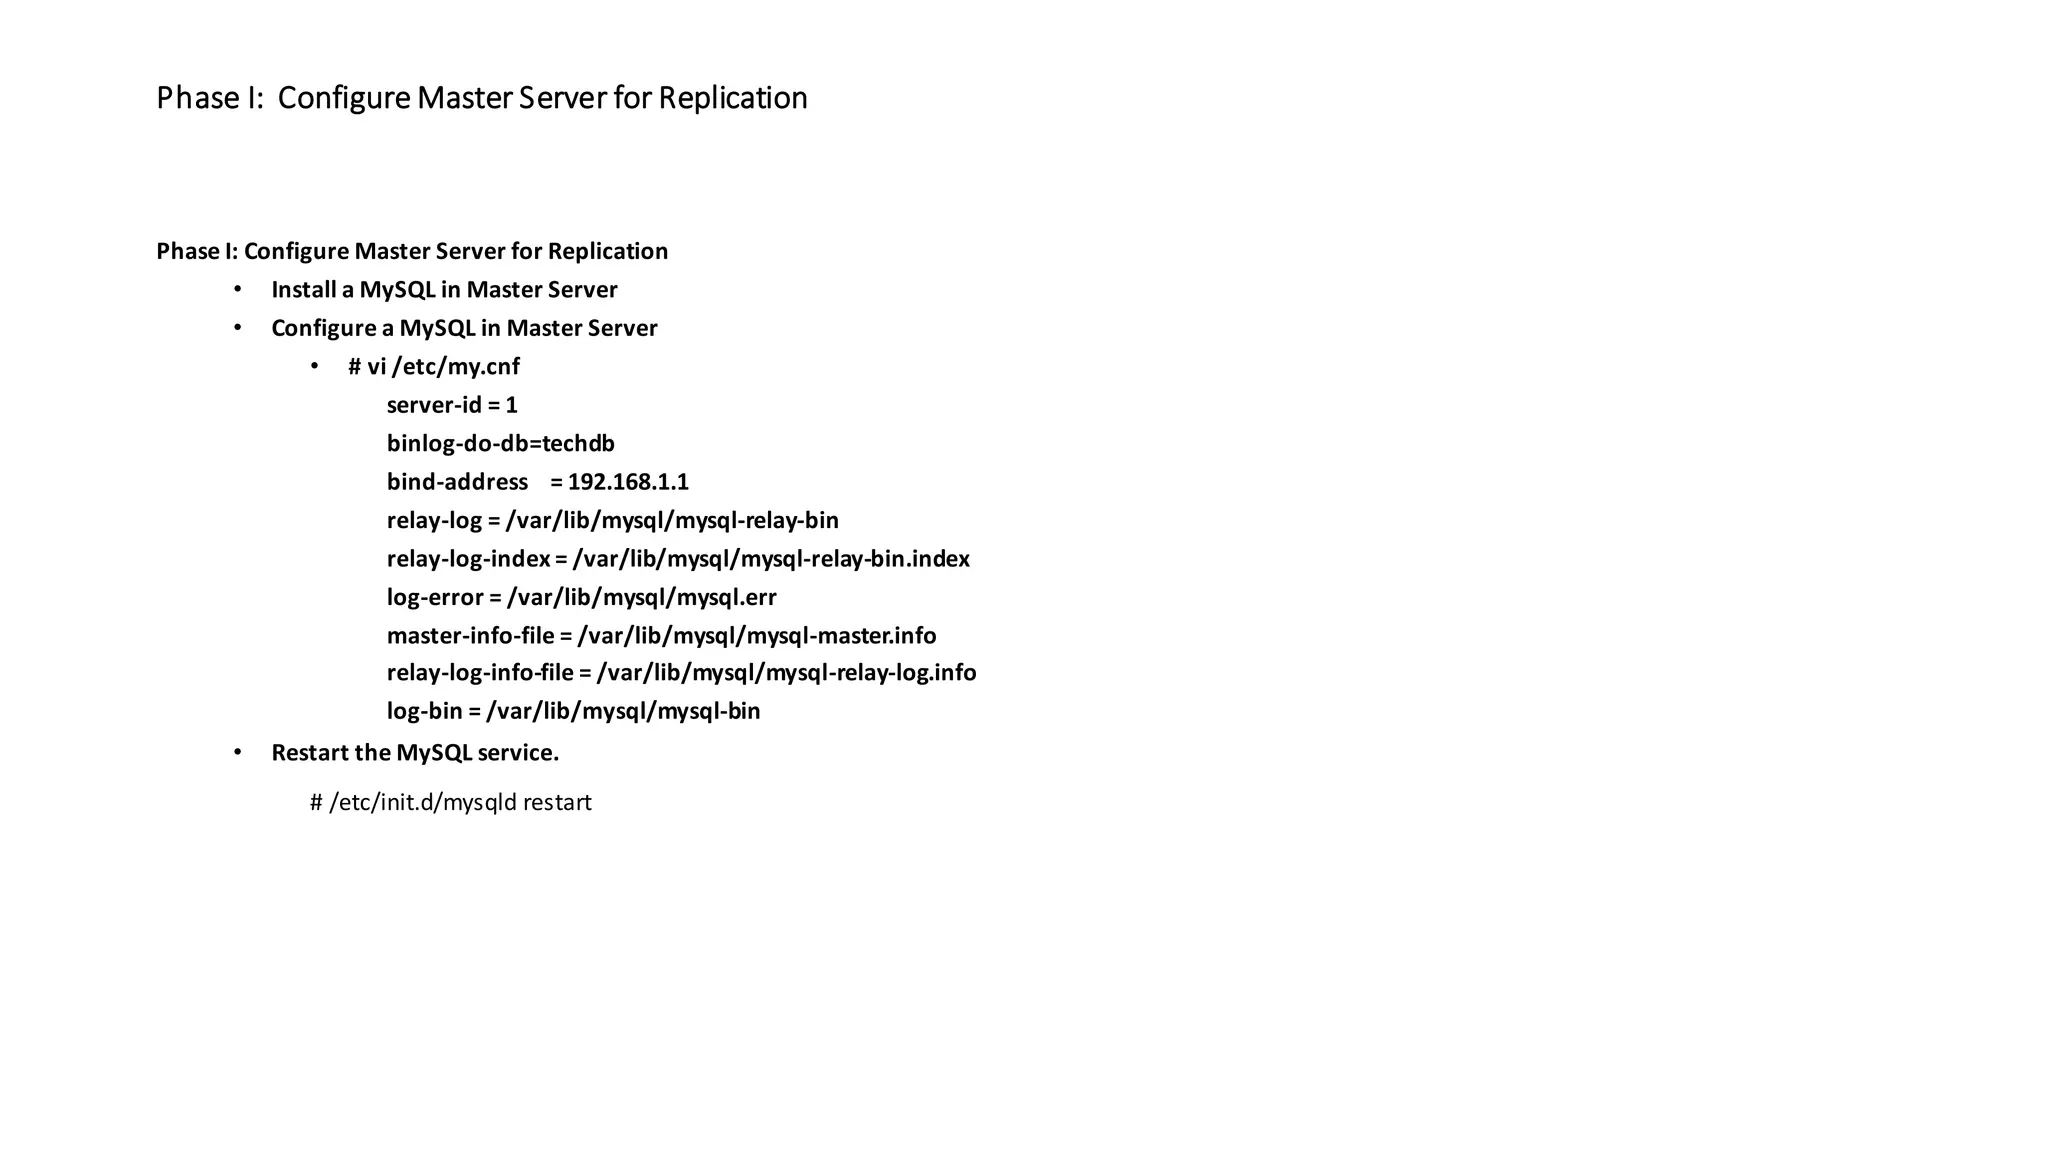
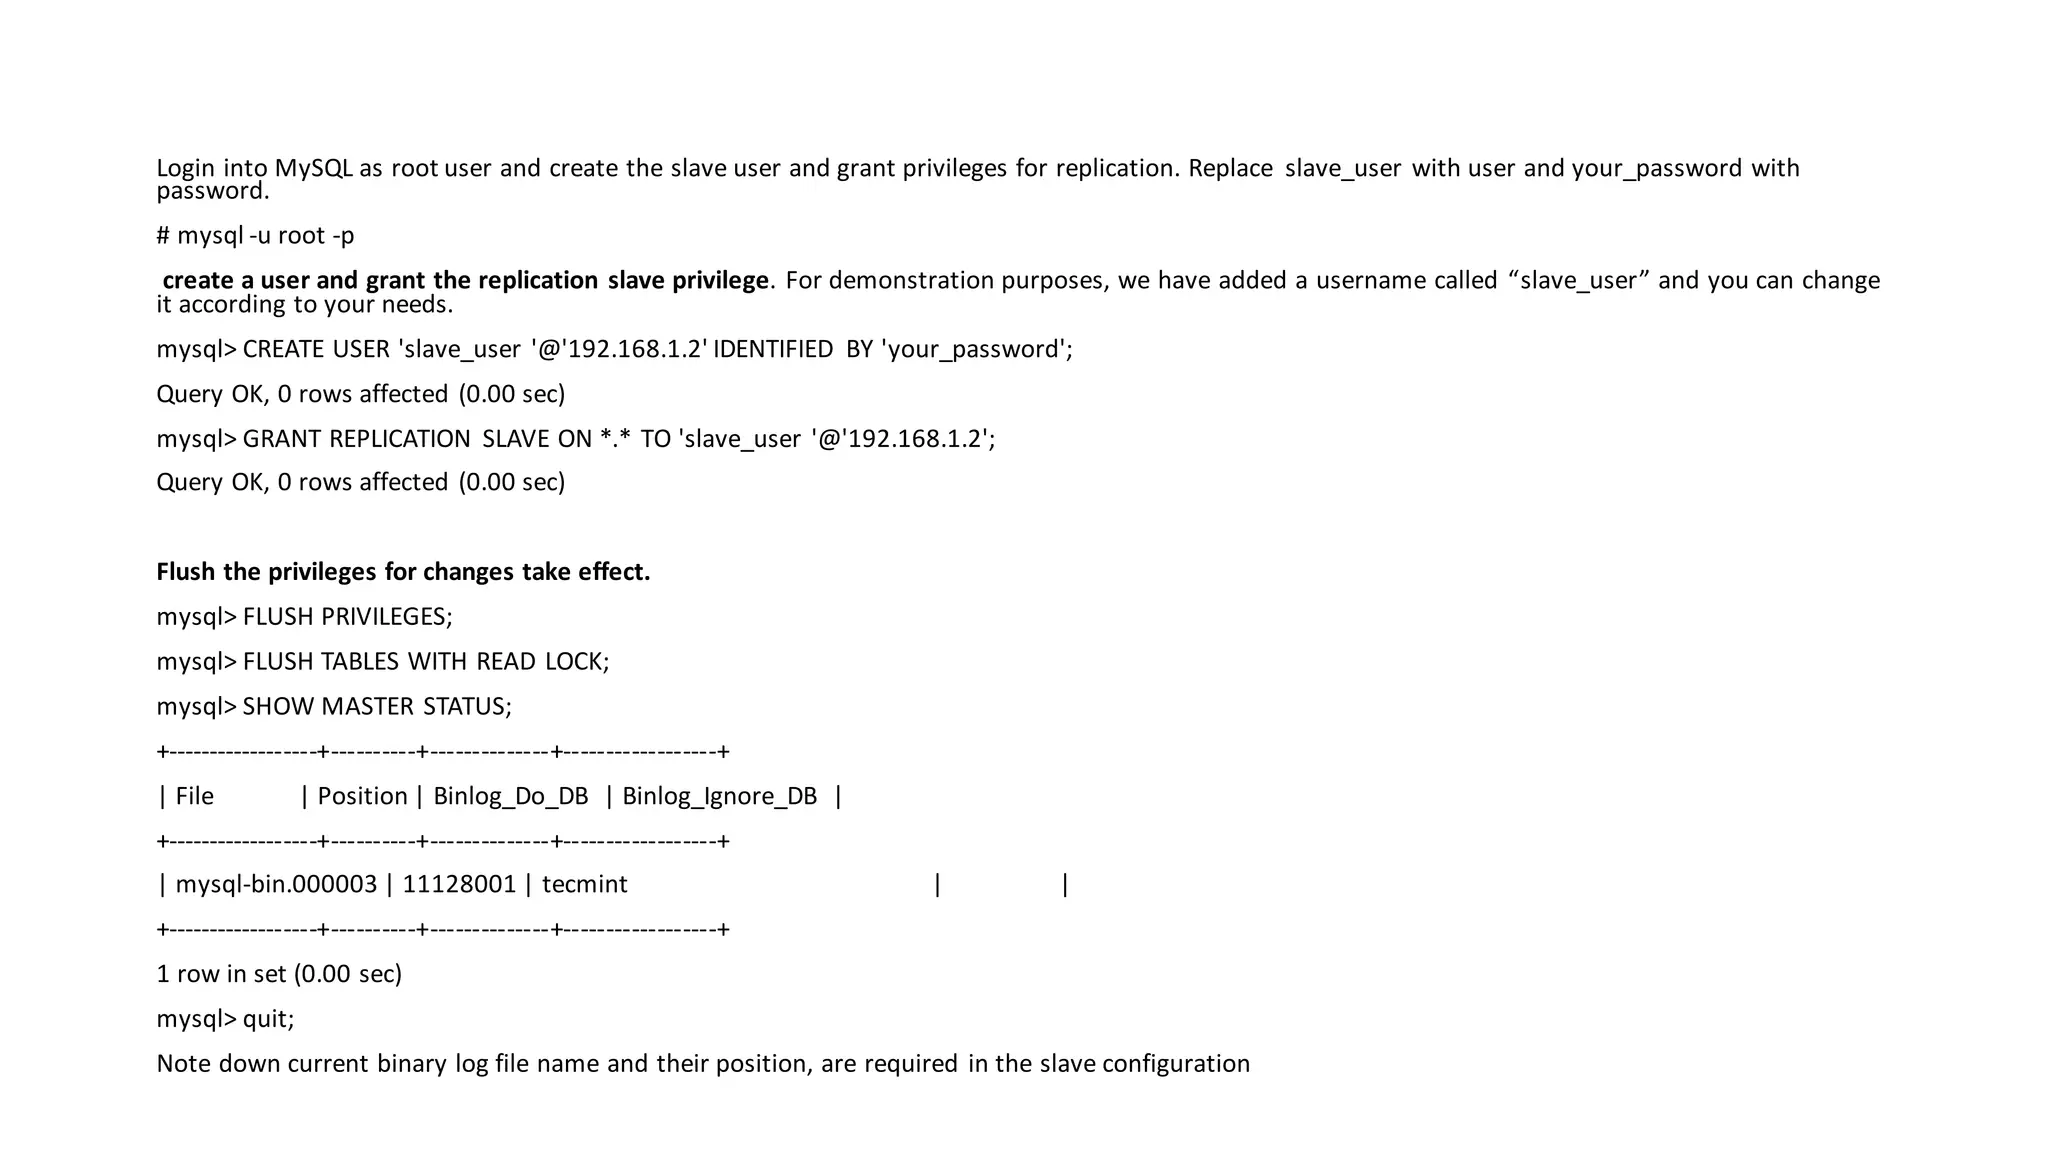
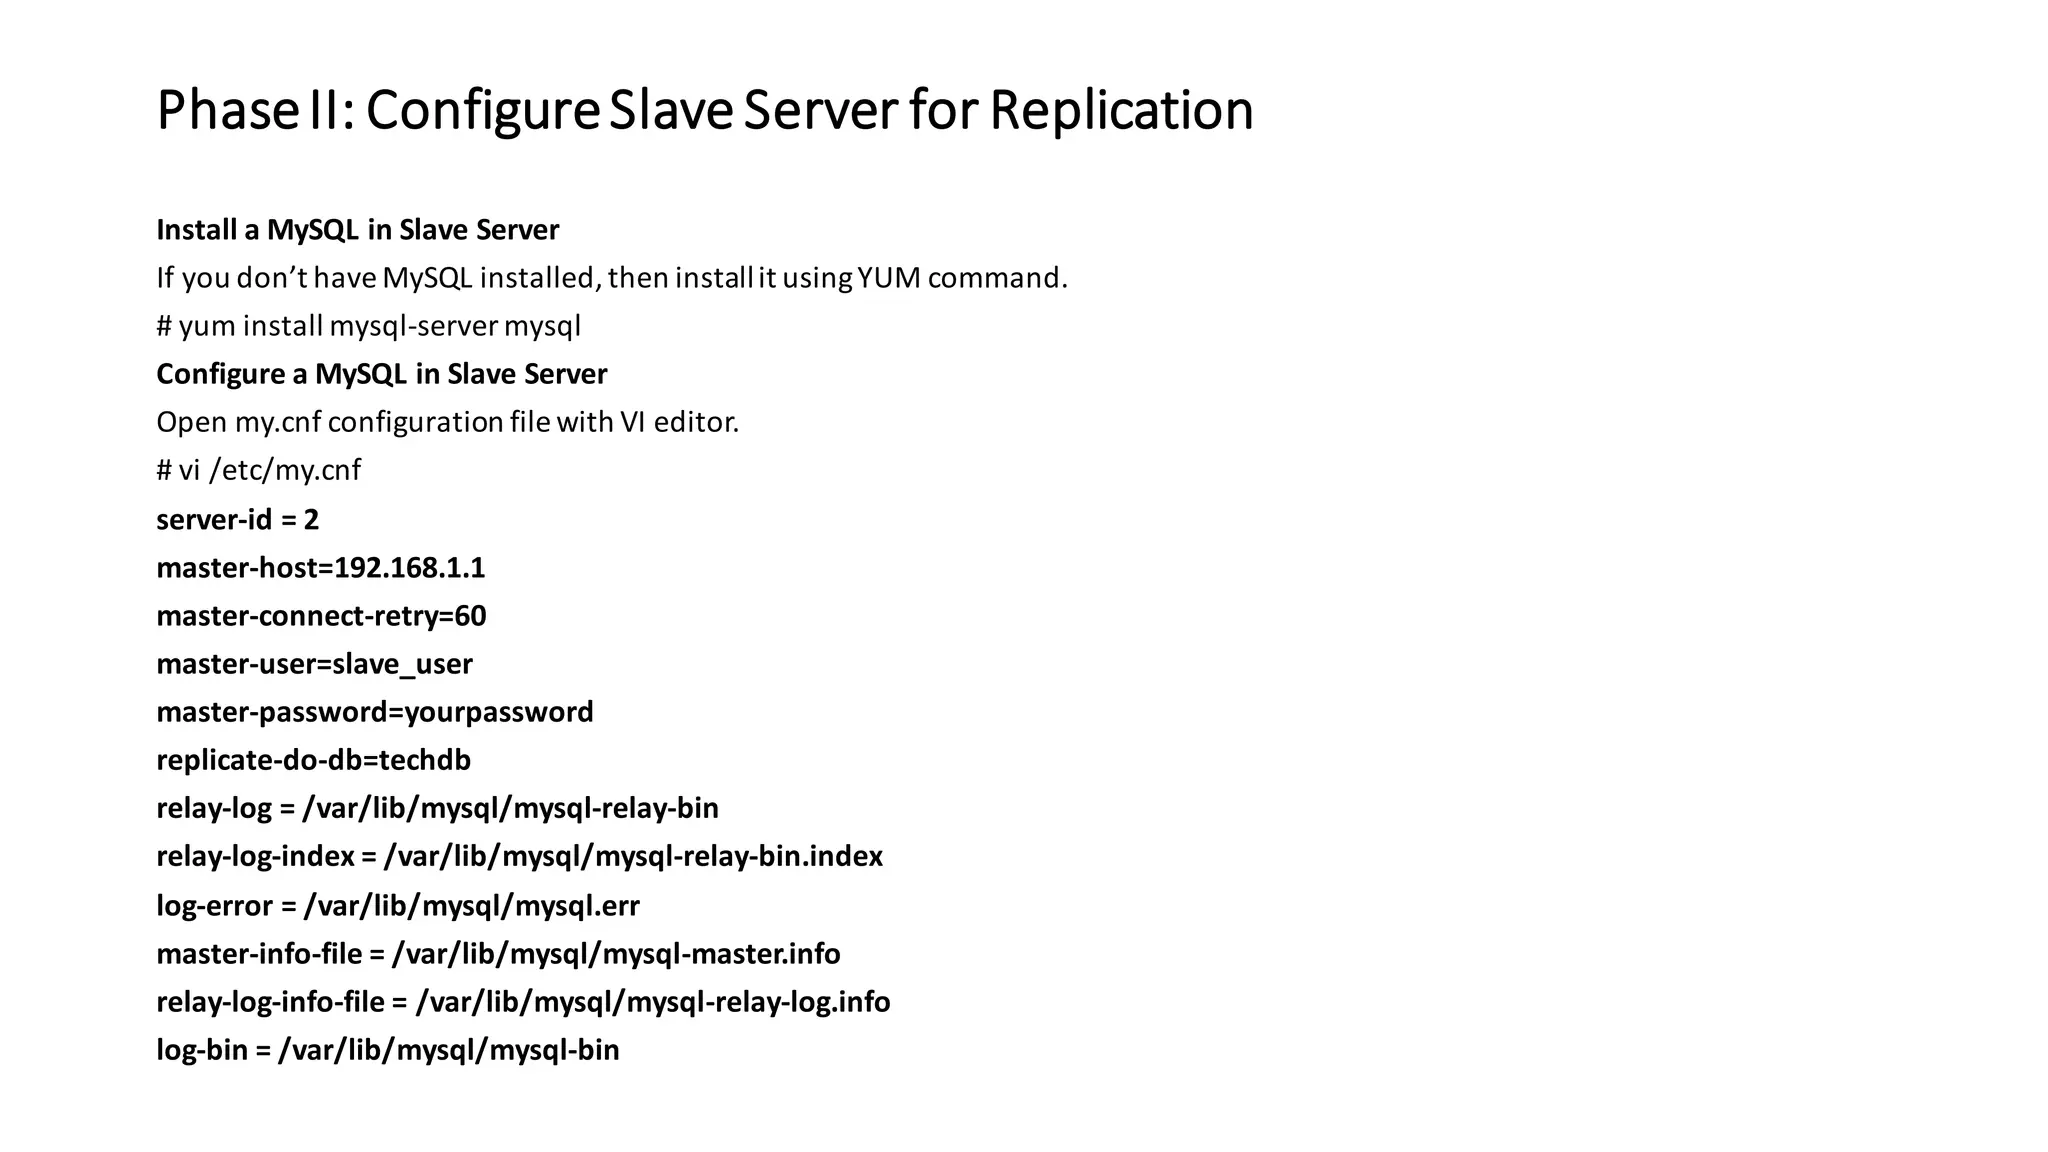
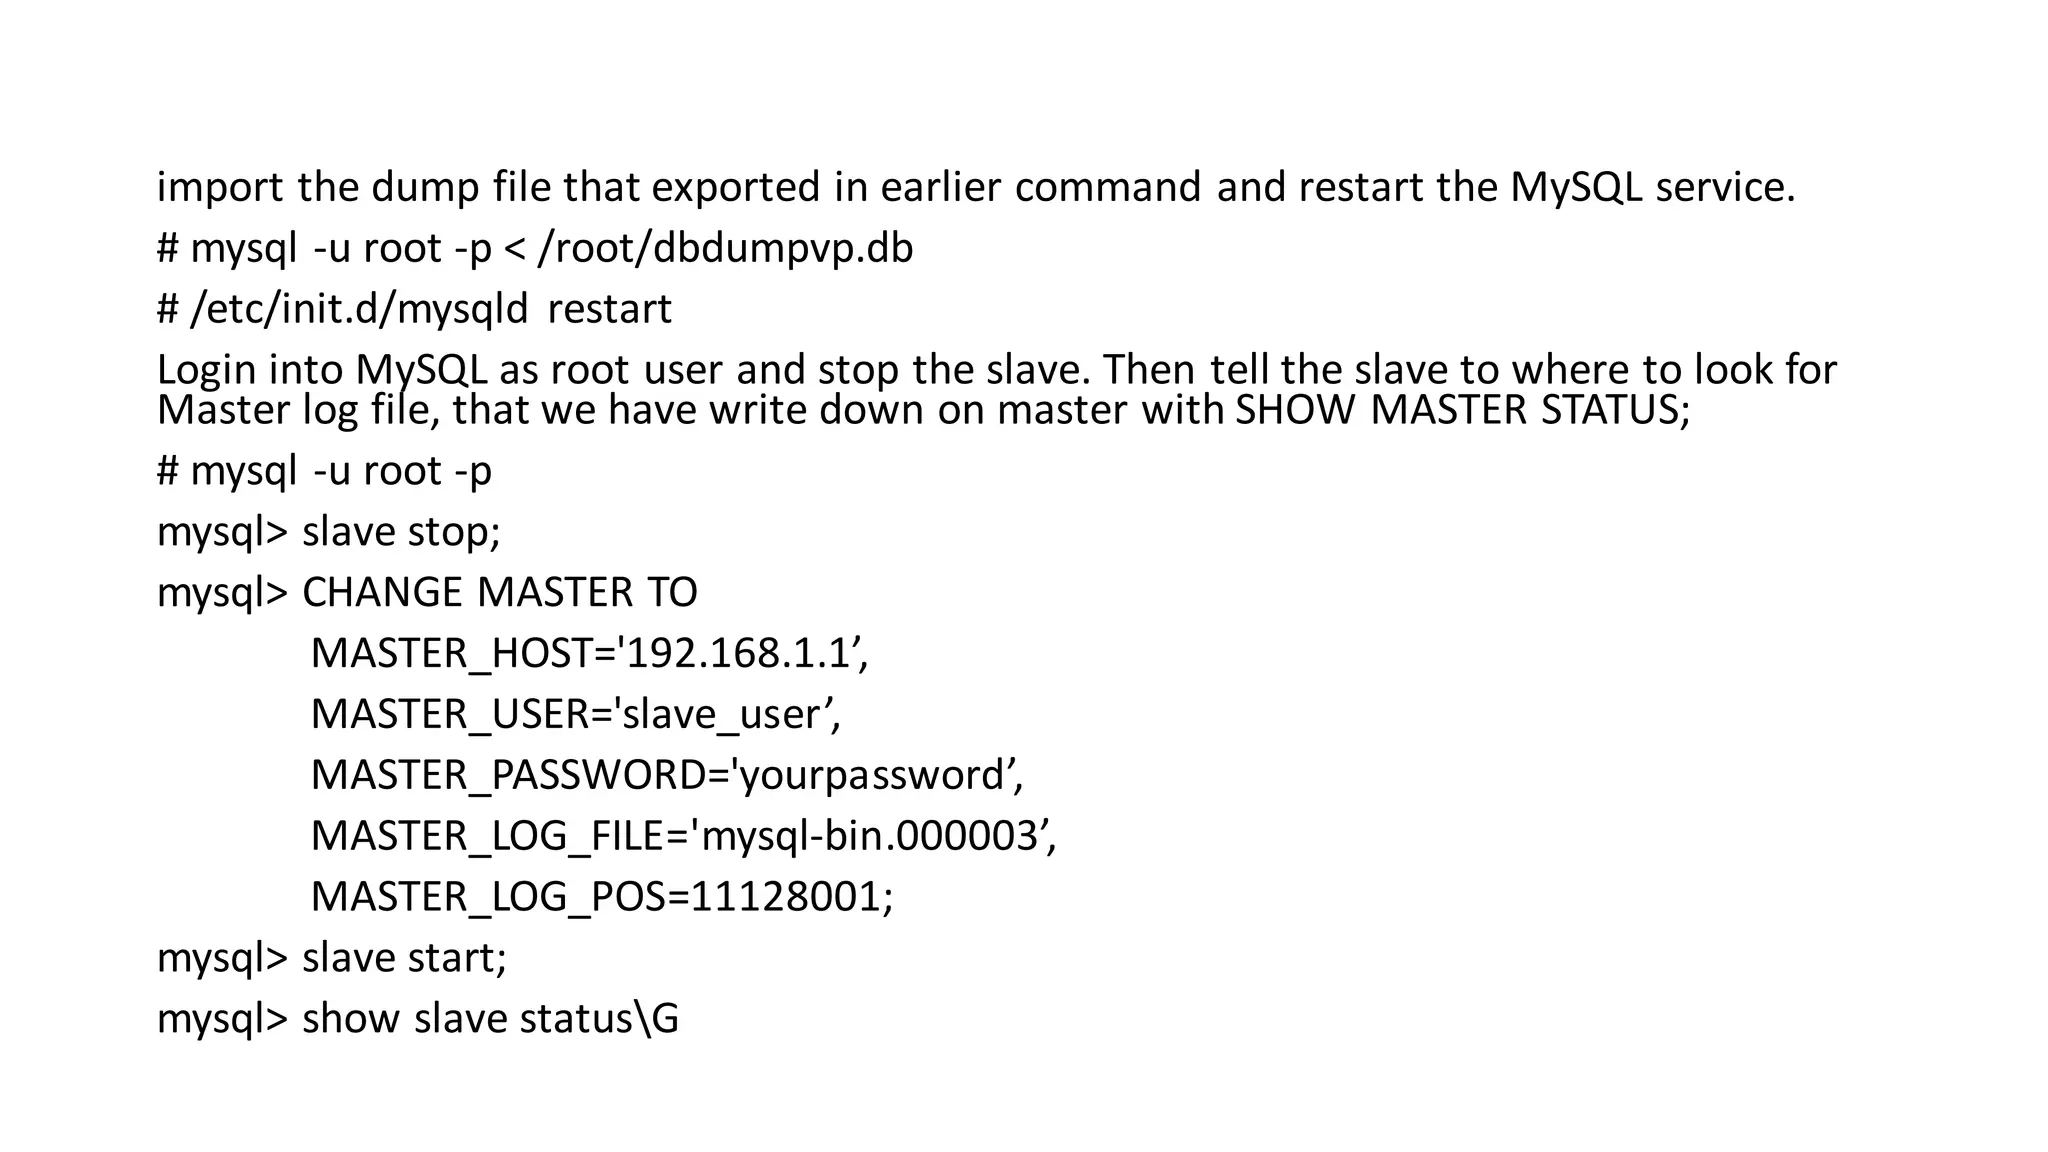
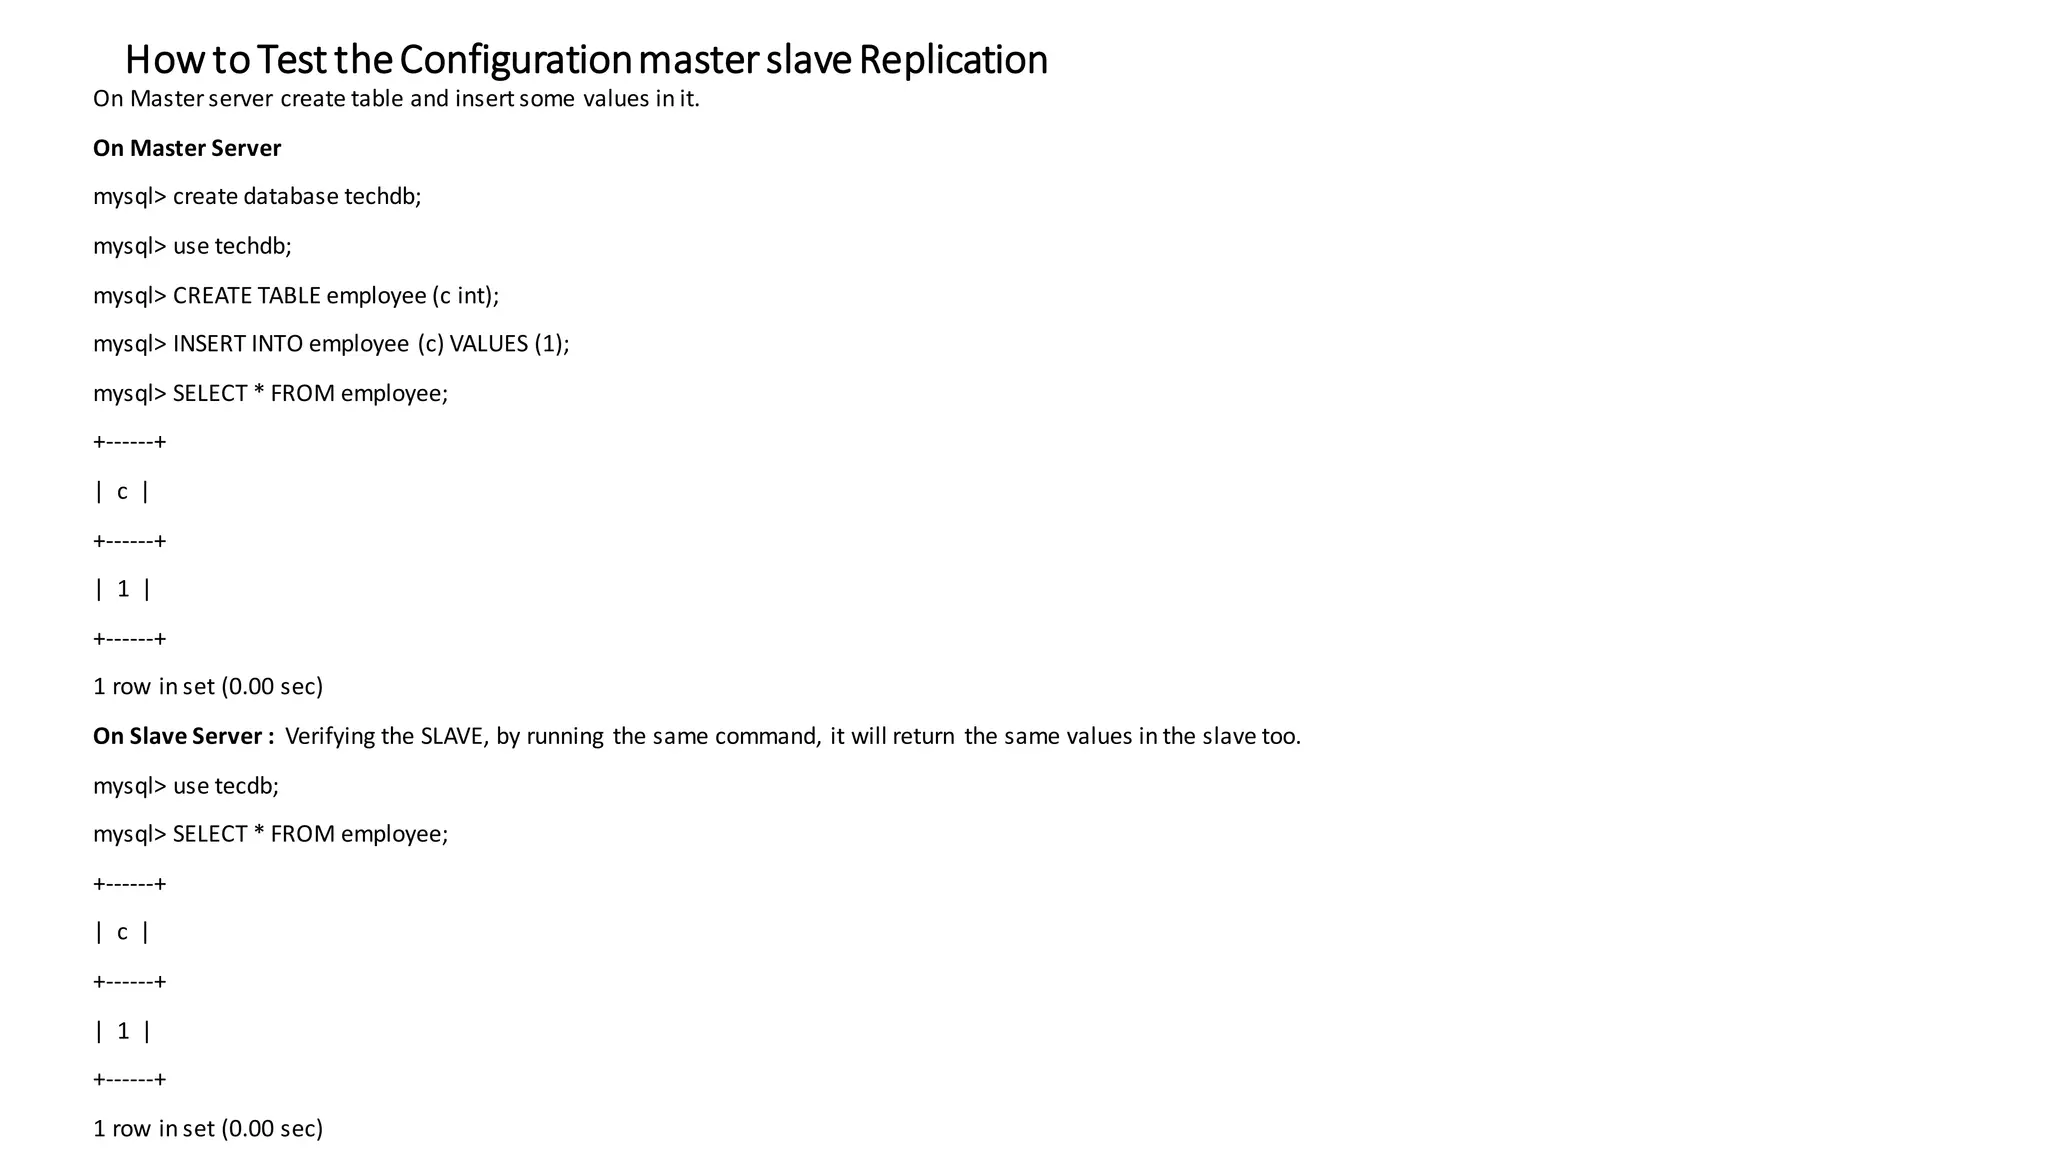
MySQLDatabaseReplication ( Master/Slave)
Advantages of replication in MySQL include: Replication enables data from one MySQL database server to be copied to one or more MySQL database servers . Replication is asynchronous by default; replicas do not need to be connectedpermanently to receive updates from a source. Depending on the configuration, you can replicate all databases, selected databases, or even selected tables within a database. • Scale-out solutions - spreading the load among multiple replicas to improve performance. In this environment, all writes and updates must take place on the source server. Reads, however, may take place on one or more replicas. This model can improve the performance of writes (since the source is dedicated to updates), while dramatically increasing read speed across an increasing number of replicas. • Data security - because the replica can pause the replication process, it is possible to run backup services on the replica without corrupting the corresponding source data. • Analytics - live data can be created on the source, while the analysis of the information can take place on the replica without affecting the performance of the source. • Long-distance data distribution - you can use replication to create a local copy of data for a remote site to use, without permanent access to the source.
Configure Master Server for Replication Edit the “my.cnf” or “my.ini” file and configure the binary log and server ID options. Also, change the “loopback” address to match the IP address of the Master node. The master-slave replication can be made using the following two methods: • Binary Log File Position Based Replication Configuration • Replication with Global Transaction Identifiers (GTIDs) The traditional method is based on replicating events from the master’s binary log, and the log files and positions in them must be synchronized between master and slave. The newer method based on global transaction identifiers (GTIDs), which does not relay on the log file. When using GTIDs, each transaction can be identified and tracked as it is committed on the originating server and applied by any slaves. Replication in MySQL supports different types of synchronization. The original type of synchronization is one-way, asynchronous replication, in which one server acts as the master, while one or more other servers act as slaves. You can replicate all databases, selected databases, or even selected tables within a database based on your needs. Steps: • Configure the Master Server • Configure the Slave Server • Finally Test this Set up The server details are as follows: • Master IP: 192.168.1.1 • Slave IP: 192.168.1.2
Phase I: Configure Master Server for Replication Phase I: Configure Master Server for Replication • Install a MySQL in Master Server • Configure a MySQL in Master Server • # vi /etc/my.cnf server-id = 1 binlog-do-db=techdb bind-address = 192.168.1.1 relay-log = /var/lib/mysql/mysql-relay-bin relay-log-index = /var/lib/mysql/mysql-relay-bin.index log-error = /var/lib/mysql/mysql.err master-info-file = /var/lib/mysql/mysql-master.info relay-log-info-file = /var/lib/mysql/mysql-relay-log.info log-bin = /var/lib/mysql/mysql-bin • Restart the MySQL service. # /etc/init.d/mysqld restart
Login into MySQL as root user and create the slave user and grant privileges for replication. Replace slave_user with user and your_password with password. # mysql -u root -p create a user and grant the replication slave privilege. For demonstration purposes, we have added a username called “slave_user” and you can change it according to your needs. mysql> CREATE USER 'slave_user '@'192.168.1.2' IDENTIFIED BY 'your_password'; Query OK, 0 rows affected (0.00 sec) mysql> GRANT REPLICATION SLAVE ON *.* TO 'slave_user '@'192.168.1.2'; Query OK, 0 rows affected (0.00 sec) Flush the privileges for changes take effect. mysql> FLUSH PRIVILEGES; mysql> FLUSH TABLES WITH READ LOCK; mysql> SHOW MASTER STATUS; +------------------+----------+--------------+------------------+ | File | Position | Binlog_Do_DB | Binlog_Ignore_DB | +------------------+----------+--------------+------------------+ | mysql-bin.000003 | 11128001 | tecmint | | +------------------+----------+--------------+------------------+ 1 row in set (0.00 sec) mysql> quit; Note down current binary log file name and their position, are required in the slave configuration
Next apply READ LOCK to databases to export all the database and master database information with mysqldump command. # mysqldump -u root -p --all-databases --master-data > /root/dbdumpvp.db Once you’ve dump all the databases, now again connect to mysql as root user and unlcok tables. mysql> UNLOCK TABLES; mysql> quit; Upload the database dump file on Slave Server (192.168.1.2) using SCP command. scp /root/dbdumpvp.db root@192.168.1.2:/root/
PhaseII: ConfigureSlave Server for Replication Install a MySQL in Slave Server If you don’t haveMySQL installed,then installit usingYUM command. # yum install mysql-server mysql Configure a MySQL in Slave Server Open my.cnf configuration file with VI editor. # vi /etc/my.cnf server-id = 2 master-host=192.168.1.1 master-connect-retry=60 master-user=slave_user master-password=yourpassword replicate-do-db=techdb relay-log = /var/lib/mysql/mysql-relay-bin relay-log-index = /var/lib/mysql/mysql-relay-bin.index log-error = /var/lib/mysql/mysql.err master-info-file = /var/lib/mysql/mysql-master.info relay-log-info-file = /var/lib/mysql/mysql-relay-log.info log-bin = /var/lib/mysql/mysql-bin
import the dump file that exported in earlier command and restart the MySQL service. # mysql -u root -p < /root/dbdumpvp.db # /etc/init.d/mysqld restart Login into MySQL as root user and stop the slave. Then tell the slave to where to look for Master log file, that we have write down on master with SHOW MASTER STATUS; # mysql -u root -p mysql> slave stop; mysql> CHANGE MASTER TO MASTER_HOST='192.168.1.1’, MASTER_USER='slave_user’, MASTER_PASSWORD='yourpassword’, MASTER_LOG_FILE='mysql-bin.000003’, MASTER_LOG_POS=11128001; mysql> slave start; mysql> show slave statusG
How toTest theConfigurationmasterslaveReplication On Master server create table and insert some values in it. On Master Server mysql> create database techdb; mysql> use techdb; mysql> CREATE TABLE employee (c int); mysql> INSERT INTO employee (c) VALUES (1); mysql> SELECT * FROM employee; +------+ | c | +------+ | 1 | +------+ 1 row in set (0.00 sec) On Slave Server : Verifying the SLAVE, by running the same command, it will return the same values in the slave too. mysql> use tecdb; mysql> SELECT * FROM employee; +------+ | c | +------+ | 1 | +------+ 1 row in set (0.00 sec)

MySQL database replication

  • 1.
  • 2.
    Advantages of replicationin MySQL include: Replication enables data from one MySQL database server to be copied to one or more MySQL database servers . Replication is asynchronous by default; replicas do not need to be connectedpermanently to receive updates from a source. Depending on the configuration, you can replicate all databases, selected databases, or even selected tables within a database. • Scale-out solutions - spreading the load among multiple replicas to improve performance. In this environment, all writes and updates must take place on the source server. Reads, however, may take place on one or more replicas. This model can improve the performance of writes (since the source is dedicated to updates), while dramatically increasing read speed across an increasing number of replicas. • Data security - because the replica can pause the replication process, it is possible to run backup services on the replica without corrupting the corresponding source data. • Analytics - live data can be created on the source, while the analysis of the information can take place on the replica without affecting the performance of the source. • Long-distance data distribution - you can use replication to create a local copy of data for a remote site to use, without permanent access to the source.
  • 3.
    Configure Master Serverfor Replication Edit the “my.cnf” or “my.ini” file and configure the binary log and server ID options. Also, change the “loopback” address to match the IP address of the Master node. The master-slave replication can be made using the following two methods: • Binary Log File Position Based Replication Configuration • Replication with Global Transaction Identifiers (GTIDs) The traditional method is based on replicating events from the master’s binary log, and the log files and positions in them must be synchronized between master and slave. The newer method based on global transaction identifiers (GTIDs), which does not relay on the log file. When using GTIDs, each transaction can be identified and tracked as it is committed on the originating server and applied by any slaves. Replication in MySQL supports different types of synchronization. The original type of synchronization is one-way, asynchronous replication, in which one server acts as the master, while one or more other servers act as slaves. You can replicate all databases, selected databases, or even selected tables within a database based on your needs. Steps: • Configure the Master Server • Configure the Slave Server • Finally Test this Set up The server details are as follows: • Master IP: 192.168.1.1 • Slave IP: 192.168.1.2
  • 4.
    Phase I: ConfigureMaster Server for Replication Phase I: Configure Master Server for Replication • Install a MySQL in Master Server • Configure a MySQL in Master Server • # vi /etc/my.cnf server-id = 1 binlog-do-db=techdb bind-address = 192.168.1.1 relay-log = /var/lib/mysql/mysql-relay-bin relay-log-index = /var/lib/mysql/mysql-relay-bin.index log-error = /var/lib/mysql/mysql.err master-info-file = /var/lib/mysql/mysql-master.info relay-log-info-file = /var/lib/mysql/mysql-relay-log.info log-bin = /var/lib/mysql/mysql-bin • Restart the MySQL service. # /etc/init.d/mysqld restart
  • 5.
    Login into MySQLas root user and create the slave user and grant privileges for replication. Replace slave_user with user and your_password with password. # mysql -u root -p create a user and grant the replication slave privilege. For demonstration purposes, we have added a username called “slave_user” and you can change it according to your needs. mysql> CREATE USER 'slave_user '@'192.168.1.2' IDENTIFIED BY 'your_password'; Query OK, 0 rows affected (0.00 sec) mysql> GRANT REPLICATION SLAVE ON *.* TO 'slave_user '@'192.168.1.2'; Query OK, 0 rows affected (0.00 sec) Flush the privileges for changes take effect. mysql> FLUSH PRIVILEGES; mysql> FLUSH TABLES WITH READ LOCK; mysql> SHOW MASTER STATUS; +------------------+----------+--------------+------------------+ | File | Position | Binlog_Do_DB | Binlog_Ignore_DB | +------------------+----------+--------------+------------------+ | mysql-bin.000003 | 11128001 | tecmint | | +------------------+----------+--------------+------------------+ 1 row in set (0.00 sec) mysql> quit; Note down current binary log file name and their position, are required in the slave configuration
  • 6.
    Next apply READLOCK to databases to export all the database and master database information with mysqldump command. # mysqldump -u root -p --all-databases --master-data > /root/dbdumpvp.db Once you’ve dump all the databases, now again connect to mysql as root user and unlcok tables. mysql> UNLOCK TABLES; mysql> quit; Upload the database dump file on Slave Server (192.168.1.2) using SCP command. scp /root/dbdumpvp.db root@192.168.1.2:/root/
  • 7.
    PhaseII: ConfigureSlave Serverfor Replication Install a MySQL in Slave Server If you don’t haveMySQL installed,then installit usingYUM command. # yum install mysql-server mysql Configure a MySQL in Slave Server Open my.cnf configuration file with VI editor. # vi /etc/my.cnf server-id = 2 master-host=192.168.1.1 master-connect-retry=60 master-user=slave_user master-password=yourpassword replicate-do-db=techdb relay-log = /var/lib/mysql/mysql-relay-bin relay-log-index = /var/lib/mysql/mysql-relay-bin.index log-error = /var/lib/mysql/mysql.err master-info-file = /var/lib/mysql/mysql-master.info relay-log-info-file = /var/lib/mysql/mysql-relay-log.info log-bin = /var/lib/mysql/mysql-bin
  • 8.
    import the dumpfile that exported in earlier command and restart the MySQL service. # mysql -u root -p < /root/dbdumpvp.db # /etc/init.d/mysqld restart Login into MySQL as root user and stop the slave. Then tell the slave to where to look for Master log file, that we have write down on master with SHOW MASTER STATUS; # mysql -u root -p mysql> slave stop; mysql> CHANGE MASTER TO MASTER_HOST='192.168.1.1’, MASTER_USER='slave_user’, MASTER_PASSWORD='yourpassword’, MASTER_LOG_FILE='mysql-bin.000003’, MASTER_LOG_POS=11128001; mysql> slave start; mysql> show slave statusG
  • 9.
    How toTest theConfigurationmasterslaveReplication OnMaster server create table and insert some values in it. On Master Server mysql> create database techdb; mysql> use techdb; mysql> CREATE TABLE employee (c int); mysql> INSERT INTO employee (c) VALUES (1); mysql> SELECT * FROM employee; +------+ | c | +------+ | 1 | +------+ 1 row in set (0.00 sec) On Slave Server : Verifying the SLAVE, by running the same command, it will return the same values in the slave too. mysql> use tecdb; mysql> SELECT * FROM employee; +------+ | c | +------+ | 1 | +------+ 1 row in set (0.00 sec)