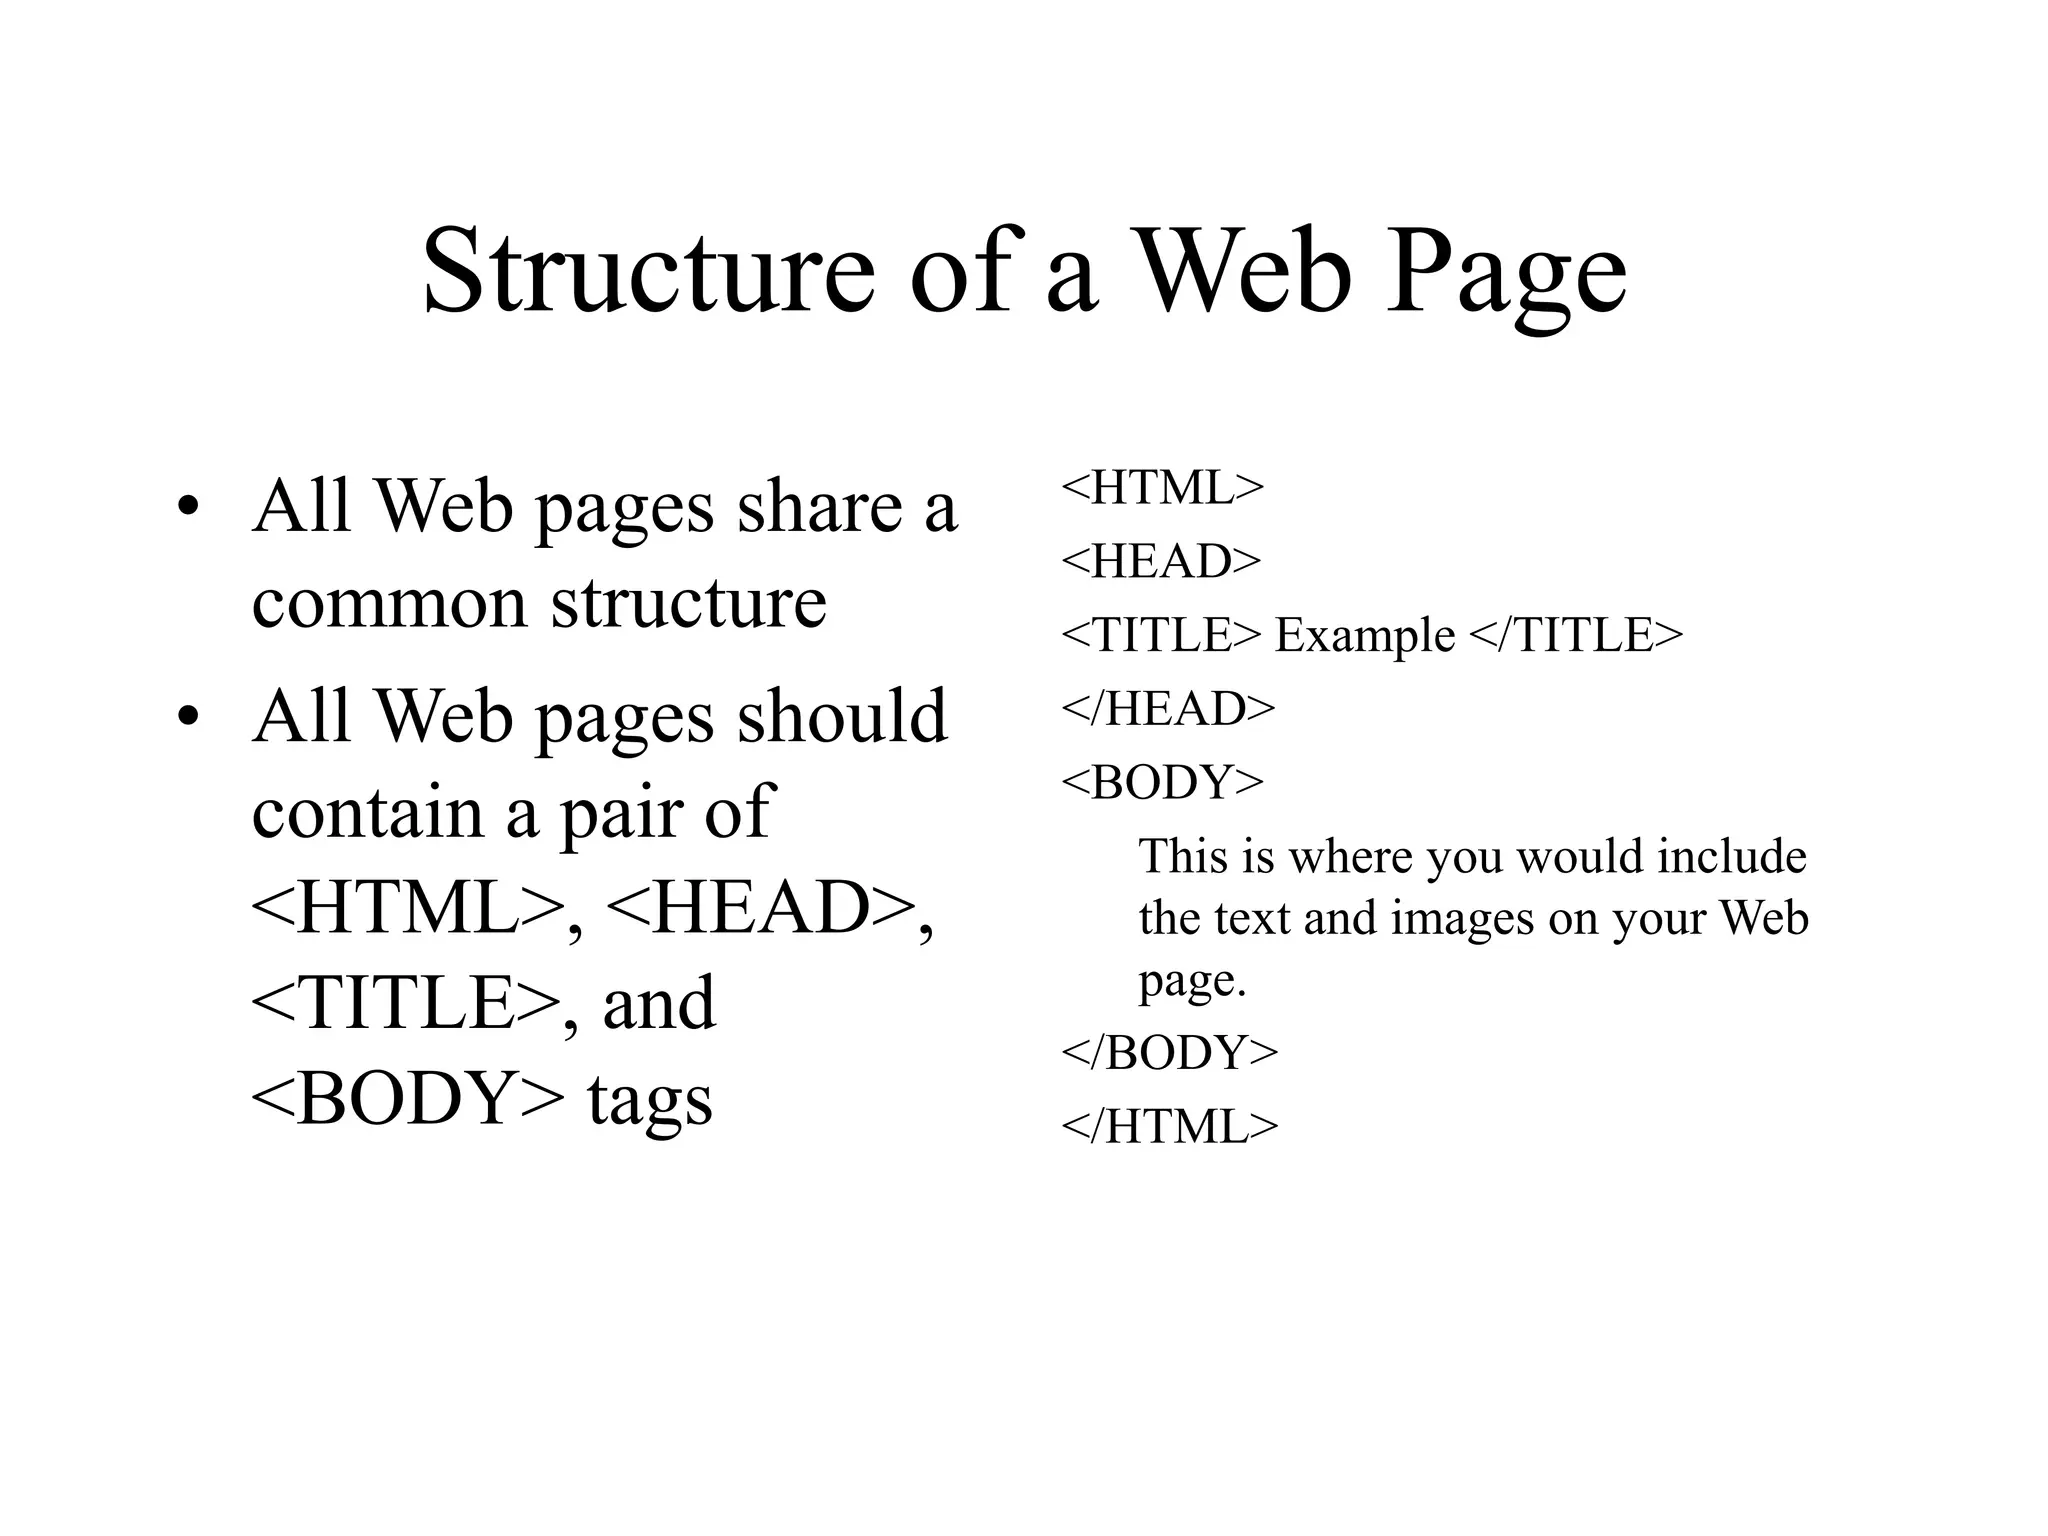
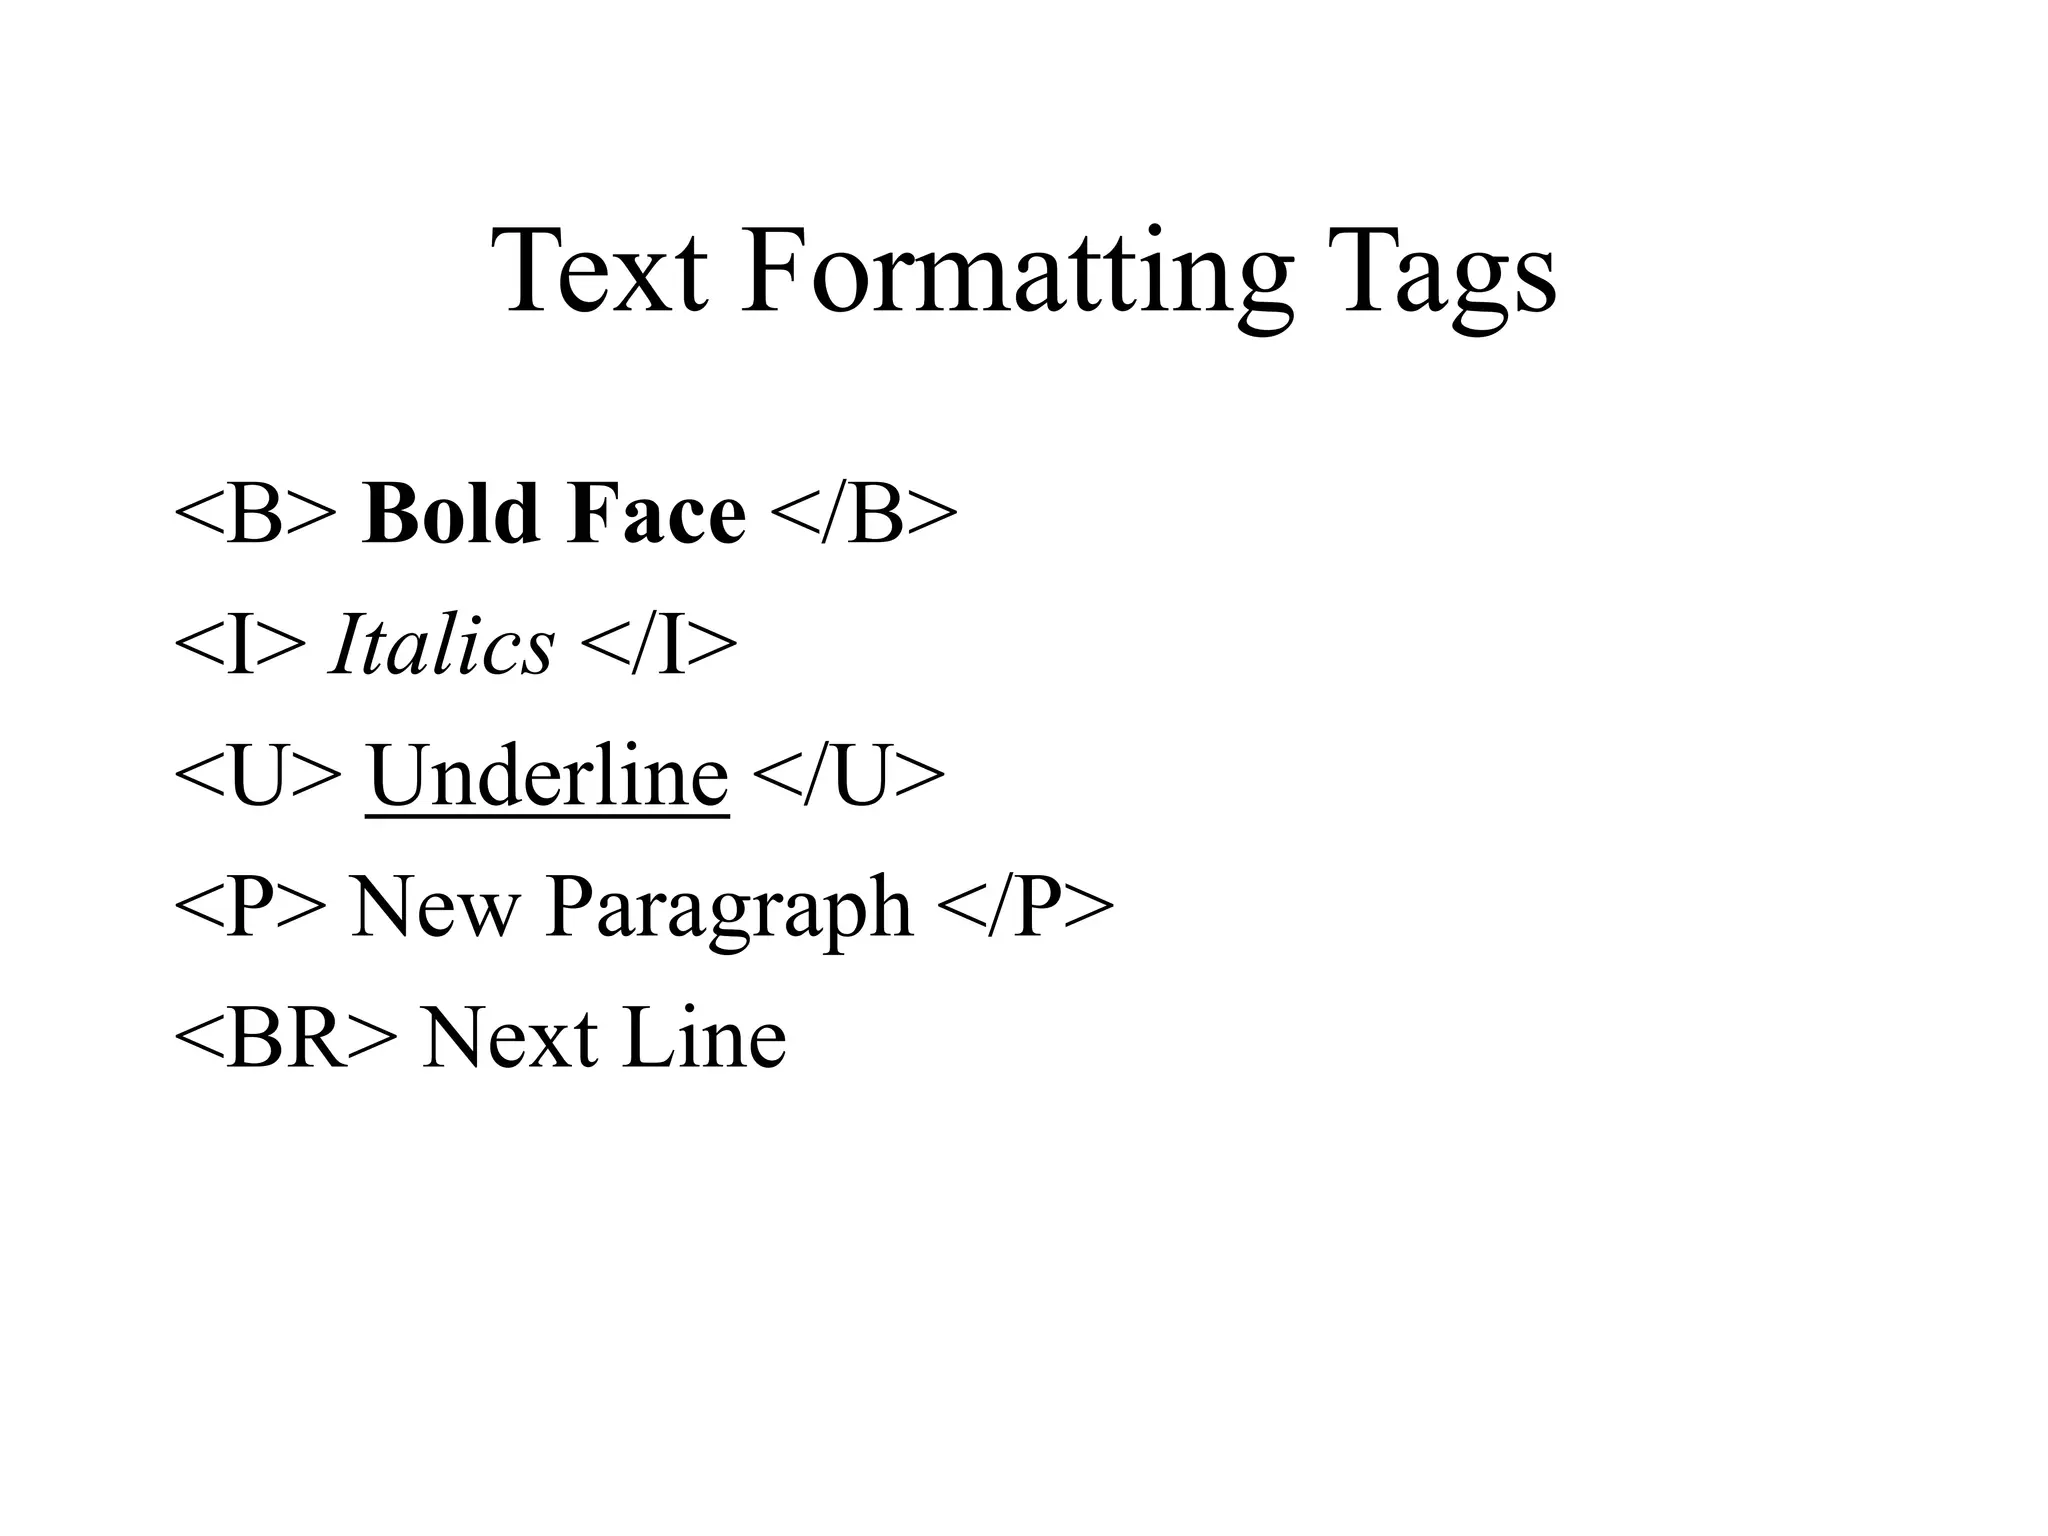
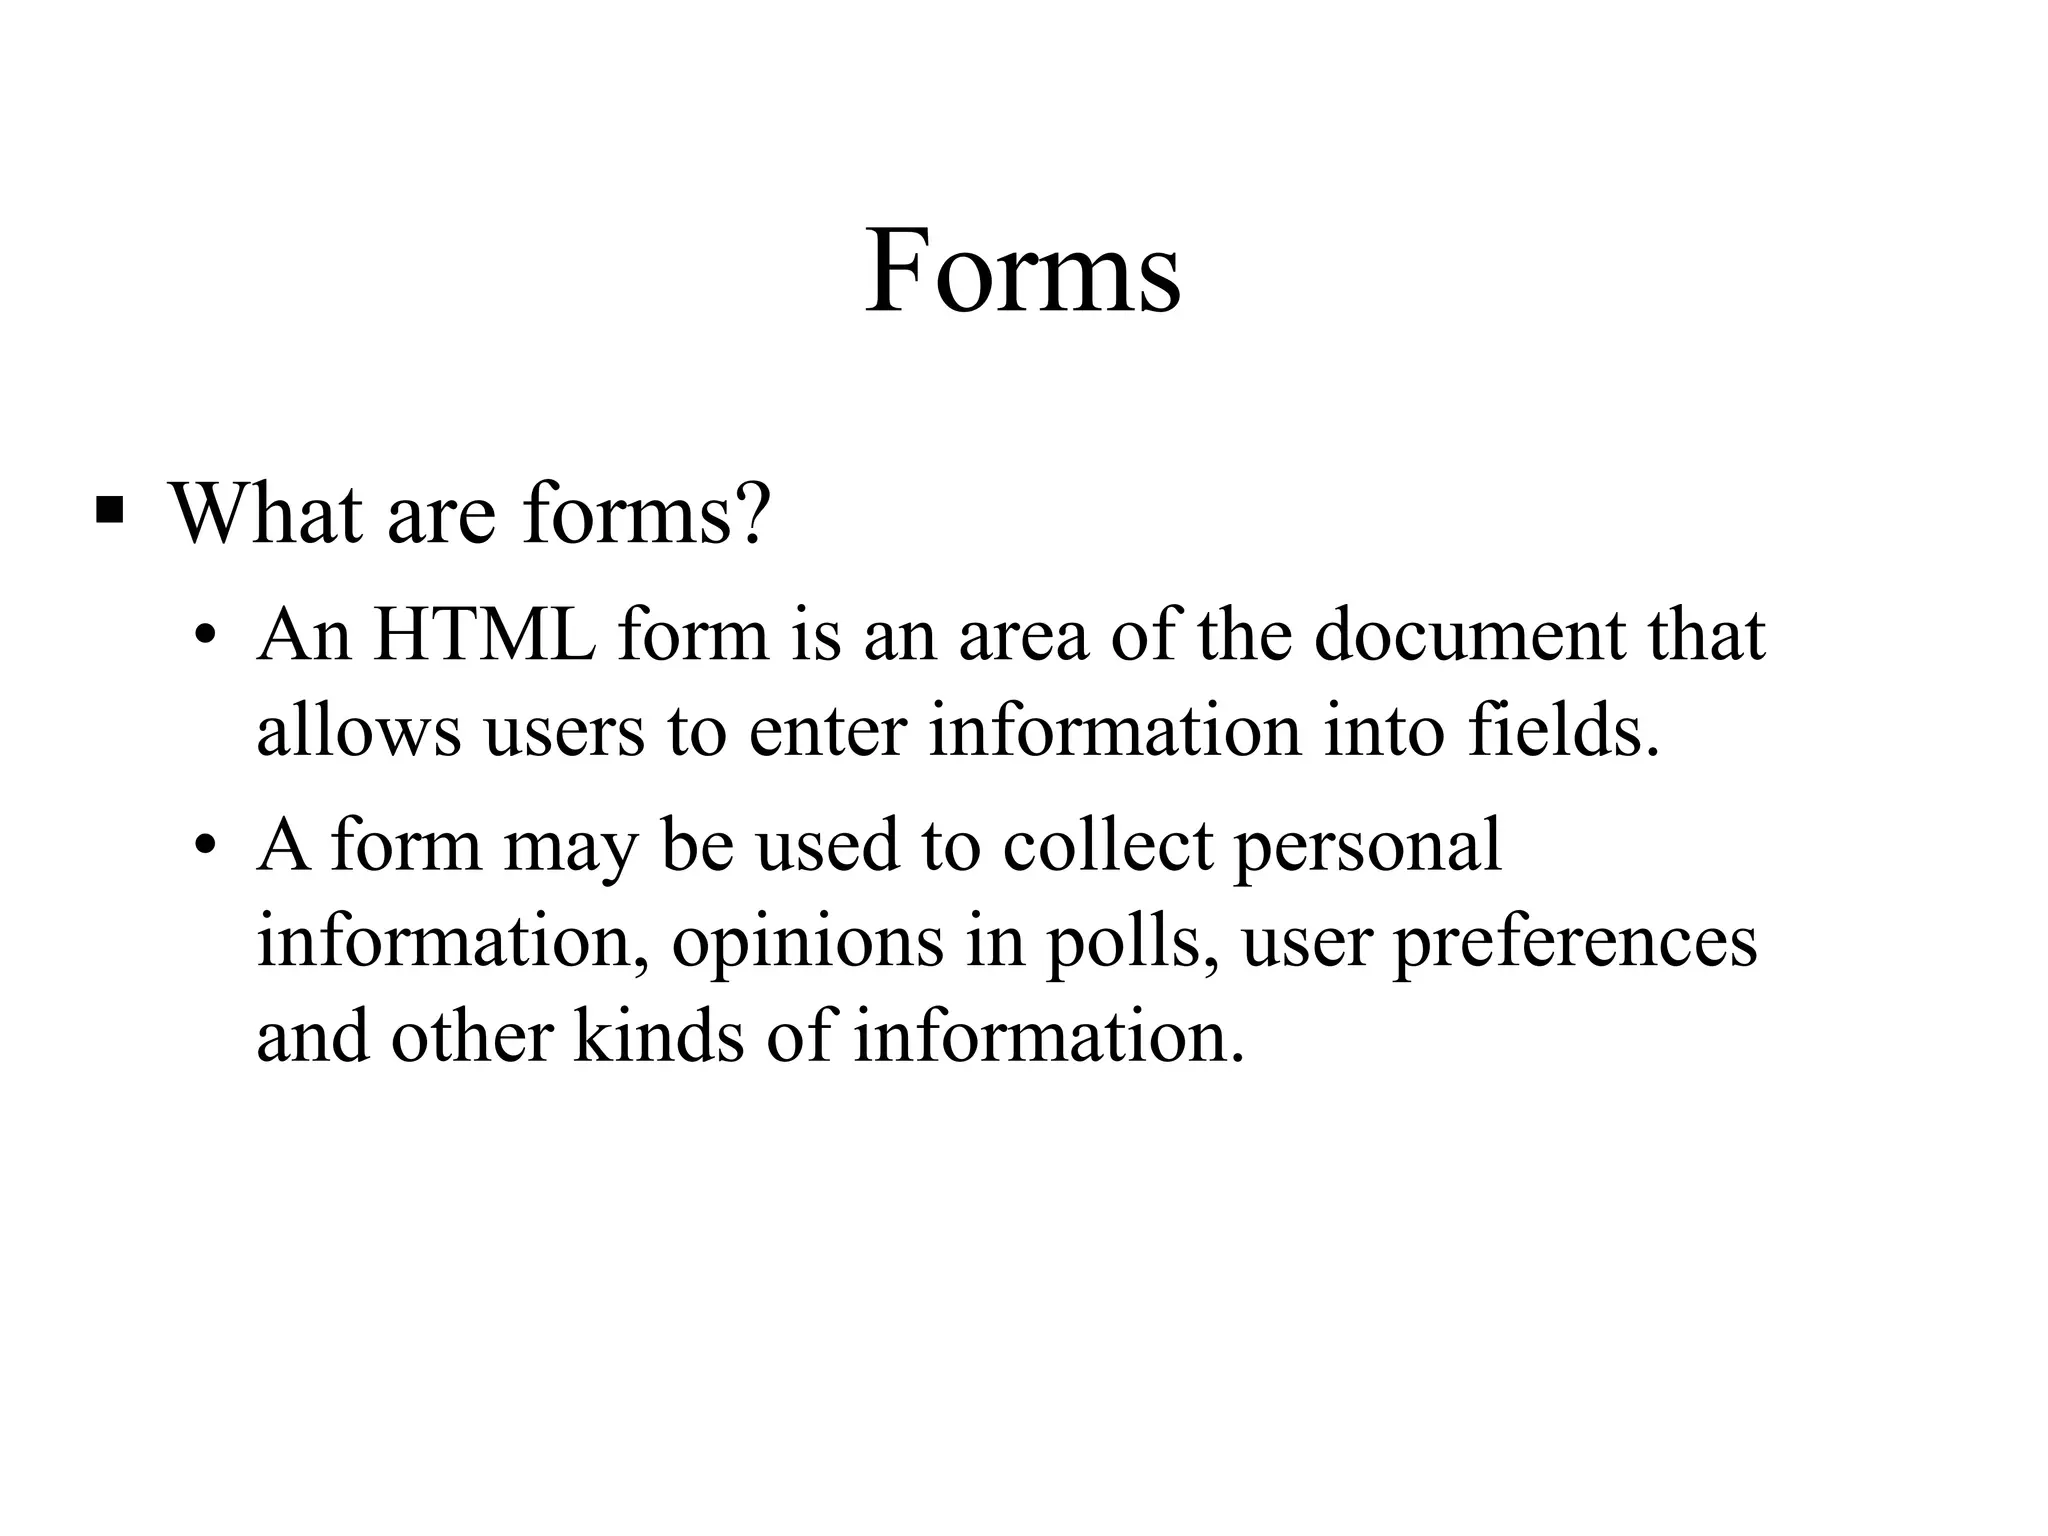
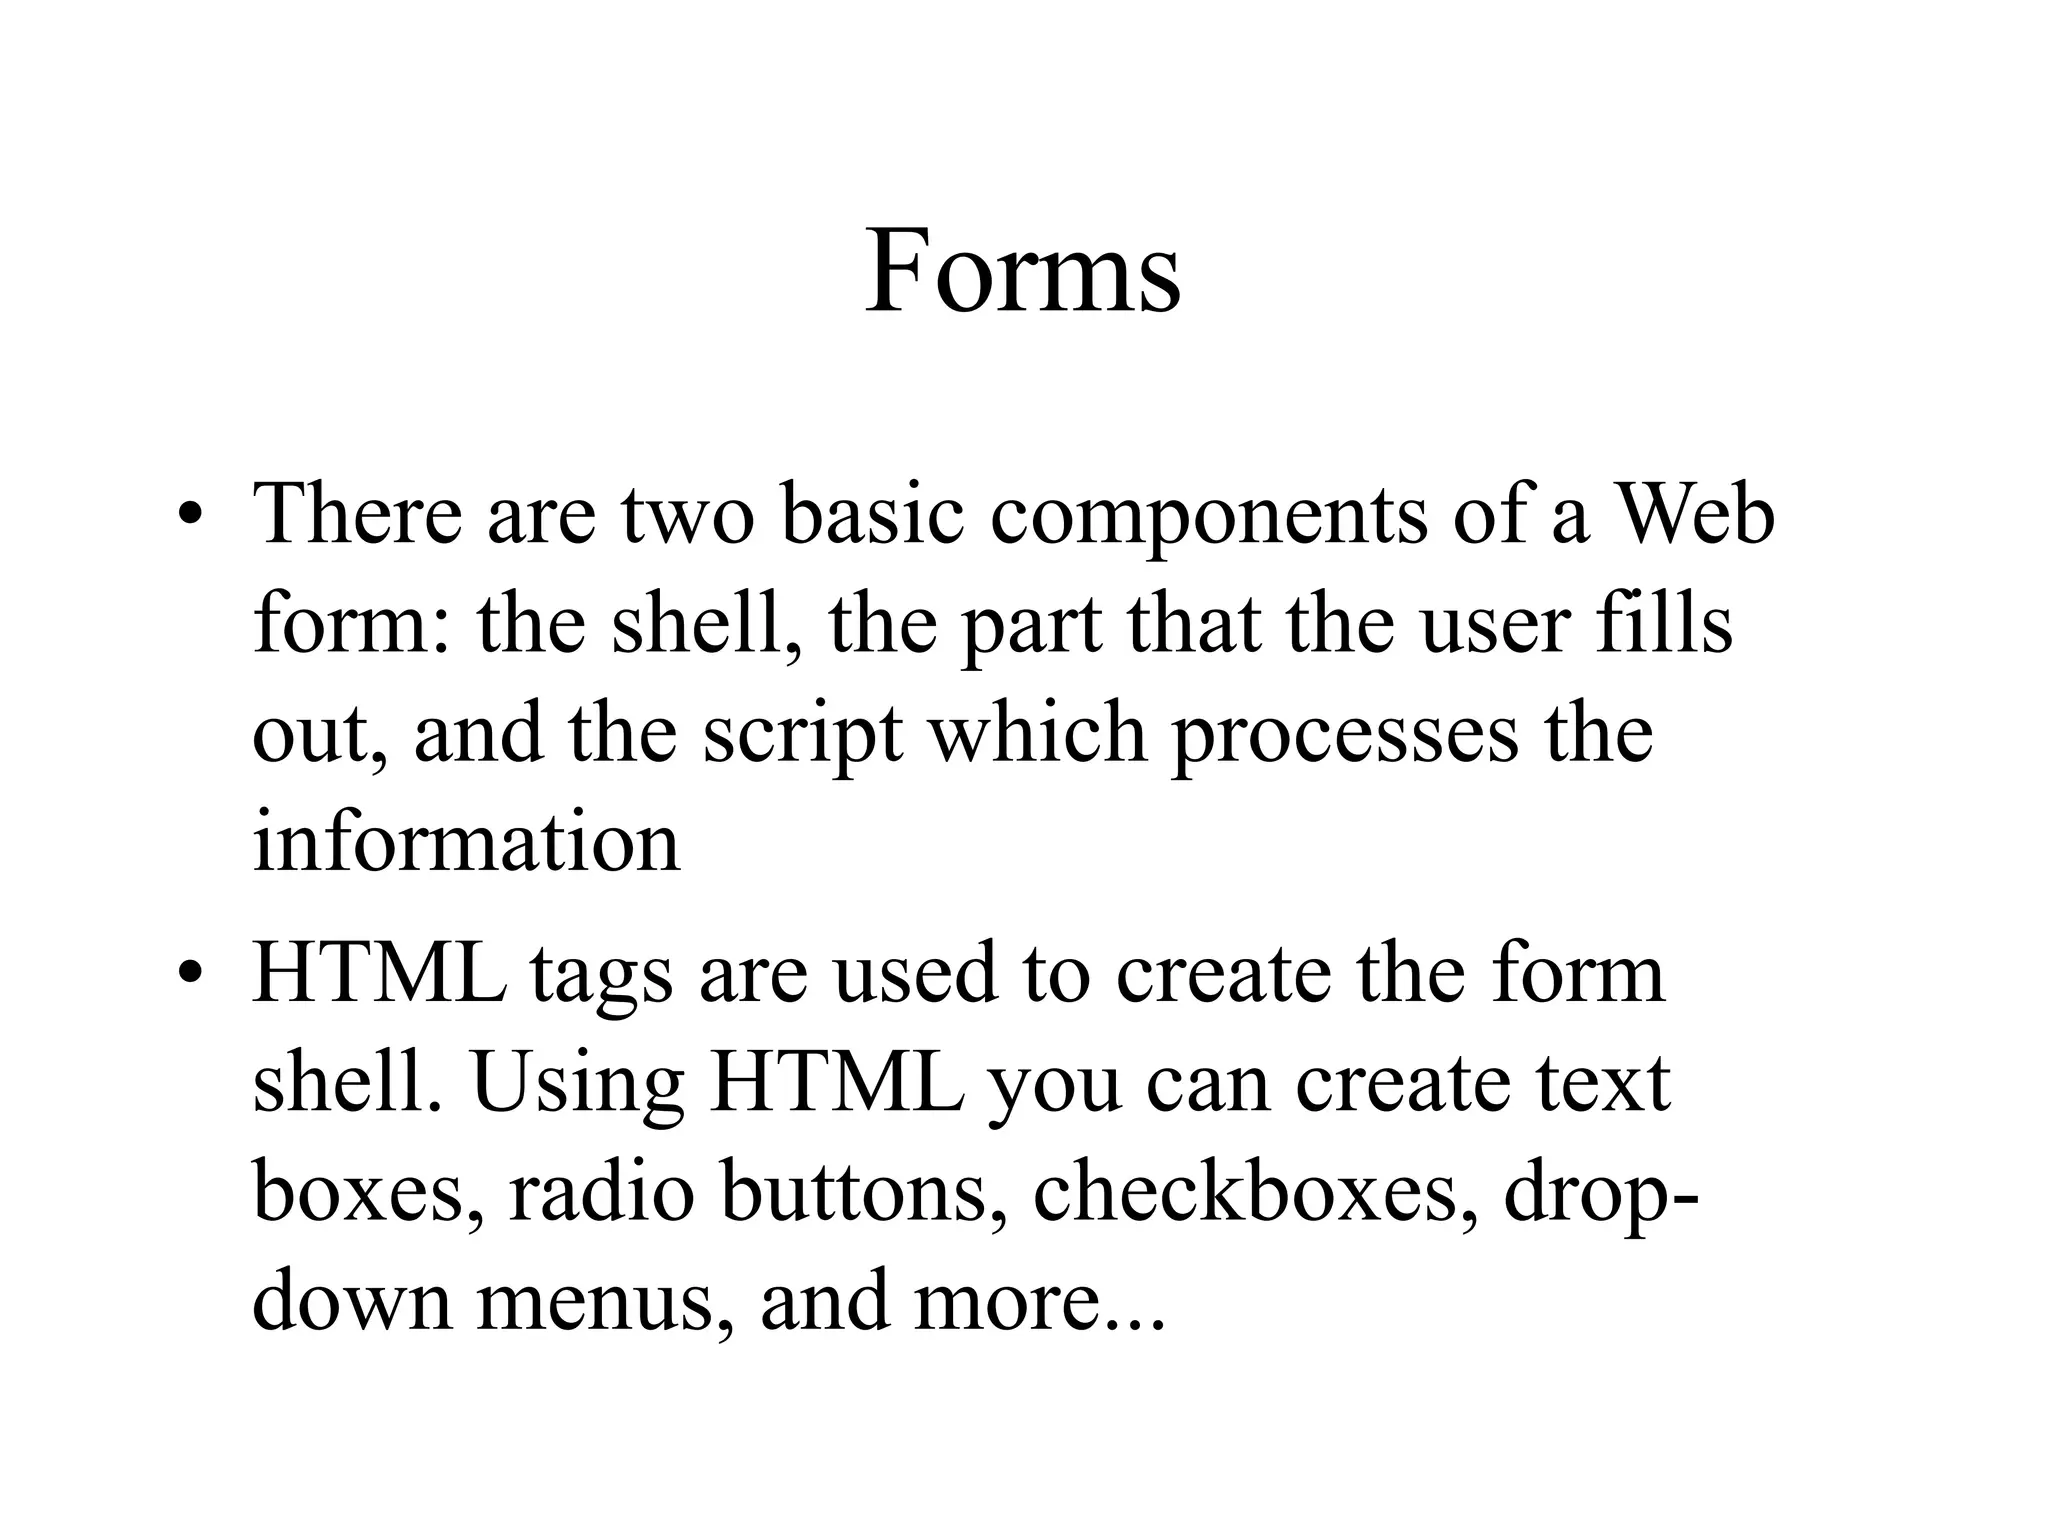
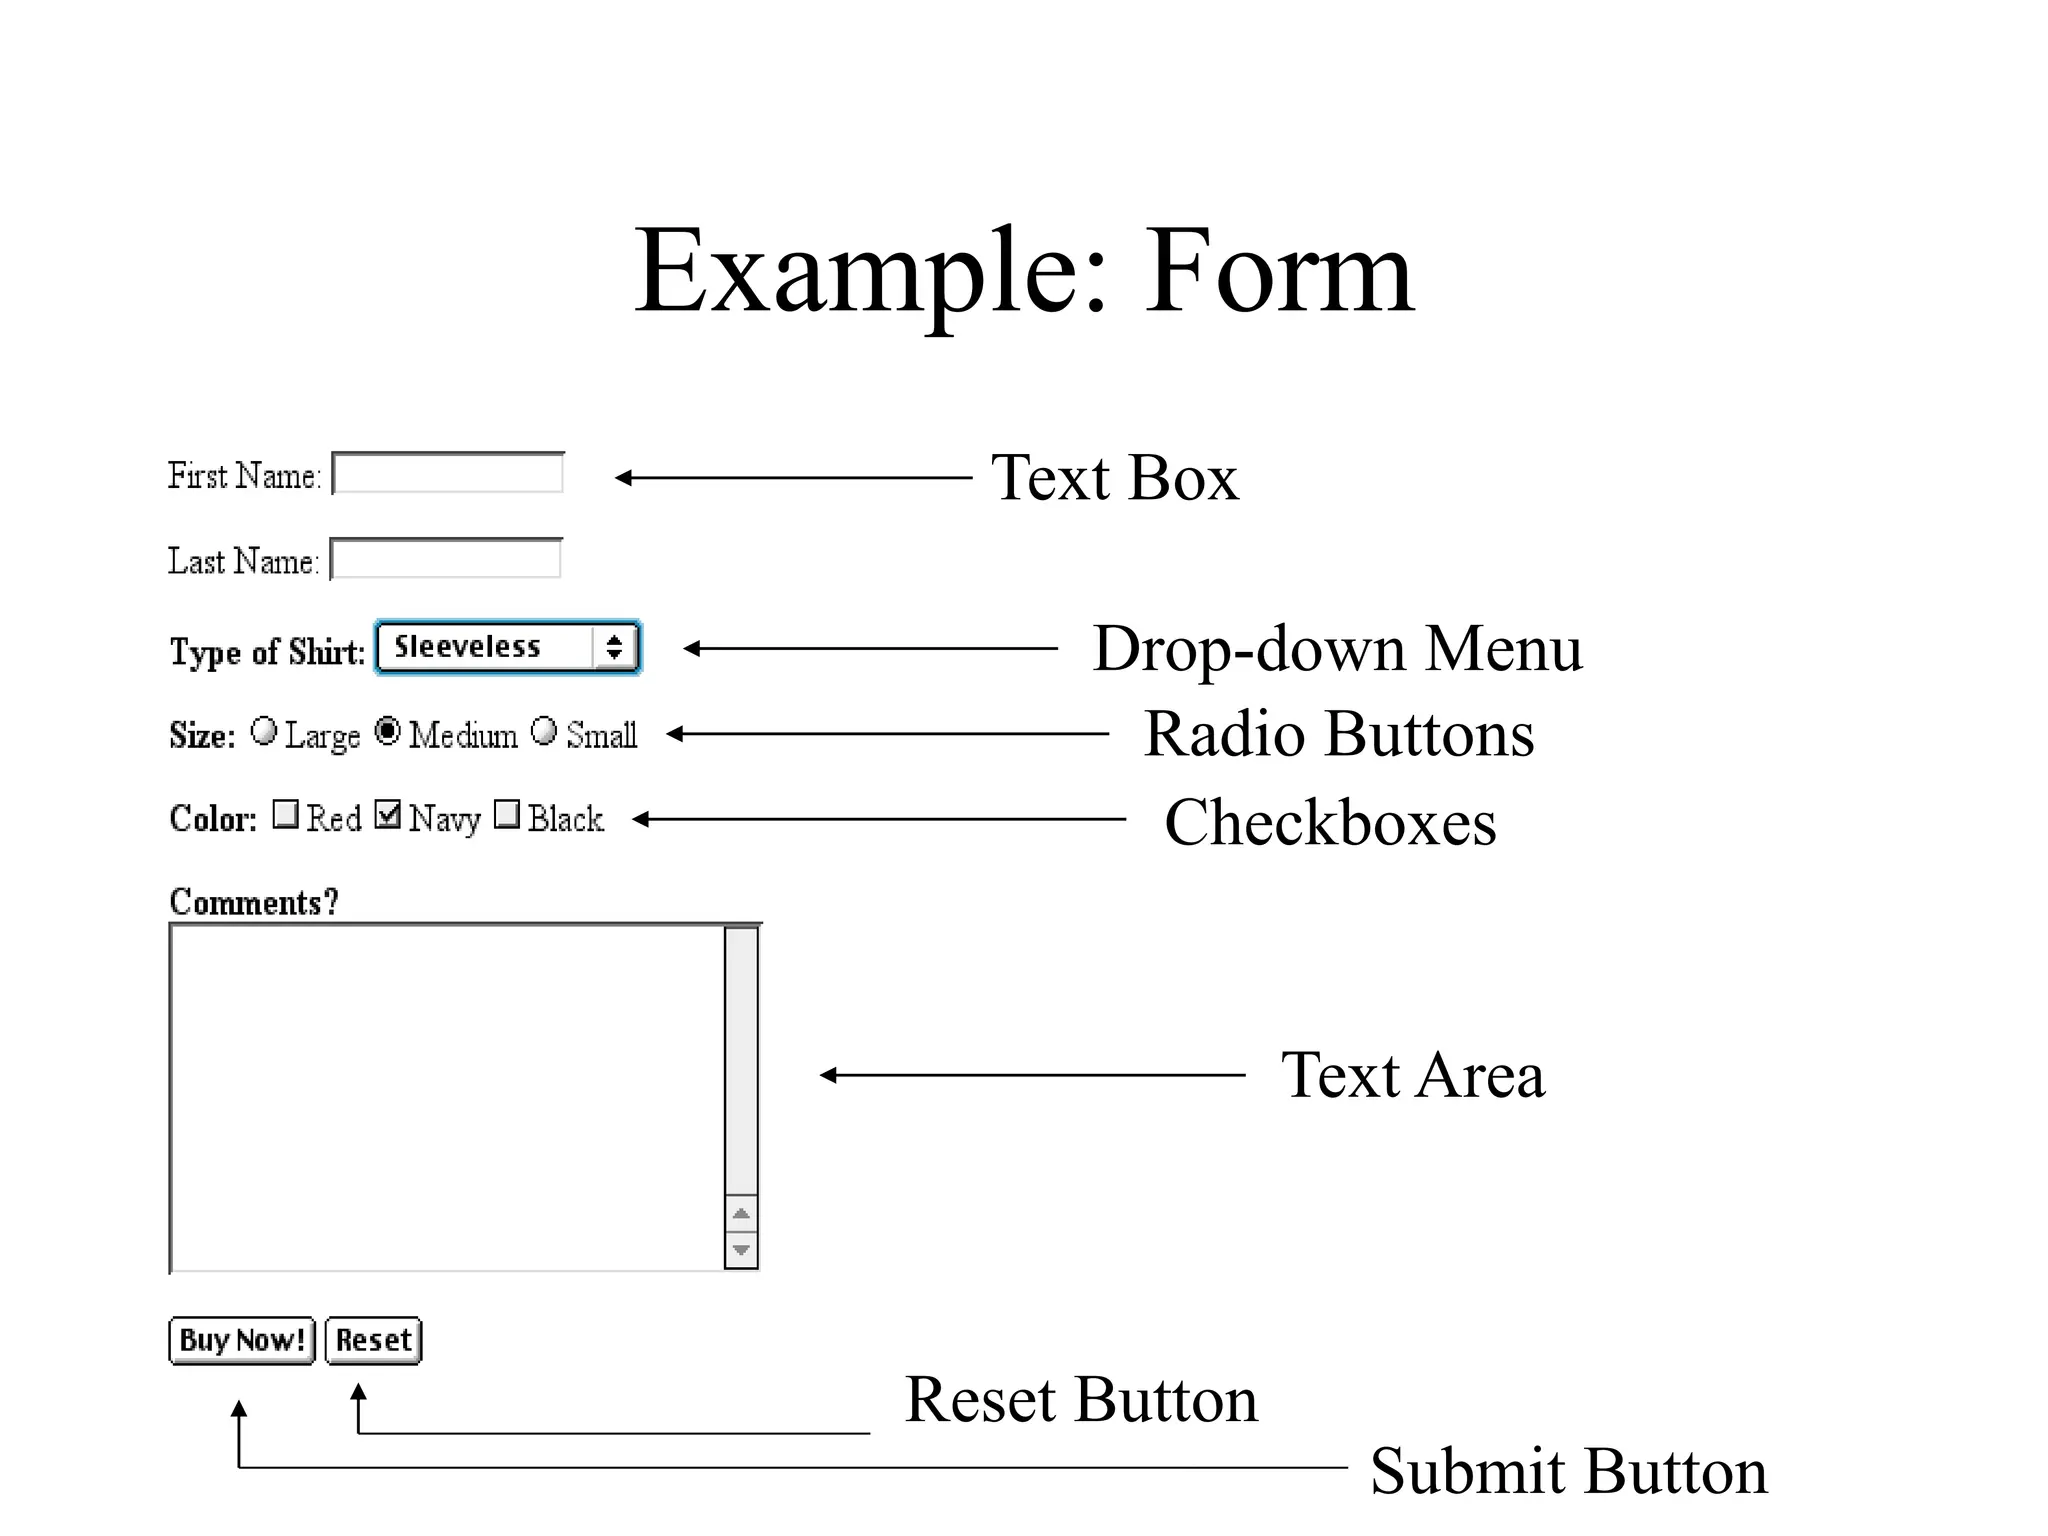
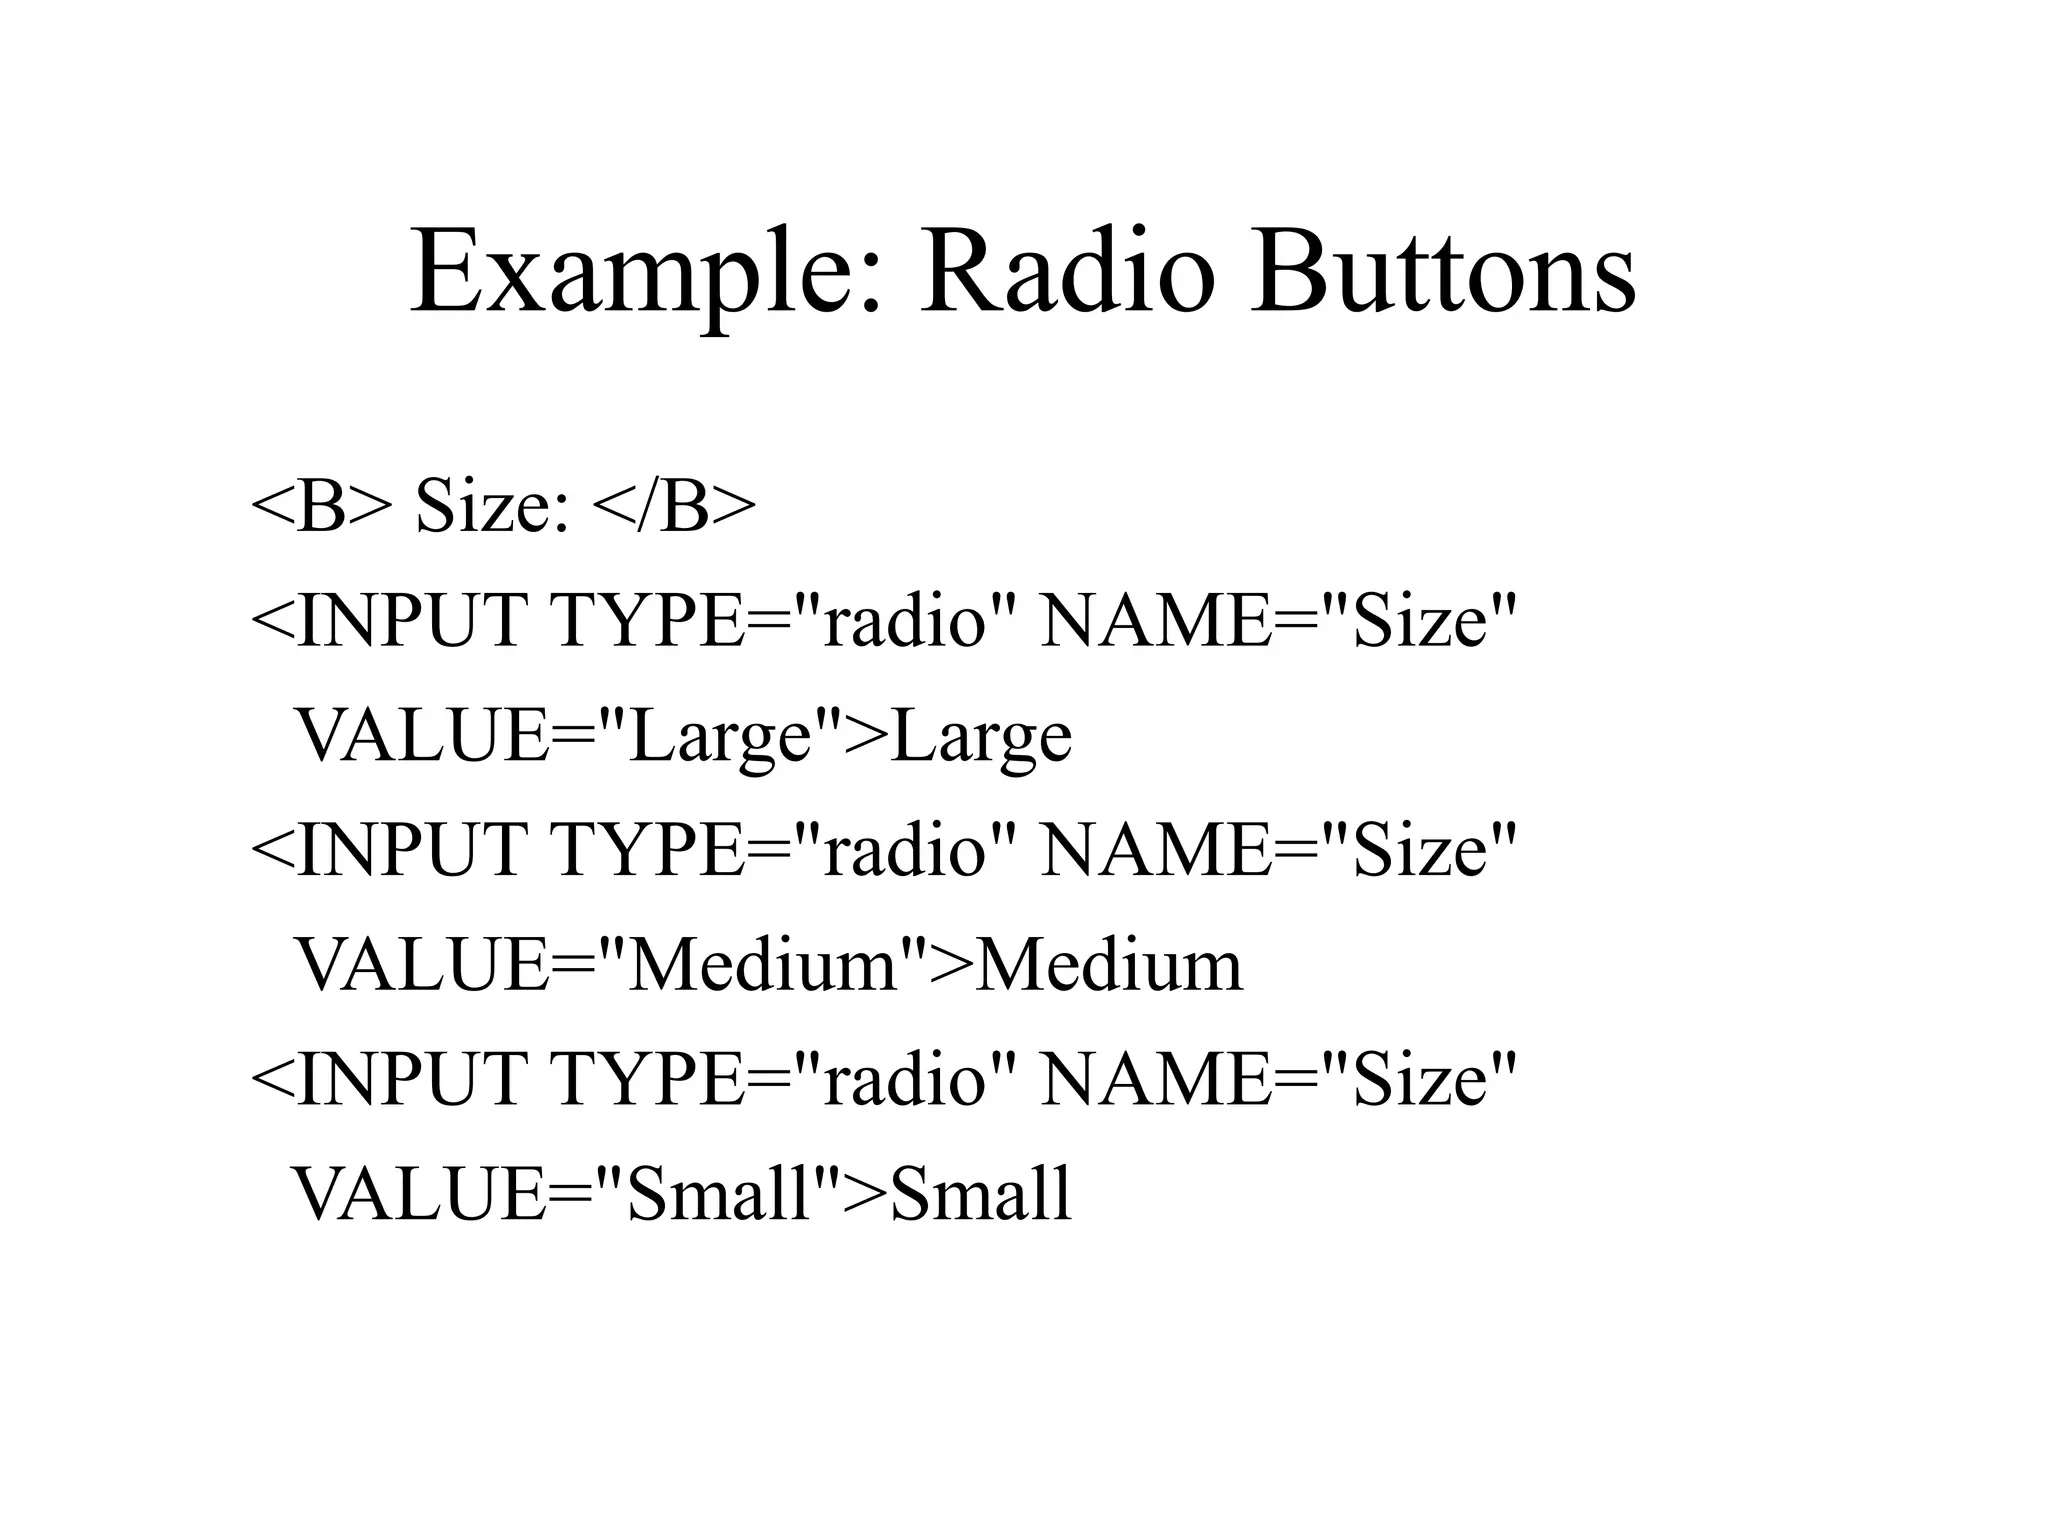
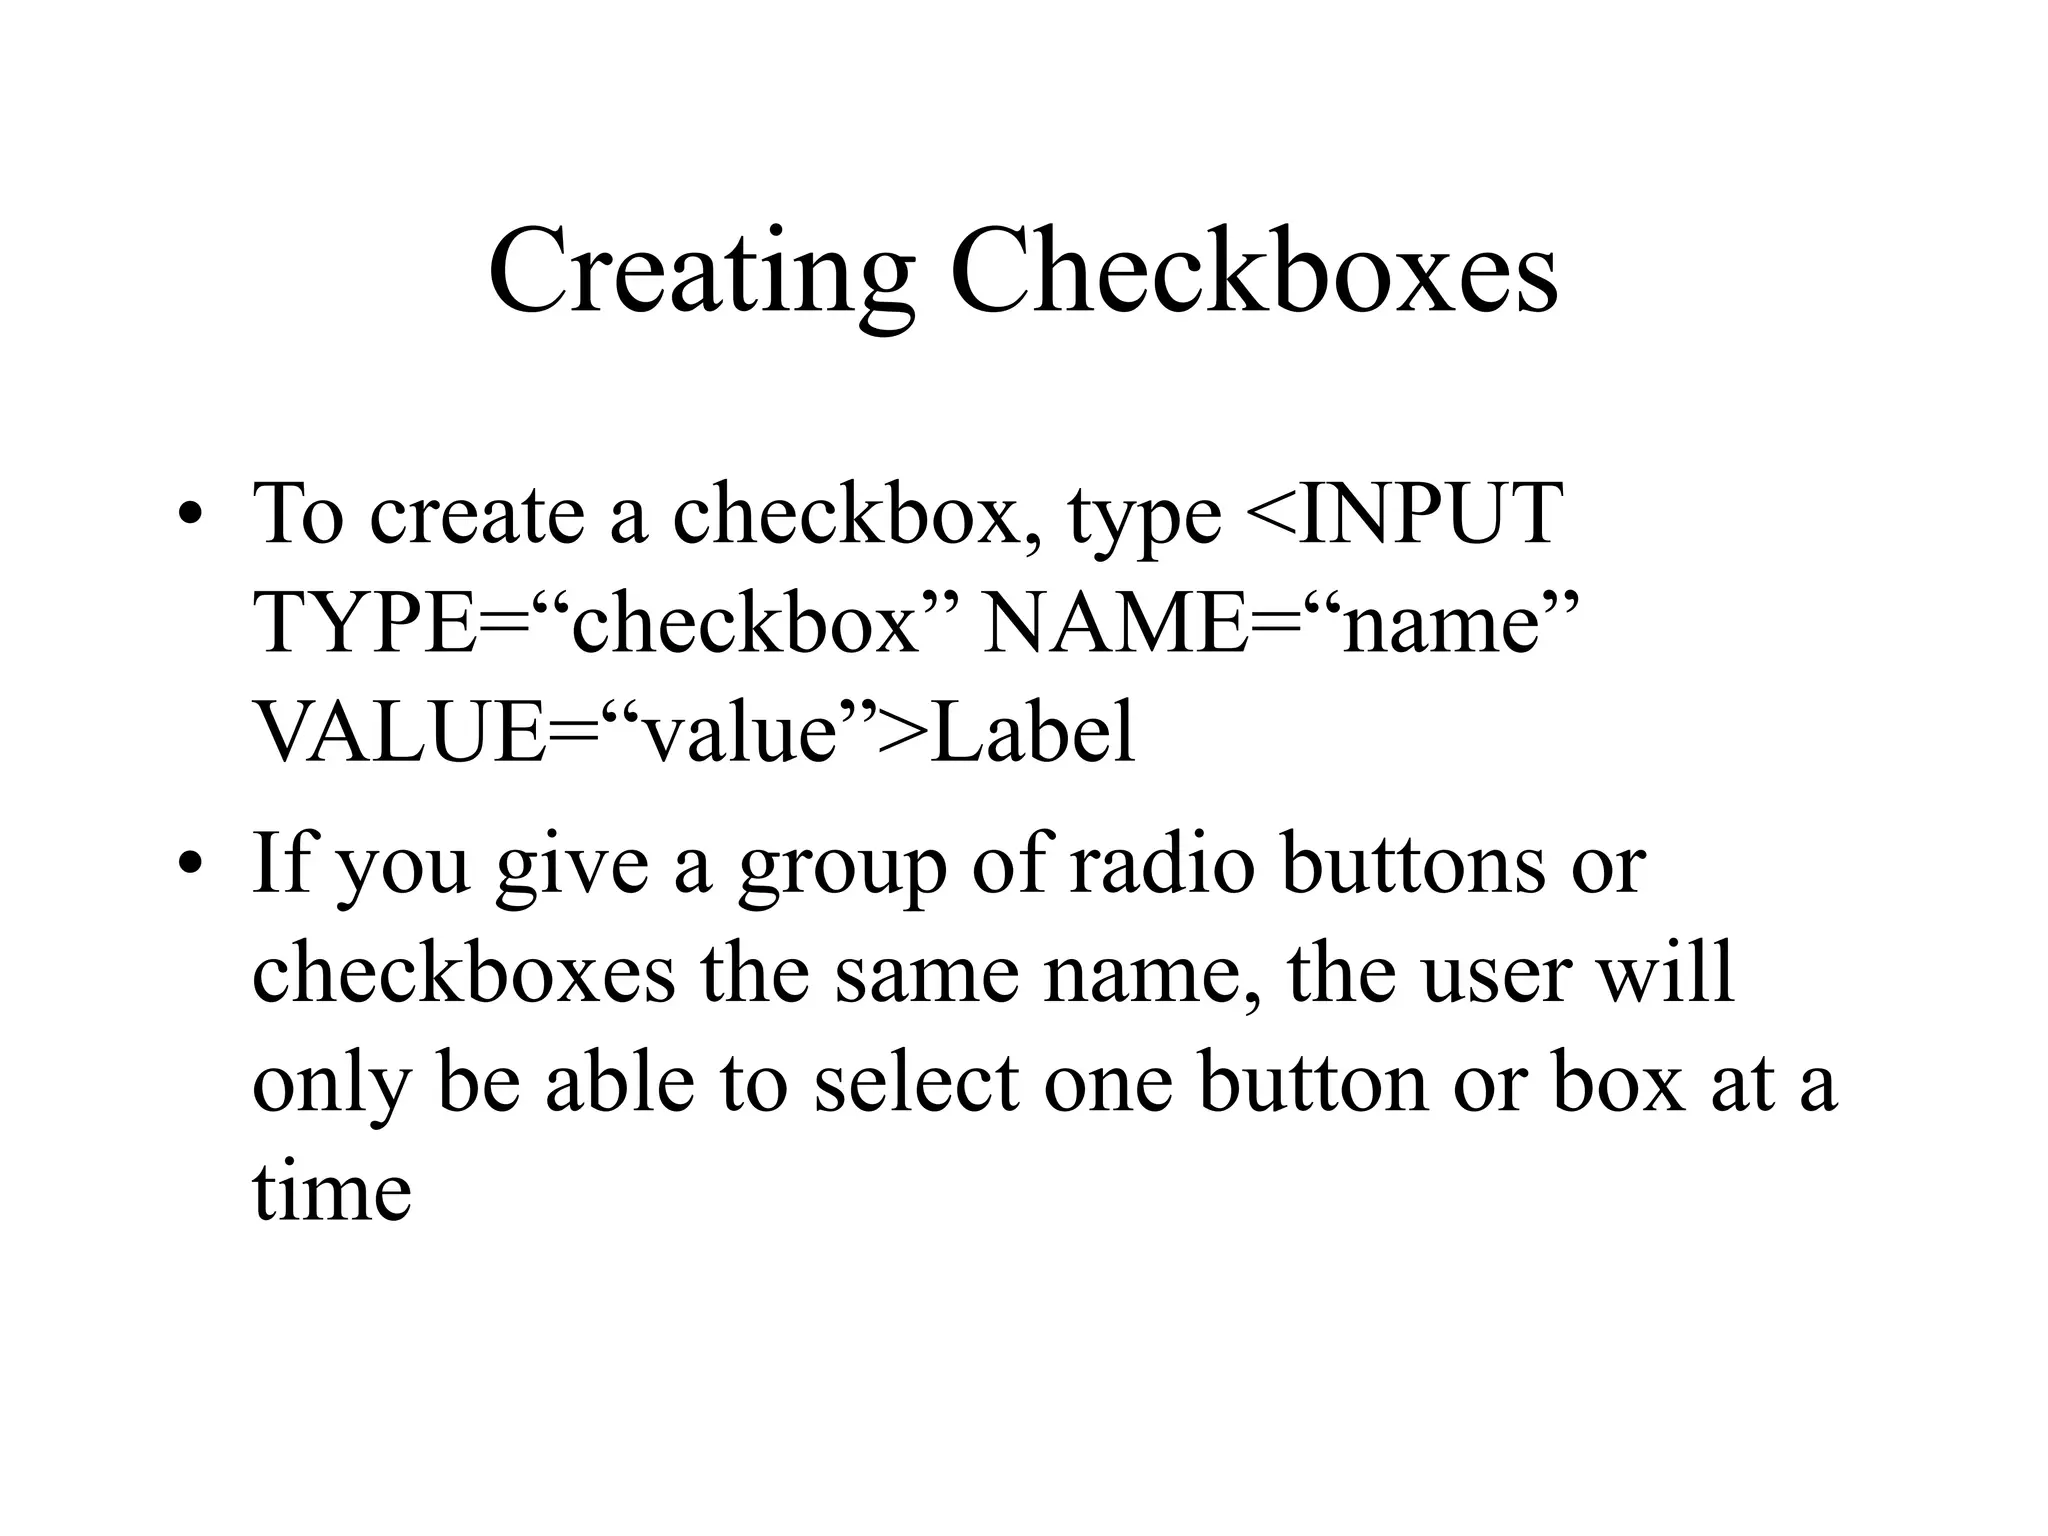
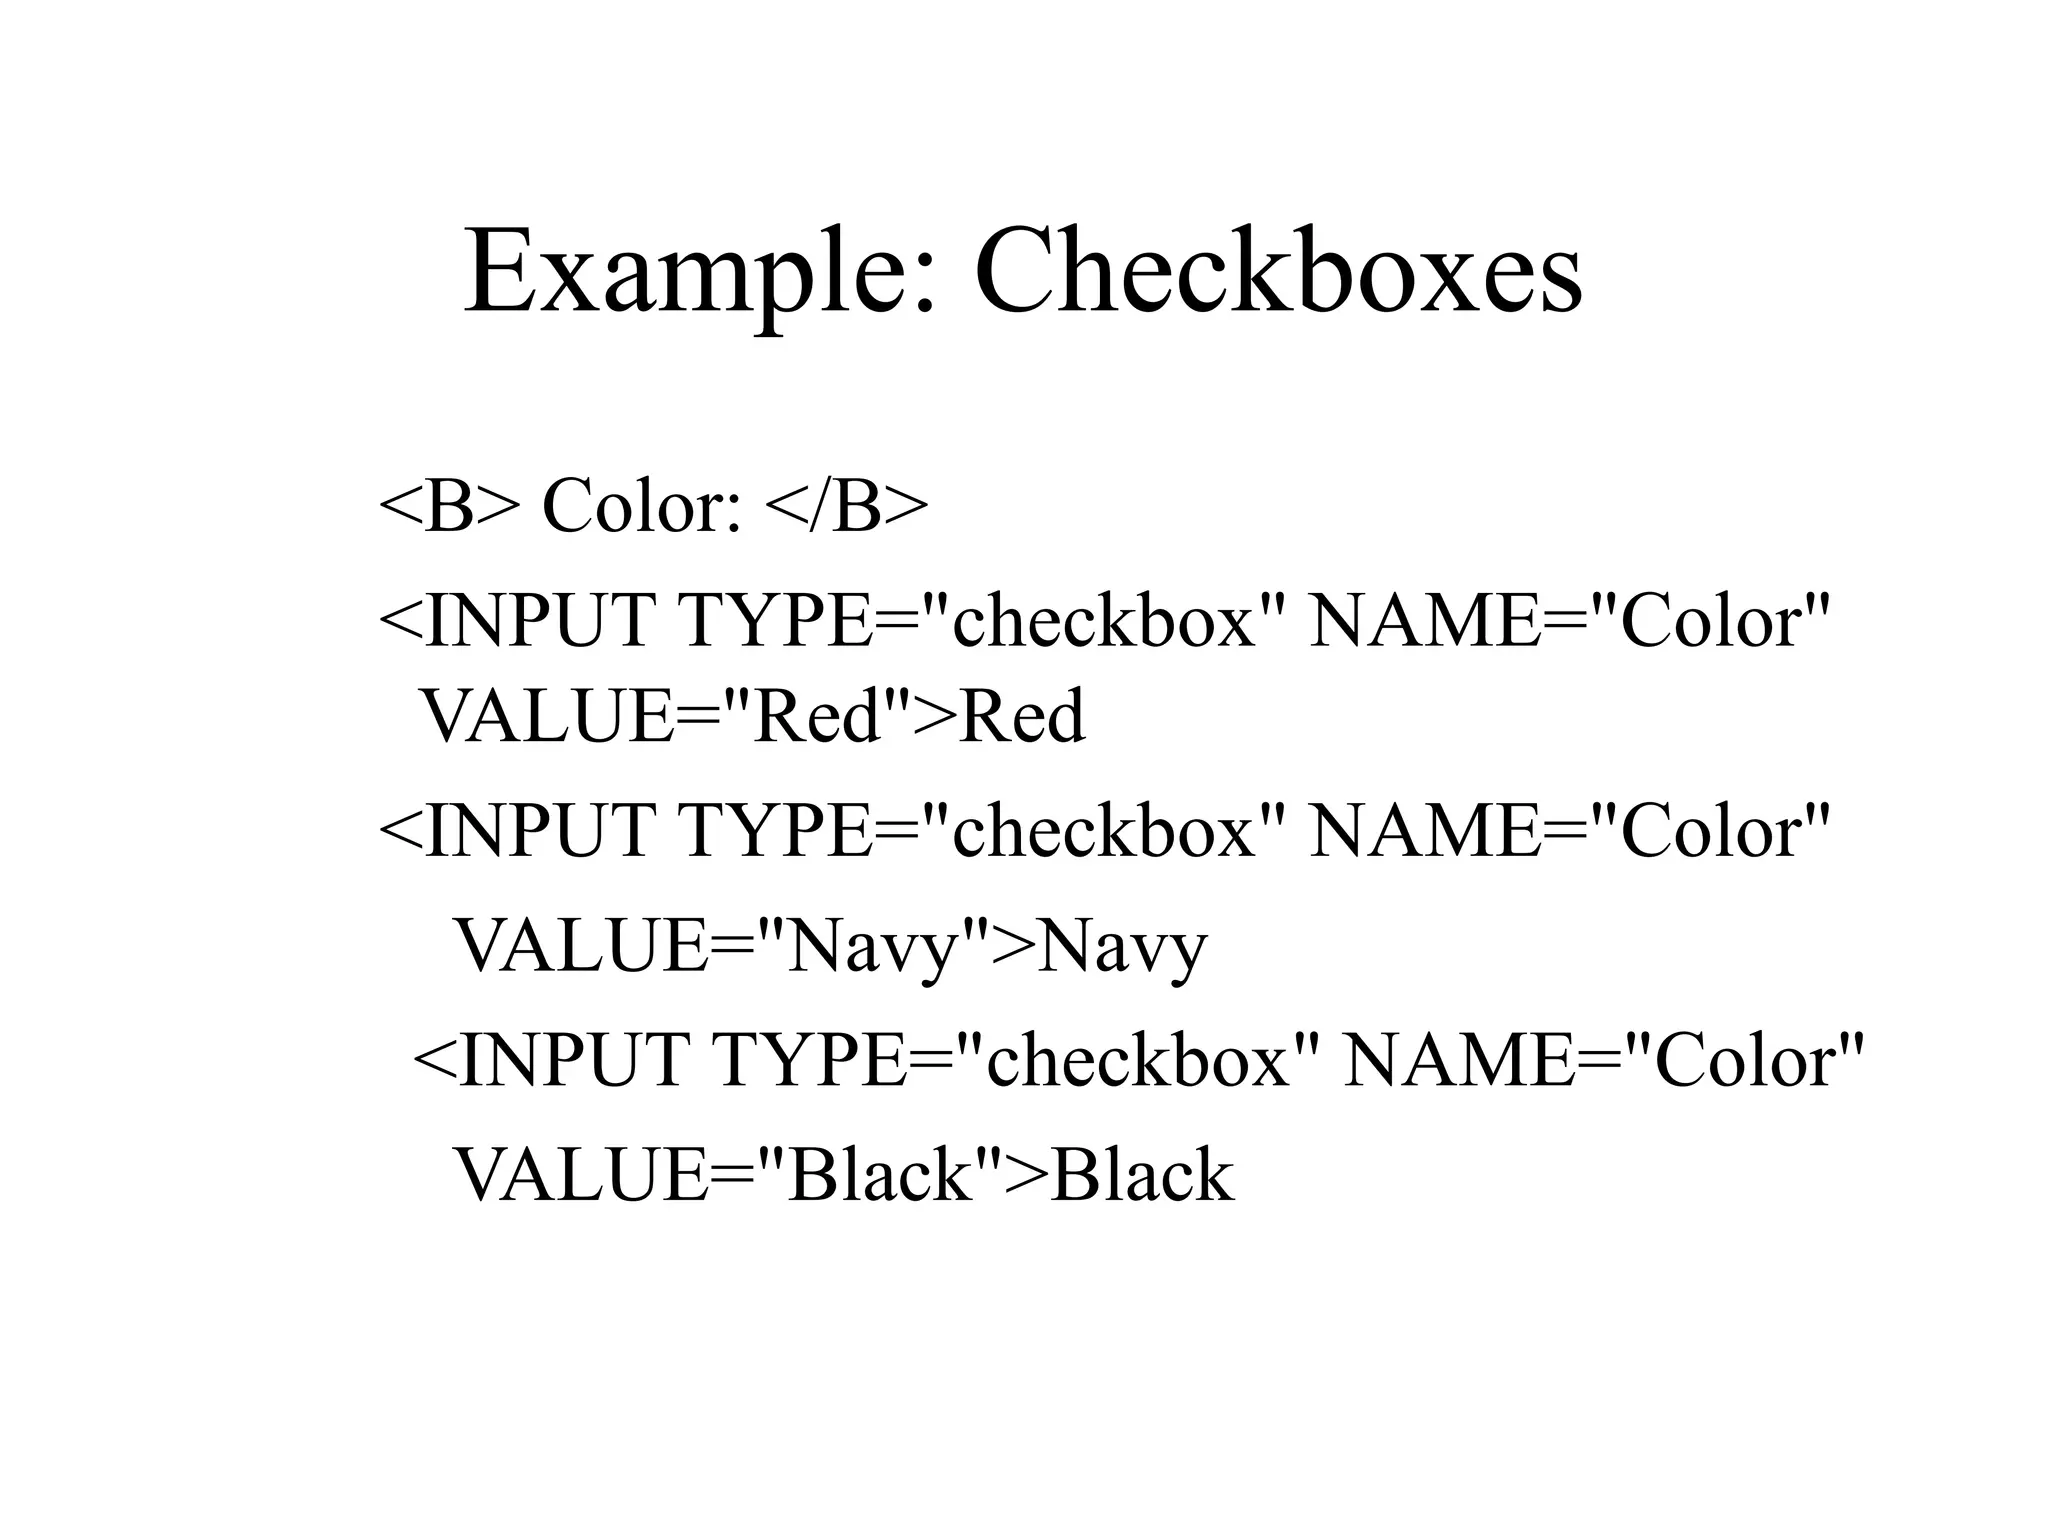
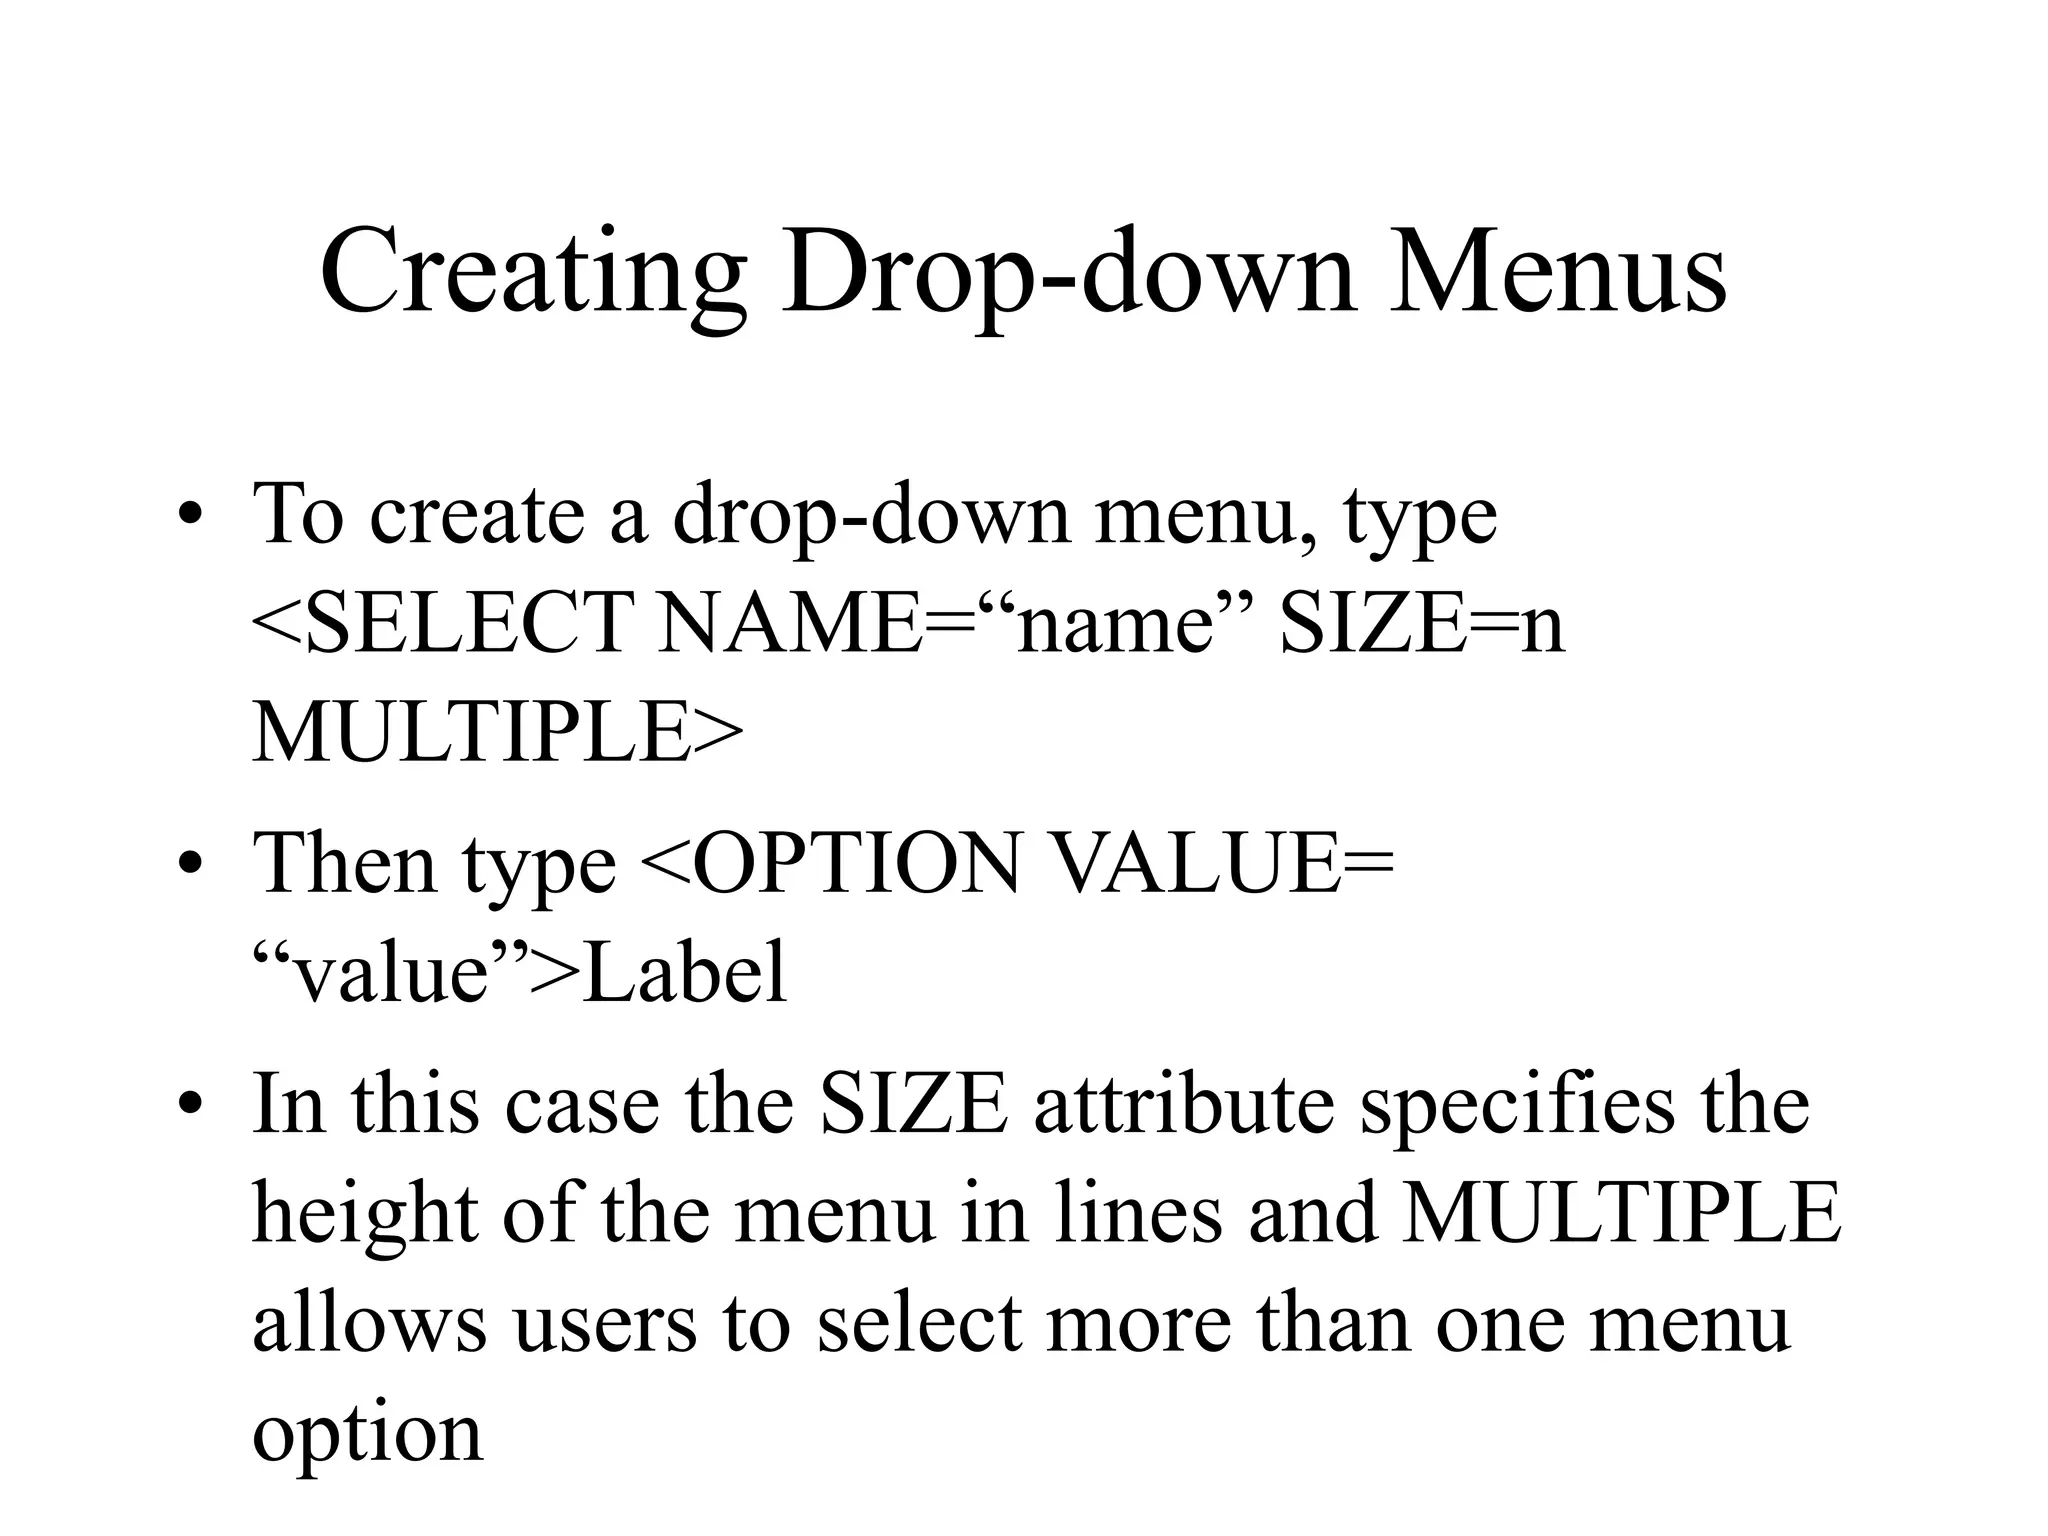
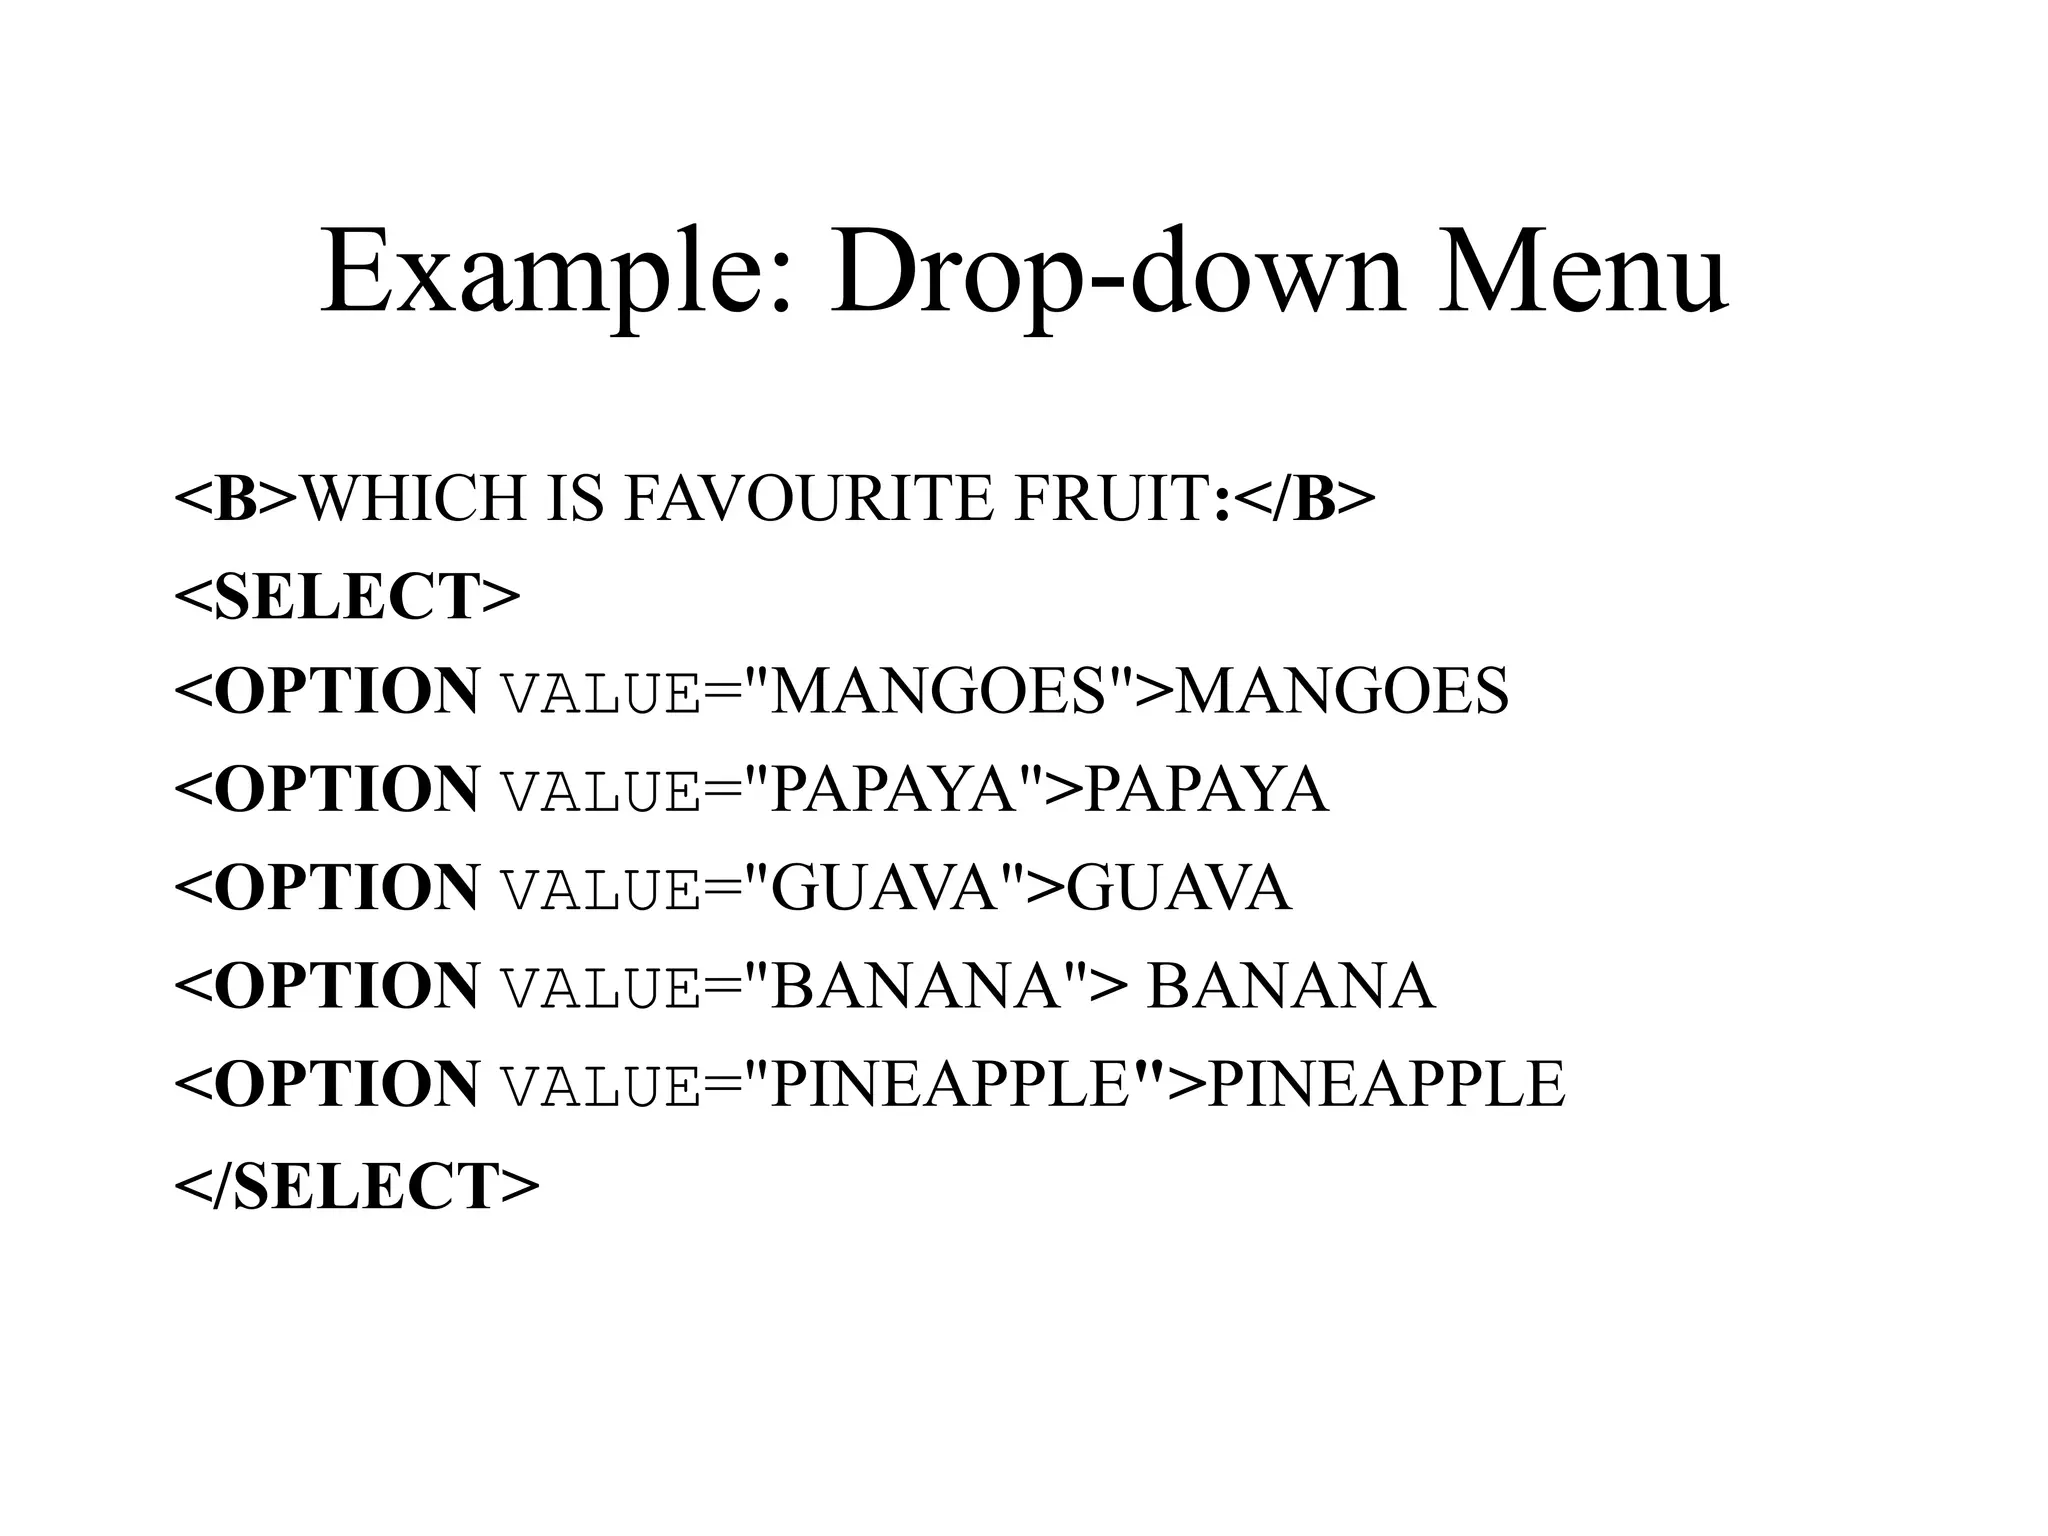
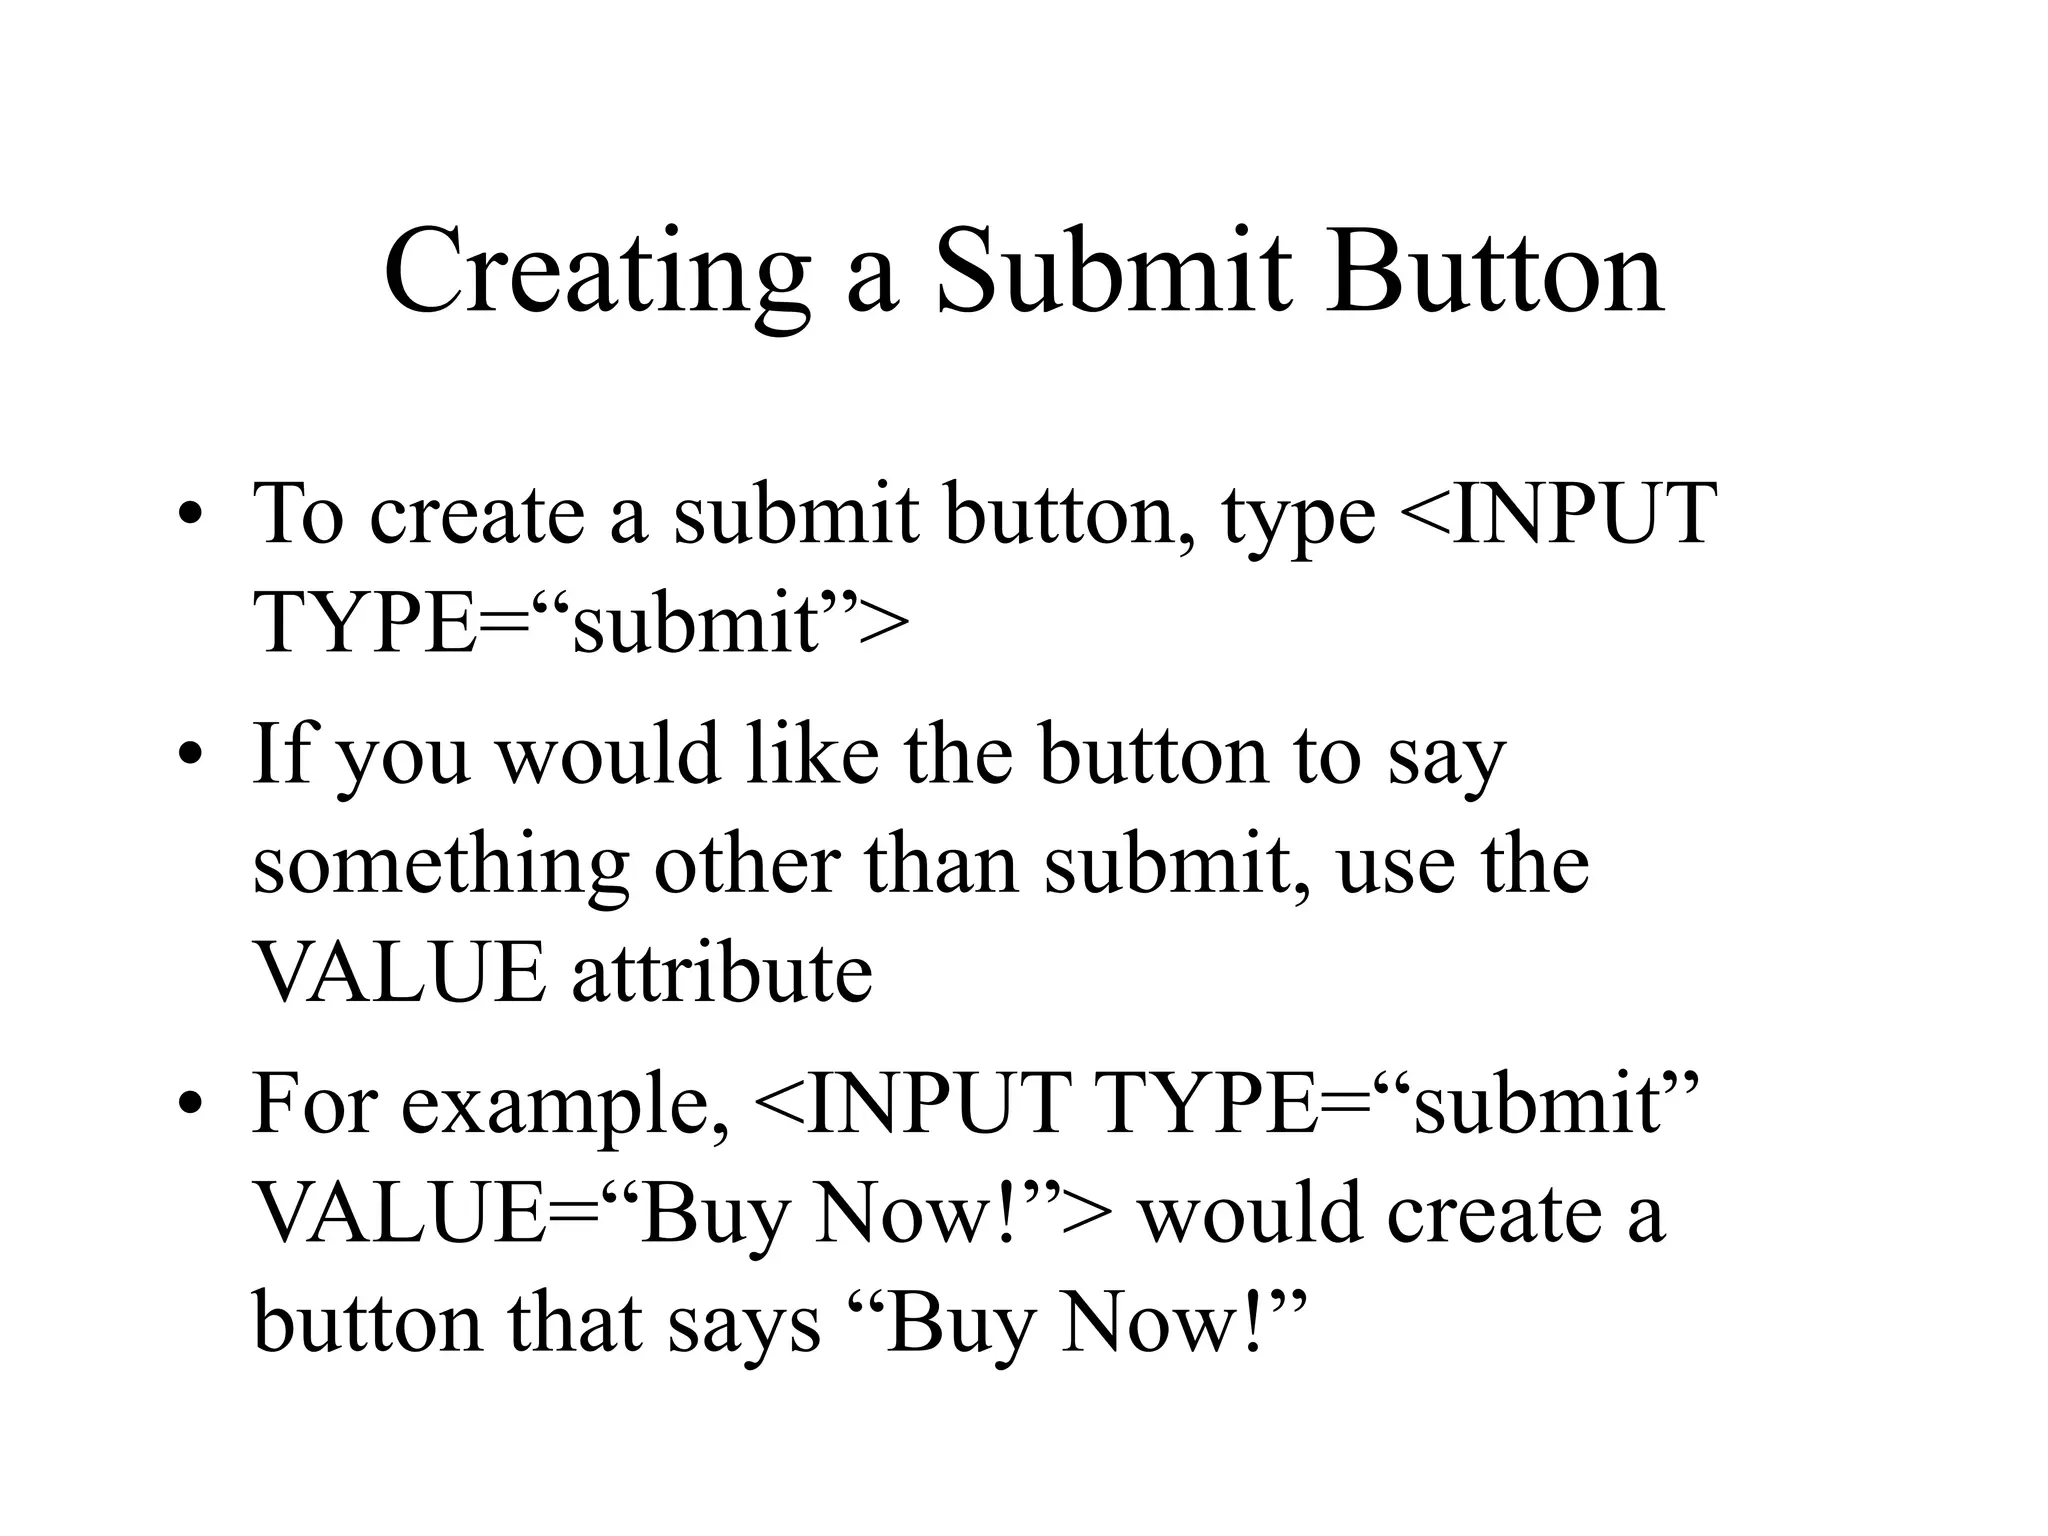
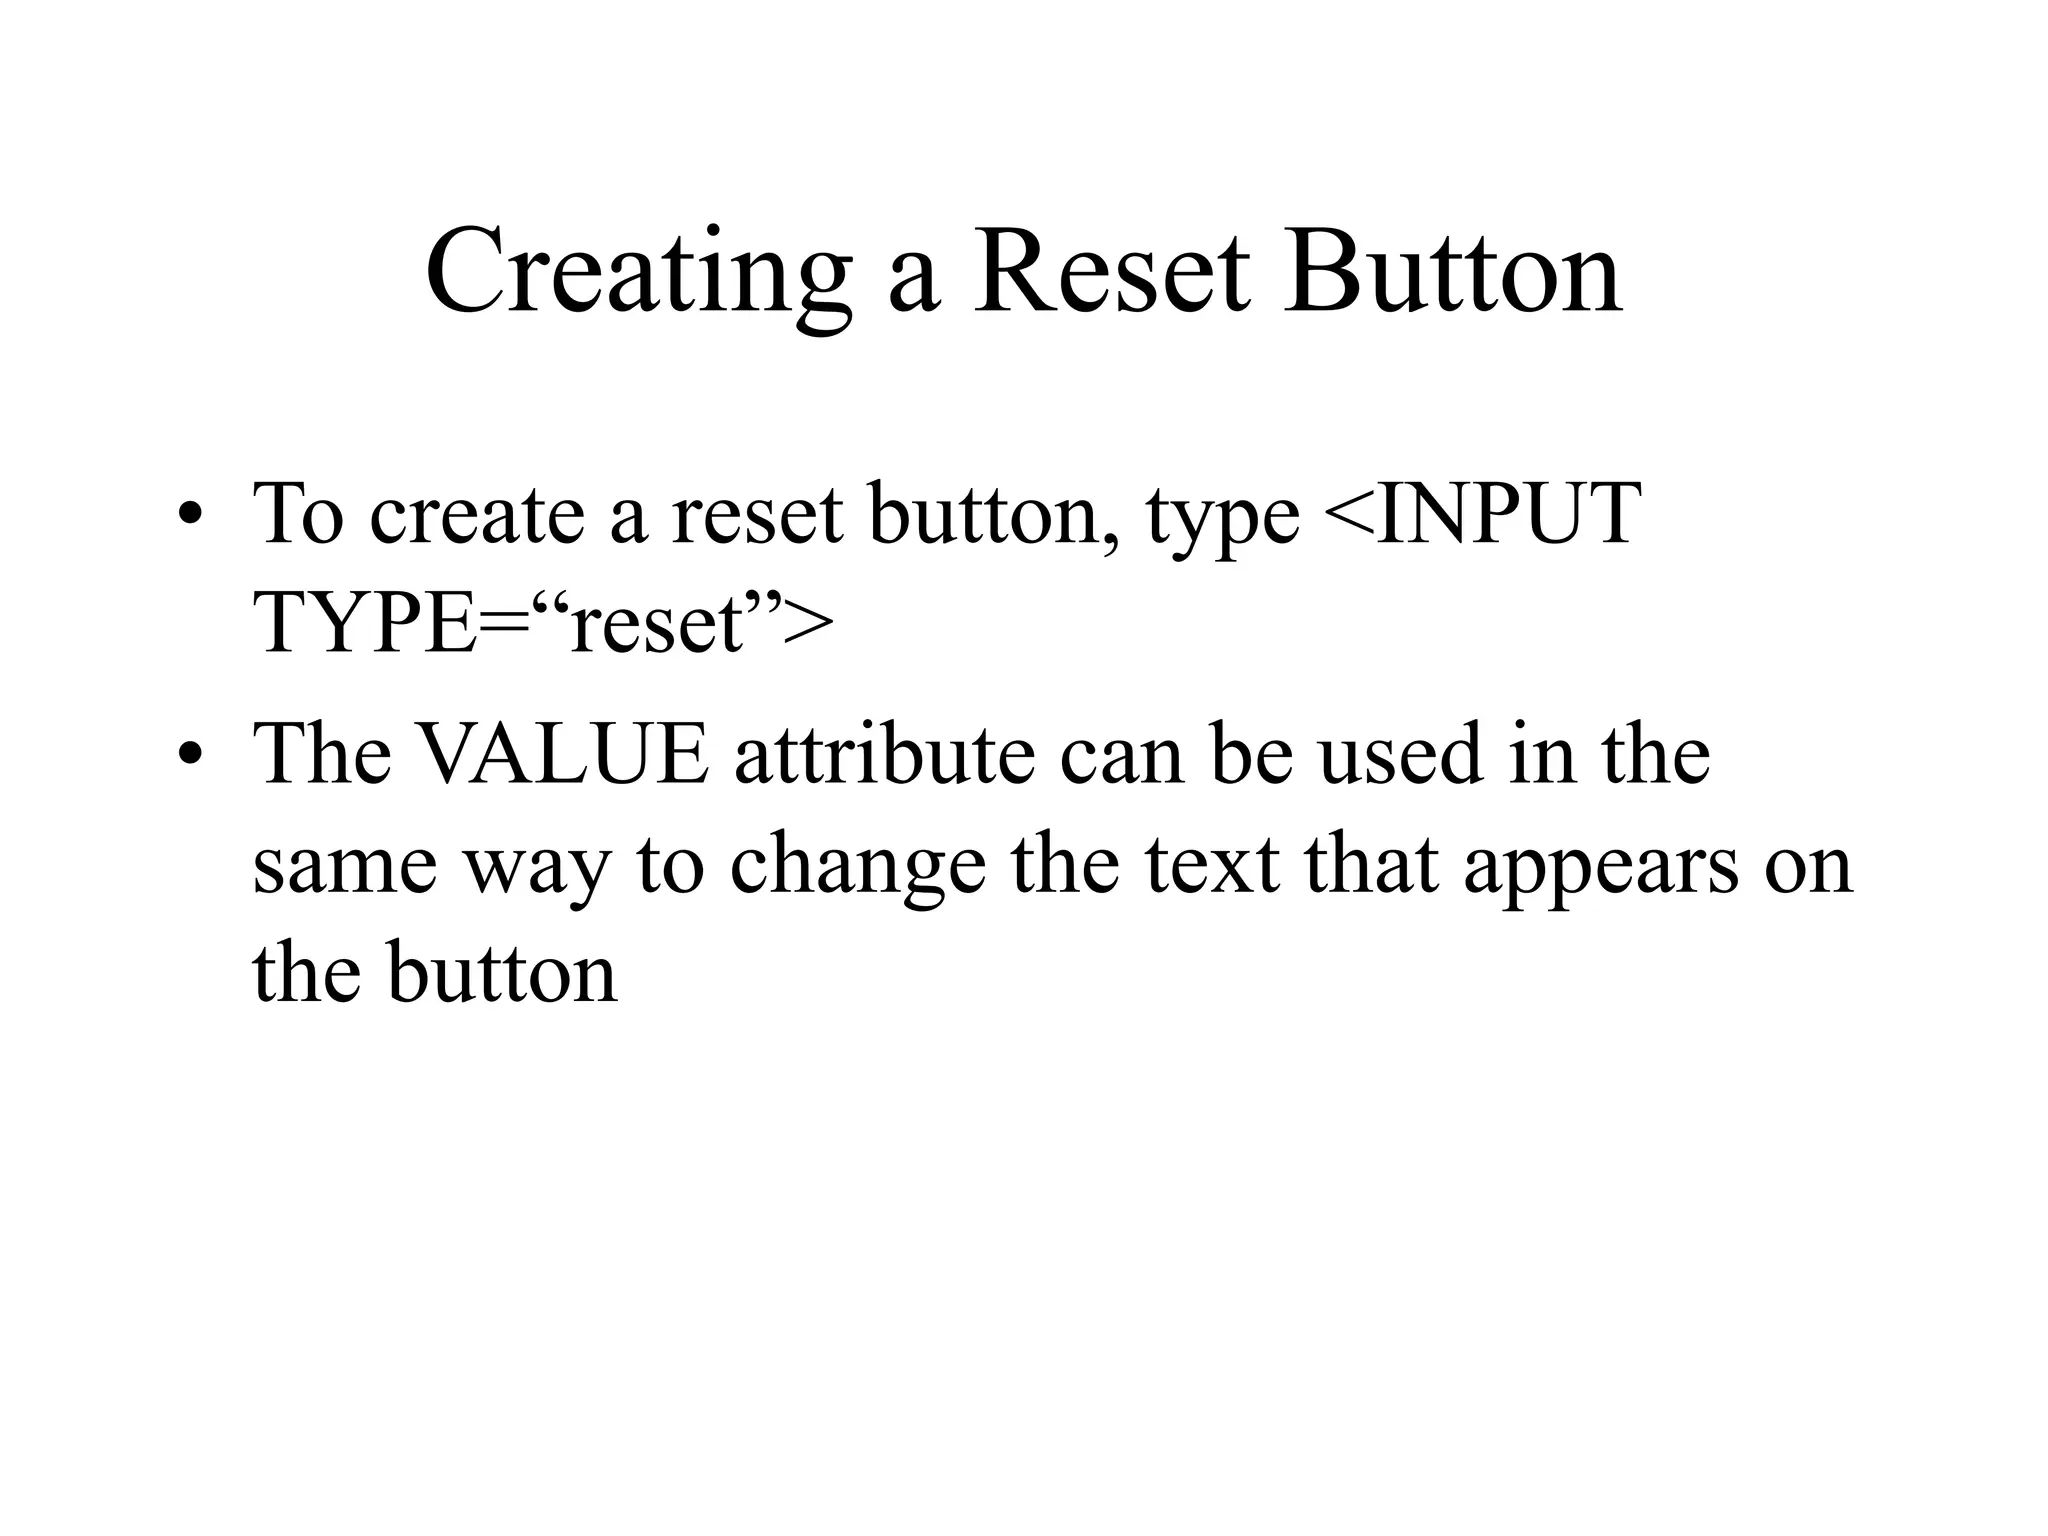
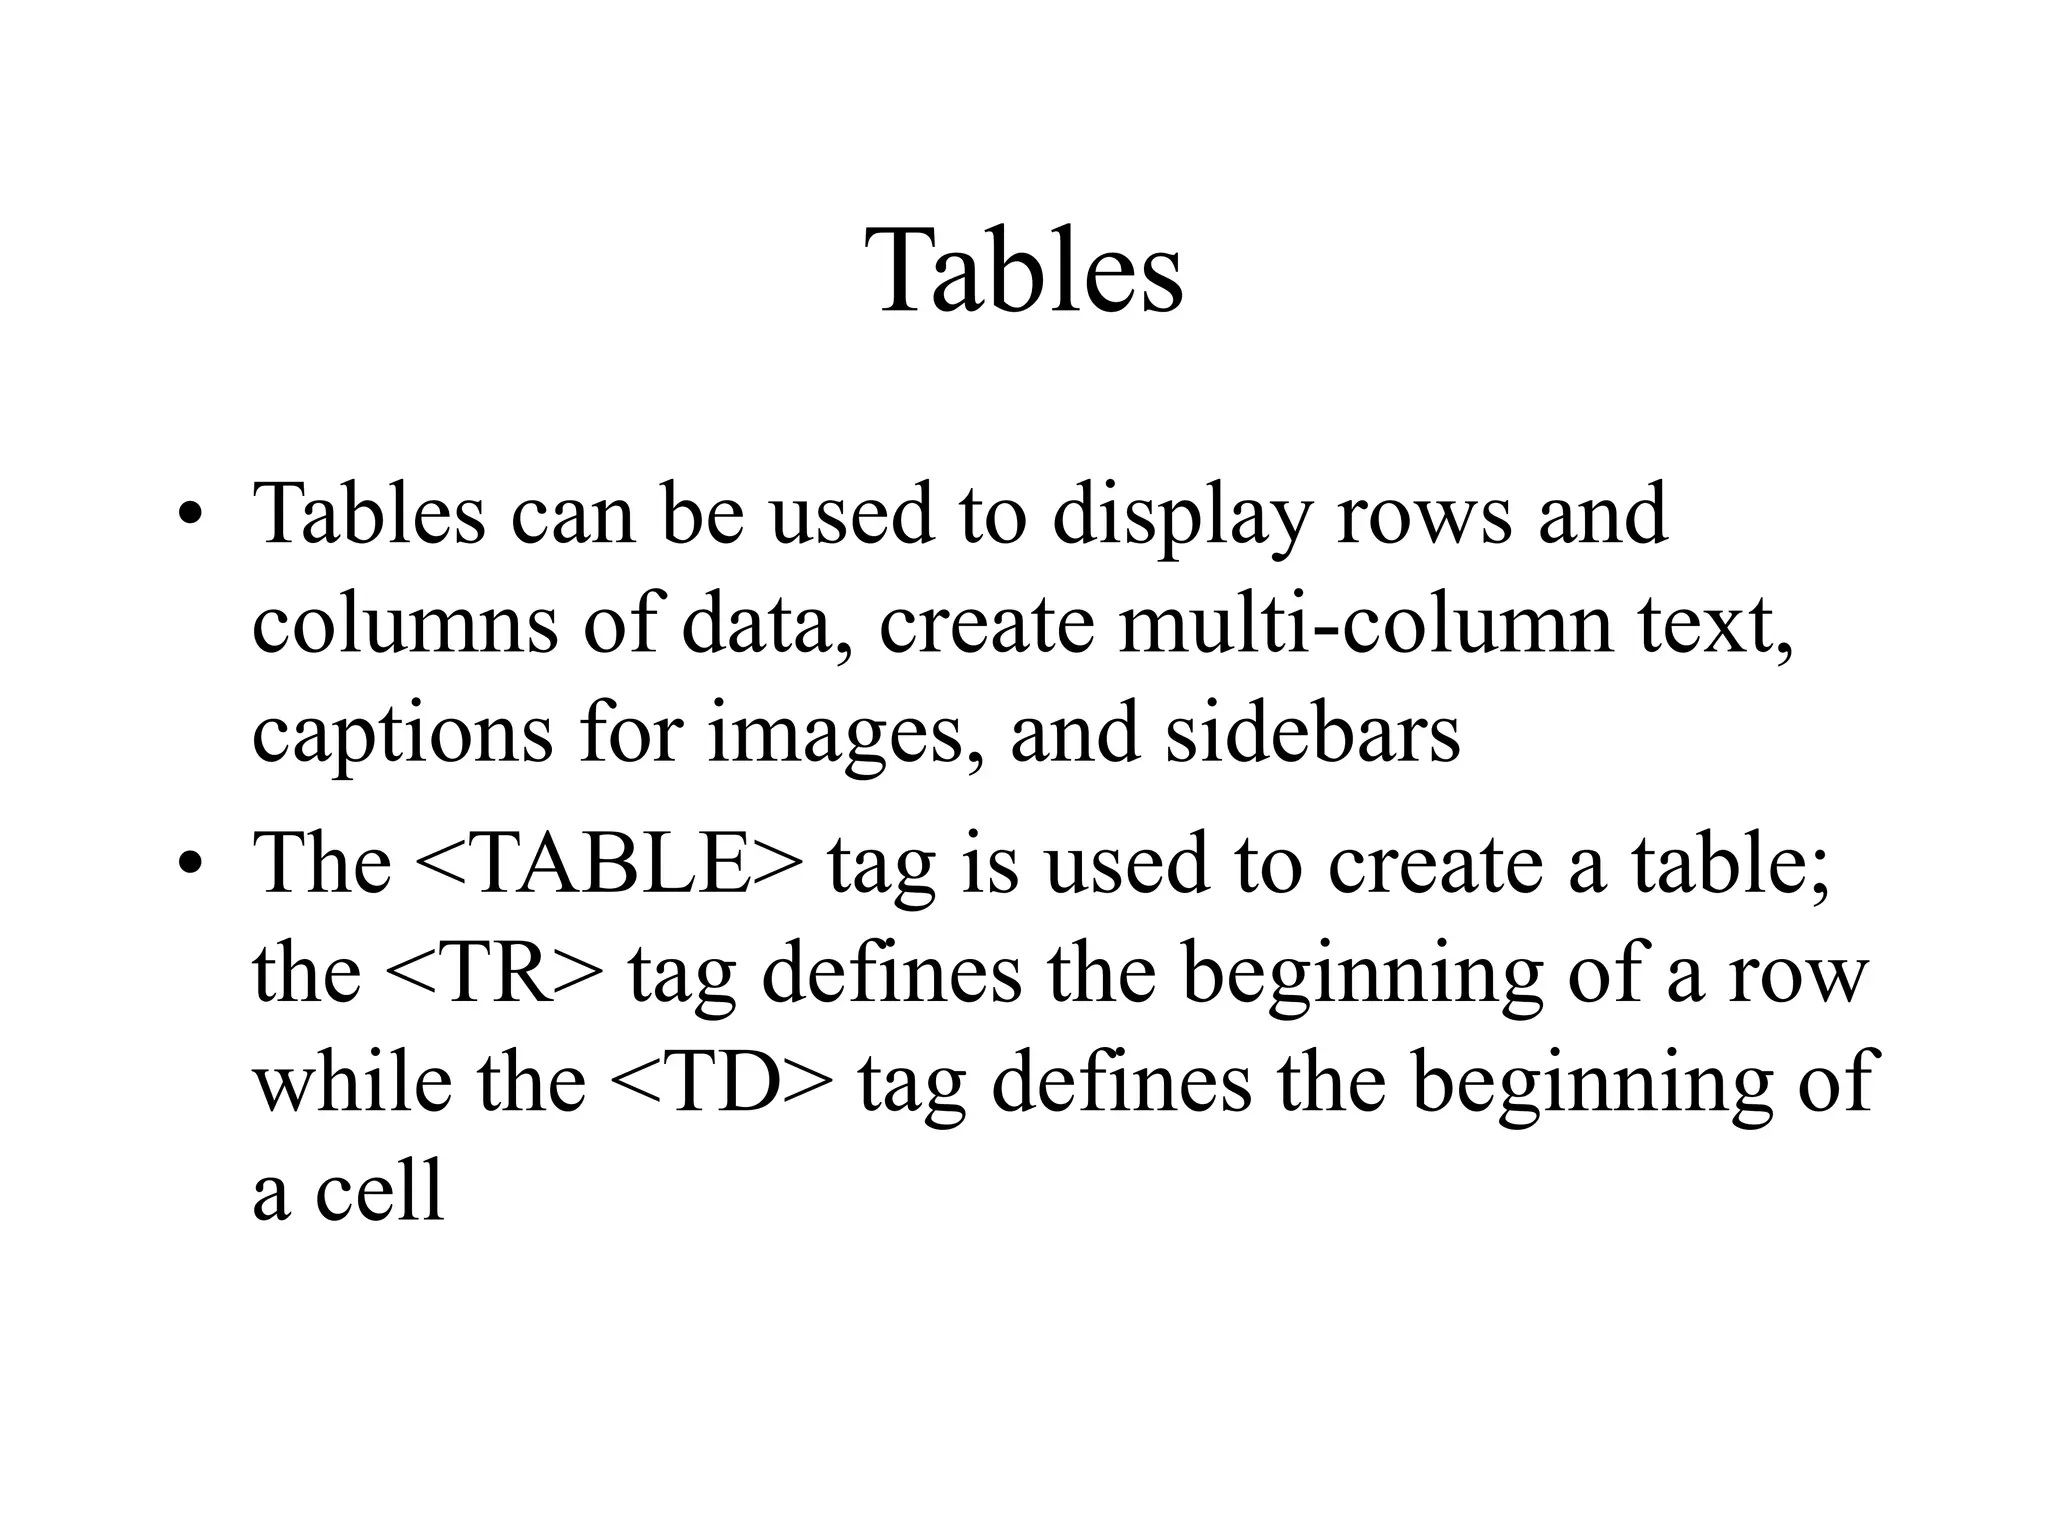
Introduction to HTML MIT - AITI
What is HTML? • HTML, otherwise known as HyperText Markup Language, is the language used to create Web pages • Using HTML, you can create a Web page with text, graphics, sound, and video
Tags • The essence of HTML programming is tags • A tag is a keyword enclosed by angle brackets ( Example: <I> ) • There are opening and closing tags for many but not all tags; The affected text is between the two tags
More Tags... • The opening and closing tags use the same command except the closing tag contains and additional forward slash / • For example, the expression <B> Warning </B> would cause the word ‘Warning’ to appear in bold face on a Web page
Nested Tags • Whenever you have HTML tags within other HTML tags, you must close the nearest tag first • Example: <H1> <I> The Nation </I> </H1>
Structure of a Web Page • All Web pages share a common structure • All Web pages should contain a pair of <HTML>, <HEAD>, <TITLE>, and <BODY> tags <HTML> <HEAD> <TITLE> Example </TITLE> </HEAD> <BODY> This is where you would include the text and images on your Web page. </BODY> </HTML>
The <TITLE> Tag • Choose the title of your Web page carefully; The title of a Web page determines its ranking in certain search engines • The title will also appear on Favorite lists, History lists, and Bookmark lists to identify your page
Text Formatting • Manipulating text in HTML can be tricky; Oftentimes, what you see is NOT what you get • For instance, special HTML tags are needed to create paragraphs, move to the next line, and create headings
Text Formatting Tags <B> Bold Face </B> <I> Italics </I> <U> Underline </U> <P> New Paragraph </P> <BR> Next Line
Changing the Font • The expression <FONT FACE = “fontname”> … </FONT> can be used to change the font of the enclosed text • To change the size of text use the expression <FONT SIZE=n> …. </FONT> where n is a number between 1 and 7
Changing the Font • To change the color, use <FONT COLOR=“red”>…. </FONT>; The color can also be defined using hexadecimal representation ( Example: #ffffff ) • These attributes can be combined to change the font, size, and color of the text all at once; For example, <FONT SIZE=4 FACE=“Courier” COLOR=“red”> …. </FONT>
Headings • Web pages are typically organized into sections with headings; To create a heading use the expression <Hn>….</Hn> where n is a number between 1 and 7 • In this case, the 1 corresponds to the largest size heading while the 7 corresponds to the smallest size
Aligning Text • The ALIGN attribute can be inserted in the <P> and <Hn> tags to right justify, center, or left justify the text • For example, <H1 ALIGN=CENTER> The New York Times </H1> would create a centered heading of the largest size
Comment Statements • Comment statements are notes in the HTML code that explain the important features of the code • The comments do not appear on the Web page itself but are a useful reference to the author of the page and other programmers • To create a comment statement use the <!-- …. --> tags
The Infamous Blink Tag • It is possible to make text blink using the <BLINK> … </BLINK> tag • However, it is best to use this feature at most sparingly or not at all; What seems like a good idea to a Web designer can become very annoying to a Web user • The <BLINK> tag is not supported by Internet Explorer
Page Formatting • To define the background color, use the BGCOLOR attribute in the <BODY> tag • To define the text color, use the TEXT attribute in the <BODY> tag • To define the size of the text, type <BASEFONT SIZE=n>
Example <HTML> <HEAD> <TITLE> Example </TITLE> </HEAD> <BODY BGCOLOR=“black” TEXT=“white”> <BASEFONT SIZE=7> This is where you would include the text and images on your Web page. </BODY> </HTML>
Inserting Images • Type <IMG SRC = “image.ext”>, where image.ext indicates the location of the image file • The WIDTH=n and HEIGHT=n attributes can be used to adjust the size of an image • The attribute BORDER=n can be used to add a border n pixels thick around the image
Alternate Text • Some browsers don’t support images. In this case, the ALT attribute can be used to create text that appears instead of the image. • Example: <IMG SRC=“satellite.jpg” ALT = “Picture of satellite”>
Links • A link lets you move from one page to another, play movies and sound, send email, download files, and more…. • A link has three parts: a destination, a label, and a target • To create a link type <A HREF=“page.html”> label </A>
Anatomy of a Link <A HREF=“page.html”> label </A> • In the above link, “page.html” is the destination. The destination specifies the address of the Web page or file the user will access when he/she clicks on the link. • The label is the text that will appear underlined or highlighted on the page
Example: Links • To create a link to CNN, I would type: <A HREF=“http://www.cnn.com”>CNN</A> • To create a link to MIT, I would type: <A HREF=“http://www.mit.edu”>MIT</A>
Changing the Color of Links • The LINK, VLINK, and ALINK attributes can be inserted in the <BODY> tag to define the color of a link – LINK defines the color of links that have not been visited – VLINK defines the color of links that have already been visited – ALINK defines the color of a link when a user clicks on it
Using Links to Send Email • To create a link to an email address, type <A HREF=“mailto:email_address”> Label</A> • For example, to create a link to send email to myself, I would type: <A HREF=“mailto: ktdunn@mit.edu”>email Katie Dunn</A>
Anchors • Anchors enable a user to jump to a specific place on a Web site • Two steps are necessary to create an anchor. First you must create the anchor itself. Then you must create a link to the anchor from another point in the document.
Anchors • To create the anchor itself, type <A NAME=“anchor name”>label</A> at the point in the Web page where you want the user to jump to • To create the link, type <A HREF=“#anchor name”>label</A> at the point in the text where you want the link to appear
Example: Anchor <A HREF="#chap2">Chapter Two</A><BR> <A NAME="chap2">Chapter 2 </A> Link Anchor
Ordered Lists • Ordered lists are a list of numbered items. • To create an ordered list, type: <OL> <LI> This is step one. <LI> This is step two. <LI> This is step three. </OL> Here’s how it would look on the Web:
More Ordered Lists…. • The TYPE=x attribute allows you to change the the kind of symbol that appears in the list. – A is for capital letters – a is for lowercase letters – I is for capital roman numerals – i is for lowercase roman numerals
Unordered Lists • An unordered list is a list of bulleted items • To create an unordered list, type: <UL> <LI> First item in list <LI> Second item in list <LI> Third item in list </UL> Here’s how it would look on the Web:
More Unordered Lists... • The TYPE=shape attribute allows you to change the type of bullet that appears – circle corresponds to an empty round bullet – square corresponds to a square bullet – disc corresponds to a solid round bullet; this is the default value
Forms  What are forms? • An HTML form is an area of the document that allows users to enter information into fields. • A form may be used to collect personal information, opinions in polls, user preferences and other kinds of information.
Forms • There are two basic components of a Web form: the shell, the part that the user fills out, and the script which processes the information • HTML tags are used to create the form shell. Using HTML you can create text boxes, radio buttons, checkboxes, drop- down menus, and more...
Example: Form Text Box Drop-down Menu Radio Buttons Checkboxes Text Area Submit Button Reset Button
The Form Shell • A form shell has three important parts: – the <FORM> tag, which includes the address of the script which will process the form – the form elements, like text boxes and radio buttons – the submit button which triggers the script to send the entered information to the server
Creating the Shell • To create a form shell, type <FORM METHOD=POST ACTION=“script_url”> where “script_url” is the address of the script • Create the form elements • End with a closing </FORM> tag
Creating Text Boxes • To create a text box, type <INPUT TYPE=“text” NAME=“name” VALUE=“value” SIZE=n MAXLENGTH=n> • The NAME, VALUE, SIZE, and MAXLENGTH attributes are optional
Text Box Attributes • The NAME attribute is used to identify the text box to the processing script • The VALUE attribute is used to specify the text that will initially appear in the text box • The SIZE attribute is used to define the size of the box in characters • The MAXLENGTH attribute is used to define the maximum number of characters that can be typed in the box
Example: Text Box First Name: <INPUT TYPE="text" NAME="FirstName" VALUE="First Name" SIZE=20> <BR><BR> Last Name: <INPUT TYPE="text" NAME="LastName" VALUE="Last Name" SIZE=20> <BR><BR> • Here’s how it would look on the Web:
Creating Larger Text Areas • To create larger text areas, type <TEXTAREA NAME=“name” ROWS=n1 COLS=n2 WRAP> Default Text </TEXTAREA>, where n1 is the height of the text box in rows and n2 is the width of the text box in characters • The WRAP attribute causes the cursor to move automatically to the next line as the user types
Example: Text Area <B>Comments?</B> <BR> <TEXTAREA NAME="Comments" ROWS=10 COLS=50 WRAP> </TEXTAREA>
Creating Radio Buttons • To create a radio button, type <INPUT TYPE=“radio” NAME=“name” VALUE=“data”>Label, where “data” is the text that will be sent to the server if the button is checked and “Label” is the text that identifies the button to the user
Example: Radio Buttons <B> Size: </B> <INPUT TYPE="radio" NAME="Size" VALUE="Large">Large <INPUT TYPE="radio" NAME="Size" VALUE="Medium">Medium <INPUT TYPE="radio" NAME="Size" VALUE="Small">Small
Creating Checkboxes • To create a checkbox, type <INPUT TYPE=“checkbox” NAME=“name” VALUE=“value”>Label • If you give a group of radio buttons or checkboxes the same name, the user will only be able to select one button or box at a time
Example: Checkboxes <B> Color: </B> <INPUT TYPE="checkbox" NAME="Color" VALUE="Red">Red <INPUT TYPE="checkbox" NAME="Color" VALUE="Navy">Navy <INPUT TYPE="checkbox" NAME="Color" VALUE="Black">Black
Creating Drop-down Menus • To create a drop-down menu, type <SELECT NAME=“name” SIZE=n MULTIPLE> • Then type <OPTION VALUE= “value”>Label • In this case the SIZE attribute specifies the height of the menu in lines and MULTIPLE allows users to select more than one menu option
Example: Drop-down Menu <B>WHICH IS FAVOURITE FRUIT:</B> <SELECT> <OPTION VALUE="MANGOES">MANGOES <OPTION VALUE="PAPAYA">PAPAYA <OPTION VALUE="GUAVA">GUAVA <OPTION VALUE="BANANA"> BANANA <OPTION VALUE="PINEAPPLE">PINEAPPLE </SELECT>
Creating a Submit Button • To create a submit button, type <INPUT TYPE=“submit”> • If you would like the button to say something other than submit, use the VALUE attribute • For example, <INPUT TYPE=“submit” VALUE=“Buy Now!”> would create a button that says “Buy Now!”
Creating a Reset Button • To create a reset button, type <INPUT TYPE=“reset”> • The VALUE attribute can be used in the same way to change the text that appears on the button
Tables • Tables can be used to display rows and columns of data, create multi-column text, captions for images, and sidebars • The <TABLE> tag is used to create a table; the <TR> tag defines the beginning of a row while the <TD> tag defines the beginning of a cell
Adding a Border • The BORDER=n attribute allows you to add a border n pixels thick around the table • To make a solid border color, use the BORDERCOLOR=“color” attribute • To make a shaded colored border, use BODERCOLORDARK=“color” and BORDERCOLORLIGHT=“color”
Creating Simple Table <TABLE BORDER=10> <TR> <TD>One</TD> <TD>Two</TD> </TR> <TR> <TD>Three</TD> <TD>Four</TD> </TR> </TABLE> • Here’s how it would look on the Web:
Adjusting the Width • When a Web browser displays a table, it often adds extra space. To eliminate this space use the WIDTH =n attribute in the <TABLE> and <TD> tags • Keep in mind - a cell cannot be smaller than its contents, and if you make a table wider than the browser window, users will not be able to see parts of it.
Centering a Table • There are two ways to center a table – Type <TABLE ALIGN=CENTER> – Enclose the <TABLE> tags in opening and closing <CENTER> tags
Wrapping Text around a Table • It is possible to wrap text around a table. This technique is often used to keep images and captions together within an article. • To wrap text around a table, type <TABLE ALIGN = LEFT> to align the table to the left while the text flows to the right. • Create the table using the <TR>, <TD>, and </TABLE> tags as you normally would
Adding Space around a Table • To add space around a table, use the HSPACE=n and VSPACE=n attributes in the <TABLE> tag • Example: <TABLE HSPACE=20 VSPACE=20>
Spanning Cells Across Columns • It is often necessary to span one cell across many columns. For example, you would use this technique to span a headline across the columns of a newspaper article. • To span a cell across many columns, type <TD COLSPAN=n>, where n is the number of columns to be spanned
Spanning Cells Across Rows • To span a cell across many rows, type <TD ROWSPAN=n>, where n is the number of rows
Aligning Cell Content • By default, a cell’s content are aligned horizontally to the left and and vertically in the middle. • Use VALIGN=direction to change the vertical alignment, where “direction” is top, middle, bottom, or baseline • Use ALIGN=direction to change the horizontal alignment where “direction” is left, center, or right
Controlling Cell Spacing • Cell spacing is the space between cells while cell padding is the space around the contents of a cell • To control both types of spacing, use the CELLSPACING =n and CELLPADDING=n attributes in the <TABLE> tag
Nesting Tables • Create the inner table • Create the outer table and determine which cell of the outer table will hold the inner table • Test both tables separately to make sure they work • Copy the inner table into the cell of the outer table • Don’t nest too many tables. If you find yourself doing that, find an easier way to lay out your Web page
Changing a Cell’s Color • To change a cell’s color, add the BGCOLOR=“color” attribute to the <TD> tag • Example: <TD BGCOLOR=“blue”>
Dividing Your Table into Column Groups • You can divide your table into two kinds of column groups: structural and non- structural. • Structural column groups control where dividing lines are drawn; Non-structural groups do not • Both let you format an entire column of cells at once
Column Groups • To create structural column groups, type <COLGROUP SPAN=n> after the <TABLE> tag, where n is the number of columns in the group • To create non-structural column groups, type <COL SPAN=n>, where n is the number of columns in the group
Dividing Table into Horizontal Sections • You can also create a horizontal section consisting of one or more rows. This allows you to format the rows all at once • To create a horizontal section, type <THEAD>, <TBODY>, or <TFOOT> before the first <TR> tag of the section • Netscape does not support these tags
Controlling Line Breaks • Unless you specify otherwise a browser will divide the lines in a cell as it sees fit. • The NOWRAP attribute placed within the <TD> tag forces the browser to keep all the text in a cell on one line • Example: – <TD NOWRAP>Washington, D.C.
Parting Words…. • If you can imagine a way to lay out your page, chances are it is possible using HTML • When in doubt, use an HTML reference

HTML.ppt

  • 1.
  • 2.
    What is HTML? •HTML, otherwise known as HyperText Markup Language, is the language used to create Web pages • Using HTML, you can create a Web page with text, graphics, sound, and video
  • 3.
    Tags • The essenceof HTML programming is tags • A tag is a keyword enclosed by angle brackets ( Example: <I> ) • There are opening and closing tags for many but not all tags; The affected text is between the two tags
  • 4.
    More Tags... • Theopening and closing tags use the same command except the closing tag contains and additional forward slash / • For example, the expression <B> Warning </B> would cause the word ‘Warning’ to appear in bold face on a Web page
  • 5.
    Nested Tags • Wheneveryou have HTML tags within other HTML tags, you must close the nearest tag first • Example: <H1> <I> The Nation </I> </H1>
  • 6.
    Structure of aWeb Page • All Web pages share a common structure • All Web pages should contain a pair of <HTML>, <HEAD>, <TITLE>, and <BODY> tags <HTML> <HEAD> <TITLE> Example </TITLE> </HEAD> <BODY> This is where you would include the text and images on your Web page. </BODY> </HTML>
  • 7.
    The <TITLE> Tag •Choose the title of your Web page carefully; The title of a Web page determines its ranking in certain search engines • The title will also appear on Favorite lists, History lists, and Bookmark lists to identify your page
  • 8.
    Text Formatting • Manipulatingtext in HTML can be tricky; Oftentimes, what you see is NOT what you get • For instance, special HTML tags are needed to create paragraphs, move to the next line, and create headings
  • 9.
    Text Formatting Tags <B>Bold Face </B> <I> Italics </I> <U> Underline </U> <P> New Paragraph </P> <BR> Next Line
  • 10.
    Changing the Font •The expression <FONT FACE = “fontname”> … </FONT> can be used to change the font of the enclosed text • To change the size of text use the expression <FONT SIZE=n> …. </FONT> where n is a number between 1 and 7
  • 11.
    Changing the Font •To change the color, use <FONT COLOR=“red”>…. </FONT>; The color can also be defined using hexadecimal representation ( Example: #ffffff ) • These attributes can be combined to change the font, size, and color of the text all at once; For example, <FONT SIZE=4 FACE=“Courier” COLOR=“red”> …. </FONT>
  • 12.
    Headings • Web pagesare typically organized into sections with headings; To create a heading use the expression <Hn>….</Hn> where n is a number between 1 and 7 • In this case, the 1 corresponds to the largest size heading while the 7 corresponds to the smallest size
  • 13.
    Aligning Text • TheALIGN attribute can be inserted in the <P> and <Hn> tags to right justify, center, or left justify the text • For example, <H1 ALIGN=CENTER> The New York Times </H1> would create a centered heading of the largest size
  • 14.
    Comment Statements • Commentstatements are notes in the HTML code that explain the important features of the code • The comments do not appear on the Web page itself but are a useful reference to the author of the page and other programmers • To create a comment statement use the <!-- …. --> tags
  • 15.
    The Infamous BlinkTag • It is possible to make text blink using the <BLINK> … </BLINK> tag • However, it is best to use this feature at most sparingly or not at all; What seems like a good idea to a Web designer can become very annoying to a Web user • The <BLINK> tag is not supported by Internet Explorer
  • 16.
    Page Formatting • Todefine the background color, use the BGCOLOR attribute in the <BODY> tag • To define the text color, use the TEXT attribute in the <BODY> tag • To define the size of the text, type <BASEFONT SIZE=n>
  • 17.
    Example <HTML> <HEAD> <TITLE> Example </TITLE> </HEAD> <BODYBGCOLOR=“black” TEXT=“white”> <BASEFONT SIZE=7> This is where you would include the text and images on your Web page. </BODY> </HTML>
  • 18.
    Inserting Images • Type<IMG SRC = “image.ext”>, where image.ext indicates the location of the image file • The WIDTH=n and HEIGHT=n attributes can be used to adjust the size of an image • The attribute BORDER=n can be used to add a border n pixels thick around the image
  • 19.
    Alternate Text • Somebrowsers don’t support images. In this case, the ALT attribute can be used to create text that appears instead of the image. • Example: <IMG SRC=“satellite.jpg” ALT = “Picture of satellite”>
  • 20.
    Links • A linklets you move from one page to another, play movies and sound, send email, download files, and more…. • A link has three parts: a destination, a label, and a target • To create a link type <A HREF=“page.html”> label </A>
  • 21.
    Anatomy of aLink <A HREF=“page.html”> label </A> • In the above link, “page.html” is the destination. The destination specifies the address of the Web page or file the user will access when he/she clicks on the link. • The label is the text that will appear underlined or highlighted on the page
  • 22.
    Example: Links • Tocreate a link to CNN, I would type: <A HREF=“http://www.cnn.com”>CNN</A> • To create a link to MIT, I would type: <A HREF=“http://www.mit.edu”>MIT</A>
  • 23.
    Changing the Colorof Links • The LINK, VLINK, and ALINK attributes can be inserted in the <BODY> tag to define the color of a link – LINK defines the color of links that have not been visited – VLINK defines the color of links that have already been visited – ALINK defines the color of a link when a user clicks on it
  • 24.
    Using Links toSend Email • To create a link to an email address, type <A HREF=“mailto:email_address”> Label</A> • For example, to create a link to send email to myself, I would type: <A HREF=“mailto: ktdunn@mit.edu”>email Katie Dunn</A>
  • 25.
    Anchors • Anchors enablea user to jump to a specific place on a Web site • Two steps are necessary to create an anchor. First you must create the anchor itself. Then you must create a link to the anchor from another point in the document.
  • 26.
    Anchors • To createthe anchor itself, type <A NAME=“anchor name”>label</A> at the point in the Web page where you want the user to jump to • To create the link, type <A HREF=“#anchor name”>label</A> at the point in the text where you want the link to appear
  • 27.
    Example: Anchor <A HREF="#chap2">ChapterTwo</A><BR> <A NAME="chap2">Chapter 2 </A> Link Anchor
  • 28.
    Ordered Lists • Orderedlists are a list of numbered items. • To create an ordered list, type: <OL> <LI> This is step one. <LI> This is step two. <LI> This is step three. </OL> Here’s how it would look on the Web:
  • 29.
    More Ordered Lists…. •The TYPE=x attribute allows you to change the the kind of symbol that appears in the list. – A is for capital letters – a is for lowercase letters – I is for capital roman numerals – i is for lowercase roman numerals
  • 30.
    Unordered Lists • Anunordered list is a list of bulleted items • To create an unordered list, type: <UL> <LI> First item in list <LI> Second item in list <LI> Third item in list </UL> Here’s how it would look on the Web:
  • 31.
    More Unordered Lists... •The TYPE=shape attribute allows you to change the type of bullet that appears – circle corresponds to an empty round bullet – square corresponds to a square bullet – disc corresponds to a solid round bullet; this is the default value
  • 32.
    Forms  What areforms? • An HTML form is an area of the document that allows users to enter information into fields. • A form may be used to collect personal information, opinions in polls, user preferences and other kinds of information.
  • 33.
    Forms • There aretwo basic components of a Web form: the shell, the part that the user fills out, and the script which processes the information • HTML tags are used to create the form shell. Using HTML you can create text boxes, radio buttons, checkboxes, drop- down menus, and more...
  • 34.
    Example: Form Text Box Drop-downMenu Radio Buttons Checkboxes Text Area Submit Button Reset Button
  • 35.
    The Form Shell •A form shell has three important parts: – the <FORM> tag, which includes the address of the script which will process the form – the form elements, like text boxes and radio buttons – the submit button which triggers the script to send the entered information to the server
  • 36.
    Creating the Shell •To create a form shell, type <FORM METHOD=POST ACTION=“script_url”> where “script_url” is the address of the script • Create the form elements • End with a closing </FORM> tag
  • 37.
    Creating Text Boxes •To create a text box, type <INPUT TYPE=“text” NAME=“name” VALUE=“value” SIZE=n MAXLENGTH=n> • The NAME, VALUE, SIZE, and MAXLENGTH attributes are optional
  • 38.
    Text Box Attributes •The NAME attribute is used to identify the text box to the processing script • The VALUE attribute is used to specify the text that will initially appear in the text box • The SIZE attribute is used to define the size of the box in characters • The MAXLENGTH attribute is used to define the maximum number of characters that can be typed in the box
  • 39.
    Example: Text Box FirstName: <INPUT TYPE="text" NAME="FirstName" VALUE="First Name" SIZE=20> <BR><BR> Last Name: <INPUT TYPE="text" NAME="LastName" VALUE="Last Name" SIZE=20> <BR><BR> • Here’s how it would look on the Web:
  • 40.
    Creating Larger TextAreas • To create larger text areas, type <TEXTAREA NAME=“name” ROWS=n1 COLS=n2 WRAP> Default Text </TEXTAREA>, where n1 is the height of the text box in rows and n2 is the width of the text box in characters • The WRAP attribute causes the cursor to move automatically to the next line as the user types
  • 41.
    Example: Text Area <B>Comments?</B> <BR> <TEXTAREANAME="Comments" ROWS=10 COLS=50 WRAP> </TEXTAREA>
  • 42.
    Creating Radio Buttons •To create a radio button, type <INPUT TYPE=“radio” NAME=“name” VALUE=“data”>Label, where “data” is the text that will be sent to the server if the button is checked and “Label” is the text that identifies the button to the user
  • 43.
    Example: Radio Buttons <B>Size: </B> <INPUT TYPE="radio" NAME="Size" VALUE="Large">Large <INPUT TYPE="radio" NAME="Size" VALUE="Medium">Medium <INPUT TYPE="radio" NAME="Size" VALUE="Small">Small
  • 44.
    Creating Checkboxes • Tocreate a checkbox, type <INPUT TYPE=“checkbox” NAME=“name” VALUE=“value”>Label • If you give a group of radio buttons or checkboxes the same name, the user will only be able to select one button or box at a time
  • 45.
    Example: Checkboxes <B> Color:</B> <INPUT TYPE="checkbox" NAME="Color" VALUE="Red">Red <INPUT TYPE="checkbox" NAME="Color" VALUE="Navy">Navy <INPUT TYPE="checkbox" NAME="Color" VALUE="Black">Black
  • 46.
    Creating Drop-down Menus •To create a drop-down menu, type <SELECT NAME=“name” SIZE=n MULTIPLE> • Then type <OPTION VALUE= “value”>Label • In this case the SIZE attribute specifies the height of the menu in lines and MULTIPLE allows users to select more than one menu option
  • 47.
    Example: Drop-down Menu <B>WHICHIS FAVOURITE FRUIT:</B> <SELECT> <OPTION VALUE="MANGOES">MANGOES <OPTION VALUE="PAPAYA">PAPAYA <OPTION VALUE="GUAVA">GUAVA <OPTION VALUE="BANANA"> BANANA <OPTION VALUE="PINEAPPLE">PINEAPPLE </SELECT>
  • 48.
    Creating a SubmitButton • To create a submit button, type <INPUT TYPE=“submit”> • If you would like the button to say something other than submit, use the VALUE attribute • For example, <INPUT TYPE=“submit” VALUE=“Buy Now!”> would create a button that says “Buy Now!”
  • 49.
    Creating a ResetButton • To create a reset button, type <INPUT TYPE=“reset”> • The VALUE attribute can be used in the same way to change the text that appears on the button
  • 50.
    Tables • Tables canbe used to display rows and columns of data, create multi-column text, captions for images, and sidebars • The <TABLE> tag is used to create a table; the <TR> tag defines the beginning of a row while the <TD> tag defines the beginning of a cell
  • 51.
    Adding a Border •The BORDER=n attribute allows you to add a border n pixels thick around the table • To make a solid border color, use the BORDERCOLOR=“color” attribute • To make a shaded colored border, use BODERCOLORDARK=“color” and BORDERCOLORLIGHT=“color”
  • 52.
    Creating Simple Table <TABLEBORDER=10> <TR> <TD>One</TD> <TD>Two</TD> </TR> <TR> <TD>Three</TD> <TD>Four</TD> </TR> </TABLE> • Here’s how it would look on the Web:
  • 53.
    Adjusting the Width •When a Web browser displays a table, it often adds extra space. To eliminate this space use the WIDTH =n attribute in the <TABLE> and <TD> tags • Keep in mind - a cell cannot be smaller than its contents, and if you make a table wider than the browser window, users will not be able to see parts of it.
  • 54.
    Centering a Table •There are two ways to center a table – Type <TABLE ALIGN=CENTER> – Enclose the <TABLE> tags in opening and closing <CENTER> tags
  • 55.
    Wrapping Text arounda Table • It is possible to wrap text around a table. This technique is often used to keep images and captions together within an article. • To wrap text around a table, type <TABLE ALIGN = LEFT> to align the table to the left while the text flows to the right. • Create the table using the <TR>, <TD>, and </TABLE> tags as you normally would
  • 56.
    Adding Space arounda Table • To add space around a table, use the HSPACE=n and VSPACE=n attributes in the <TABLE> tag • Example: <TABLE HSPACE=20 VSPACE=20>
  • 57.
    Spanning Cells AcrossColumns • It is often necessary to span one cell across many columns. For example, you would use this technique to span a headline across the columns of a newspaper article. • To span a cell across many columns, type <TD COLSPAN=n>, where n is the number of columns to be spanned
  • 58.
    Spanning Cells AcrossRows • To span a cell across many rows, type <TD ROWSPAN=n>, where n is the number of rows
  • 59.
    Aligning Cell Content •By default, a cell’s content are aligned horizontally to the left and and vertically in the middle. • Use VALIGN=direction to change the vertical alignment, where “direction” is top, middle, bottom, or baseline • Use ALIGN=direction to change the horizontal alignment where “direction” is left, center, or right
  • 60.
    Controlling Cell Spacing •Cell spacing is the space between cells while cell padding is the space around the contents of a cell • To control both types of spacing, use the CELLSPACING =n and CELLPADDING=n attributes in the <TABLE> tag
  • 61.
    Nesting Tables • Createthe inner table • Create the outer table and determine which cell of the outer table will hold the inner table • Test both tables separately to make sure they work • Copy the inner table into the cell of the outer table • Don’t nest too many tables. If you find yourself doing that, find an easier way to lay out your Web page
  • 62.
    Changing a Cell’sColor • To change a cell’s color, add the BGCOLOR=“color” attribute to the <TD> tag • Example: <TD BGCOLOR=“blue”>
  • 63.
    Dividing Your Tableinto Column Groups • You can divide your table into two kinds of column groups: structural and non- structural. • Structural column groups control where dividing lines are drawn; Non-structural groups do not • Both let you format an entire column of cells at once
  • 64.
    Column Groups • Tocreate structural column groups, type <COLGROUP SPAN=n> after the <TABLE> tag, where n is the number of columns in the group • To create non-structural column groups, type <COL SPAN=n>, where n is the number of columns in the group
  • 65.
    Dividing Table intoHorizontal Sections • You can also create a horizontal section consisting of one or more rows. This allows you to format the rows all at once • To create a horizontal section, type <THEAD>, <TBODY>, or <TFOOT> before the first <TR> tag of the section • Netscape does not support these tags
  • 66.
    Controlling Line Breaks •Unless you specify otherwise a browser will divide the lines in a cell as it sees fit. • The NOWRAP attribute placed within the <TD> tag forces the browser to keep all the text in a cell on one line • Example: – <TD NOWRAP>Washington, D.C.
  • 67.
    Parting Words…. • Ifyou can imagine a way to lay out your page, chances are it is possible using HTML • When in doubt, use an HTML reference