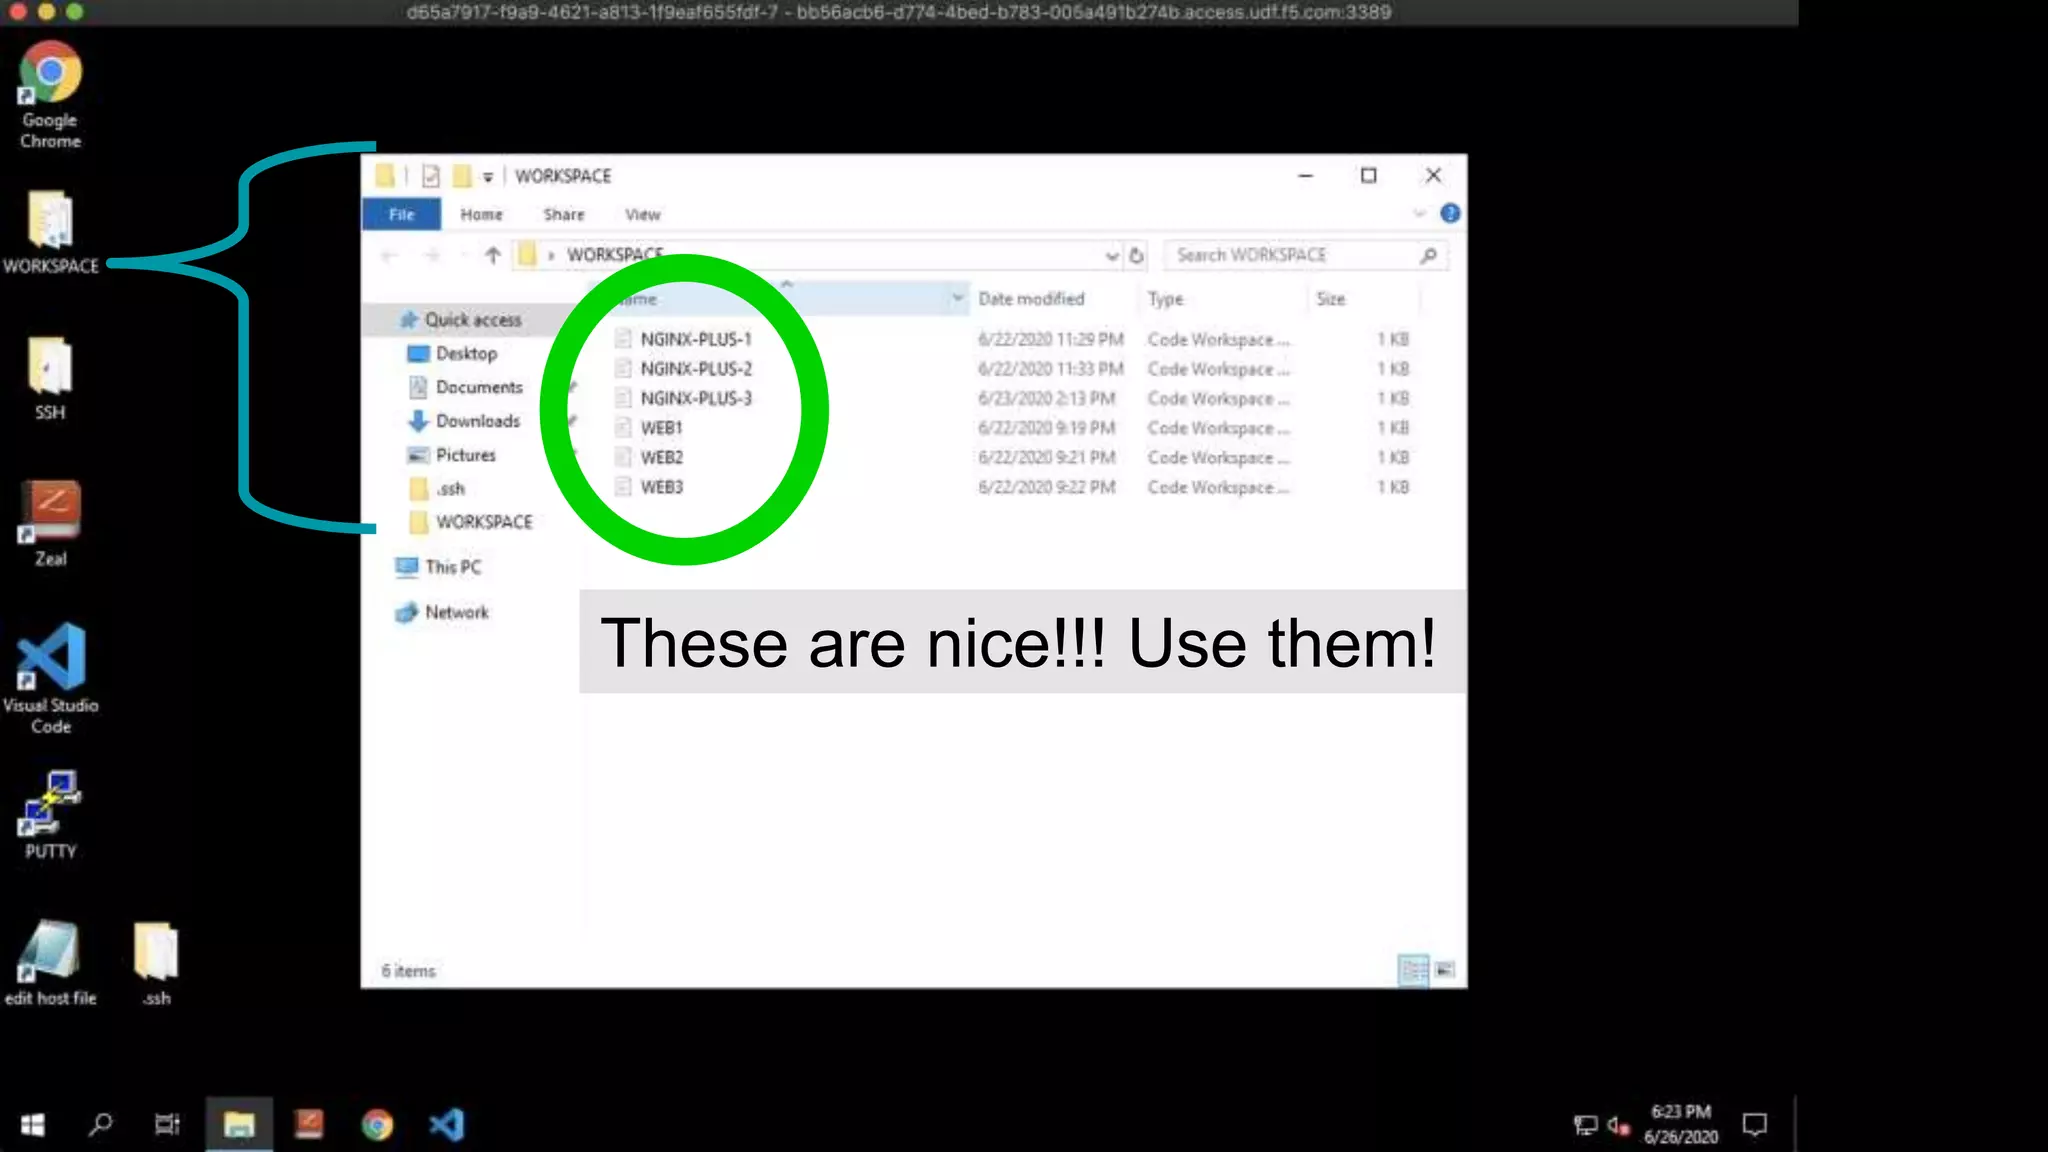
NGINX Basics & Best Practices Workshop F5 Solutions Engineers: Jason Williams Shouvik Dutta Dominic Lucia Anton Varkalevich Melisa Wentz
Agenda Welcome & Intros: [5 min] Presentation: Introduction to NGINX & NGINX Plus [20 min] Lab: [2 hr. 30 min] Closing: [5 min] 1 2 3 4
Introduction to NGINX Plus Intro
NGINX Application Platform A suite of technologies to develop and deliver digital experiences that span from legacy, monolithic apps to modern, microservices apps.
7 ENTERPRISE SOLUTIONS WITH DYNAMIC MODULES • Enterprise class visibility with 200+ additional metrics and live dashboard built-in • JWTAuthentication (simple integration with okta/ping/etc) • Native OpenID Connect support • Active health checks on status code and response body • Key value store (dynamic IP black-listing, blue/green deployments) • High Availability / Zone Sync across cluster • Dynamic reconfiguration—zero downtime • Service discovery using DNS • Sticky Session persistence based on cookies What is NGINX Plus?
Dynamic Modules Tested and certified to take your applications further 9
MORE INFORMATION AT NGINX.COM NGINX Plus Installation • Visit docs.nginx.com > NGINX Plus > Admin Guide > Installing NGINX Plus
MORE INFORMATION AT NGINX.COM $ sudo cp -a /etc/nginx /etc/nginx-plus-backup $ sudo cp -a /var/log/nginx /var/log/nginx-plus-backup $ sudo mkdir -p /etc/ssl/nginx $ sudo wget http://nginx.org/keys/nginx_signing.key && sudo apt-key add nginx_signing.key $ sudo apt-get install apt-transport-https lsb-release ca-certificates $ printf "deb https://plus-pkgs.nginx.com/ubuntu `lsb_release -cs` nginx- plusn" | sudo tee /etc/apt/sources.list.d/nginx-plus.list $ sudo wget -P /etc/apt/apt.conf.d https://cs.nginx.com/static/files/90nginx $ sudo apt-get update $ sudo apt-get install nginx-plus NGINX Plus Installation
MORE INFORMATION AT NGINX.COM Verifying Installation $ nginx -v nginx version: nginx/1.13.10 (nginx-plus-r15-p1) $ ps -ef | grep nginx root 1334 1 0 Apr24 ? 00:00:00 nginx: master process /usr/sbin/nginx -c /etc/nginx/nginx.conf nginx 168200 1334 0 Apr26 ? 00:00:28 nginx: worker process … $ service nginx status ● nginx.service - NGINX Plus - high performance web server Loaded: loaded (/lib/systemd/system/nginx.service; enabled; vendor preset: enabled) Active: active (running) since Tue 2018-04-24 07:20:49 PDT; 6 days ago Docs: https://www.nginx.com/resources/ Process: 1299 ExecStart=/usr/sbin/nginx -c /etc/nginx/nginx.conf (code=exited, status=0/SUCCESS) Process: 1193 ExecStartPre=/usr/lib/nginx-plus/check-subscription (code=exited, status=0/SUCCESS) Main PID: 1334 (nginx) Tasks: 2 Memory: 6.2M CPU: 30.732s CGroup: /system.slice/nginx.service ├─ 1334 nginx: master process /usr/sbin/nginx -c /etc/nginx/nginx.con └─168200 nginx: worker process
Lab Components & Tour Intro
Feel free to ask questions into the chat window Welcome
One-on-one assistance
Getting started • Chrome based web browser highly recommended • RDP client required. If you do not have one, please download one, Some examples are: • Remote desktop connection (macOS) https://apps.apple.com/us/app/microsoft-remote-desktop/ • Chrome browser RDP https://remotedesktop.google.com/ • Bypass VPNs (known to cause issues) 17
Join the Lab 18
19
20
MORE INFORMATION AT NGINX.COM No need to access other systems directly Important: Use Windows Jumphost to run workshop
22 Black: test (“prod”) traffic Blue: management/lab traffic
23 Black: test (“prod”) traffic Blue: management/lab traffic
24 Black: test (“prod”) traffic Blue: management/lab traffic
These are nice!!! Use them!
SELF PACED WORKTIME To launch the lab, go to https://udf.f5.com. Use chat or come off mute if you have any questions and we can help you in a breakout room. 1. Turn off VPN 2. Username and Password for the jumphost are user/user 3. The lab guide is on the jump host and available via web1 under Access->Lab Guide 4. If you have any questions, (login not working, didnt get an email from UDF, you want to discuss NGINX best practices) the best way to get ahold of us is to unmute to get our attention, but we'll be watching the chat as well 5. Breakout rooms are available for conversations, troubleshooting, etc.

NGINX Basics and Best Practices Workshop

  • 1.
    NGINX Basics &Best Practices Workshop F5 Solutions Engineers: Jason Williams Shouvik Dutta Dominic Lucia Anton Varkalevich Melisa Wentz
  • 2.
    Agenda Welcome & Intros:[5 min] Presentation: Introduction to NGINX & NGINX Plus [20 min] Lab: [2 hr. 30 min] Closing: [5 min] 1 2 3 4
  • 3.
  • 5.
    NGINX Application Platform A suite oftechnologies to develop and deliver digital experiences that span from legacy, monolithic apps to modern, microservices apps.
  • 7.
    7 ENTERPRISE SOLUTIONS WITHDYNAMIC MODULES • Enterprise class visibility with 200+ additional metrics and live dashboard built-in • JWTAuthentication (simple integration with okta/ping/etc) • Native OpenID Connect support • Active health checks on status code and response body • Key value store (dynamic IP black-listing, blue/green deployments) • High Availability / Zone Sync across cluster • Dynamic reconfiguration—zero downtime • Service discovery using DNS • Sticky Session persistence based on cookies What is NGINX Plus?
  • 8.
    Dynamic Modules Tested andcertified to take your applications further 9
  • 9.
    MORE INFORMATION AT NGINX.COM NGINXPlus Installation • Visit docs.nginx.com > NGINX Plus > Admin Guide > Installing NGINX Plus
  • 10.
    MORE INFORMATION AT NGINX.COM $sudo cp -a /etc/nginx /etc/nginx-plus-backup $ sudo cp -a /var/log/nginx /var/log/nginx-plus-backup $ sudo mkdir -p /etc/ssl/nginx $ sudo wget http://nginx.org/keys/nginx_signing.key && sudo apt-key add nginx_signing.key $ sudo apt-get install apt-transport-https lsb-release ca-certificates $ printf "deb https://plus-pkgs.nginx.com/ubuntu `lsb_release -cs` nginx- plusn" | sudo tee /etc/apt/sources.list.d/nginx-plus.list $ sudo wget -P /etc/apt/apt.conf.d https://cs.nginx.com/static/files/90nginx $ sudo apt-get update $ sudo apt-get install nginx-plus NGINX Plus Installation
  • 11.
    MORE INFORMATION AT NGINX.COM VerifyingInstallation $ nginx -v nginx version: nginx/1.13.10 (nginx-plus-r15-p1) $ ps -ef | grep nginx root 1334 1 0 Apr24 ? 00:00:00 nginx: master process /usr/sbin/nginx -c /etc/nginx/nginx.conf nginx 168200 1334 0 Apr26 ? 00:00:28 nginx: worker process … $ service nginx status ● nginx.service - NGINX Plus - high performance web server Loaded: loaded (/lib/systemd/system/nginx.service; enabled; vendor preset: enabled) Active: active (running) since Tue 2018-04-24 07:20:49 PDT; 6 days ago Docs: https://www.nginx.com/resources/ Process: 1299 ExecStart=/usr/sbin/nginx -c /etc/nginx/nginx.conf (code=exited, status=0/SUCCESS) Process: 1193 ExecStartPre=/usr/lib/nginx-plus/check-subscription (code=exited, status=0/SUCCESS) Main PID: 1334 (nginx) Tasks: 2 Memory: 6.2M CPU: 30.732s CGroup: /system.slice/nginx.service ├─ 1334 nginx: master process /usr/sbin/nginx -c /etc/nginx/nginx.con └─168200 nginx: worker process
  • 12.
  • 13.
    Feel free toask questions into the chat window Welcome
  • 14.
  • 15.
  • 16.
    Getting started • Chromebased web browser highly recommended • RDP client required. If you do not have one, please download one, Some examples are: • Remote desktop connection (macOS) https://apps.apple.com/us/app/microsoft-remote-desktop/ • Chrome browser RDP https://remotedesktop.google.com/ • Bypass VPNs (known to cause issues) 17
  • 17.
  • 18.
  • 19.
  • 20.
    MORE INFORMATION AT NGINX.COM Noneed to access other systems directly Important: Use Windows Jumphost to run workshop
  • 21.
    22 Black: test (“prod”)traffic Blue: management/lab traffic
  • 22.
    23 Black: test (“prod”)traffic Blue: management/lab traffic
  • 23.
    24 Black: test (“prod”)traffic Blue: management/lab traffic
  • 24.
  • 25.
    SELF PACED WORKTIME Tolaunch the lab, go to https://udf.f5.com. Use chat or come off mute if you have any questions and we can help you in a breakout room. 1. Turn off VPN 2. Username and Password for the jumphost are user/user 3. The lab guide is on the jump host and available via web1 under Access->Lab Guide 4. If you have any questions, (login not working, didnt get an email from UDF, you want to discuss NGINX best practices) the best way to get ahold of us is to unmute to get our attention, but we'll be watching the chat as well 5. Breakout rooms are available for conversations, troubleshooting, etc.

Editor's Notes

  • #2 Product marketing for our most strategic partnerships, of which Red Hat is at the top The GTM team is here Product managers and technical experts – Liam Crilly, Roberto Cardona, Brian Ehlert, Tom Gamull, Damian Curry, Amir Rawdat, Alessandro Garcia We also have some business development folks on the call, Stu Shader and Matt Quill. We’ll try to keep up with questions in the chat, and will be collecting them for consolidation in our Red Hat sales FAQ. Upfront on digital business and how they drives the need for app and API delivery
 A section on code to customer as our vision for solving these problems
 A segue to the NGINX portfolio and how we help on the modernization journey
 Sections on each solution area (ADC,
APIM
Microservices (KIC, SM)
Security
App server, Red Hat) Setup on the use case components of the solution A conclusion with ‘About NGINX’ with typical history and stats
  • #5 NGINX was created by Igor Sysoev as a side project while he was working as a sysadmin at Ramblr, a Russian equivalent of Yahoo!. While at Ramblr, Igor was asked to look into enabling the Apache HTTP servers to better handle the influx of traffic the company was receiving. While looking for ways to improve Apache's performance, Igor found himself blocked by several inherent design choices that hampered Apache's ability to handle 10,000 simultaneous users, commonly known as the C10K problem. In the spring of 2002 Igor started developing NGINX with an event-driven architecture that addressed the shortcomings in Apache. On October 4th, 2004, the anniversary of the launch of Sputnik, the first space satellite, Igor publicly released the source code of NGINX for free.
  • #6 The NGINX Application Platform is a suite of products that together form the core of what organizations need to modernize their infrastructure and move to microservices. The NGINX Application Platform includes NGINX Plus for load balancing and application delivery, the NGINX WAF for security, and NGINX Unit to run the application code, all monitored and managed by the NGINX Controller. Note: Please mention that this is a vision and not all the pieces are available yet, such Controller controlling Unit.
  • #7 What is NGINX Plus? Enterprise class visibility with 200+ additional metrics JWT Authentication Native OpenID Connect support Active health checks on status code and response body Service discovery using DNS Key value store (dynamic IP black-listing, blue/green deployments) Dynamic reconfiguration—zero downtime Session persistence based on cookie --- HTTP, TCP, and UDP load balancing Layer 7 request routing using URI, cookie, args, and more Plus: Session persistence based on cookie *: NGINX Plus can identify user sessions and send all requests in a client session to the same upstream server. This can avoid fatal errors that might otherwise result when app servers store state locally and a load balancer sends an in‑progress user session to a different server. Session persistence can also improve performance when applications share information across a cluster. Active health checks on status code and response body *:  NGINX Plus performs out-of-band application health checks (also known as synthetic transactions) and a slow‑start feature to gracefully add new and recovered servers into the load‑balanced group. These features enable NGINX Plus to detect and work around a much wider variety of problems, significantly improving the reliability of your HTTP and TCP/UDP applications. Service discovery using DNS *: NGINX Plus servers resolve DNS names when they start up, and cache these resolved values persistently. When you have to identify a group of upstream servers with a domain name (such as example.com), NGINX Plus periodically re‑resolves the name in DNS. If the associated list of IP addresses has changed, NGINX Plus immediately starts load balancing across the updated group of servers. The key‑value store provides a wealth of dynamic configuration solutions. Sample use cases include: Dynamic IP blacklisting (see the NGINX Plus Admin Guide) Managing lists of permitted URIs per user You can use the NGINX Plus API to create, modify, and remove key‑value pairs on the fly in one or more “keyval” shared memory zones. The value of each key‑value pair can then be evaluated as a variable for use by other NGINX Plus features. Use the NGINX Plus API to update upstream configurations and key‑value stores on the fly with zero downtime. Add/remove upstream servers as well as make changes to the load balancer to handle more scale or deploy new features.
  • #8 HTTP, TCP, and UDP load balancing Layer 7 request routing using URI, cookie, args, and more Plus: Session persistence based on cookie *: NGINX Plus can identify user sessions and send all requests in a client session to the same upstream server. This can avoid fatal errors that might otherwise result when app servers store state locally and a load balancer sends an in‑progress user session to a different server. Session persistence can also improve performance when applications share information across a cluster. Active health checks on status code and response body *:  NGINX Plus performs out-of-band application health checks (also known as synthetic transactions) and a slow‑start feature to gracefully add new and recovered servers into the load‑balanced group. These features enable NGINX Plus to detect and work around a much wider variety of problems, significantly improving the reliability of your HTTP and TCP/UDP applications. Service discovery using DNS *: NGINX Plus servers resolve DNS names when they start up, and cache these resolved values persistently. When you have to identify a group of upstream servers with a domain name (such as example.com), NGINX Plus periodically re‑resolves the name in DNS. If the associated list of IP addresses has changed, NGINX Plus immediately starts load balancing across the updated group of servers. The key‑value store provides a wealth of dynamic configuration solutions. Sample use cases include: Dynamic IP blacklisting (see the NGINX Plus Admin Guide) Managing lists of permitted URIs per user You can use the NGINX Plus API to create, modify, and remove key‑value pairs on the fly in one or more “keyval” shared memory zones. The value of each key‑value pair can then be evaluated as a variable for use by other NGINX Plus features. Use the NGINX Plus API to update upstream configurations and key‑value stores on the fly with zero downtime. Add/remove upstream servers as well as make changes to the load balancer to handle more scale or deploy new features.
  • #9 https://www.nginx.com/blog/wait-which-nginx-ingress-controller-kubernetes-am-i-using/#What-Makes-NGINX’s-Ingress-Controller-Different All Plus Capabilities:  Plus:  •Session persistence based on cookie: NGINX Plus can identify user sessions and send all requests in a client session to the same upstream server. This can avoid fatal errors that might otherwise result when app servers store state locally and a load balancer sends an in‑progress user session to a different server. Session persistence can also improve performance when applications share information across a cluster.  Active health checks on status code and response body *:  NGINX Plus performs out-of-band application health checks (also known as synthetic transactions) and a slow‑start feature to gracefully add new and recovered servers into the load‑balanced group.  These features enable NGINX Plus to detect and work around a much wider variety of problems, significantly improving the reliability of your HTTP and TCP/UDP applications.  •Service discovery using DNS *:  NGINX Plus servers resolve DNS names when they start up, and cache these resolved values persistently. When you have to identify a group of upstream servers with a domain name (such as example.com), NGINX Plus periodically re‑resolves the name in DNS. If the associated list of IP addresses has changed, NGINX Plus immediately starts load balancing across the updated group of servers.  The key‑value store provides a wealth of dynamic configuration solutions.  Sample use cases include:  Dynamic IP blacklisting (see the NGINX Plus Admin Guide)  Managing lists of permitted URIs per user  You can use the NGINX Plus API to create, modify, and remove key‑value pairs on the fly in one or more “keyval” shared memory zones. The value of each key‑value pair can then be evaluated as a variable for use by other NGINX Plus features.  Use the NGINX Plus API to update upstream configurations and key‑value stores on the fly with zero downtime. Add/remove upstream servers as well as make changes to the load balancer to handle more scale or deploy new features.   OSS:  •Load balancing w/ SSL/TLS termination  •WebSocket and HTTP/2 support  •URI rewriting before request is forwarded to application 
  • #10 Dynamic Modules - https://www.nginx.com/products/nginx/modules/ A strength of the NGINX platform comes from the large community of developers contributing new features and functionality through our open source base. New features developed by the community are available as modules that can be dynamically plugged into a running NGINX Plus instance. For example, with community‑contributed (and NGINX‑authored) modules you can locate users by their IP address and send them to language-specific sites, resize images to save bandwidth, and embed Lua scripting (allowing complex routing and security operations). NGINX, Inc. maintains a repository of third‑party modules that are fully tested and certified for correct interoperation with NGINX Plus. When you load a module to dynamically plug it into a running NGINX Plus instance, you can be confident knowing that both NGINX Plus and your selected modules are fully supported by the NGINX team. A full list of certified NGINX Plus modules is available. Third Party modules? Third‑party and custom modules not in the list can also be compiled and dynamically loaded into a running NGINX Plus instance. For more detail on how to do this, please see this blog post. https://www.nginx.com/resources/wiki/modules/ How to install The NGINX Plus repository includes both dynamic modules authored by NGINX, Inc. and approved modules authored by community contributors. You can access and install them using standard package management tools such as apt and yum. The dynamically loadable modules are: nginx-plus-module-geoip nginx-plus-module-headers-more nginx-plus-module-image-filter nginx-plus-module-lua nginx-plus-module-passenger nginx-plus-module-perl nginx-plus-module-rtmp nginx-plus-module-set-misc nginx-plus-module-xslt The standard NGINX Plus package contains just the NGINX-authored modules from the official open source build and the NGINX Plus extensions. Third-party modules, however, can be dynamically loaded into a running NGINX Plus instance. We build and maintain the most widely used third party modules, a full list of these modules is available here. Custom or third-party modules not in the list above can also be loaded dynamically into a running NGINX Plus instance. For more details on how to do this, please see this blog post.
  • #11  Nginx Inc provides pre compiled binaries for NGINX OSS (Stable and Mainline) and NGINX Plus. These can be downloaded from our commercial repo The standard NGINX Plus package contains just the NGINX-authored modules from the official open source build and the NGINX Plus extensions. Third-party modules, however, can be dynamically loaded into a running NGINX Plus instance. We build and maintain the most widely used third party modules, a full list of these modules is available here. Custom or third-party modules not in the list above can also be loaded dynamically into a running NGINX Plus instance. For more details on how to do this, please see this blog post. Installation packages: For open source NGINX: http://nginx.org/en/linux_packages.html (pre-built packages & modules) http://nginx.org/en/download.html (sources) For NGINX Plus: https://www.nginx.com/products/technical-specs/ (OS and modules) https://cs.nginx.com/repo_setup (installation instructions)
  • #12 Nginx Plus Installation instructions: https://cs.nginx.com/repo_setup Notes: If you already have old NGINX packages in your system, back up your configs and logs. The Installation of Nginx Plus will override the any pre existing installation of Nginx OSS Nginx plus repo key (nginx-repo.key) and cert (nginx-repo.crt) must live in /etc/ssl/nginx/ Make sure sufficent permissions are provided to the files: $ sudo chmod a+rx /etc/ssl/nginx $ sudo chmod a+r /etc/ssl/nginx/nginx-repo.* If you like you can also remove any installation of Nginx OSS before hand: $ sudo apt-get remove nginx nginx-common # Removes all but config files. $ sudo apt-get purge nginx nginx-common # Removes everything. $ sudo apt-get autoremove # After using any of the above commands, use this in order to remove dependencies used by nginx which are no longer required.
  • #13 Troubleshooting: Since a new installation publishes a default page on port 80, If you don’t see nginx running then possible contention for port 80, especially if you already have with Apache installed Nginx Master Always runs a ’root’ and worker processes run as ‘nginx’ Running Nginx without root user It is possible to run nginx without root user - https://www.exratione.com/2014/03/running-nginx-as-a-non-root-user/ This article says that the following filesystem path configuration options need to be changed, and set to locations to which the user has write access: • error_log (in the main scope as well as lower scopes) • access_log • pid • client_body_temp_path • fastcgi_temp_path • proxy_temp_path • scgi_temp_path • uwsgi_temp_path Other important notes: Note that as Nginx is not launched as root, it cannot bind to privileged ports lower than 1024. So, you should verify that all listen directives have ports > 1024. Also, you should check permissions to the unix sockets in the configuration (if any). To avoid warnings at the start the "user" directive should be commented out because non-root master process has no ability to make setuid(2)-like calls.
  • #15 Please take a moment now to locate the CHAT button at the bottom of the Zoom window.  For short questions, feel free to type them directly into the Chat widget and our Lab Assistants will answer them as soon as possible. If your question is a detailed question, our Lab Assistants may chat you privately through the chat widget or will request that you join them in a Breakout Room to discuss further.
  • #16 Zoom's Breakout Room feature is designed to allow participants in a meeting to have one-on-one conversations if needed. If a Lab Assistant requests that you join a Breakout Room, a notification like this will appear on your screen. Please select the "Join Breakout Room" button to connect with the Lab Assistant. You will then be brought to a separate Zoom room with the Lab Assistant to help answer/troubleshoot any questions you may have. 
  • #17 When the Lab Assistant has answered all of your questions and you are both finished with the Breakout Room, please ensure that you select "Leave Room" in the bottom right corner of the screen and then select "Leave Breakout Room" in the notification window that follows. Lab Assistants will not have the ability to bring you back to the main session on their own. 
  • #18 Notes from:  https://clouddocs.f5.com/training/community/nginx/html/class1/class1.html As with any hands-on lab there are several layers where things are happening concurrently.  So we’ll take a few minutes to make sure we’re all similarly oriented and aware of all the different components and on the same page with each other.  The next few slides go over this in (sometimes excruciating) detail.
  • #19 Follow these steps to complete this lab: Exercise 1 - Setting Up Lab Workstation Open your web browser Navigate to https://udf.f5.com/courses login using your UDF credentials, you should have received an email from noreply@registration.udf.f5.com
  • #21 Once finished, you should be brought to your session window. The "Documentation" tab will be displayed first and it will have a link to the lab guide for this session so that you may access it at any time. If you select the "Deployment" tab you will be brought to the page shown here. On this page, you can see each of the components of your lab deployment and at this time all of them should be spinning as they boot up. It may take a few minutes before they are up and running. Just a reminder, each attendee should be joining the session at this time to ensure each of these components are up and running in time for your lab to begin.  ----- As with any hands-on lab there are several layers where things are happening concurrently.  Recently, we’re able to leverage things like containerization, virtualization, rich browser apps, and interactive IDEs to give easy access to rich environments. But, this adds to complexity.  So we’ll take a few minutes to make sure we’re all similarly oriented and aware of all the different components and on the same page with each other.  The next few slides go over this in (sometimes excruciating) detail.
  • #22 Here is your list of VMs for the lab. Remember there are back end servers, an NGINX Plus node in between you and the back end servers, and a jump host. [CLICK] Again, it’s easiest to just interact with the jump host. It’s really nicely configured and it should only take you a few minutes to get acquainted [CLICK] Remember there are a few NGINX Plus instances, these correspond to different exercises that we deal with one at a time and one is there for a demo we’ll show you [CLICK TO NEXT SLIDE TO RE-EMPHASIZE POINT]
  • #23 NOTE TO SELF: HAVE RDP READY ON AN ADJACENT SCREEN TO BE ABLE TO QUICKLY DEMO Network diagram. In any lab environment it’s useful to conceptualize “test” vs “management” traffic. Test vs Management is analogous to user vs control traffic in a production system This diagram has both types of traffic: Solid black lines are actual “test” traffic flows (traffic we pretend is prod, or real user traffic) Dotted blue lines are management (access, or how you control and configure the various parts of the lab) Note once you’re on the jumphost you can control/configure the nodes through a web browser, PuTTY, or straight through Visual Studio Code A big thing to note here: I’m only showing one nginx-plus-X host. [CLICK] There are three in the lab, but we’ll deal with one at a time. So, the diagram is the same for each exercise, therefore For clarity’s sake I’ve put only one in a diagram.
  • #24 NOTE TO SELF: HAVE RDP READY ON AN ADJACENT SCREEN TO BE ABLE TO QUICKLY DEMO Network diagram. In any lab environment it’s useful to conceptualize “test” vs “management” traffic. Test vs Management is analogous to user vs control traffic in a production system This diagram has both types of traffic: Solid black lines are actual “test” traffic flows (traffic we pretend is prod, or real user traffic) Dotted blue lines are management (access, or how you control and configure the various parts of the lab) Note once you’re on the jumphost you can control/configure the nodes through a web browser, PuTTY, or straight through Visual Studio Code A big thing to note here: I’m only showing one nginx-plus-X host. [CLICK] There are three in the lab, but we’ll deal with one at a time. So, the diagram is the same for each exercise, therefore For clarity’s sake I’ve put only one in a diagram.
  • #25 Remember: we use one nginx-plus instance at a time Now, when you log into the JUMP HOST [circle a bunch of times with virtual laser] it’ll look like this [CLICK TO NEXT SLIDE]
  • #26 So the easiest, nicest way to work with this demo is to use VS Code similar to the way you might in your day-to-day as a developer. Lets say I wanted to work on nginx-plus-1, since that’s the first thing we’ll work on [SWIPE OVER TO SHOW OPENING ONE OF THE WORKSPACES]