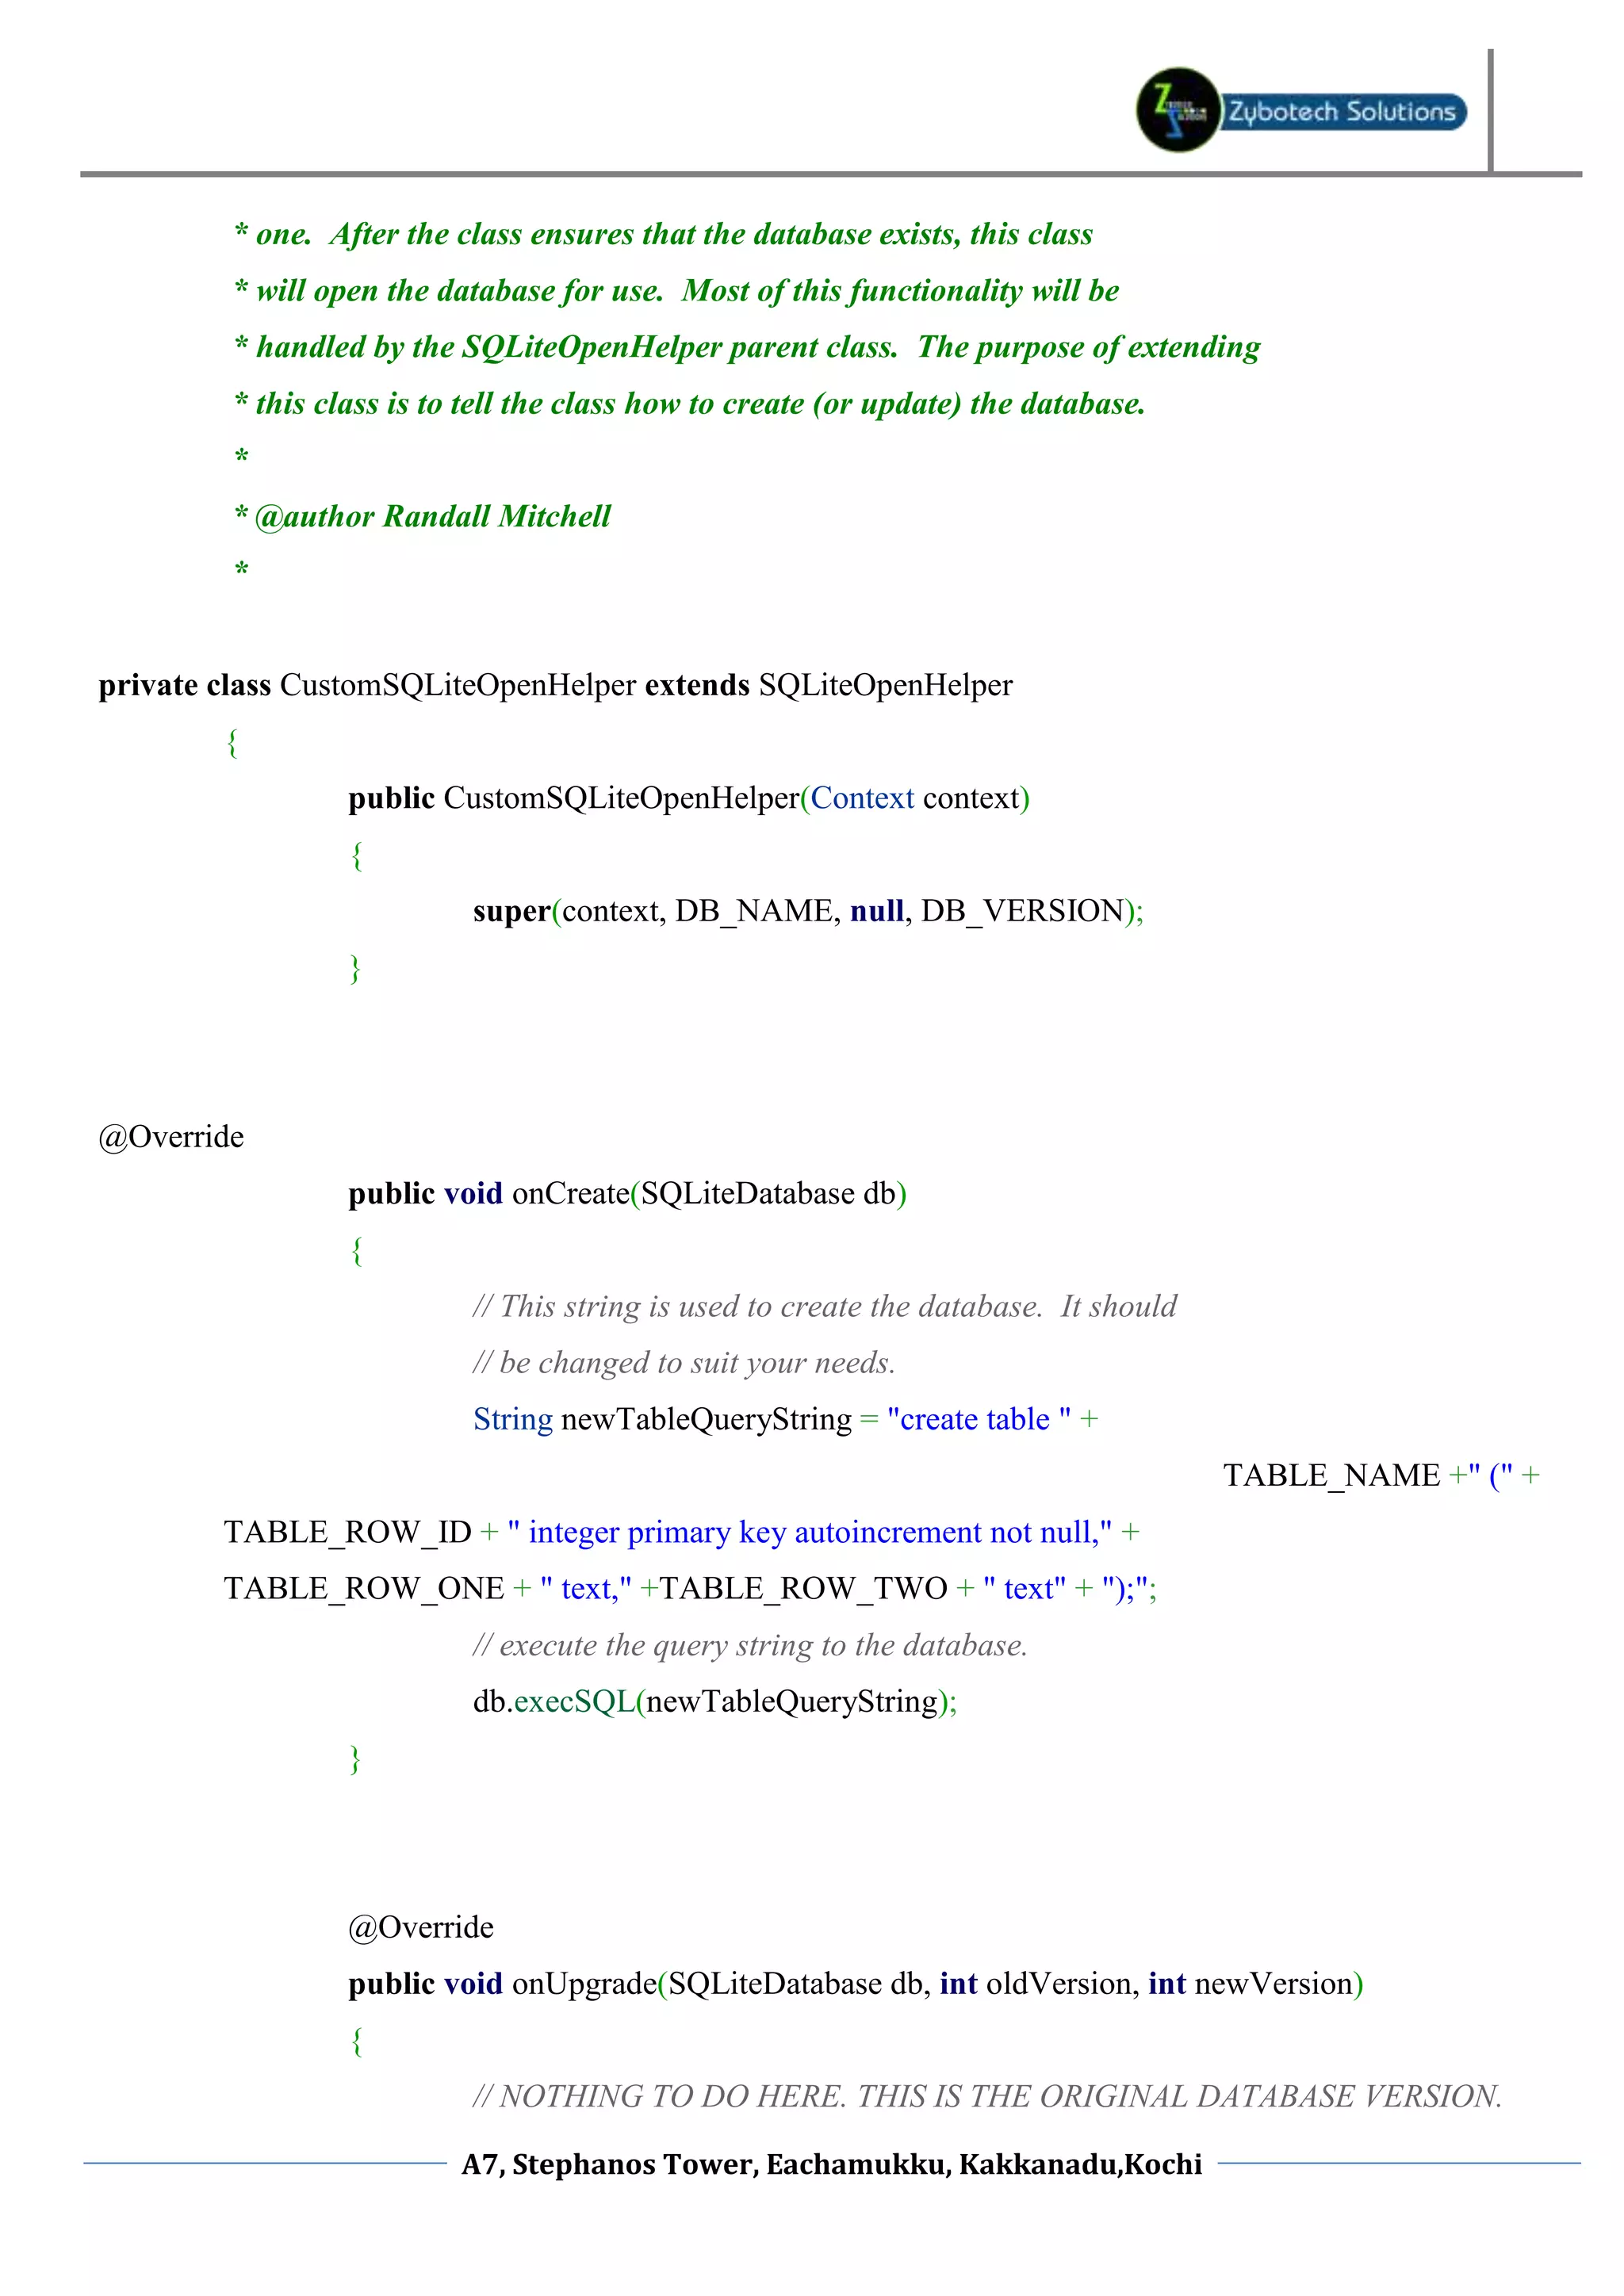
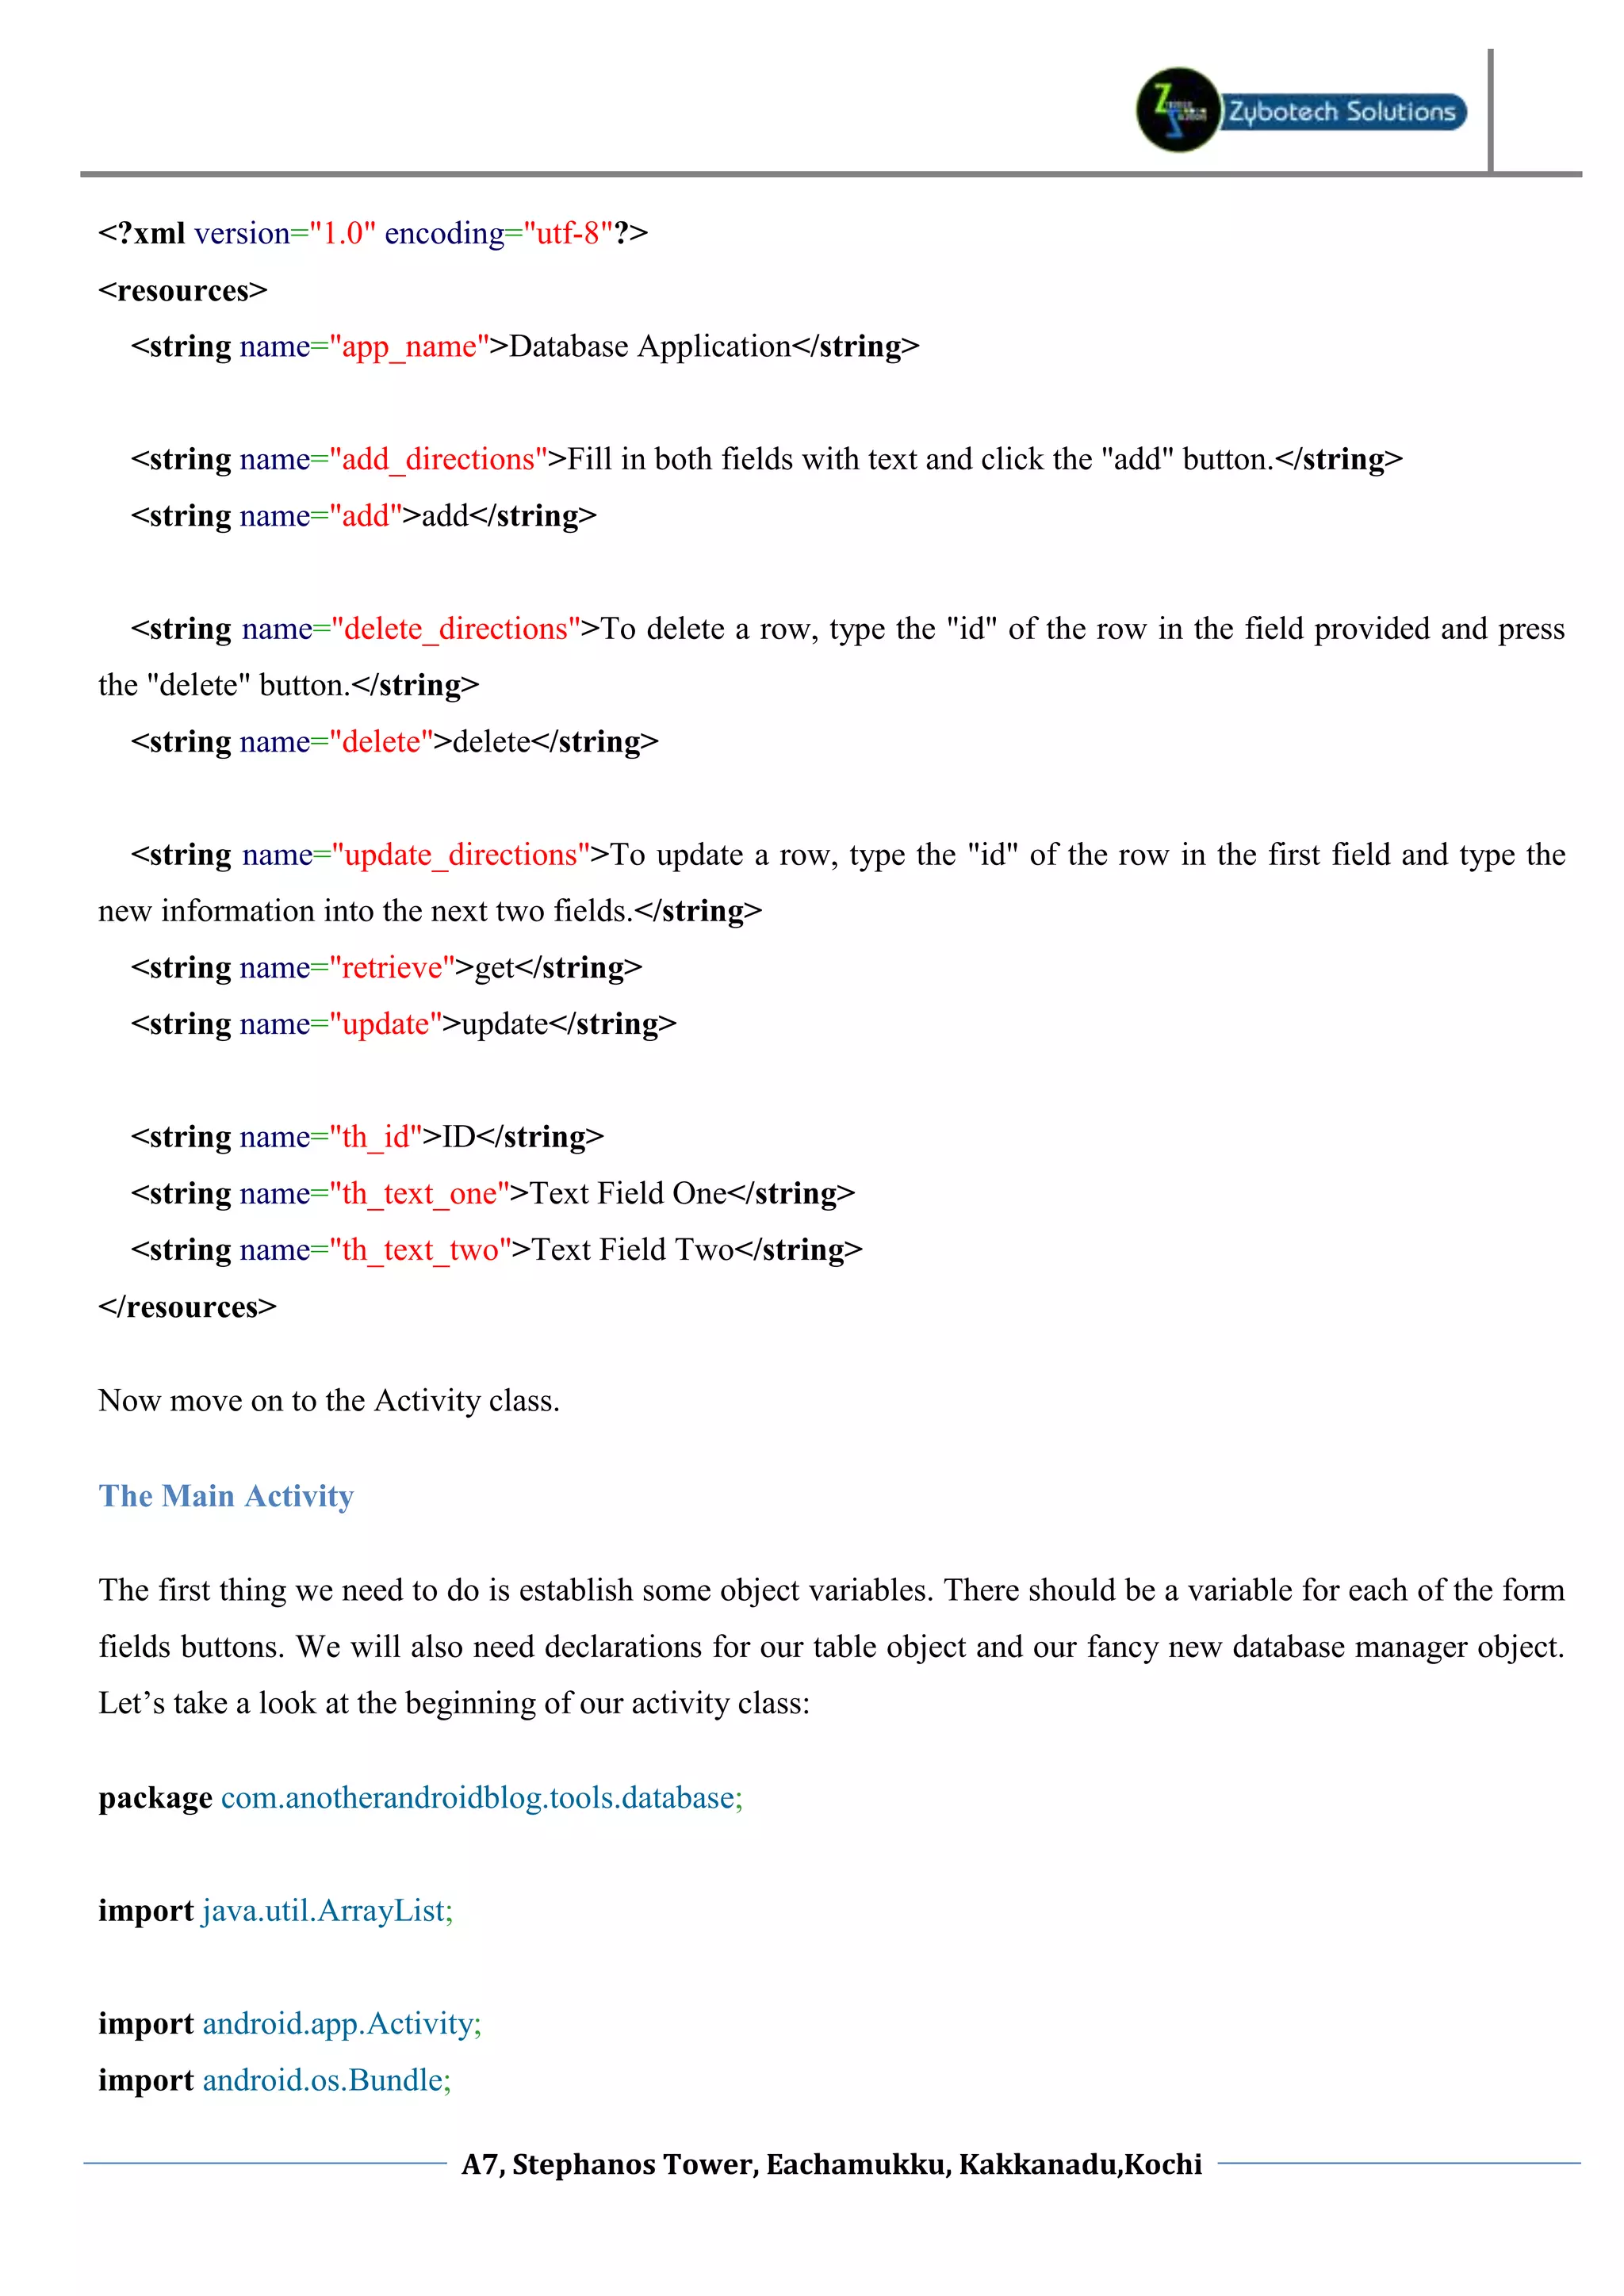
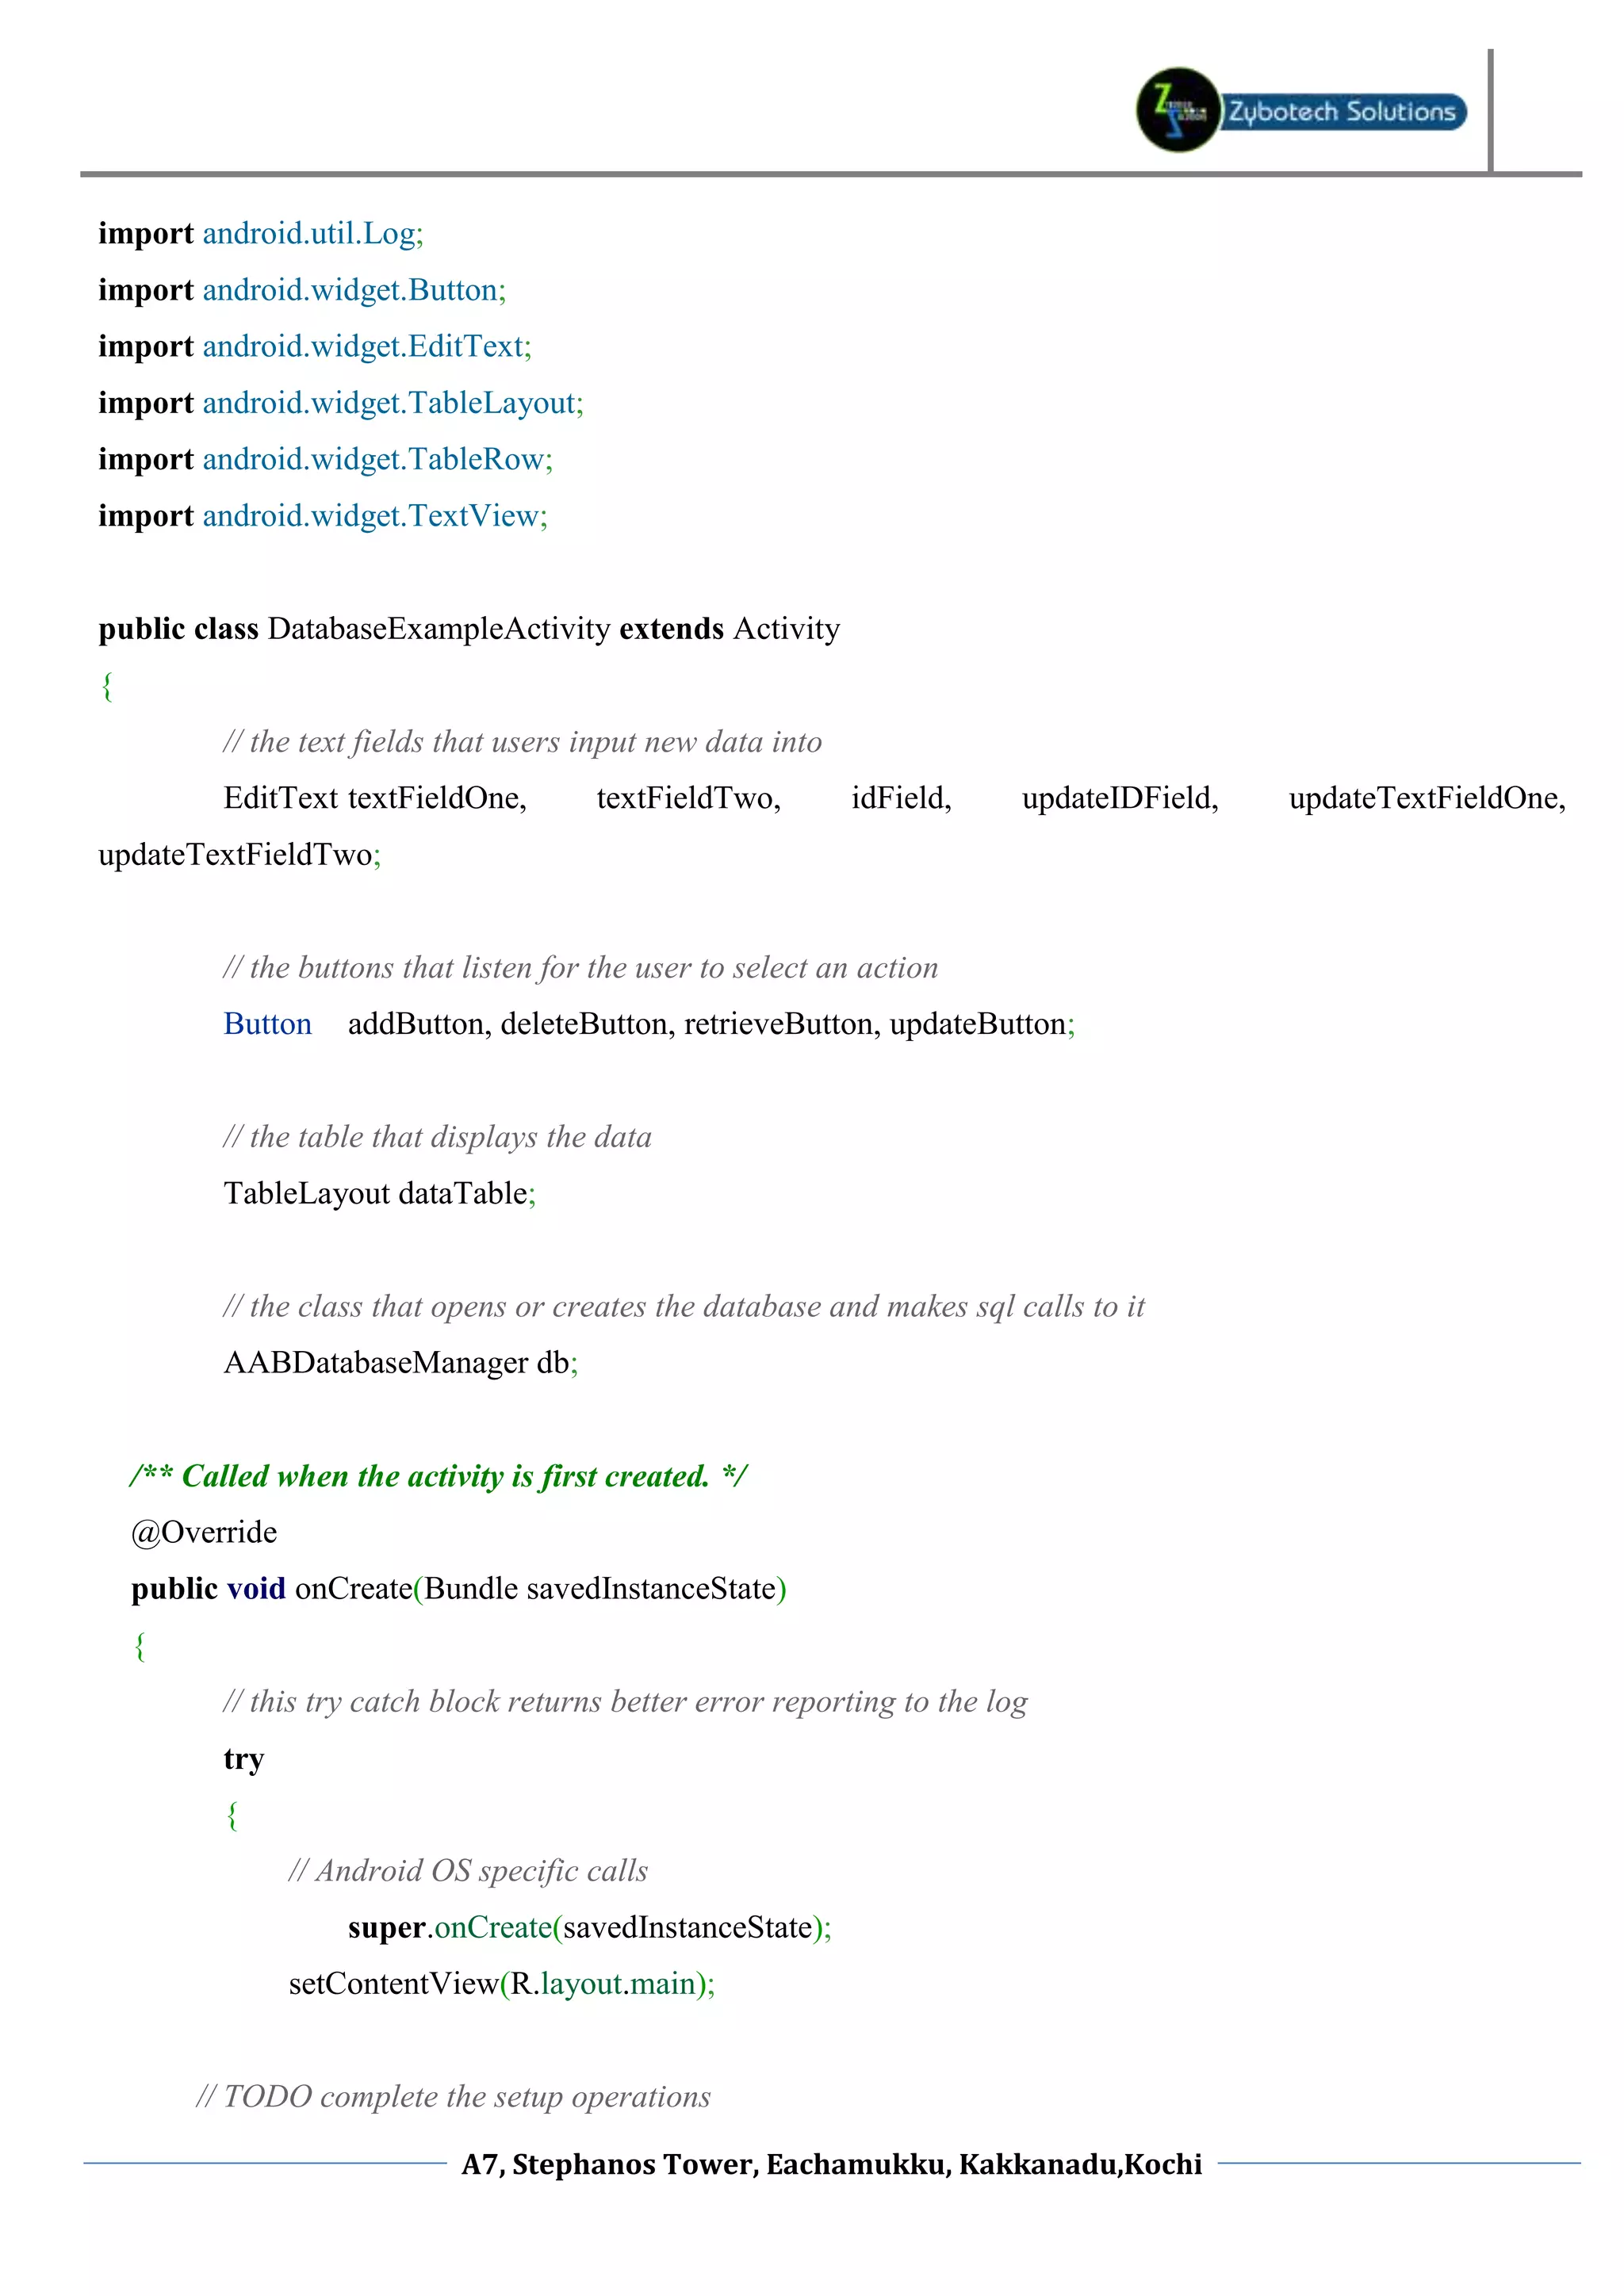
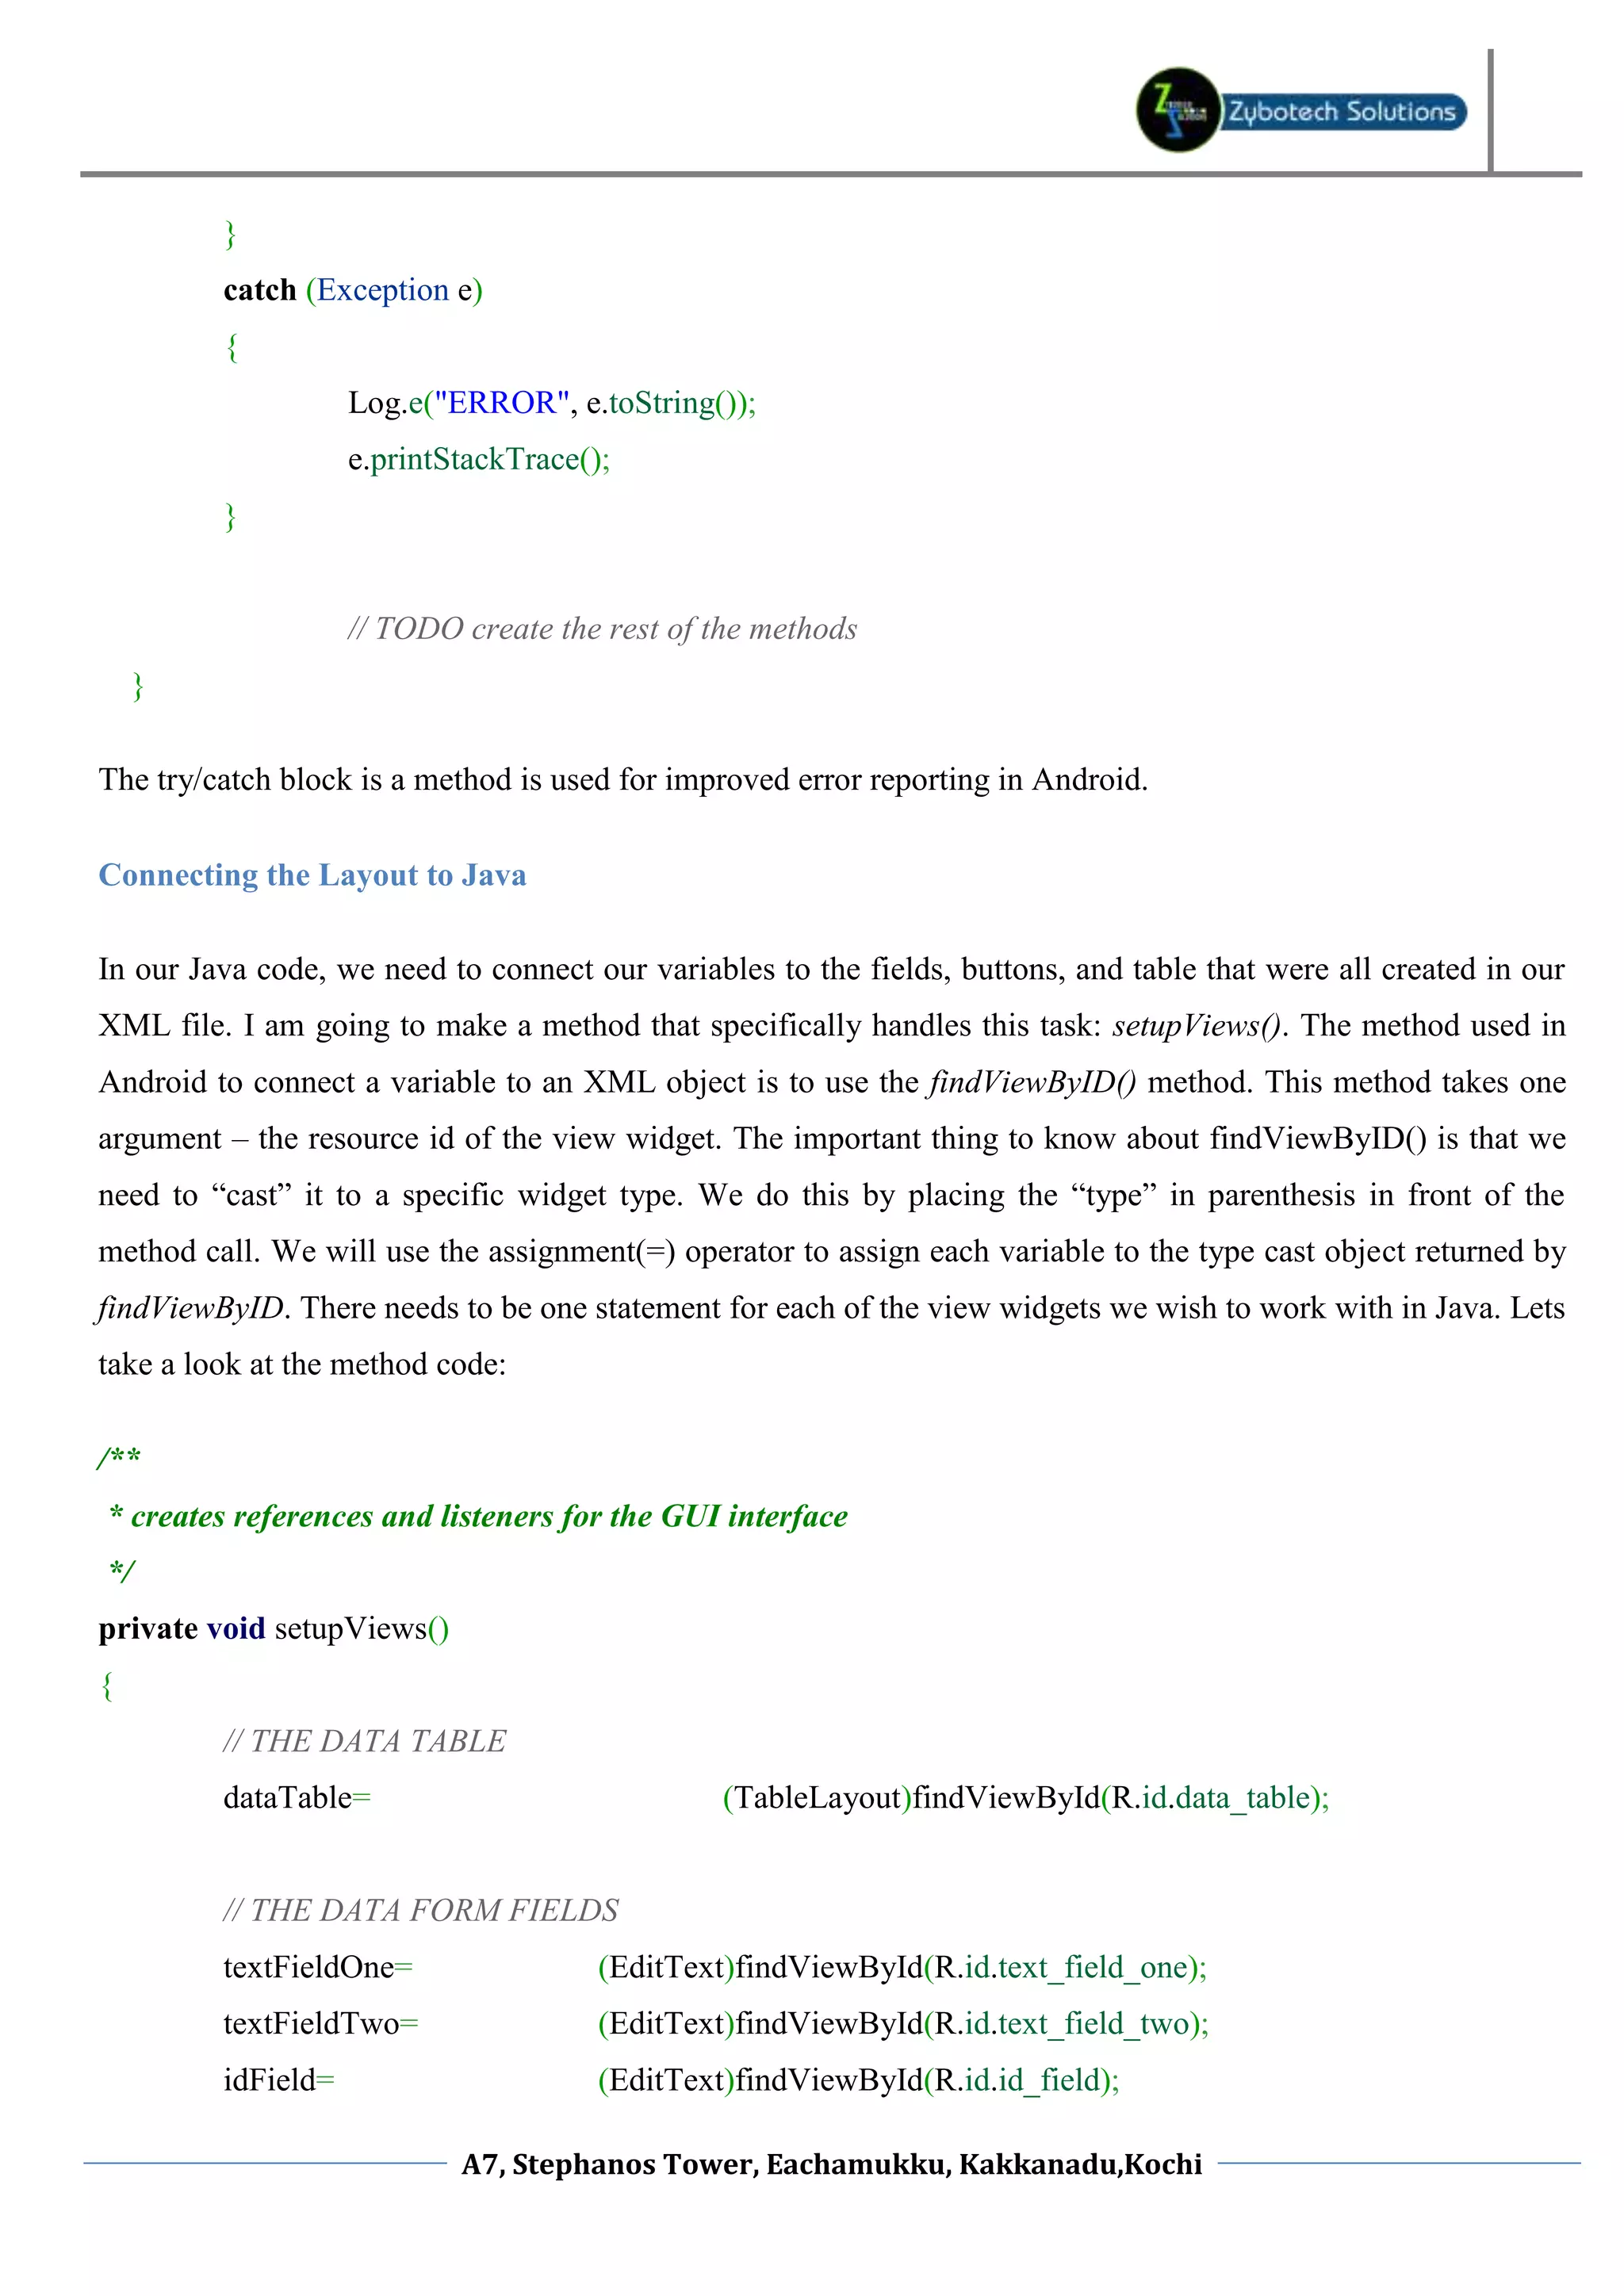
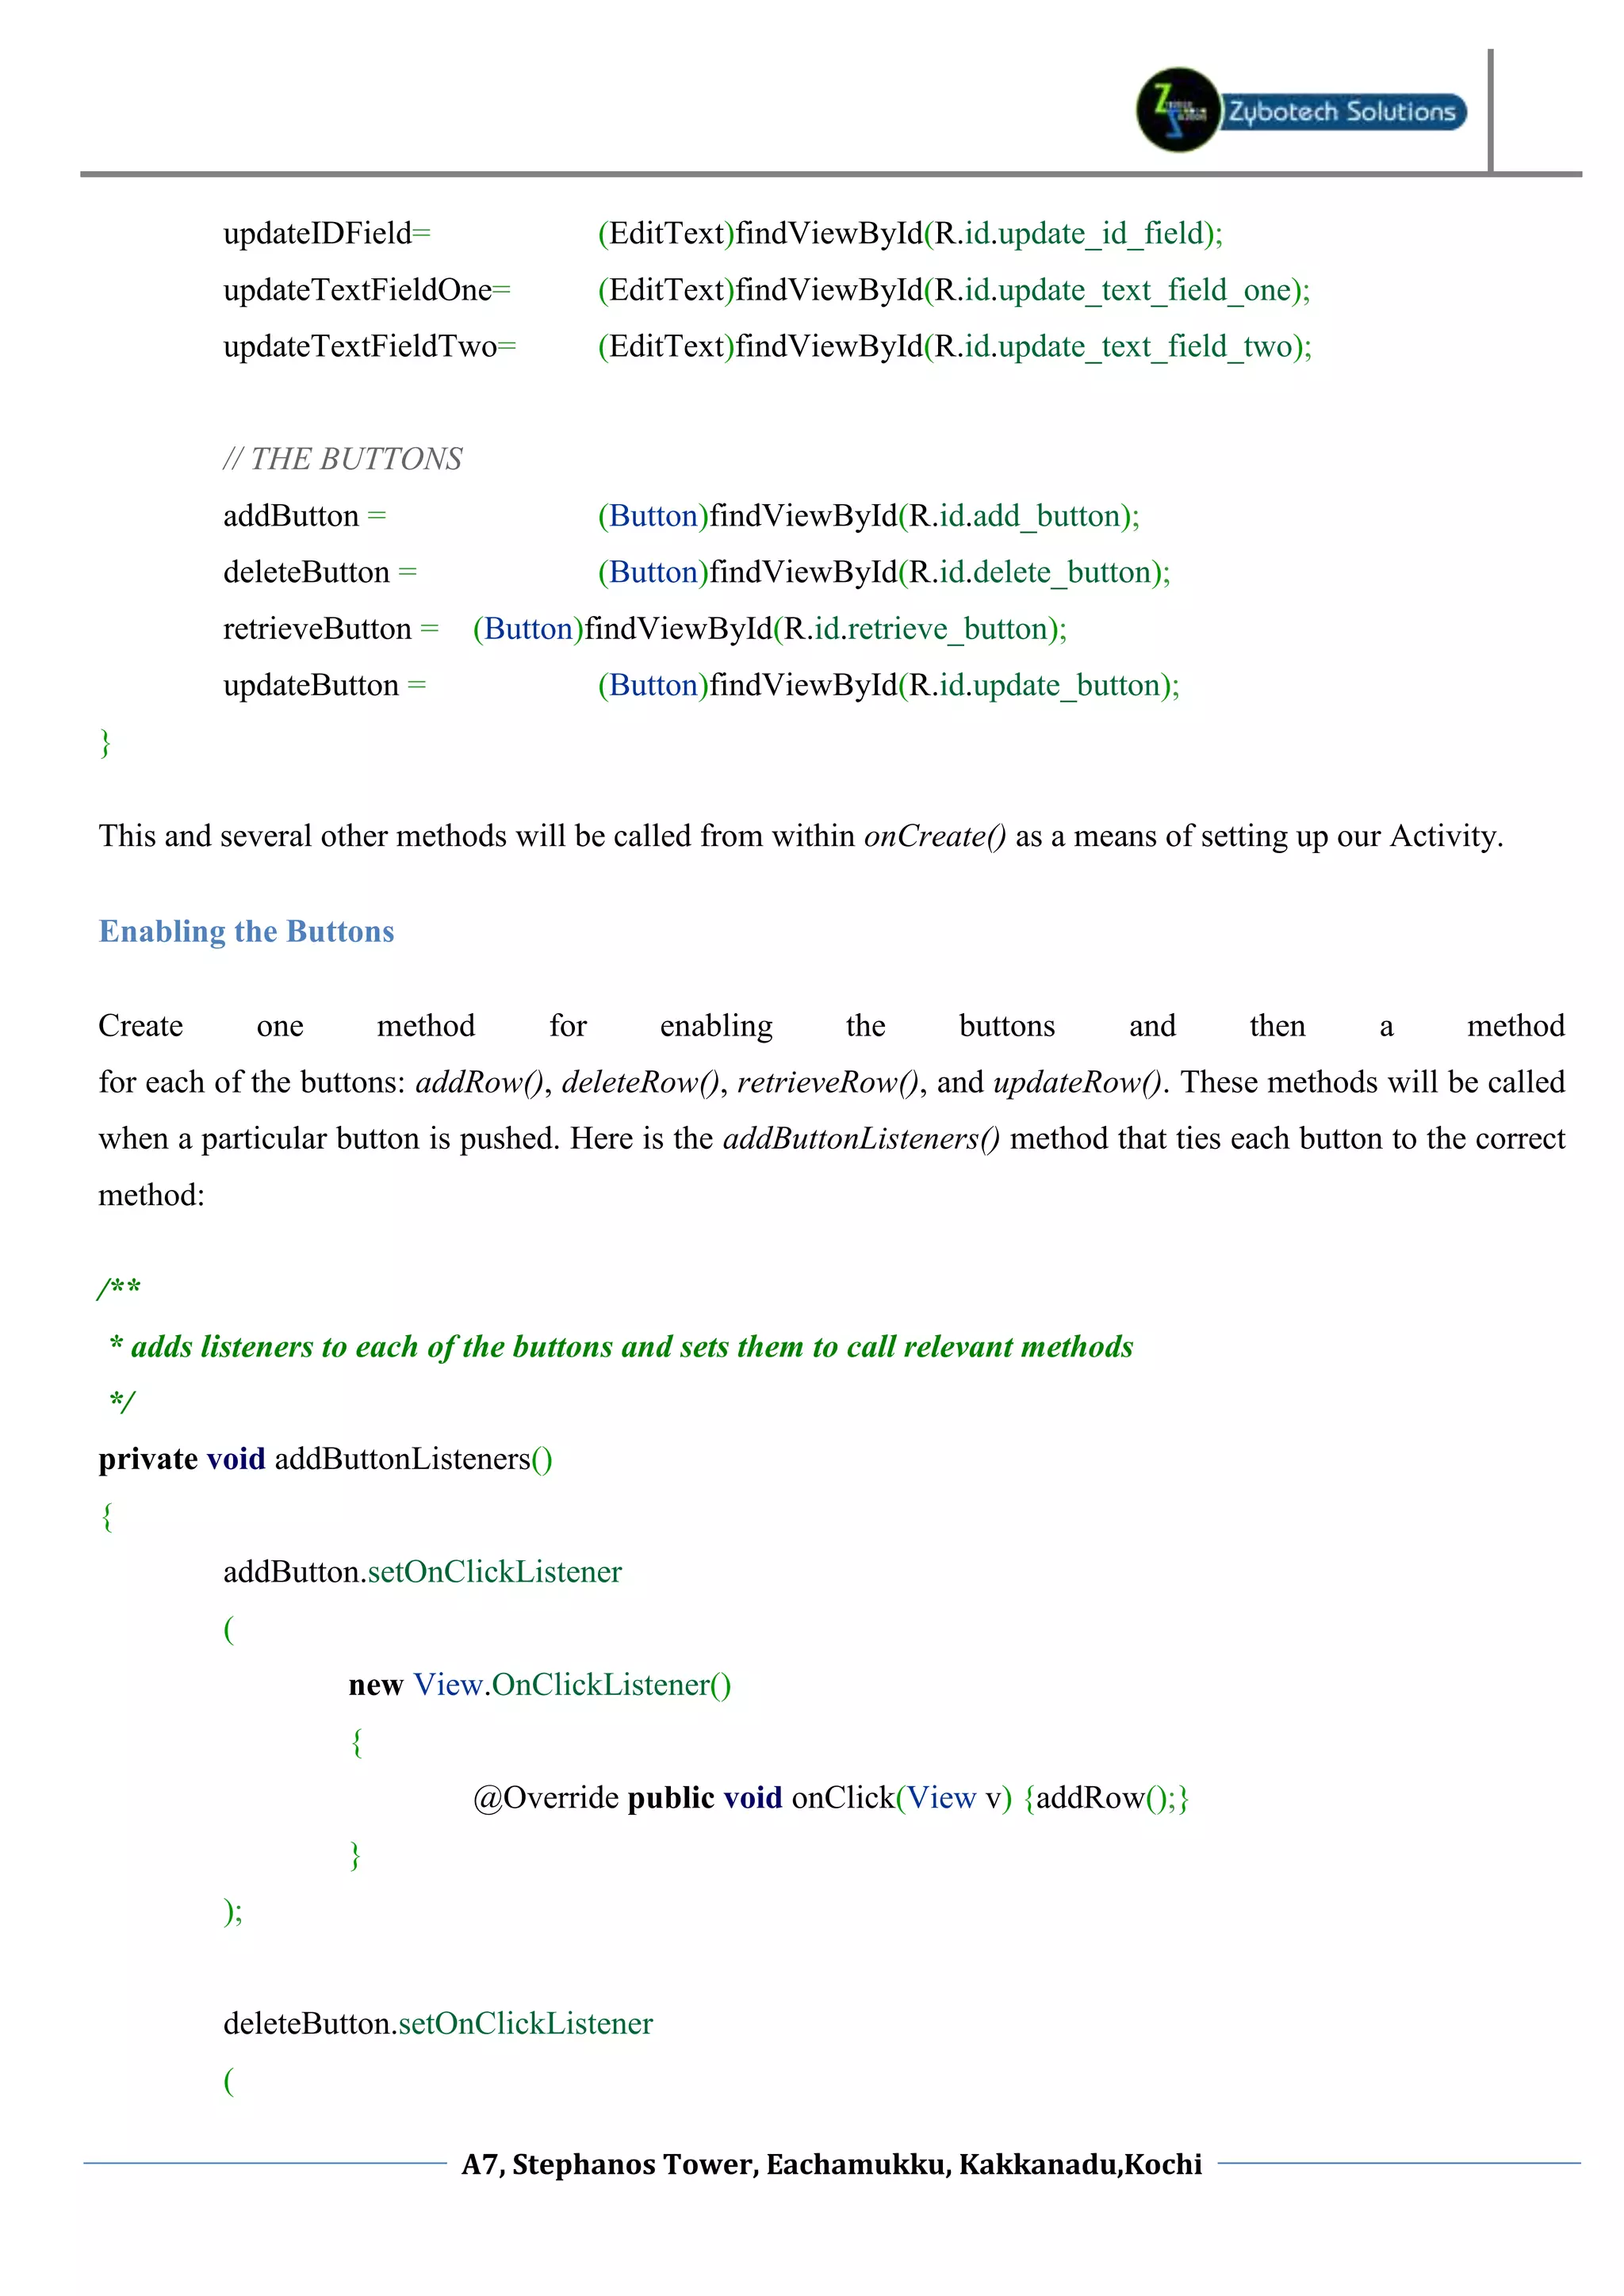
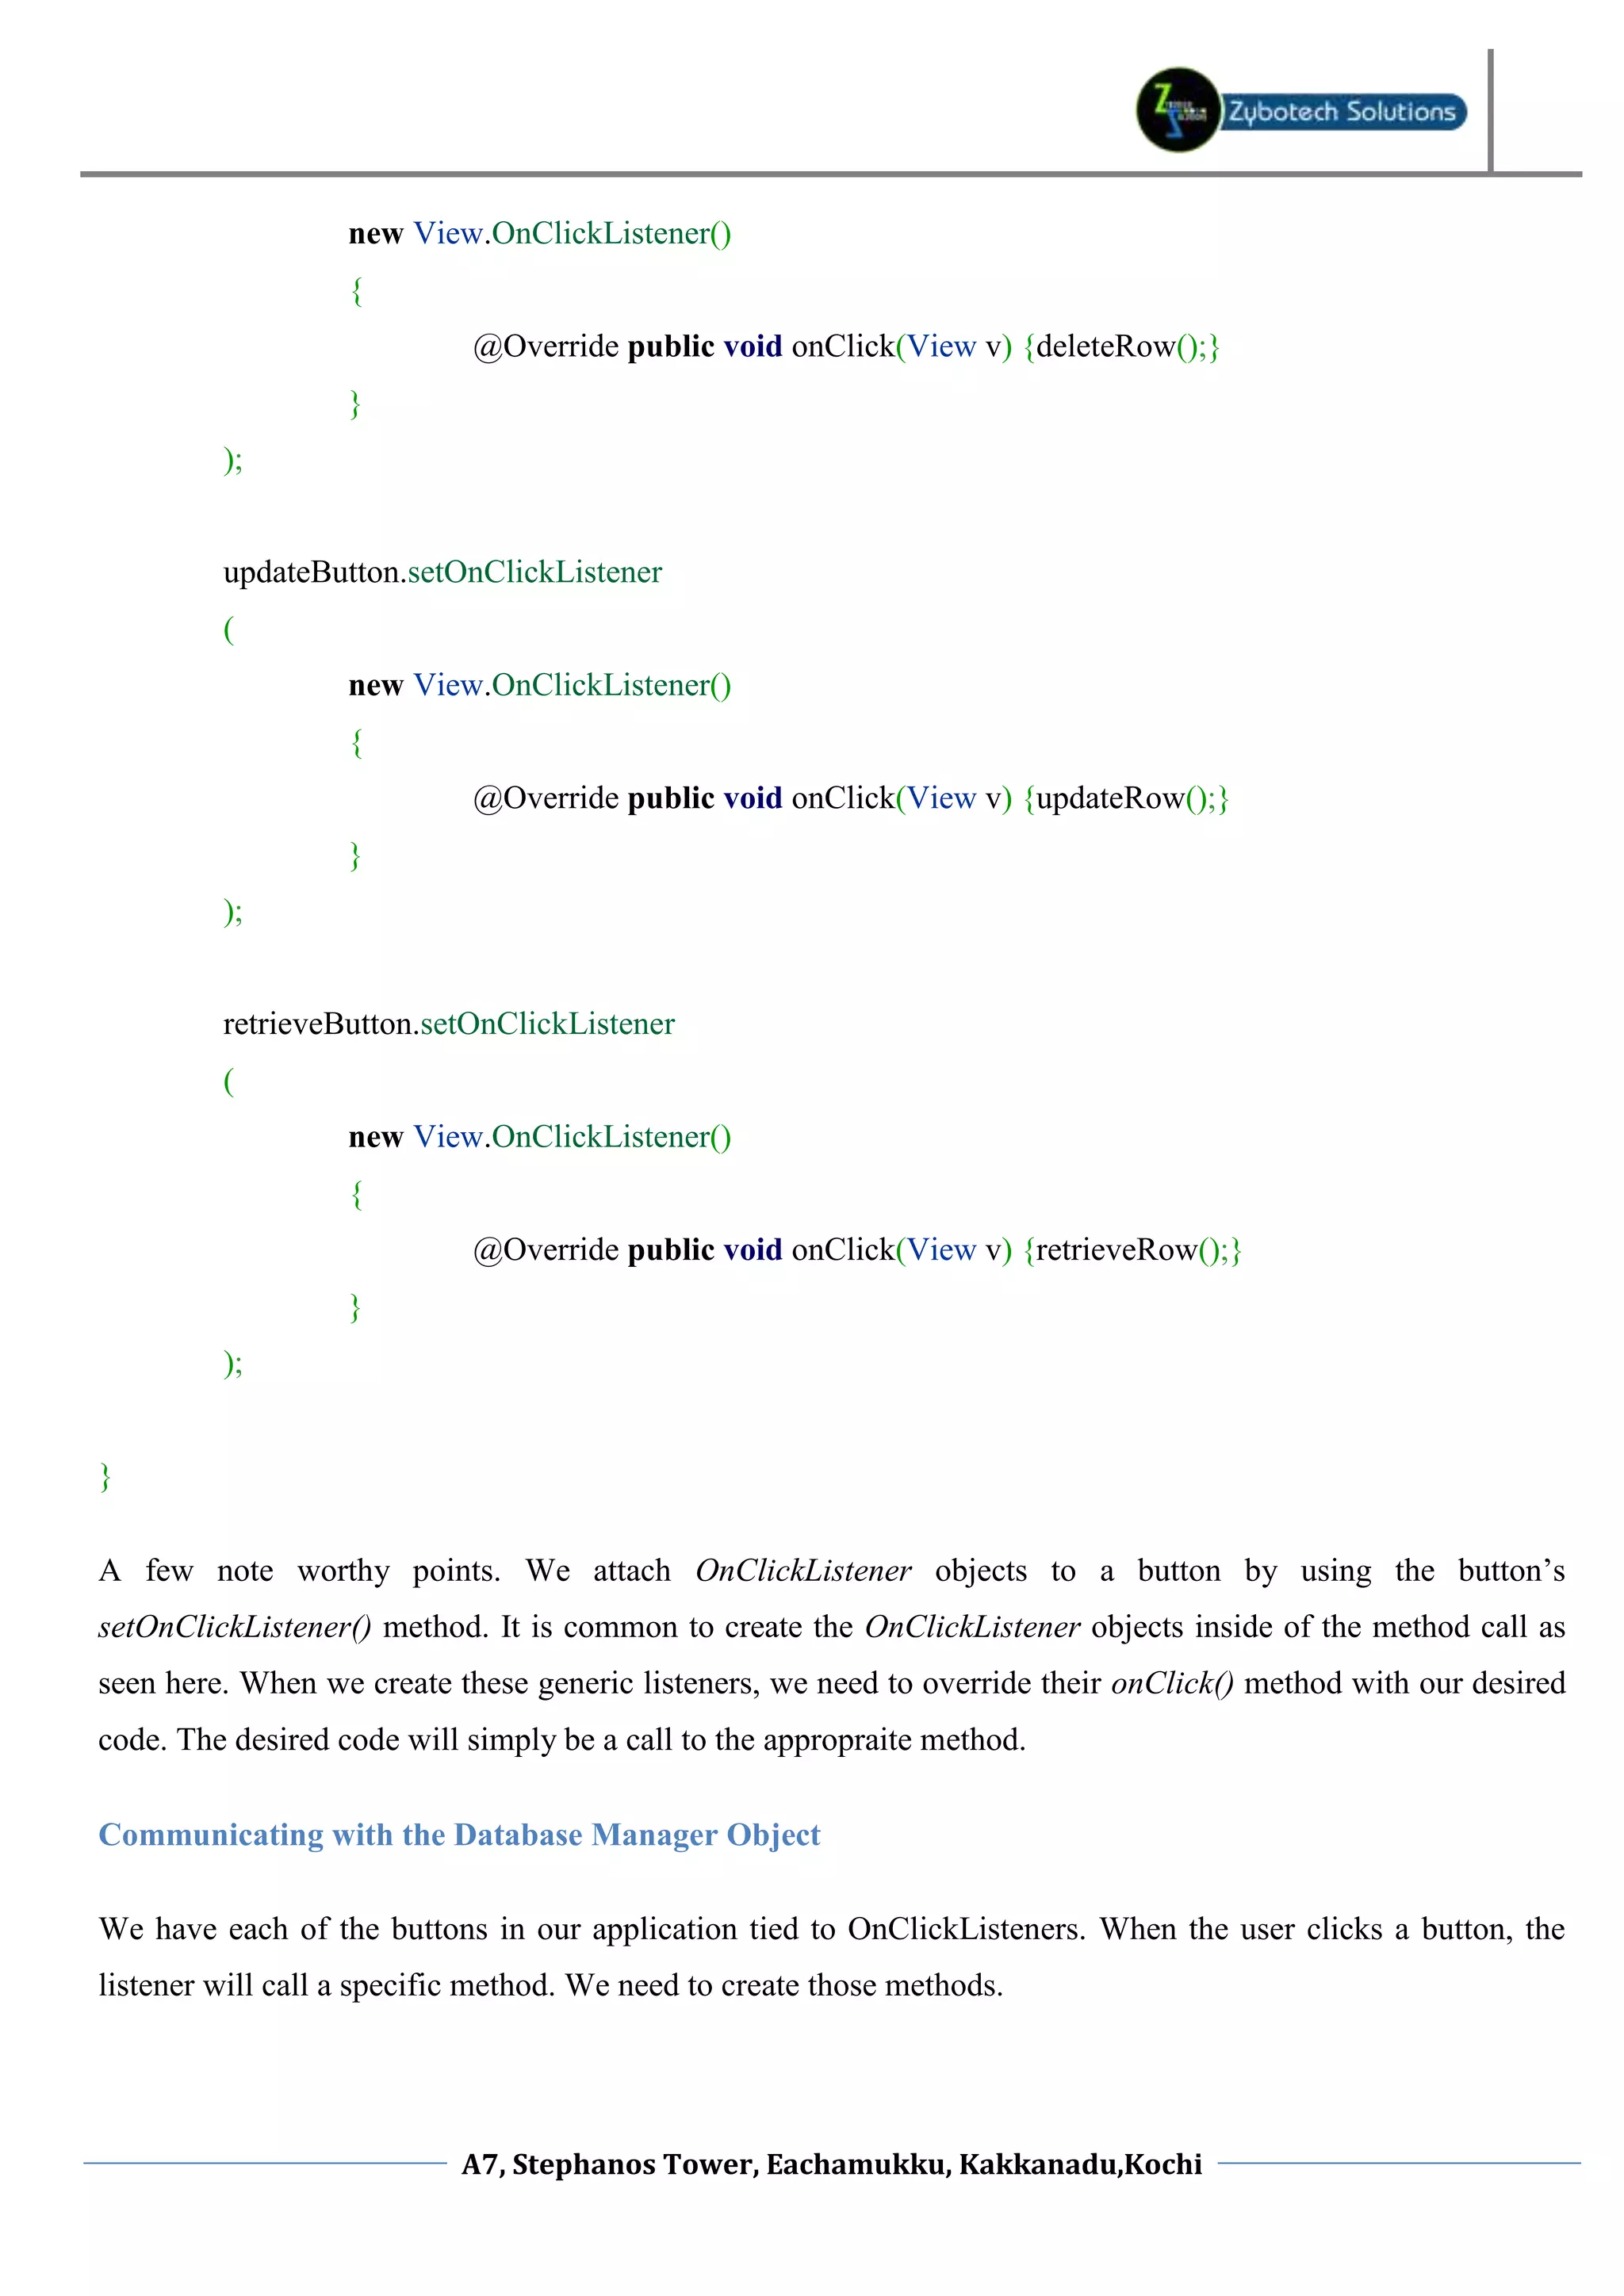
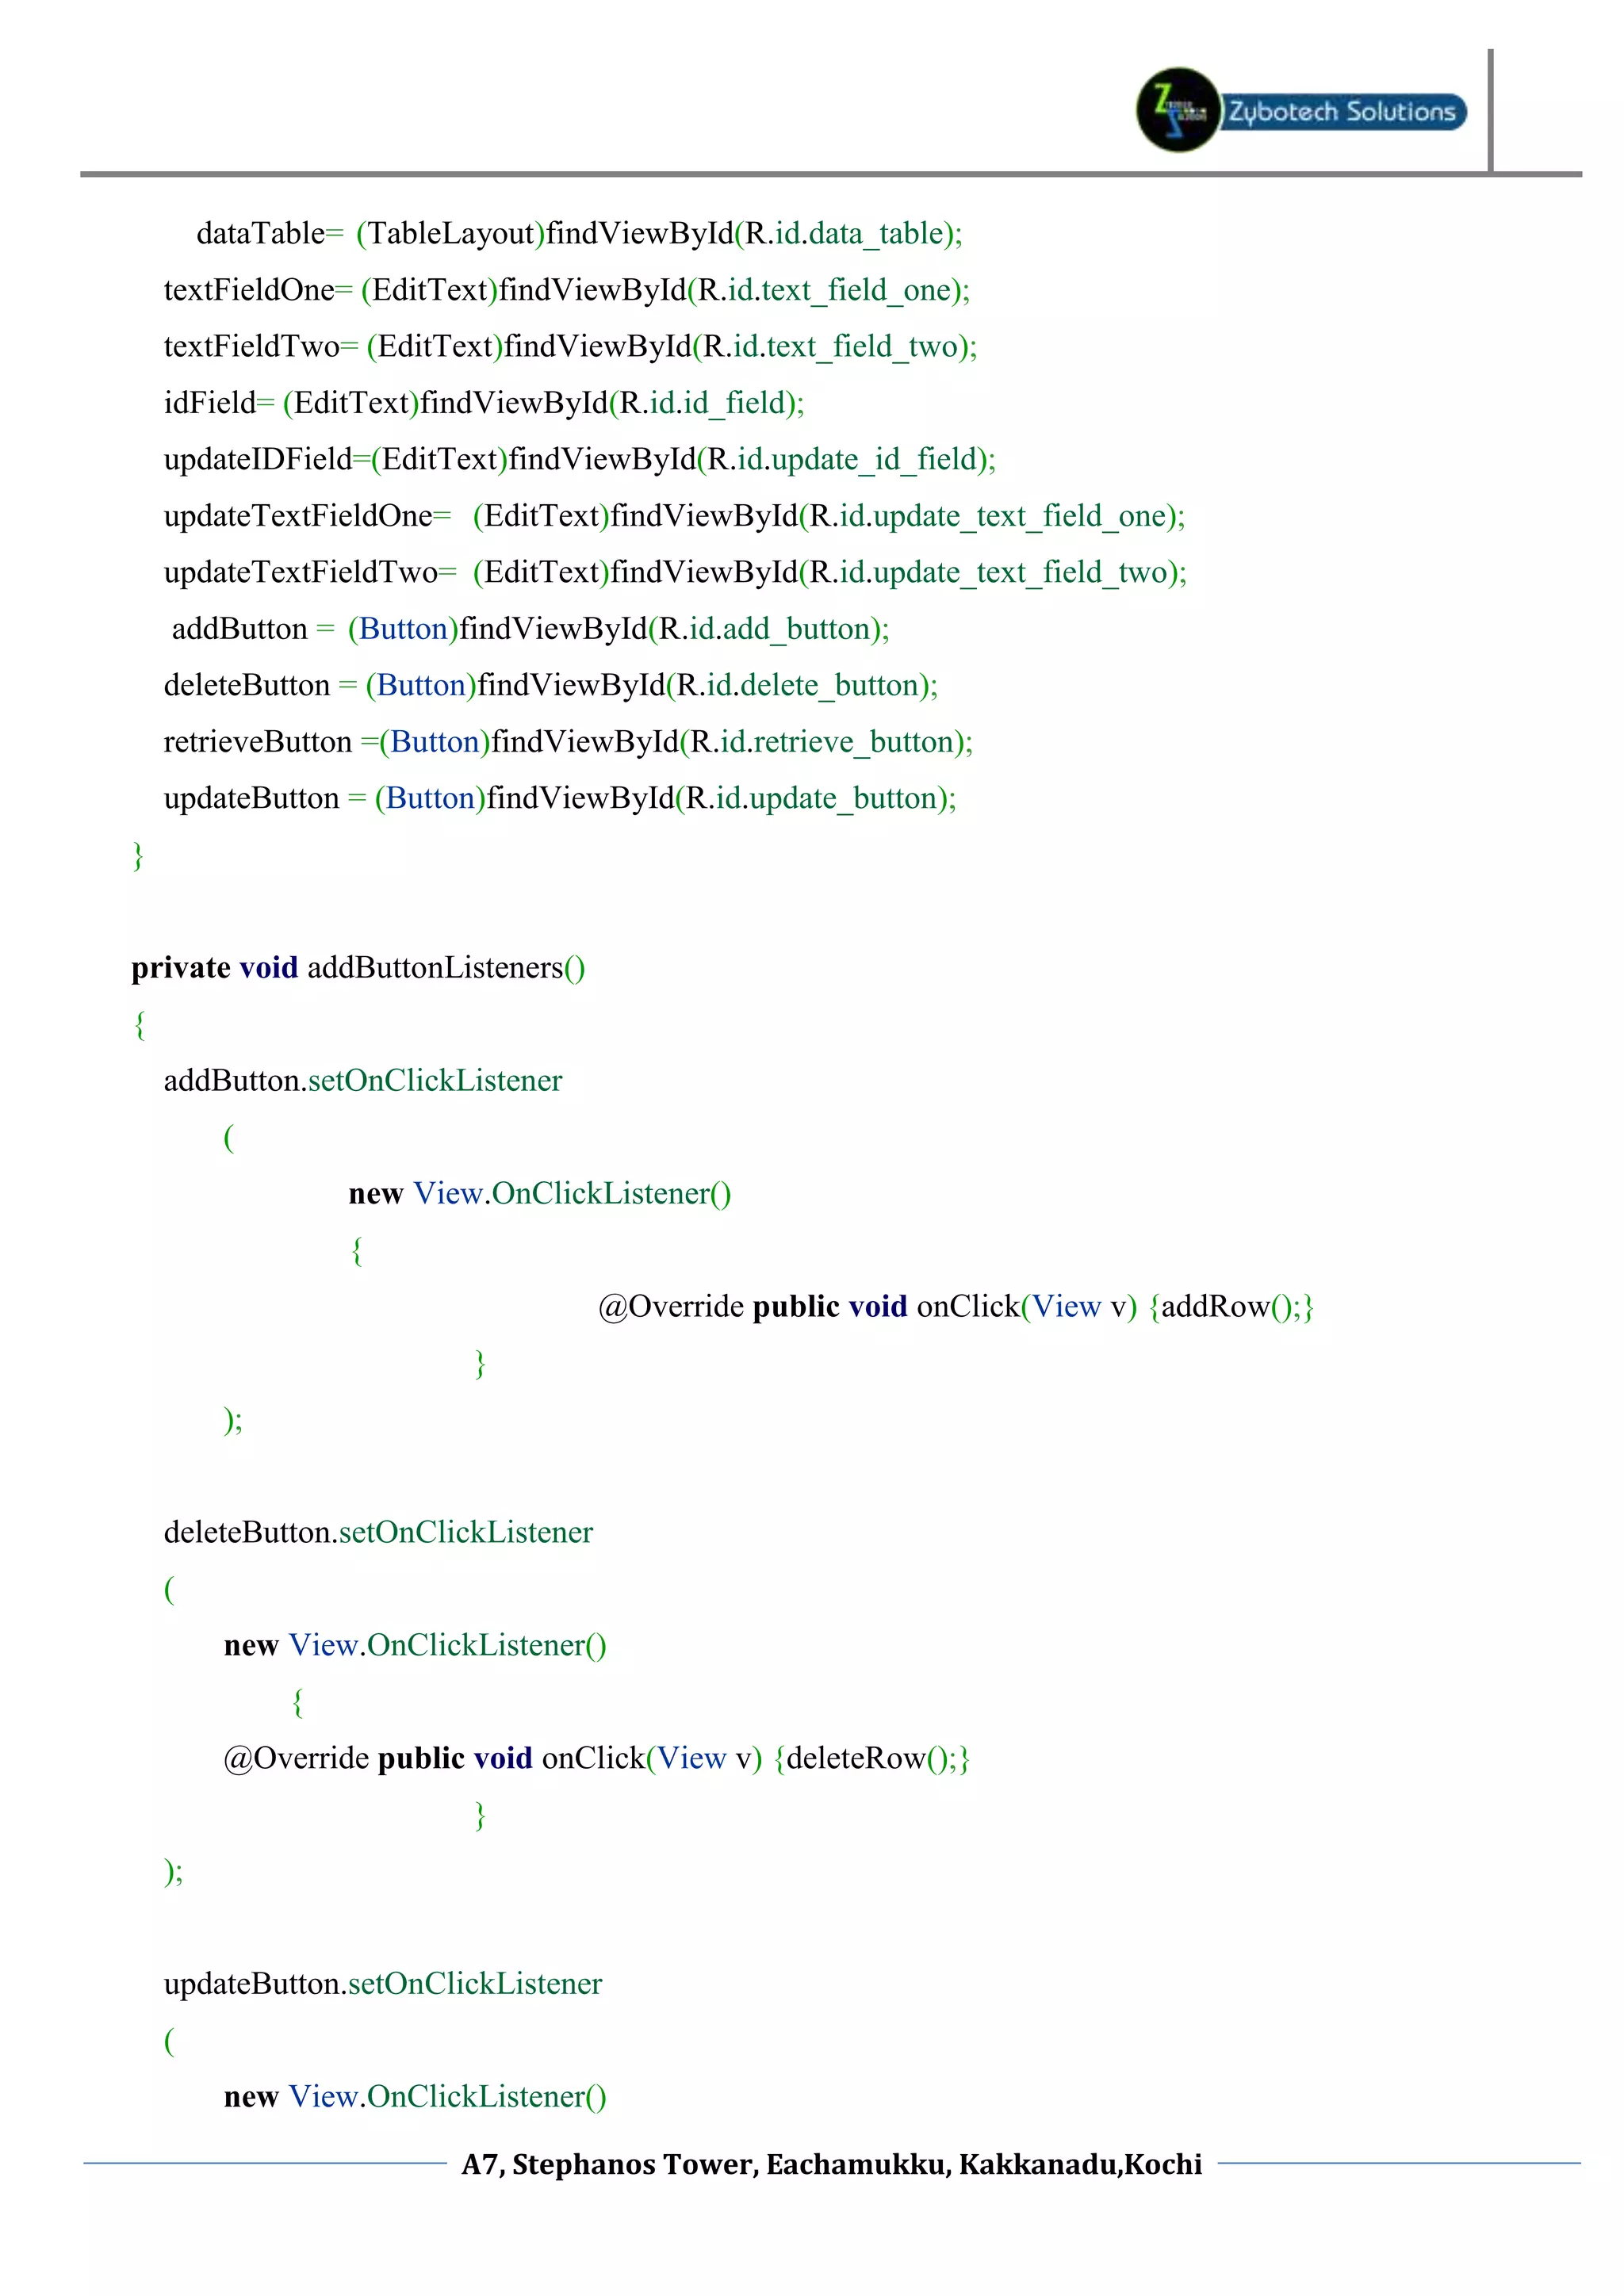
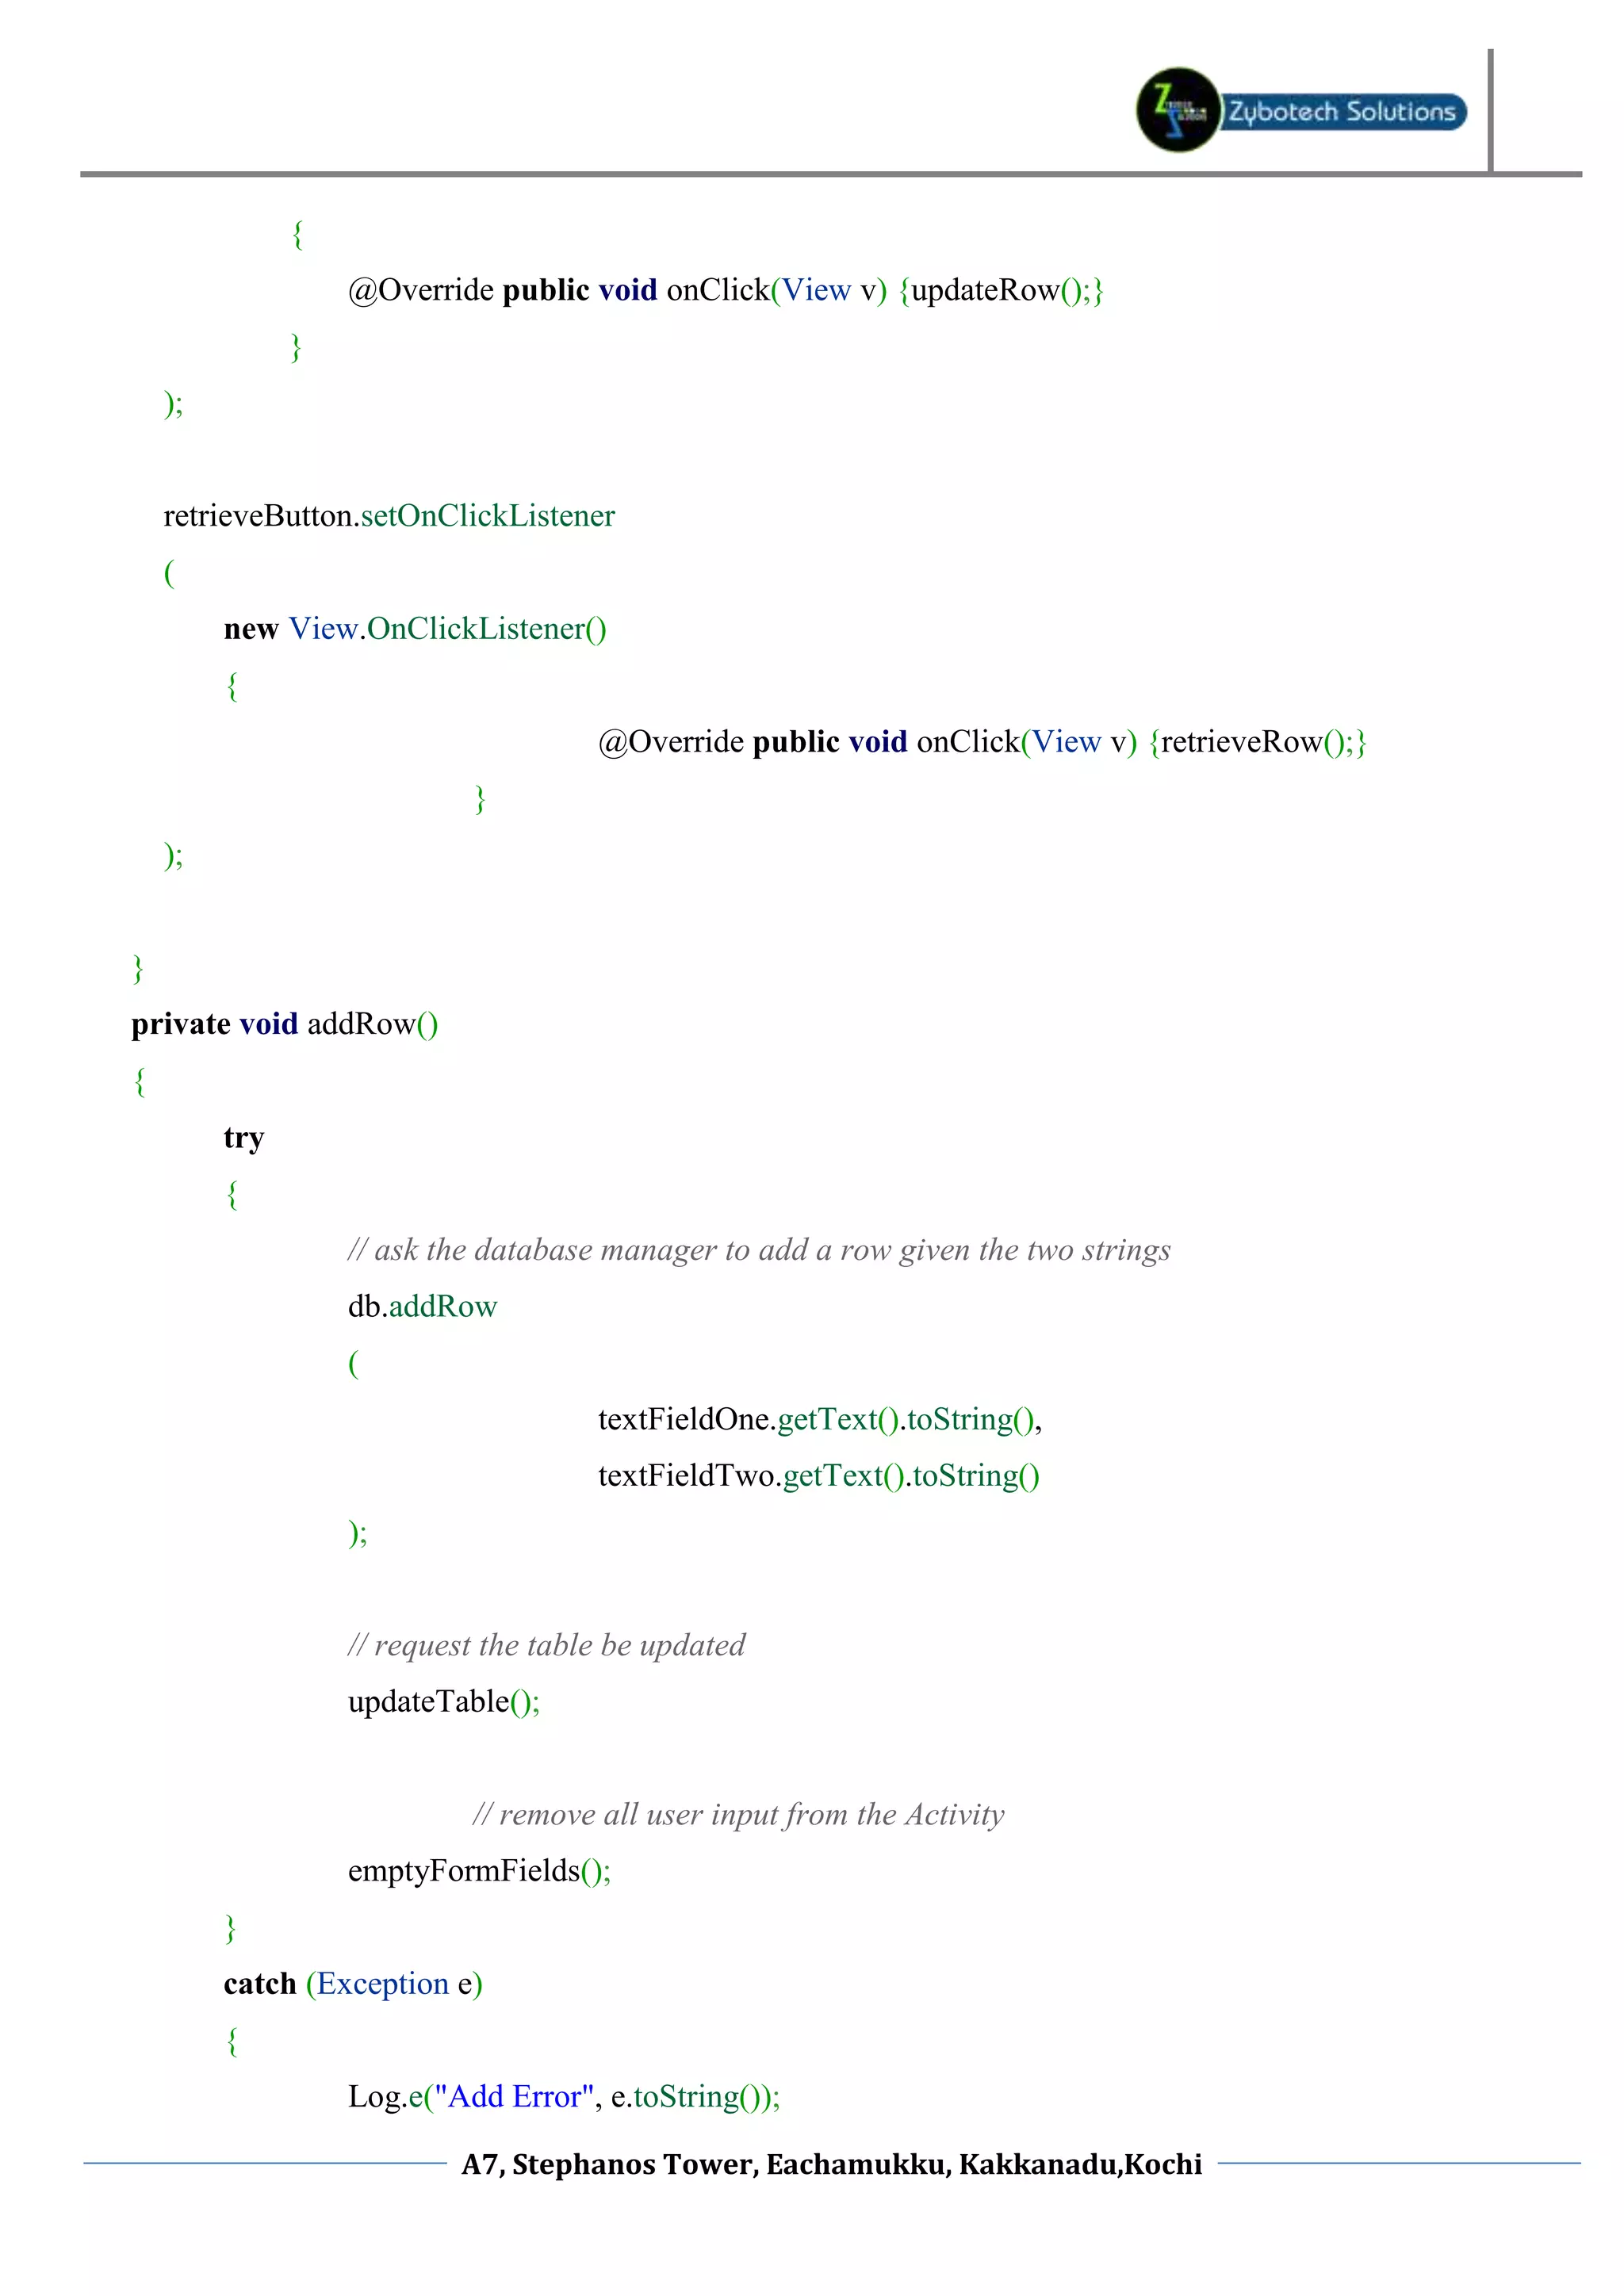
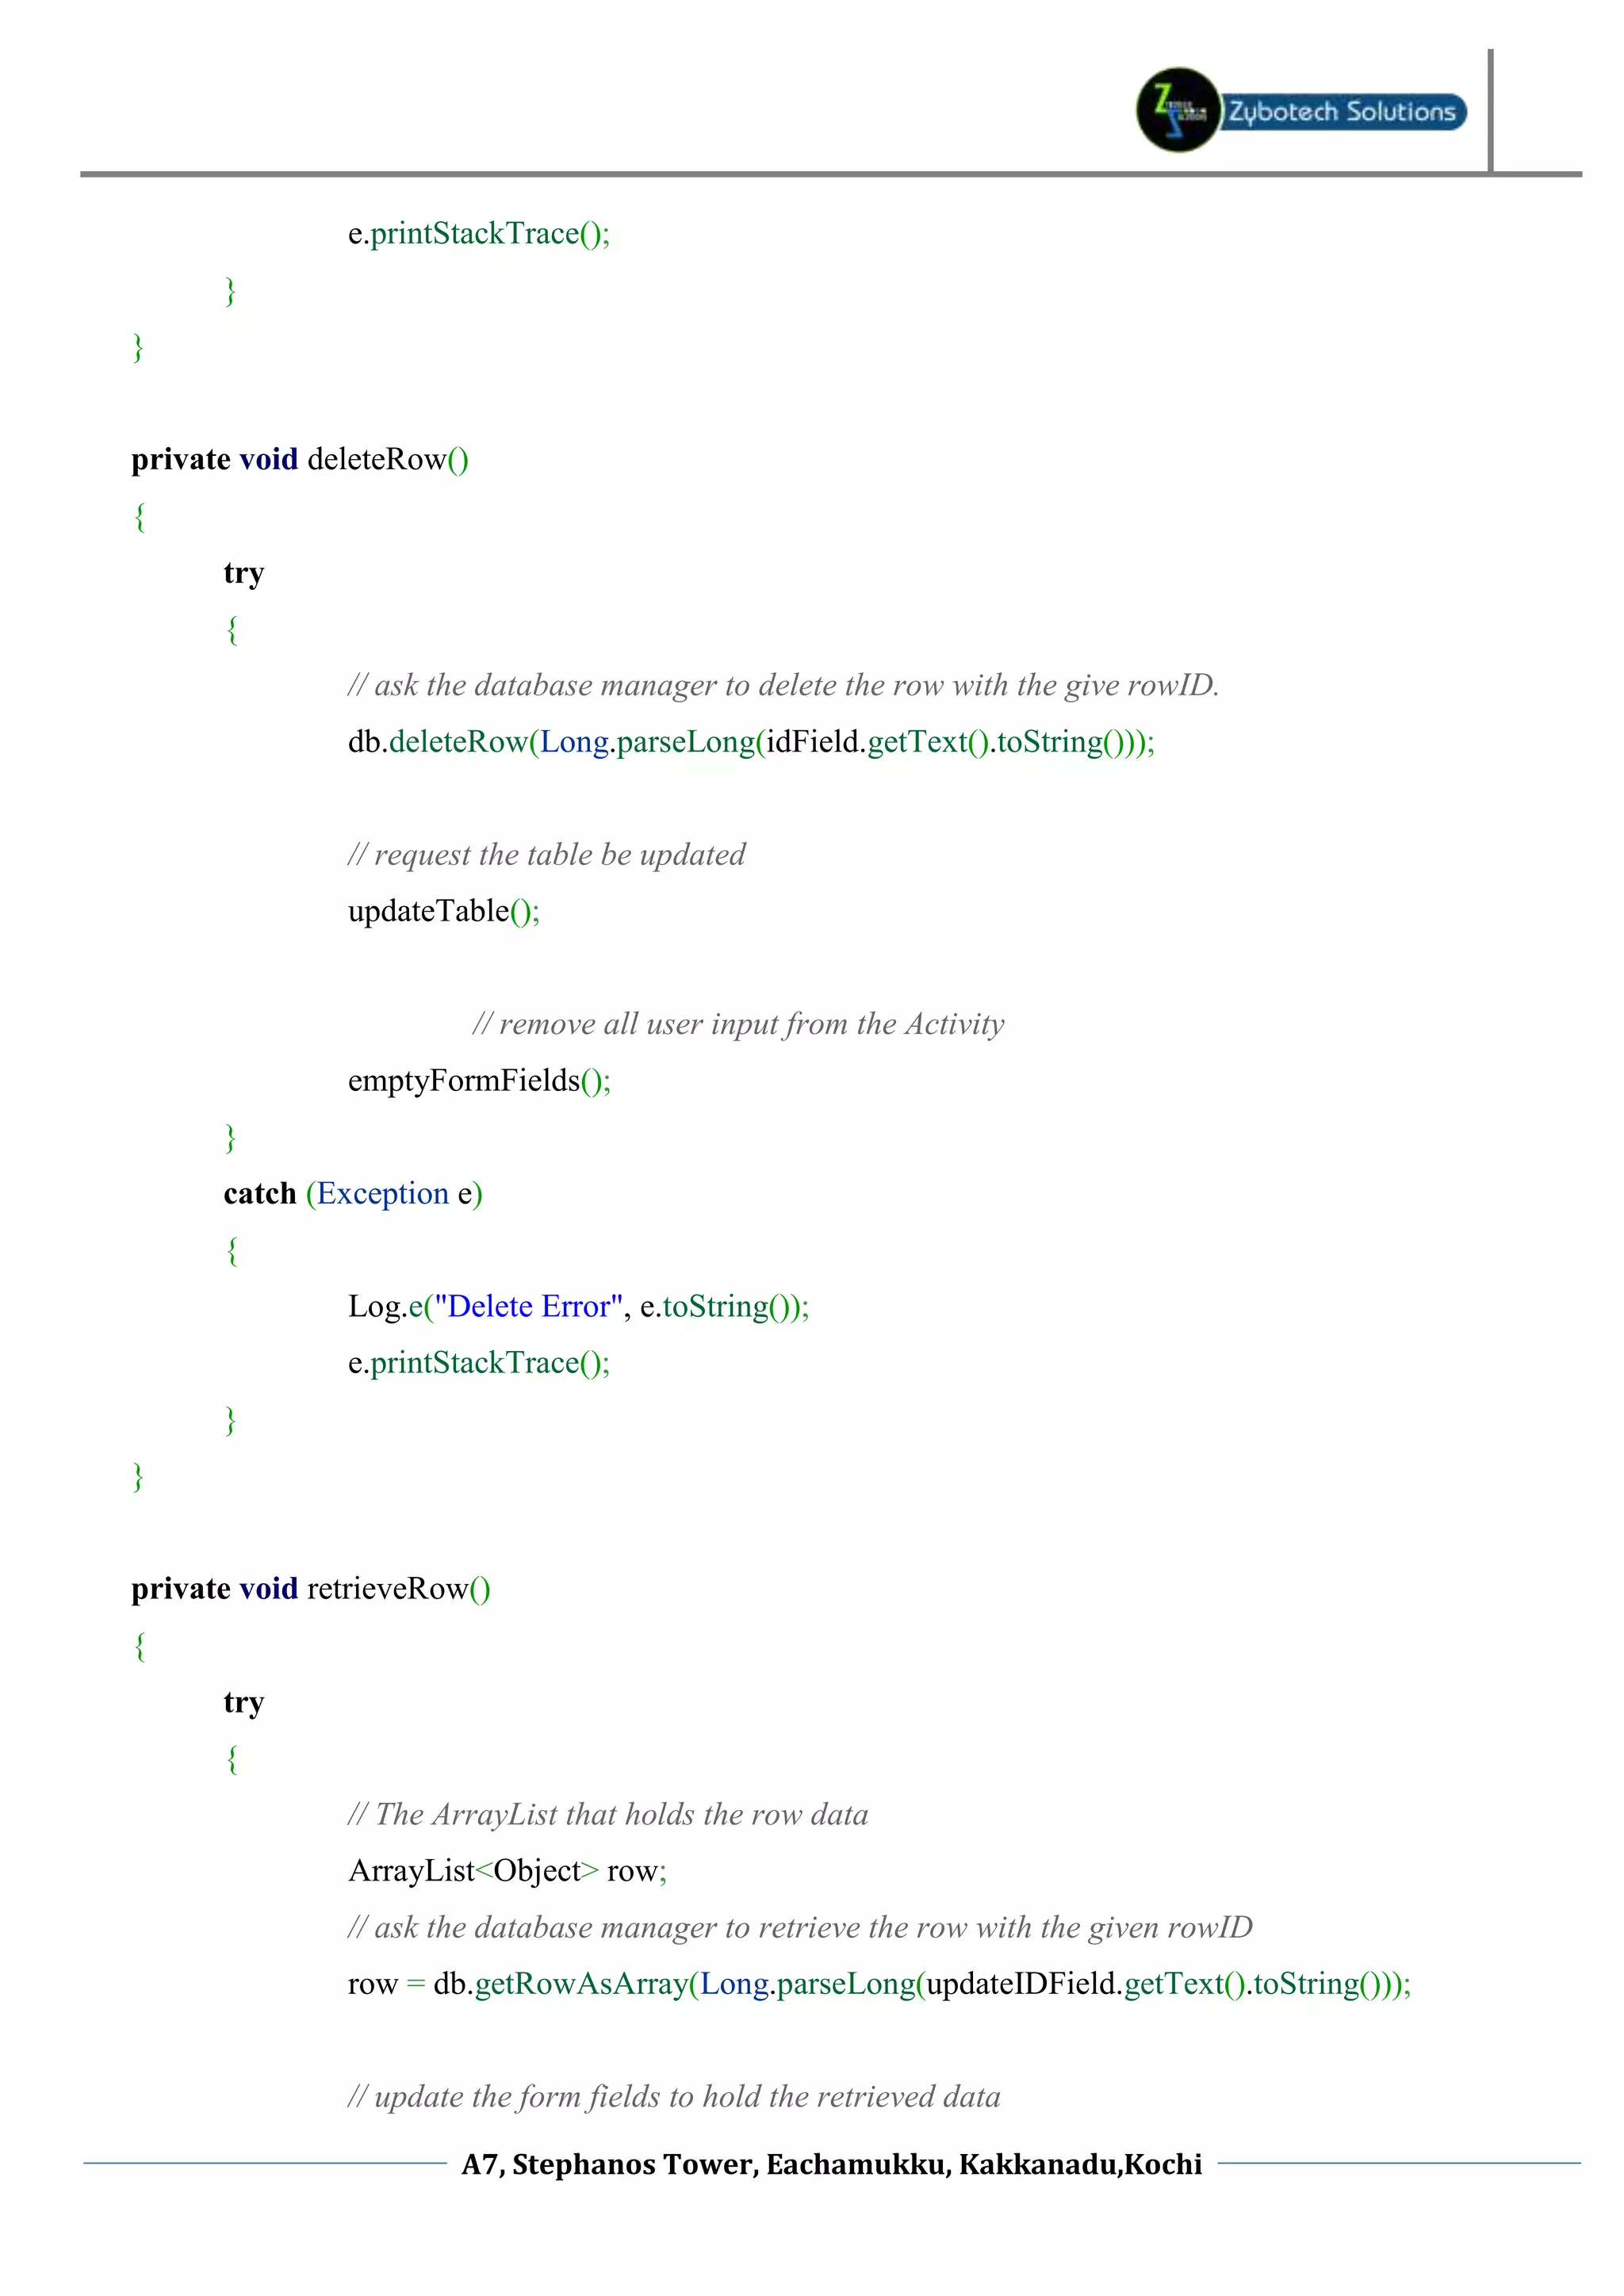
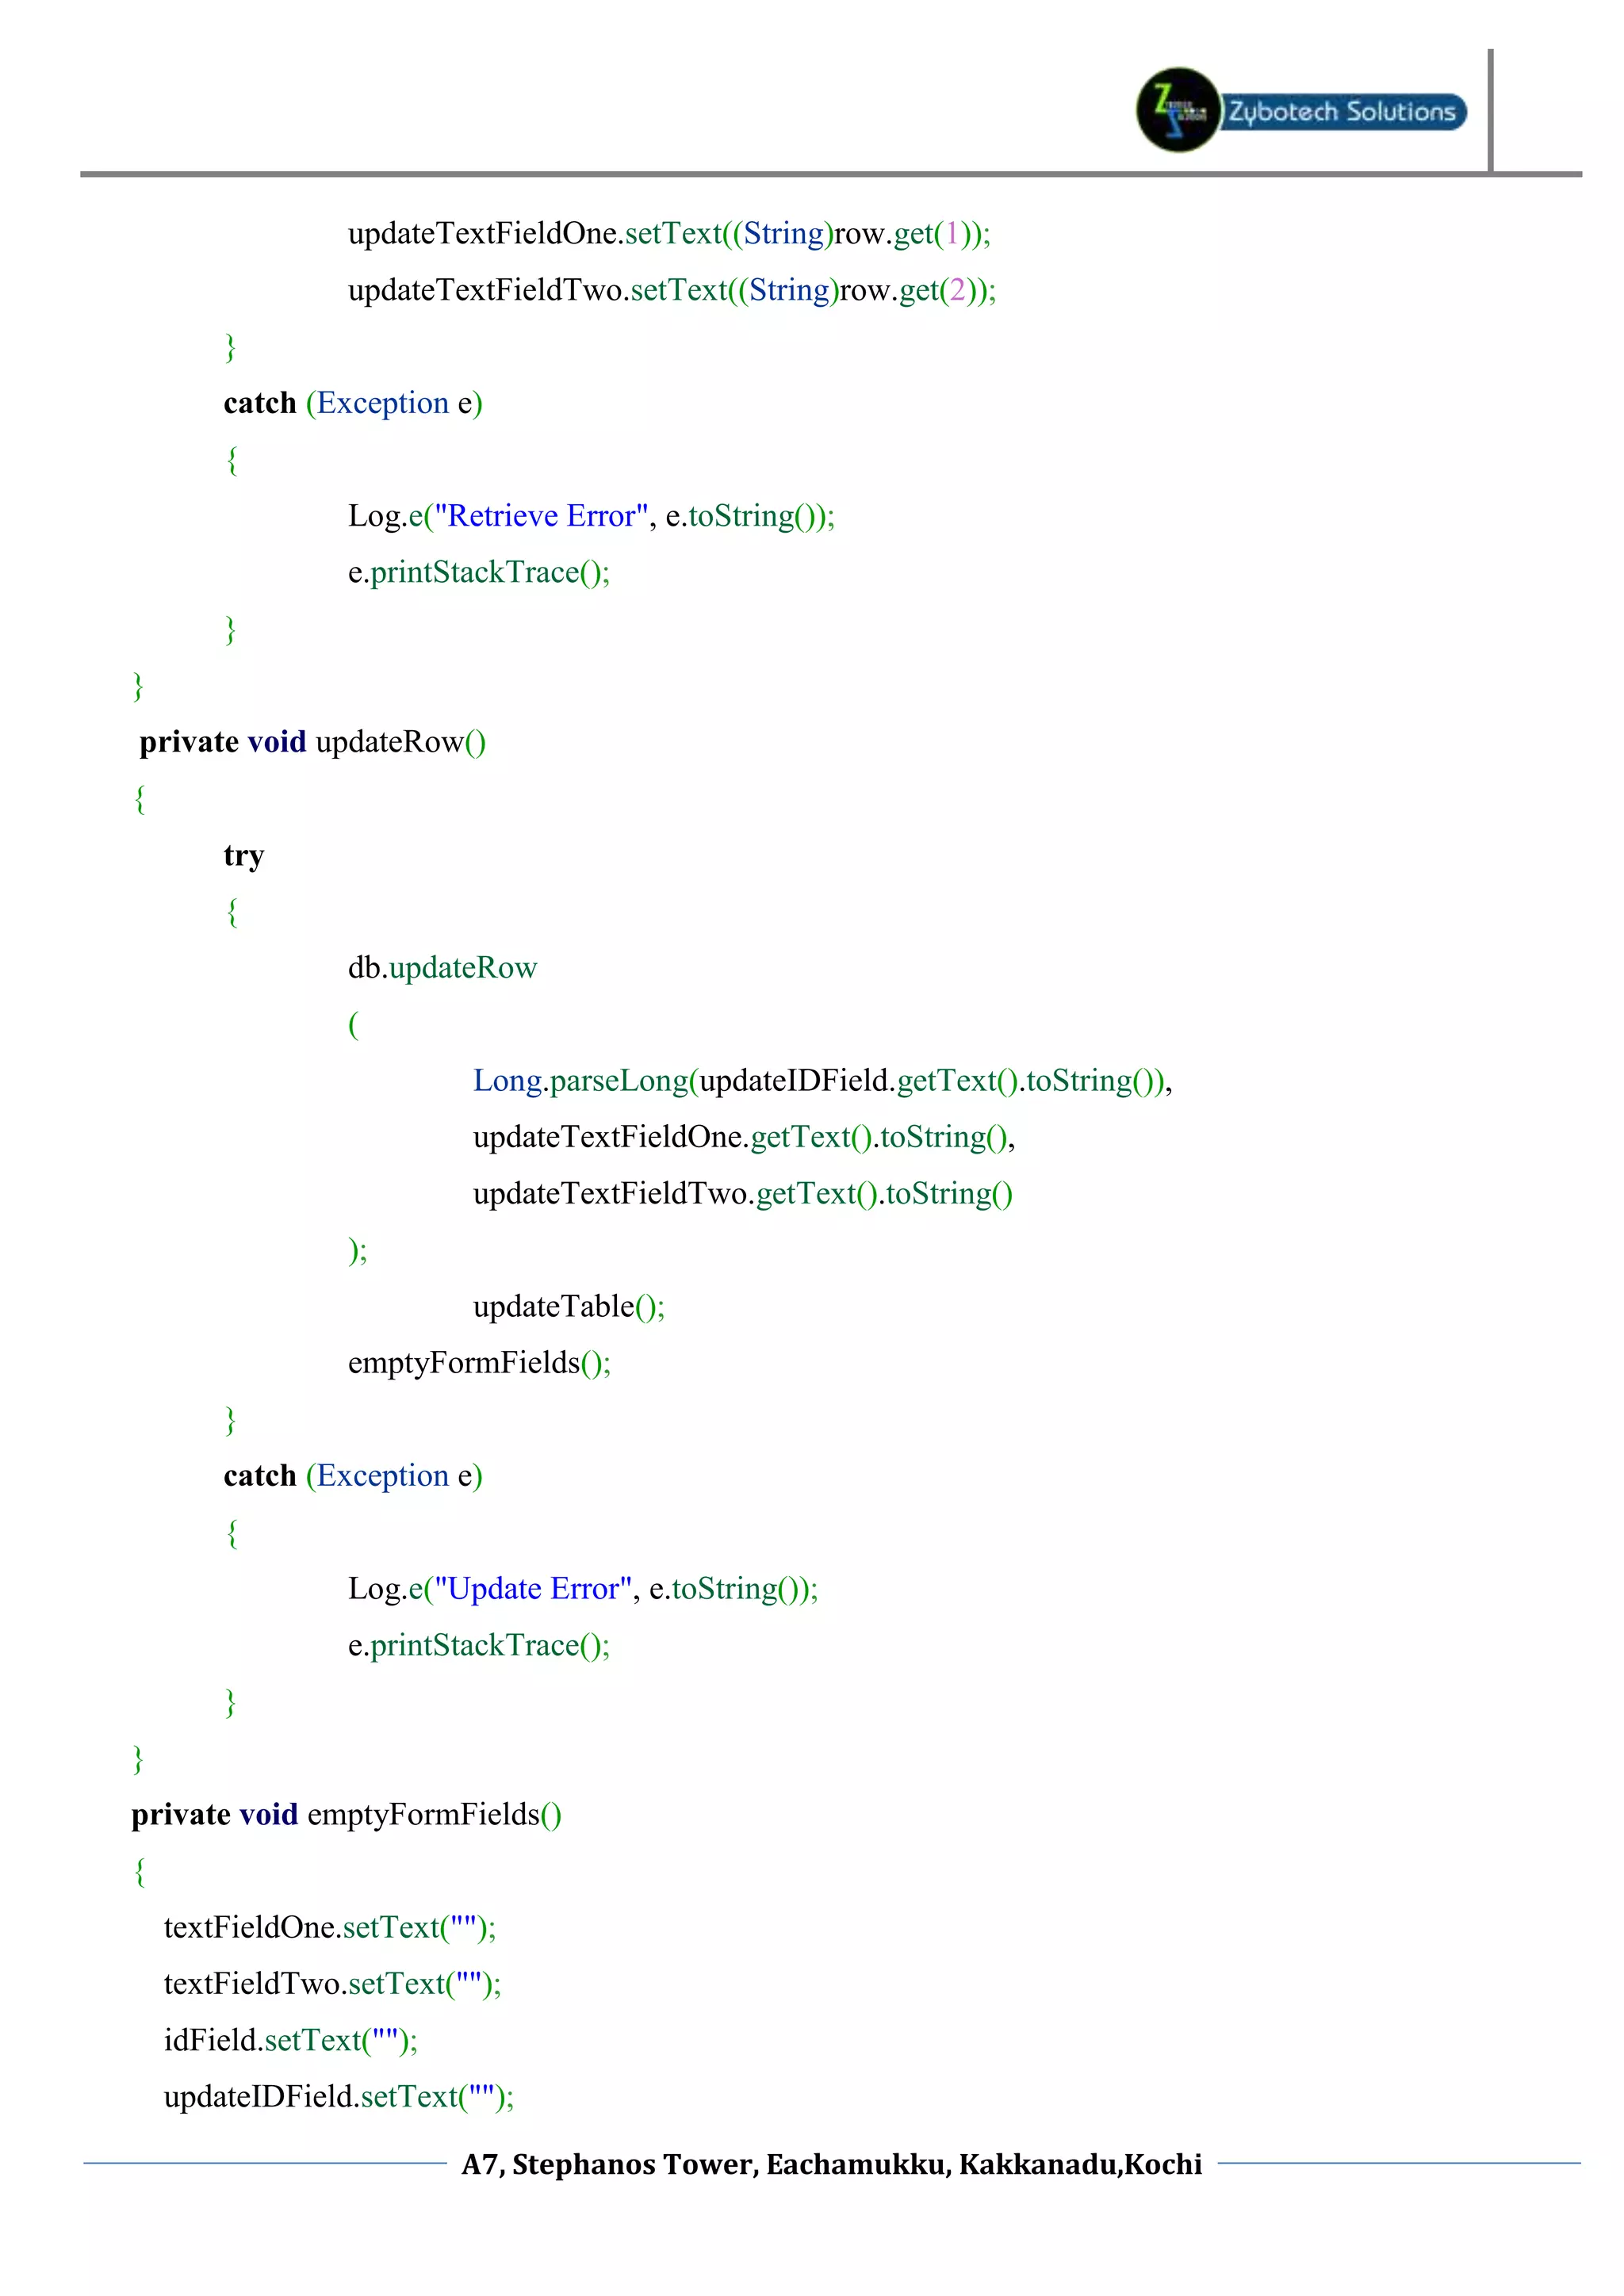
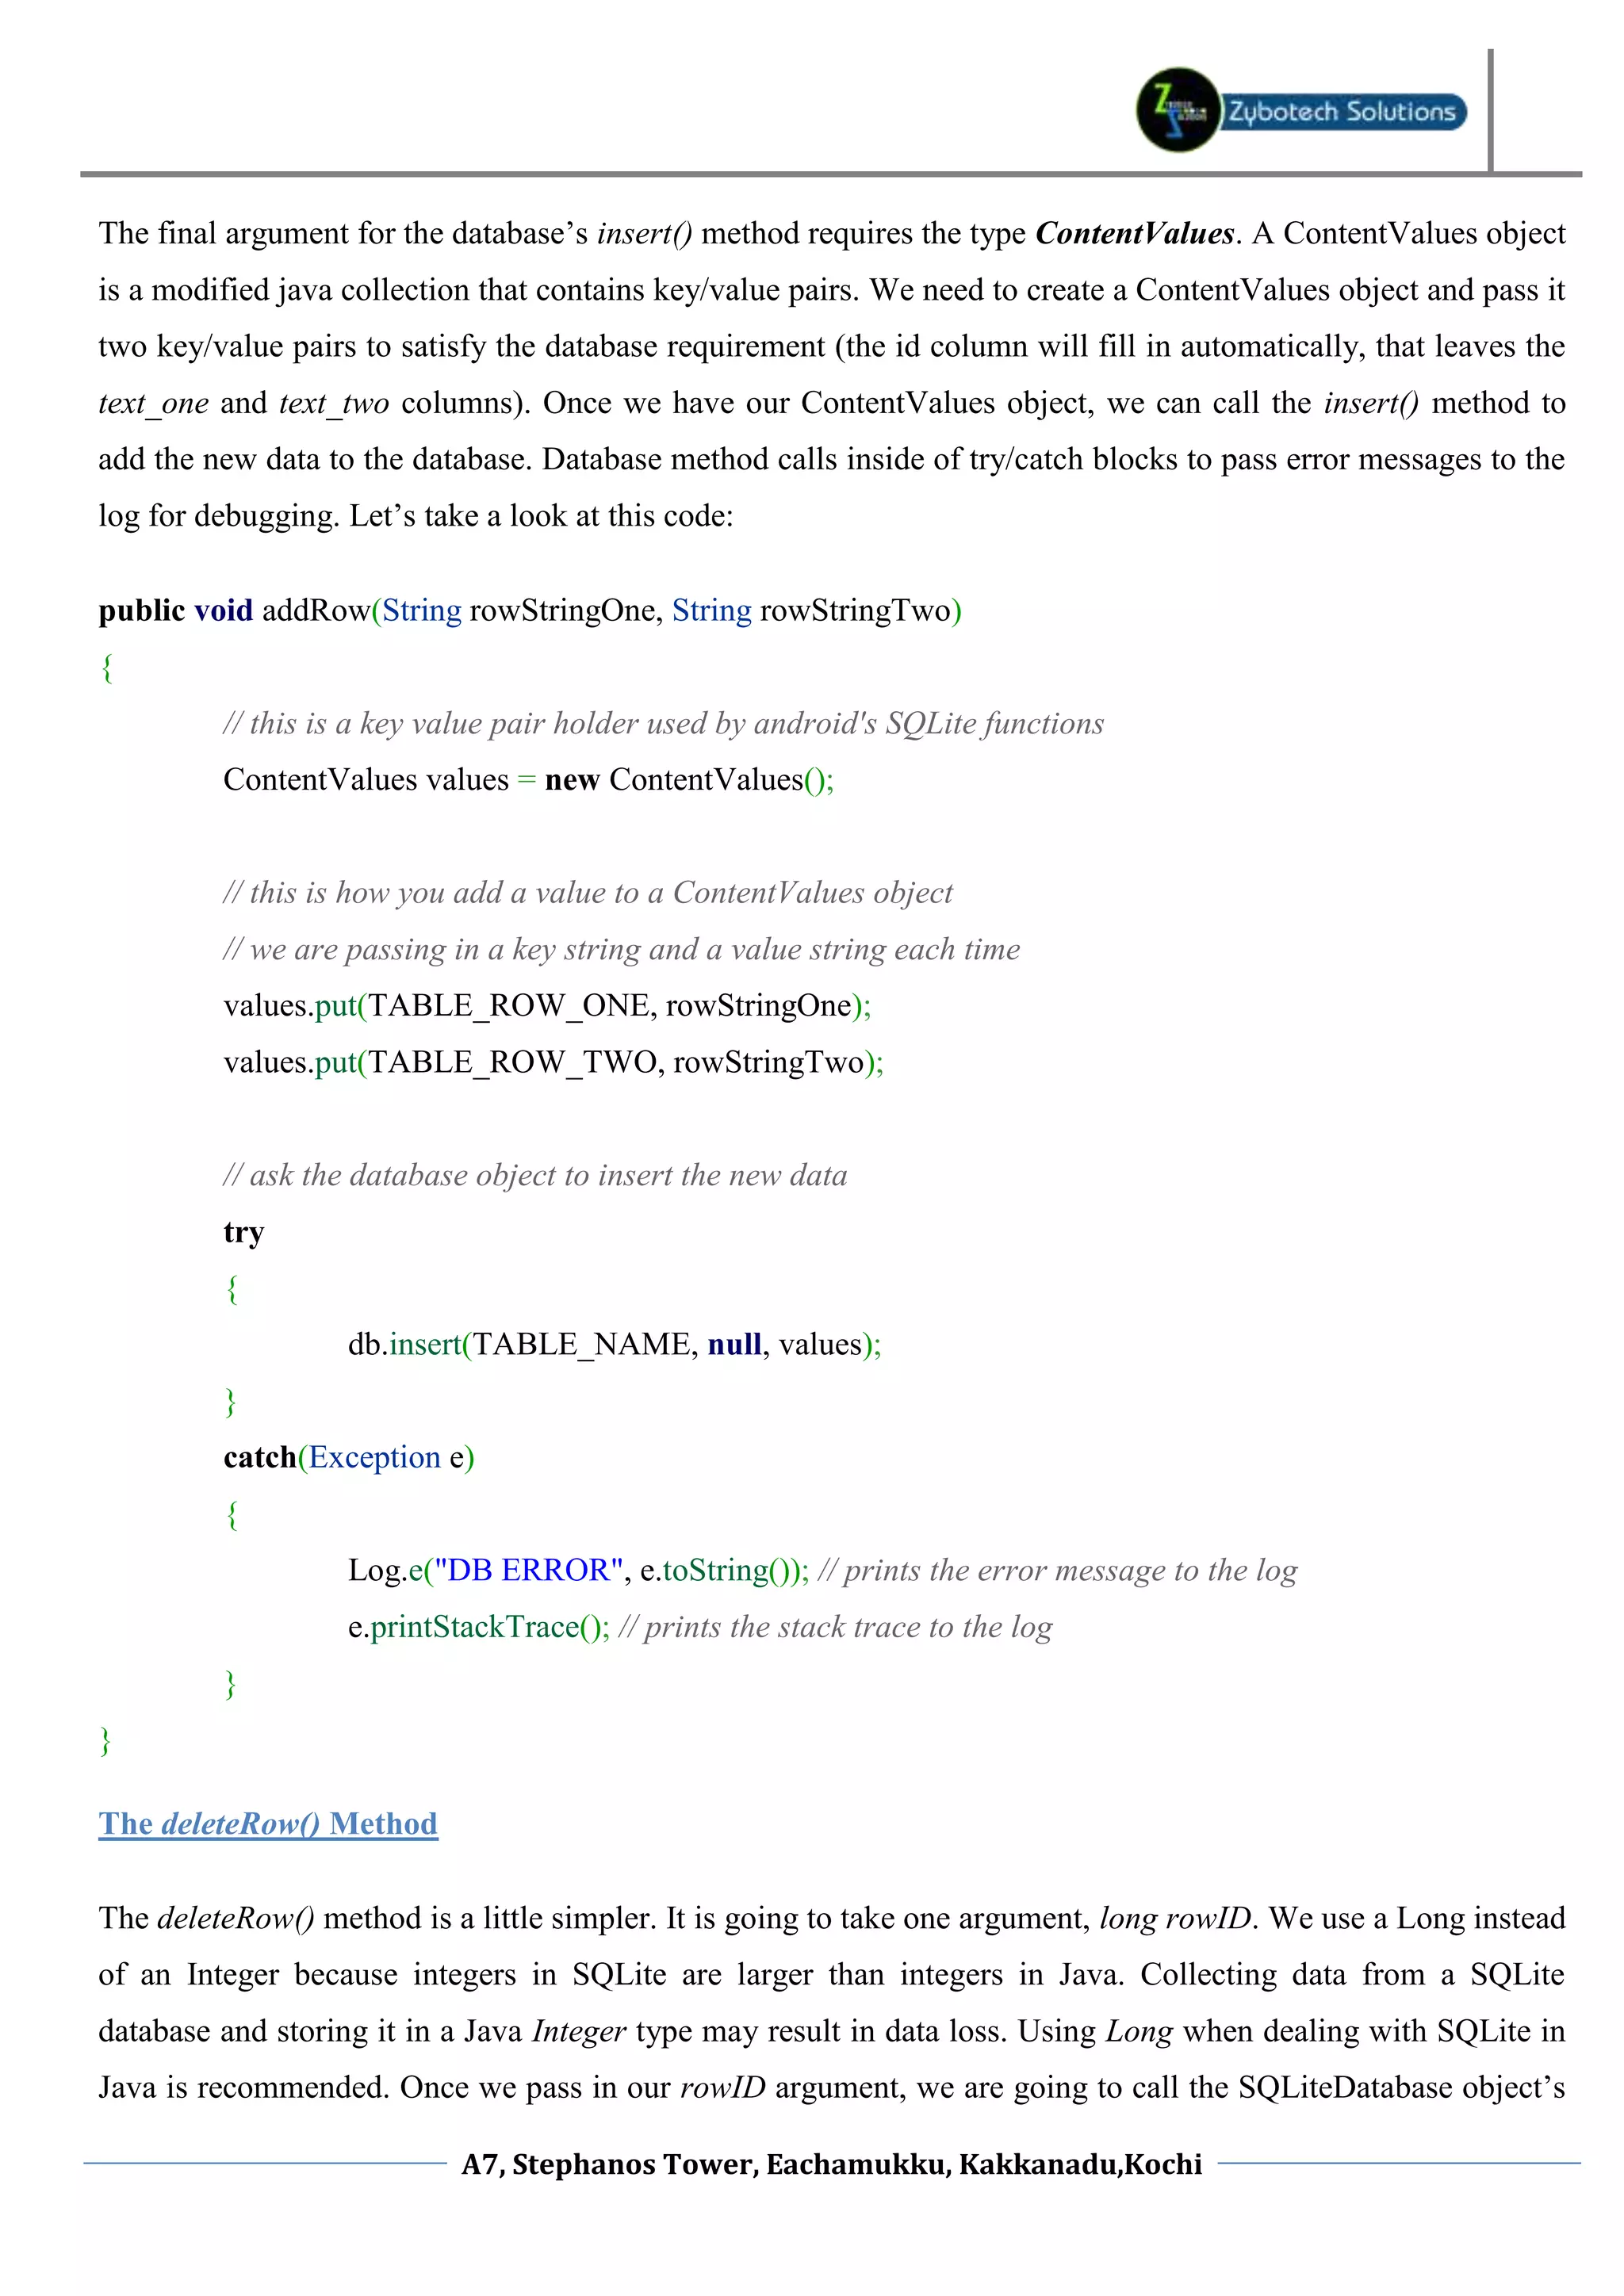
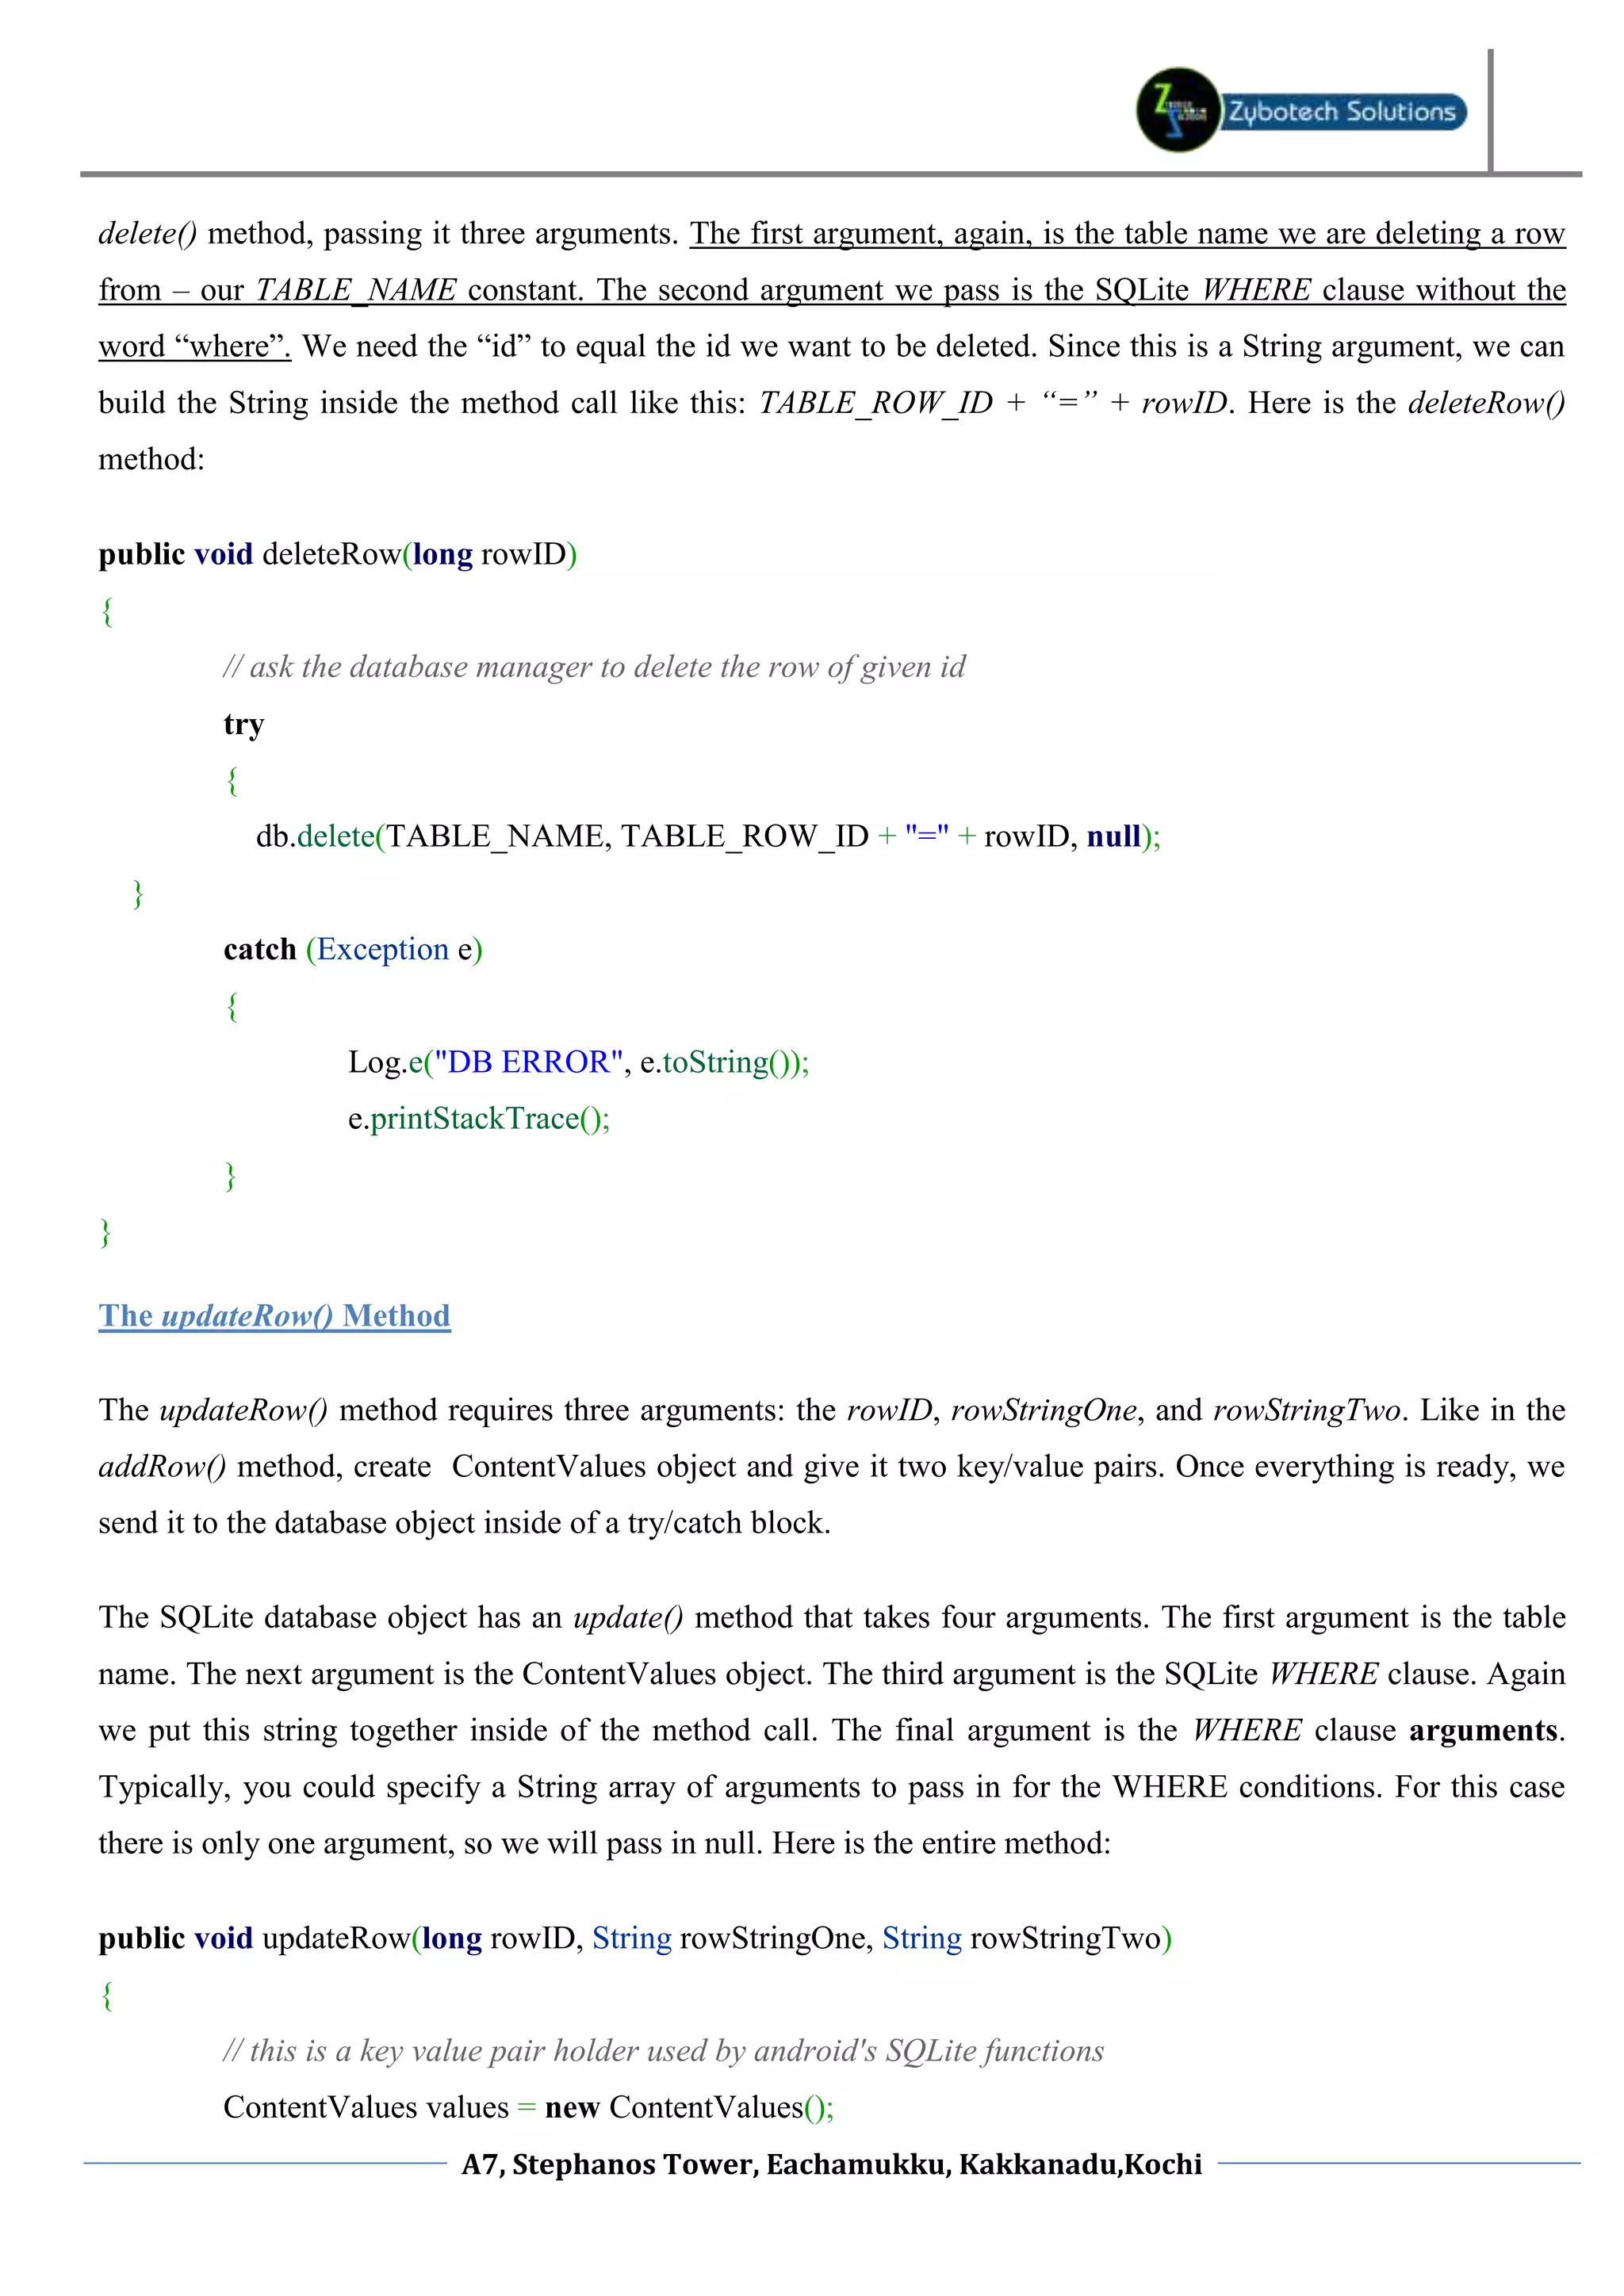
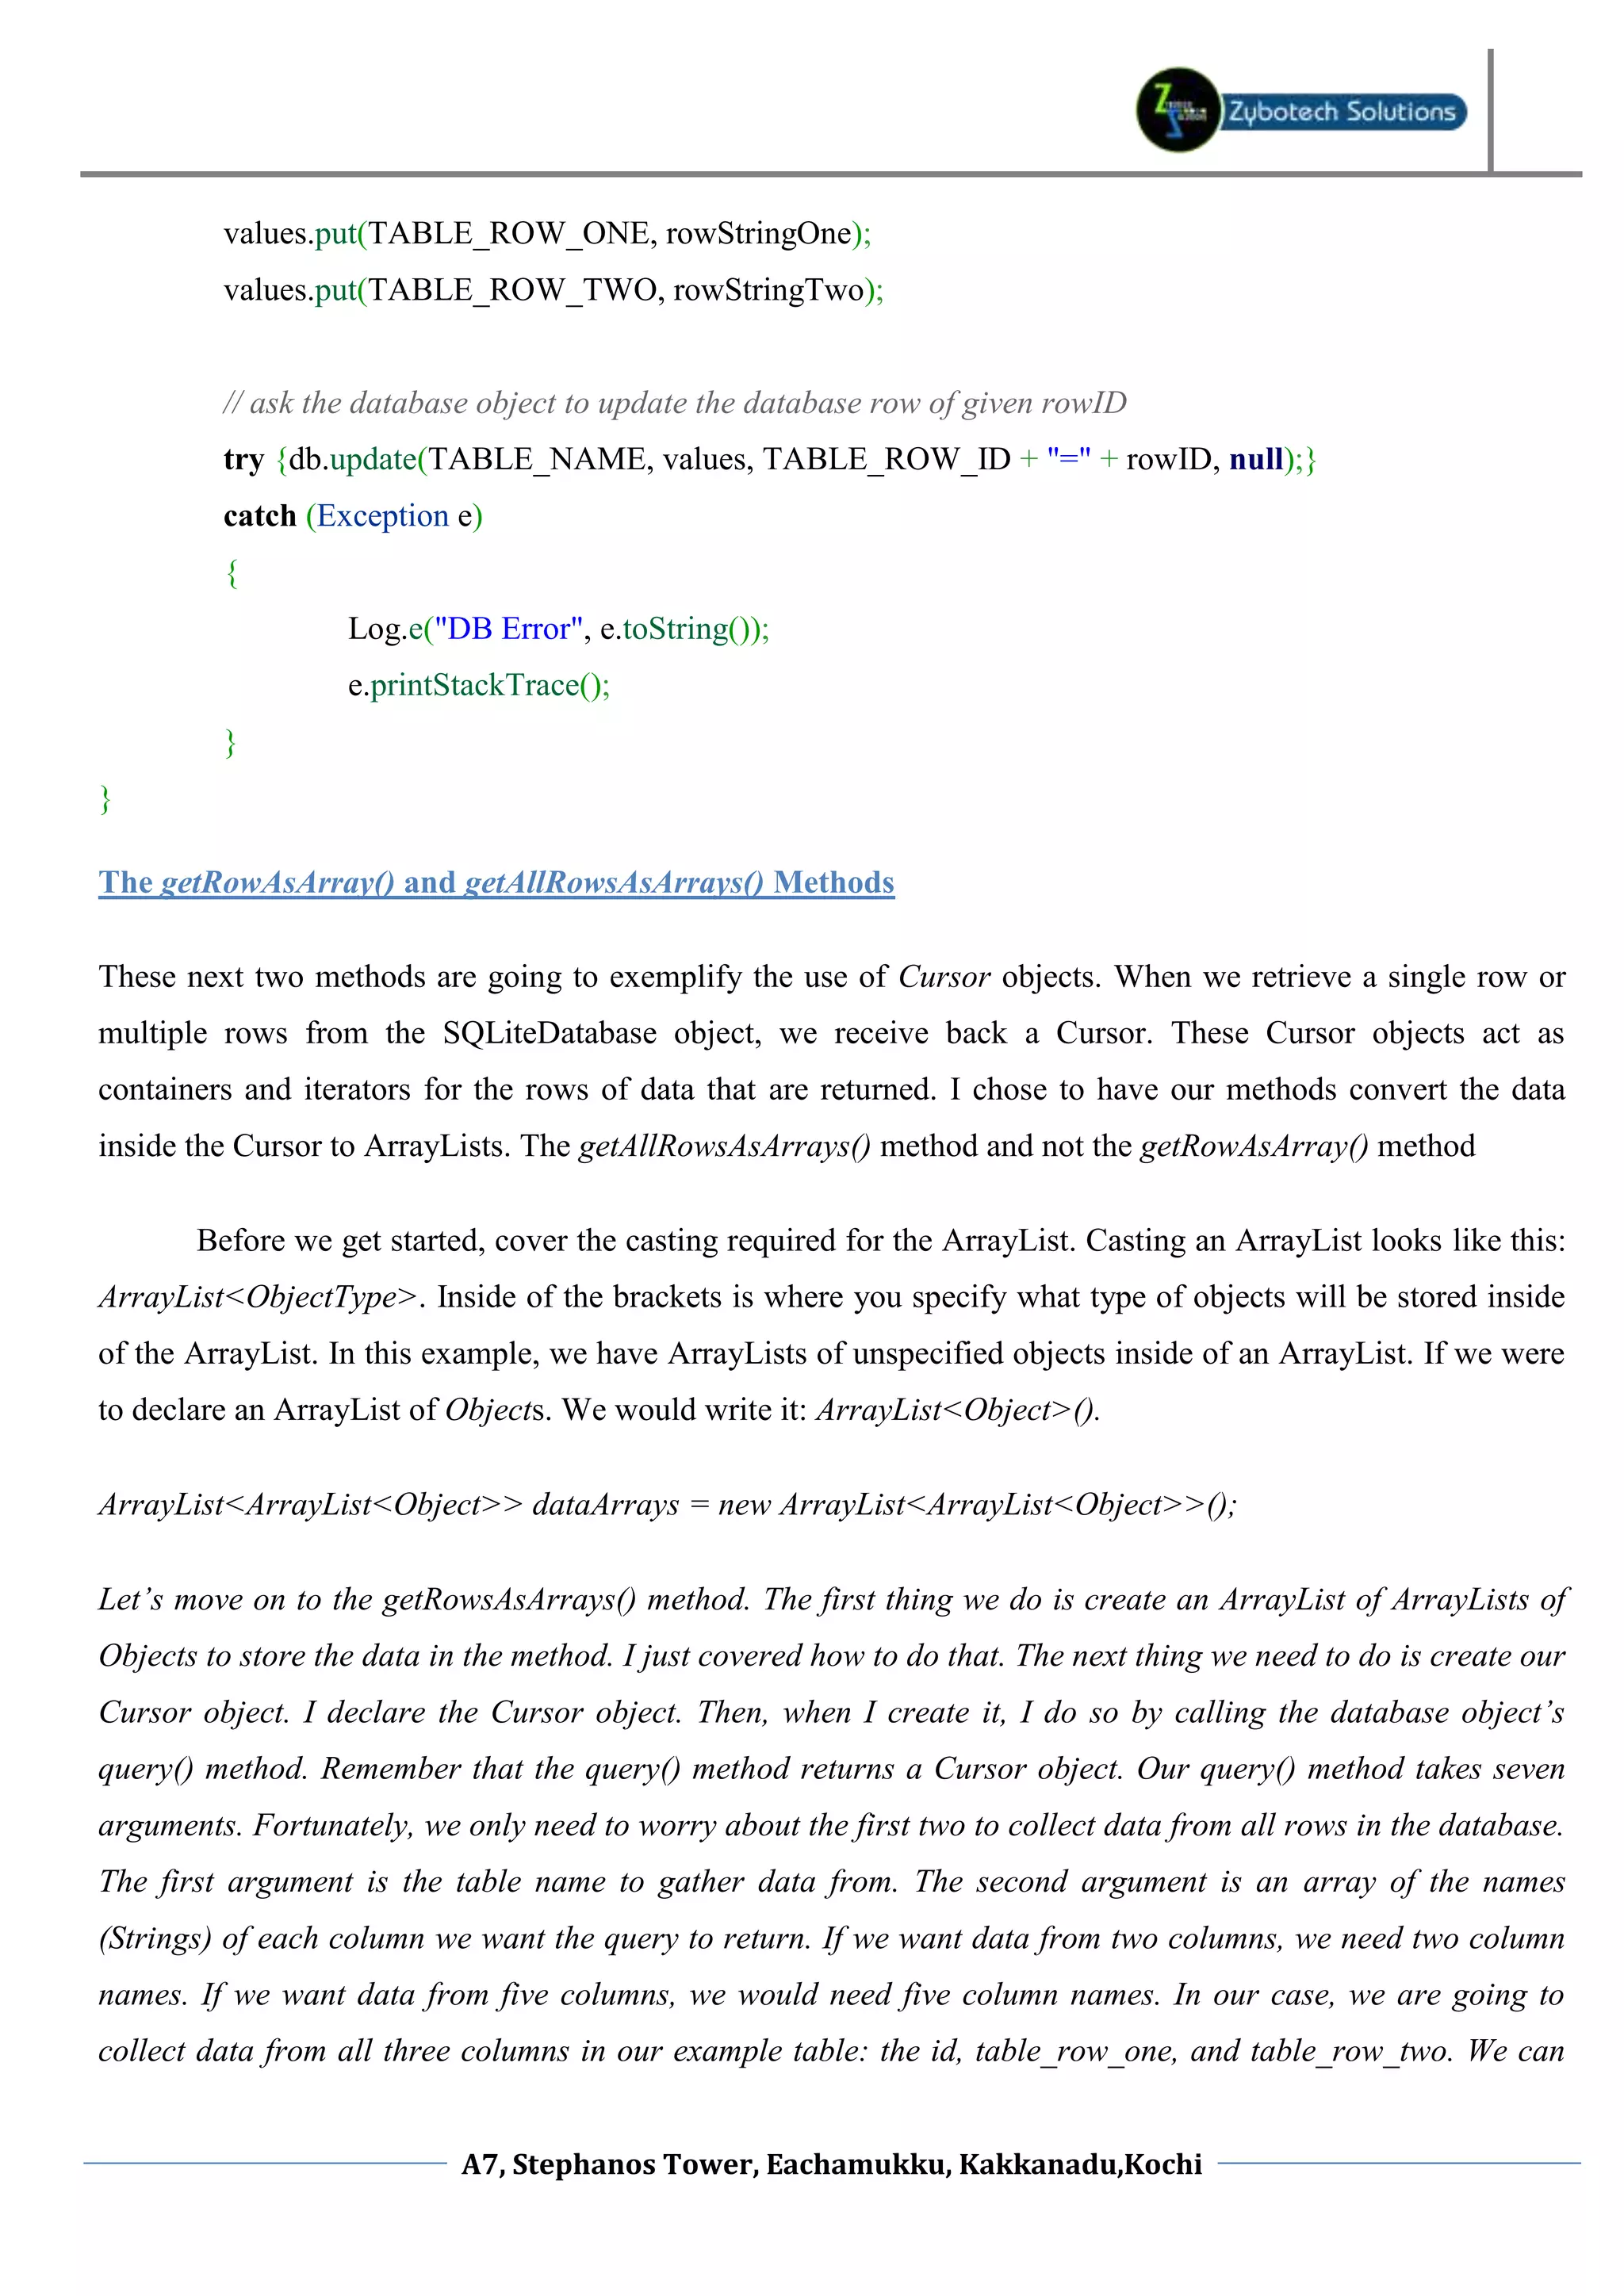
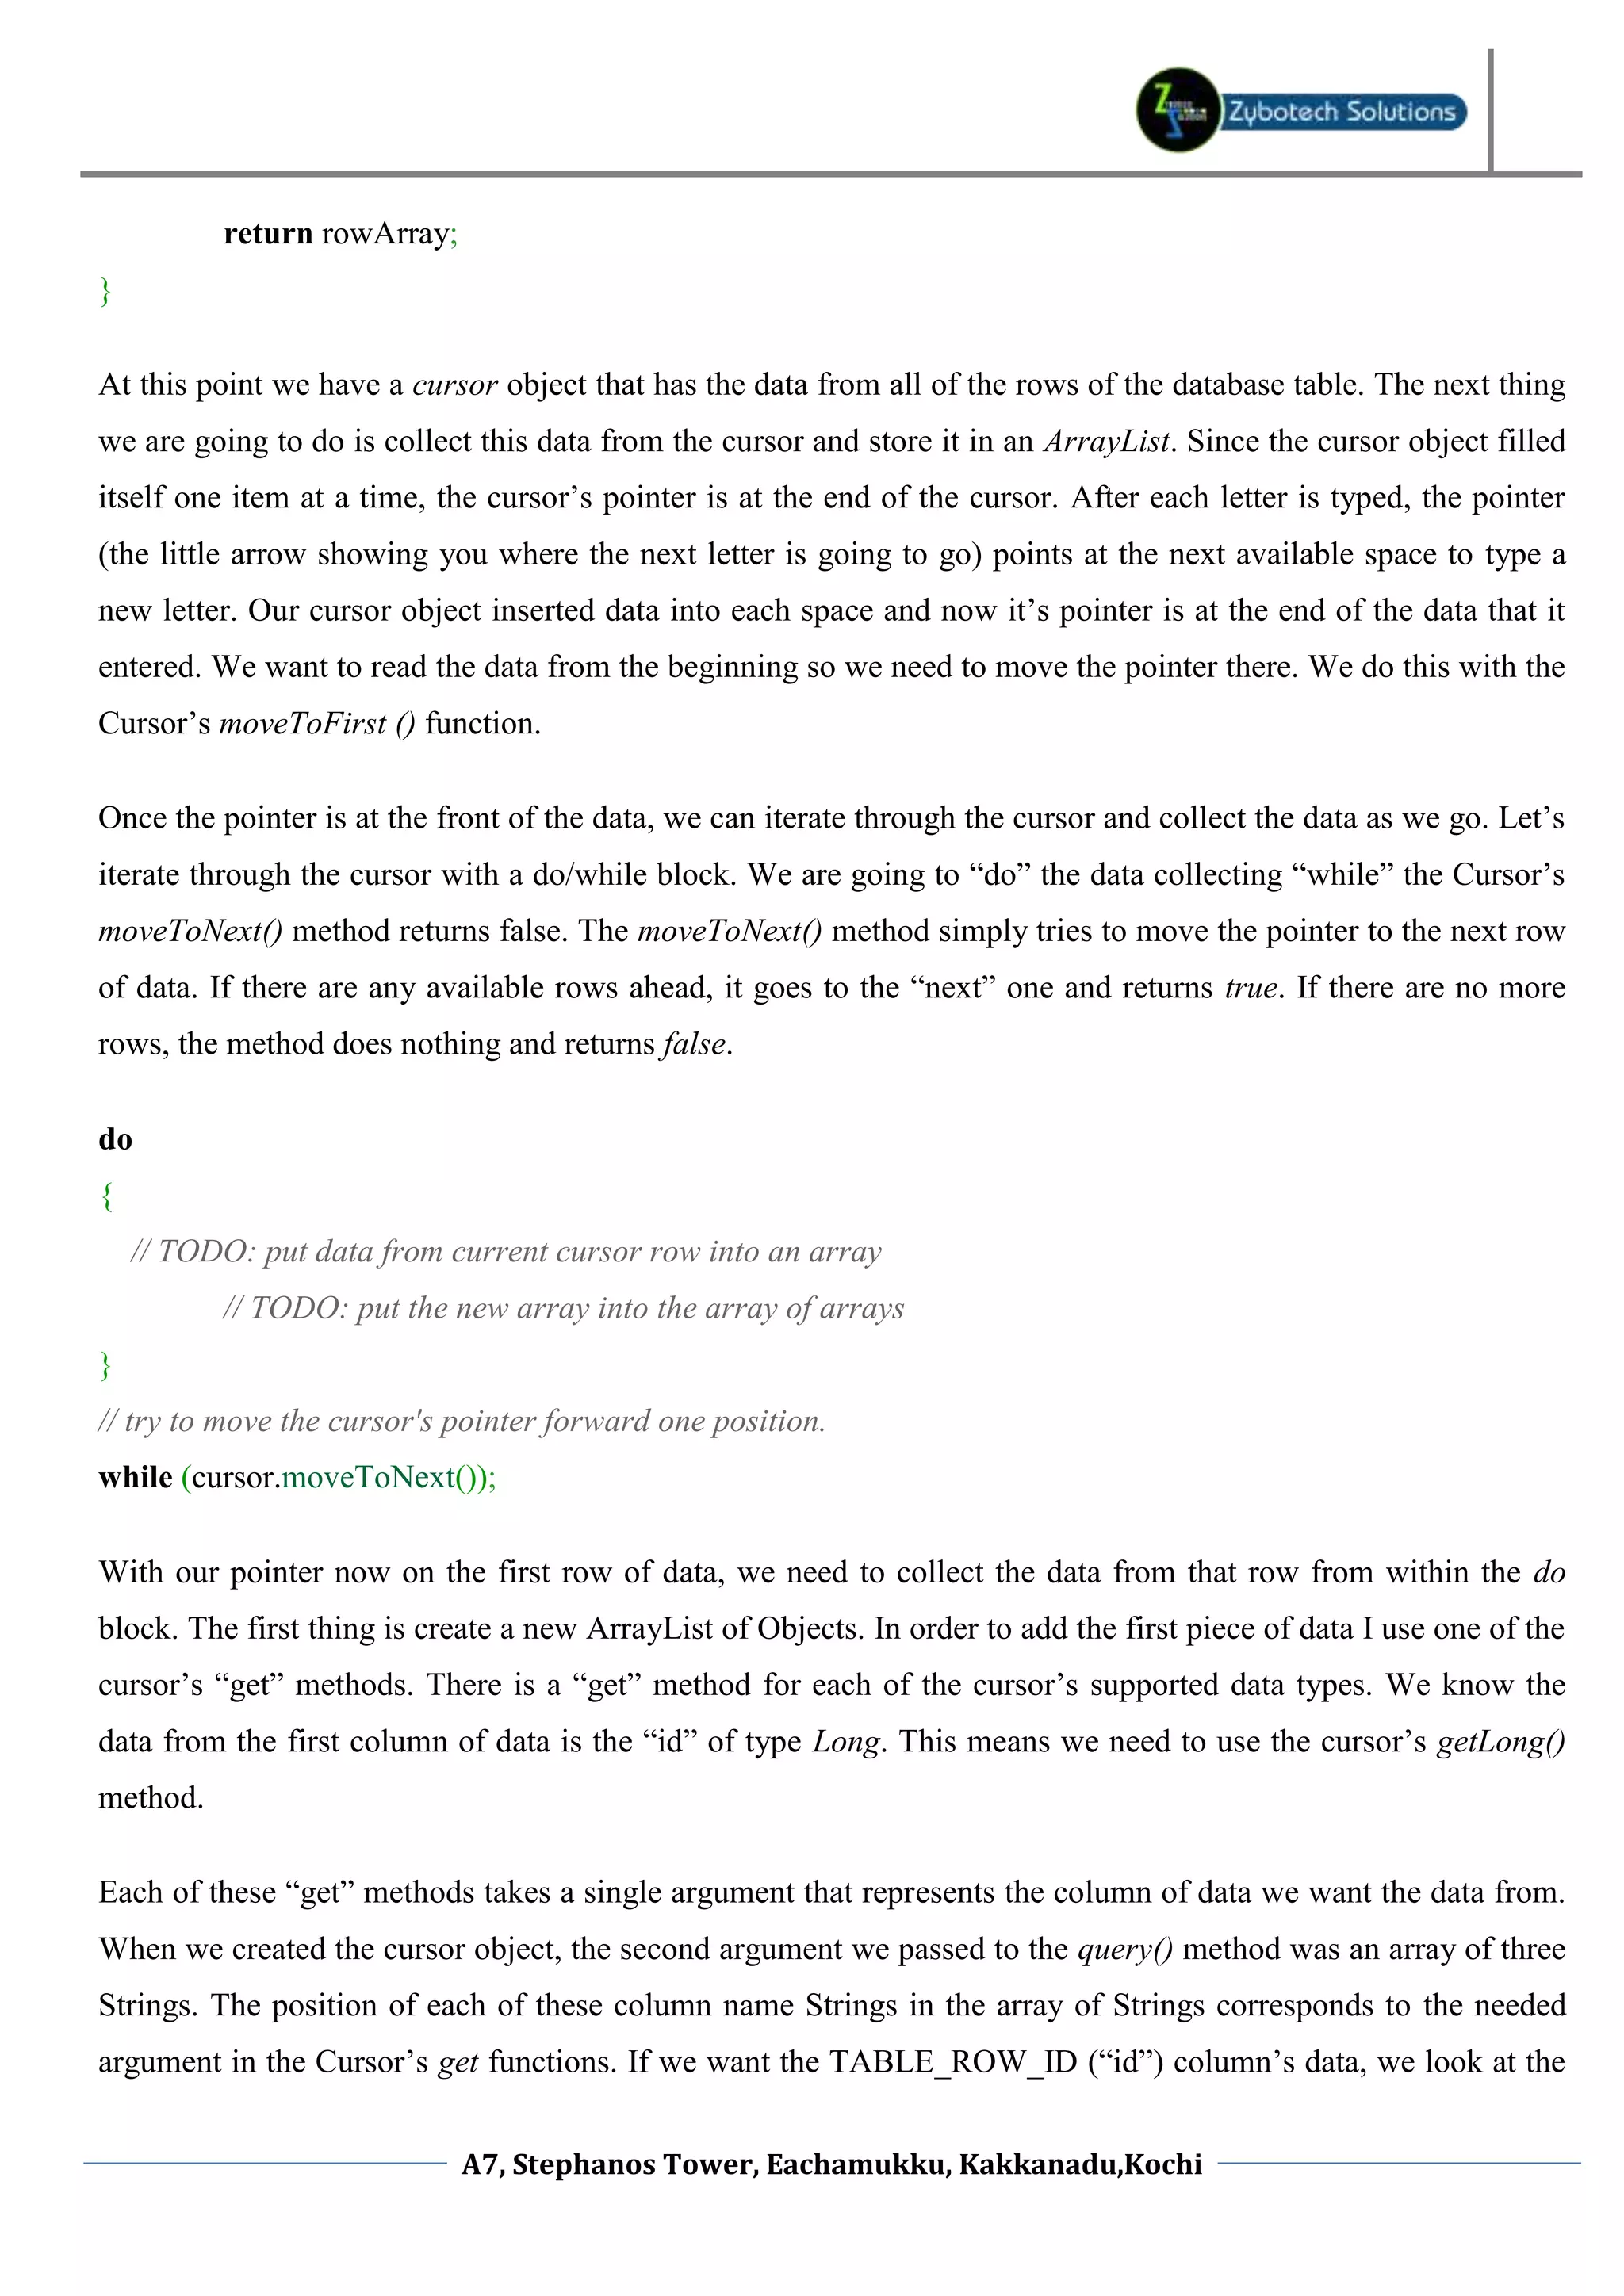
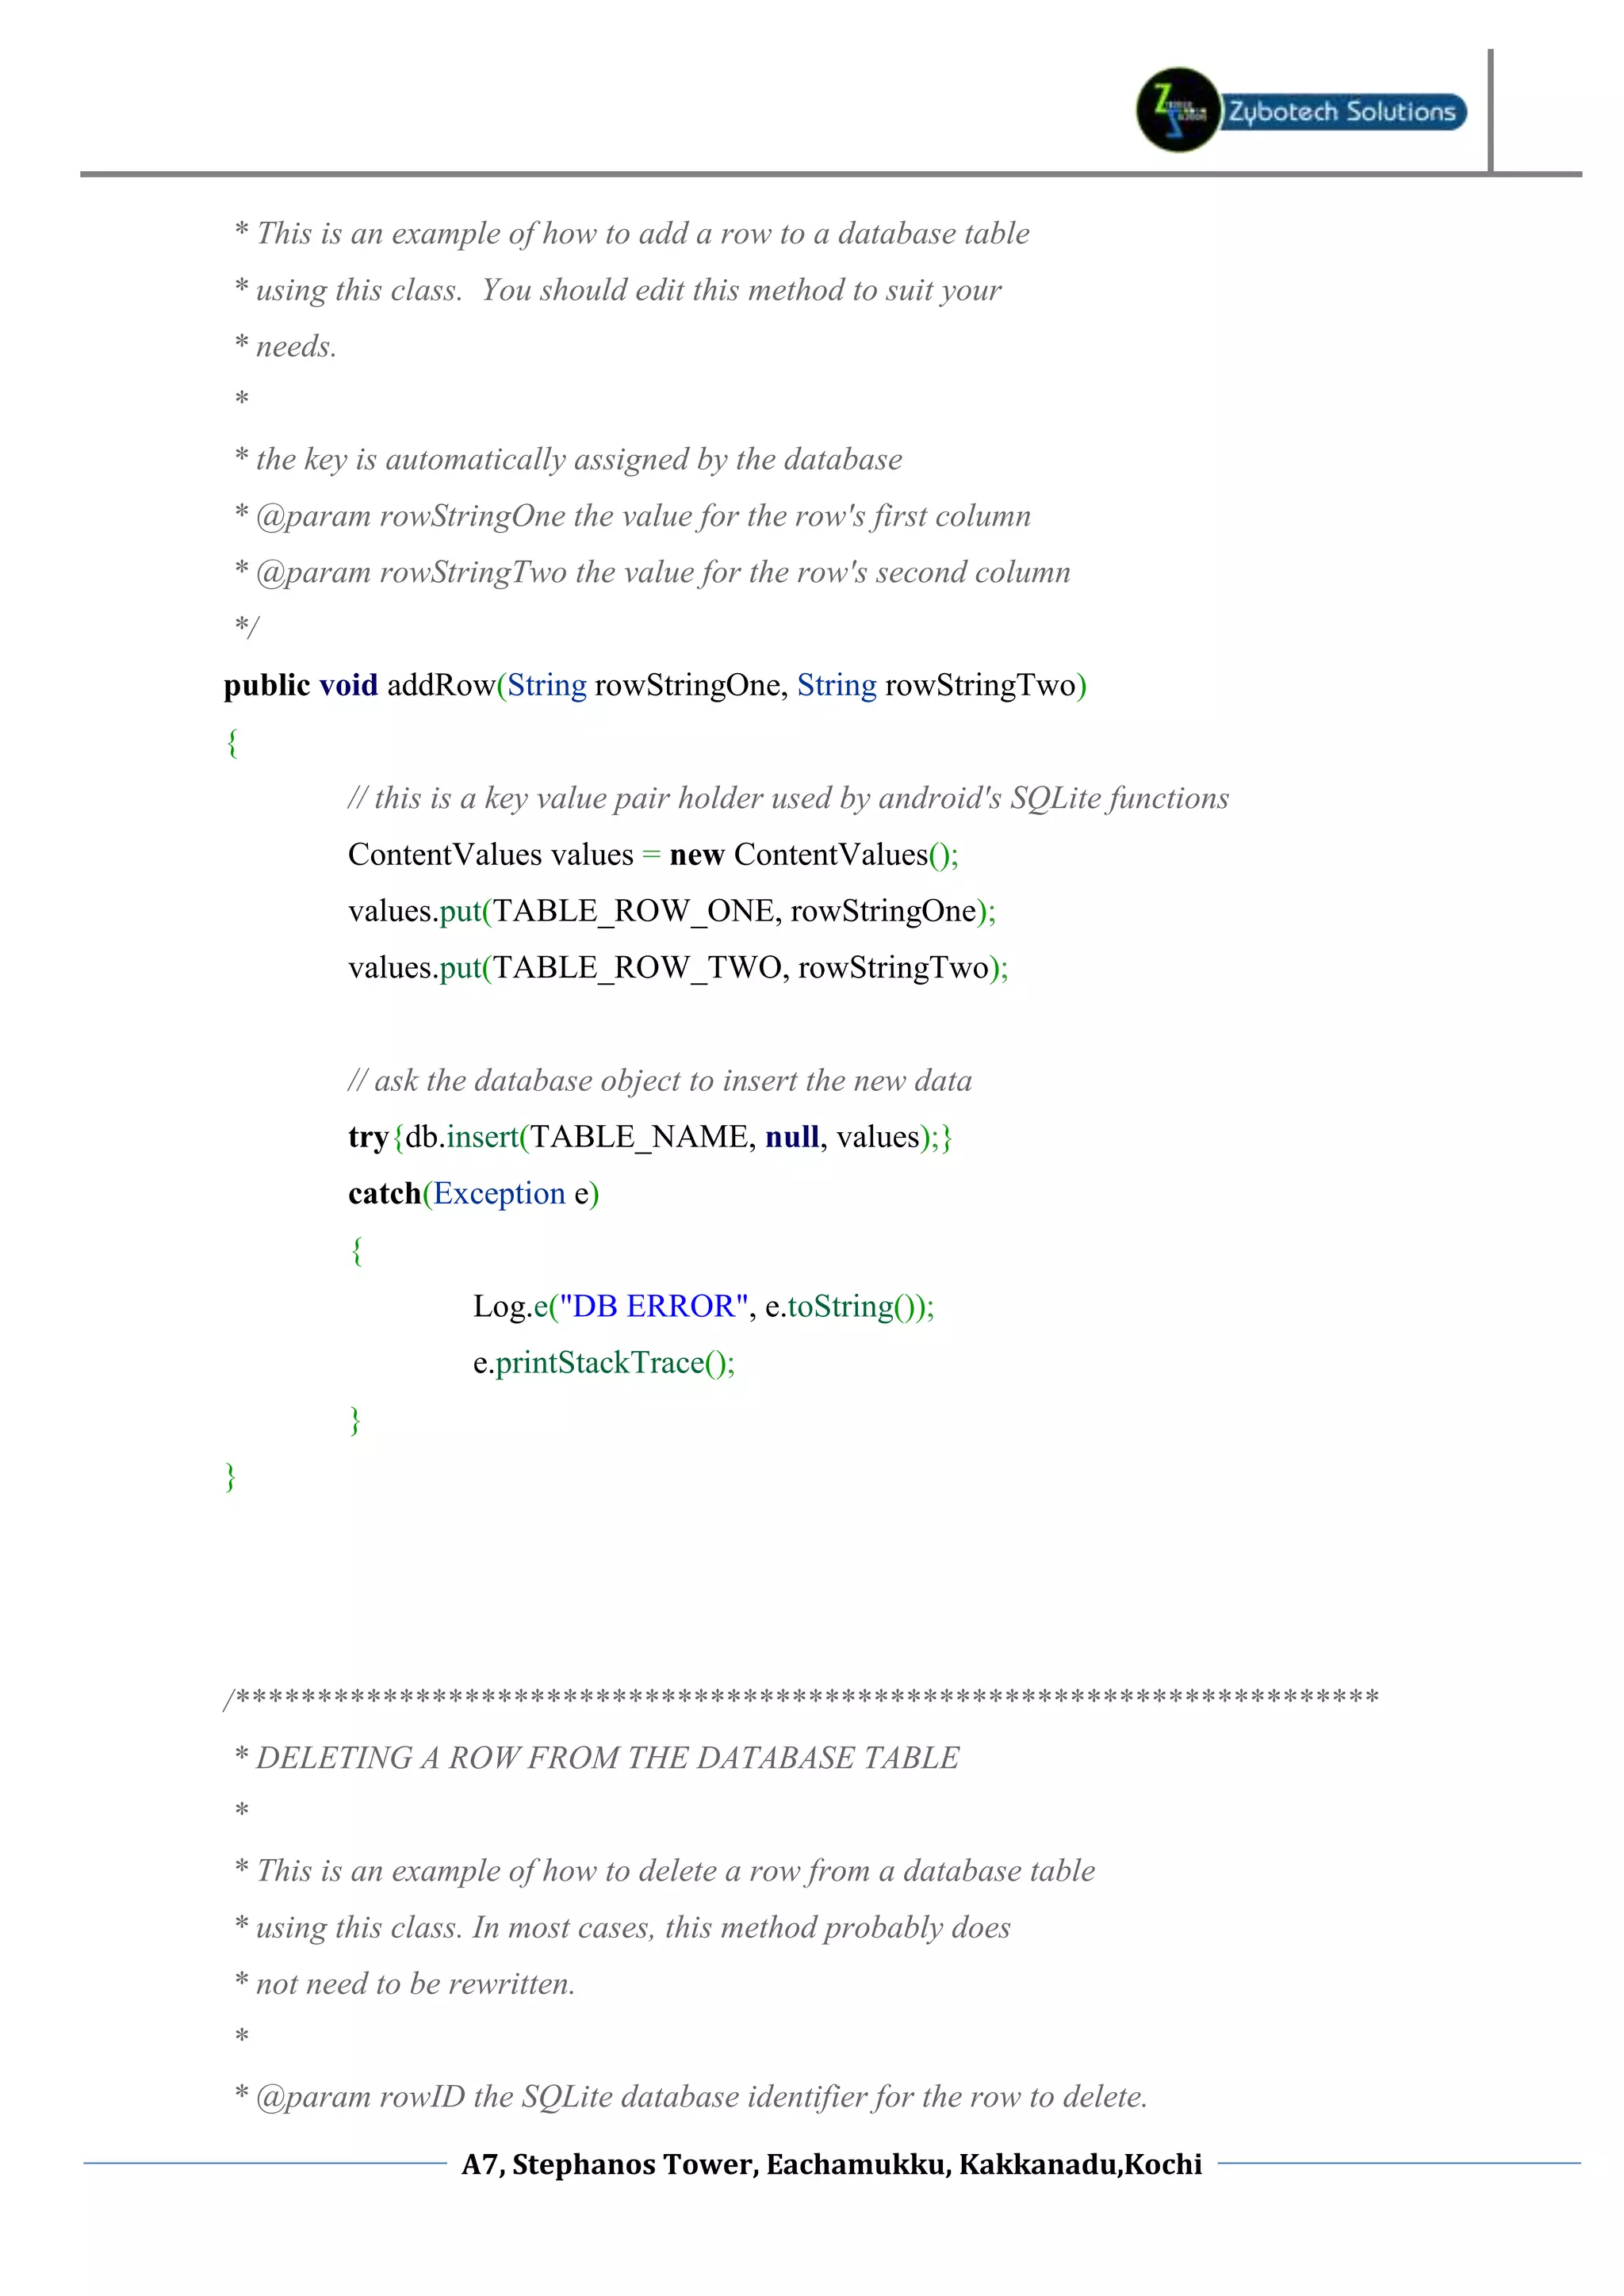
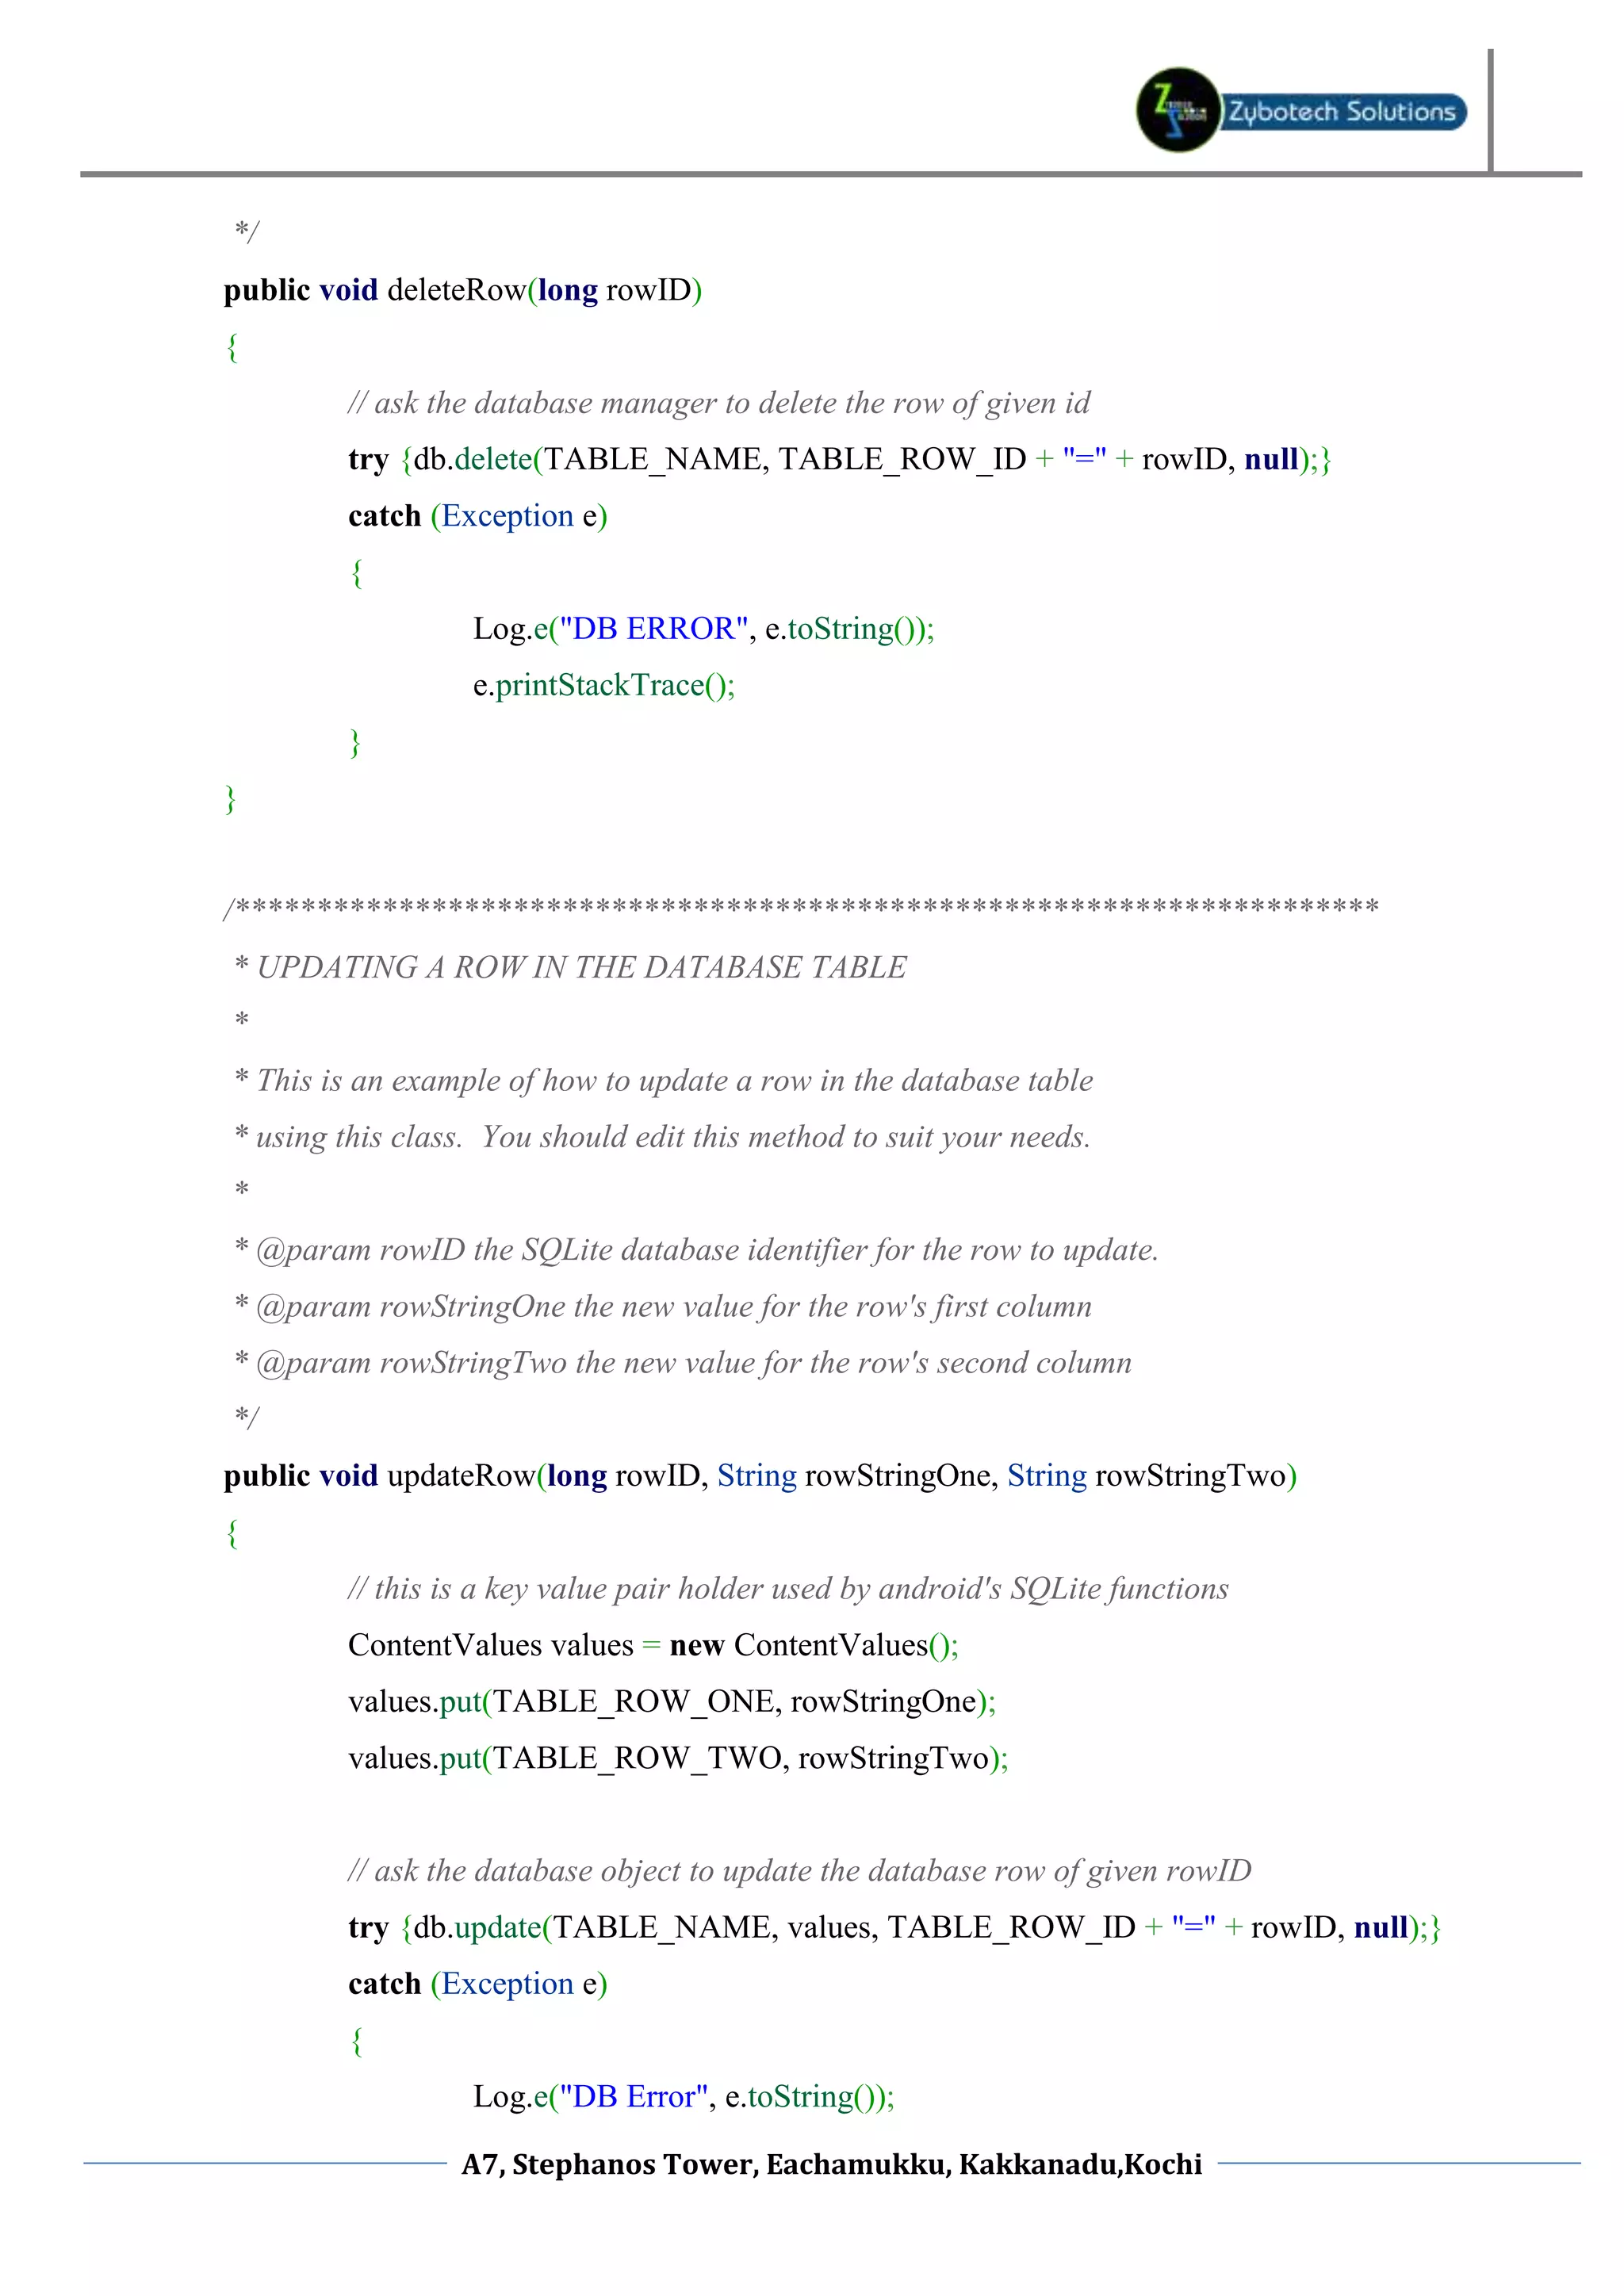
This document provides an overview and tutorial for using SQLite database tools in Android application development. It discusses the SQLiteOpenHelper and SQLiteDatabase classes, which are used to create, open, and manage an app's database. It then demonstrates how to create a database manager class that extends SQLiteOpenHelper to define the database structure, and includes methods like addRow(), deleteRow(), and updateRow() to interact with the database. The goal is to build reusable database functionality that can be included in most Android apps.


![pass the value null five times for the next five arguments. That gives us all seven arguments for the SQLiteDatabase object’s query() method. Our getRowAsArray() method passes a third argument to the query() method. This argument, a String, satisfies the WHERE clause by specifying “TABLE_ROW_ID=rowID”. This is similar to the deleteRow() method’s WHERE clause that I covered earlier in this section. So when we write the getRowAsArray() method. We pass in three arguments and four null arguments to the SQLiteDatabase query() method. In this code the database query() method call into seven lines. I prefer to do this for readability – you may or may not want to do the same. public ArrayList<Object> getRowAsArray(long rowID) { ArrayList<Object> rowArray = new ArrayList<Object>(); Cursor cursor; try { // this method call is spread out over seven lines as a personal preference cursor = db.query ( TABLE_NAME, new String[] { TABLE_ROW_ID, TABLE_ROW_ONE, TABLE_ROW_TWO }, TABLE_ROW_ID + "=" + rowID, null, null, null, null, null ); // TODO Move the data from the cursor to the arraylist. } catch (SQLException e) { Log.e("DB ERROR", e.toString()); e.printStackTrace(); } A7, Stephanos Tower, Eachamukku, Kakkanadu,Kochi](https://image.slidesharecdn.com/androiddatabasetutorial-120919042004-phpapp02/75/Android-database-tutorial-9-2048.jpg)
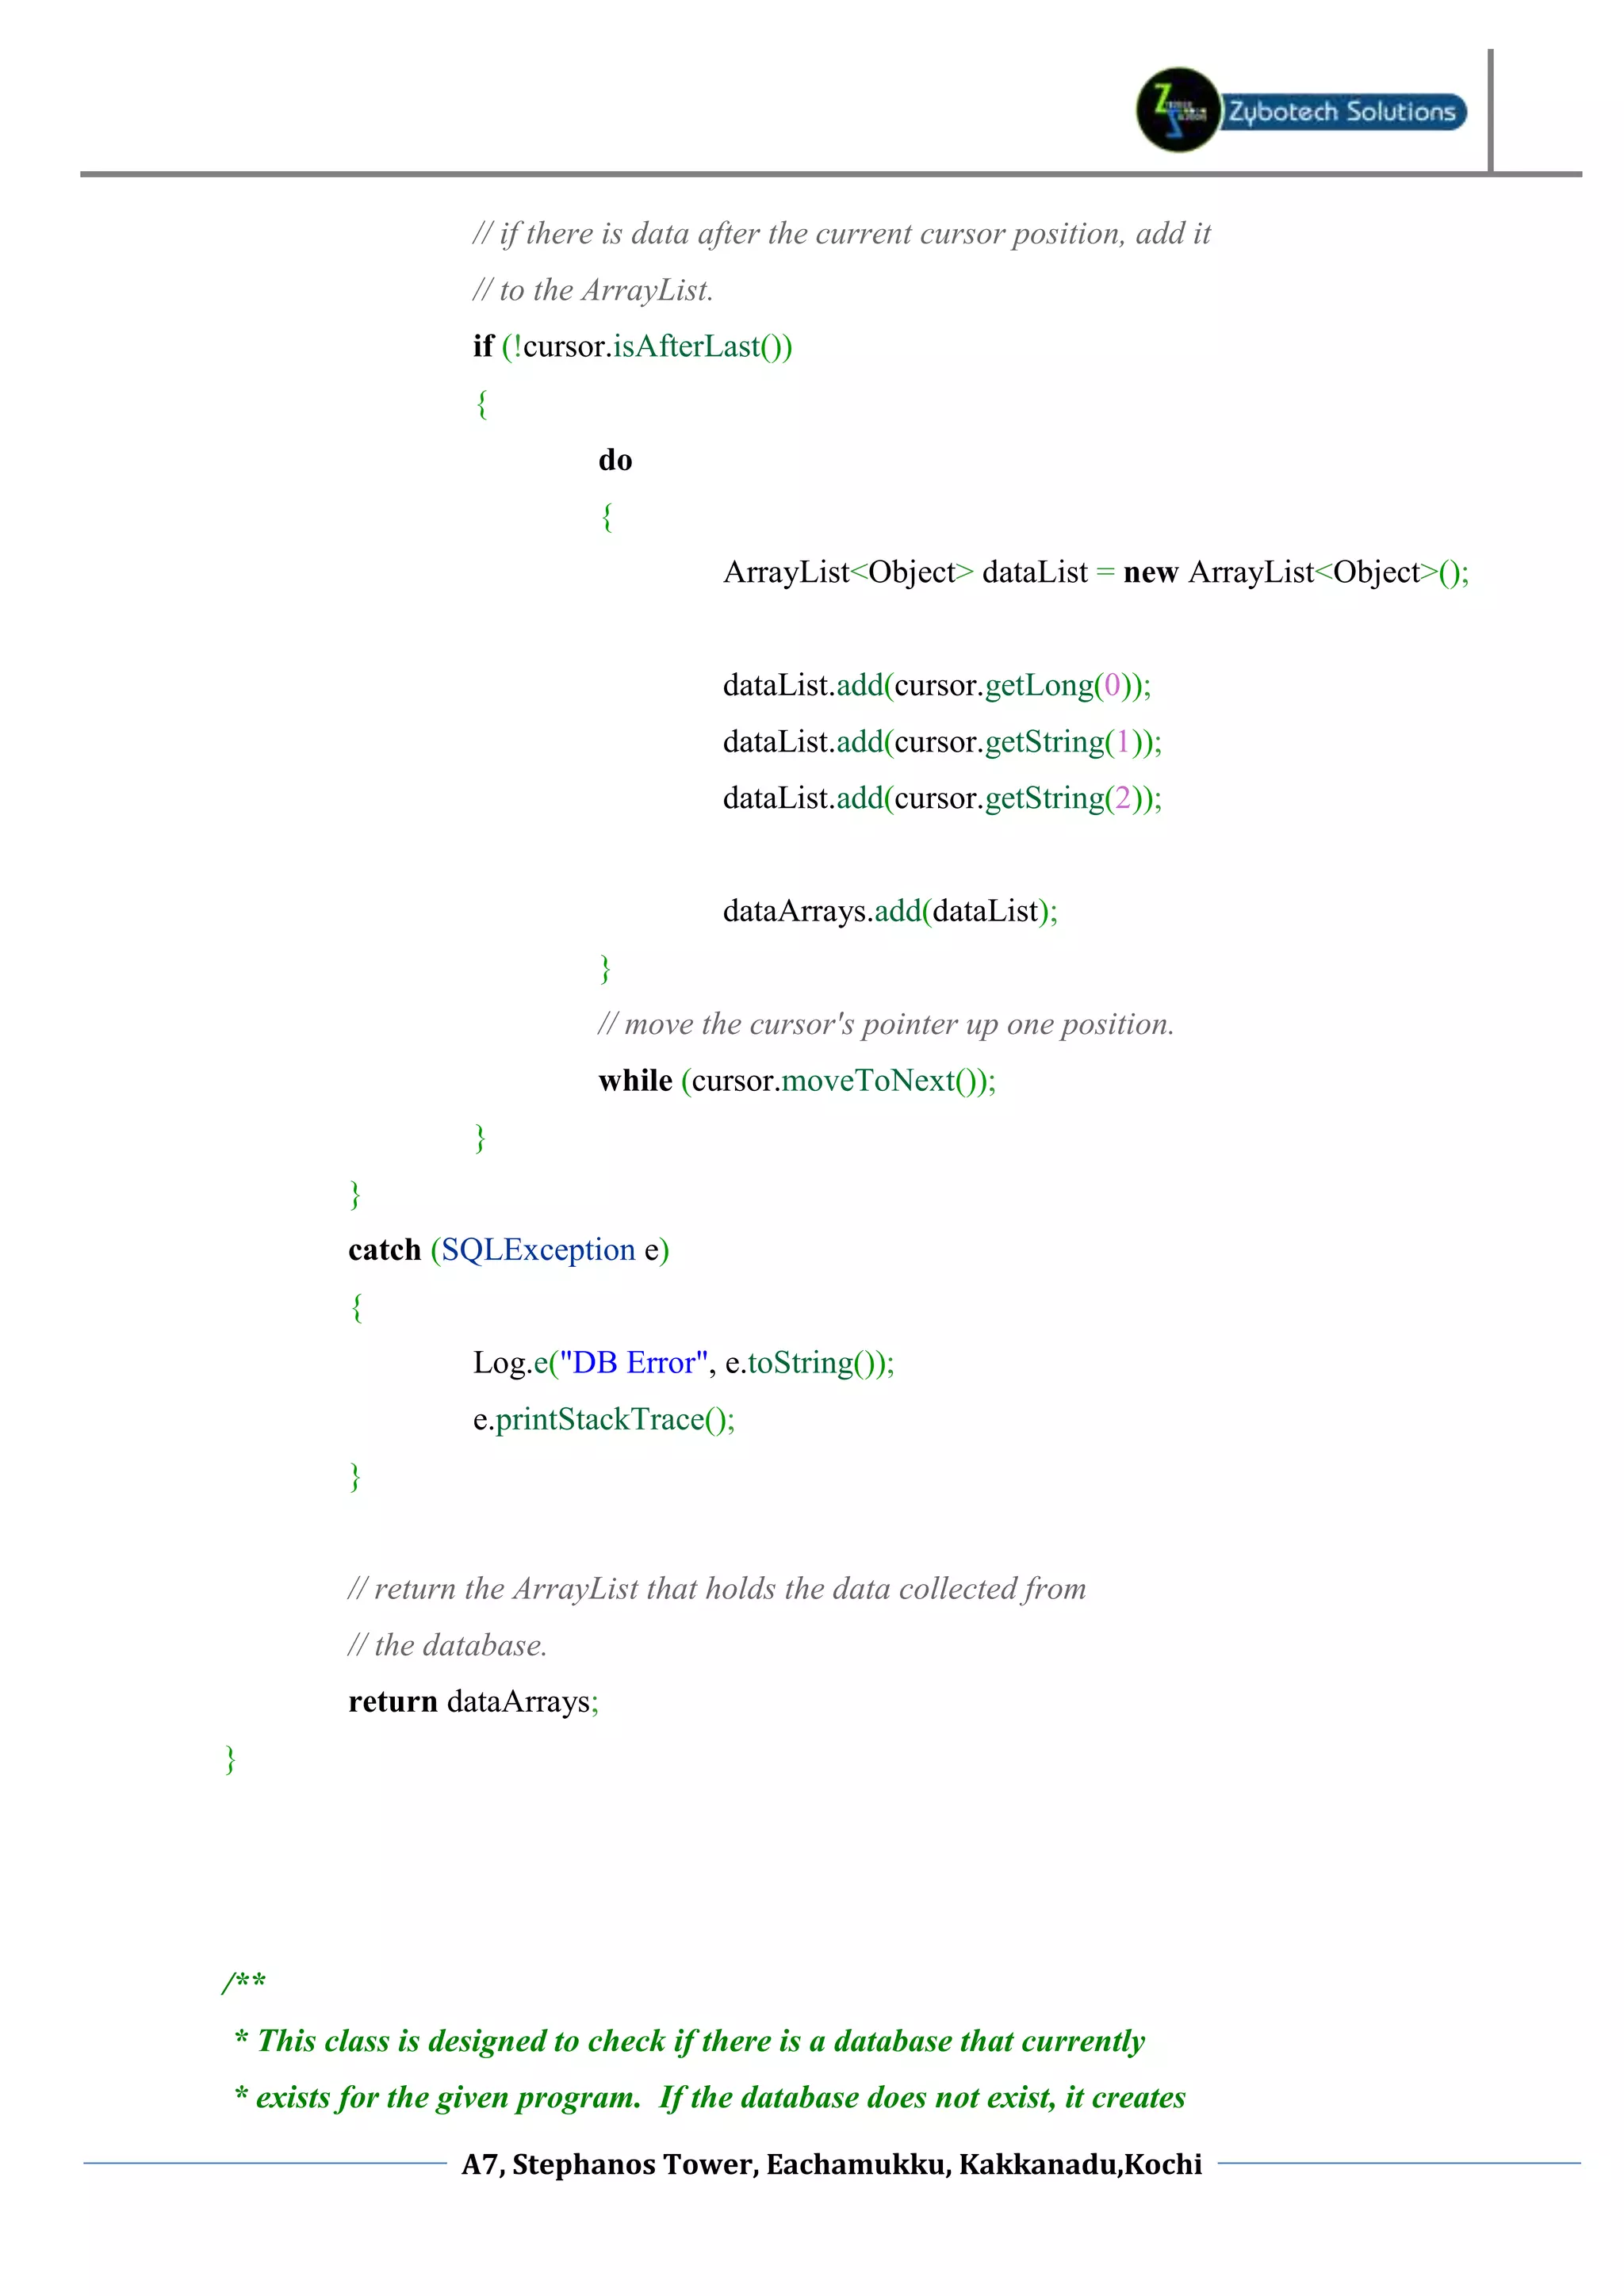
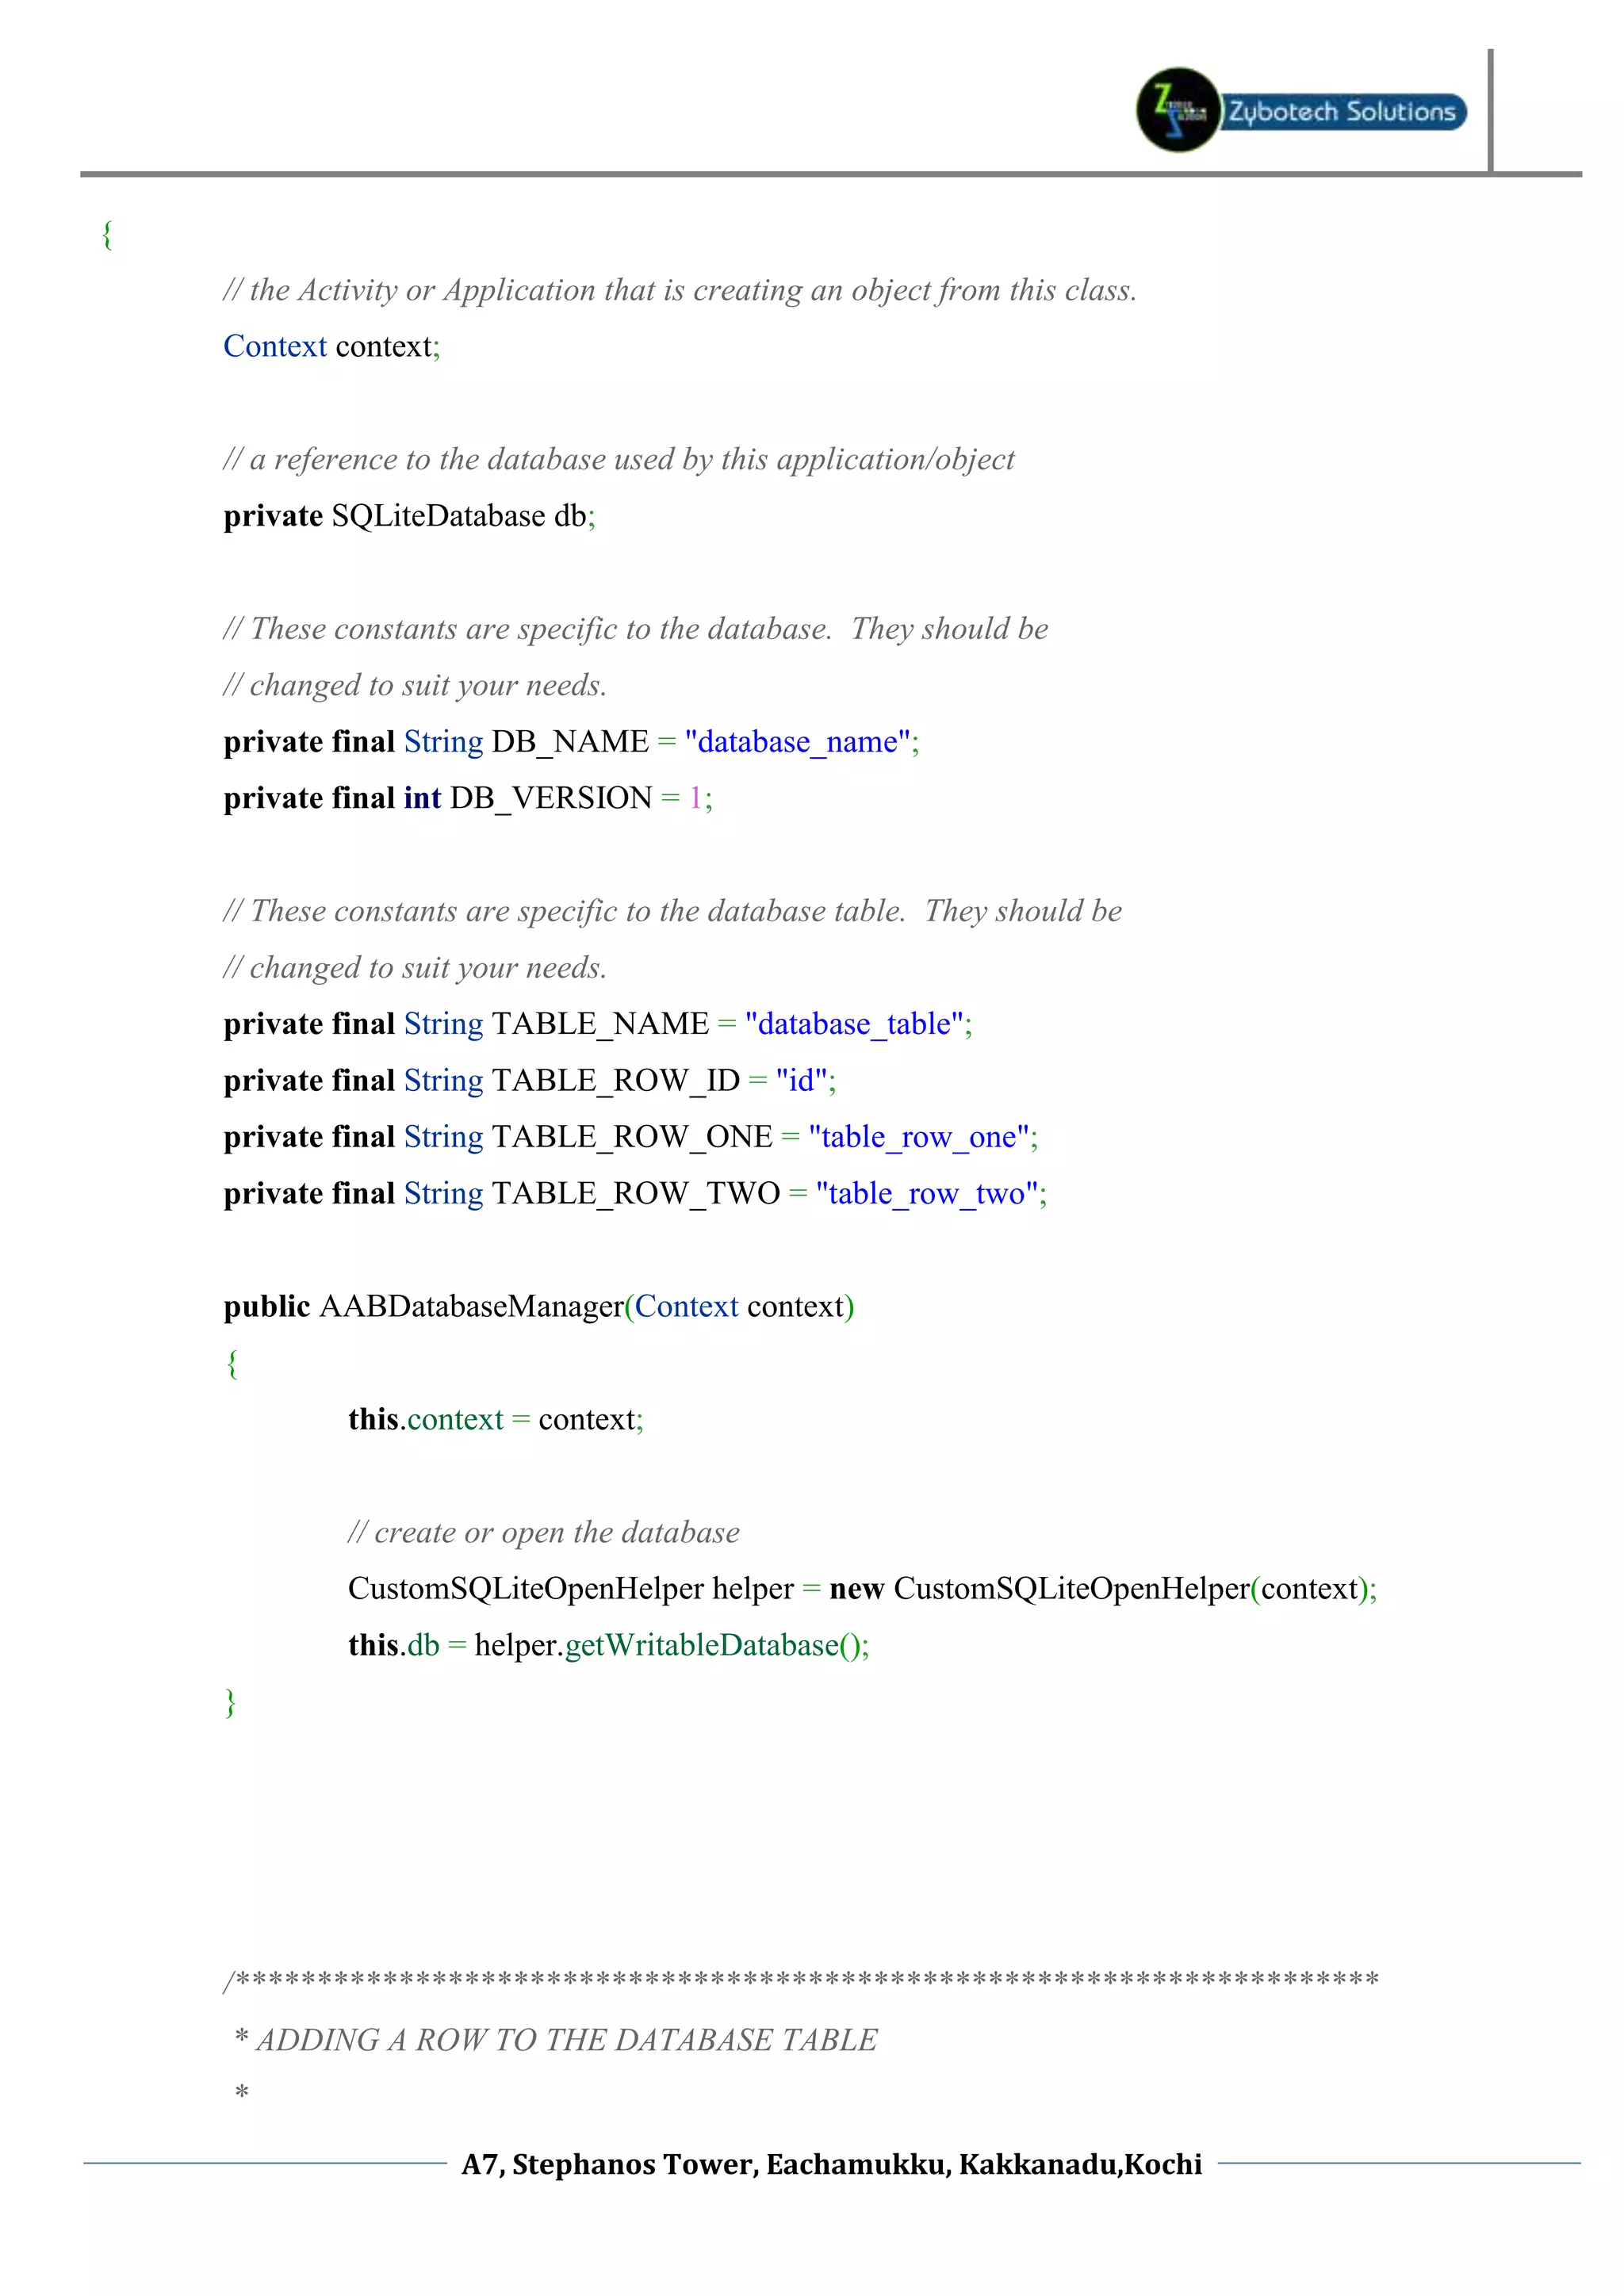
![* * the key is automatically assigned by the database */ public ArrayList<ArrayList<Object>> getAllRowsAsArrays() { // create an ArrayList that will hold all of the data collected from // the database. ArrayList<ArrayList<Object>> dataArrays = new ArrayList<ArrayList<Object>>(); // this is a database call that creates a "cursor" object. // the cursor object store the information collected from the // database and is used to iterate through the data. Cursor cursor; try { // ask the database object to create the cursor. cursor = db.query( TABLE_NAME, new String[]{TABLE_ROW_ID, TABLE_ROW_ONE, TABLE_ROW_TWO}, null, null, null, null, null ); // move the cursor's pointer to position zero. cursor.moveToFirst(); // if there is data after the current cursor position, add it // to the ArrayList. if (!cursor.isAfterLast()) { do { A7, Stephanos Tower, Eachamukku, Kakkanadu,Kochi](https://image.slidesharecdn.com/androiddatabasetutorial-120919042004-phpapp02/75/Android-database-tutorial-12-2048.jpg)
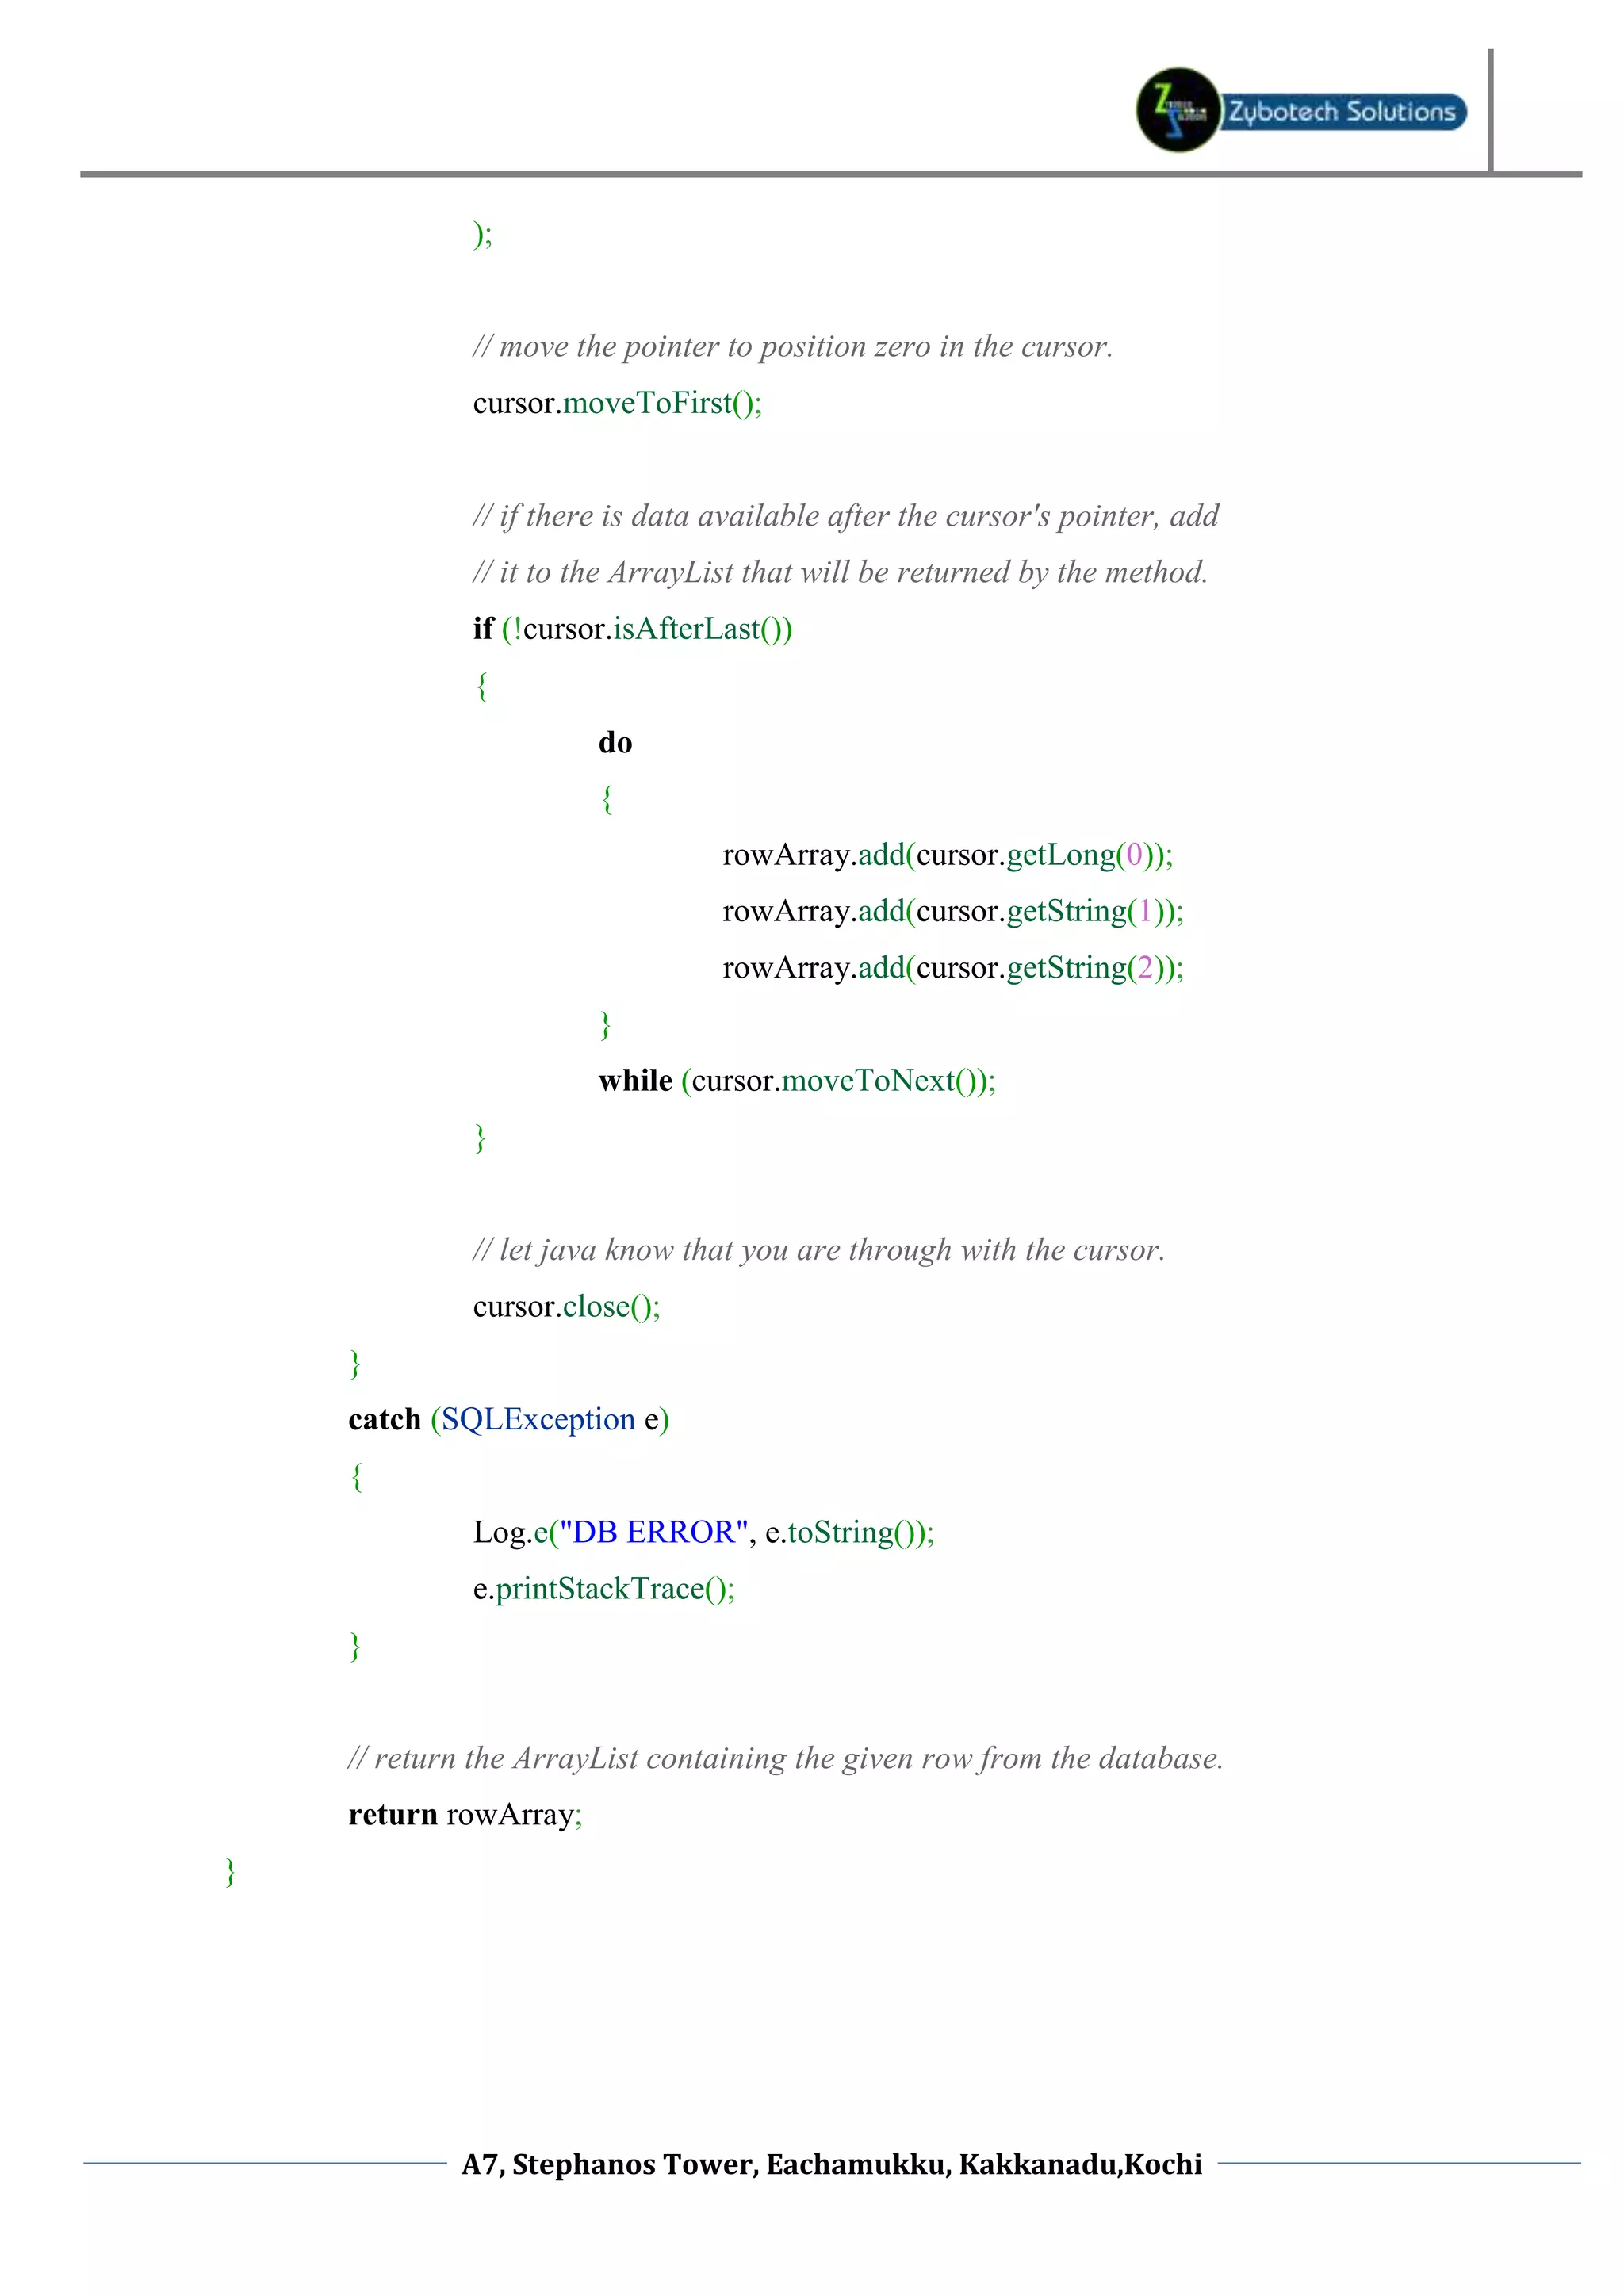
![*/ public ArrayList<Object> getRowAsArray(long rowID) { // create an array list to store data from the database row. // I would recommend creating a JavaBean compliant object // to store this data instead. That way you can ensure // data types are correct. ArrayList<Object> rowArray = new ArrayList<Object>(); Cursor cursor; try { // this is a database call that creates a "cursor" object. // the cursor object store the information collected from the // database and is used to iterate through the data. cursor = db.query ( TABLE_NAME, new String[] { TABLE_ROW_ID, TABLE_ROW_ONE, TABLE_ROW_TWO }, TABLE_ROW_ID + "=" + rowID, null, null, null, null, null ); // move the pointer to position zero in the cursor. cursor.moveToFirst(); // if there is data available after the cursor's pointer, add // it to the ArrayList that will be returned by the method. if (!cursor.isAfterLast()) { do { rowArray.add(cursor.getLong(0)); A7, Stephanos Tower, Eachamukku, Kakkanadu,Kochi](https://image.slidesharecdn.com/androiddatabasetutorial-120919042004-phpapp02/75/Android-database-tutorial-14-2048.jpg)
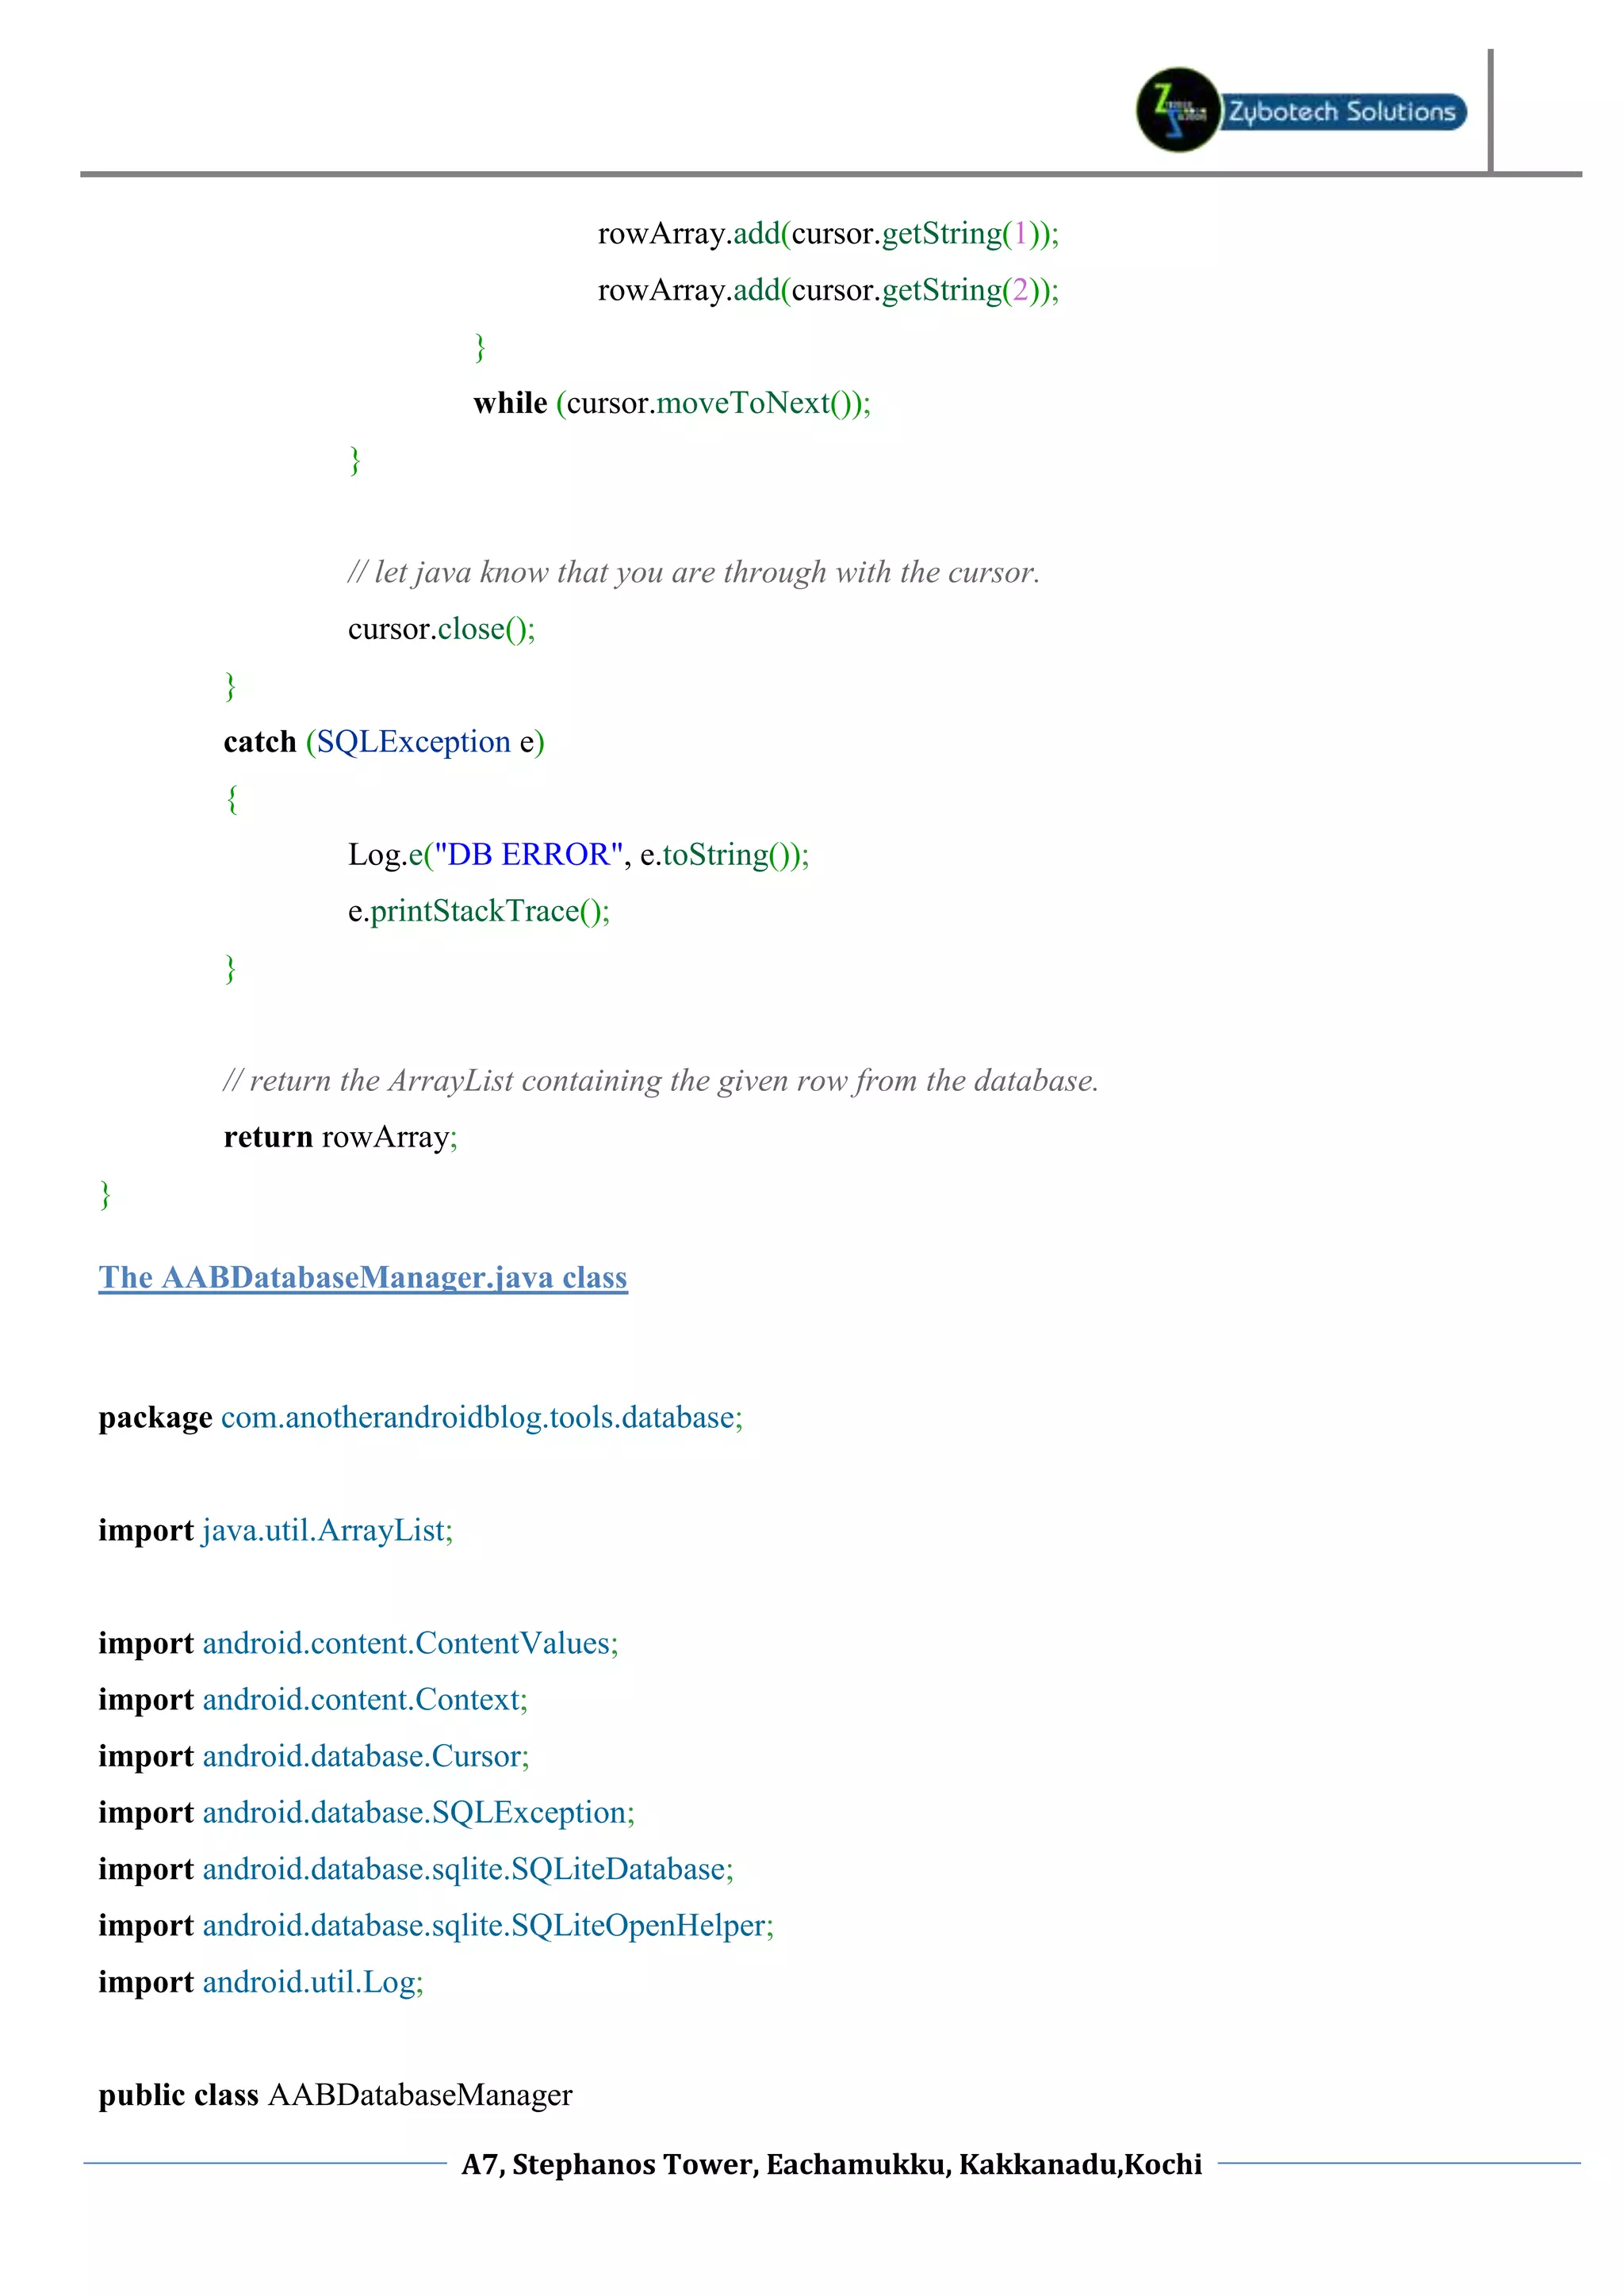
![e.printStackTrace(); } } /********************************************************************** * RETRIEVING A ROW FROM THE DATABASE TABLE * * This is an example of how to retrieve a row from a database table * using this class. You should edit this method to suit your needs. * * @param rowID the id of the row to retrieve * @return an array containing the data from the row */ public ArrayList<Object> getRowAsArray(long rowID) { // create an array list to store data from the database row. // I would recommend creating a JavaBean compliant object // to store this data instead. That way you can ensure // data types are correct. ArrayList<Object> rowArray = new ArrayList<Object>(); Cursor cursor; try { // this is a database call that creates a "cursor" object. // the cursor object store the information collected from the // database and is used to iterate through the data. cursor = db.query ( TABLE_NAME, new String[] { TABLE_ROW_ID, TABLE_ROW_ONE, TABLE_ROW_TWO }, TABLE_ROW_ID + "=" + rowID, null, null, null, null, null A7, Stephanos Tower, Eachamukku, Kakkanadu,Kochi](https://image.slidesharecdn.com/androiddatabasetutorial-120919042004-phpapp02/75/Android-database-tutorial-19-2048.jpg)
![/********************************************************************** * RETRIEVING ALL ROWS FROM THE DATABASE TABLE * * This is an example of how to retrieve all data from a database * table using this class. You should edit this method to suit your * needs. * * the key is automatically assigned by the database */ public ArrayList<ArrayList<Object>> getAllRowsAsArrays() { // create an ArrayList that will hold all of the data collected from // the database. ArrayList<ArrayList<Object>> dataArrays = new ArrayList<ArrayList<Object>>(); // this is a database call that creates a "cursor" object. // the cursor object store the information collected from the // database and is used to iterate through the data. Cursor cursor; try { // ask the database object to create the cursor. cursor = db.query( TABLE_NAME, new String[]{TABLE_ROW_ID, TABLE_ROW_ONE, TABLE_ROW_TWO}, null, null, null, null, null ); // move the cursor's pointer to position zero. cursor.moveToFirst(); A7, Stephanos Tower, Eachamukku, Kakkanadu,Kochi](https://image.slidesharecdn.com/androiddatabasetutorial-120919042004-phpapp02/75/Android-database-tutorial-21-2048.jpg)