The MaxCompute Query Accelerator (MaxQA) engine is designed to optimize query performance in near-real-time scenarios. It optimizes multiple components, such as control links, the query optimizer, the execution engine, the storage engine, and caching mechanisms in a dedicated query computing resource pool. It is suitable for business scenarios that require low latency and high stability, such as business intelligence (BI), interactive analysis, and near-real-time data warehouses. This topic describes how to use the MaxQA engine.
Public preview
The MaxQA feature is in public preview. To participate, submit a ticket to request access.
Public preview schedule by region
Region | Public Preview Start Date |
China (Hangzhou) | February 17, 2025 |
China (Shanghai) | |
China (Beijing) | |
China (Shenzhen) | |
China (Ulanqab) | |
China (Hong Kong) | March 05, 2025 |
Japan (Tokyo) | March 05, 2025 |
Singapore | March 20, 2025 |
Indonesia (Jakarta) | |
Germany (Frankfurt) | March 31, 2025 |
US (Silicon Valley) | |
US (Virginia) |
Notes
After you join the public preview, new interactive quota groups that you create will be in MaxQA mode by default. Existing MCQA quota groups are not affected. If you want to create a new MCQA quota group after joining the MaxQA public preview, submit a ticket.
To help you get started with MaxQA, we provide 100 CUs of computing resources (valid for one month, valued at USD 2,200) to reduce your trial-related costs.
Support channels
If you are participating in the public preview, scan the QR code below to join the official MaxQA user support group (DingTalk group number: 87535025714). MaxCompute technical support can help you with any public preview-related issues.
Basic MaxQA operations
Activate a MaxQA instance
MaxQA is available only for subscription-based MaxCompute projects. To activate a MaxQA instance, follow these steps:
Log on to the MaxCompute console. In the top navigation bar, select a region.
In the navigation pane on the left, click .
On the Quota Management page, find the level-1 quota that you want to manage and click Quota Configuration in the Actions column.
Configure basic parameters.
On the Quota Configuration page, click the Basic Configurations tab and then click Edit Basic Configurations.
Click Add Level-2 Quota, enter a Quota Name, and select a Type.
Parameter
Description
Quota Name
Enter a custom name. You will need to specify this name when you use MaxQA. We recommend that the name reflects the business purpose to help distinguish between multiple instances.
Type
Select Interactive.
Click OK. A MaxQA instance is activated.
After activation, the status of the interactive quota group is displayed as Starting. The process takes 5 to 8 minutes. The instance is ready to use after its status changes to Running.
Delete a MaxQA instance
If you no longer need a MaxQA instance, you can delete it.
On the Quota Management page, find the level-1 quota that you want to manage and click Quota Configuration in the Actions column.
On the Quota Configuration page, click the Basic Configurations tab. Find the interactive quota group that you want to delete and click Delete in the Actions column.
The deletion is performed in the background. The page does not show status updates or the deletion progress.
Scale a MaxQA instance
You can scale out or scale in an interactive quota group as needed. You can also configure a scheduled scaling plan to automatically scale the instance. For more information, see Configure a time-based scaling rule for MaxQA.
On the Quota Management page, find the level-1 quota that you want to manage and click Quota Configuration in the Actions column.
On the Quota Configuration page, click the Basic Configurations tab and then click Edit Basic Configurations.
Adjust the Reserved CUs [minCU,maxCU] for the interactive quota group. Increase the value to scale out, or decrease it to scale in.
NoteThe minimum step size for CUs is 32.
The minimum number of CUs must be 32 or greater. If you do not need interactive resources, set the value to
0or delete the quota group.Elastic reserved CUs are not supported for interactive quotas.
Click OK to adjust the reserved CUs for the interactive quota group.
The Actions column for the interactive quota group displays Scaling Out or Scaling In. A scale-out operation takes approximately 5 to 8 minutes. A scale-in operation may take longer because it depends on when the currently running jobs are completed. In a worst-case scenario, the system might wait for jobs to time out before starting the scale-in operation to ensure that all jobs on the scaled-in machines have finished. Neither scale-out nor scale-in operations affect normal job execution.
Configure a time-based scaling rule for MaxQA
You can also configure a time-based scaling plan for scheduled scaling. To do so, follow these steps:
On the Quota Management page, find the level-1 quota that you want to manage and click Quota Configuration in the Actions column.
On the Quota Configuration page, click the Scaling Configurations tab.
Configure the time-based scaling plan.
In the Resource Configuration Plan List section, click Add Configuration Plan.
In the Add Configuration Plan dialog box, adjust the Reserved CUs [minCU,maxCU] for each interactive quota group and click OK.
(Optional) You can also find an existing configuration plan and click Edit in the Actions column to modify it.
Configure the time-based plan.
In the Time-based Management section, click Edit Time Plan.
Click Add Effective Period to enable different quota configuration plans at different times of the day. This allows for time-based management of quota configurations. For more information, see Quota management for computing resources.
Scheduling policy
When you submit a job, you must explicitly specify the name of the interactive quota group in the client or the Java Database Connectivity (JDBC) connection string. The job is then scheduled to run on the corresponding MaxQA instance.
Fallback policy
MaxQA does not support an automatic fallback policy. If a MaxQA job fails due to limits or other reasons, you must resubmit it manually or submit it to a batch processing quota group.
MaxQA connection methods
MaxQA supports the following connection methods:
Enable MaxQA using the MaxCompute client
Install and configure MaxCompute client (odpscmd) V0.51.1 or later. For more information, see Connect using the local client (odpscmd).
(Optional) In the
conffolder of the client installation folder, you can add the following command to the end of theodps_config.inifile.enable_quota_cache=true -- Enables the caching feature for MaxQA connection information.Run the script file in the
bindirectory of the installation path to start the MaxCompute client.ImportantFor Linux or macOS, run the
odpscmdscript file.For Windows, double-click the
odpscmd.batfile.
Before you run a job, execute the following command. Subsequent jobs submitted from the client use MaxQA mode and run on the MaxQA instance that corresponds to the specified interactive quota group.
USE QUOTA <name_of_the_interactive_quota_group>;You can also specify the MaxQA instance for the current job at the session level.
SET odps.task.wlm.quota=<name_of_the_interactive_quota_group>;
Enable MaxQA for data development in DataWorks
MaxQA is supported only in workspaces that are part of the public preview for the new Data Development. If you are using the old version of Data Development, you must upgrade to the new version to use MaxQA. For more information, see Enable the new Data Development (DataStudio).
On the Data Development page in DataWorks, click Debugging Configuration on the right.
On the Debugging Configuration page, for Computing Resource, select the attached MaxCompute project resource. For Computing Quota, select the interactive quota group.
For more information, see Create a MaxCompute SQL node in DataWorks.
After you complete the configuration, jobs executed by the SQL node are scheduled to run on the MaxQA instance that corresponds to the interactive quota group.

Enable MaxQA for SQL analysis in the MaxCompute console
Log on to the MaxCompute console. In the navigation pane on the left, click Workspace > SQL Analysis.
Go to the SQL query page and create a new text file.
Click Runtime Parameters on the right. In the tab that appears, select the Project. For Computing Quota, select the computing resource that corresponds to the interactive quota group.
For more information, see SQL analysis.
After you complete the configuration, jobs executed on the SQL analysis page are scheduled to run on the MaxQA instance that corresponds to the interactive quota group.

Use MaxQA in MaxCompute Studio
Ensure that you have installed MaxCompute Studio and connected to a MaxCompute project. You can then execute a script in MaxCompute Studio to use the MaxQA feature. To do so, follow these steps:
Install and configure MaxCompute Studio 4.3.2 or later. For more information, see Install MaxCompute Studio.
Create a MaxCompute Studio project and connect it to your MaxCompute project. For more information, see Manage project connections.
Create a MaxCompute SQL script in the project. For more information, see Develop and submit SQL scripts.
In the MaxCompute SQL script, enter the SQL script statements. From the execution mode drop-down list, select MaxQA.
Click the specify additional parameters icon
 , enter the MaxQA quota name, and then click OK.
Run the script. The job will use the MaxQA query acceleration feature.
Enable MaxQA using JDBC
When you use Java Database Connectivity (JDBC) to connect to MaxCompute, you can perform the following operations to enable the MaxQA feature. For more information about connecting to MaxCompute using JDBC, see Instructions.
Download the source code that supports the MaxQA feature and can be compiled.
Configure the Pom dependency in Maven.
<dependency> <groupId>com.aliyun.odps</groupId> <artifactId>odps-jdbc</artifactId> <version>${Latest Version}</version> </dependency>ImportantThe
Latest Versionin the preceding code is a placeholder. You must replace it with a specific SDK version number to successfully compile the project. Visit the Maven Central Repository to view all released versions of odps-jdbc. We recommend that you use the latest version. The version number format is X.X.X.Create a Java program based on the source code and adapt the information as needed. For more information, see MaxCompute JDBC. The following code provides an example.
import java.sql.Connection; import java.sql.DatabaseMetaData; import java.sql.DriverManager; import java.sql.ResultSet; import java.sql.SQLException; import java.sql.Statement; public class MaxCompute { private static final String DRIVER_NAME = "com.aliyun.odps.jdbc.OdpsDriver"; // An Alibaba Cloud account AccessKey has full permissions on all APIs and poses a high security threat. We strongly recommend that you create and use a RAM user to make API calls or perform routine O&M. Log on to the RAM console to create a RAM user. // This example shows how to store the AccessKey ID and AccessKey secret in environment variables. You can also store them in a configuration file as needed. // We strongly recommend that you do not hard-code the AccessKey ID and AccessKey secret in your code. This can lead to security risks. private static String accessId = System.getenv("ALIBABA_CLOUD_ACCESS_KEY_ID"); private static String accessKey = System.getenv("ALIBABA_CLOUD_ACCESS_KEY_SECRET"); public static void main(String[] args) throws SQLException { try { Class.forName(DRIVER_NAME); } catch (ClassNotFoundException e) { e.printStackTrace(); System.exit(1); } Connection conn = DriverManager.getConnection( "jdbc:odps:https://service.cn-hangzhou.maxcompute.aliyun.com/api?project=maxqatomax&charset=UTF-8&interactiveMode=true"aName=maxfor1&autoSelectLimit=1000000000", MaxCompute.accessId, MaxCompute.accessKey); // create a table Statement stmt = conn.createStatement(); final String tableName = "jdbc_test11"; stmt.execute("DROP TABLE IF EXISTS " + tableName); stmt.execute("CREATE TABLE " + tableName + " (key BIGINT, value STRING)"); // get meta data DatabaseMetaData metaData = conn.getMetaData(); System.out.println("product = " + metaData.getDatabaseProductName()); System.out.println("jdbc version = " + metaData.getDriverMajorVersion() + ", " + metaData.getDriverMinorVersion()); ResultSet tables = metaData.getTables(null, "default", tableName, null); while (tables.next()) { String name = tables.getString("TABLE_NAME"); System.out.println("inspecting table: " + name); ResultSet columns = metaData.getColumns(null, null, name, null); while (columns.next()) { System.out.println( columns.getString("COLUMN_NAME") + "\t" + columns.getString("TYPE_NAME") + "(" + columns.getInt("DATA_TYPE") + ")"); } columns.close(); } tables.close(); stmt.close(); conn.close(); } }
The following code provides an example of a JDBC connection string configuration.
// your_quota_nick_name is the name of the interactive quota group that you want to use. jdbc:odps:<MaxCompute_endpoint>? project=<MaxCompute_project_name>&interactiveMode=true"aName=your_quota_nick_name&enableLimit=false&enableOdpsLogger=true"Parameter | Description |
MaxCompute_endpoint | The Endpoint of the region where the MaxCompute service is located. For more information, see Endpoints. |
MaxCompute_project_name | The name of the MaxCompute project. |
interactiveMode | The switch for the MaxQA feature. |
quotaName | The name of the interactive quota group that you want to use. |
enableLimit | Allows you to download more than 10,000 rows of data. |
enableOdpsLogger | Used for log printing. If SLF4J is not configured, we recommend that you set this parameter to True. |
Connect to MaxQA using BI analysis tools
You can connect to MaxQA using Tableau, Quick BI, Guanyuan BI, SQLWorkBench. To do so, follow these steps.
Connect to MaxQA from Tableau
In the Server URL path, add the interactiveMode=true and quotaName=your_quota_nick_name properties to enable the MaxQA feature. We recommend that you also add the enableOdpsLogger=true property for log printing. For more information, see Configure JDBC to use Tableau.
URL format:
<MaxCompute_endpoint>?project=<MaxCompute_project_name>&charset=UTF-8&interactiveMode=true"aName=<your_quota_nick_name>&autoSelectLimit=1000000000Parameter
Required
Description
MaxCompute_endpoint
Yes
The Endpoint of the region where the MaxCompute service is located. For more information, see Endpoints. For example, the Endpoint for the China (Hangzhou) region is
https://service.cn-hangzhou.maxcompute.aliyun.com/api.MaxCompute_project_name
Yes
The name of the MaxCompute project, such as
maxqatomax.your_quota_nick_name
Yes
The name of the interactive quota group that you want to use, such as
maxfor1.
URL example:
https://service.cn-hangzhou.maxcompute.aliyun.com/api?project=maxqatomax&charset=UTF-8&interactiveMode=true"aName=maxfor1&autoSelectLimit=1000000000
Connect to MaxQA from Quick BI
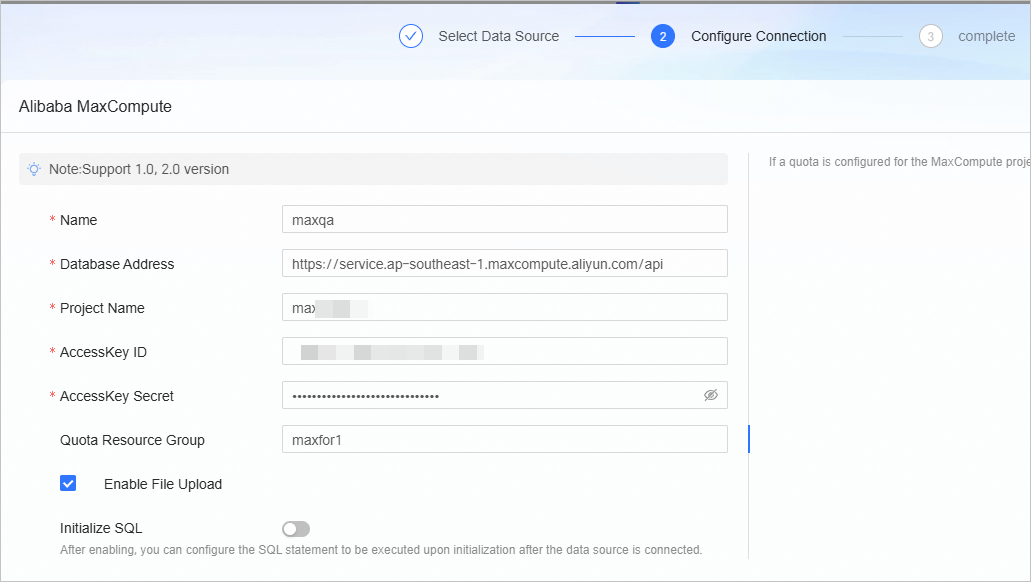
On the Quick BI workbench page, select Data Source on the left, and then click New Data Source in the upper-right corner. Select Alibaba MaxCompute. On the Configure Connection page, enter the name of the MaxQA quota computing resource in the Quota Computing Resource Group field. This enables the MaxQA feature and lets you use MaxQA computing resources. For more information, see Connect Quick BI to MaxCompute.
The following example shows that maxfor1 is the MaxQA quota name:
Connect to MaxQA from Guanyuan BI
Add a driver.
Upload MaxCompute JDBC Driver V3.8.5 or later to Guanyuan BI. For more information, see MaxCompute JDBC and the Release Notes.
In the upper-right corner of the Guanyuan BI page, click the
 icon to go to the Management Center.
Click and switch to the Drivers and Connectors page.
On the Driver Management tab, click Add Driver, edit the Driver Name, and save the changes.
Click the name of the new driver. On the Driver List tab, click Upload File to upload the MaxCompute JDBC Driver. Then, set Driver to com.aliyun.odps.jdbc.OdpsDriver and click Apply.
Create a data account to connect to the MaxCompute data source using MaxQA.
In the top menu bar, click Data Preparation.
On the left side of the page, select the Data Account tab. In the upper-right corner, click New Data Account and configure the account information as prompted.
Parameter
Description
Select Connector
Select MaxCompute.
Configure Data Account
Connection Method
Select JDBC URL.
Logon ID
The AccessKey ID of your Alibaba Cloud account.
Logon Key
The AccessKey secret of your Alibaba Cloud account.
JDBC URL
The JDBC connection string customized for MaxQA. The URL format is:
jdbc:odps:<maxcompute_endpoint>?project=<maxcompute_projectName>&charset=UTF-8&interactiveMode=true"aName=<your_quota_nickName>&autoSelectLimit=1000000000.The following table describes the parameters.
maxcompute_endpoint: The Endpoint of the region where the MaxCompute service is located. For more information, see Endpoints. For example, the Endpoint for the China (Hangzhou) region ishttps://service.cn-hangzhou.maxcompute.aliyun.com/api.maxcompute_projectName: The name of the MaxCompute project, such asmaxqatomax.your_quota_nickName: The name of the interactive quota group that you want to use, such asmaxfor1. For more information about how to create an interactive quota group, see Quota management for computing resources.
The following code provides a URL example:
jdbc:odps:https://service.cn-hangzhou.maxcompute.aliyun.com/api?project=maxqatomax&charset=UTF-8&interactiveMode=true"aName=maxfor1&autoSelectLimit=1000000000SQL Version
Select 2.0/Hive Compatible Mode.
Maximum Connections
The default value is 16.
Driver
Select Custom and then select the driver that you created.
Click Test Connection. After the message Connection Successful appears, click Next.
Confirm the data account information, enter a custom Display Name, and click Confirm and Create.
Connect to MaxQA from SQLWorkBench
On the Profile configuration interface, modify the JDBC URL to enable SQLWorkbench to use the MaxQA feature. For more information, see Configure JDBC to use SQL Workbench/J.
URL format:
jdbc:odps:<MaxCompute_endpoint>? project=<MaxCompute_project_name>&charset=UTF-8&interactiveMode=true"aName=<your_quota_nick_name>&autoSelectLimit=1000000000"Parameter
Required
Description
MaxCompute_endpoint
Yes
The Endpoint of the region where the MaxCompute service is located. For more information, see Endpoints. For example, the Endpoint for the China (Hangzhou) region is
https://service.cn-hangzhou.maxcompute.aliyun.com/api.MaxCompute_project_name
Yes
The name of the MaxCompute project, such as
maxqatomax.your_quota_nick_name
Yes
The name of the interactive quota group that you want to use, such as
maxfor1.URL example:
jdbc:odps:https://service.cn-hangzhou.maxcompute.aliyun.com/api?project=maxqatomax&charset=UTF-8&interactiveMode=true"aName=maxfor1&autoSelectLimit=1000000000
Enable MaxQA using the Java SDK
For more information about the Java SDK, see Java SDK introduction.
Configure the Pom dependency in Maven. The following code provides an example.
<dependency> <groupId>com.aliyun.odps</groupId> <artifactId>odps-sdk-core</artifactId> <version>${Latest Version}</version> </dependency>ImportantThe
Latest Versionin the preceding code is a placeholder. You must replace it with a specific SDK version number to successfully compile the project. Visit the Maven Central Repository to view all released versions of odps-sdk-core. We recommend that you use the latest version. The version number format is X.X.X-public.Create a Java program. The following code provides an example.
import com.aliyun.odps.Odps; import com.aliyun.odps.OdpsException; import com.aliyun.odps.account.Account; import com.aliyun.odps.account.AliyunAccount; import com.aliyun.odps.sqa.ExecuteMode; import com.aliyun.odps.sqa.SQLExecutor; import com.aliyun.odps.sqa.SQLExecutorBuilder; import java.util.HashMap; import java.util.Map; public class MaxCompute { public static void main(String args[]) { // Set the account and project information. // An Alibaba Cloud account AccessKey has full permissions on all APIs and poses a high security threat. We strongly recommend that you create and use a RAM user to make API calls or perform routine O&M. Log on to the RAM console to create a RAM user. // This example shows how to store the AccessKey ID and AccessKey secret in environment variables. You can also store them in a configuration file as needed. // We strongly recommend that you do not hard-code the AccessKey ID and AccessKey secret in your code. This can lead to security risks. Account account = new AliyunAccount(System.getenv("ALIBABA_CLOUD_ACCESS_KEY_ID"), System.getenv("ALIBABA_CLOUD_ACCESS_KEY_SECRET")); Odps odps = new Odps(account); odps.setDefaultProject("maxqatomax"); odps.setEndpoint("https://service.cn-hangzhou.maxcompute.aliyun.com/api"); // Prepare to build the SQLExecutor. SQLExecutorBuilder builder = SQLExecutorBuilder.builder(); SQLExecutor sqlExecutor = null; try { // Create an executor that uses MCQA 2.0 mode by default. sqlExecutor = builder.odps(odps) .executeMode(ExecuteMode.INTERACTIVE) .quotaName("maxfor1") .enableMcqaV2(true) .build(); // If needed, you can pass special settings for the query. Map<String, String> queryHint = new HashMap<>(); queryHint.put("odps.sql.mapper.split.size", "128"); // Submit a query job. Hints are supported. sqlExecutor.run("select count(1) from test_table;", queryHint); // The logview of the current query job. System.out.println("Logview:" + sqlExecutor.getLogView()); // The InstanceId of the current query job. System.out.println("InstanceId:" + sqlExecutor.getQueryId()); } catch (OdpsException e) { e.printStackTrace(); } finally { if (sqlExecutor != null) { // Close the executor to release resources. sqlExecutor.close(); } } } }
Use MaxQA with PyODPS
PyODPS V0.12.1 and later support the MaxQA feature. The following code provides an example.
import os from odps import ODPS # Set the account and project information. # Make sure that the ALIBABA_CLOUD_ACCESS_KEY_ID environment variable is set to your AccessKey ID and # the ALIBABA_CLOUD_ACCESS_KEY_SECRET environment variable is set to your AccessKey secret. # We do not recommend that you use the AccessKey ID and AccessKey secret strings directly. o = ODPS( os.getenv('ALIBABA_CLOUD_ACCESS_KEY_ID'), os.getenv('ALIBABA_CLOUD_ACCESS_KEY_SECRET'), project='maxto****', endpoint='https://service.cn-hangzhou.maxcompute.aliyun.com/api', ) # If needed, you can pass special settings for the query. hints = {"odps.sql.mapper.split.size": "128"} inst = o.execute_sql_interactive( 'select count(1) from test_table', use_mcqa_v2=True, quota_name='maxfor1', # Set quota_name to the name of the interactive quota group that corresponds to the MaxQA instance. hints=hints, ) # The logview of the current query job. print(inst.get_logview_address()) # The InstanceId of the current query job. print(inst.id) # Read data row by row. with inst.open_reader() as reader: result = [res.values for res in reader]Use PyODPS with SQLAlchemy or other third-party tools that support the SQLAlchemy interface to accelerate queries
Starting from PyODPS 0.12.2, you can use SQLAlchemy to query MaxCompute data through MaxQA. You must specify the following parameters in the connection string.
Parameter | Required | Description |
interactive_mode=v2 | Yes | The main switch for the query acceleration feature. |
quota_name=<YOUR_INTERACTIVE_QUOTA_NICKNAME> | Yes | The name of your interactive quota. |
reuse_odps=true | No | Enables forced connection reuse. For some third-party tools, such as Apache Superset, enabling this option can improve performance. |
For example, the following connection string enables MaxQA and forced connection reuse.
odps://<access_id>:<ACCESS_KEY>@<project>/?endpoint=<endpoint>"a_name=<YOUR_INTERACTIVE_QUOTA_NICKNAME>&interactive_mode=v2&reuse_odps=trueConfirm whether a job is in MaxQA mode
Check the Logview
After a job is complete, you can go to the Logview page and check the following three items to confirm that the job is in MaxQA mode.
Check whether the MaxCompute InstanceId ends with _mcqa.
Check whether the Quota Nickname is the specified interactive quota name.
On the Summary tab, check whether the Job run mode is mcqa 2.0.

Check the observability page in the console
Log on to the MaxCompute console. In the navigation pane on the left, click Workspace > Job O&M.
On the Job O&M page, set Job Type to MCQA2 to filter for MaxQA jobs within a specified time range.
