The MaxCompute console provides the SQL Analysis feature to help you quickly run SQL statements. This topic describes how to use the SQL Analysis feature.
Overview
After you activate MaxCompute and create a MaxCompute project, you can edit and run SQL statements using the SQL Analysis feature. The SQL Analysis feature lets you perform the following operations:
Edit and run SQL commands, and perform simple chart analysis on the results.
Use the built-in public dataset demo. You can open the corresponding SQL files and run the code to test MaxCompute.
Scenarios
SQL Analysis is suitable for the following scenarios:
New users can quickly experience the core features of MaxCompute using public datasets.
Running temporary SQL commands, such as viewing table data.
Precautions
Because SQL jobs must be initiated in a project, you must create a project after you activate the MaxCompute service before you can use SQL Analysis.
The SQL Analysis feature is in public preview (Beta) and does not support cloud file systems. It supports local file directories. You can open and edit local
.sqlfiles, create new.sqlfiles, and save them to a local directory.
SQL Analysis interface
The SQL Analysis interface is shown in the following figure.
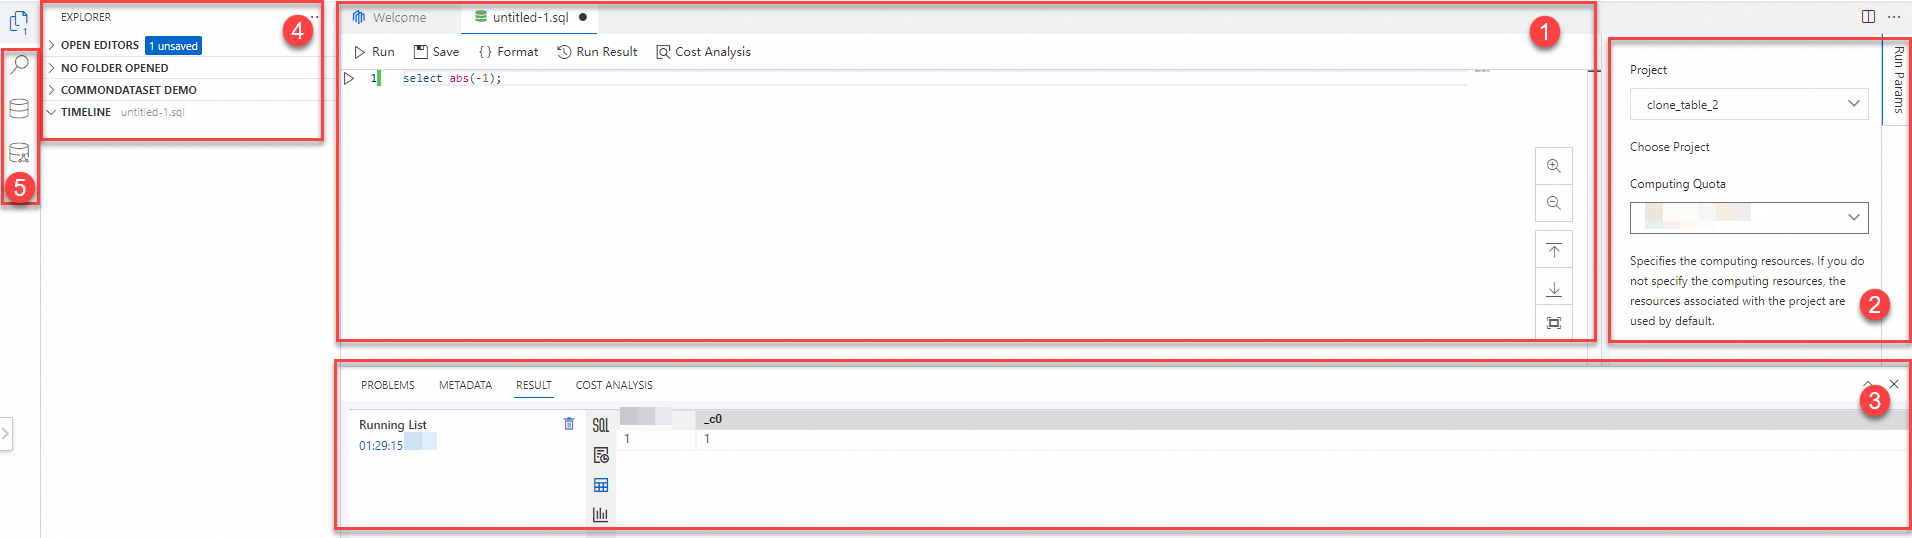
1. Editor area
Module
Description
Tab bar
The file tabs. You can open multiple files at the same time.
Double-click the blank area in the tab bar to quickly create a
.sqlfile.Right-click the blank area in the tab bar and select New Text File to create a non-
.sqlfile, such as a JSON file.NoteAfter you create a text file that is not an
.sqlfile, you must save it as an.sqlfile to use the toolbar.
Toolbar
Run: Execute the SQL script. You can select a segment of SQL script in the current file to run. If you make no selection, all SQL scripts in the current file are executed by default.
Stop: The Stop button appears after you click Run.
This version does not support stopping execution. To terminate a job, go to the Job O&M page. For more information, see Job O&M.
Save: The current public preview version does not yet support cloud file storage and only supports saving files locally. Please save as a
.sqlfile.Format: Format the SQL code in the current file.
Run Result: If you have executed an SQL script in the current file and the results section is hidden, you can click this button to display the results section.
Cost Analysis: Executes a COST SQL statement for metering estimation, returning the scan volume and complexity of the SQL statement. For more information about COST SQL, see COST SQL.
Editor
The SQL editor. Note the following items:
The first line of the script must be a script that is run.
If a file contains multiple SQL scripts and flags (SET statements), the flags must be placed at the beginning of the file. The flags apply to all SQL statements in the file.
You can write and run SQL scripts, and view results in full-screen mode.
2. Run parameter configuration area
Module
Description
Project
Select the project in which you want to run the SQL code. This parameter is required.
Select a project for which your account has the
create instancepermission.You must select a project the first time you run SQL code. The cache records the project that you selected last time. You can change the project at any time. The selected project takes effect for all file tabs.
Computing quota
Select the computing quota (Quota) that you want to use. This parameter is optional.
If you select a quota, you must select a quota for which your account has the
usagepermission. If you do not select a quota, the default computing quota of the selected project is used. The selected quota takes effect for all file tabs.3. Results area
Module
Description
Problems
Before you run a script, MaxCompute automatically checks the syntax and specifications of all scripts in open files in the editor. This helps you identify script standardization issues before the script is run.
Metadata
Select an object (such as a table, resource, or user-defined function) in Table Data or Public Dataset to view its corresponding metadata details, including but not limited to the object's basic information, column information, DDL generation, and data preview. Note that you need the relevant database permissions for the corresponding object.
Result
The results of running a script. Details are as follows:
Run list: A start time record is generated each time an SQL statement in the current file is run. You can click a record to view information about each run.
Log: The log content for each run.
SQL: The specific SQL code that is run.
Result list: If results are generated, they are displayed here.
Analysis: If results are generated, you can perform simple chart analysis here.
SQL scan estimation
Displays the results of the COST SQL statements that are executed from the SQL scan estimation operation. The results include execution logs and results.
4. Explorer area
Module
Description
Workspace
A list of files. The public preview version of the workspace file list supports connecting to on-premises files.
When you access this feature for the first time, the message No Open Folder is displayed. You can click the Open Folder button to open an on-premises folder. The first time you open a folder, a pop-up window appears for you to confirm the permission to view the folder.
ImportantWe are committed to the security of your system data. Each time you open the page and the system attempts to read your on-premises folder, you must manually grant the permission to access all files in the specified folder. We do not save the content of your folder on our servers.
Public Dataset DEMO
The query files of the built-in public dataset demo in SQL Analysis. You can open and run the files directly. You can also temporarily edit and run them, but your edits cannot be saved. If you save your changes and refresh the page, the content reverts to the original. Save the modified file content yourself.
Because the built-in demos are mainly SQL queries based on public datasets that use schemas for storage, the scripts include the
set odps.namespace.schema=true;command by default to enable Schema syntax.Each built-in demo file contains multiple SQL scripts. The number before
-queryin the script name indicates the number of queries. For the TPC-DS dataset demos in particular, each file contains 99 queries that are divided into different data volume specifications. Executing these scripts consumes computing resources, so please proceed with caution.
Timeline
Records and displays the operation logs for each file opened in the editor. The information is stored in the cache. If you clear the cache, the logs are deleted.
Right-click feature
You can right-click an empty area in the resource manager to configure it. For example, to hide the COMMONDATASET DEMO module, deselect it.
5. Search area
Module
Description
Search
A global search of the contents of all files in the resource manager. For example, you can search for files that contain the
from table1statement.Click a search result to open the corresponding file in the editor on the right and go directly to the keyword.
File search is supported in the workspace.
Replace
Replaces the searched keyword with another statement.
For example, to replace the
from table1statement withfrom table2in all files, enterfrom table1in the Search box, enterfrom table2in the Replace box, and then click the button.
Table Data
Displays a list of objects in all projects of the current tenant in the region. The objects include schemas, tables, views, resources, and functions.
To view the list of objects in all projects, you must have the corresponding List permission. For table objects, if the current logon account has the Select permission, a green table icon
 is displayed next to the table. This helps you quickly identify tables on which you have permissions.
The SYSTEM_CATALOG project in the list is the system project for the tenant-level Information Schema. The system creates this project by default. The INFORMATION_SCHEMA is placed as a view in the "INFORMATION_SCHEMA" schema of this project and can be viewed directly.
An Alibaba Cloud account can view all project lists. A Resource Access Management (RAM) user must be added to a project to view the project.
Click a project to expand it. If your project has a schema level, a list of schemas is displayed first. If not, the data object categories are displayed directly. Click a category to expand the list of objects of that type.
Clicking an object displays its metadata details on the Metadata tab in the results area on the right.
Public datasets
Displays the table metadata of the public datasets provided by the system.
Use SQL Analysis
Log on to the MaxCompute console and select a region in the upper-left corner.
In the left navigation pane, select Workspace > SQL Analysis.
You can create an SQL file on the SQL Analysis page.
When you access SQL Analysis for the first time, a file named
untitled_xis opened by default. You can directly edit SQL in this file. You can also double-click the blank area in the tab bar to create an SQL file.After you enter the SQL code in the editor, click Run Parameters on the right to configure the following parameters:
Project: Required. Specifies the project in which the SQL statement is executed. You must select a project for which your account has the
create instancepermission.Computing Quota: Optional. The computing quota that you specify for a job. If you want to select a quota, you must select one for which your account has the
usagepermission. If you do not select a quota, the SQL statement is executed using the default computing quota of the project.
Click Run. The execution results are displayed in the Results tab.
You can click the
 icon in the results to perform simple visual analytics.Note
The SQL Analysis interface does not support downloading results. To download the results to a local machine, use one of the following methods:
Run the SQL task in the MaxCompute client (odpscmd) and then use Tunnel commands to download the results to your local machine. For more information, see Download instance data.
Run the SQL task in an ODPS SQL node on the Data Development page of DataWorks and then use the export button on the page to download the results to your local machine. For more information, see Export, share, and download a workbook.
Click Save. The SQL file is saved to your local machine.