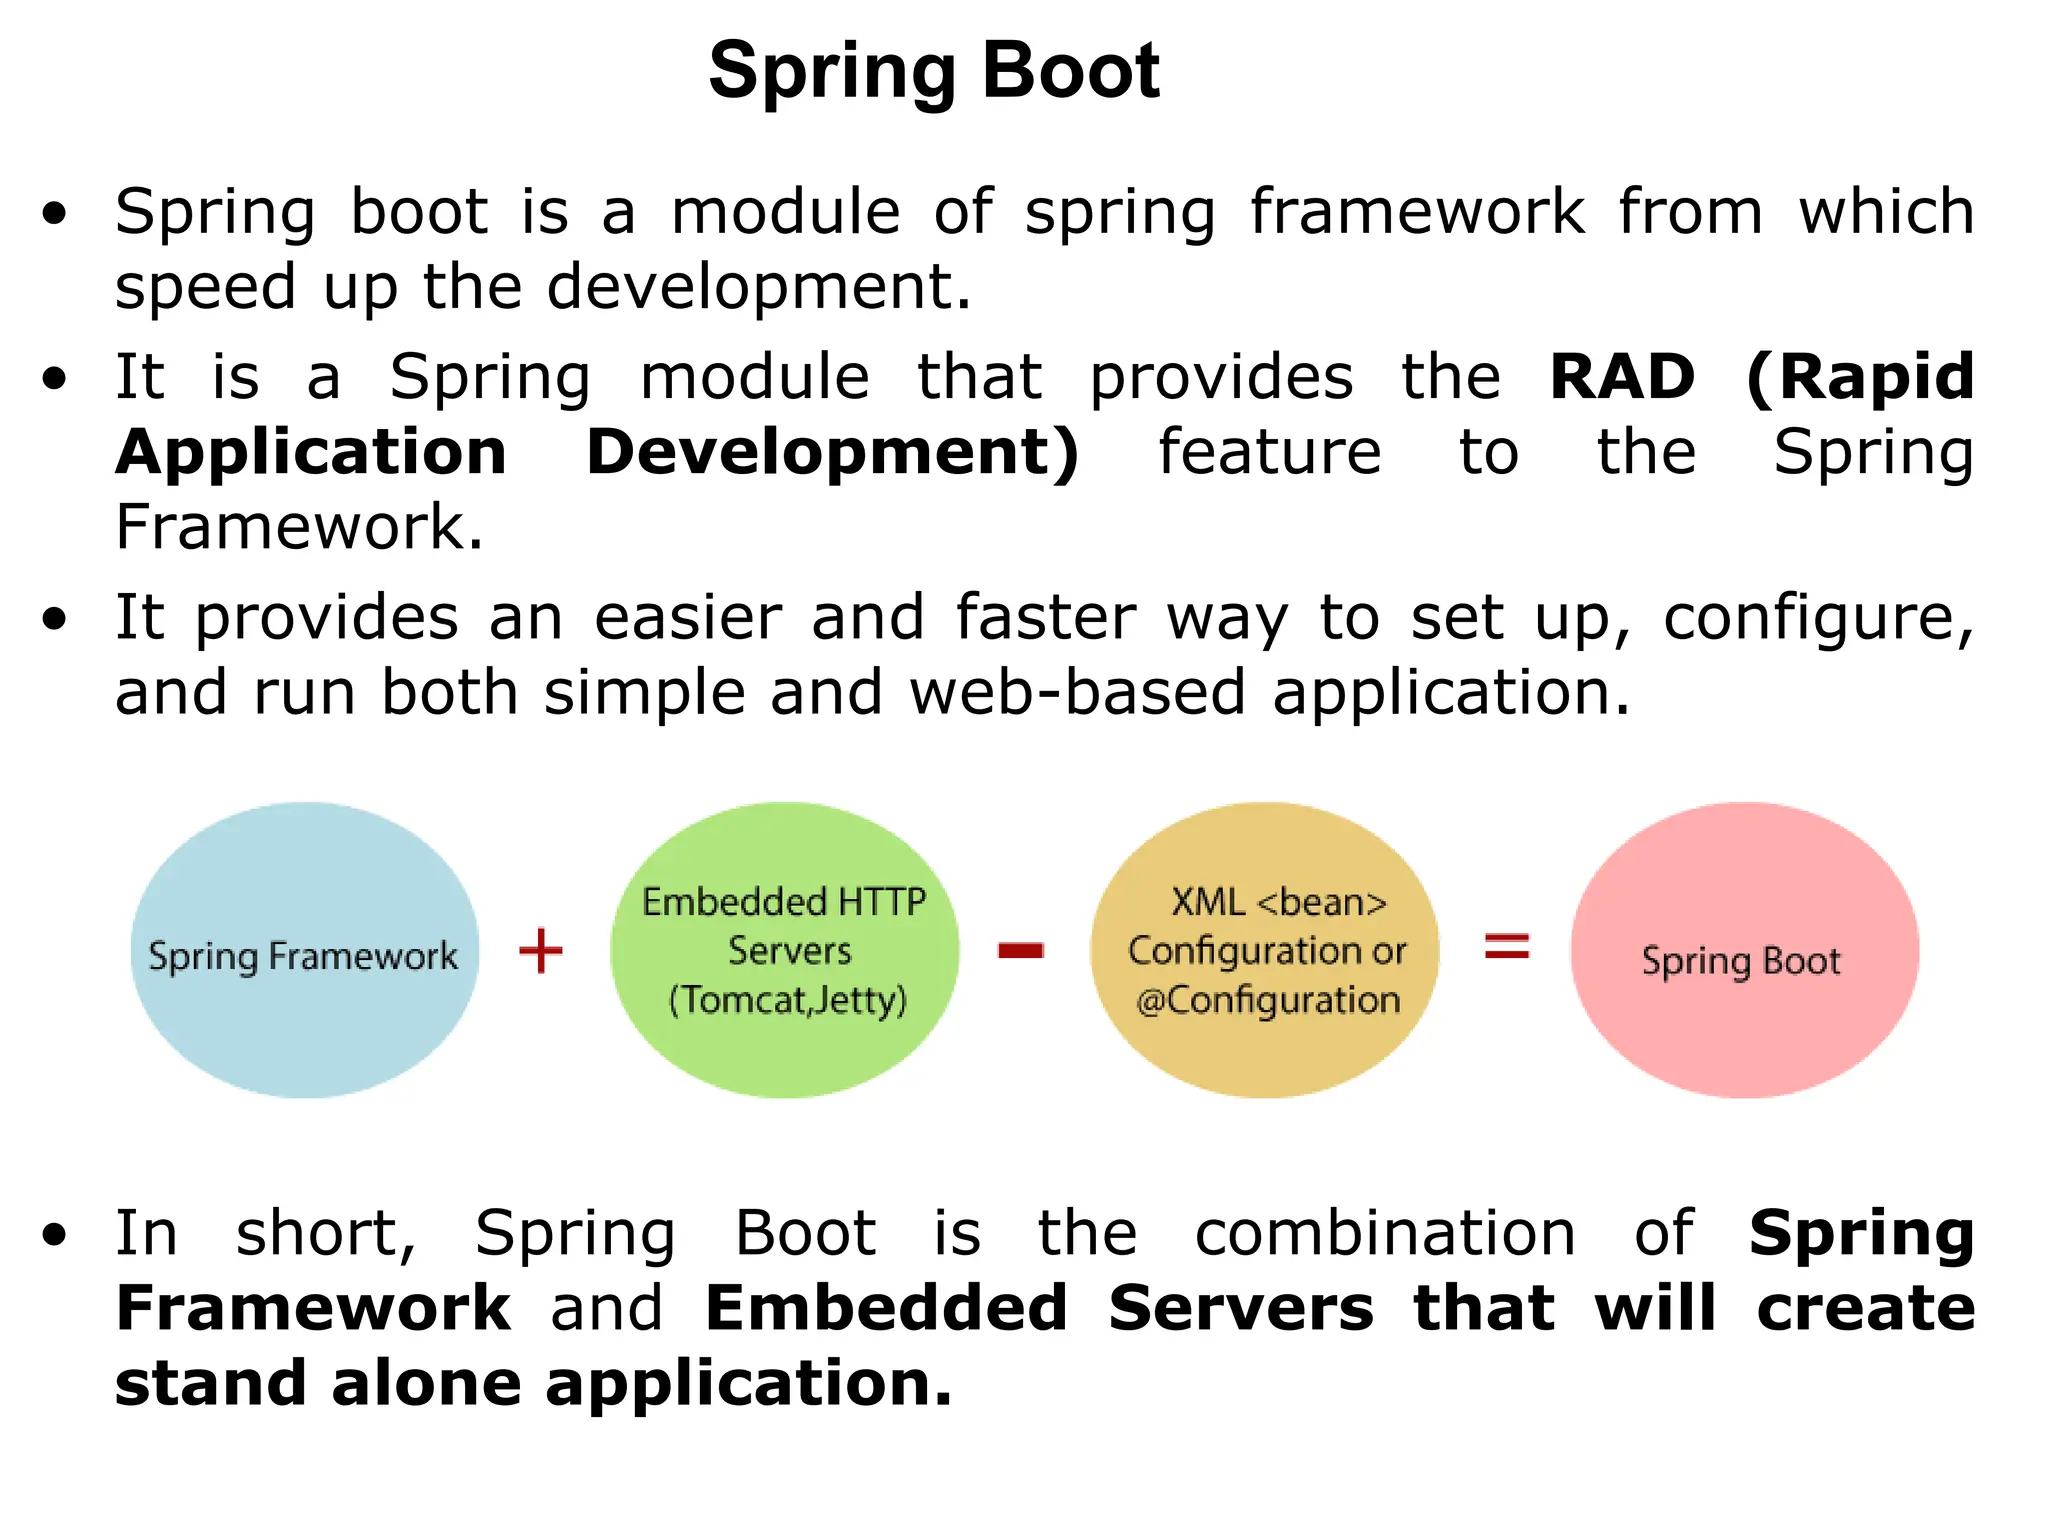
Spring Boot • Spring boot is a module of spring framework from which speed up the development. • It is a Spring module that provides the RAD (Rapid Application Development) feature to the Spring Framework. • It provides an easier and faster way to set up, configure, and run both simple and web-based application. • In short, Spring Boot is the combination of Spring Framework and Embedded Servers that will create stand alone application.
Why Spring Boot • Spring is used to create scalable web applications. But main disadvantage of spring projects is that configuration is time-consuming and can be a bit complex for the new developers. Making the application production-ready takes some time if you are new to the spring. • Solution to this is Spring Boot. Spring Boot is built on the top of the spring and contains all the features of spring. • It is becoming favorite for developer’s these days because of it’s a rapid production-ready environment which enables the developers to directly focus on the logic instead of struggling with the configuration and set up.
Features of Spring Boot 1.It allows to avoid heavy configuration of XML which is present in spring: In spring boot everything is auto-configured. We just need to use proper configuration for utilizing a particular functionality. 2. It includes embedded Tomcat-server: Unlike Spring where we have to manually add and install the tomcat server, Spring Boot comes with an embedded Tomcat server, so that the applications can be hosted on it.
Features of Spring Boot 3. Deployment is very easy; WAR and JAR file can be easily deployed in the tomcat server: WAR(Web-application Archive) or JAR(Java Archive) files can be directly deployed on the Tomcat Server and Spring Boot provides the facility to convert our project into WAR or JAR files. 4. Microservices Based Architecture: Microservices are a modern approach to software whereby application code is delivered in small, manageable pieces, independent of others. Microservice, as the name suggests is the name given to a module/service which focuses on a single type of feature.
Features of Spring Boot • Let us consider an example of a hospital management system. • In case of other systems, there will be a single code containing all the features which are very tough to maintain on a huge scale. • But in the microservice-based system, each feature can be divided into smaller subsystems like service to handle patient registration, service to handle database management, service to handle billing etc. • Microservice based system can be easily migrated as only some services need to be altered which also makes debugging and deployment easy. • Also, each service can be integrated and can be made in different technologies suited to them.
Features of Spring Boot 5. It provides easy maintenance and creation of REST API: Creating a REST API is very easy in Spring Boot. Just the annotation @RestController and @RequestMapping(/endPoint) over the controller class does the work. • REpresentational State Transfer (REST) is an architectural style that defines a set of constraints to be used for creating web services. • Web service is a technology to communicate between programming language. For example, Java programming language can interact with PHP and . Net by using web services.
Spring vs Spring Boot Basis Spring Spring Boot Use For building or developing applications, the Spring framework is the most widely used Java EE framework. For developing REST APIs(REpresentational State Transfer API) Spring Boot framework is widely used. Key or Primary Feature Dependency Injection Autoconfiguration: Based on the requirement, the classes are automatically configured by Spring Boot. Developing Applications This framework helps make things simpler by allowing us to build loosely coupled applications. Standalone applications can be built using Spring Boot framework with minimal or fewer configurations.
Spring vs Spring Boot Basis Spring Spring Boot Server The server needs to be set up explicitly for the testing purpose of the Spring Project. Embedded servers like Jetty, Tomcat, etc., are offered by the Spring Boot framework. Need of Deployment Descriptor Deployment descriptor is required for running Spring applications. Deployment descriptor is not required for Spring Boot. Configurations In the Spring framework, the configurations need to be built manually. For Spring Boot, there are default configurations.
Spring vs Spring Boot Basis Spring Spring Boot XML Configuration In Spring, XML configuration is required. In Spring Boot, XML configuration is not required. Testing Testing in Spring is more difficult than testing in Spring Boot. Testing is easier in Spring Boot.
Advantage of Spring Boot 1. Autoconfiguration Spring application comes with automatic configuration functions. They intend to reduce the efforts from the developer. Other than that, by following an automatic approach, developers can easily save significant amount of time spent in development. Thus, we can say Spring boot offers greater flexibility. 2. Embedded Server Unlike Spring where we have to manually add and install the tomcat server, Spring Boot comes with an embedded Tomcat server, so that the applications can be hosted on it.
Advantage of Spring Boot 3.Save Time It increases productivity and reduces development time. 4. Easily Connection with Database Allows for easily connecting with database services like Oracle,MySQL, MongoDB and many more. 5. WAR File Requirement Currently, Spring boot supports two types of files known as Web Application Resource (WAR) and JAR (Java Resource). Compared to WAR, JAR is a type of lightweight file that is useful for the developer in many ways.
Disadvantage of Spring Boot 1. No Control • Generally, the development file size of Spring boot is larger due to its design. The developers have no control over the file size. The design of Spring boot adds needless dependencies which is mostly unused. All these excess dependencies increase the binary size of applications. 2. Large Scale Project Support • Spring boot is built focusing on micro services. In fact, it works seamless on these applications. However, they are not recommended to be used in large monolithic applications. • Monolithic applications typically consist of a client-side UI, a database, and a server-side application. Developers build all of these modules on a single code base. On the other hand, in a distributed architecture, each microservice works to accomplish a single feature or business logic.
Disadvantage of Spring Boot 3. Modifications • Modifications are not an easy task in Spring boot. Unless you have strong knowledge on Spring systems and history, you cannot modify or troubleshoot Spring boot. 4. Resource Utilization • Autoconfiguration feature of Spring boot enables several unnecessary features. When this process is automatically enabled, it will definitely utilize excess amount of computing resources by being fully configured.
Spring Boot Code Structure • Though spring boot does not advocate any specific structure, some best practices help the developer to create manageable code. Best Practices for Structuring Code About Typical Layout A typical layout for maven projects contains different directories, each for specific types of files to be placed. src/main/java: Package should contain source java classes. We should not create classes directly in this folder; rather, we should have our package. For example, we have the com.psit.ems package under this folder. Typically package name is the same as that of the group id.
src/main/resources: This folder should contain configuration files, properties files, XML files, and other such configurations. src/test/java: This folder should contain unit test classes. src/test/resources: This folder should contain configuration files used in tests. target: This folder contains compiled classes and generated project artifacts. Spring Boot Code Structure
Using the “default” Package A class not part of any package is in a default package. For example, any class in src/main/java will go into the default package. Use of default package is discouraged and should be avoided as it may cause issues in automatic bean scan. Spring Boot Code Structure
Approaches in Layout Structure We can structure your code in two ways: 1. Structure by layer 2. Structure by feature. It affects the application's cohesion and coupling factors. Structure by Layer In this structure, classes are placed in the package based on the layer it belongs to. This method causes low cohesion within packages because packages contain classes that are not closely related. Below is an example of packaging by layers: Spring Boot Code Structure
├── com.app └── controller ├── CompanyController ├── ProductController └── UserController └── model ├── Company ├── Product └── User └── repository ├── CompanyRepository ├── ProductRepository └── UserRepository └── service ├── CompanyService ├── ProductService └── UserService └── util
On observing this structure, we see that there are: High coupling: Because classes tend to change in all the packages to implement the functionality. Low cohesion: Because each package contains unrelated code. This structure loses coupling and cohesion. Spring Boot Code Structure
Structure by Feature In this structure, packages contain all classes required for a feature. The feature-based packing ensures that closely related classes are kept together. An example of this structure is given below: Spring Boot Code Structure On observing this structure, we see that there are: Low coupling: Only classes within the package is touched to implement the functionality. High cohesion: Set of related classes is kept together as they usually get changes.
├── com.app └── company ├── Company ├── CompanyController ├── CompanyRepository └── CompanyService └── product ├── Product ├── ProductController ├── ProductRepository └── ProductService └── util └── user ├── User ├── UserController ├── UserRepository └── UserService
Spring Boot Runners • Spring Boot provides two runner interfaces, which are ApplicationRunner and CommandLineRunner. • Both of these runners are used to execute piece of code when a Spring Boot Application starts. • Both of these interfaces are Functional Interfaces, which means they have only one functional method. • In order to execute specific piece of code when Spring Boot Application starts, we need to implement either of these functional interfaces and override the single method of run.
Application Runners • It is used to perform any task or actions immediately after the spring boot application started. • Basically, this interface contains a method named run() which only gets executed once the application starts. • Once a class implements this method, we need to override and add our own business logic or the actions which we want to perform. Ex: @SpringBootApplication public class DemoApplication implements ApplicationRunner{ @Override public void run(ApplicationArguments arg0) throws Exception{ System.out.println("Hello World from Application Runner"); } }
Command Line Runner • It also works in the same way as ApplicationRunner Interface. It also used to run the code just immediately after the spring boot application started. • This interface provides access to application arguments as String array @SpringBootApplication public class DemoApplication implements CommandLineRunner { @Override public void run(String... arg0) throws Exception { System.out.println("Hello World from commandLine Runner"); } }
Spring Boot Logger • In software development, “log” represents a report containing the history of events, activities, or messages generated by a computer program throughout its execution. • These logs are used to collect relevant information about the program’s behavior, errors, warnings, and other noticeable events that take place while the program is running. • Moreover, logs are very important for diagnosing issues, monitoring system performance, and troubleshooting in an application, debugging, monitoring, auditing, and analyzing the applications. • Spring Boot offers a flexible logging framework that allows developers to configure and control how log messages are generated, formatted, and stored. • This logging framework is built on top of the popular SLF4J (Simple Logging Facade for Java) and Logback libraries.
Components in Logging in Spring Boot Logging Levels Spring Boot contains different logging levels to classify the log messages. The common log levels are DEBUG, INFO, WARN, ERROR, and TRACE. We can choose the suitable log level for a specific message based on our requirement & its importance. Levels Usage Error It is used for non-recoverable error. Warning It is used for recoverable error. Info It is used for audit purpose. Debug It is used for investigation. Trace It is used for detailed investigation.
Components in Logging in Spring Boot Logging Configuration Spring Boot applications can be configured to use different logging implementations. Spring Boot uses Logback as the default logging framework, but it is also capable of supporting other common logging frameworks like Log4j2 and JUL (Java Util Logging) etc. We can configure the required logging implementation by adding the corresponding dependency to our project’s build configuration.
Components in Logging in Spring Boot Configuration Properties Configuration properties of Spring Boot allow us to customize various characteristics of logging, such as log level thresholds for different loggers, log output formats, and log file locations. These properties can be specified in the ‘application.properties’ or ‘application.yml’ files.
Logging Output • Log messages can be in the form of various outputs, such as the console, log files, database entries, or even external logging services. • Spring Boot provides configuration options to control where log messages are sent. • It also includes the ability to specify rolling log files to manage log rotation and retention based on the specified size of the file. • Along with application-specific log messages, Spring Boot’s logging framework can also capture various system events and information, such as server startup details, database connection information, and HTTP request/response logs. Components in Logging in Spring Boot
A logger is an object that allows us to generate log messages within the application. Loggers are part of the logging framework provided by Spring Boot and are used to record various events, activities, and information during the runtime of our application. These log messages provide information into the behavior of our application, assist in troubleshooting, and help in monitoring and maintaining the application’s health. Logger Interface Spring Boot internally uses the Logger interface from the SLF4J (Simple Logging Facade for Java) library as the primary abstraction for creating log messages. We need to connect with the logger interface to generate log messages in our code. What is Logger In Spring Boot
Logger Initialization Logger instances are generally initialized at the class level as private static final field. This practice ensures that the logger is shared across instances of the same class and eliminates the overhead of logger creation. Logger Factory Spring Boot’s logging framework uses a logger factory to create logger instances behind the scenes. The factory is responsible for determining which logging implementation (e.g., Logback, Log4j2) to use and instantiates the appropriate logger accordingly. What is Logger In Spring Boot
Generating Log Messages • In order to generate log messages, we call methods on the logger instance with respect to the desired logging level. • For example, to generate an informational log message, you would use logger.info(“Message text”). What is Logger In Spring Boot
Logging Levels • Logging levels are used to categorize log messages based on their severity and importance. • Each logging level corresponds to a specific severity level, which helps developers understand the nature of the logged events. • Spring Boot, along with logging frameworks like SLF4J and Logback, provides a set of standard logging levels that are commonly used to indicate different levels of severity. –These are trace, debug, info, warn, and error. • By default, info & above level messages are enabled. • In order to receive other level messages, go to application.properties and add below entries accordingly: • logger.level.root=TRACE –Since the TRACE has the lowest severity, in this case all levels messages will appear. What is Logger In Spring Boot
RESTful Web Services • REST stands for REpresentational State Transfer. It is developed by Roy Thomas Fielding, who also developed HTTP. • The main goal of RESTful web services is to make web services more effective. • RESTful web services try to define services using the different concepts that are already present in HTTP. • REST is an architectural approach, not a protocol. • It does not define the standard message exchange format. We can build REST services with both XML and JSON. • The key abstraction is a resource in REST. A resource can be anything. It can be accessed through a Uniform Resource Identifier (URI). RESTful Web Services
• A resource can be anything. It can be accessed through a Uniform Resource Identifier (URI). For example: • The resource has representations like XML, HTML, and JSON. The current state capture by representational resource. When we request a resource, we provide the representation of the resource. The important methods of HTTP are: • GET: It reads a resource. • PUT: It updates an existing resource. • POST: It creates a new resource. • DELETE: It deletes the resource. • For example, if we want to perform the following actions in the social media application, we get the corresponding results. RESTful Web Services
Advantages of RESTful web services • RESTful web services are platform-independent. • It can be written in any programming language and can be executed on any platform. • It provides different data format like JSON, text, HTML, and XML. • It is fast in comparison to SOAP because there is no strict specification like SOAP. • These are reusable. • They are language neutral.
Building RESTful Web Services • Spring Boot provides a very good support to building RESTful Web Services for enterprise applications. • For building a RESTful Web Services, we need to add the Spring Boot Starter Web dependency into the build configuration file. • If you are a Maven user, use the following code to add the below dependency in your pom.xml file − <dependency> <groupId>org.springframework.boot</groupId> <artifactId>spring-boot-starter-web</artifactId> </dependency> • If you are a Gradle user, use the following code to add the below dependency in your build.gradle file. compile('org.springframework.boot:spring-boot-starter- web')
Annotations for RESTful Web Services • Rest Controller The @RestController annotation is used to define the RESTful web services. It serves JSON, XML and custom response. Its syntax is shown below − @RestController public class ProductServiceController { } • Request Mapping The @RequestMapping annotation is used to define the Request URI to access the REST Endpoints. We can define Request method to consume and produce object. The default request method is GET. @RequestMapping(value = "/products") public ResponseEntity<Object> getProducts() { }
Annotations for RESTful Web Services • Request Body The @RequestBody annotation is used to define the request body content type. public ResponseEntity<Object> createProduct(@RequestBody Product product) { } • Path Variable The @PathVariable annotation is used to define the custom or dynamic request URI. public ResponseEntity<Object> updateProduct(@PathVariable("id") String id) { }
Annotations for RESTful Web Services • Request Parameter The @RequestParam annotation is used to read the request parameters from the Request URL. By default, it is a required parameter. We can also set default value for request parameters as shown here − public ResponseEntity<Object> getProduct( @RequestParam(value = "name", required = false, defaultValue = "honey") String name) { }
GET API • The default HTTP request method is GET. • This method does not require any Request Body. • You can send request parameters and path variables to define the custom or dynamic URL. • The sample code to define the HTTP GET request method is shown below. In this example, we used HashMap to store the Product. Note that we used a POJO class as the product to be stored. • Here, the request URI is /products and it will return the list of products from HashMap repository. The controller class file is given below that contains GET method REST Endpoint.
GET API @RestController public class ProductServiceController { private static Map<String, Product> productRepo = new HashMap<>(); static { Product honey = new Product(); honey.setId("1"); honey.setName("Honey"); productRepo.put(honey.getId(), honey); Product almond = new Product(); almond.setId("2"); almond.setName("Almond"); productRepo.put(almond.getId(), almond); } @RequestMapping(value = "/products") public ResponseEntity<Object> getProduct() { return new ResponseEntity<>(productRepo.values(), HttpStatus.OK); } }
POST API • The HTTP POST request is used to create a resource. • This method contains the Request Body. • We can send request parameters and path variables to define the custom or dynamic URL. • The following example shows the sample code to define the HTTP POST request method. In this example, we used HashMap to store the Product, where the product is a POJO class. • Here, the request URI is /products, and it will return the String after storing the product into HashMap repository.
POST API @RestController public class ProductServiceController { private static Map<String, Product> productRepo = new HashMap<>(); @RequestMapping(value = "/products", method = RequestMethod.POST) public ResponseEntity<Object> createProduct(@RequestBody Product product) { productRepo.put(product.getId(), product); return new ResponseEntity<>("Product is created successfully", HttpStatus.CREATED); } }
PUT API • The HTTP PUT request is used to update the existing resource. • This method contains a Request Body. We can send request parameters and path variables to define the custom or dynamic URL. • The example given below shows how to define the HTTP PUT request method. • In this example, we used HashMap to update the existing Product, where the product is a POJO class. • Here, the request URI is /products/{id} which will return the String after the product into a HashMap repository. Note that, we used the Path variable {id} which defines the products ID that needs to be updated.
PUT API @RestController public class ProductServiceController { private static Map<String, Product> productRepo = new HashMap<>(); @RequestMapping(value = "/products/{id}", method = RequestMethod.PUT) public ResponseEntity<Object> updateProduct(@PathVariable("id") String id, @RequestBody Product product) { productRepo.remove(id); product.setId(id); productRepo.put(id, product); return new ResponseEntity<>("Product is updated successsfully", HttpStatus.OK); } }
DELETE API • The HTTP Delete request is used to delete the existing resource. • This method does not contain any Request Body. • We can send request parameters and path variables to define the custom or dynamic URL. • The example given below shows how to define the HTTP DELETE request method. • In this example, we used HashMap to remove the existing product, which is a POJO class. • The request URI is /products/{id} and it will return the String after deleting the product from HashMap repository. We used the Path variable {id} which defines the products ID that needs to be deleted.
DELETE API @RestController public class ProductServiceController { private static Map<String, Product> productRepo = new HashMap<>(); @RequestMapping(value = "/products/{id}", method = RequestMethod.DELETE) public ResponseEntity<Object> delete(@PathVariable("id") String id) { productRepo.remove(id); return new ResponseEntity<>("Product is deleted successsfully", HttpStatus.OK); } }
RESTful Web Services – main class import org.springframework.boot.SpringApplication; import org.springframework.boot.autoconfigure.SpringBootAppli cation; @SpringBootApplication public class DemoApplication { public static void main(String[] args) { SpringApplication.run(DemoApplication.class, args); } }
public class Product { private String id; private String name; public String getId() { return id; } public void setId(String id) { this.id = id; } public String getName() { return name; } public void setName(String name) { this.name = name; } } RESTful Web Services – main class
Spring Boot Build Systems • Maven and Gradle are the two most popular build tools to build java-based applications. Both support dependency management and consume artifactory from maven central. Artifactory is a source for artifacts needed for a build, and a target to deploy artifacts generated in the build process. Maven This section will cover all dependencies and plugins required to build the spring boot application. Inheriting the starter Parent Every spring boot application must inherit the starter-parent dependency to use spring boot defaults. The starter parent inherits from spring-boot-dependencies, which contains all dependency versions for all the framework that works with spring boot and are compatible with each other.
<parent> <groupId>org.springframework.boot</groupId> <artifactId>spring-boot-starter-parent</artifactId> <version>2.7.2</version> <relativePath/> <!-- lookup parent from repository --> </parent> Starter parent provides: • Provide the default compiler level as Java 1.8. • Provides a default configuration for maven-surefire-plugin, maven-jar-plugin, and maven-failsafe-plugin. Spring Boot Build Systems
Using Spring Boot without the Parent POM • There can be a situation in that you can not inherit from starter-parent dependency because your corporate has its parent pom, which must be inherited. • In such cases, spring boot provides an alternate way to take advantage of dependency management. Spring Boot Build Systems
<dependencyManagement> <dependencies> <dependency> <!-- Import dependency management from Spring Boot --> <groupId>org.springframework.boot</groupId> <artifactId>spring-boot-dependencies</artifactId> <version>2.7.2</version> <type>pom</type> <scope>import</scope> </dependency> </dependencies> </dependencyManagement> Spring Boot Build Systems
Changing the Java Version Spring boot by default assumes the application is using java 8, but it can be overridden using the maven property java.version <properties> <java.version>17</java.version> </properties> Spring Boot Build Systems
Using the Spring Boot Maven plugin Spring Boot includes a Maven plugin that can package the project as an executable jar. Add the plugin to your <plugins> section. <build> <plugins> <plugin> <groupId>org.springframework.boot</groupId> <artifactId>spring-boot-maven-plugin</artifactId> </plugin> </plugins> </build> Spring Boot Build Systems
Gradle The same configuration in gradle looks like: plugins { id 'org.springframework.boot' version '2.7.2' id 'io.spring.dependency-management' version '1.0.12.RELEASE' id 'java' } group = 'com.scaler' version = '0.0.1-SNAPSHOT' sourceCompatibility = '11' configurations { compileOnly { extendsFrom annotationProcessor } } Spring Boot Build Systems
repositories { mavenCentral() } tasks.named('test') { useJUnitPlatform() } Spring Boot Build Systems

Java springboot framework- Spring Boot.pptx

  • 1.
    Spring Boot • Springboot is a module of spring framework from which speed up the development. • It is a Spring module that provides the RAD (Rapid Application Development) feature to the Spring Framework. • It provides an easier and faster way to set up, configure, and run both simple and web-based application. • In short, Spring Boot is the combination of Spring Framework and Embedded Servers that will create stand alone application.
  • 2.
    Why Spring Boot •Spring is used to create scalable web applications. But main disadvantage of spring projects is that configuration is time-consuming and can be a bit complex for the new developers. Making the application production-ready takes some time if you are new to the spring. • Solution to this is Spring Boot. Spring Boot is built on the top of the spring and contains all the features of spring. • It is becoming favorite for developer’s these days because of it’s a rapid production-ready environment which enables the developers to directly focus on the logic instead of struggling with the configuration and set up.
  • 3.
    Features of SpringBoot 1.It allows to avoid heavy configuration of XML which is present in spring: In spring boot everything is auto-configured. We just need to use proper configuration for utilizing a particular functionality. 2. It includes embedded Tomcat-server: Unlike Spring where we have to manually add and install the tomcat server, Spring Boot comes with an embedded Tomcat server, so that the applications can be hosted on it.
  • 4.
    Features of SpringBoot 3. Deployment is very easy; WAR and JAR file can be easily deployed in the tomcat server: WAR(Web-application Archive) or JAR(Java Archive) files can be directly deployed on the Tomcat Server and Spring Boot provides the facility to convert our project into WAR or JAR files. 4. Microservices Based Architecture: Microservices are a modern approach to software whereby application code is delivered in small, manageable pieces, independent of others. Microservice, as the name suggests is the name given to a module/service which focuses on a single type of feature.
  • 5.
    Features of SpringBoot • Let us consider an example of a hospital management system. • In case of other systems, there will be a single code containing all the features which are very tough to maintain on a huge scale. • But in the microservice-based system, each feature can be divided into smaller subsystems like service to handle patient registration, service to handle database management, service to handle billing etc. • Microservice based system can be easily migrated as only some services need to be altered which also makes debugging and deployment easy. • Also, each service can be integrated and can be made in different technologies suited to them.
  • 6.
    Features of SpringBoot 5. It provides easy maintenance and creation of REST API: Creating a REST API is very easy in Spring Boot. Just the annotation @RestController and @RequestMapping(/endPoint) over the controller class does the work. • REpresentational State Transfer (REST) is an architectural style that defines a set of constraints to be used for creating web services. • Web service is a technology to communicate between programming language. For example, Java programming language can interact with PHP and . Net by using web services.
  • 7.
    Spring vs SpringBoot Basis Spring Spring Boot Use For building or developing applications, the Spring framework is the most widely used Java EE framework. For developing REST APIs(REpresentational State Transfer API) Spring Boot framework is widely used. Key or Primary Feature Dependency Injection Autoconfiguration: Based on the requirement, the classes are automatically configured by Spring Boot. Developing Applications This framework helps make things simpler by allowing us to build loosely coupled applications. Standalone applications can be built using Spring Boot framework with minimal or fewer configurations.
  • 8.
    Spring vs SpringBoot Basis Spring Spring Boot Server The server needs to be set up explicitly for the testing purpose of the Spring Project. Embedded servers like Jetty, Tomcat, etc., are offered by the Spring Boot framework. Need of Deployment Descriptor Deployment descriptor is required for running Spring applications. Deployment descriptor is not required for Spring Boot. Configurations In the Spring framework, the configurations need to be built manually. For Spring Boot, there are default configurations.
  • 9.
    Spring vs SpringBoot Basis Spring Spring Boot XML Configuration In Spring, XML configuration is required. In Spring Boot, XML configuration is not required. Testing Testing in Spring is more difficult than testing in Spring Boot. Testing is easier in Spring Boot.
  • 10.
    Advantage of SpringBoot 1. Autoconfiguration Spring application comes with automatic configuration functions. They intend to reduce the efforts from the developer. Other than that, by following an automatic approach, developers can easily save significant amount of time spent in development. Thus, we can say Spring boot offers greater flexibility. 2. Embedded Server Unlike Spring where we have to manually add and install the tomcat server, Spring Boot comes with an embedded Tomcat server, so that the applications can be hosted on it.
  • 11.
    Advantage of SpringBoot 3.Save Time It increases productivity and reduces development time. 4. Easily Connection with Database Allows for easily connecting with database services like Oracle,MySQL, MongoDB and many more. 5. WAR File Requirement Currently, Spring boot supports two types of files known as Web Application Resource (WAR) and JAR (Java Resource). Compared to WAR, JAR is a type of lightweight file that is useful for the developer in many ways.
  • 12.
    Disadvantage of SpringBoot 1. No Control • Generally, the development file size of Spring boot is larger due to its design. The developers have no control over the file size. The design of Spring boot adds needless dependencies which is mostly unused. All these excess dependencies increase the binary size of applications. 2. Large Scale Project Support • Spring boot is built focusing on micro services. In fact, it works seamless on these applications. However, they are not recommended to be used in large monolithic applications. • Monolithic applications typically consist of a client-side UI, a database, and a server-side application. Developers build all of these modules on a single code base. On the other hand, in a distributed architecture, each microservice works to accomplish a single feature or business logic.
  • 13.
    Disadvantage of SpringBoot 3. Modifications • Modifications are not an easy task in Spring boot. Unless you have strong knowledge on Spring systems and history, you cannot modify or troubleshoot Spring boot. 4. Resource Utilization • Autoconfiguration feature of Spring boot enables several unnecessary features. When this process is automatically enabled, it will definitely utilize excess amount of computing resources by being fully configured.
  • 14.
    Spring Boot CodeStructure • Though spring boot does not advocate any specific structure, some best practices help the developer to create manageable code. Best Practices for Structuring Code About Typical Layout A typical layout for maven projects contains different directories, each for specific types of files to be placed. src/main/java: Package should contain source java classes. We should not create classes directly in this folder; rather, we should have our package. For example, we have the com.psit.ems package under this folder. Typically package name is the same as that of the group id.
  • 15.
    src/main/resources: This folder shouldcontain configuration files, properties files, XML files, and other such configurations. src/test/java: This folder should contain unit test classes. src/test/resources: This folder should contain configuration files used in tests. target: This folder contains compiled classes and generated project artifacts. Spring Boot Code Structure
  • 17.
    Using the “default”Package A class not part of any package is in a default package. For example, any class in src/main/java will go into the default package. Use of default package is discouraged and should be avoided as it may cause issues in automatic bean scan. Spring Boot Code Structure
  • 18.
    Approaches in LayoutStructure We can structure your code in two ways: 1. Structure by layer 2. Structure by feature. It affects the application's cohesion and coupling factors. Structure by Layer In this structure, classes are placed in the package based on the layer it belongs to. This method causes low cohesion within packages because packages contain classes that are not closely related. Below is an example of packaging by layers: Spring Boot Code Structure
  • 19.
    ├── com.app └── controller ├──CompanyController ├── ProductController └── UserController └── model ├── Company ├── Product └── User └── repository ├── CompanyRepository ├── ProductRepository └── UserRepository └── service ├── CompanyService ├── ProductService └── UserService └── util
  • 20.
    On observing thisstructure, we see that there are: High coupling: Because classes tend to change in all the packages to implement the functionality. Low cohesion: Because each package contains unrelated code. This structure loses coupling and cohesion. Spring Boot Code Structure
  • 21.
    Structure by Feature Inthis structure, packages contain all classes required for a feature. The feature-based packing ensures that closely related classes are kept together. An example of this structure is given below: Spring Boot Code Structure On observing this structure, we see that there are: Low coupling: Only classes within the package is touched to implement the functionality. High cohesion: Set of related classes is kept together as they usually get changes.
  • 22.
    ├── com.app └── company ├──Company ├── CompanyController ├── CompanyRepository └── CompanyService └── product ├── Product ├── ProductController ├── ProductRepository └── ProductService └── util └── user ├── User ├── UserController ├── UserRepository └── UserService
  • 23.
    Spring Boot Runners •Spring Boot provides two runner interfaces, which are ApplicationRunner and CommandLineRunner. • Both of these runners are used to execute piece of code when a Spring Boot Application starts. • Both of these interfaces are Functional Interfaces, which means they have only one functional method. • In order to execute specific piece of code when Spring Boot Application starts, we need to implement either of these functional interfaces and override the single method of run.
  • 24.
    Application Runners • Itis used to perform any task or actions immediately after the spring boot application started. • Basically, this interface contains a method named run() which only gets executed once the application starts. • Once a class implements this method, we need to override and add our own business logic or the actions which we want to perform. Ex: @SpringBootApplication public class DemoApplication implements ApplicationRunner{ @Override public void run(ApplicationArguments arg0) throws Exception{ System.out.println("Hello World from Application Runner"); } }
  • 25.
    Command Line Runner •It also works in the same way as ApplicationRunner Interface. It also used to run the code just immediately after the spring boot application started. • This interface provides access to application arguments as String array @SpringBootApplication public class DemoApplication implements CommandLineRunner { @Override public void run(String... arg0) throws Exception { System.out.println("Hello World from commandLine Runner"); } }
  • 26.
    Spring Boot Logger •In software development, “log” represents a report containing the history of events, activities, or messages generated by a computer program throughout its execution. • These logs are used to collect relevant information about the program’s behavior, errors, warnings, and other noticeable events that take place while the program is running. • Moreover, logs are very important for diagnosing issues, monitoring system performance, and troubleshooting in an application, debugging, monitoring, auditing, and analyzing the applications. • Spring Boot offers a flexible logging framework that allows developers to configure and control how log messages are generated, formatted, and stored. • This logging framework is built on top of the popular SLF4J (Simple Logging Facade for Java) and Logback libraries.
  • 27.
    Components in Loggingin Spring Boot Logging Levels Spring Boot contains different logging levels to classify the log messages. The common log levels are DEBUG, INFO, WARN, ERROR, and TRACE. We can choose the suitable log level for a specific message based on our requirement & its importance. Levels Usage Error It is used for non-recoverable error. Warning It is used for recoverable error. Info It is used for audit purpose. Debug It is used for investigation. Trace It is used for detailed investigation.
  • 28.
    Components in Loggingin Spring Boot Logging Configuration Spring Boot applications can be configured to use different logging implementations. Spring Boot uses Logback as the default logging framework, but it is also capable of supporting other common logging frameworks like Log4j2 and JUL (Java Util Logging) etc. We can configure the required logging implementation by adding the corresponding dependency to our project’s build configuration.
  • 29.
    Components in Loggingin Spring Boot Configuration Properties Configuration properties of Spring Boot allow us to customize various characteristics of logging, such as log level thresholds for different loggers, log output formats, and log file locations. These properties can be specified in the ‘application.properties’ or ‘application.yml’ files.
  • 30.
    Logging Output • Logmessages can be in the form of various outputs, such as the console, log files, database entries, or even external logging services. • Spring Boot provides configuration options to control where log messages are sent. • It also includes the ability to specify rolling log files to manage log rotation and retention based on the specified size of the file. • Along with application-specific log messages, Spring Boot’s logging framework can also capture various system events and information, such as server startup details, database connection information, and HTTP request/response logs. Components in Logging in Spring Boot
  • 31.
    A logger isan object that allows us to generate log messages within the application. Loggers are part of the logging framework provided by Spring Boot and are used to record various events, activities, and information during the runtime of our application. These log messages provide information into the behavior of our application, assist in troubleshooting, and help in monitoring and maintaining the application’s health. Logger Interface Spring Boot internally uses the Logger interface from the SLF4J (Simple Logging Facade for Java) library as the primary abstraction for creating log messages. We need to connect with the logger interface to generate log messages in our code. What is Logger In Spring Boot
  • 32.
    Logger Initialization Logger instancesare generally initialized at the class level as private static final field. This practice ensures that the logger is shared across instances of the same class and eliminates the overhead of logger creation. Logger Factory Spring Boot’s logging framework uses a logger factory to create logger instances behind the scenes. The factory is responsible for determining which logging implementation (e.g., Logback, Log4j2) to use and instantiates the appropriate logger accordingly. What is Logger In Spring Boot
  • 33.
    Generating Log Messages •In order to generate log messages, we call methods on the logger instance with respect to the desired logging level. • For example, to generate an informational log message, you would use logger.info(“Message text”). What is Logger In Spring Boot
  • 34.
    Logging Levels • Logginglevels are used to categorize log messages based on their severity and importance. • Each logging level corresponds to a specific severity level, which helps developers understand the nature of the logged events. • Spring Boot, along with logging frameworks like SLF4J and Logback, provides a set of standard logging levels that are commonly used to indicate different levels of severity. –These are trace, debug, info, warn, and error. • By default, info & above level messages are enabled. • In order to receive other level messages, go to application.properties and add below entries accordingly: • logger.level.root=TRACE –Since the TRACE has the lowest severity, in this case all levels messages will appear. What is Logger In Spring Boot
  • 35.
    RESTful Web Services •REST stands for REpresentational State Transfer. It is developed by Roy Thomas Fielding, who also developed HTTP. • The main goal of RESTful web services is to make web services more effective. • RESTful web services try to define services using the different concepts that are already present in HTTP. • REST is an architectural approach, not a protocol. • It does not define the standard message exchange format. We can build REST services with both XML and JSON. • The key abstraction is a resource in REST. A resource can be anything. It can be accessed through a Uniform Resource Identifier (URI). RESTful Web Services
  • 36.
    • A resourcecan be anything. It can be accessed through a Uniform Resource Identifier (URI). For example: • The resource has representations like XML, HTML, and JSON. The current state capture by representational resource. When we request a resource, we provide the representation of the resource. The important methods of HTTP are: • GET: It reads a resource. • PUT: It updates an existing resource. • POST: It creates a new resource. • DELETE: It deletes the resource. • For example, if we want to perform the following actions in the social media application, we get the corresponding results. RESTful Web Services
  • 37.
    Advantages of RESTfulweb services • RESTful web services are platform-independent. • It can be written in any programming language and can be executed on any platform. • It provides different data format like JSON, text, HTML, and XML. • It is fast in comparison to SOAP because there is no strict specification like SOAP. • These are reusable. • They are language neutral.
  • 38.
    Building RESTful WebServices • Spring Boot provides a very good support to building RESTful Web Services for enterprise applications. • For building a RESTful Web Services, we need to add the Spring Boot Starter Web dependency into the build configuration file. • If you are a Maven user, use the following code to add the below dependency in your pom.xml file − <dependency> <groupId>org.springframework.boot</groupId> <artifactId>spring-boot-starter-web</artifactId> </dependency> • If you are a Gradle user, use the following code to add the below dependency in your build.gradle file. compile('org.springframework.boot:spring-boot-starter- web')
  • 39.
    Annotations for RESTfulWeb Services • Rest Controller The @RestController annotation is used to define the RESTful web services. It serves JSON, XML and custom response. Its syntax is shown below − @RestController public class ProductServiceController { } • Request Mapping The @RequestMapping annotation is used to define the Request URI to access the REST Endpoints. We can define Request method to consume and produce object. The default request method is GET. @RequestMapping(value = "/products") public ResponseEntity<Object> getProducts() { }
  • 40.
    Annotations for RESTfulWeb Services • Request Body The @RequestBody annotation is used to define the request body content type. public ResponseEntity<Object> createProduct(@RequestBody Product product) { } • Path Variable The @PathVariable annotation is used to define the custom or dynamic request URI. public ResponseEntity<Object> updateProduct(@PathVariable("id") String id) { }
  • 41.
    Annotations for RESTfulWeb Services • Request Parameter The @RequestParam annotation is used to read the request parameters from the Request URL. By default, it is a required parameter. We can also set default value for request parameters as shown here − public ResponseEntity<Object> getProduct( @RequestParam(value = "name", required = false, defaultValue = "honey") String name) { }
  • 42.
    GET API • Thedefault HTTP request method is GET. • This method does not require any Request Body. • You can send request parameters and path variables to define the custom or dynamic URL. • The sample code to define the HTTP GET request method is shown below. In this example, we used HashMap to store the Product. Note that we used a POJO class as the product to be stored. • Here, the request URI is /products and it will return the list of products from HashMap repository. The controller class file is given below that contains GET method REST Endpoint.
  • 43.
    GET API @RestController public classProductServiceController { private static Map<String, Product> productRepo = new HashMap<>(); static { Product honey = new Product(); honey.setId("1"); honey.setName("Honey"); productRepo.put(honey.getId(), honey); Product almond = new Product(); almond.setId("2"); almond.setName("Almond"); productRepo.put(almond.getId(), almond); } @RequestMapping(value = "/products") public ResponseEntity<Object> getProduct() { return new ResponseEntity<>(productRepo.values(), HttpStatus.OK); } }
  • 44.
    POST API • TheHTTP POST request is used to create a resource. • This method contains the Request Body. • We can send request parameters and path variables to define the custom or dynamic URL. • The following example shows the sample code to define the HTTP POST request method. In this example, we used HashMap to store the Product, where the product is a POJO class. • Here, the request URI is /products, and it will return the String after storing the product into HashMap repository.
  • 45.
    POST API @RestController public classProductServiceController { private static Map<String, Product> productRepo = new HashMap<>(); @RequestMapping(value = "/products", method = RequestMethod.POST) public ResponseEntity<Object> createProduct(@RequestBody Product product) { productRepo.put(product.getId(), product); return new ResponseEntity<>("Product is created successfully", HttpStatus.CREATED); } }
  • 46.
    PUT API • TheHTTP PUT request is used to update the existing resource. • This method contains a Request Body. We can send request parameters and path variables to define the custom or dynamic URL. • The example given below shows how to define the HTTP PUT request method. • In this example, we used HashMap to update the existing Product, where the product is a POJO class. • Here, the request URI is /products/{id} which will return the String after the product into a HashMap repository. Note that, we used the Path variable {id} which defines the products ID that needs to be updated.
  • 47.
    PUT API @RestController public classProductServiceController { private static Map<String, Product> productRepo = new HashMap<>(); @RequestMapping(value = "/products/{id}", method = RequestMethod.PUT) public ResponseEntity<Object> updateProduct(@PathVariable("id") String id, @RequestBody Product product) { productRepo.remove(id); product.setId(id); productRepo.put(id, product); return new ResponseEntity<>("Product is updated successsfully", HttpStatus.OK); } }
  • 48.
    DELETE API • TheHTTP Delete request is used to delete the existing resource. • This method does not contain any Request Body. • We can send request parameters and path variables to define the custom or dynamic URL. • The example given below shows how to define the HTTP DELETE request method. • In this example, we used HashMap to remove the existing product, which is a POJO class. • The request URI is /products/{id} and it will return the String after deleting the product from HashMap repository. We used the Path variable {id} which defines the products ID that needs to be deleted.
  • 49.
    DELETE API @RestController public classProductServiceController { private static Map<String, Product> productRepo = new HashMap<>(); @RequestMapping(value = "/products/{id}", method = RequestMethod.DELETE) public ResponseEntity<Object> delete(@PathVariable("id") String id) { productRepo.remove(id); return new ResponseEntity<>("Product is deleted successsfully", HttpStatus.OK); } }
  • 50.
    RESTful Web Services– main class import org.springframework.boot.SpringApplication; import org.springframework.boot.autoconfigure.SpringBootAppli cation; @SpringBootApplication public class DemoApplication { public static void main(String[] args) { SpringApplication.run(DemoApplication.class, args); } }
  • 51.
    public class Product{ private String id; private String name; public String getId() { return id; } public void setId(String id) { this.id = id; } public String getName() { return name; } public void setName(String name) { this.name = name; } } RESTful Web Services – main class
  • 52.
    Spring Boot BuildSystems • Maven and Gradle are the two most popular build tools to build java-based applications. Both support dependency management and consume artifactory from maven central. Artifactory is a source for artifacts needed for a build, and a target to deploy artifacts generated in the build process. Maven This section will cover all dependencies and plugins required to build the spring boot application. Inheriting the starter Parent Every spring boot application must inherit the starter-parent dependency to use spring boot defaults. The starter parent inherits from spring-boot-dependencies, which contains all dependency versions for all the framework that works with spring boot and are compatible with each other.
  • 53.
    <parent> <groupId>org.springframework.boot</groupId> <artifactId>spring-boot-starter-parent</artifactId> <version>2.7.2</version> <relativePath/> <!-- lookupparent from repository --> </parent> Starter parent provides: • Provide the default compiler level as Java 1.8. • Provides a default configuration for maven-surefire-plugin, maven-jar-plugin, and maven-failsafe-plugin. Spring Boot Build Systems
  • 54.
    Using Spring Bootwithout the Parent POM • There can be a situation in that you can not inherit from starter-parent dependency because your corporate has its parent pom, which must be inherited. • In such cases, spring boot provides an alternate way to take advantage of dependency management. Spring Boot Build Systems
  • 55.
    <dependencyManagement> <dependencies> <dependency> <!-- Import dependencymanagement from Spring Boot --> <groupId>org.springframework.boot</groupId> <artifactId>spring-boot-dependencies</artifactId> <version>2.7.2</version> <type>pom</type> <scope>import</scope> </dependency> </dependencies> </dependencyManagement> Spring Boot Build Systems
  • 56.
    Changing the JavaVersion Spring boot by default assumes the application is using java 8, but it can be overridden using the maven property java.version <properties> <java.version>17</java.version> </properties> Spring Boot Build Systems
  • 57.
    Using the SpringBoot Maven plugin Spring Boot includes a Maven plugin that can package the project as an executable jar. Add the plugin to your <plugins> section. <build> <plugins> <plugin> <groupId>org.springframework.boot</groupId> <artifactId>spring-boot-maven-plugin</artifactId> </plugin> </plugins> </build> Spring Boot Build Systems
  • 58.
    Gradle The same configurationin gradle looks like: plugins { id 'org.springframework.boot' version '2.7.2' id 'io.spring.dependency-management' version '1.0.12.RELEASE' id 'java' } group = 'com.scaler' version = '0.0.1-SNAPSHOT' sourceCompatibility = '11' configurations { compileOnly { extendsFrom annotationProcessor } } Spring Boot Build Systems
  • 59.