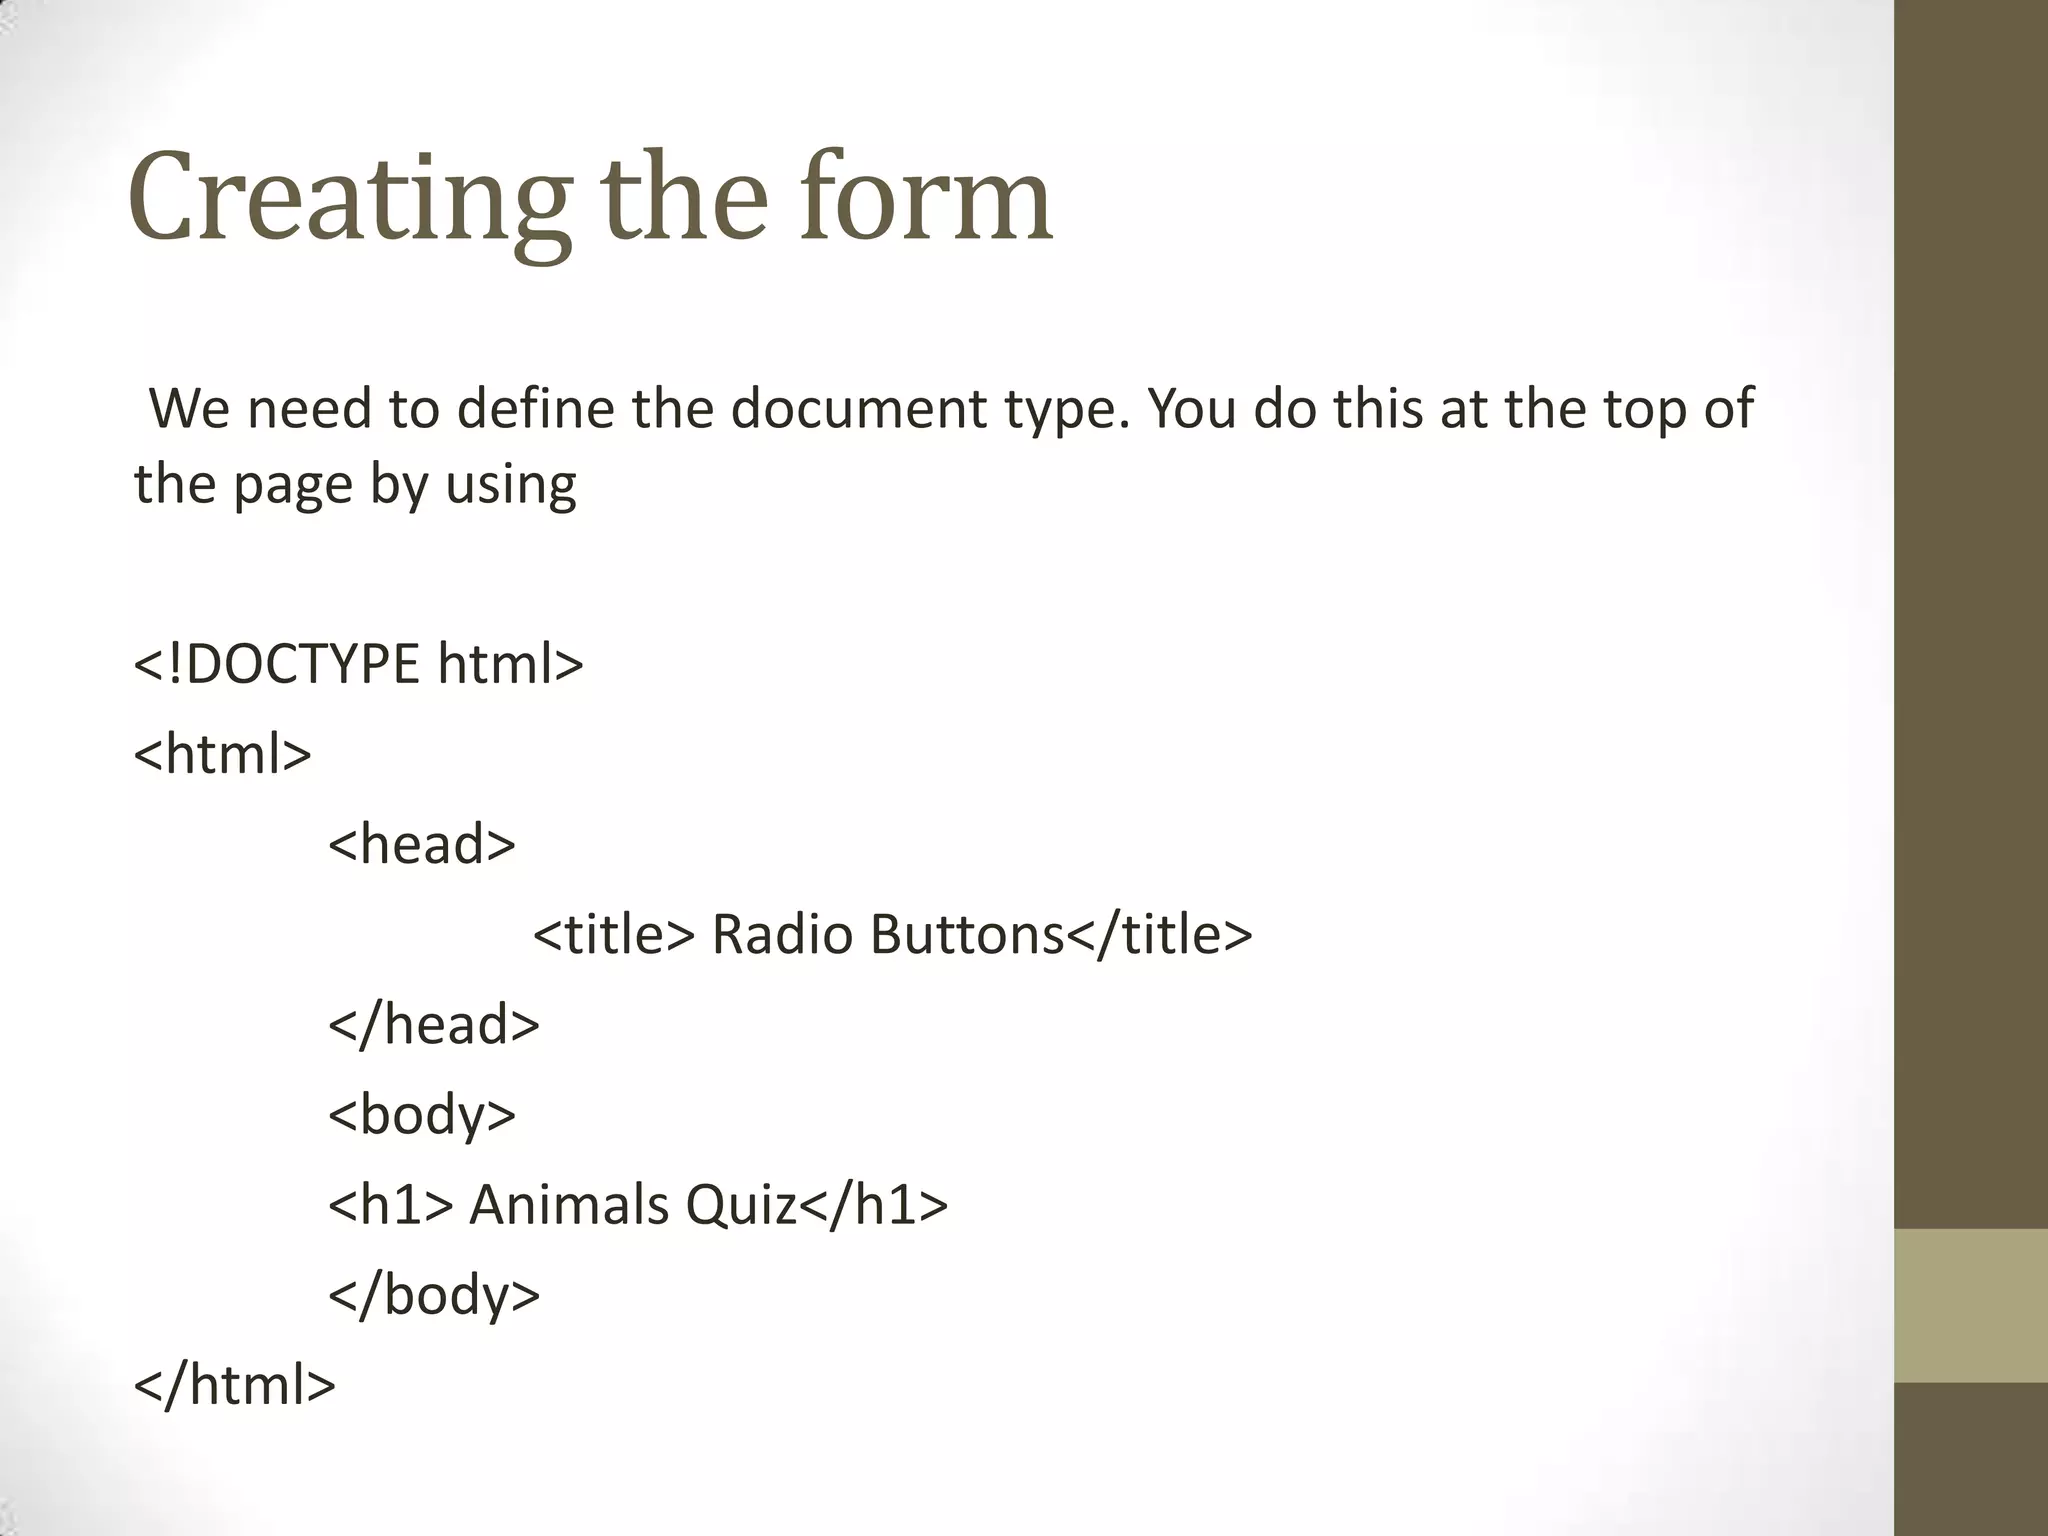
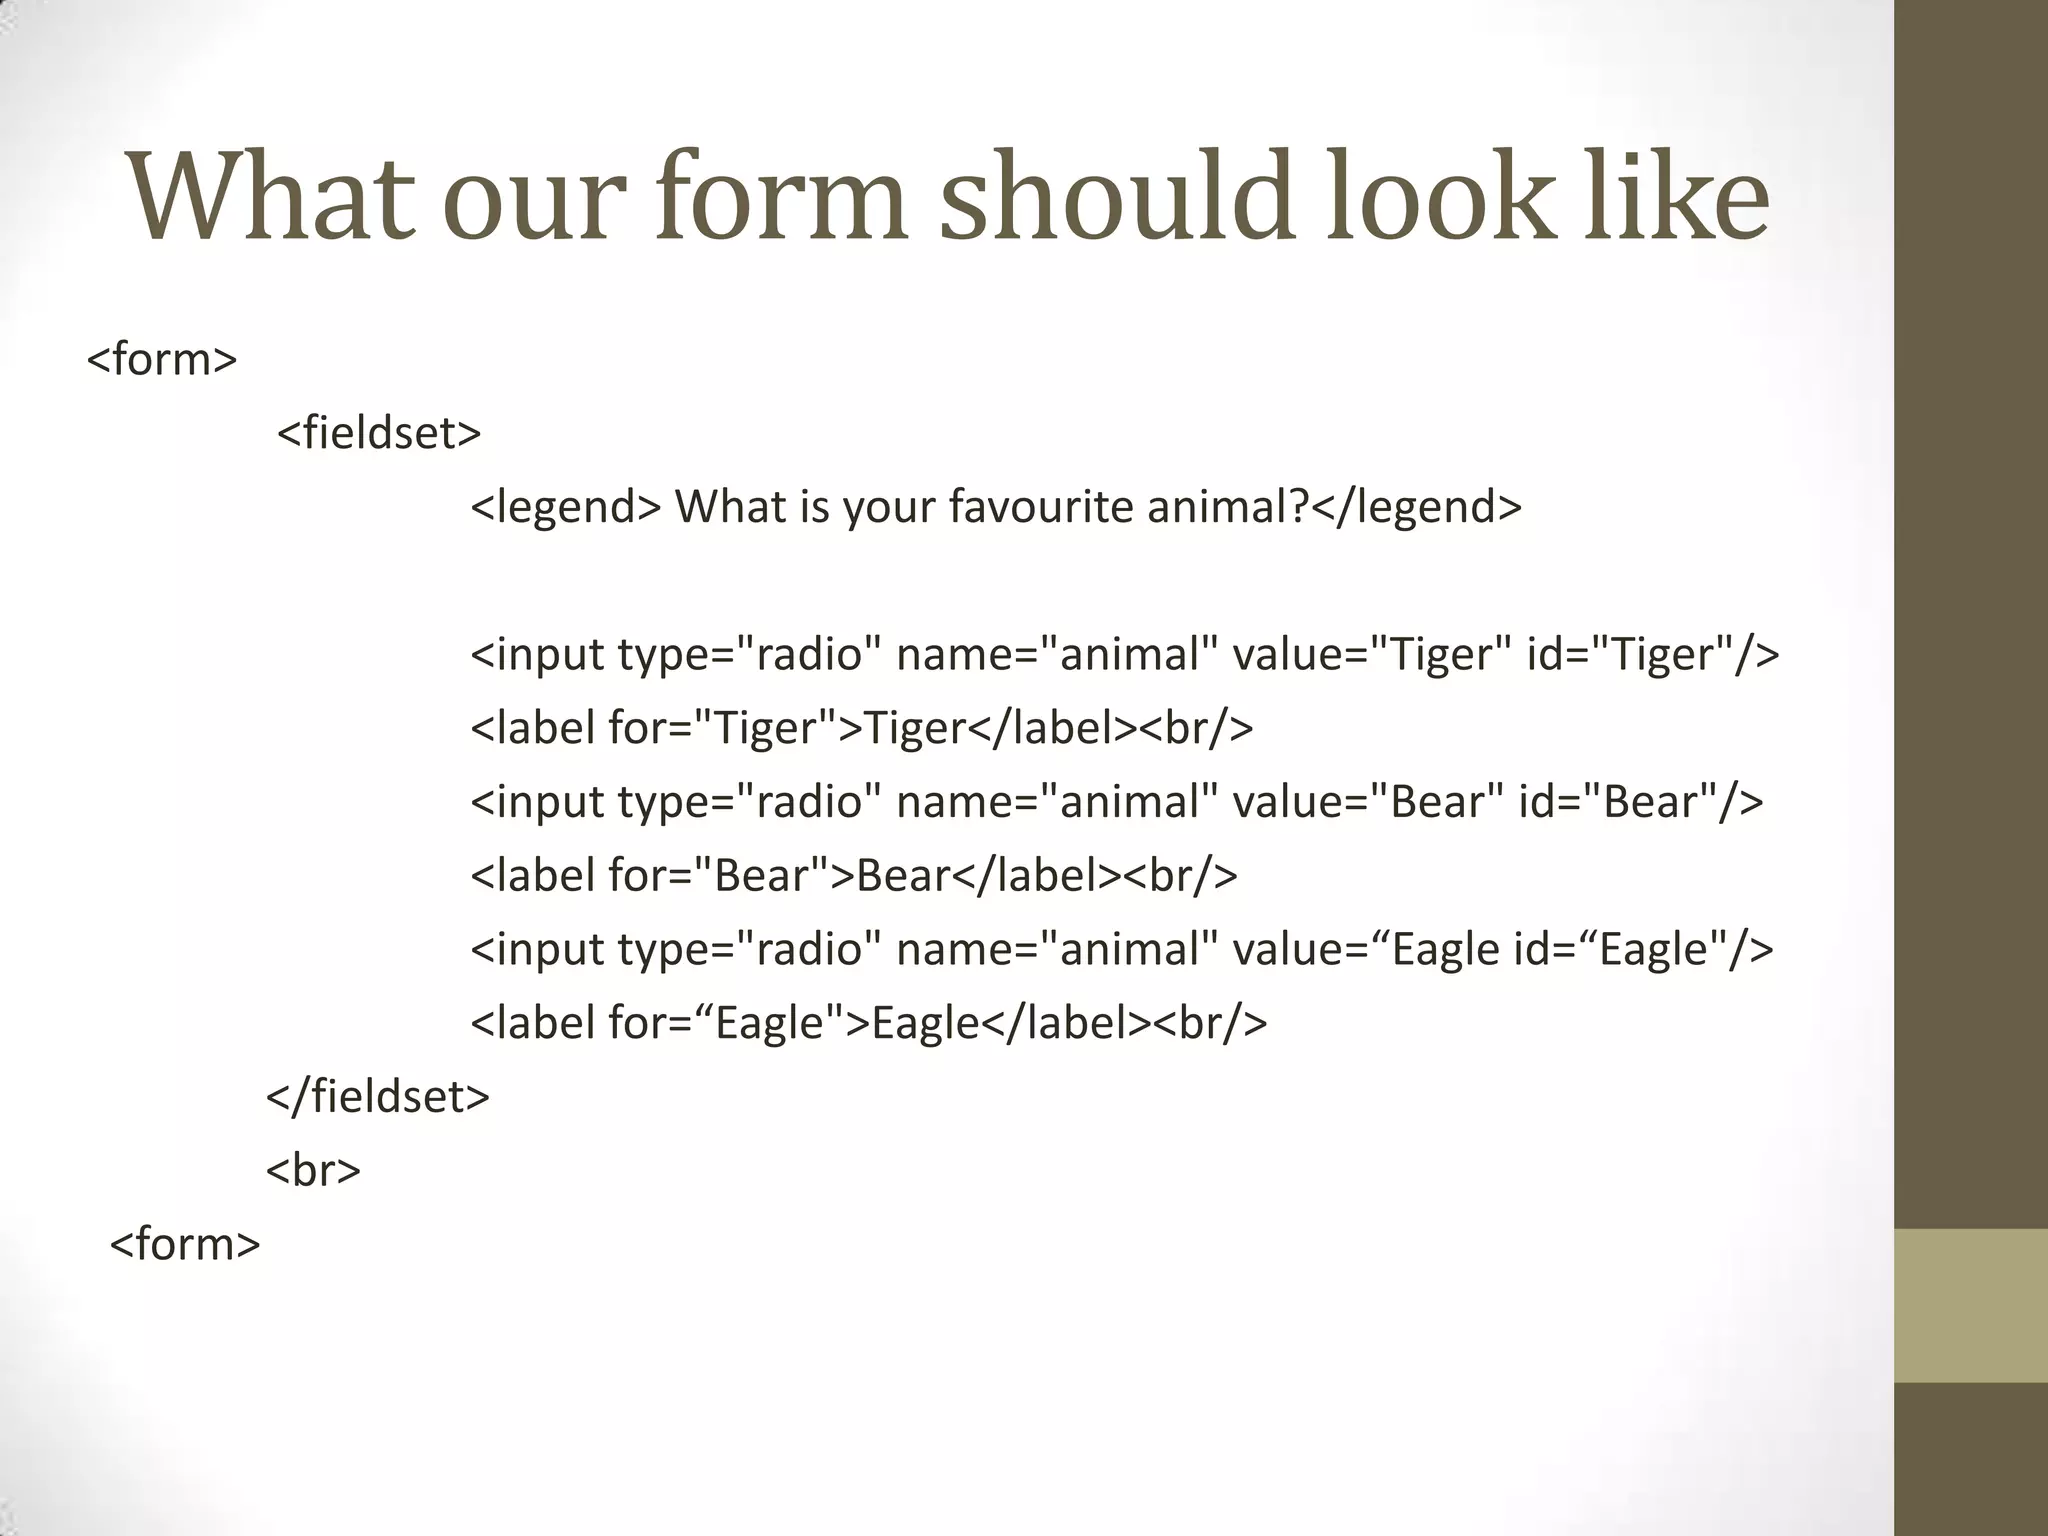
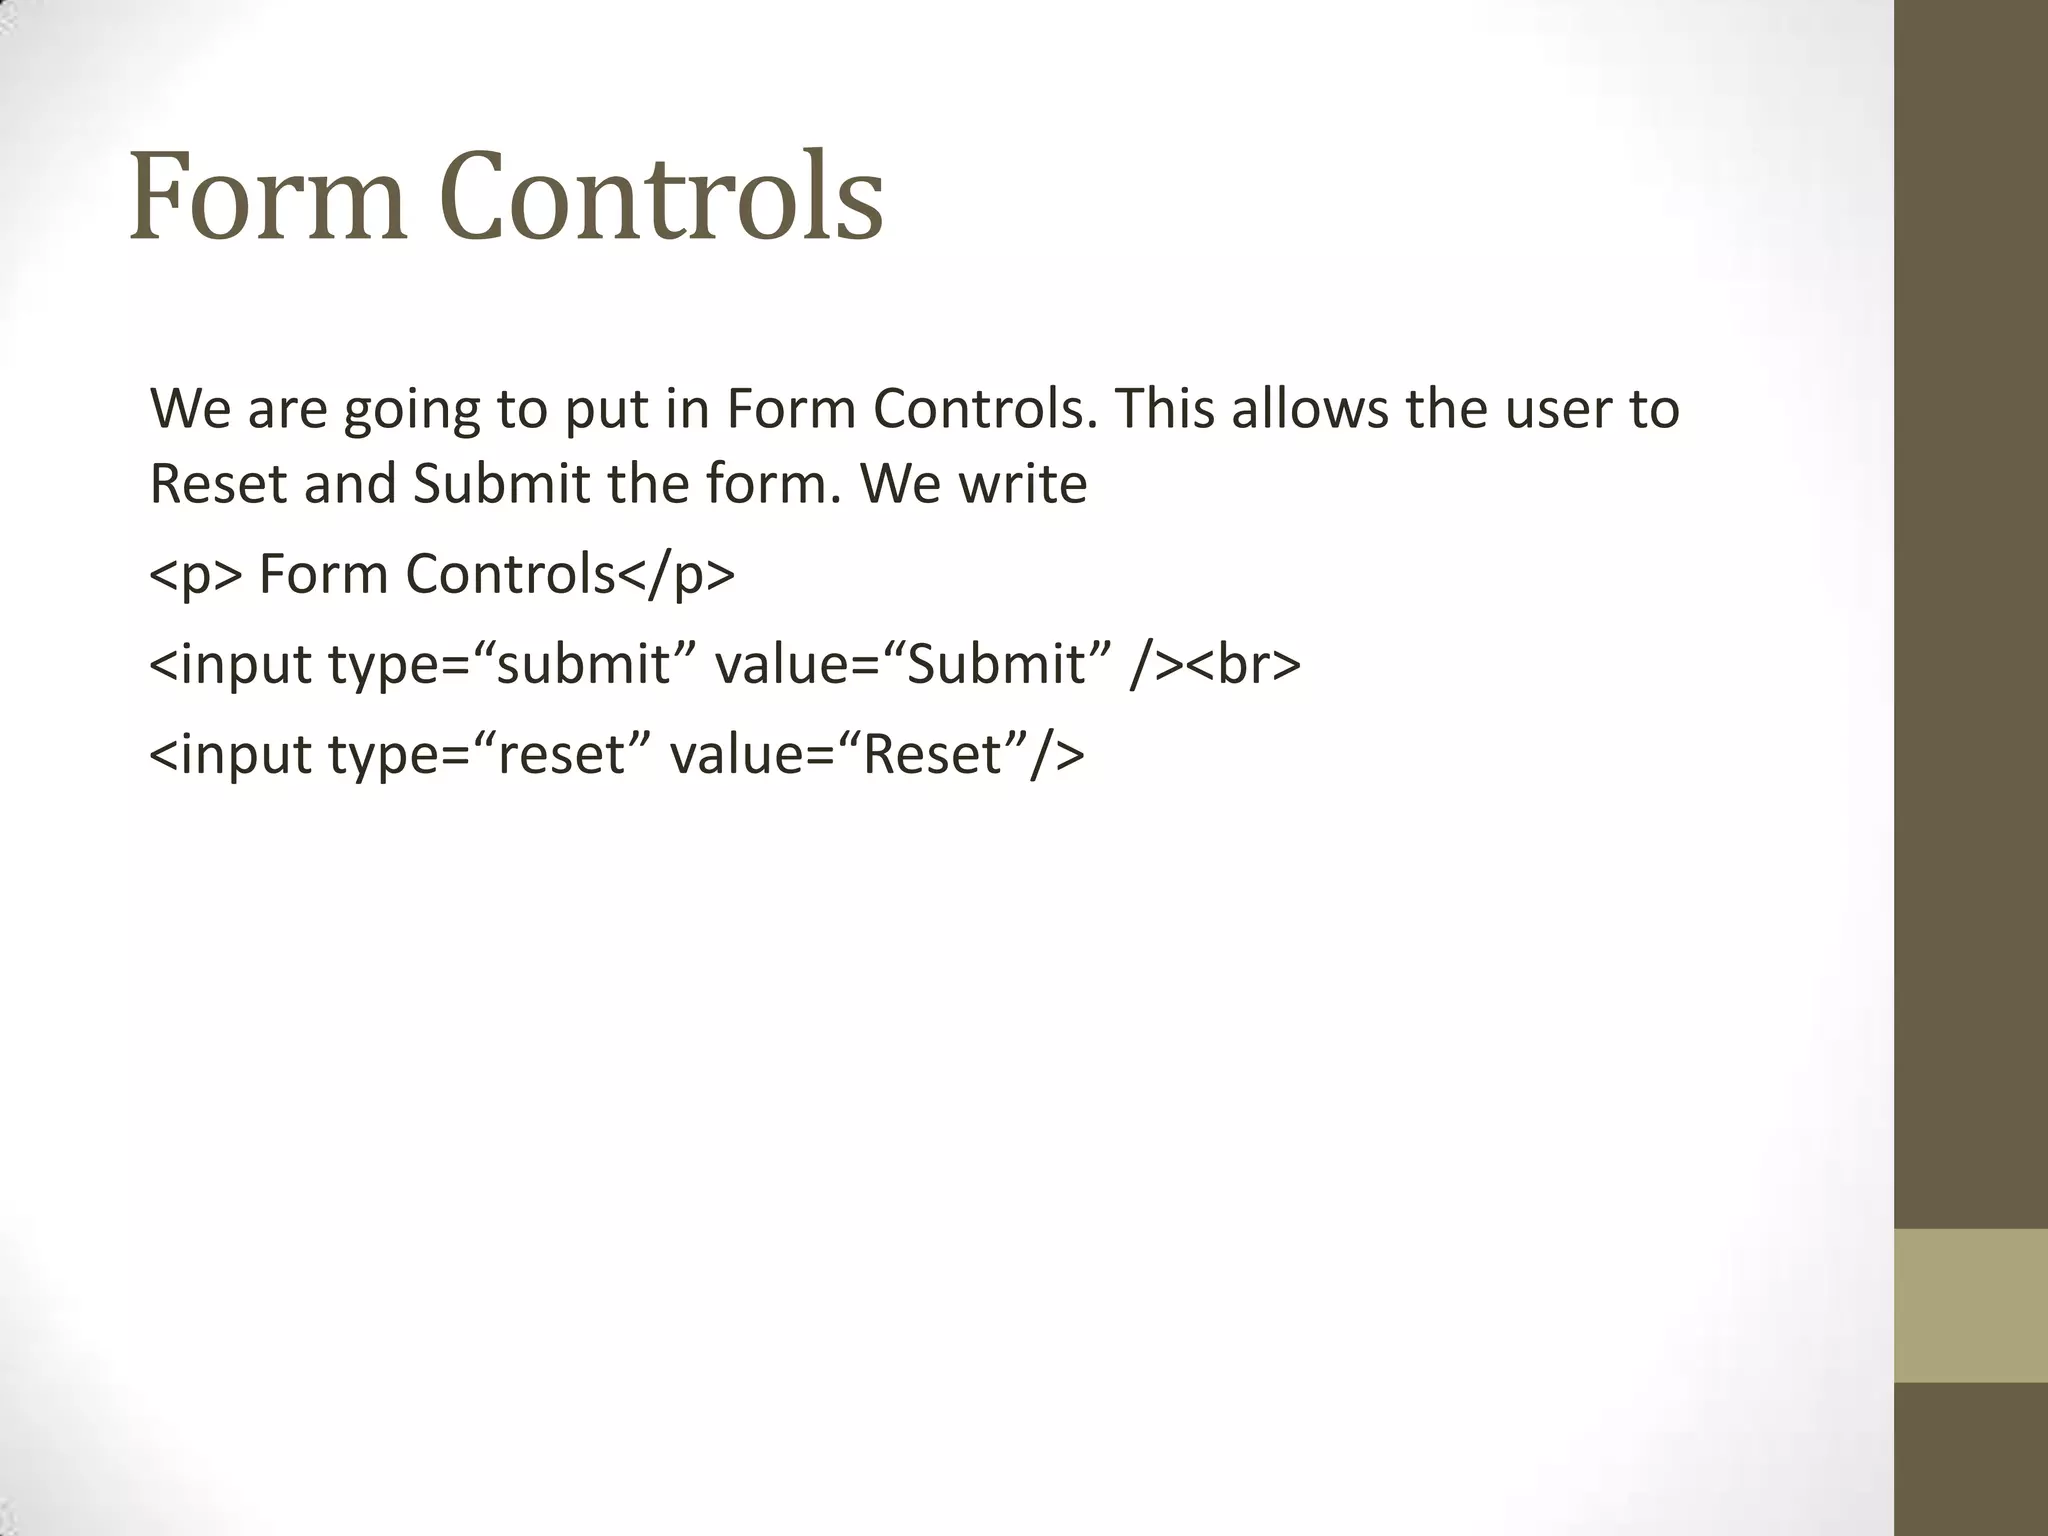
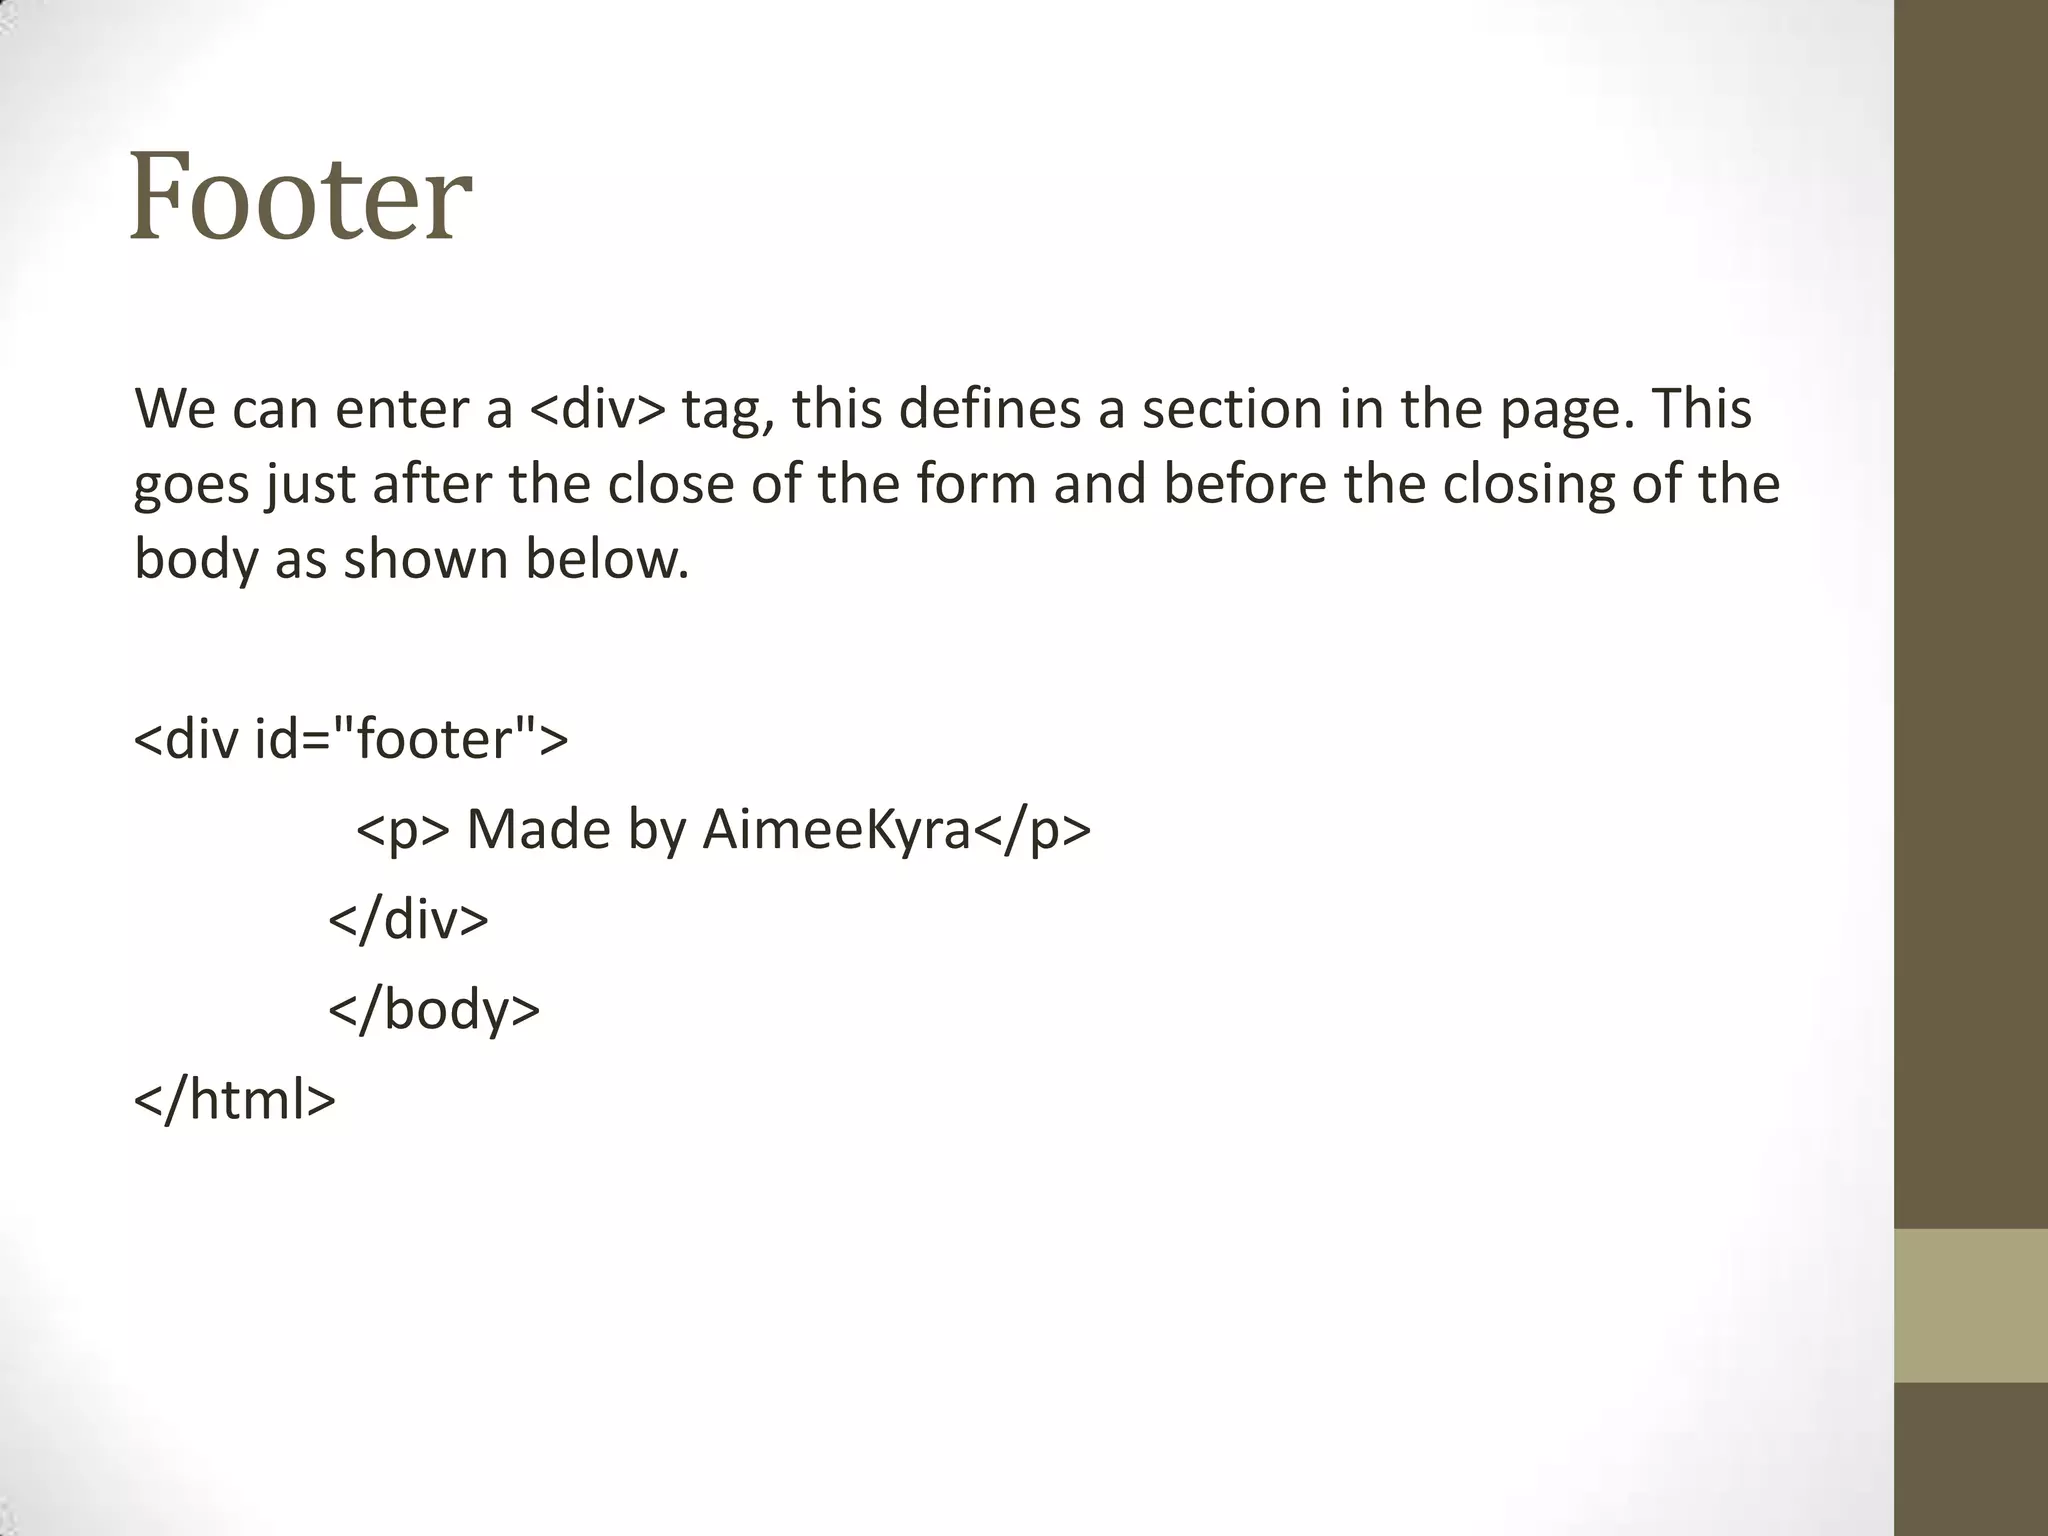
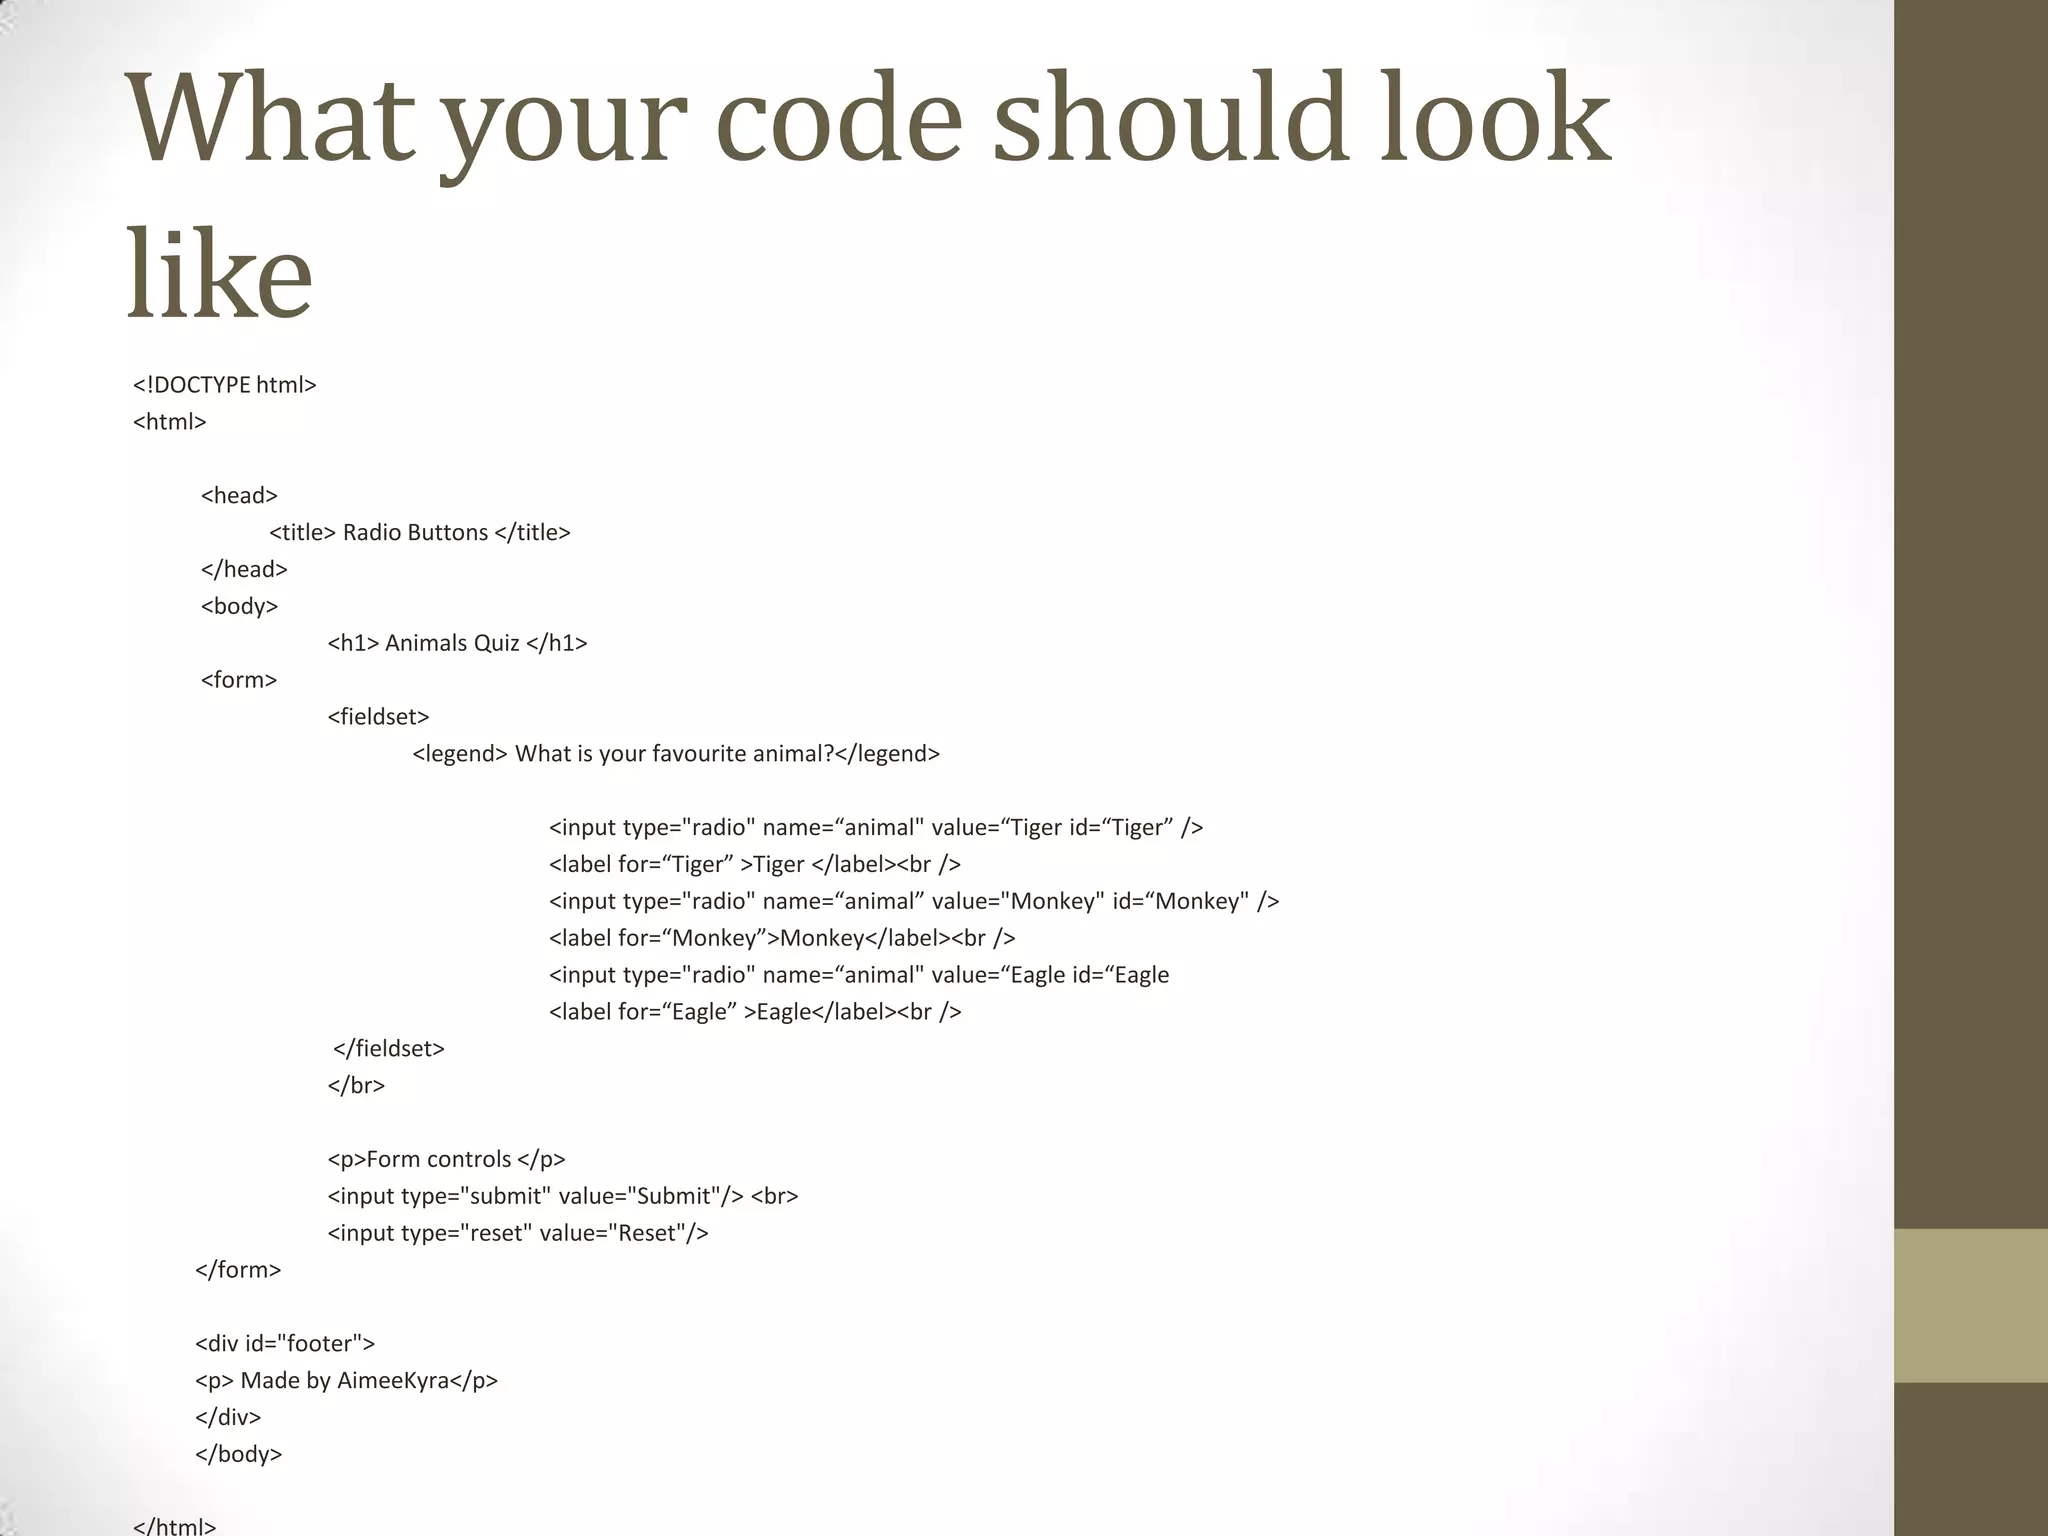
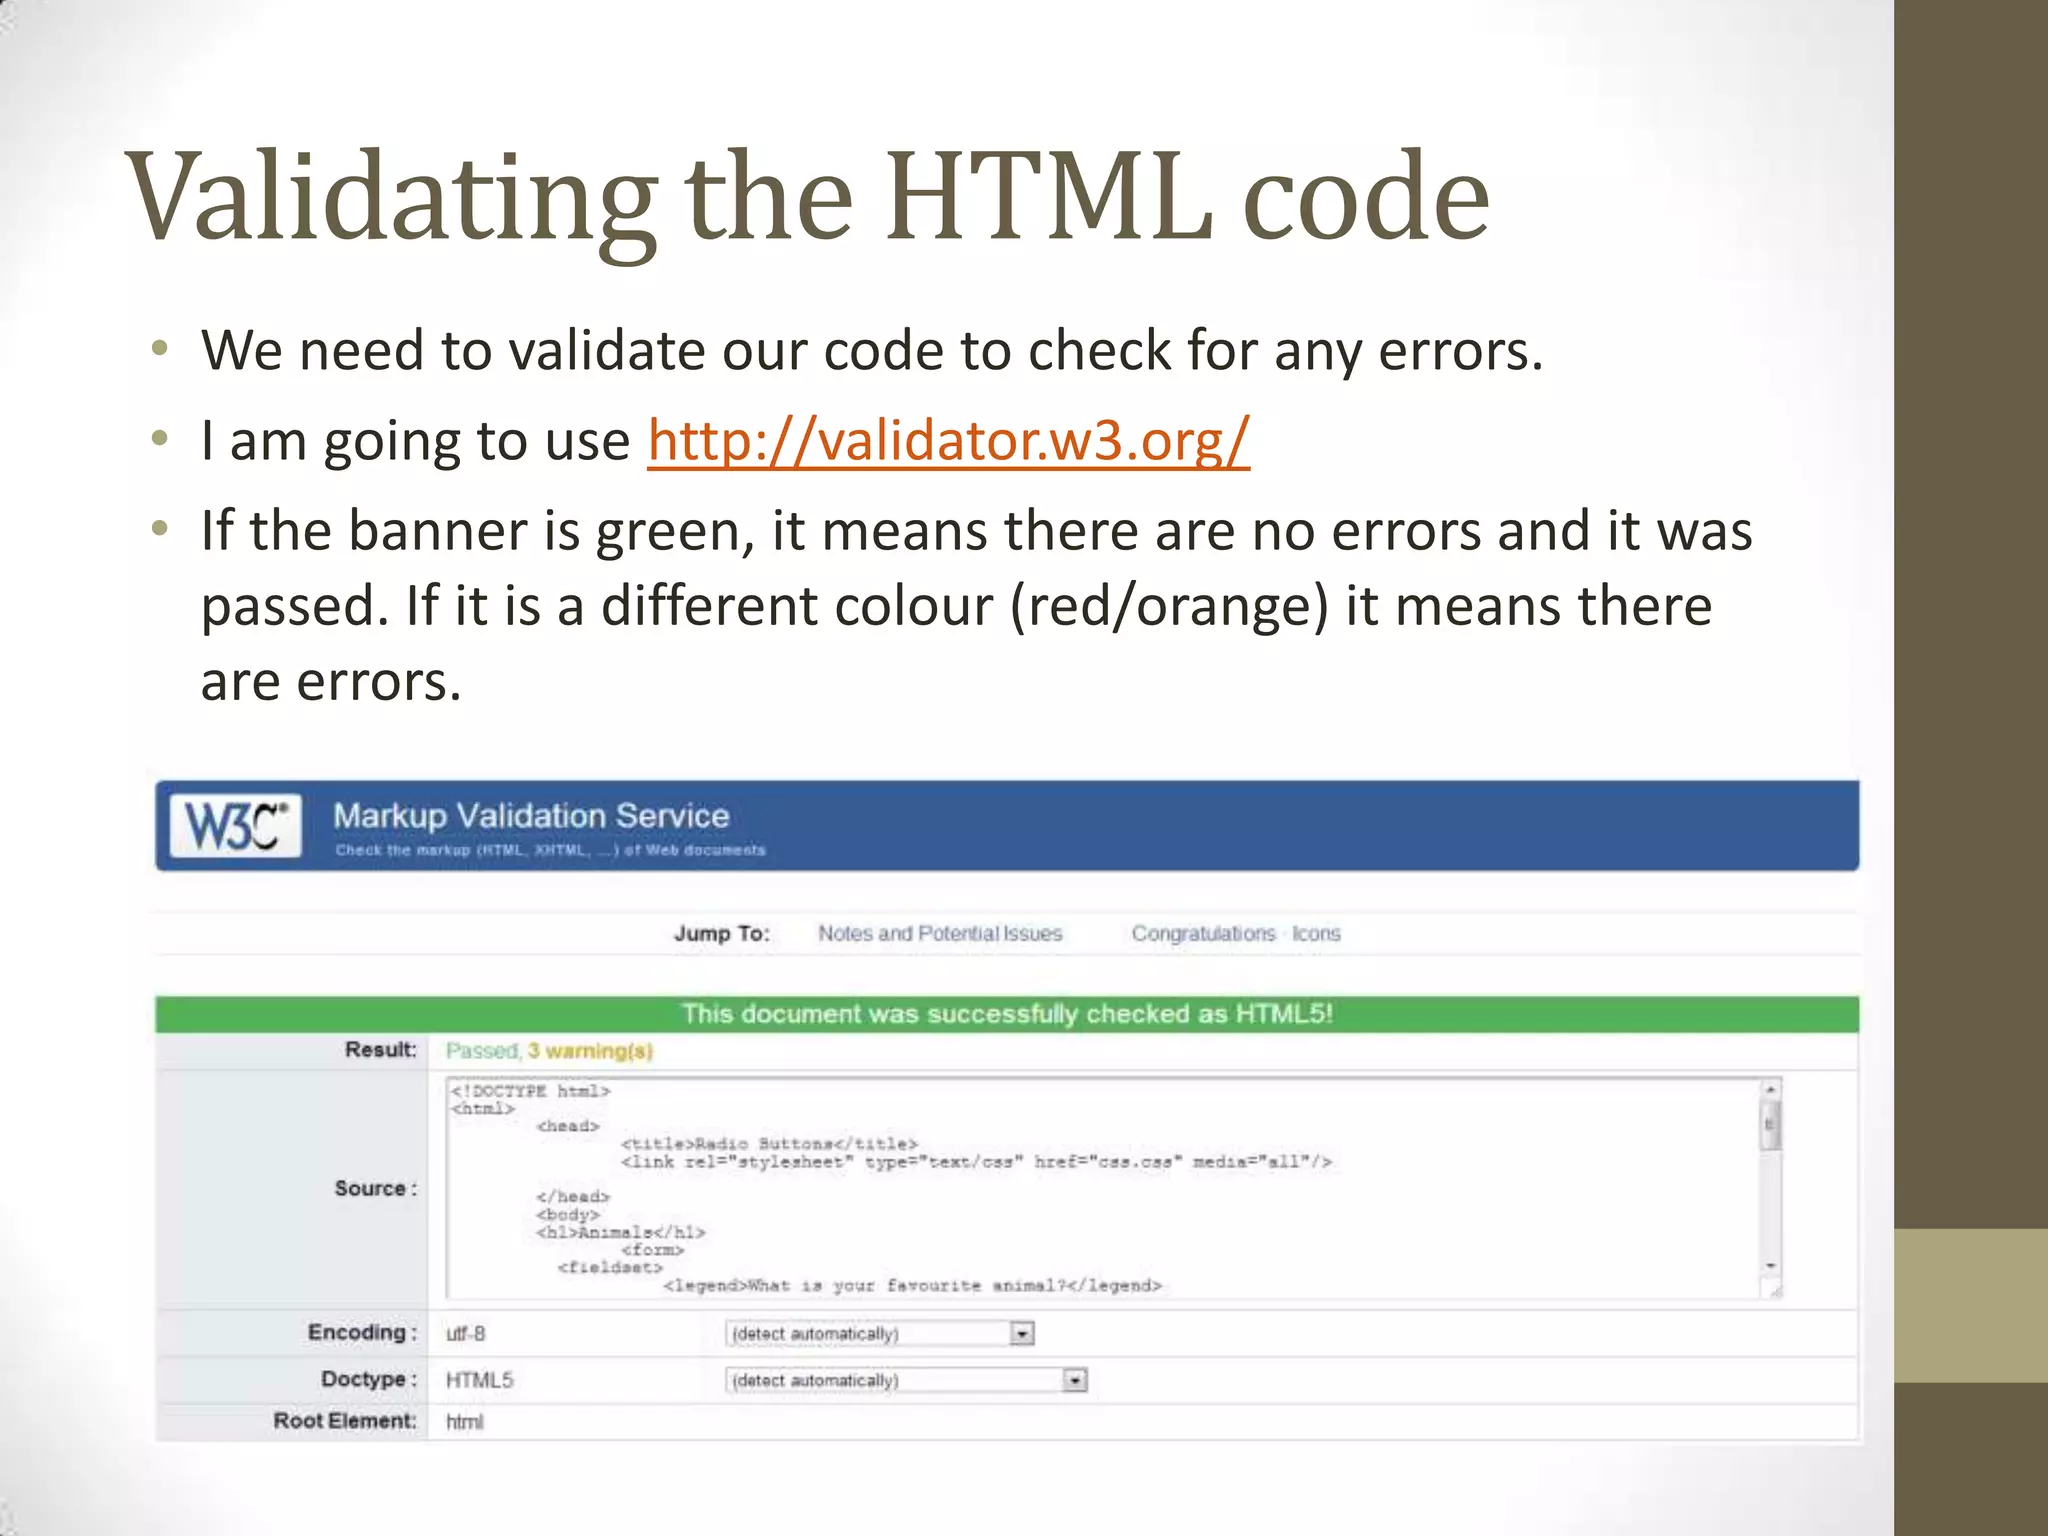
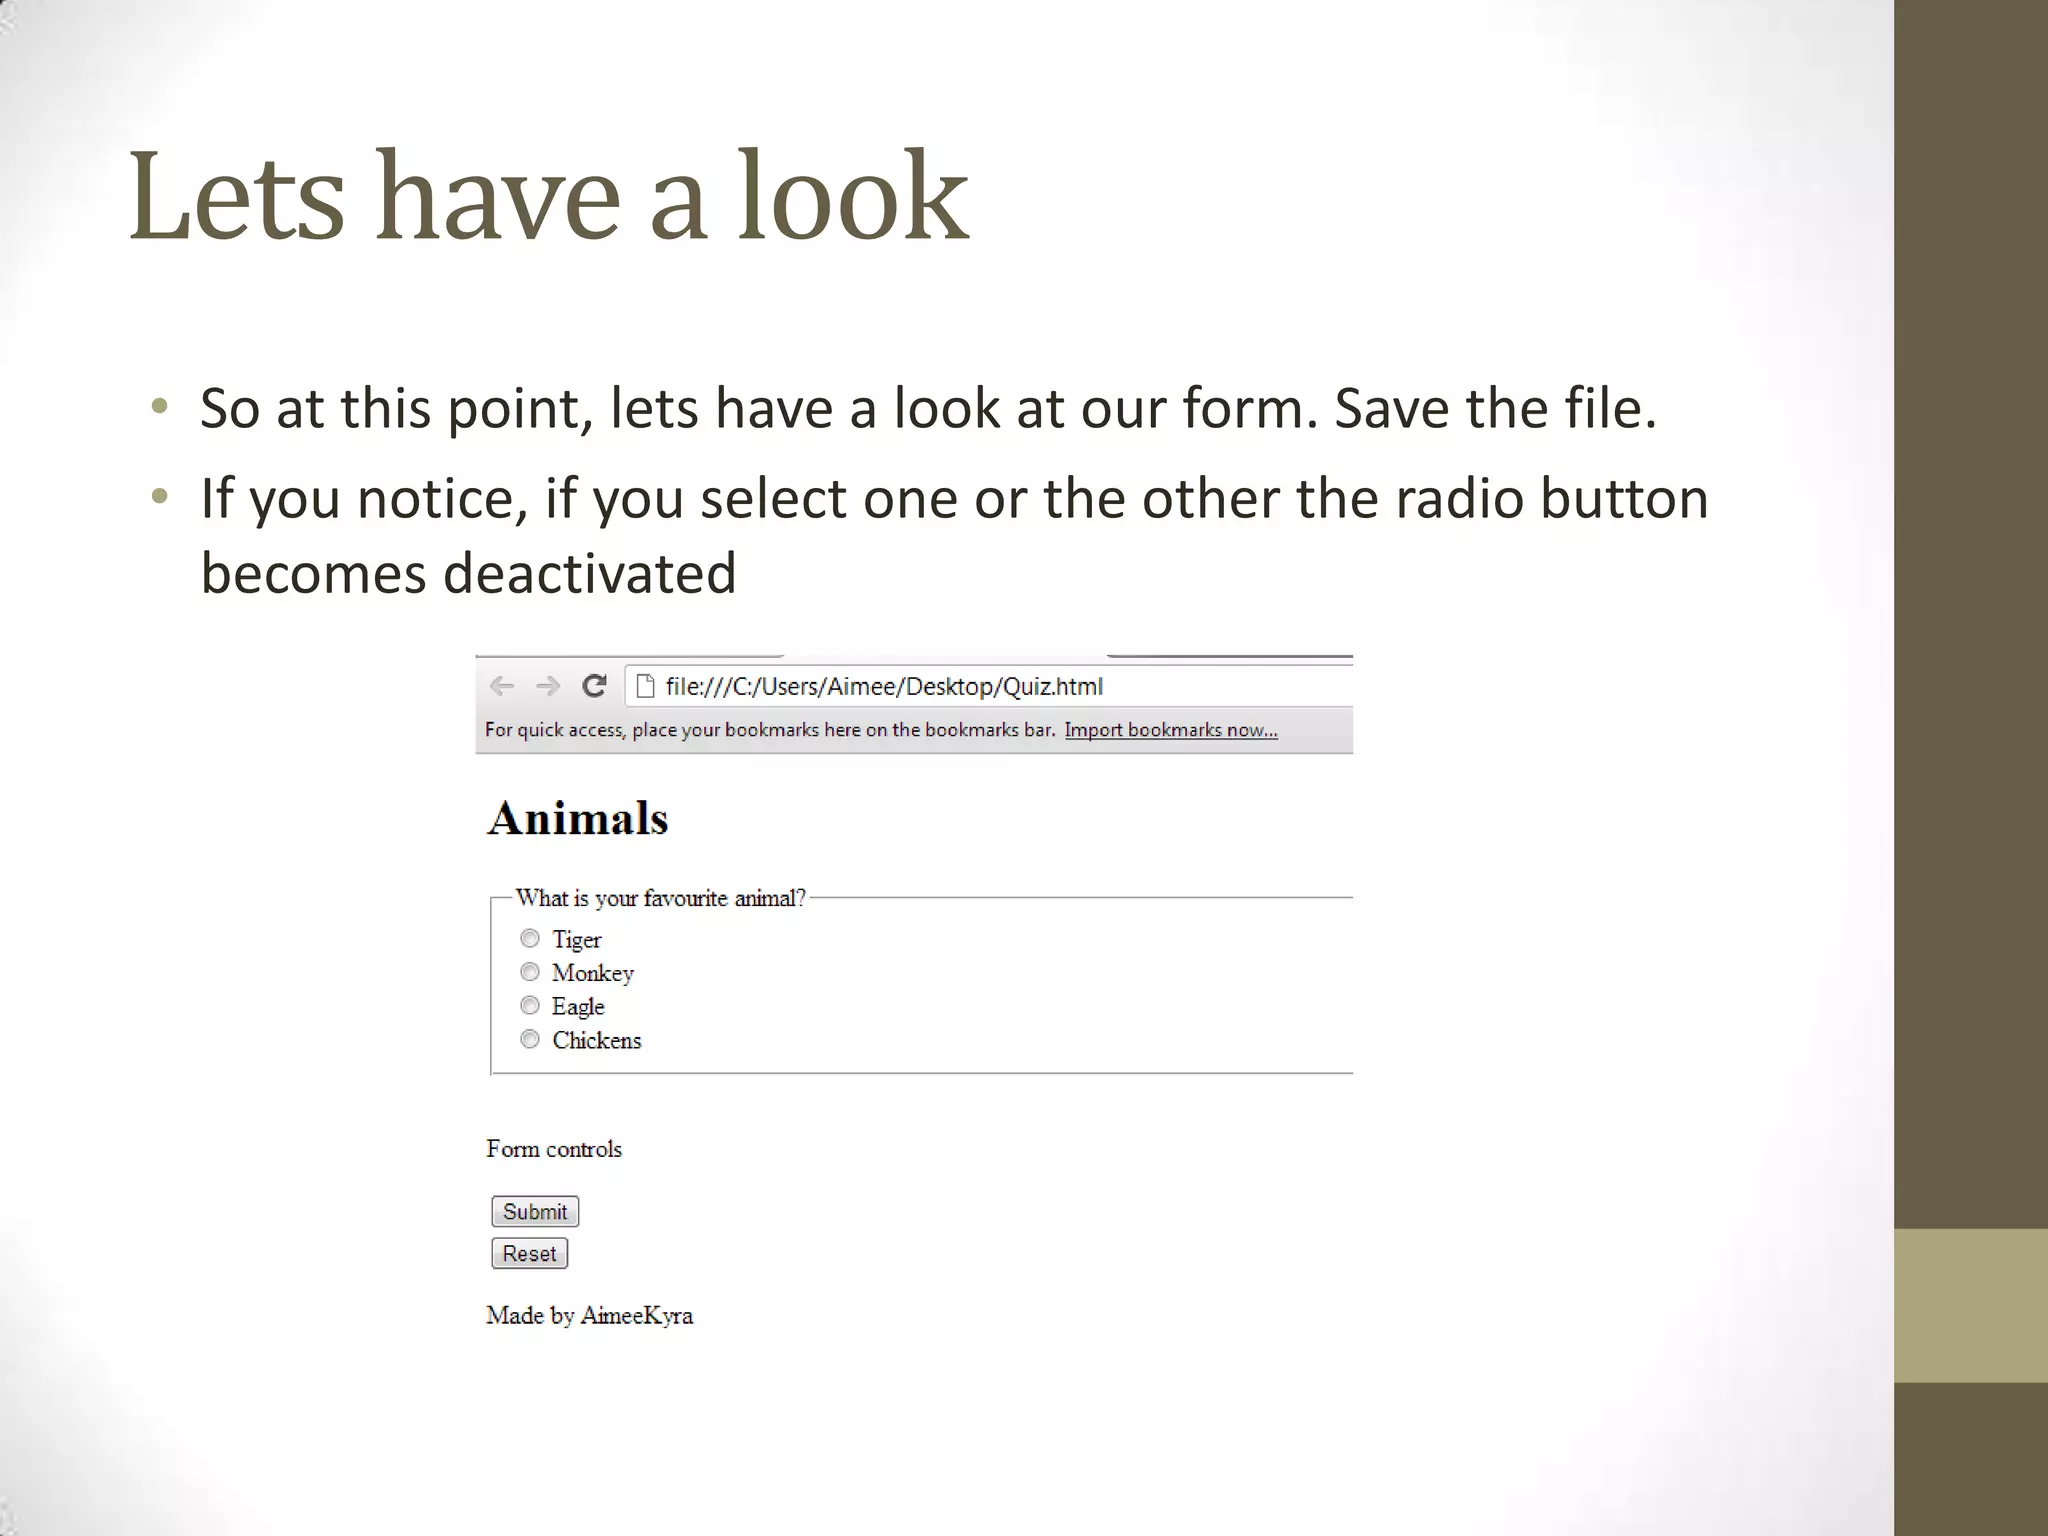
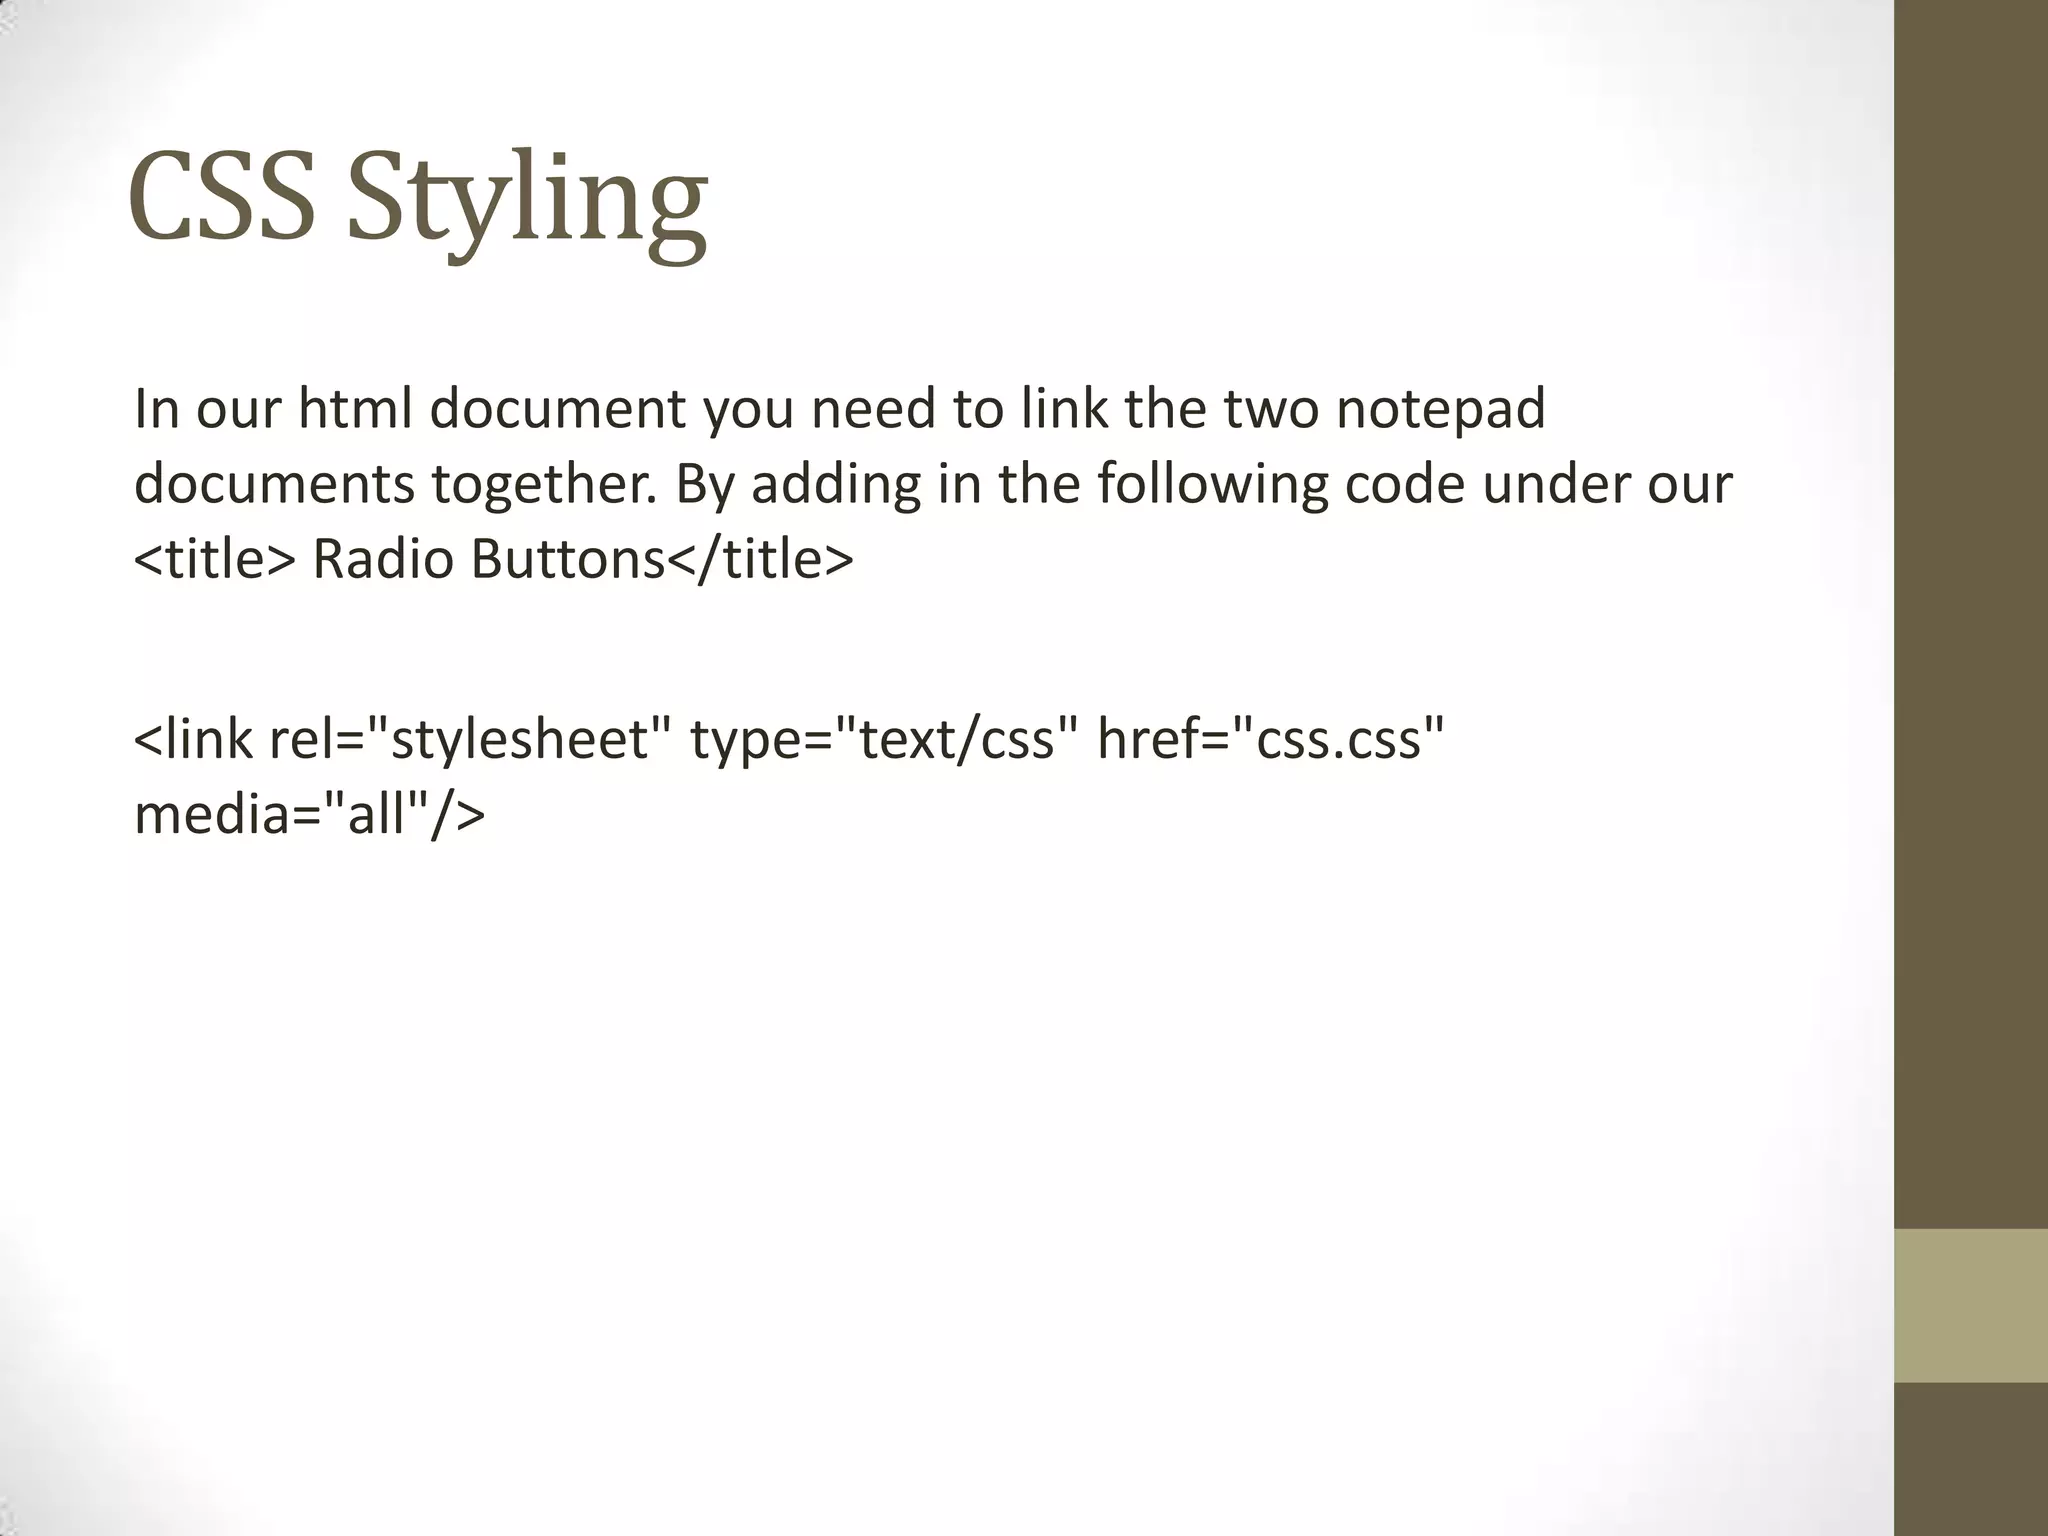
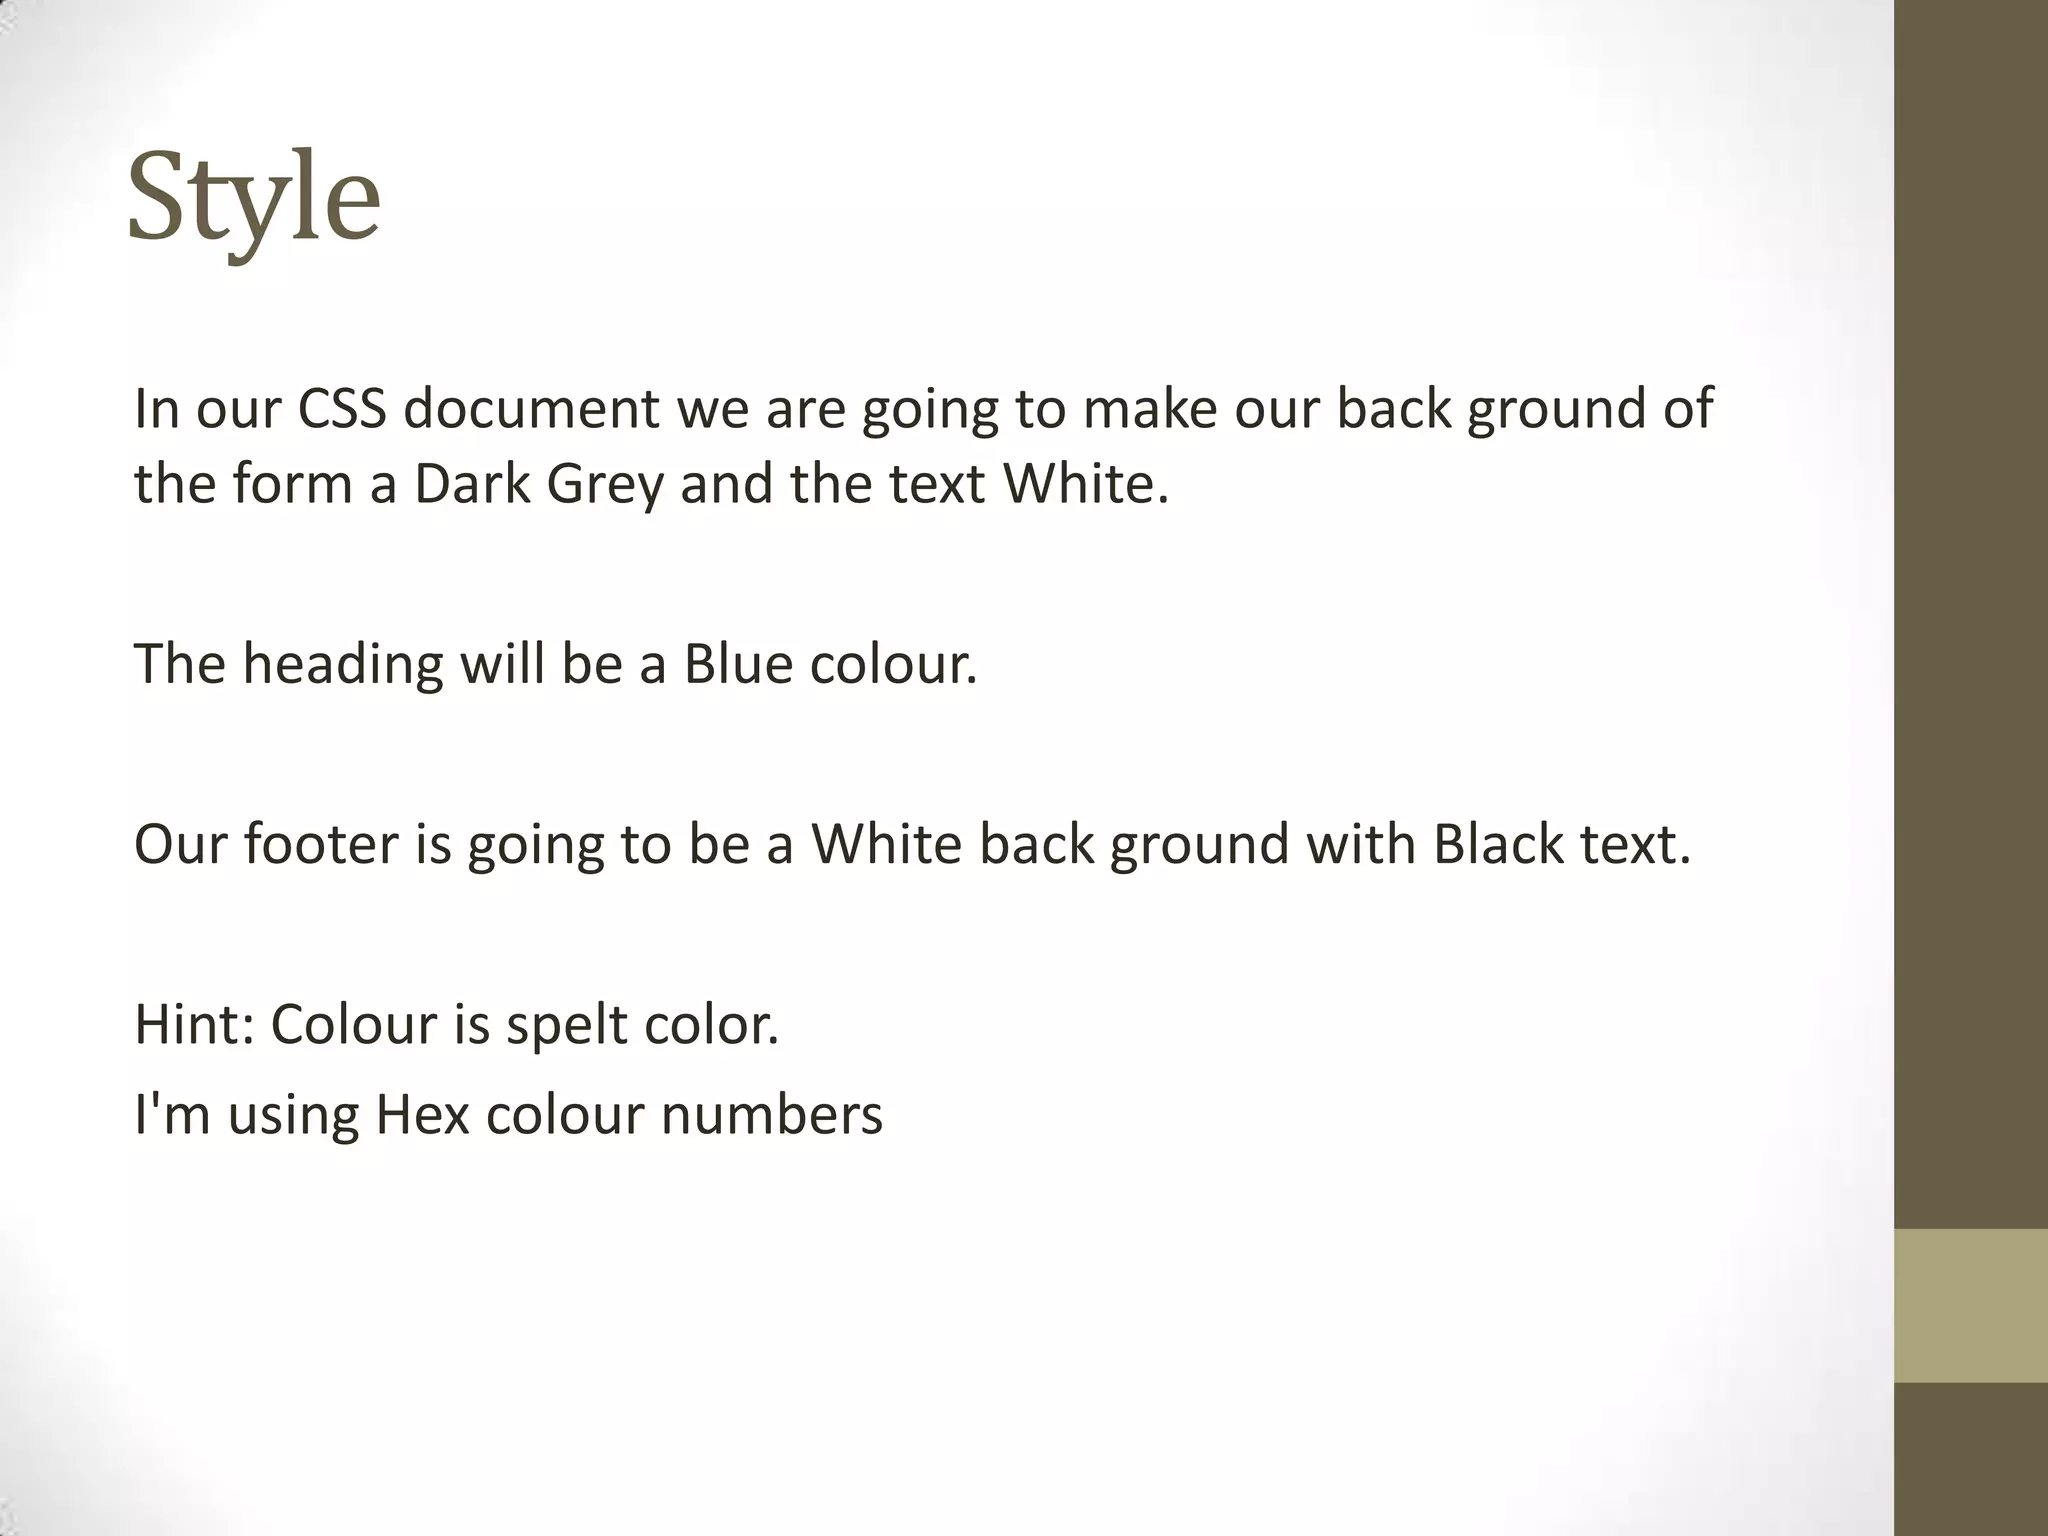
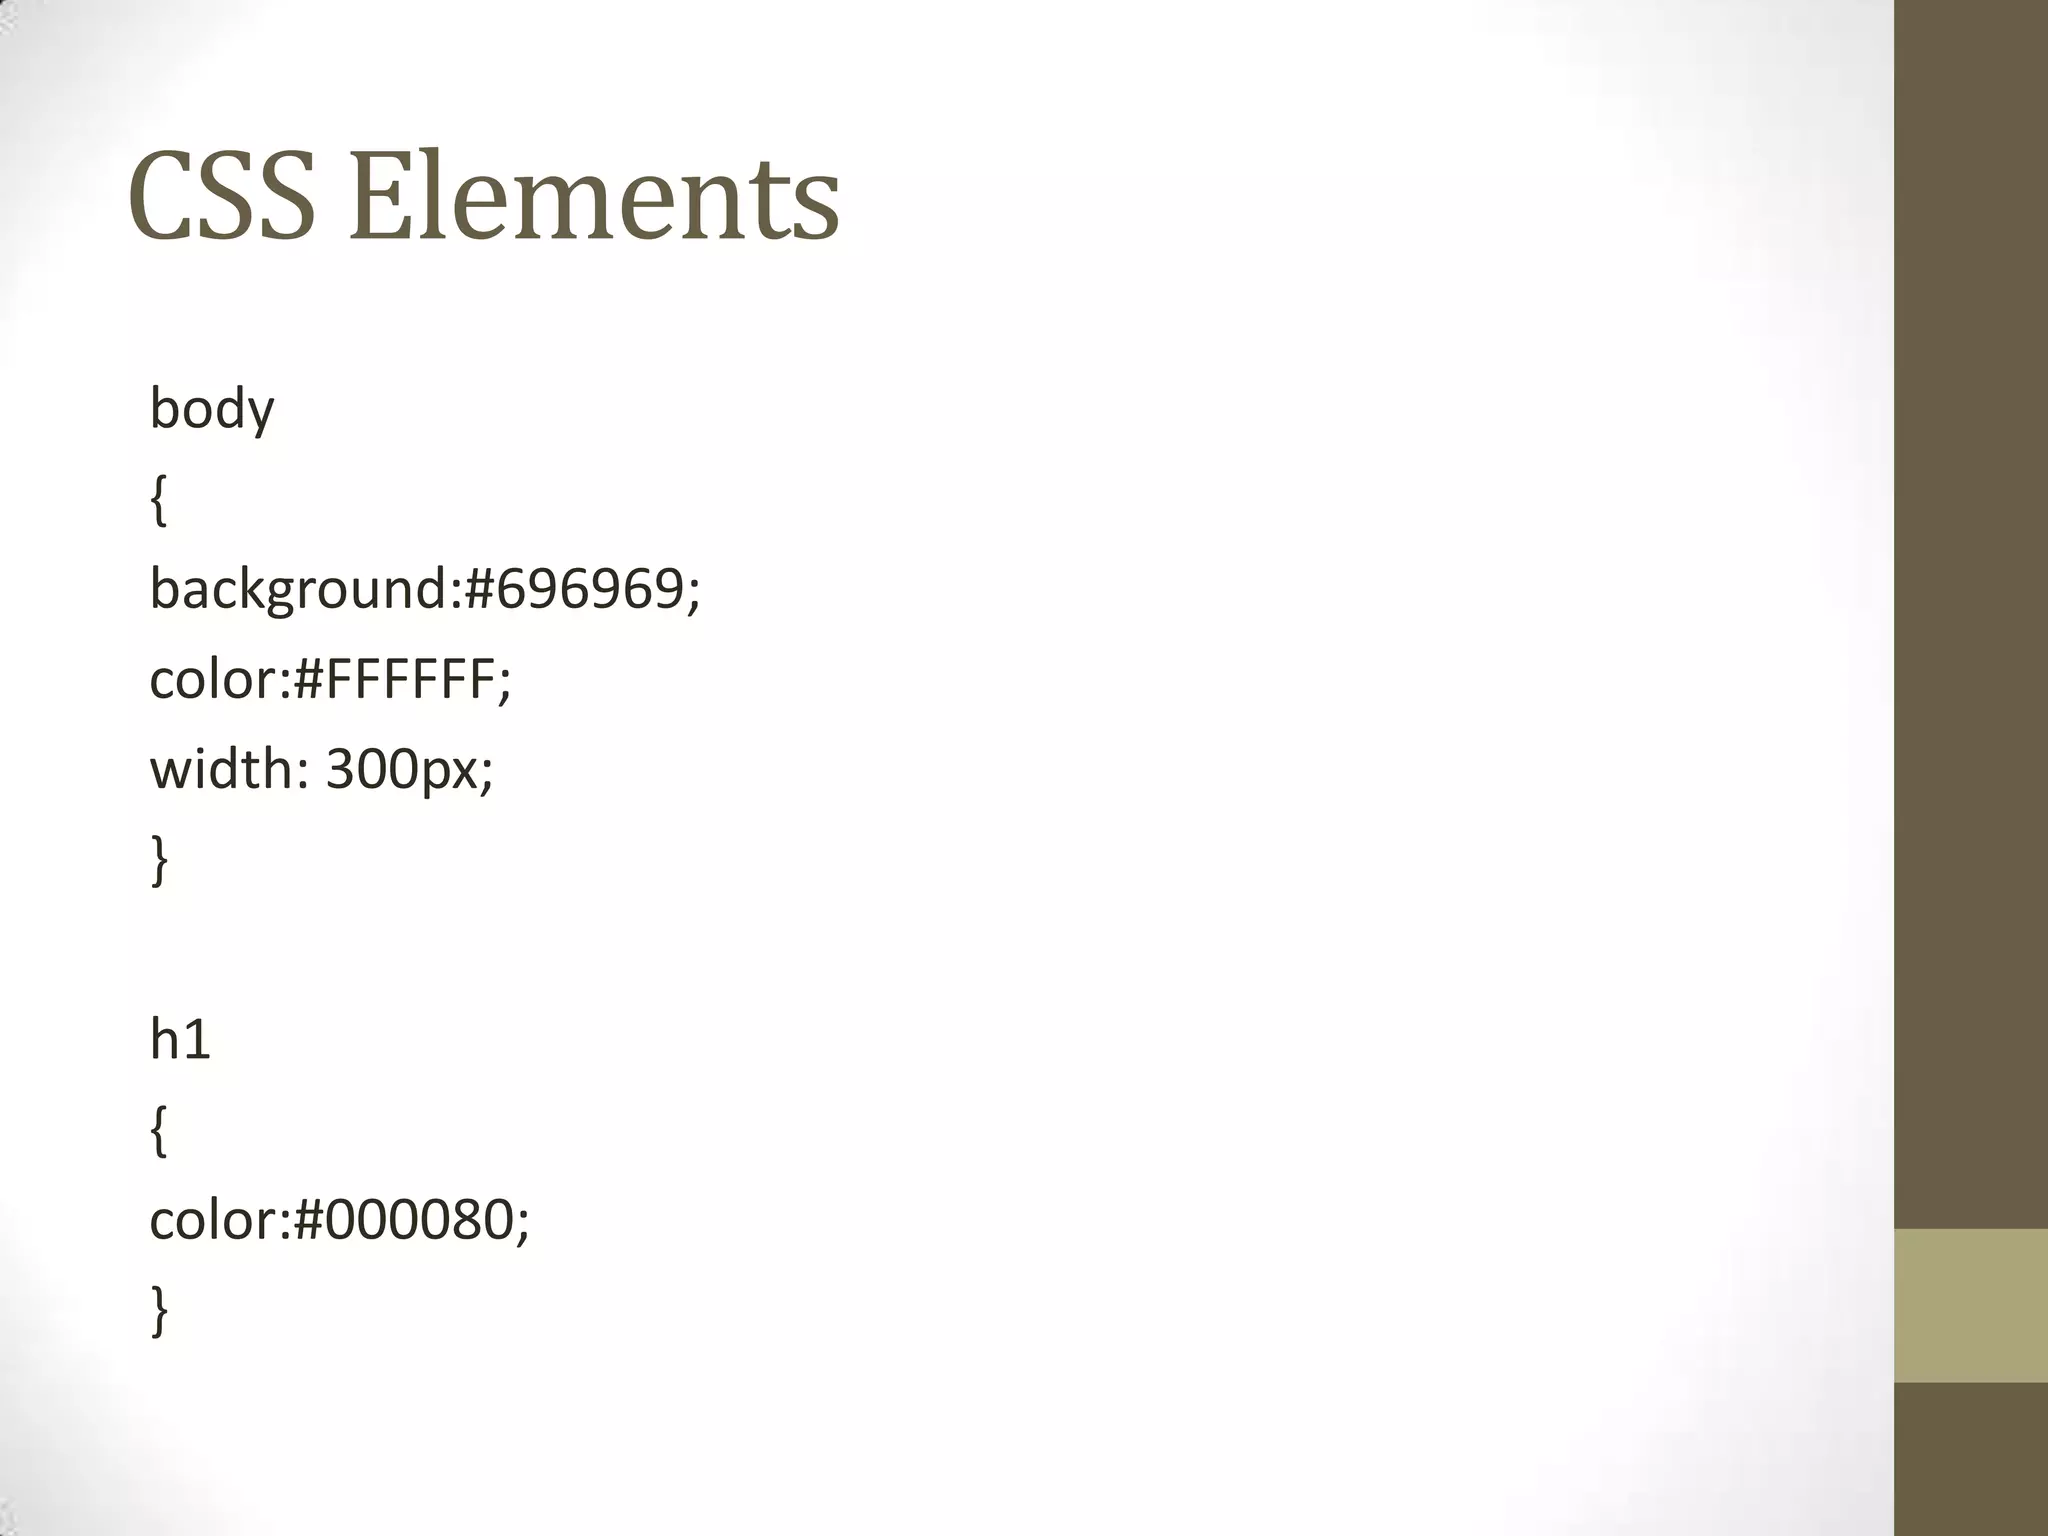
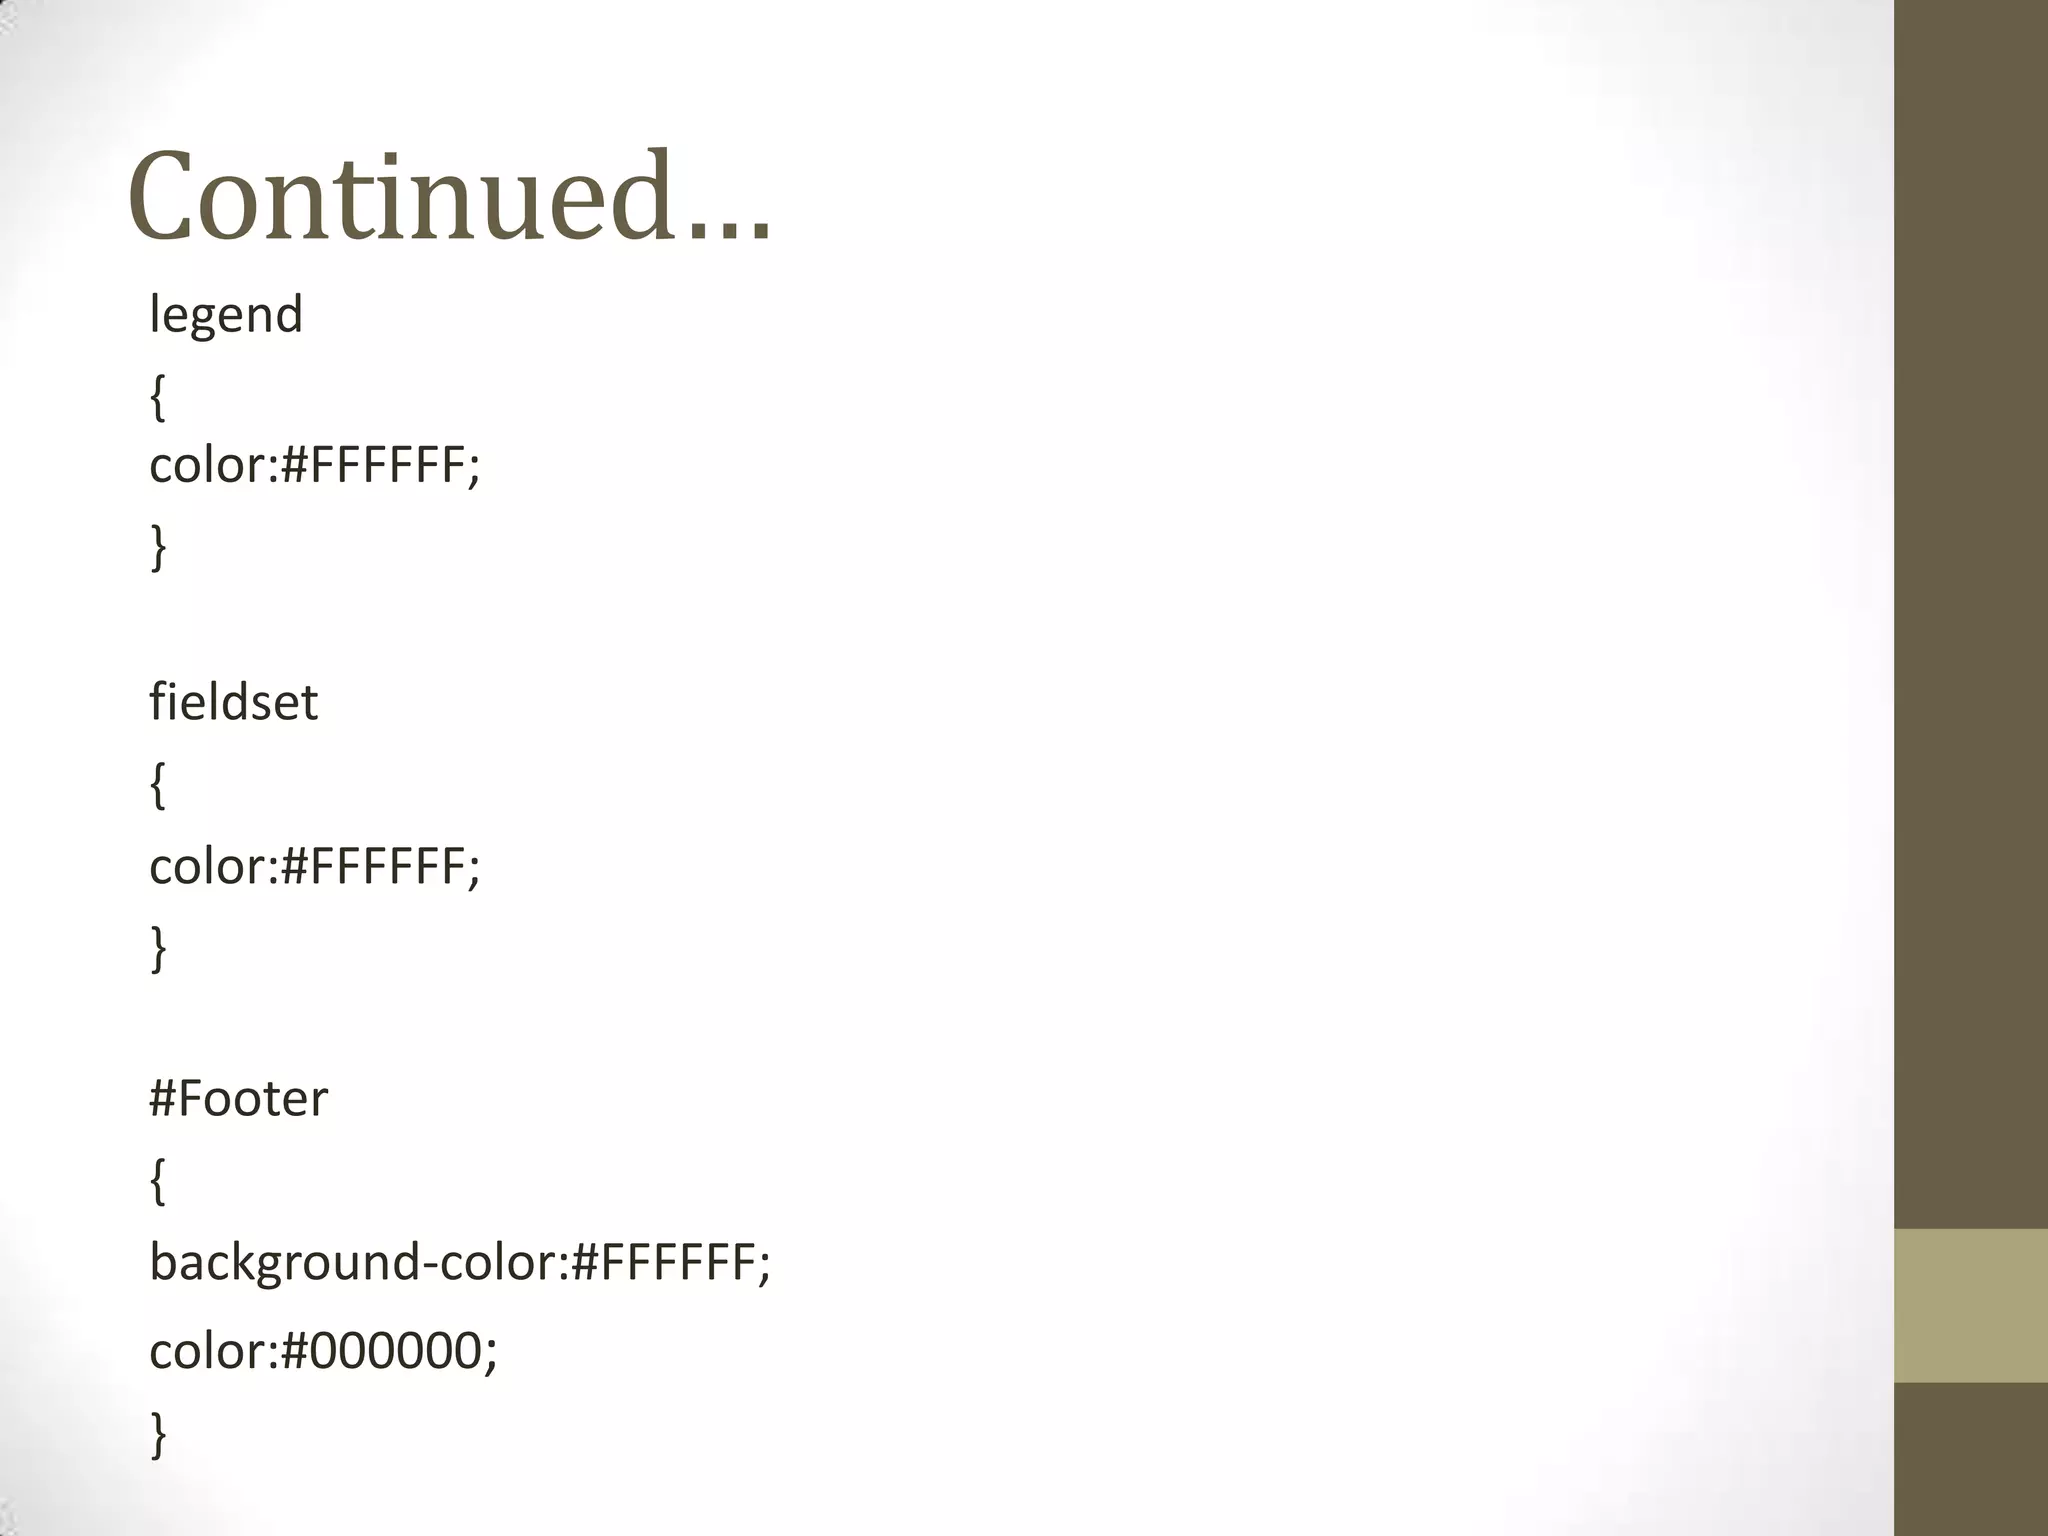
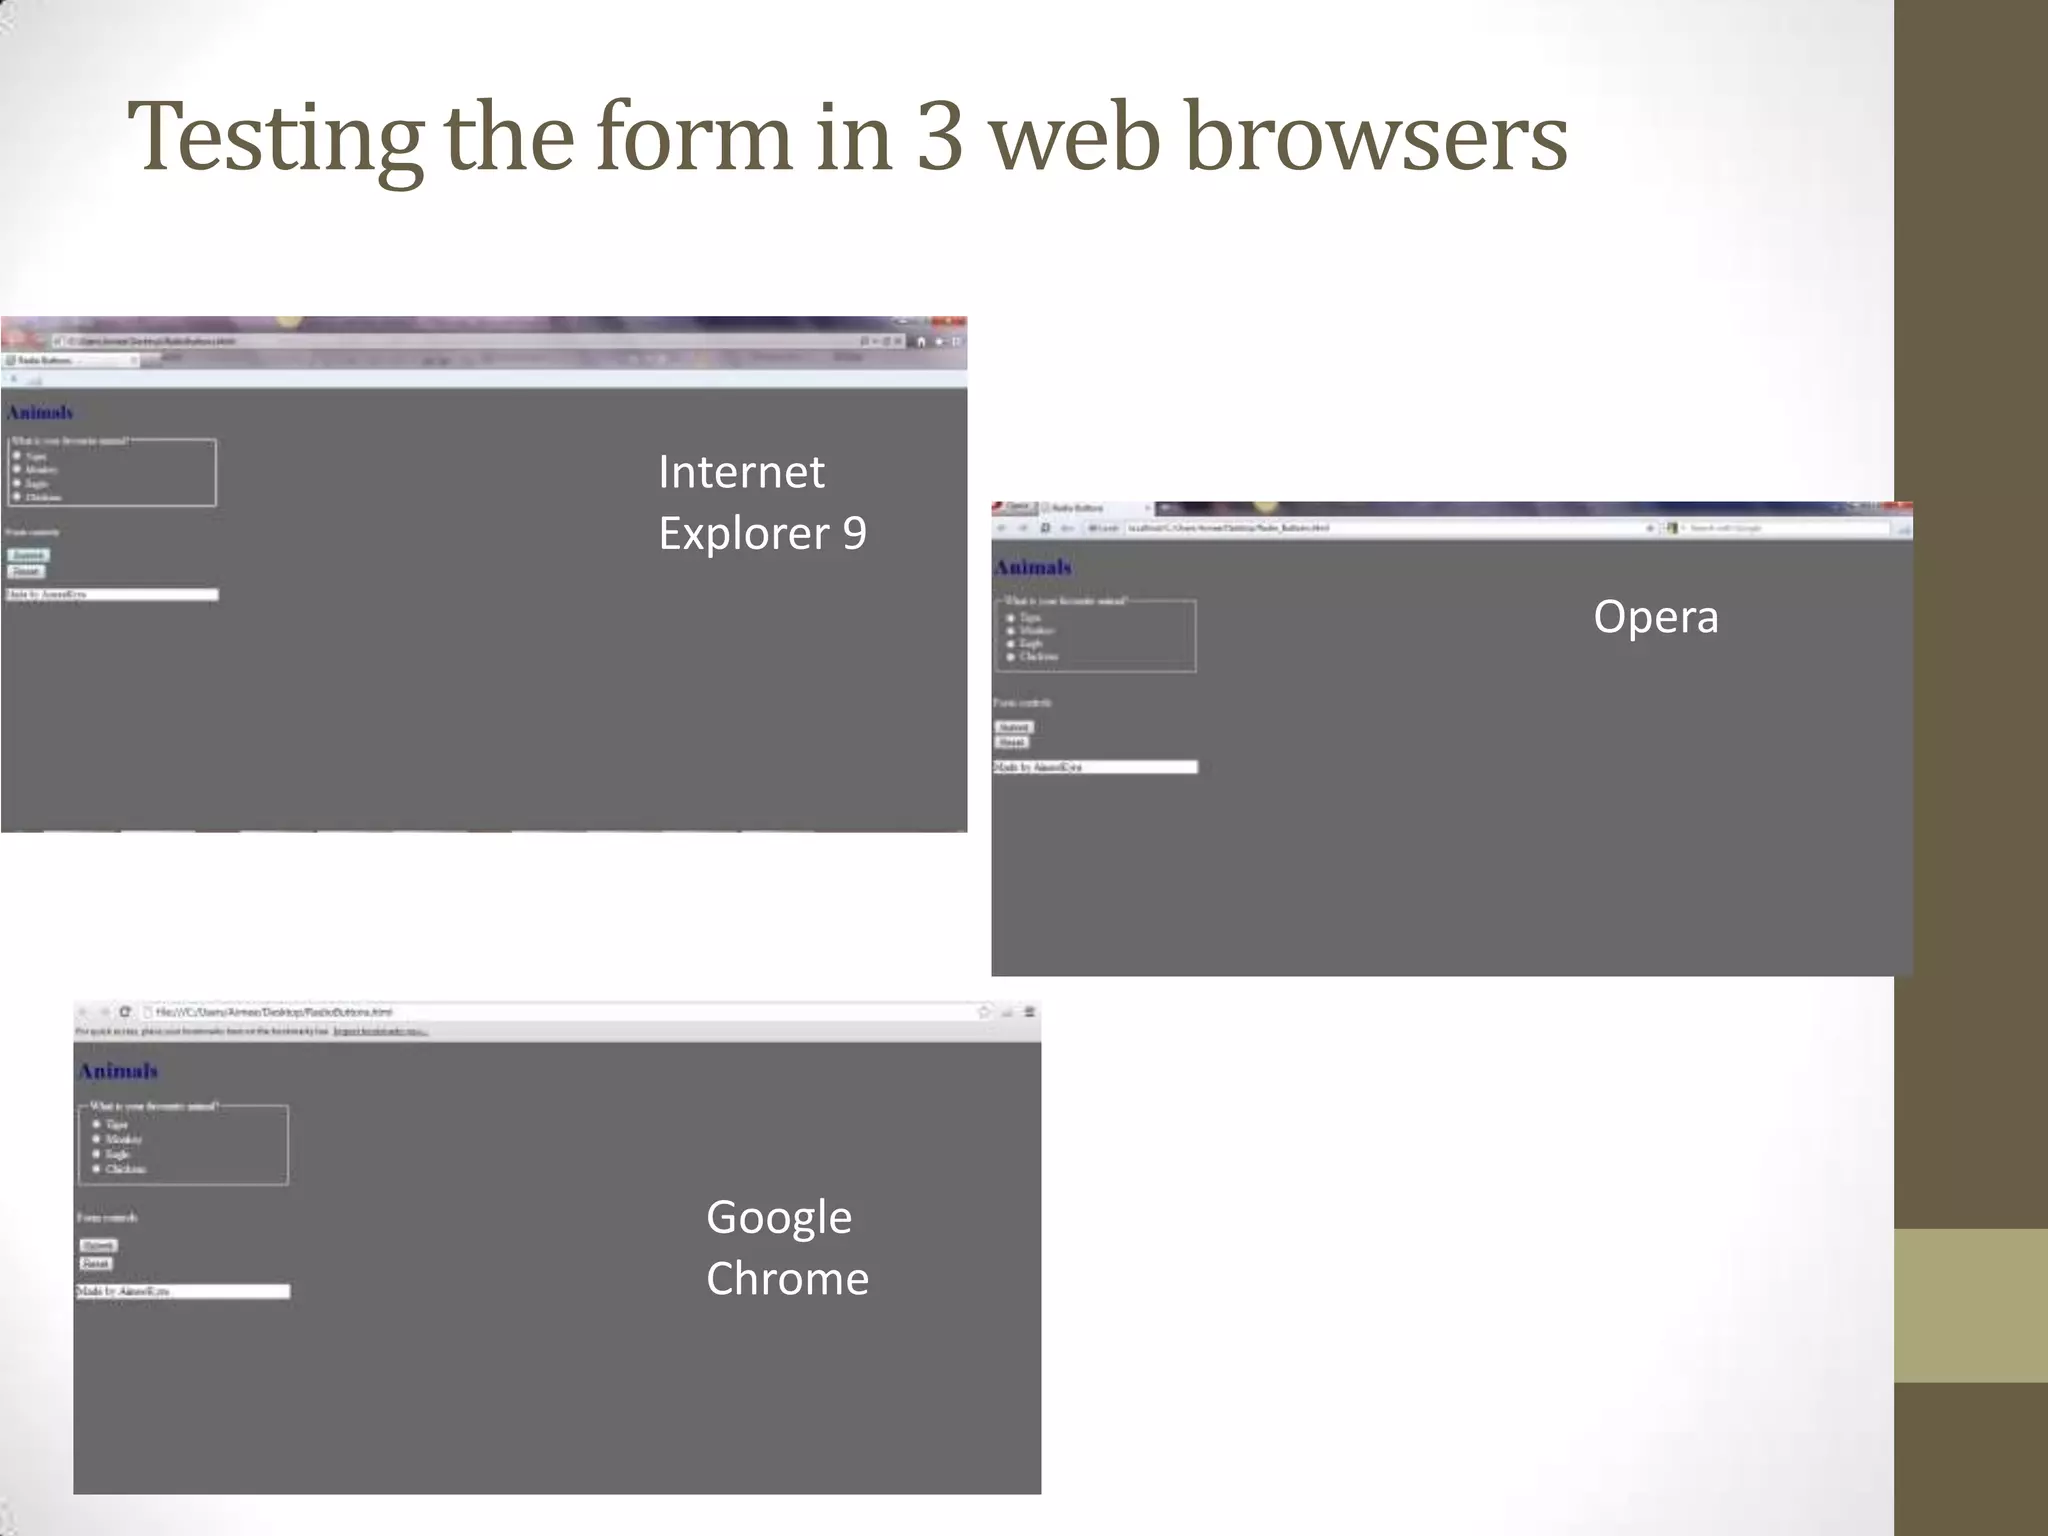
How to code Radio Buttons in HTML5 and CSS Styling
Introduction • This slide show is designed to explain how to use the <input type=“radio”> tag in HTML, how to use CSS to format the radio button and how to use both CSS and HTML together to achieve a desired look.
Hints There are 2 important hints that we need to remember: • To open and close each tag • To indent 3 spaces
What are Radio Buttons? • Radio Buttons are used to represent one of a set of options, only one of which can be selected at any time. Example is the quiz we are about to make.
Creating the form We need to define the document type. You do this at the top of the page by using <!DOCTYPE html> <html> <head> <title> Radio Buttons</title> </head> <body> <h1> Animals Quiz</h1> </body> </html>
We need to declare it’s a form. Underneath <body> we insert <h1>Animals Quiz</h1> <form> <fieldset> <legend> What is your favourite animal?</legend> </fieldset> <br> </form>
The Radio button We will create a radio button group. Below is the question and the set of options that we are going to code. What is your favourite animal? • Tiger • Monkey • Eagle
Radio Button in HTML To achieve the function of the radio button, we have the input type which indicates what the element will be, for ours we put “radio” • <input type=“radio” The name is the group of buttons. In this case it will be • name=“animal” We are going to add a value= usually defines something that’s going to be written. • value=“Tiger” The id is the same name as the value • id=“Tiger”/> We are going to put a label on the button so they know which one to pick. • <label for=“Tiger”>Tiger</label><br/>
What our form should look like <form> <fieldset> <legend> What is your favourite animal?</legend> <input type="radio" name="animal" value="Tiger" id="Tiger"/> <label for="Tiger">Tiger</label><br/> <input type="radio" name="animal" value="Bear" id="Bear"/> <label for="Bear">Bear</label><br/> <input type="radio" name="animal" value=“Eagle id=“Eagle"/> <label for=“Eagle">Eagle</label><br/> </fieldset> <br> <form>
Form Controls We are going to put in Form Controls. This allows the user to Reset and Submit the form. We write <p> Form Controls</p> <input type=“submit” value=“Submit” /><br> <input type=“reset” value=“Reset”/>
Footer We can enter a <div> tag, this defines a section in the page. This goes just after the close of the form and before the closing of the body as shown below. <div id="footer"> <p> Made by AimeeKyra</p> </div> </body> </html>
What your code should look like <!DOCTYPE html> <html> <head> <title> Radio Buttons </title> </head> <body> <h1> Animals Quiz </h1> <form> <fieldset> <legend> What is your favourite animal?</legend> <input type="radio" name=“animal" value=“Tiger id=“Tiger” /> <label for=“Tiger” >Tiger </label><br /> <input type="radio" name=“animal” value="Monkey" id=“Monkey" /> <label for=“Monkey”>Monkey</label><br /> <input type="radio" name=“animal" value=“Eagle id=“Eagle <label for=“Eagle” >Eagle</label><br /> </fieldset> </br> <p>Form controls </p> <input type="submit" value="Submit"/> <br> <input type="reset" value="Reset"/> </form> <div id="footer"> <p> Made by AimeeKyra</p> </div> </body> </html>
Validating the HTML code • We need to validate our code to check for any errors. • I am going to use http://validator.w3.org/ • If the banner is green, it means there are no errors and it was passed. If it is a different colour (red/orange) it means there are errors.
Lets have a look • So at this point, lets have a look at our form. Save the file. • If you notice, if you select one or the other the radio button becomes deactivated
CSS Styling In our html document you need to link the two notepad documents together. By adding in the following code under our <title> Radio Buttons</title> <link rel="stylesheet" type="text/css" href="css.css" media="all"/>
Style In our CSS document we are going to make our back ground of the form a Dark Grey and the text White. The heading will be a Blue colour. Our footer is going to be a White back ground with Black text. Hint: Colour is spelt color. I'm using Hex colour numbers
CSS Elements body { background:#696969; color:#FFFFFF; width: 300px; } h1 { color:#000080; }
Continued… legend { color:#FFFFFF; } fieldset { color:#FFFFFF; } #Footer { background-color:#FFFFFF; color:#000000; }
Viewing it in a webpage Now that your code has got some style, you can view your website. In Notepad++, go to Run in the toolbar and select the correct Browser. Once you have done this try and open it in a verity of different web browsers.
Testing the form in 3 web browsers Internet Explorer 9 Opera Google Chrome
The End • Hope this tutorial has given you an idea on how to create Radio Buttons and style using CSS.

How to code radio buttons in HTML5 and CSS Styling

  • 1.
    How to codeRadio Buttons in HTML5 and CSS Styling
  • 2.
    Introduction • This slideshow is designed to explain how to use the <input type=“radio”> tag in HTML, how to use CSS to format the radio button and how to use both CSS and HTML together to achieve a desired look.
  • 3.
    Hints There are 2important hints that we need to remember: • To open and close each tag • To indent 3 spaces
  • 4.
    What are RadioButtons? • Radio Buttons are used to represent one of a set of options, only one of which can be selected at any time. Example is the quiz we are about to make.
  • 5.
    Creating the form We need to define the document type. You do this at the top of the page by using <!DOCTYPE html> <html> <head> <title> Radio Buttons</title> </head> <body> <h1> Animals Quiz</h1> </body> </html>
  • 6.
    We need todeclare it’s a form. Underneath <body> we insert <h1>Animals Quiz</h1> <form> <fieldset> <legend> What is your favourite animal?</legend> </fieldset> <br> </form>
  • 7.
    The Radio button Wewill create a radio button group. Below is the question and the set of options that we are going to code. What is your favourite animal? • Tiger • Monkey • Eagle
  • 8.
    Radio Button inHTML To achieve the function of the radio button, we have the input type which indicates what the element will be, for ours we put “radio” • <input type=“radio” The name is the group of buttons. In this case it will be • name=“animal” We are going to add a value= usually defines something that’s going to be written. • value=“Tiger” The id is the same name as the value • id=“Tiger”/> We are going to put a label on the button so they know which one to pick. • <label for=“Tiger”>Tiger</label><br/>
  • 9.
    What our formshould look like <form> <fieldset> <legend> What is your favourite animal?</legend> <input type="radio" name="animal" value="Tiger" id="Tiger"/> <label for="Tiger">Tiger</label><br/> <input type="radio" name="animal" value="Bear" id="Bear"/> <label for="Bear">Bear</label><br/> <input type="radio" name="animal" value=“Eagle id=“Eagle"/> <label for=“Eagle">Eagle</label><br/> </fieldset> <br> <form>
  • 10.
    Form Controls We aregoing to put in Form Controls. This allows the user to Reset and Submit the form. We write <p> Form Controls</p> <input type=“submit” value=“Submit” /><br> <input type=“reset” value=“Reset”/>
  • 11.
    Footer We can entera <div> tag, this defines a section in the page. This goes just after the close of the form and before the closing of the body as shown below. <div id="footer"> <p> Made by AimeeKyra</p> </div> </body> </html>
  • 12.
    What your codeshould look like <!DOCTYPE html> <html> <head> <title> Radio Buttons </title> </head> <body> <h1> Animals Quiz </h1> <form> <fieldset> <legend> What is your favourite animal?</legend> <input type="radio" name=“animal" value=“Tiger id=“Tiger” /> <label for=“Tiger” >Tiger </label><br /> <input type="radio" name=“animal” value="Monkey" id=“Monkey" /> <label for=“Monkey”>Monkey</label><br /> <input type="radio" name=“animal" value=“Eagle id=“Eagle <label for=“Eagle” >Eagle</label><br /> </fieldset> </br> <p>Form controls </p> <input type="submit" value="Submit"/> <br> <input type="reset" value="Reset"/> </form> <div id="footer"> <p> Made by AimeeKyra</p> </div> </body> </html>
  • 13.
    Validating the HTMLcode • We need to validate our code to check for any errors. • I am going to use http://validator.w3.org/ • If the banner is green, it means there are no errors and it was passed. If it is a different colour (red/orange) it means there are errors.
  • 14.
    Lets have alook • So at this point, lets have a look at our form. Save the file. • If you notice, if you select one or the other the radio button becomes deactivated
  • 15.
    CSS Styling In ourhtml document you need to link the two notepad documents together. By adding in the following code under our <title> Radio Buttons</title> <link rel="stylesheet" type="text/css" href="css.css" media="all"/>
  • 16.
    Style In our CSSdocument we are going to make our back ground of the form a Dark Grey and the text White. The heading will be a Blue colour. Our footer is going to be a White back ground with Black text. Hint: Colour is spelt color. I'm using Hex colour numbers
  • 17.
  • 18.
  • 19.
    Viewing it ina webpage Now that your code has got some style, you can view your website. In Notepad++, go to Run in the toolbar and select the correct Browser. Once you have done this try and open it in a verity of different web browsers.
  • 20.
    Testing the formin 3 web browsers Internet Explorer 9 Opera Google Chrome
  • 21.
    The End • Hopethis tutorial has given you an idea on how to create Radio Buttons and style using CSS.