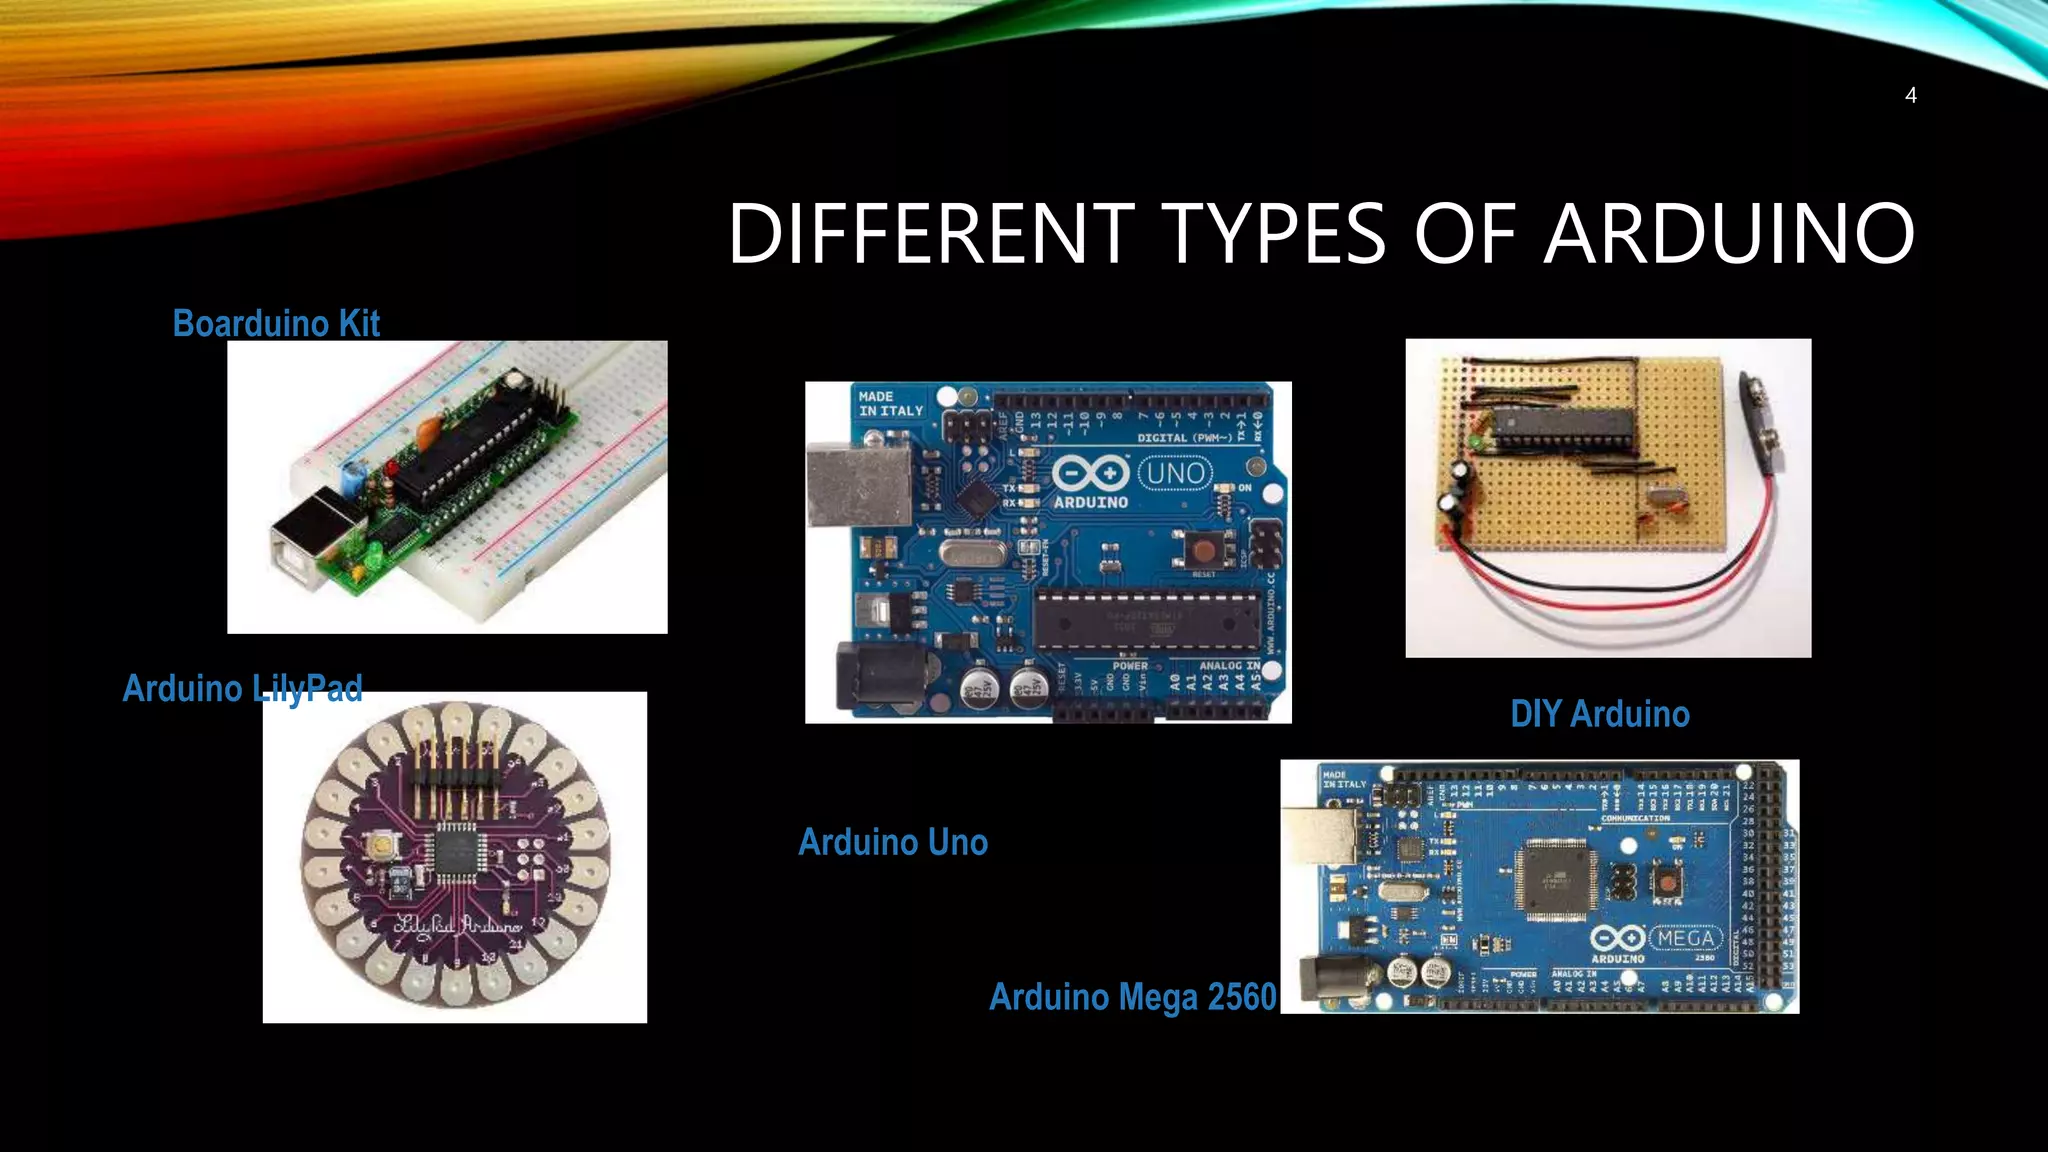
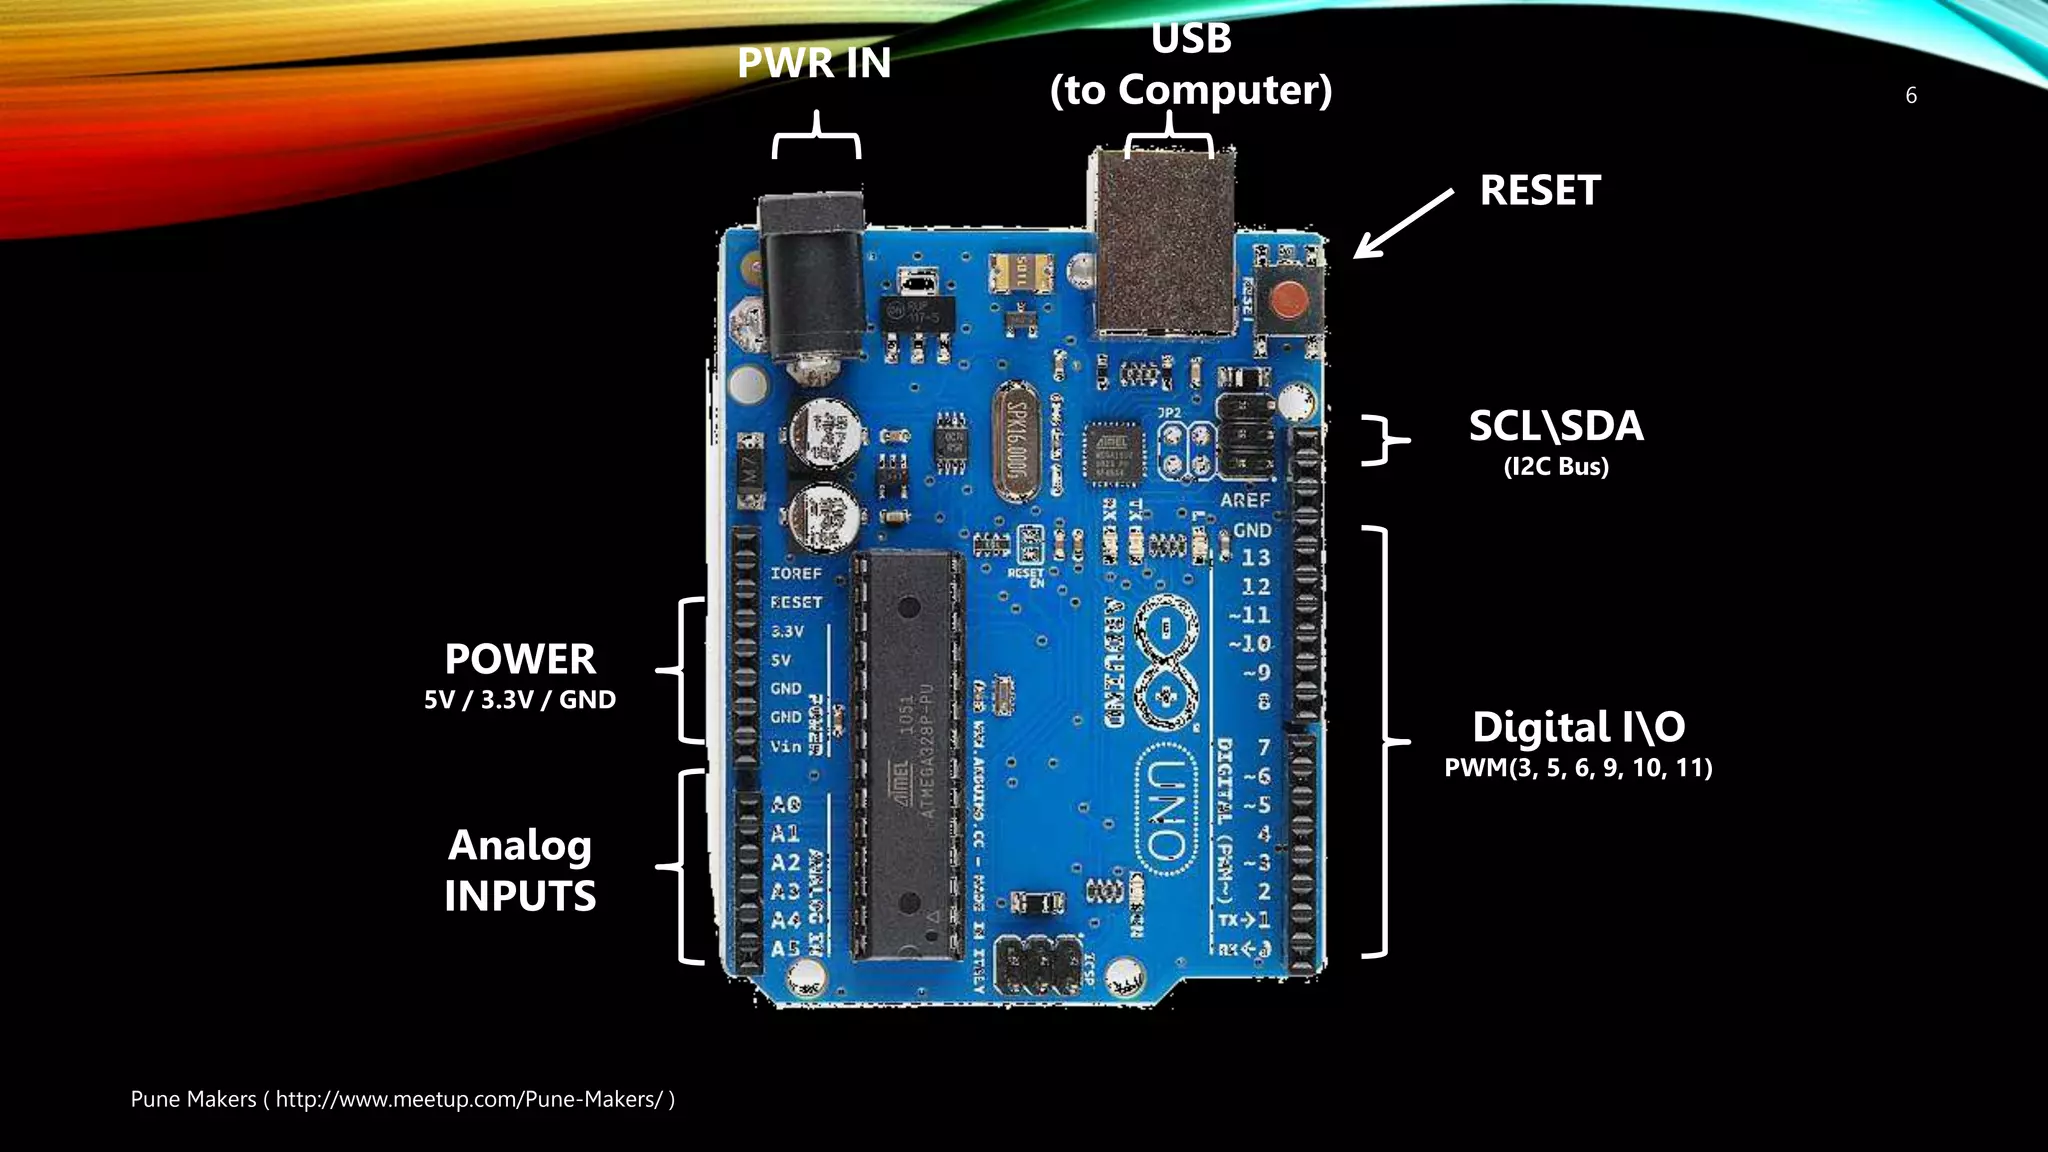
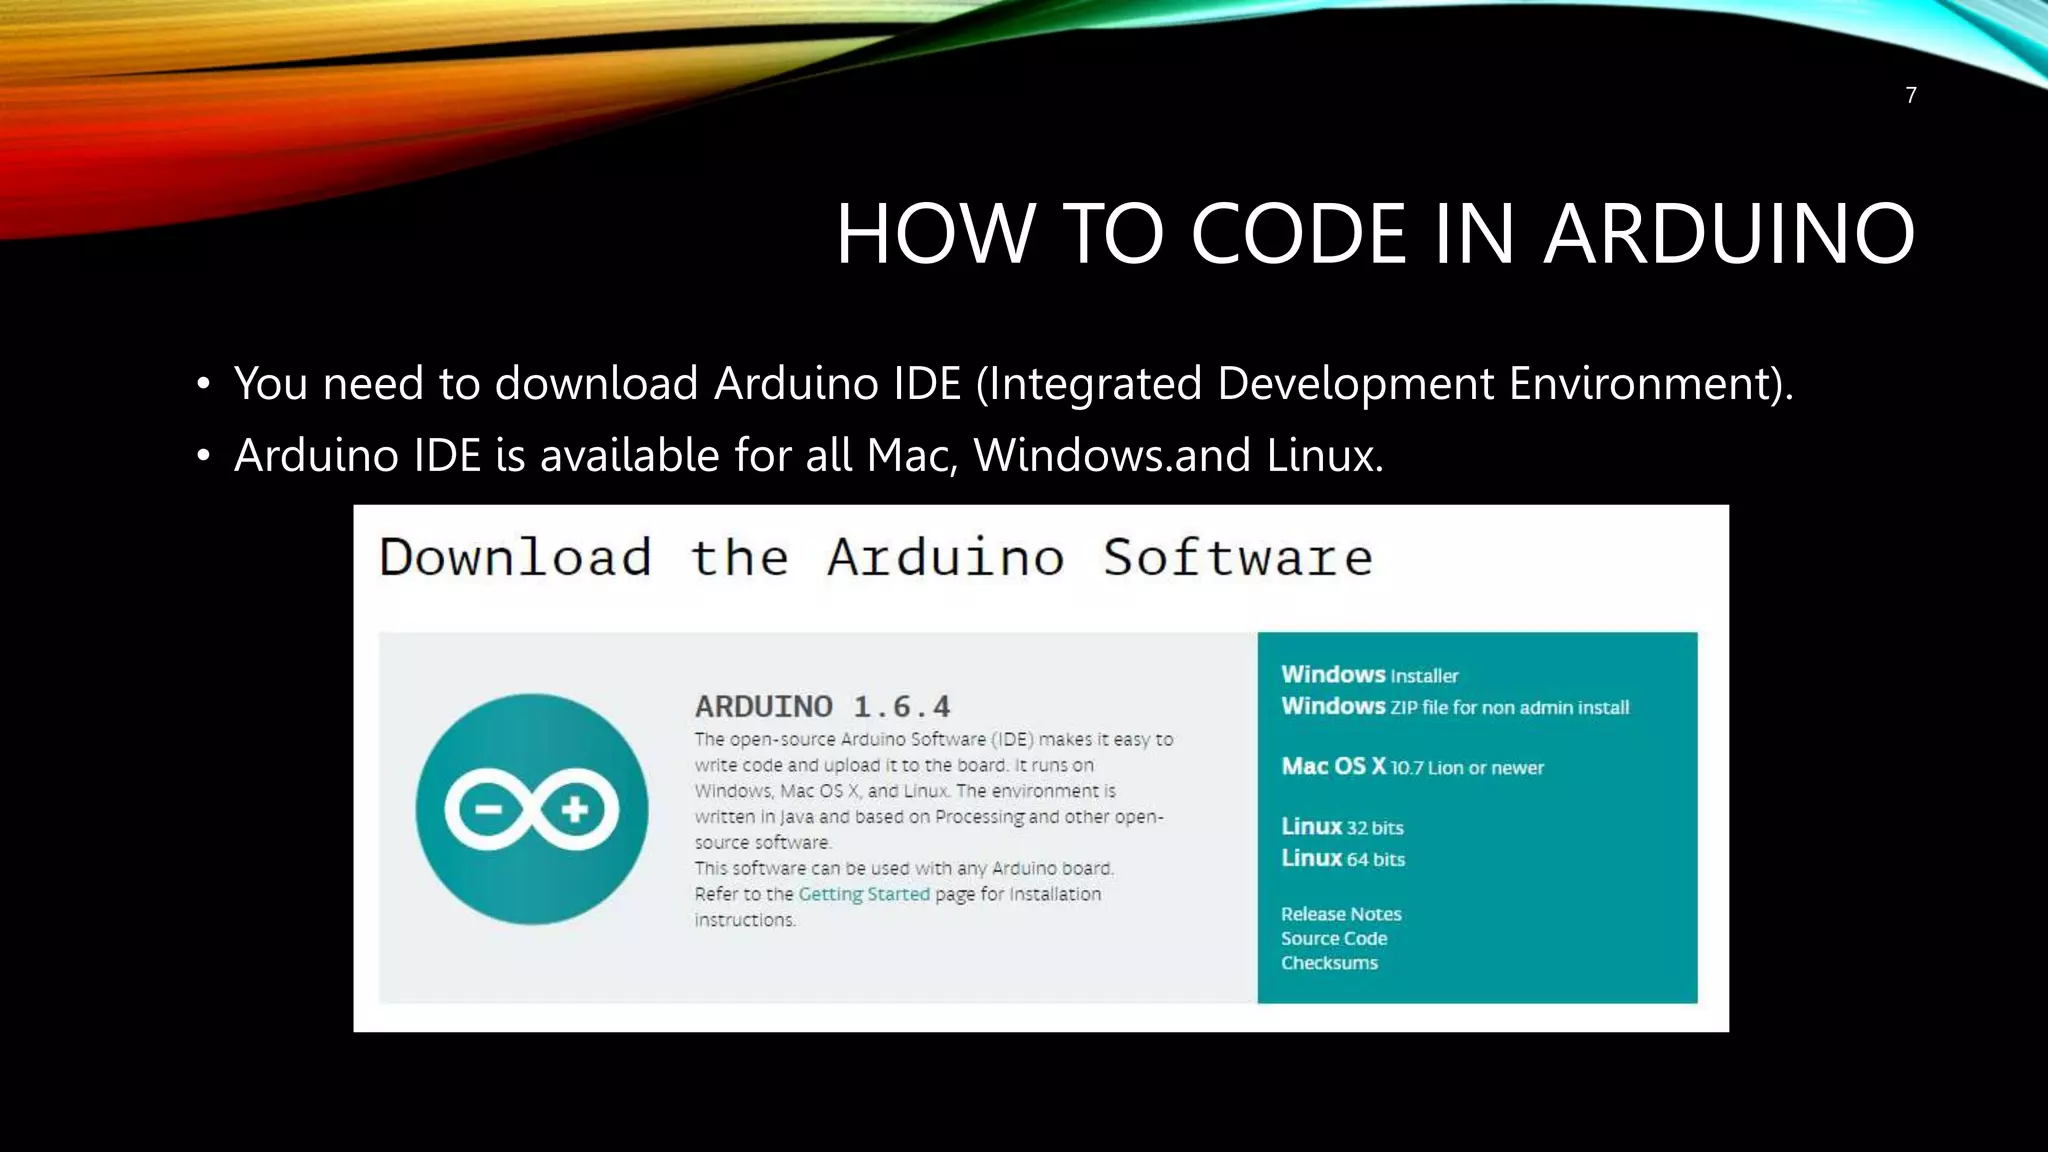
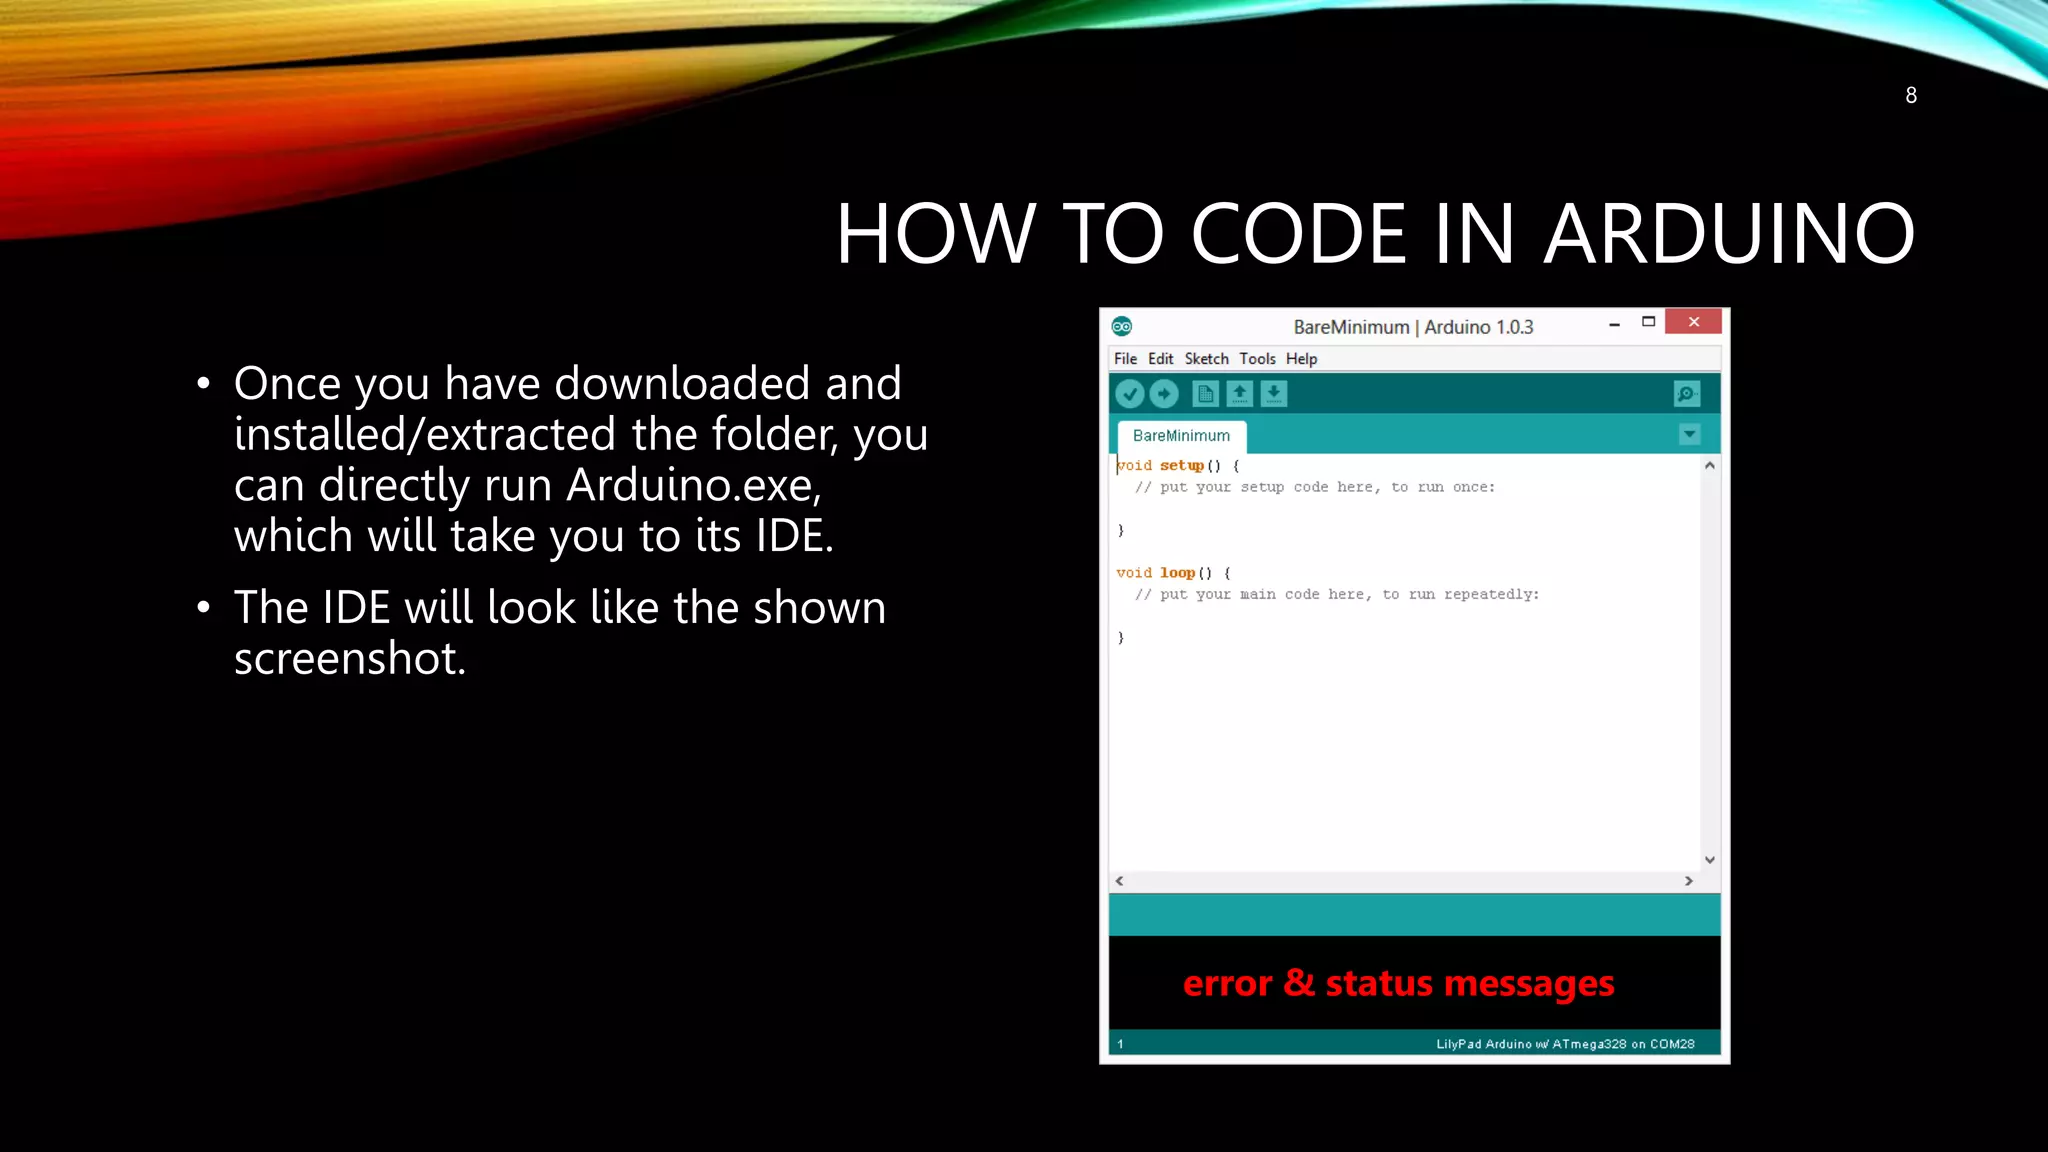
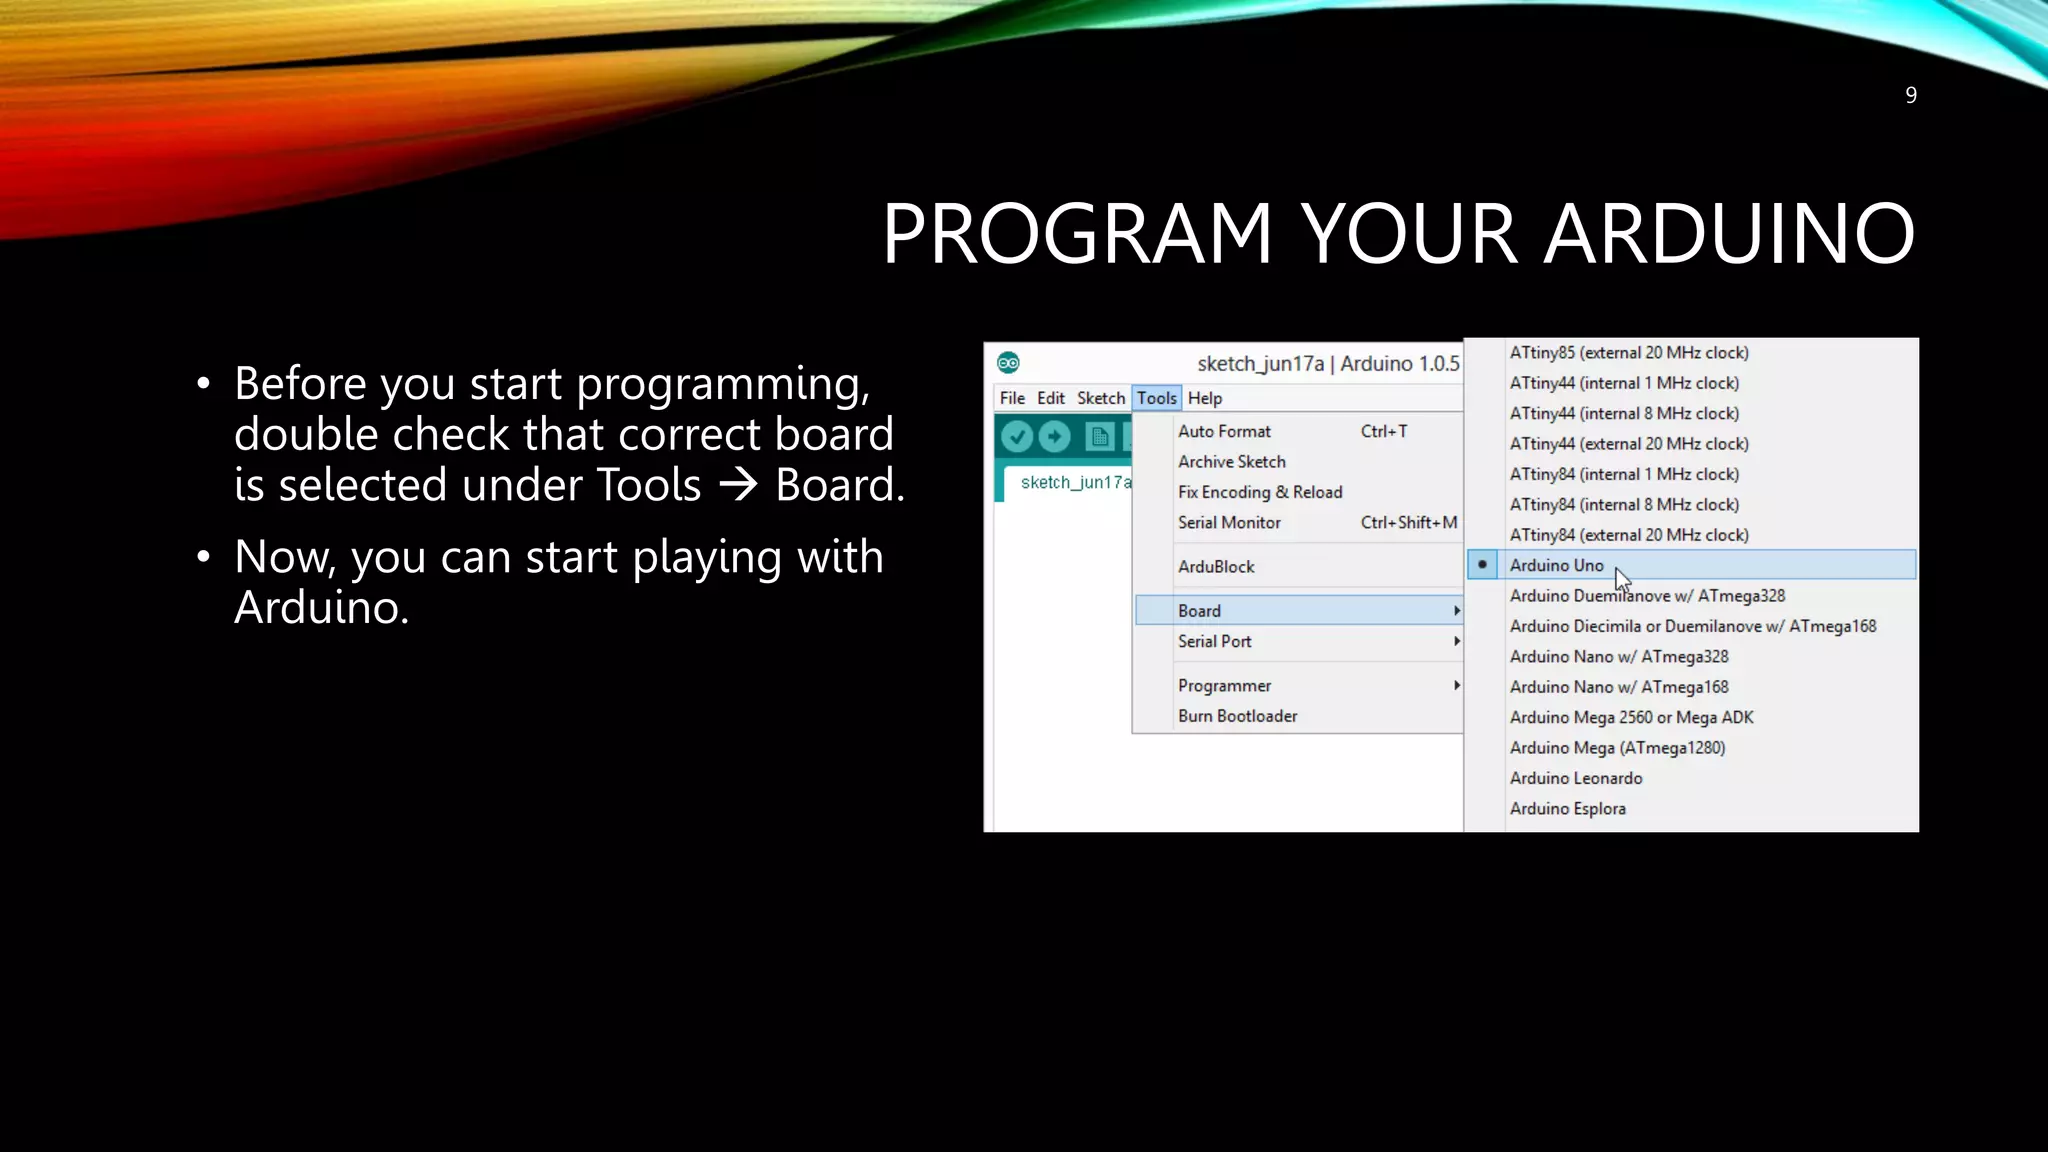
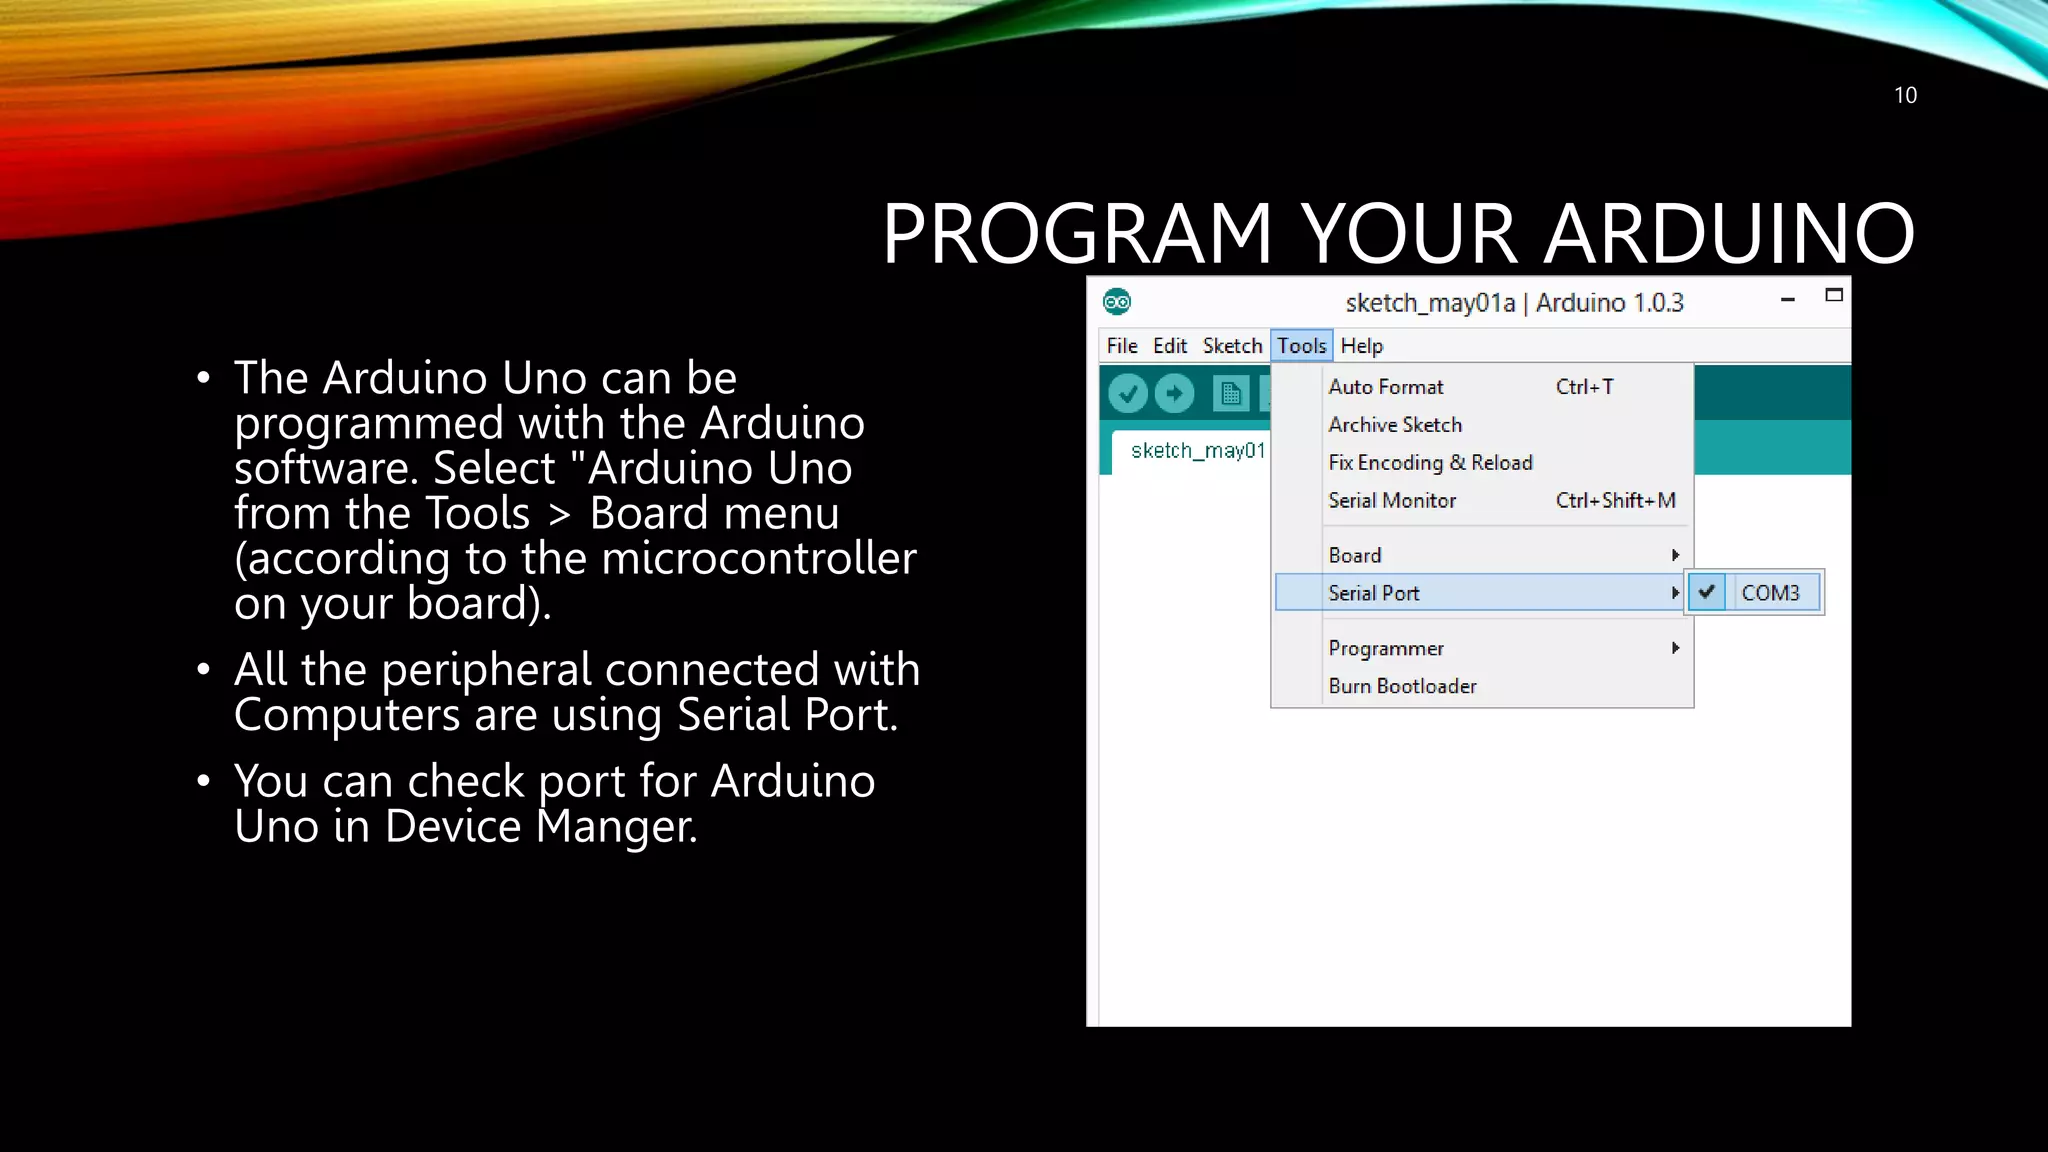
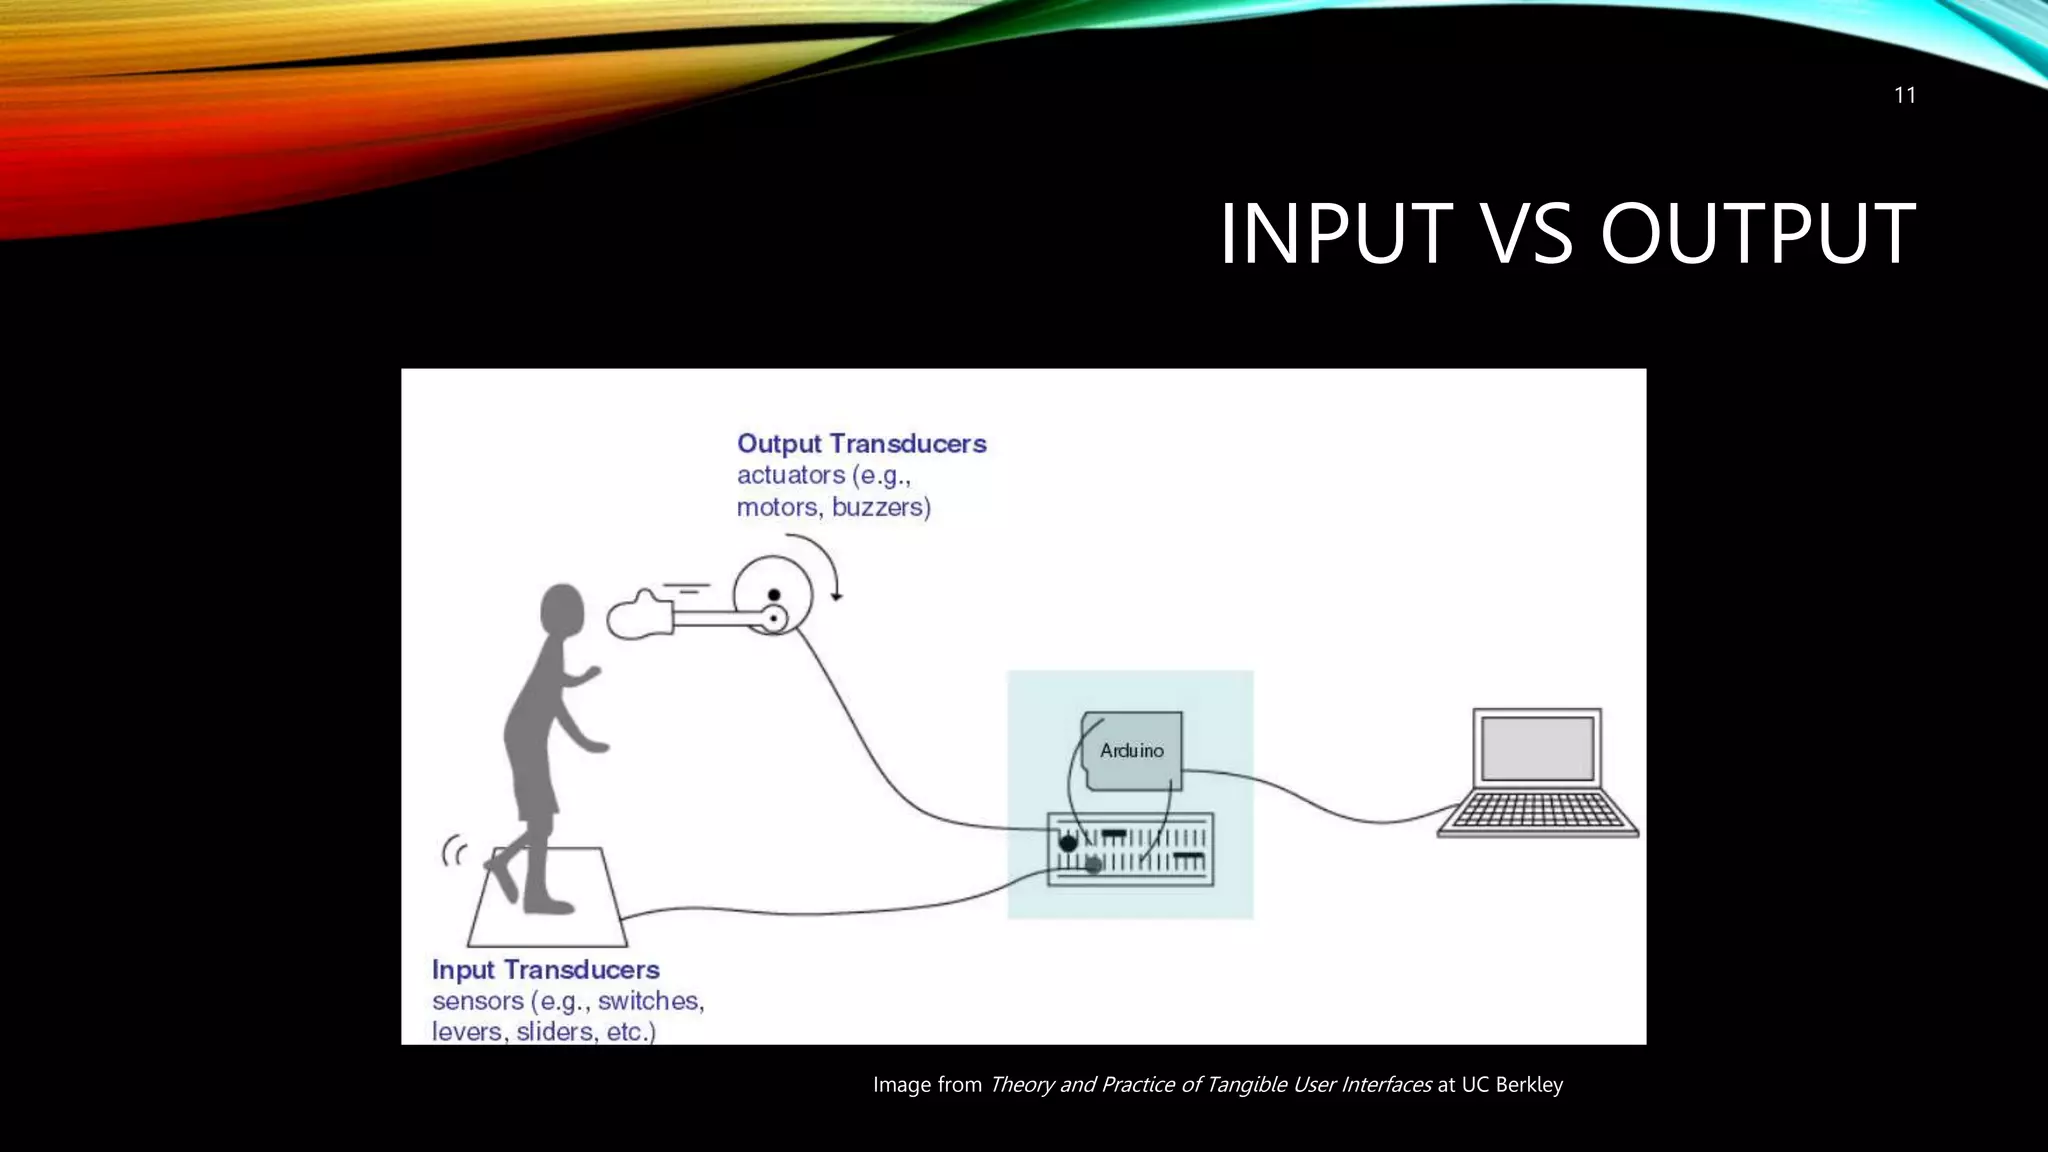
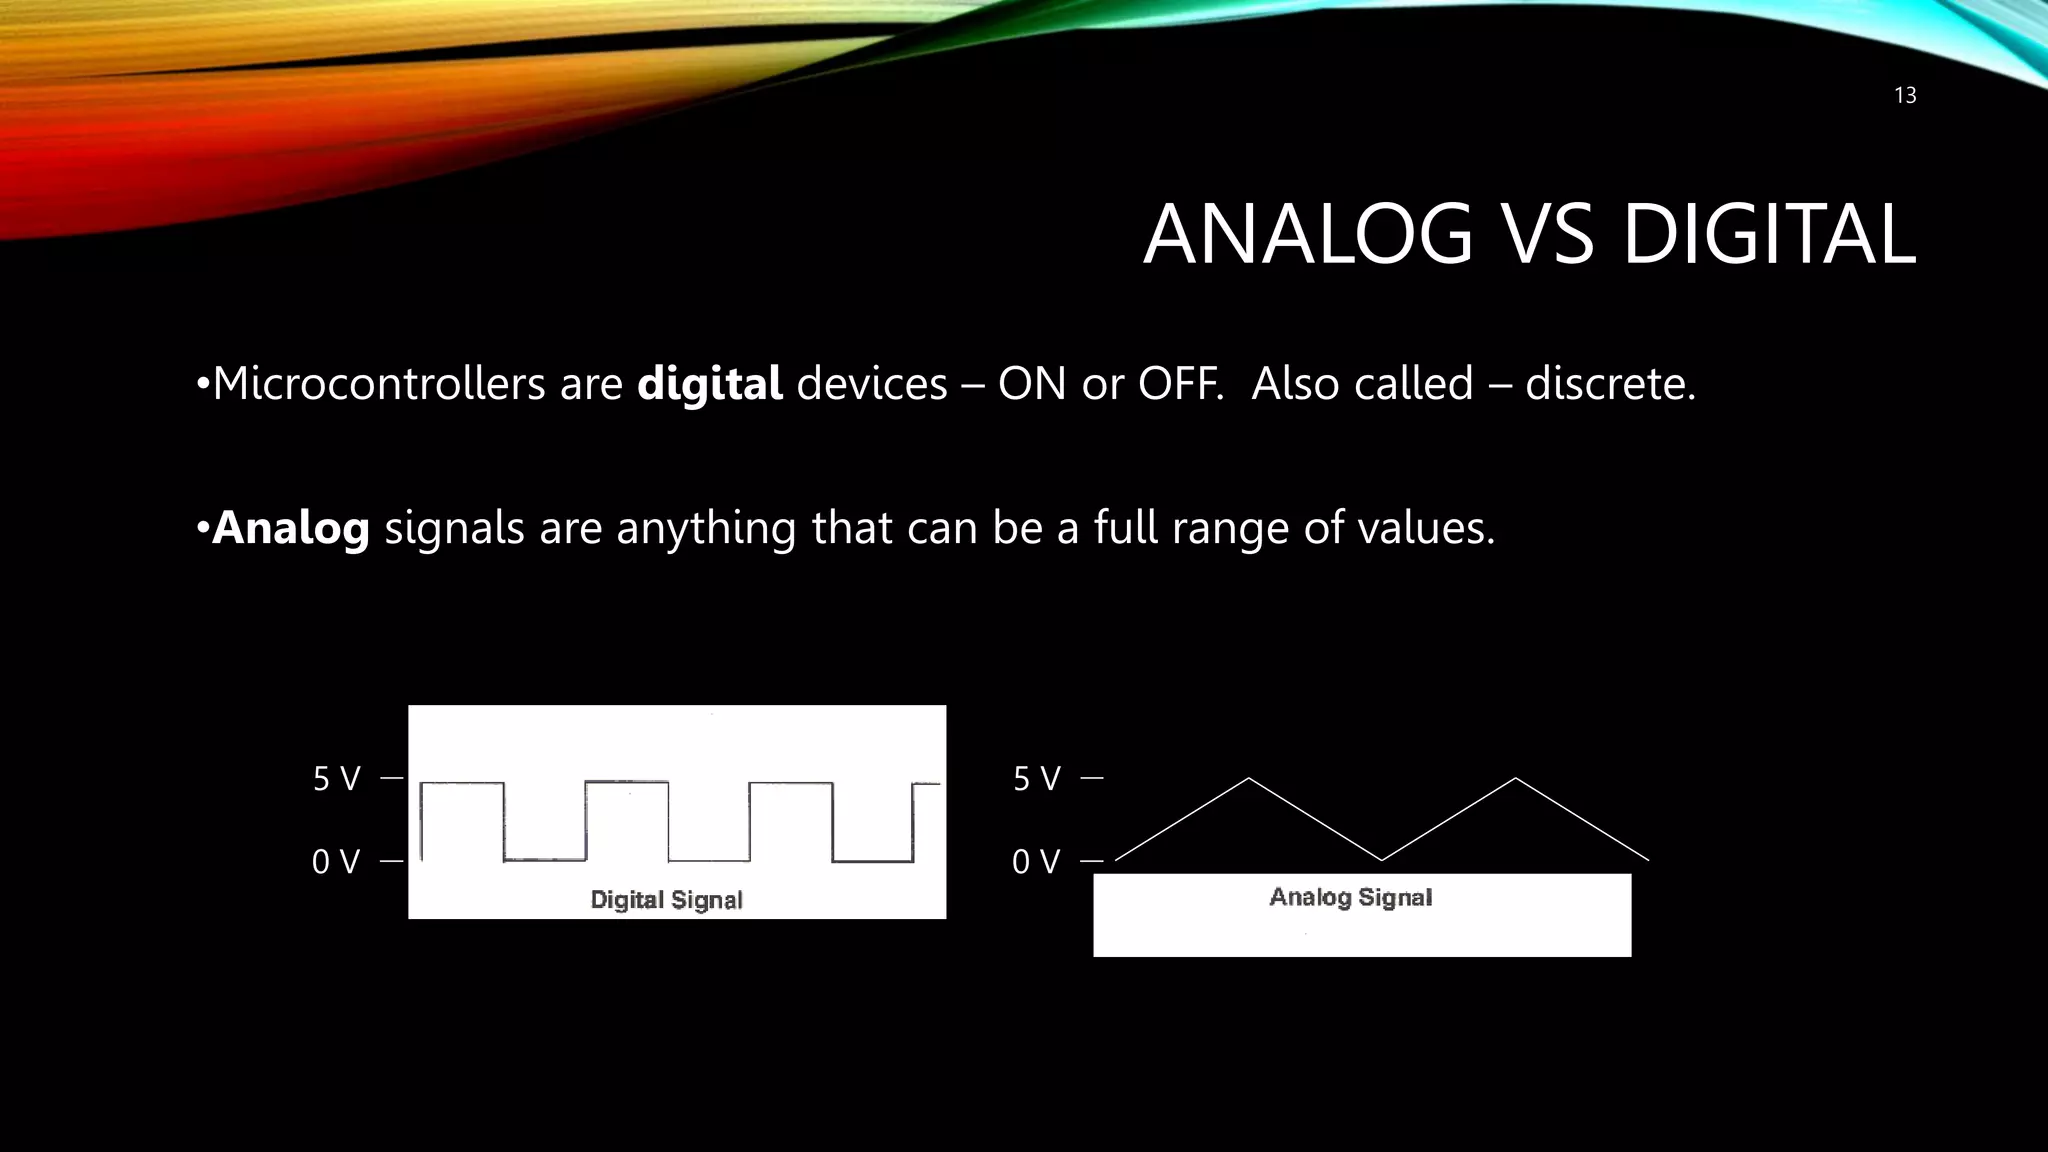
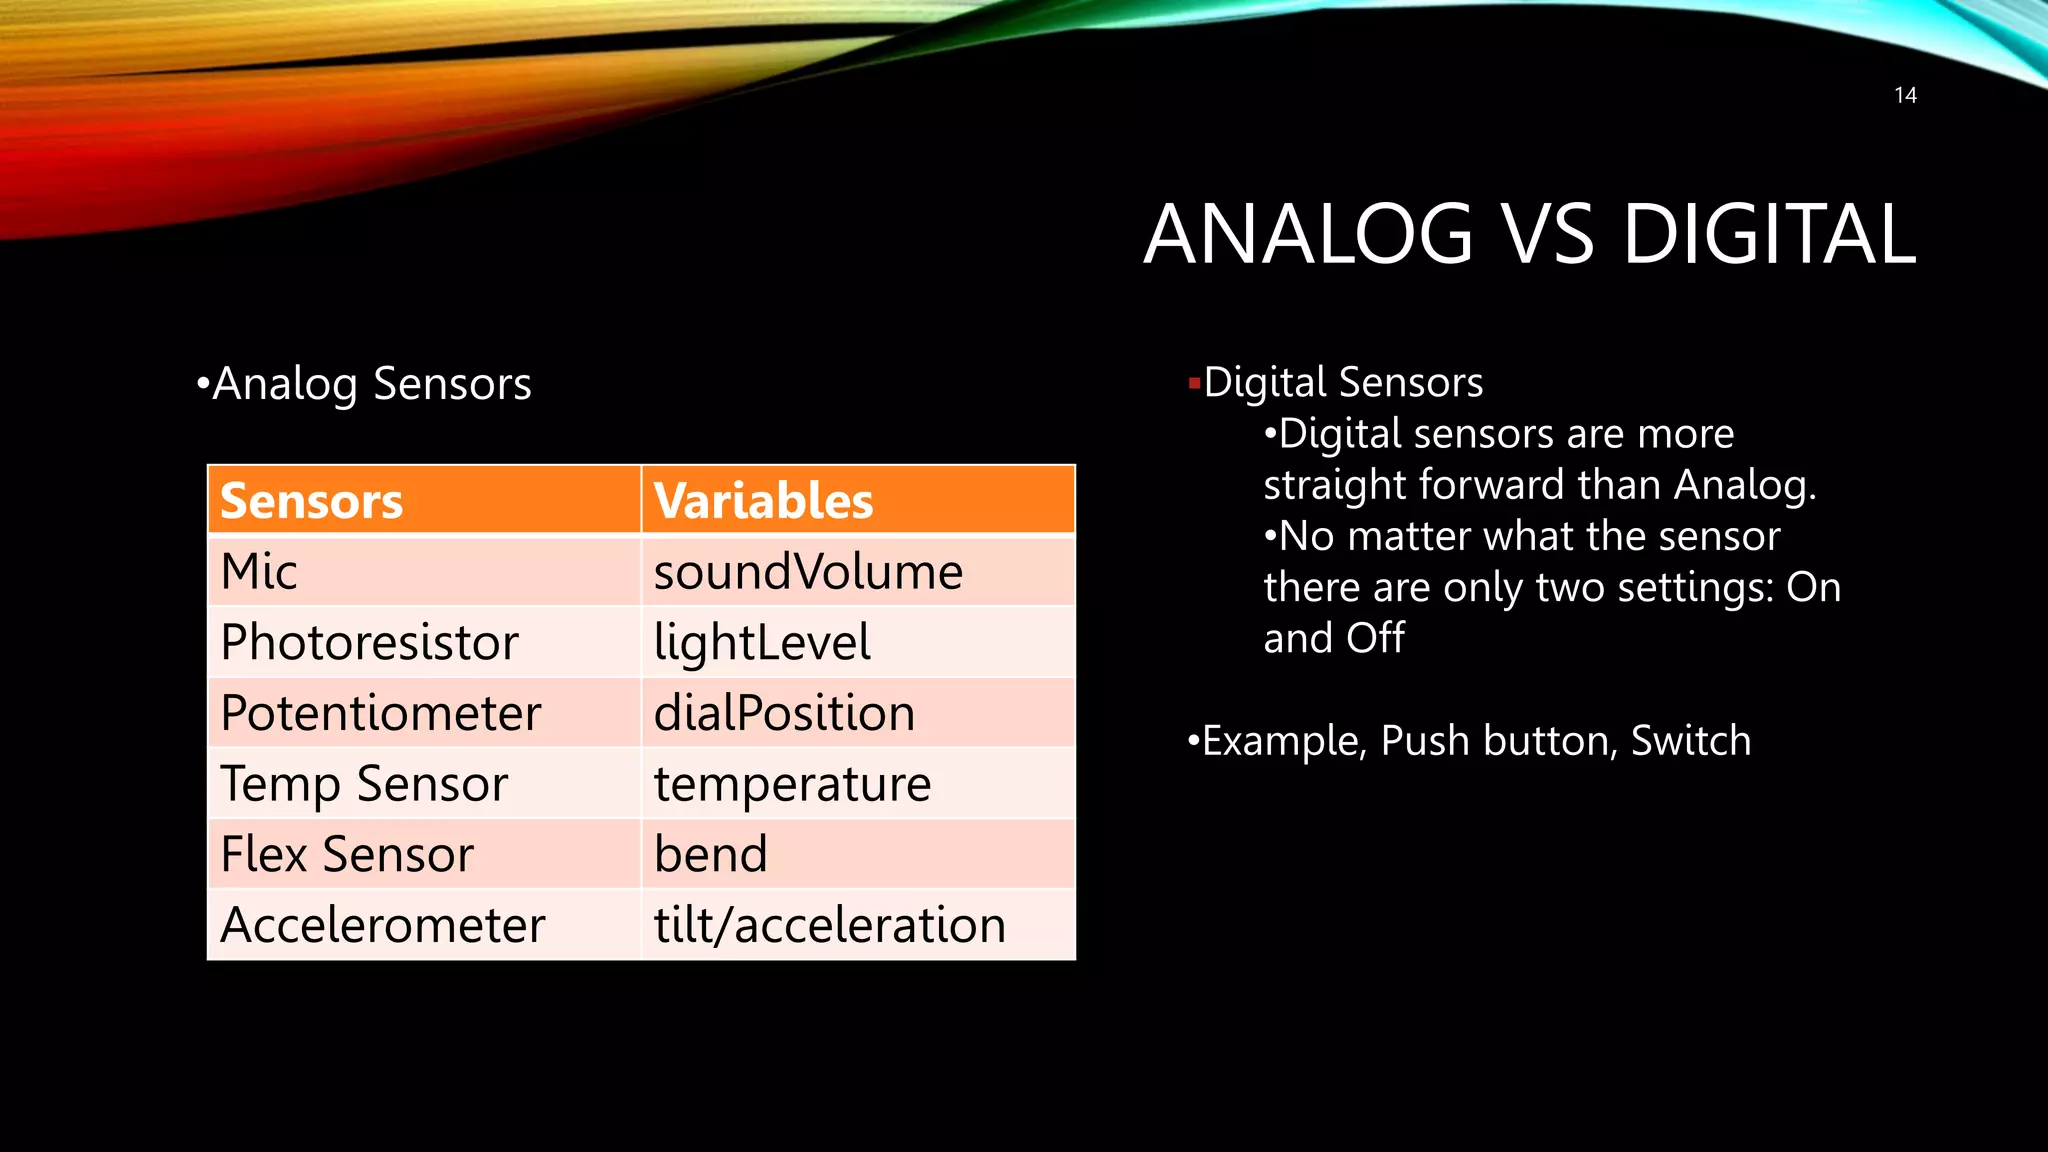
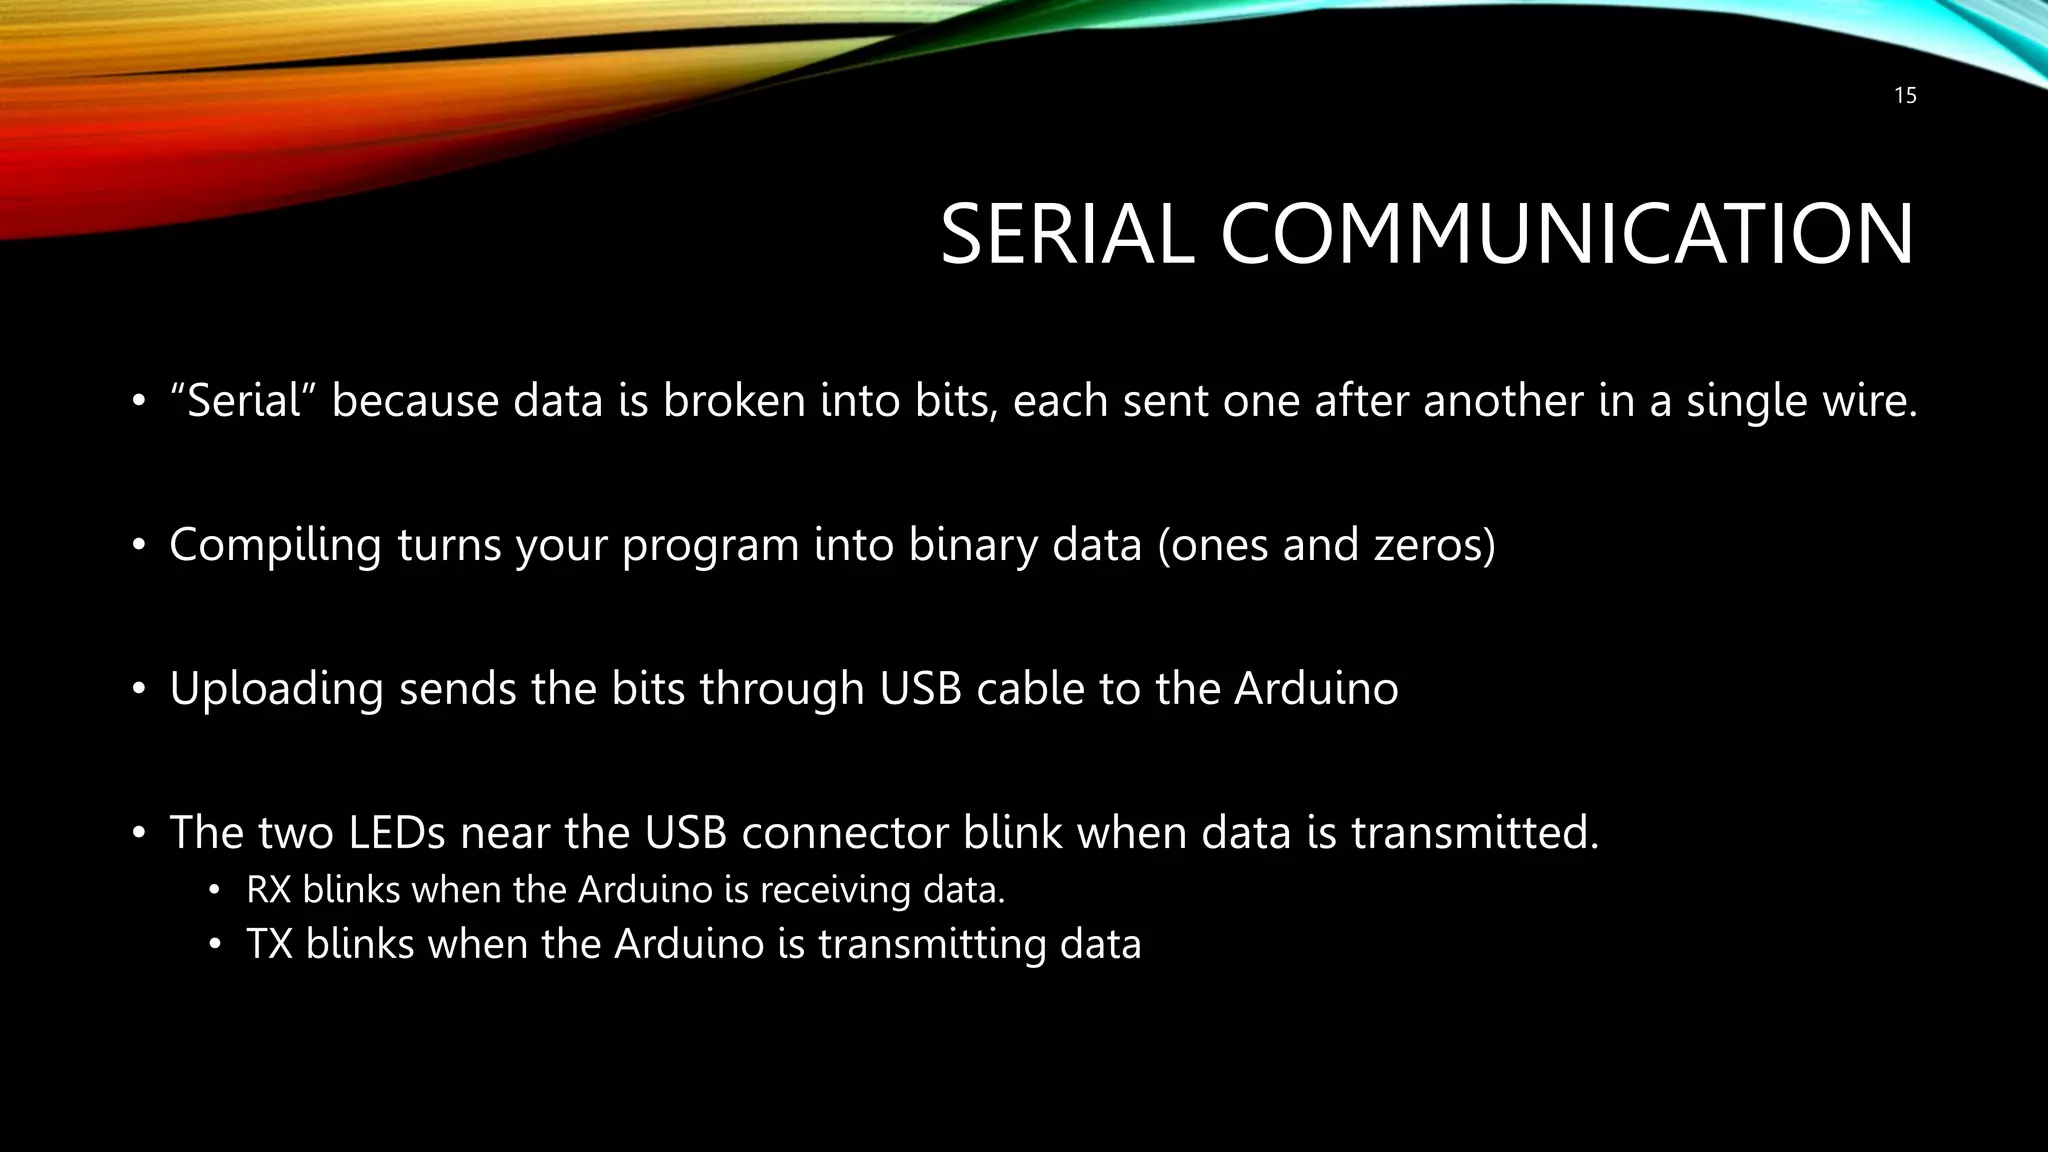
INTRODUCTION TO ARDUINO
ARDUINO • Arduino is the go-to gear for artists, hobbyists, students, and anyone with a gadgetry dream. • Arduino rose out of another formidable challenge: how to teach students to create electronics, fast. • With Arduino, you can control almost everything around you be it simple LED or giant Robots. 2
ARDUINO • Basically Arduino is Microcontroller. • Microcontroller is microprocessor with memory, RAM and some other peripheral connected with it. • The Arduino Uno is a microcontroller board based on the ATmega328 . The ATmega328 has Flash memory of 32 KB (with 0.5 KB used for the bootloader). It also has 2 KB of SRAM and 1 KB of EEPROM 3
DIFFERENT TYPES OF ARDUINO 4 Arduino Mega 2560 Arduino LilyPad Arduino Uno DIY Arduino Boarduino Kit
ARDUINO UNO • What does it have? • 14 Digital In/Out pins (6 can be used as PWM) • 6 Analog Inputs • A USB Connection • A Power Jack • Reset Button • On-board LED • SCL/SDA pins (Serial Clock/ Serial Data pins) • In short, it contains everything needed to support the microcontroller; simply connect it to a computer with a USB cable or power it with a AC-to-DC adapter or battery to get started. 5
Pune Makers ( http://www.meetup.com/Pune-Makers/ ) 6 Digital IO PWM(3, 5, 6, 9, 10, 11) SCLSDA (I2C Bus) RESET PWR IN USB (to Computer) Analog INPUTS POWER 5V / 3.3V / GND
HOW TO CODE IN ARDUINO • You need to download Arduino IDE (Integrated Development Environment). • Arduino IDE is available for all Mac, Windows.and Linux. 7
HOW TO CODE IN ARDUINO • Once you have downloaded and installed/extracted the folder, you can directly run Arduino.exe, which will take you to its IDE. • The IDE will look like the shown screenshot. 8 error & status messages
PROGRAM YOUR ARDUINO • Before you start programming, double check that correct board is selected under Tools  Board. • Now, you can start playing with Arduino. 9
PROGRAM YOUR ARDUINO • The Arduino Uno can be programmed with the Arduino software. Select "Arduino Uno from the Tools > Board menu (according to the microcontroller on your board). • All the peripheral connected with Computers are using Serial Port. • You can check port for Arduino Uno in Device Manger. 10
INPUT VS OUTPUT 11 Image from Theory and Practice of Tangible User Interfaces at UC Berkley
6 MAJOR CONCEPTS • digitalWrite() • analogWrite() • digitalRead() • If (statements) / Boolean • analogRead • Serial Communication Pune Makers ( http://www.meetup.com/Pune-Makers/ ) 12
ANALOG VS DIGITAL •Microcontrollers are digital devices – ON or OFF. Also called – discrete. •Analog signals are anything that can be a full range of values. 13 5 V 0 V 5 V 0 V
ANALOG VS DIGITAL •Analog Sensors 14 Sensors Variables Mic soundVolume Photoresistor lightLevel Potentiometer dialPosition Temp Sensor temperature Flex Sensor bend Accelerometer tilt/acceleration Digital Sensors •Digital sensors are more straight forward than Analog. •No matter what the sensor there are only two settings: On and Off •Example, Push button, Switch
SERIAL COMMUNICATION • “Serial” because data is broken into bits, each sent one after another in a single wire. • Compiling turns your program into binary data (ones and zeros) • Uploading sends the bits through USB cable to the Arduino • The two LEDs near the USB connector blink when data is transmitted. • RX blinks when the Arduino is receiving data. • TX blinks when the Arduino is transmitting data 15
LET’S START CODING
PROJECT #1 LED BLINK • digitalWrite() 17
18 Compile Upload Status Message
THANK YOU

Arduino intro.pptx

  • 1.
  • 2.
    ARDUINO • Arduino isthe go-to gear for artists, hobbyists, students, and anyone with a gadgetry dream. • Arduino rose out of another formidable challenge: how to teach students to create electronics, fast. • With Arduino, you can control almost everything around you be it simple LED or giant Robots. 2
  • 3.
    ARDUINO • Basically Arduinois Microcontroller. • Microcontroller is microprocessor with memory, RAM and some other peripheral connected with it. • The Arduino Uno is a microcontroller board based on the ATmega328 . The ATmega328 has Flash memory of 32 KB (with 0.5 KB used for the bootloader). It also has 2 KB of SRAM and 1 KB of EEPROM 3
  • 4.
    DIFFERENT TYPES OFARDUINO 4 Arduino Mega 2560 Arduino LilyPad Arduino Uno DIY Arduino Boarduino Kit
  • 5.
    ARDUINO UNO • Whatdoes it have? • 14 Digital In/Out pins (6 can be used as PWM) • 6 Analog Inputs • A USB Connection • A Power Jack • Reset Button • On-board LED • SCL/SDA pins (Serial Clock/ Serial Data pins) • In short, it contains everything needed to support the microcontroller; simply connect it to a computer with a USB cable or power it with a AC-to-DC adapter or battery to get started. 5
  • 6.
    Pune Makers (http://www.meetup.com/Pune-Makers/ ) 6 Digital IO PWM(3, 5, 6, 9, 10, 11) SCLSDA (I2C Bus) RESET PWR IN USB (to Computer) Analog INPUTS POWER 5V / 3.3V / GND
  • 7.
    HOW TO CODEIN ARDUINO • You need to download Arduino IDE (Integrated Development Environment). • Arduino IDE is available for all Mac, Windows.and Linux. 7
  • 8.
    HOW TO CODEIN ARDUINO • Once you have downloaded and installed/extracted the folder, you can directly run Arduino.exe, which will take you to its IDE. • The IDE will look like the shown screenshot. 8 error & status messages
  • 9.
    PROGRAM YOUR ARDUINO •Before you start programming, double check that correct board is selected under Tools  Board. • Now, you can start playing with Arduino. 9
  • 10.
    PROGRAM YOUR ARDUINO •The Arduino Uno can be programmed with the Arduino software. Select "Arduino Uno from the Tools > Board menu (according to the microcontroller on your board). • All the peripheral connected with Computers are using Serial Port. • You can check port for Arduino Uno in Device Manger. 10
  • 11.
    INPUT VS OUTPUT 11 Imagefrom Theory and Practice of Tangible User Interfaces at UC Berkley
  • 12.
    6 MAJOR CONCEPTS •digitalWrite() • analogWrite() • digitalRead() • If (statements) / Boolean • analogRead • Serial Communication Pune Makers ( http://www.meetup.com/Pune-Makers/ ) 12
  • 13.
    ANALOG VS DIGITAL •Microcontrollersare digital devices – ON or OFF. Also called – discrete. •Analog signals are anything that can be a full range of values. 13 5 V 0 V 5 V 0 V
  • 14.
    ANALOG VS DIGITAL •AnalogSensors 14 Sensors Variables Mic soundVolume Photoresistor lightLevel Potentiometer dialPosition Temp Sensor temperature Flex Sensor bend Accelerometer tilt/acceleration Digital Sensors •Digital sensors are more straight forward than Analog. •No matter what the sensor there are only two settings: On and Off •Example, Push button, Switch
  • 15.
    SERIAL COMMUNICATION • “Serial”because data is broken into bits, each sent one after another in a single wire. • Compiling turns your program into binary data (ones and zeros) • Uploading sends the bits through USB cable to the Arduino • The two LEDs near the USB connector blink when data is transmitted. • RX blinks when the Arduino is receiving data. • TX blinks when the Arduino is transmitting data 15
  • 16.
  • 17.
    PROJECT #1 LEDBLINK • digitalWrite() 17
  • 18.
  • 19.

Editor's Notes

  • #4 Flash- Where program is stored. SRAM-Static Random Access Memory ( sketch creates and manipulates variables when it runs ) EEPROM- Electrically Erasable Programmable Read-Only Memory ( memory whose values are kept when the board is turned off )