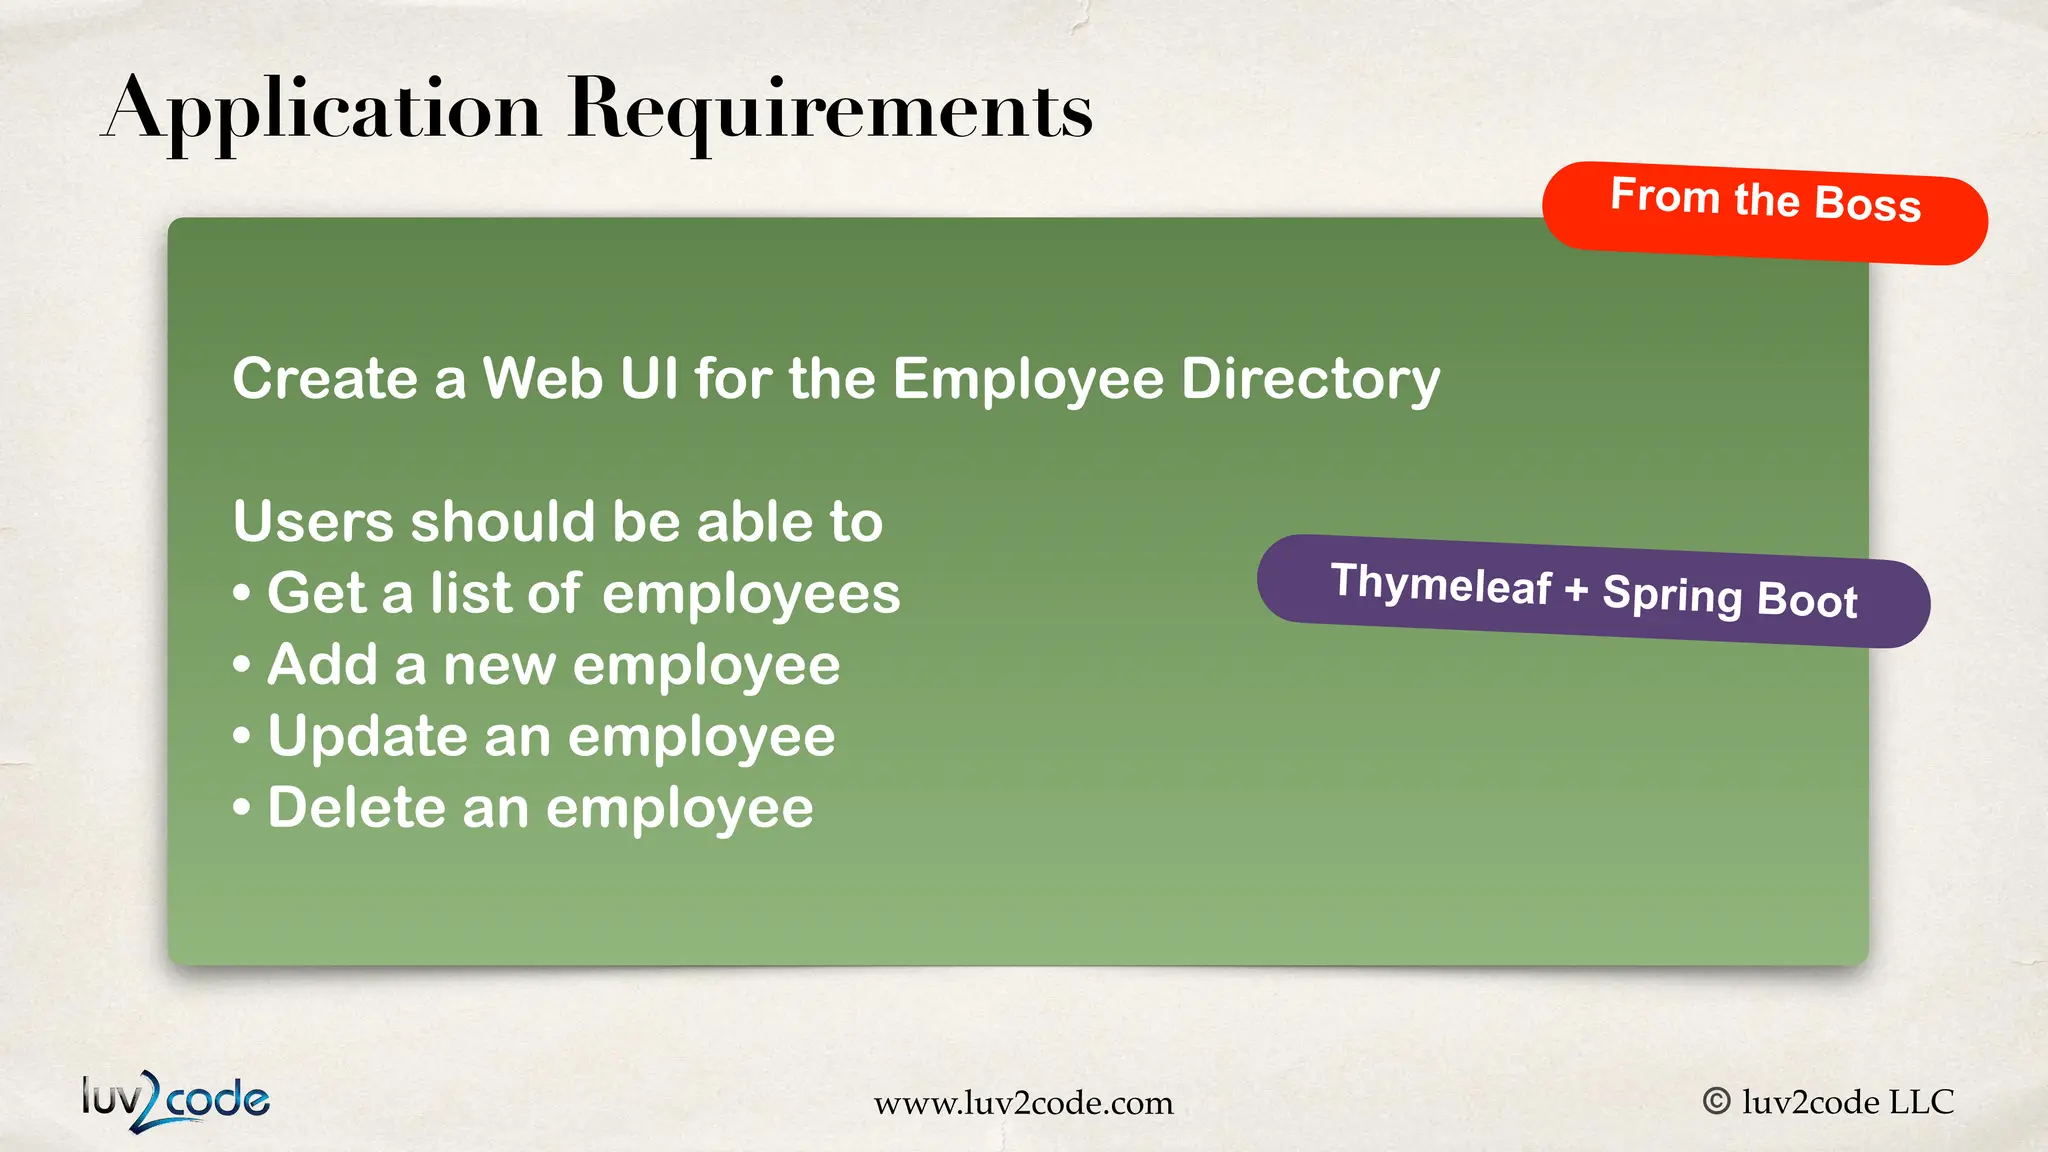
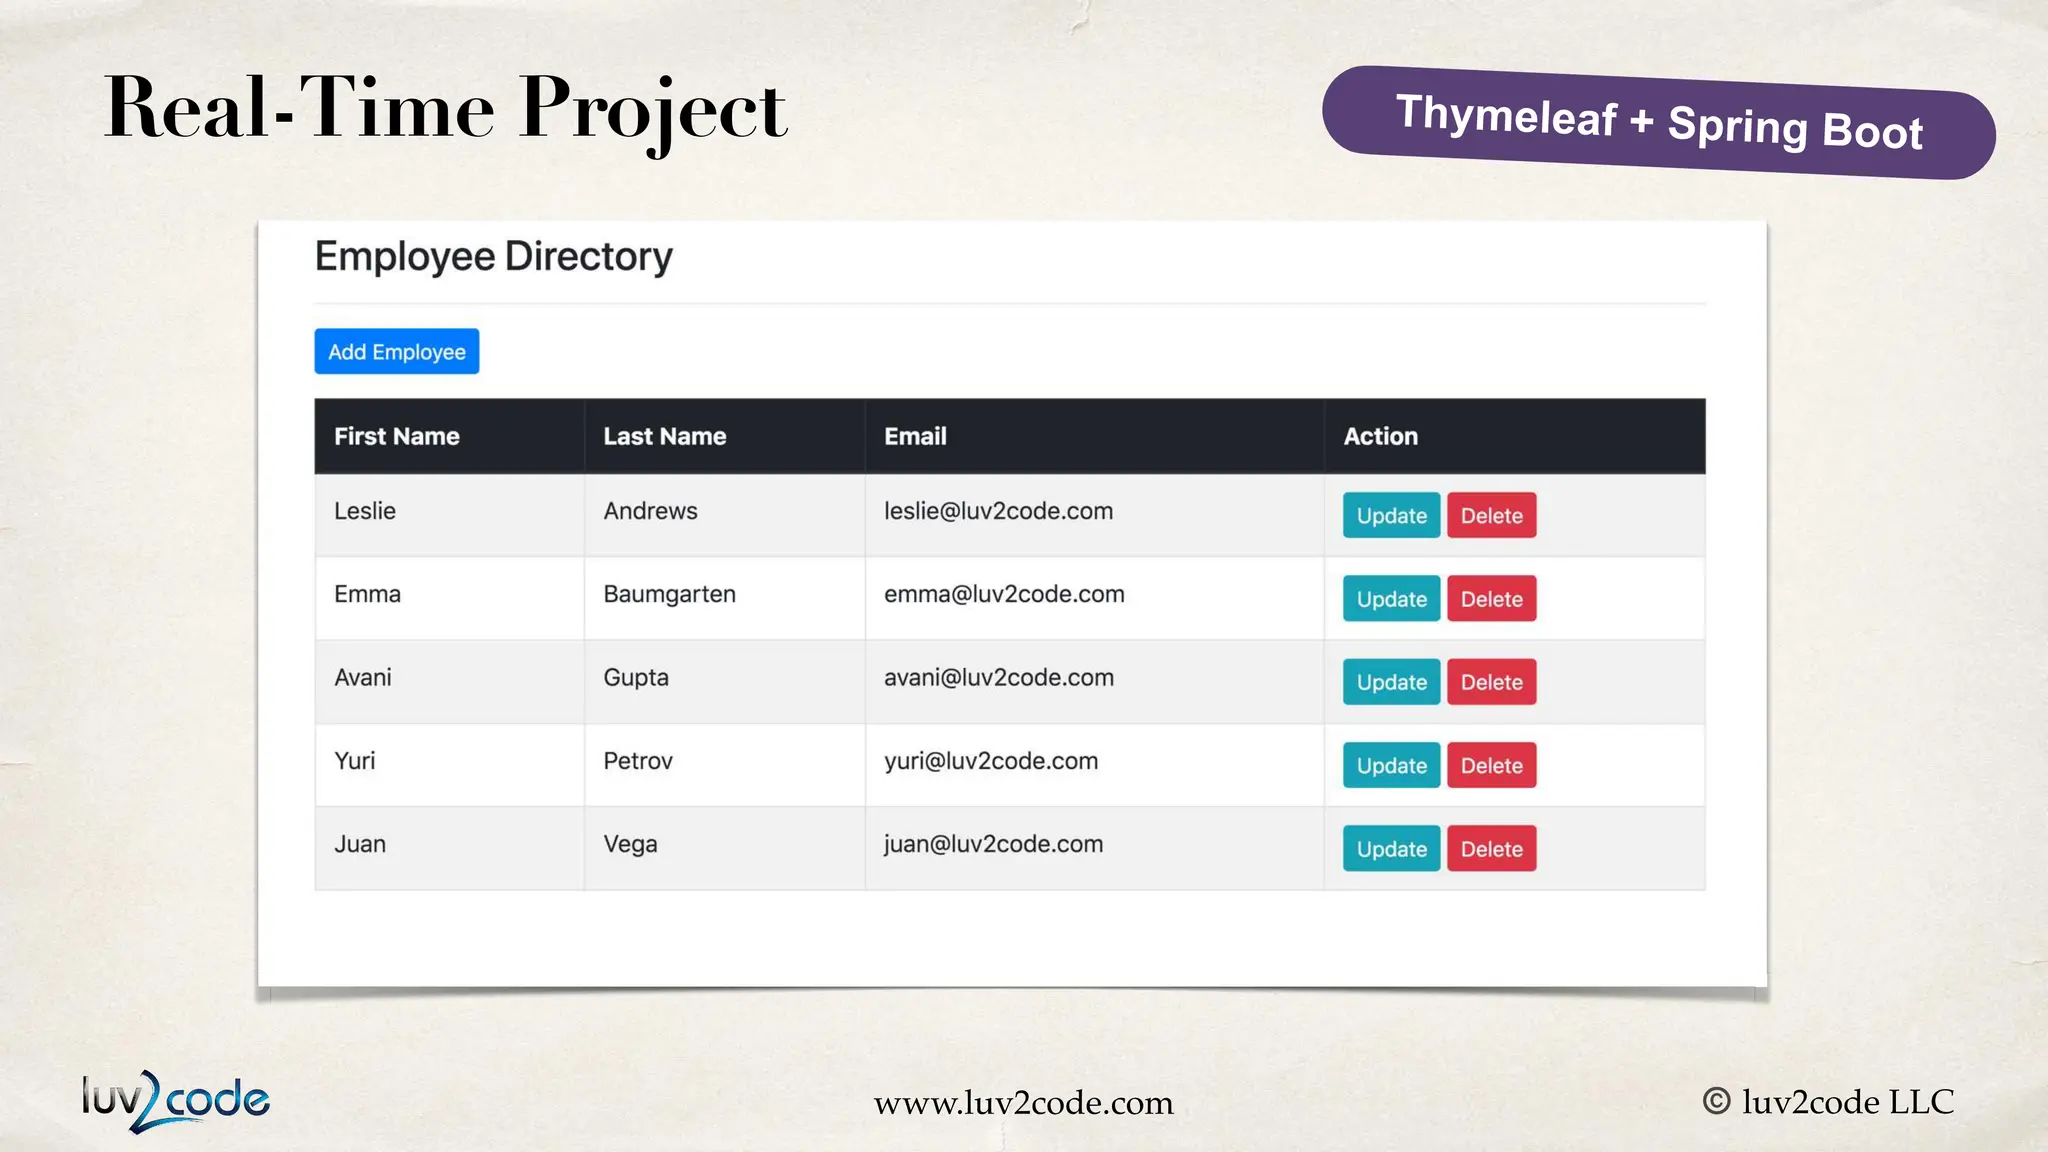
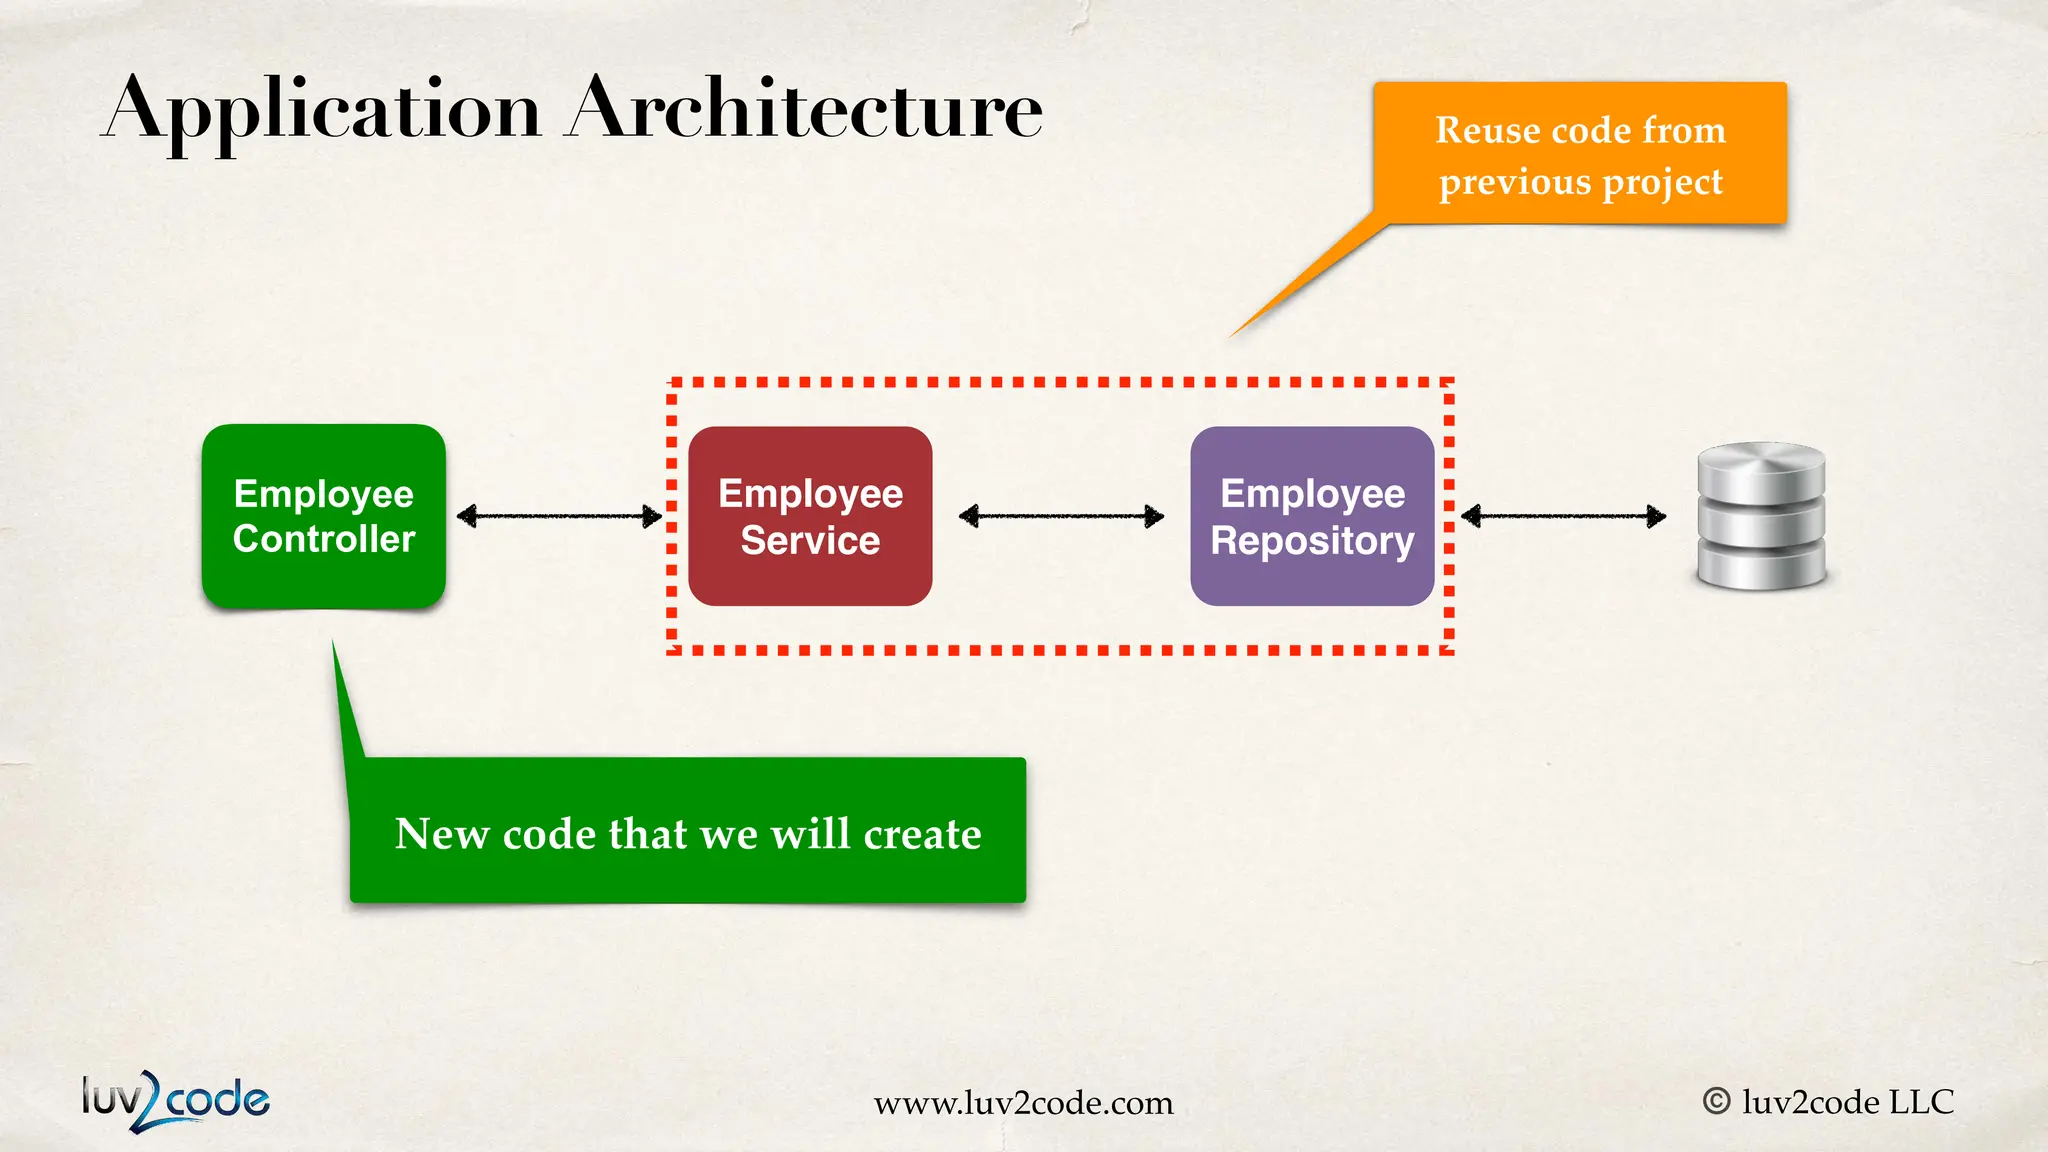
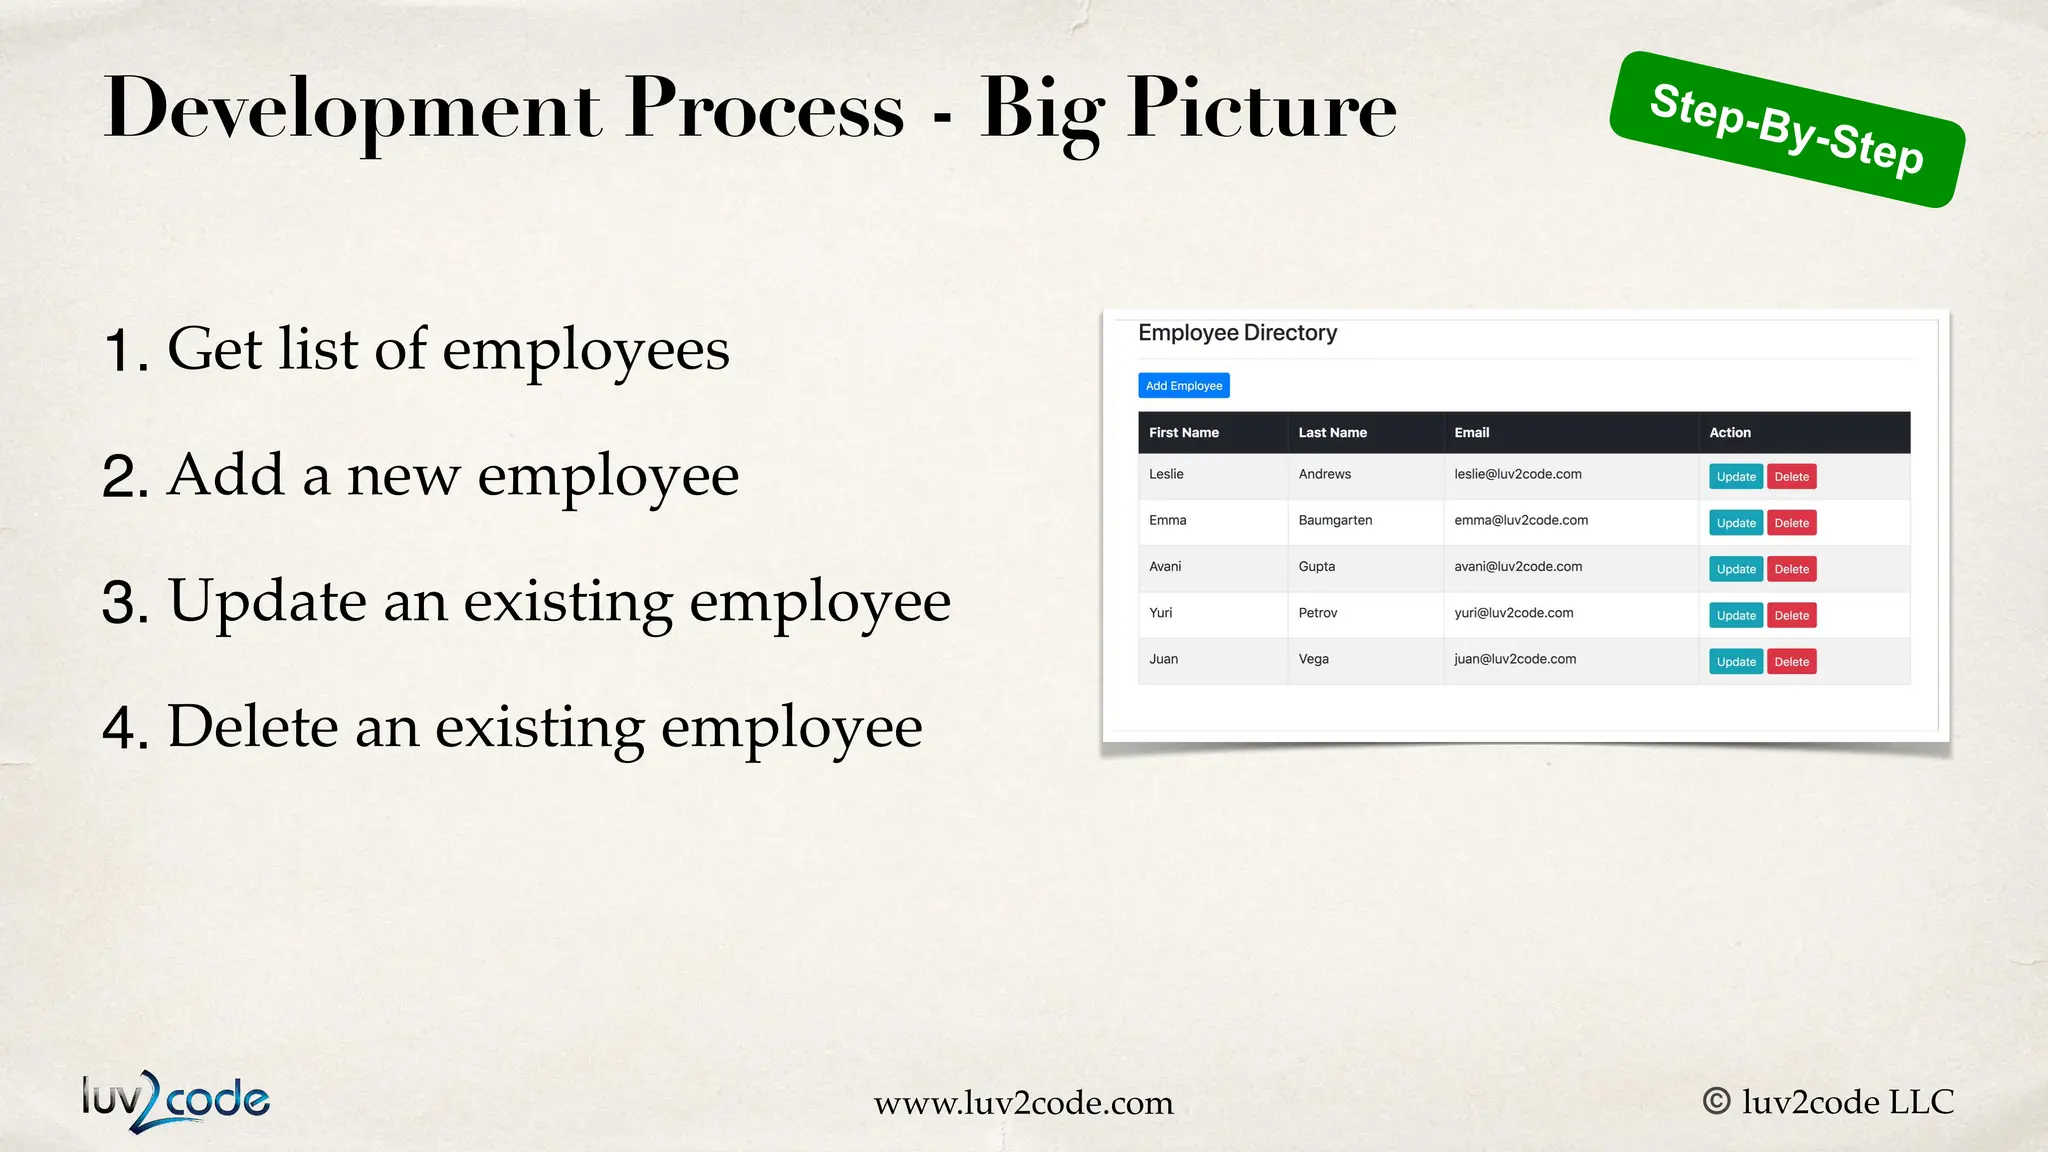
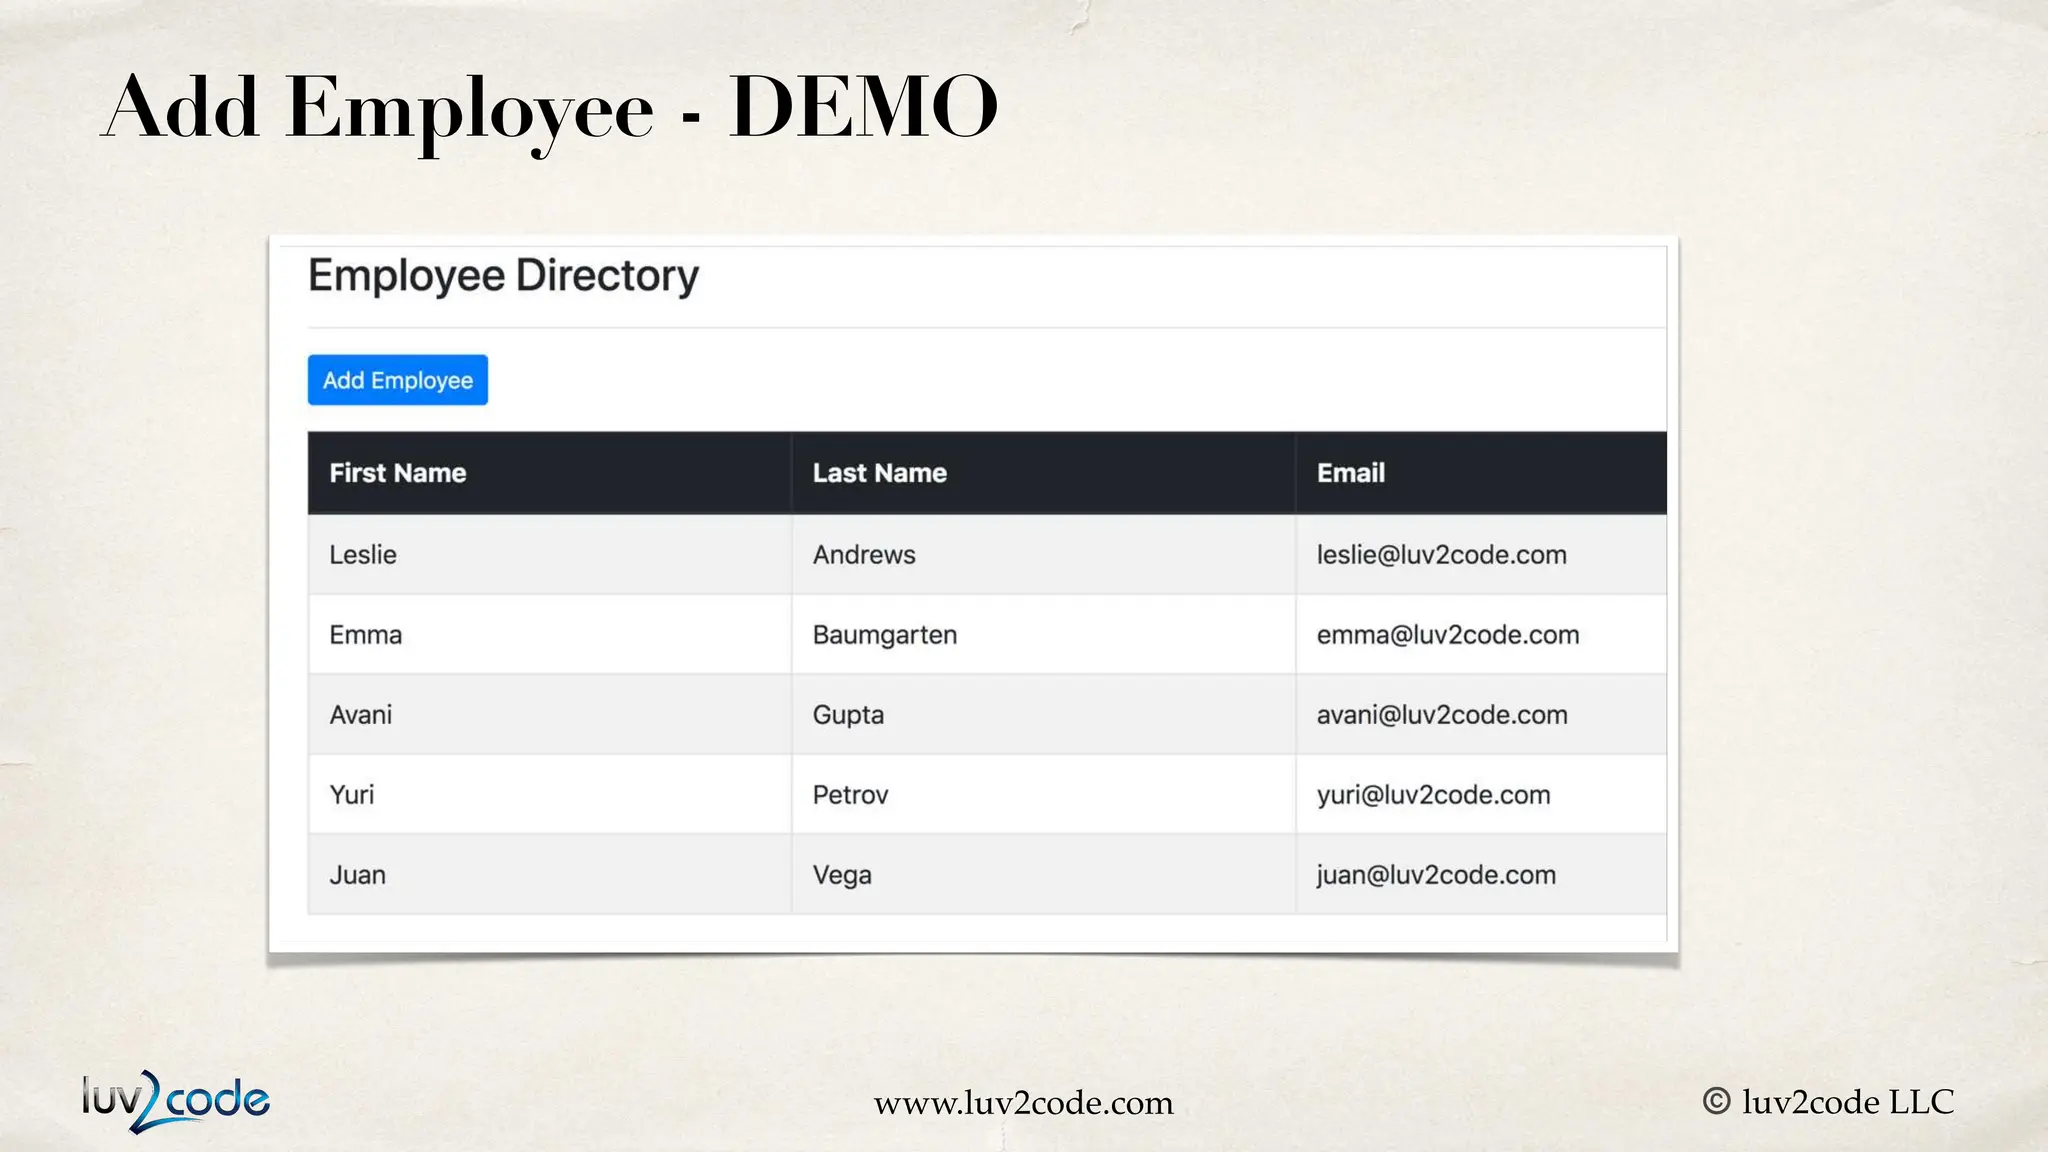
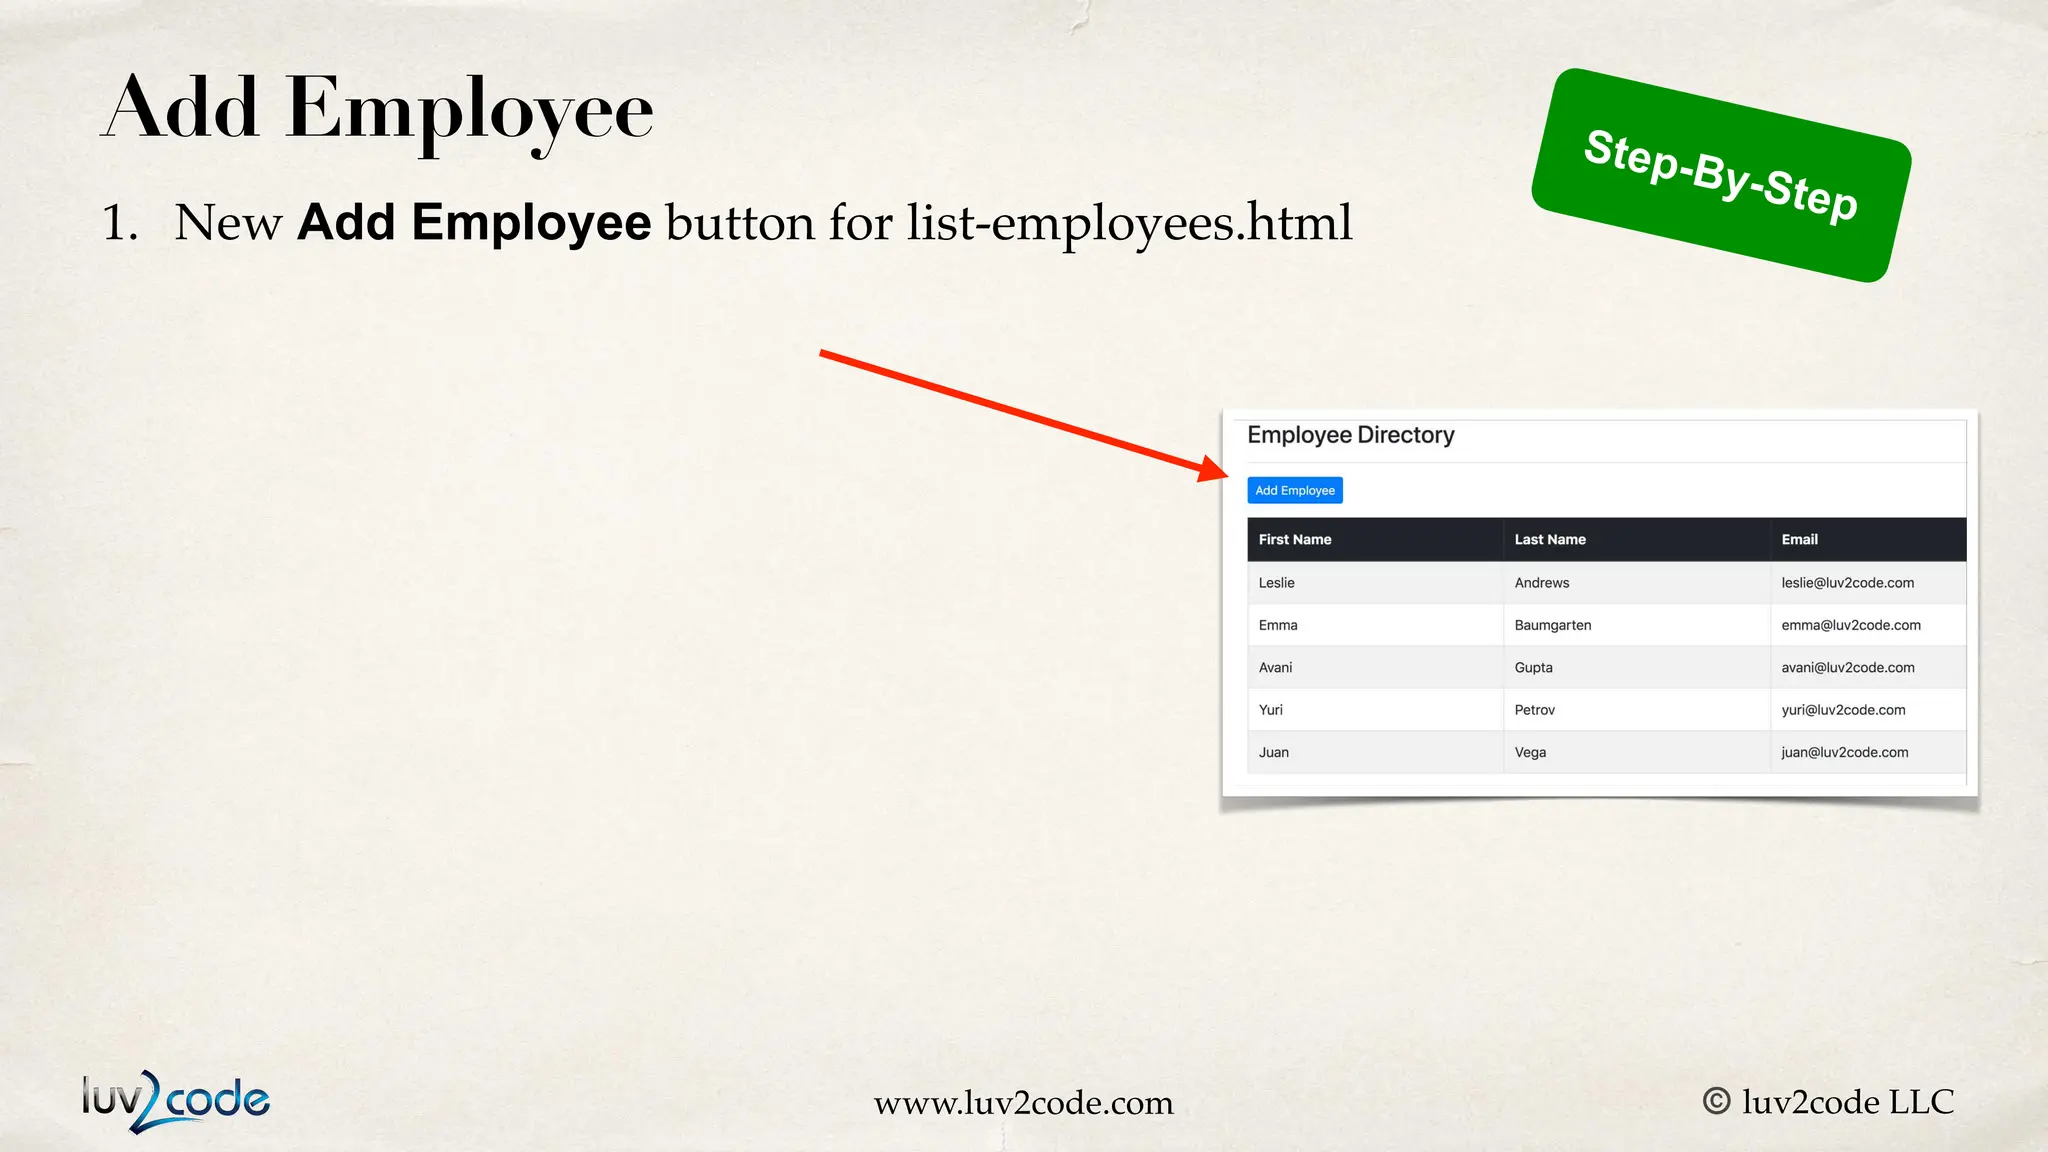
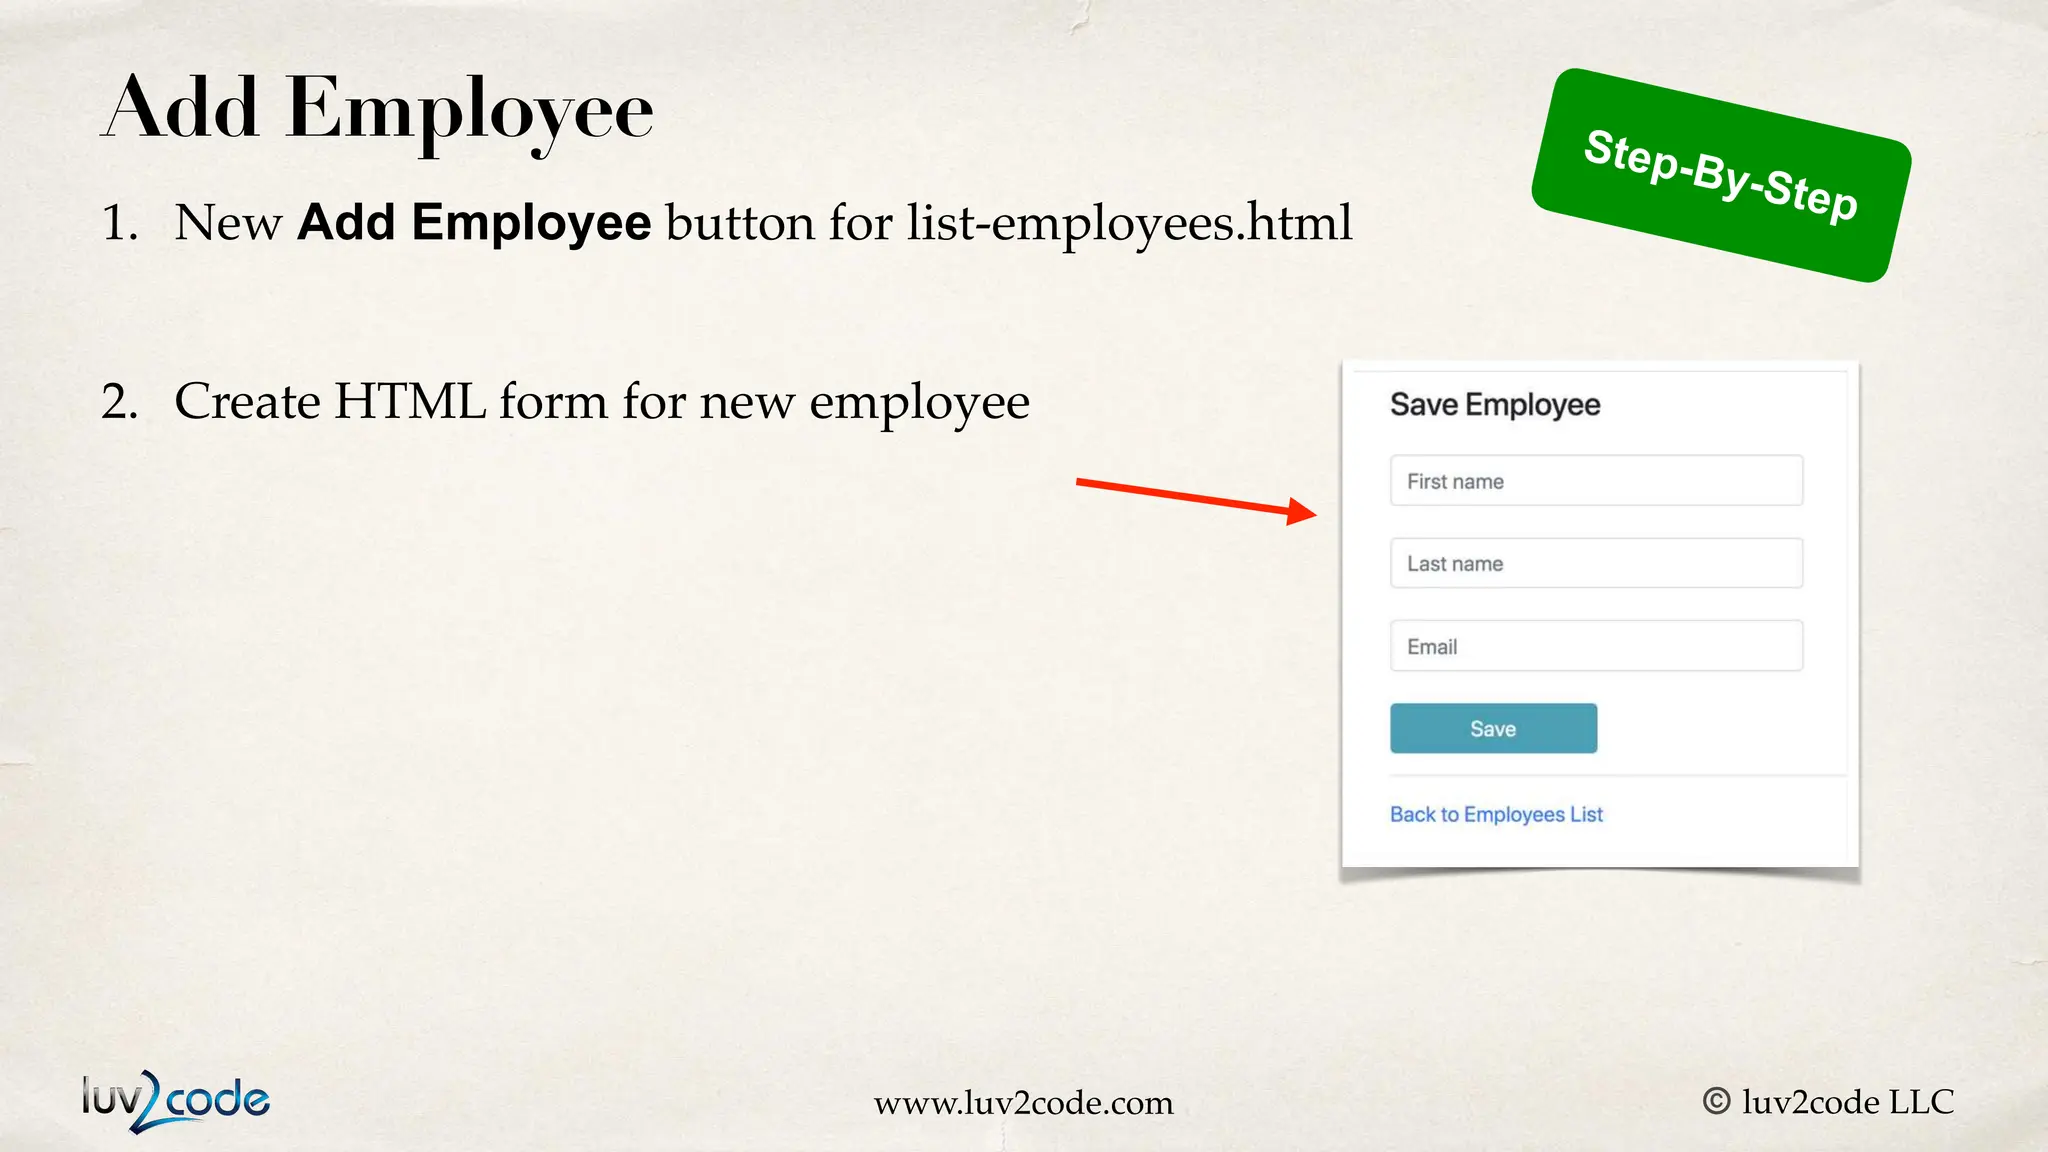
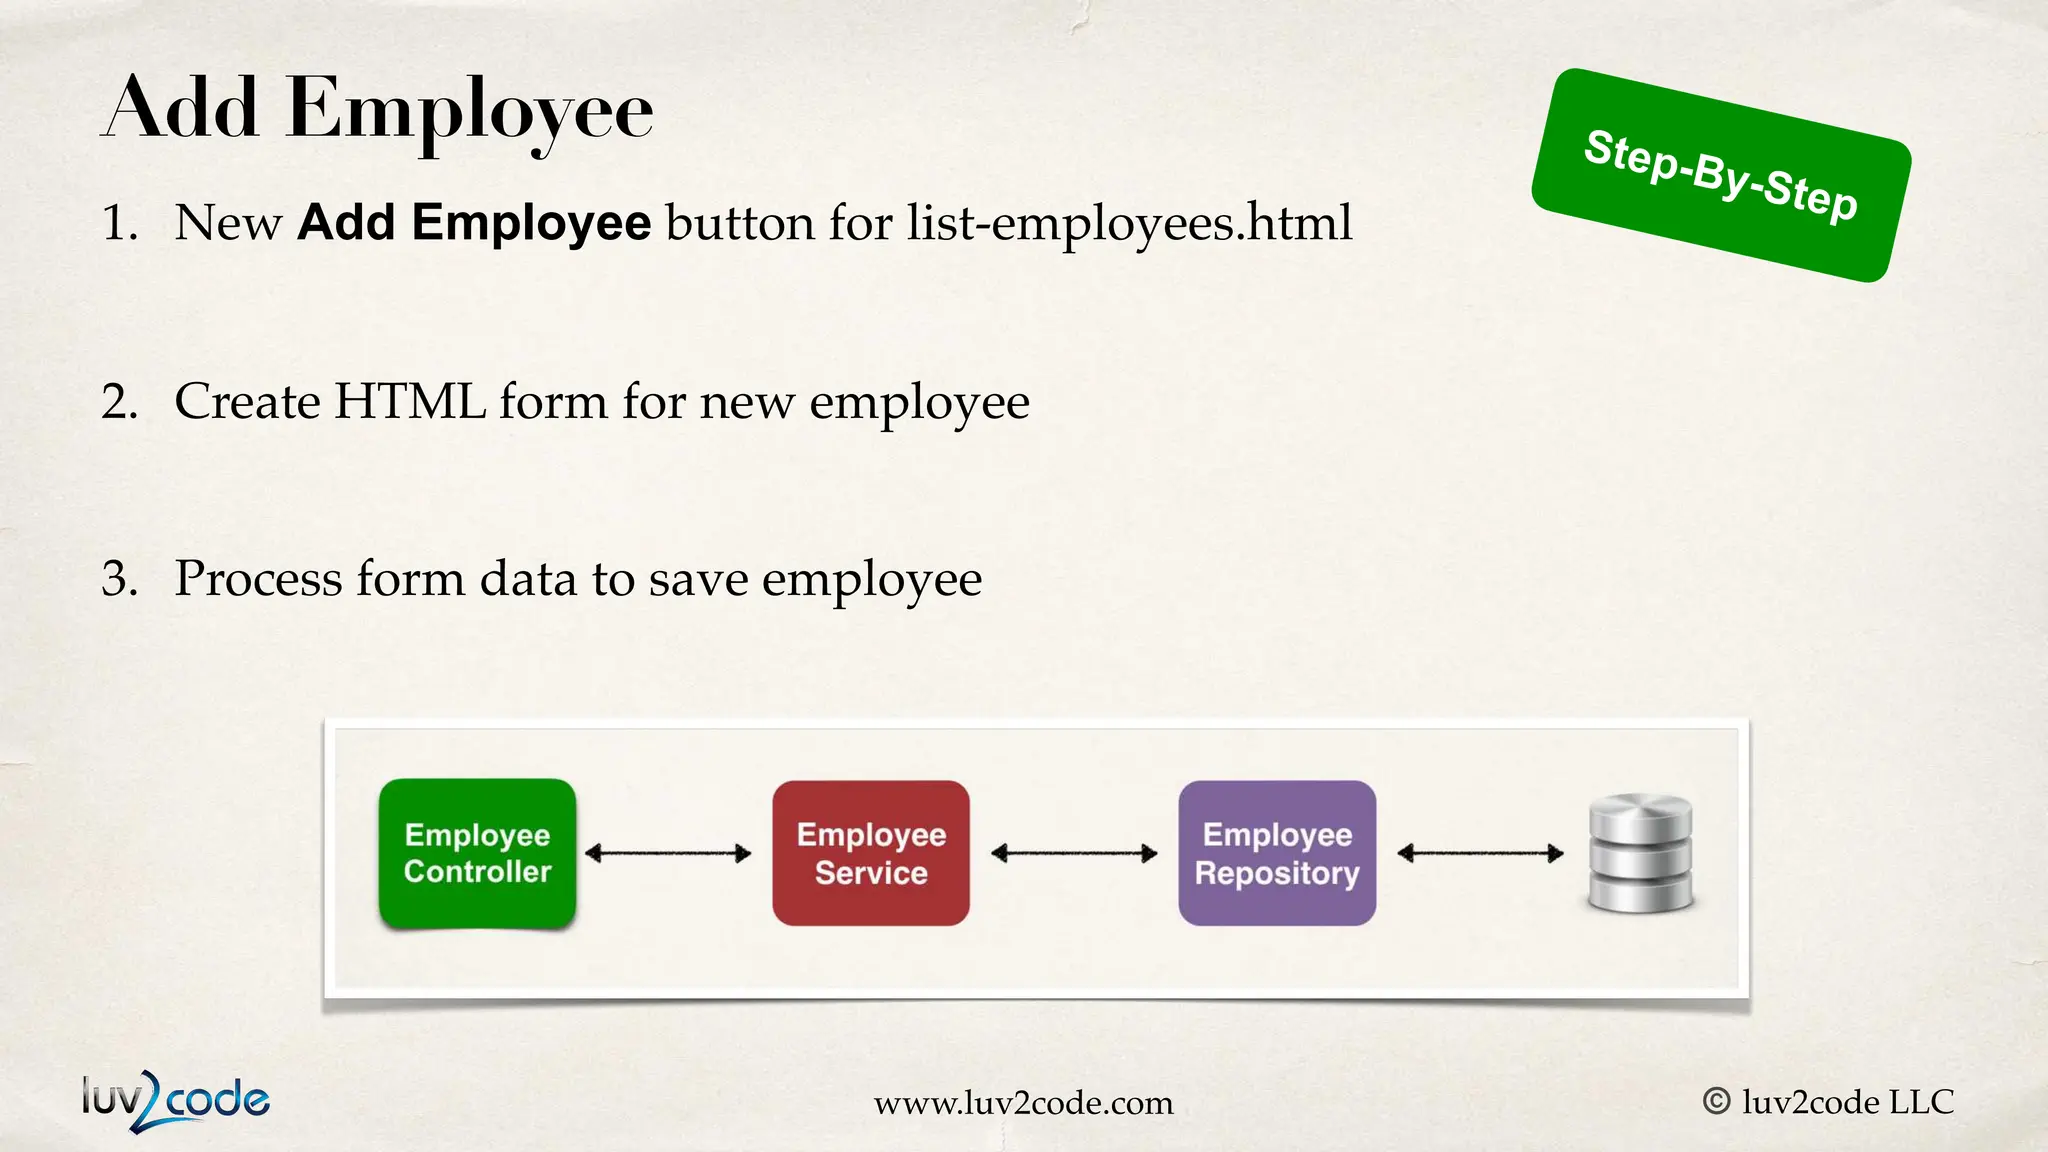
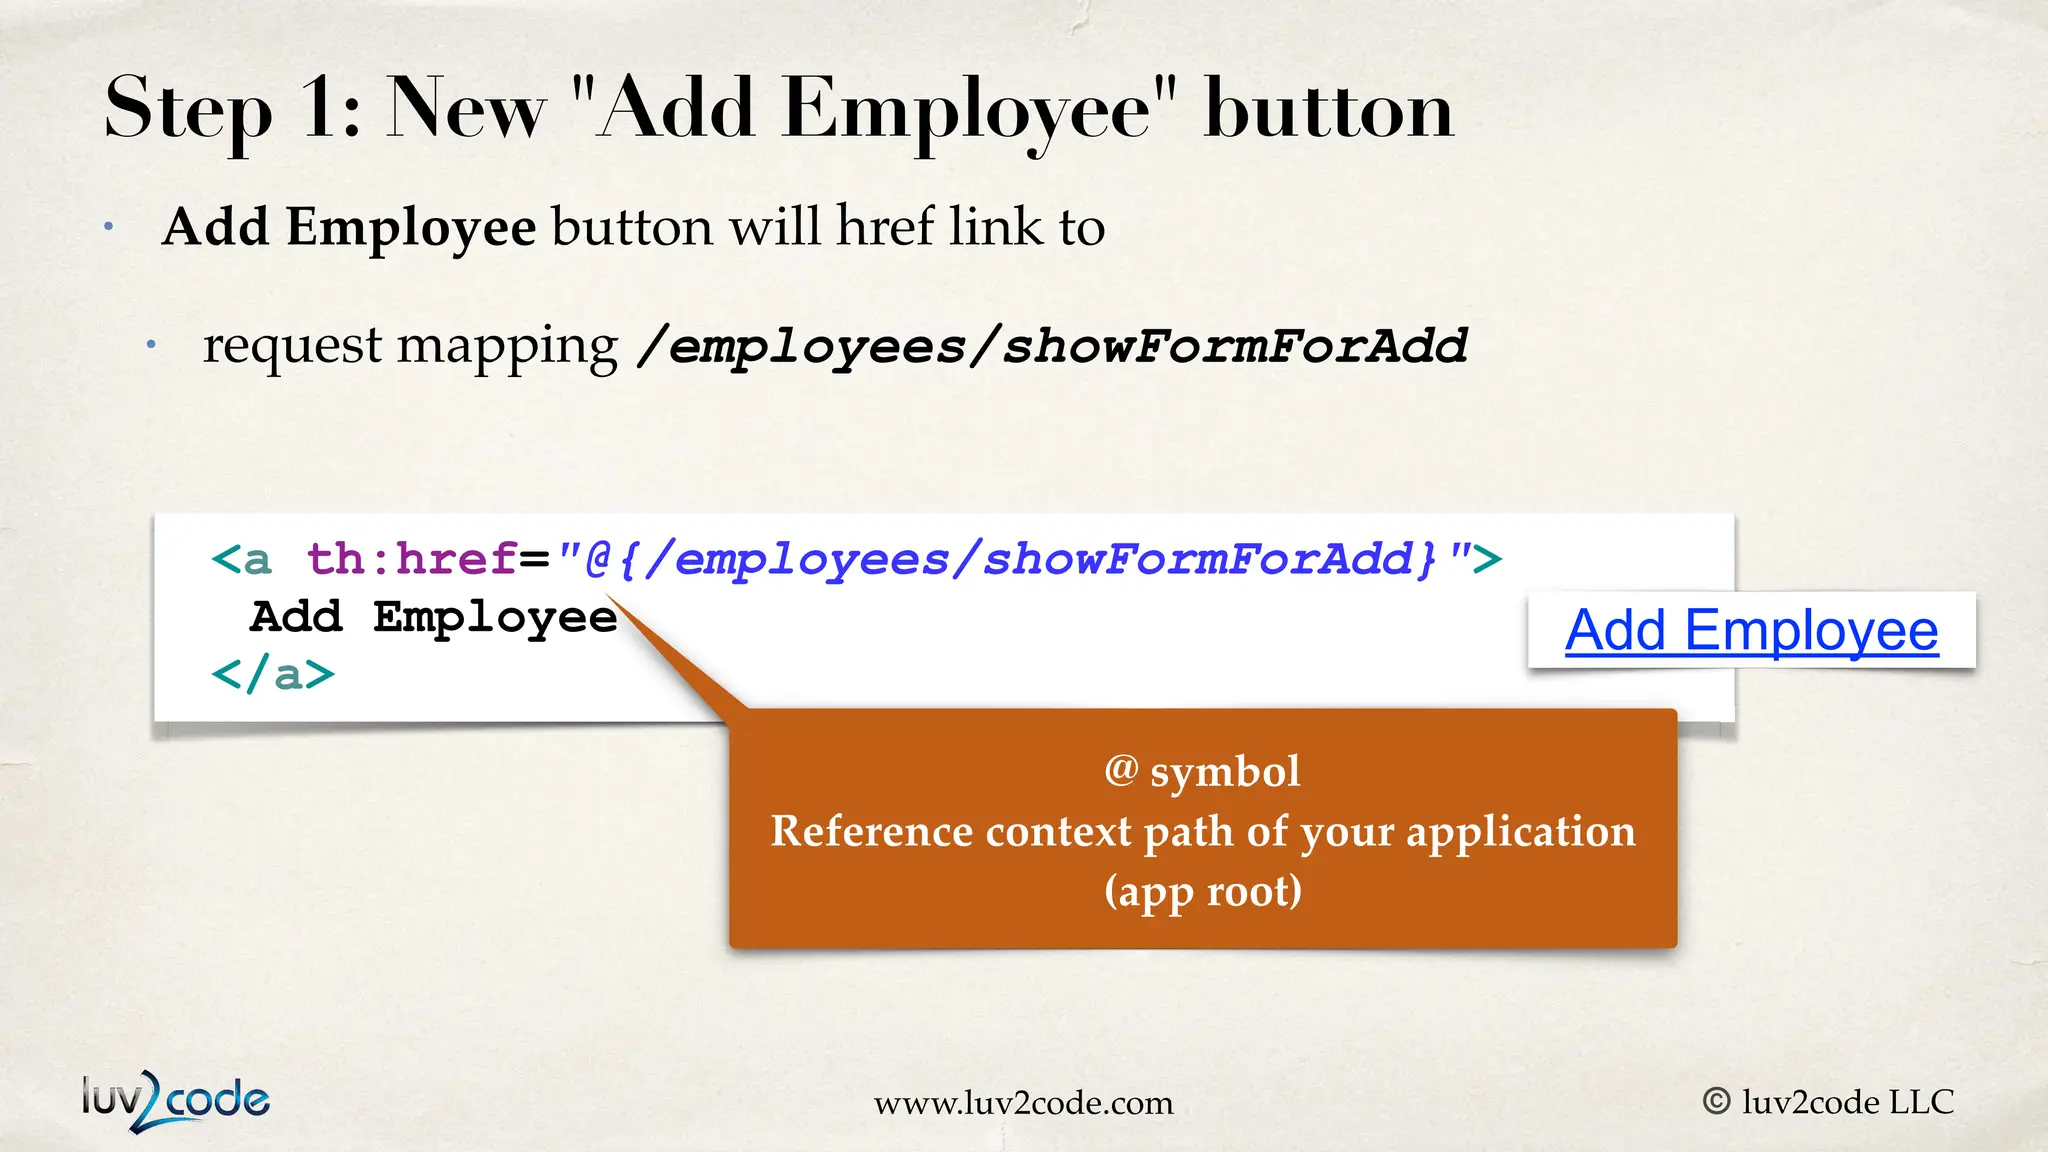
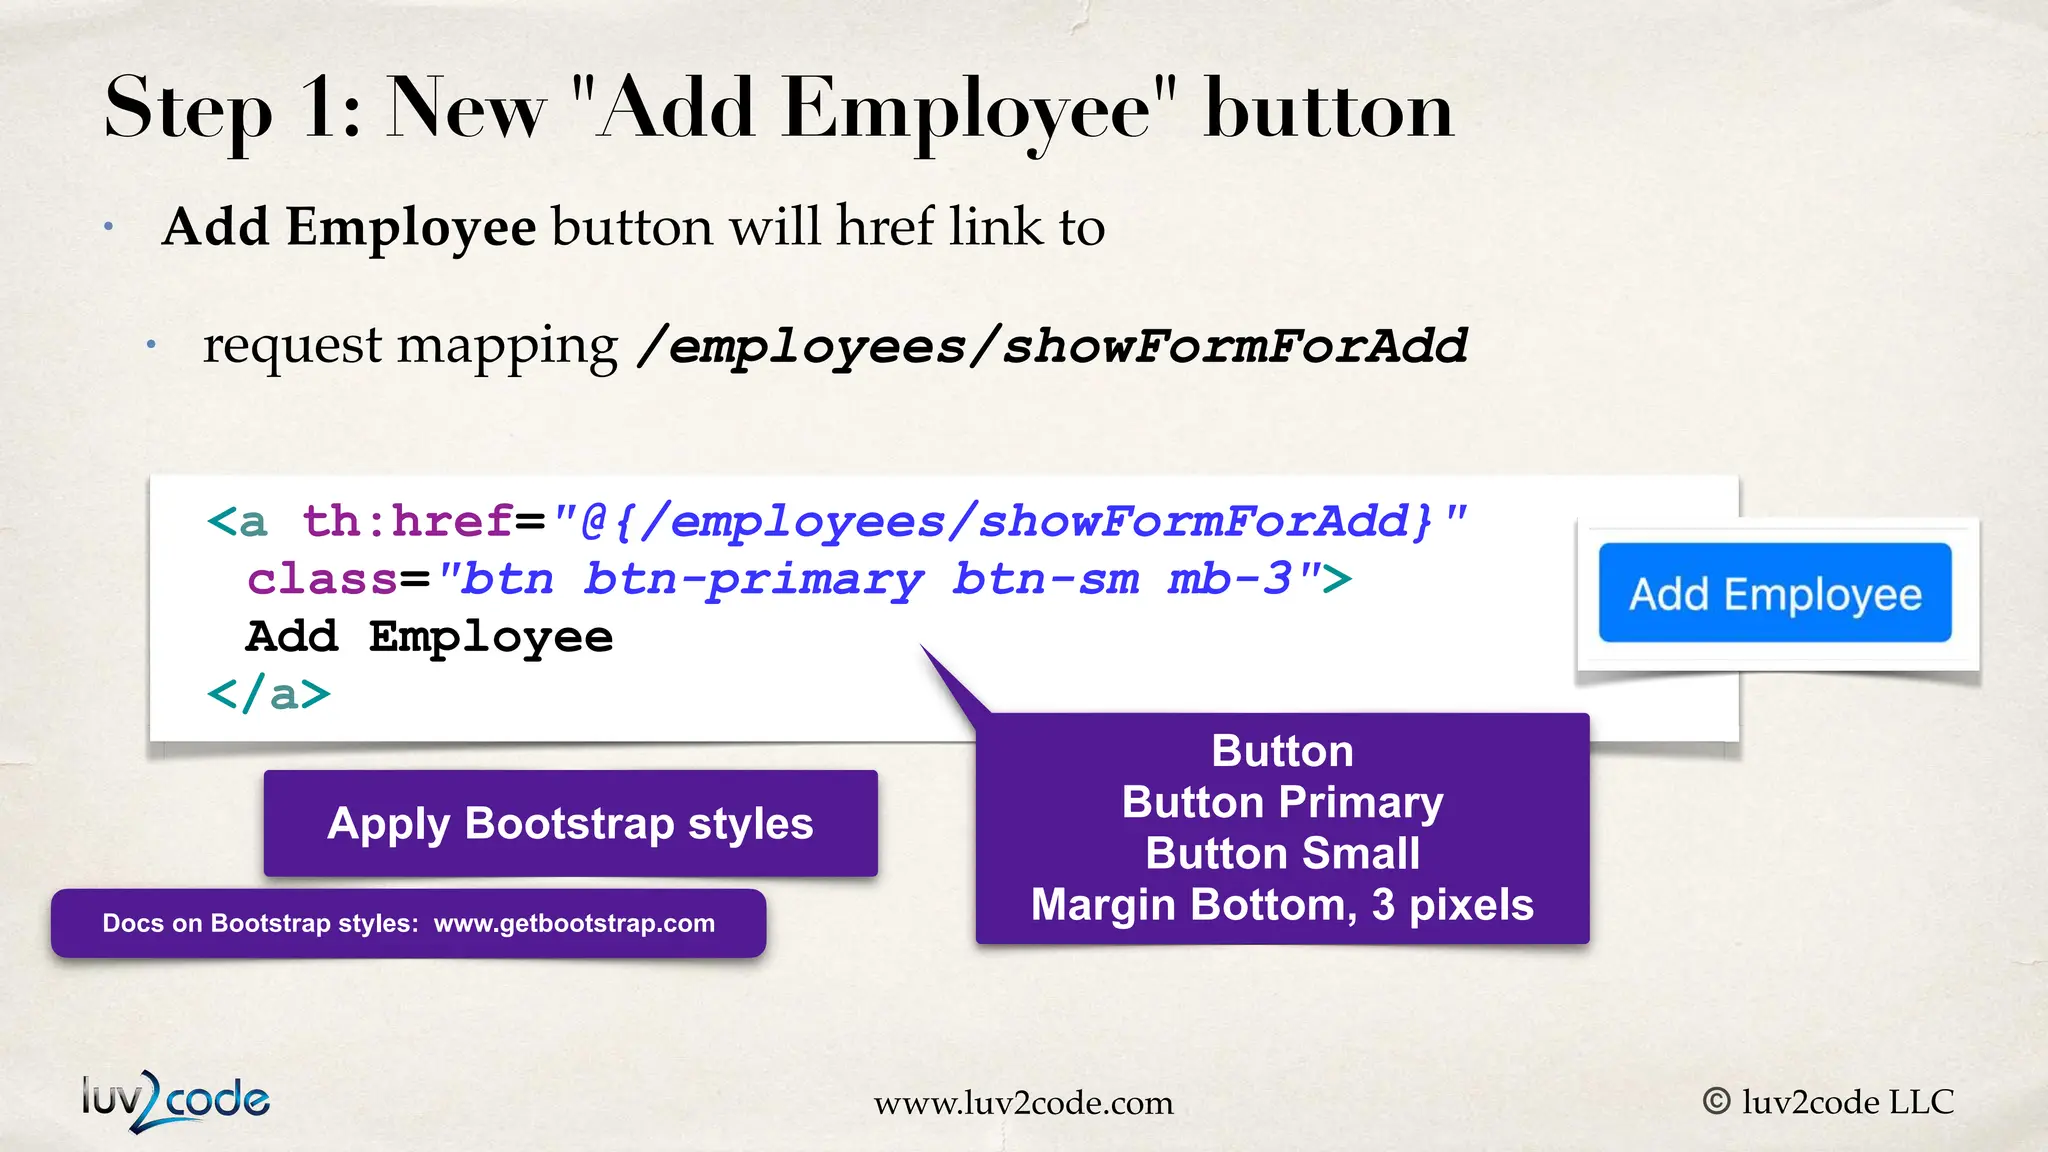
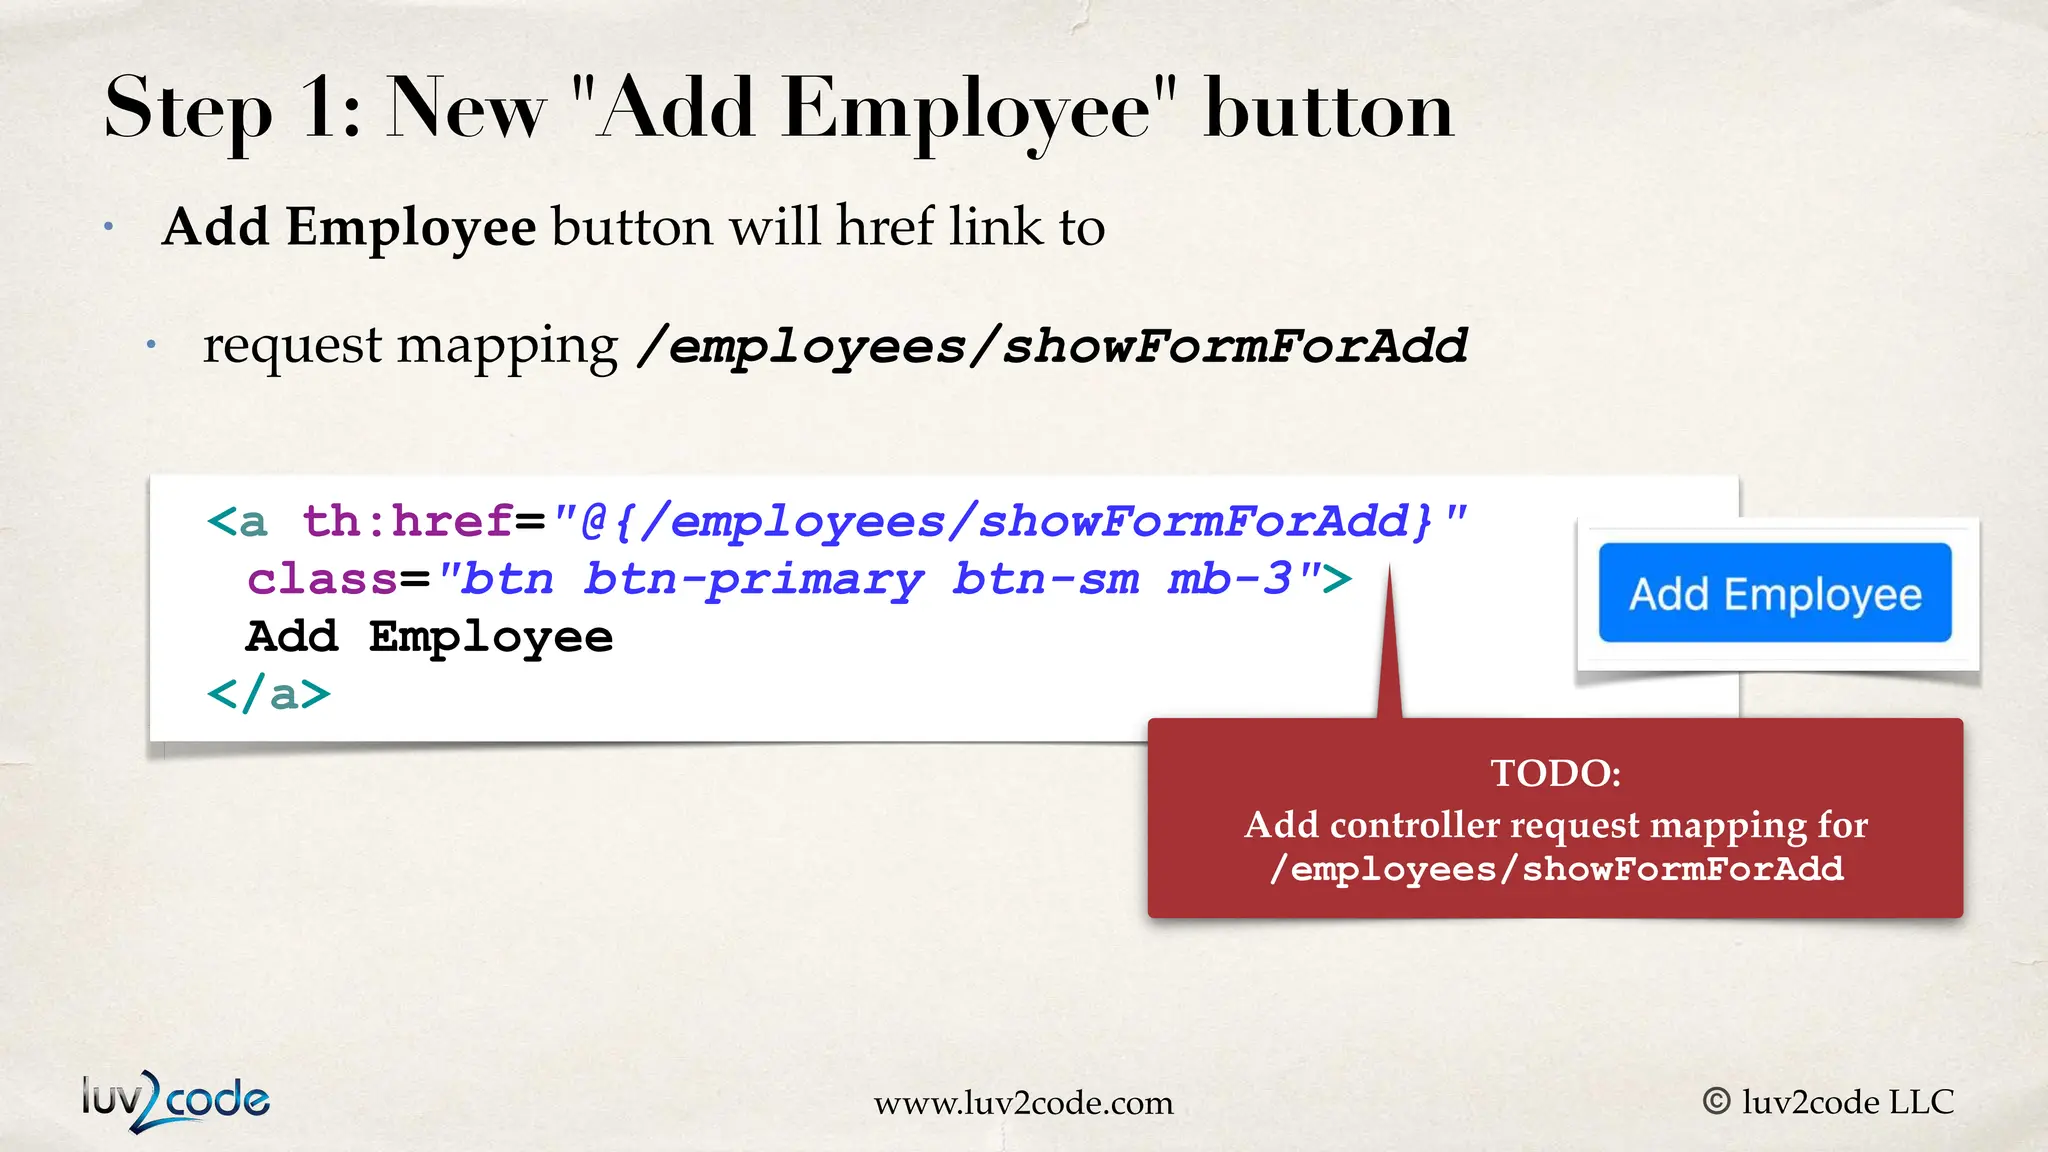
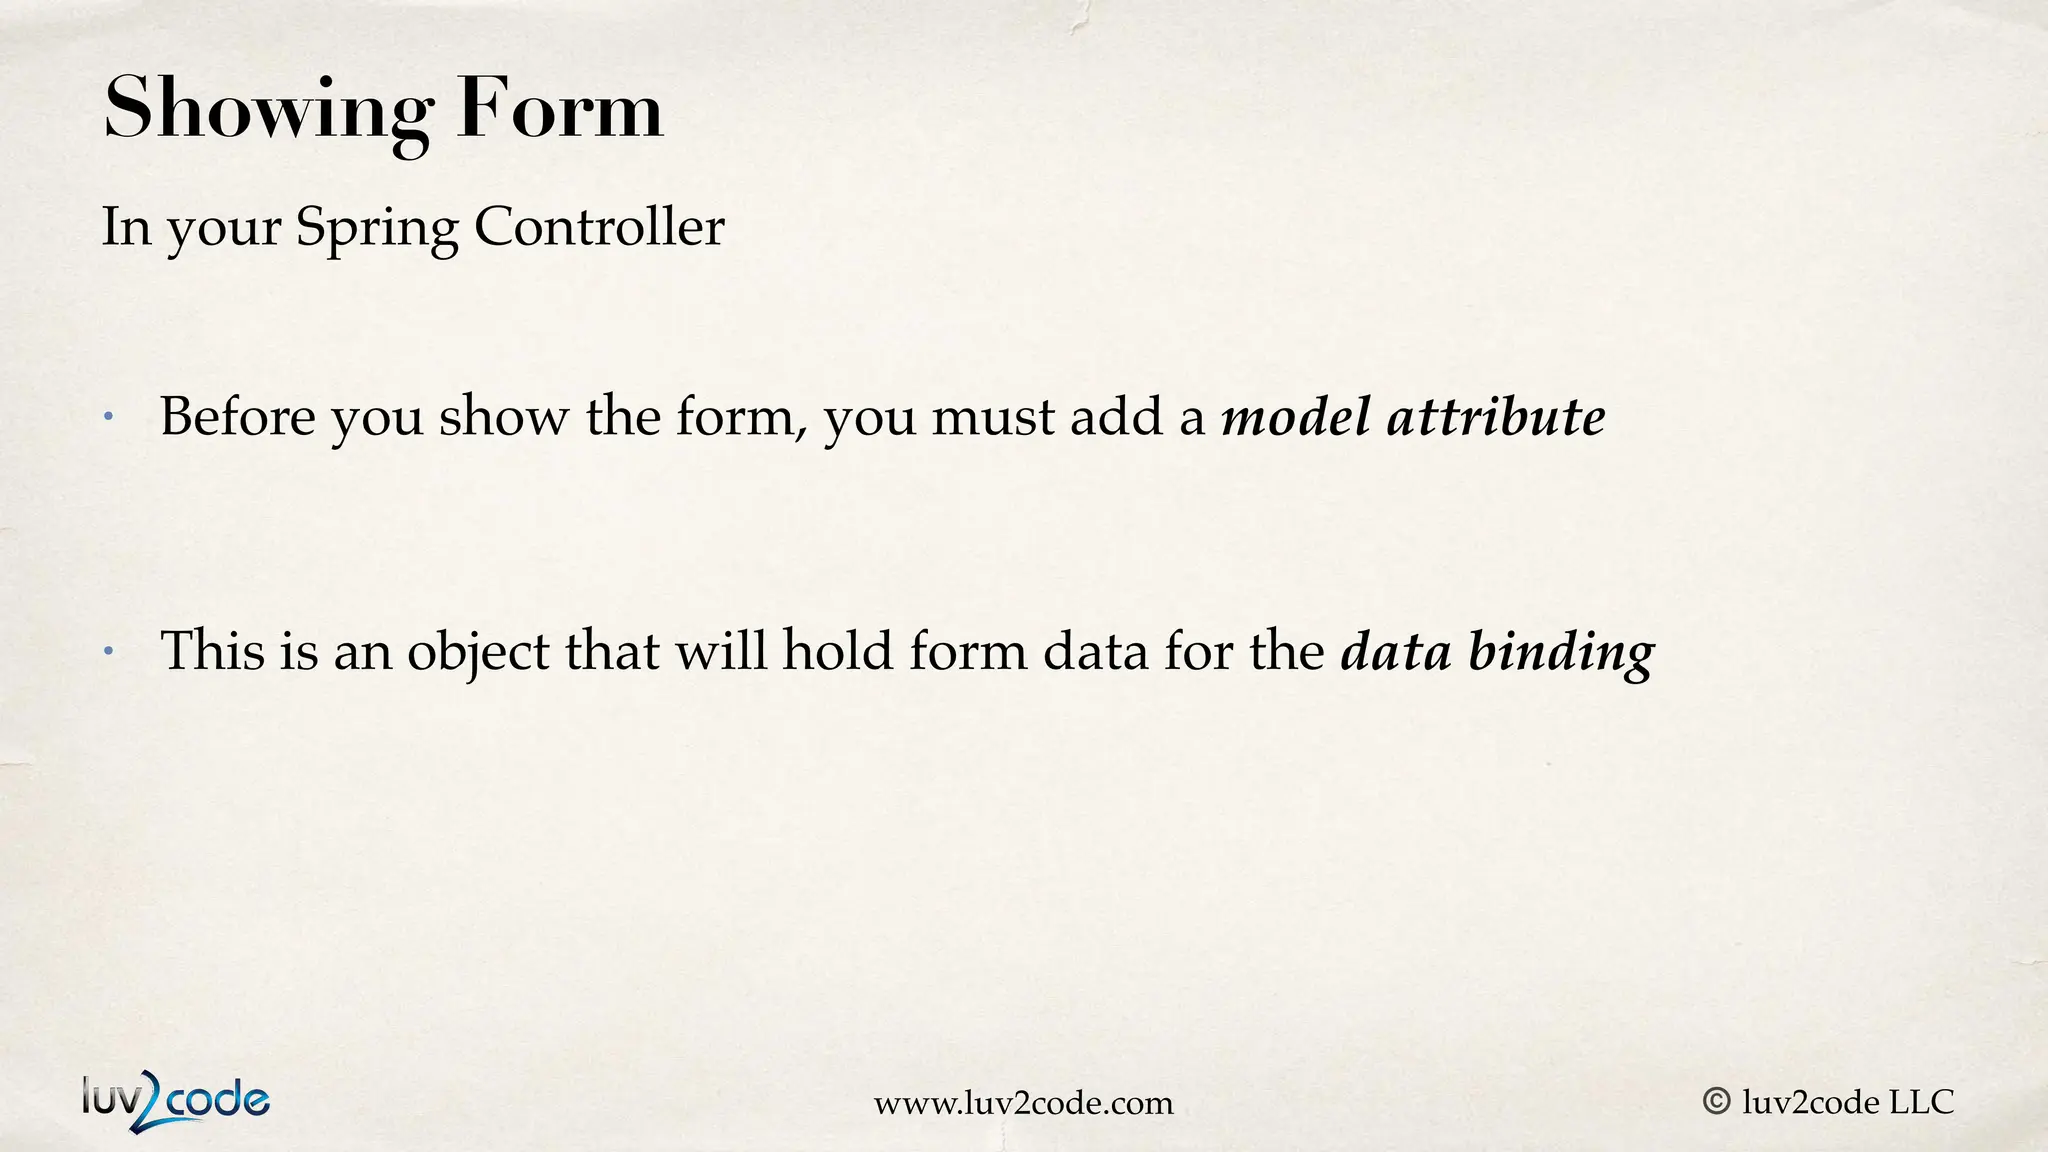
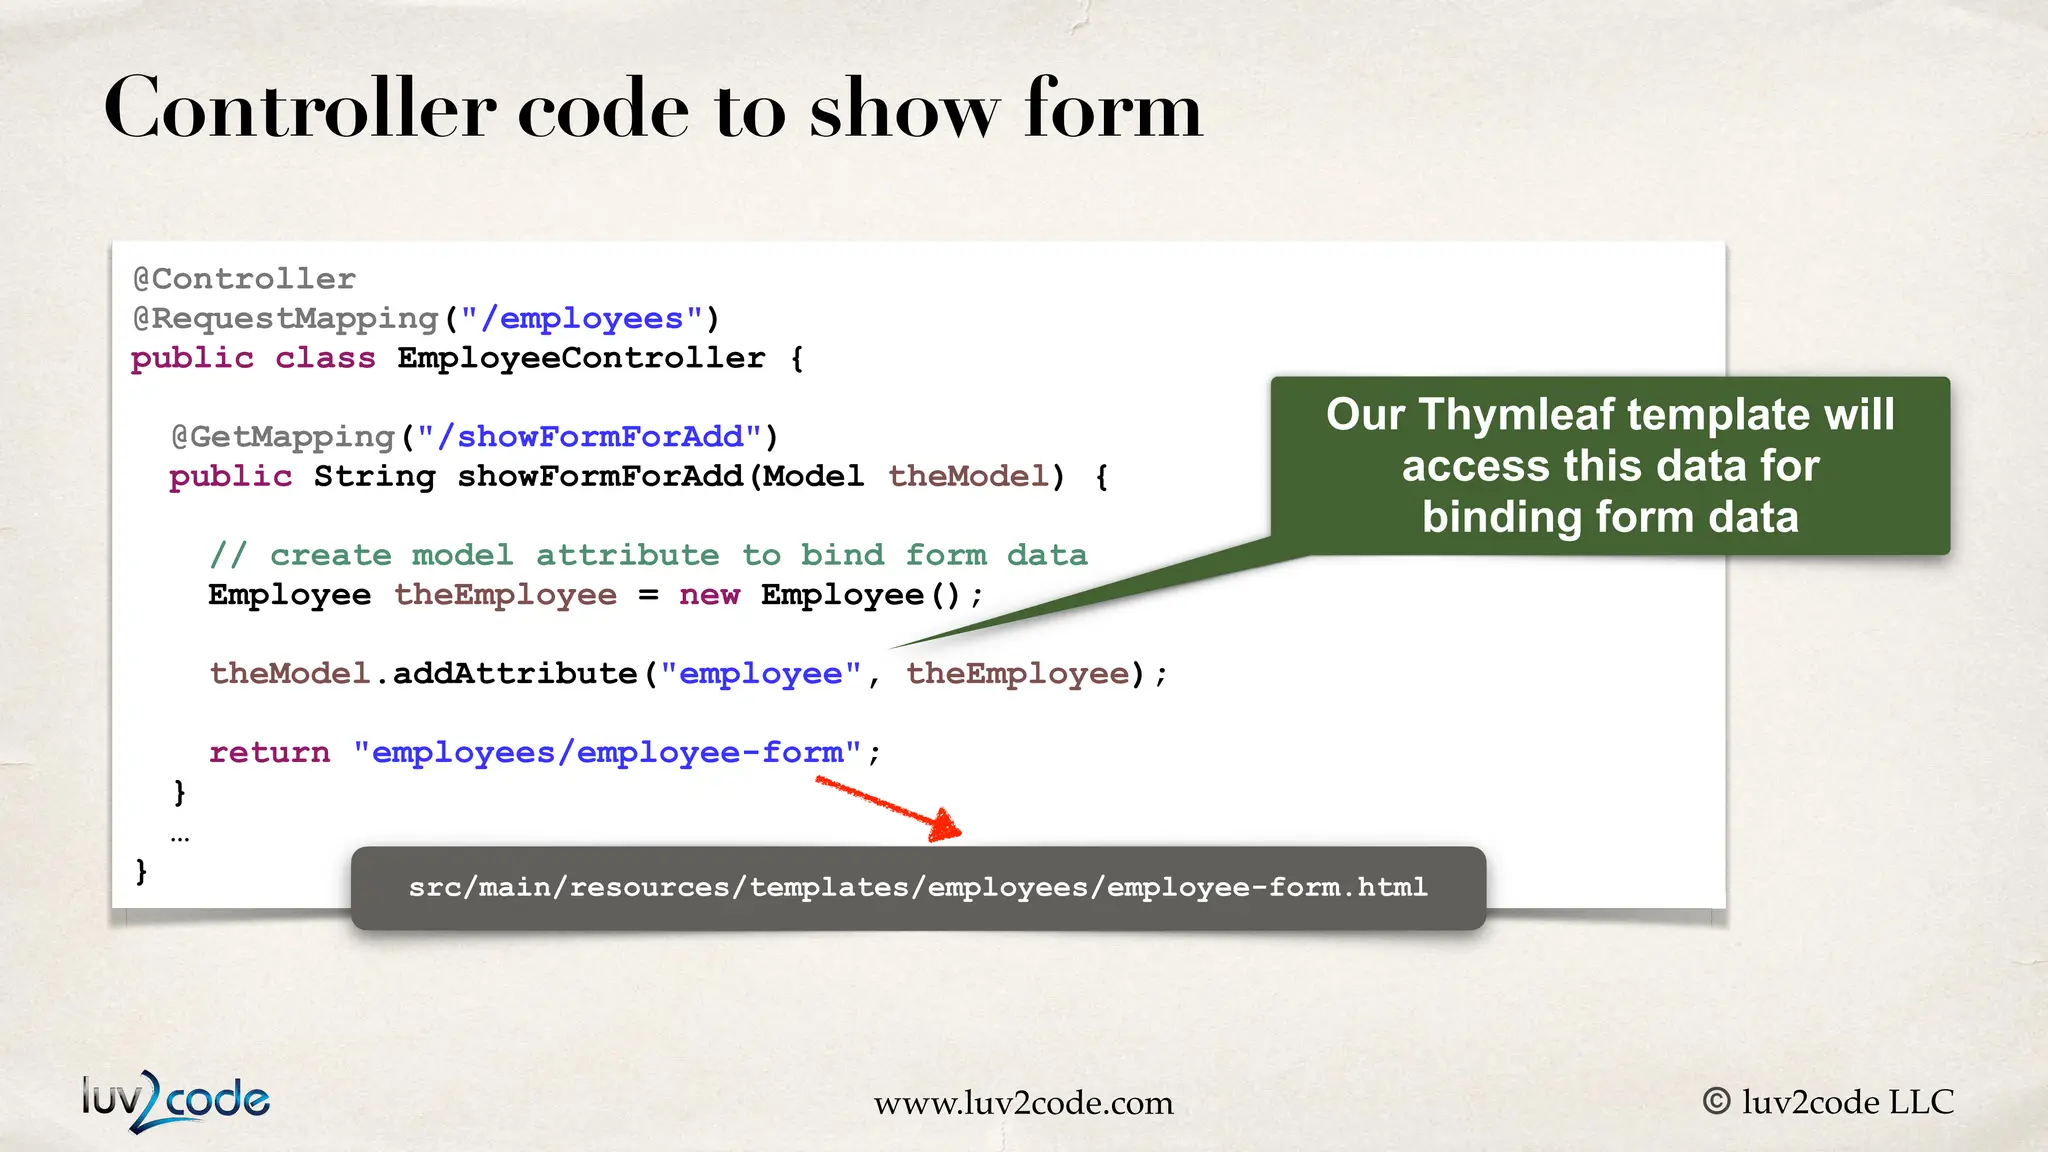
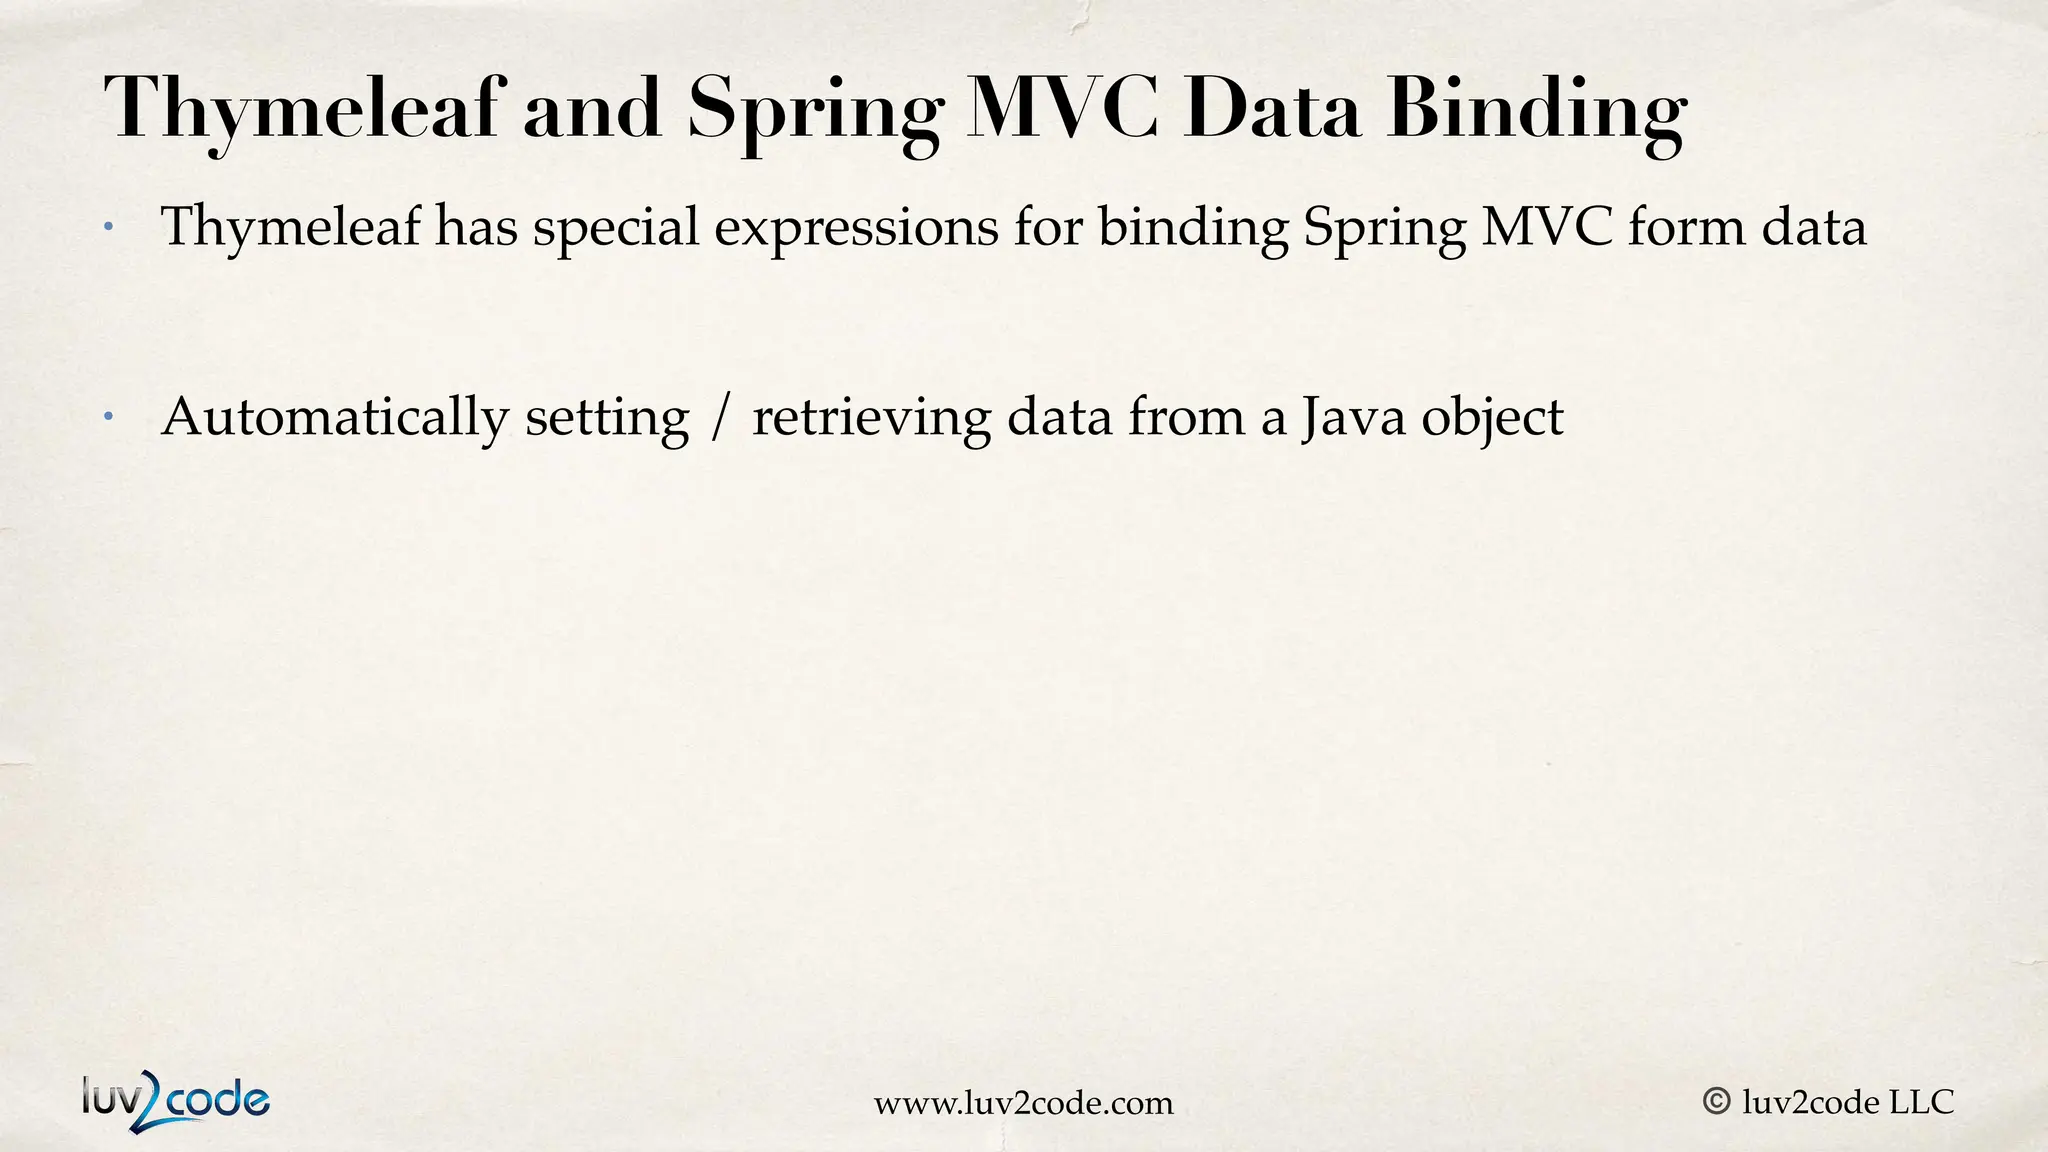
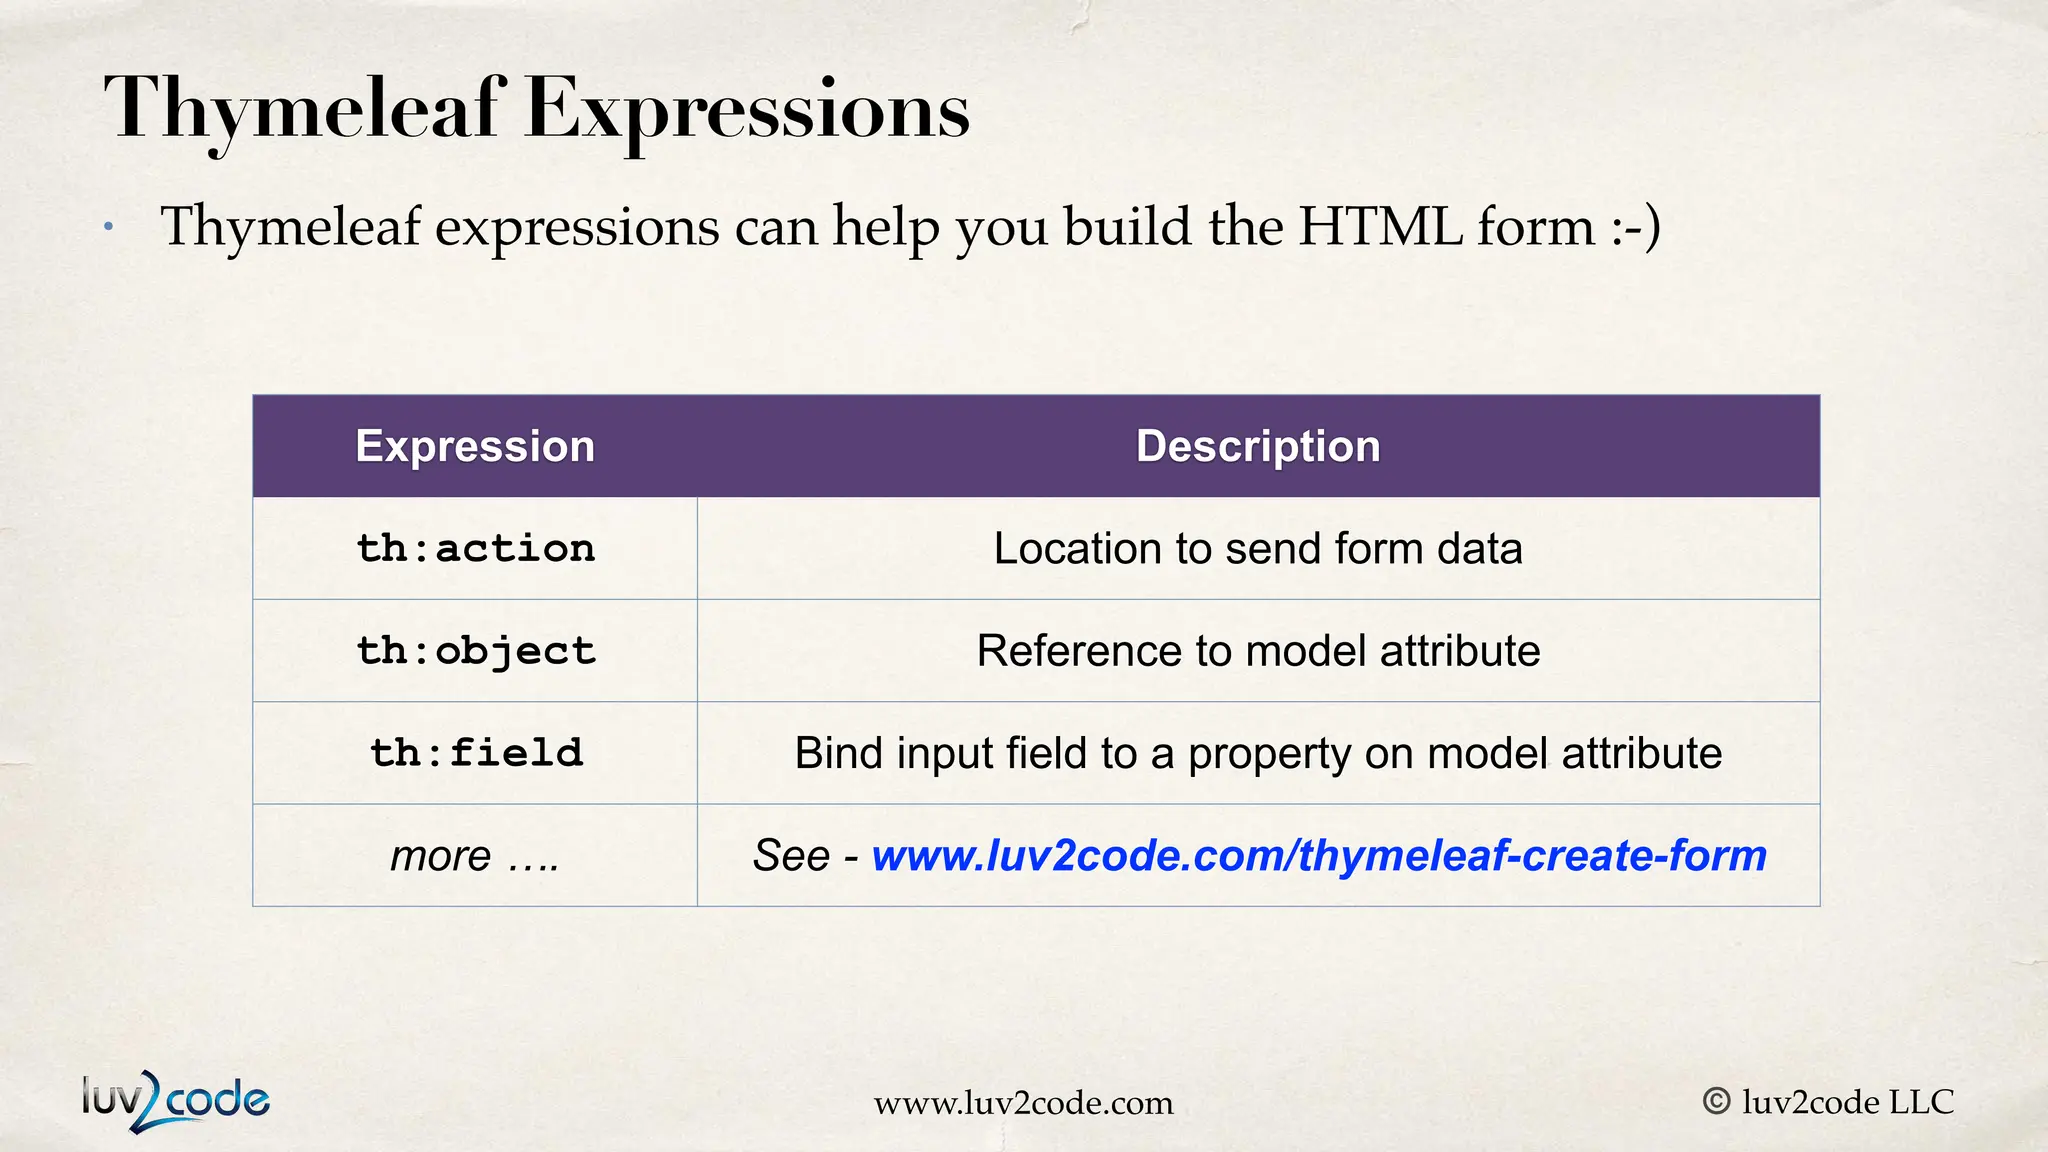
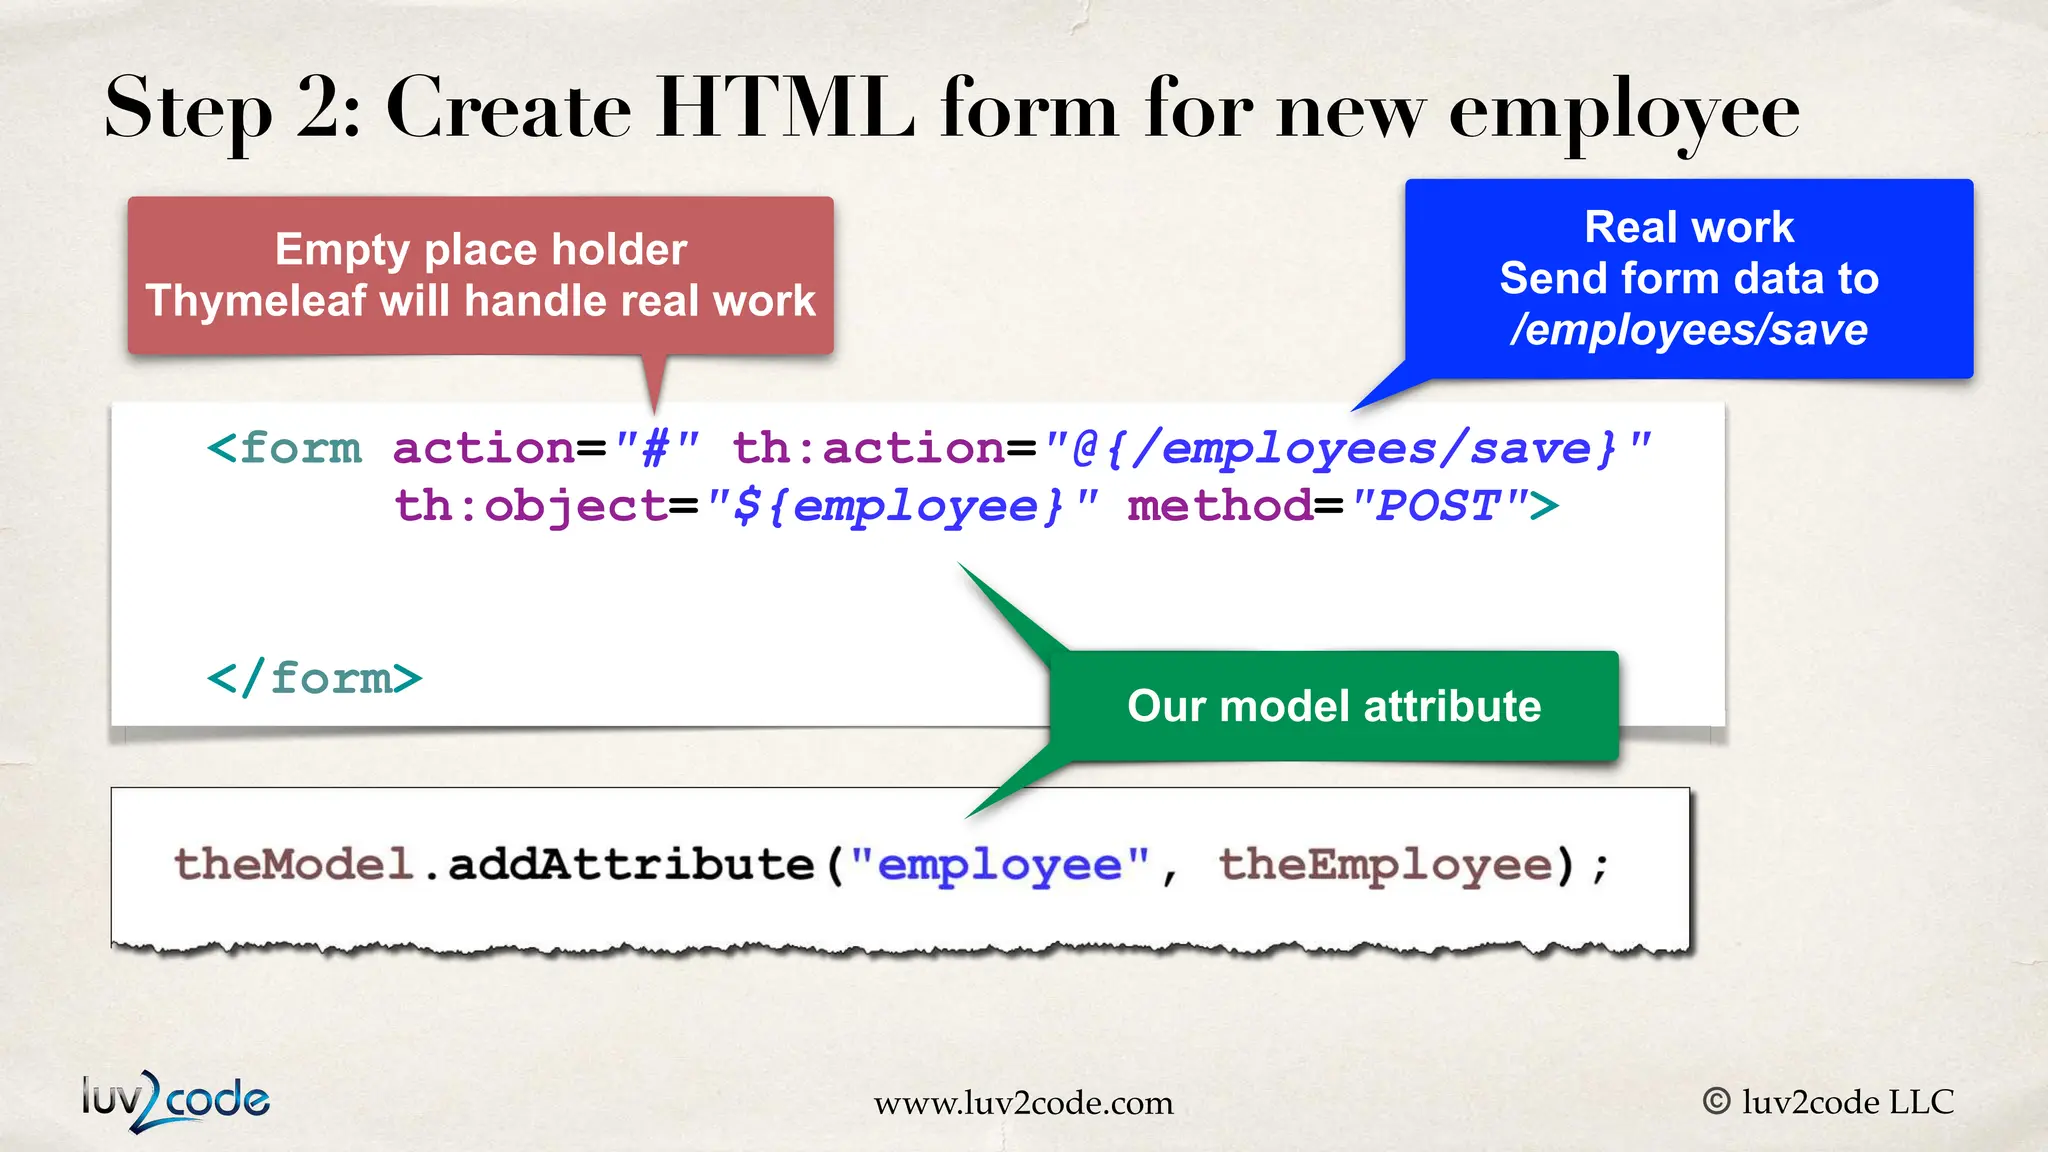
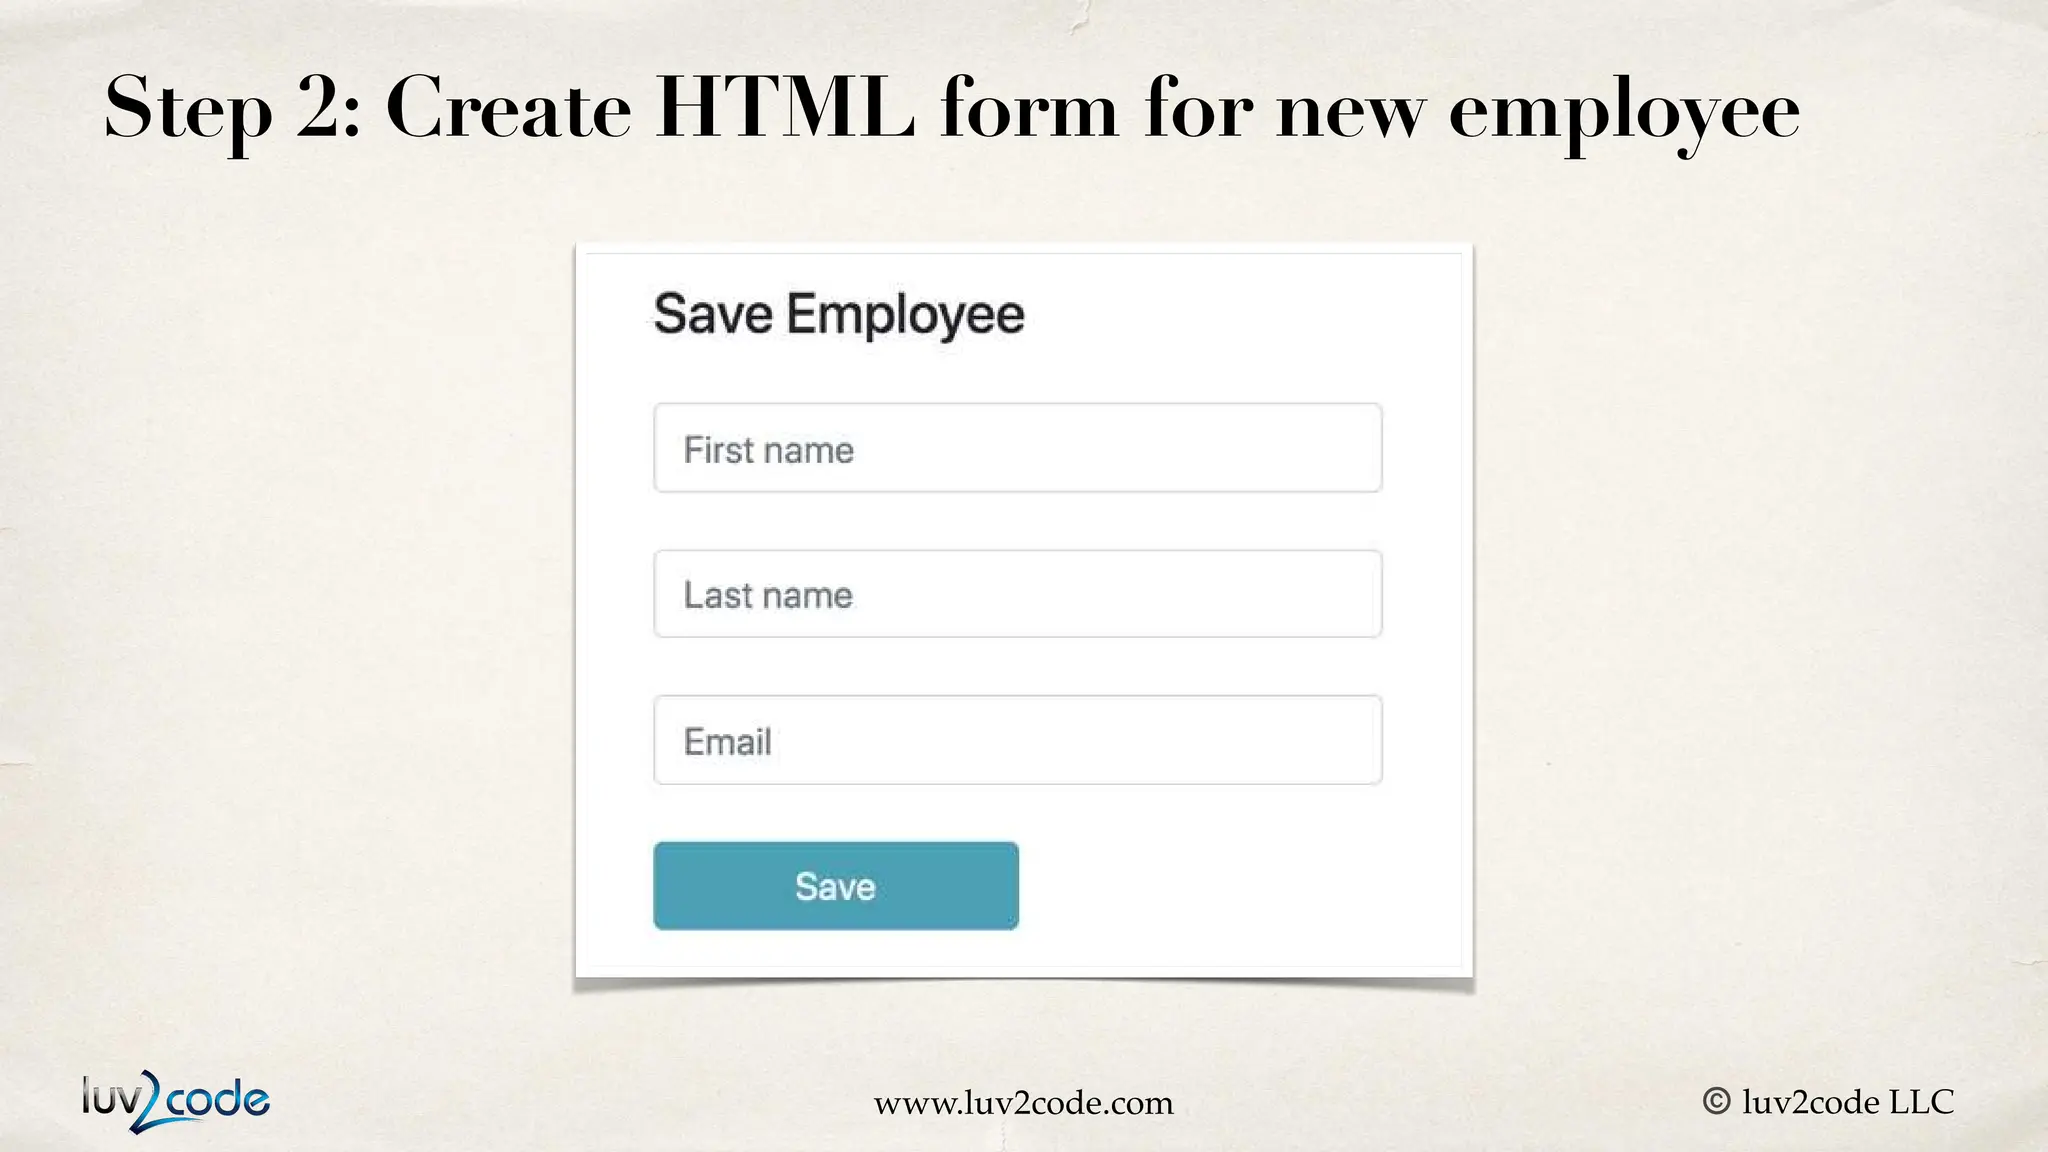
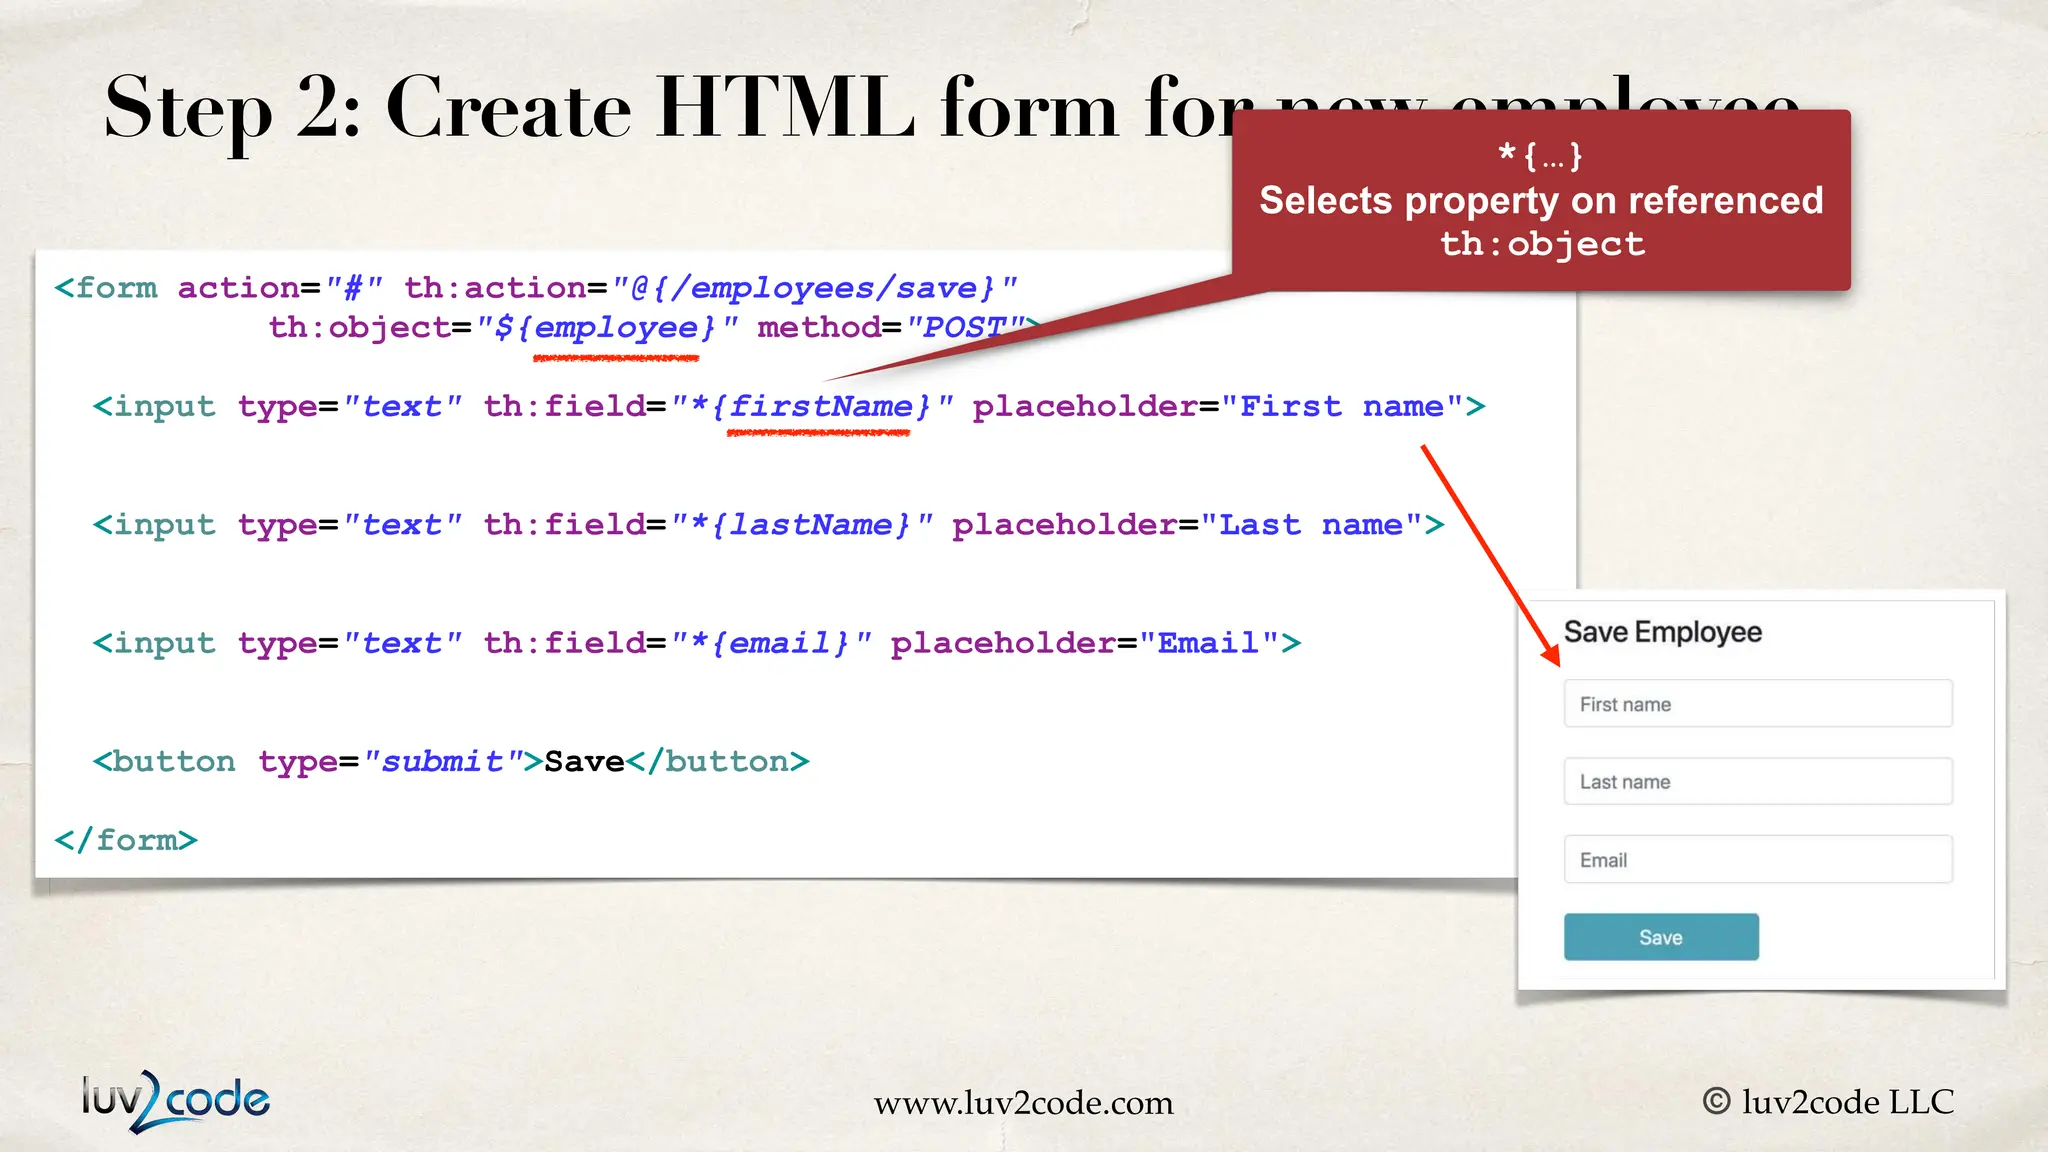
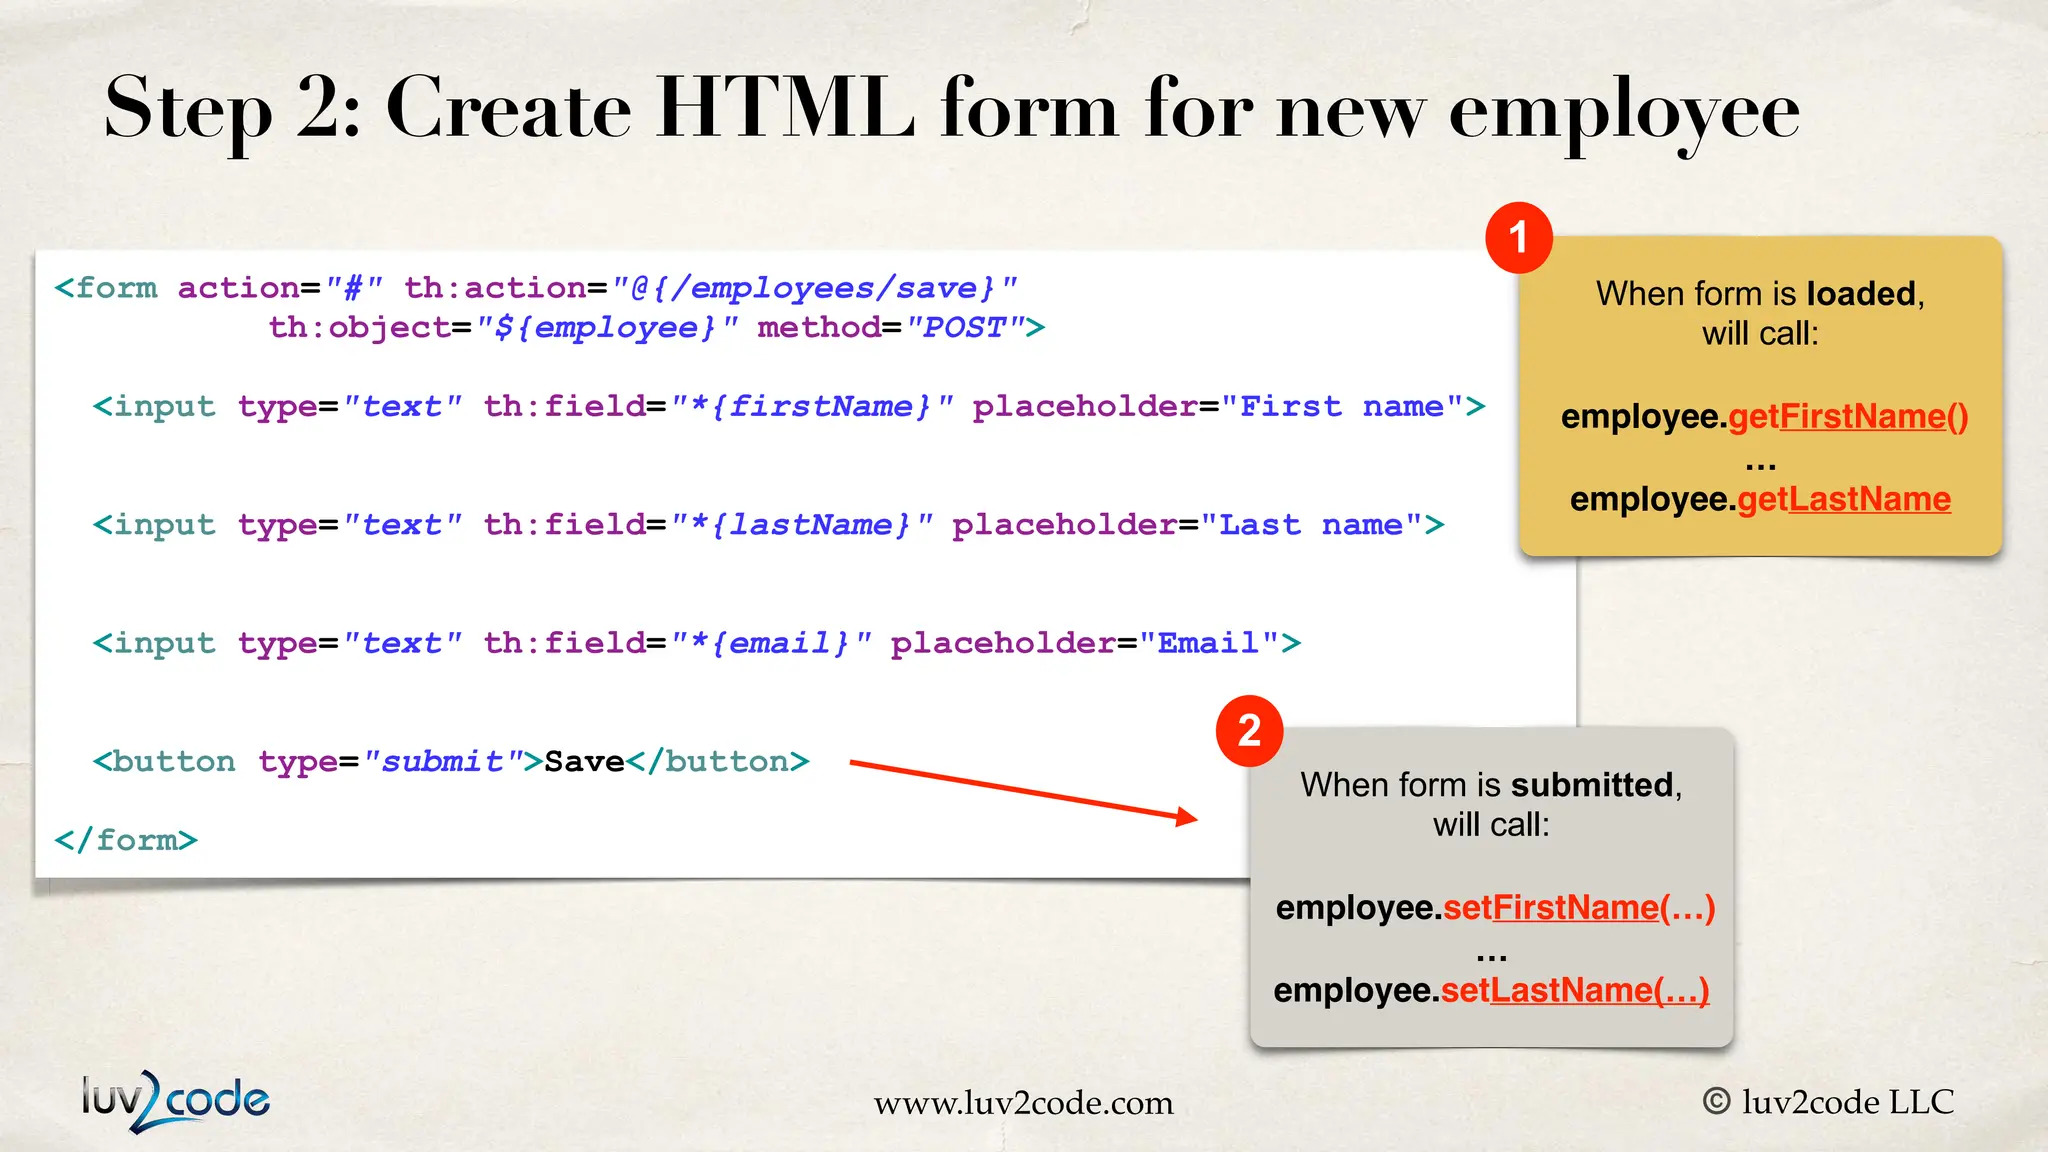
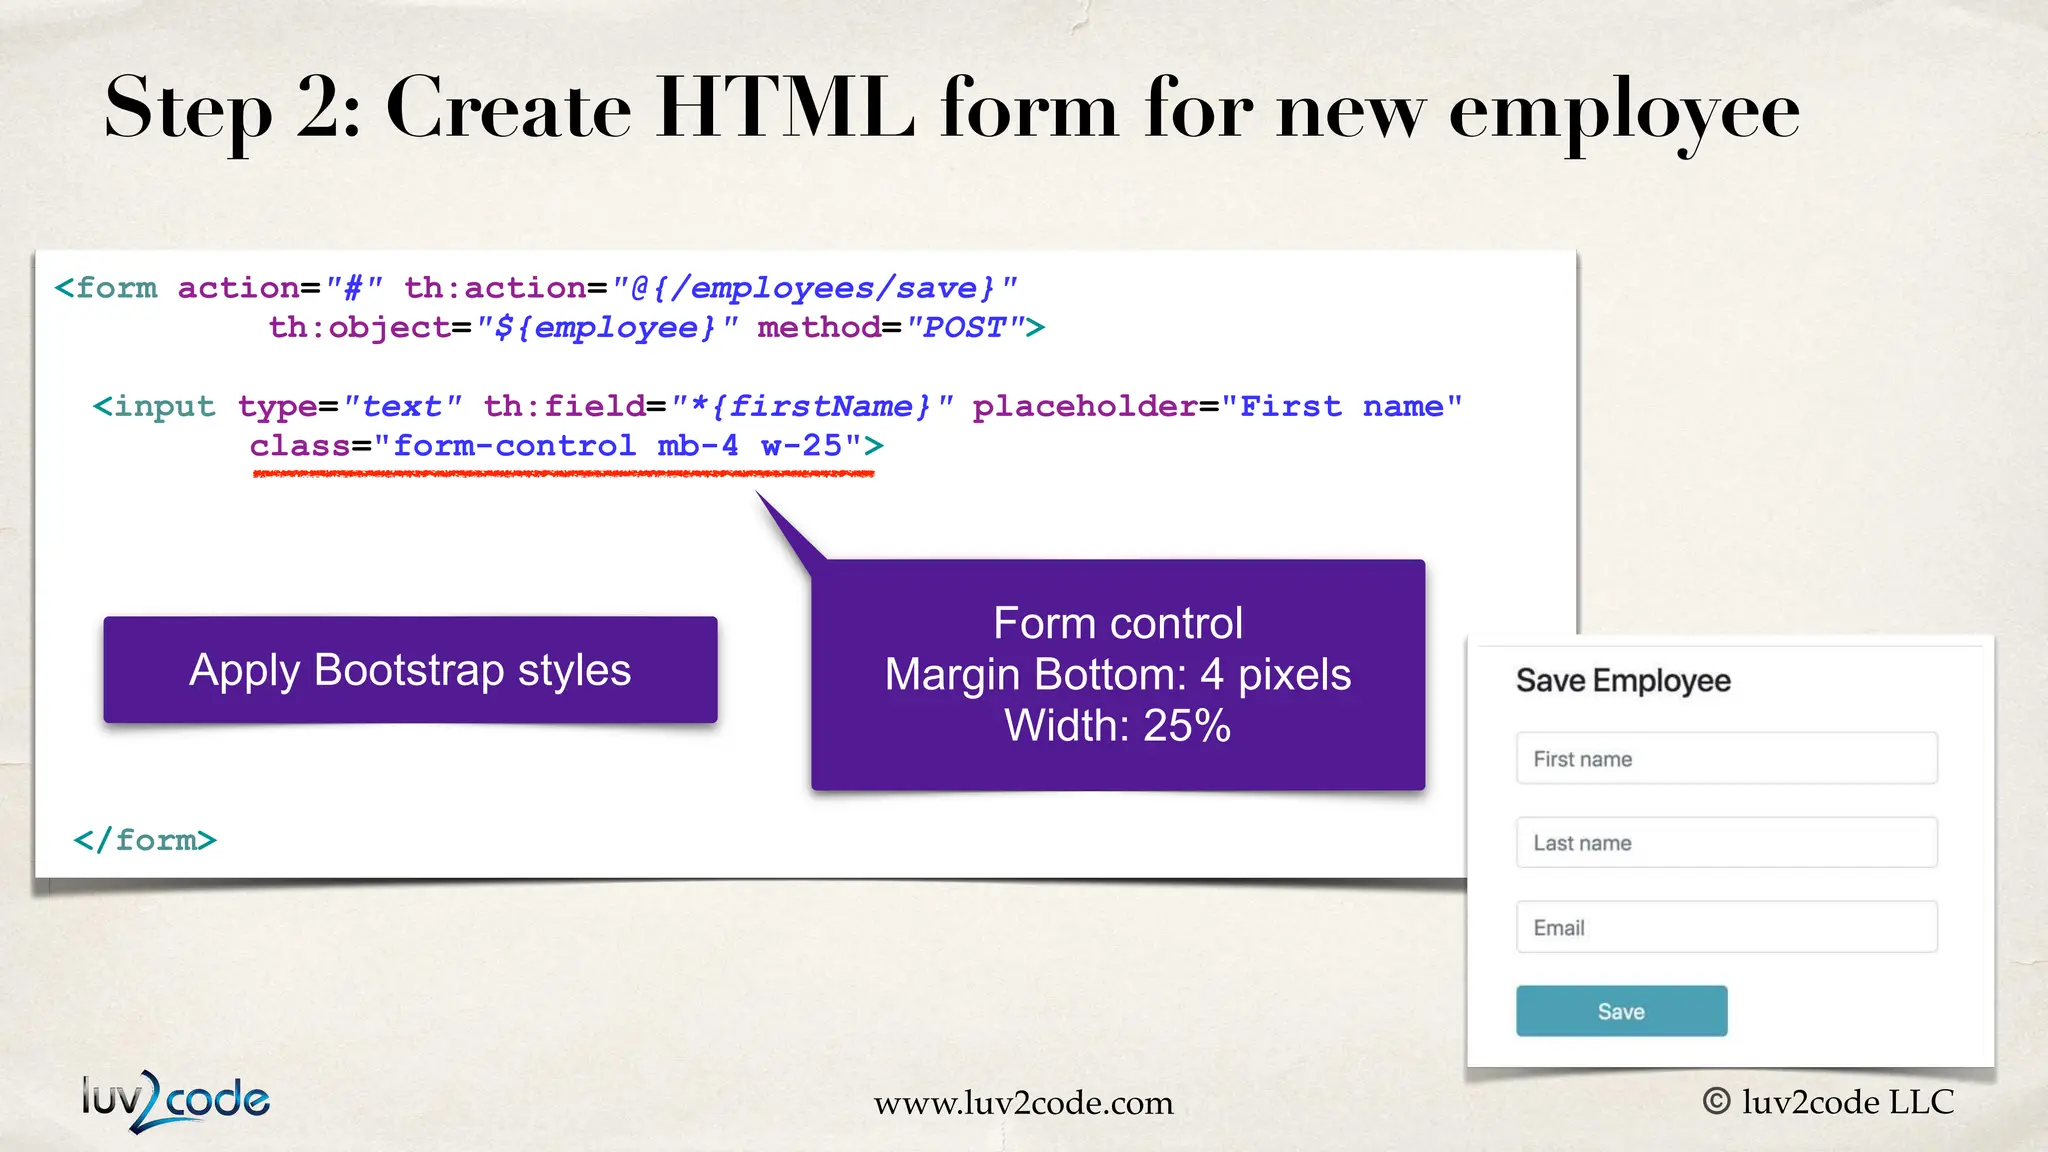
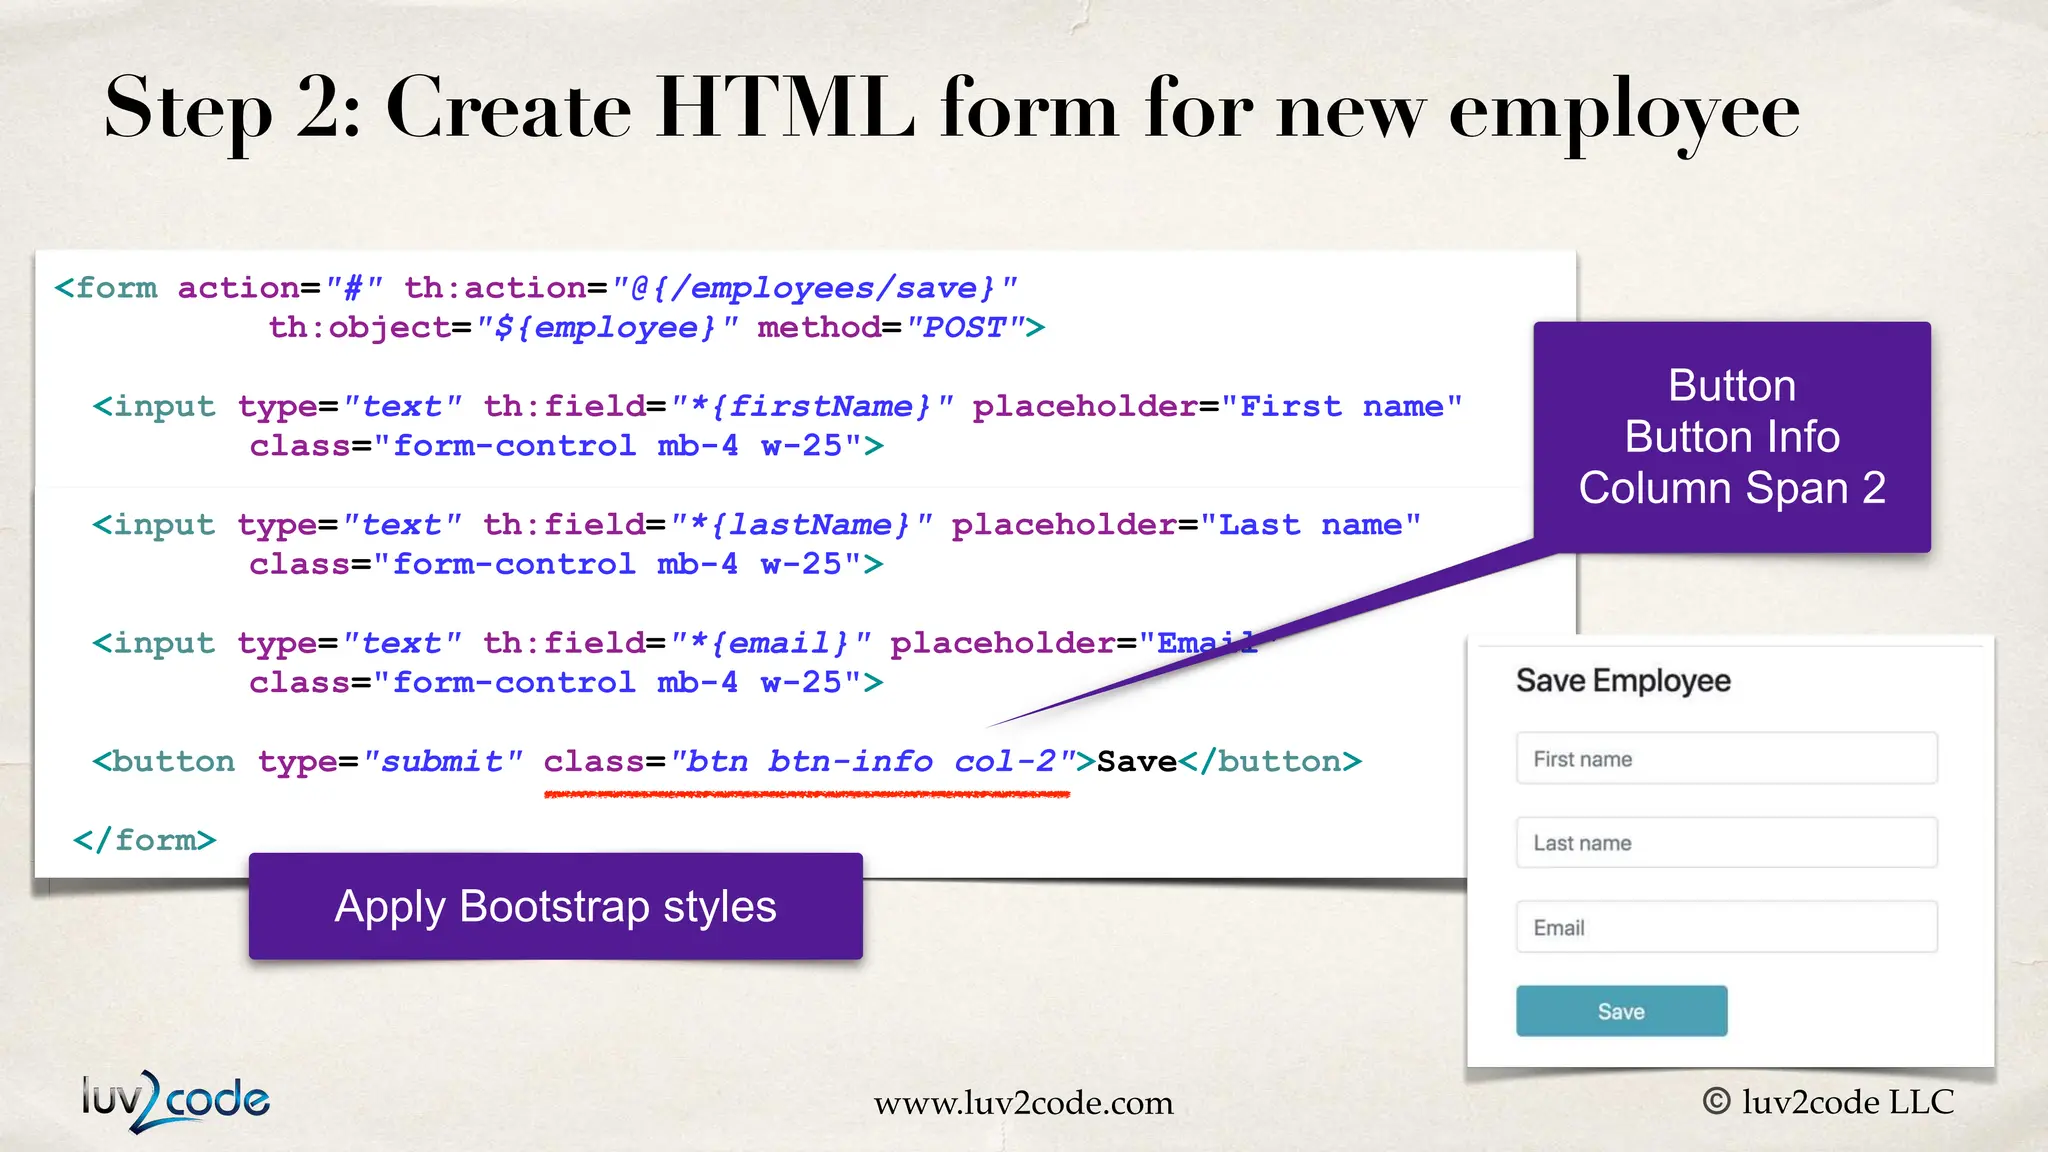
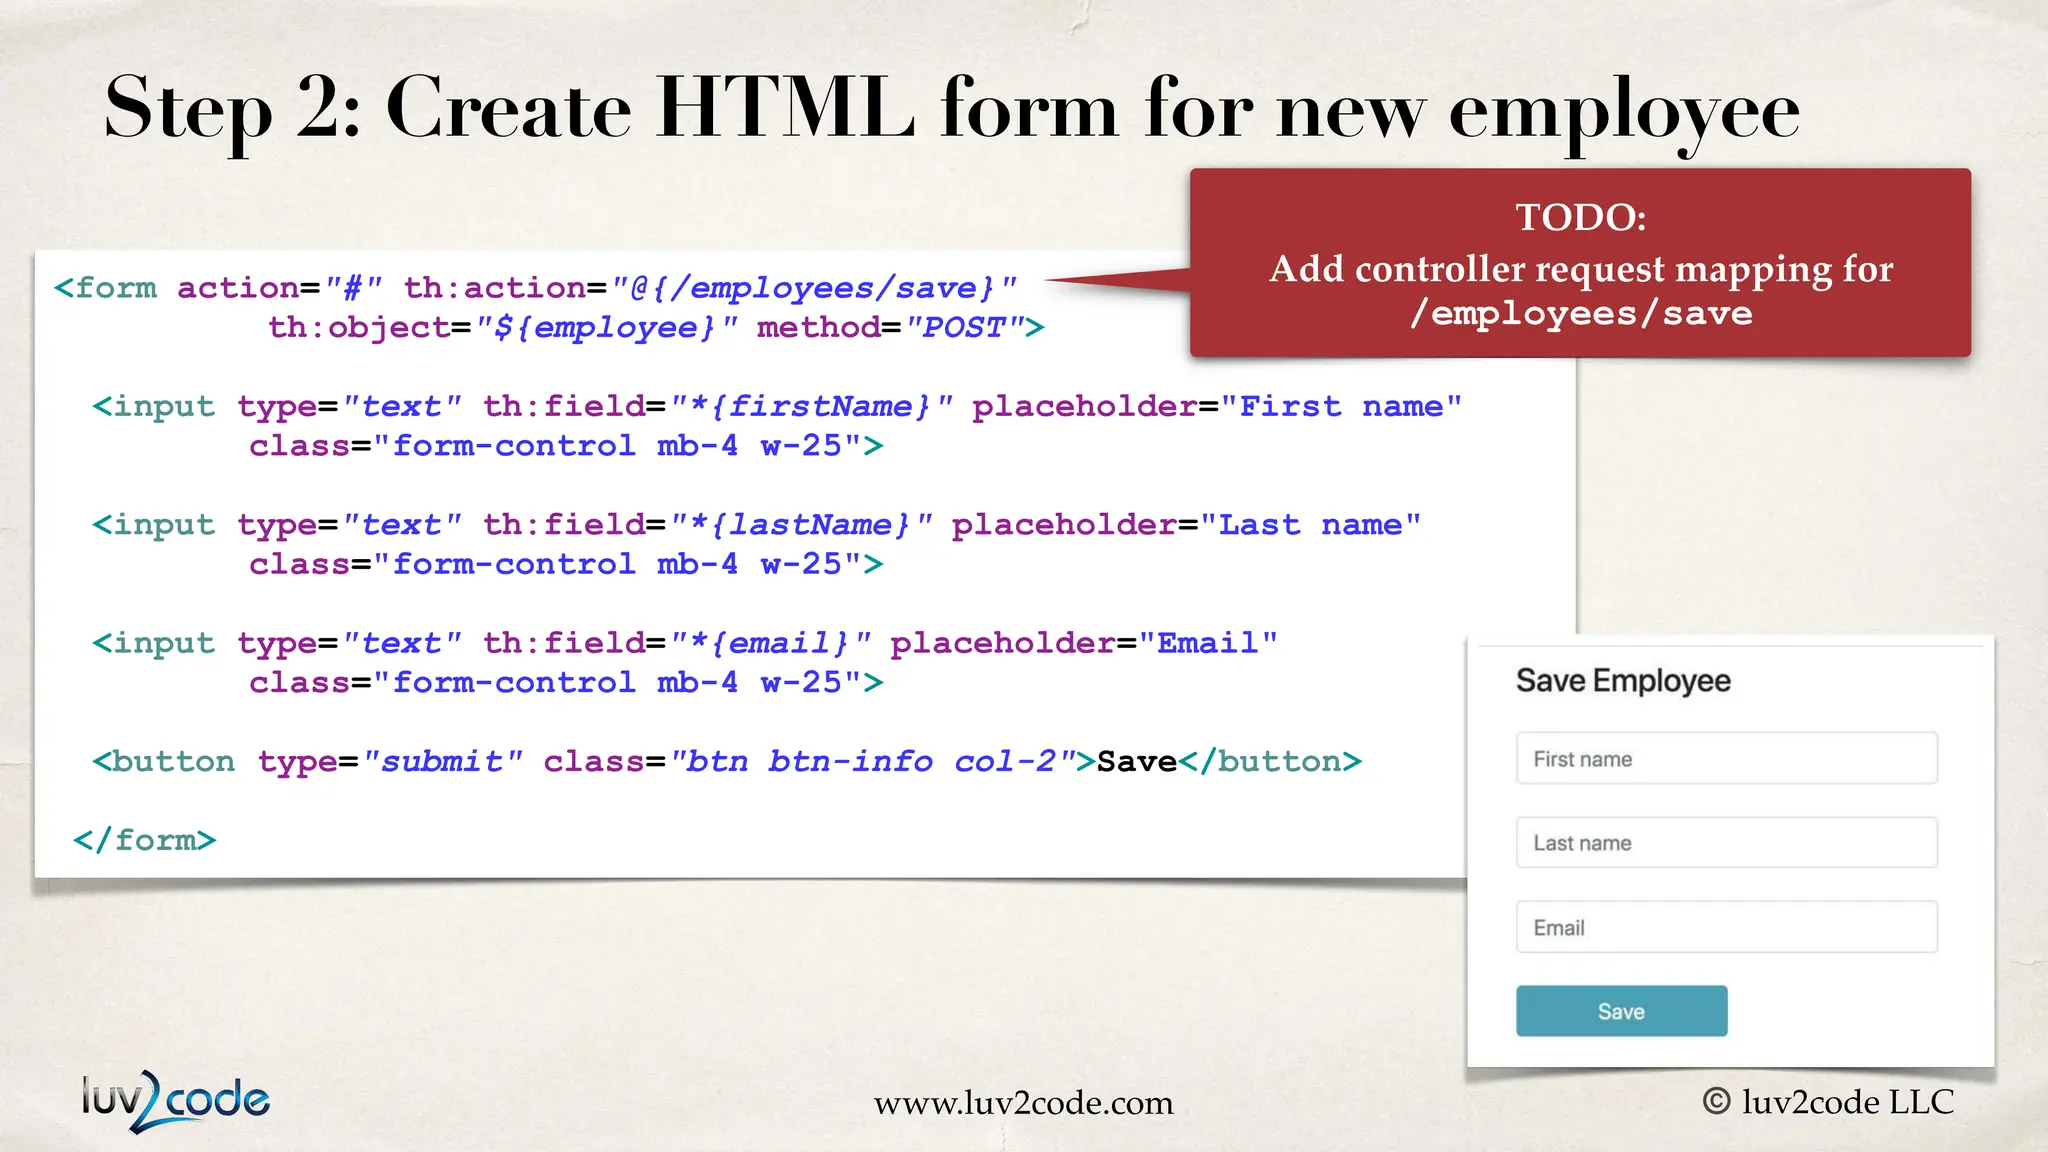
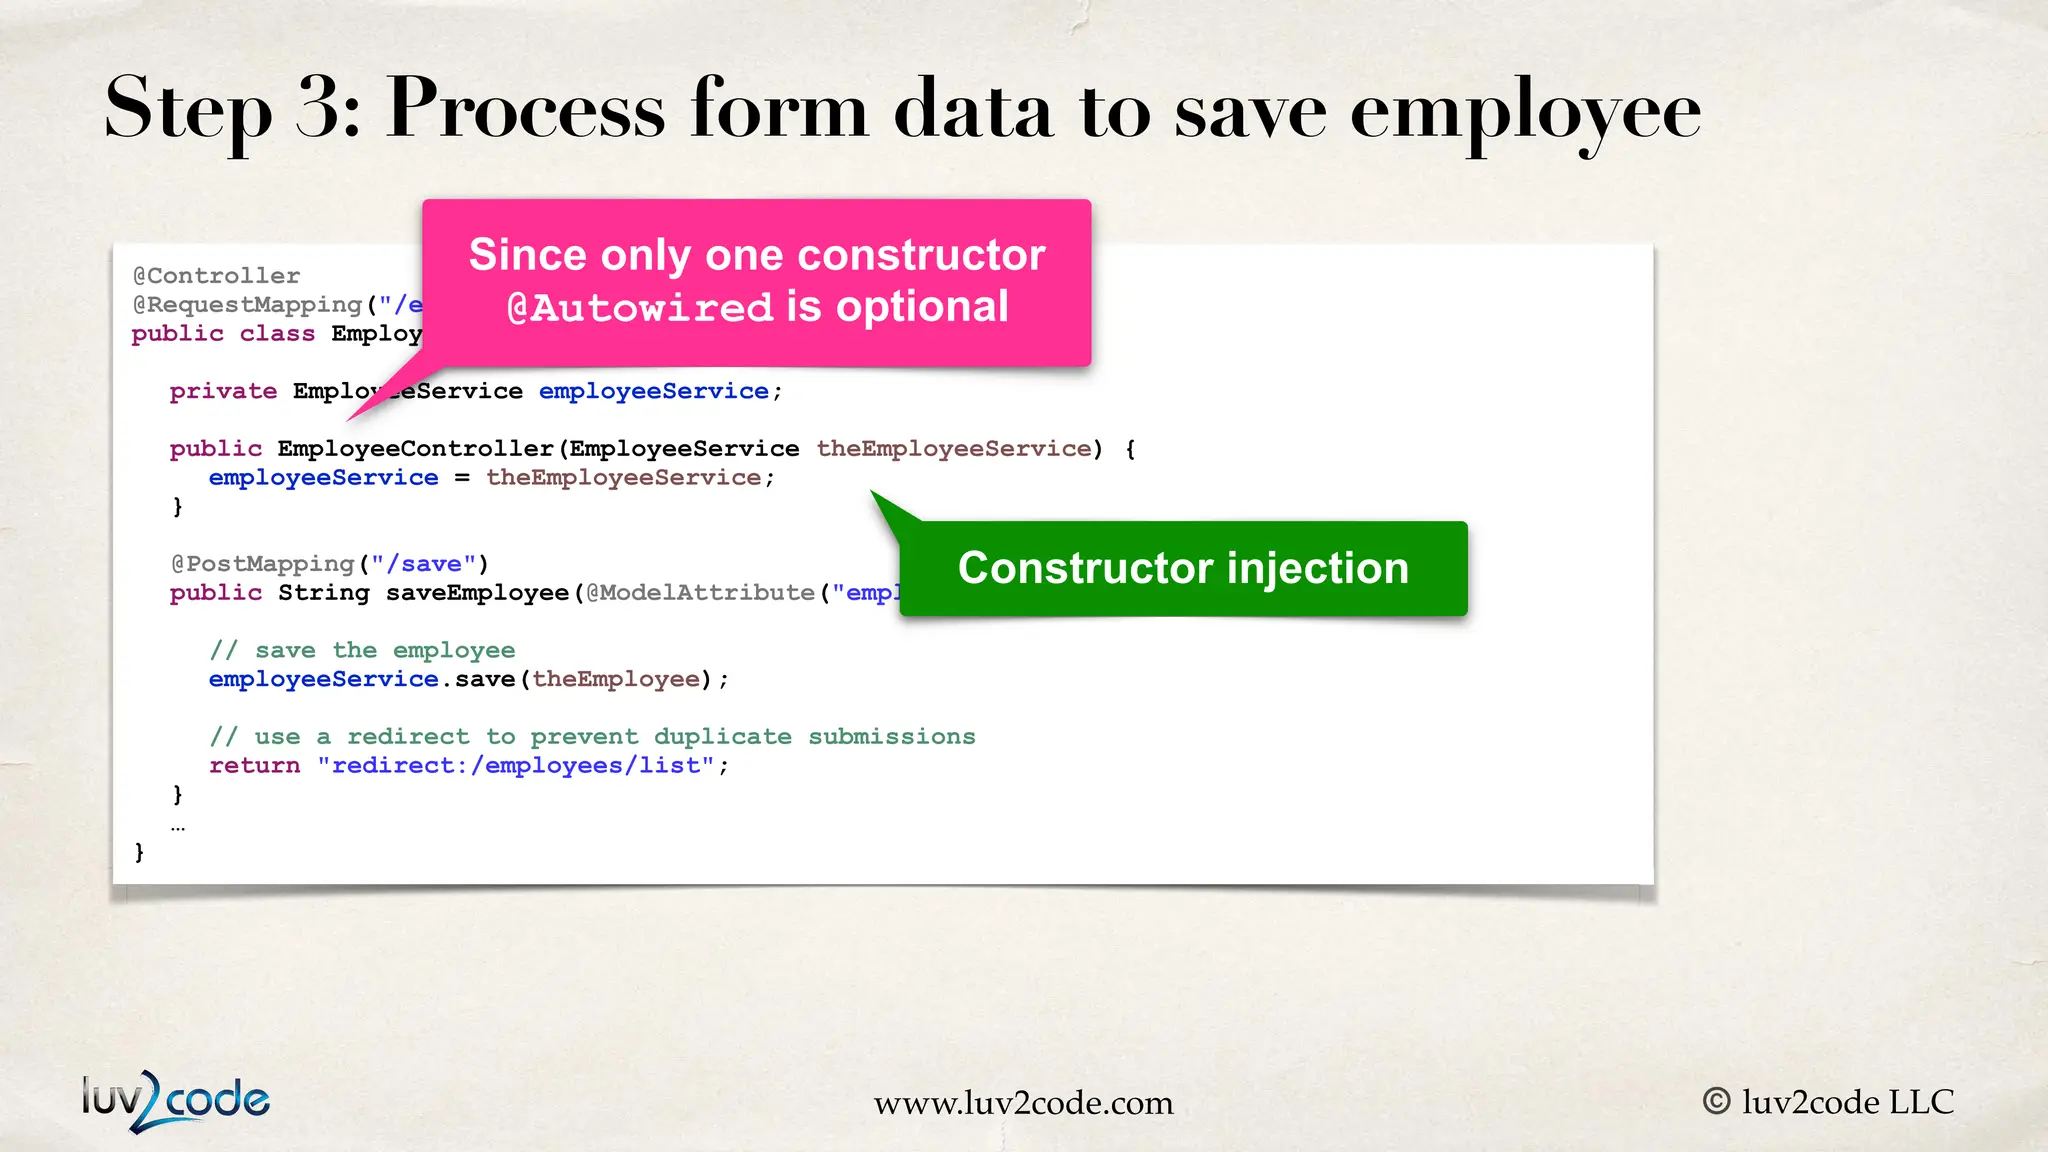
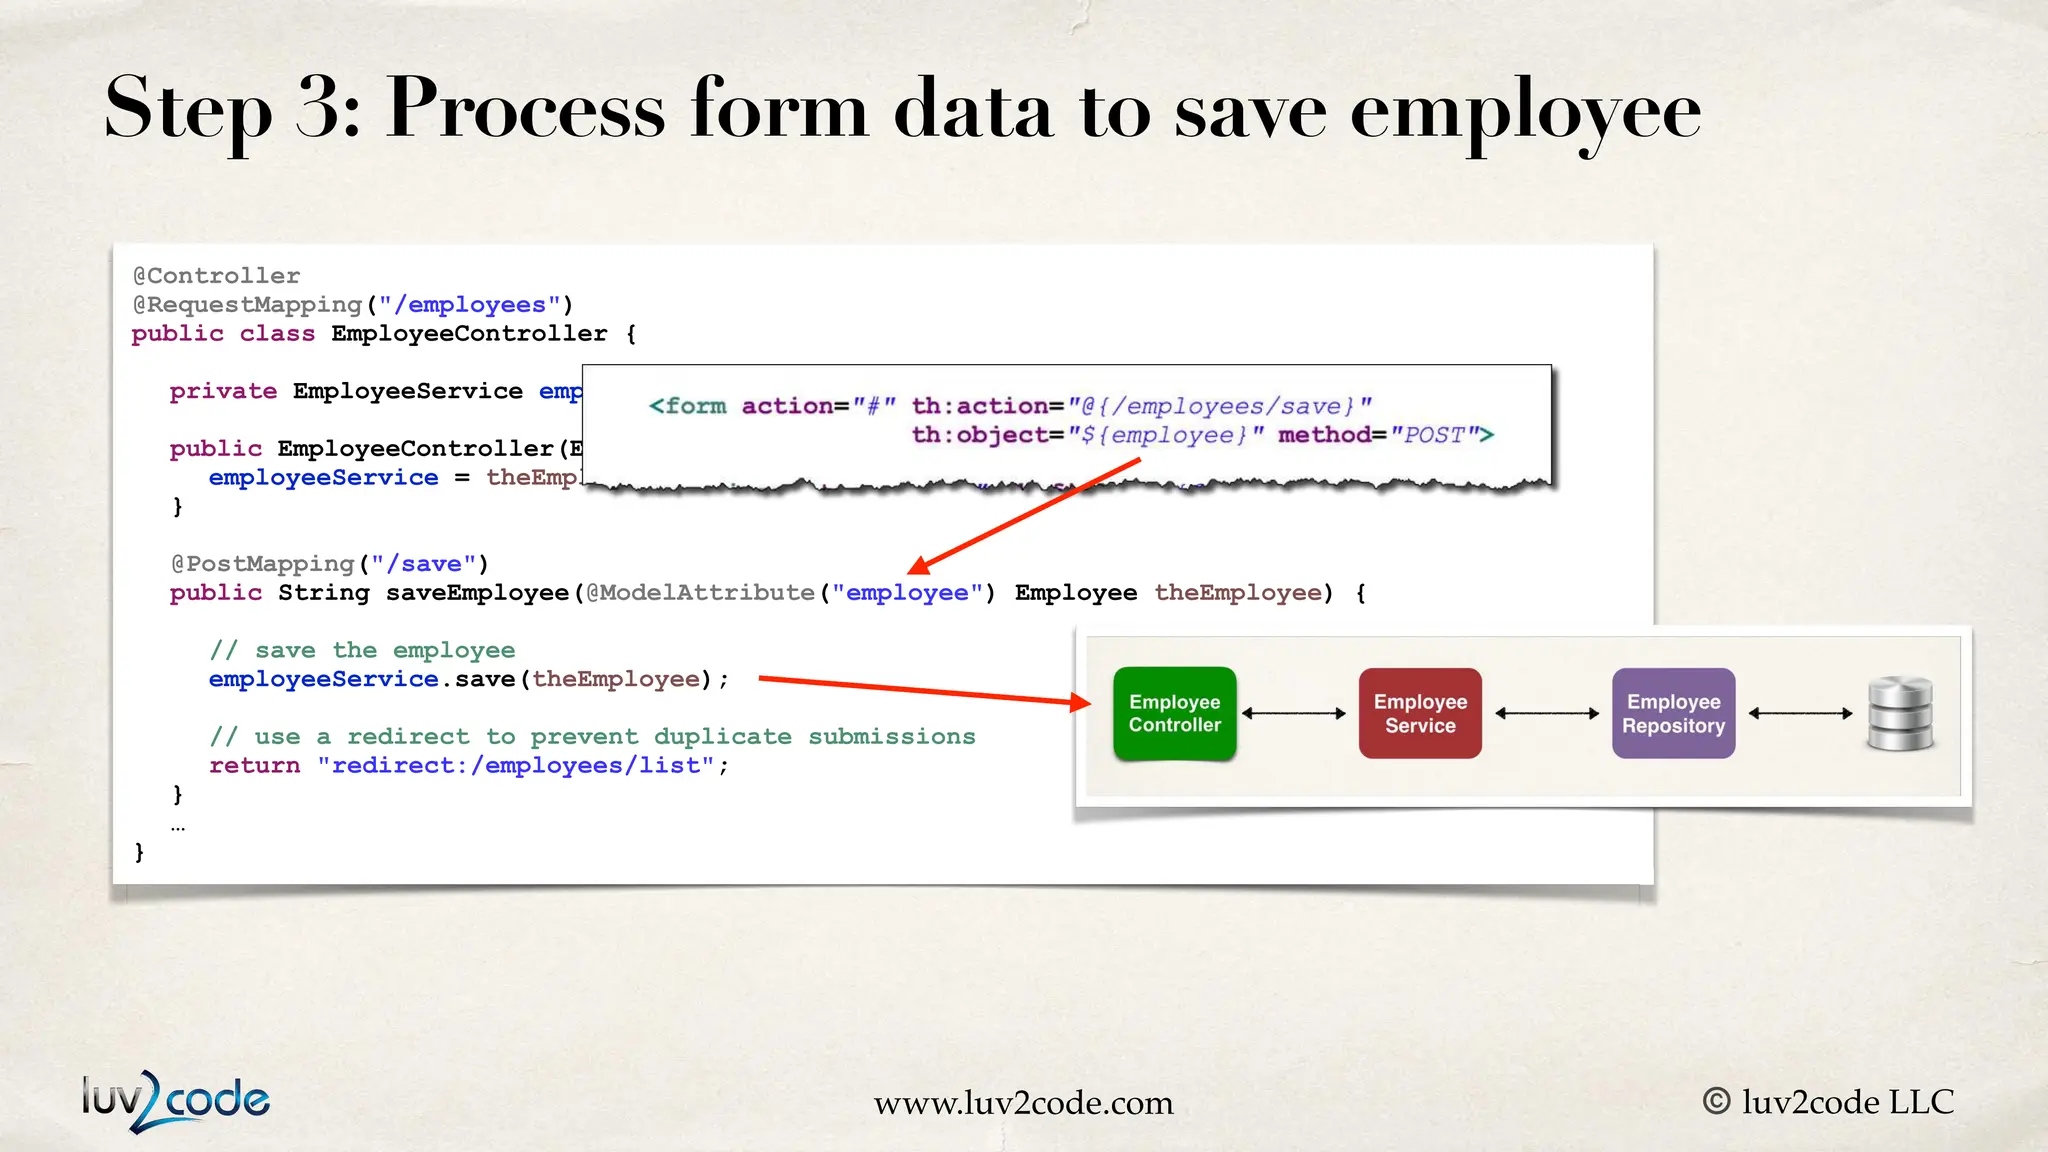
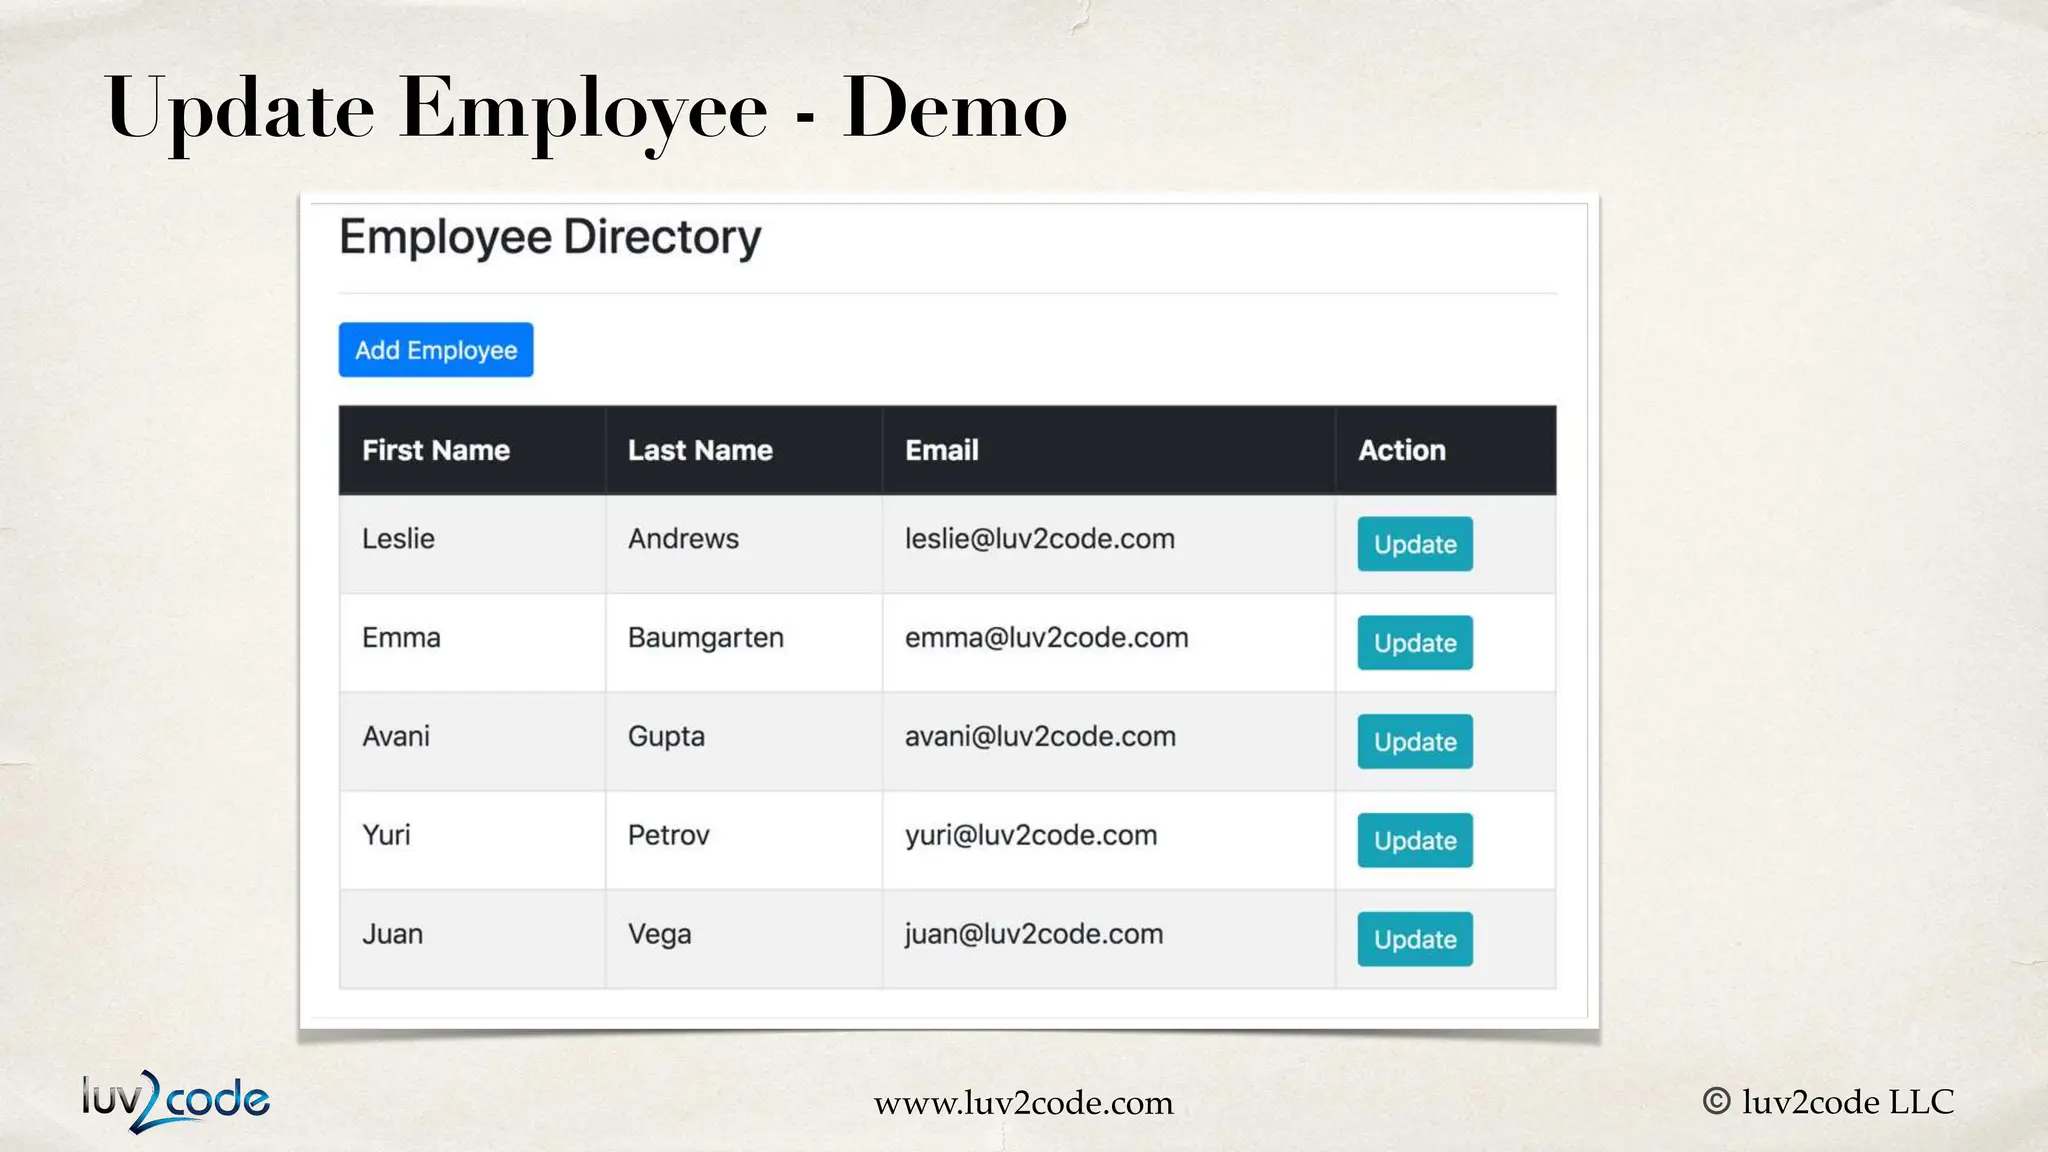
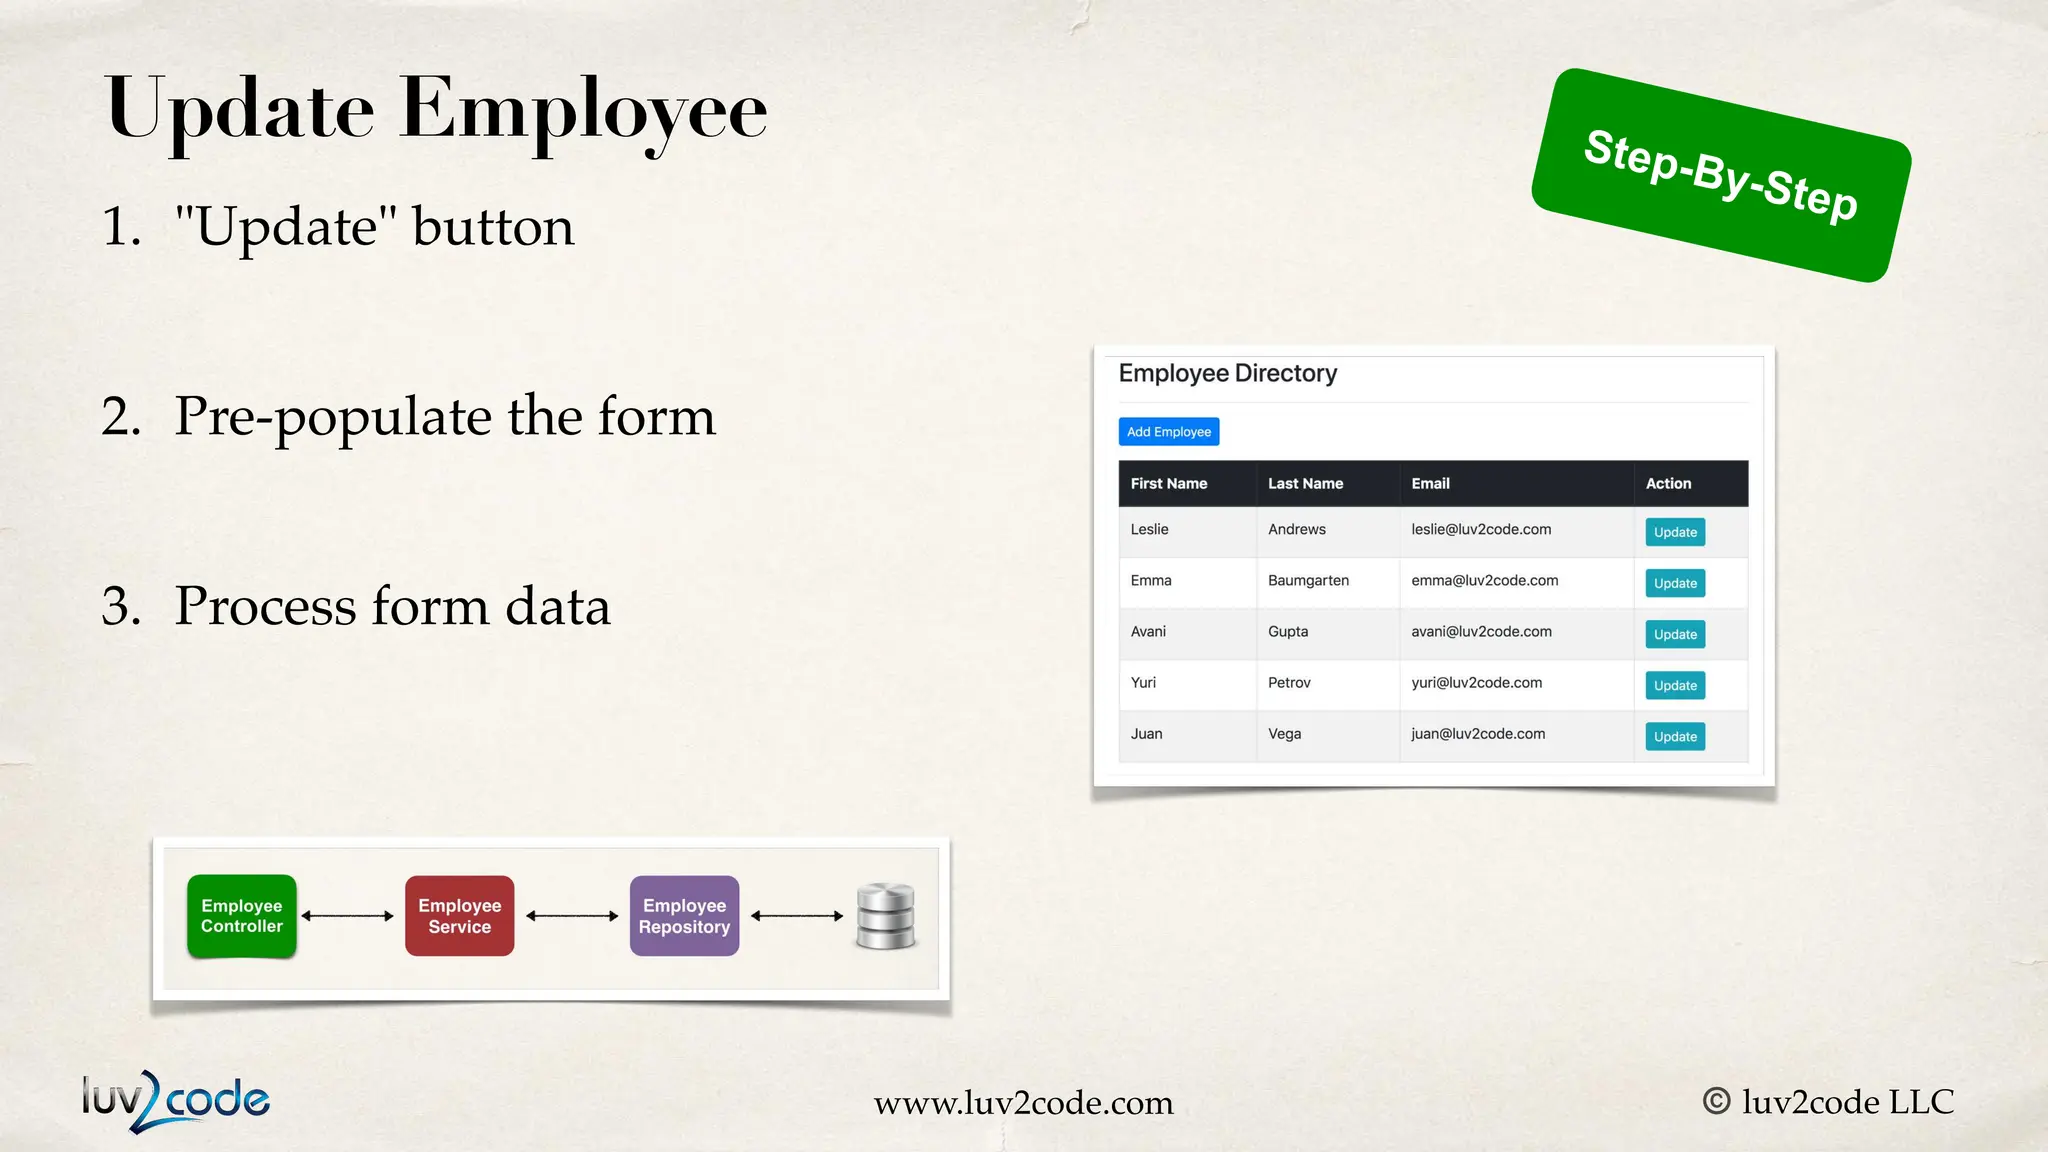
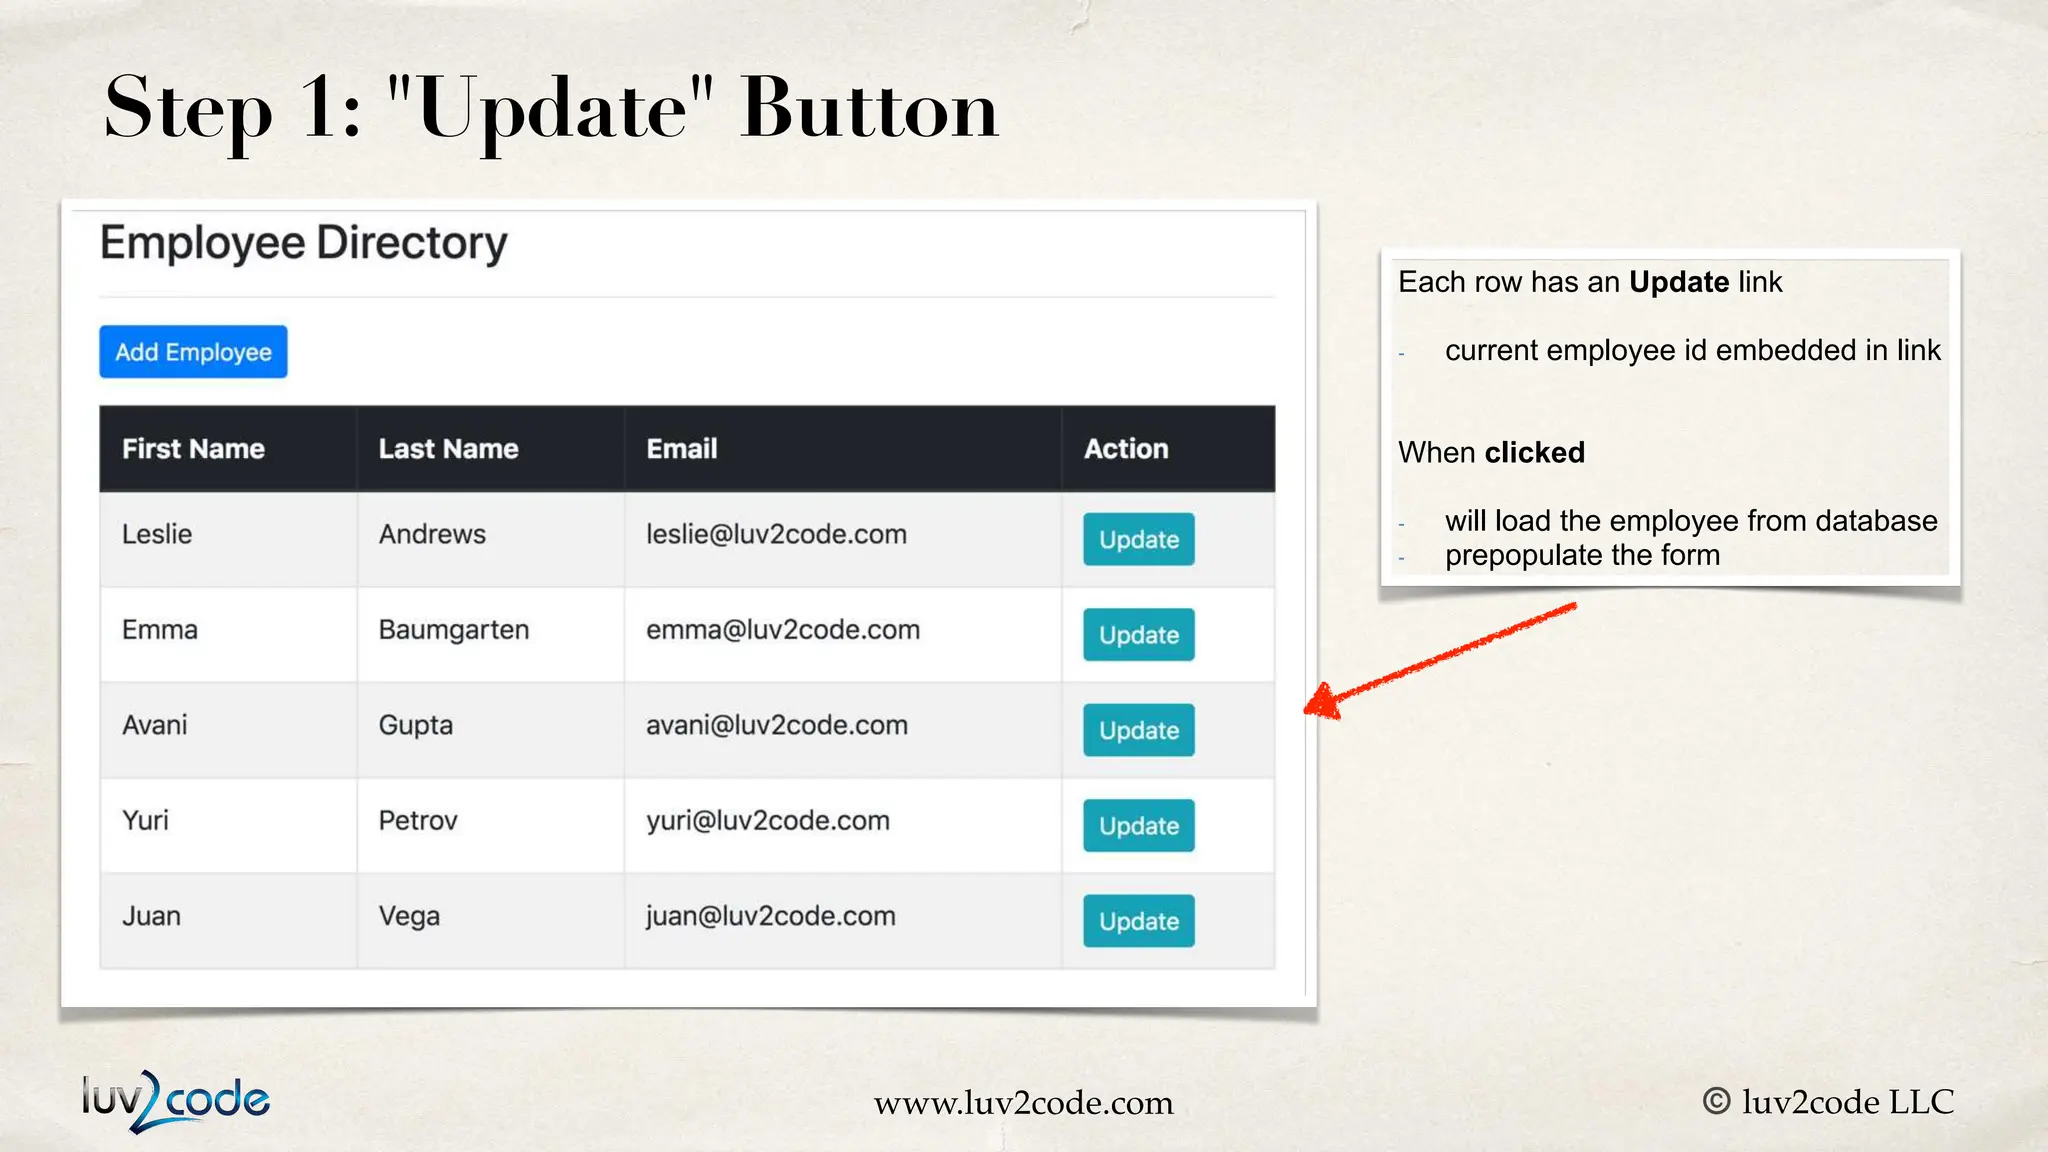
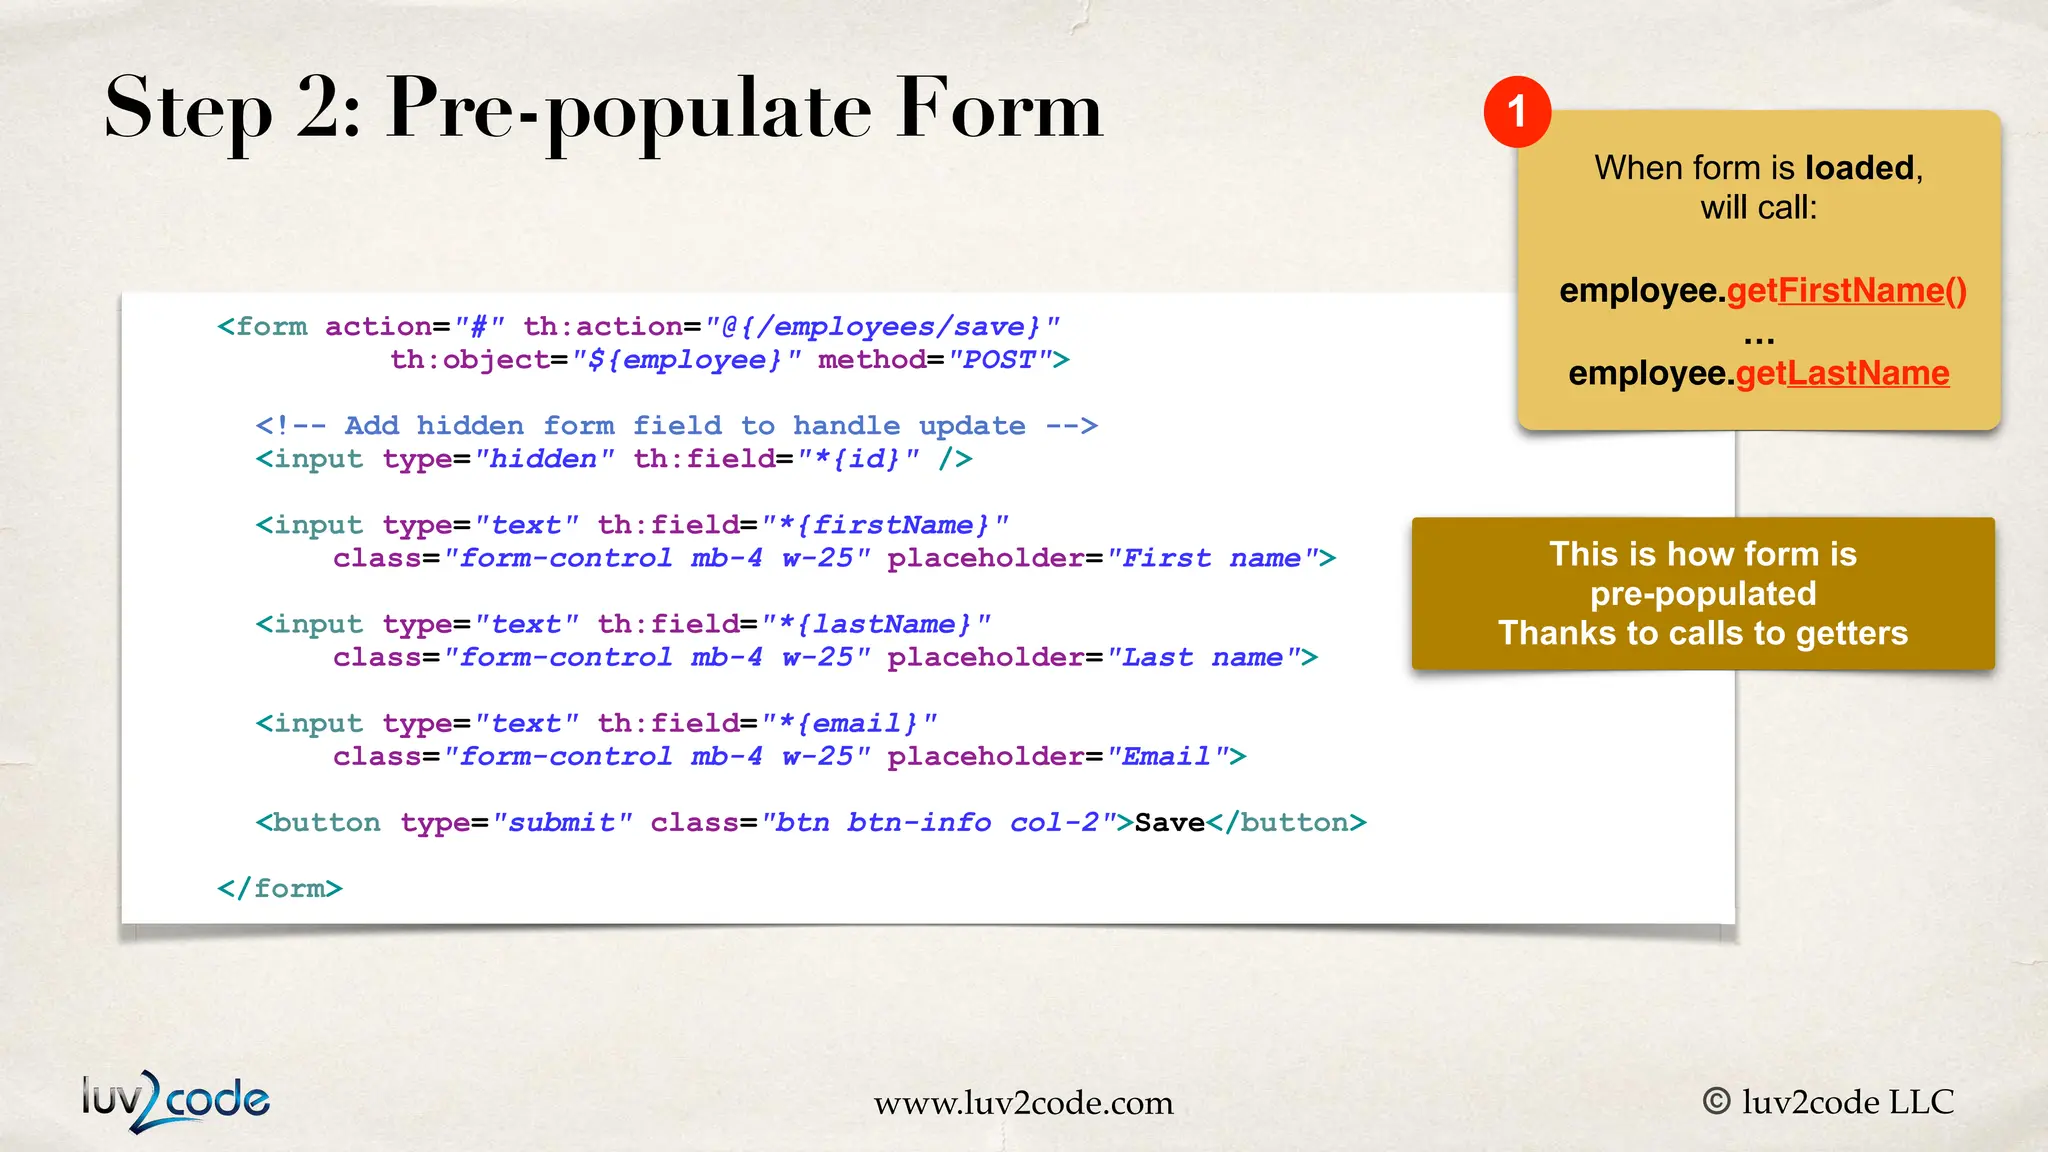
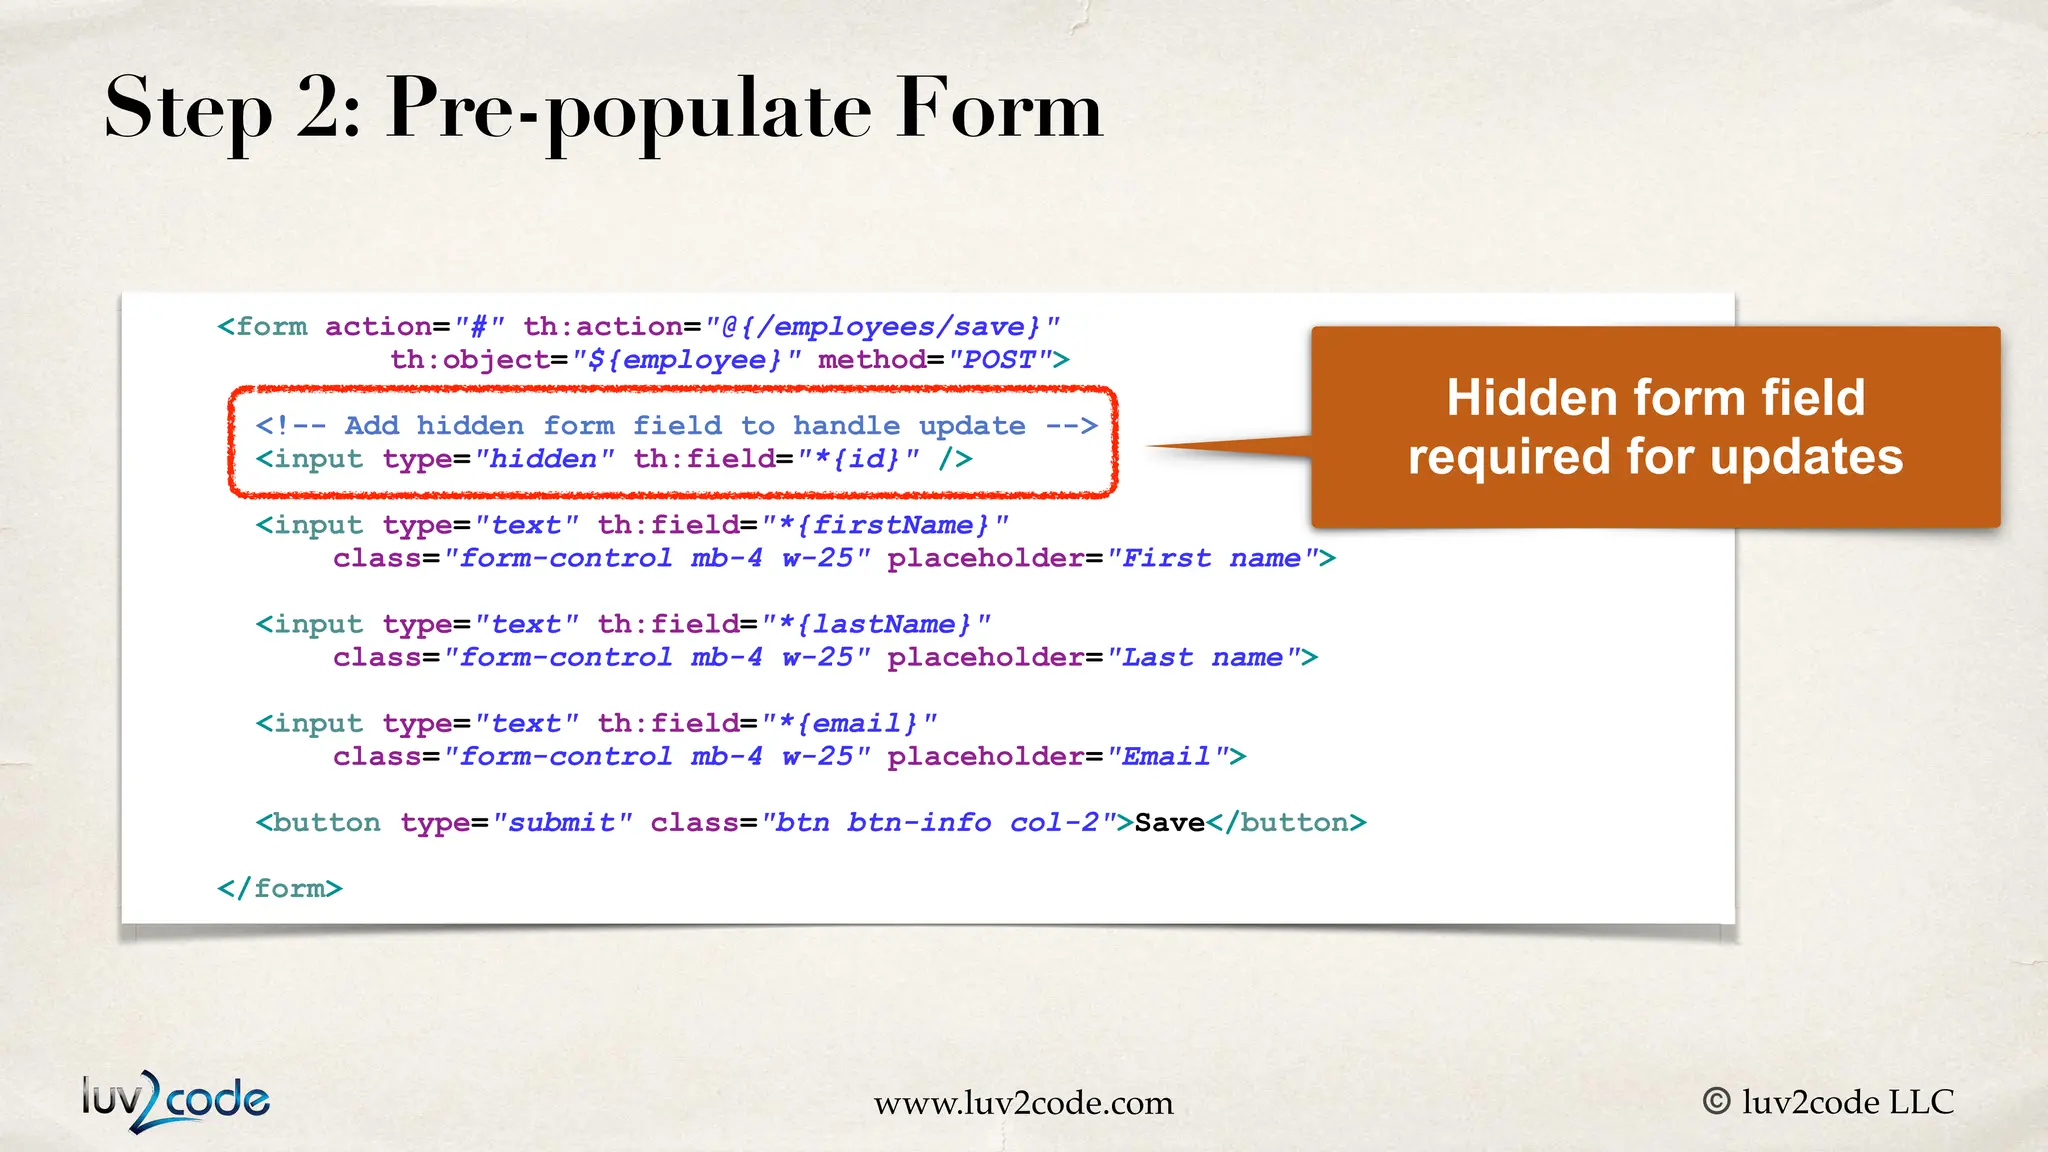
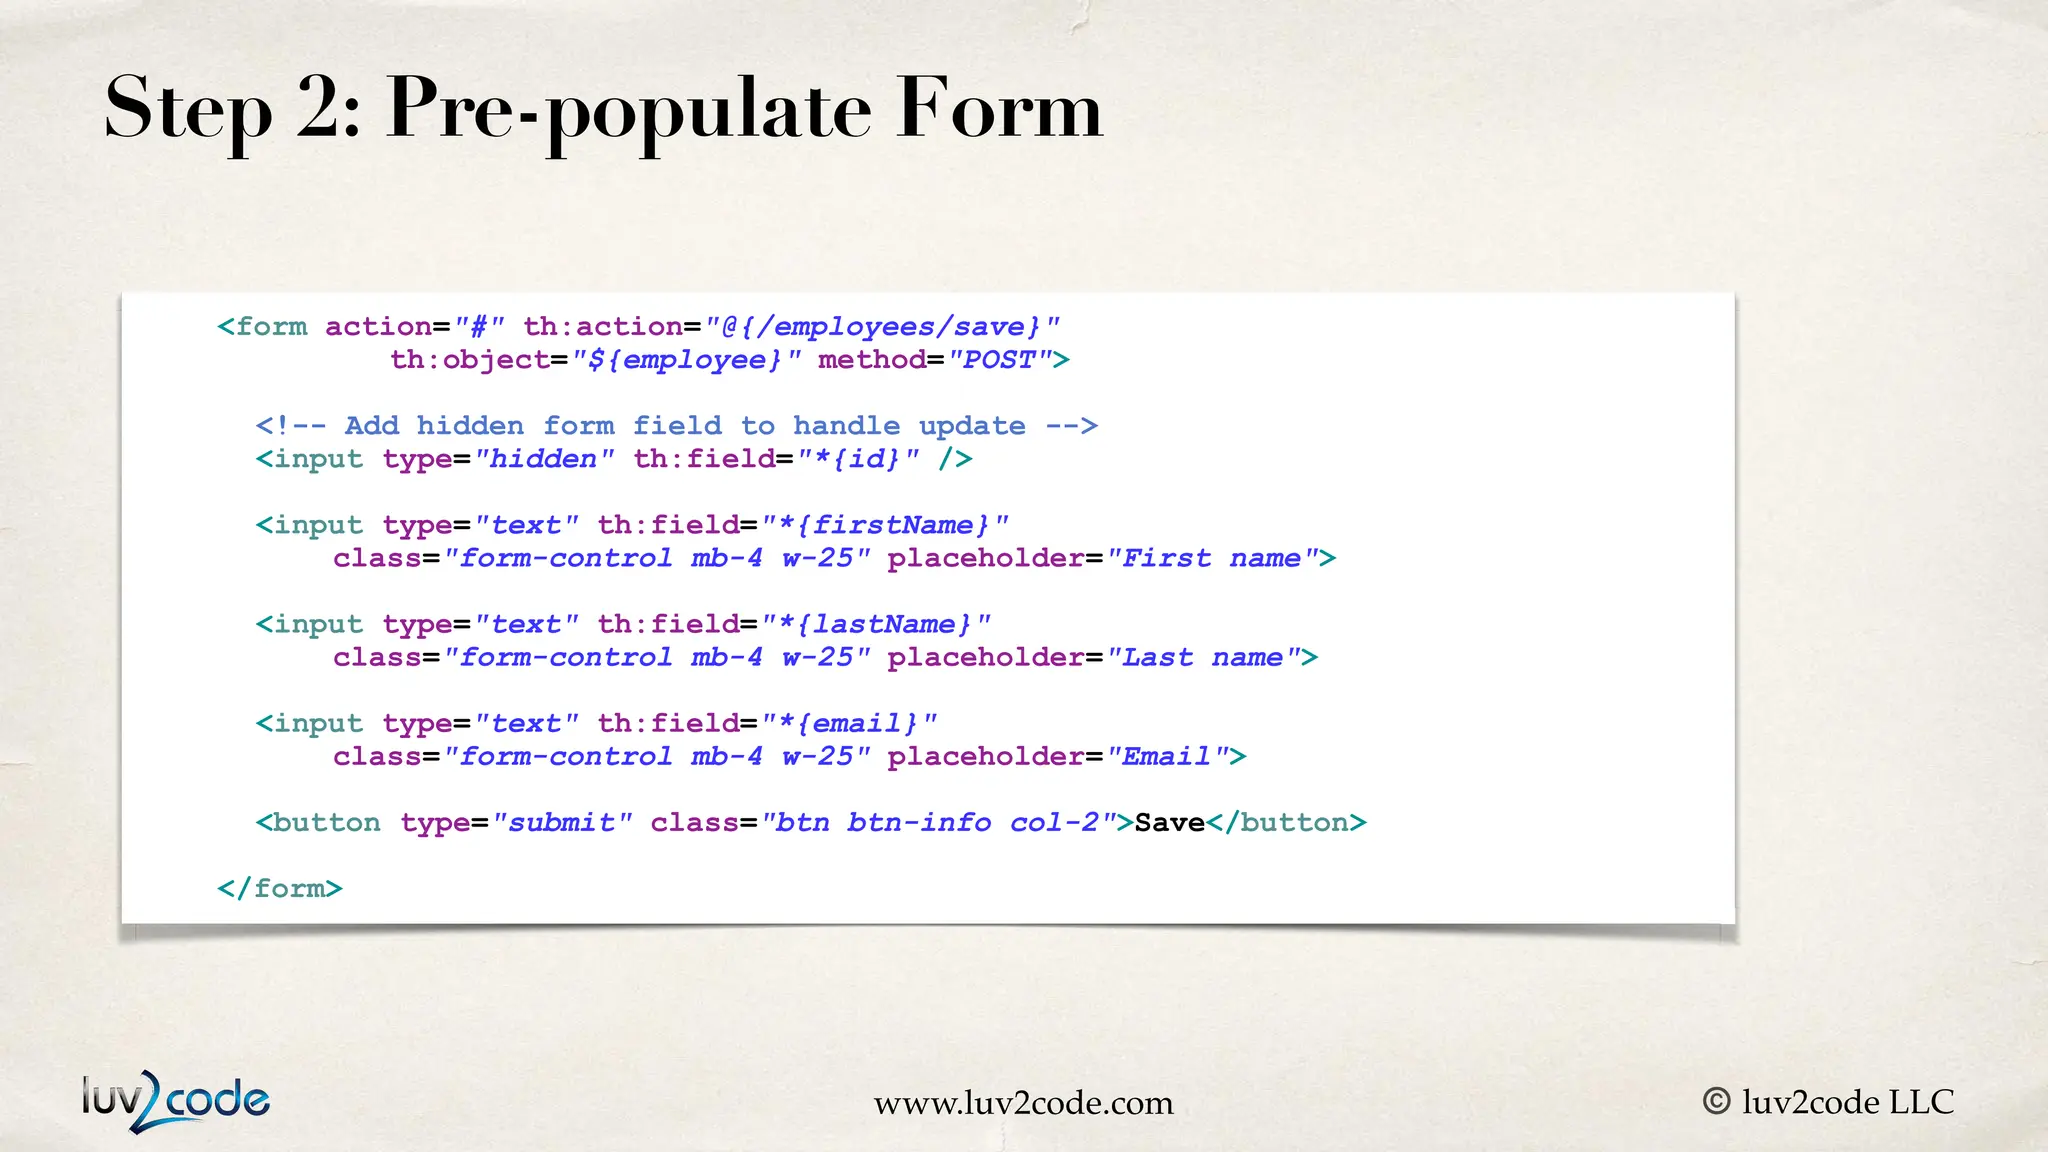
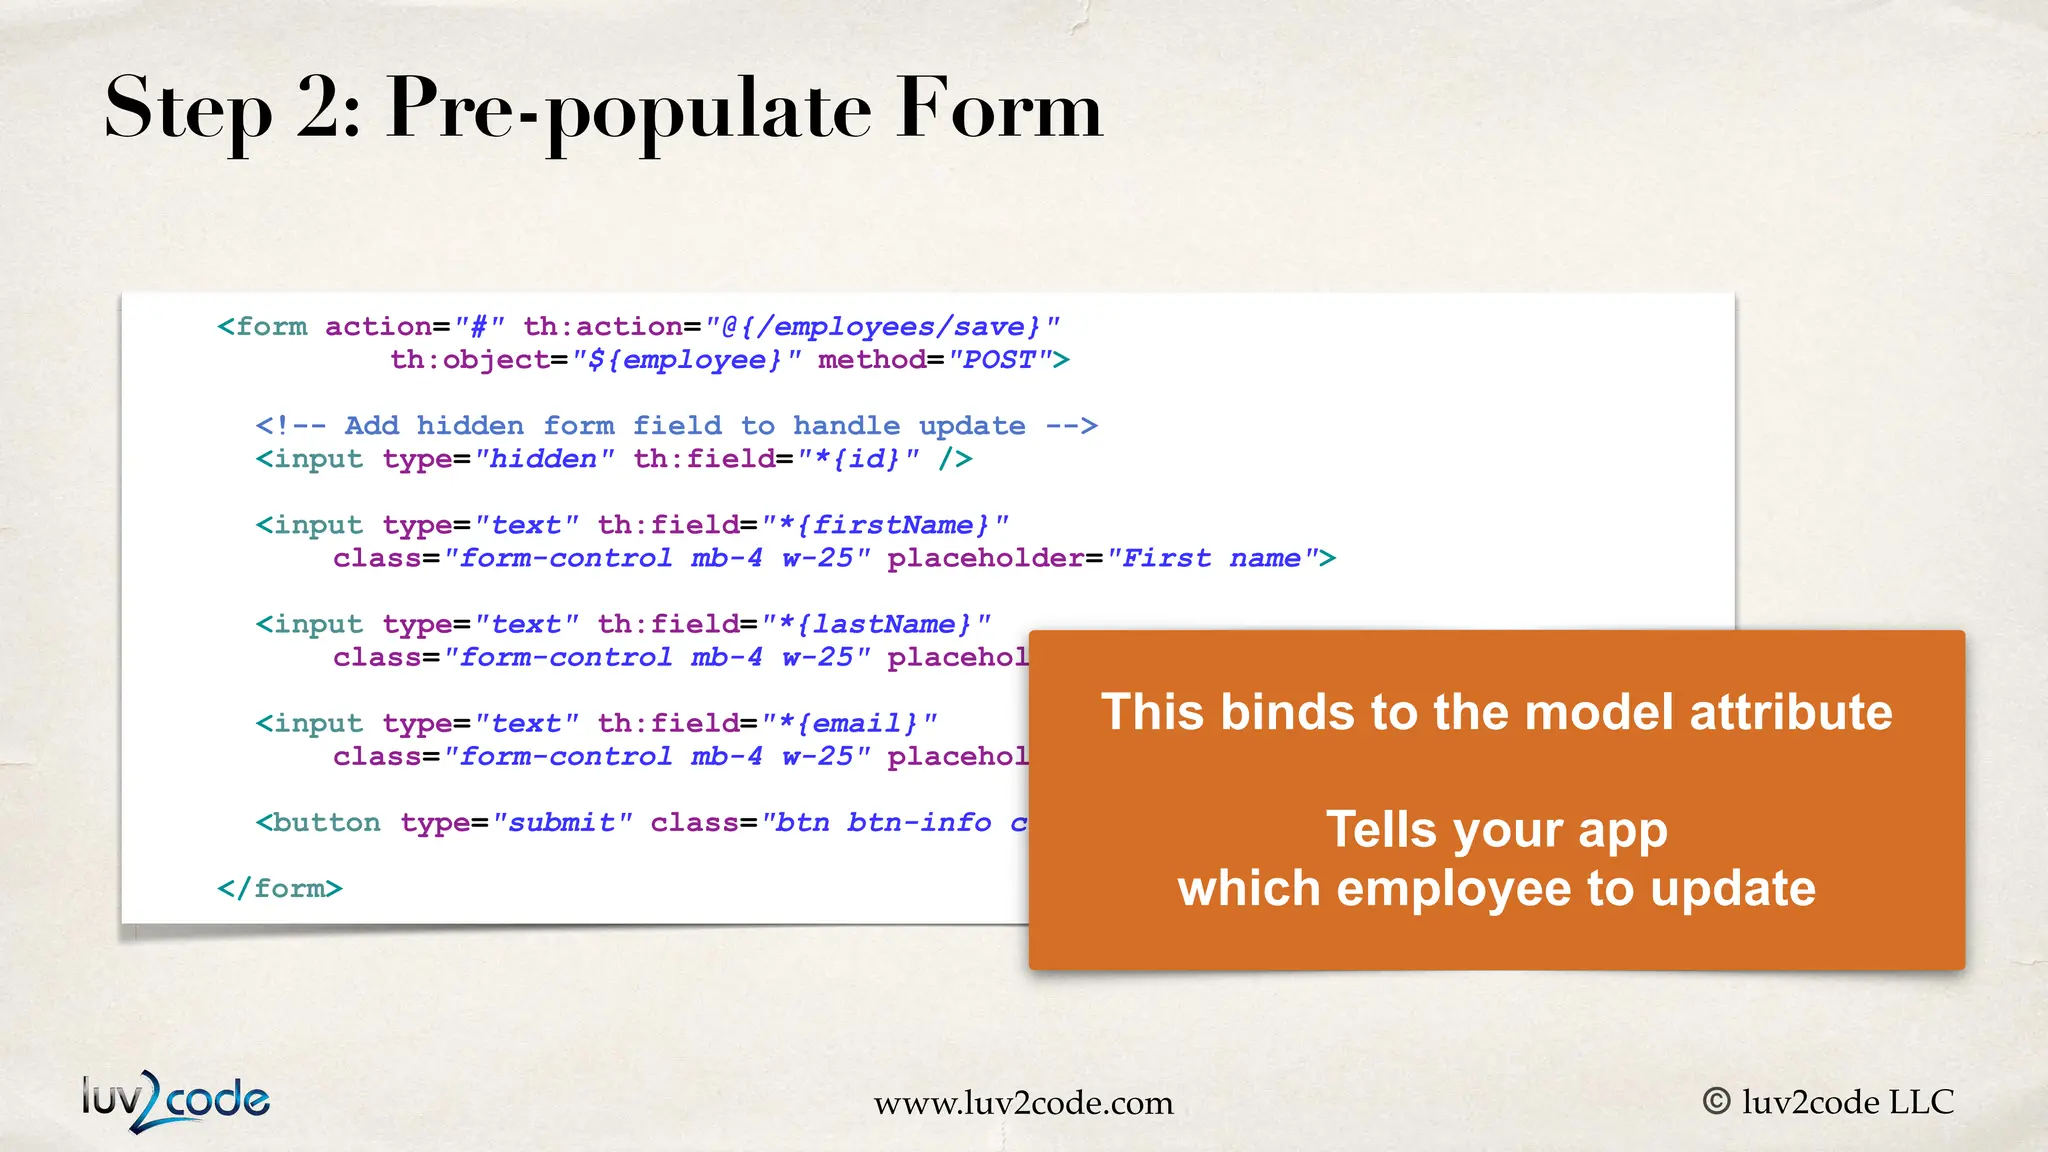
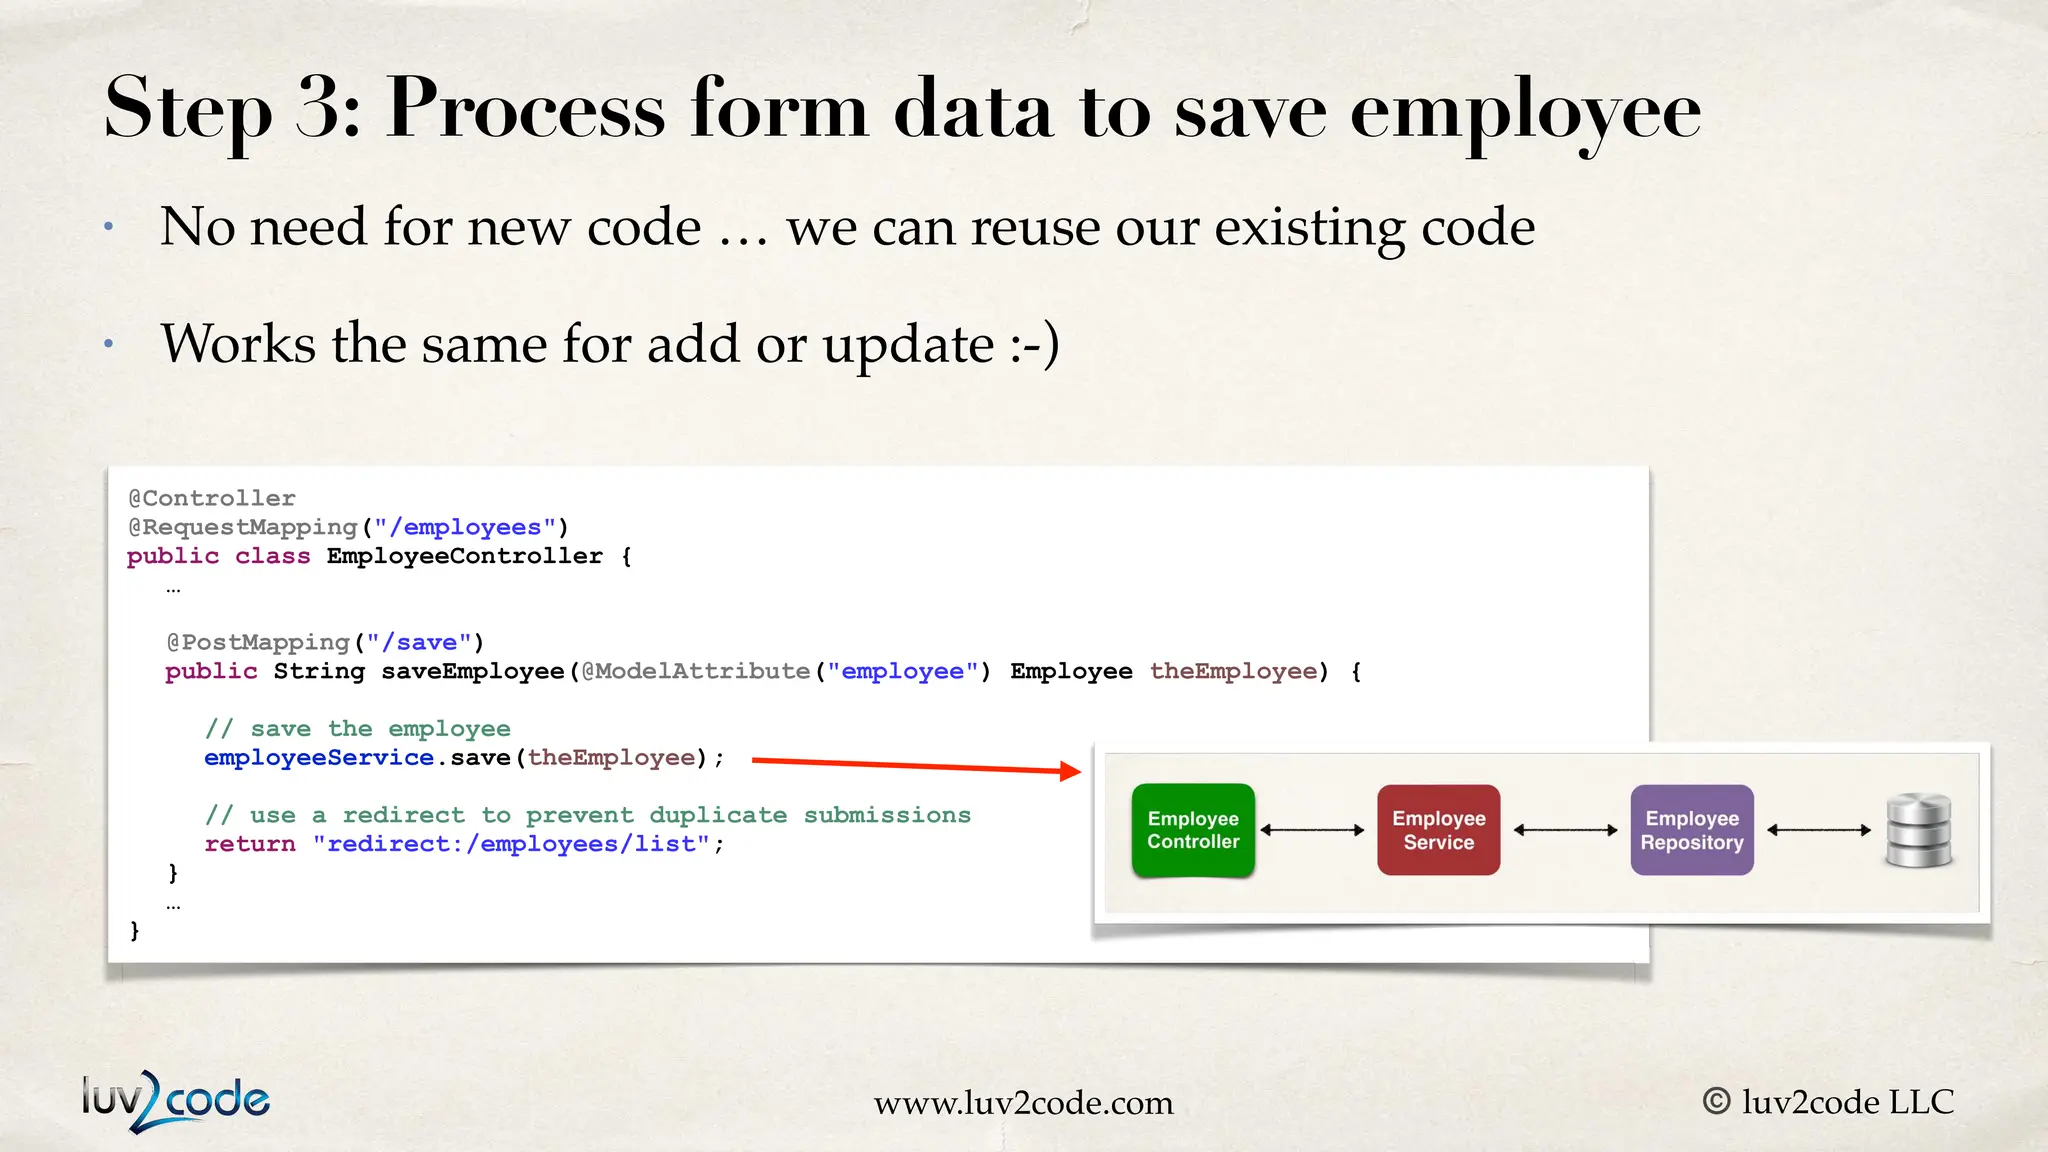
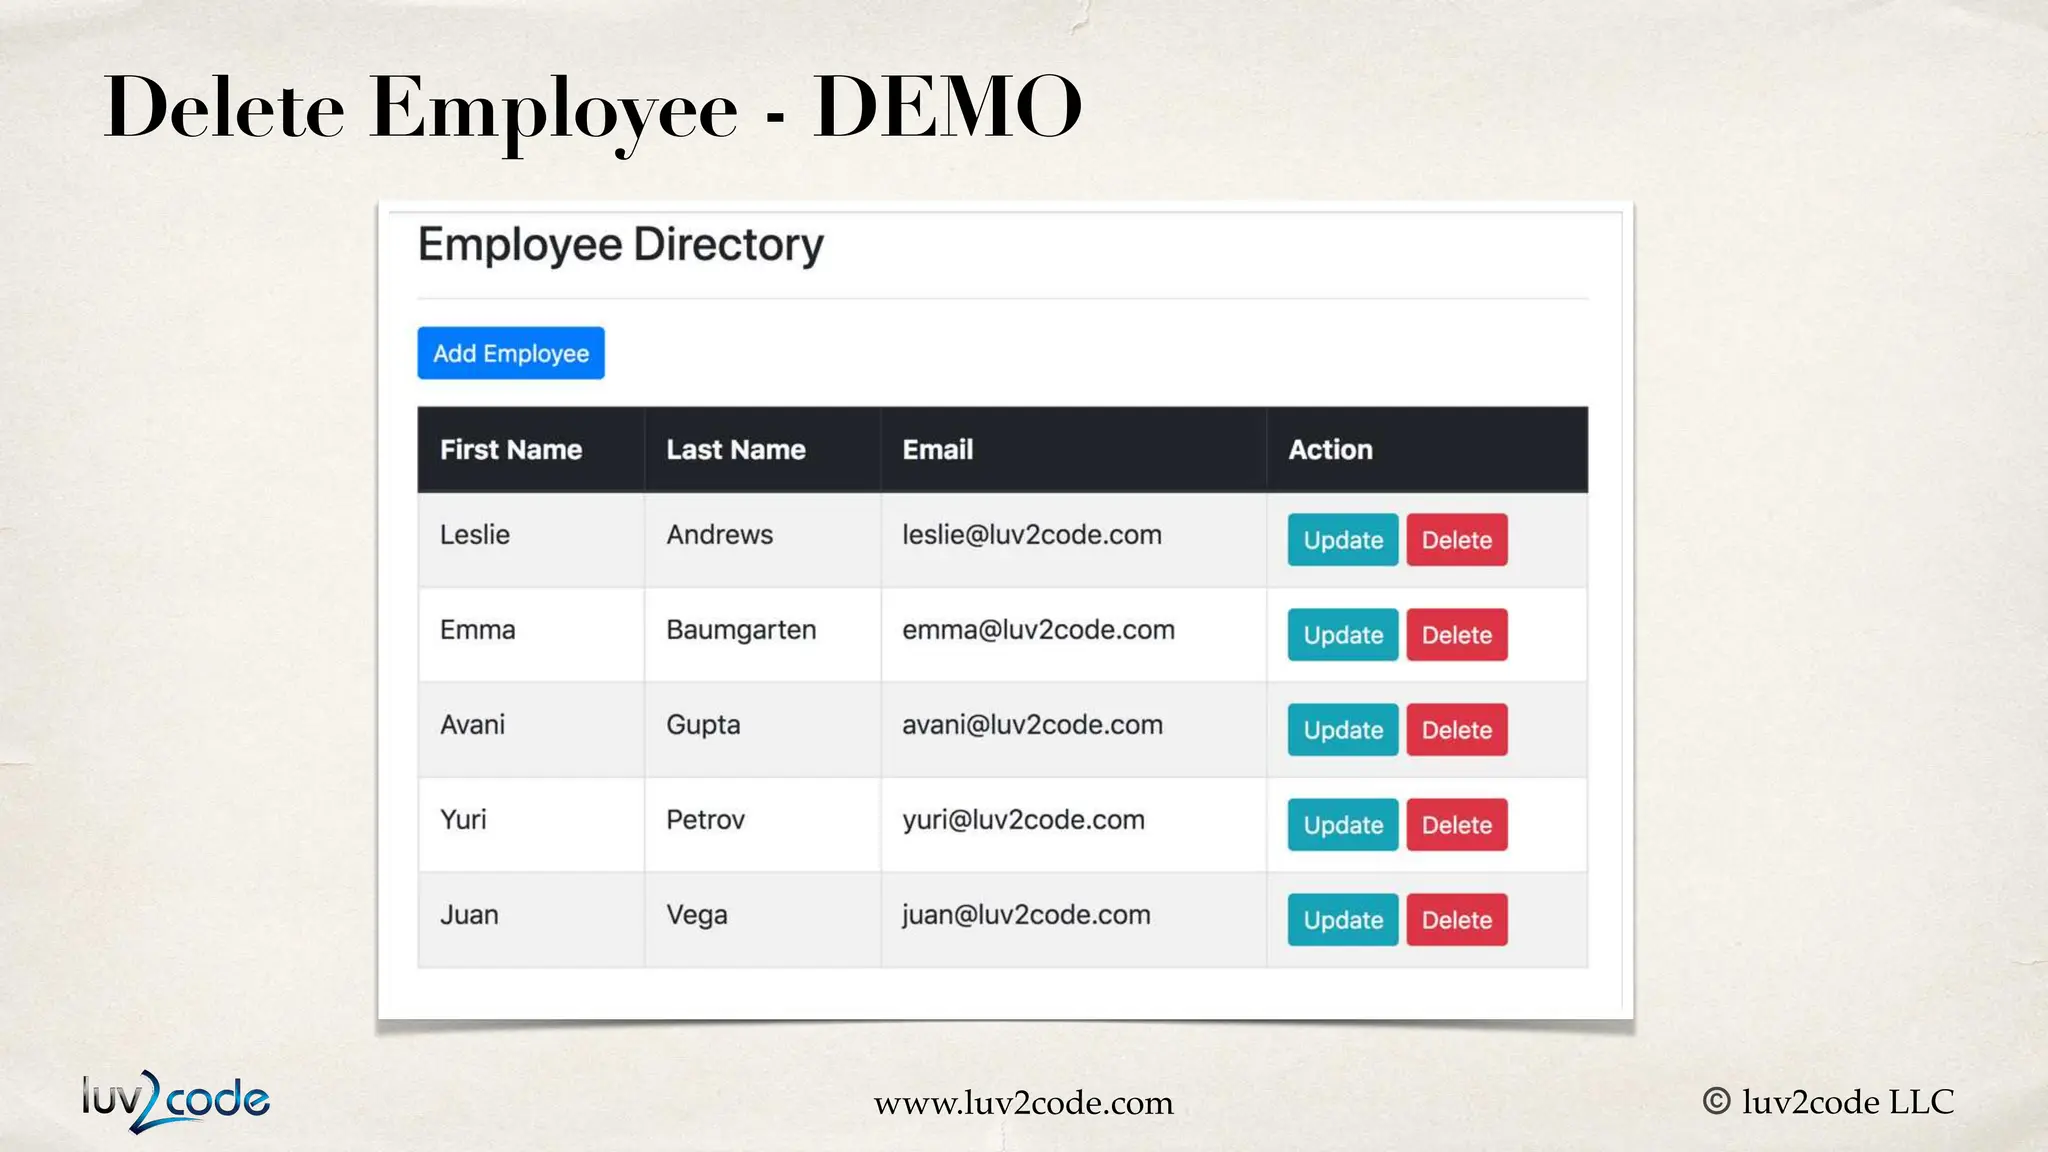
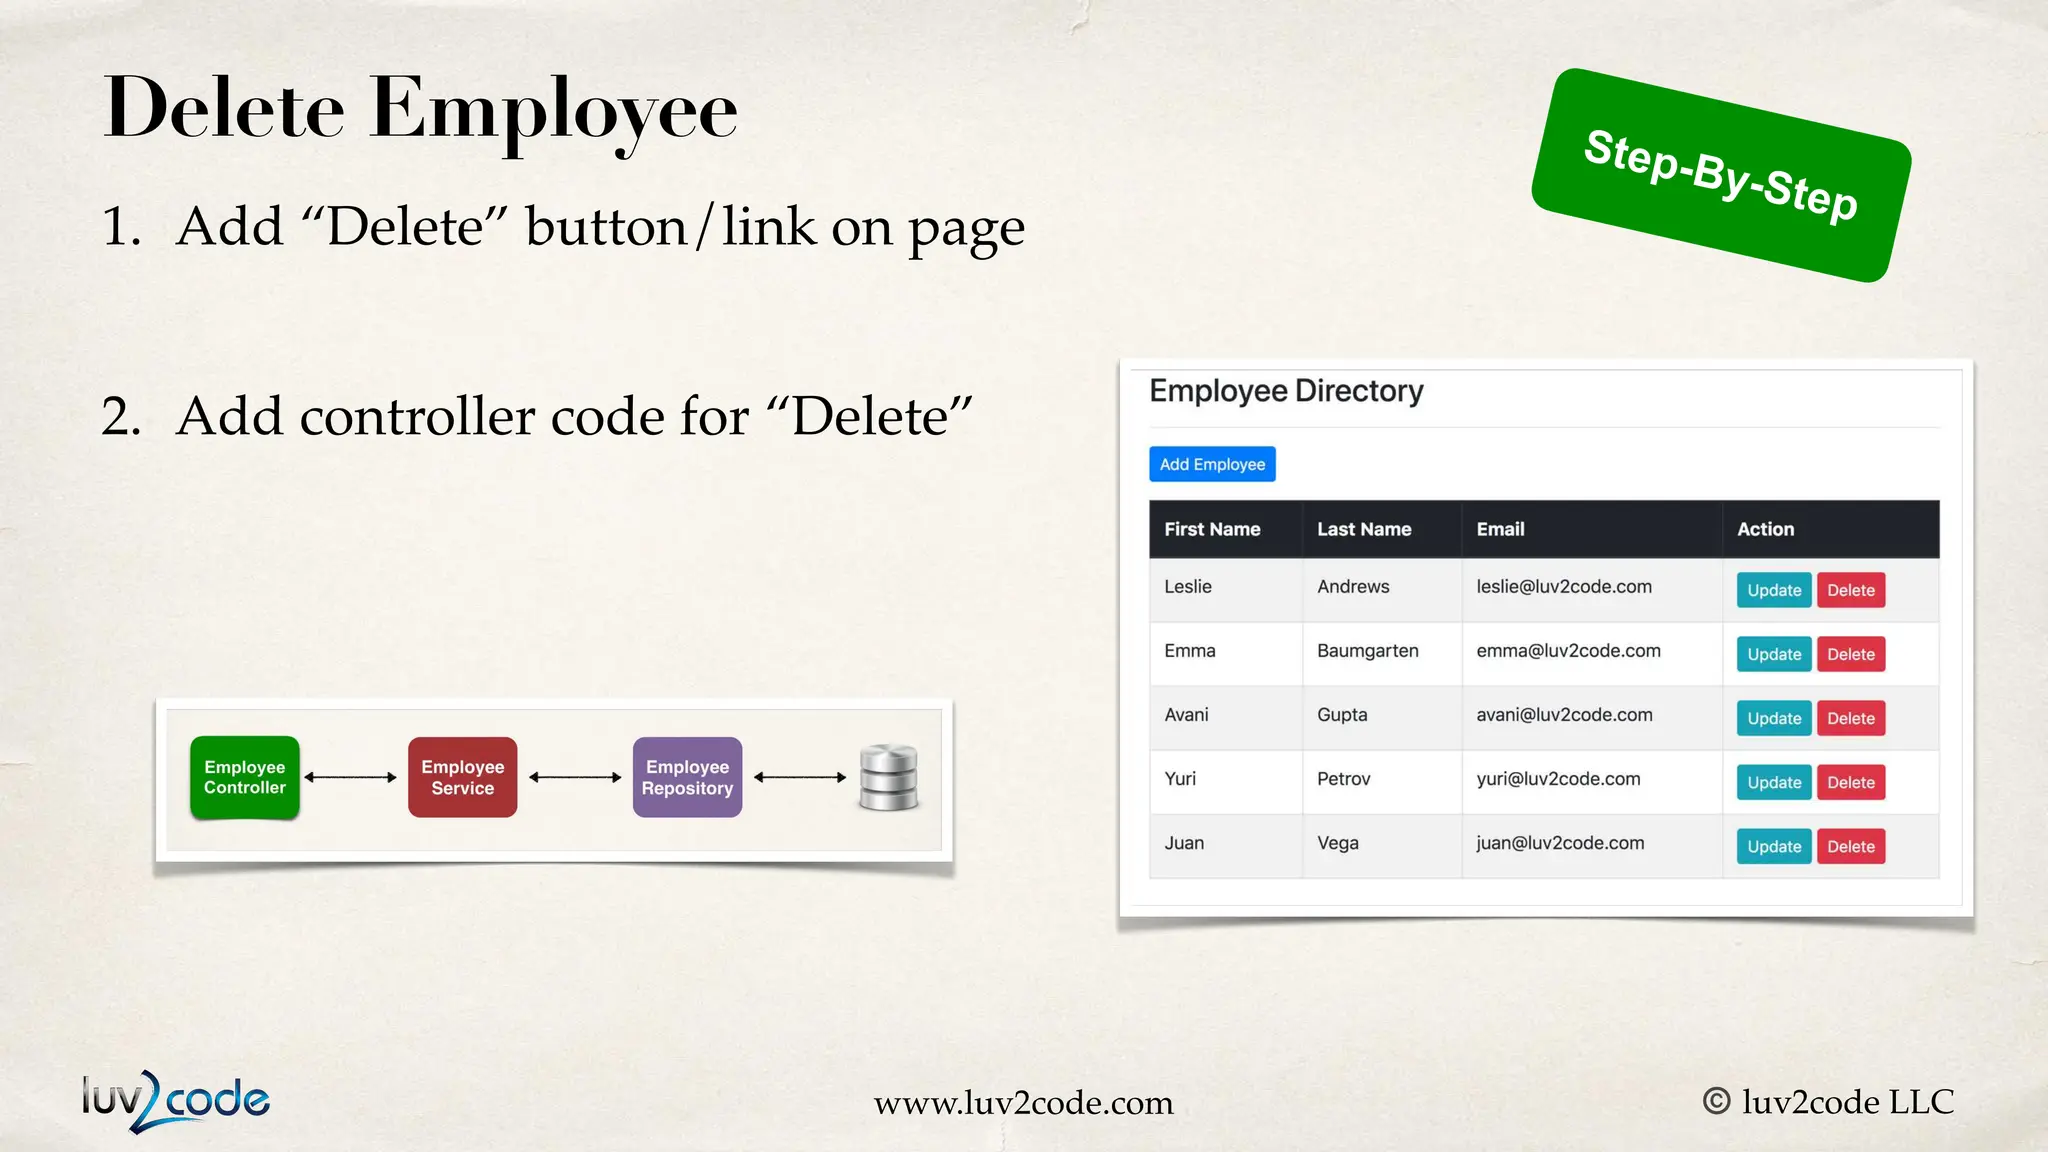
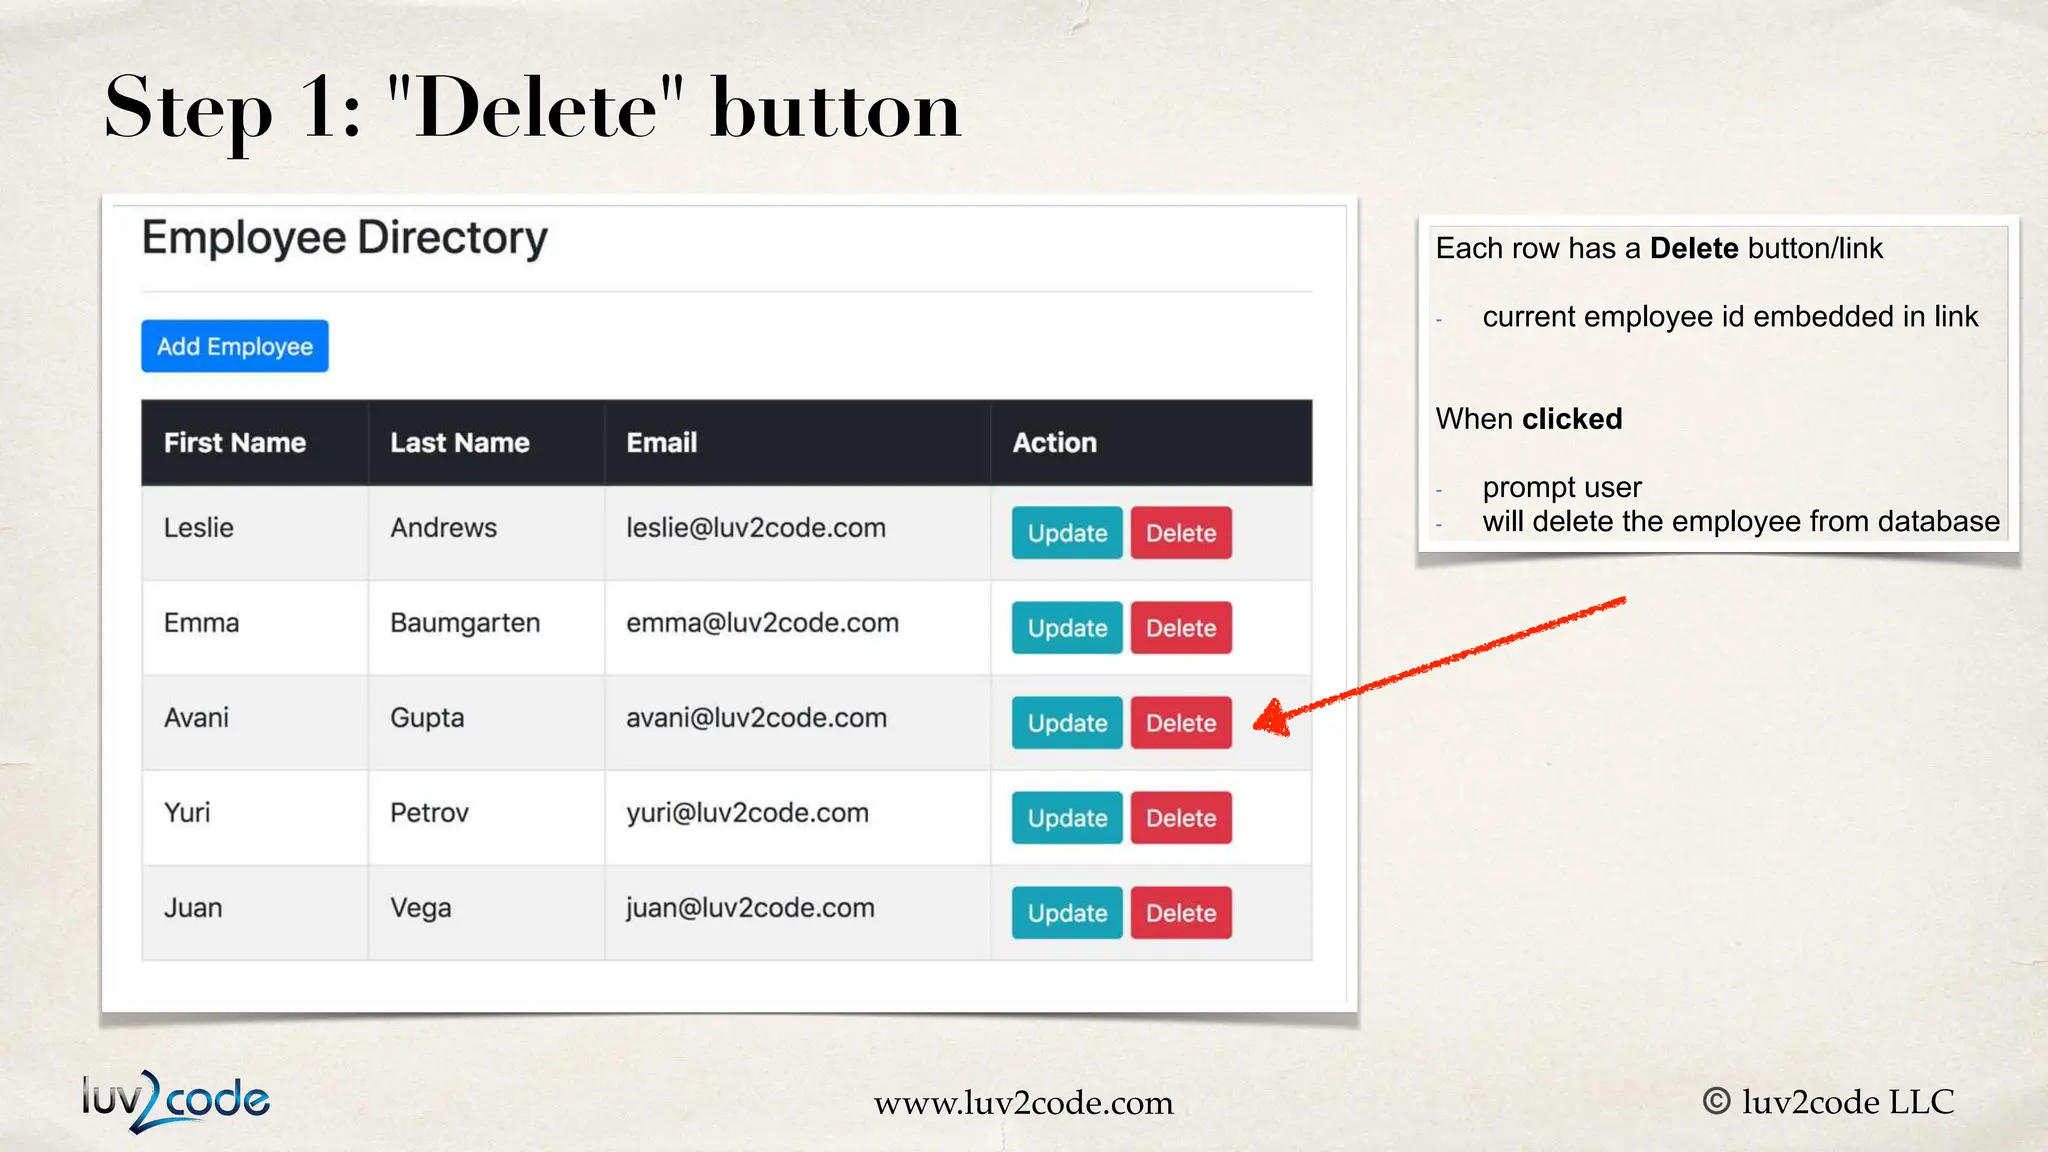
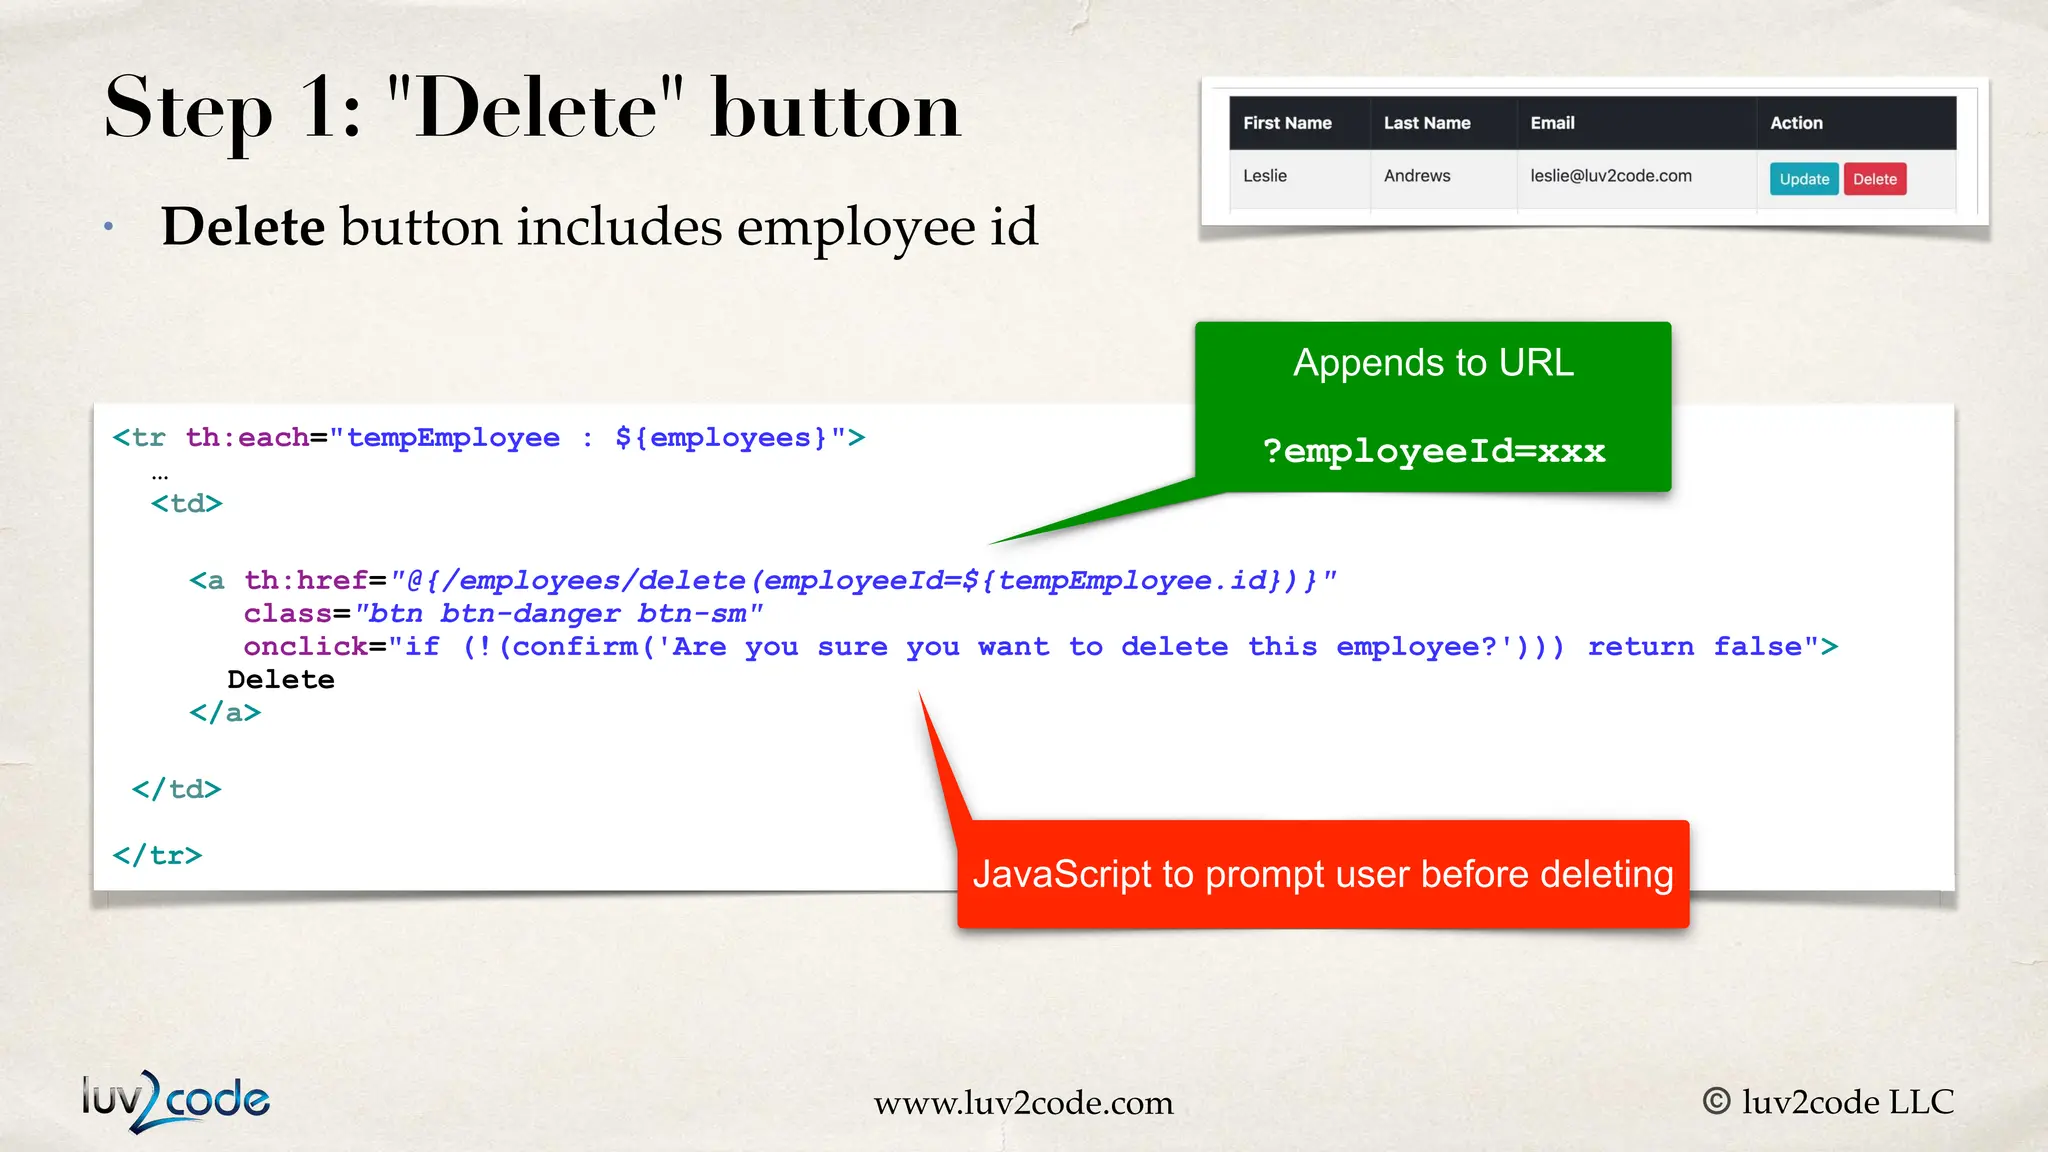
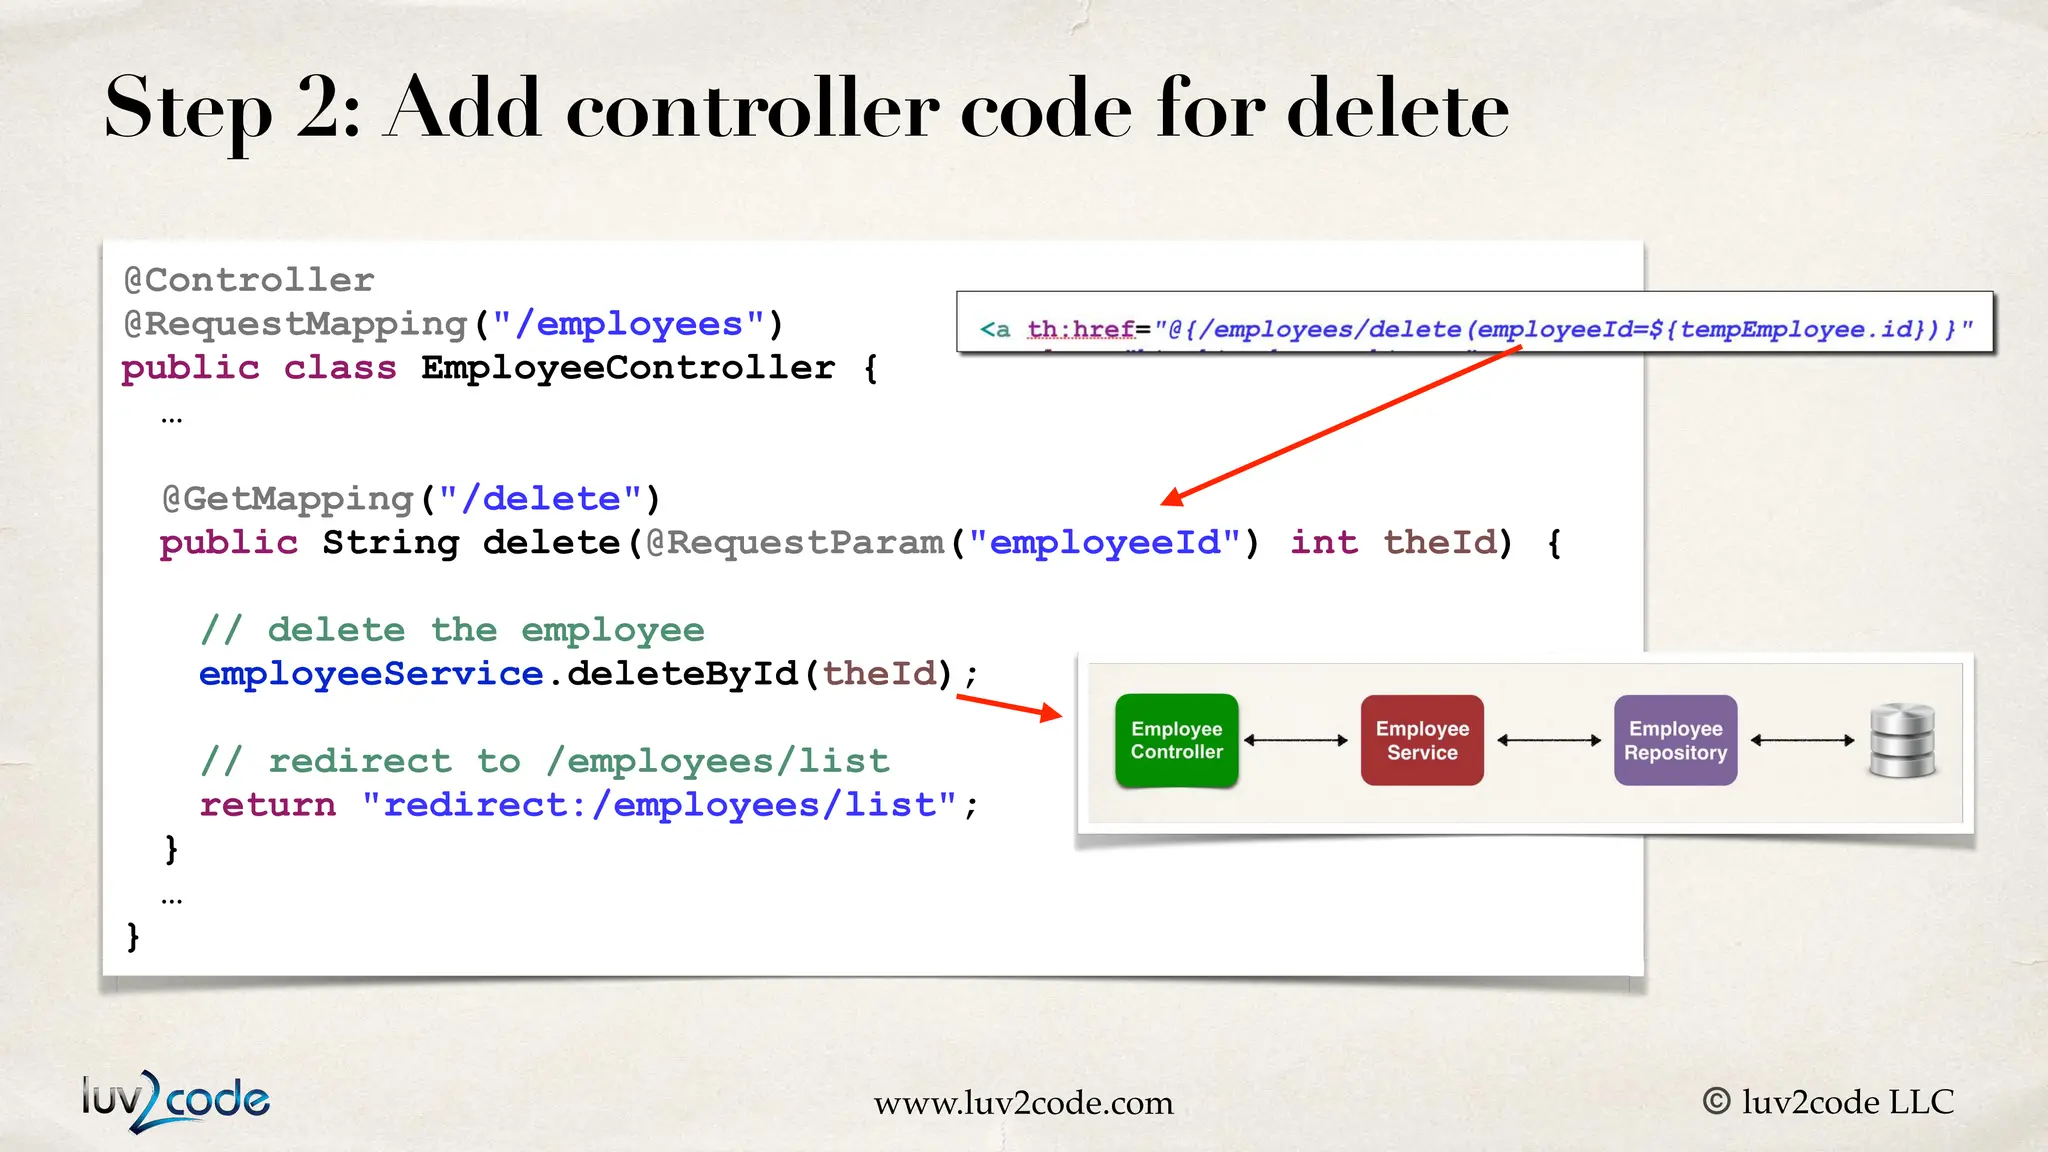
© luv2code LLC m Thymeleaf CRUD - Real Time Project
www.luv2code.com © luv2code LLC Application Requirements Create a Web UI for the Employee Directory Users should be able to • Get a list of employees • Add a new employee • Update an employee • Delete an employee From the Boss Thymeleaf + Spring Boot
www.luv2code.com © luv2code LLC Real-Time Project Thymeleaf + Spring Boot
www.luv2code.com © luv2code LLC Big Picture 1 2 3 4 Employe e Controller Employe e Repository Thymeleaf Templates Web Browser Employe e Service 6 5
www.luv2code.com © luv2code LLC Application Architecture Employee Controller Employe e Repository Employe e Service Reuse code from previous project New code that we will create
www.luv2code.com © luv2code LLC Project Set Up • We will extend our existing Employee project and add DB integration • Add EmployeeService, EmployeeRepository and Employee entit y • Available in one of our previous project s • We created all of this code already from scratch … so we'll just copy/paste it • Allows us to focus on creating EmployeeController and Thymeleaf templates
www.luv2code.com © luv2code LLC Development Process - Big Picture 1. Get list of employee s 2. Add a new employe e 3. Update an existing employe e 4. Delete an existing employee Step-By-Step
© luv2code LLC Date Thymeleaf - Add Employee
www.luv2code.com © luv2code LLC Add Employee - DEMO
www.luv2code.com © luv2code LLC Add Employee 1. New Add Employee button for list-employees.html Step-By-Step
www.luv2code.com © luv2code LLC Add Employee 1. New Add Employee button for list-employees.html 2. Create HTML form for new employee Step-By-Step
www.luv2code.com © luv2code LLC Add Employee 1. New Add Employee button for list-employees.html 2. Create HTML form for new employee 3. Process form data to save employee Step-By-Step
www.luv2code.com © luv2code LLC Step 1: New "Add Employee" button • Add Employee button will href link to • request mapping /employees/showFormForAdd <a th:href="@{/employees/showFormForAdd}"> Add Employee </a> Add Employee @ symbo l Reference context path of your application (app root)
www.luv2code.com © luv2code LLC Step 1: New "Add Employee" button • Add Employee button will href link to • request mapping /employees/showFormForAdd Apply Bootstrap styles Docs on Bootstrap styles: www.getbootstrap.com <a th:href="@{/employees/showFormForAdd}"> Add Employee </a> <a th:href="@{/employees/showFormForAdd}" class="btn btn-primary btn-sm mb-3"> Add Employee </a> Button Button Primary Button Small Margin Bottom, 3 pixels
www.luv2code.com © luv2code LLC <a th:href="@{/employees/showFormForAdd}" class="btn btn-primary btn-sm mb-3"> Add Employee </a> Step 1: New "Add Employee" button • Add Employee button will href link to • request mapping /employees/showFormForAdd TODO : Add controller request mapping for /employees/showFormForAdd
www.luv2code.com © luv2code LLC Showing Form In your Spring Controller • Before you show the form, you must add a model attribute • This is an object that will hold form data for the data binding
www.luv2code.com © luv2code LLC Controller code to show form @Controller @RequestMapping("/employees") public class EmployeeController { @GetMapping("/showFormForAdd") public String showFormForAdd(Model theModel) { // create model attribute to bind form data Employee theEmployee = new Employee(); theModel.addAttribute("employee", theEmployee); return "employees/employee-form"; } … } Our Thymleaf template will access this data for binding form data src/main/resources/templates/employees/employee-form.html
www.luv2code.com © luv2code LLC Thymeleaf and Spring MVC Data Binding • Thymeleaf has special expressions for binding Spring MVC form data • Automatically setting / retrieving data from a Java object
www.luv2code.com © luv2code LLC Thymeleaf Expressions • Thymeleaf expressions can help you build the HTML form :-) Expression Description th:action Location to send form data th:object Reference to model attribute th:field Bind input field to a property on model attribute more …. See - www.luv2code.com/thymeleaf-create-form
www.luv2code.com © luv2code LLC Step 2: Create HTML form for new employee <form action="#" th:action="@{/employees/save}" th:object="${employee}" method="POST"> </form> Real work Send form data to /employees/save Empty place holder Thymeleaf will handle real work Our model attribute Our model attribute
www.luv2code.com © luv2code LLC Step 2: Create HTML form for new employee
www.luv2code.com © luv2code LLC Step 2: Create HTML form for new employee <form action="#" th:action="@{/employees/save}" th:object="${employee}" method="POST"> <input type="text" th:field="*{firstName}" placeholder="First name"> <input type="text" th:field="*{lastName}" placeholder="Last name"> <input type="text" th:field="*{email}" placeholder="Email"> <button type="submit">Save</button> </form> *{…} Selects property on referenced th:object
www.luv2code.com © luv2code LLC Step 2: Create HTML form for new employee <form action="#" th:action="@{/employees/save}" th:object="${employee}" method="POST"> <input type="text" th:field="*{firstName}" placeholder="First name"> <input type="text" th:field="*{lastName}" placeholder="Last name"> <input type="text" th:field="*{email}" placeholder="Email"> <button type="submit">Save</button> </form> When form is loaded, will call: employee.getFirstName() … employee.getLastName 1 When form is submitted, will call: employee.setFirstName(…) … employee.setLastName(…) 2
www.luv2code.com © luv2code LLC Step 2: Create HTML form for new employee <form action="#" th:action="@{/employees/save}" th:object="${employee}" method="POST"> <input type="text" th:field="*{firstName}" placeholder="First name"> <input type="text" th:field="*{lastName}" placeholder="Last name"> <input type="text" th:field="*{email}" placeholder="Email"> <button type="submit">Save</button> </form> <form action="#" th:action="@{/employees/save}" th:object="${employee}" method="POST"> <input type="text" th:field="*{firstName}" placeholder="First name" class="form-control mb-4 w-25"> </form> Apply Bootstrap styles Form control Margin Bottom: 4 pixels Width: 25%
www.luv2code.com © luv2code LLC Step 2: Create HTML form for new employee <form action="#" th:action="@{/employees/save}" th:object="${employee}" method="POST"> <input type="text" th:field="*{firstName}" placeholder="First name" class="form-control mb-4 w-25"> </form> <input type="text" th:field="*{lastName}" placeholder="Last name" class="form-control mb-4 w-25"> <input type="text" th:field="*{email}" placeholder="Email" class="form-control mb-4 w-25"> <button type="submit" class="btn btn-info col-2">Save</button> </form> Apply Bootstrap styles Button Button Info Column Span 2
www.luv2code.com © luv2code LLC Step 2: Create HTML form for new employee <form action="#" th:action="@{/employees/save}" th:object="${employee}" method="POST"> <input type="text" th:field="*{firstName}" placeholder="First name" class="form-control mb-4 w-25"> <input type="text" th:field="*{lastName}" placeholder="Last name" class="form-control mb-4 w-25"> <input type="text" th:field="*{email}" placeholder="Email" class="form-control mb-4 w-25"> <button type="submit" class="btn btn-info col-2">Save</button> </form> TODO : Add controller request mapping for /employees/save
www.luv2code.com © luv2code LLC Step 3: Process form data to save employee @Controller @RequestMapping("/employees") public class EmployeeController { private EmployeeService employeeService; public EmployeeController(EmployeeService theEmployeeService) { employeeService = theEmployeeService; } @PostMapping("/save") public String saveEmployee(@ModelAttribute("employee") Employee theEmployee) { // save the employee employeeService.save(theEmployee); // use a redirect to prevent duplicate submissions return "redirect:/employees/list"; } … } Constructor injection Since only one constructor @Autowired is optional
www.luv2code.com © luv2code LLC Step 3: Process form data to save employee @Controller @RequestMapping("/employees") public class EmployeeController { private EmployeeService employeeService; public EmployeeController(EmployeeService theEmployeeService) { employeeService = theEmployeeService; } @PostMapping("/save") public String saveEmployee(@ModelAttribute("employee") Employee theEmployee) { // save the employee employeeService.save(theEmployee); // use a redirect to prevent duplicate submissions return "redirect:/employees/list"; } … }
www.luv2code.com © luv2code LLC Step 3: Process form data to save employee @Controller @RequestMapping("/employees") public class EmployeeController { private EmployeeService employeeService; public EmployeeController(EmployeeService theEmployeeService) { employeeService = theEmployeeService; } @PostMapping("/save") public String saveEmployee(@ModelAttribute("employee") Employee theEmployee) { // save the employee employeeService.save(theEmployee); // use a redirect to prevent duplicate submissions return "redirect:/employees/list"; } … } Redirect to request mapping /employees/list "Post/Redirect/Get" pattern For more info see www.luv2code.com/post-redirect-get
© luv2code LLC Date Thymeleaf - Update Employee
www.luv2code.com © luv2code LLC Update Employee - Demo
www.luv2code.com © luv2code LLC Update Employee 1. "Update" button 2. Pre-populate the form 3. Process form data Step-By-Step
www.luv2code.com © luv2code LLC Step 1: "Update" Button Each row has an Update link - current employee id embedded in link When clicked - will load the employee from database - prepopulate the form
www.luv2code.com © luv2code LLC Step 1: "Update" button • Update button includes employee id <tr th:each="tempEmployee : ${employees}"> … <td> <a th:href="@{/employees/showFormForUpdate(employeeId=${tempEmployee.id})}" class="btn btn-info btn-sm"> Update </a> </td> </tr> Appends to URL ?employeeId=xxx
www.luv2code.com © luv2code LLC Step 2: Pre-populate Form @Controller @RequestMapping("/employees") public class EmployeeController { … @GetMapping("/showFormForUpdate") public String showFormForUpdate(@RequestParam("employeeId") int theId, Model theModel) { // get the employee from the service Employee theEmployee = employeeService.findById(theId); // set employee as a model attribute to pre-populate the form theModel.addAttribute("employee", theEmployee); // send over to our form return "employees/employee-form"; } }
www.luv2code.com © luv2code LLC Step 2: Pre-populate Form <form action="#" th:action="@{/employees/save}" th:object="${employee}" method="POST"> <!-- Add hidden form field to handle update --> <input type="hidden" th:field="*{id}" /> <input type="text" th:field="*{firstName}" class="form-control mb-4 w-25" placeholder="First name"> <input type="text" th:field="*{lastName}" class="form-control mb-4 w-25" placeholder="Last name"> <input type="text" th:field="*{email}" class="form-control mb-4 w-25" placeholder="Email"> <button type="submit" class="btn btn-info col-2">Save</button> </form> This is how form is pre-populated Thanks to calls to getters When form is loaded, will call: employee.getFirstName() … employee.getLastName 1
www.luv2code.com © luv2code LLC Step 2: Pre-populate Form <form action="#" th:action="@{/employees/save}" th:object="${employee}" method="POST"> <!-- Add hidden form field to handle update --> <input type="hidden" th:field="*{id}" /> <input type="text" th:field="*{firstName}" class="form-control mb-4 w-25" placeholder="First name"> <input type="text" th:field="*{lastName}" class="form-control mb-4 w-25" placeholder="Last name"> <input type="text" th:field="*{email}" class="form-control mb-4 w-25" placeholder="Email"> <button type="submit" class="btn btn-info col-2">Save</button> </form> Hidden form field required for updates
www.luv2code.com © luv2code LLC Step 2: Pre-populate Form <form action="#" th:action="@{/employees/save}" th:object="${employee}" method="POST"> <!-- Add hidden form field to handle update --> <input type="hidden" th:field="*{id}" /> <input type="text" th:field="*{firstName}" class="form-control mb-4 w-25" placeholder="First name"> <input type="text" th:field="*{lastName}" class="form-control mb-4 w-25" placeholder="Last name"> <input type="text" th:field="*{email}" class="form-control mb-4 w-25" placeholder="Email"> <button type="submit" class="btn btn-info col-2">Save</button> </form>
www.luv2code.com © luv2code LLC Step 2: Pre-populate Form <form action="#" th:action="@{/employees/save}" th:object="${employee}" method="POST"> <!-- Add hidden form field to handle update --> <input type="hidden" th:field="*{id}" /> <input type="text" th:field="*{firstName}" class="form-control mb-4 w-25" placeholder="First name"> <input type="text" th:field="*{lastName}" class="form-control mb-4 w-25" placeholder="Last name"> <input type="text" th:field="*{email}" class="form-control mb-4 w-25" placeholder="Email"> <button type="submit" class="btn btn-info col-2">Save</button> </form> This binds to the model attribute Tells your app which employee to update
www.luv2code.com © luv2code LLC Step 3: Process form data to save employee @Controller @RequestMapping("/employees") public class EmployeeController { … @PostMapping("/save") public String saveEmployee(@ModelAttribute("employee") Employee theEmployee) { // save the employee employeeService.save(theEmployee); // use a redirect to prevent duplicate submissions return "redirect:/employees/list"; } … } • No need for new code … we can reuse our existing cod e • Works the same for add or update :-)
© luv2code LLC Date Thymeleaf - Delete Employee
www.luv2code.com © luv2code LLC Delete Employee - DEMO
www.luv2code.com © luv2code LLC Delete Employee 1. Add “Delete” button/link on page 2. Add controller code for “Delete” Step-By-Step
www.luv2code.com © luv2code LLC Step 1: "Delete" button Each row has a Delete button/link - current employee id embedded in link When clicked - prompt user - will delete the employee from database
www.luv2code.com © luv2code LLC Step 1: "Delete" button • Delete button includes employee id <tr th:each="tempEmployee : ${employees}"> … <td> <a th:href="@{/employees/delete(employeeId=${tempEmployee.id})}" class="btn btn-danger btn-sm" onclick="if (!(confirm('Are you sure you want to delete this employee?'))) return false"> Delete </a> </td> </tr> Appends to URL ?employeeId=xxx JavaScript to prompt user before deleting
www.luv2code.com © luv2code LLC Step 2: Add controller code for delete @Controller @RequestMapping("/employees") public class EmployeeController { … @GetMapping("/delete") public String delete(@RequestParam("employeeId") int theId) { // delete the employee employeeService.deleteById(theId); // redirect to /employees/list return "redirect:/employees/list"; } … }

07-spring-boot-spring-mvc-crud spring mvc

  • 1.
    © luv2code LLC m ThymeleafCRUD - Real Time Project
  • 2.
    www.luv2code.com © luv2codeLLC Application Requirements Create a Web UI for the Employee Directory Users should be able to • Get a list of employees • Add a new employee • Update an employee • Delete an employee From the Boss Thymeleaf + Spring Boot
  • 3.
    www.luv2code.com © luv2codeLLC Real-Time Project Thymeleaf + Spring Boot
  • 4.
    www.luv2code.com © luv2codeLLC Big Picture 1 2 3 4 Employe e Controller Employe e Repository Thymeleaf Templates Web Browser Employe e Service 6 5
  • 5.
    www.luv2code.com © luv2codeLLC Application Architecture Employee Controller Employe e Repository Employe e Service Reuse code from previous project New code that we will create
  • 6.
    www.luv2code.com © luv2codeLLC Project Set Up • We will extend our existing Employee project and add DB integration • Add EmployeeService, EmployeeRepository and Employee entit y • Available in one of our previous project s • We created all of this code already from scratch … so we'll just copy/paste it • Allows us to focus on creating EmployeeController and Thymeleaf templates
  • 7.
    www.luv2code.com © luv2codeLLC Development Process - Big Picture 1. Get list of employee s 2. Add a new employe e 3. Update an existing employe e 4. Delete an existing employee Step-By-Step
  • 8.
  • 9.
    www.luv2code.com © luv2codeLLC Add Employee - DEMO
  • 10.
    www.luv2code.com © luv2codeLLC Add Employee 1. New Add Employee button for list-employees.html Step-By-Step
  • 11.
    www.luv2code.com © luv2codeLLC Add Employee 1. New Add Employee button for list-employees.html 2. Create HTML form for new employee Step-By-Step
  • 12.
    www.luv2code.com © luv2codeLLC Add Employee 1. New Add Employee button for list-employees.html 2. Create HTML form for new employee 3. Process form data to save employee Step-By-Step
  • 13.
    www.luv2code.com © luv2codeLLC Step 1: New "Add Employee" button • Add Employee button will href link to • request mapping /employees/showFormForAdd <a th:href="@{/employees/showFormForAdd}"> Add Employee </a> Add Employee @ symbo l Reference context path of your application (app root)
  • 14.
    www.luv2code.com © luv2codeLLC Step 1: New "Add Employee" button • Add Employee button will href link to • request mapping /employees/showFormForAdd Apply Bootstrap styles Docs on Bootstrap styles: www.getbootstrap.com <a th:href="@{/employees/showFormForAdd}"> Add Employee </a> <a th:href="@{/employees/showFormForAdd}" class="btn btn-primary btn-sm mb-3"> Add Employee </a> Button Button Primary Button Small Margin Bottom, 3 pixels
  • 15.
    www.luv2code.com © luv2codeLLC <a th:href="@{/employees/showFormForAdd}" class="btn btn-primary btn-sm mb-3"> Add Employee </a> Step 1: New "Add Employee" button • Add Employee button will href link to • request mapping /employees/showFormForAdd TODO : Add controller request mapping for /employees/showFormForAdd
  • 16.
    www.luv2code.com © luv2codeLLC Showing Form In your Spring Controller • Before you show the form, you must add a model attribute • This is an object that will hold form data for the data binding
  • 17.
    www.luv2code.com © luv2codeLLC Controller code to show form @Controller @RequestMapping("/employees") public class EmployeeController { @GetMapping("/showFormForAdd") public String showFormForAdd(Model theModel) { // create model attribute to bind form data Employee theEmployee = new Employee(); theModel.addAttribute("employee", theEmployee); return "employees/employee-form"; } … } Our Thymleaf template will access this data for binding form data src/main/resources/templates/employees/employee-form.html
  • 18.
    www.luv2code.com © luv2codeLLC Thymeleaf and Spring MVC Data Binding • Thymeleaf has special expressions for binding Spring MVC form data • Automatically setting / retrieving data from a Java object
  • 19.
    www.luv2code.com © luv2codeLLC Thymeleaf Expressions • Thymeleaf expressions can help you build the HTML form :-) Expression Description th:action Location to send form data th:object Reference to model attribute th:field Bind input field to a property on model attribute more …. See - www.luv2code.com/thymeleaf-create-form
  • 20.
    www.luv2code.com © luv2codeLLC Step 2: Create HTML form for new employee <form action="#" th:action="@{/employees/save}" th:object="${employee}" method="POST"> </form> Real work Send form data to /employees/save Empty place holder Thymeleaf will handle real work Our model attribute Our model attribute
  • 21.
    www.luv2code.com © luv2codeLLC Step 2: Create HTML form for new employee
  • 22.
    www.luv2code.com © luv2codeLLC Step 2: Create HTML form for new employee <form action="#" th:action="@{/employees/save}" th:object="${employee}" method="POST"> <input type="text" th:field="*{firstName}" placeholder="First name"> <input type="text" th:field="*{lastName}" placeholder="Last name"> <input type="text" th:field="*{email}" placeholder="Email"> <button type="submit">Save</button> </form> *{…} Selects property on referenced th:object
  • 23.
    www.luv2code.com © luv2codeLLC Step 2: Create HTML form for new employee <form action="#" th:action="@{/employees/save}" th:object="${employee}" method="POST"> <input type="text" th:field="*{firstName}" placeholder="First name"> <input type="text" th:field="*{lastName}" placeholder="Last name"> <input type="text" th:field="*{email}" placeholder="Email"> <button type="submit">Save</button> </form> When form is loaded, will call: employee.getFirstName() … employee.getLastName 1 When form is submitted, will call: employee.setFirstName(…) … employee.setLastName(…) 2
  • 24.
    www.luv2code.com © luv2codeLLC Step 2: Create HTML form for new employee <form action="#" th:action="@{/employees/save}" th:object="${employee}" method="POST"> <input type="text" th:field="*{firstName}" placeholder="First name"> <input type="text" th:field="*{lastName}" placeholder="Last name"> <input type="text" th:field="*{email}" placeholder="Email"> <button type="submit">Save</button> </form> <form action="#" th:action="@{/employees/save}" th:object="${employee}" method="POST"> <input type="text" th:field="*{firstName}" placeholder="First name" class="form-control mb-4 w-25"> </form> Apply Bootstrap styles Form control Margin Bottom: 4 pixels Width: 25%
  • 25.
    www.luv2code.com © luv2codeLLC Step 2: Create HTML form for new employee <form action="#" th:action="@{/employees/save}" th:object="${employee}" method="POST"> <input type="text" th:field="*{firstName}" placeholder="First name" class="form-control mb-4 w-25"> </form> <input type="text" th:field="*{lastName}" placeholder="Last name" class="form-control mb-4 w-25"> <input type="text" th:field="*{email}" placeholder="Email" class="form-control mb-4 w-25"> <button type="submit" class="btn btn-info col-2">Save</button> </form> Apply Bootstrap styles Button Button Info Column Span 2
  • 26.
    www.luv2code.com © luv2codeLLC Step 2: Create HTML form for new employee <form action="#" th:action="@{/employees/save}" th:object="${employee}" method="POST"> <input type="text" th:field="*{firstName}" placeholder="First name" class="form-control mb-4 w-25"> <input type="text" th:field="*{lastName}" placeholder="Last name" class="form-control mb-4 w-25"> <input type="text" th:field="*{email}" placeholder="Email" class="form-control mb-4 w-25"> <button type="submit" class="btn btn-info col-2">Save</button> </form> TODO : Add controller request mapping for /employees/save
  • 27.
    www.luv2code.com © luv2codeLLC Step 3: Process form data to save employee @Controller @RequestMapping("/employees") public class EmployeeController { private EmployeeService employeeService; public EmployeeController(EmployeeService theEmployeeService) { employeeService = theEmployeeService; } @PostMapping("/save") public String saveEmployee(@ModelAttribute("employee") Employee theEmployee) { // save the employee employeeService.save(theEmployee); // use a redirect to prevent duplicate submissions return "redirect:/employees/list"; } … } Constructor injection Since only one constructor @Autowired is optional
  • 28.
    www.luv2code.com © luv2codeLLC Step 3: Process form data to save employee @Controller @RequestMapping("/employees") public class EmployeeController { private EmployeeService employeeService; public EmployeeController(EmployeeService theEmployeeService) { employeeService = theEmployeeService; } @PostMapping("/save") public String saveEmployee(@ModelAttribute("employee") Employee theEmployee) { // save the employee employeeService.save(theEmployee); // use a redirect to prevent duplicate submissions return "redirect:/employees/list"; } … }
  • 29.
    www.luv2code.com © luv2codeLLC Step 3: Process form data to save employee @Controller @RequestMapping("/employees") public class EmployeeController { private EmployeeService employeeService; public EmployeeController(EmployeeService theEmployeeService) { employeeService = theEmployeeService; } @PostMapping("/save") public String saveEmployee(@ModelAttribute("employee") Employee theEmployee) { // save the employee employeeService.save(theEmployee); // use a redirect to prevent duplicate submissions return "redirect:/employees/list"; } … } Redirect to request mapping /employees/list "Post/Redirect/Get" pattern For more info see www.luv2code.com/post-redirect-get
  • 30.
  • 31.
    www.luv2code.com © luv2codeLLC Update Employee - Demo
  • 32.
    www.luv2code.com © luv2codeLLC Update Employee 1. "Update" button 2. Pre-populate the form 3. Process form data Step-By-Step
  • 33.
    www.luv2code.com © luv2codeLLC Step 1: "Update" Button Each row has an Update link - current employee id embedded in link When clicked - will load the employee from database - prepopulate the form
  • 34.
    www.luv2code.com © luv2codeLLC Step 1: "Update" button • Update button includes employee id <tr th:each="tempEmployee : ${employees}"> … <td> <a th:href="@{/employees/showFormForUpdate(employeeId=${tempEmployee.id})}" class="btn btn-info btn-sm"> Update </a> </td> </tr> Appends to URL ?employeeId=xxx
  • 35.
    www.luv2code.com © luv2codeLLC Step 2: Pre-populate Form @Controller @RequestMapping("/employees") public class EmployeeController { … @GetMapping("/showFormForUpdate") public String showFormForUpdate(@RequestParam("employeeId") int theId, Model theModel) { // get the employee from the service Employee theEmployee = employeeService.findById(theId); // set employee as a model attribute to pre-populate the form theModel.addAttribute("employee", theEmployee); // send over to our form return "employees/employee-form"; } }
  • 36.
    www.luv2code.com © luv2codeLLC Step 2: Pre-populate Form <form action="#" th:action="@{/employees/save}" th:object="${employee}" method="POST"> <!-- Add hidden form field to handle update --> <input type="hidden" th:field="*{id}" /> <input type="text" th:field="*{firstName}" class="form-control mb-4 w-25" placeholder="First name"> <input type="text" th:field="*{lastName}" class="form-control mb-4 w-25" placeholder="Last name"> <input type="text" th:field="*{email}" class="form-control mb-4 w-25" placeholder="Email"> <button type="submit" class="btn btn-info col-2">Save</button> </form> This is how form is pre-populated Thanks to calls to getters When form is loaded, will call: employee.getFirstName() … employee.getLastName 1
  • 37.
    www.luv2code.com © luv2codeLLC Step 2: Pre-populate Form <form action="#" th:action="@{/employees/save}" th:object="${employee}" method="POST"> <!-- Add hidden form field to handle update --> <input type="hidden" th:field="*{id}" /> <input type="text" th:field="*{firstName}" class="form-control mb-4 w-25" placeholder="First name"> <input type="text" th:field="*{lastName}" class="form-control mb-4 w-25" placeholder="Last name"> <input type="text" th:field="*{email}" class="form-control mb-4 w-25" placeholder="Email"> <button type="submit" class="btn btn-info col-2">Save</button> </form> Hidden form field required for updates
  • 38.
    www.luv2code.com © luv2codeLLC Step 2: Pre-populate Form <form action="#" th:action="@{/employees/save}" th:object="${employee}" method="POST"> <!-- Add hidden form field to handle update --> <input type="hidden" th:field="*{id}" /> <input type="text" th:field="*{firstName}" class="form-control mb-4 w-25" placeholder="First name"> <input type="text" th:field="*{lastName}" class="form-control mb-4 w-25" placeholder="Last name"> <input type="text" th:field="*{email}" class="form-control mb-4 w-25" placeholder="Email"> <button type="submit" class="btn btn-info col-2">Save</button> </form>
  • 39.
    www.luv2code.com © luv2codeLLC Step 2: Pre-populate Form <form action="#" th:action="@{/employees/save}" th:object="${employee}" method="POST"> <!-- Add hidden form field to handle update --> <input type="hidden" th:field="*{id}" /> <input type="text" th:field="*{firstName}" class="form-control mb-4 w-25" placeholder="First name"> <input type="text" th:field="*{lastName}" class="form-control mb-4 w-25" placeholder="Last name"> <input type="text" th:field="*{email}" class="form-control mb-4 w-25" placeholder="Email"> <button type="submit" class="btn btn-info col-2">Save</button> </form> This binds to the model attribute Tells your app which employee to update
  • 40.
    www.luv2code.com © luv2codeLLC Step 3: Process form data to save employee @Controller @RequestMapping("/employees") public class EmployeeController { … @PostMapping("/save") public String saveEmployee(@ModelAttribute("employee") Employee theEmployee) { // save the employee employeeService.save(theEmployee); // use a redirect to prevent duplicate submissions return "redirect:/employees/list"; } … } • No need for new code … we can reuse our existing cod e • Works the same for add or update :-)
  • 41.
  • 42.
    www.luv2code.com © luv2codeLLC Delete Employee - DEMO
  • 43.
    www.luv2code.com © luv2codeLLC Delete Employee 1. Add “Delete” button/link on page 2. Add controller code for “Delete” Step-By-Step
  • 44.
    www.luv2code.com © luv2codeLLC Step 1: "Delete" button Each row has a Delete button/link - current employee id embedded in link When clicked - prompt user - will delete the employee from database
  • 45.
    www.luv2code.com © luv2codeLLC Step 1: "Delete" button • Delete button includes employee id <tr th:each="tempEmployee : ${employees}"> … <td> <a th:href="@{/employees/delete(employeeId=${tempEmployee.id})}" class="btn btn-danger btn-sm" onclick="if (!(confirm('Are you sure you want to delete this employee?'))) return false"> Delete </a> </td> </tr> Appends to URL ?employeeId=xxx JavaScript to prompt user before deleting
  • 46.
    www.luv2code.com © luv2codeLLC Step 2: Add controller code for delete @Controller @RequestMapping("/employees") public class EmployeeController { … @GetMapping("/delete") public String delete(@RequestParam("employeeId") int theId) { // delete the employee employeeService.deleteById(theId); // redirect to /employees/list return "redirect:/employees/list"; } … }