📘 Premium Read: Access my best content on Medium member-only articles — deep dives into Java, Spring Boot, Microservices, backend architecture, interview preparation, career advice, and industry-standard best practices.
🎓 Top 15 Udemy Courses (80-90% Discount): My Udemy Courses - Ramesh Fadatare — All my Udemy courses are real-time and project oriented courses.
▶️ Subscribe to My YouTube Channel (176K+ subscribers): Java Guides on YouTube
▶️ For AI, ChatGPT, Web, Tech, and Generative AI, subscribe to another channel: Ramesh Fadatare on YouTube
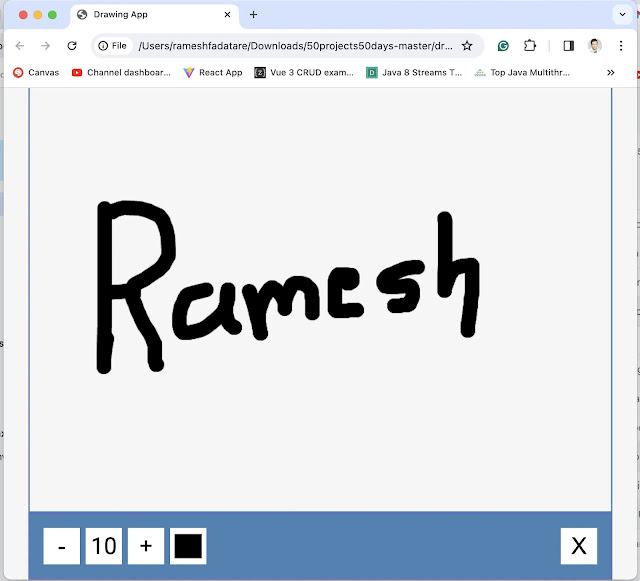
Creating a drawing app is a fun and interactive way to learn web development. This tutorial will walk you through the steps to build a basic drawing application using JavaScript, HTML5, and CSS. By the end of this guide, you'll have a fully functional drawing app where users can draw on a canvas, change brush sizes, select colors, and clear the canvas.
Project Setup
- index.html: Contains the HTML markup for the application.
- style.css: Styles the application.
- script.js: Contains the logic of the Drawing application.
Development Steps
1. HTML Markup (index.html)
<!DOCTYPE html> <html lang="en"> <head> <meta charset="UTF-8" /> <meta name="viewport" content="width=device-width, initial-scale=1.0" /> <link rel="stylesheet" href="style.css" /> <title>Drawing App</title> </head> <body> <canvas id="canvas" width="800" height="700"></canvas> <div class="toolbox"> <button id="decrease">-</button> <span id="size">10</span> <button id="increase">+</button> <input type="color" id="color"> <button id="clear">X</button> </div> <script src="script.js"></script> </body> </html> 2. style.css - CSS Styling
@import url('https://fonts.googleapis.com/css2?family=Roboto:wght@400;700&display=swap'); * { box-sizing: border-box; } body { background-color: #f5f5f5; font-family: 'Roboto', sans-serif; display: flex; flex-direction: column; align-items: center; justify-content: center; height: 100vh; margin: 0; } canvas { border: 2px solid steelblue; } .toolbox { background-color: steelblue; border: 1px solid slateblue; display: flex; width: 804px; padding: 1rem; } .toolbox > * { background-color: #fff; border: none; display: inline-flex; align-items: center; justify-content: center; font-size: 2rem; height: 50px; width: 50px; margin: 0.25rem; padding: 0.25rem; cursor: pointer; } .toolbox > *:last-child { margin-left: auto; } 3. script.js - JavaScript Functionality
const canvas = document.getElementById('canvas'); const increaseBtn = document.getElementById('increase'); const decreaseBtn = document.getElementById('decrease'); const sizeEL = document.getElementById('size'); const colorEl = document.getElementById('color'); const clearEl = document.getElementById('clear'); const ctx = canvas.getContext('2d'); let size = 10 let isPressed = false colorEl.value = 'black' let color = colorEl.value let x let y canvas.addEventListener('mousedown', (e) => { isPressed = true x = e.offsetX y = e.offsetY }) document.addEventListener('mouseup', (e) => { isPressed = false x = undefined y = undefined }) canvas.addEventListener('mousemove', (e) => { if(isPressed) { const x2 = e.offsetX const y2 = e.offsetY drawCircle(x2, y2) drawLine(x, y, x2, y2) x = x2 y = y2 } }) function drawCircle(x, y) { ctx.beginPath(); ctx.arc(x, y, size, 0, Math.PI * 2) ctx.fillStyle = color ctx.fill() } function drawLine(x1, y1, x2, y2) { ctx.beginPath() ctx.moveTo(x1, y1) ctx.lineTo(x2, y2) ctx.strokeStyle = color ctx.lineWidth = size * 2 ctx.stroke() } function updateSizeOnScreen() { sizeEL.innerText = size } increaseBtn.addEventListener('click', () => { size += 5 if(size > 50) { size = 50 } updateSizeOnScreen() }) decreaseBtn.addEventListener('click', () => { size -= 5 if(size < 5) { size = 5 } updateSizeOnScreen() }) colorEl.addEventListener('change', (e) => color = e.target.value) clearEl.addEventListener('click', () => ctx.clearRect(0,0, canvas.width, canvas.height)) Here’s a breakdown of the JavaScript functionality:
Canvas Setup and Event Listeners: We start by setting up the canvas context and defining event listeners for mouse down, up, and move actions. These events track whether the user is drawing and the position of the cursor on the canvas.
const canvas = document.getElementById('canvas'); const ctx = canvas.getContext('2d');Drawing Functions: The drawCircle and drawLine functions are where the magic happens. They use the canvas API to draw on the canvas based on the user's input.
function drawCircle(x, y) { ctx.beginPath(); ctx.arc(x, y, size, 0, Math.PI * 2); ctx.fillStyle = color; ctx.fill(); } function drawLine(x1, y1, x2, y2) { ctx.beginPath(); ctx.moveTo(x1, y1); ctx.lineTo(x2, y2); ctx.strokeStyle = color; ctx.lineWidth = size * 2; ctx.stroke(); } Toolbox Functionality: The increase and decrease buttons adjust the brush size, the color input changes the brush color, and the clear button wipes the canvas clean.
increaseBtn.addEventListener('click', () => { size += 5; updateSizeOnScreen(); }); decreaseBtn.addEventListener('click', () => { size -= 5; updateSizeOnScreen(); }); colorEl.addEventListener('change', (e) => color = e.target.value); clearEl.addEventListener('click', () => ctx.clearRect(0,0, canvas.width, canvas.height)); 


![[NEW] Full-Stack Java Development with Spring Boot 3 & React Build 5 Spring Boot Projects with Java: Line-by-Line Coding](https://img-c.udemycdn.com/course/750x422/5338984_4d3a_5.jpg)


Comments
Post a Comment
Leave Comment