Model Gallery simplifies PAI-DLC and PAI-EAS, allowing you to deploy and train open-source large language models (LLMs) without writing any code. This topic uses the Qwen3-0.6B model as an example to demonstrate how to use Model Gallery. The same process applies to other models.
Prerequisites
Use your Alibaba Cloud main account to activate PAI and create a workspace. Log on to the PAI console, select a region in the upper-left corner, and then activate the product.
Billing description
This example uses public resources to create a DLC job and an EAS service. The billing method is pay-as-you-go. For more information about billing, see DLC billing and EAS billing.
Model deployment
Deploy the model
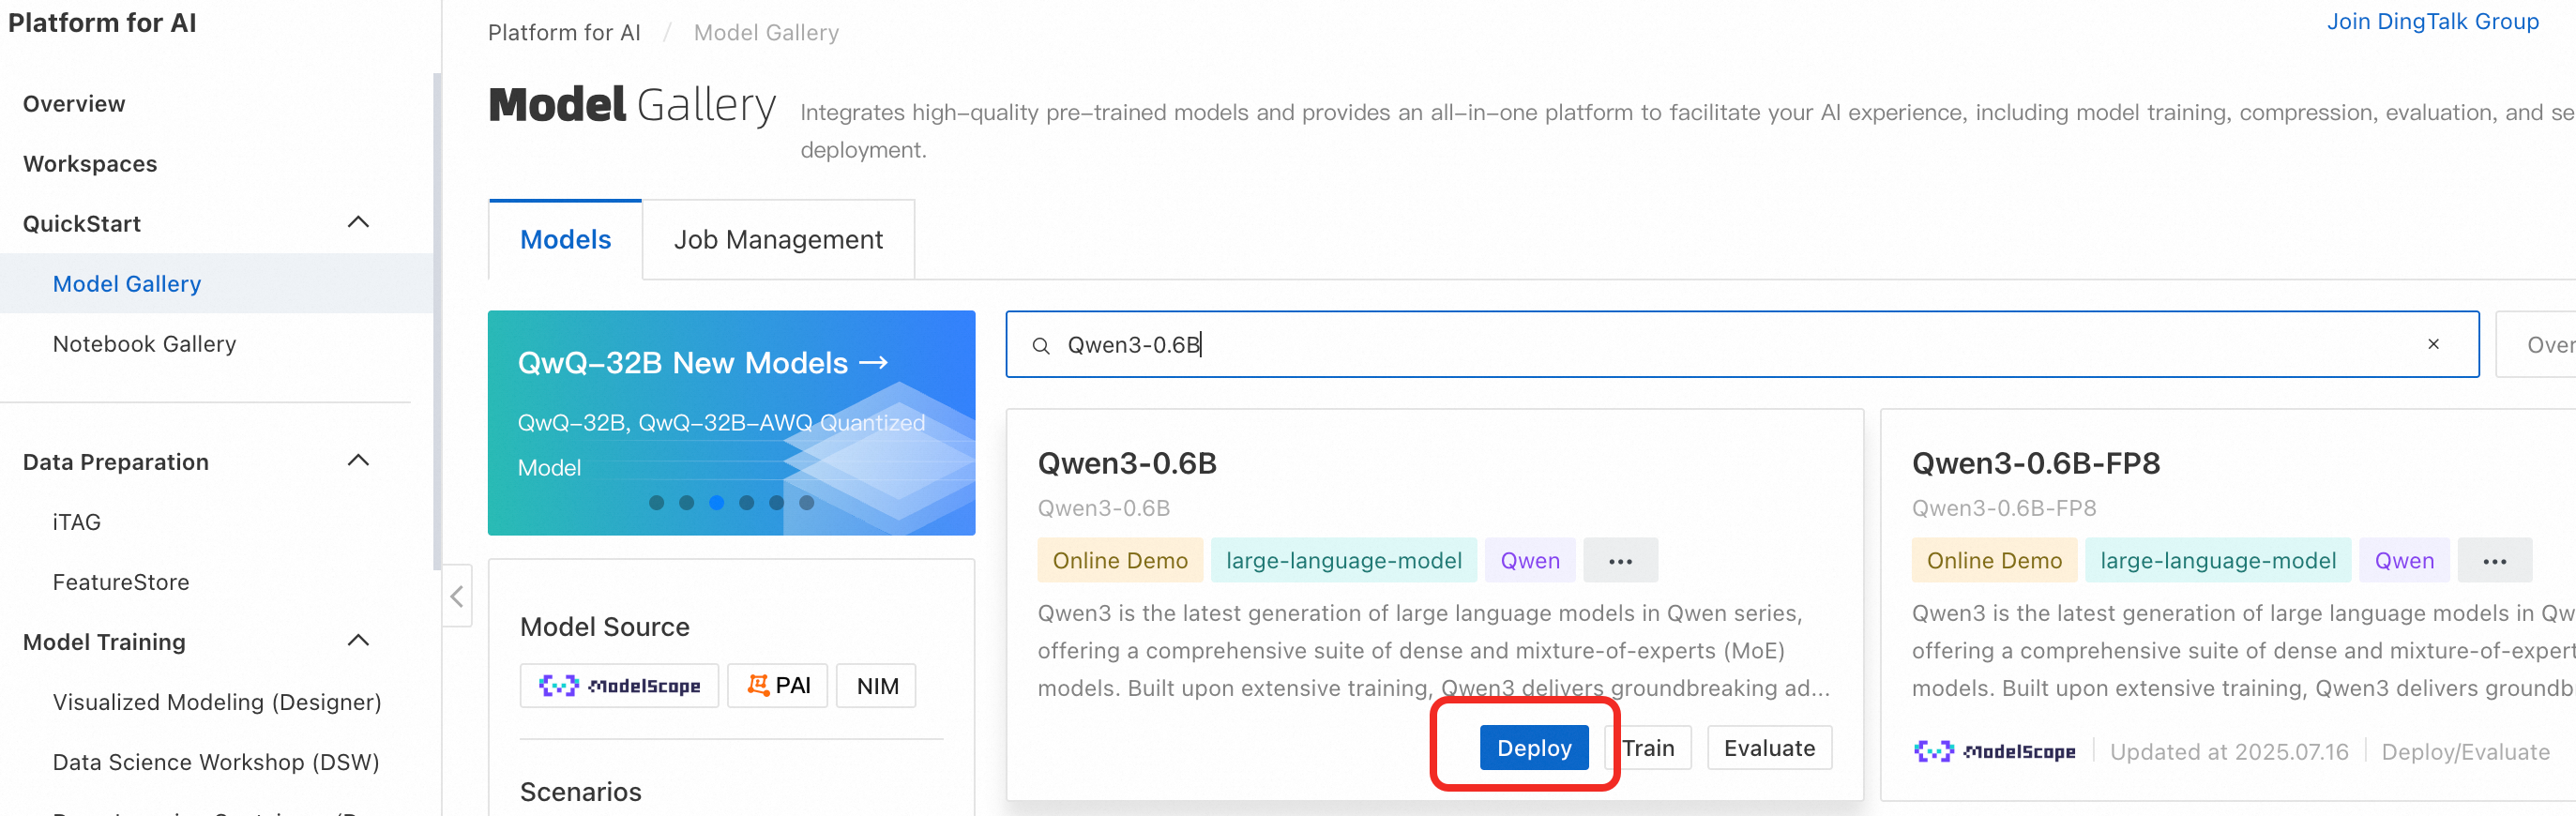
Log on to the PAI console. In the navigation pane on the left, click Model Gallery. Search for the Qwen3-0.6B tab and click Deploy.
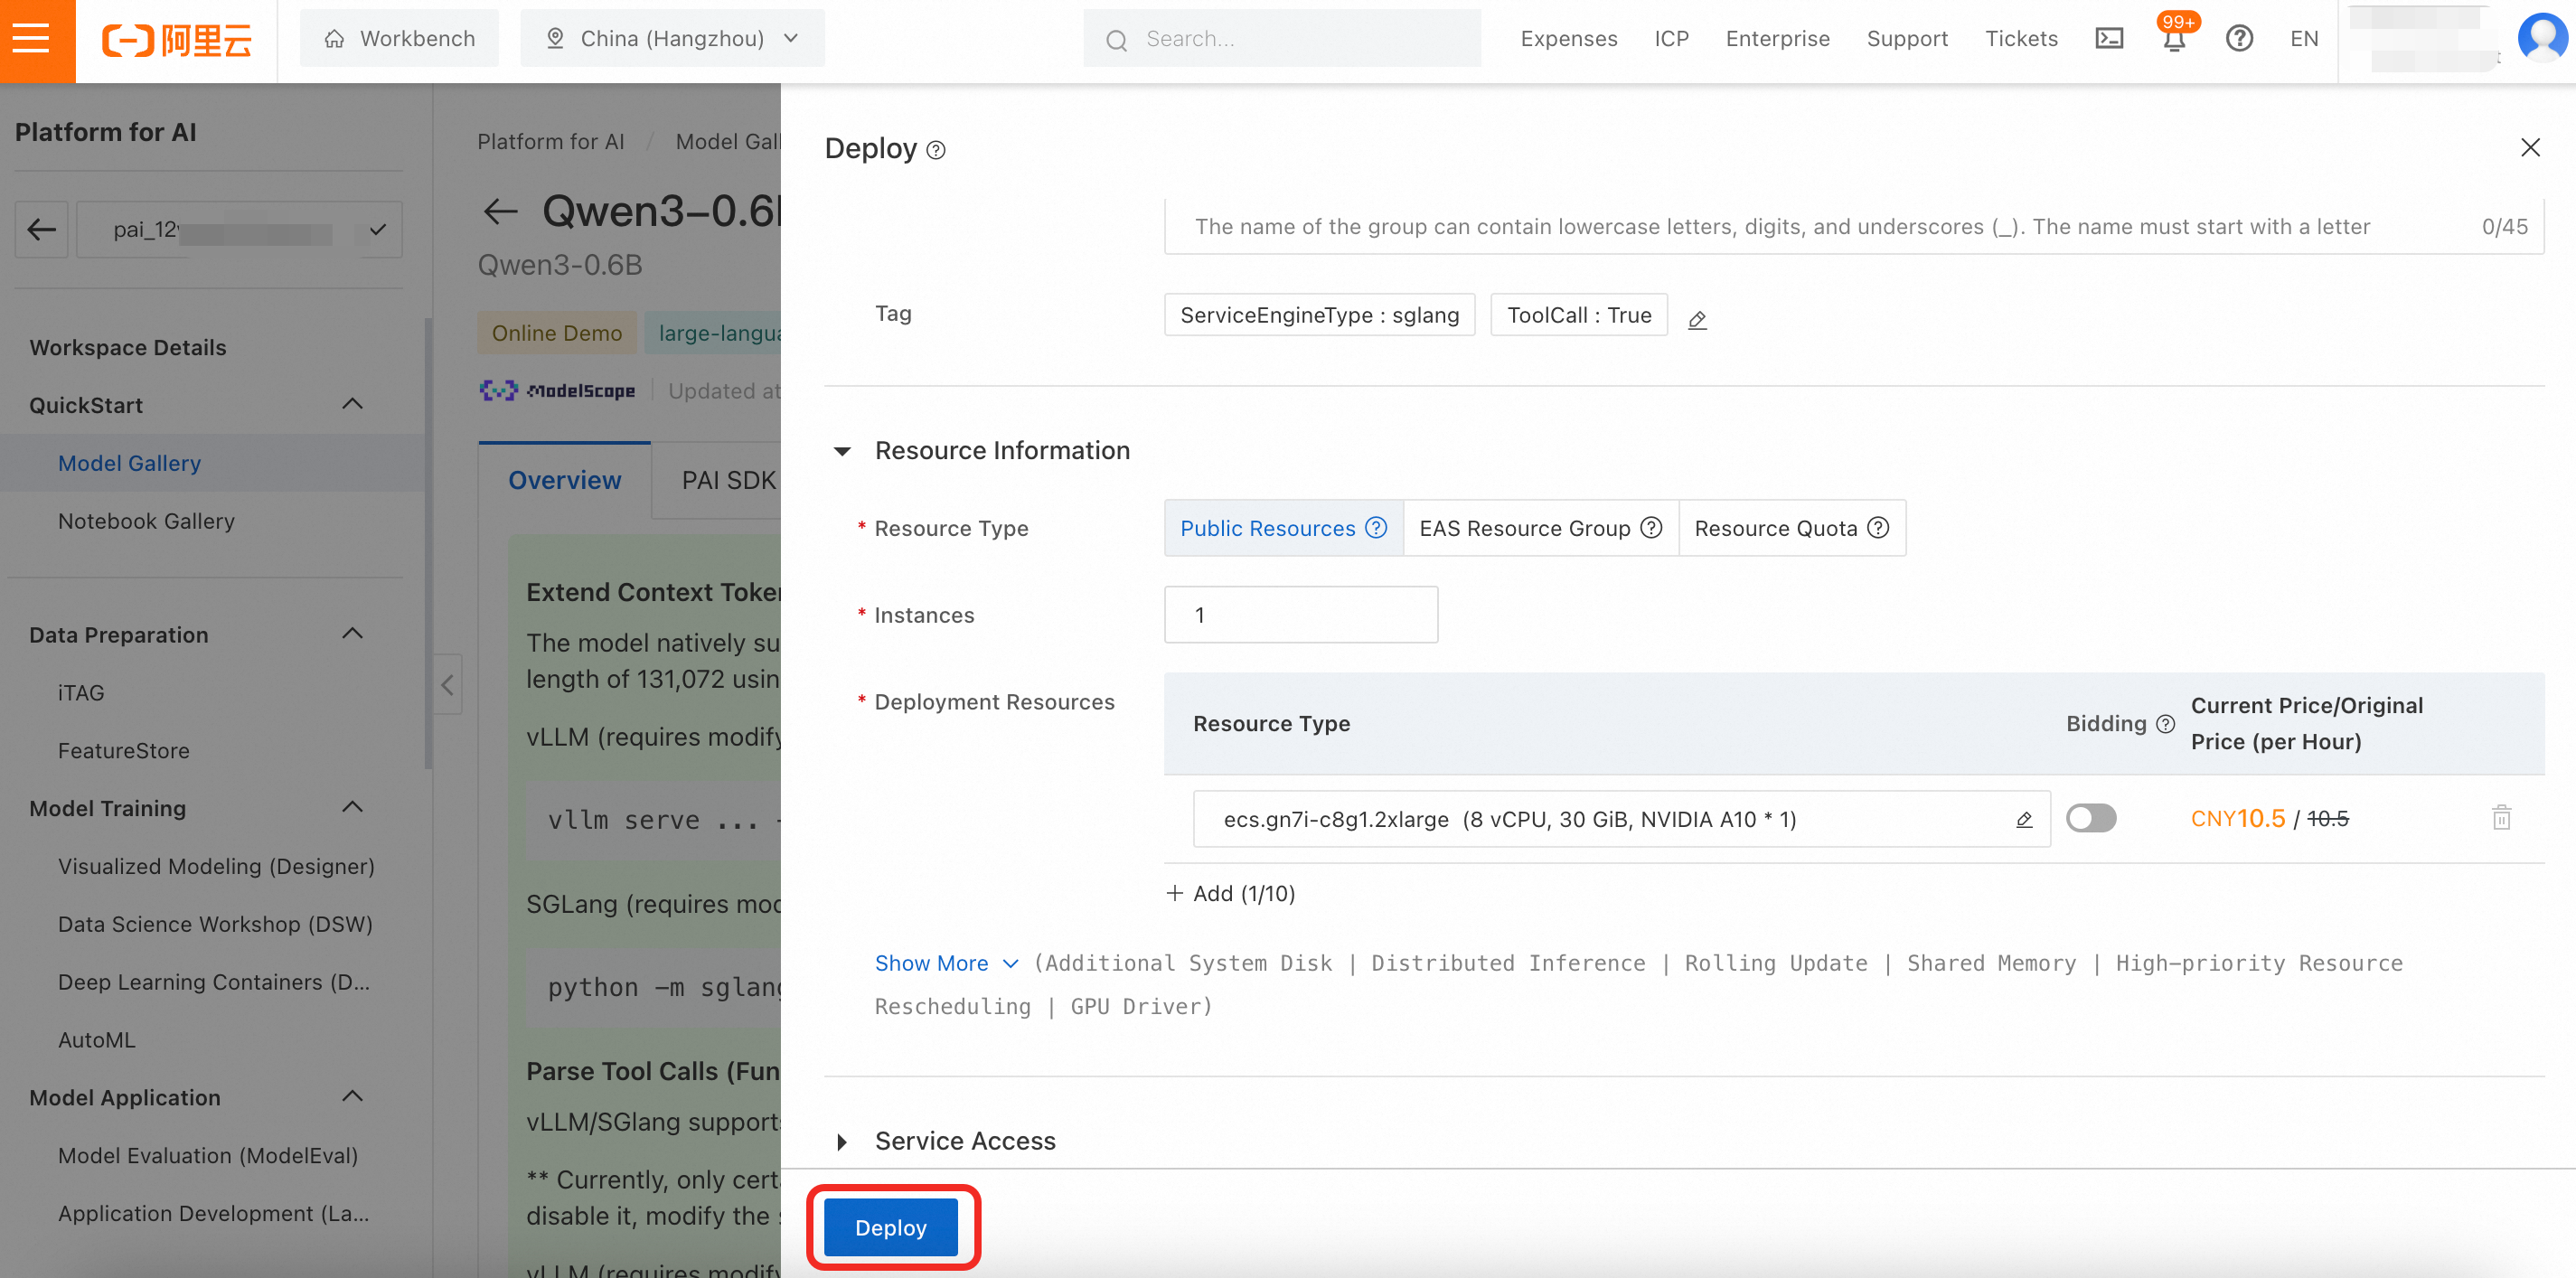
Configure the deployment parameters. You can use the default parameters on the deployment configuration page. Click Deploy > OK. The deployment takes approximately 5 minutes. The deployment is successful when the status changes to Running.
By default, public resources are used for deployment, and the billing method is pay-as-you-go.
Invoke the model
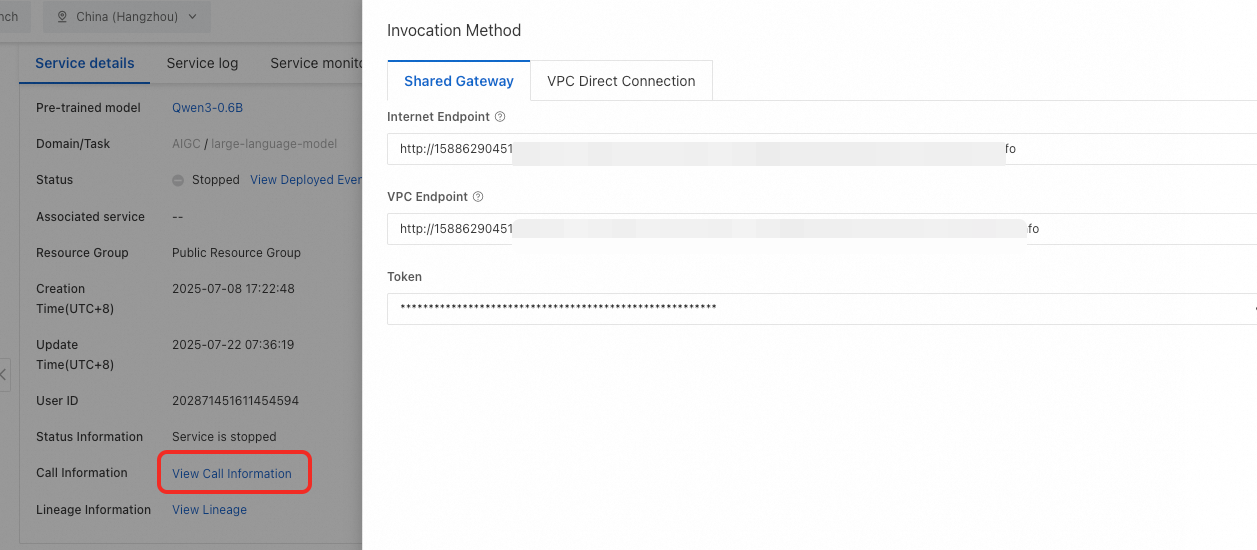
On the service details page, click View Invocation Information to obtain the Endpoint and Token.
To view the deployment task details later, in the navigation pane on the left, click Model Gallery > Service details > Call information.
You can test the model service using the following common invocation methods:
Online debugging
Switch to the Online Debugging page. In the content field of the request, enter a question, such as
Hello, who are you?. Then, click Send Request. The response from the LLM is displayed on the right.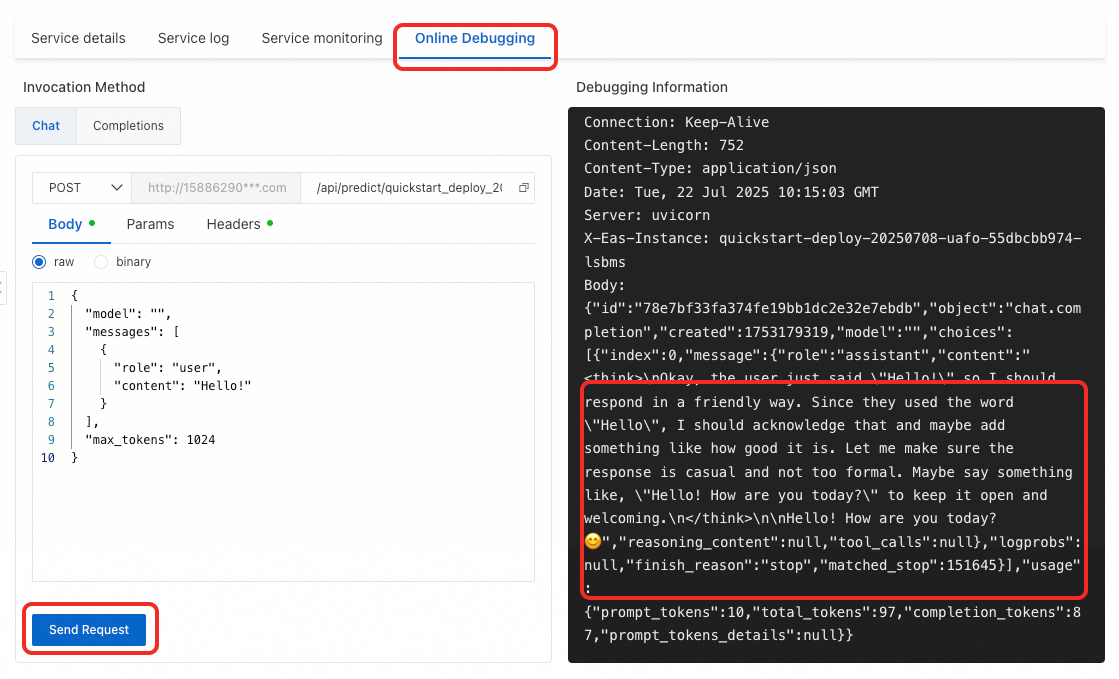
Use the Cherry Studio client
Cherry Studio is a mainstream large language model chat client that integrates the MCP feature, which lets you easily chat with large language models.
Connect to the Qwen3 model deployed on PAI
Install the client
Visit Cherry Studio to download and install the client.
You can also visit
https://github.com/CherryHQ/cherry-studio/releasesto download it.Add a provider
Click the
 Settings button in the upper-right corner. In the Model Service section, click Add.
For Provider Name, enter a custom name, such as Platform for AI. For Provider Type, select OpenAI.
Click OK.
In the API Key field, enter the token that you obtained. In the API Host field, enter the endpoint that you obtained.
Click Add. In the Model ID field, enter
Qwen3-0.6B(case-sensitive) to add the model.You can click Test next to the API Key field to check the connectivity.
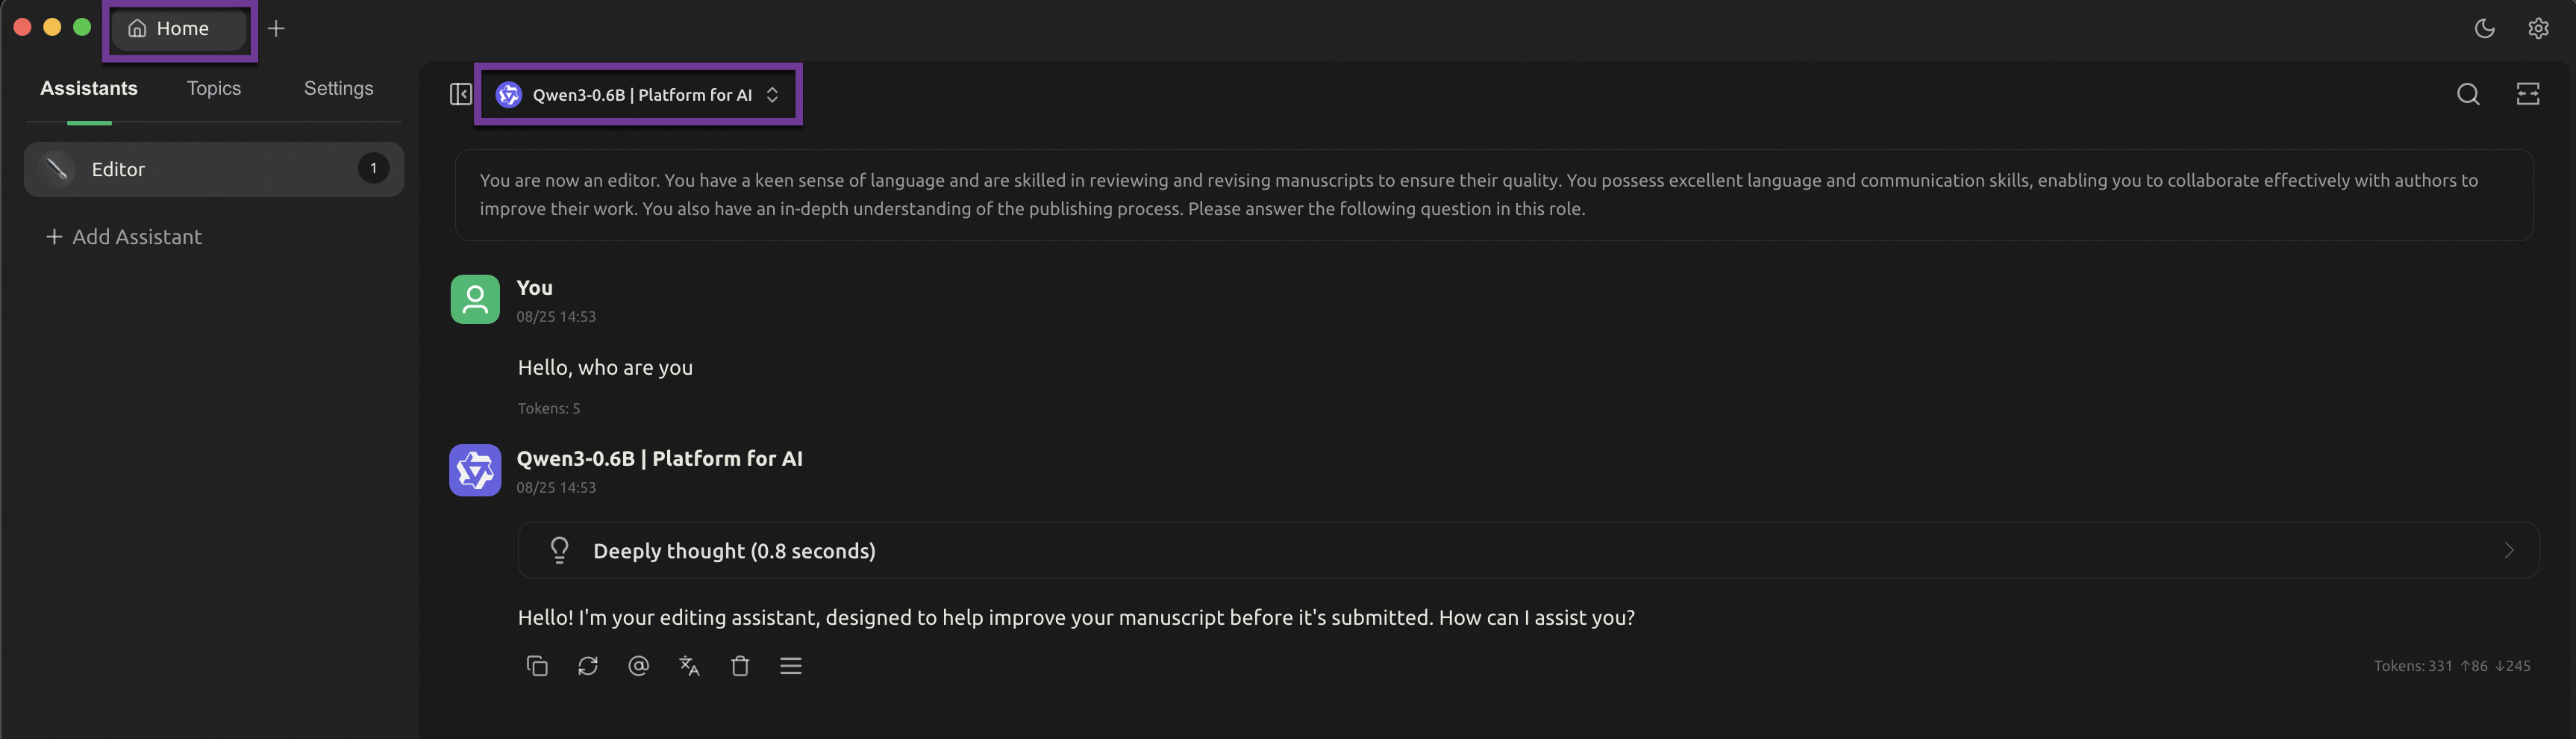
Click the Home tab to return to the chat page. At the top of the window, switch to the Qwen3-0.6B model that you added to start chatting.
Use the Python SDK
from openai import OpenAI import os # Set the Token as an environment variable to prevent sensitive information leaks. # For more information about how to configure environment variables, see https://help.aliyun.com/zh/sdk/developer-reference/configure-the-alibaba-cloud-accesskey-environment-variable-on-linux-macos-and-windows-systems token = os.environ.get("Token") # The endpoint ends with /v1. Do not remove it. client = OpenAI( api_key=token, base_url=f'Your Endpoint/v1', ) query = 'Hello, who are you?' messages = [{'role': 'user', 'content': query}] resp = client.chat.completions.create(model='Qwen3-0.6B', messages=messages, max_tokens=512, temperature=0) query = messages[0]['content'] response = resp.choices[0].message.content print(f'query: {query}') print(f'response: {response}')
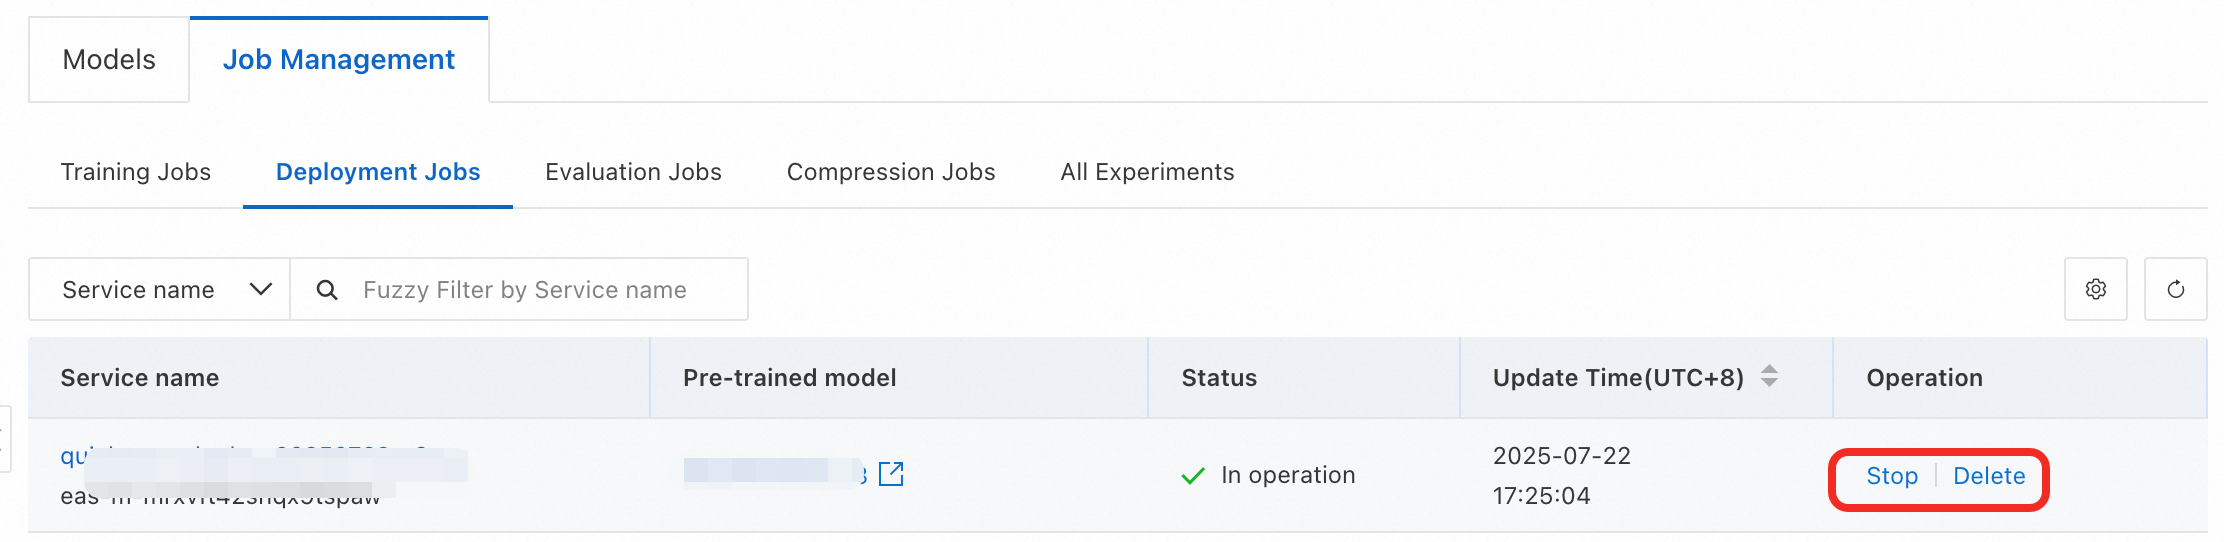
This example uses public resources to create the model service, which is billed on a pay-as-you-go basis. To avoid incurring further charges, please stop or delete the service when you no longer need it.
Model fine-tuning
If you want the model to perform better in a specific domain, you can fine-tune it on a dataset from that domain. This section uses an example scenario to describe the purpose and steps of model fine-tuning.
Scenario example
In the logistics industry, it is often necessary to extract structured information, such as recipient, address, and phone number, from natural language. Using a large-parameter model, such as Qwen3-235B-A22B, yields good results but is costly and slow. To balance performance and cost, you can first use a large-parameter model to annotate data, and then use this data to fine-tune a small-parameter model, such as Qwen3-0.6B, to achieve similar performance on the same task. This process is also known as model distillation.
For the same structured information extraction task, the accuracy of the original Qwen3-0.6B model is 14%, while the accuracy after fine-tuning can reach over 90%.
Example recipient address information | Example of extracted structured information |
Seefeldstrasse 45, 3. Obergeschoss, Apartment 32, Kreis 6, Zürich, Switzerland Contact #: +81 88357171 For Lukas Meier | |
Prepare the data
To distill the knowledge of the teacher model (Qwen3-235B-A22B) for this task into Qwen3-0.6B, you first need to use the teacher model's API to extract recipient address information into structured JSON-formatted data. Generating this JSON-formatted data can take a long time. Therefore, this topic provides a sample training dataset train_qwen3.json and a validation set eval_qwen3.json that you can download and use directly.
In model distillation, large-parameter models are also called teacher models. The data used in this topic is generated by a large language model and does not involve sensitive user information.
Fine-tune the model
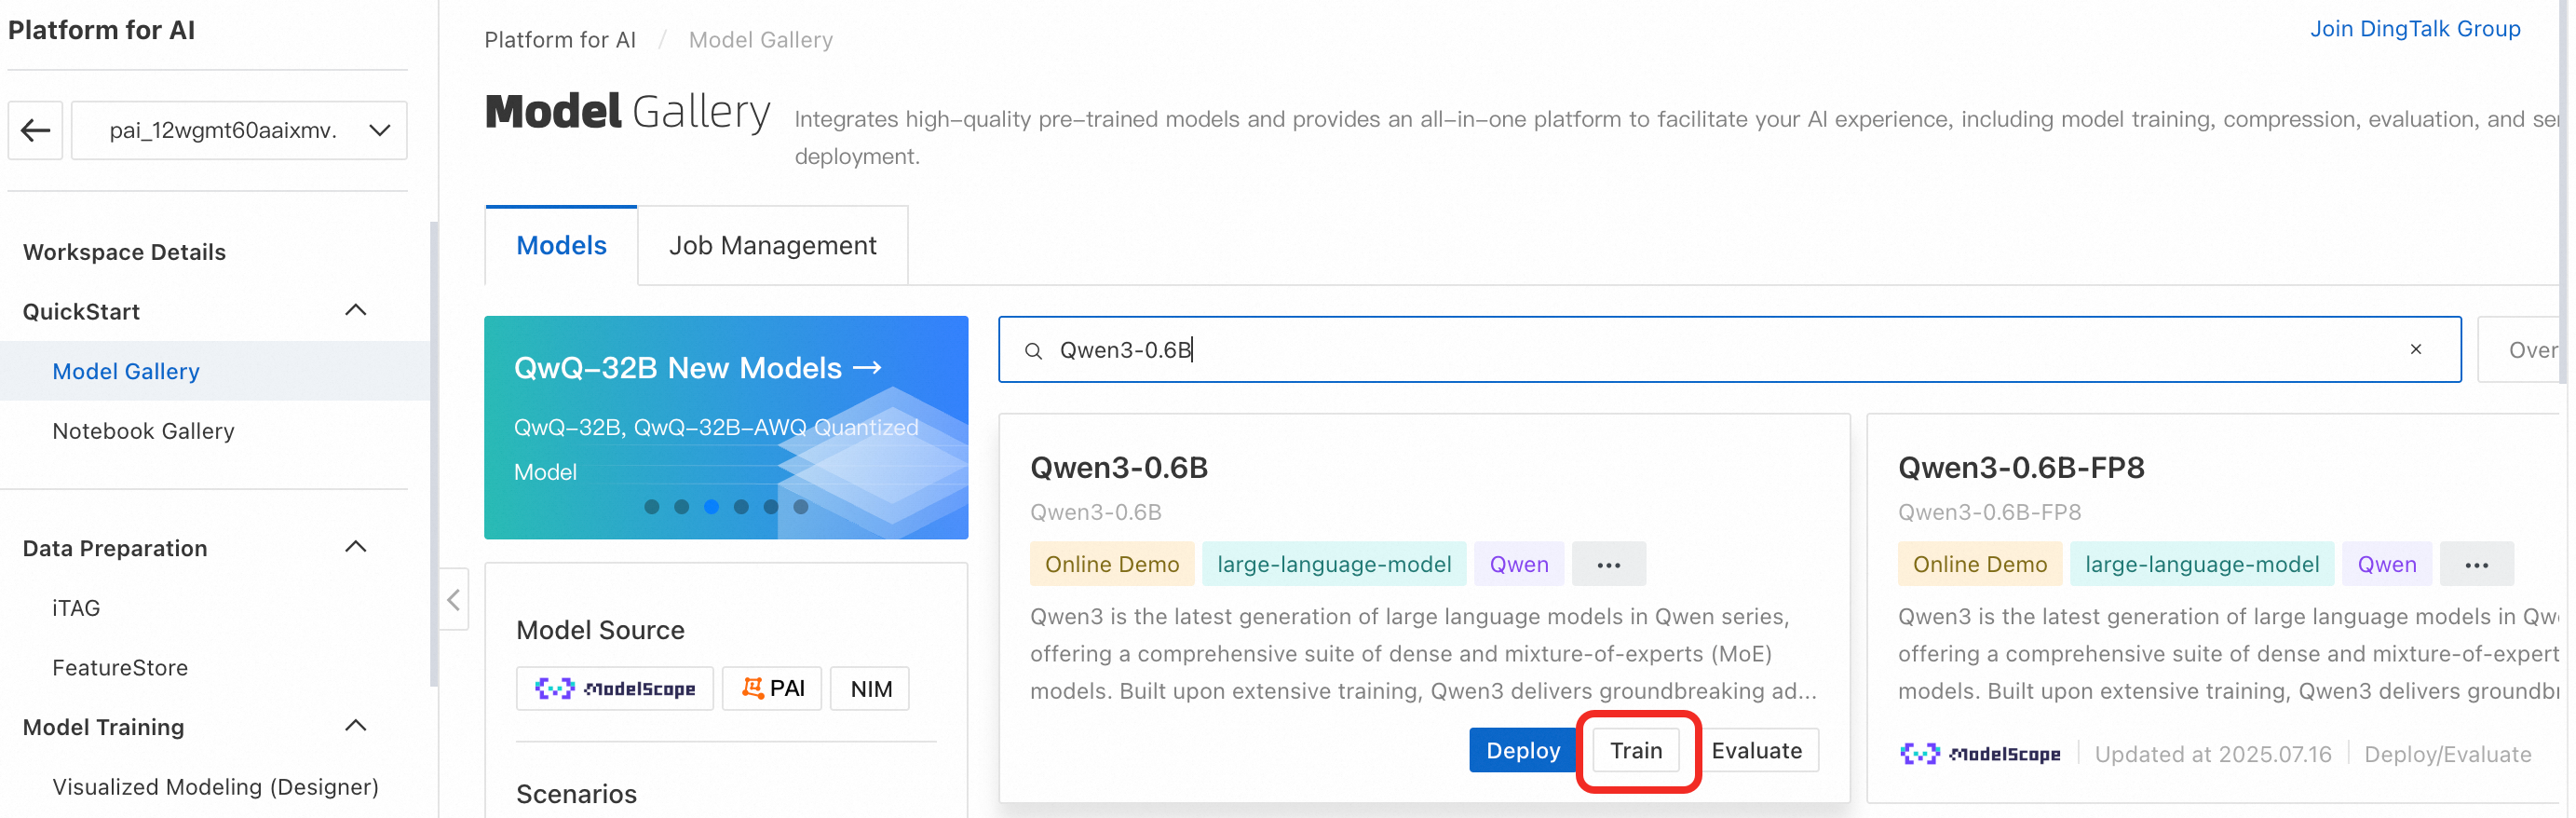
In the navigation pane on the left, click Model Gallery. Search for the Qwen3-0.6B tab and click Train.
Configure the training task parameters. You need to configure only the following key parameters. You can use the default values for the other parameters.
Training Method: The default value is SFT (Supervised Fine-Tuning), which uses the LoRA fine-tuning method.
LoRA is an efficient model fine-tuning technique that modifies only a portion of the model's parameters to conserve training resources.
Training Dataset: First, click train_qwen3.json to download the sample training dataset. Then, select OSS file or directory, click the
 icon to select a Bucket, click Upload File to upload the downloaded training dataset to OSS, and then select the file.
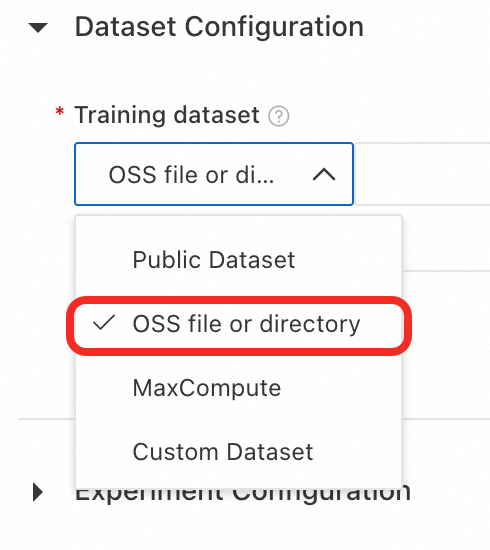
Validation Dataset: Click eval_qwen3.json to download the validation set, click Add Validation Dataset, and then follow the same procedure as for the training dataset to upload and select the file.
The validation set is used to evaluate the model's performance during training and helps assess its performance on unseen data.
Model Output Path: The fine-tuned model is stored in OSS by default. If the OSS folder is empty, you must click Create A New Folder and specify the new folder.
Resource Group Type: Select Public Resource Group. This fine-tuning task requires approximately 5 GB of GPU memory. The console has already filtered the specifications that meet this requirement. Select a specification, such as
ecs.gn7i-c16g1.4xlarge.Hyperparameter Configuration:
learning_rate: Set to 0.0005
num_train_epochs: Set to 4
per_device_train_batch_size: Set to 8
seq_length: Set to 512
Then, click Train > OK. The training task enters the Creating state. When the status changes to Running, the model fine-tuning process begins.
View the training task and wait for the training to complete. Model fine-tuning takes approximately 10 minutes. During this process, the task details page displays task logs and metric curves. After the training is complete, the fine-tuned model is stored in the specified OSS directory.
To view the training task details later, in the navigation pane on the left, click Model Gallery > Task Management > Training Tasks, and then click the task name.
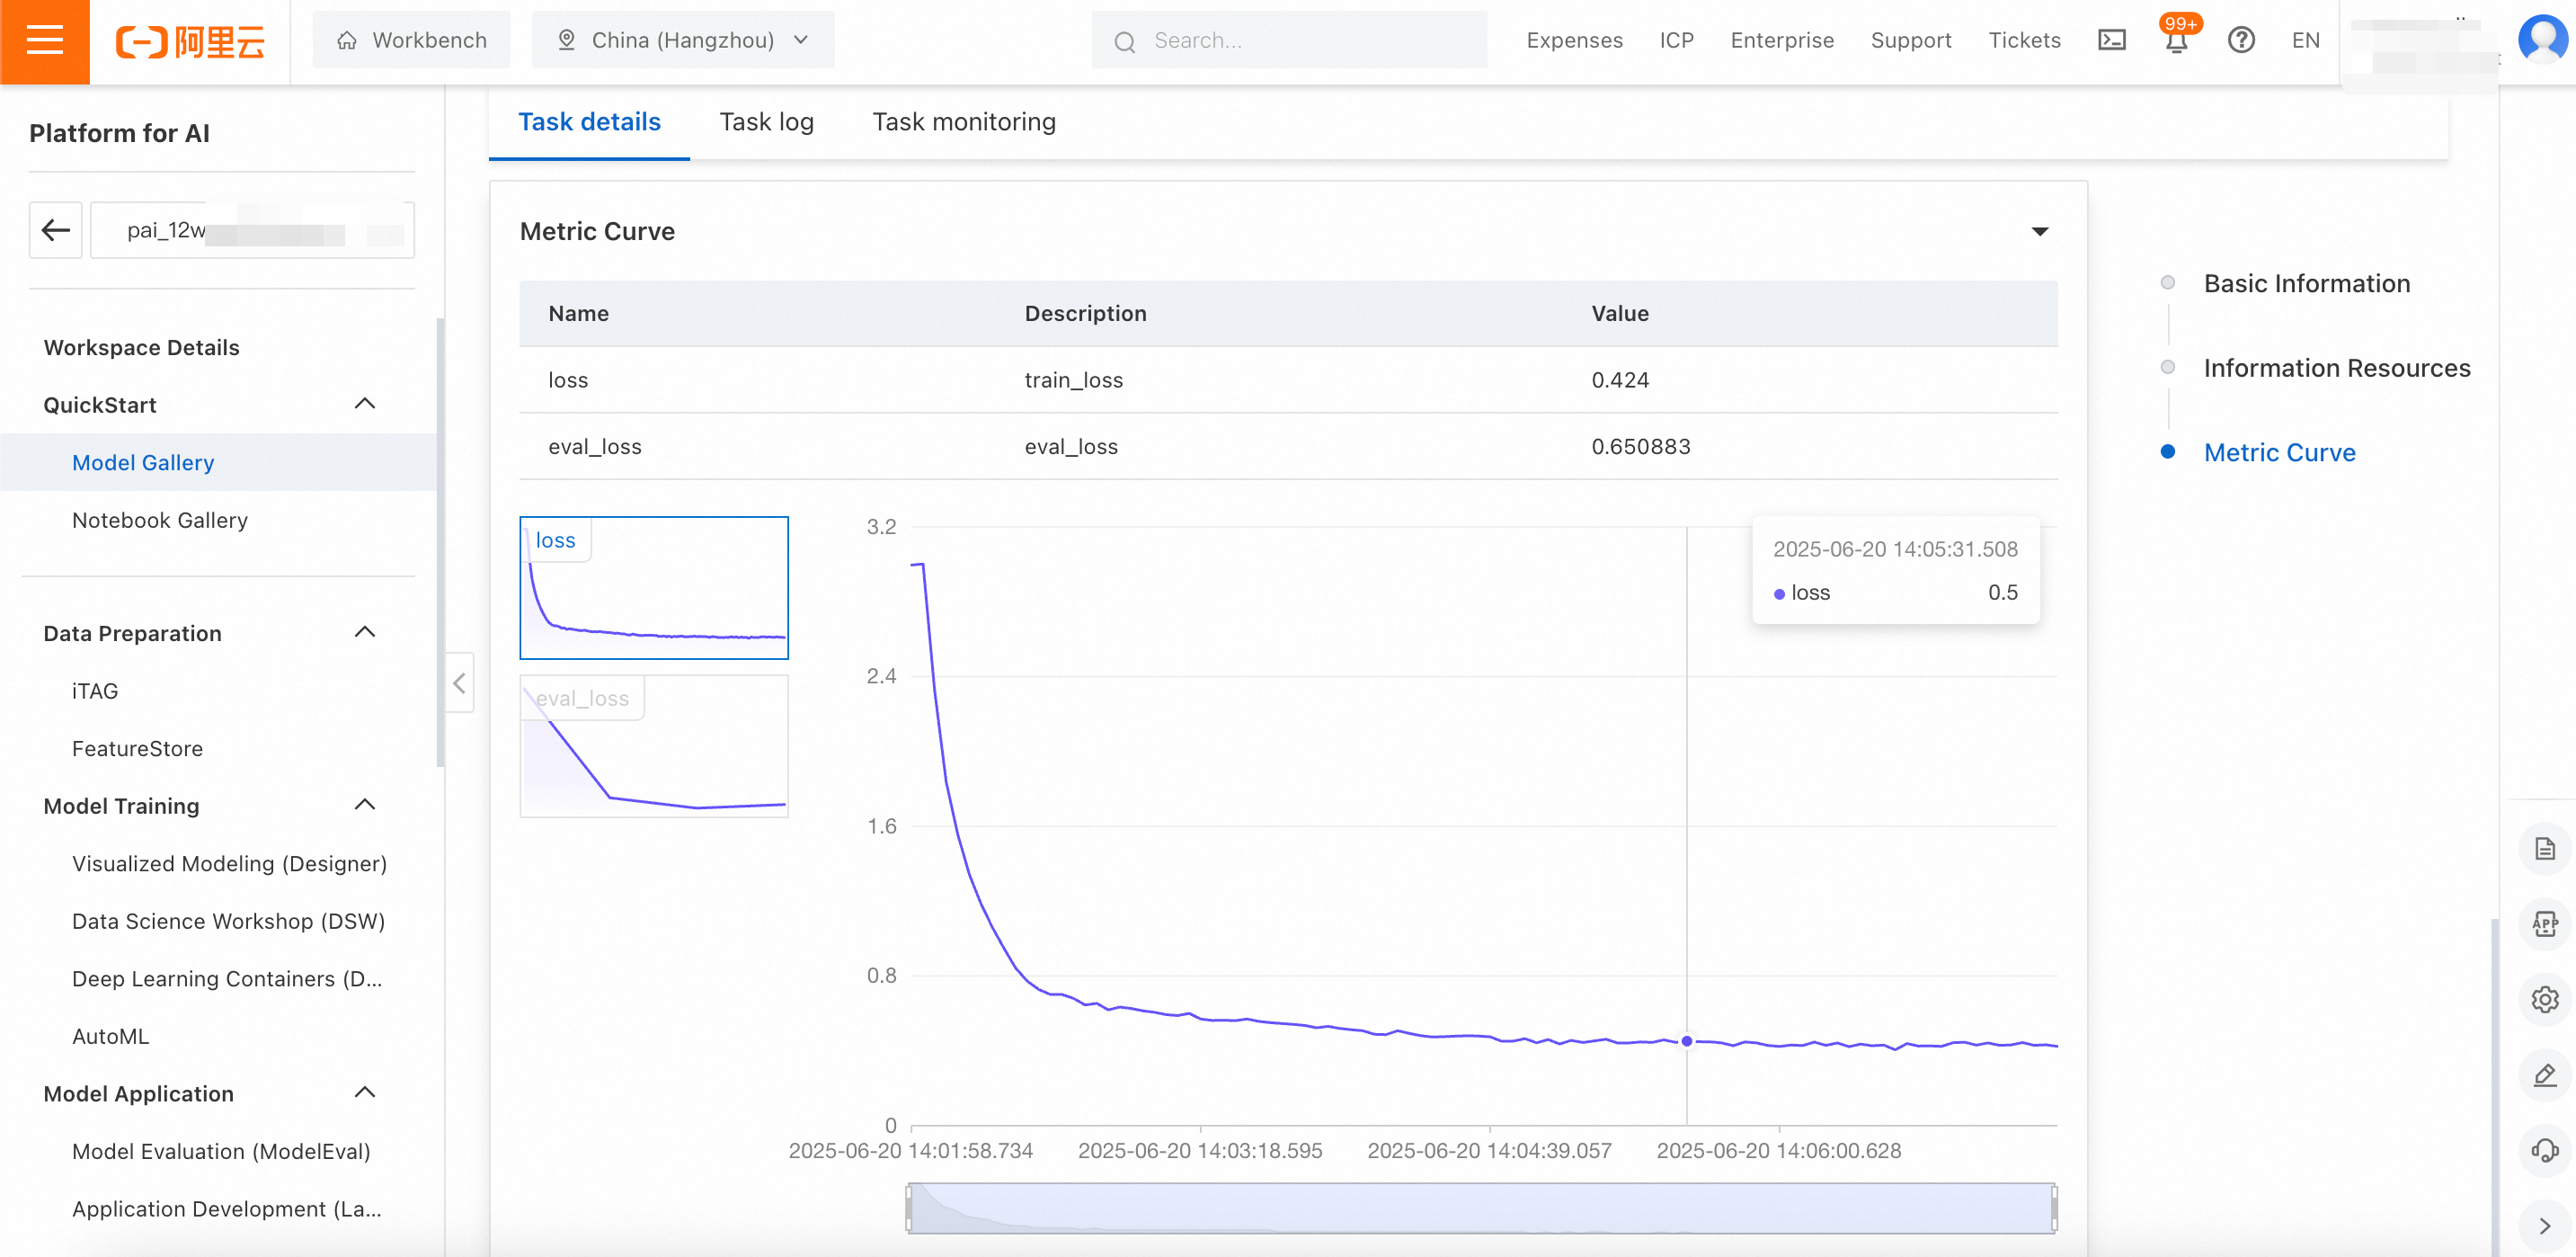
On the task details page, you can view the train_loss curve, which reflects the training set loss, and the eval_loss curve, which reflects the validation set loss:
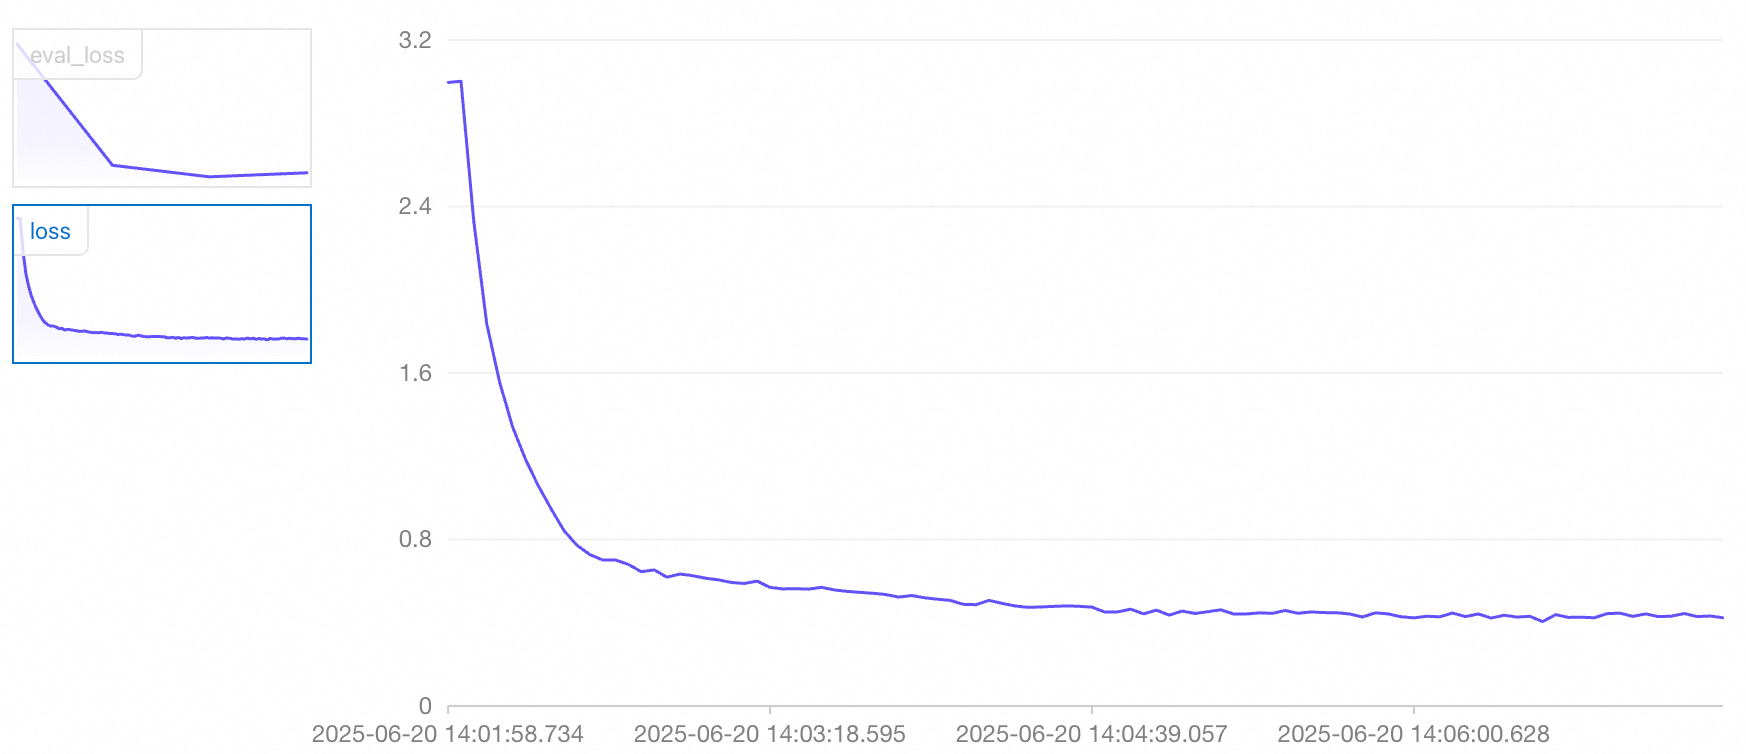
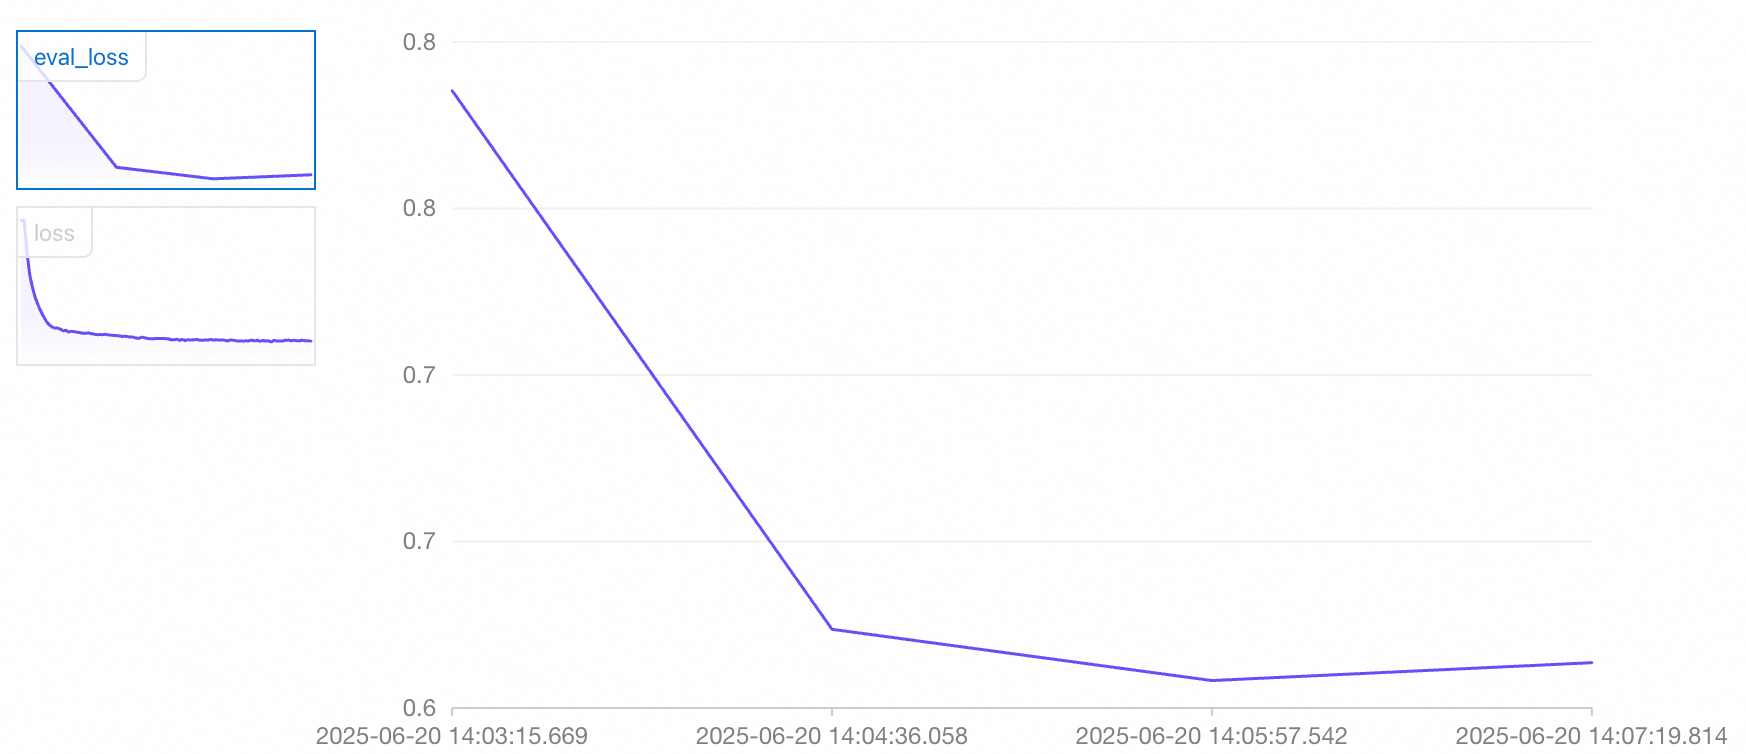
You can make an initial judgment about the training effectiveness of the current model based on the trend of the loss values:
train_loss and eval_loss are still decreasing when the training ends (underfitting)
You can increase the num_train_epochs parameter (number of training epochs, which is positively correlated with training depth) or appropriately increase the value of lora_rank (the rank of the low-rank matrix; a larger rank allows the model to express more complex tasks but is more prone to overfitting) and then train the model again to improve its fit to the training data.
train_loss continues to decrease, but eval_loss starts to increase before the training ends (overfitting)
You can decrease the num_train_epochs parameter or appropriately decrease the value of lora_rank and then train the model again to prevent it from overfitting.
Both train_loss and eval_loss are stable before the training ends (good fit)
When the model is in this state, you can proceed to the next steps.
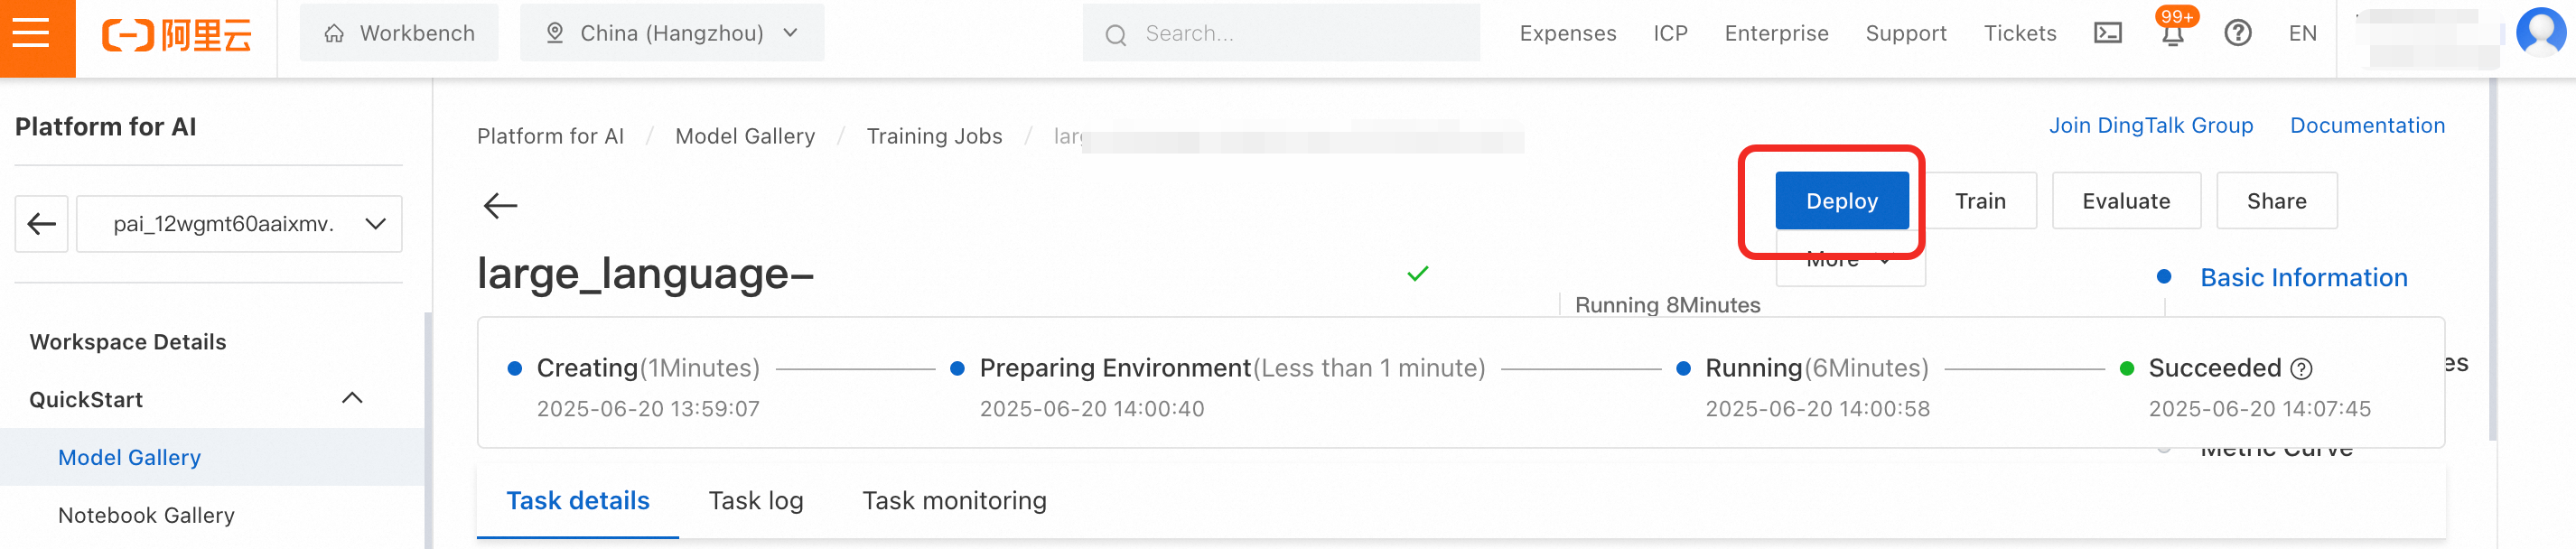
Deploy the fine-tuned model
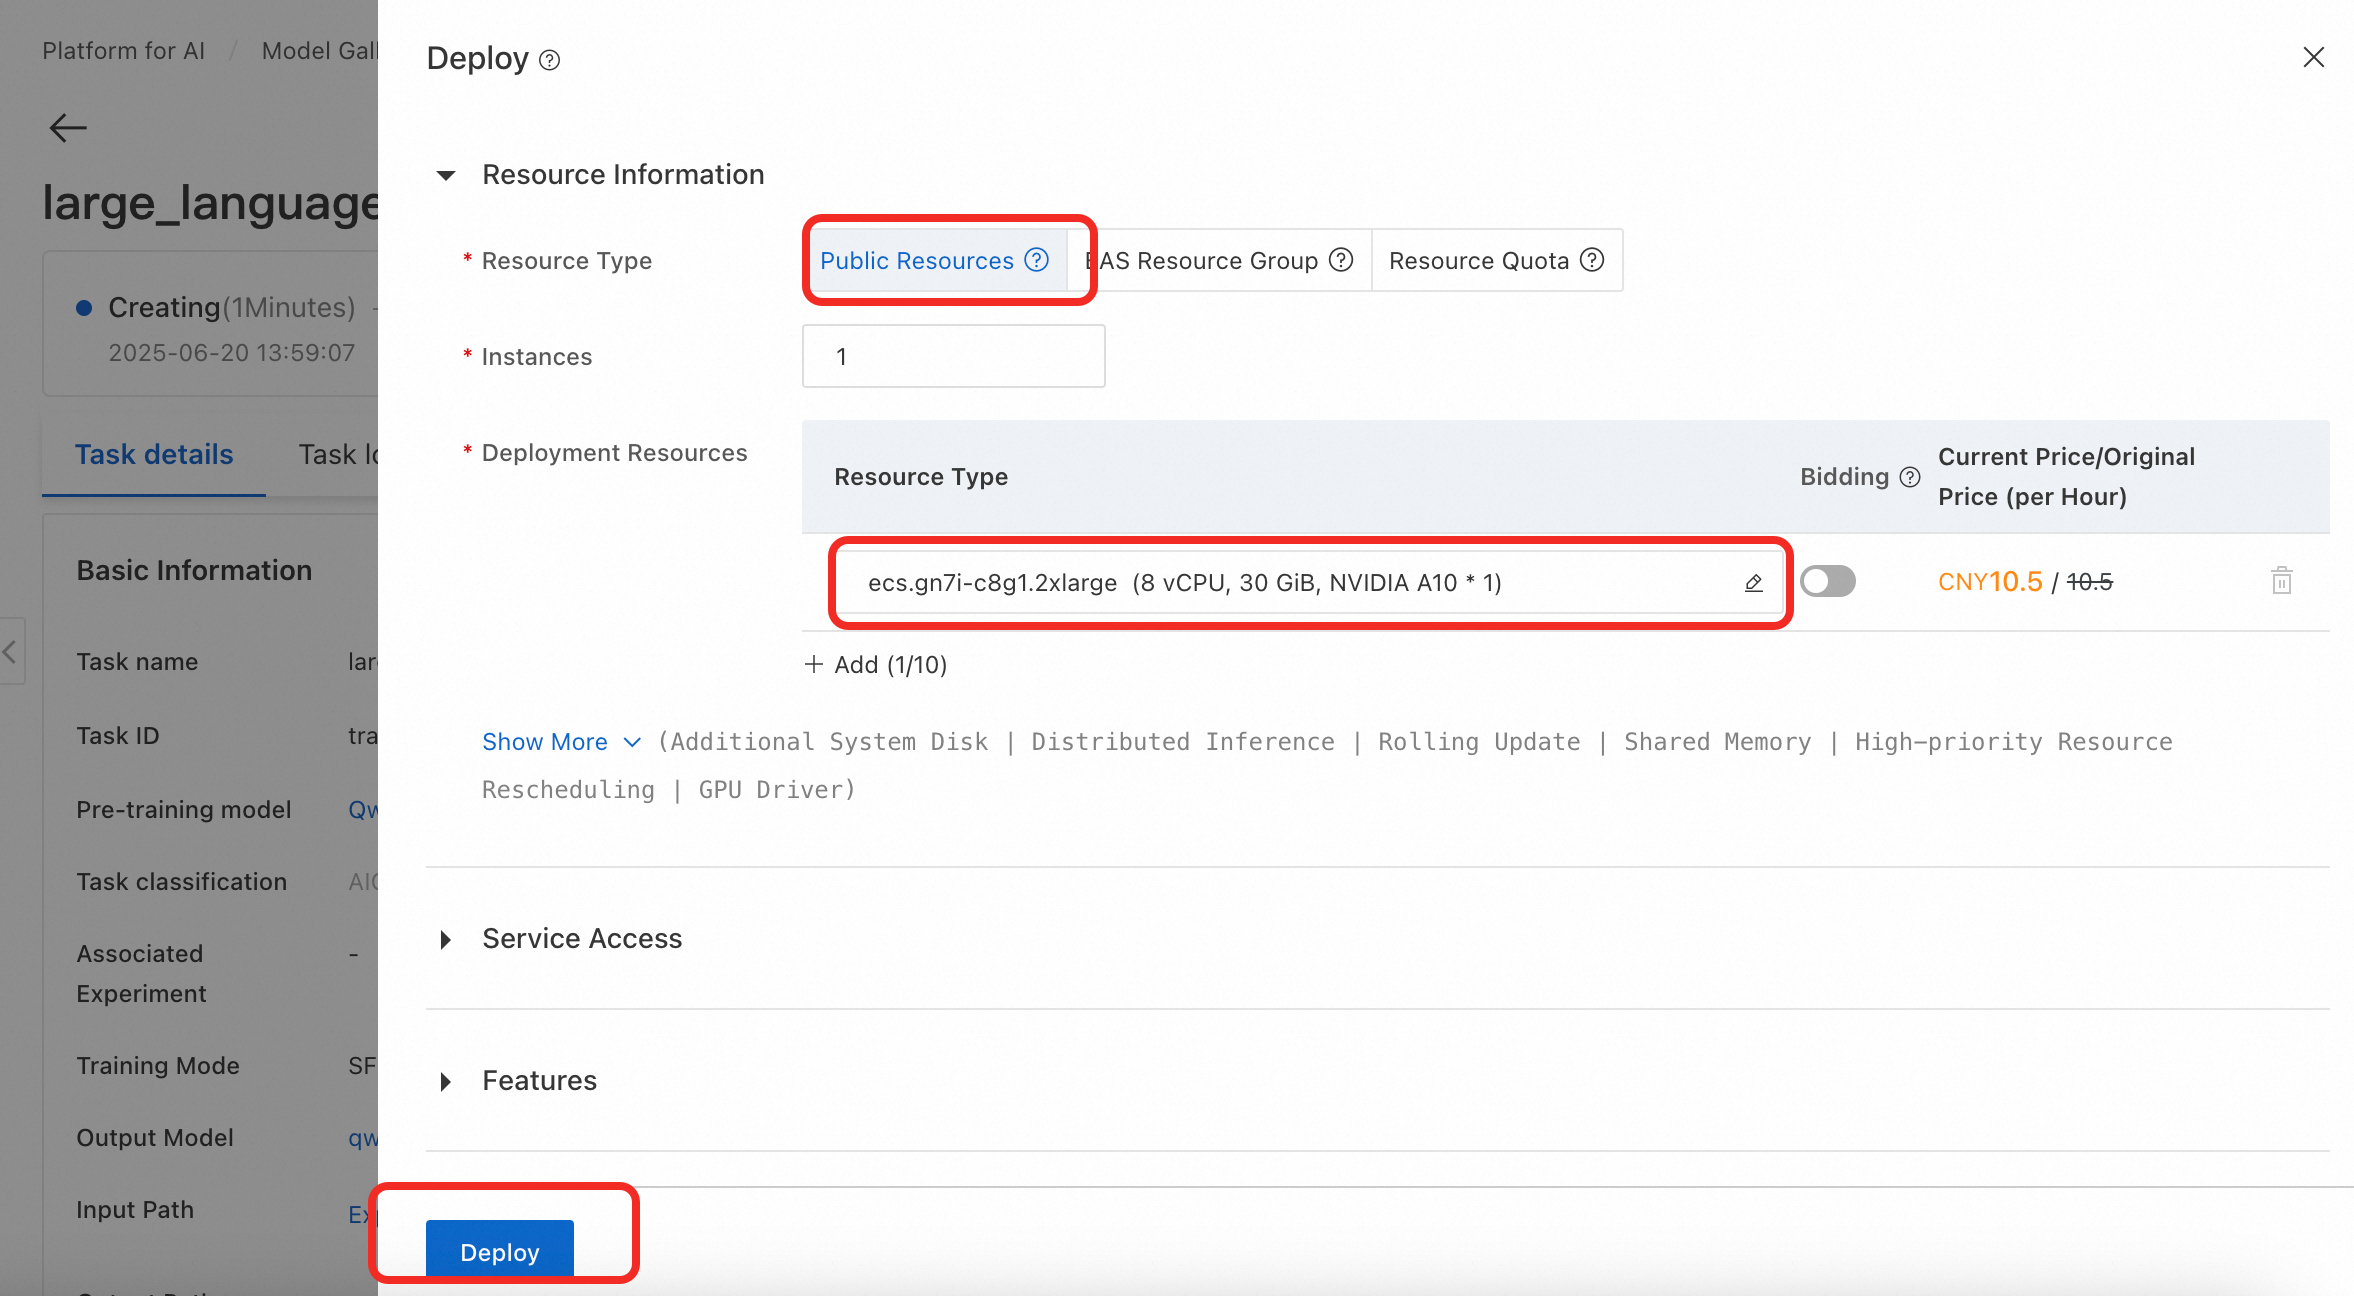
On the Model Gallery > Job Management > Training Jobs page, click the model you trained, and click Deploy button to open the deployment configuration page. Set Resource Type to Public Resources. Deploying the 0.6B model requires approximately 5 GB of GPU memory. In the Deployment Resources section, the console has filtered the specifications that meet this requirement. Select a specification, such as ecs.gn7i-c8g1.2xlarge. Keep the default values for the other parameters, and then click Deploy > OK.
The deployment process takes approximately 5 minutes. The deployment is successful when the status changes to Running.
To view the training task details later, in the navigation pane on the left, click Model Gallery > Task Management > Training Tasks, and then click the task name.
After the training task is successful, if the Deploy button is not clickable, it indicates that the output model is still being registered. You need to wait for approximately 1 minute.
The subsequent steps for invoking the model are the same as those in Invoke the model.
Verify the performance of the fine-tuned model
Before you deploy the fine-tuned model to a production environment, you must systematically evaluate its performance to ensure stability and accuracy and to prevent unexpected issues after it goes online.
Prepare test data
Prepare test data that does not overlap with the training data to test the model's performance. This topic has prepared a test dataset for you that is downloaded automatically when you run the accuracy test code below.
Test data samples must not overlap with training data. This provides a more accurate reflection of the model's generalization ability on new data and prevents inflated scores due to "seen samples."
Design evaluation metrics
Evaluation standards must align closely with actual business goals. In this topic, for example, in addition to determining whether the generated JSON string is valid, you must also check whether the corresponding key-value pairs are correct.
You must define evaluation metrics programmatically. For an implementation of the evaluation metrics in this example, see the compare_address_info method in the accuracy test code below.Verify the performance of the fine-tuned model
Run the following test code to output the model's accuracy on the test dataset.
Output:
All predictions are complete! The results have been saved to predicted_labels.jsonl Number of samples: 400 Correct responses: 361 Incorrect responses: 39 Accuracy: 91.25 %Due to the random seed in model fine-tuning and the randomness of the large language model's output, the accuracy that you test may differ from the results in this topic. This is expected behavior.
The accuracy is 91.25%, which is a significant improvement over the 14% accuracy of the original Qwen3-0.6B model. This indicates that the fine-tuned model has significantly enhanced its ability to extract structured information in the logistics form-filling domain.
Important reminder
This topic uses public resources to create the model service, which is billed on a pay-as-you-go basis. To avoid incurring further charges, remember to stop or delete the service when you no longer need it.
References
For more information about Model Gallery features such as evaluation and compression, see Model Gallery.
For more information about EAS features such as Auto Scaling, stress testing, and monitoring and alerting, see EAS overview.