This topic describes how to use the data synchronization feature of DataWorks Data Integration to automatically create partitions and dynamically migrate data from RDS to MaxCompute, a big data computing service.
Preparations
Prepare a DataWorks environment.
Create a workflow in DataWorks. This example uses the basic mode of DataWorks. For more information, see Create a workflow.
Add a data source.
Add a MySQL data source as the source. For more information, see Configure a MySQL data source.
Add a MaxCompute data source as the destination to receive data from RDS. For more information, see Configure a MaxCompute data source.
Automatically create partitions
After you complete the prerequisites, you can synchronize data from RDS to MaxCompute daily and automatically create daily partitions. For more information about the operations and configurations for data synchronization tasks, see Data development and O&M in DataWorks.
This example uses the basic mode of DataWorks. When you create a workspace, the Join the Public Preview of DataStudio option is deselected by default. This example is not applicable to workspaces in public preview.
Login DataWorks console.
Create a destination table in MaxCompute.
In the navigation pane on the left, click Workspaces.
In the Actions column of the workspace, click Quick Access > Data Development.
Right-click the workflow and choose .
On the Create Table page, select the engine instance, schema, and path, enter a Table Name, and then click Create.
On the table editing page, click the
 icon to switch to DDL mode.
In the DDL dialog box, enter the following statement to create a table and click Generate Table Schema. In the Confirm dialog box that appears, click OK.
CREATE TABLE IF NOT EXISTS ods_user_info_d ( uid STRING COMMENT 'User ID', gender STRING COMMENT 'Gender', age_range STRING COMMENT 'Age range', zodiac STRING COMMENT 'Zodiac sign' ) PARTITIONED BY ( dt STRING );Click Submit to Production Environment.
Create an offline sync node.
Go to the data analytics page. Right-click the specified workflow and choose .
In create a node dialog box, enter node name, and click submit.
Select the data source, resource group, and destination, and then test the connectivity.
Data Source: Select the MySQL data source that you created.
Resource Group: Select an exclusive resource group for Data Integration.
Destination: Select the MaxCompute data source that you created.
Click Next to configure the task.
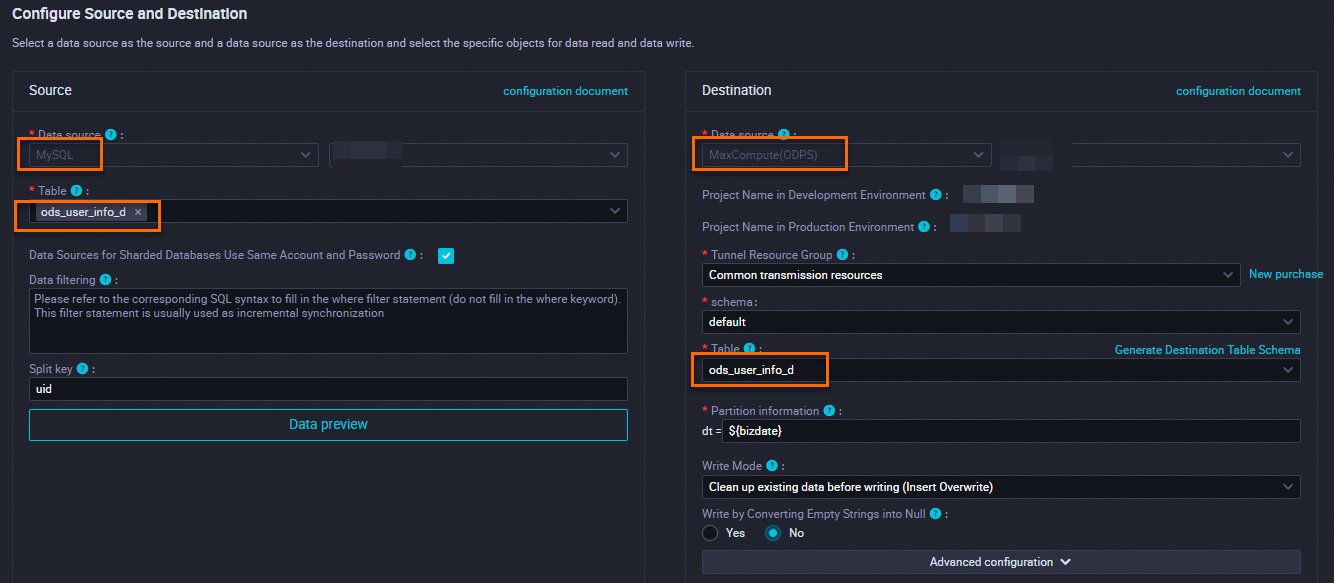
Configure partition parameters.
In the right-side navigation pane, click Schedule.
In the Scheduling Parameters section, set the parameters. By default, the parameter value is the system time parameter
${bizdate}. The value is in yyyymmdd format.NoteThe default parameter value corresponds to the value of Partition Information in the Destination section. When the migration task is scheduled and run, the partition value of the destination table is automatically replaced with the date of the day before the task execution date. By default, the task processes business data from the previous day. This date is also called the data timestamp. To use the task execution date as the partition value, you must use a custom parameter.
Custom parameter settings: You can specify a date and configure the format. The following examples show how to do this:
N years later:
$[add_months(yyyymmdd,12*N)]N years earlier:
$[add_months(yyyymmdd,-12*N)]N months earlier:
$[add_months(yyyymmdd,-N)]N weeks later:
$[yyyymmdd+7*N]N months later:
$[add_months(yyyymmdd,N)]N weeks earlier:
$[yyyymmdd-7*N]N days later:
$[yyyymmdd+N]N days earlier:
$[yyyymmdd-N]N hours later:
$[hh24miss+N/24]N hours earlier:
$[hh24miss-N/24]N minutes later:
$[hh24miss+N/24/60]N minutes earlier:
$[hh24miss-N/24/60]
NoteUse brackets ([]) to edit the formula that calculates the value of a custom variable. For example,
key1=$[yyyy-mm-dd].By default, the unit for a custom variable is days. For example,
$[hh24miss-N/24/60]indicates the result of(yyyymmddhh24miss-(N/24/60 × 1 day)). The result is in hh24miss format.The unit for add_months is months. For example,
$[add_months(yyyymmdd,12*N)-M/24/60]indicates the result of(yyyymmddhh24miss-(12 × N × 1 month))-(M/24/60 × 1 day). The result is inyyyymmddformat.
Click
 icon to run the code.
You can operation Log view the results.
Data backfill experiment
If you have a large amount of historical data that was generated before the current run date, you need to perform an automatic synchronization and partitioning. To do this, go to the Operation Center in DataWorks, select the current data synchronization node, and use the Data Backfill feature.
Filter historical data in RDS by date.
You can set the Data Filtering condition in the Data Source section of the sync node. For example, set the condition to
${bizdate}.Perform a data backfill. For more information, see Perform a data backfill operation and view the data backfill instance (new version).
View the result of the data extraction from RDS in the run log.
The run log shows that MaxCompute automatically created a partition.
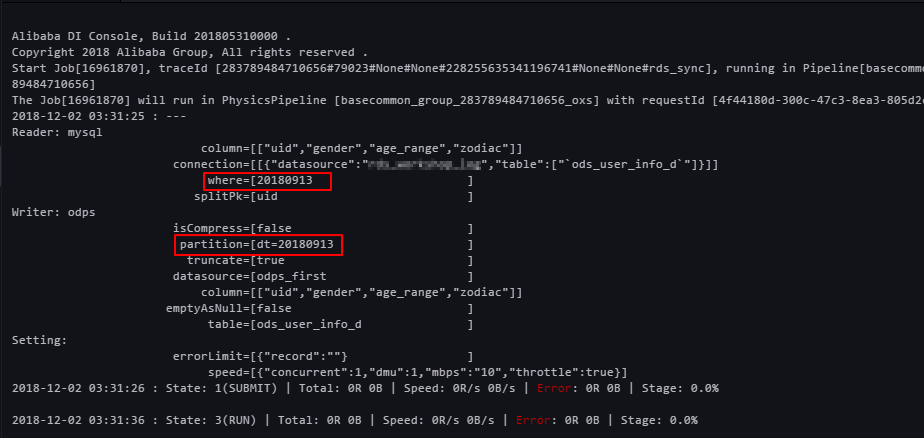
Verify the result. Run the following command on the MaxCompute client to view the data writing status.
SELECT count(*) from ods_user_info_d where dt = 20180913;
Use hash to implement partitioning by non-date fields
If you have a large amount of data, or to partition the initial full dataset based on a non-date field, such as a province, instead of a date field, Data Integration cannot automatically create the partitions. In this case, you can apply a hash function to a field in RDS to automatically store records with the same field value in the corresponding MaxCompute partition.
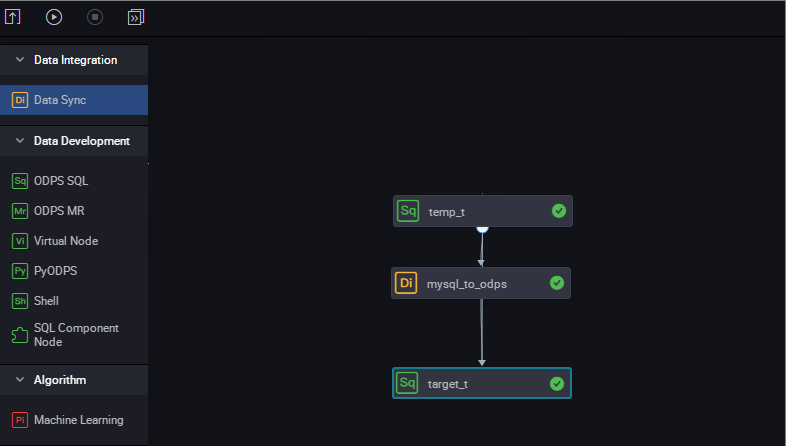
Synchronize all data to a temporary table in MaxCompute and create an SQL script node. Run the following command.
drop table if exists ods_user_t; CREATE TABLE ods_user_t ( dt STRING, uid STRING, gender STRING, age_range STRING, zodiac STRING); --Store the data from the MaxCompute table to the temporary table. insert overwrite table ods_user_t select dt,uid,gender,age_range,zodiac from ods_user_info_d;Create a simple sync task node named mysql_to_odps. This task synchronizes all data from RDS to MaxCompute without setting partitions.
Use an SQL statement to dynamically partition data into the destination table. The following command is an example.
drop table if exists ods_user_d; //Create an ODPS partitioned table (the destination table). CREATE TABLE ods_user_d ( uid STRING, gender STRING, age_range STRING, zodiac STRING ) PARTITIONED BY ( dt STRING ); //Execute the dynamic partitioning SQL statement. The system automatically creates partitions based on the dt field of the temporary table. For each unique value in the dt field, a partition is created with that value. //For example, if some data in the dt field is 20181025, a partition dt=20181025 is automatically created in the ODPS partitioned table. //The dynamic partitioning SQL statement is as follows. //Note that the dt field is added to the SELECT statement to specify that partitions are automatically created based on this field. insert overwrite table ods_user_d partition(dt)select dt,uid,gender,age_range,zodiac from ods_user_t; //After the import is complete, you can delete the temporary table to save storage costs. drop table if exists ods_user_t;In MaxCompute, you can use SQL statements to complete data synchronization.
Configure the three nodes to run sequentially in a workflow.
View the execution progress. Pay special attention to the dynamic partitioning process of the last node.
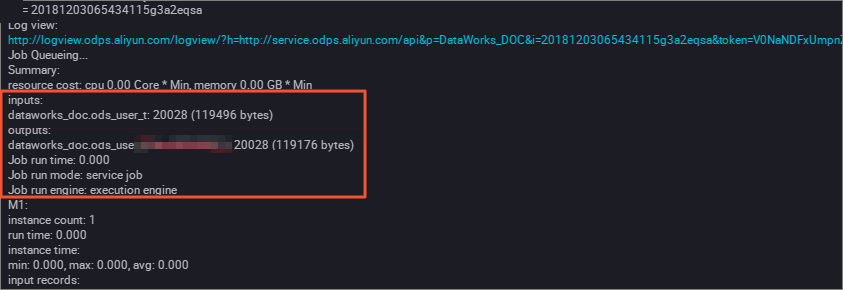
Verify the result. Run the following command on the MaxCompute client to view the data writing status.
SELECT count(*) from ods_user_d where dt = 20180913;