The MySQL data source provides a bidirectional channel for reading from and writing to MySQL. This topic describes the data synchronization capabilities of DataWorks for MySQL.
Supported MySQL versions
Offline read and write:
Supports MySQL 5.5.x, MySQL 5.6.x, MySQL 5.7.x, and MySQL 8.0.x. It is compatible with Amazon RDS for MySQL, Azure MySQL, and Amazon Aurora MySQL.
Offline synchronization supports reading data from views.
Real-time read:
Data Integration reads MySQL data in real time by subscribing to MySQL binary logs. Real-time synchronization is supported for MySQL 5.5.x, 5.6.x, 5.7.x, and 8.0.x. For version 8.0.x, all features are supported except for new features such as functional indexes. It is compatible with Amazon RDS for MySQL, Azure MySQL, and Amazon Aurora MySQL.
ImportantTo synchronize data from a DRDS for MySQL database, do not configure it as a MySQL data source. For more information, see Configure a DRDS data source.
Limits
Real-time read
Data synchronization from MySQL read-only instances is not supported.
Synchronizing tables that contain functional indexes is not supported.
XA ROLLBACK is not supported.
For data in transactions that are in the XA PREPARE state, real-time synchronization writes the data to the destination. If an XA ROLLBACK occurs, real-time synchronization does not roll back this data. To handle this scenario, you must manually remove the table from the real-time synchronization task and then add it back to restart the synchronization.
Only the ROW format for MySQL server binary logging is supported.
Real-time synchronization does not synchronize records in associated tables that are deleted by a cascade delete operation.
For an Amazon Aurora MySQL database, you must connect to your primary or writer database instance. This is because AWS does not allow you to enable the binary logging feature on read replicas of Aurora MySQL. Real-time synchronization tasks require binary logs to perform incremental updates.
Real-time synchronization of online DDL operations only supports adding columns (Add Column) to MySQL tables using Data Management DMS.
Reading stored procedures from MySQL is not supported.
Offline read
When the MySQL Reader plugin synchronizes data from multiple tables in a sharded database, the number of sharded tasks is equal to the number of tables by default. To enable sharding for a single table, you must set the number of concurrent tasks to a value greater than the number of tables.
Reading stored procedures from MySQL is not supported.
Supported data types
For a complete list of data types for each MySQL version, see the official MySQL documentation. The following table lists the major data types supported in MySQL 8.0.x as an example.
Data type | Offline read (MySQL Reader) | Offline write (MySQL Writer) | Real-time read | Real-time write |
TINYINT |
|
|
|
|
SMALLINT |
|
|
|
|
INTEGER |
|
|
|
|
BIGINT |
|
|
|
|
FLOAT |
|
|
|
|
DOUBLE |
|
|
|
|
DECIMAL/NUMERIC |
|
|
|
|
REAL |
|
|
|
|
VARCHAR |
|
|
|
|
JSON |
|
|
|
|
TEXT |
|
|
|
|
MEDIUMTEXT |
|
|
|
|
LONGTEXT |
|
|
|
|
VARBINARY |
|
|
|
|
BINARY |
|
|
|
|
TINYBLOB |
|
|
|
|
MEDIUMBLOB |
|
|
|
|
LONGBLOB |
|
|
|
|
ENUM |
|
|
|
|
SET |
|
|
|
|
BOOLEAN |
|
|
|
|
BIT |
|
|
|
|
DATE |
|
|
|
|
DATETIME |
|
|
|
|
TIMESTAMP |
|
|
|
|
TIME |
|
|
|
|
YEAR |
|
|
|
|
LINESTRING |
|
|
|
|
POLYGON |
|
|
|
|
MULTIPOINT |
|
|
|
|
MULTILINESTRING |
|
|
|
|
MULTIPOLYGON |
|
|
|
|
GEOMETRYCOLLECTION |
|
|
|
|
Preparations
Before you configure a MySQL data source in DataWorks, complete the preparations described in this section to ensure that subsequent tasks run as expected.
The following sections describe the preparations required to synchronize MySQL data.
Confirm the MySQL version
Data Integration has specific version requirements for MySQL. For more information, see the Supported MySQL versions section. You can run the following statement in your MySQL database to check the current version.
SELECT version();Configure account permissions
Create a dedicated MySQL account for DataWorks to access the data source. The procedure is as follows.
Optional: Create an account.
For more information, see Create a MySQL account.
Configure permissions.
Offline
Offline synchronization
To read data from MySQL, the account must have the
SELECTpermission on the target tables.To write data to MySQL, the account must have the
INSERT,DELETE, andUPDATEpermissions on the target tables.
Real-time synchronization
For real-time synchronization, the account must have the
SELECT,REPLICATION SLAVE, andREPLICATION CLIENTpermissions on the database.
You can run the following command to grant permissions to the account, or you can grant the
SUPERpermission directly. In the following statement, replace'sync_account'with the account you created.-- CREATE USER 'sync_account'@'%' IDENTIFIED BY 'password'; //Create a sync account, set a password, and allow it to log on to the database from any host. The percent sign (%) indicates any host. GRANT SELECT, REPLICATION SLAVE, REPLICATION CLIENT ON *.* TO 'sync_account'@'%'; // Grant the SELECT, REPLICATION SLAVE, and REPLICATION CLIENT permissions on the database to the sync account.*.*grants the account the specified permissions on all tables in all databases. You can also grant the permissions on specific tables in a target database. For example, to grant the `SELECT` and `REPLICATION CLIENT` permissions on the user table in the test database, run the following statement:GRANT SELECT, REPLICATION CLIENT ON test.user TO 'sync_account'@'%';.NoteREPLICATION SLAVEis a global permission. You cannot grant this permission on a specific table in a target database.
Enable MySQL binary logging (for real-time synchronization only)
Data Integration performs real-time synchronization of incremental data by subscribing to MySQL binary logs. Before you configure the synchronization task in DataWorks, you must enable the MySQL binary logging service. The procedure is as follows:
If a binary log is being consumed, the database cannot delete it. If a real-time synchronization task experiences high latency, the binary log on the source database may be retained for a long time. Configure latency alerts for your tasks and monitor the disk space of your database.
You should retain binary logs for at least 72 hours. This prevents data loss if a task fails and cannot be reset to an earlier offset because the binary log has been deleted. In this case, you must perform a full offline synchronization to backfill the data.
Check if binary logging is enabled.
Run the following statement to check if binary logging is enabled.
SHOW variables LIKE "log_bin";If the command returns ON, binary logging is enabled.
If you synchronize data from a secondary database, you can also run the following statement to check if binary logging is enabled.
SHOW variables LIKE "log_slave_updates";If the command returns ON, binary logging is enabled on the secondary database.
If the results do not match:
For open source MySQL, see the official MySQL documentation to enable binary logging.
For ApsaraDB RDS for MySQL, see RDS for MySQL log backup to enable binary logging.
For PolarDB for MySQL, see Enable binary logging to enable binary logging.
Check the binary log format.
Run the following statement to check the binary log format.
SHOW variables LIKE "binlog_format";The possible return values are described as follows:
ROW: The binary log format is ROW.
STATEMENT: The binary log format is STATEMENT.
MIXED: The binary log format is MIXED.
ImportantDataWorks real-time synchronization supports only the ROW format for MySQL server binary logging. If the command returns a value other than ROW, you must modify the binary log format.
Check if full row image logging is enabled.
Run the following statement to check if full row image logging is enabled.
SHOW variables LIKE "binlog_row_image";The possible return values are described as follows:
FULL: Full row image logging is enabled for binary logs.
MINIMAL: Minimal row image logging is enabled for binary logs. Full row image logging is not enabled.
ImportantDataWorks real-time synchronization supports only MySQL servers on which full row image logging is enabled. If the command returns a value other than FULL, you must modify the binlog_row_image configuration.
Configure authorization for reading binary logs from OSS
When you add a MySQL data source, if you set Configuration Mode to Alibaba Cloud Instance and the RDS for MySQL instance is in the same region as the DataWorks workspace, you can enable Read OSS Binlog. After you enable this feature, if DataWorks cannot access the RDS binary logs, it attempts to obtain the binary logs from OSS. This prevents real-time synchronization tasks from being interrupted.
If you set OSS Binlog Access Identity to Alibaba Cloud RAM User or Alibaba Cloud RAM Role, you must also configure account permissions as described below.
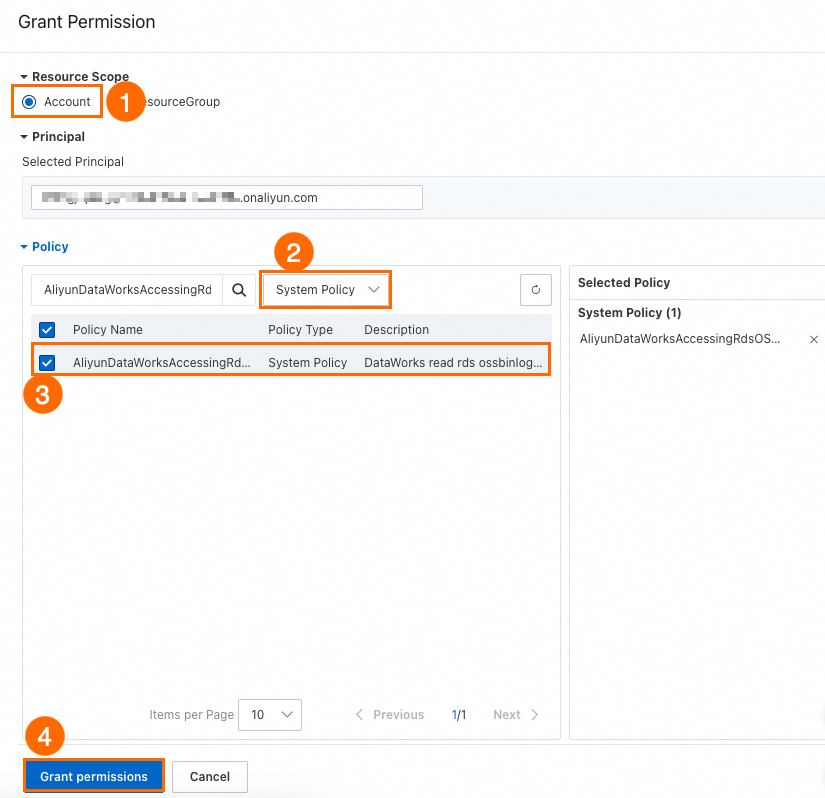
Alibaba Cloud RAM user
Log on to the RAM console and find the RAM user to which you want to grant permissions.
In the Actions column, click Add Permissions.
Configure the following key parameters and click OK.
Set Resource Scope to Account Level.
Set Access Policy to System Policy.
Set Policy Name to
AliyunDataWorksAccessingRdsOSSBinlogPolicy.
Alibaba Cloud RAM role
Log on to the RAM console and create a RAM role. For more information, see Create a RAM role for a trusted Alibaba Cloud account.
Key parameters:
Set Trusted Entity Type to Alibaba Cloud Account.
Set Trusted Entity Name to Other Alibaba Cloud Account and enter the ID of the Alibaba Cloud account that owns the DataWorks workspace.
Set Role Name to a custom name.
Grant permissions to the created RAM role. For more information, see Grant permissions to a RAM role.
Key parameters:
Set Access Policy to System Policy.
Set Policy Name to
AliyunDataWorksAccessingRdsOSSBinlogPolicy.
Modify the trust policy for the created RAM role. For more information, see Modify the trust policy of a RAM role.
{ "Statement": [ { "Action": "sts:AssumeRole", "Effect": "Allow", "Principal": { "Service": [ "<Alibaba_Cloud_account_ID_of_the_DataWorks_user>@di.dataworks.aliyuncs.com", "<Alibaba_Cloud_account_ID_of_the_DataWorks_user>@dataworks.aliyuncs.com" ] } } ], "Version": "1" }
Add a data source
Alibaba Cloud instance mode
If your MySQL database is an Alibaba Cloud RDS instance, you can create the data source in Alibaba Cloud instance mode. The following table describes the parameters:
Parameter | Description |
Data Source Name | The name of the data source. The name must be unique within the workspace. Use a name that identifies the business and environment, such as |
Configuration Mode | Select the Alibaba Cloud instance mode. For more information, see Scenario 1: Instance mode (current Alibaba Cloud account) and Scenario 2: Instance mode (other Alibaba Cloud accounts). |
Alibaba Cloud Account | Select the account to which the instance belongs. If you select Other Alibaba Cloud Account, you must configure cross-account permissions. For more information, see Cross-account authorization (RDS, Hive, or Kafka). If you select Other Alibaba Cloud Account, you must specify the following information:
|
Region | The region where the instance is located. |
Instance | The name of the instance to which you want to connect. |
Read Replica Settings | If the data source has a read-only instance (read replica), you can select the read replica for read operations when you configure a task. This prevents interference with the primary database and does not affect its performance. |
Instance Endpoint | After you select the correct instance, click Get Latest Endpoint to view the public or private endpoint, VPC, and vSwitch of the instance. |
Database | The name of the database that the data source needs to access. Make sure that the specified user has the permissions to access the database. |
Username/Password | The username and password of the MySQL database account. If you use an RDS instance, you can create and manage the account in the Account Management section of the instance. |
Read OSS Binlog | If you enable this feature, when DataWorks cannot access the RDS binary logs, it attempts to obtain the binary logs from OSS. This prevents real-time synchronization tasks from being interrupted. For more information about the configuration, see Configure authorization for reading binary logs from OSS. Then, set OSS Binlog Access Identity based on the authorization configuration. |
Authentication Options | You can select No Authentication or SSL Authentication. If you select SSL Authentication, SSL authentication must be enabled for the instance itself. Prepare the certificate file and upload it to Certificate File Management. |
Version | You can log on to the MySQL server and run the `SELECT VERSION()` command to view the version number. |
Connection string mode
You can also create a data source in connection string mode for greater flexibility. The following table describes the parameters:
Parameter | Description |
Data Source Name | The name of the data source. The name must be unique within the workspace. Use a name that identifies the business and environment, such as |
Configuration Mode | Select Connection String Mode. This mode connects to the database using a JDBC URL. |
Connection String Preview | After you enter the endpoint and database name, DataWorks automatically concatenates them into a JDBC URL for you to preview. |
Endpoint | Host IP: The IP address or domain name of the database host. If the database is an Alibaba Cloud RDS instance, you can view the endpoint on the instance details page. Port: The database port. The default value is 3306. |
Database Name | The name of the database that the data source needs to access. Make sure that the specified user has the permissions to access the database. |
Username/Password | The username and password of the MySQL database account. If you use an RDS instance, you can create and manage the account in the Account Management section of the instance. |
Version | You can log on to the MySQL server and run the `SELECT VERSION()` command to view the version number. |
Authentication Options | You can select No Authentication or SSL Authentication. If you select SSL Authentication, SSL authentication must be enabled for the instance itself. Prepare the certificate file and upload it to Certificate File Management. |
Advanced Parameters | Parameter: Click the parameter drop-down list and select a supported parameter name, such as connectTimeout. Value: Enter a value for the selected parameter, such as 3000. The URL is then automatically updated to: jdbc:mysql://192.168.90.28:3306/test?connectTimeout=50000 |
You must ensure that the resource group can connect to the data source. Otherwise, subsequent tasks cannot run. The required network configuration depends on the network environment and connection mode of your data source. For more information, see Test connectivity.
Develop a data synchronization task: MySQL synchronization process guide
For information about the entry point for and the procedure of configuring a synchronization task, see the following configuration guides.
Guide for configuring an offline synchronization task for a single table
For instructions, see Configure an offline synchronization task in the codeless UI and Configure an offline synchronization task in the code editor.
For a complete list of parameters and a script example for the code editor, see Appendix: MySQL script examples and parameter descriptions.
Guide for configuring a real-time synchronization task for a single table
For instructions, see Configure a real-time synchronization task in DataStudio.
Guide for configuring database-level synchronization tasks: offline, full and incremental (real-time), and sharded (real-time)
For instructions, see Configure a synchronization task in Data Integration.
FAQ
An error is reported during real-time synchronization of MySQL data
Why does the speed of real-time synchronization for a MySQL data source slow down?
For more information about other common issues in Data Integration, see FAQ about Data Integration.
Appendix: MySQL script examples and parameter descriptions
Configure a batch synchronization task by using the code editor
If you want to configure a batch synchronization task by using the code editor, you must configure the related parameters in the script based on the unified script format requirements. For more information, see Configure a batch synchronization task by using the code editor. The following information describes the parameters that you must configure for data sources when you configure a batch synchronization task by using the code editor.
Reader script example
This section provides configuration examples for a single table in a single database and for sharded tables:
The comments in the following JSON examples are for demonstration purposes only. You must remove the comments when you configure the script.
Single table in a single database
{ "type": "job", "version": "2.0",// The version number. "steps": [ { "stepType": "mysql",// The plugin name. "parameter": { "column": [// The column names. "id" ], "connection": [ { "querySql": [ "select a,b from join1 c join join2 d on c.id = d.id;" ], "datasource": ""// The data source name. } ], "where": "",// The filter condition. "splitPk": "",// The shard key. "encoding": "UTF-8"// The encoding format. }, "name": "Reader", "category": "reader" }, { "stepType": "stream", "parameter": {}, "name": "Writer", "category": "writer" } ], "setting": { "errorLimit": { "record": "0"// The number of error records allowed. }, "speed": { "throttle": true,// If throttle is set to false, the mbps parameter does not take effect, and the data transfer rate is not limited. If throttle is set to true, the data transfer rate is limited. "concurrent": 1,// The number of concurrent jobs. "mbps": "12"// The maximum data transfer rate. 1 mbps = 1 MB/s. } }, "order": { "hops": [ { "from": "Reader", "to": "Writer" } ] } }Sharded tables
NoteSharding allows the MySQL Reader to select multiple MySQL tables that have the same schema. In this context, sharding means writing data from multiple source MySQL tables to a single destination table. To configure database-level sharding, you can create a task in Data Integration and select the database-level sharding feature.
{ "type": "job", "version": "2.0", "steps": [ { "stepType": "mysql", "parameter": { "indexes": [ { "type": "unique", "column": [ "id" ] } ], "envType": 0, "useSpecialSecret": false, "column": [ "id", "buyer_name", "seller_name", "item_id", "city", "zone" ], "tableComment": "Test order table", "connection": [ { "datasource": "rds_dataservice", "table": [ "rds_table" ] }, { "datasource": "rds_workshop_log", "table": [ "rds_table" ] } ], "where": "", "splitPk": "id", "encoding": "UTF-8" }, "name": "Reader", "category": "reader" }, { "stepType": "odps", "parameter": {}, "name": "Writer", "category": "writer" }, { "name": "Processor", "stepType": null, "category": "processor", "copies": 1, "parameter": { "nodes": [], "edges": [], "groups": [], "version": "2.0" } } ], "setting": { "executeMode": null, "errorLimit": { "record": "" }, "speed": { "concurrent": 2, "throttle": false } }, "order": { "hops": [ { "from": "Reader", "to": "Writer" } ] } }
Reader script parameters
Parameter | Description | Required | Default value |
datasource | The name of the data source. The code editor supports adding data sources. The value of this parameter must be the same as the name of the added data source. | Yes | None |
table | The name of the table from which to synchronize data. A data integration task can read data from only one table. The following examples show the advanced usage of the table parameter for configuring a range:
Note The task reads all matched tables. Specifically, it reads the columns specified by the column parameter in these tables. If a table or a column does not exist, the task fails. | Yes | None |
column | A collection of column names to be synchronized from the configured table. Use a JSON array to describe the field information. By default, all columns are configured, for example, [*].
| Yes | None |
splitPk | When MySQL Reader extracts data, specifying the splitPk parameter shards the data based on the field that splitPk represents. This allows data synchronization to run as concurrent tasks, which improves synchronization efficiency.
| No | None |
where | The filter condition. In many business scenarios, you might want to synchronize only the data for the current day. You can set the where condition to
| No | None |
querySql (Advanced mode. This parameter is not supported in the codeless UI.) | In some business scenarios, the `where` parameter is not sufficient to describe the filter condition. You can use this parameter to define a custom filter SQL statement. If you configure this parameter, the system ignores the `tables`, `columns`, and `splitPk` parameters and uses the content of this parameter to filter data. For example, to synchronize data after a multi-table join, use Note The querySql parameter is case-sensitive. For example, if you write it as querysql, it will not take effect. | No | None |
useSpecialSecret | If you have multiple source data sources, specifies whether to use the password of each data source. Valid values:
If you have configured multiple source data sources and each data source uses a different username and password, you can set this parameter to true to use the password of each data source. | No | false |
Writer script example
{ "type": "job", "version": "2.0",// The version number. "steps": [ { "stepType": "stream", "parameter": {}, "name": "Reader", "category": "reader" }, { "stepType": "mysql",// The plugin name. "parameter": { "postSql": [],// The SQL statement to be executed after the import. "datasource": "",// The data source. "column": [// The column names. "id", "value" ], "writeMode": "insert",// The write mode. You can set it to insert, replace, or update. "batchSize": 1024,// The number of records to be submitted in a single batch. "table": "",// The table name. "nullMode": "skipNull",// The policy for handling null values. "skipNullColumn": [// The columns for which to skip null values. "id", "value" ], "preSql": [ "delete from XXX;"// The SQL statement to be executed before the import. ] }, "name": "Writer", "category": "writer" } ], "setting": { "errorLimit": {// The number of error records allowed. "record": "0" }, "speed": { "throttle": true,// If throttle is set to false, the mbps parameter does not take effect, and the data transfer rate is not limited. If throttle is set to true, the data transfer rate is limited. "concurrent": 1,// The number of concurrent jobs. "mbps": "12"// The maximum data transfer rate. This prevents excessive read/write pressure on the upstream/downstream database. 1 mbps = 1 MB/s. } }, "order": { "hops": [ { "from": "Reader", "to": "Writer" } ] } }Writer script parameters
Parameter | Description | Required | Default value |
datasource | The name of the data source. The code editor supports adding data sources. The value of this parameter must be the same as the name of the added data source. | Yes | None |
table | The name of the table to which to synchronize data. | Yes | None |
writeMode | The import mode. You can select insert into, on duplicate key update, or replace into.
| No | insert |
nullMode | The policy for handling null values. Valid values:
Important If you set this parameter to skipNull, the task dynamically generates the SQL statement for writing data to support the default values of the destination. This increases the number of FLUSH operations and reduces the synchronization speed. In the worst-case scenario, a FLUSH operation is performed for each data record. | No | writeNull |
skipNullColumn | When nullMode is set to skipNull, the columns configured for this parameter are not forced to be written as Format: | No | By default, all columns configured for the task. |
column | The fields in the destination table to which data is to be written. Separate the fields with commas (,), for example, | Yes | None |
preSql | The SQL statement to be executed before the data synchronization task starts. In the codeless UI, you can execute only one SQL statement. In the code editor, you can execute multiple SQL statements. For example, you can clear old data from the table before execution: `truncate table tablename`. Note Transactions are not supported for multiple SQL statements. | No | None |
postSql | The SQL statement to be executed after the data synchronization task is complete. In the codeless UI, you can execute only one SQL statement. In the code editor, you can execute multiple SQL statements. For example, you can add a timestamp: Note Transactions are not supported for multiple SQL statements. | No | None |
batchSize | The number of records to be submitted in a single batch. A larger value can significantly reduce network interactions between the data synchronization system and MySQL and improve overall throughput. If this value is set too high, it may cause an out-of-memory (OOM) error in the data synchronization process. | No | 256 |
updateColumn | When writeMode is set to update, these are the fields to be updated when a primary key or unique index conflict occurs. Separate the fields with commas (,), for example, | No | None |