For more fine-grained control, you can configure your batch synchronization task in the code editor. You can write a JSON script and use DataWorks scheduling parameters to periodically synchronize full or incremental data. You can sync from a single source table or from sharded tables to a destination table. This topic describes common configurations in the code editor. The required settings vary based on the data source. For more information, see the documentation for your specific data source.
Scenarios
You can use the code editor to configure a synchronization task in the following scenarios:
The data source does not support the codeless UI.
NoteYou can check whether a data source supports the codeless UI on the user interface (UI).

Configuration parameters for some data sources are supported only in the code editor.
The synchronization task uses a data source that cannot be created in DataWorks.
Prerequisites
Before you configure a Data Integration sync task, ensure that the source and destination databases are configured in Data Source Management of DataWorks. For more information about data source configuration, see Data Source List.
NoteFor more information about the data sources supported by batch synchronization and their configurations, see Supported data sources and read/write plug-ins.
For an overview of data source capabilities, see Data source overview.
A resource group with the appropriate specifications must be purchased and attached to the workspace. For more information, see Use a Serverless resource group and Add and use an exclusive resource group for Data Integration.
Network connectivity must be established between the resource group and the data source. For more information, see Network connectivity.
Go to the DataStudio page
Go to the DataStudio page.
Log on to the DataWorks console. In the top navigation bar, select the desired region. In the left-side navigation pane, choose . On the page that appears, select the desired workspace from the drop-down list and click Go to Data Development.
Step 1: Create a batch synchronization node
Create a workflow. For more information, see Create a workflow.
Create a batch synchronization task.
You can use one of the following methods to create a batch synchronization task:
Method 1: Log on to the DataWorks console and go to the Scheduled Workflow pane of the DataStudio page. In the Scheduled Workflow pane, find the created workflow and click its name. Right-click Data Integration and choose .
Method 2: Log on to the DataWorks console and go to the Scheduled Workflow pane of the DataStudio page. In the Scheduled Workflow pane, find the created workflow and double-click its name. In the Data Integration section of the workflow editing tab that appears, drag Offline synchronization to the canvas on the right.
In the Create Node dialog box, configure the parameters to create a batch synchronization task.
Step 2: Configure the network connection for synchronization
Select the source, destination, and resource group, and establish network connections between the resource group and data sources.
You can use a batch synchronization task to synchronize data from tables in sharded databases to a single table. For more information, see Configure a batch synchronization task to synchronize data from tables in sharded databases.
If network connections between the resource group and the data sources cannot be established, you can configure the network connectivity as prompted or by referring to the related topic. For more information, see Network connectivity solutions.
If you have created a resource group but the resource group is not displayed, you must check whether the resource group is associated with your workspace. For more information, see Use serverless resource groups or Create and use an exclusive resource group for Data Integration.
The shared resource group for Data Integration (debugging) of DataWorks discontinues. We recommend that you use serverless resource groups. For more information about serverless resource groups, see Use serverless resource groups. For more information about the discontinuation notice of the shared resource group for Data Integration, see Notice on the discontinuation of the shared resource group for Data Integration (debugging).
If you use a serverless resource group to run a synchronization task, you can specify an upper limit for the number of CUs that can be used to run a synchronization task. If an out of memory (OOM) error is reported for the synchronization task due to insufficient resources, you can appropriately change the upper limit.
Step 3: Switch to the code editor and import a template
Click the Convert to Script  icon in the toolbar.
If no script is configured, you can click the  icon in the toolbar to quickly import a script template based on the on-screen instructions.
Step 4: Edit the script to configure the sync task
The following section describes the common configurations for a batch synchronization task in the code editor:
The type and version fields have default values that cannot be modified.
You can ignore the processor-related configurations in the script. They are not required.
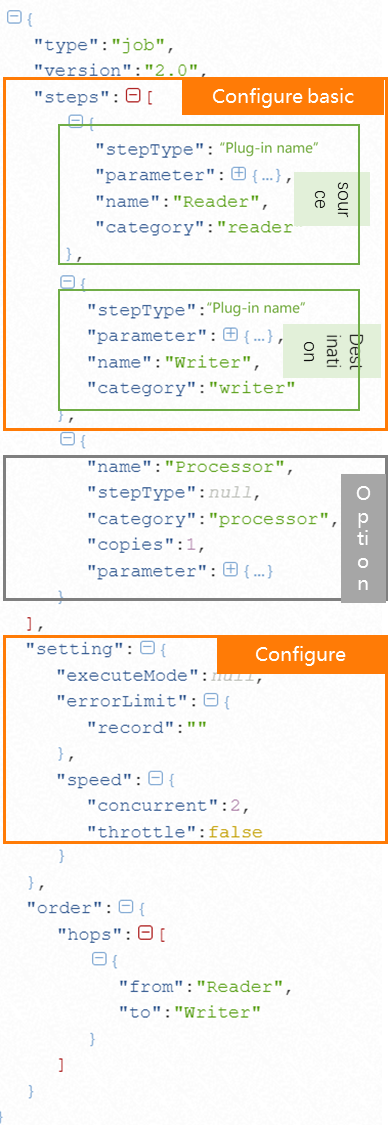
Configure basic information for the reader and writer and map the source and target fields.
ImportantThe required configurations vary based on the plug-in. This section describes only common configurations. To check whether a plug-in supports a specific configuration and how to implement it, see the documentation for that plug-in. For more information, see Supported data sources and read/write plug-ins.
You can configure parameters to perform the following operations:
Reader
Operation
Description
Specify a synchronization scope
For some plug-ins, you can use parameters to filter data for incremental synchronization. For example, when you use the MySQL Reader plug-in to synchronize MySQL data, use the where parameter of the plug-in together with DataWorks scheduling parameters to perform incremental synchronization. For more information about how to configure incremental data synchronization, see Scenario: Configure a batch synchronization task for incremental data.
NoteWhether a plug-in supports incremental synchronization and how it is implemented vary by plug-in. For more information, see the documentation for the specific plug-in.
For plug-ins that support parameters for incremental synchronization, if you do not specify a data filtering condition, full data is synchronized by default.
When you configure scheduling properties, you can assign values to the variables that you define in the data filtering and target table configurations. This lets you write incremental or full data to the corresponding time partitions of the target table. For more information about how to use scheduling parameters, see Supported formats of scheduling parameters.
The syntax for incremental synchronization filter conditions is almost the same as the database syntax. During synchronization, the batch synchronization task assembles a complete SQL statement to extract data from the data source.
Configure a shard key for a relational database
Define a field in the source data to use as a shard key. During task execution, the data is split into multiple tasks based on this field. This allows for concurrent, batched data reading.
NoteSet splitPk to the primary key of the table. Primary keys are usually evenly distributed. This helps prevent data hot spots in the resulting shards.
Currently, splitPk supports sharding only for integer data. It does not support strings, floating-point numbers, dates, or other types. If you specify an unsupported type, the splitPk feature is ignored, and a single channel is used for synchronization.
If you do not specify splitPk, or if the value is empty, data is synchronized using a single channel.
Not all plug-ins support specifying a shard key to configure task sharding logic. The preceding information is for example only. For more information, see the documentation for the specific plug-in. For more information, see Supported data sources and read/write plug-ins.
Assign values to destination fields
In the source table fields to be synchronized (column), you can add constants and variables for the target table. Examples include '123' and '${variable_name}'. When you configure scheduling, you can assign values to the variables defined here. For more information about how to use scheduling parameters, see Supported formats of scheduling parameters.
Edit source table fields
Use functions supported by the source database to process fields. For example, use Max(id) to synchronize only the maximum value.
NoteMaxCompute Reader does not support functions.
Writer
Operation
Description
Configure statements to run before and after synchronization
Some data sources support running SQL statements on the target before data is written to the target data source (pre-synchronization) and after data is written (post-synchronization).
Example: MySQL Writer supports preSql and postSql configurations. This means you can run MySQL commands before or after writing data to MySQL. For example, in the MySQL Writer configuration, set the Pre-import Preparation Statement (preSql) to the MySQL command
truncate table tablename. This clears the old data from the table before new data is written.Define the write mode for conflicts
Define how to write data to the destination when conflicts, such as path or primary key conflicts, occur. This configuration varies based on the data source features and writer plug-in support. For more information, refer to the documentation for the specific writer plug-in.
Configure channel control.
In the setting domain, you can configure performance settings, such as concurrency, synchronization rate, and dirty data settings.
Parameter
Description
executeMode (distributed processing capability)
Controls whether to enable the distributed mode to run the current task.
distribute: Enables distributed processing. The distributed execution mode can split your task into segments and distribute them to multiple execution nodes for concurrent execution. This allows the synchronization speed to scale horizontally with the size of the execution cluster, breaking through single-machine bottlenecks.
null: Disables distributed processing. The configured concurrency is only for processes on a single machine and cannot use the computing power of multiple machines.
ImportantIf you use an exclusive resource group for Data Integration with only one machine, do not use the distributed mode because it cannot leverage multi-machine resources.
If a single machine meets your speed requirements, prefer the single-machine mode to simplify task execution.
Distributed processing can be enabled only if the concurrency is 8 or greater.
Some data sources support running tasks in distributed mode. For more information, see the specific plug-in documentation.
Enabling distributed processing consumes more resources. If an out-of-memory (OOM) error occurs at runtime, try disabling this switch.
concurrent (maximum expected task concurrency)
Defines the maximum number of concurrent threads for the current task to read from the source or write to the target.
NoteDue to resource specifications and other factors, the actual concurrency during execution may be less than or equal to the configured value. You are charged for the debug resource group based on the actual concurrency. For more information, see Performance metrics.
throttle (synchronization rate)
Controls the synchronization rate.
true: Enables throttling. This protects the source database by preventing excessive extraction speeds that could overload the source database. The minimum rate limit is 1 MB/s.
NoteIf you set throttle to true, you must also set the mbps (synchronization rate) parameter.
false: Disables throttling. Without throttling, the task uses the maximum transfer performance available in the current hardware environment, based on the configured concurrency limit.
NoteThe traffic measure is a metric of Data Integration itself and does not represent the actual network interface card (NIC) traffic. Typically, NIC traffic is 1 to 2 times the channel traffic. The actual traffic inflation depends on the data storage system's transmission serialization.
errorLimit (error record count control)
Defines the threshold for dirty data and its effect on the task.
ImportantToo much dirty data can affect the overall speed of the sync task.
If not configured, dirty data is allowed by default. The task continues to run even if dirty data is generated.
If set to 0, dirty data is not allowed. If dirty data is generated during synchronization, the task fails and exits.
If you allow dirty data and set a threshold:
If the amount of dirty data is within the threshold, the sync task ignores the dirty data (it is not written to the target) and runs normally.
If the amount of dirty data exceeds the threshold, the sync task fails and exits.
NoteCriteria for dirty data: Dirty data is data that is meaningless to the business, has an invalid format, or causes problems during synchronization. A single record that causes an exception when being written to the target data source is considered dirty data. Therefore, any data that fails to be written is classified as dirty data.
For example, writing VARCHAR data from the source to an INT column in the target can cause an invalid conversion, resulting in dirty data that cannot be written. When you configure a sync task, you can control whether dirty data is allowed and set a limit on the number of dirty data records. If the number of dirty records exceeds the specified limit, the task fails.
NoteThe overall synchronization speed of a task is affected by the preceding configurations, the performance of the source data source, and the synchronization network environment. For more information about synchronization speed and tuning, see Tune a batch synchronization task.
Step 5: Configure scheduling properties
If a batch synchronization task needs to run on a recurring schedule, you must configure its automatic scheduling properties. To do this, go to the configuration page of the batch synchronization node and click Schedule in the right-side pane. The following sections describe how to configure the scheduling properties for a node in a sync task. For more information about how to use scheduling parameters, see Notes on using scheduling parameters in Data Integration.
Configure node scheduling properties: Assign scheduling parameters to the variables used in the task configuration phase. You can assign values to all variables defined in the preceding configurations. Both constants and variables are supported.
Configure time properties: Define how the task is periodically scheduled in the production environment. In the Time Properties section of the scheduling configuration, you can configure properties such as how recurring instances are generated, the scheduling type, and the scheduling cycle.
Configure resource properties: Define the scheduling resource group used to dispatch the current task to the Data Integration task execution resource. In the Resource Properties section of the scheduling configuration, you can select the resource group to use for task scheduling and runtime.
NoteBatch synchronization tasks in Data Integration are dispatched through scheduling resource groups to the corresponding Data Integration task execution resource groups to run. This process incurs scheduling-related fees. For more information about the task dispatch mechanism, see Task dispatch mechanism.
Step 6: Commit and publish the task
After the task passes the test run, if the task needs to run on a recurring schedule, you can click the  icon at the top of the node configuration page to publish the task to the production environment. For more information about how to publish tasks, see Publish a task.
What to do next
After the batch synchronization task is deployed to the production environment, you can go to Operation Center in the production environment to view the task. For information about how to perform O&M operations for a batch synchronization task, such as running and managing the task, monitoring the status of the task, and performing O&M for the resource group that is used to run the task, see O&M for batch synchronization tasks.