-
- Notifications
You must be signed in to change notification settings - Fork 487
Procedure update #920
New issue
Have a question about this project? Sign up for a free GitHub account to open an issue and contact its maintainers and the community.
By clicking “Sign up for GitHub”, you agree to our terms of service and privacy statement. We’ll occasionally send you account related emails.
Already on GitHub? Sign in to your account
Procedure update #920
Changes from 2 commits
10b8f96 d0997a2 cb5687b 2c59f0e a978070 ed6b0e9 6619516 d4cf554 caecce3 File filter
Filter by extension
Conversations
Jump to
Diff view
Diff view
There are no files selected for viewing
| Original file line number | Diff line number | Diff line change |
|---|---|---|
| | @@ -100,21 +100,54 @@ Click OK to save the settings and press the connect button on **On-line > connec | |
| | ||
|  | ||
| | ||
| ### 6. License Activation | ||
| ### 6. License Activation With Product Key (Portenta Machine Control) | ||
jcarolinares marked this conversation as resolved. Show resolved Hide resolved | ||
| | ||
| If the communication is successful the main panel will show the license section to be filled in and a status indicator. | ||
| | ||
| To use your product license, fill it in on the form and press the **Activate** button. | ||
| #### Online Activation | ||
| | ||
| To use your product license, paste the key in the blank next to **Product Key:** and press the **Activate** button. | ||
jcarolinares marked this conversation as resolved. Outdated Show resolved Hide resolved | ||
| | ||
|  | ||
| | ||
| After you click the **Activate** button, it will use the license and attach it to the board. A popup telling you to reboot the target (which is the device connected to the PLC IDE) will show up once the attachment finishes. Press the reset button of your device to perform the reboot. | ||
| After you click the **Activate** button, the IDE will bind the license to the hardware ID. A popup telling you to reboot the target (which is the device connected to the PLC IDE) will show up: press the reset button of your device to reboot. | ||
jcarolinares marked this conversation as resolved. Outdated Show resolved Hide resolved | ||
| | ||
|  | ||
| | ||
| Once the board has been activated, it is recommended to get the **Hardware-ID** of your device. | ||
| Once the product has been activated, it is recommended to get the **Hardware-ID** of your device. | ||
| | ||
| #### Offline Activation | ||
jcarolinares marked this conversation as resolved. Show resolved Hide resolved | ||
| | ||
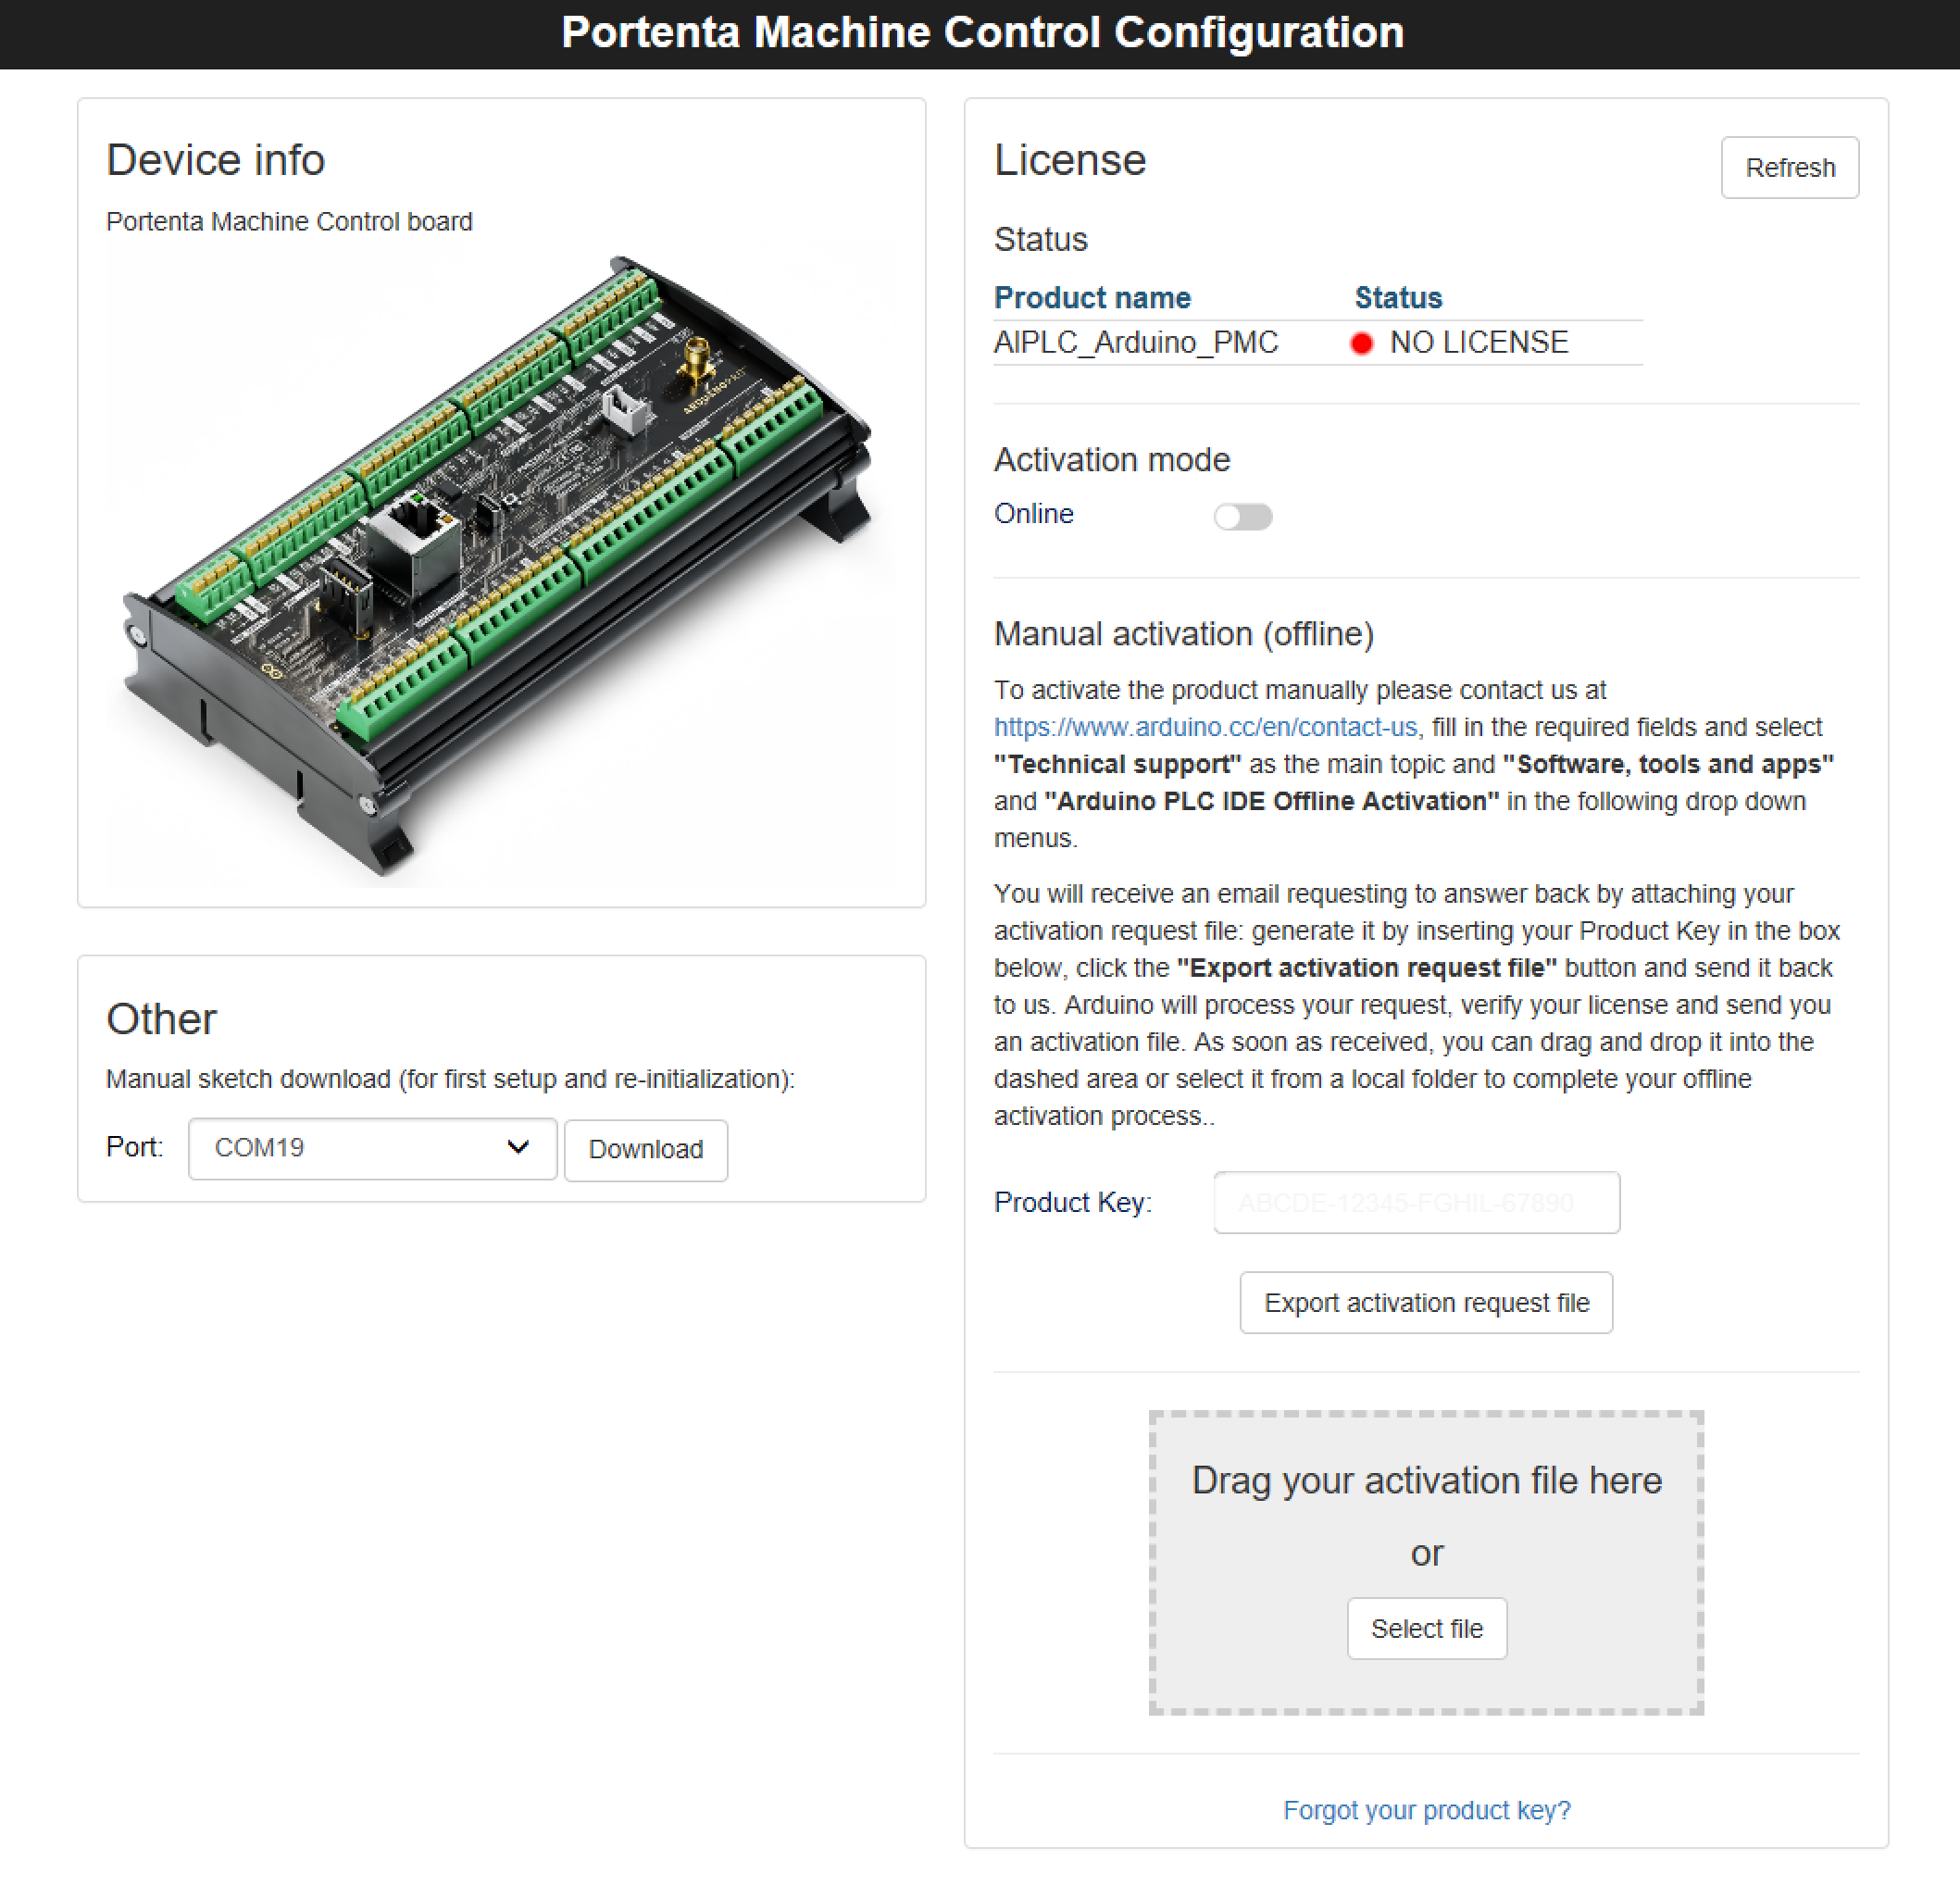
| To activate the product Offline, deselect the "online" slider and the scenario below will show up: | ||
| | ||
|  | ||
| | ||
| Follow the instructions provided, using our [Contact form](https://www.arduino.cc/en/contact-us) and generating the **Activation Request File**. | ||
jcarolinares marked this conversation as resolved. Outdated Show resolved Hide resolved | ||
| | ||
| Once you will receive back the **Activation file**, drag&drop it in the dashed rectangle or select it from the folder where it is stored to complete your Offline Activation. | ||
jcarolinares marked this conversation as resolved. Outdated Show resolved Hide resolved | ||
| | ||
| ### 7. License Activation With Pre-Licensed Products (Opta) | ||
| | ||
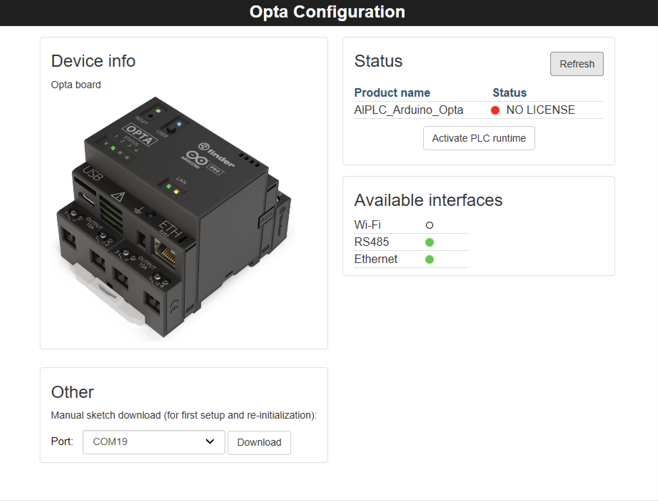
| When a product is pre-licensed, the scenario below will be displayed: | ||
| | ||
|  | ||
| | ||
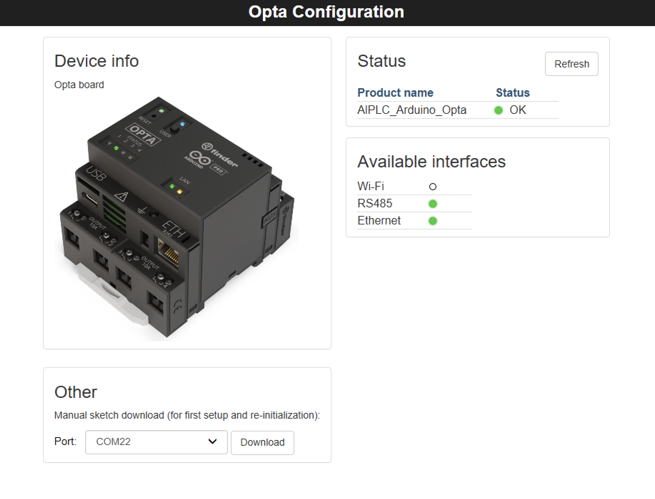
| By clicking the **Activate PLC Runtime** button, the product activation will be completed and the PLC status will be set as OK: | ||
jcarolinares marked this conversation as resolved. Outdated Show resolved Hide resolved | ||
| | ||
|  | ||
| | ||
| ### 8. Activation Recovery | ||
| | ||
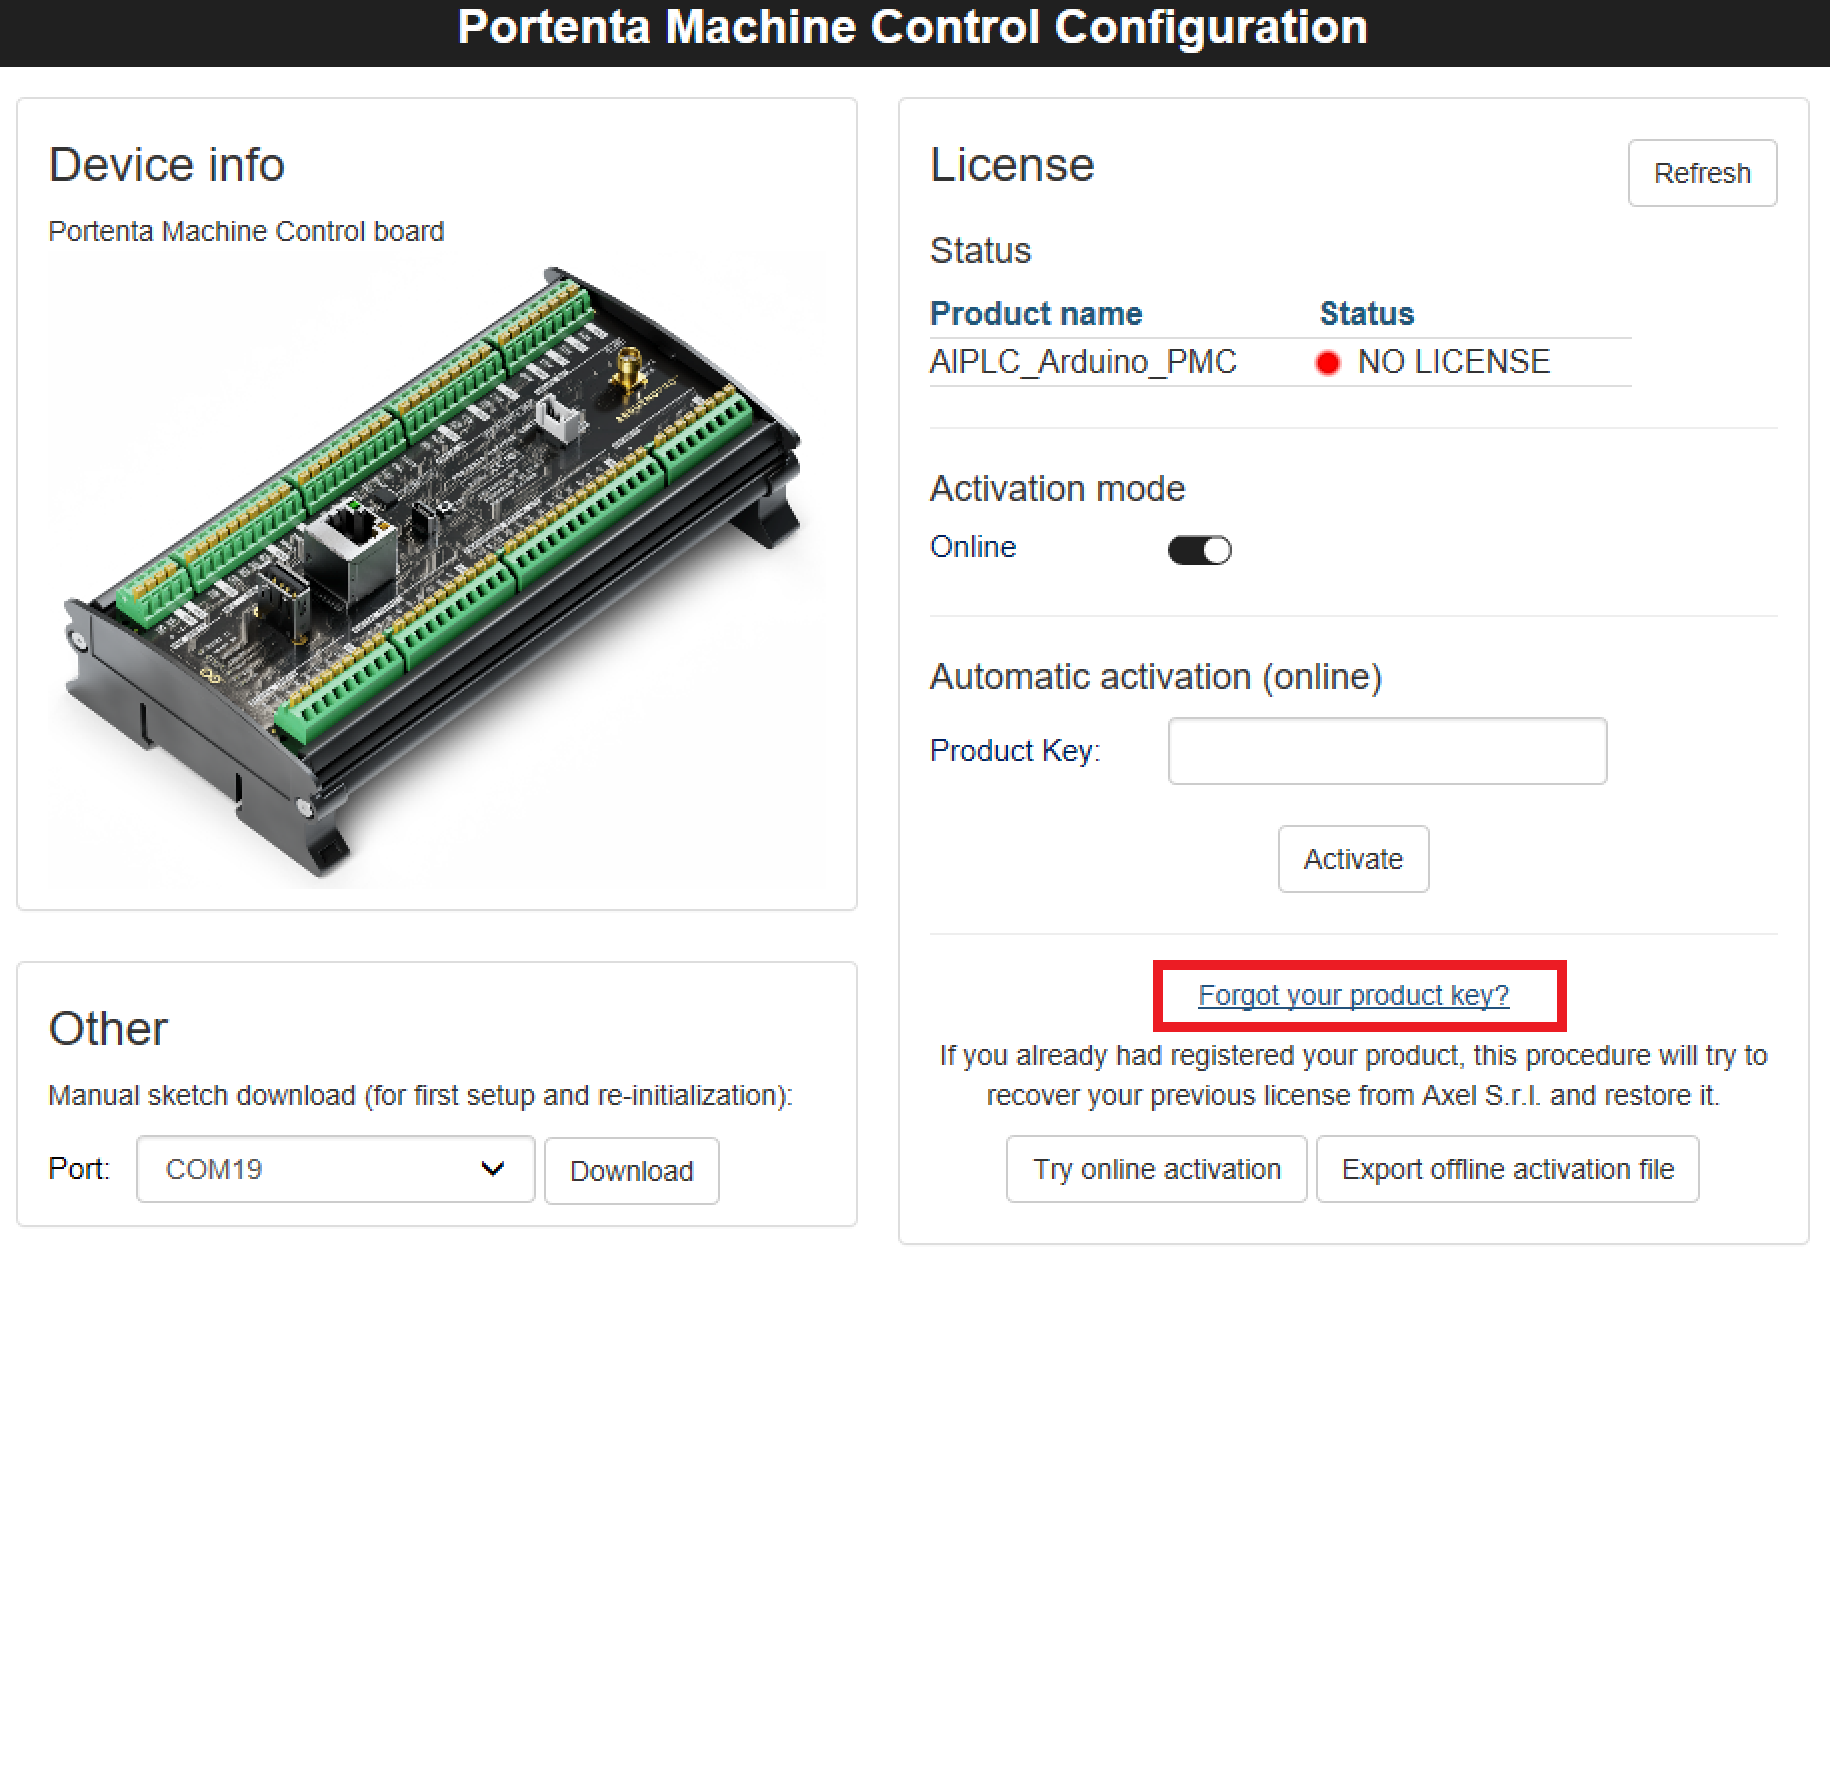
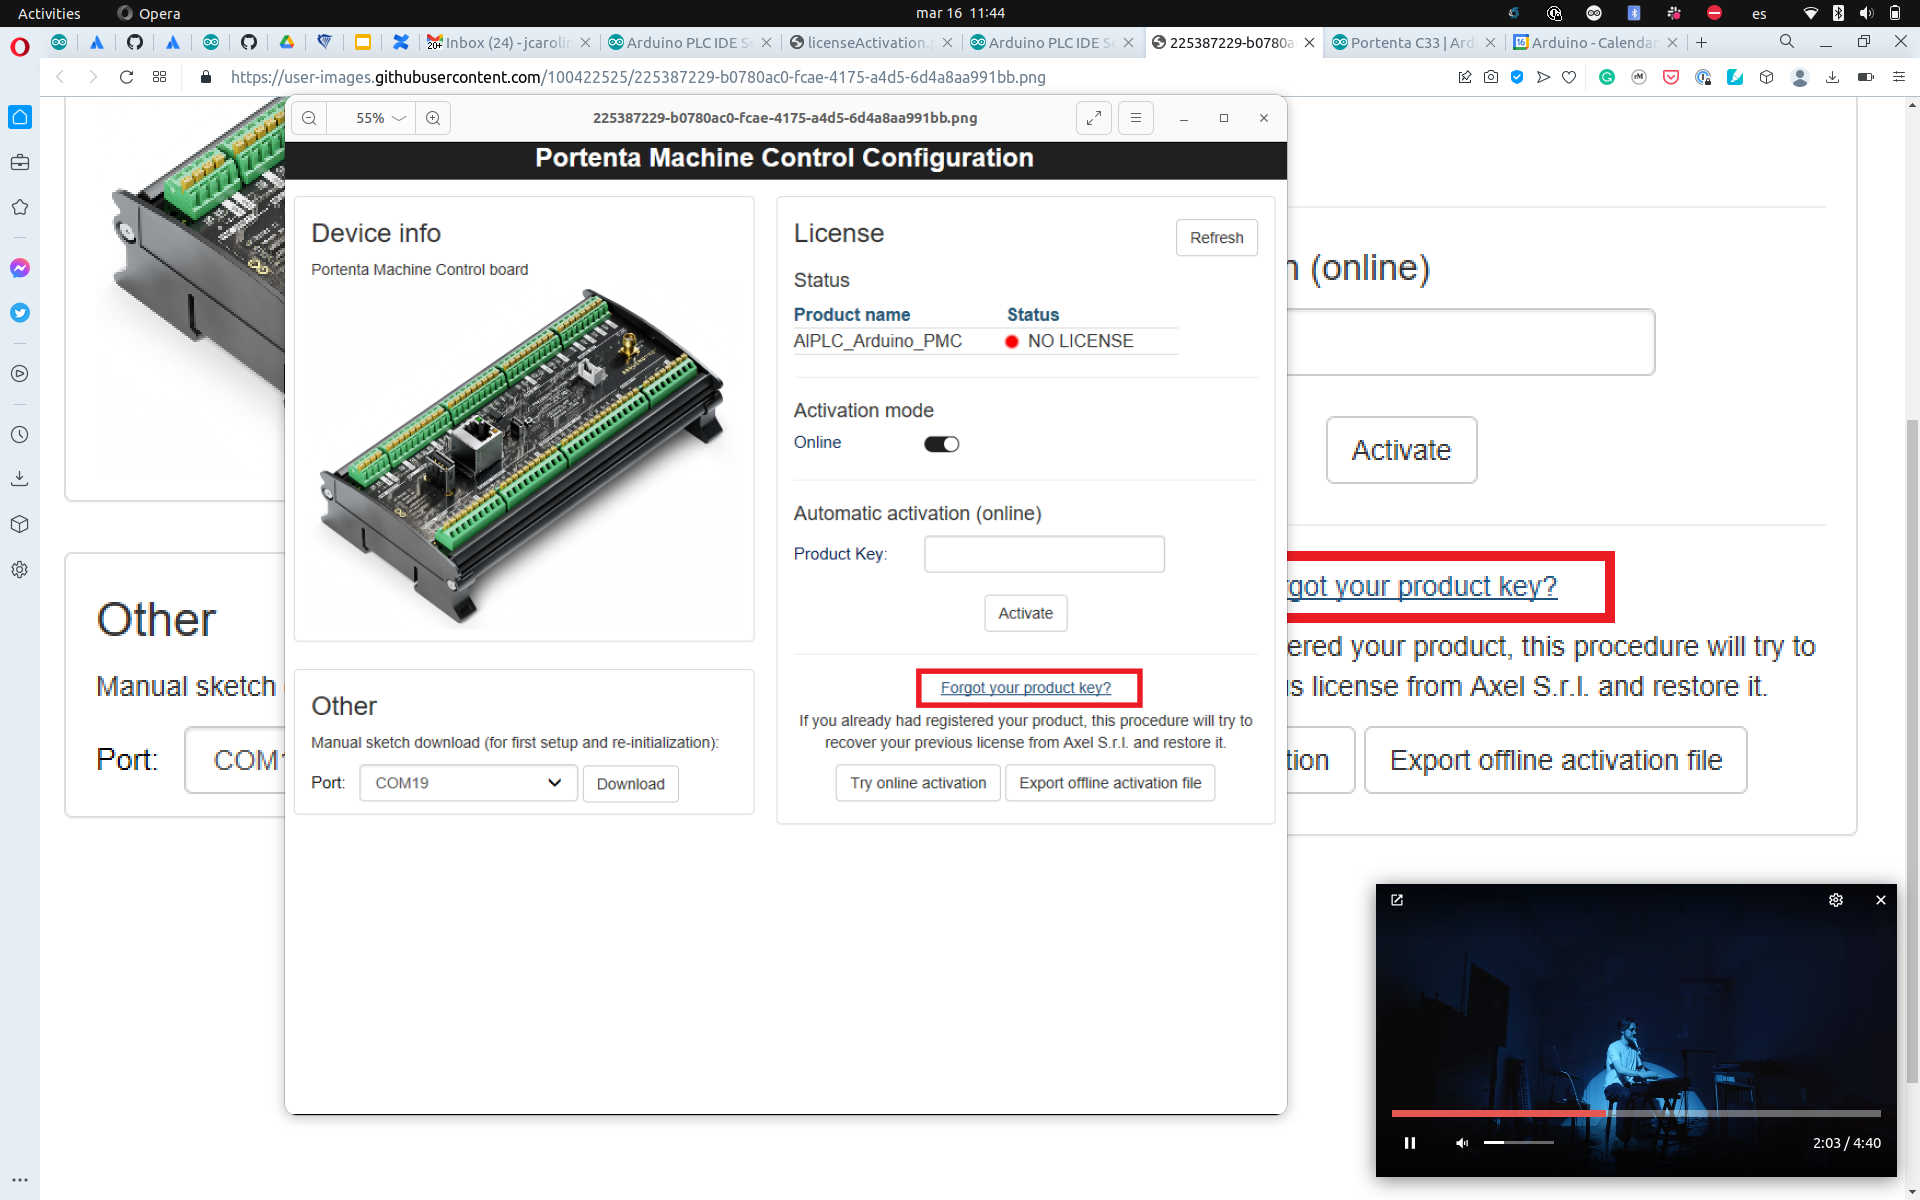
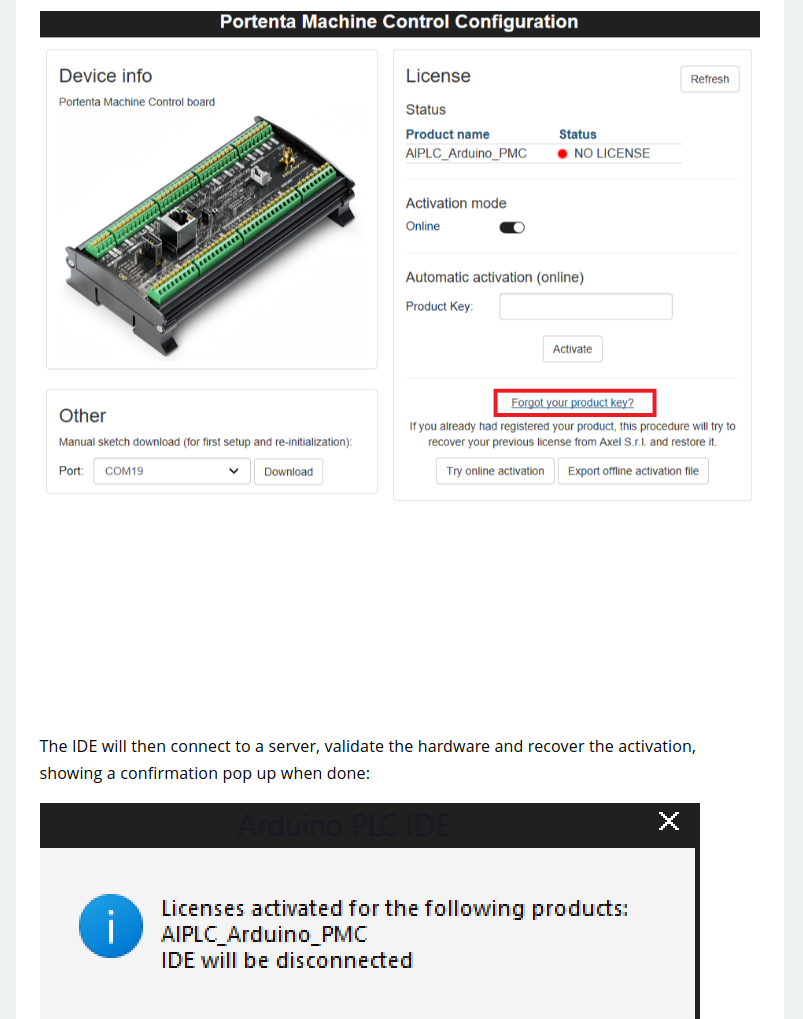
| In case the hardware is being reflashed and the key got lost, the license can be recovered just clicking the **Forgot your Product Key?" button: | ||
jcarolinares marked this conversation as resolved. Outdated Show resolved Hide resolved | ||
| | ||
|  | ||
| There was a problem hiding this comment. Choose a reason for hiding this commentThe reason will be displayed to describe this comment to others. Learn more. | ||
| | ||
| The IDE will then connect to a server, validate the hardware and recover the activation, showing a confirmation pop up when done: | ||
| | ||
| 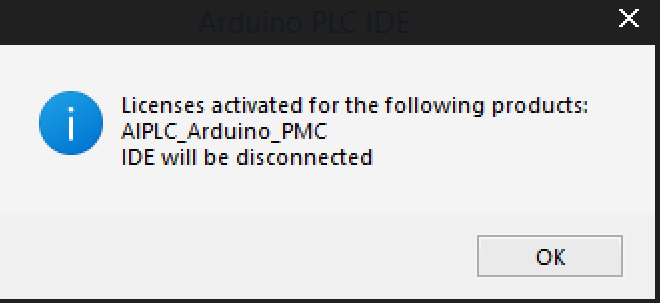 | ||
| There was a problem hiding this comment. Choose a reason for hiding this commentThe reason will be displayed to describe this comment to others. Learn more. The image has a big problem incomplete I think I can edit it and make a small trick to fix it | ||
| | ||
| | ||
| ### 7. Getting the Hardware-ID of Your Device | ||
| ### 9. Getting the Hardware-ID of Your Device | ||
| | ||
| To do it follow the next steps: | ||
| - Be sure that your device is disconnected from the Arduino PLC IDE. | ||
| | @@ -123,13 +156,13 @@ To do it follow the next steps: | |
| - Go to **Tools** > **Port** to select the proper port (the default one shown before in the PLC IDE inside the **Arduino PMC Configuration** > **Other** section) | ||
| - Go to **Tools** > **Serial Monitor** and reset the board. Look at the end of the boot report to find the "Hardware-ID" and store it in a safe place. | ||
| Comment on lines 156 to 157 There was a problem hiding this comment. Choose a reason for hiding this commentThe reason will be displayed to describe this comment to others. Learn more. See line from above we need to fix it to add Opta tool | ||
| | ||
| ### 8. Download a Program | ||
| ### 10. Download a Program | ||
| | ||
| Let's download and run the first program on your device. We are going to use the default program that is included in a project: a counter. To upload that program to your PLC, it is needed to compile the program and send it to the target device. | ||
| | ||
|  | ||
| | ||
| ### 9. Communication Test | ||
| ### 11. Communication Test | ||
| | ||
| Open the **Watch** window by clicking on "View > Tool Windows > Watch", it will attach a new window on the right side called **Watch**. This window shows the real-time variables value. | ||
| | ||
| | @@ -141,4 +174,4 @@ Select the **Watch** window and click on the **Start/Stop watch button** unless | |
| | ||
| In this tutorial we went through how to setup the Portenta Machine Control with the Arduino IDE lab, learning how to connect the board to the program through Modbus, activating the hardware license of your product, and creating a simple sketch with one variable that went compiled and downloaded inside the board. Finally, we learned how to see the values of the variables in real-time using the **Watch** window. | ||
| | ||
| Now that your board is up and running with the Arduino PLC IDE, you can start to create your own professional solutions. | ||
| Now that your board is up and running with the Arduino PLC IDE, you can start to create your own professional solutions. | ||
There was a problem hiding this comment.
Choose a reason for hiding this comment
The reason will be displayed to describe this comment to others. Learn more.
The tutorial requires additional changes that will be made by me after this review.