
 Data Structure
 Networking
 RDBMS
RDBMS Operating System
 Java
Java MS Excel
 iOS
iOS HTML
HTML CSS
CSS Android
 Python
 C Programming
 C++
C++ C#
C# MongoDB
 MySQL
MySQL Javascript
 PHP
PHP
- Selected Reading
- UPSC IAS Exams Notes
- Developer's Best Practices
- Questions and Answers
- Effective Resume Writing
- HR Interview Questions
- Computer Glossary
- Who is Who
How to pass values from one activity to another in Android?
For this lesson we are only concerned with passing data between activities without making them persistent so we’ll look at the two simplest ways to achieve that which are by using Static methods and Intents
Using Static methods
This example demonstrate about Passing data between activities in Android using Static methods.
Step 1 − Create a new project in Android Studio, go to File ⇒ New Project and fill all required details to create a new project.
Step 2 − Add the following code to res/layout/activity_main.xml.
<?xml version = "1.0" encoding = "utf-8"?> <LinearLayout xmlns:android = "http://schemas.android.com/apk/res/android" xmlns:tools = "http://schemas.android.com/tools" android:layout_width = "match_parent" android:layout_height = "match_parent" android:layout_margin = "16dp" android:orientation = "vertical" tools:context = ".MainActivity"> <EditText android:id = "@+id/edit_text" android:layout_width = "match_parent" android:layout_height = "wrap_content" android:layout_gravity = "center" android:hint = "Enter something to pass" android:inputType = "text" /> <Button android:id = "@+id/button" android:layout_width = "wrap_content" android:layout_height = "wrap_content" android:layout_gravity = "center" android:layout_marginTop = "16dp" android:text = "Next" /> </LinearLayout>
Step 3 − Add the following code to src/MainActivity.java
package com.example.myapplication; import android.content.Intent; import android.os.Bundle; import android.support.v7.app.AppCompatActivity; import android.view.View; import android.widget.Button; import android.widget.EditText; public class MainActivity extends AppCompatActivity { private static String value; public static String getValue() { return value; } @Override protected void onCreate(Bundle savedInstanceState) { super.onCreate(savedInstanceState); setContentView(R.layout.activity_main); final EditText editText = findViewById(R.id.edit_text); Button button = findViewById(R.id.button); button.setOnClickListener(new View.OnClickListener() { @Override public void onClick(View v) { value = editText.getText().toString().trim(); Intent intent = new Intent(MainActivity.this, SecondActivity.class); startActivity(intent); } }); } } Step 4 − Add the following code to res/layout/activity_second.xml.
<?xml version = "1.0" encoding = "utf-8"?> <LinearLayout xmlns:android = "http://schemas.android.com/apk/res/android" xmlns:tools = "http://schemas.android.com/tools" android:layout_width = "match_parent" android:layout_height = "match_parent" android:layout_margin = "16dp" android:orientation = "vertical" tools:context = ".SecondActivity"> <TextView android:id = "@+id/text_view" android:layout_width = "match_parent" android:layout_height = "wrap_content" android:layout_gravity = "center" /> </LinearLayout>
Step 5 − Add the following code to src/SecondActivity.java
package com.example.myapplication; import android.support.v7.app.AppCompatActivity; import android.os.Bundle; import android.widget.TextView; public class SecondActivity extends AppCompatActivity { @Override protected void onCreate(Bundle savedInstanceState) { super.onCreate(savedInstanceState); setContentView(R.layout.activity_second); TextView textView = findViewById(R.id.text_view); textView.setText(MainActivity.getValue()); } } Step 6 − Add the following code to androidManifest.xml
<?xml version = "1.0" encoding = "utf-8"?> <manifest xmlns:android = "http://schemas.android.com/apk/res/android" package = "com.example.myapplication"> <application android:allowBackup = "true" android:icon = "@mipmap/ic_launcher" android:label = "@string/app_name" android:roundIcon = "@mipmap/ic_launcher_round" android:supportsRtl = "true" android:theme = "@style/AppTheme"> <activity android:name = ".MainActivity"> <intent-filter> <action android:name = "android.intent.action.MAIN" /> <category android:name = "android.intent.category.LAUNCHER" /> </intent-filter> </activity> <activity android:name = ".SecondActivity"></activity> </application> </manifest>
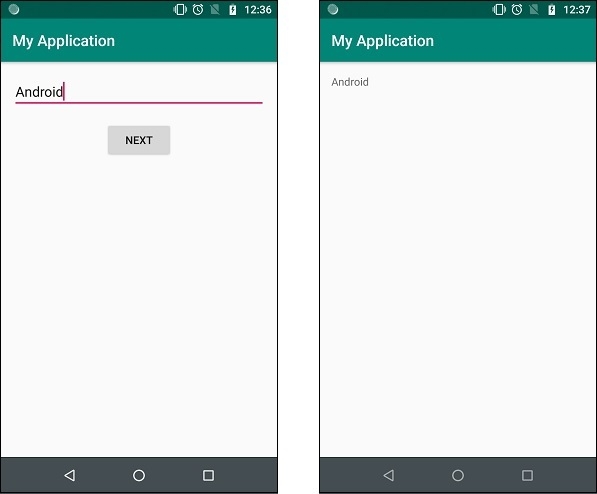
Let's try to run your application. I assume you have connected your actual Android Mobile device with your computer. To run the app from android studio, open one of your project's activity files and click Run ![]() icon from the toolbar. Select your mobile device as an option and then check your mobile device which will display your default screen –
icon from the toolbar. Select your mobile device as an option and then check your mobile device which will display your default screen –
Using Intents
This example demonstrate about How to send data from one activity to another in Android using intent.
Step 1 − Create a new project in Android Studio, go to File ⇒ New Project and fill all required details to create a new project.
Step 2 − Add the following code to res/layout/activity_main.xml.
<?xml version = "1.0" encoding = "utf-8"?> <LinearLayout xmlns:android = "http://schemas.android.com/apk/res/android" xmlns:tools = "http://schemas.android.com/tools" android:layout_width = "match_parent" android:layout_height = "match_parent" android:layout_margin = "16dp" android:orientation = "vertical" tools:context = ".MainActivity"> <EditText android:id = "@+id/edit_text" android:layout_width = "match_parent" android:layout_height = "wrap_content" android:layout_gravity = "center" android:hint = "Enter something to pass" android:inputType = "text" /> <Button android:id = "@+id/button" android:layout_width = "wrap_content" android:layout_height = "wrap_content" android:layout_gravity = "center" android:layout_marginTop = "16dp" android:text = "Next" /> </LinearLayout>
Step 3 − Add the following code to src/MainActivity.java
package com.example.myapplication; import android.content.Intent; import android.os.Bundle; import android.support.v7.app.AppCompatActivity; import android.view.View; import android.widget.Button; import android.widget.EditText; public class MainActivity extends AppCompatActivity { @Override protected void onCreate(Bundle savedInstanceState) { super.onCreate(savedInstanceState); setContentView(R.layout.activity_main); final EditText editText = findViewById(R.id.edit_text); Button button = findViewById(R.id.button); button.setOnClickListener(new View.OnClickListener() { @Override public void onClick(View v) { String value = editText.getText().toString().trim(); Intent intent = new Intent(MainActivity.this, SecondActivity.class); intent.putString(“value”,value); startActivity(intent); } }); } } Step 4 − Add the following code to res/layout/activity_second.xml.
<?xml version = "1.0" encoding = "utf-8"?> <LinearLayout xmlns:android = "http://schemas.android.com/apk/res/android" xmlns:tools = "http://schemas.android.com/tools" android:layout_width = "match_parent" android:layout_height = "match_parent" android:layout_margin = "16dp" android:orientation = "vertical" tools:context = ".SecondActivity"> <TextView android:id = "@+id/text_view" android:layout_width = "match_parent" android:layout_height = "wrap_content" android:layout_gravity = "center" /> </LinearLayout>
Step 5 − Add the following code to src/SecondActivity.java
package com.example.myapplication; import android.support.v7.app.AppCompatActivity; import android.os.Bundle; import android.widget.TextView; public class SecondActivity extends AppCompatActivity { @Override protected void onCreate(Bundle savedInstanceState) { super.onCreate(savedInstanceState); setContentView(R.layout.activity_second); Bundle bundle = getIntent().getExtras(); if (bundle ! = null) { String value = bundle.getString("value"); TextView textView = findViewById(R.id.text_view); textView.setText(value); } } } Step 6 − Add the following code to androidManifest.xml
<?xml version = "1.0" encoding = "utf-8"?> <manifest xmlns:android = "http://schemas.android.com/apk/res/android" package = "com.example.myapplication"> <application android:allowBackup = "true" android:icon = "@mipmap/ic_launcher" android:label = "@string/app_name" android:roundIcon = "@mipmap/ic_launcher_round" android:supportsRtl = "true" android:theme = "@style/AppTheme"> <activity android:name = ".MainActivity"> <intent-filter> <action android:name = "android.intent.action.MAIN" /> <category android:name = "android.intent.category.LAUNCHER" /> </intent-filter> </activity> <activity android:name = ".SecondActivity"></activity> </application> </manifest>
Let's try to run your application. I assume you have connected your actual Android Mobile device with your computer. To run the app from android studio, open one of your project's activity files and click Run ![]() icon from the toolbar. Select your mobile device as an option and then check your mobile device which will display your default screen –
icon from the toolbar. Select your mobile device as an option and then check your mobile device which will display your default screen –
List of projects -

5K+ Views
