
 Data Structure
 Networking
 RDBMS
RDBMS Operating System
 Java
Java MS Excel
 iOS
iOS HTML
HTML CSS
CSS Android
 Python
 C Programming
 C++
C++ C#
C# MongoDB
 MySQL
MySQL Javascript
 PHP
PHP
- Selected Reading
- UPSC IAS Exams Notes
- Developer's Best Practices
- Questions and Answers
- Effective Resume Writing
- HR Interview Questions
- Computer Glossary
- Who is Who
How to pass multiple data from one activity to another in Android?
This example demonstrate about How to pass multiple data from one activity to another in Android
Step 1 − Create a new project in Android Studio, go to File ⇒ New Project and fill all required details to create a new project.
Step 2 − Add the following code to res/layout/activity_main.xml.
<?xml version = "1.0" encoding = "utf-8"?> <LinearLayout xmlns:android = "http://schemas.android.com/apk/res/android" xmlns:tools = "http://schemas.android.com/tools" android:layout_width = "match_parent" android:layout_height = "match_parent" android:layout_margin = "16dp" android:orientation = "vertical" tools:context = ".MainActivity"> <EditText android:id = "@+id/etName" android:layout_width = "match_parent" android:layout_height = "wrap_content" android:layout_gravity = "center" android:hint = "Name" android:inputType = "text" /> <EditText android:id = "@+id/etAge" android:layout_width = "match_parent" android:layout_height = "wrap_content" android:layout_gravity = "center" android:hint = "Age" android:inputType = "number" /> <Button android:id = "@+id/button" android:layout_width = "match_parent" android:layout_height = "wrap_content" android:layout_gravity = "center" android:layout_marginTop = "16dp" android:text = "Next" /> </LinearLayout>
Step 3 − Add the following code to src/MainActivity.java
package com.example.myapplication; import android.content.Intent; import android.os.Bundle; import android.support.v7.app.AppCompatActivity; import android.view.View; import android.widget.Button; import android.widget.EditText; public class MainActivity extends AppCompatActivity { EditText etName, etAge; @Override protected void onCreate(Bundle savedInstanceState) { super.onCreate(savedInstanceState); setContentView(R.layout.activity_main); etName = findViewById(R.id.etName); etAge = findViewById(R.id.etAge); Button button = findViewById(R.id.button); button.setOnClickListener(new View.OnClickListener() { @Override public void onClick(View v) { String name = etName.getText().toString().trim(); String age = etAge.getText().toString().trim(); Bundle bundle = new Bundle(); bundle.putString("name", name); bundle.putString("age", age); Intent intent = new Intent(MainActivity.this, SecondActivity.class); intent.putExtras(bundle); startActivity(intent); } }); } } Step 4 − Add the following code to res/layout/activity_second.xml.
<?xml version = "1.0" encoding = "utf-8"?> <LinearLayout xmlns:android = "http://schemas.android.com/apk/res/android" xmlns:tools = "http://schemas.android.com/tools" android:layout_width = "match_parent" android:layout_height = "match_parent" android:layout_margin = "16dp" android:orientation = "vertical" tools:context = ".SecondActivity"> <TextView android:id = "@+id/tvName" android:layout_width = "match_parent" android:layout_height = "wrap_content" /> <TextView android:id = "@+id/tvAge" android:layout_width = "match_parent" android:layout_height = "wrap_content" /> </LinearLayout>
Step 5 − Add the following code to src/SecondActivity.java
package com.example.myapplication; import android.os.Bundle; import android.support.v7.app.AppCompatActivity; import android.widget.TextView; public class SecondActivity extends AppCompatActivity { @Override protected void onCreate(Bundle savedInstanceState) { super.onCreate(savedInstanceState); setContentView(R.layout.activity_second); Bundle bundle = getIntent().getExtras(); if (bundle ! = null) { String name = bundle.getString("name"); String age = bundle.getString("age"); TextView tvName = findViewById(R.id.tvName); TextView tvAge = findViewById(R.id.tvAge); tvName.setText(name); tvAge.setText(age); } } } Step 6 − Add the following code to androidManifest.xml
<?xml version = "1.0" encoding = "utf-8"?> <manifest xmlns:android = "http://schemas.android.com/apk/res/android" package = "com.example.myapplication"> <application android:allowBackup = "true" android:icon = "@mipmap/ic_launcher" android:label = "@string/app_name" android:roundIcon = "@mipmap/ic_launcher_round" android:supportsRtl = "true" android:theme = "@style/AppTheme"> <activity android:name = ".MainActivity"> <intent-filter> <action android:name = "android.intent.action.MAIN" /> <category android:name = "android.intent.category.LAUNCHER" /> </intent-filter> </activity> <activity android:name = ".SecondActivity"></activity> </application> </manifest>
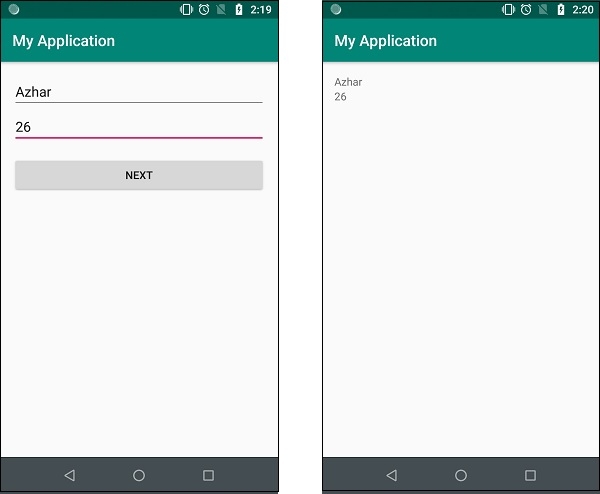
Let's try to run your application. I assume you have connected your actual Android Mobile device with your computer. To run the app from android studio, open one of your project's activity files and click Run ![]() icon from the toolbar. Select your mobile device as an option and then check your mobile device which will display your default screen –
icon from the toolbar. Select your mobile device as an option and then check your mobile device which will display your default screen –
Click here to download the project code

3K+ Views
