Unlock the secrets of your code with our AI-powered Code Explainer. Take a look!
Ever wondered how digital forensics tools bring files back from the dead? Whether you're dealing with a corrupted drive, a deleted folder, or you're just a curious hacker at heart — this tutorial walks you through building a Python-based file recovery tool that scans a raw disk image and pulls out recognizable file types.
No black magic. Just file structure, byte patterns, and Python.
What You'll Learn
- How deleted files can be recovered by looking for file signatures
- The structure of common file types (JPG, PNG, PDF, etc.)
- How to scan a raw disk image for recoverable data
- How to write and run a file recovery script in Python
Table of Contents:
How File Recovery Actually Works
When you delete a file, it's not physically removed from the drive. The OS just erases its reference in the file table. The data stays there—waiting to be overwritten. As long as it hasn't been overwritten, there's a solid chance of recovering it.
File recovery tools work by:
- Scanning the raw data on the drive (bit-by-bit).
- Looking for known file signatures (unique headers/footers).
- Extracting data between those signatures.
Think of it like digging through an old journal without an index. If you know what the start of a chapter looks like, you can probably find and recover it—even if the table of contents is missing.
Every file format has a unique signature — usually a few bytes at the start (called a header) and sometimes at the end (footer). Our script will use this knowledge to identify and recover files from raw data. You can learn more about file signatures here.
Requirements
To follow along with this project, you need Python3 and a USB or external storage drive that can be connected to your PC.
You should insert some files like PDFs, JPGs, PNGs, PPTX, DOCx in the USB drive and delete them to hopefully recover for the purpose of testing.
PLEASE DO NOT GAMBLE WITH SENSITIVE, IMPORTANT FILES.
Getting Started
We do not need to install any packages for this program as they all come preinstalled with Python. So just open up a new file, name it meaning fully like file_recovery.py and follow along:
import os import sys import argparse import struct import time import logging import subprocess import signal from datetime import datetime, timedelta from pathlib import Path import shutil import binascii # File signatures (magic numbers) for common file types FILE_SIGNATURES = { 'jpg': [bytes([0xFF, 0xD8, 0xFF, 0xE0]), bytes([0xFF, 0xD8, 0xFF, 0xE1])], 'png': [bytes([0x89, 0x50, 0x4E, 0x47, 0x0D, 0x0A, 0x1A, 0x0A])], 'gif': [bytes([0x47, 0x49, 0x46, 0x38, 0x37, 0x61]), bytes([0x47, 0x49, 0x46, 0x38, 0x39, 0x61])], 'pdf': [bytes([0x25, 0x50, 0x44, 0x46])], 'zip': [bytes([0x50, 0x4B, 0x03, 0x04])], 'docx': [bytes([0x50, 0x4B, 0x03, 0x04, 0x14, 0x00, 0x06, 0x00])], # More specific signature 'xlsx': [bytes([0x50, 0x4B, 0x03, 0x04, 0x14, 0x00, 0x06, 0x00])], # More specific signature 'pptx': [bytes([0x50, 0x4B, 0x03, 0x04, 0x14, 0x00, 0x06, 0x00])], # More specific signature 'mp3': [bytes([0x49, 0x44, 0x33])], 'mp4': [bytes([0x00, 0x00, 0x00, 0x18, 0x66, 0x74, 0x79, 0x70])], 'avi': [bytes([0x52, 0x49, 0x46, 0x46])], } # Additional validation patterns to check after finding the signature # This helps reduce false positives VALIDATION_PATTERNS = { 'docx': [b'word/', b'[Content_Types].xml'], 'xlsx': [b'xl/', b'[Content_Types].xml'], 'pptx': [b'ppt/', b'[Content_Types].xml'], 'zip': [b'PK\x01\x02'], # Central directory header 'pdf': [b'obj', b'endobj'], } # File endings (trailer signatures) for some file types FILE_TRAILERS = { 'jpg': bytes([0xFF, 0xD9]), 'png': bytes([0x49, 0x45, 0x4E, 0x44, 0xAE, 0x42, 0x60, 0x82]), 'gif': bytes([0x00, 0x3B]), 'pdf': bytes([0x25, 0x25, 0x45, 0x4F, 0x46]), } # Maximum file sizes to prevent recovering corrupted files MAX_FILE_SIZES = { 'jpg': 30 * 1024 * 1024, # 30MB 'png': 50 * 1024 * 1024, # 50MB 'gif': 20 * 1024 * 1024, # 20MB 'pdf': 100 * 1024 * 1024, # 100MB 'zip': 200 * 1024 * 1024, # 200MB 'docx': 50 * 1024 * 1024, # 50MB 'xlsx': 50 * 1024 * 1024, # 50MB 'pptx': 100 * 1024 * 1024, # 100MB 'mp3': 50 * 1024 * 1024, # 50MB 'mp4': 1024 * 1024 * 1024, # 1GB 'avi': 1024 * 1024 * 1024, # 1GB }The program starts by making the necessary imports: os and pathlib for file system operations, sys for system-specific parameters, argparse for command-line argument parsing, struct for binary data handling, time and datetime for timing operations, logging for error tracking, subprocess and signal for process management, shutil for high-level file operations, and binascii for binary-to-ASCII conversions.
FILE_SIGNATURES contains the magic bytes/headers for various file formats, with some formats having multiple possible signatures (like JPG with two variants). VALIDATION_PATTERNS provides additional byte sequences found within specific file types to reduce false positives, particularly important for Office formats (docx, xlsx, pptx) which share the same ZIP-based header. FILE_TRAILERS defines the ending byte sequences for formats that have consistent footers, such as JPG, PNG, GIF, and PDF. Finally, MAX_FILE_SIZES establishes reasonable size limits for each file type to prevent recovering excessively large or corrupted files.
For the next section, there's going to be a lot of code, so please be patient as It's all a part of one class. If you find it too overwhelming, no problem if you just copy the code for the full code section at the end of the tutorial. The code is well commented, so you can understand what's happening. I'll still explain though.
class FileRecoveryTool: def __init__(self, source, output_dir, file_types=None, deep_scan=False, block_size=512, log_level=logging.INFO, skip_existing=True, max_scan_size=None, timeout_minutes=None): """Initialize the file recovery tool Args: source (str): Path to the source device or directory output_dir (str): Directory to save recovered files file_types (list): List of file types to recover deep_scan (bool): Whether to perform a deep scan block_size (int): Block size for reading data log_level (int): Logging level skip_existing (bool): Skip existing files in output directory max_scan_size (int): Maximum number of bytes to scan timeout_minutes (int): Timeout in minutes""" self.source = source self.output_dir = Path(output_dir) self.file_types = file_types if file_types else list(FILE_SIGNATURES.keys()) self.deep_scan = deep_scan self.block_size = block_size self.skip_existing = skip_existing self.max_scan_size = max_scan_size self.timeout_minutes = timeout_minutes self.timeout_reached = False # Setup logging self.setup_logging(log_level) # Create output directory if it doesn't exist self.output_dir.mkdir(parents=True, exist_ok=True) # Statistics self.stats = { 'total_files_recovered': 0, 'recovered_by_type': {}, 'start_time': time.time(), 'bytes_scanned': 0, 'false_positives': 0 } for file_type in self.file_types: self.stats['recovered_by_type'][file_type] = 0 def setup_logging(self, log_level): """Set up logging configuration""" logging.basicConfig( level=log_level, format='%(asctime)s - %(levelname)s - %(message)s', handlers=[ logging.StreamHandler(), logging.FileHandler(f"recovery_{datetime.now().strftime('%Y%m%d_%H%M%S')}.log") ] ) self.logger = logging.getLogger('file_recovery') def _setup_timeout(self): """Set up a timeout handler""" if self.timeout_minutes: def timeout_handler(signum, frame): self.logger.warning(f"Timeout of {self.timeout_minutes} minutes reached!") self.timeout_reached = True # Set the timeout signal.signal(signal.SIGALRM, timeout_handler) signal.alarm(int(self.timeout_minutes * 60)) def get_device_size(self): """Get the size of the device or file""" if os.path.isfile(self.source): # Regular file return os.path.getsize(self.source) else: # Block device try: # Try using blockdev command (Linux) result = subprocess.run(['blockdev', '--getsize64', self.source], capture_output=True, text=True, check=True) return int(result.stdout.strip()) except (subprocess.SubprocessError, FileNotFoundError): try: # Try using ioctl (requires root) import fcntl with open(self.source, 'rb') as fd: # BLKGETSIZE64 = 0x80081272 buf = bytearray(8) fcntl.ioctl(fd, 0x80081272, buf) return struct.unpack('L', buf)[0] except: # Last resort: try to seek to the end try: with open(self.source, 'rb') as fd: fd.seek(0, 2) # Seek to end return fd.tell() except: self.logger.warning("Could not determine device size. Using fallback size.") # Fallback to a reasonable size for testing return 1024 * 1024 * 1024 # 1GB def scan_device(self): """Scan the device for deleted files""" self.logger.info(f"Starting scan of {self.source}") self.logger.info(f"Looking for file types: {', '.join(self.file_types)}") try: # Get device size device_size = self.get_device_size() self.logger.info(f"Device size: {self._format_size(device_size)}") # Set up timeout if specified if self.timeout_minutes: self._setup_timeout() self.logger.info(f"Timeout set for {self.timeout_minutes} minutes") with open(self.source, 'rb', buffering=0) as device: # buffering=0 for direct I/O self._scan_device_data(device, device_size) except (IOError, OSError) as e: self.logger.error(f"Error accessing source: {e}") return False self._print_summary() return True def _scan_device_data(self, device, device_size): """Scan the device data for file signatures""" position = 0 # Limit scan size if specified if self.max_scan_size and self.max_scan_size < device_size: self.logger.info(f"Limiting scan to first {self._format_size(self.max_scan_size)} of device") device_size = self.max_scan_size # Create subdirectories for each file type for file_type in self.file_types: (self.output_dir / file_type).mkdir(exist_ok=True) scan_start_time = time.time() last_progress_time = scan_start_time # Read the device in blocks while position < device_size: # Check if timeout reached if self.timeout_reached: self.logger.warning("Stopping scan due to timeout") break try: # Seek to position first device.seek(position) # Read a block of data data = device.read(self.block_size) if not data: break self.stats['bytes_scanned'] += len(data) # Check for file signatures in this block for file_type in self.file_types: signatures = FILE_SIGNATURES.get(file_type, []) for signature in signatures: sig_pos = data.find(signature) if sig_pos != -1: # Found a file signature, try to recover the file absolute_pos = position + sig_pos device.seek(absolute_pos) self.logger.debug(f"Found {file_type} signature at position {absolute_pos}") # Recover the file if self._recover_file(device, file_type, absolute_pos): self.stats['total_files_recovered'] += 1 self.stats['recovered_by_type'][file_type] += 1 else: self.stats['false_positives'] += 1 # Reset position to continue scanning device.seek(position + self.block_size) # Update position and show progress position += self.block_size current_time = time.time() # Show progress every 5MB or 10 seconds, whichever comes first if (position % (5 * 1024 * 1024) == 0) or (current_time - last_progress_time >= 10): percent = (position / device_size) * 100 if device_size > 0 else 0 elapsed = current_time - self.stats['start_time'] # Calculate estimated time remaining if position > 0 and device_size > 0: bytes_per_second = position / elapsed if elapsed > 0 else 0 remaining_bytes = device_size - position eta_seconds = remaining_bytes / bytes_per_second if bytes_per_second > 0 else 0 eta_str = str(timedelta(seconds=int(eta_seconds))) else: eta_str = "unknown" self.logger.info(f"Progress: {percent:.2f}% ({self._format_size(position)} / {self._format_size(device_size)}) - " f"{self.stats['total_files_recovered']} files recovered - " f"Elapsed: {timedelta(seconds=int(elapsed))} - ETA: {eta_str}") last_progress_time = current_time except Exception as e: self.logger.error(f"Error reading at position {position}: {e}") position += self.block_size # Skip this block and continue def _validate_file_content(self, data, file_type): """Additional validation to reduce false positives Args: data: File data to validate file_type: Type of file to validate Returns: bool: True if file content appears valid""" # Check minimum size if len(data) < 100: return False # Check for validation patterns patterns = VALIDATION_PATTERNS.get(file_type, []) if patterns: for pattern in patterns: if pattern in data: return True return False # None of the patterns were found # For file types without specific validation patterns return True def _recover_file(self, device, file_type, start_position): """Recover a file of the given type starting at the given position Args: device: Open file handle to the device file_type: Type of file to recover start_position: Starting position of the file Returns: bool: True if file was recovered successfully""" max_size = MAX_FILE_SIZES.get(file_type, 10 * 1024 * 1024) # Default to 10MB trailer = FILE_TRAILERS.get(file_type) # Generate a unique filename filename = f"{file_type}_{start_position}_{int(time.time())}_{binascii.hexlify(os.urandom(4)).decode()}.{file_type}" output_path = self.output_dir / file_type / filename if self.skip_existing and output_path.exists(): self.logger.debug(f"Skipping existing file: {output_path}") return False # Save the current position to restore later current_pos = device.tell() try: # Seek to the start of the file device.seek(start_position) # Read the file data if trailer and self.deep_scan: # If we know the trailer and deep scan is enabled, read until trailer file_data = self._read_until_trailer(device, trailer, max_size) else: # Otherwise, use heuristics to determine file size file_data = self._read_file_heuristic(device, file_type, max_size) if not file_data or len(file_data) < 100: # Ignore very small files return False # Additional validation to reduce false positives if not self._validate_file_content(file_data, file_type): self.logger.debug(f"Skipping invalid {file_type} file at position {start_position}") return False # Write the recovered file with open(output_path, 'wb') as f: f.write(file_data) self.logger.info(f"Recovered {file_type} file: {filename} ({self._format_size(len(file_data))})") return True except Exception as e: self.logger.error(f"Error recovering file at position {start_position}: {e}") return False finally: # Restore the original position try: device.seek(current_pos) except: pass # Ignore seek errors in finally block def _read_until_trailer(self, device, trailer, max_size): """Read data until a trailer signature is found or max size is reached""" buffer = bytearray() chunk_size = 4096 while len(buffer) < max_size: try: chunk = device.read(chunk_size) if not chunk: break buffer.extend(chunk) # Check if trailer is in the buffer trailer_pos = buffer.find(trailer, max(0, len(buffer) - len(trailer) - chunk_size)) if trailer_pos != -1: # Found trailer, return data up to and including the trailer return buffer[:trailer_pos + len(trailer)] except Exception as e: self.logger.error(f"Error reading chunk: {e}") break # If we reached max size without finding a trailer, return what we have return buffer if len(buffer) > 100 else None def _read_file_heuristic(self, device, file_type, max_size): """Use heuristics to determine file size when trailer is unknown This is a simplified approach - real tools use more sophisticated methods""" buffer = bytearray() chunk_size = 4096 valid_chunks = 0 invalid_chunks = 0 # For Office documents and ZIP files, read a larger initial chunk to validate initial_chunk_size = 16384 if file_type in ['docx', 'xlsx', 'pptx', 'zip'] else chunk_size # Read initial chunk for validation initial_chunk = device.read(initial_chunk_size) if not initial_chunk: return None buffer.extend(initial_chunk) # For Office documents, check if it contains required elements if file_type in ['docx', 'xlsx', 'pptx', 'zip']: # Basic validation for Office Open XML files if file_type == 'docx' and b'word/' not in initial_chunk: return None if file_type == 'xlsx' and b'xl/' not in initial_chunk: return None if file_type == 'pptx' and b'ppt/' not in initial_chunk: return None if file_type == 'zip' and b'PK\x01\x02' not in initial_chunk: return None # Continue reading chunks while len(buffer) < max_size: try: chunk = device.read(chunk_size) if not chunk: break buffer.extend(chunk) # Simple heuristic: for binary files, check if chunk contains too many non-printable characters # This is a very basic approach and would need to be refined for real-world use if file_type in ['jpg', 'png', 'gif', 'pdf', 'zip', 'docx', 'xlsx', 'pptx', 'mp3', 'mp4', 'avi']: # For binary files, we continue reading until we hit max size or end of device valid_chunks += 1 # For ZIP-based formats, check for corruption if file_type in ['zip', 'docx', 'xlsx', 'pptx'] and b'PK' not in chunk and valid_chunks > 10: # If we've read several chunks and don't see any more PK signatures, we might be past the file invalid_chunks += 1 else: # For text files, we could check for text validity printable_ratio = sum(32 <= b <= 126 or b in (9, 10, 13) for b in chunk) / len(chunk) if printable_ratio < 0.7: # If less than 70% printable characters invalid_chunks += 1 else: valid_chunks += 1 # If we have too many invalid chunks in a row, stop if invalid_chunks > 3: return buffer[:len(buffer) - (invalid_chunks * chunk_size)] except Exception as e: self.logger.error(f"Error reading chunk in heuristic: {e}") break return buffer def _format_size(self, size_bytes): """Format size in bytes to a human-readable string""" for unit in ['B', 'KB', 'MB', 'GB', 'TB']: if size_bytes < 1024 or unit == 'TB': return f"{size_bytes:.2f} {unit}" size_bytes /= 1024 def _print_summary(self): """Print a summary of the recovery operation""" elapsed = time.time() - self.stats['start_time'] self.logger.info("=" * 50) self.logger.info("Recovery Summary") self.logger.info("=" * 50) self.logger.info(f"Total files recovered: {self.stats['total_files_recovered']}") self.logger.info(f"False positives detected and skipped: {self.stats['false_positives']}") self.logger.info(f"Total data scanned: {self._format_size(self.stats['bytes_scanned'])}") self.logger.info(f"Time elapsed: {timedelta(seconds=int(elapsed))}") self.logger.info("Files recovered by type:") for file_type, count in self.stats['recovered_by_type'].items(): if count > 0: self.logger.info(f" - {file_type}: {count}") if self.timeout_reached: self.logger.info("Note: Scan was stopped due to timeout") self.logger.info("=" * 50)The FileRecoveryTool class is a comprehensive solution for recovering deleted or corrupted files from storage devices by scanning for known file signatures. Here's a breakdown of each method:
__init__
- Initializes the recovery tool with parameters like source device/path, output directory, file types to recover, and scan options
- Sets up configuration, creates necessary directories, and initializes statistics tracking
setup_logging
- Configures logging to both console and a time stamped log file
- Sets the level of detail in logs based on user preference
_setup_timeout
- Creates a signal handler to stop scanning after a specified timeout
- Uses
SIGALRMto interrupt the scan when the time limit is reached
get_device_size
- Determines the total size of the source device or file using several fallback methods:
- Standard file size check for regular files
- Linux blockdev command for block devices
- IOCTL system calls (requires root access)
- File seeking as a last resort
- Returns a default 1GB size if all methods fail
scan_device
- The main method that orchestrates the entire scanning process
- Opens the device, calculates its size, sets up timeout, and calls
_scan_device_data - Handles exceptions and prints a summary when complete
_scan_device_data
- Performs the actual scanning of device data in blocks
- Tracks progress and estimates remaining time
- Searches for file signatures in each data block
- When a signature is found, calls
_recover_fileto extract the file
_validate_file_content
- Reduces false positives by performing additional validation on found files
- Checks for minimum size and searches for validation patterns specific to each file type
_recover_file
- Extracts a file from the device starting at a given position
- Generates a unique filename and determines how to read the file data
- Validates the file content and writes it to the output directory if valid
_read_until_trailer
- Reads data from the device until a known file ending (trailer) is found
- Used for file types with known trailers during deep scans
- Limits reading to the maximum allowed file size
_read_file_heuristic
- Used when a file's trailer is unknown or deep scan is disabled
- Employs heuristics to determine where a file likely ends
- Handles different file types with specific validation for Office documents
_format_size
- Utility method that converts byte sizes to human-readable formats (
B,KB,MB,GB,TB)
_print_summary
- Generates and logs a comprehensive summary of the recovery operation
- Shows statistics on files recovered by type, scan time, and total data processed
This class implements a forensic file carving approach, using file signatures to identify the beginning of files and various strategies to determine their endpoints, making it useful for data recovery after accidental deletions or disk corruption.
def main(): """Main function to parse arguments and run the recovery tool""" parser = argparse.ArgumentParser(description='File Recovery Tool - Recover deleted files from storage devices') parser.add_argument('source', help='Source device or directory to recover files from (e.g., /dev/sdb, /media/usb)') parser.add_argument('output', help='Directory to save recovered files') parser.add_argument('-t', '--types', nargs='+', choices=FILE_SIGNATURES.keys(), default=None, help='File types to recover (default: all supported types)') parser.add_argument('-d', '--deep-scan', action='store_true', help='Perform a deep scan (slower but more thorough)') parser.add_argument('-b', '--block-size', type=int, default=512, help='Block size for reading data (default: 512 bytes)') parser.add_argument('-v', '--verbose', action='store_true', help='Enable verbose output') parser.add_argument('-q', '--quiet', action='store_true', help='Suppress all output except errors') parser.add_argument('--no-skip', action='store_true', help='Do not skip existing files in output directory') parser.add_argument('--max-size', type=int, help='Maximum size to scan in MB (e.g., 1024 for 1GB)') parser.add_argument('--timeout', type=int, default=None, help='Stop scanning after specified minutes') args = parser.parse_args() # Set logging level based on verbosity if args.quiet: log_level = logging.ERROR elif args.verbose: log_level = logging.DEBUG else: log_level = logging.INFO # Convert max size from MB to bytes if specified max_scan_size = args.max_size * 1024 * 1024 if args.max_size else None # Create and run the recovery tool recovery_tool = FileRecoveryTool( source=args.source, output_dir=args.output, file_types=args.types, deep_scan=args.deep_scan, block_size=args.block_size, log_level=log_level, skip_existing=not args.no_skip, max_scan_size=max_scan_size, timeout_minutes=args.timeout ) try: recovery_tool.scan_device() except KeyboardInterrupt: print("\nRecovery process interrupted by user.") recovery_tool._print_summary() sys.exit(1) if __name__ == "__main__": main()The main() function serves as the entry point for the file recovery tool's command-line interface. Here's what it does:
This function sets up an argument parser using Python's argparse module to handle command-line options. It defines required arguments (source and output) for specifying where to read data from and where to save recovered files. It also provides several optional arguments: file types to recover (--types), scan depth (--deep-scan), block size for reading (--block-size), verbosity levels (--verbose, --quiet), file skipping behavior (--no-skip), scan size limitation (--max-size), and a timeout option (--timeout).
After parsing the arguments, it determines the appropriate logging level based on verbosity flags and converts the maximum scan size from megabytes to bytes if specified. It then creates an instance of the FileRecoveryTool class with all the configured parameters and calls its scan_device() method to begin the recovery process.
The function also includes error handling with a try-except block to catch keyboard interruptions (Ctrl+C), allowing the user to gracefully terminate the scanning process. When interrupted, it prints a message, displays a summary of the recovery progress, and exits with a non-zero status code to indicate abnormal termination.
The final conditional if __name__ == "__main__": ensures that main() only runs when the script is executed directly, not when imported as a module.
Now, let's run our code. I'll be running this program from two different Operating Systems - Linux and Windows. The essence of this is to highlight the different modes of operation.
Running on Linux
Before we run this program on Linux, first plug your storage drive to your computer and run sudo fdisk -l to list all storage devices and their partitions.
Result:
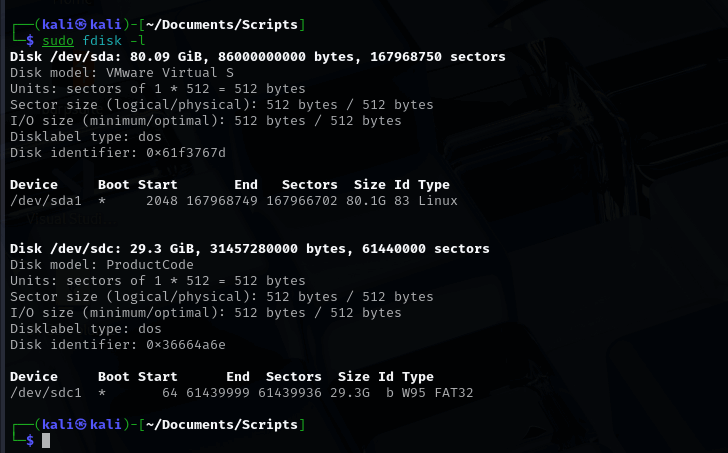
The first listing (/dev/sda) is my Kali VM's storage. The second listing (/dev/sdc) is my flash drive that I plugged into my Kali. Even if you're on another flavor of Linux, it'll work the same.
Next, navigate to the directory containing your code, create a folder to store the recovered files and run:
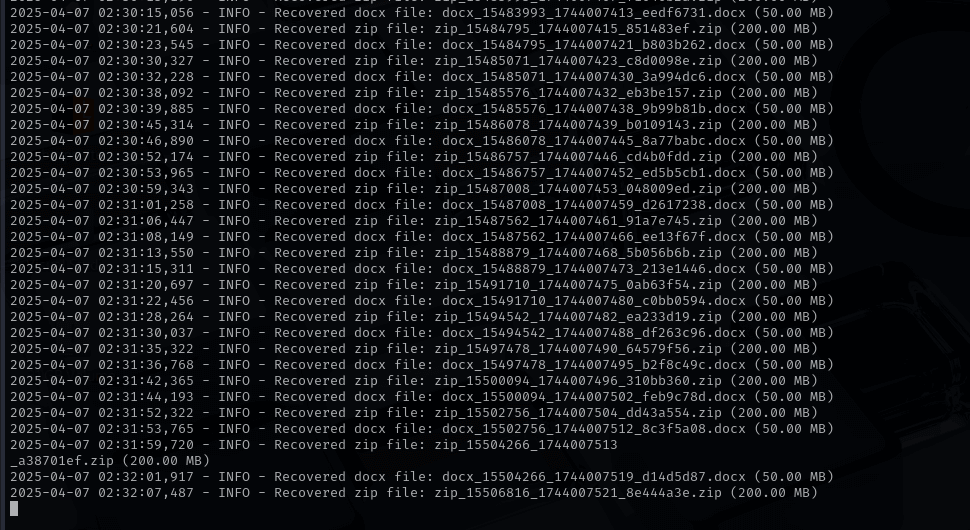
$ sudo python3 file_recovery.py /dev/sdc /home/kali/Documents/Recovered/ --types pdf docx jpg png zip --deep-scanNotice I specified my flash drive /dev/sdc and I also specified the directory to save the recovered files. In this run, we are attempting to recover docx, pdfs, jpg, and zips.
Result:
After Recovery:
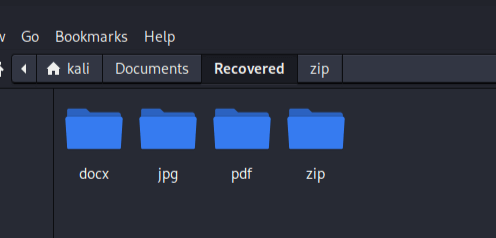
Notice that for each filetype we attempt to recover, a folder is created and if any file of the filetype is recovered, it is stored there.
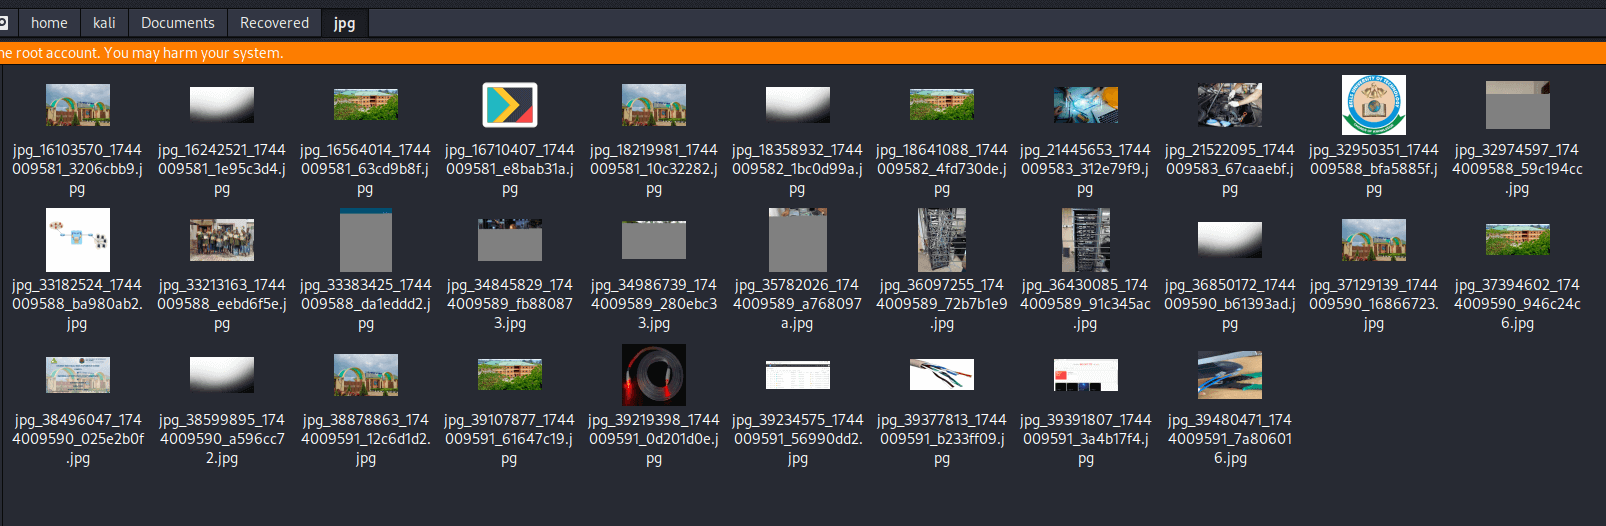
When we open the jpg folder, we see a ton of recovered images even though I “wiped” my flash drive clean before running this program.
You may notice that some recovered files are corrupted or inaccessible. We'll talk about that later.
Running on Windows
Now, let's test our code on Windows. Just like Linux, create a folder where you want the recorded files to be stored. Plug in your test storage drive to windows.
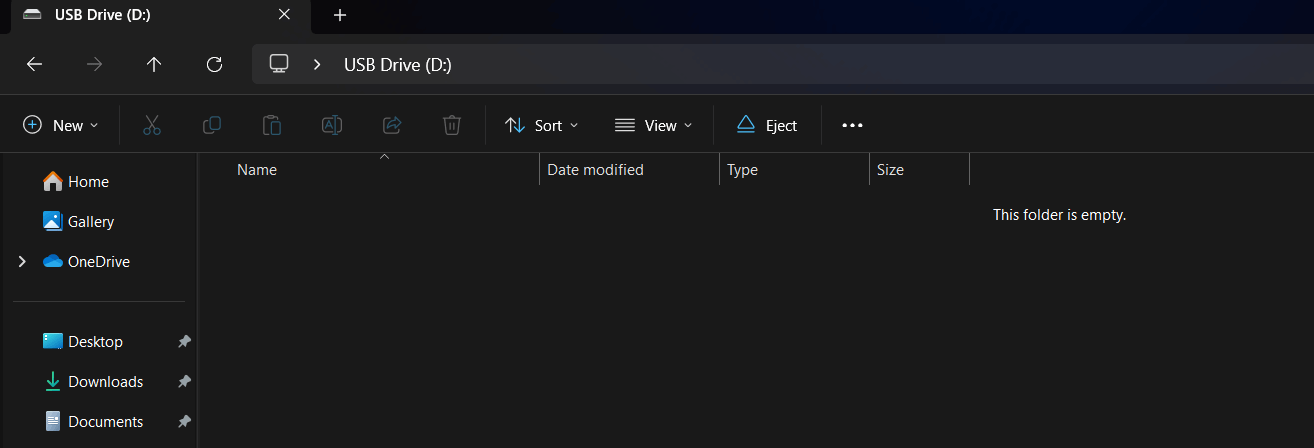
Notice the drive is D: and it is currently empty as I have deleted everything in it.
Grab the code and the run the program like so:
python file_recovery.py \\.\D: "C:\Users\muham\Documents\Recoveredfiles" --types jpg pdf zip docx png --deep-scanIn here, notice we specified the D: and we also specified the folder where the recovered files will be stored. We also specified the file types to be recovered.
Please make sure to add the " \\.\D:" (replace D with your letter e.g E) as it is a Windows device namespace prefix that allows us to bypass system drivers and get direct access to the drive. If you don’t specify it, our program may not get access to the drive for file recovery.
Result:
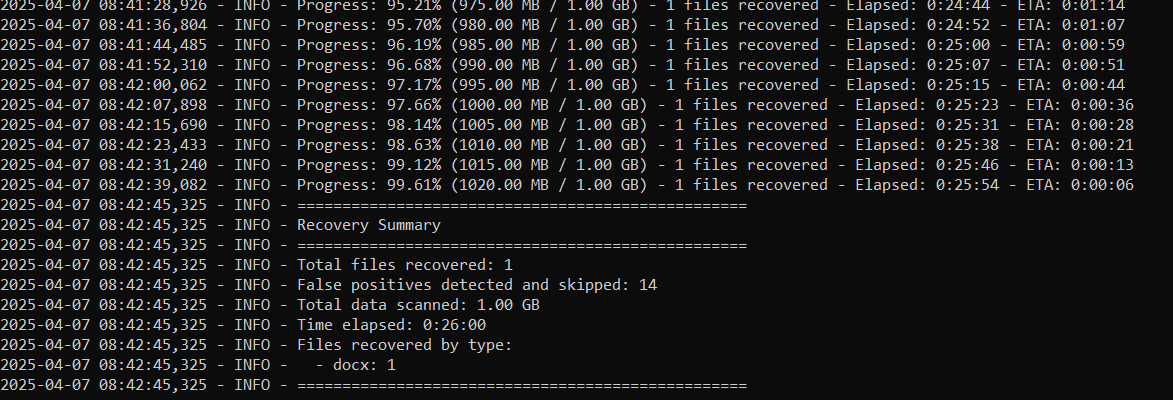
From the result, we'll notice that Windows couldn't get the exact storage capacity of my drive, so it defaulted to 1GB. It may be different for you. In your own case, it may actually detect your exact storage capacity. However, the fallback size of 1GB isn't necessarily a problem - it just means the progress percentage and ETA might not be accurate. The script will still scan the entire drive until it reaches the end of the data.
We can also see that we actually recovered just one docx file. This is the same drive I attempted to recover from on Linux. On Linux, we recovered tons of files, while on Windows, just one. Leading us to the question - why is it like that?
Next, I'll explain the difference in the mode of operation and accessibility in the different OSs.
Differences in Recovery Results Between Linux and Windows
The significant difference in recovery results between Linux and Windows (one file versus tons) stems from several key factors:
Why Linux Recovers More Files
- Direct Device Access: Linux provides lower-level, more direct access to storage devices. It allows programs to read raw data from the device without as many abstraction layers, exposing more data fragments that might be interpreted as files.
- Fewer Filtering Mechanisms: Linux has fewer built-in filtering mechanisms when accessing raw devices, resulting in more potential file signatures being detected, including false positives.
- Different I/O Subsystems: Linux's I/O subsystem is designed differently, allowing more granular access to physical sectors of storage media.
- Permissive Access Control: When running with sudo/root privileges on Linux, the operating system grants nearly unrestricted access to hardware devices.
Why Windows Recovers Fewer Files
- Layered Storage Architecture: Windows has more abstraction layers between applications and physical storage, which may filter out certain data patterns.
- File System Filtering: Windows may apply more aggressive filtering when accessing storage, even in administrator mode.
- Access Restrictions: Windows enforces stricter security policies for direct device access, limiting what raw data can be read.
- Built-in Data Validation: Windows may automatically validate file structures more strictly before presenting them to applications.
Which Results Are More Accurate?
This is the key question. More files doesn't necessarily mean better recovery:
- Linux results likely include many false positives - fragments of data that match file signatures but aren't actually complete, valid files.
- Windows results are probably more conservative, showing only files that pass stricter validation, resulting in fewer but potentially more usable recovered files.
Recommendation for Users
- For most users: Windows provides a more user-friendly experience with fewer false positives, making it easier to identify genuinely recoverable files without sorting through numerous corrupted ones.
- For forensic experts: Linux offers more comprehensive recovery potential, but requires more expertise to filter through the results and identify valid files.
If you need to recover truly important data, I recommend:
- Try Windows first for a cleaner initial result set
- If critical files aren't found, try Linux for a more exhaustive search
- For the most critical recoveries, consider professional data recovery services that use specialized hardware
The ideal approach depends on your technical expertise and how important the data is - Windows for simplicity and fewer false positives, Linux for thoroughness when you're willing to sort through more potential results.
Extending the Program
To extend this recovery program to support more file types, all we need is to understand the file signatures (or magic numbers) associated with those new formats. Each file type begins with a unique sequence of bytes that acts like its fingerprint. By identifying these signatures and optionally their trailer patterns or internal structures, we can teach the program to recognize and recover even more file formats with minimal changes to the existing code.
You can learn more about file signatures here.
Conclusion
In conclusion, while this program does a solid job at scanning raw data and recovering files based on their signatures, it's important to note that not every file it recovers will be fully valid. Some false positives are inevitable—random byte patterns can sometimes mimic real file signatures—so users should expect to do a bit of manual review to separate the useful files from the junk. For more advanced needs, there are professional-grade tools available like DC3DD, MagicRescue, and Foremost, which offer more features and refined recovery techniques. That said, this program remains an effective and practical tool for critical data recovery tasks, especially in digital forensics where every byte of lost data could matter.
I hope you enjoyed this one, till next time.
Just finished the article? Now, boost your next project with our Python Code Generator. Discover a faster, smarter way to code.
View Full Code Generate Python Code


Got a coding query or need some guidance before you comment? Check out this Python Code Assistant for expert advice and handy tips. It's like having a coding tutor right in your fingertips!