Confused by complex code? Let our AI-powered Code Explainer demystify it for you. Try it out!
In this tutorial, we will combine gender detection and age detection tutorials to develop a single code that detects both.
Let's get started. If you haven't OpenCV already installed, make sure to do so:
$ pip install opencv-python numpyOpen up a new file. Importing the libraries:
# Import Libraries import cv2 import numpy as npNext, defining the variables of weights and architectures for face, age, and gender detection models:
# https://raw.githubusercontent.com/opencv/opencv/master/samples/dnn/face_detector/deploy.prototxt FACE_PROTO = "weights/deploy.prototxt.txt" # https://raw.githubusercontent.com/opencv/opencv_3rdparty/dnn_samples_face_detector_20180205_fp16/res10_300x300_ssd_iter_140000_fp16.caffemodel FACE_MODEL = "weights/res10_300x300_ssd_iter_140000_fp16.caffemodel" # The gender model architecture # https://drive.google.com/open?id=1W_moLzMlGiELyPxWiYQJ9KFaXroQ_NFQ GENDER_MODEL = 'weights/deploy_gender.prototxt' # The gender model pre-trained weights # https://drive.google.com/open?id=1AW3WduLk1haTVAxHOkVS_BEzel1WXQHP GENDER_PROTO = 'weights/gender_net.caffemodel' # Each Caffe Model impose the shape of the input image also image preprocessing is required like mean # substraction to eliminate the effect of illunination changes MODEL_MEAN_VALUES = (78.4263377603, 87.7689143744, 114.895847746) # Represent the gender classes GENDER_LIST = ['Male', 'Female'] # The model architecture # download from: https://drive.google.com/open?id=1kiusFljZc9QfcIYdU2s7xrtWHTraHwmW AGE_MODEL = 'weights/deploy_age.prototxt' # The model pre-trained weights # download from: https://drive.google.com/open?id=1kWv0AjxGSN0g31OeJa02eBGM0R_jcjIl AGE_PROTO = 'weights/age_net.caffemodel' # Represent the 8 age classes of this CNN probability layer AGE_INTERVALS = ['(0, 2)', '(4, 6)', '(8, 12)', '(15, 20)', '(25, 32)', '(38, 43)', '(48, 53)', '(60, 100)']Below are the necessary files to be included in the project directory:
gender_net.caffemodel: It is the pre-trained model weights for gender detection. You can download it here.deploy_gender.prototxt: is the model architecture for the gender detection model (a plain text file with a JSON-like structure containing all the neural network layer’s definitions). Get it here.age_net.caffemodel: It is the pre-trained model weights for age detection. You can download it here.deploy_age.prototxt: is the model architecture for the age detection model (a plain text file with a JSON-like structure containing all the neural network layer’s definitions). Get it here.res10_300x300_ssd_iter_140000_fp16.caffemodel: The pre-trained model weights for face detection, download here.deploy.prototxt.txt: This is the model architecture for the face detection model, download here.
Next, loading the models:
# Initialize frame size frame_width = 1280 frame_height = 720 # load face Caffe model face_net = cv2.dnn.readNetFromCaffe(FACE_PROTO, FACE_MODEL) # Load age prediction model age_net = cv2.dnn.readNetFromCaffe(AGE_MODEL, AGE_PROTO) # Load gender prediction model gender_net = cv2.dnn.readNetFromCaffe(GENDER_MODEL, GENDER_PROTO)Before trying to detect age and gender, we need a function to detect faces first:
def get_faces(frame, confidence_threshold=0.5): # convert the frame into a blob to be ready for NN input blob = cv2.dnn.blobFromImage(frame, 1.0, (300, 300), (104, 177.0, 123.0)) # set the image as input to the NN face_net.setInput(blob) # perform inference and get predictions output = np.squeeze(face_net.forward()) # initialize the result list faces = [] # Loop over the faces detected for i in range(output.shape[0]): confidence = output[i, 2] if confidence > confidence_threshold: box = output[i, 3:7] * \ np.array([frame.shape[1], frame.shape[0], frame.shape[1], frame.shape[0]]) # convert to integers start_x, start_y, end_x, end_y = box.astype(np.int) # widen the box a little start_x, start_y, end_x, end_y = start_x - \ 10, start_y - 10, end_x + 10, end_y + 10 start_x = 0 if start_x < 0 else start_x start_y = 0 if start_y < 0 else start_y end_x = 0 if end_x < 0 else end_x end_y = 0 if end_y < 0 else end_y # append to our list faces.append((start_x, start_y, end_x, end_y)) return facesMastering YOLO: Build an Automatic Number Plate Recognition System
Building a real-time automatic number plate recognition system using YOLO and OpenCV library in Python
Download EBookThe get_faces() function was grabbed from the face detection tutorial, so check it out if you want more information.
Below is a function for simply displaying an image:
def display_img(title, img): """Displays an image on screen and maintains the output until the user presses a key""" # Display Image on screen cv2.imshow(title, img) # Mantain output until user presses a key cv2.waitKey(0) # Destroy windows when user presses a key cv2.destroyAllWindows()Below are is a function for dynamically resizing an image, we're going to need it to resize the input images when exceeding a certain width:
# from: https://stackoverflow.com/questions/44650888/resize-an-image-without-distortion-opencv def image_resize(image, width = None, height = None, inter = cv2.INTER_AREA): # initialize the dimensions of the image to be resized and # grab the image size dim = None (h, w) = image.shape[:2] # if both the width and height are None, then return the # original image if width is None and height is None: return image # check to see if the width is None if width is None: # calculate the ratio of the height and construct the # dimensions r = height / float(h) dim = (int(w * r), height) # otherwise, the height is None else: # calculate the ratio of the width and construct the # dimensions r = width / float(w) dim = (width, int(h * r)) # resize the image return cv2.resize(image, dim, interpolation = inter)Now that everything is ready, let's define our two functions for age and gender detection:
def get_gender_predictions(face_img): blob = cv2.dnn.blobFromImage( image=face_img, scalefactor=1.0, size=(227, 227), mean=MODEL_MEAN_VALUES, swapRB=False, crop=False ) gender_net.setInput(blob) return gender_net.forward() def get_age_predictions(face_img): blob = cv2.dnn.blobFromImage( image=face_img, scalefactor=1.0, size=(227, 227), mean=MODEL_MEAN_VALUES, swapRB=False ) age_net.setInput(blob) return age_net.forward()The get_gender_predictions() and get_age_predictions() perform prediction on the gender_net and age_net models to infer the gender and age of the input image respectively.
Finally, we write our main function:
def predict_age_and_gender(input_path: str): """Predict the gender of the faces showing in the image""" # Initialize frame size # frame_width = 1280 # frame_height = 720 # Read Input Image img = cv2.imread(input_path) # resize the image, uncomment if you want to resize the image # img = cv2.resize(img, (frame_width, frame_height)) # Take a copy of the initial image and resize it frame = img.copy() if frame.shape[1] > frame_width: frame = image_resize(frame, width=frame_width) # predict the faces faces = get_faces(frame) # Loop over the faces detected # for idx, face in enumerate(faces): for i, (start_x, start_y, end_x, end_y) in enumerate(faces): face_img = frame[start_y: end_y, start_x: end_x] age_preds = get_age_predictions(face_img) gender_preds = get_gender_predictions(face_img) i = gender_preds[0].argmax() gender = GENDER_LIST[i] gender_confidence_score = gender_preds[0][i] i = age_preds[0].argmax() age = AGE_INTERVALS[i] age_confidence_score = age_preds[0][i] # Draw the box label = f"{gender}-{gender_confidence_score*100:.1f}%, {age}-{age_confidence_score*100:.1f}%" # label = "{}-{:.2f}%".format(gender, gender_confidence_score*100) print(label) yPos = start_y - 15 while yPos < 15: yPos += 15 box_color = (255, 0, 0) if gender == "Male" else (147, 20, 255) cv2.rectangle(frame, (start_x, start_y), (end_x, end_y), box_color, 2) # Label processed image font_scale = 0.54 cv2.putText(frame, label, (start_x, yPos), cv2.FONT_HERSHEY_SIMPLEX, font_scale, box_color, 2) # Display processed image display_img("Gender Estimator", frame) # uncomment if you want to save the image cv2.imwrite("output.jpg", frame) # Cleanup cv2.destroyAllWindows()The main function does the following:
- First, it reads the image using the
cv2.imread()method. - After the image is resized to the appropriate size, we use our
get_faces()function to get all the detected faces from the image. - We iterate on each detected face image and call our
get_age_predictions()andget_gender_predictions()to get the predictions. - We print the age and gender.
- We draw a rectangle surrounding the face and also put the label that contains the age and gender text along with confidence on the image.
- Finally, we show the image.
Let's call it:
if __name__ == "__main__": import sys input_path = sys.argv[1] predict_age_and_gender(input_path)Done, let's run the script now (testing on this image):
$ python age_and_gender_detection.py images/girl.jpgOutput in the console:
Male-99.1%, (4, 6)-71.9% Female-96.0%, (4, 6)-70.9%The resulting image:
 Here is another example:
 Or this:
 Awesome! If you see the text in the image is large or small, make sure to tweak the
 font_scale floating-point variable on your image in the predict_age_and_gender() function.
For more detail on how the gender and age prediction works, I suggest you check the individual tutorials:
If you want to use your camera, I made a Python script to read images from your webcam and perform inference in real time.
Check the full code here.
Mastering YOLO: Build an Automatic Number Plate Recognition System
Building a real-time automatic number plate recognition system using YOLO and OpenCV library in Python
Download EBookHappy coding ♥
Save time and energy with our Python Code Generator. Why start from scratch when you can generate? Give it a try!
View Full Code Analyze My Code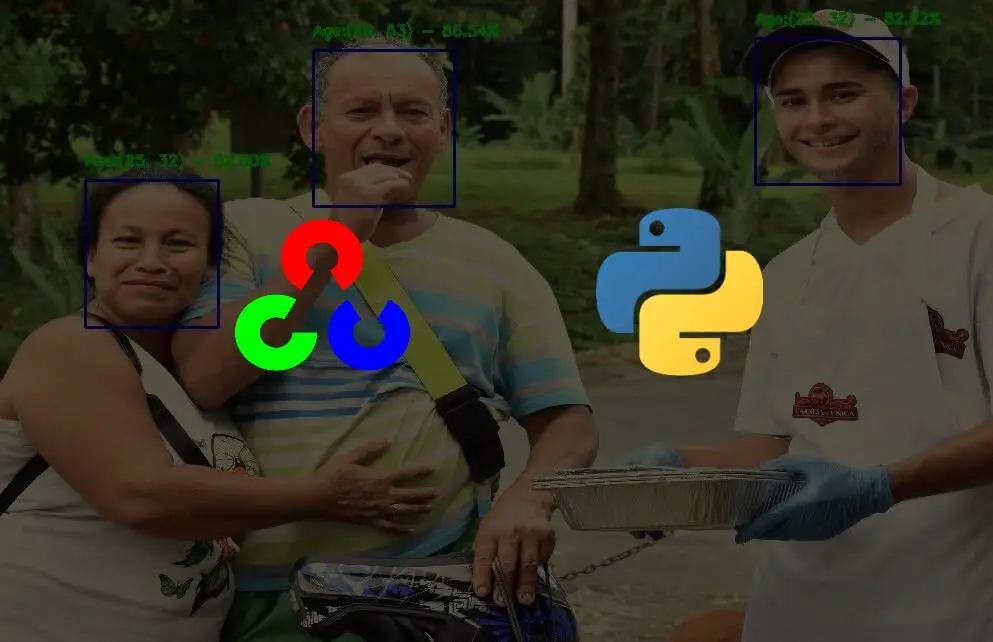


Got a coding query or need some guidance before you comment? Check out this Python Code Assistant for expert advice and handy tips. It's like having a coding tutor right in your fingertips!