스프링 군살 없이 세팅하기 실전 스프링 프레임워크 웹 프로젝트 세팅
0_(1/2) 강사소개 강 사 : 신은철 경 력 : 개발경력 10년 2013.7 ~ KT 뮤직, 음원 메타 및 라이선스 관리 시스템 개발 및 유지보수 2007.8 ~ 2013.7 하늘연 소프트, 한국고용 정보원 워크넷 차세대 시스템 구축 외 13개 프로젝트 - 하늘연 재직 당시 다수의 공공 SI 프로젝트에 PL 로 참여하여 다양한 프레임워크를 경험함 (jsp, javaBeans, Spring, Struts, Spring + Struts, 전자정부프레임워크, Jgarnet, Spring 3.x) - KT 뮤직에서 담당하고 있는 시스템에 Spring 3.2, Spring 4.2등을 도입함.
0_(2/2) 오늘 할 이야기들.. 1. 군살없이 스프링을 세팅한다는 것은? 2. STS(Spring Tool Suite)로 스프링 프로젝트 생성하기 3. STS가 생성한 스프링 설정 살펴보기 4. DI를 이해하기 위한 Sample Code 작성하기
군살없이 스프링을 세팅한다는 것은?
1_(1/3) 군살 없이 스프링을 세팅한다는 것은? 필요한 것만 세팅 세팅된 모든 것을 알고 인지함
1_(2/3) 스프링 프레임워크를 세팅하는 방법들.. 1. Dynamic Web Project 생성 후 직접 스프링 세팅 2. STS (Spring Tool Suite) 이용하여 스프링 프로젝트 생성 3. 이전 프로그램에서 스프링 설정만 복붙 4. 이전 프로그램에서 비지니스 로직 삭제 (재활용성을 극대 화 하기 위해 공통소스는 남겨둠)
1_(3/3) 왜 정확히 알고 필요한 것만 세팅해야 할까? 속도 향상 예상 외의 오류 방지 기술의 대체가 가능
STS(Spring Tool Suite) 로 스프링 프로젝트 생성하기
2_(1/3) 준비물.. ● Eclipse Java EE IDE for Web Developers (MARS.2 release 4.5.2) ● JDK 1.8.0_91 ● Tomcat 8.0.36 (※ 8.0.35 버그 있음) ● Spring Tool Suite For Eclipse 3.8.0 RELEASE
2_(2/3) 프로젝트 생성하기 프로젝트 생성 : New → Other.. → Spring Legacy Project → Spring MVC Project 프로젝트 확인 : Tomcat add→ Tomcat port&context 확인 → Tomcat start → 확인
2_(3/3) STS(Spring Tool Suite)로 스프링 프로젝트를 만들면? 엄청 간단한 생성방법 설정할 줄 몰라도 사용할 줄만 알면 개발이 가능 스프링 유저 코더? STS 가 사라 진다면? 아니 스프링 프레임워크가 사라진다면?
STS가 생성한 스프링 설정 살펴보기
3_(1/10) web.xml 배포서술자(DD : Deployment Descriptor) Web Application의 시작 웹 애플리케이션의 기본적인 설정을 위해 작성하는 파일
3_(2/10) ContextLoaderListener 설정 코드 <!-- The definition of the Root Spring Container shared by all Servlets and Filters --> <context-param> <param-name>contextConfigLocation</param-name> <param-value>/WEB-INF/spring/root-context.xml</param-value> </context-param> <!-- Creates the Spring Container shared by all Servlets and Filters --> <listener> <listener-class>org.springframework.web.context.ContextLoaderListener</listener-class> </listener>
3_(3/10) ContextLoaderListener 는? 프로젝트 전체에서 사용되는 WebApplicationContext 를 생성
3_(4/10) root-context.xml STS 에서는 아무것도 입력하지 않음. 일반적으로.. 1. DB 관련(Datasource, Mybatis 등..) 2. PropertyService 3. MessageSource(다국어 관련) 4. Spring Security
3_(5/10) DispatcherServlet 설정 코드 <!-- Processes application requests --> <servlet> <servlet-name>appServlet</servlet-name> <servlet-class>org.springframework.web.servlet.DispatcherServlet</servlet-class> <init-param> <param-name>contextConfigLocation</param-name> <param-value>/WEB-INF/spring/appServlet/servlet-context.xml</param- value> </init-param> <load-on-startup>1</load-on-startup> </servlet> <servlet-mapping> <servlet-name>appServlet</servlet-name> <url-pattern>/</url-pattern> </servlet-mapping>
3_(6/10) DispatcherServlet 은? • Dispatcher Servlet 내에서 사용 가능한 WebApplicationContext를 생성 • 여러 개의 DispatherServlet 설정 가능 • Front Controller의 역할
3_(7/10) DispatcherServlet 흐름 출처 : http://blog.naver.com/kim3zz/220275732627
3_(8/10) DispatcherServlet 이 없다면? <servlet> <servlet-name>myServlet</servlet-name> <servlet-class>com.softcamp.spring.MyServlet</servlet-class> </servlet> <servlet-mapping> <servlet-name>myServlet</servlet-name> <url-pattern>/</url-pattern> </servlet-mapping> init() destroy() doGet() doPost() parameter urlMapping bizMapping viewMapping
3_(9/10) servlet-context.xml <annotation-driven /> <!-- mvc 관련 annotation 처리 --> <!-- Handles HTTP GET requests for /resources/** by efficiently serving up static resources in the ${webappRoot}/resources directory --> <resources mapping="/resources/**" location="/resources/" /> <!-- Resolves views selected for rendering by @Controllers to .jsp resources in the /WEB- INF/views directory --> <beans:bean class="org.springframework.web.servlet.view.InternalResourceViewResolver"> <beans:property name="prefix" value="/WEB-INF/views/" /> <beans:property name="suffix" value=".jsp" /> </beans:bean> <context:component-scan base-package="com.softcamp.sample1" /> Dispatcher 에서 처리할 필요없는 Resource(img,css,js…) 영역을 설정함.. @Component 또는 @Component를 메타 어노테이션으로 갖고 있는 어 노테이션(@Controller, @Repository, @Service를 말함)이 붙은 클래스를 빈으로 등록 MVC annotation(RequestMapping, RequestBody, RequestParam.. 등)을 처리하는 Bean 들을 설정함.. 3.0이하에서는 예외 처리가 불가 3.1부터 예외 처리가 가능
3_(10/10) ContextLoaderListener 과의 DispatcherServlet 관계 ContextLoaderListener => Root WAC(WebApplicationContext) DispatcherServlet => Child WAC(WebApplicationContext) Child WAC => Root WAC 참조 (O) Root WAC => Child WAC 참조 (X) Root WAC : 웹에 종속적이지 않은 빈 ex) 서비스, DAO Child WAC : 웹에 종속적인 빈 ex) 컨트롤러, 스프링 MVC관련 빈
DI를 이해하기 위한 Sample Code 작성하기 with Mybatis 3.2.0
4_(1/12) Maven Library Dependency 추가 (in pom.xml) DATA SOURCE 관련... spring-jdbc spring-tx commons-dbcp 1.4 Mybatis 관련... cglib 2.2.2 mybatis 3.2.0 mybatis-spring 1.2.0 MySql 관련... mysql-connector-java 5.1.6 dependency 추가 후.. Project Name 우클릭 → Maven → Update Project.. 버전까지 명시한 건.. 라이브러리 간(JDK 또한)에 호환성이 존재함. 본인이 쓰고자 하는 라이브러리의 호환성 확 인이 필요
4_(2/12) jdbc.properties load (in root-context.xml) <context:property-placeholder location="classpath:properties/jdbc.propertie s" /> context 추가해야함 xmlns:context="http://www.springframework.org/schema/context" http://www.springframework.org/schema/context http://www.springframework.org/schema/context/spring-context.xsd
4_(3/12) Datasource 설정 코드 (in root-context.xml) <bean id="dataSource" class="org.apache.commons.dbcp.BasicDataSource" destroy-method="close"> <property name="driverClassName" value="${jdbc.dbDriverName}" /> <property name="url" value="${jdbc.url}" /> <property name="username" value="${jdbc.username}" /> <property name="password" value="${jdbc.password}" /> </bean>
4_(4/12) Mybatis - sqlSessionFactory 설정 (in root-context.xml) <bean id="sqlSessionFactory" class="org.mybatis.spring.SqlSessionFactoryBean"> <property name="dataSource" ref="dataSource" /> <property name="mapperLocations" value="classpath:com/softcamp/sample/**/*_def_SQL.xml" /> <property name="configLocation" value="classpath:mybatis/mybatis-config.xml" /> <!-- <property name="transactionFactory"> <bean class="org.apache.ibatis.transaction.managed.ManagedTransactionFactory" /> </property> --> </bean> <bean id="sqlSessionTemplate" class="org.mybatis.spring.SqlSessionTemplate"> <constructor-arg index="0" ref="sqlSessionFactory" /> </bean>
4_(5/12) mybatis-config.xml <configuration> <settings> <setting name="defaultExecutorType" value="SIMPLE" /> <!-- 세팅은 http://www.mybatis.org/mybatis-3/ko/configuration.html 참조 --> </settings> <typeAliases> <typeAlias alias="integer" type="java.lang.Integer" /> <typeAlias alias="string" type="java.lang.String" /> <typeAlias alias="date" type="java.util.Date" /> <typeAlias alias="hashMap" type="java.util.HashMap" /> <package name="com.softcamp" /> </typeAliases> </configuration>
4_(6/12) 출력할 데이터 조회 쿼리 작성 Hello_def_SQL.xml >> <!DOCTYPE mapper PUBLIC "-//mybatis.org//DTD mapper 3.0//EN" "http://mybatis.org/dtd/mybatis-3- mapper.dtd"> <mapper namespace="hello"> <resultMap id="GreetingMessagesMap" type="helloVO"> <result column="LANGUAGE_NM" property="languageNm" javaType="string"></result> <result column="GREETING" property="greeting" javaType="string"></result> </resultMap> <select id="getGreetingMessages" resultMap="GreetingMessagesMap"> SELECT LANGUAGE_NM, GREETING FROM TB_GREETINGS_BY_COUNTRY </select> </mapper>
4_(7/12) Spring IoC 와 DI 스프링 IoC 란? → 스프링 프레임워크(컨테이너)가 Bean(객체)의 제어권을 갖 는 것 DI 란? → Bean(객체) 간의 의존성을 주입하는 것. 이를 통하여 IoC가 이루어짐.
4_(8/12) HelloDao 생성 @Repository("helloDao") public class HelloDao{ @Resource(name = "sqlSessionTemplate") private SqlSession sqlSessionTemplate; public List<HelloVO> getGreetingMessages() throws Exception{ return sqlSessionTemplate.selectList("hello.getGreetingMessages"); } } root-context에서 설정한 sqlSessionTemplate bean을 resource로 의존성 설정
4_(9/12) HelloService 생성 @Service("helloService") public class HelloService{ @Resource(name = "helloDao") private HelloDao helloDao; public List<HelloVO> getGreetingMessages() throws Exception{ return helloDao.getGreetingMessages(); } } compornent-scan에 의한 WAC에 등 록된 Bean도 의존성 설정
4_(10/12) setter를 이용한 의존성 주입 방법 in HelloService private HelloDao helloDao; public void setHelloDao(HelloDao helloDao){ this.helloDao = helloDao; } in servletContext.xml <beans:bean id="helloDao" class="com.softcamp.sample.dao.HelloDao"/> <beans:bean id="helloService" class="com.softcamp.sample.service.HelloService"> <beans:property name="helloDao" ref="helloDao"></beans:property> </beans:bean>
4_(11/12) 스프링으로 객체를 제어하지 않는다면? helloService = new HelloService(); HelloDao helloDao = new HelloDao(); helloDao.setConnectionPool(connetionPool); helloService.setHelloDao(helloDao); List helloMessages = helloService.getHelloMessages(); helloDao = null; helloService = null; 생성 및 의존성 주입 소멸
4_(12/12) view 에 출력하기 <%@ page contentType="text/html; charset=utf-8" pageEncoding="utf-8" %> <%@ taglib uri="http://java.sun.com/jsp/jstl/core" prefix="c" %> <%@ page session="false" %> <html> <head> <title>Home</title> </head> <body> <c:forEach items="${greetingMessages}" var="itm"> <P><c:out value='${itm.languageNm }'/> : <c:out value='${itm.greeting }'/></P> </c:forEach> </body> </html>
결론은?
표준 설정은 없다. 한번에 설정하지 말고 필요한 것들을 그 때 그 때 설정하자!!
Q & A

스프링군살없이세팅하기(The way to setting the Spring framework for web.)

  • 1.
    스프링 군살 없이세팅하기 실전 스프링 프레임워크 웹 프로젝트 세팅
  • 2.
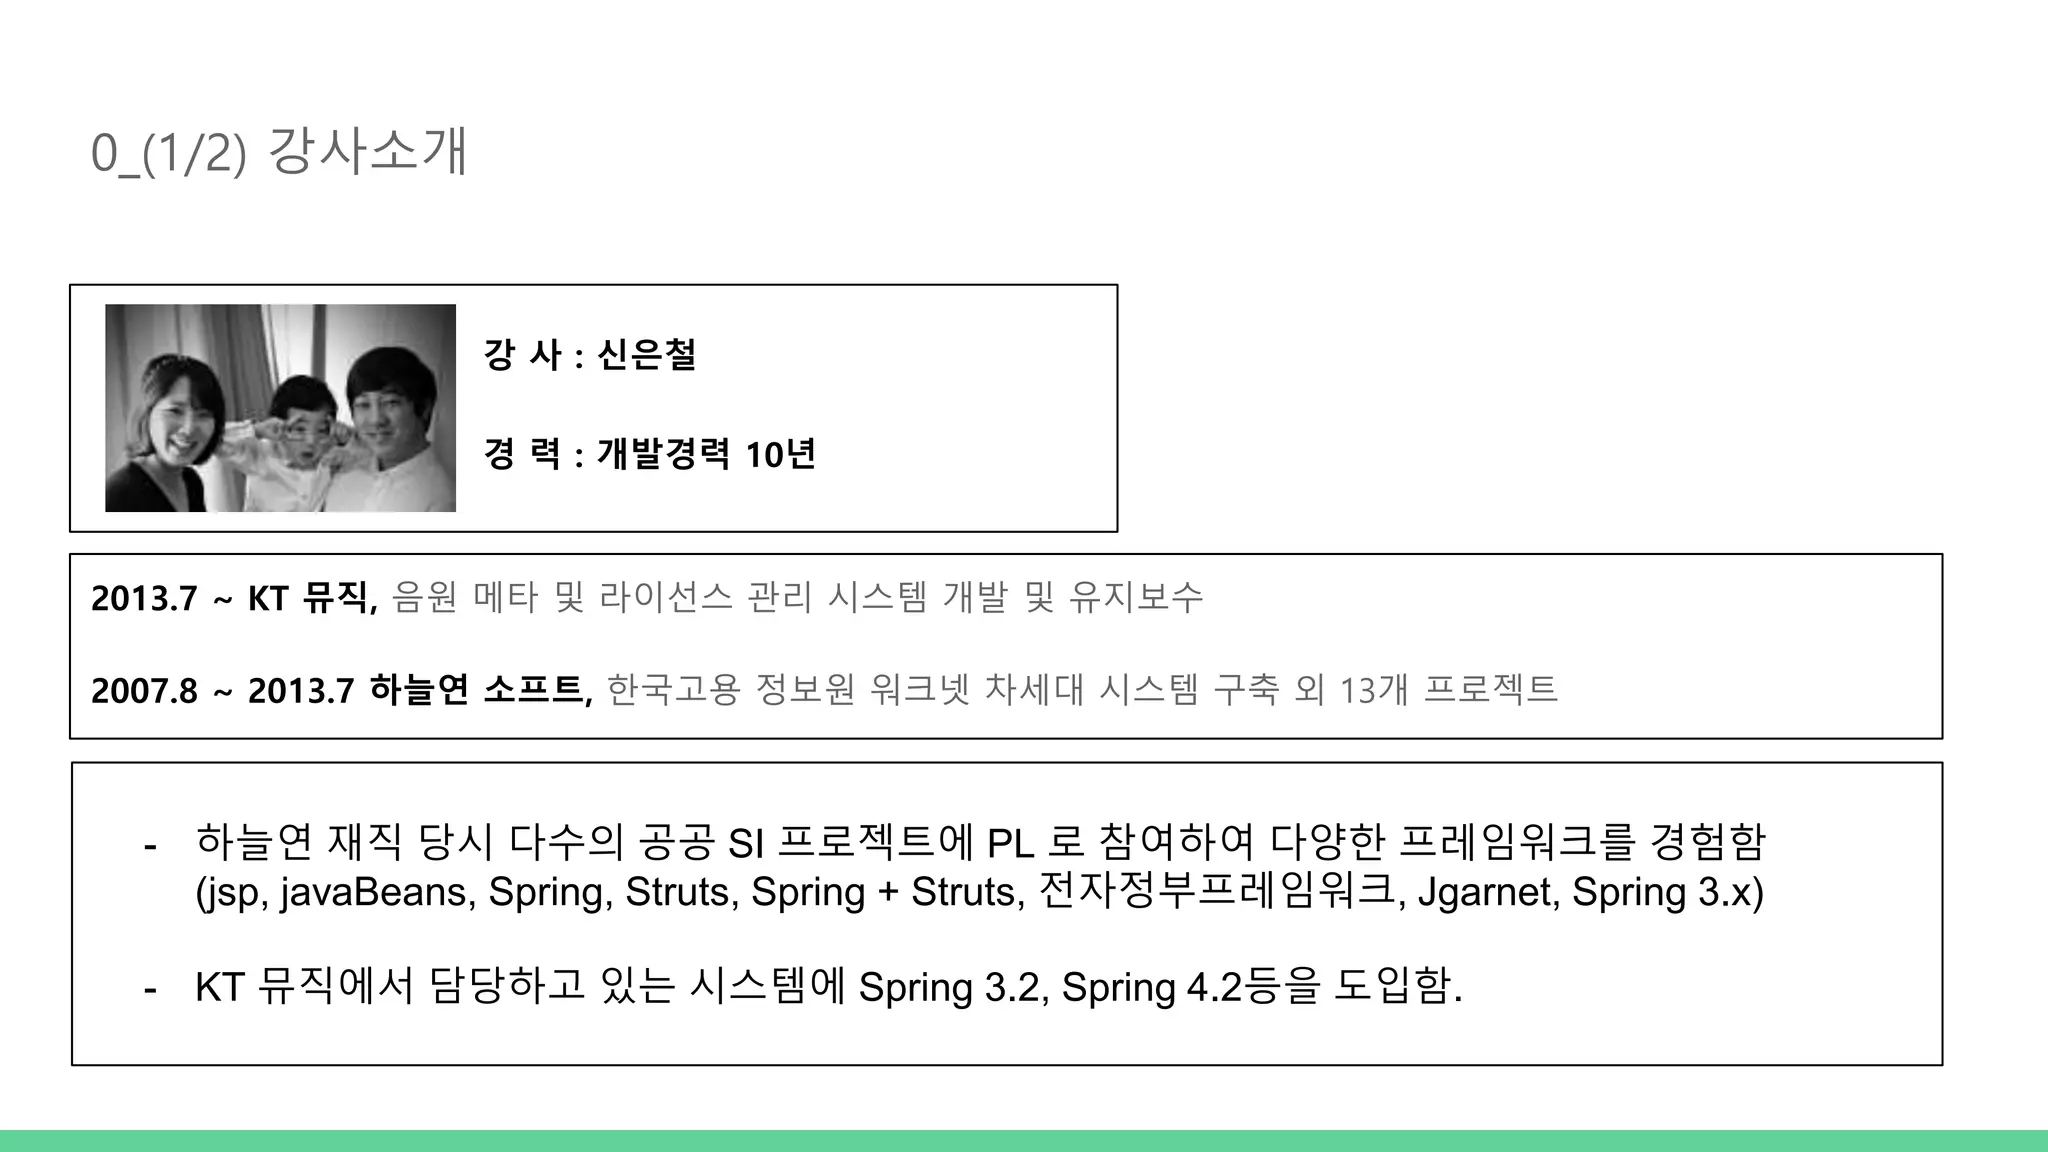
    0_(1/2) 강사소개 강 사: 신은철 경 력 : 개발경력 10년 2013.7 ~ KT 뮤직, 음원 메타 및 라이선스 관리 시스템 개발 및 유지보수 2007.8 ~ 2013.7 하늘연 소프트, 한국고용 정보원 워크넷 차세대 시스템 구축 외 13개 프로젝트 - 하늘연 재직 당시 다수의 공공 SI 프로젝트에 PL 로 참여하여 다양한 프레임워크를 경험함 (jsp, javaBeans, Spring, Struts, Spring + Struts, 전자정부프레임워크, Jgarnet, Spring 3.x) - KT 뮤직에서 담당하고 있는 시스템에 Spring 3.2, Spring 4.2등을 도입함.
  • 3.
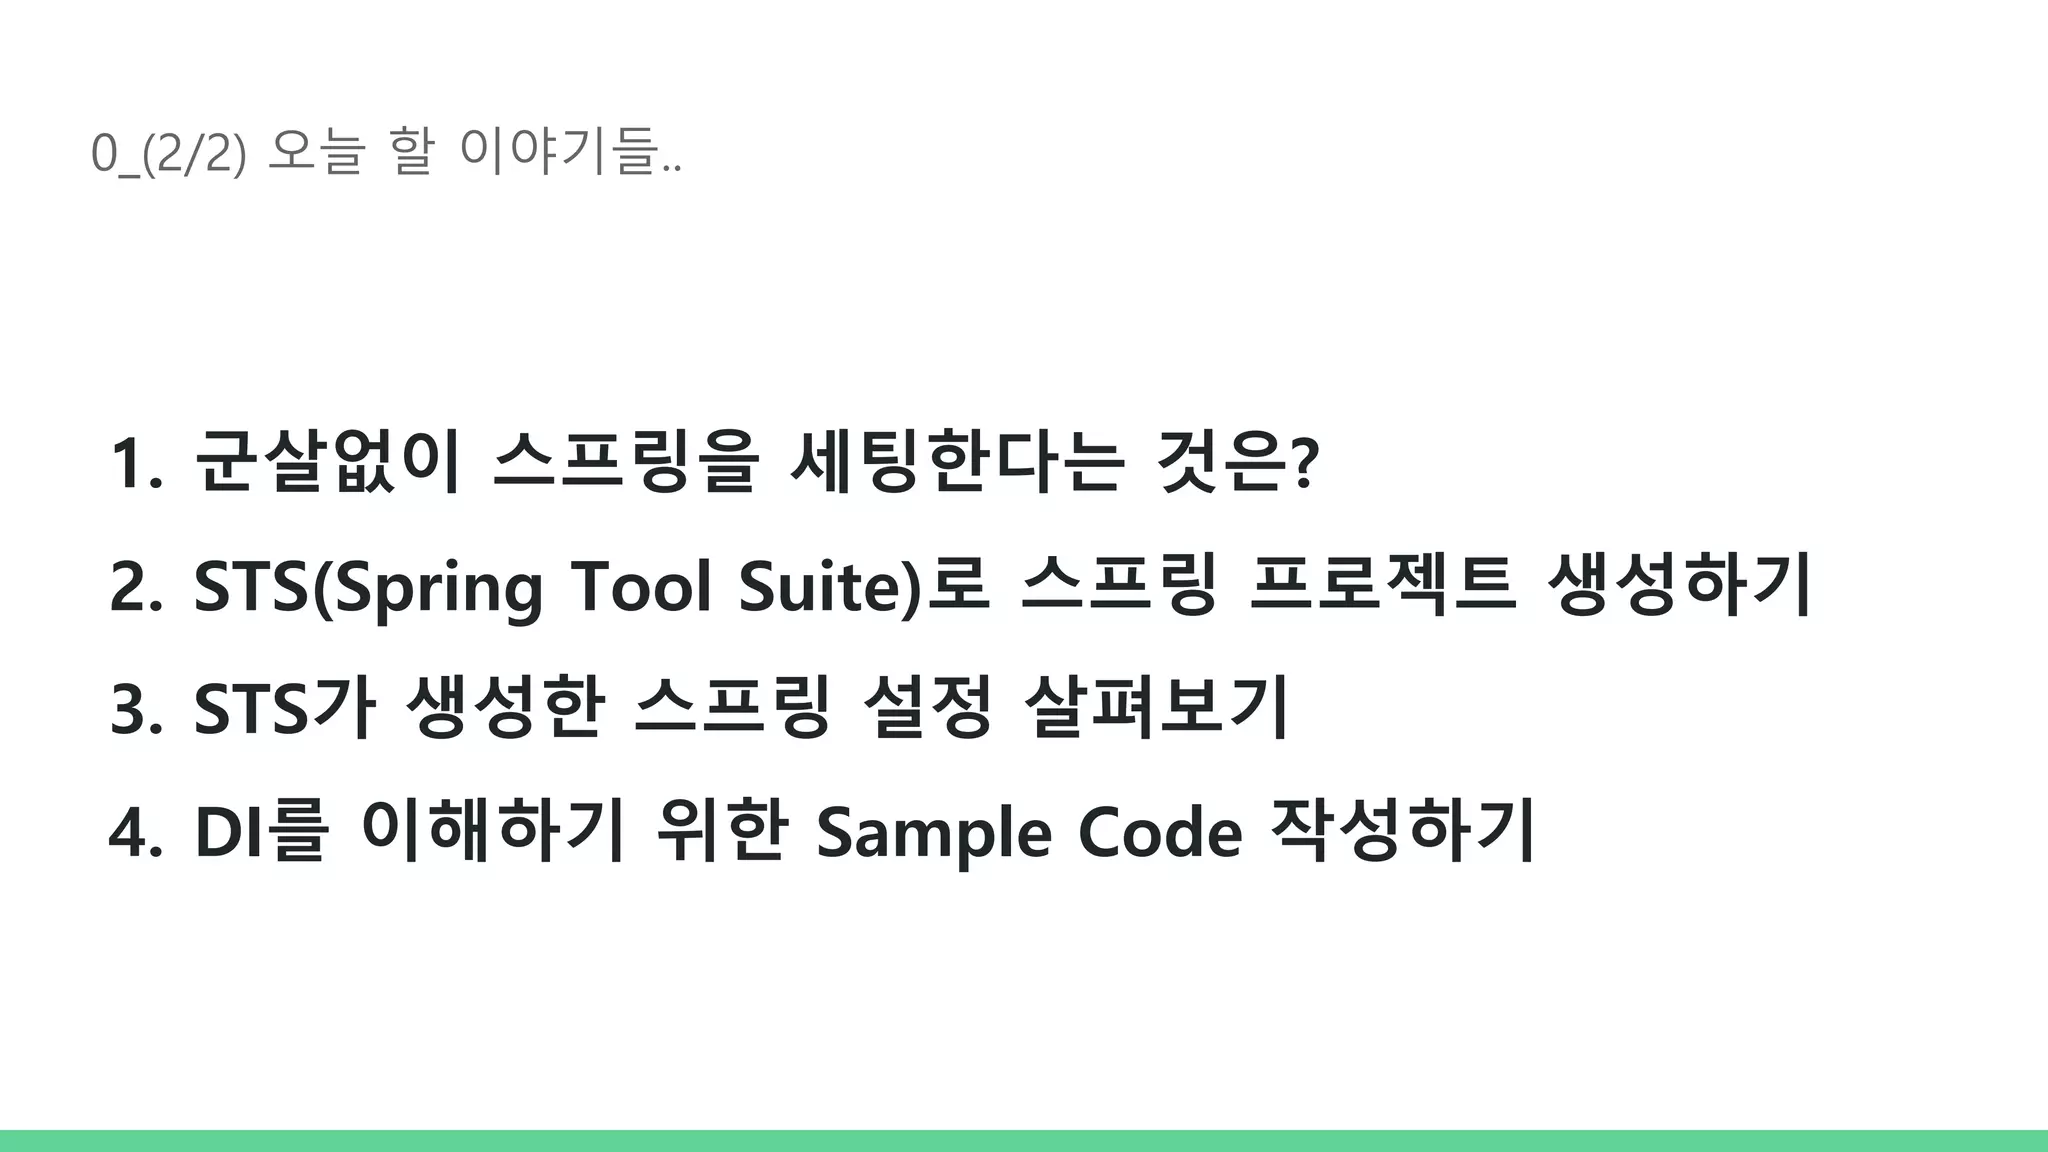
    0_(2/2) 오늘 할이야기들.. 1. 군살없이 스프링을 세팅한다는 것은? 2. STS(Spring Tool Suite)로 스프링 프로젝트 생성하기 3. STS가 생성한 스프링 설정 살펴보기 4. DI를 이해하기 위한 Sample Code 작성하기
  • 4.
  • 5.
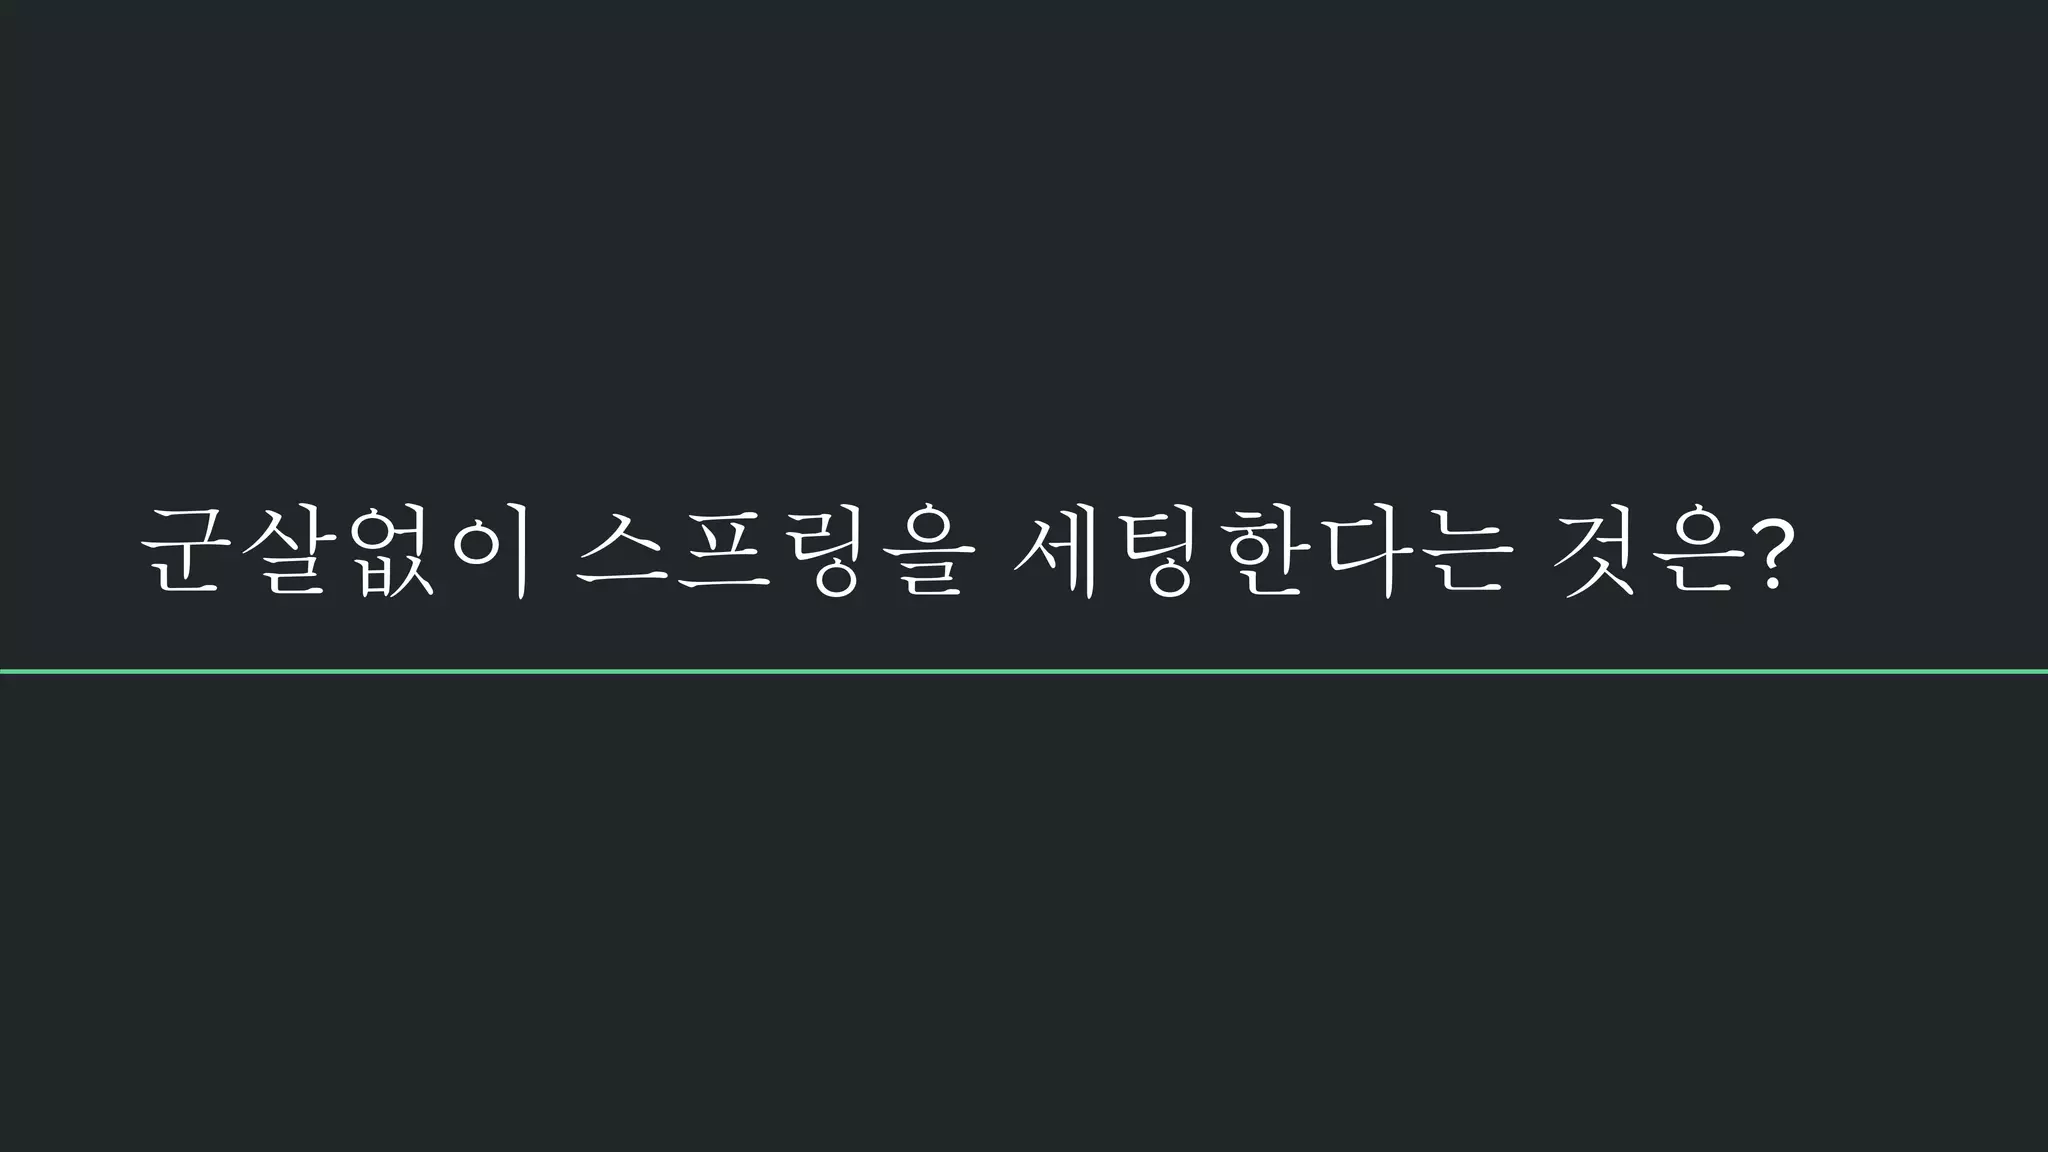
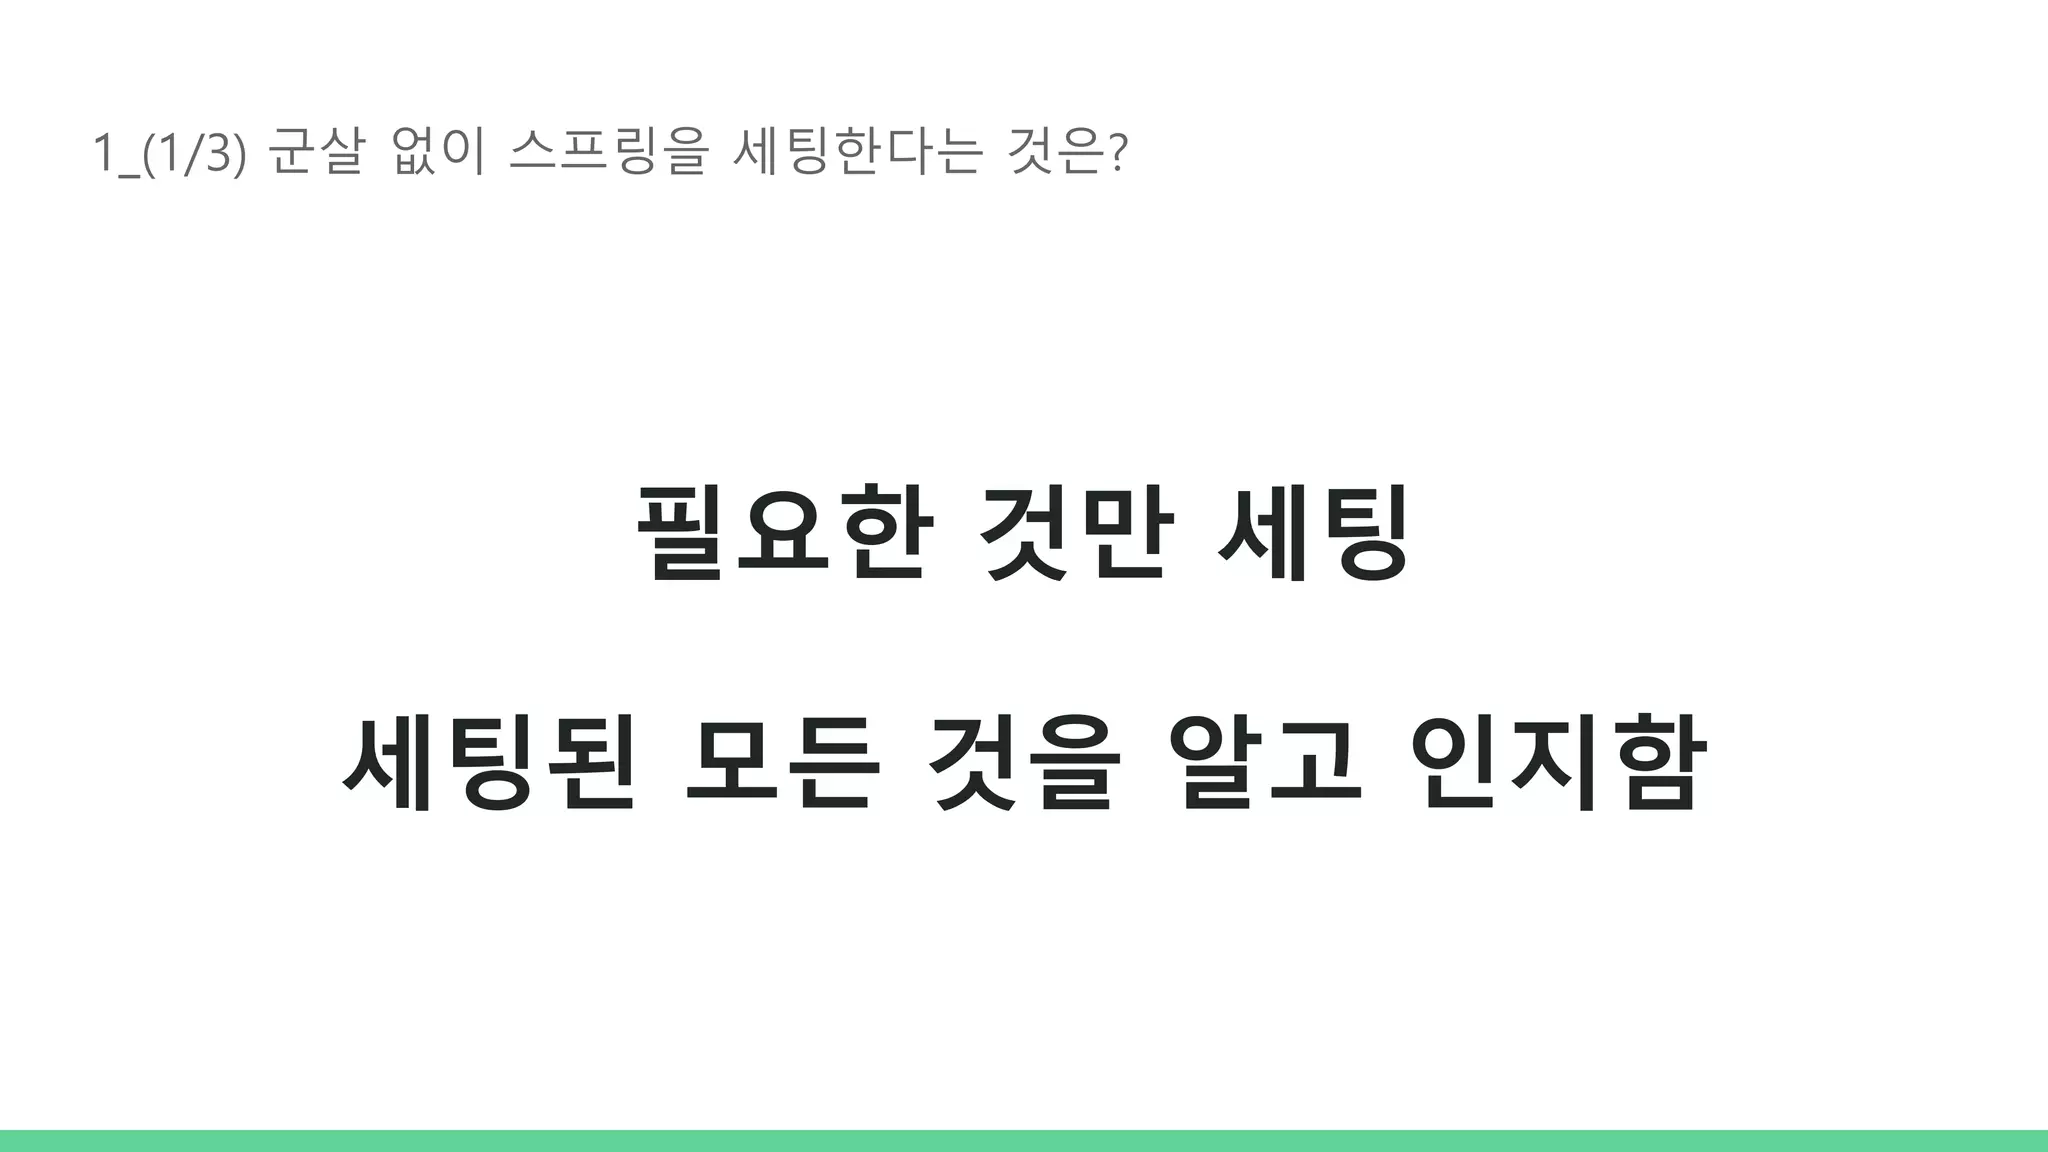
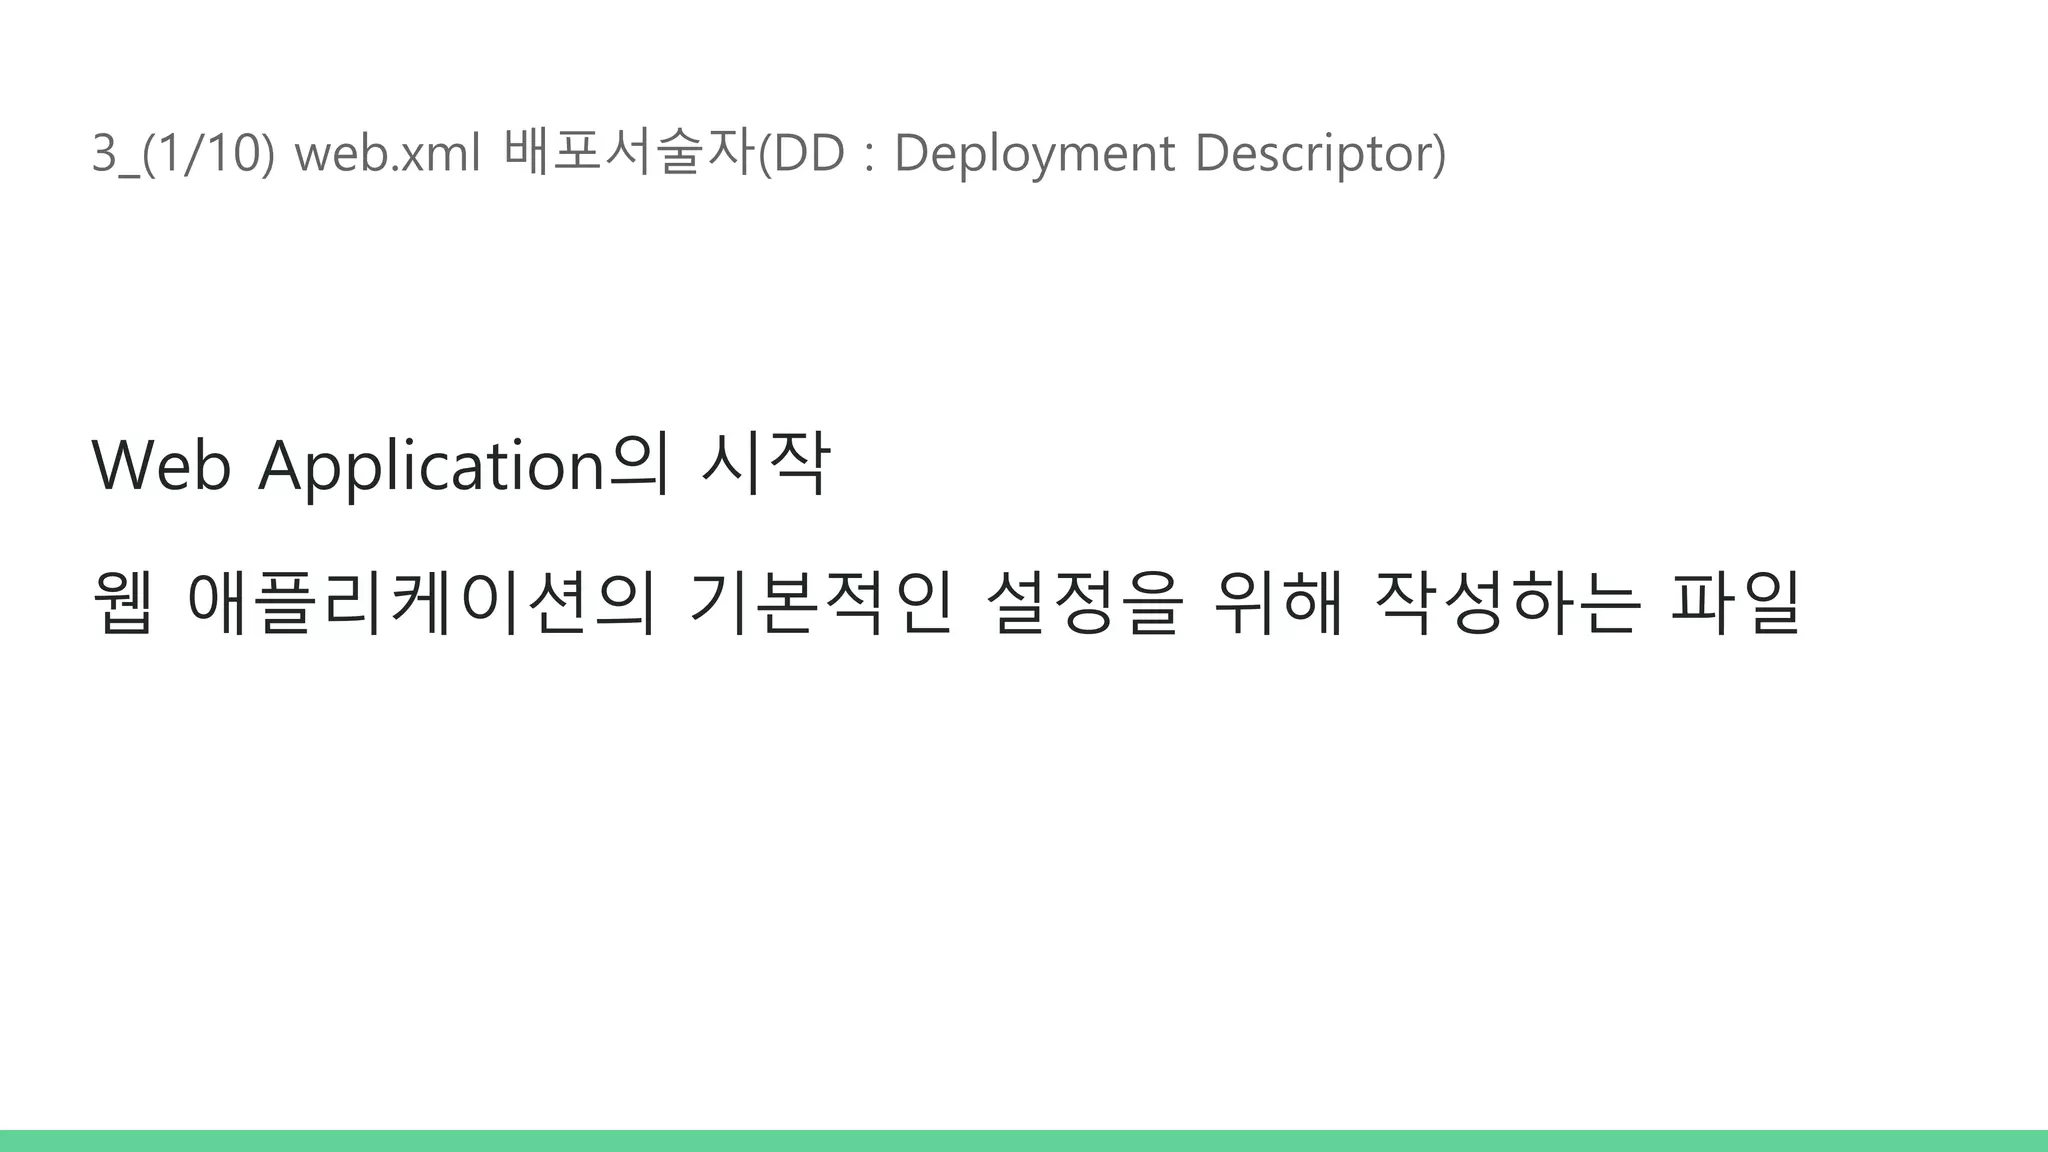
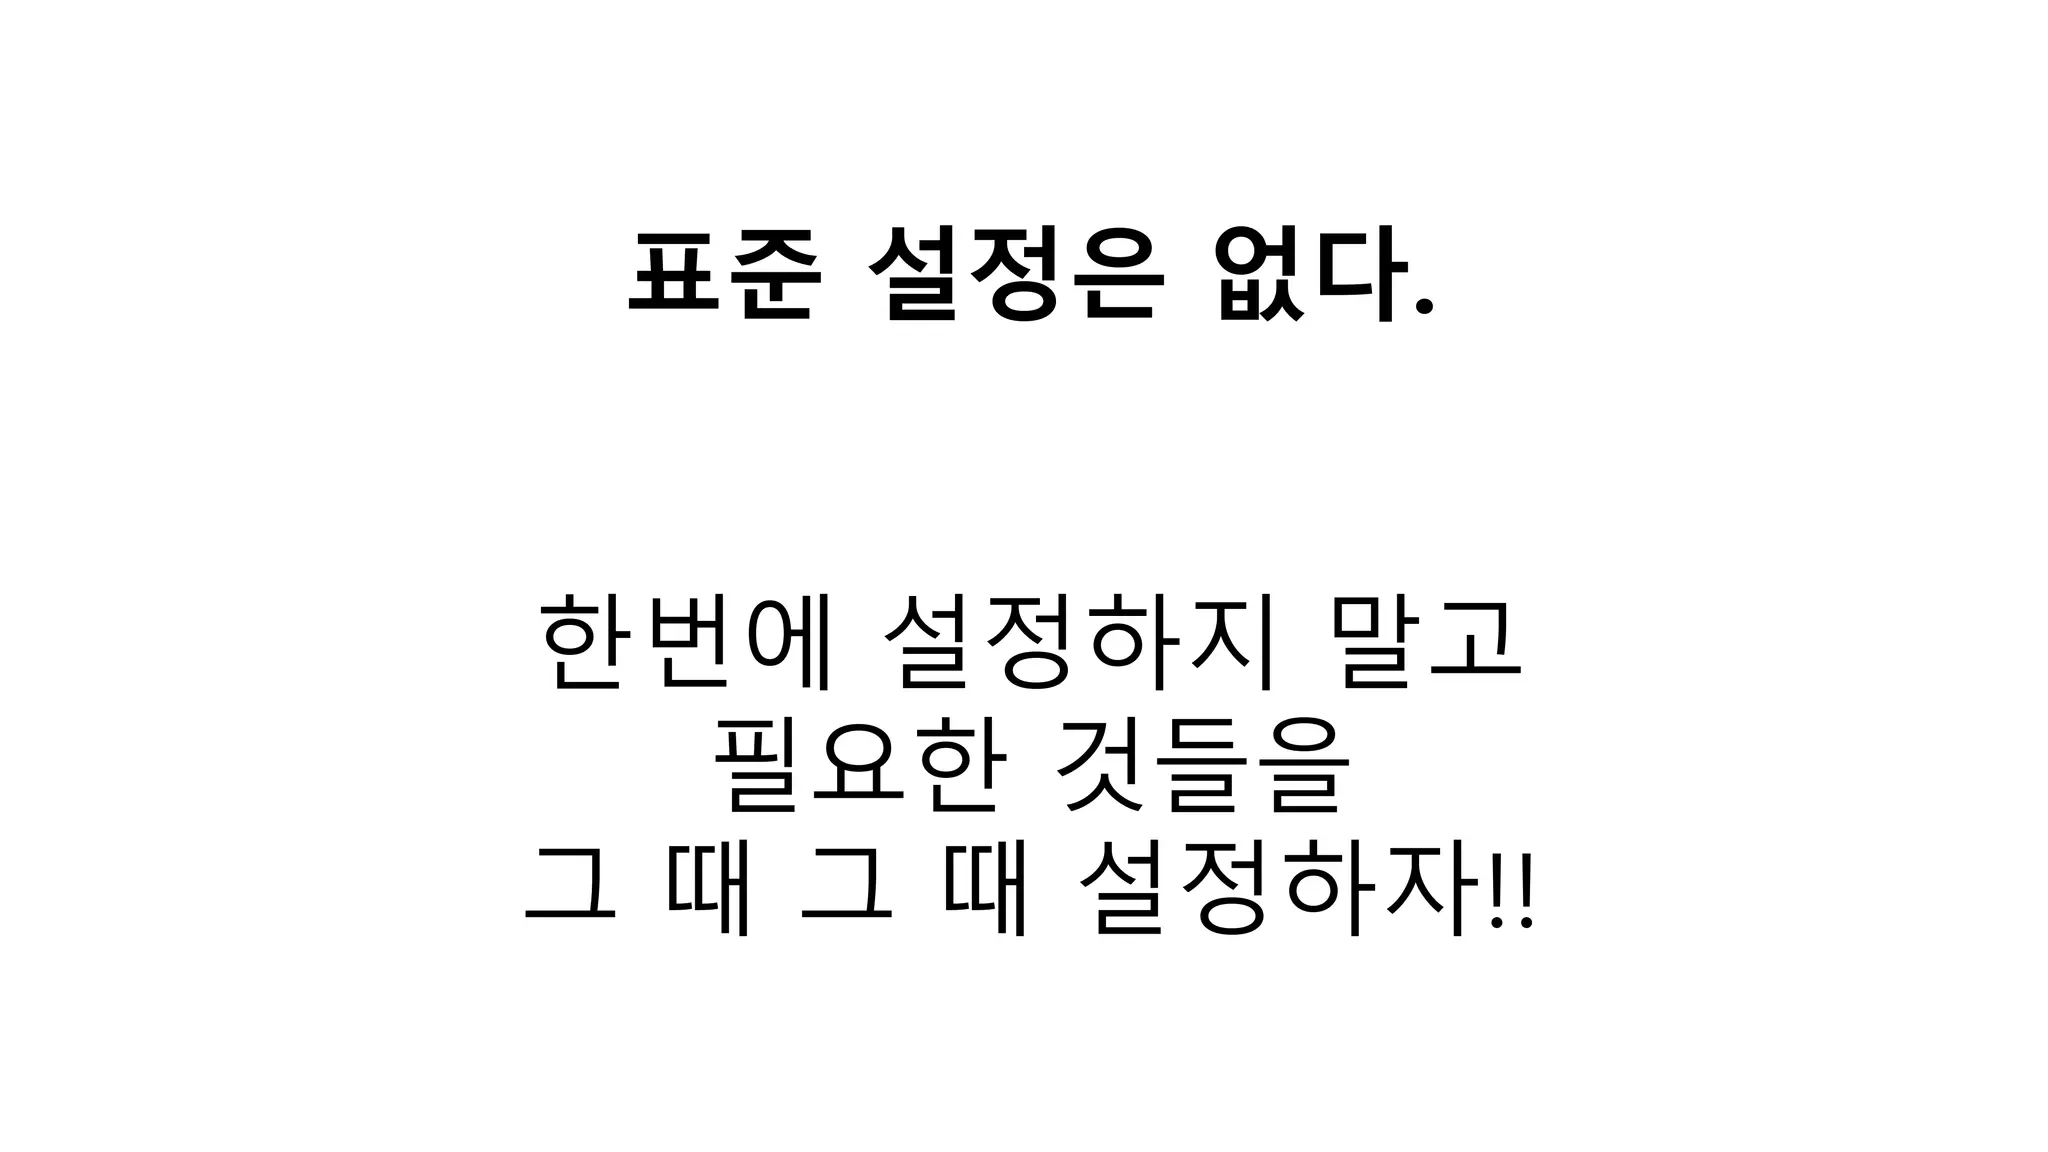
    1_(1/3) 군살 없이스프링을 세팅한다는 것은? 필요한 것만 세팅 세팅된 모든 것을 알고 인지함
  • 6.
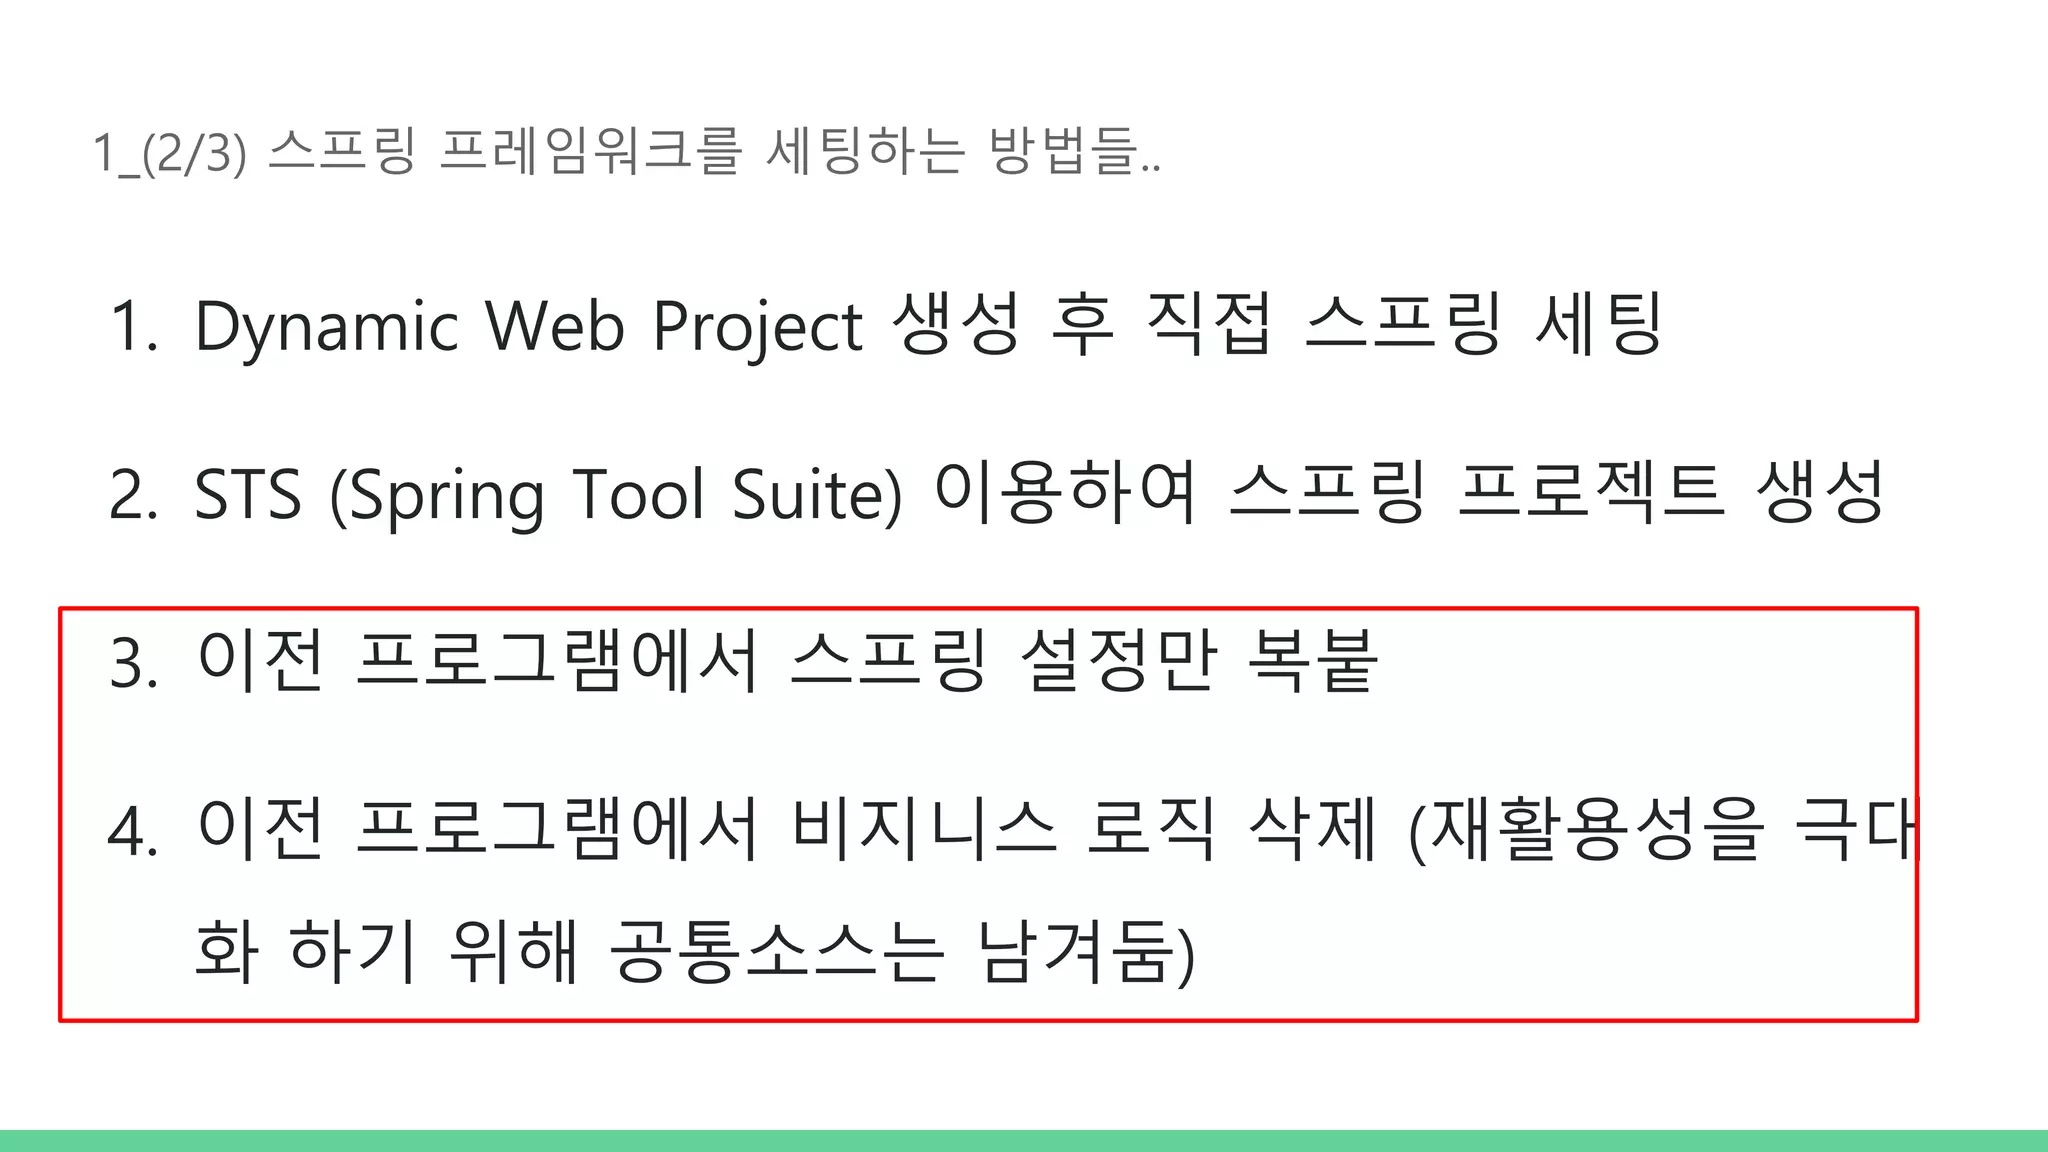
    1_(2/3) 스프링 프레임워크를세팅하는 방법들.. 1. Dynamic Web Project 생성 후 직접 스프링 세팅 2. STS (Spring Tool Suite) 이용하여 스프링 프로젝트 생성 3. 이전 프로그램에서 스프링 설정만 복붙 4. 이전 프로그램에서 비지니스 로직 삭제 (재활용성을 극대 화 하기 위해 공통소스는 남겨둠)
  • 7.
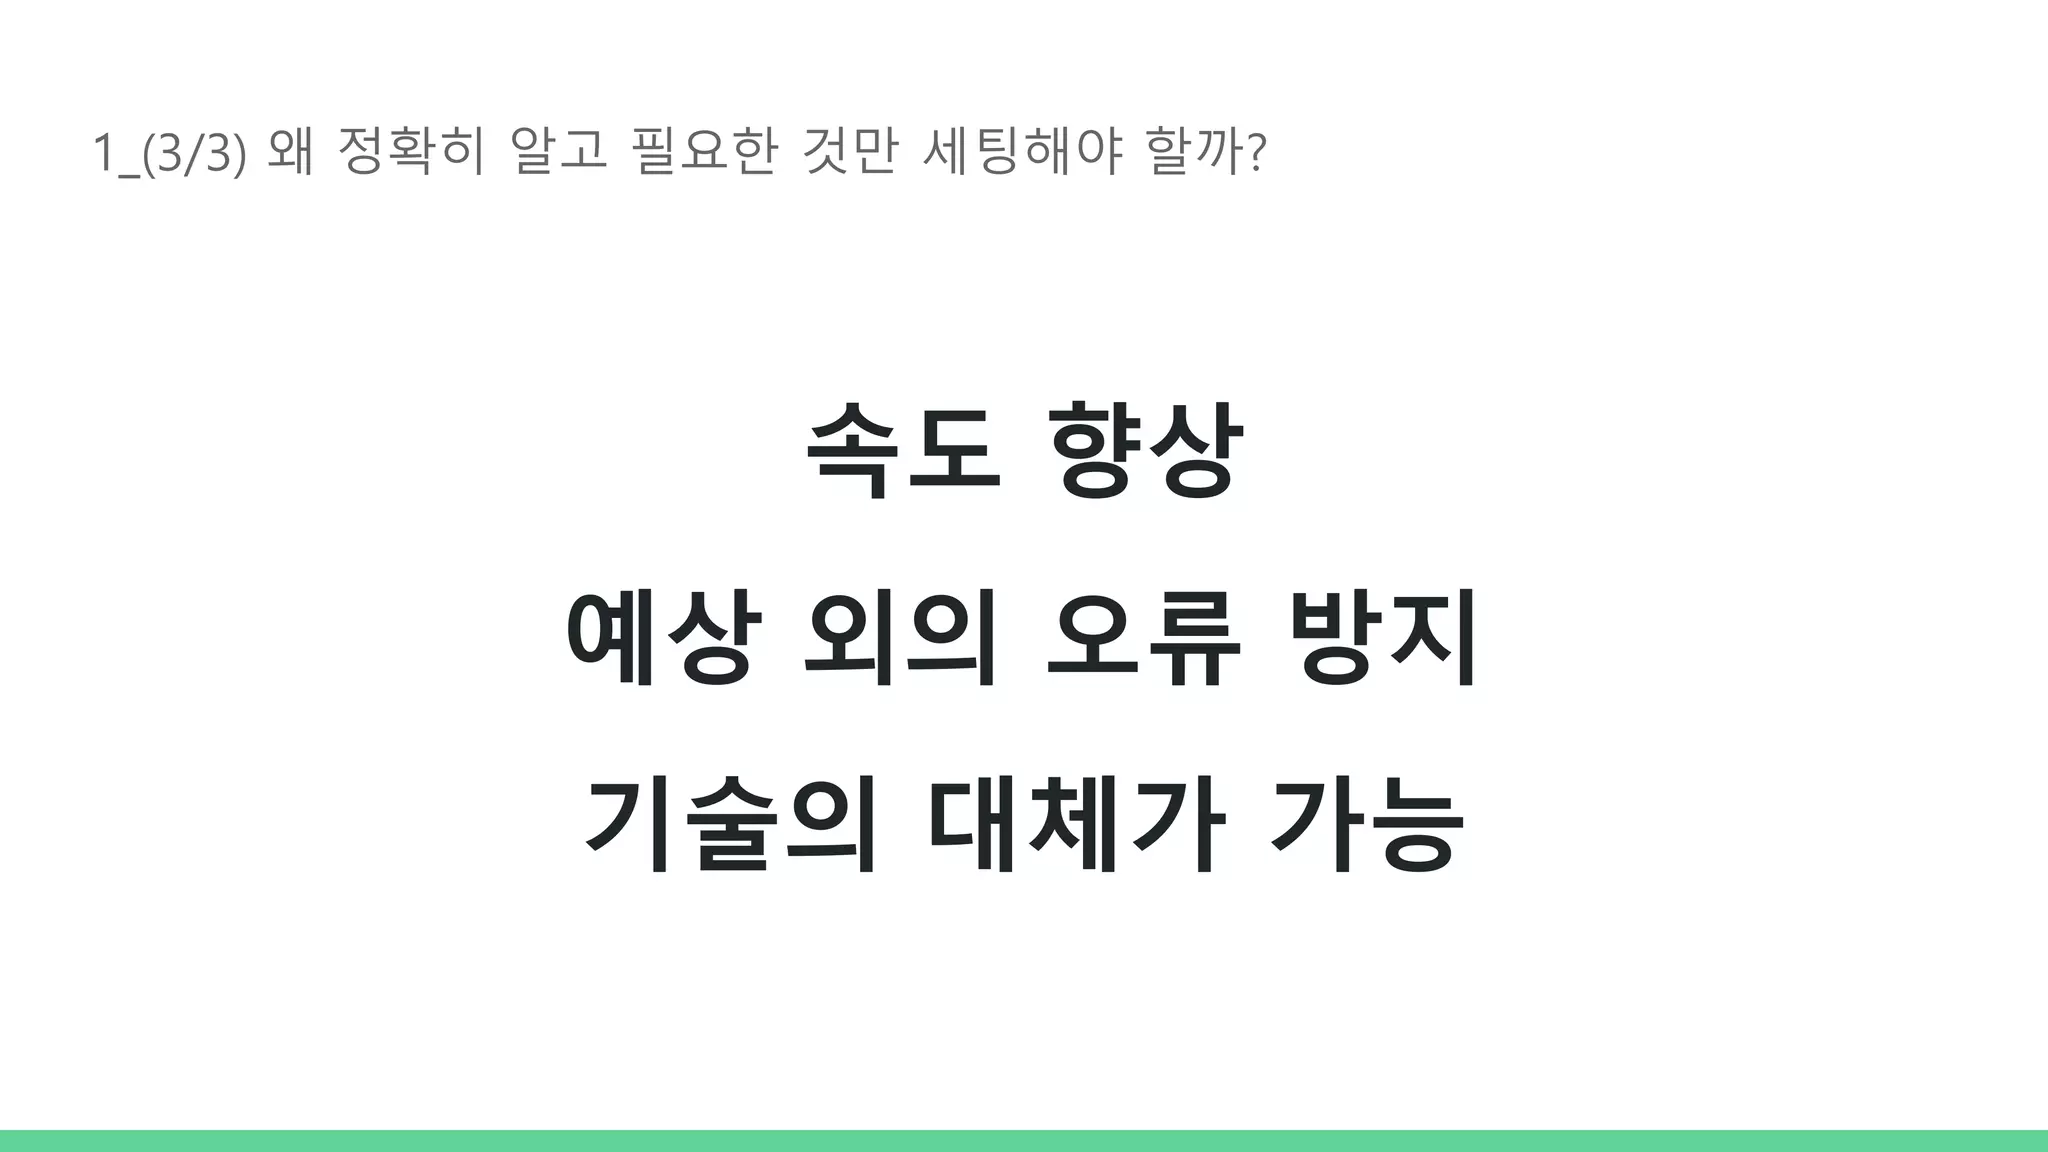
    1_(3/3) 왜 정확히알고 필요한 것만 세팅해야 할까? 속도 향상 예상 외의 오류 방지 기술의 대체가 가능
  • 8.
    STS(Spring Tool Suite)로 스프링 프로젝트 생성하기
  • 9.
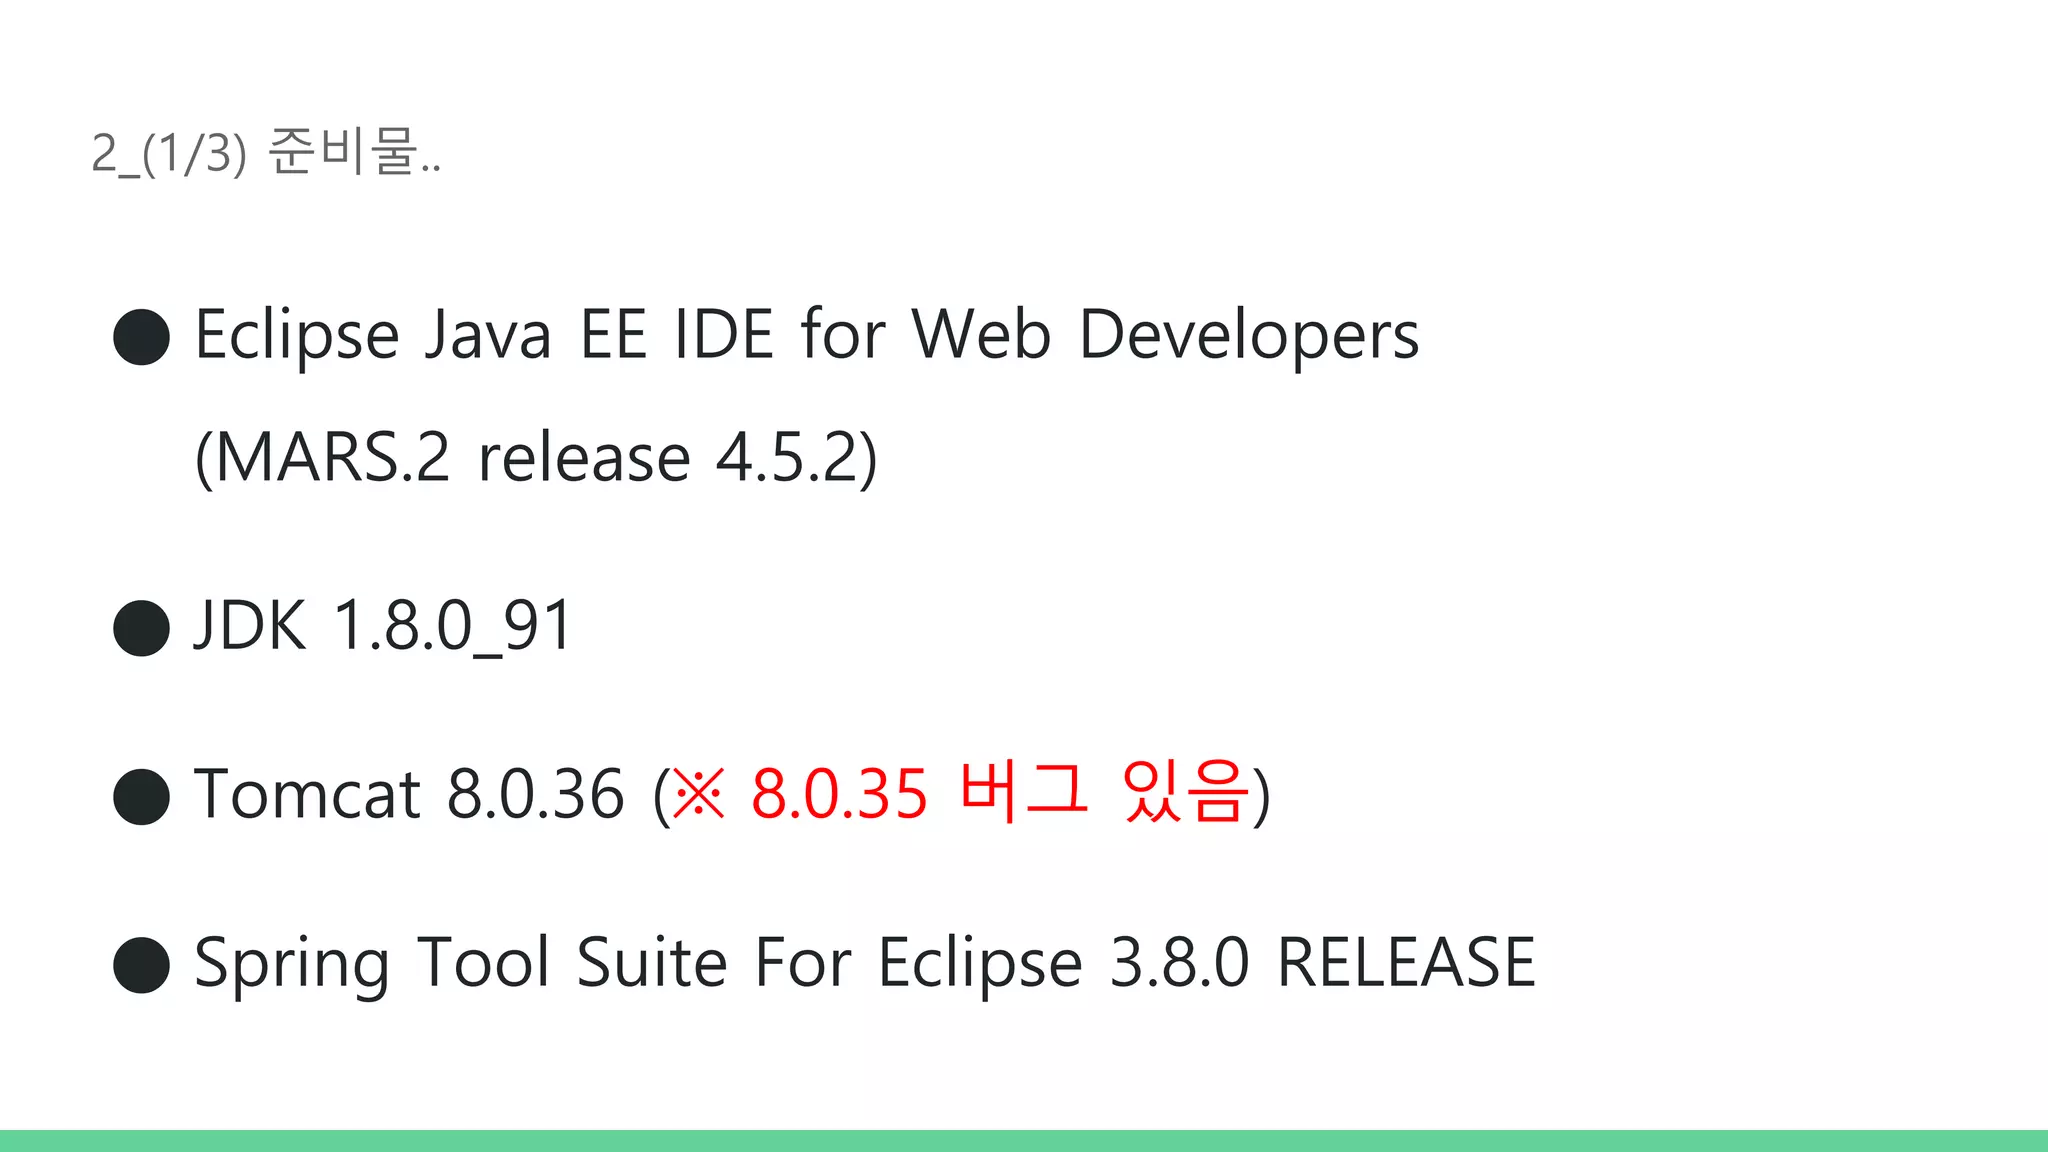
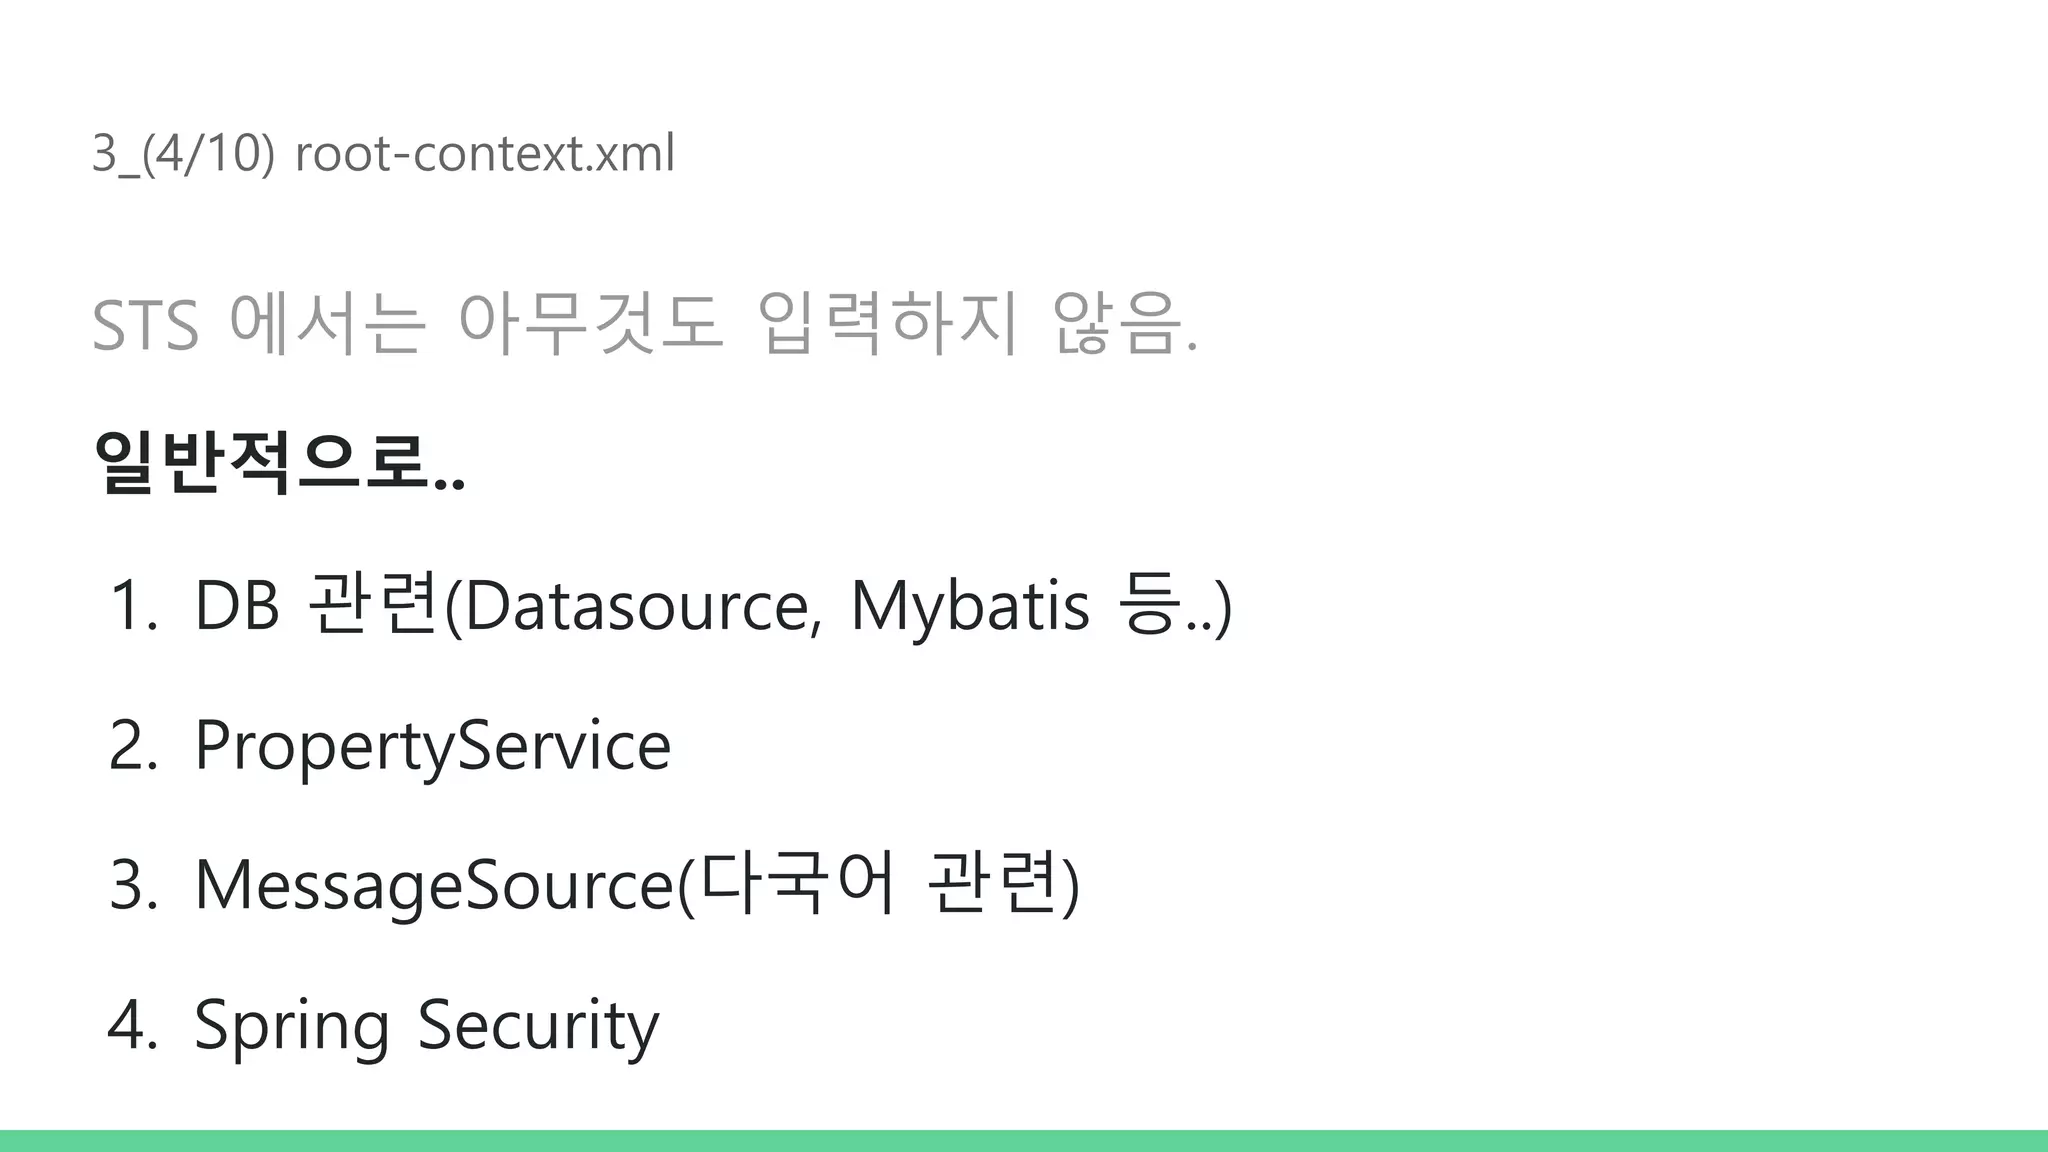
    2_(1/3) 준비물.. ● EclipseJava EE IDE for Web Developers (MARS.2 release 4.5.2) ● JDK 1.8.0_91 ● Tomcat 8.0.36 (※ 8.0.35 버그 있음) ● Spring Tool Suite For Eclipse 3.8.0 RELEASE
  • 10.
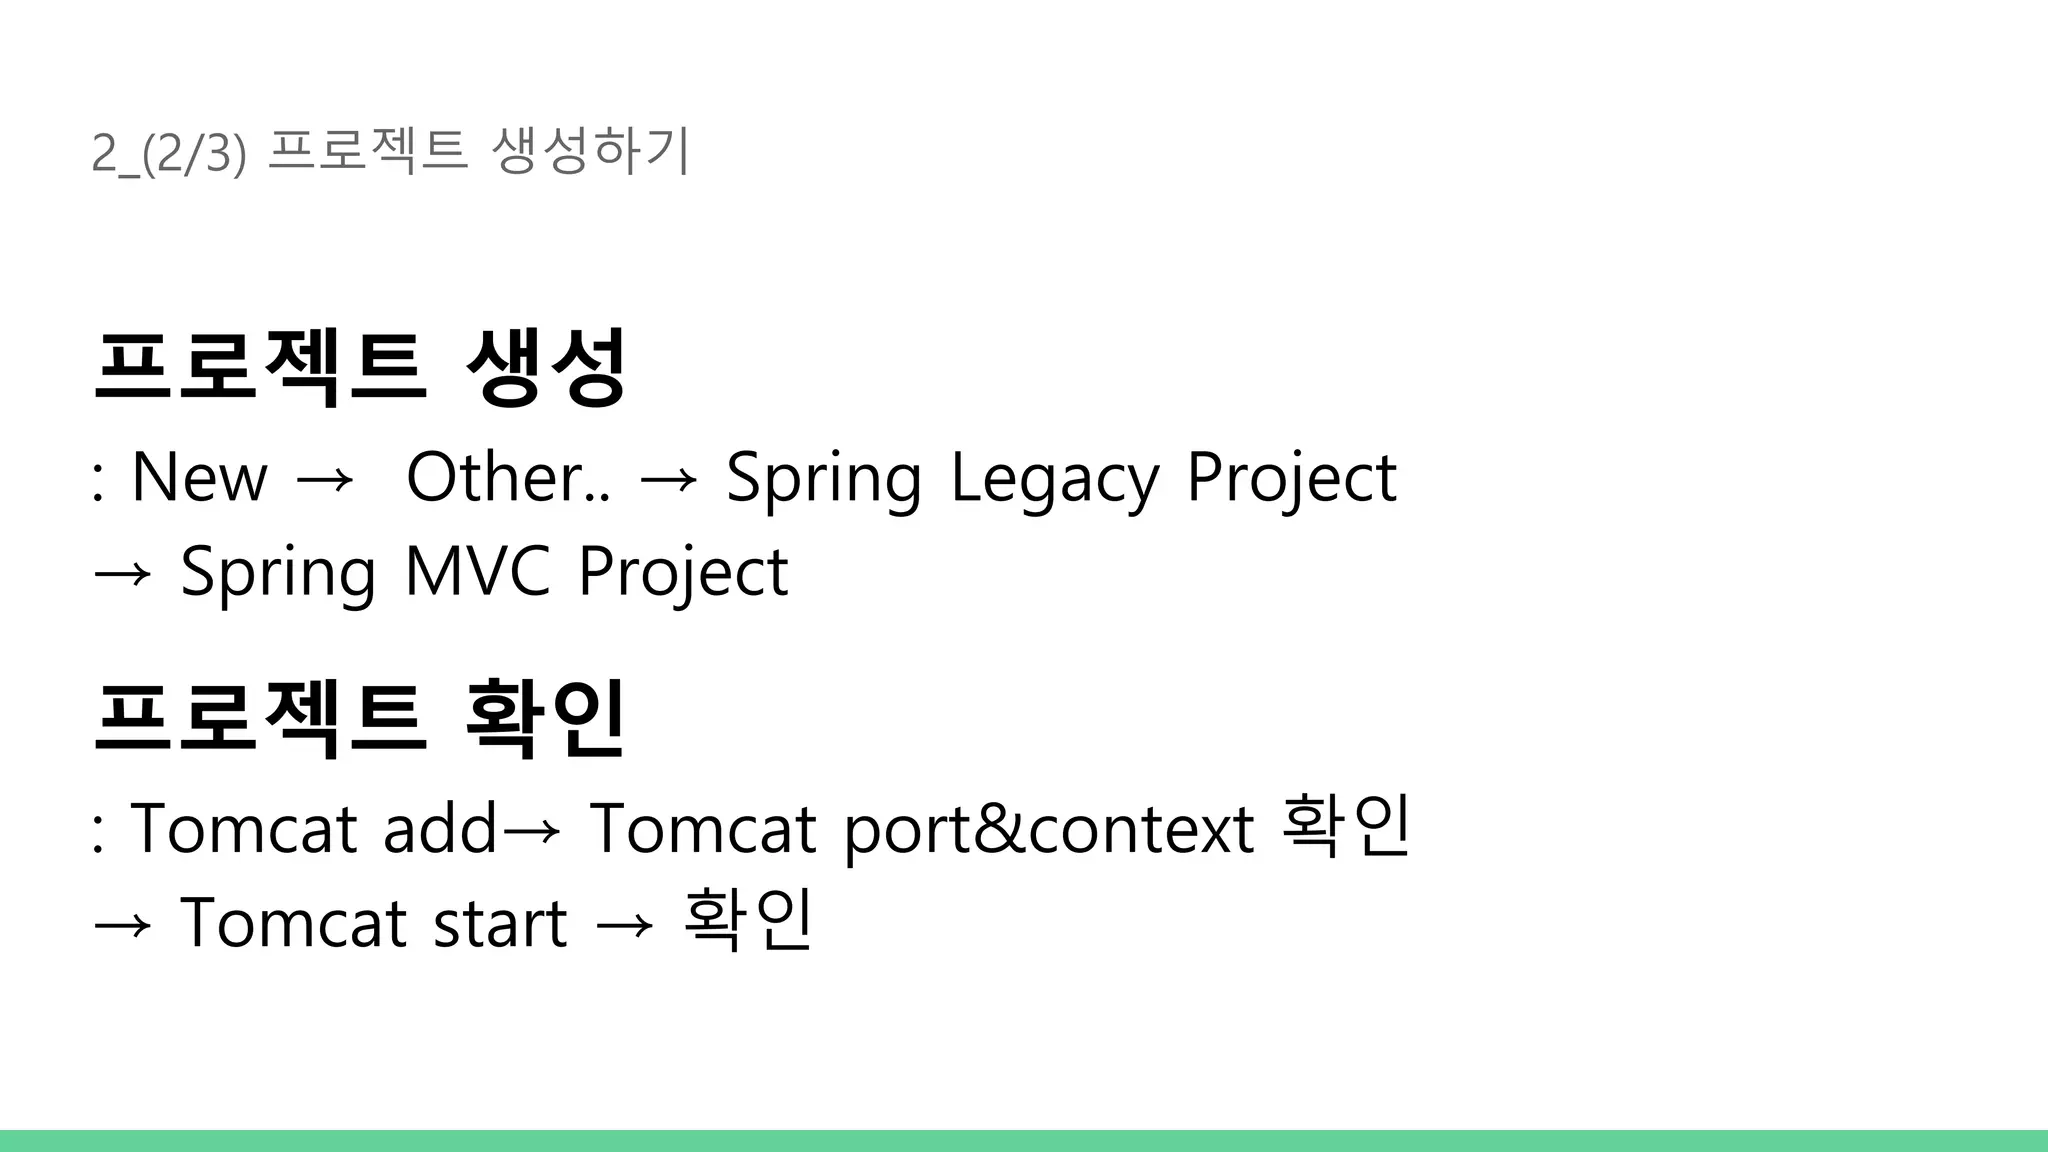
    2_(2/3) 프로젝트 생성하기 프로젝트생성 : New → Other.. → Spring Legacy Project → Spring MVC Project 프로젝트 확인 : Tomcat add→ Tomcat port&context 확인 → Tomcat start → 확인
  • 11.
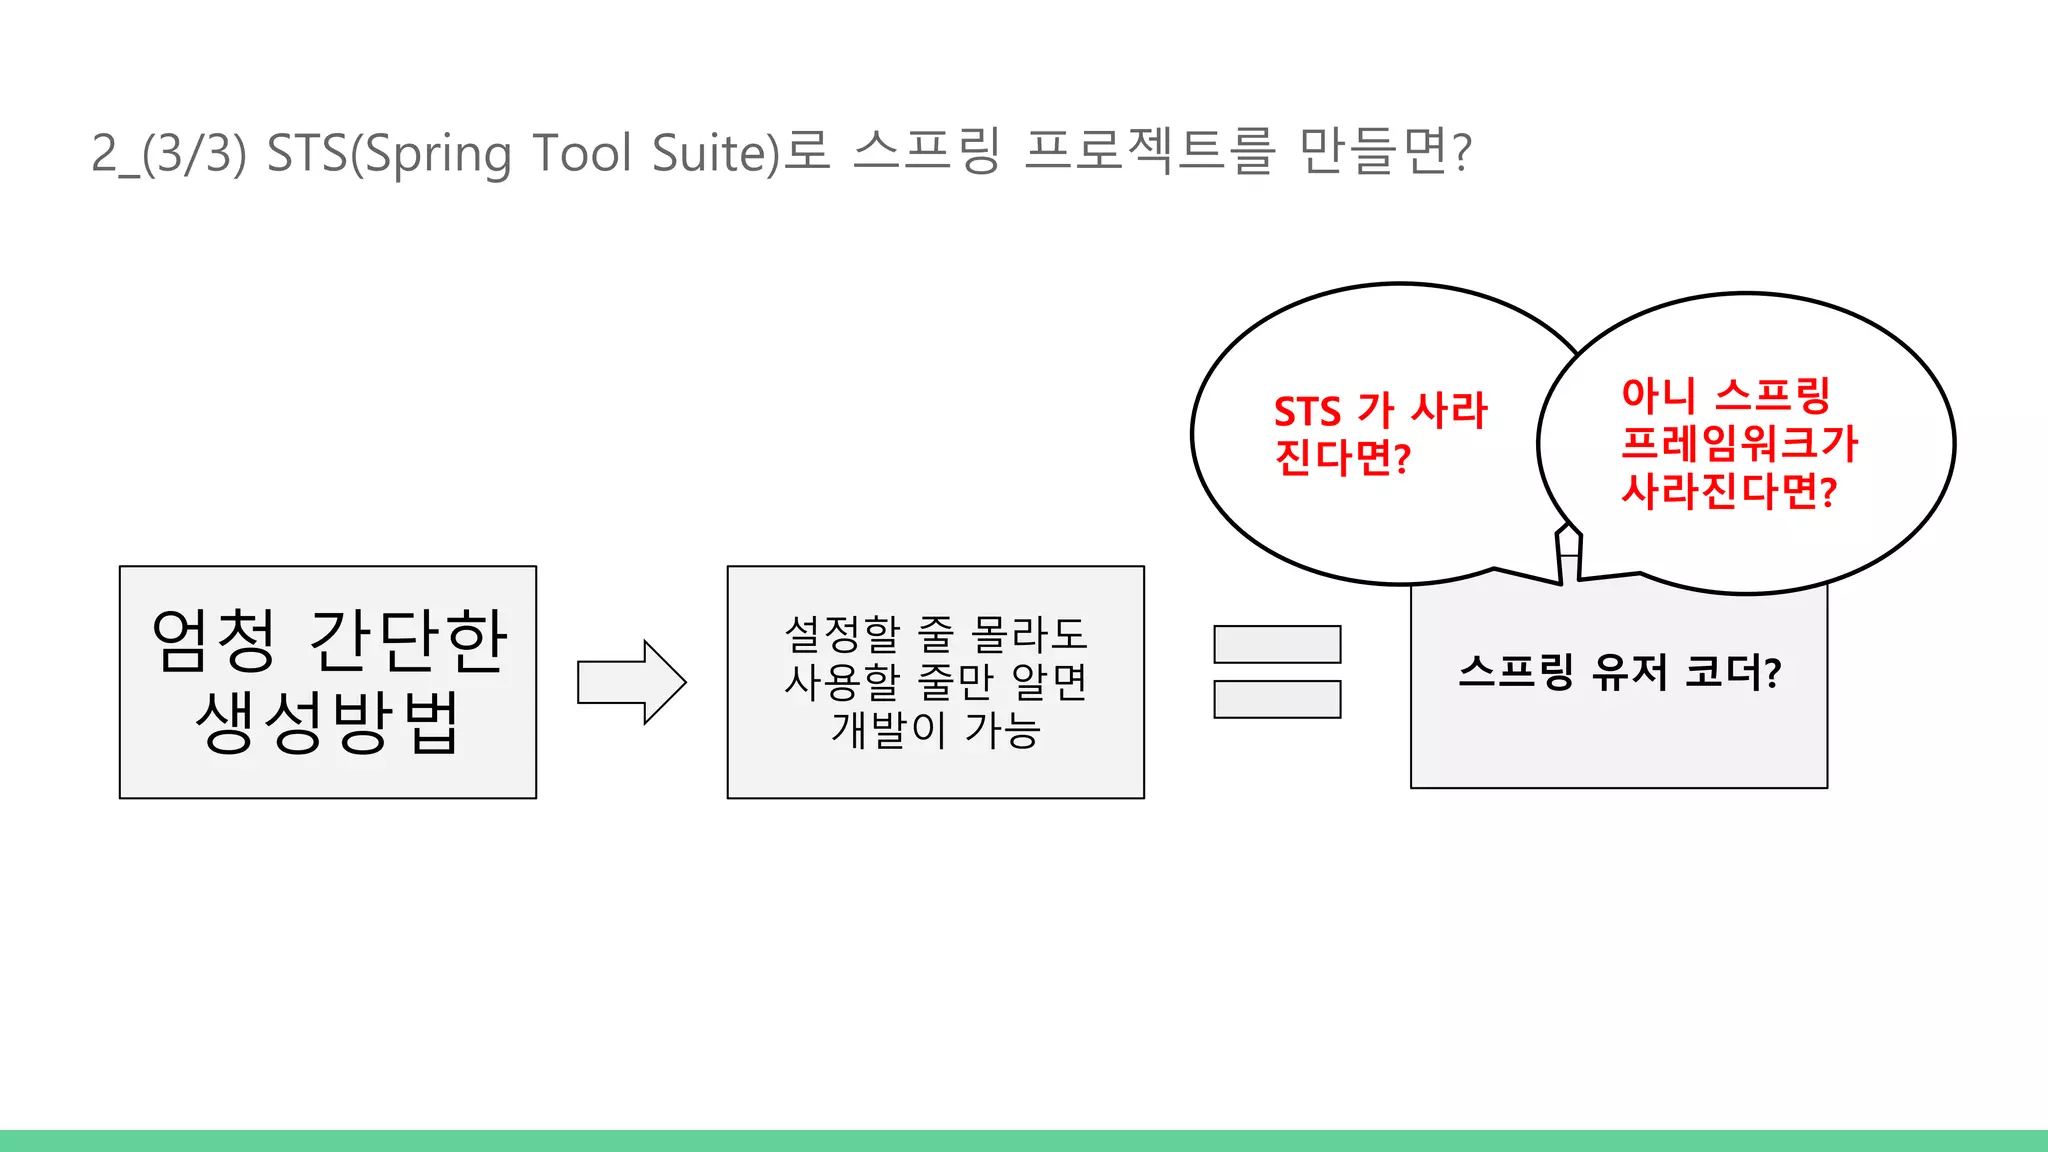
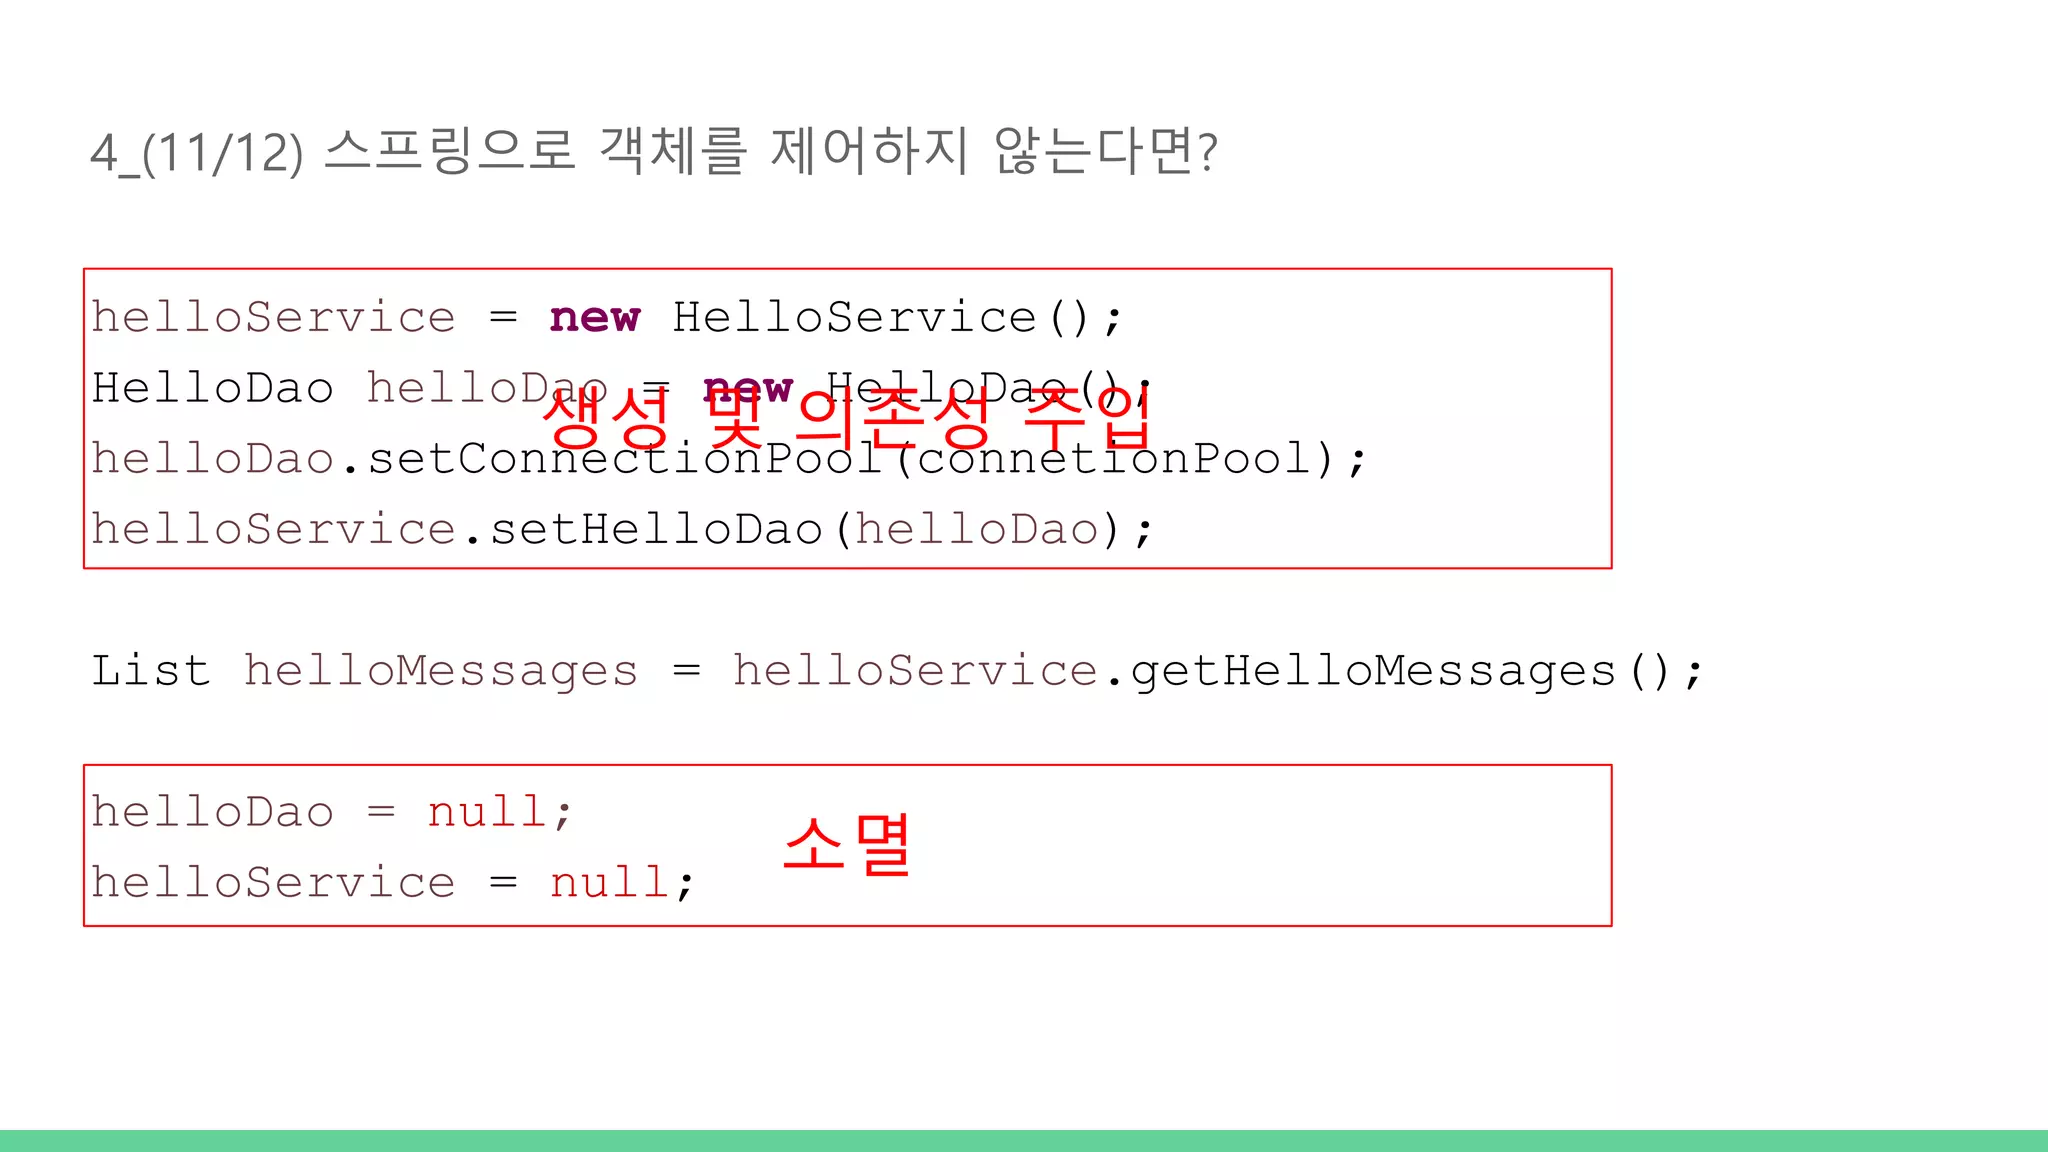
    2_(3/3) STS(Spring ToolSuite)로 스프링 프로젝트를 만들면? 엄청 간단한 생성방법 설정할 줄 몰라도 사용할 줄만 알면 개발이 가능 스프링 유저 코더? STS 가 사라 진다면? 아니 스프링 프레임워크가 사라진다면?
  • 12.
    STS가 생성한 스프링설정 살펴보기
  • 13.
    3_(1/10) web.xml 배포서술자(DD: Deployment Descriptor) Web Application의 시작 웹 애플리케이션의 기본적인 설정을 위해 작성하는 파일
  • 14.
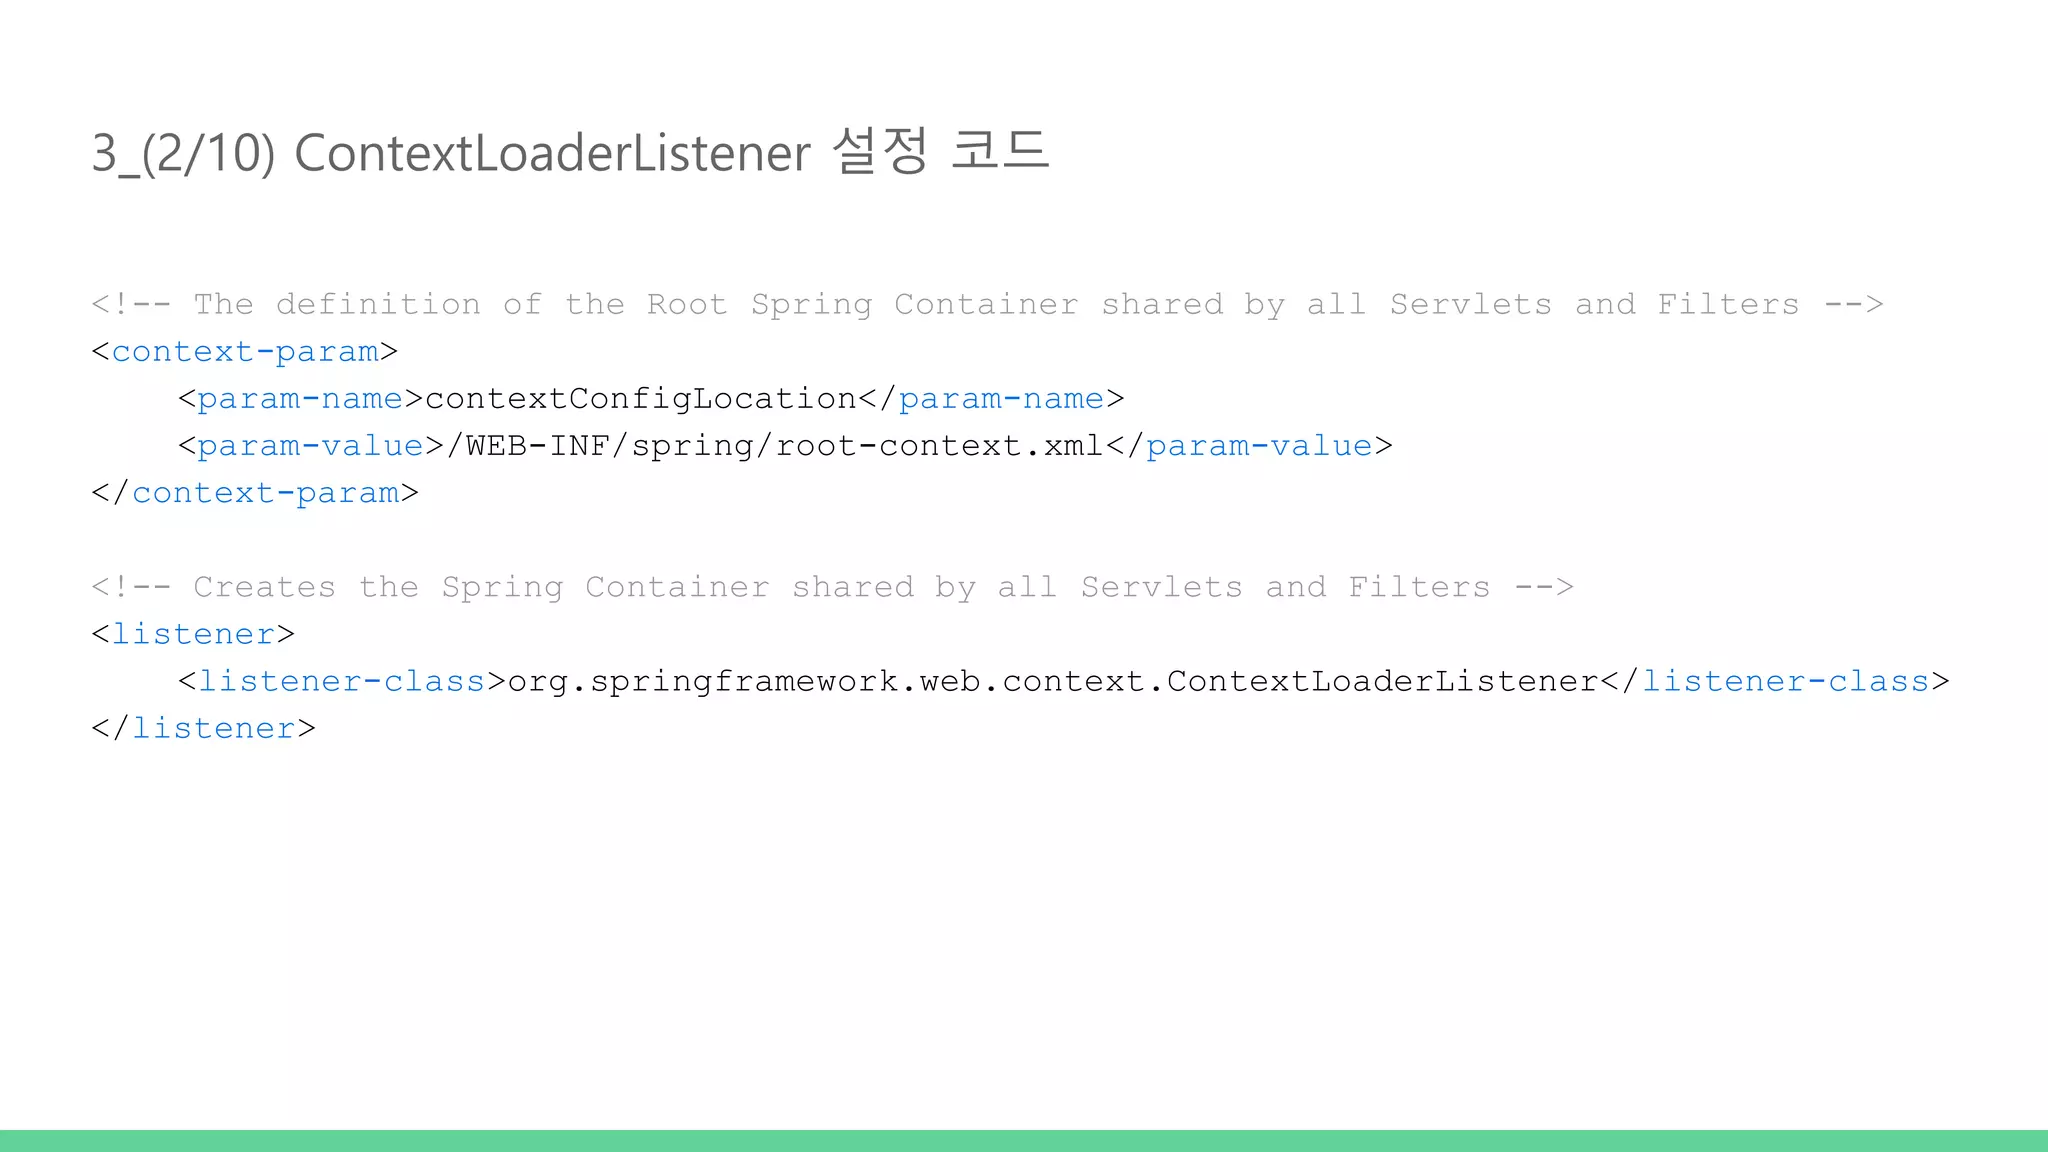
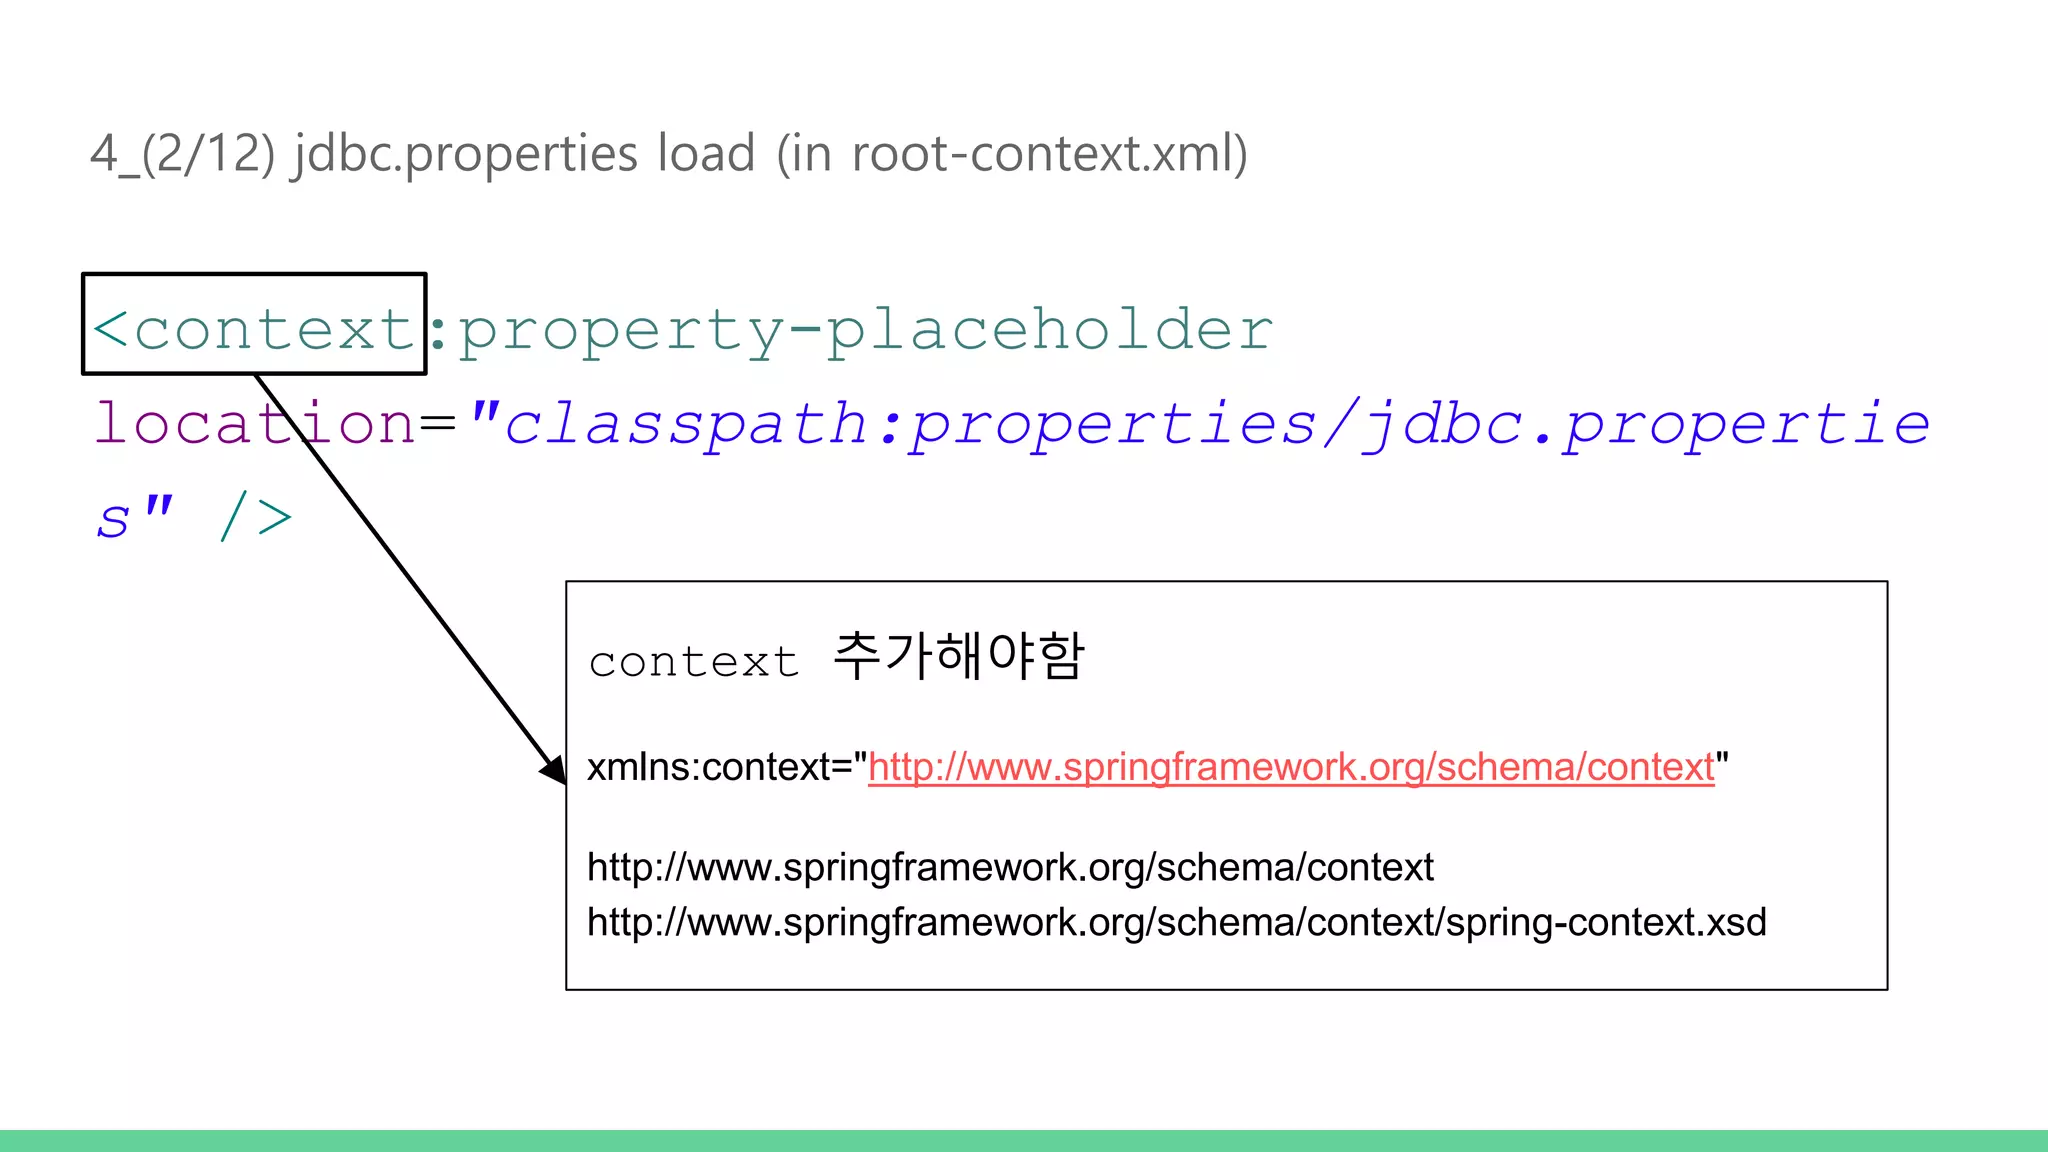
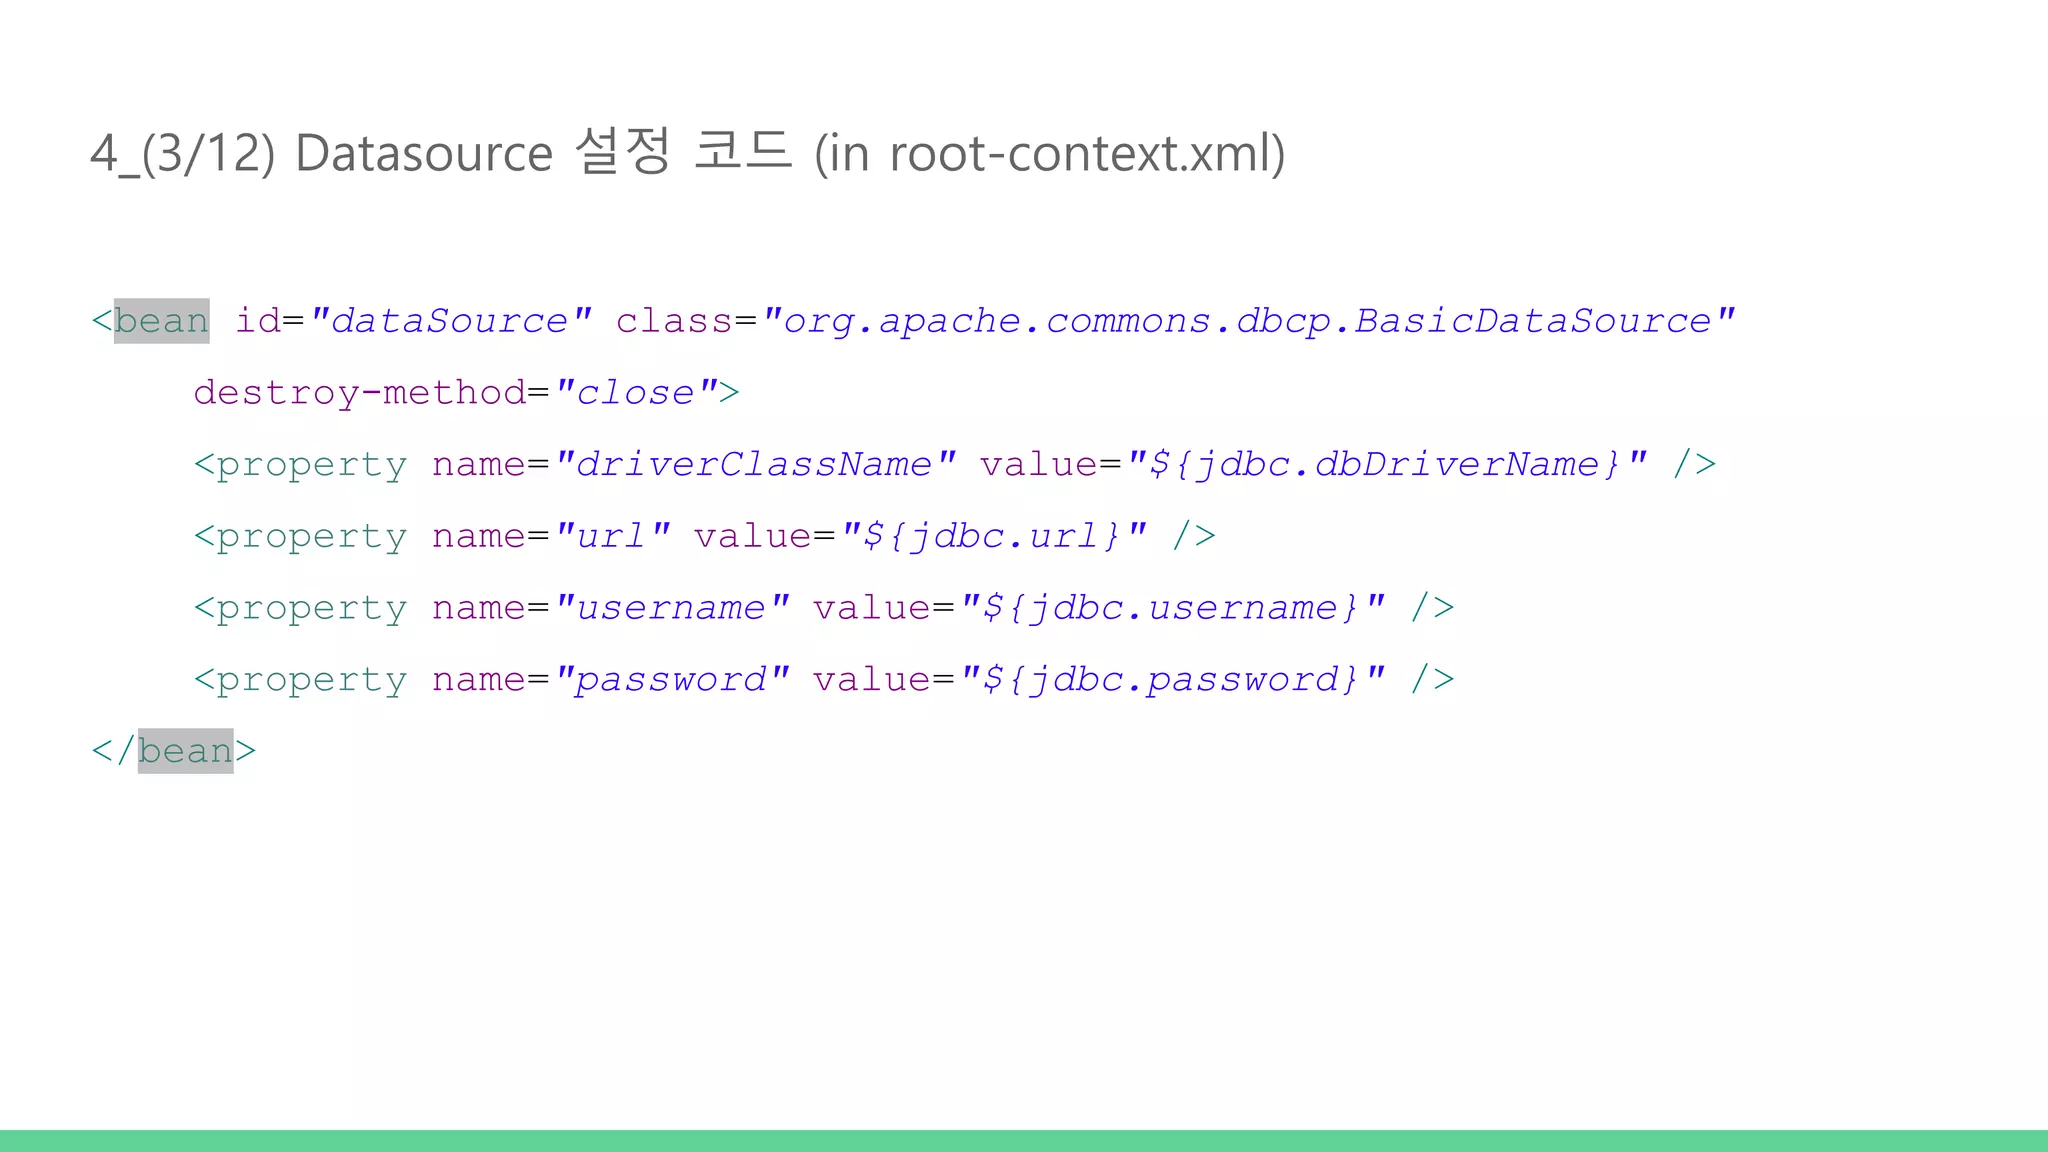
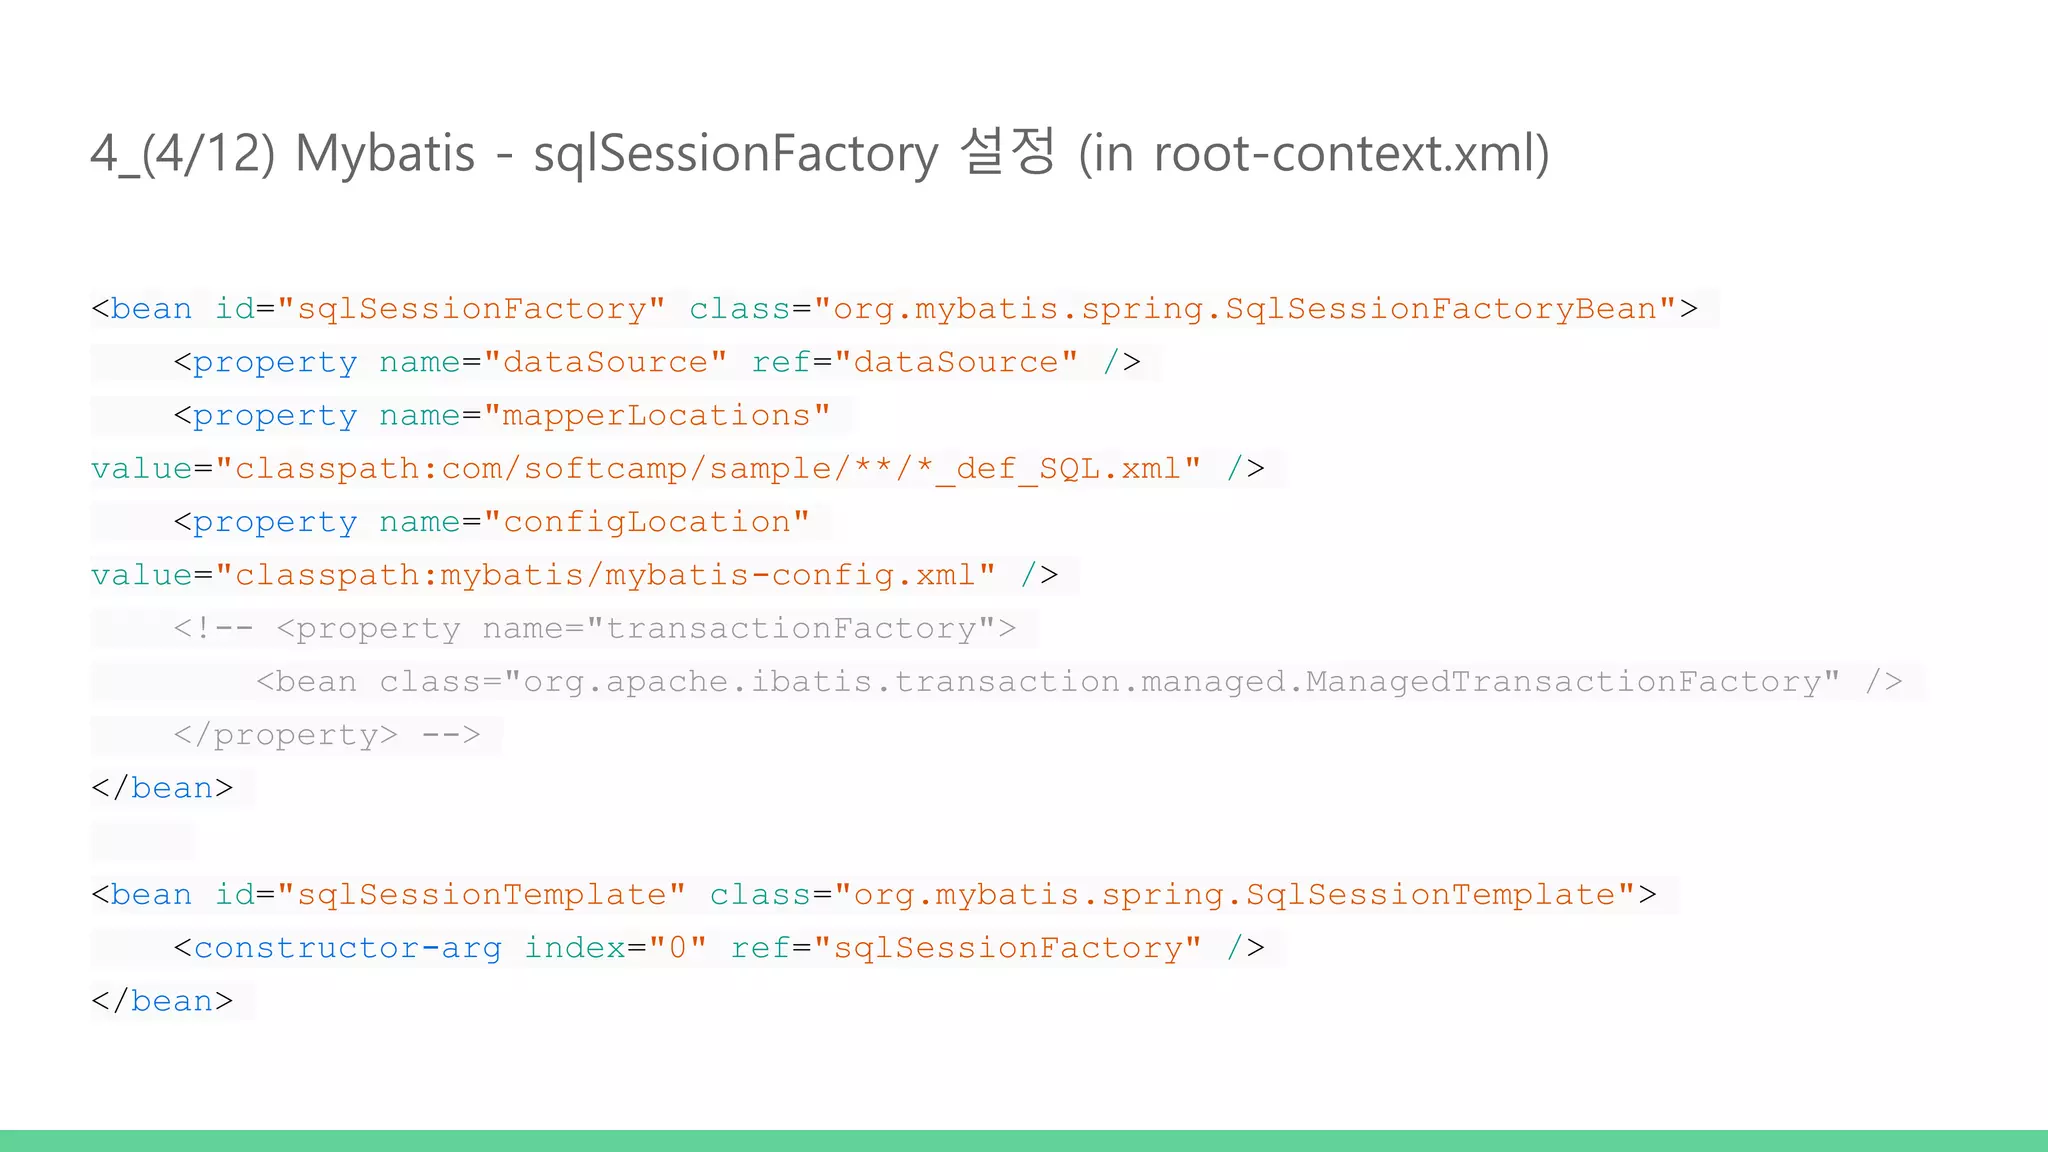
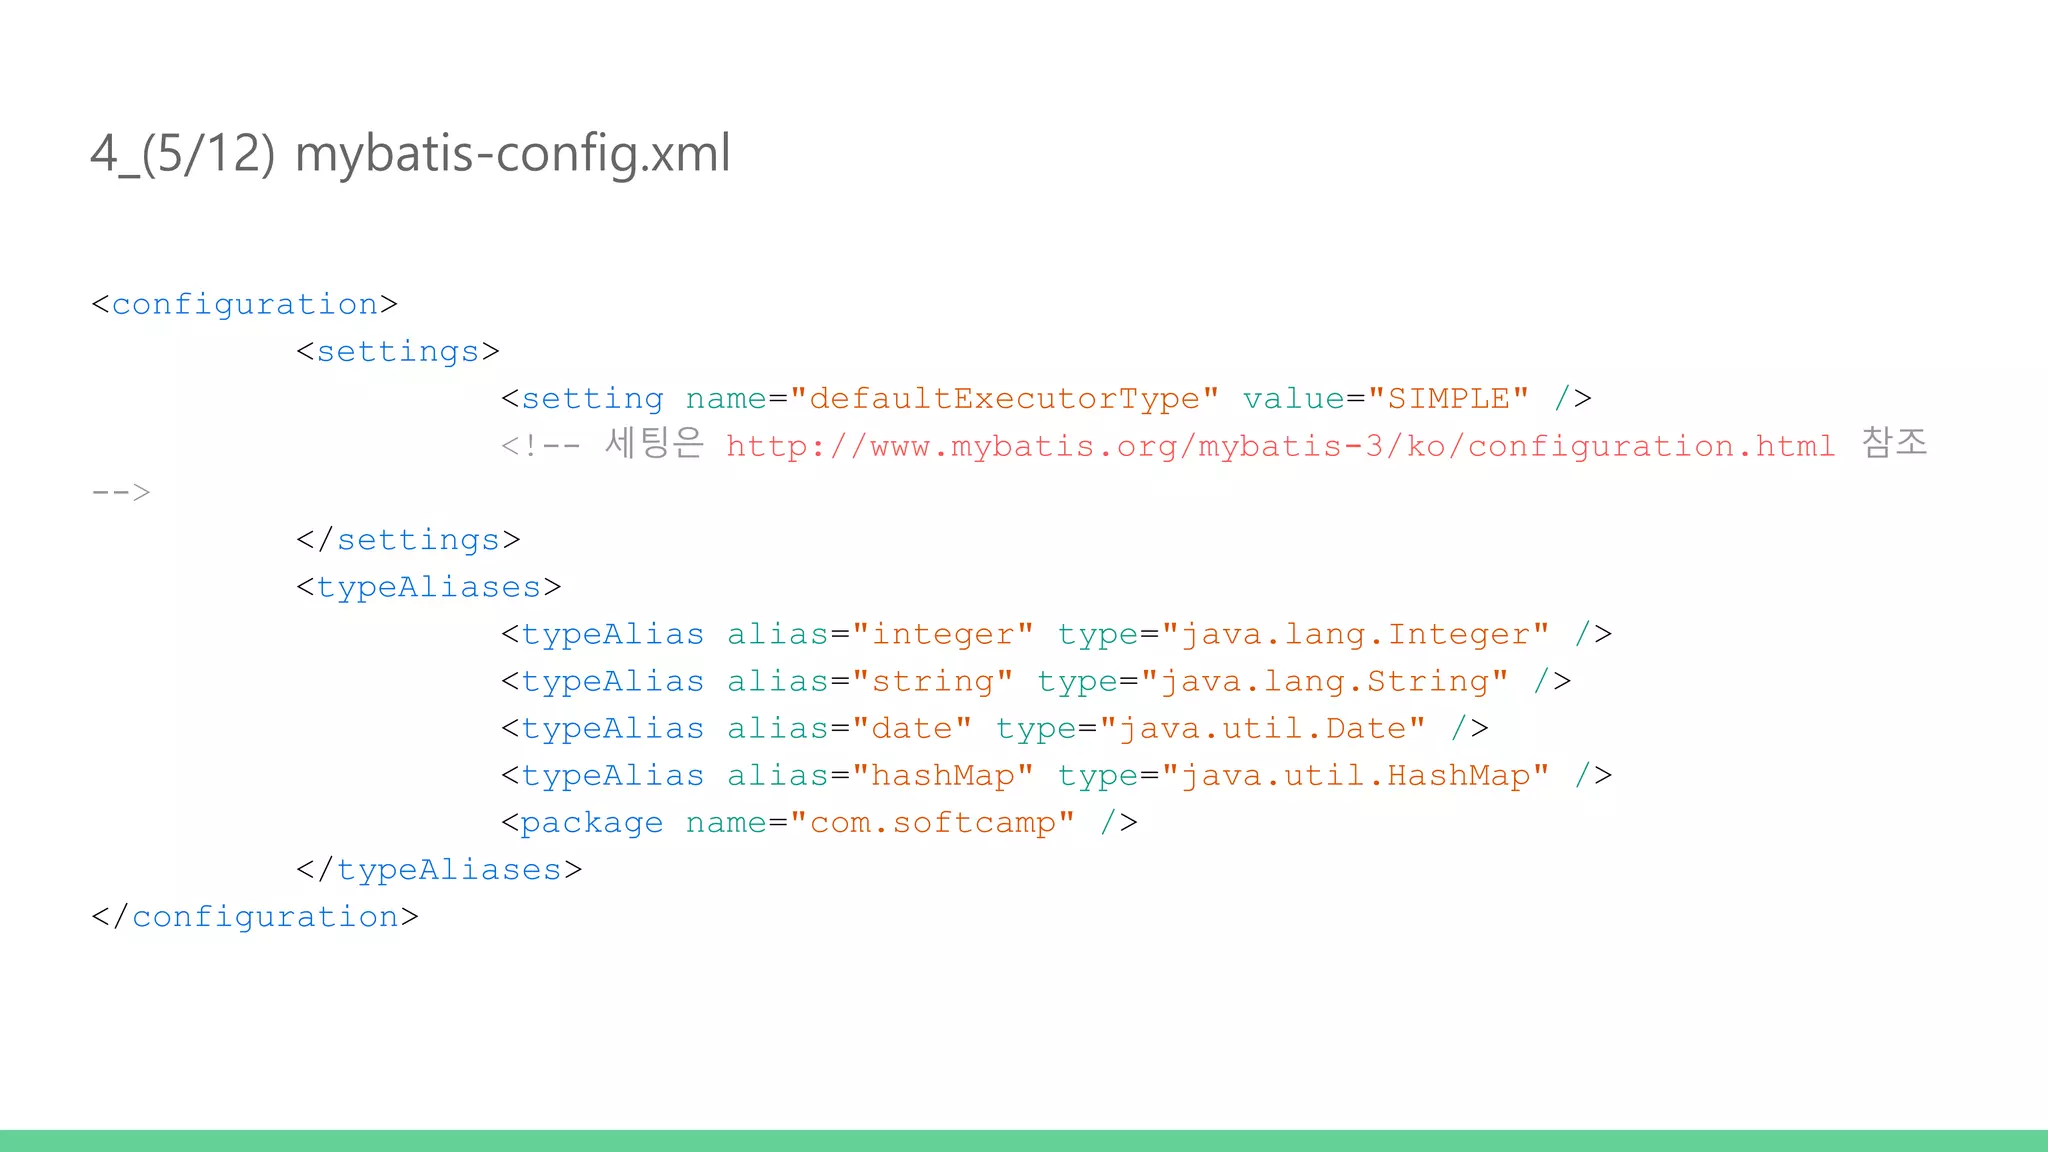
    3_(2/10) ContextLoaderListener 설정코드 <!-- The definition of the Root Spring Container shared by all Servlets and Filters --> <context-param> <param-name>contextConfigLocation</param-name> <param-value>/WEB-INF/spring/root-context.xml</param-value> </context-param> <!-- Creates the Spring Container shared by all Servlets and Filters --> <listener> <listener-class>org.springframework.web.context.ContextLoaderListener</listener-class> </listener>
  • 15.
    3_(3/10) ContextLoaderListener 는? 프로젝트전체에서 사용되는 WebApplicationContext 를 생성
  • 16.
    3_(4/10) root-context.xml STS 에서는아무것도 입력하지 않음. 일반적으로.. 1. DB 관련(Datasource, Mybatis 등..) 2. PropertyService 3. MessageSource(다국어 관련) 4. Spring Security
  • 17.
    3_(5/10) DispatcherServlet 설정코드 <!-- Processes application requests --> <servlet> <servlet-name>appServlet</servlet-name> <servlet-class>org.springframework.web.servlet.DispatcherServlet</servlet-class> <init-param> <param-name>contextConfigLocation</param-name> <param-value>/WEB-INF/spring/appServlet/servlet-context.xml</param- value> </init-param> <load-on-startup>1</load-on-startup> </servlet> <servlet-mapping> <servlet-name>appServlet</servlet-name> <url-pattern>/</url-pattern> </servlet-mapping>
  • 18.
    3_(6/10) DispatcherServlet 은? •Dispatcher Servlet 내에서 사용 가능한 WebApplicationContext를 생성 • 여러 개의 DispatherServlet 설정 가능 • Front Controller의 역할
  • 19.
    3_(7/10) DispatcherServlet 흐름 출처: http://blog.naver.com/kim3zz/220275732627
  • 20.
    3_(8/10) DispatcherServlet 이없다면? <servlet> <servlet-name>myServlet</servlet-name> <servlet-class>com.softcamp.spring.MyServlet</servlet-class> </servlet> <servlet-mapping> <servlet-name>myServlet</servlet-name> <url-pattern>/</url-pattern> </servlet-mapping> init() destroy() doGet() doPost() parameter urlMapping bizMapping viewMapping
  • 21.
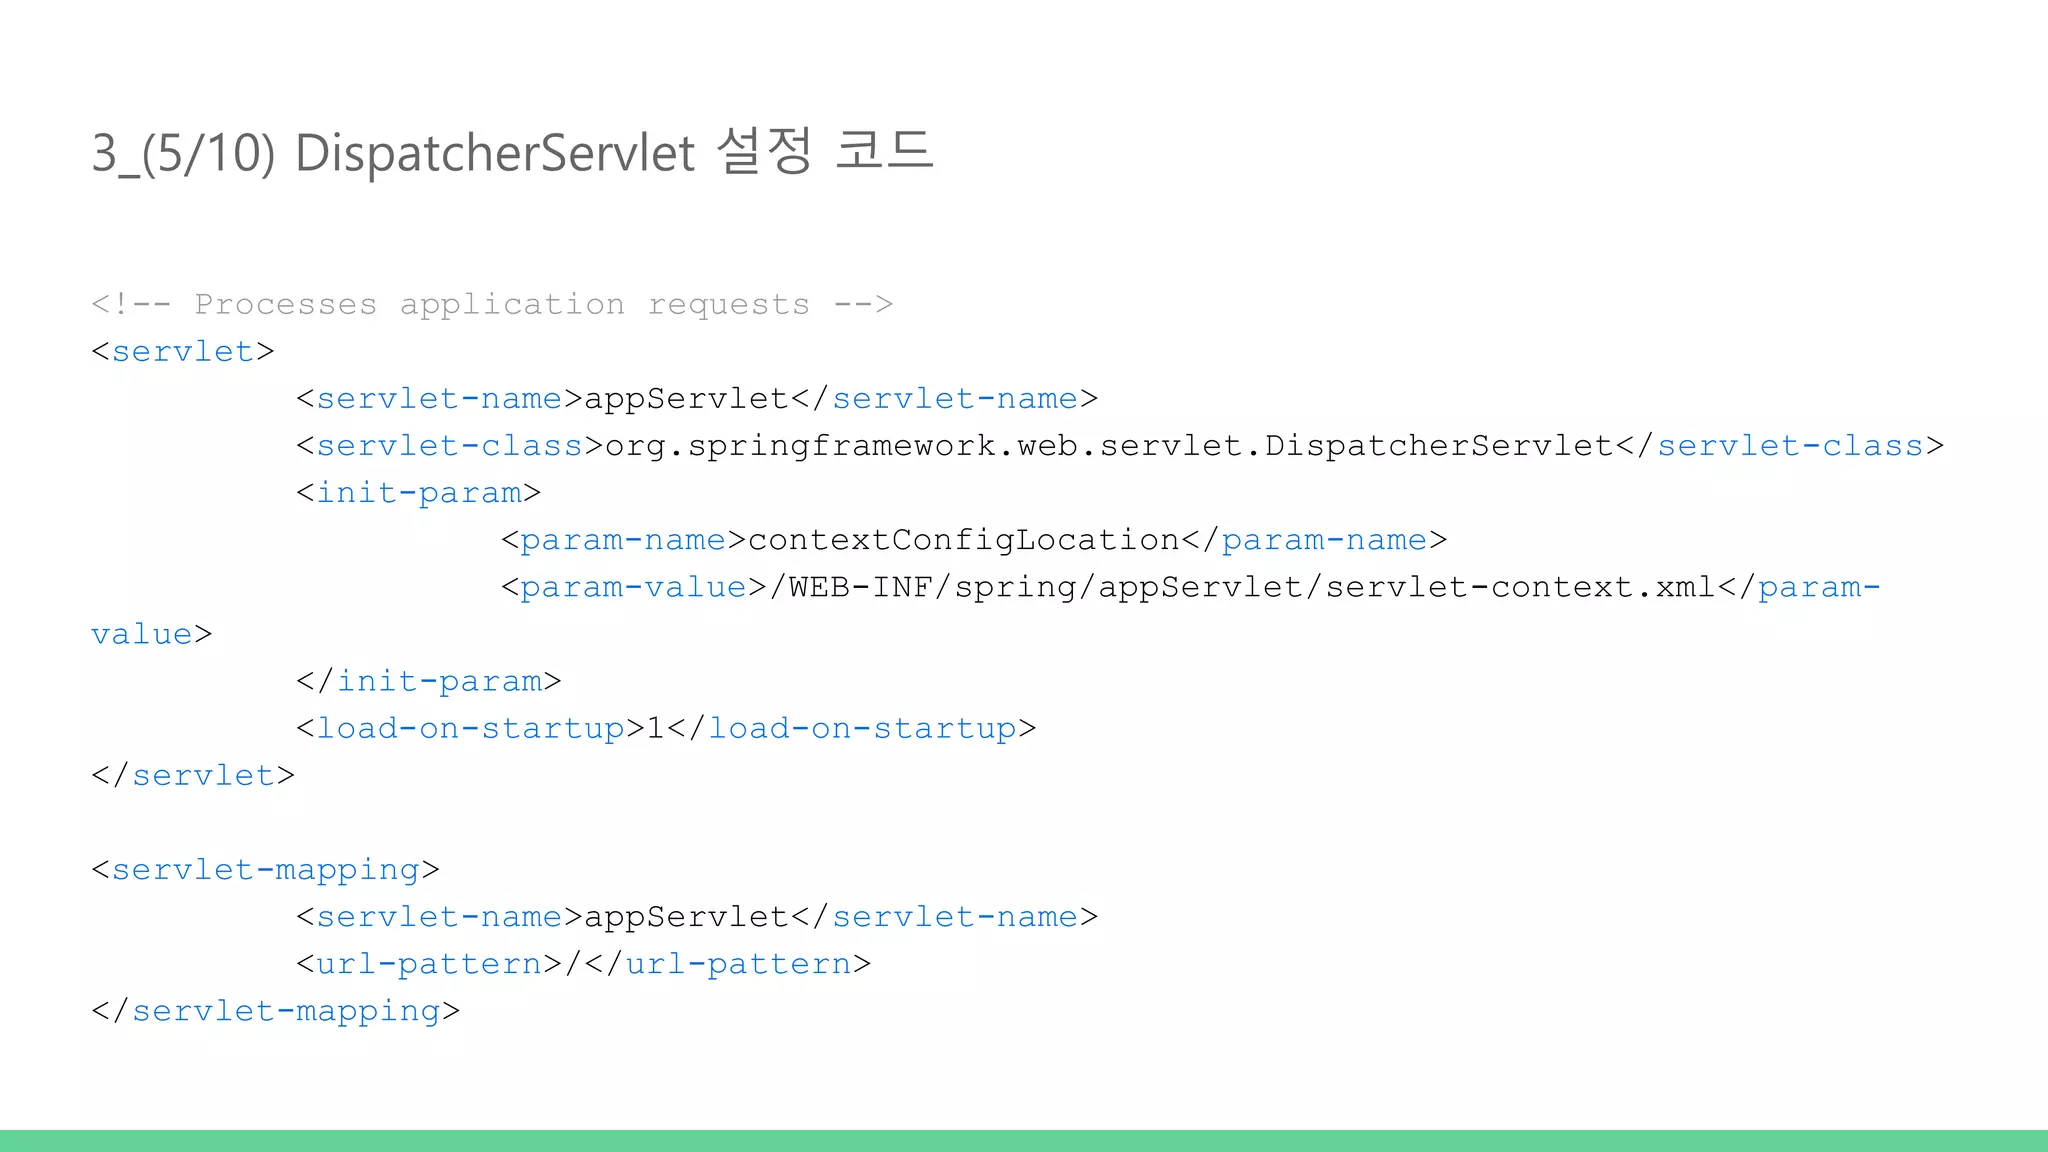
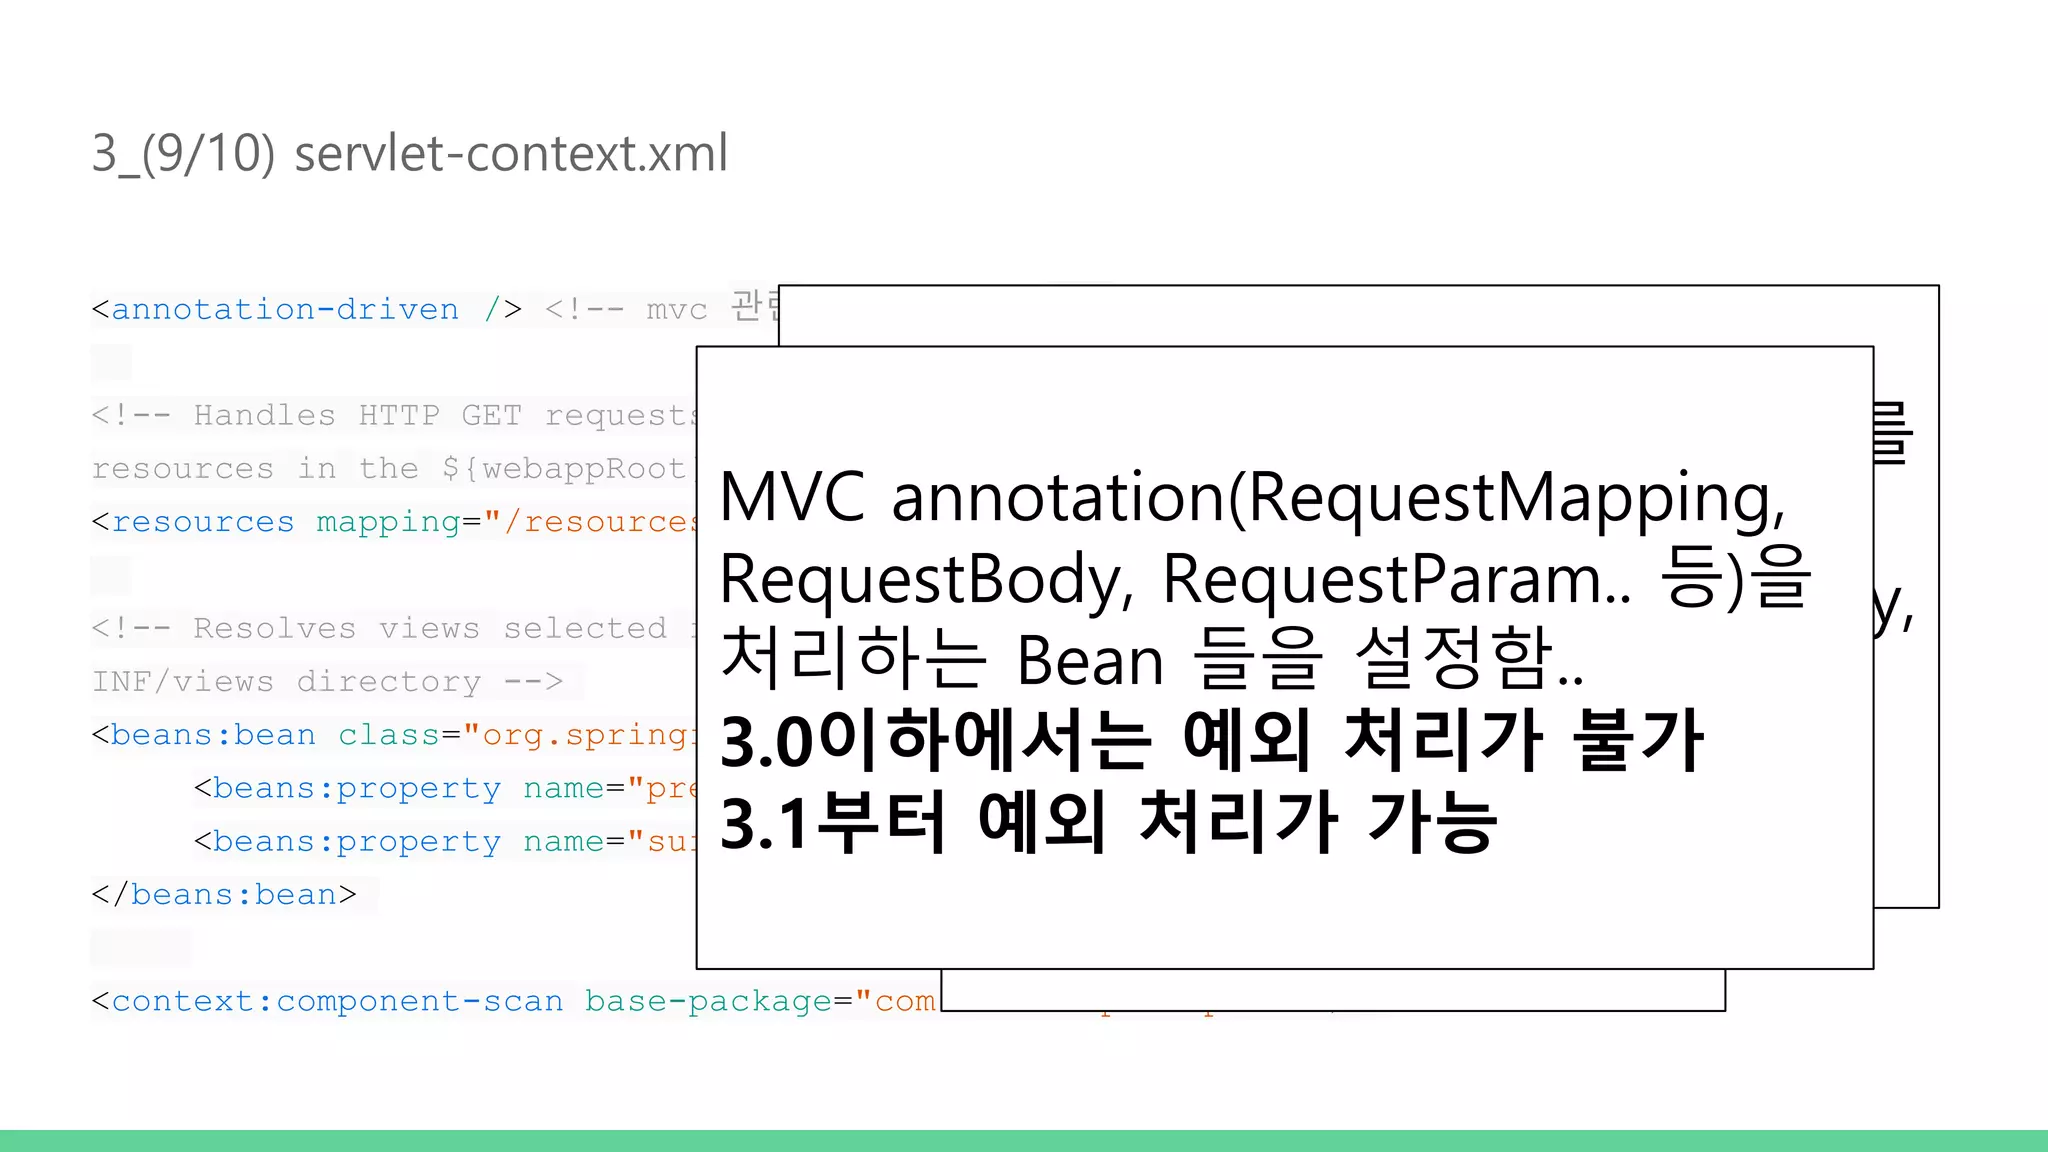
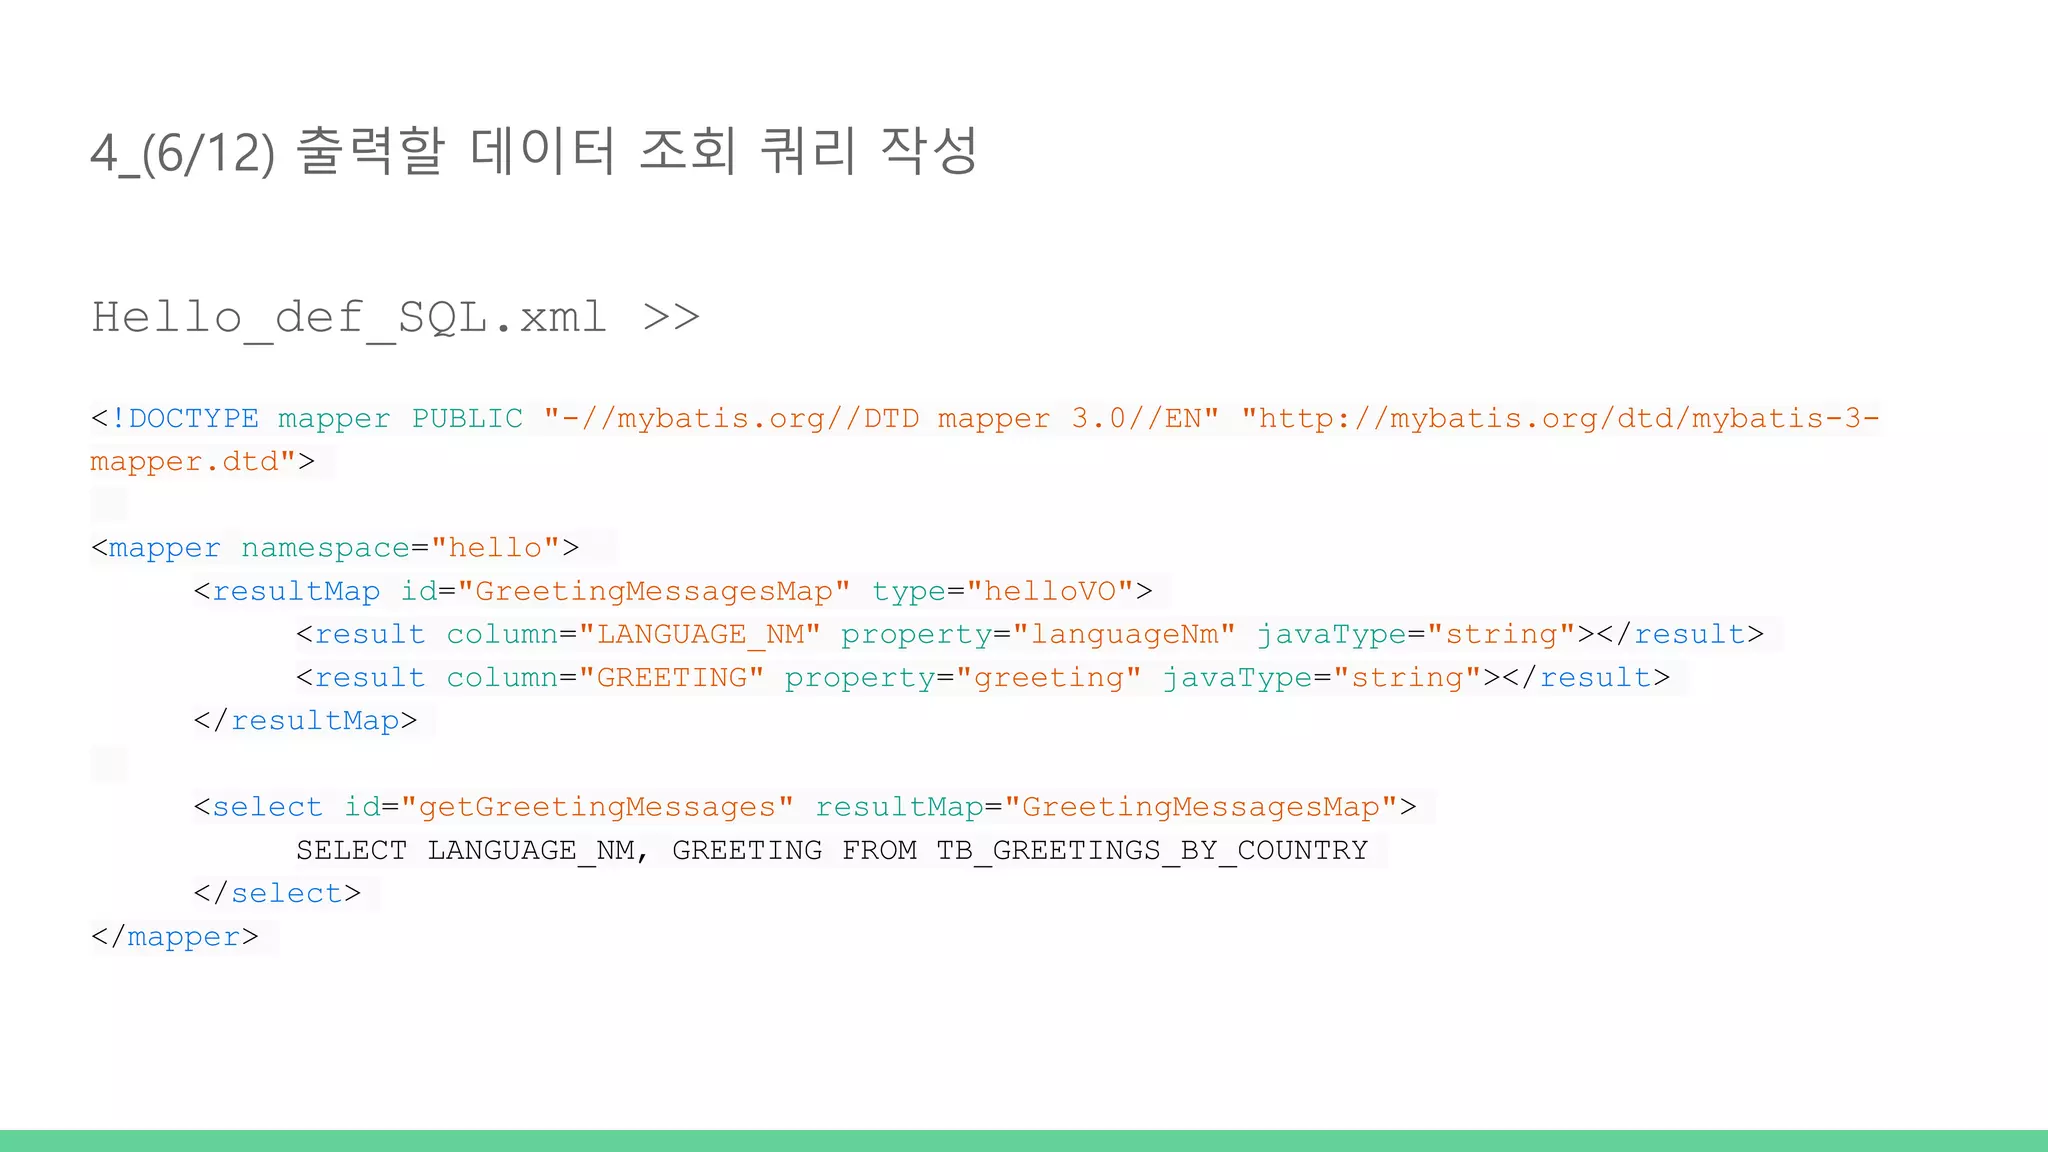
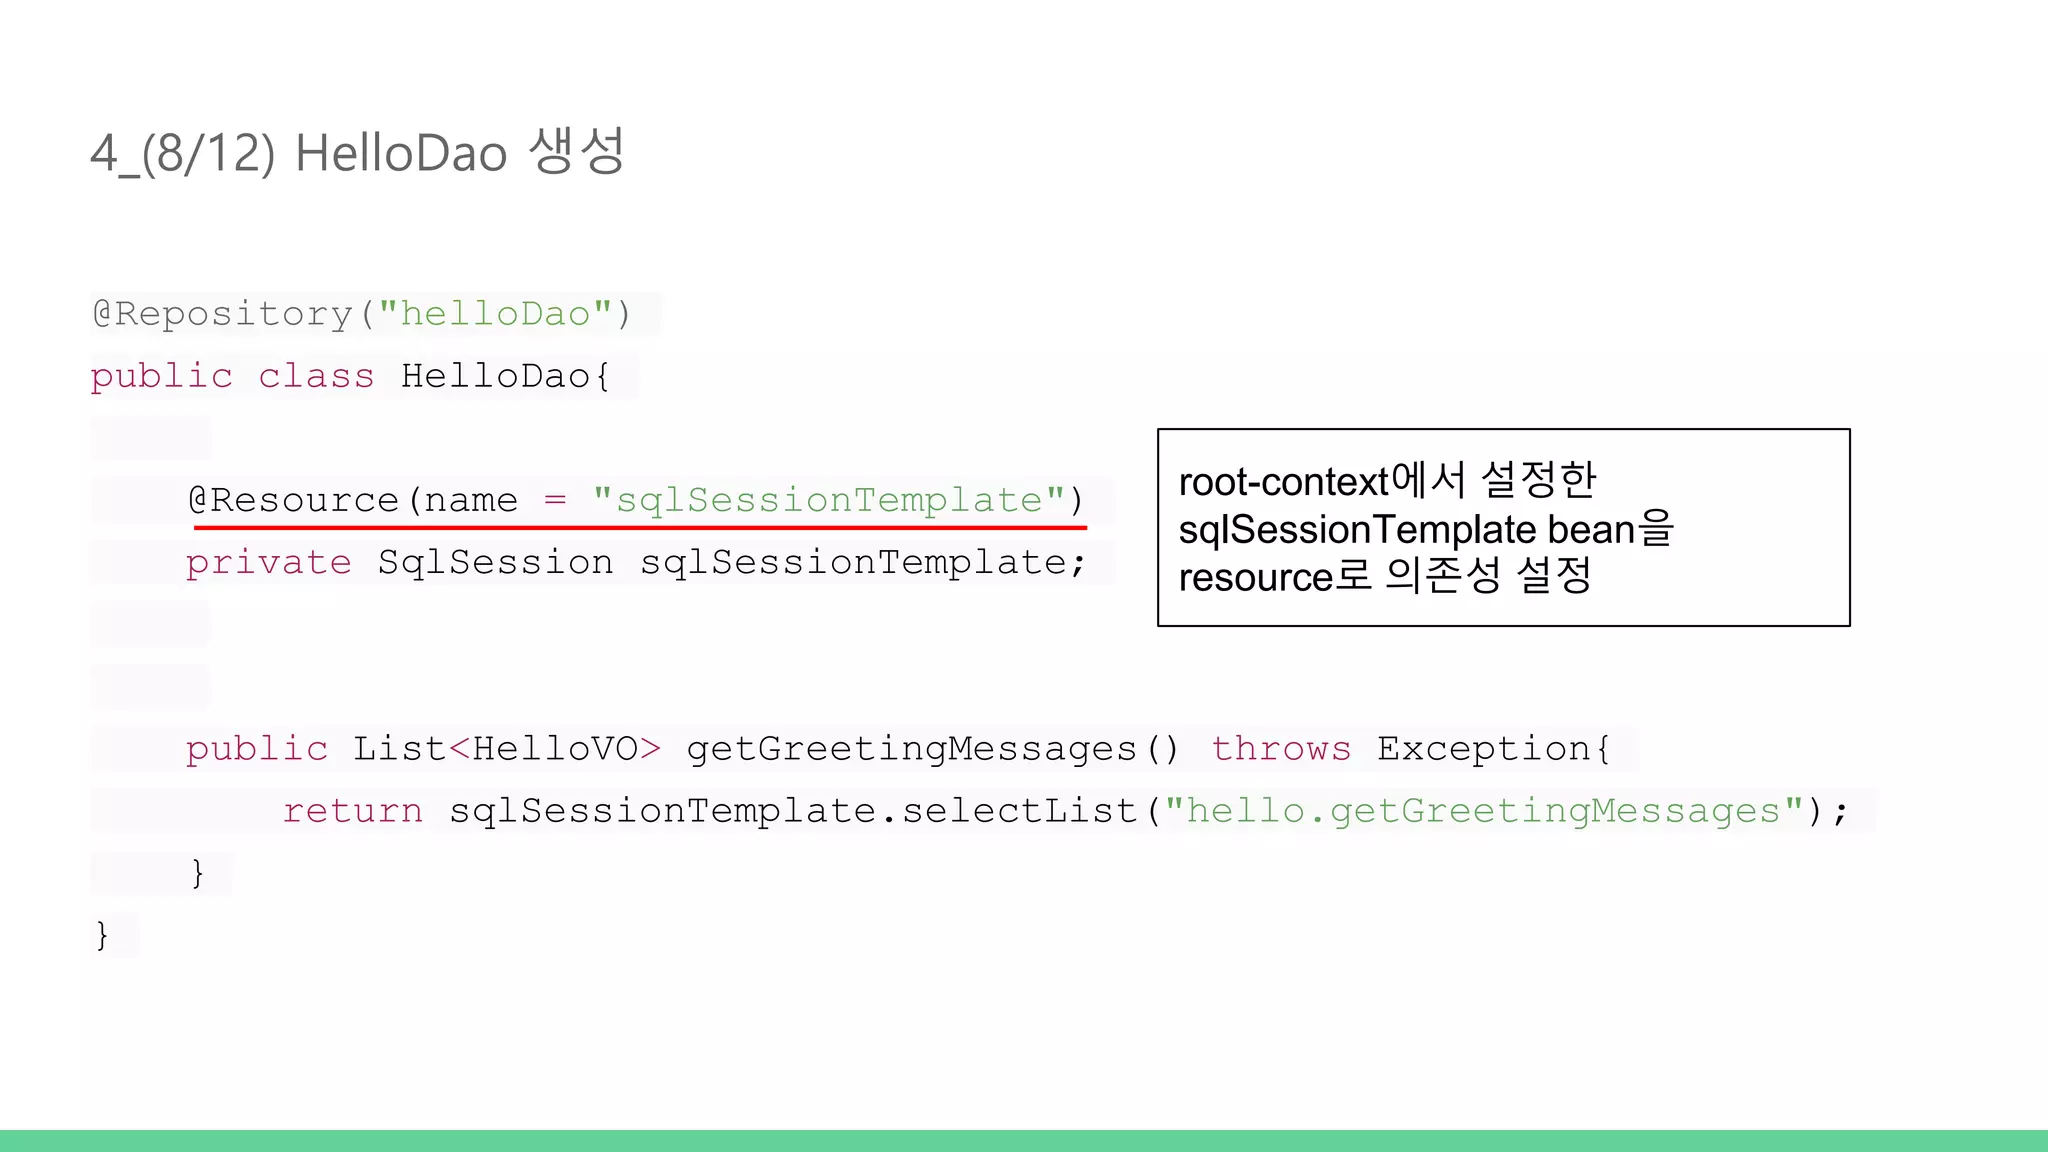
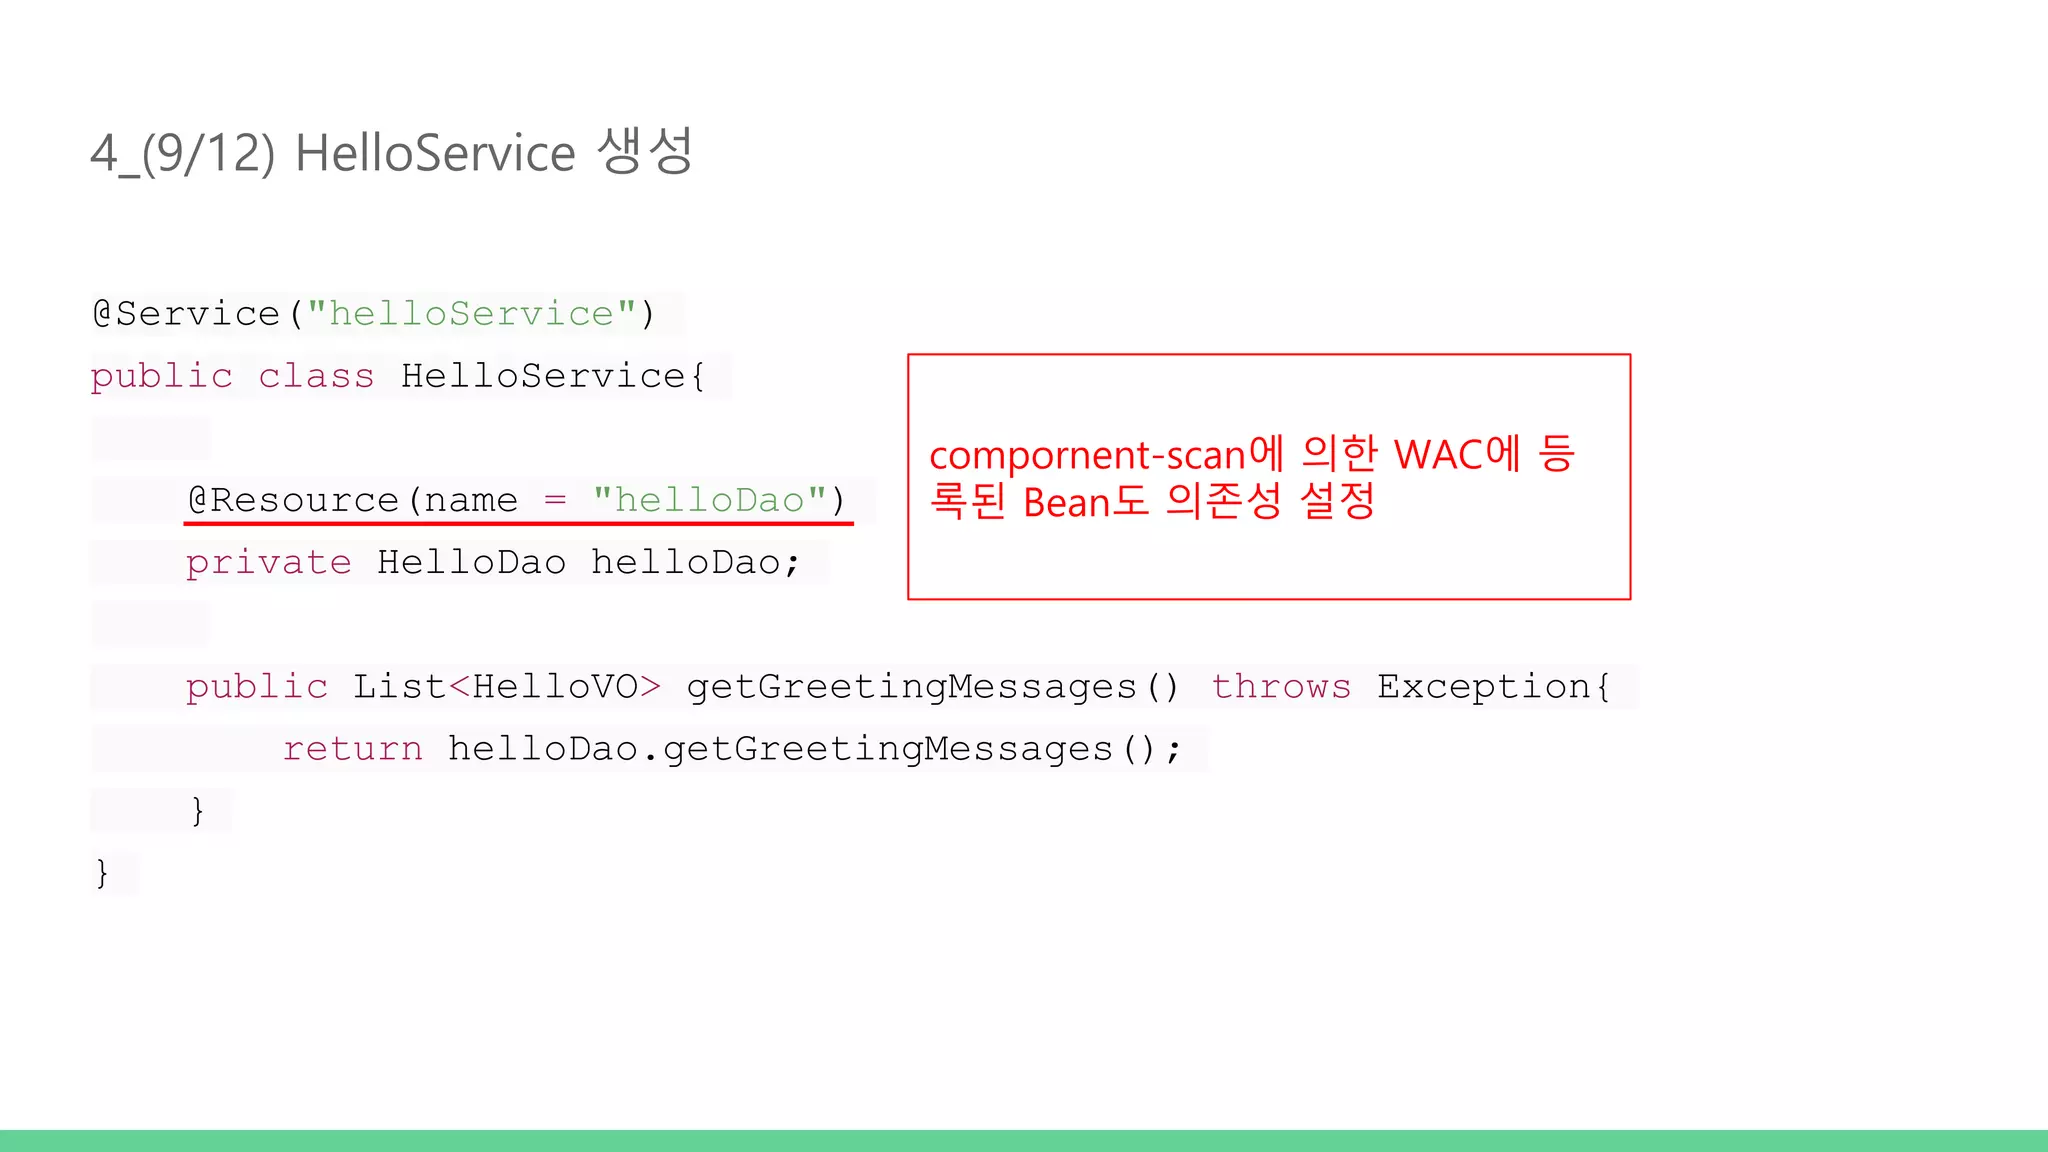
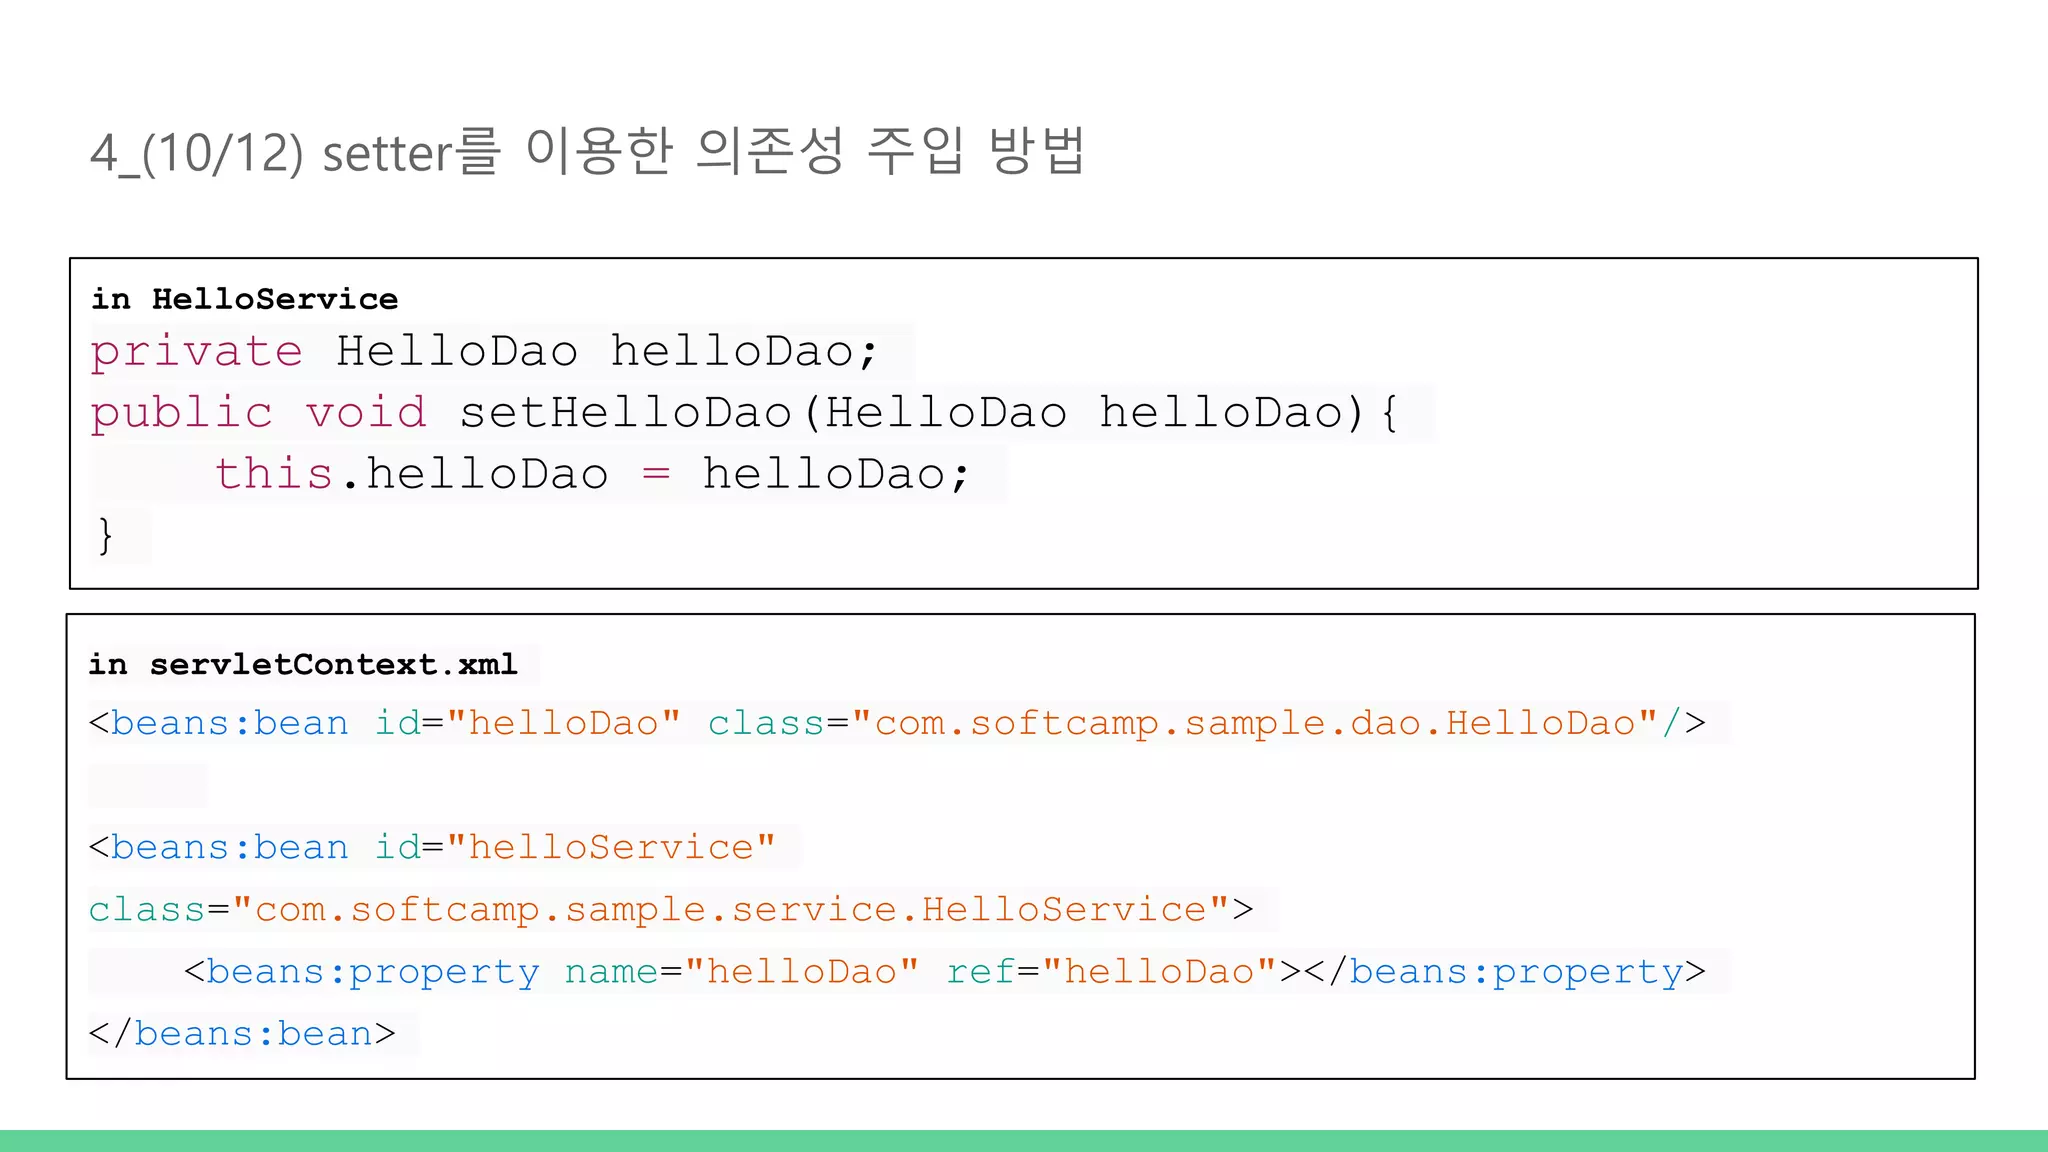
    3_(9/10) servlet-context.xml <annotation-driven /><!-- mvc 관련 annotation 처리 --> <!-- Handles HTTP GET requests for /resources/** by efficiently serving up static resources in the ${webappRoot}/resources directory --> <resources mapping="/resources/**" location="/resources/" /> <!-- Resolves views selected for rendering by @Controllers to .jsp resources in the /WEB- INF/views directory --> <beans:bean class="org.springframework.web.servlet.view.InternalResourceViewResolver"> <beans:property name="prefix" value="/WEB-INF/views/" /> <beans:property name="suffix" value=".jsp" /> </beans:bean> <context:component-scan base-package="com.softcamp.sample1" /> Dispatcher 에서 처리할 필요없는 Resource(img,css,js…) 영역을 설정함.. @Component 또는 @Component를 메타 어노테이션으로 갖고 있는 어 노테이션(@Controller, @Repository, @Service를 말함)이 붙은 클래스를 빈으로 등록 MVC annotation(RequestMapping, RequestBody, RequestParam.. 등)을 처리하는 Bean 들을 설정함.. 3.0이하에서는 예외 처리가 불가 3.1부터 예외 처리가 가능
  • 22.
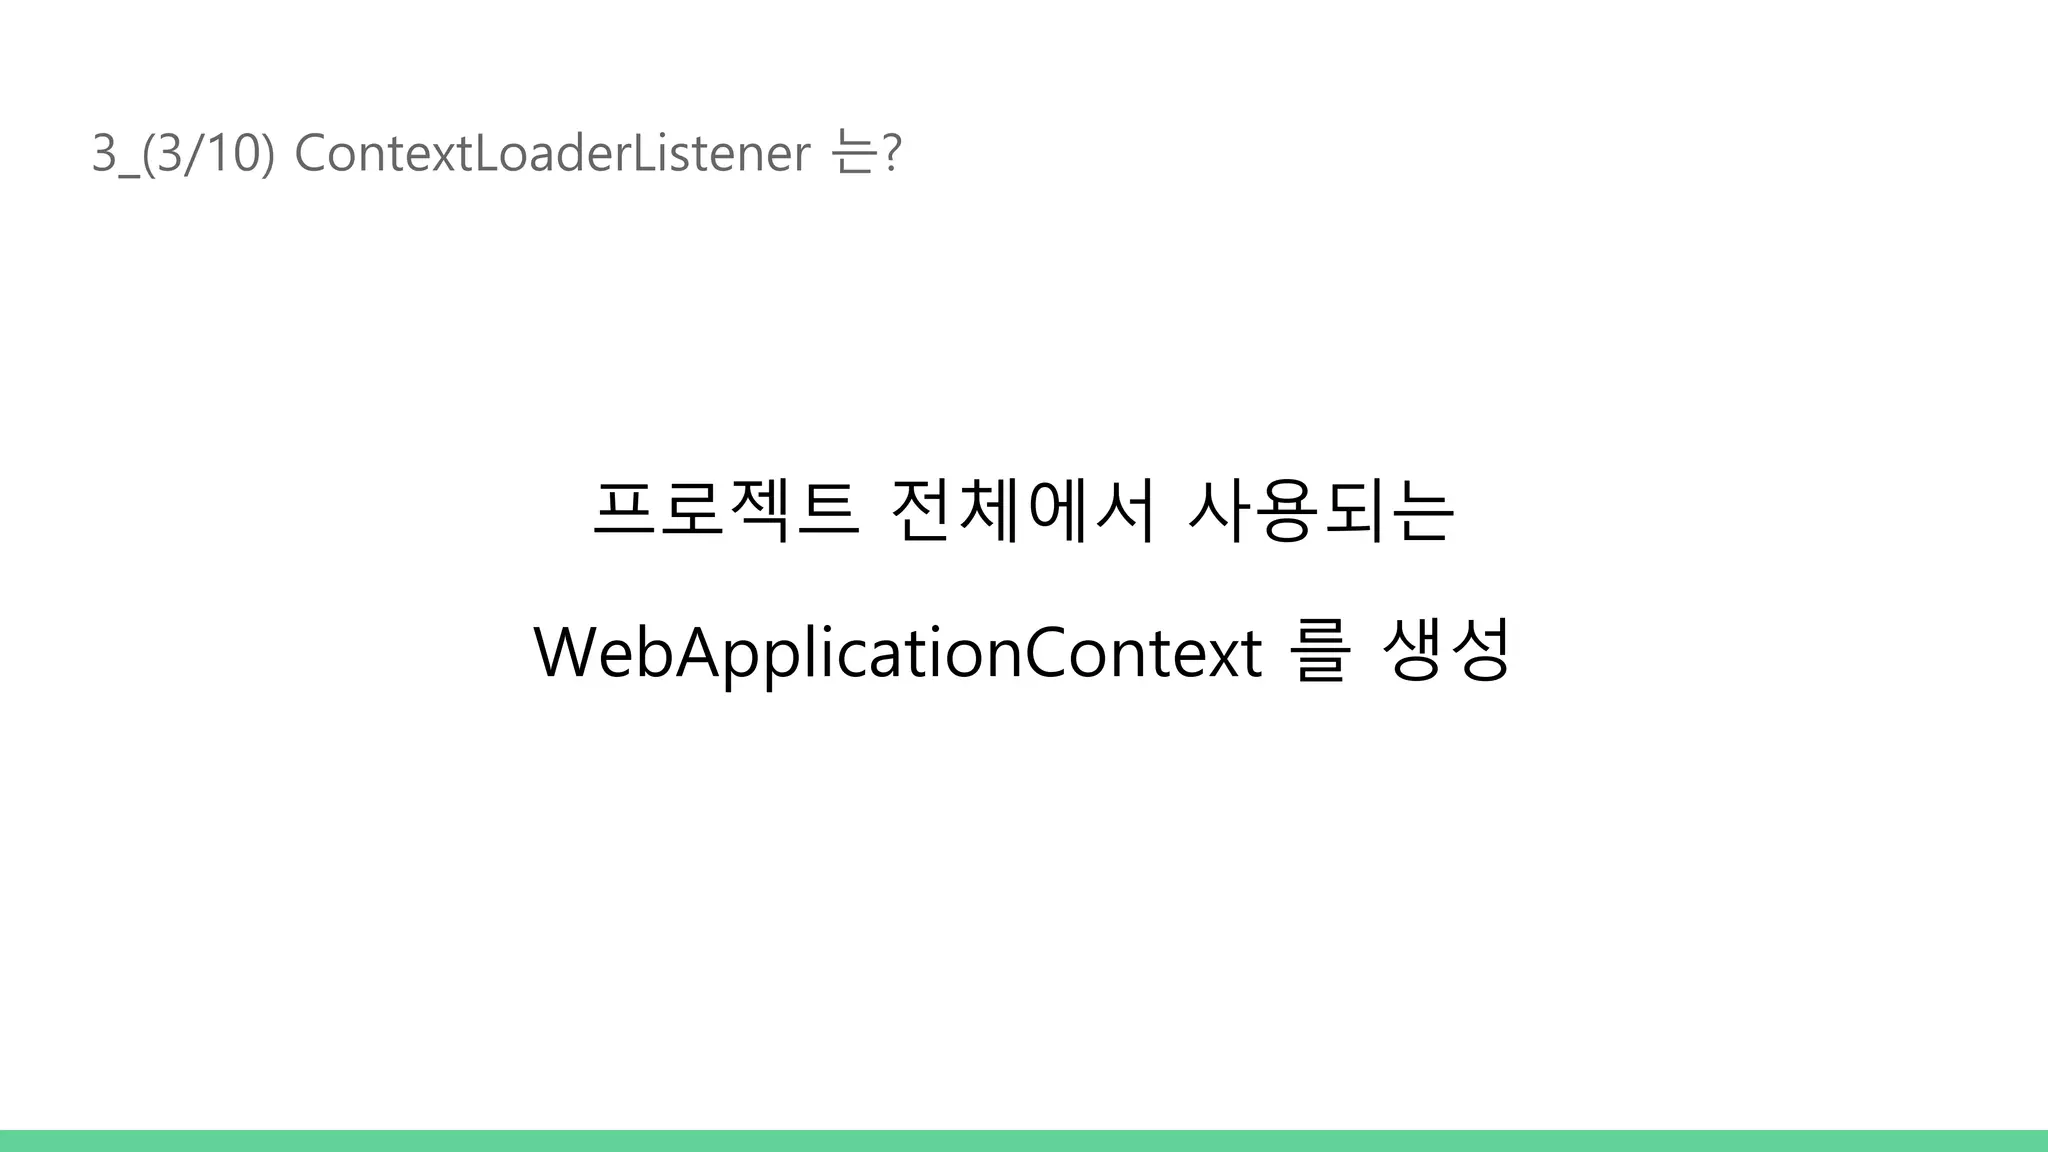
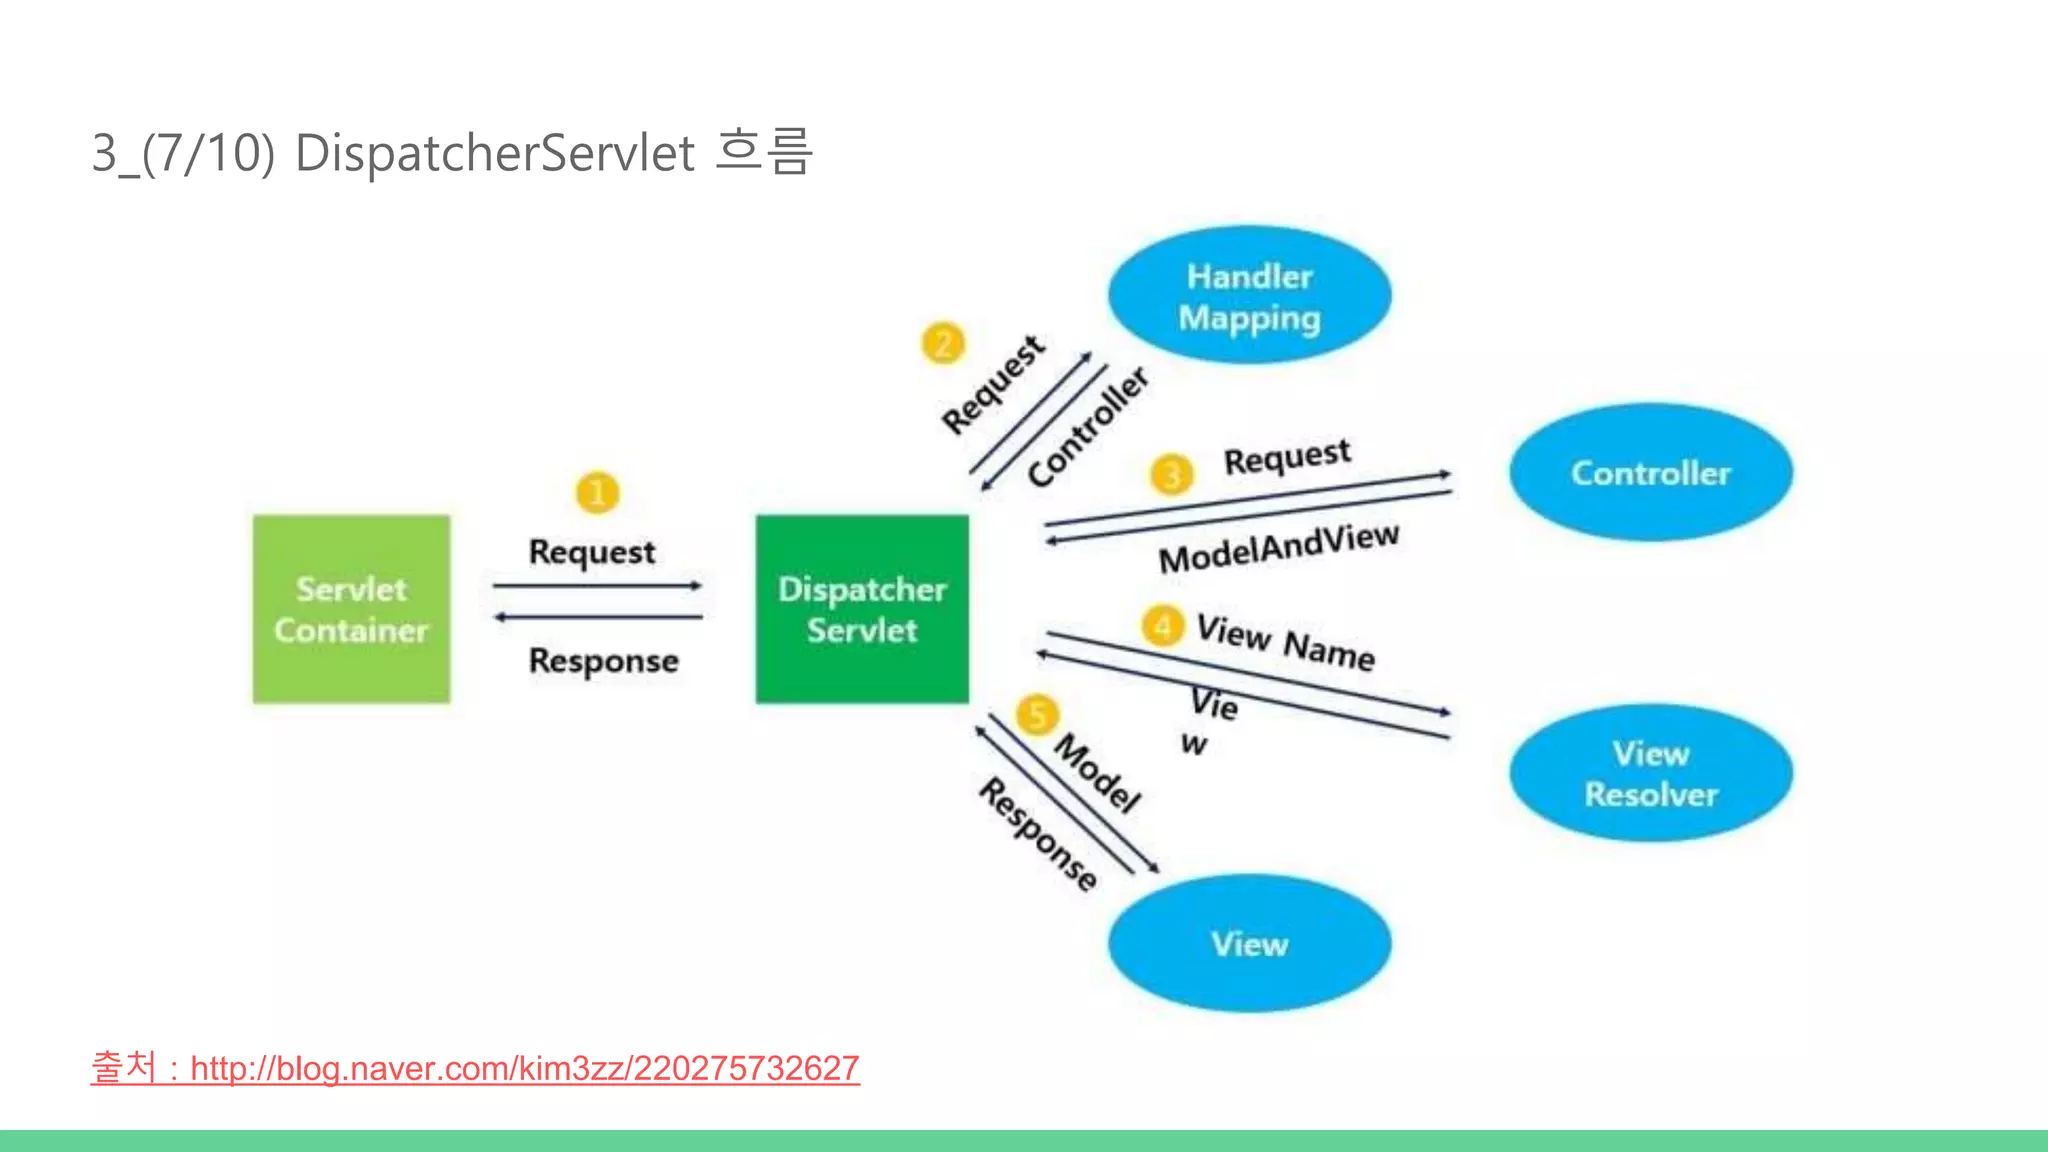
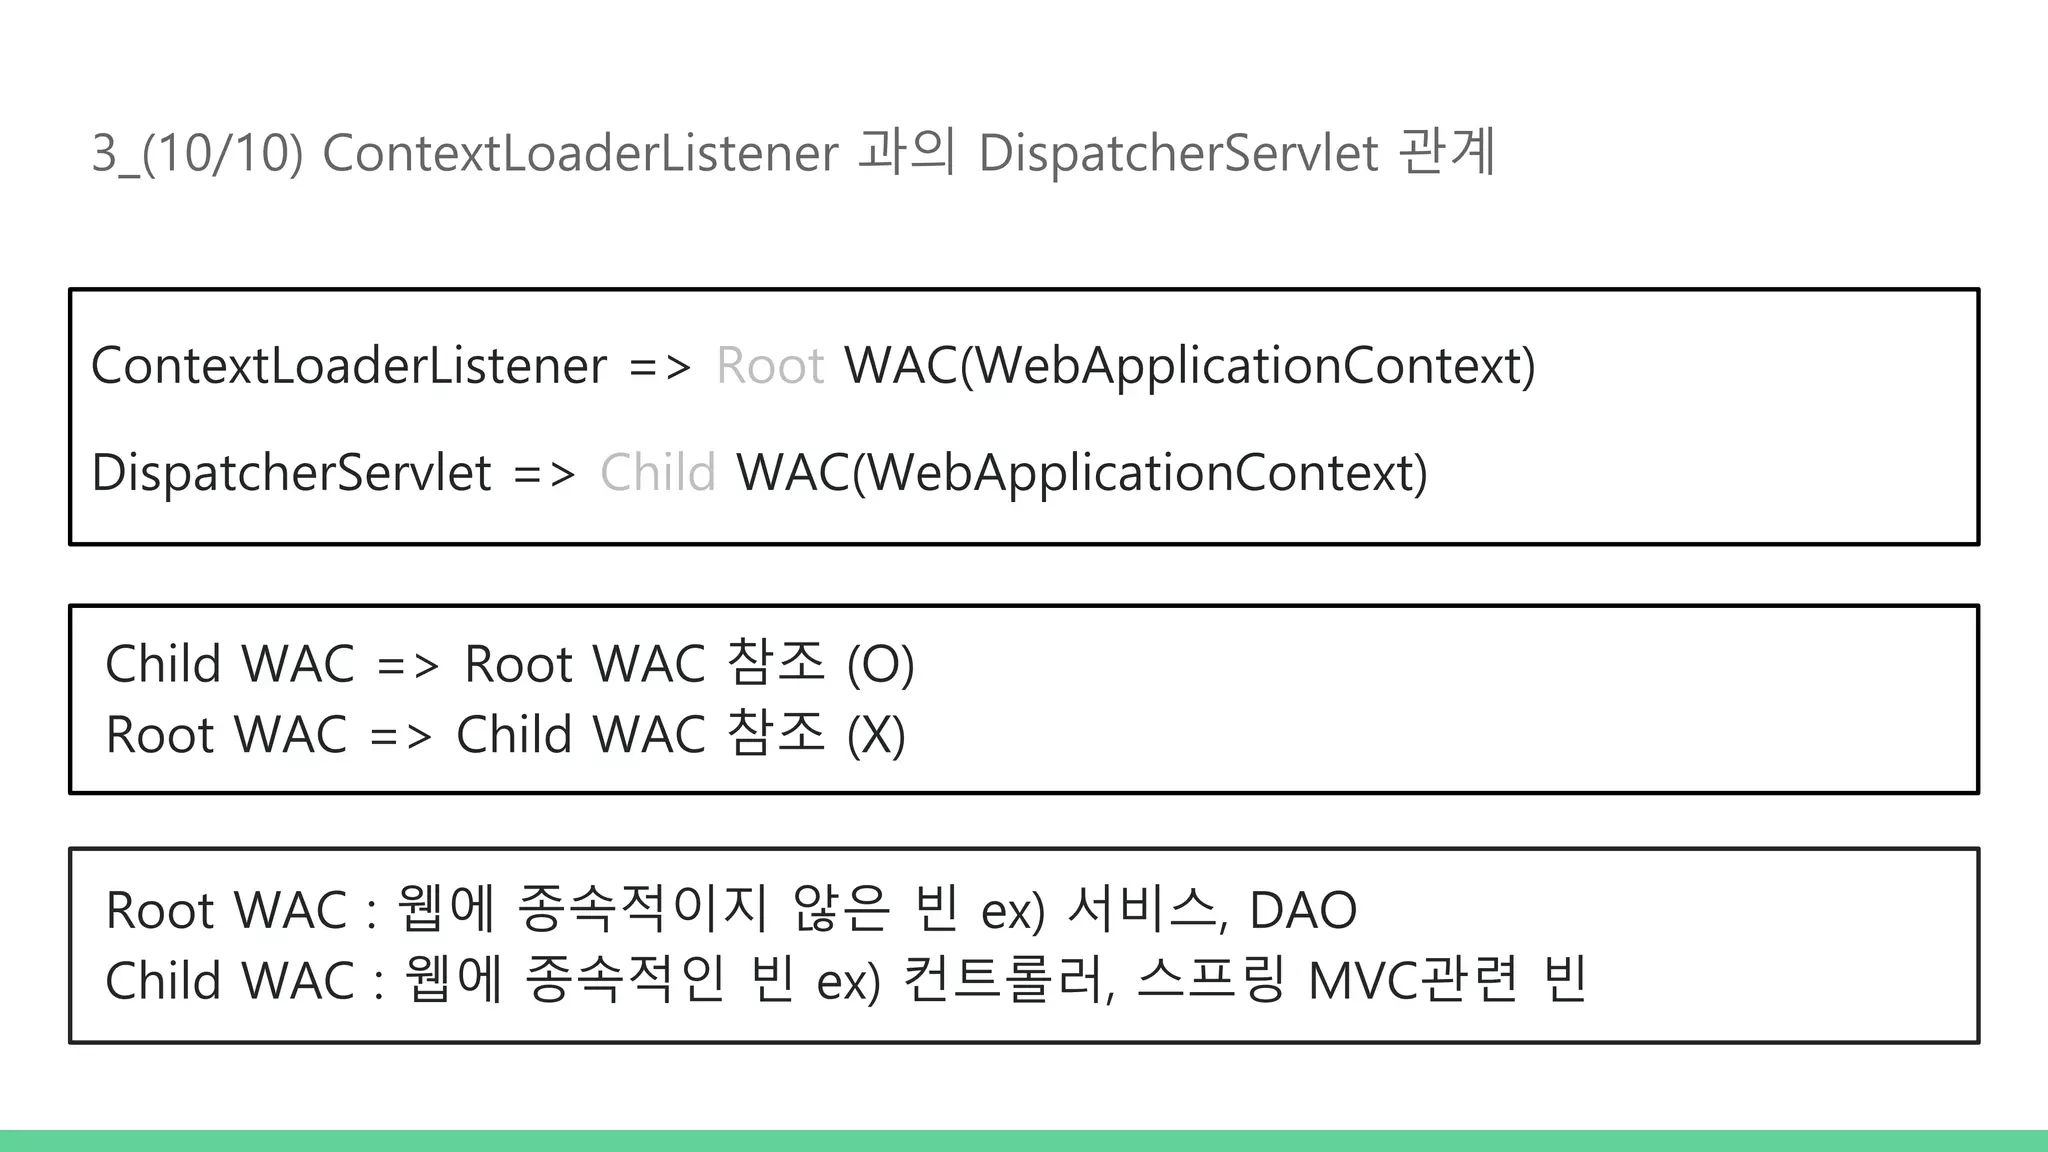
    3_(10/10) ContextLoaderListener 과의DispatcherServlet 관계 ContextLoaderListener => Root WAC(WebApplicationContext) DispatcherServlet => Child WAC(WebApplicationContext) Child WAC => Root WAC 참조 (O) Root WAC => Child WAC 참조 (X) Root WAC : 웹에 종속적이지 않은 빈 ex) 서비스, DAO Child WAC : 웹에 종속적인 빈 ex) 컨트롤러, 스프링 MVC관련 빈
  • 23.
    DI를 이해하기 위한 SampleCode 작성하기 with Mybatis 3.2.0
  • 24.
    4_(1/12) Maven LibraryDependency 추가 (in pom.xml) DATA SOURCE 관련... spring-jdbc spring-tx commons-dbcp 1.4 Mybatis 관련... cglib 2.2.2 mybatis 3.2.0 mybatis-spring 1.2.0 MySql 관련... mysql-connector-java 5.1.6 dependency 추가 후.. Project Name 우클릭 → Maven → Update Project.. 버전까지 명시한 건.. 라이브러리 간(JDK 또한)에 호환성이 존재함. 본인이 쓰고자 하는 라이브러리의 호환성 확 인이 필요
  • 25.
    4_(2/12) jdbc.properties load(in root-context.xml) <context:property-placeholder location="classpath:properties/jdbc.propertie s" /> context 추가해야함 xmlns:context="http://www.springframework.org/schema/context" http://www.springframework.org/schema/context http://www.springframework.org/schema/context/spring-context.xsd
  • 26.
    4_(3/12) Datasource 설정코드 (in root-context.xml) <bean id="dataSource" class="org.apache.commons.dbcp.BasicDataSource" destroy-method="close"> <property name="driverClassName" value="${jdbc.dbDriverName}" /> <property name="url" value="${jdbc.url}" /> <property name="username" value="${jdbc.username}" /> <property name="password" value="${jdbc.password}" /> </bean>
  • 27.
    4_(4/12) Mybatis -sqlSessionFactory 설정 (in root-context.xml) <bean id="sqlSessionFactory" class="org.mybatis.spring.SqlSessionFactoryBean"> <property name="dataSource" ref="dataSource" /> <property name="mapperLocations" value="classpath:com/softcamp/sample/**/*_def_SQL.xml" /> <property name="configLocation" value="classpath:mybatis/mybatis-config.xml" /> <!-- <property name="transactionFactory"> <bean class="org.apache.ibatis.transaction.managed.ManagedTransactionFactory" /> </property> --> </bean> <bean id="sqlSessionTemplate" class="org.mybatis.spring.SqlSessionTemplate"> <constructor-arg index="0" ref="sqlSessionFactory" /> </bean>
  • 28.
    4_(5/12) mybatis-config.xml <configuration> <settings> <setting name="defaultExecutorType"value="SIMPLE" /> <!-- 세팅은 http://www.mybatis.org/mybatis-3/ko/configuration.html 참조 --> </settings> <typeAliases> <typeAlias alias="integer" type="java.lang.Integer" /> <typeAlias alias="string" type="java.lang.String" /> <typeAlias alias="date" type="java.util.Date" /> <typeAlias alias="hashMap" type="java.util.HashMap" /> <package name="com.softcamp" /> </typeAliases> </configuration>
  • 29.
    4_(6/12) 출력할 데이터조회 쿼리 작성 Hello_def_SQL.xml >> <!DOCTYPE mapper PUBLIC "-//mybatis.org//DTD mapper 3.0//EN" "http://mybatis.org/dtd/mybatis-3- mapper.dtd"> <mapper namespace="hello"> <resultMap id="GreetingMessagesMap" type="helloVO"> <result column="LANGUAGE_NM" property="languageNm" javaType="string"></result> <result column="GREETING" property="greeting" javaType="string"></result> </resultMap> <select id="getGreetingMessages" resultMap="GreetingMessagesMap"> SELECT LANGUAGE_NM, GREETING FROM TB_GREETINGS_BY_COUNTRY </select> </mapper>
  • 30.
    4_(7/12) Spring IoC와 DI 스프링 IoC 란? → 스프링 프레임워크(컨테이너)가 Bean(객체)의 제어권을 갖 는 것 DI 란? → Bean(객체) 간의 의존성을 주입하는 것. 이를 통하여 IoC가 이루어짐.
  • 31.
    4_(8/12) HelloDao 생성 @Repository("helloDao") publicclass HelloDao{ @Resource(name = "sqlSessionTemplate") private SqlSession sqlSessionTemplate; public List<HelloVO> getGreetingMessages() throws Exception{ return sqlSessionTemplate.selectList("hello.getGreetingMessages"); } } root-context에서 설정한 sqlSessionTemplate bean을 resource로 의존성 설정
  • 32.
    4_(9/12) HelloService 생성 @Service("helloService") publicclass HelloService{ @Resource(name = "helloDao") private HelloDao helloDao; public List<HelloVO> getGreetingMessages() throws Exception{ return helloDao.getGreetingMessages(); } } compornent-scan에 의한 WAC에 등 록된 Bean도 의존성 설정
  • 33.
    4_(10/12) setter를 이용한의존성 주입 방법 in HelloService private HelloDao helloDao; public void setHelloDao(HelloDao helloDao){ this.helloDao = helloDao; } in servletContext.xml <beans:bean id="helloDao" class="com.softcamp.sample.dao.HelloDao"/> <beans:bean id="helloService" class="com.softcamp.sample.service.HelloService"> <beans:property name="helloDao" ref="helloDao"></beans:property> </beans:bean>
  • 34.
    4_(11/12) 스프링으로 객체를제어하지 않는다면? helloService = new HelloService(); HelloDao helloDao = new HelloDao(); helloDao.setConnectionPool(connetionPool); helloService.setHelloDao(helloDao); List helloMessages = helloService.getHelloMessages(); helloDao = null; helloService = null; 생성 및 의존성 주입 소멸
  • 35.
    4_(12/12) view 에출력하기 <%@ page contentType="text/html; charset=utf-8" pageEncoding="utf-8" %> <%@ taglib uri="http://java.sun.com/jsp/jstl/core" prefix="c" %> <%@ page session="false" %> <html> <head> <title>Home</title> </head> <body> <c:forEach items="${greetingMessages}" var="itm"> <P><c:out value='${itm.languageNm }'/> : <c:out value='${itm.greeting }'/></P> </c:forEach> </body> </html>
  • 36.
  • 37.
    표준 설정은 없다. 한번에설정하지 말고 필요한 것들을 그 때 그 때 설정하자!!
  • 38.