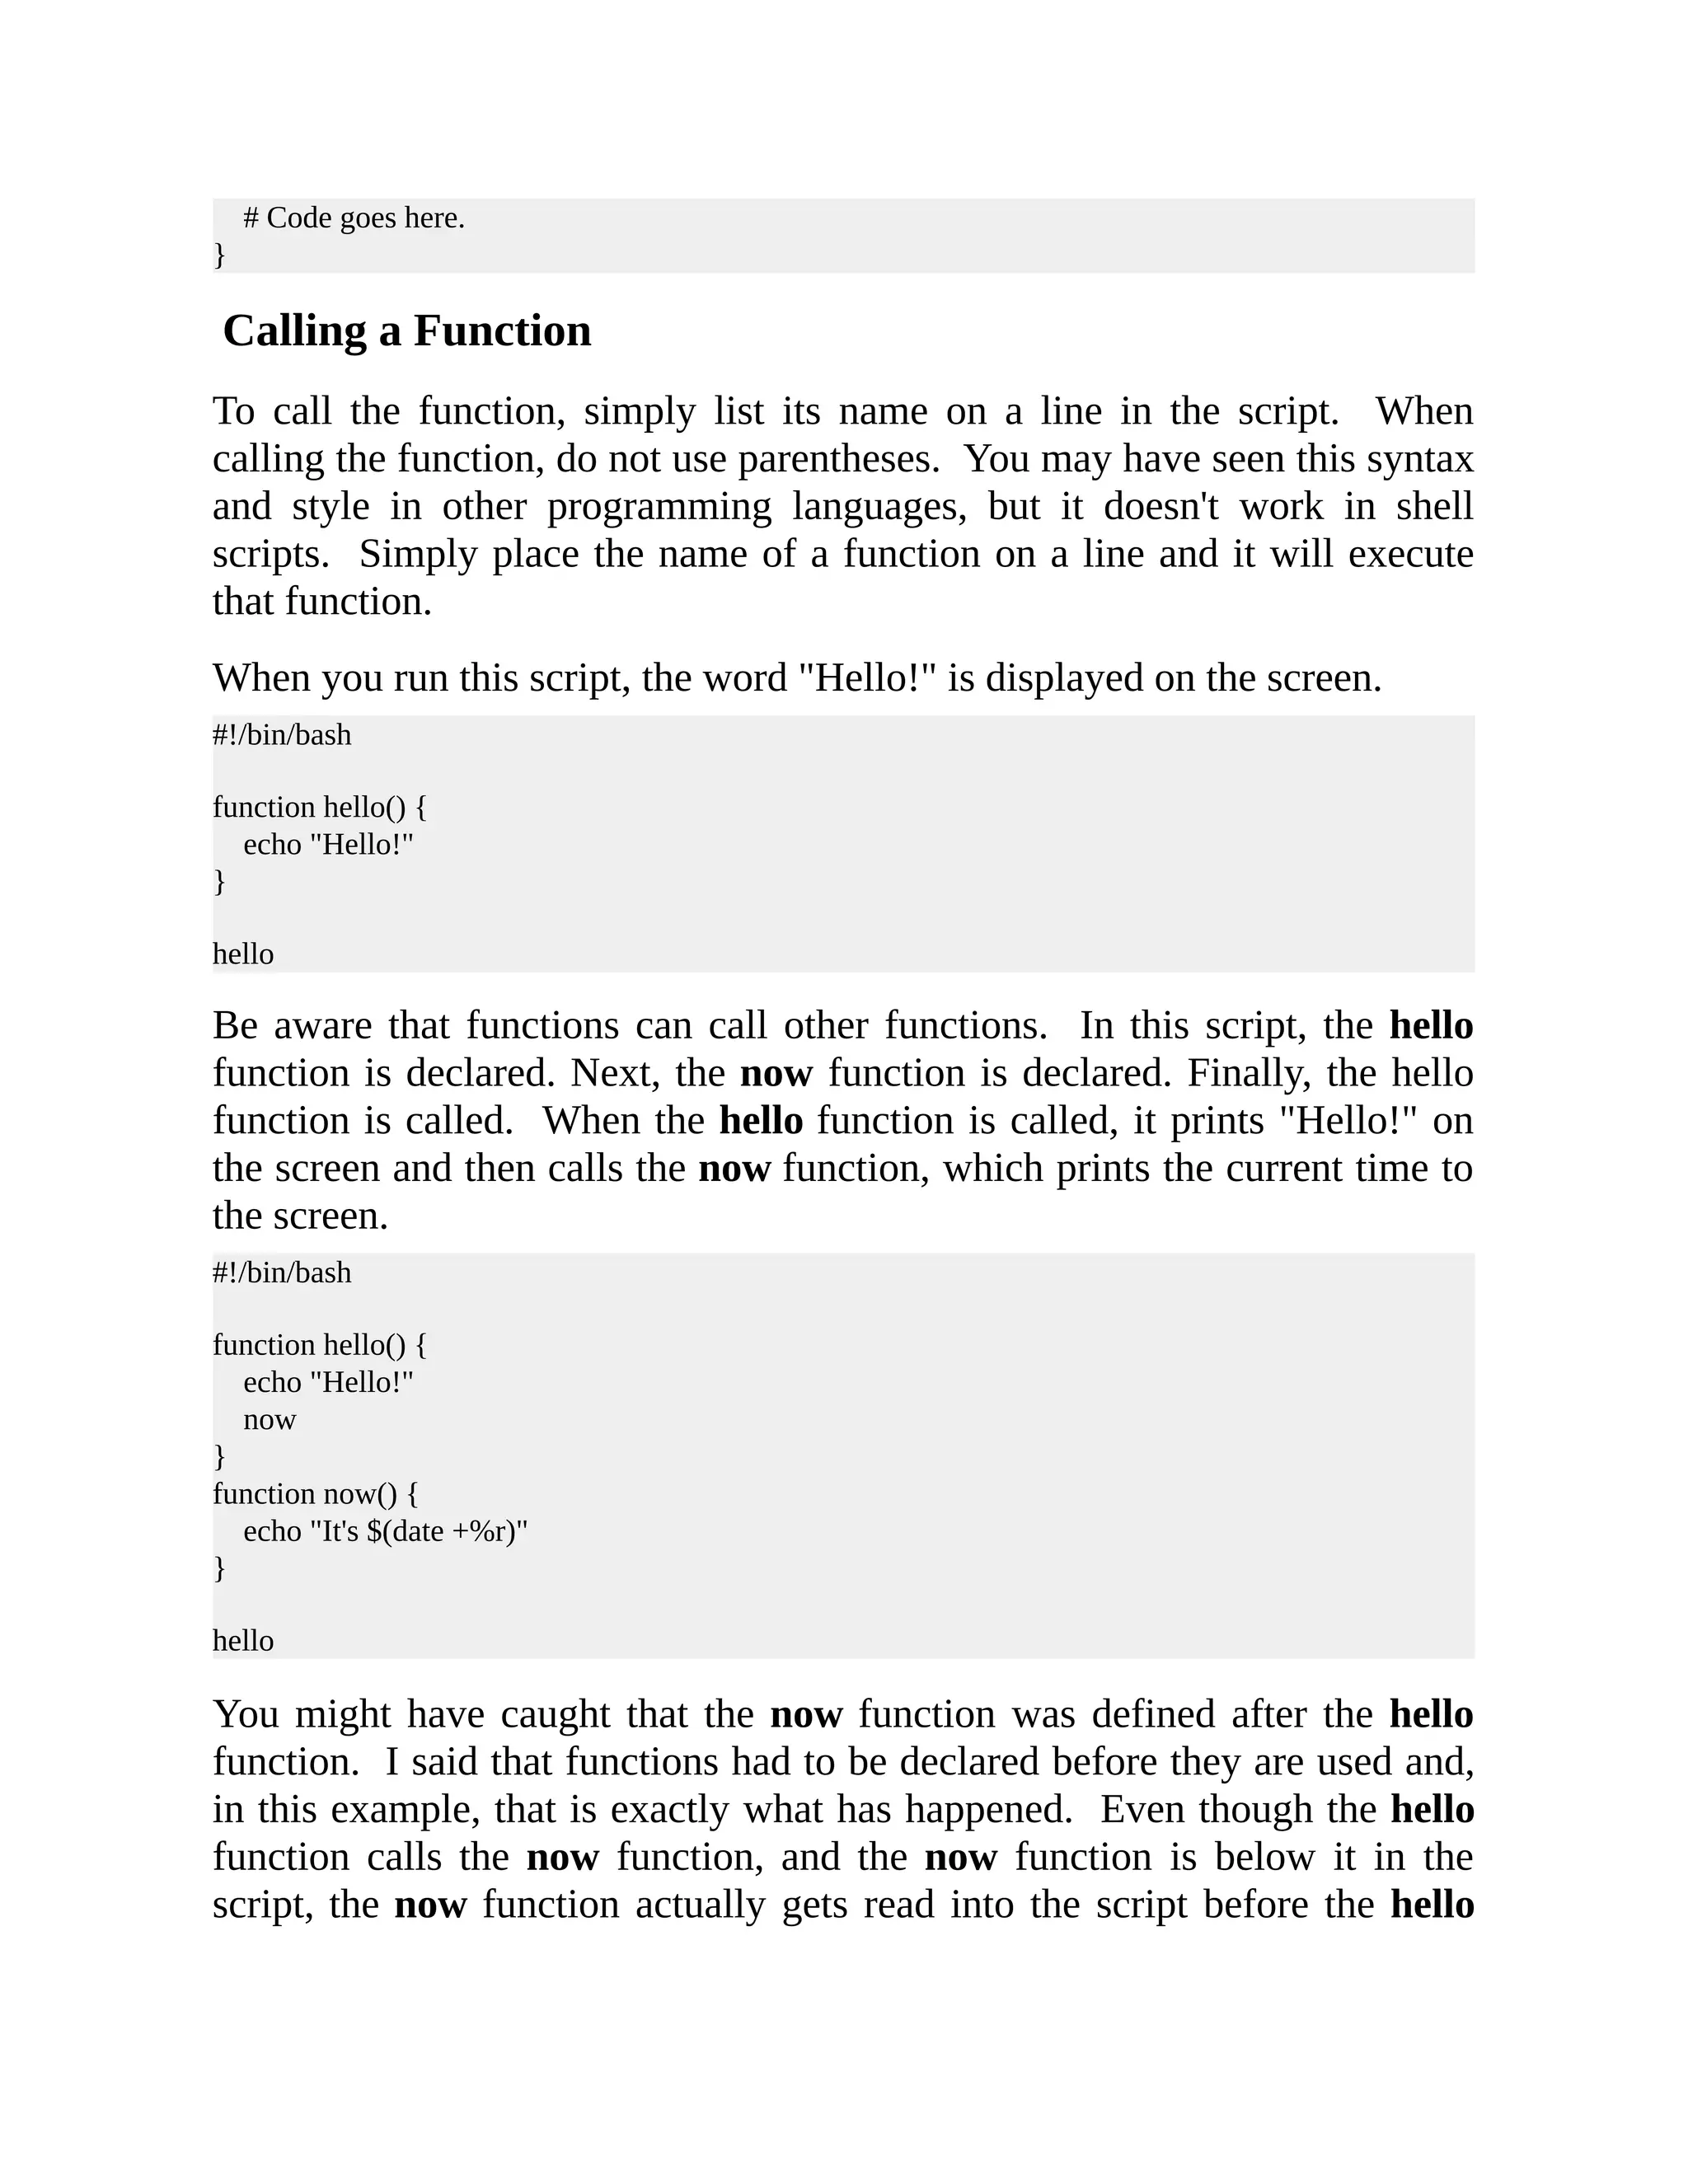
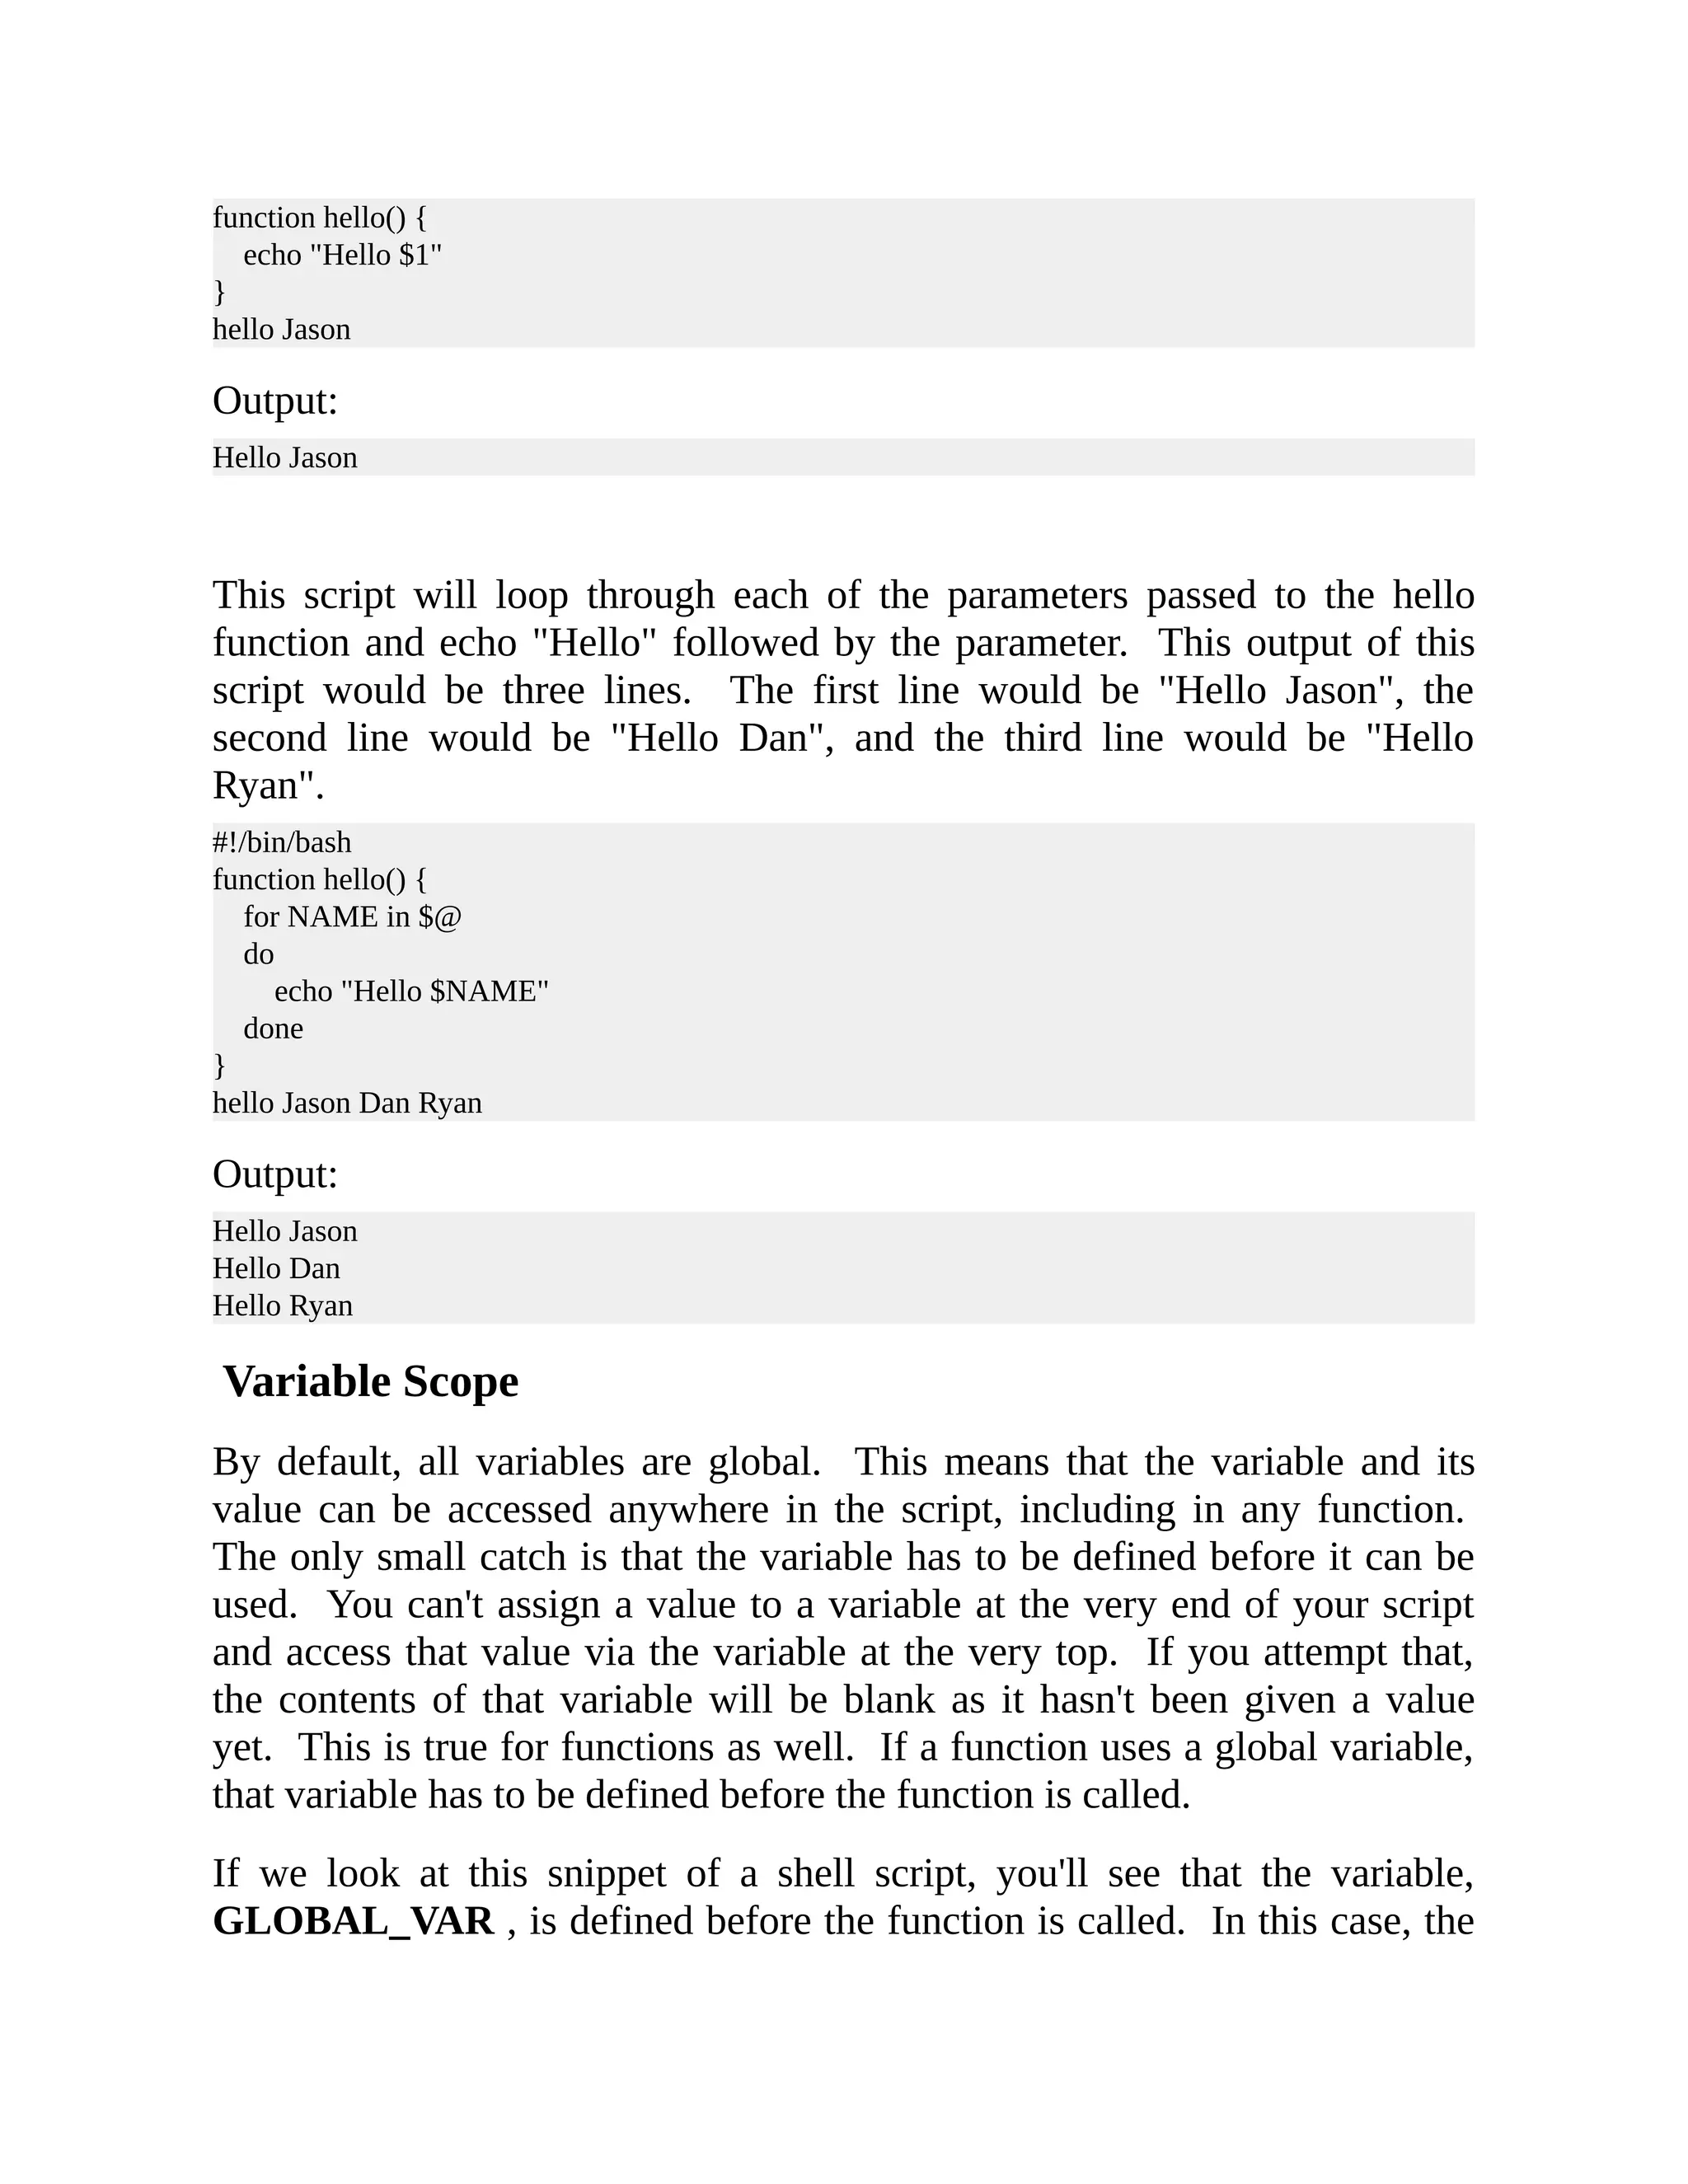
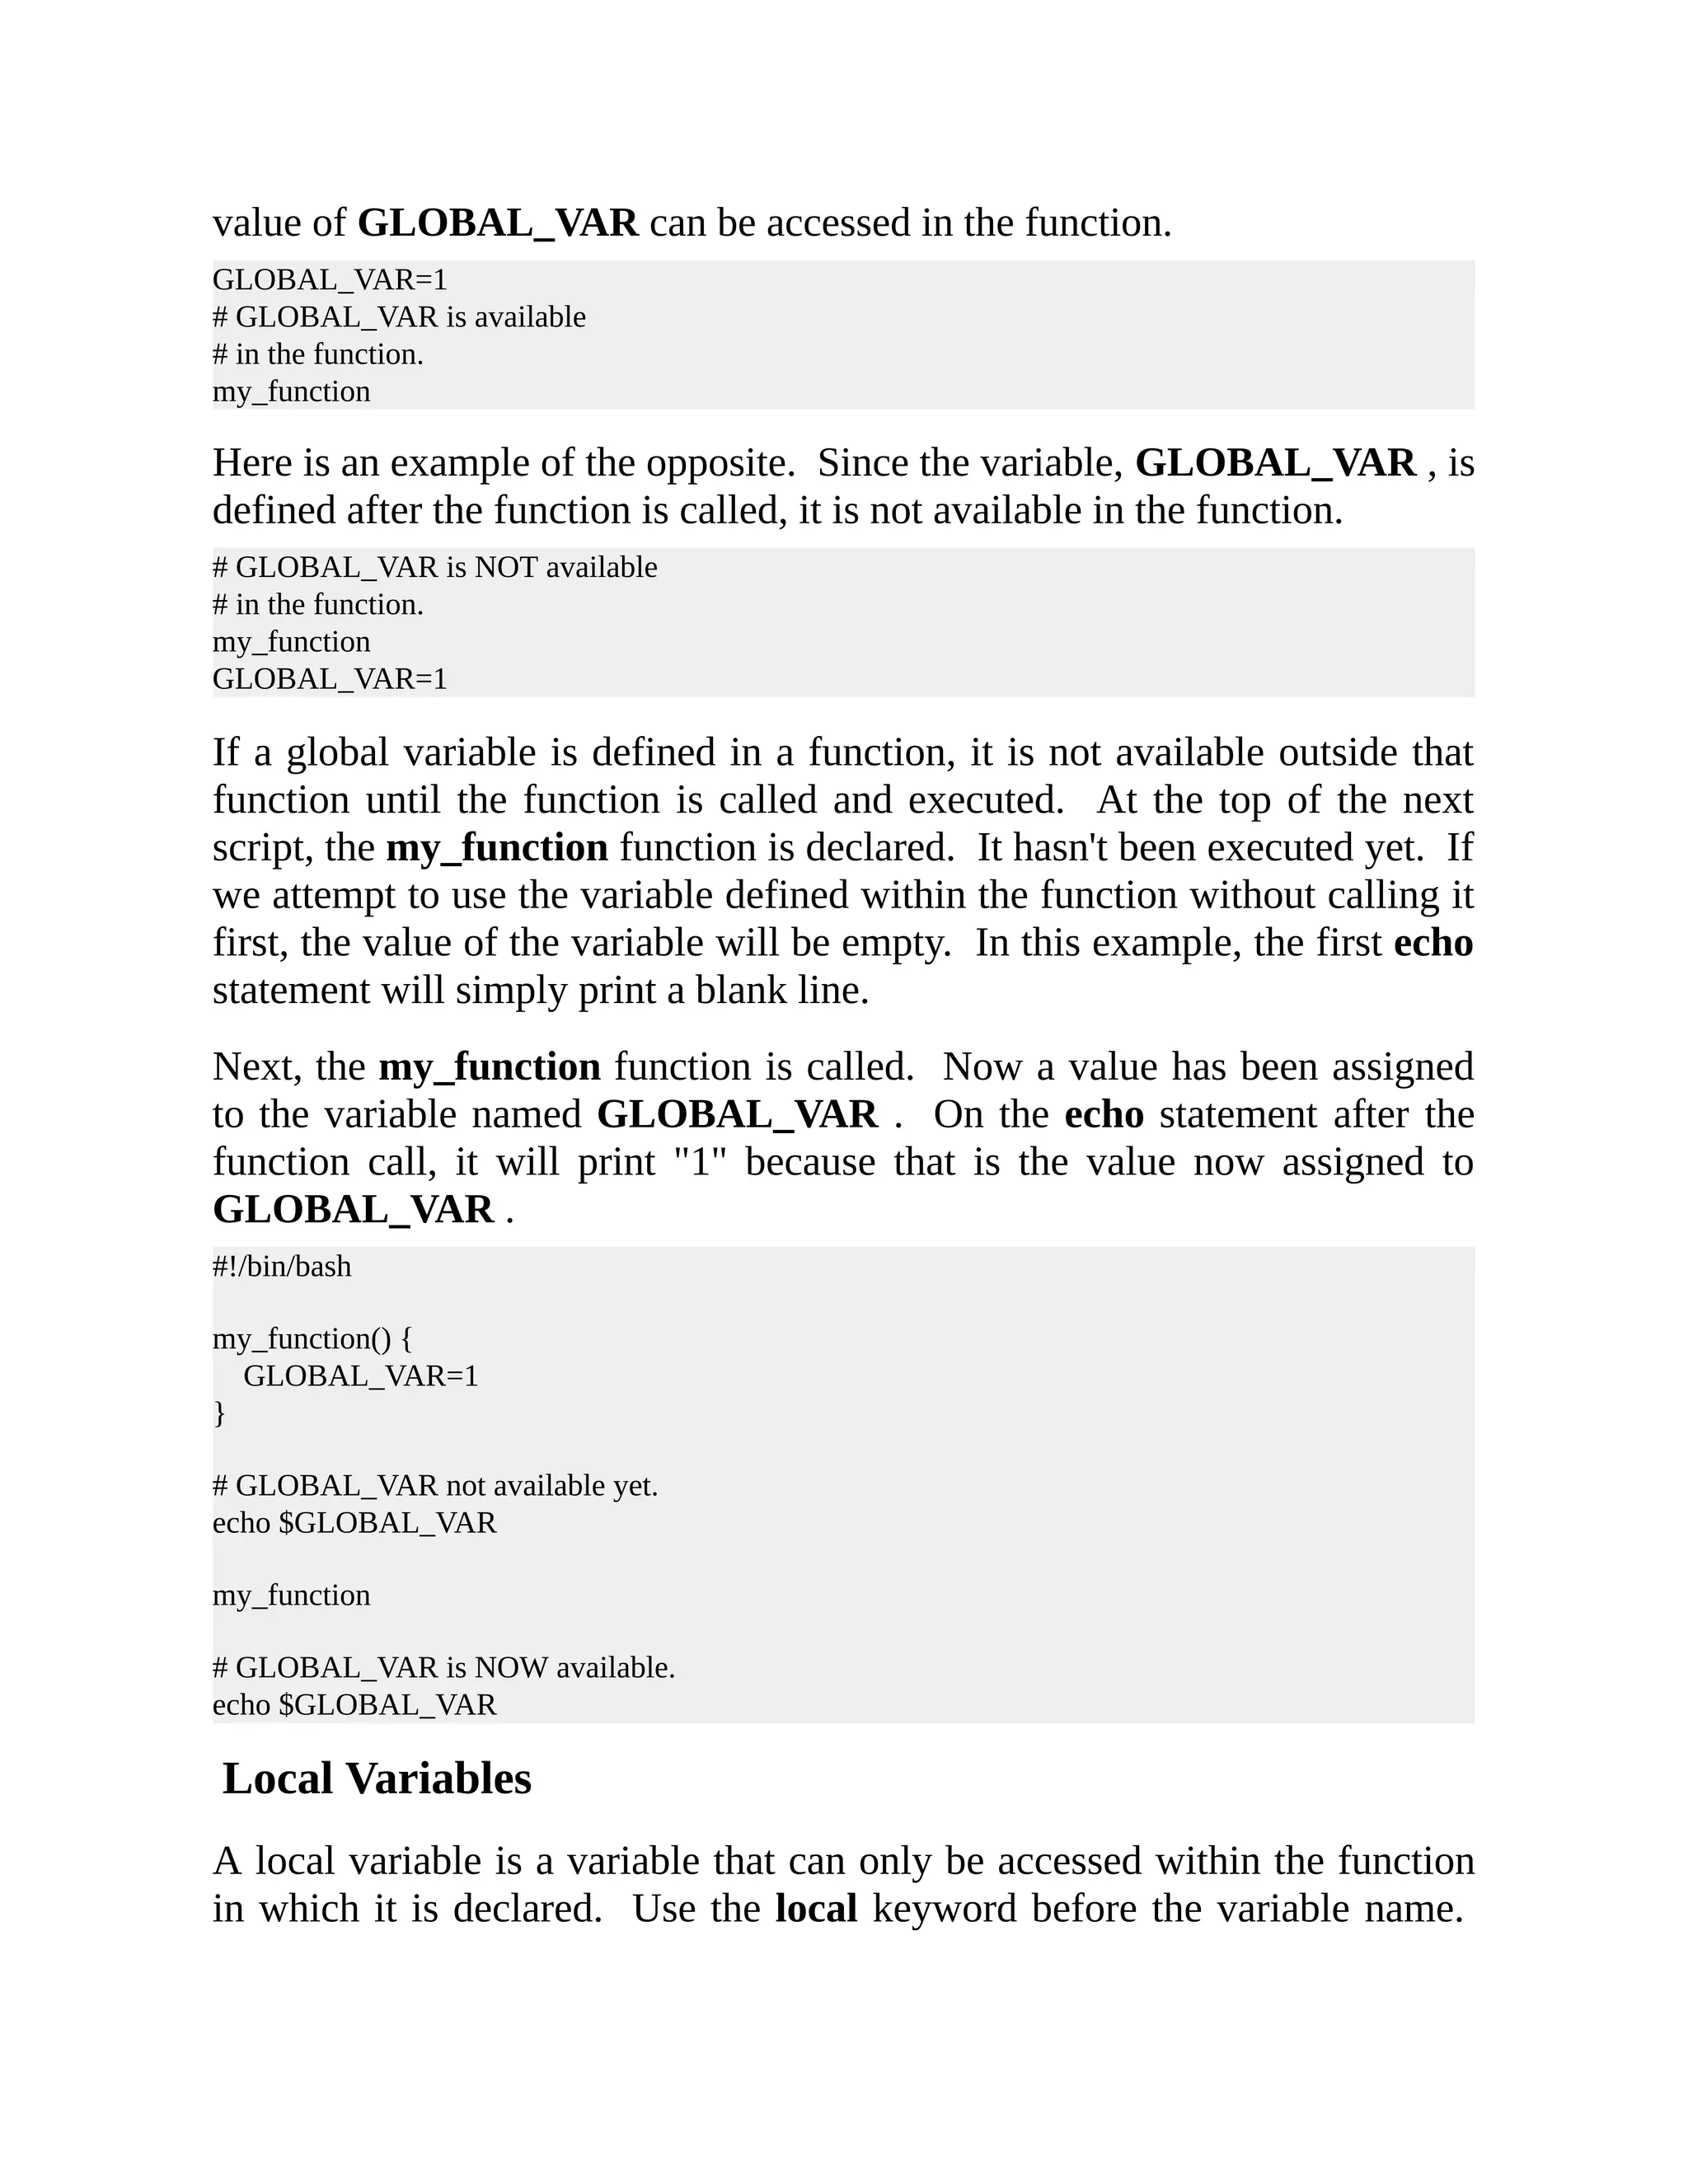
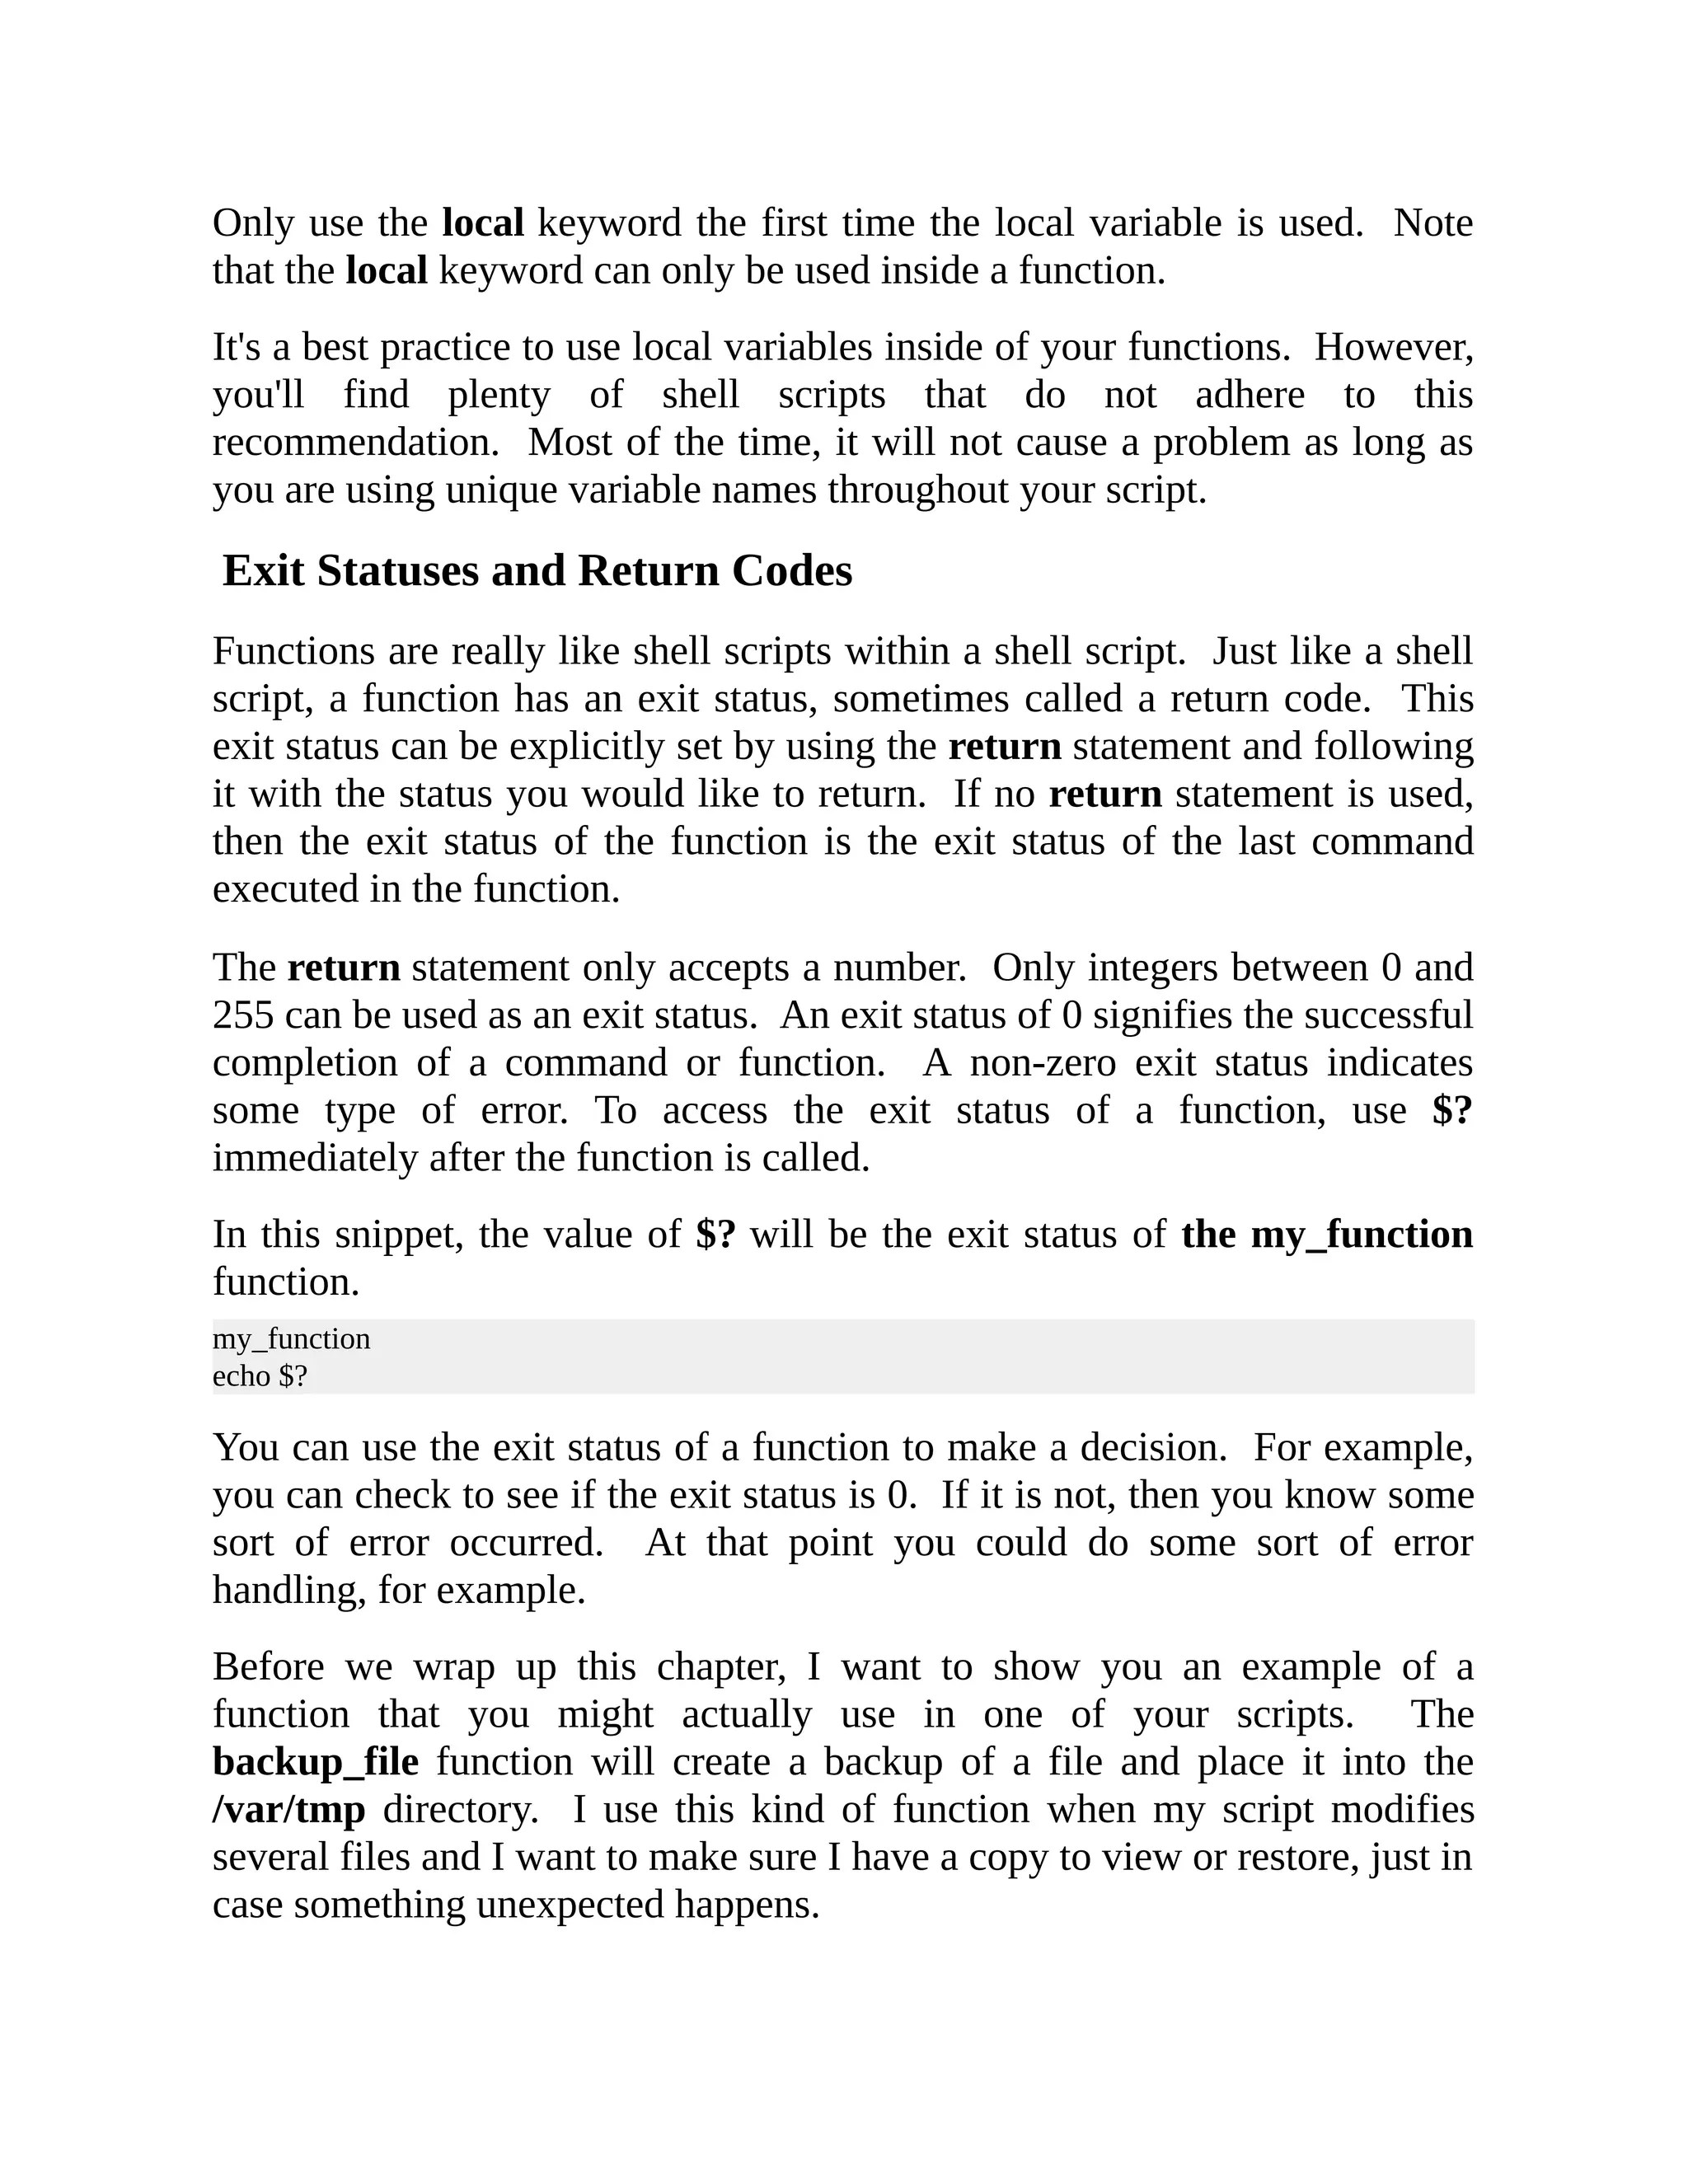
This document provides an introduction and overview of shell scripting. It discusses key concepts like the shebang, variables, conditional tests using if/else statements, and for loops. Examples are provided to demonstrate how to write simple shell scripts to automate tasks like renaming files. The document is intended to teach shell scripting basics and inspire readers to create scripts to facilitate laziness.


![#!/bin/ksh echo "This script uses ksh as the interpreter." #!/bin/zsh echo "This script uses zsh as the interpreter." When you execute a script that contains a shebang, what actually happens is that the interpreter is executed and the path used to call the script is passed as an argument to the interpreter. You can prove this by examining the process table. Let's start this script, sleepy.sh , in the background and look at the process table. The contents of sleepy.sh : #!/bin/bash sleep 90 Let's execute it in the background and take a look at the processes. $ ./sleepy.sh & [1] 16796 $ ps -fp 16796 UID PID PPID C STIME TTY TIME CMD jason 16796 16725 0 22:50 pts/0 00:00:00 /bin/bash ./sleepy.sh $ You can see that what is actually running is /bin/bash ./sleepy.sh . Let's use a full path to the script. $ /tmp/sleepy.sh & [1] 16804 $ ps -fp 16804 UID PID PPID C STIME TTY TIME CMD jason 16804 16725 0 22:51 pts/0 00:00:00 /bin/bash /tmp/sleepy.sh $ Sure enough, /bin/bash /tmp/sleepy.sh is being executed. Also, you can see that /bin/bash is executing the sleep command, which is the first and only command command in the shell script. $ ps -ef| grep 16804 | grep -v grep jason 16804 16725 0 22:51 pts/0 00:00:00 /bin/bash /tmp/sleepy.sh jason 16805 16804 0 22:51 pts/0 00:00:00 sleep 90 $ pstree –p 16804 sleepy.sh(16804)───sleep(16805)](https://image.slidesharecdn.com/shellscriptinghowtoautomatecommandl-jasoncannon-220122160302/75/Shell-scripting-_how_to_automate_command_l_-_jason_cannon-9-2048.jpg)
![#!/bin/bash SERVER_NAME=`hostname` echo "You are running this script on ${SERVER_NAME}." Valid Variable Names Variable names can contain letters, digits, and underscores. They can start with letters or underscores, but cannot start with a digit. Here are examples of valid variable names. FIRST3LETTERS="ABC" FIRST_THREE_LETTERS="ABC" firstThreeLetters="ABC" Here are some examples of invalid variable names. 3LETTERS="ABC" first-three-letters="ABC" first@Three@Letters="ABC" Tests Scripts are designed to replace the need for a person to physically be at a keyboard and type in a series of commands. What if you have a task you want to automate, but it requires different actions based on different circumstances? Since a person may not be around to make decisions when the script needs to run, we'll need to test for those conditions and have the script act accordingly. To create a test, place a conditional expression between brackets. The syntax is: [ condition-to-test-for ] . You can test for several types of situations. For example, you can compare if strings are equal, if a number is greater than another one, or if a file exists. This test checks to see if /etc/passwd exists. If it does, it returns true. I.e., the command exits with a status of 0. If the file doesn't exist it returns false. I.e., the command exits with a status of 1. [ -e /etc/passwd ] If you are using the bash shell, you can run the command help test to see the various types of tests you can perform. You can also read the man page for test: man test . Here are of some of the more common tests you can perform. File operators:](https://image.slidesharecdn.com/shellscriptinghowtoautomatecommandl-jasoncannon-220122160302/75/Shell-scripting-_how_to_automate_command_l_-_jason_cannon-12-2048.jpg)
![-d FILE True if file is a directory. -e FILE True if file exists. -f FILE True if file exists and is a regular file. -r FILE True if file is readable by you. -s FILE True if file exists and is not empty. -w FILE True if the file is writable by you. -x FILE True if the file is executable by you. String operators: -z STRING True if string is empty. -n STRING True if string is not empty. STRING True if string is not empty. STRING1 = STRING2 True if the strings are equal. STRING1 != STRING2 True if the strings are not equal. Arithmetic operators: arg1 –eq arg2 True if arg1 is equal to arg2. arg1 –ne arg2 True if arg1 is not equal to arg2. arg1 –lt arg2 True if arg1 is less than arg2. arg1 –le arg2 True if arg1 is less than or equal to arg2. arg1 –gt arg2 True if arg1 is greater than arg2. arg1 –ge arg2 True if arg1 is greater than or equal to arg2. The if Statement Now that you know how to determine if a certain condition is true or not, you can combine that with the if statement to make decisions in your scripts. The if statement starts with the word "if" and is then followed by a test. The following line contains the word then . Next comes a series of commands that will be executed if the tested condition is true. Finally, the if statement ends with fi , which is if spelled backwards. Here is the syntax. if [ condition-true ] then command 1 command 2 ... fi Here is an example: #!/bin/bash MY_SHELL="bash"](https://image.slidesharecdn.com/shellscriptinghowtoautomatecommandl-jasoncannon-220122160302/75/Shell-scripting-_how_to_automate_command_l_-_jason_cannon-13-2048.jpg)
![if [ "$MY_SHELL" = "bash" ] then echo "You seem to like the bash shell." fi It is a best practice to enclose variables in quotes to prevent some unexpected side effects when performing conditional tests. Here is the output of running the script: You seem to like the bash shell. You can also perform an action if the condition is not true by using an if/else statement. Here is what an if/else statement looks like. if [ condition-true ] then command 1 command 2 ... else # command 3 command 4 ... fi Let's update the script to perform an action if the statement is not true. #!/bin/bash MY_SHELL="csh" if [ "$MY_SHELL" = "bash" ] then echo "You seem to like the bash shell." else echo "You don't seem to like the bash shell." fi Here is the output. Because [ "$MY_SHELL" = "bash" ] evaluated to false the statements following else were executed. You don't seem to like the bash shell. You can also test for multiple conditions using the elif . The word elif is a contraction for "else if." Like if , follow elif with a condition to test for. On the following line, use the word then . Finally, provide a series of commands to execute if the condition evaluates as true. if [ condition-true ]](https://image.slidesharecdn.com/shellscriptinghowtoautomatecommandl-jasoncannon-220122160302/75/Shell-scripting-_how_to_automate_command_l_-_jason_cannon-14-2048.jpg)
![then command 1 command 2 ... elif [ condition-true ] then command 3 command 4 ... else # command 5 command 6 ... fi Here is an updated script using elif . #!/bin/bash MY_SHELL="csh" if [ "$MY_SHELL" = "bash" ] then echo "You seem to like the bash shell." elif [ "$MY_SHELL" = "csh" ] then echo "You seem to like the csh shell." else echo "You don't seem to like the bash or csh shells." fi Output: You seem to like the csh shell. The for Loop If you want to perform an action on a list of items, use a for loop. The first line of a for loop start with the word "for" followed by a variable name, followed by the word "in" and then a list of items. The next line contains the word "do" . Place the statements you want to execute on the following lines and, finally, end the for loop with the word "done " on a single line. for VARIABLE_NAME in ITEM_1 ITEM_2 ITEM_N do command 1 command 2 ... done](https://image.slidesharecdn.com/shellscriptinghowtoautomatecommandl-jasoncannon-220122160302/75/Shell-scripting-_how_to_automate_command_l_-_jason_cannon-15-2048.jpg)
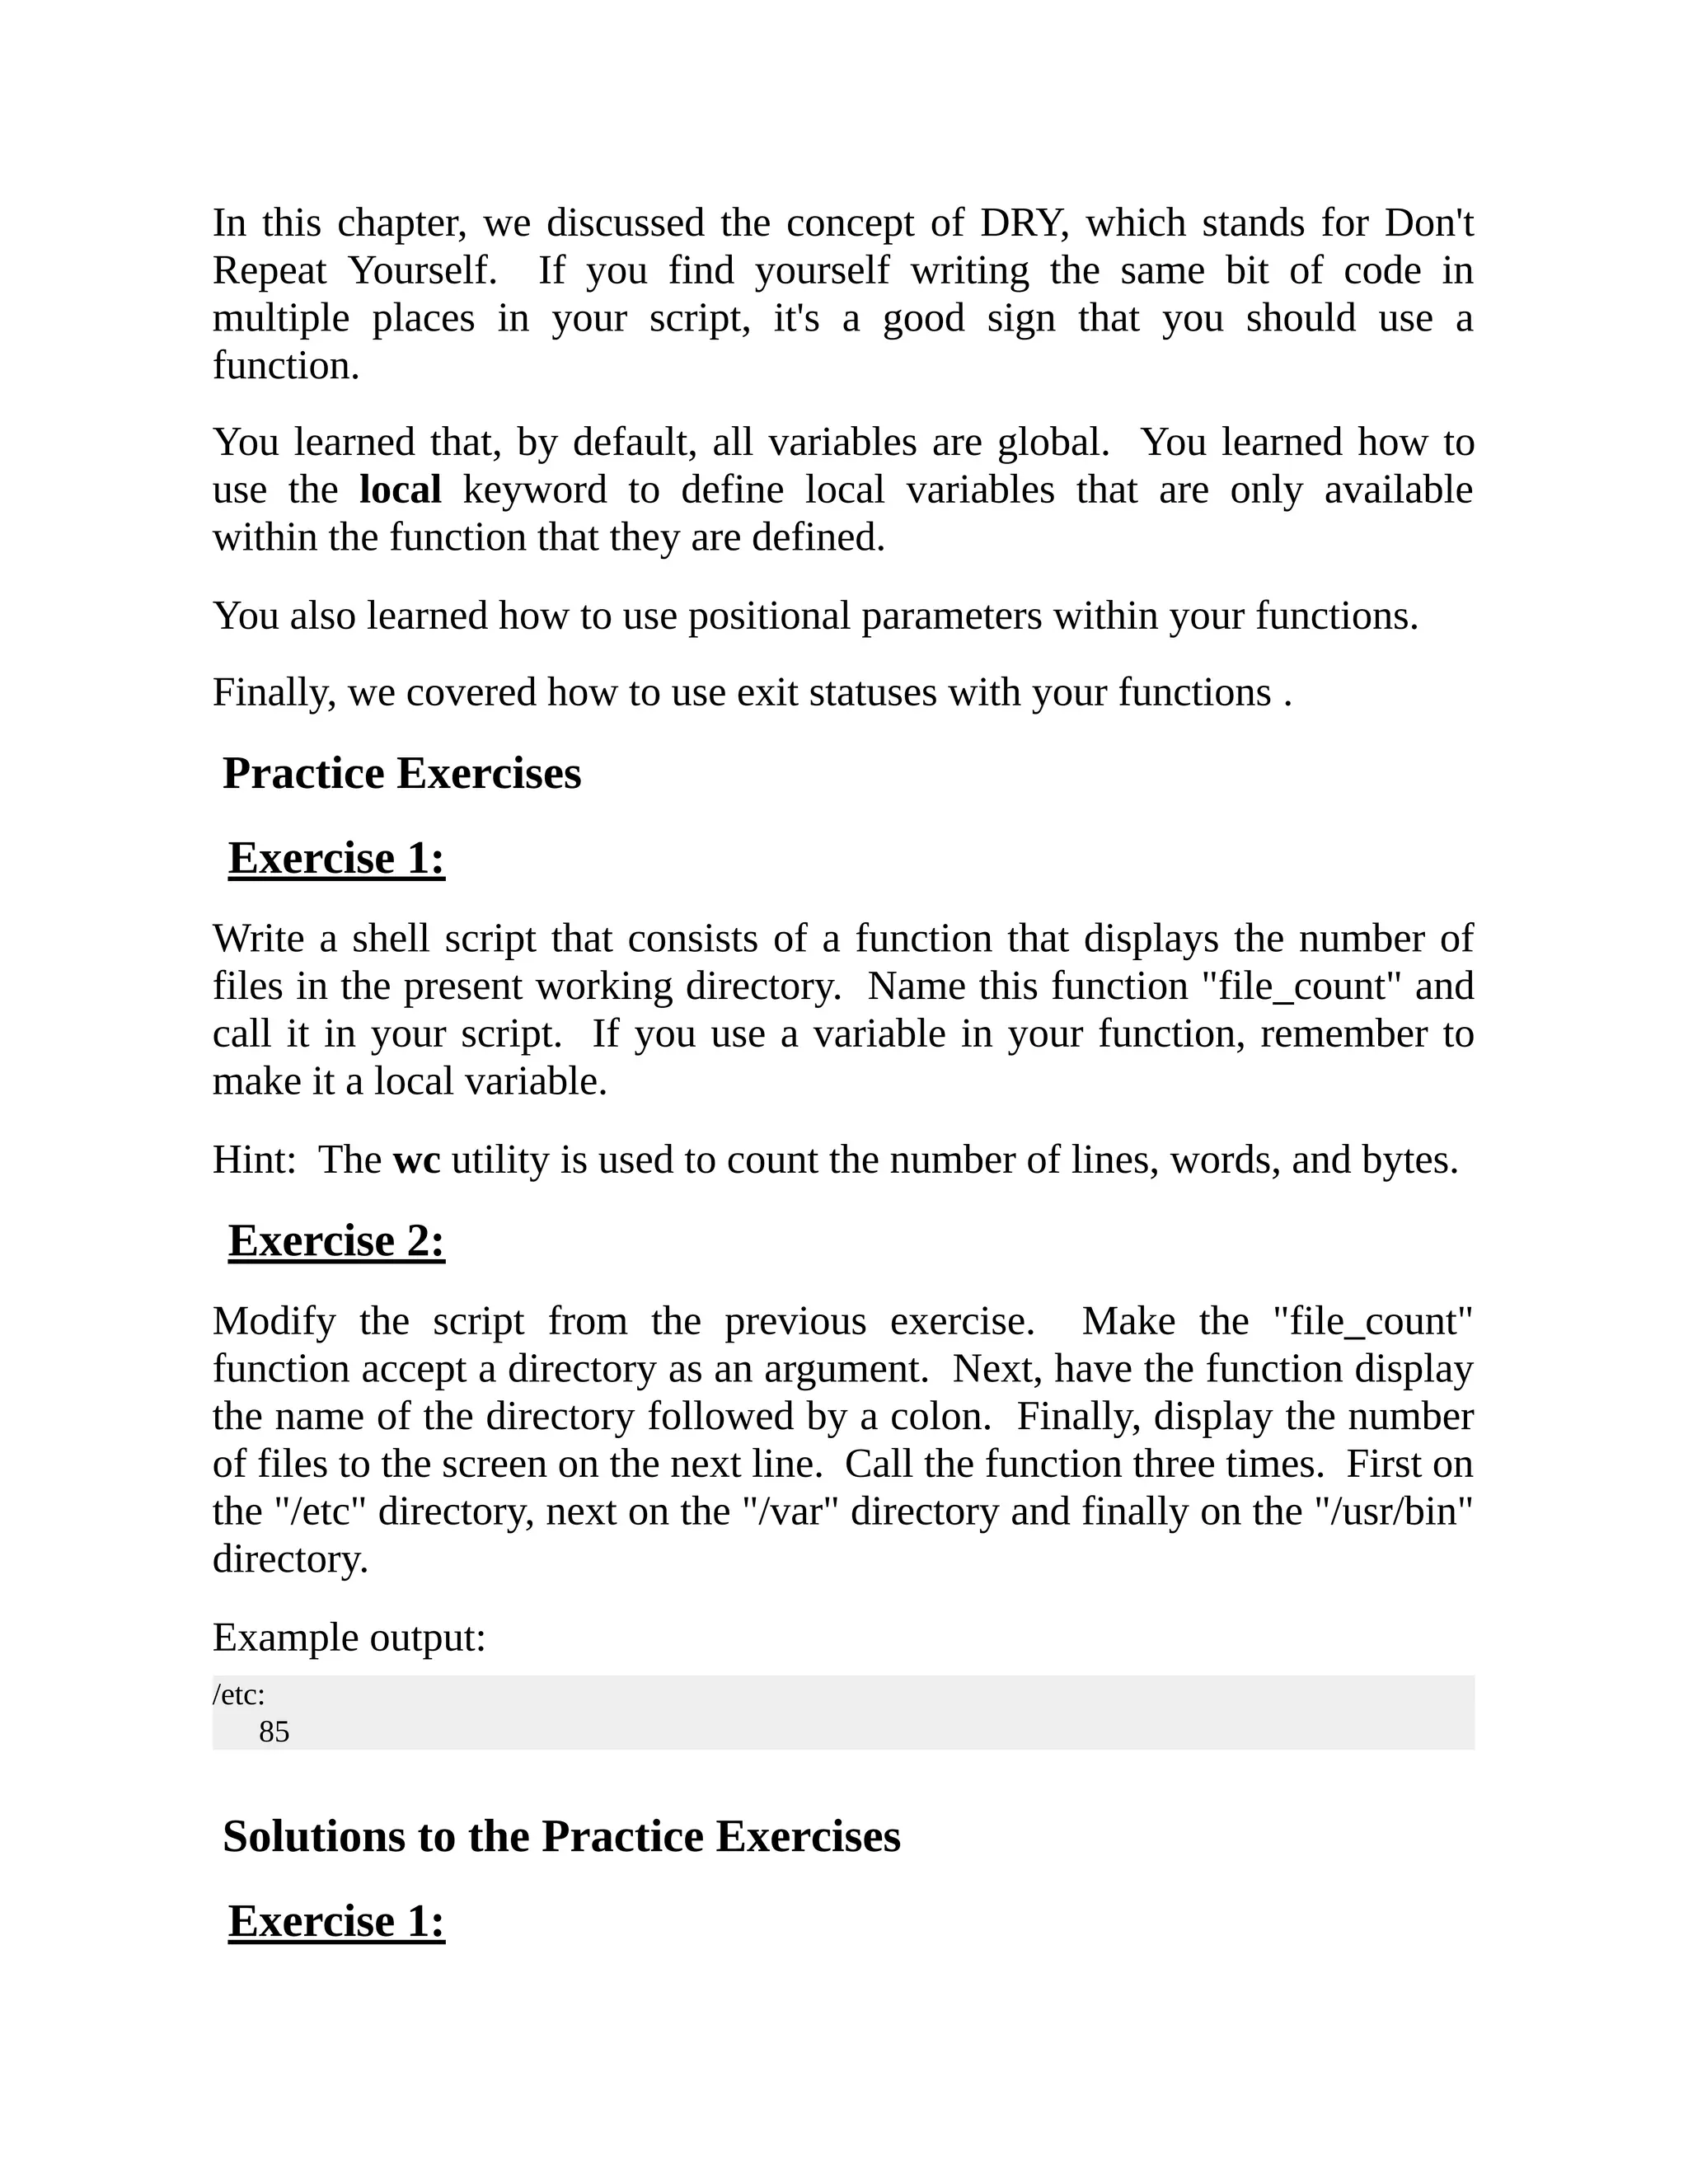
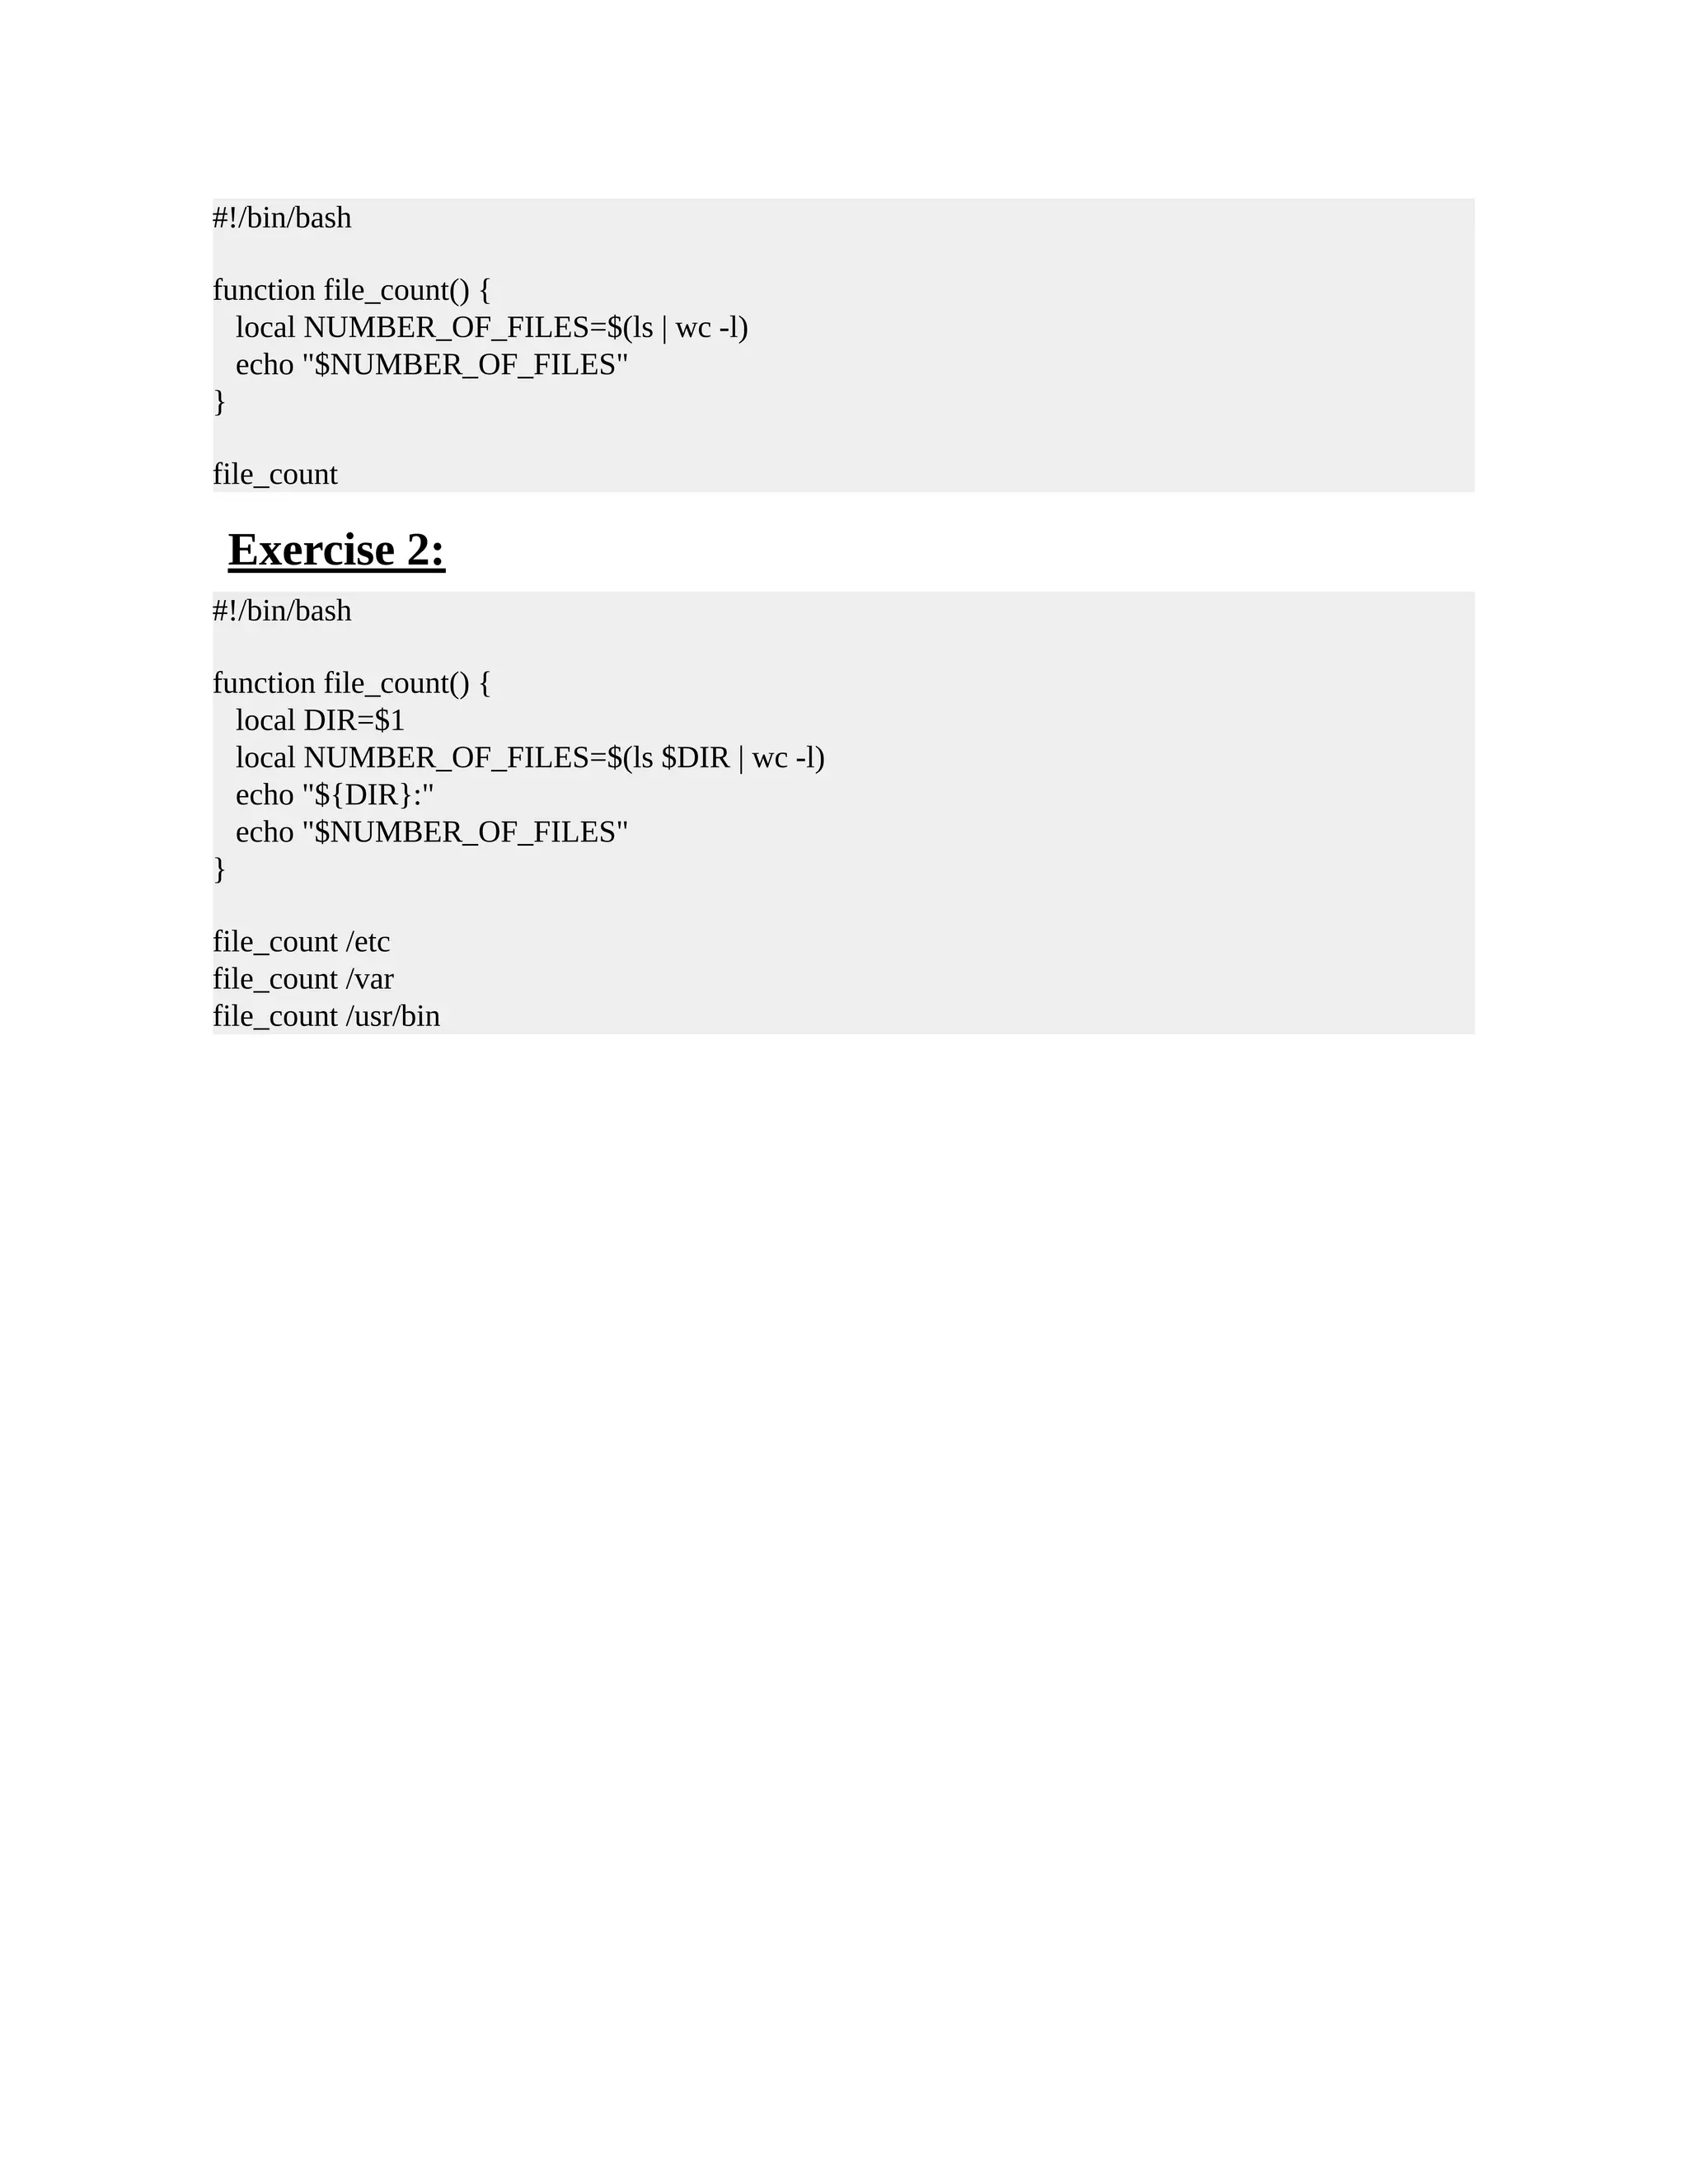
![Modify the previous script so that it accepts the file or directory name as an argument instead of prompting the user to enter it. Exercise 8: Modify the previous script to accept an unlimited number of files and directories as arguments. Hint: You'll want to use a special variable. Solutions to the Practice Exercises Exercise 1: #!/bin/bash echo "Shell Scripting is Fun!" Exercise 2: #!/bin/bash MESSAGE="Shell Scripting is Fun!" echo "$MESSAGE" Exercise 3: #!/bin/bash HOST_NAME=$(hostname) echo "This script is running on ${HOST_NAME}." Exercise 4: #!/bin/bash FILE="/etc/shadow" if [ -e "$FILE" ] then echo "Shadow passwords are enabled." fi if [ -w "$FILE" ] then echo "You have permissions to edit ${FILE}." else echo "You do NOT have permissions to edit ${FILE}." fi Exercise 5:](https://image.slidesharecdn.com/shellscriptinghowtoautomatecommandl-jasoncannon-220122160302/75/Shell-scripting-_how_to_automate_command_l_-_jason_cannon-22-2048.jpg)
![#!/bin/bash for ANIMAL in man bear pig dog cat sheep do echo "$ANIMAL" done Exercise 6: #!/bin/bash read -p "Enter the path to a file or a directory: " FILE if [ -f "$FILE" ] then echo "$FILE is a regular file." elif [ -d "$FILE" ] then echo "$FILE is a directory." else echo "$FILE is something other than a regular file or directory." fi ls -l $FILE Exercise 7: #!/bin/bash FILE=$1 if [ -f "$FILE" ] then echo "$FILE is a regular file." elif [ -d "$FILE" ] then echo "$FILE is a directory." else echo "$FILE is something other than a regular file or directory." fi ls -l $FILE Exercise 8: #!/bin/bash for FILE in $@ do if [ -f "$FILE" ]](https://image.slidesharecdn.com/shellscriptinghowtoautomatecommandl-jasoncannon-220122160302/75/Shell-scripting-_how_to_automate_command_l_-_jason_cannon-23-2048.jpg)
![then echo "$FILE is a regular file." elif [ -d "$FILE" ] then echo "$FILE is a directory." else echo "$FILE is something other than a regular file or directory." fi ls -l $FILE done](https://image.slidesharecdn.com/shellscriptinghowtoautomatecommandl-jasoncannon-220122160302/75/Shell-scripting-_how_to_automate_command_l_-_jason_cannon-24-2048.jpg)
![error. Had the file /not/here existed and if ls was able to display information about that file successfully, the exit status would have been 0 . You can use the exit status of a command to make a decision or perform a different action based on the exit status. In this example shell script snippet, we use the ping command to test our network connectivity to www.google.com. The -c option for the ping command simply tells ping to send just one packet. HOST="google.com" ping -c 1 $HOST if [ "$?" -eq "0" ] then echo "$HOST reachable." else echo "$HOST unreachable." fi After the ping command is executed, we check the exit status. If the exit status is equal to 0, then we echo to the screen that google.com is reachable . If the exit status is NOT equal to 0 we echo to the screen that google.com is unreachable. This example just checks for an error condition. In the if statement, we look for a non-zero exit status. If $? does not equal zero, then we echo that the host is unreachable. If the ping command succeeds and returns a 0 exit status, then the echo statement is not executed. HOST="google.com" ping -c 1 $HOST if [ "$?" -ne "0" ] then echo "$HOST unreachable." fi We can assign the return code of a command to variable and then use that variable later in the script. In this example, the value of $? is assigned to the RETURN_CODE variable. So, RETURN_CODE contains the exit status of the ping command. HOST="google.com"](https://image.slidesharecdn.com/shellscriptinghowtoautomatecommandl-jasoncannon-220122160302/75/Shell-scripting-_how_to_automate_command_l_-_jason_cannon-26-2048.jpg)
![ping -c 1 $HOST RETURN_CODE=$? if [ "$RETURN_CODE" -ne "0" ] then echo "$HOST unreachable." fi In addition to using if statements with exit statuses, you can use logical ANDs and ORs. The double ampersand (&& ) represents AND, while the double pipe (|| ) represents OR. You can chain together multiple commands with either ANDS or ORS. The command following a double ampersand will only execute if the previous command succeeds. In other words, the command following a double ampersand will only run if the previous command exits with a 0 exit status. In the following example, mkdir /tmp/bak is executed. If it succeeds and returns a 0 exit status, then, and only then, will the cp command be executed. In this example, you can see there is no need for the cp command to be executed if the directory wasn't able to be created. mkdir /tmp/bak && cp test.txt /tmp/bak/ The command following a double pipe will only execute if the previous command fails. If the first command returns a non-zero exit status, then the next command is executed. In the following example, the first cp command, cp test.txt /tmp/bak/ , is executed. If it succeeds the next cp command is NOT executed. In that instance, if the first cp command succeeds, we have successfully created a backup copy of test.txt so the there is no need for another backup copy of that file. If the first command fails, then the second command is executed. If test.txt can't be copied into /tmp/bak , an attempt will be make to copy it to /tmp . With an OR, only one of the two commands will successfully execute. cp test.txt /tmp/bak/ || cp test.txt /tmp Let's revisit our earlier example. Instead of using an if statement, here we are using an AND. This time, if the ping command exits with a 0 exit status, then "google.com reachable" will be echoed to the screen.](https://image.slidesharecdn.com/shellscriptinghowtoautomatecommandl-jasoncannon-220122160302/75/Shell-scripting-_how_to_automate_command_l_-_jason_cannon-27-2048.jpg)
![Also note that you can use the exit command anywhere in your shell script. Whenever the exit command is reached, your shell script will stop running. In this example, we are controlling the exit status of our script with the exit command. #!/bin/bash HOST="google.com" ping -c 1 $HOST if [ "$?" -ne "0" ] then echo "$HOST unreachable." exit 1 fi exit 0 If the ping command succeeds, a return code of 0 is received. This means that the test in the if statement is false and that code block will not execute. That means the exit 0 line is executed. This stops the execution of the script and returns a 0 exit status. If the ping command fails, then a non-zero exit status is received. That makes the if statement true, and the echo command and exit 1 commands are executed. The exit 1 command will stop the execution of the script and return an exit status of 1. Now your shell script can be called by another shell script and its exit status can be examined just like any other command. Since you control the exit statuses, you can make them have a significant meaning. Maybe a return code of 1 means that one type of error occurred while a return code of 2 means that a different type of error occurred. If you have scripts that are executing other scripts, then you can program accordingly to these returns codes if you need or want to. Review In this chapter, you learned that all commands return an exit status . Valid exit statuses are numbers that range from 0 to 255, with a zero exit status representing the successful execution of a command and a non-zero status representing an error condition.](https://image.slidesharecdn.com/shellscriptinghowtoautomatecommandl-jasoncannon-220122160302/75/Shell-scripting-_how_to_automate_command_l_-_jason_cannon-29-2048.jpg)
![Exercise 3: #!/bin/bash cat /etc/shadow if [ "$?" -eq "0" ] then echo "Command succeeded" exit 0 else echo "Command failed" exit 1 fi](https://image.slidesharecdn.com/shellscriptinghowtoautomatecommandl-jasoncannon-220122160302/75/Shell-scripting-_how_to_automate_command_l_-_jason_cannon-31-2048.jpg)


![In any case, the first line of the function checks to see whether what was passed in is a file and if it exists. If it is a file and it does exist, a variable called BACKUP_FILE is created. It starts off with /var/tmp , followed by the basename of the passed in file, the current date, and the PID of the shell script. The basename command removes any leading directory components and returns just the file name. The basename of /etc/hosts is just hosts . The date command is using a nice format of the year, followed by the month, and finally the day, all separated by dashes. The special variable $$ represents the PID of the currently running shell script. I use this so if I run the script multiple times on the same day, the PID will be different each time and thus the existing backups will not be overwritten. In this snippet, the backup_file function is called with /etc/hosts as a parameter. This will create a copy of that file and place it in the temp directory as just described. Finally, there is an if statement that examines the return code of the backup_file function. function backup_file () { if [ -f "$1" ] then local BACKUP_FILE="/var/tmp/$(basename ${1}).$(date +%F).$$" echo "Backing up $1 to ${BACKUP_FILE}" cp $1 $BACKUP_FILE fi } backup_file /etc/hosts if [ $? -eq 0 ] then echo "Backup succeeded!" fi We can take this example and improve it. One thing we can do is change the if statement to an if/else statement. If the file exists, let the exit status of the function be the exit status of the cp command. If the cp command returns a non-zero code, then our function has also failed. If we know for a fact that the file does not exist, we can use the else clause to explicitly return a non- zero exit status back to our main script.](https://image.slidesharecdn.com/shellscriptinghowtoautomatecommandl-jasoncannon-220122160302/75/Shell-scripting-_how_to_automate_command_l_-_jason_cannon-38-2048.jpg)
![We can also improve what happens after the function is called. If we know the function—and thus the backup—has failed, we can exit the script with a non-zero exit status. We could also do some other sort of error handling. Maybe you don't want to exit the script, but instead keep track of all the files that failed to backup. You could potentially move this bit of code into the backup_file function if you wanted to as well. #!/bin/bash function backup_file () { # This function creates a backup of a file. # Make sure the file exists. if [ -f "$1" ] then # Make the BACKUP_FILE variable. local BACKUP_FILE="/tmp/$(basename ${1}).$(date +%F).$$" echo "Backing up $1 to ${BACKUP_FILE}" # The exit status of the function will be the # exit status of the cp command. cp $1 $BACKUP_FILE else # The file does not exist, so return # a non-zero exit status. return 1 fi } # Call the function backup_file /etc/hosts # Make a decision based on the exit status. # Note this is for demonstration purposes. # You could have put this functionality inside the # backup_file function. if [ $? -eq "0" ] then echo "Backup succeeded!" else echo "Backup failed!" # Abort the script and return a non-zero status. exit 1 fi Summary](https://image.slidesharecdn.com/shellscriptinghowtoautomatecommandl-jasoncannon-220122160302/75/Shell-scripting-_how_to_automate_command_l_-_jason_cannon-39-2048.jpg)
![want to match a one character long file name that consists of a vowel, you can use [aeiou] . If you want to match files that start with "ca", followed by either an "n" or a "t", followed by zero or more characters, then use ca[nt]* . This pattern will match files named "can", "cat", "candy", and "catch." If you want to exclude characters in a match, use an exclamation mark. For example, if you want to find all the files that do not start with a vowel, use [!aeiou]* . "Baseball" and "cricket" match this pattern because the first character is not an "a,"e", "i," "o," or a "u." Ranges When using character classes, you can create a range by separating two characters with a hyphen. If you want to match all the characters from "a" to "g" use [a-g] . If you want to match the numbers 3, 4, 5, and 6, use [3-6] . Named Character Classes Instead of creating your own ranges, you can use predefined named character classes. These named classes represent the most commonly used ranges. [:alpha:] - Matches alphabetic (letters). This matches both lower and uppercase letters. [:alnum:] - Matches alphanumeric characters. This character class matches alpha and digits. In other words, it matches any uppercase letters, any lowercase letters, or any decimal digits. [:digit:] - Represents numbers in decimal, 0 to 9 [:lower:] - Matches lowercase letters [:space:] - Matches whitespace. This means characters such as spaces, tabs, and newline characters. [:upper:] - Matches uppercase letters Matching Wildcard Patterns](https://image.slidesharecdn.com/shellscriptinghowtoautomatecommandl-jasoncannon-220122160302/75/Shell-scripting-_how_to_automate_command_l_-_jason_cannon-43-2048.jpg)
![read -p "Please enter a file extension: " EXTENSION read -p "Please enter a file prefix: (Press ENTER for ${DATE}). " PREFIX if [ -z "$PREFIX" ] then PREFIX="$DATE" fi for FILE in *.${EXTENSION} do NEW_FILE="${PREFIX}-${FILE}" echo "Renaming $FILE to ${NEW_FILE}." mv $FILE ${NEW_FILE} done](https://image.slidesharecdn.com/shellscriptinghowtoautomatecommandl-jasoncannon-220122160302/75/Shell-scripting-_how_to_automate_command_l_-_jason_cannon-48-2048.jpg)
![CASE STATEMENTS You already know how to make decisions and vary the flow of your scripts by using if statements. If you find yourself using an if statement to compare the same variable against different values, you could use a case statement in its place. Some people argue that, for these situations, a case statement is easier to read. You'll see case statement in shell scripts and you'll want to at least understand what they are doing and how they work. One common place to find case statements in use is in system startup scripts. Here is an example if statement that could also be a case statement. #!/bin/bash if [ "$1" = "start" ] then /usr/sbin/sshd elif [ "$1" = "stop" ] then kill $(cat /var/run/sshd.pid) elif [ "$1" = "restart" ] then kill $(cat /var/run/sshd.pid) /usr/sbin/sshd elif [ "$1" = "reload" ] then kill –HUP $(cat /var/run/sshd.pid) else echo "Usage: $0 start|stop|restart|reload" exit 1 fi To create a case statement, start with the word case , follow it with an expression (most commonly a variable), and end the line with the word in . Next, list a pattern or value you want to test against the variable. End the pattern with a parenthesis. If that pattern is matched, the commands following it will be executed. The execution will stop when a double semicolon is reached and the script will continue after the case statement. You can test for multiple values using the same pattern. Finally, the case statement is ended with esac , which is “case” spelled backwards. case "$VAR" in](https://image.slidesharecdn.com/shellscriptinghowtoautomatecommandl-jasoncannon-220122160302/75/Shell-scripting-_how_to_automate_command_l_-_jason_cannon-49-2048.jpg)
![kill $(cat /var/run/sshd.pid) ;; *) echo "Usage: $0 start|stop" exit 1 ;; esac This is yet another slightly modified version of the same case statement. This time, you might notice that a pipe was used. You can use the pipe as an OR. So, if $1 is equal to "start" in all lowercase letters or "START" in all uppercase letters, the sshd command is executed . We did the same thing with "stop." Like the previous example, the wildcard will act as a catch-all and match anything else. case "$1" in start|START) /usr/sbin/sshd ;; stop|STOP) kill $(cat /var/run/sshd.pid) ;; *) echo "Usage: $0 start|stop" ; exit 1 ;; esac Take a look at this example: read -p "Enter y or n: " ANSWER case "$ANSWER" in [yY]|[yY][eE][sS]) echo "You answered yes." ;; [nN]|[nN][oO]) echo "You answered no." ;; *) echo "Invalid answer." ;; esac Here we are asking for input from the user. This input is stored in the variable ANSWER . Even though you may ask the user to enter a lowercase "y" or a lower case "n", they may do something slightly](https://image.slidesharecdn.com/shellscriptinghowtoautomatecommandl-jasoncannon-220122160302/75/Shell-scripting-_how_to_automate_command_l_-_jason_cannon-51-2048.jpg)
![different. Instead of being so strict, you can adjust the pattern matching in your case statement. Like I said earlier, all the rules for wildcards are in play for the pattern matching section of the case statement. Here we are going to use character classes . A quick reminder, a character class is simply a list of characters between brackets. A character class matches exactly one character and a match occurs for any of the characters included between the brackets. The first character class in this is example is lowercase "y" and upper case "y." [yY] If the user enters a lower case or an uppercase "y", the first pattern will match and then "You answered yes" will be echoed to the screen. Also, if the user entered "yes", using any combination of upper or lowercase letters, the pattern following the pipe will match and "You answered yes" will be echoed to the screen. That pattern is 3 characters in length using 3 character classes. [yY][eE][sS] The first character class is a lowercase and uppercase "y", the second is a lowercase and uppercase "e", and the third is a lowercase and uppercase "s." We use the exact same concept to match for the "n" or "no" answer. The last pattern is an asterisk, so it will match anything that did not match the above patterns. You don't have to use the star wildcard by itself. In the following example, the first pattern will match anything that starts with a lowercase or uppercase "y". This will include "y", "yes", or even "yup." read -p "Enter y or n: " ANSWER case "$ANSWER" in [yY]*) echo "You answered yes." ;; *) echo "You answered something else." ;; esac](https://image.slidesharecdn.com/shellscriptinghowtoautomatecommandl-jasoncannon-220122160302/75/Shell-scripting-_how_to_automate_command_l_-_jason_cannon-52-2048.jpg)
![Let's look at the messages generated by the following logger commands. The first logger command is used without any options. You can see that it generates a message with a time stamp and includes the message passed to the logger command. This message will be routed based on the system logger configuration. For most distributions, this message will end up in the /var/log/messages file or the /var/log/syslog file. $ logger "Message" Aug 2 01:22:34 linuxsvr jason: Message The next logger command generates the same message, but this time we have specified the facility and severity. Remember that different facilities and severities can cause the system logger to route the messages to a different log file. $ logger -p local0.info "Message" Aug 2 01:22:41 linuxsvr jason: Message If you want to display the message to the screen in addition to sending it to the logging system, use the "-s" option. $ logger -s -p local0.info "Message" jason: Message # <-- Displayed on screen. This logger command makes use of a tag. The message that it generates now contains the specified tag. $ logger -t myscript -p local0.info "Message" Aug 2 01:22:44 linuxsvr myscript: Message The next logger command uses the -i option which causes the PID to be included in brackets in the log message. If multiple copies of your script can run at the same time, having a PID can help differentiate the logs being generated by one instance of the script vs logs generated by another instance of the script. $ logger -i -t myscript "Message" Aug 2 01:22:53 linuxsvr myscript[12986]: Message You can even create a function in your shell script to handle logging. Here is an example from one of my scripts. logit () { local LOG_LEVEL=$1 shift MSG=$@](https://image.slidesharecdn.com/shellscriptinghowtoautomatecommandl-jasoncannon-220122160302/75/Shell-scripting-_how_to_automate_command_l_-_jason_cannon-58-2048.jpg)
![TIMESTAMP=$(date +"%Y-%m-%d %T") if [ $LOG_LEVEL = 'ERROR' ] || $VERBOSE then echo "${TIMESTAMP} ${HOST} ${PROGRAM_NAME}[${PID}]: ${LOG_LEVEL} ${MSG}" fi } This function, named logit , expects that a log level be passed into it followed by a message. It assigns the first thing passed into it to the LOG_LEVEL variable. Next, shift is run to shift the positional parameters to the left. These means that the special variable $@ contains everything except the first positional parameter which we already used for our LOG_LEVEL variable. Everything that is left over is assigned to the MSG variable. Next, a TIMESTAMP variable is created and assigned some output from the date command. If the LOG_LEVEL is "ERROR" or the VERBOSE global variable is set to true , a message is echoed to the screen which includes information such as the timestamp, log level, and the message. Instead of using echo , this function could employ the use of the logger command, if we wanted to do that. Here are some examples of calling this function. The first time it is called, the INFO log level is used and the message is "Processing data." If the command fetch-data $HOST fails, then the logit function is called with an ERROR log level and a message that states "Could not fetch data from $HOST." The fetch-data command in this example is made up. It could be another script, for example. In any case, this gives you an idea of how you can use a custom written logging function. logit INFO "Processing data." fetch-data $HOST || logit ERROR "Could not fetch data from $HOST" Review In this chapter, you learned why you may want to use logging in your shell scripts. You also learned about the syslog standard and how to generate](https://image.slidesharecdn.com/shellscriptinghowtoautomatecommandl-jasoncannon-220122160302/75/Shell-scripting-_how_to_automate_command_l_-_jason_cannon-59-2048.jpg)
![exactly as they are in the shell script. In this script, the only thing that happens is that "test" gets echoed to the screen. #!/bin/bash -v TEST_VAR="test" echo "$TEST_VAR" Output: #!/bin/bash -v TEST_VAR="test" echo "$TEST_VAR" test Here is what would happen if we added the -x option to the previous script. What's useful about this output is that we can see the how a command looks in the shell script and how it actually gets executed. Take the echo command, for example. We can see that, in the script, we run echo $TEST_VAR and that actually causes echo test to be executed. #!/bin/bash -vx TEST_VAR="test" + TEST_VAR=test echo "$TEST_VAR" + echo test test From the command line, using a bash shell, you can run help set . That will display information about the options we covered in this lesson plus the other options that are available. You might want to pipe this output to a pager like less so you can easily scroll through all the options and their descriptions. $ help set | less set: set [-abefhkmnptuvxBCHP] [-o option-name] [--] [arg ...] Set or unset values of shell options and positional parameters. Change the value of shell attributes and positional parameters, or display the names and values of shell variables. Options: -a Mark variables which are modified or created for export. -b Notify of job termination immediately.](https://image.slidesharecdn.com/shellscriptinghowtoautomatecommandl-jasoncannon-220122160302/75/Shell-scripting-_how_to_automate_command_l_-_jason_cannon-65-2048.jpg)

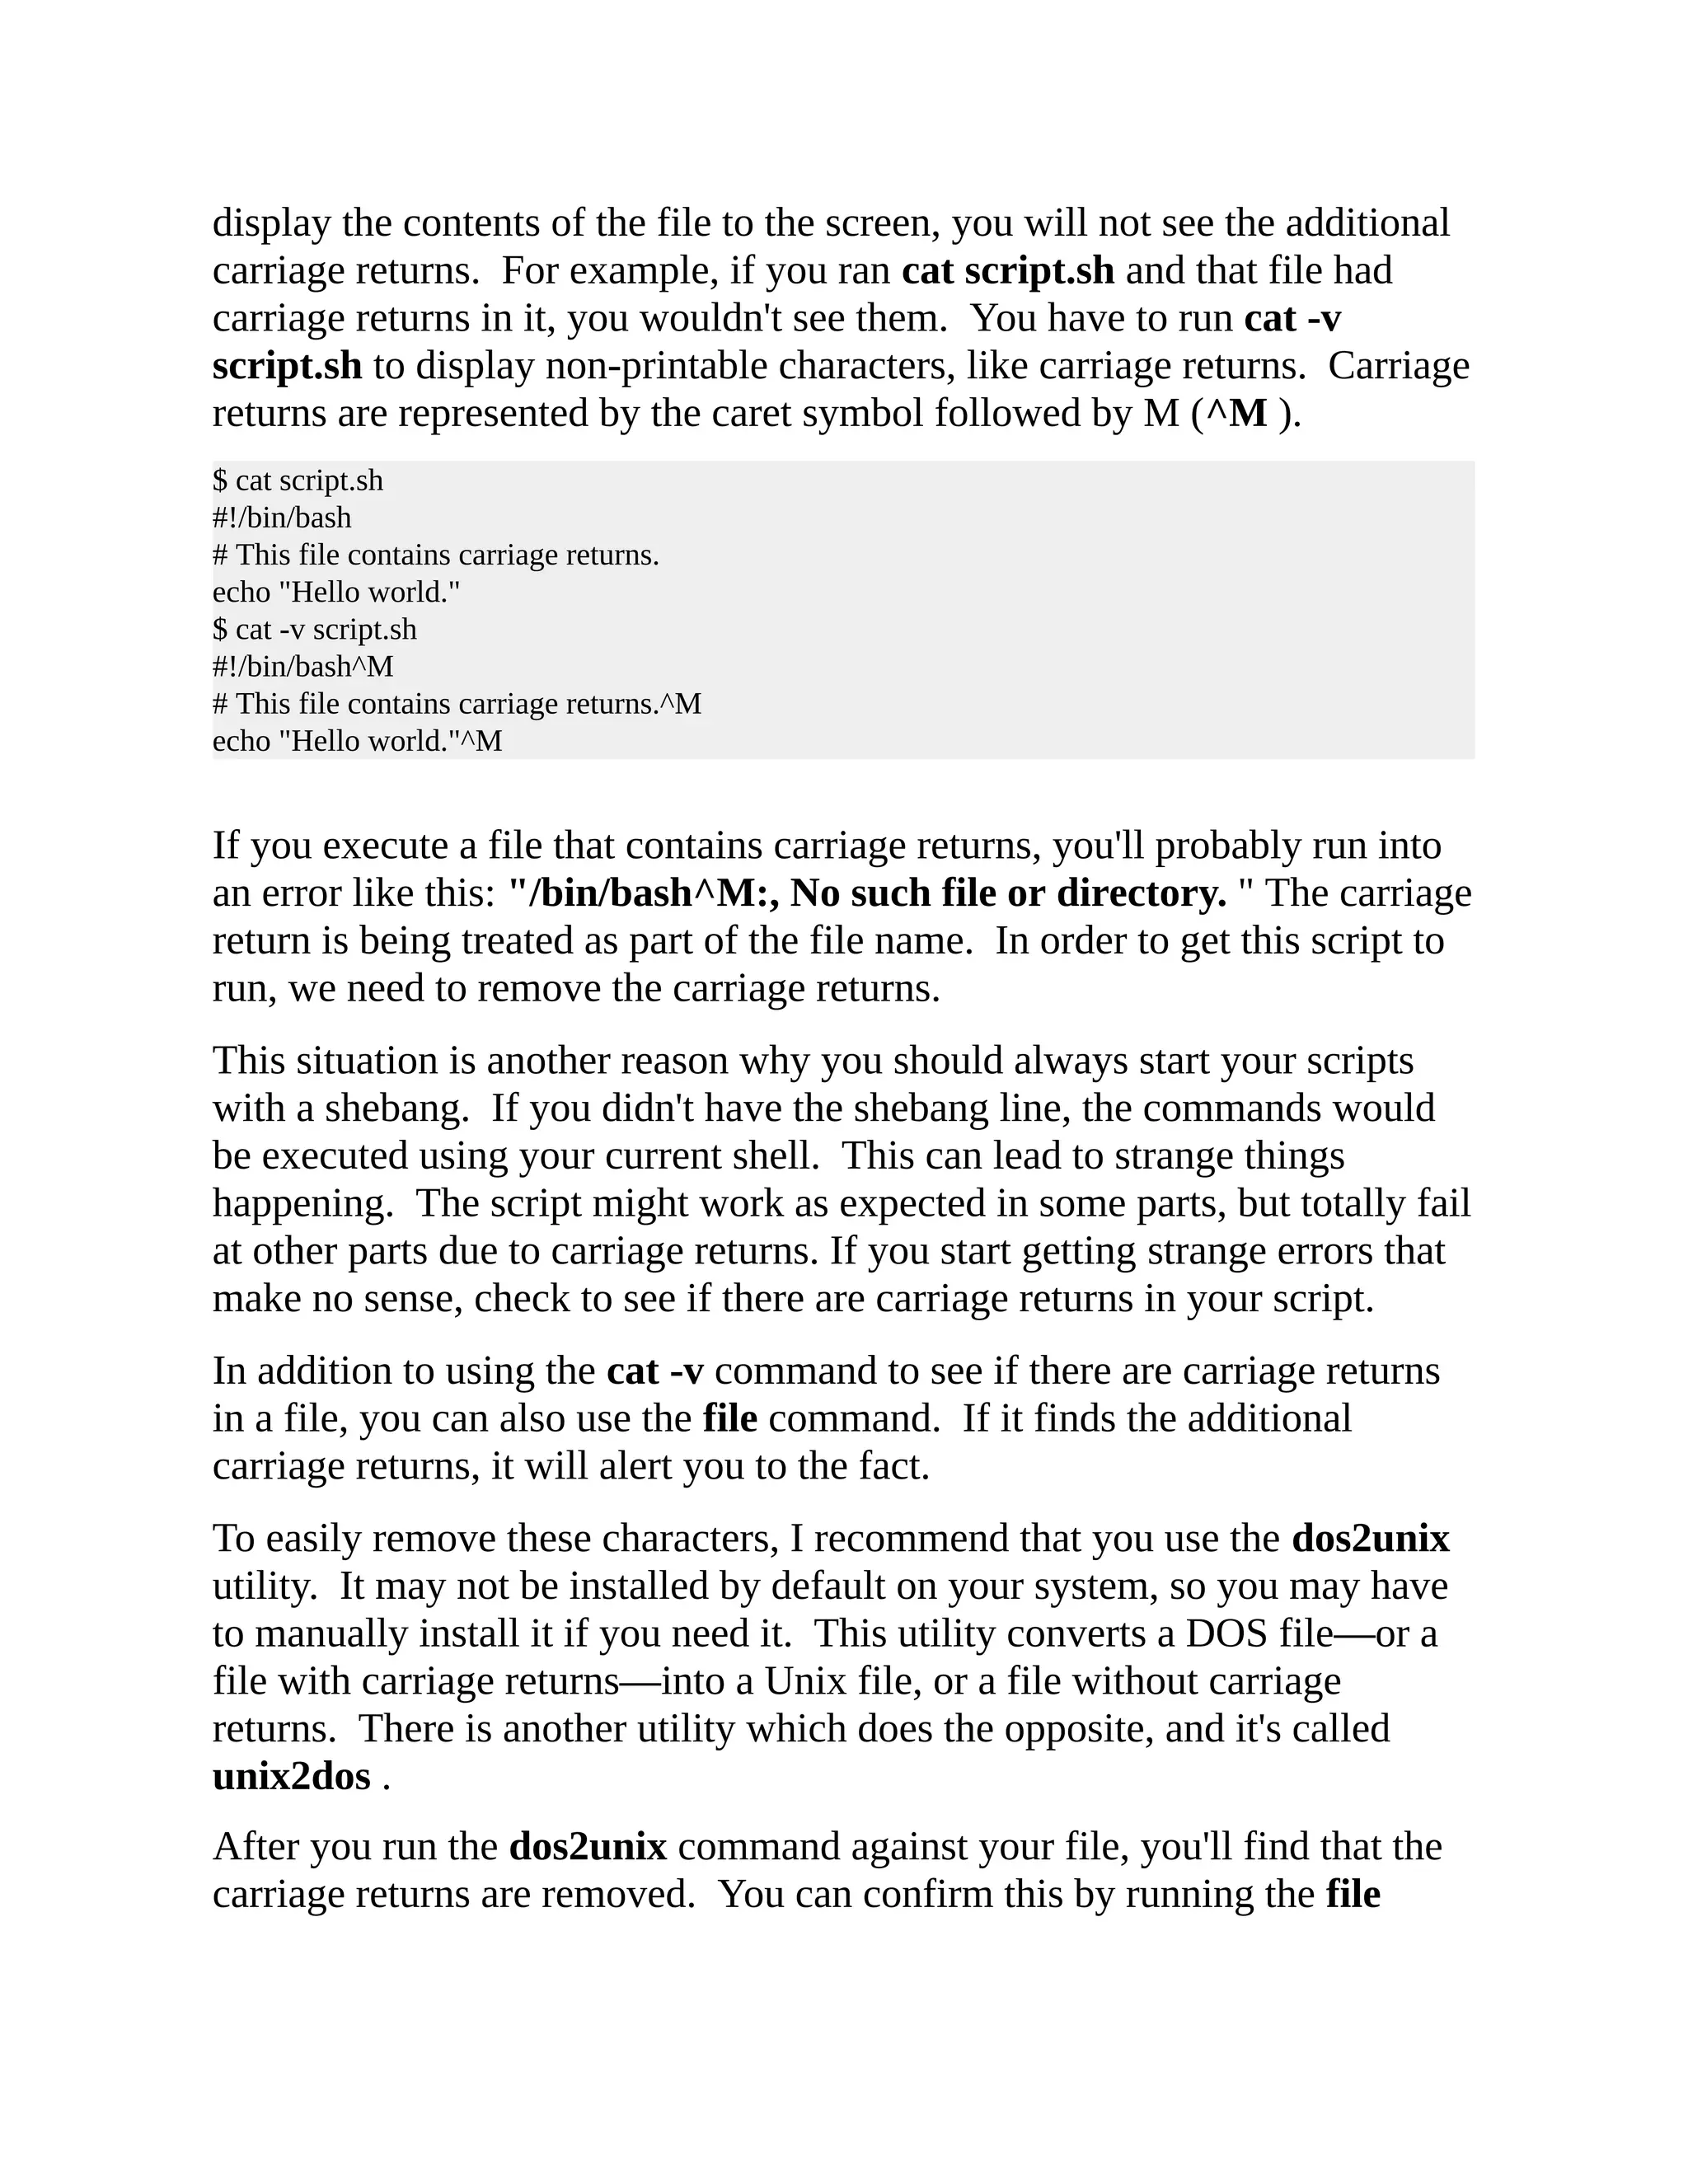
![You can see that when the script gets executed, the output changes after the PS4 variable is set. This can make the output clearer. For example, if we have a problem with the echo command, we know we can edit the script and head straight for line 4. Here is a more advanced example. It just includes more information, such as the function name. #!/bin/bash -x PS4='+ ${BASH_SOURCE}:${LINENO}:${FUNCNAME[0]}() ' debug() { echo "Executing: $@" $@ } debug ls Output: + PS4='+ ${BASH_SOURCE}:${LINENO}:${FUNCNAME[0]}() ' + /tmp/j:7:() debug ls + /tmp/j:4:debug() echo 'Executing: ls' Executing: ls + /tmp/j:5:debug() ls You can see how the PS4 variable allowed us to print the function name using the built-in variable FUNCNAME . File Types Plain text files, like we are working with for shell scripts, contain a control character to represent the end of a line. For Unix and Linux systems, the control character representing a new line is a Line Feed. DOS or Windows systems actually use two characters to represent a new line: a carriage return and a line feed. If you've ever created a text file on a Linux system and sent it to someone who is using a Windows system, it may very well display as one long line on their computer. This is due to the lack of carriage returns. If you were to do the opposite, create a text file on a Windows system and open it on a Linux system, there will be additional characters, specifically carriage returns, in that file. The problem in this situation is that when you](https://image.slidesharecdn.com/shellscriptinghowtoautomatecommandl-jasoncannon-220122160302/75/Shell-scripting-_how_to_automate_command_l_-_jason_cannon-71-2048.jpg)

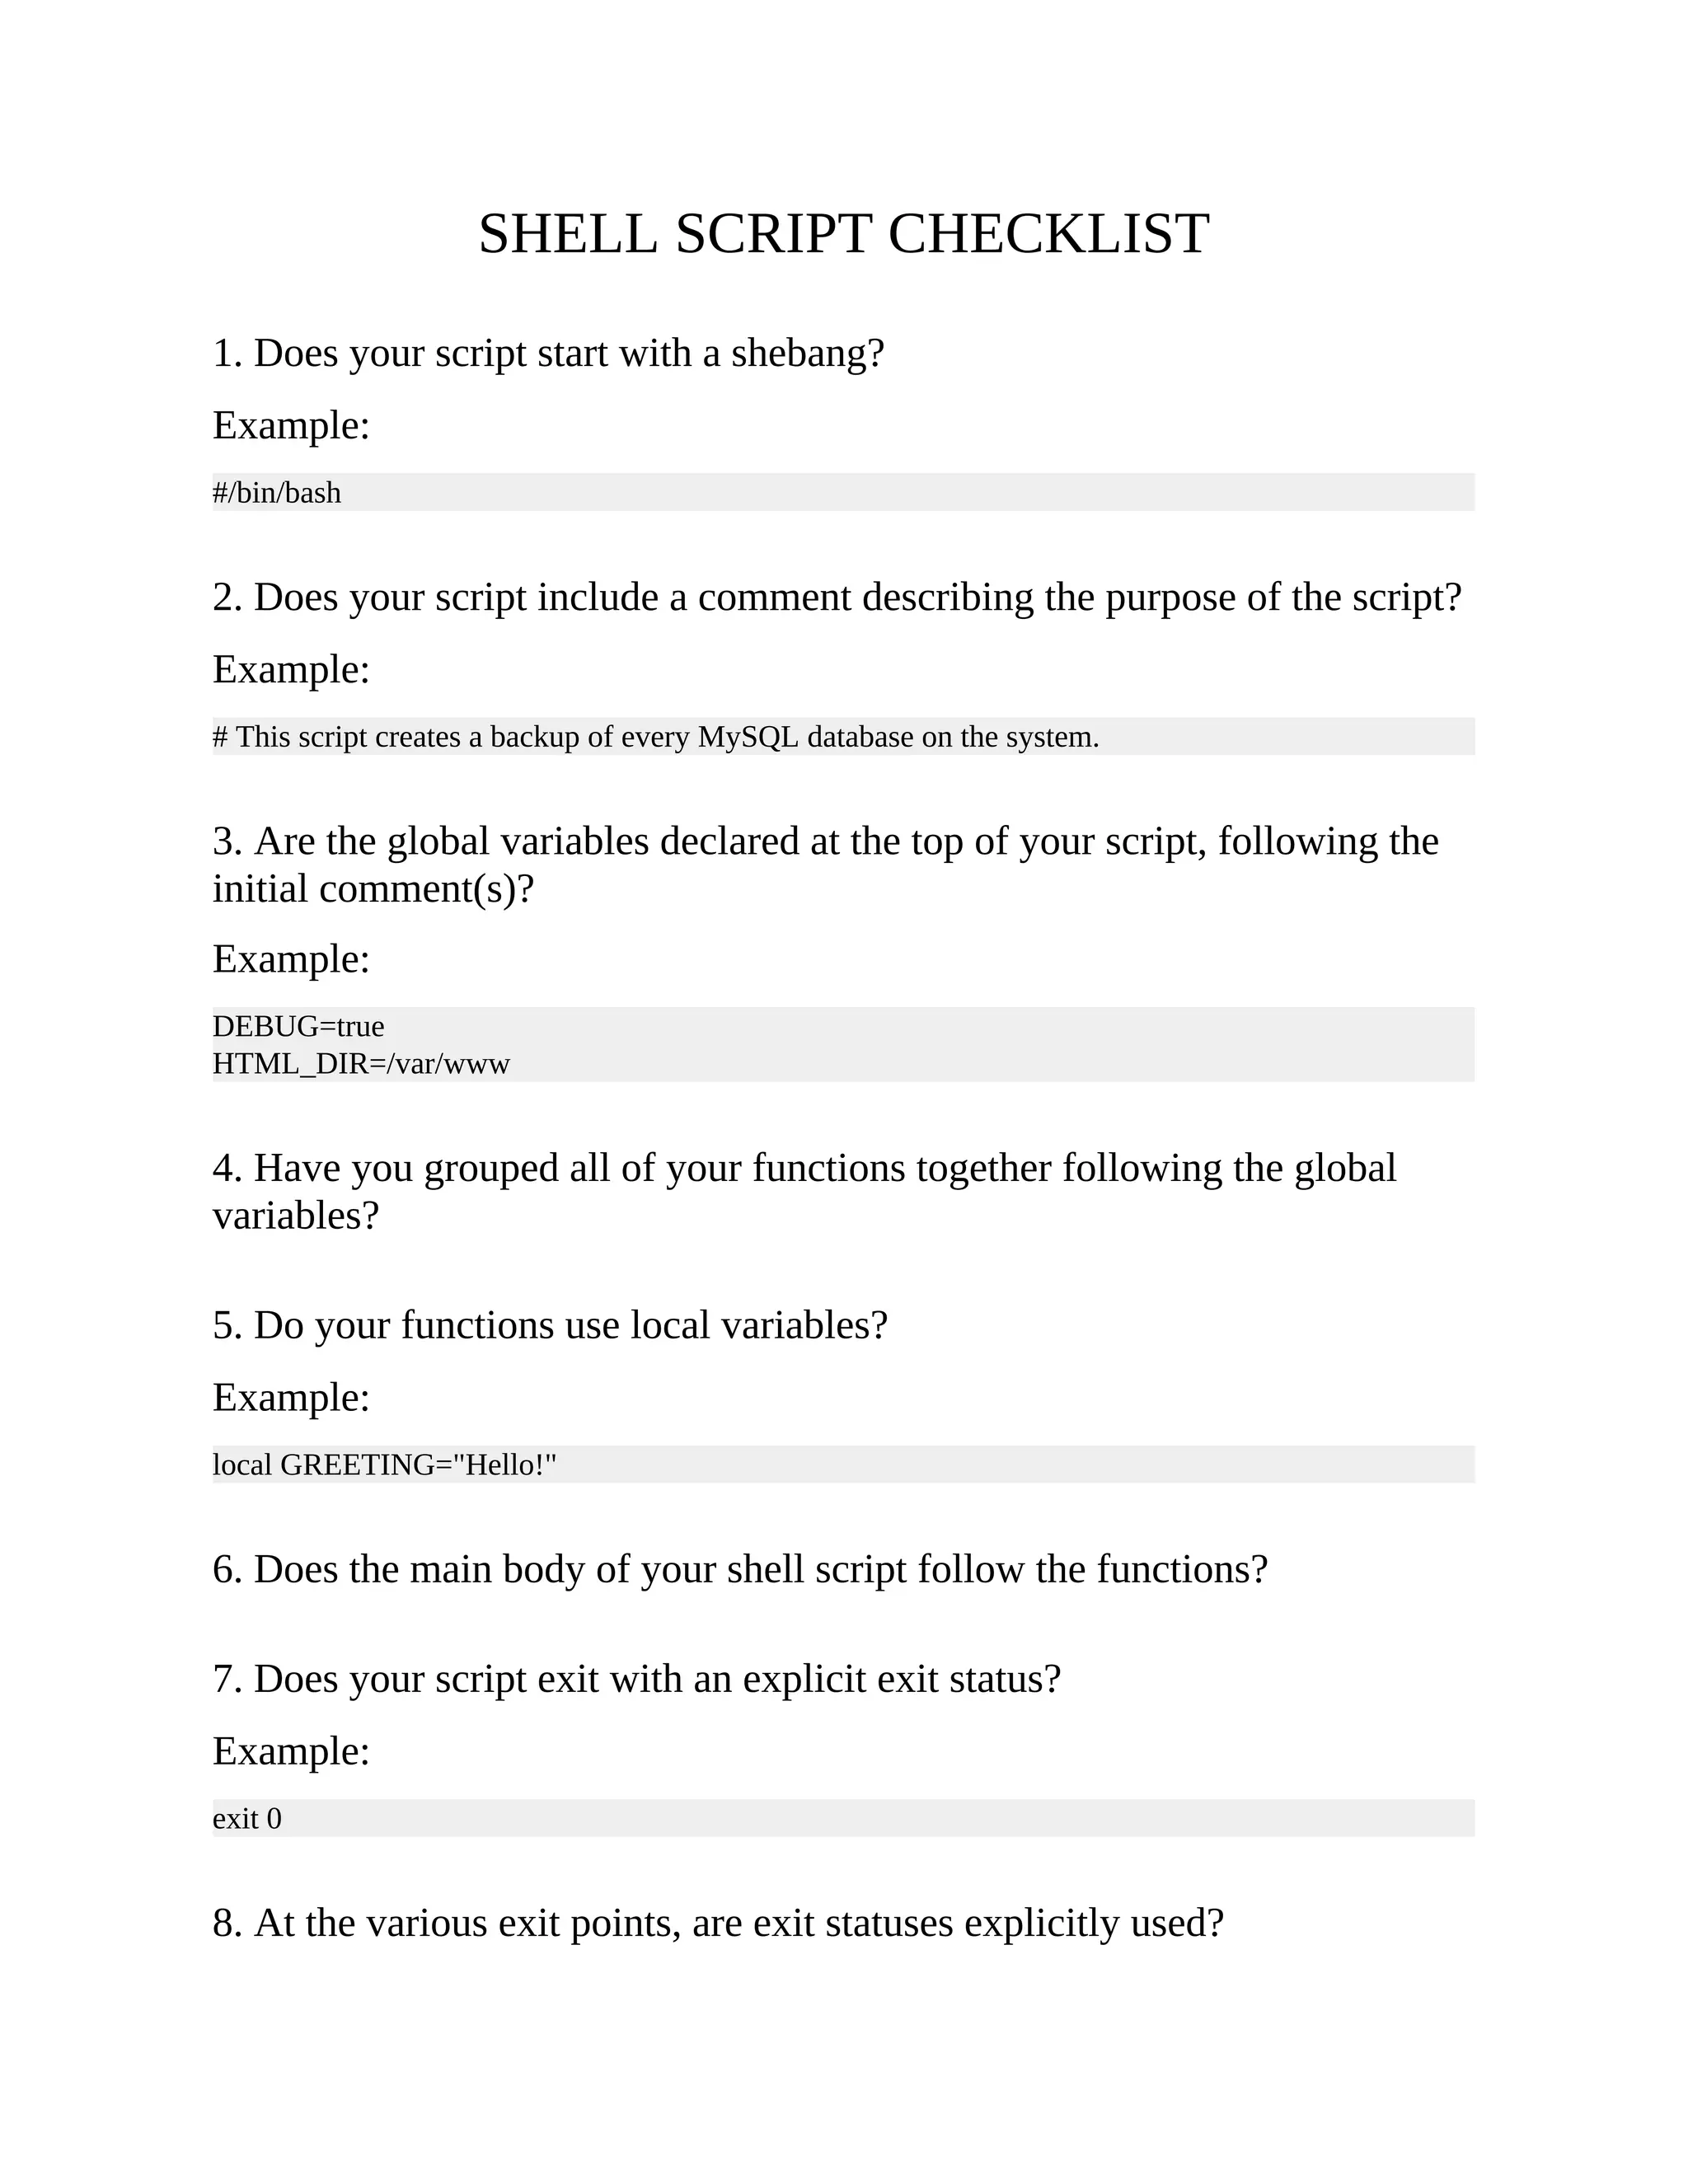
![Example: if [ ! -d "$HTML_DIR" ] then echo "$HTML_DIR does not exist. Exiting." exit 1 fi SHELL SCRIPT TEMPLATE #!/bin/bash # # <Replace with the description and/or purpose # of this shell script.> GLOBAL_VAR1="one" GLOBAL_VAR2="two" function function_one() { local LOCAL_VAR1="one"](https://image.slidesharecdn.com/shellscriptinghowtoautomatecommandl-jasoncannon-220122160302/75/Shell-scripting-_how_to_automate_command_l_-_jason_cannon-76-2048.jpg)