CentOS 5.6 Samba Standalone Server With tdbsam Backend *** may used in Centos 6.0 *** Version 1.0 Author: Falko Timme <ft [at] falkotimme [dot] com> Follow me on Twitter Last edited 04/26/2011 This tutorial explains the installation of a Samba fileserver on CentOS 5.6 and how to configure it to share files over the SMB protocol as well as how to add users. Samba is configured as a standalone server, not as a domain controller. In the resulting setup, every user has his own home directory accessible via the SMB protocol and all users have a shared directory with read-/write access. I do not issue any guarantee that this will work for you! 1 Preliminary Note I'm using a CentOS 5.6 system here with the hostname server1.example.com and the IP address 192.168.0.100. Please make sure that SELinux is disabled and firewall. Disable SELinux [root@host2a ~]# cat /etc/sysconfig/selinux # This file controls the state of SELinux on the system. # SELINUX= can take one of these three values: # enforcing - SELinux security policy is enforced. # permissive - SELinux prints warnings instead of enforcing. # disabled - SELinux is fully disabled. SELINUX= disabled # SELINUXTYPE= type of policy in use. Possible values are: # targeted - Only targeted network daemons are protected. # strict - Full SELinux protection. SELINUXTYPE=targeted Disable Firewall Setup > firewall > disable firewall.
2 Installing Samba Check samba install or not. By default not install. rpm -q samba Connect to your server on the shell and install the Samba packages: Server: yum install samba samba-common Samba client yum install samba-client Time to configure samba server. I highly recommend backing up your smb.conf file before using Samba. You can do this by issuing the following command from the directory where your smb.conf file is located: cd /etc/samba cp smb.conf smb.conf.original Edit the smb.conf file: vi /etc/samba/smb.conf Make sure you see the following lines in the [global] section: [...] # Backend to store user information in. New installations should # use either tdbsam or ldapsam. smbpasswd is available for backwards # compatibility. tdbsam requires no further configuration. security = user passdb backend = tdbsam [...] This enables Linux system users to log in to the Samba server. Then create the system startup links for Samba and start it: chkconfig --levels 235 smb on /etc/init.d/smb start
3 Adding Samba Shares Now I will add a share that is accessible by all users. Create the directory for sharing the files and change the group to the users group: mkdir -p /home/shares/allusers chown -R root:users /home/shares/allusers/ chmod -R ug+rwx,o+rx-w /home/shares/allusers/ At the end of the file /etc/samba/smb.conf add the following lines: vi /etc/samba/smb.conf [allusers] comment = All Users path = /home/shares/allusers valid users = @users force group = users create mask = 0660 directory mask = 0771 writable = yes If you want all users to be able to read and write to their home directories via Samba, add the following lines to /etc/samba/smb.conf (make sure you comment out or remove the other [homes] section in the smb.conf file!): [homes] comment = Home Directories browseable = no valid users = %S writable = yes create mask = 0700 directory mask = 0700 Now we restart Samba: /etc/init.d/smb restart
4 Adding And Managing Users In this example, I will add a user named tom. You can add as many users as you need in the same way, just replace the username tom with the desired username in the commands. useradd tom -m -G users Set a password for tom in the Linux system user database. If the user tom should not be able to log into the Linux system, skip this step. passwd tom -> Enter the password for the new user. Now add the user to the Samba user database: smbpasswd -a tom -> Enter the password for the new user. Now you should be able to log in from your Windows workstation with the file explorer (address is 192.168.0.100 or 192.168.0.100tom for tom's home directory) using the username tom and the chosen password and store files on the Linux server either in tom's home directory or in the public shared directory. 5 Links Samba: http://www.samba.org/ CentOS: http://www.centos.org/ CentOS 5.6 Samba Standalone Server With tdbsam Backend Submitted by falko (Contact Author) (Forums) on Fri, 2011-07-08 13:57. :: CentOS | Samba | Storage
Additional note Starting the Samba and NetBIOS Name Services on RHEL 6 In order for an RHEL 6 server to operate within a Windows network both the Samba (SMB) and NetBOIS nameservice (NMB) services must be started. To identify if the services are already running, the following command may be executed with root privileges in a terminal window: su – /sbin/service smb status smbd is stopped # /sbin/service nmb status nmbd is stopped If the services are reported as currently running and you have made changes to the smb.conf file it will be necessary to restart the services in order to pick up the changes: /sbin/service smb restart /sbin/service nmb restart If, on the other hand, the services are currently stopped, start them as follows: /sbin/service smb start /sbin/service nmb start Accessing Samba Shares Now that the Samba resources are configured and the services are running, it is time to access the shared resource from a Windows system. On a suitable Windows system on the same workgroup as the RHEL 6 system, open Windows Explorer and navigate to the Network page. At this point, explorer should search the network and list any systems using the SMB protocol that it finds. The following figure illustrates an RHEL 6 system named rhel6 located using Windows Explorer on a Windows 7 system:
Double clicking on the RHEL 6 host will prompt for the name and password of a user with access privileges. In this case it is the demo account that we configured using the smbpasswd tool. Entering the username and password will result in the shared resources configured for that user appearing the explorer window, including the tmp resource previously configured:
Double clicking on the tmp shred resource will display a listing of the files and directories contained therein. Accessing Windows Shares from RHEL 6 As previously mentioned, Samba is a two way street, allowing not only Windows systems to access files and printers hosted on an RHEL 6 system, but also allowing the RHEL system to access shared resources on Windows systems. This is achieved using the samba-client package which is installed by default under most RHEL 6 configurations. If it is not currently installed, install it from a Terminal window as follows: su – yum install samba-client To access any shared resources on a Windows system, begin by selecting the Places -> Network desktop menu option. This will display the Network browser dialog including an icon for the Windows Network (if one is detected) as illustrated in the following figure: To obtain a list of Windows workgroups on the network, double click on the Windows Network icon. From within the list of workgroups double click on the desired group to obtain a listing of servers available for access:
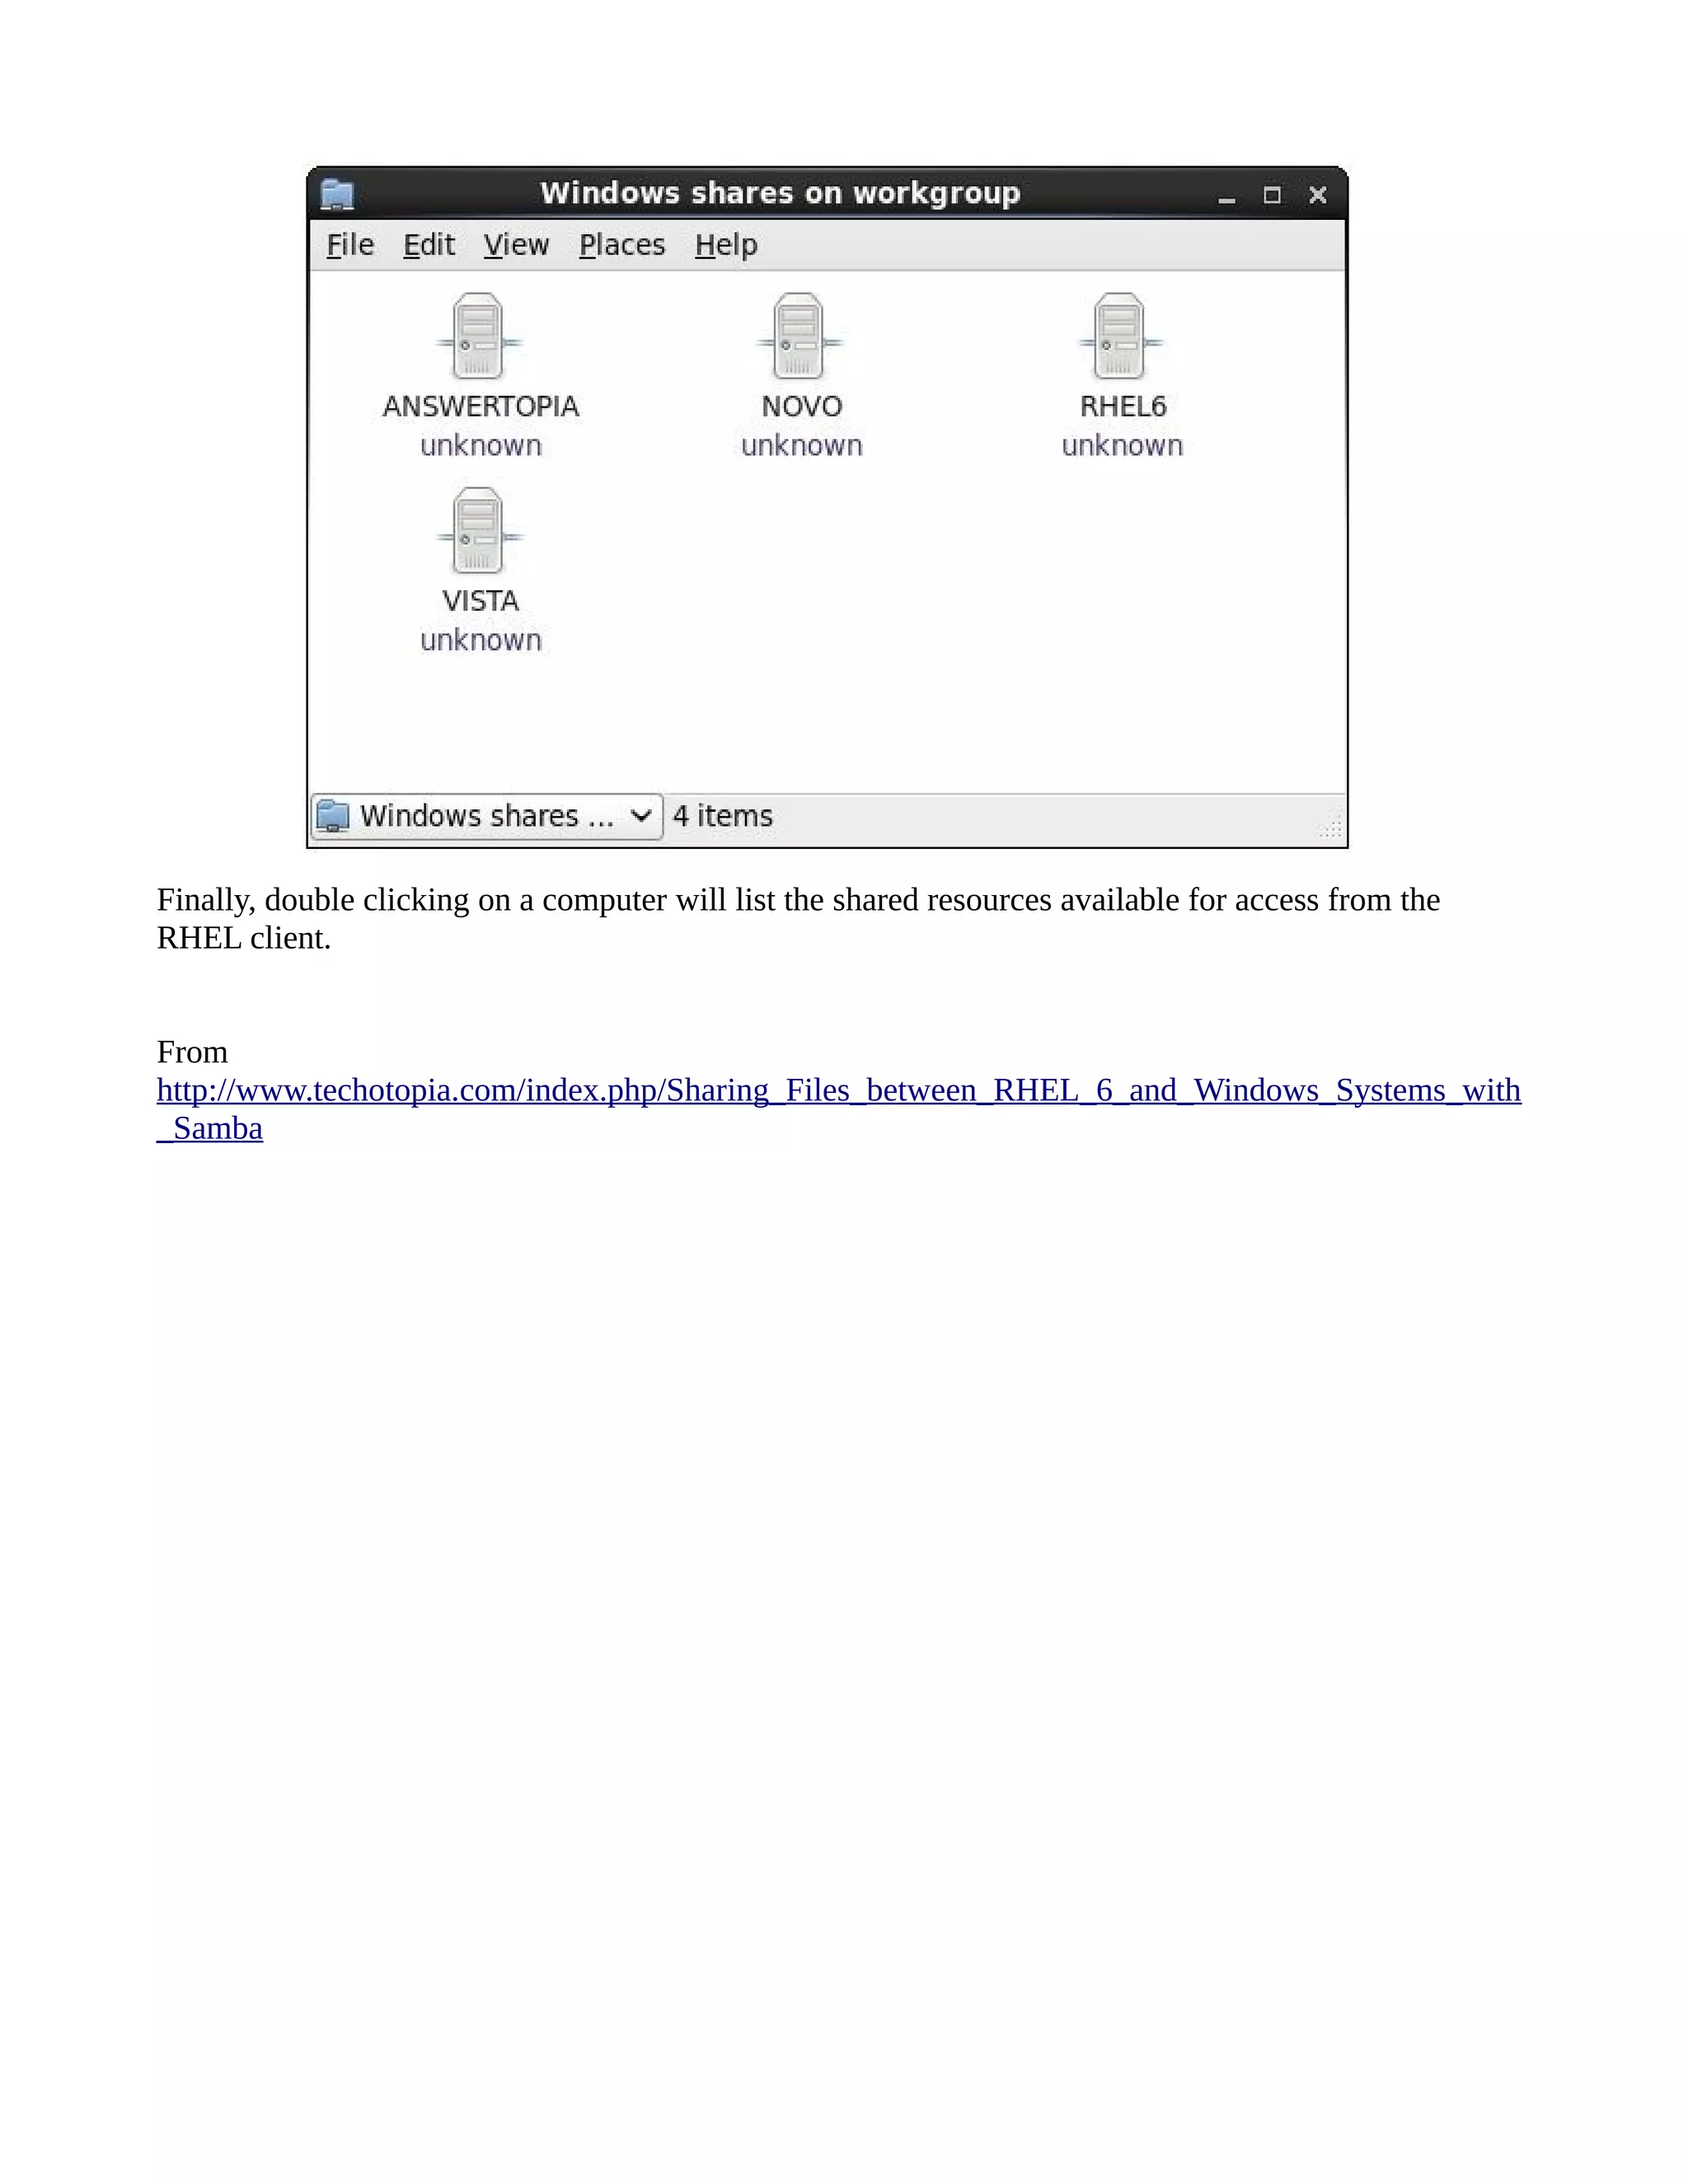
Finally, double clicking on a computer will list the shared resources available for access from the RHEL client. From http://www.techotopia.com/index.php/Sharing_Files_between_RHEL_6_and_Windows_Systems_with _Samba
Managing samba using webmin In centos 5.6 there is GUI : system-config-samba but in centos 6 not have any GUI to manage samba. Management tool using web browser is call webmin. Let install and using it. Download latest rpm for centos form webmin wget http://www.webmin.com/download.html install using command rpm -Uvh webmin.x.x.x.rpm wait until finish installations open web browser and point your web browser to samba server port 10000 http://no.ip.sambaserver:10000 login with root acount and password.

Samba tutorial

  • 1.
    CentOS 5.6 SambaStandalone Server With tdbsam Backend *** may used in Centos 6.0 *** Version 1.0 Author: Falko Timme <ft [at] falkotimme [dot] com> Follow me on Twitter Last edited 04/26/2011 This tutorial explains the installation of a Samba fileserver on CentOS 5.6 and how to configure it to share files over the SMB protocol as well as how to add users. Samba is configured as a standalone server, not as a domain controller. In the resulting setup, every user has his own home directory accessible via the SMB protocol and all users have a shared directory with read-/write access. I do not issue any guarantee that this will work for you! 1 Preliminary Note I'm using a CentOS 5.6 system here with the hostname server1.example.com and the IP address 192.168.0.100. Please make sure that SELinux is disabled and firewall. Disable SELinux [root@host2a ~]# cat /etc/sysconfig/selinux # This file controls the state of SELinux on the system. # SELINUX= can take one of these three values: # enforcing - SELinux security policy is enforced. # permissive - SELinux prints warnings instead of enforcing. # disabled - SELinux is fully disabled. SELINUX= disabled # SELINUXTYPE= type of policy in use. Possible values are: # targeted - Only targeted network daemons are protected. # strict - Full SELinux protection. SELINUXTYPE=targeted Disable Firewall Setup > firewall > disable firewall.
  • 2.
    2 Installing Samba Checksamba install or not. By default not install. rpm -q samba Connect to your server on the shell and install the Samba packages: Server: yum install samba samba-common Samba client yum install samba-client Time to configure samba server. I highly recommend backing up your smb.conf file before using Samba. You can do this by issuing the following command from the directory where your smb.conf file is located: cd /etc/samba cp smb.conf smb.conf.original Edit the smb.conf file: vi /etc/samba/smb.conf Make sure you see the following lines in the [global] section: [...] # Backend to store user information in. New installations should # use either tdbsam or ldapsam. smbpasswd is available for backwards # compatibility. tdbsam requires no further configuration. security = user passdb backend = tdbsam [...] This enables Linux system users to log in to the Samba server. Then create the system startup links for Samba and start it: chkconfig --levels 235 smb on /etc/init.d/smb start
  • 3.
    3 Adding SambaShares Now I will add a share that is accessible by all users. Create the directory for sharing the files and change the group to the users group: mkdir -p /home/shares/allusers chown -R root:users /home/shares/allusers/ chmod -R ug+rwx,o+rx-w /home/shares/allusers/ At the end of the file /etc/samba/smb.conf add the following lines: vi /etc/samba/smb.conf [allusers] comment = All Users path = /home/shares/allusers valid users = @users force group = users create mask = 0660 directory mask = 0771 writable = yes If you want all users to be able to read and write to their home directories via Samba, add the following lines to /etc/samba/smb.conf (make sure you comment out or remove the other [homes] section in the smb.conf file!): [homes] comment = Home Directories browseable = no valid users = %S writable = yes create mask = 0700 directory mask = 0700 Now we restart Samba: /etc/init.d/smb restart
  • 4.
    4 Adding AndManaging Users In this example, I will add a user named tom. You can add as many users as you need in the same way, just replace the username tom with the desired username in the commands. useradd tom -m -G users Set a password for tom in the Linux system user database. If the user tom should not be able to log into the Linux system, skip this step. passwd tom -> Enter the password for the new user. Now add the user to the Samba user database: smbpasswd -a tom -> Enter the password for the new user. Now you should be able to log in from your Windows workstation with the file explorer (address is 192.168.0.100 or 192.168.0.100tom for tom's home directory) using the username tom and the chosen password and store files on the Linux server either in tom's home directory or in the public shared directory. 5 Links Samba: http://www.samba.org/ CentOS: http://www.centos.org/ CentOS 5.6 Samba Standalone Server With tdbsam Backend Submitted by falko (Contact Author) (Forums) on Fri, 2011-07-08 13:57. :: CentOS | Samba | Storage
  • 5.
    Additional note Starting theSamba and NetBIOS Name Services on RHEL 6 In order for an RHEL 6 server to operate within a Windows network both the Samba (SMB) and NetBOIS nameservice (NMB) services must be started. To identify if the services are already running, the following command may be executed with root privileges in a terminal window: su – /sbin/service smb status smbd is stopped # /sbin/service nmb status nmbd is stopped If the services are reported as currently running and you have made changes to the smb.conf file it will be necessary to restart the services in order to pick up the changes: /sbin/service smb restart /sbin/service nmb restart If, on the other hand, the services are currently stopped, start them as follows: /sbin/service smb start /sbin/service nmb start Accessing Samba Shares Now that the Samba resources are configured and the services are running, it is time to access the shared resource from a Windows system. On a suitable Windows system on the same workgroup as the RHEL 6 system, open Windows Explorer and navigate to the Network page. At this point, explorer should search the network and list any systems using the SMB protocol that it finds. The following figure illustrates an RHEL 6 system named rhel6 located using Windows Explorer on a Windows 7 system:
  • 6.
    Double clicking onthe RHEL 6 host will prompt for the name and password of a user with access privileges. In this case it is the demo account that we configured using the smbpasswd tool. Entering the username and password will result in the shared resources configured for that user appearing the explorer window, including the tmp resource previously configured:
  • 7.
    Double clicking onthe tmp shred resource will display a listing of the files and directories contained therein. Accessing Windows Shares from RHEL 6 As previously mentioned, Samba is a two way street, allowing not only Windows systems to access files and printers hosted on an RHEL 6 system, but also allowing the RHEL system to access shared resources on Windows systems. This is achieved using the samba-client package which is installed by default under most RHEL 6 configurations. If it is not currently installed, install it from a Terminal window as follows: su – yum install samba-client To access any shared resources on a Windows system, begin by selecting the Places -> Network desktop menu option. This will display the Network browser dialog including an icon for the Windows Network (if one is detected) as illustrated in the following figure: To obtain a list of Windows workgroups on the network, double click on the Windows Network icon. From within the list of workgroups double click on the desired group to obtain a listing of servers available for access:
  • 8.
    Finally, double clickingon a computer will list the shared resources available for access from the RHEL client. From http://www.techotopia.com/index.php/Sharing_Files_between_RHEL_6_and_Windows_Systems_with _Samba
  • 9.
    Managing samba usingwebmin In centos 5.6 there is GUI : system-config-samba but in centos 6 not have any GUI to manage samba. Management tool using web browser is call webmin. Let install and using it. Download latest rpm for centos form webmin wget http://www.webmin.com/download.html install using command rpm -Uvh webmin.x.x.x.rpm wait until finish installations open web browser and point your web browser to samba server port 10000 http://no.ip.sambaserver:10000 login with root acount and password.