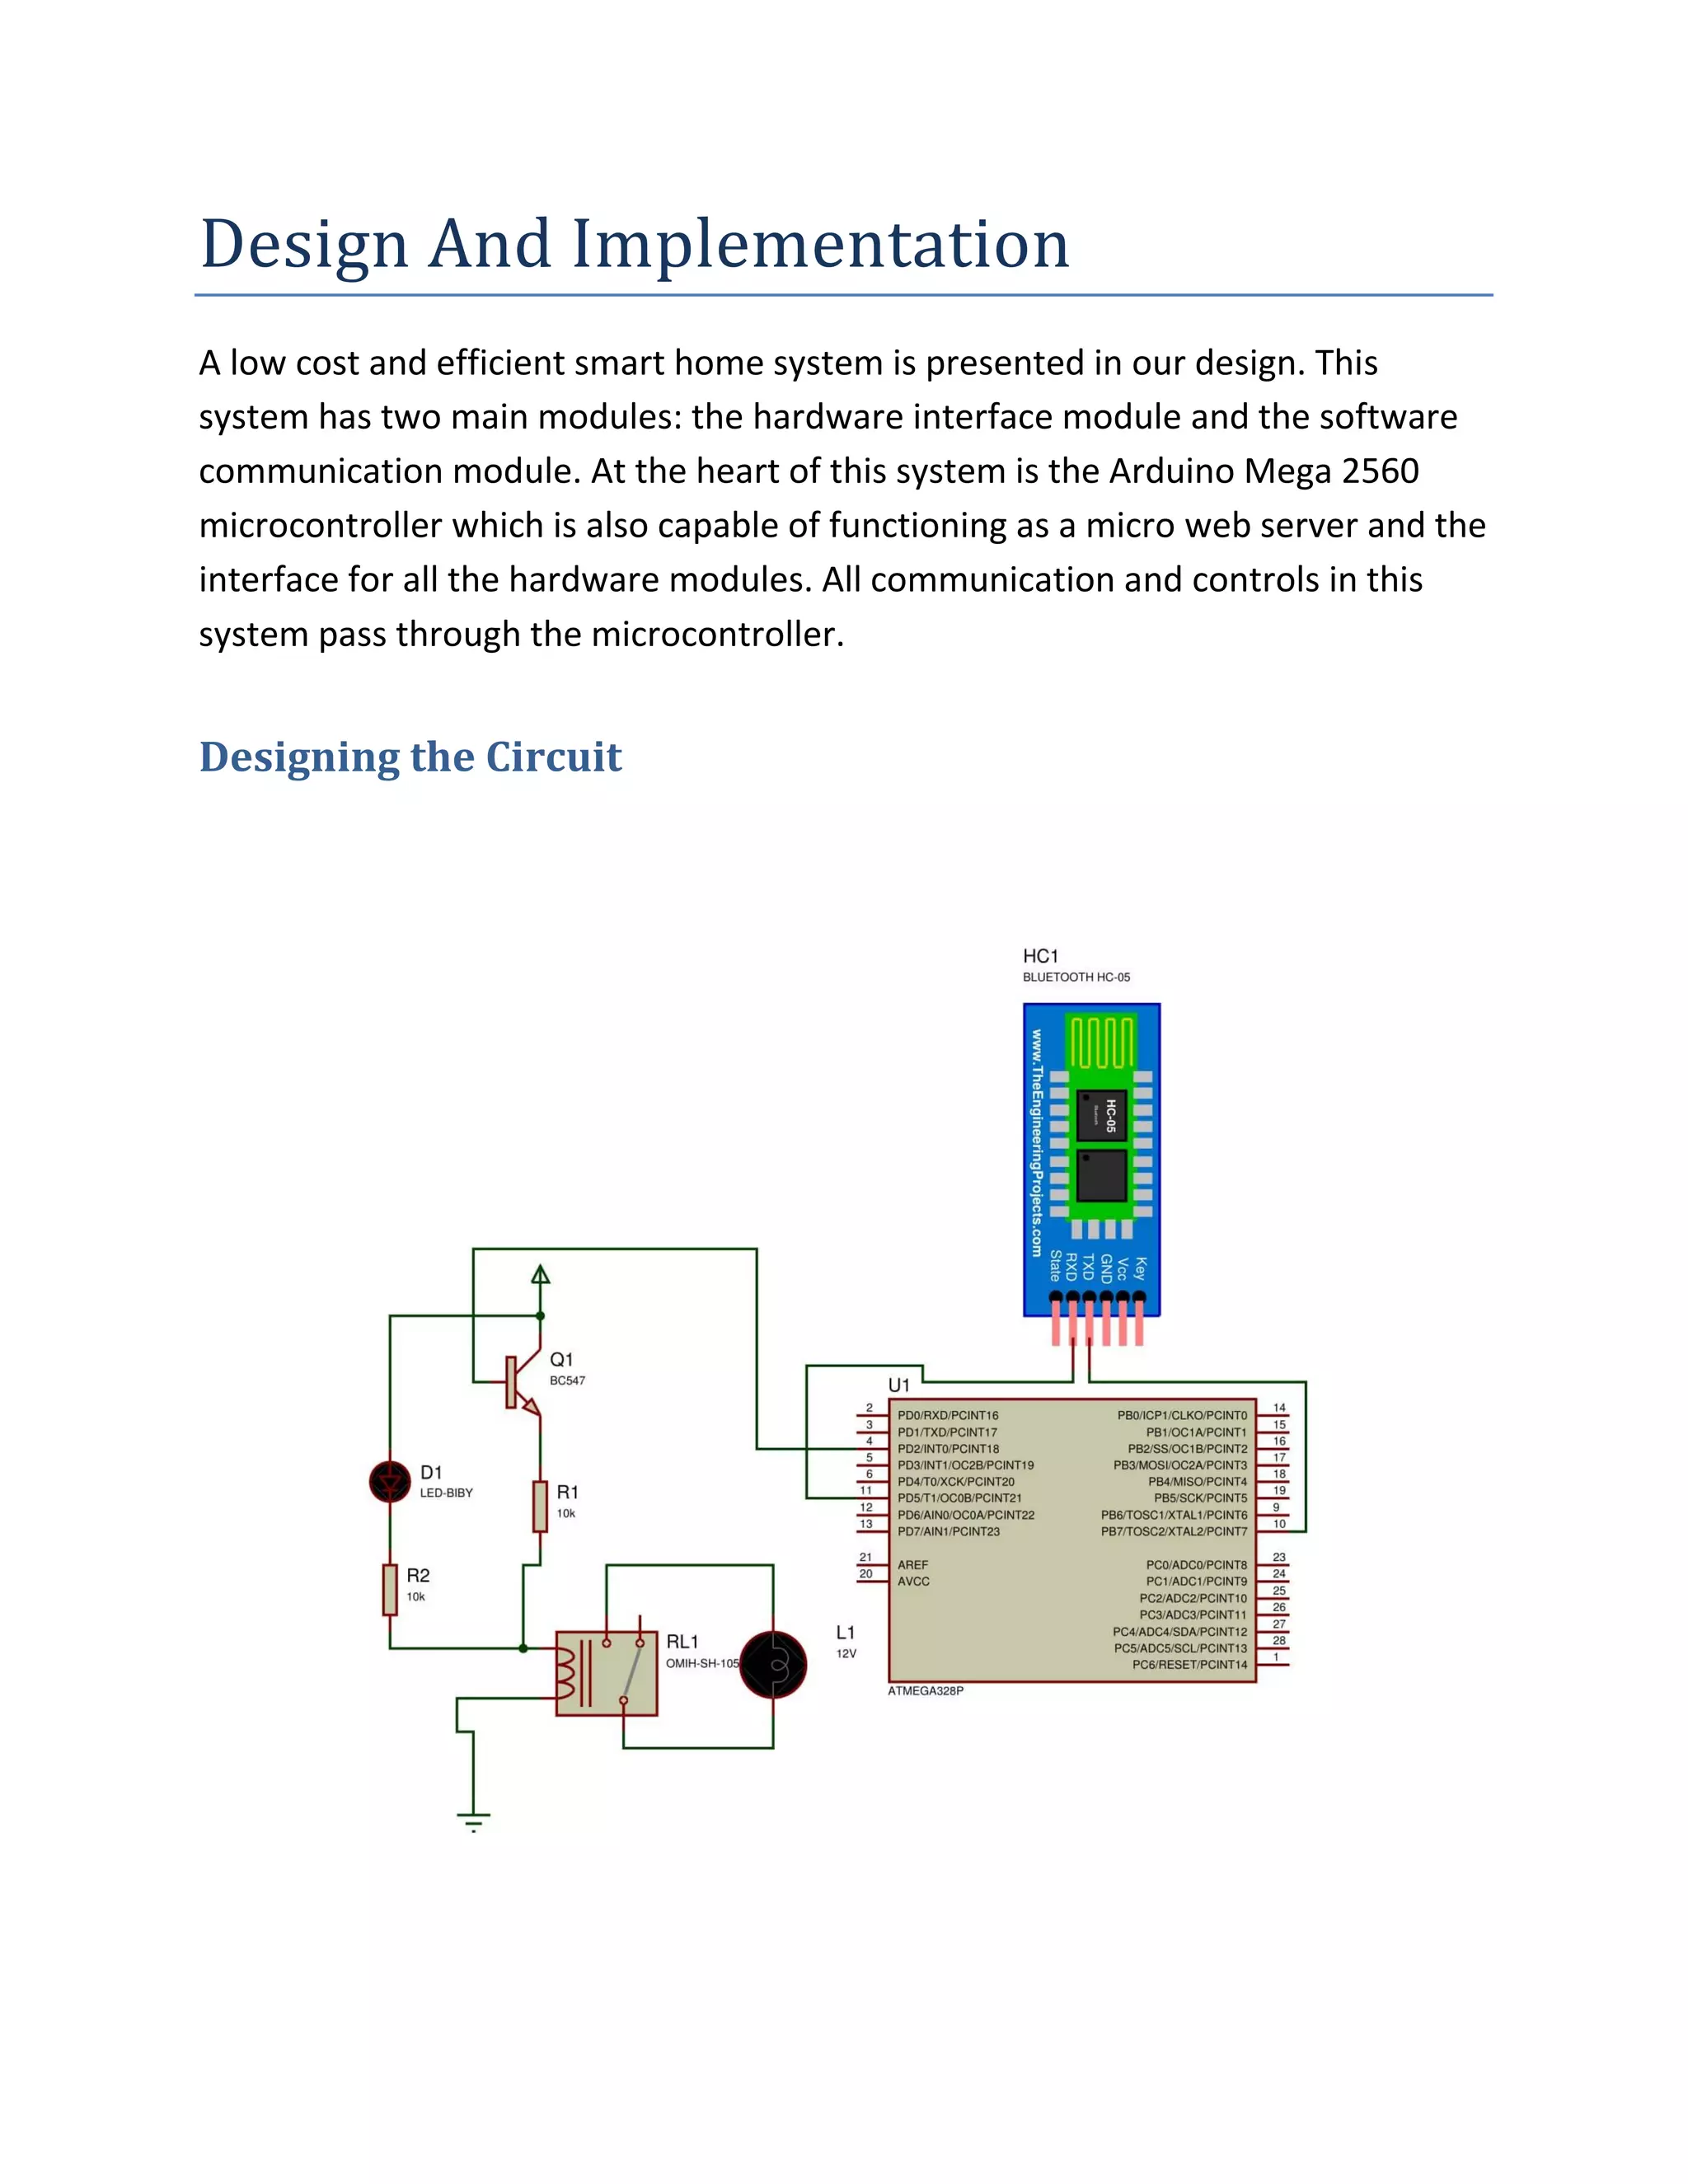
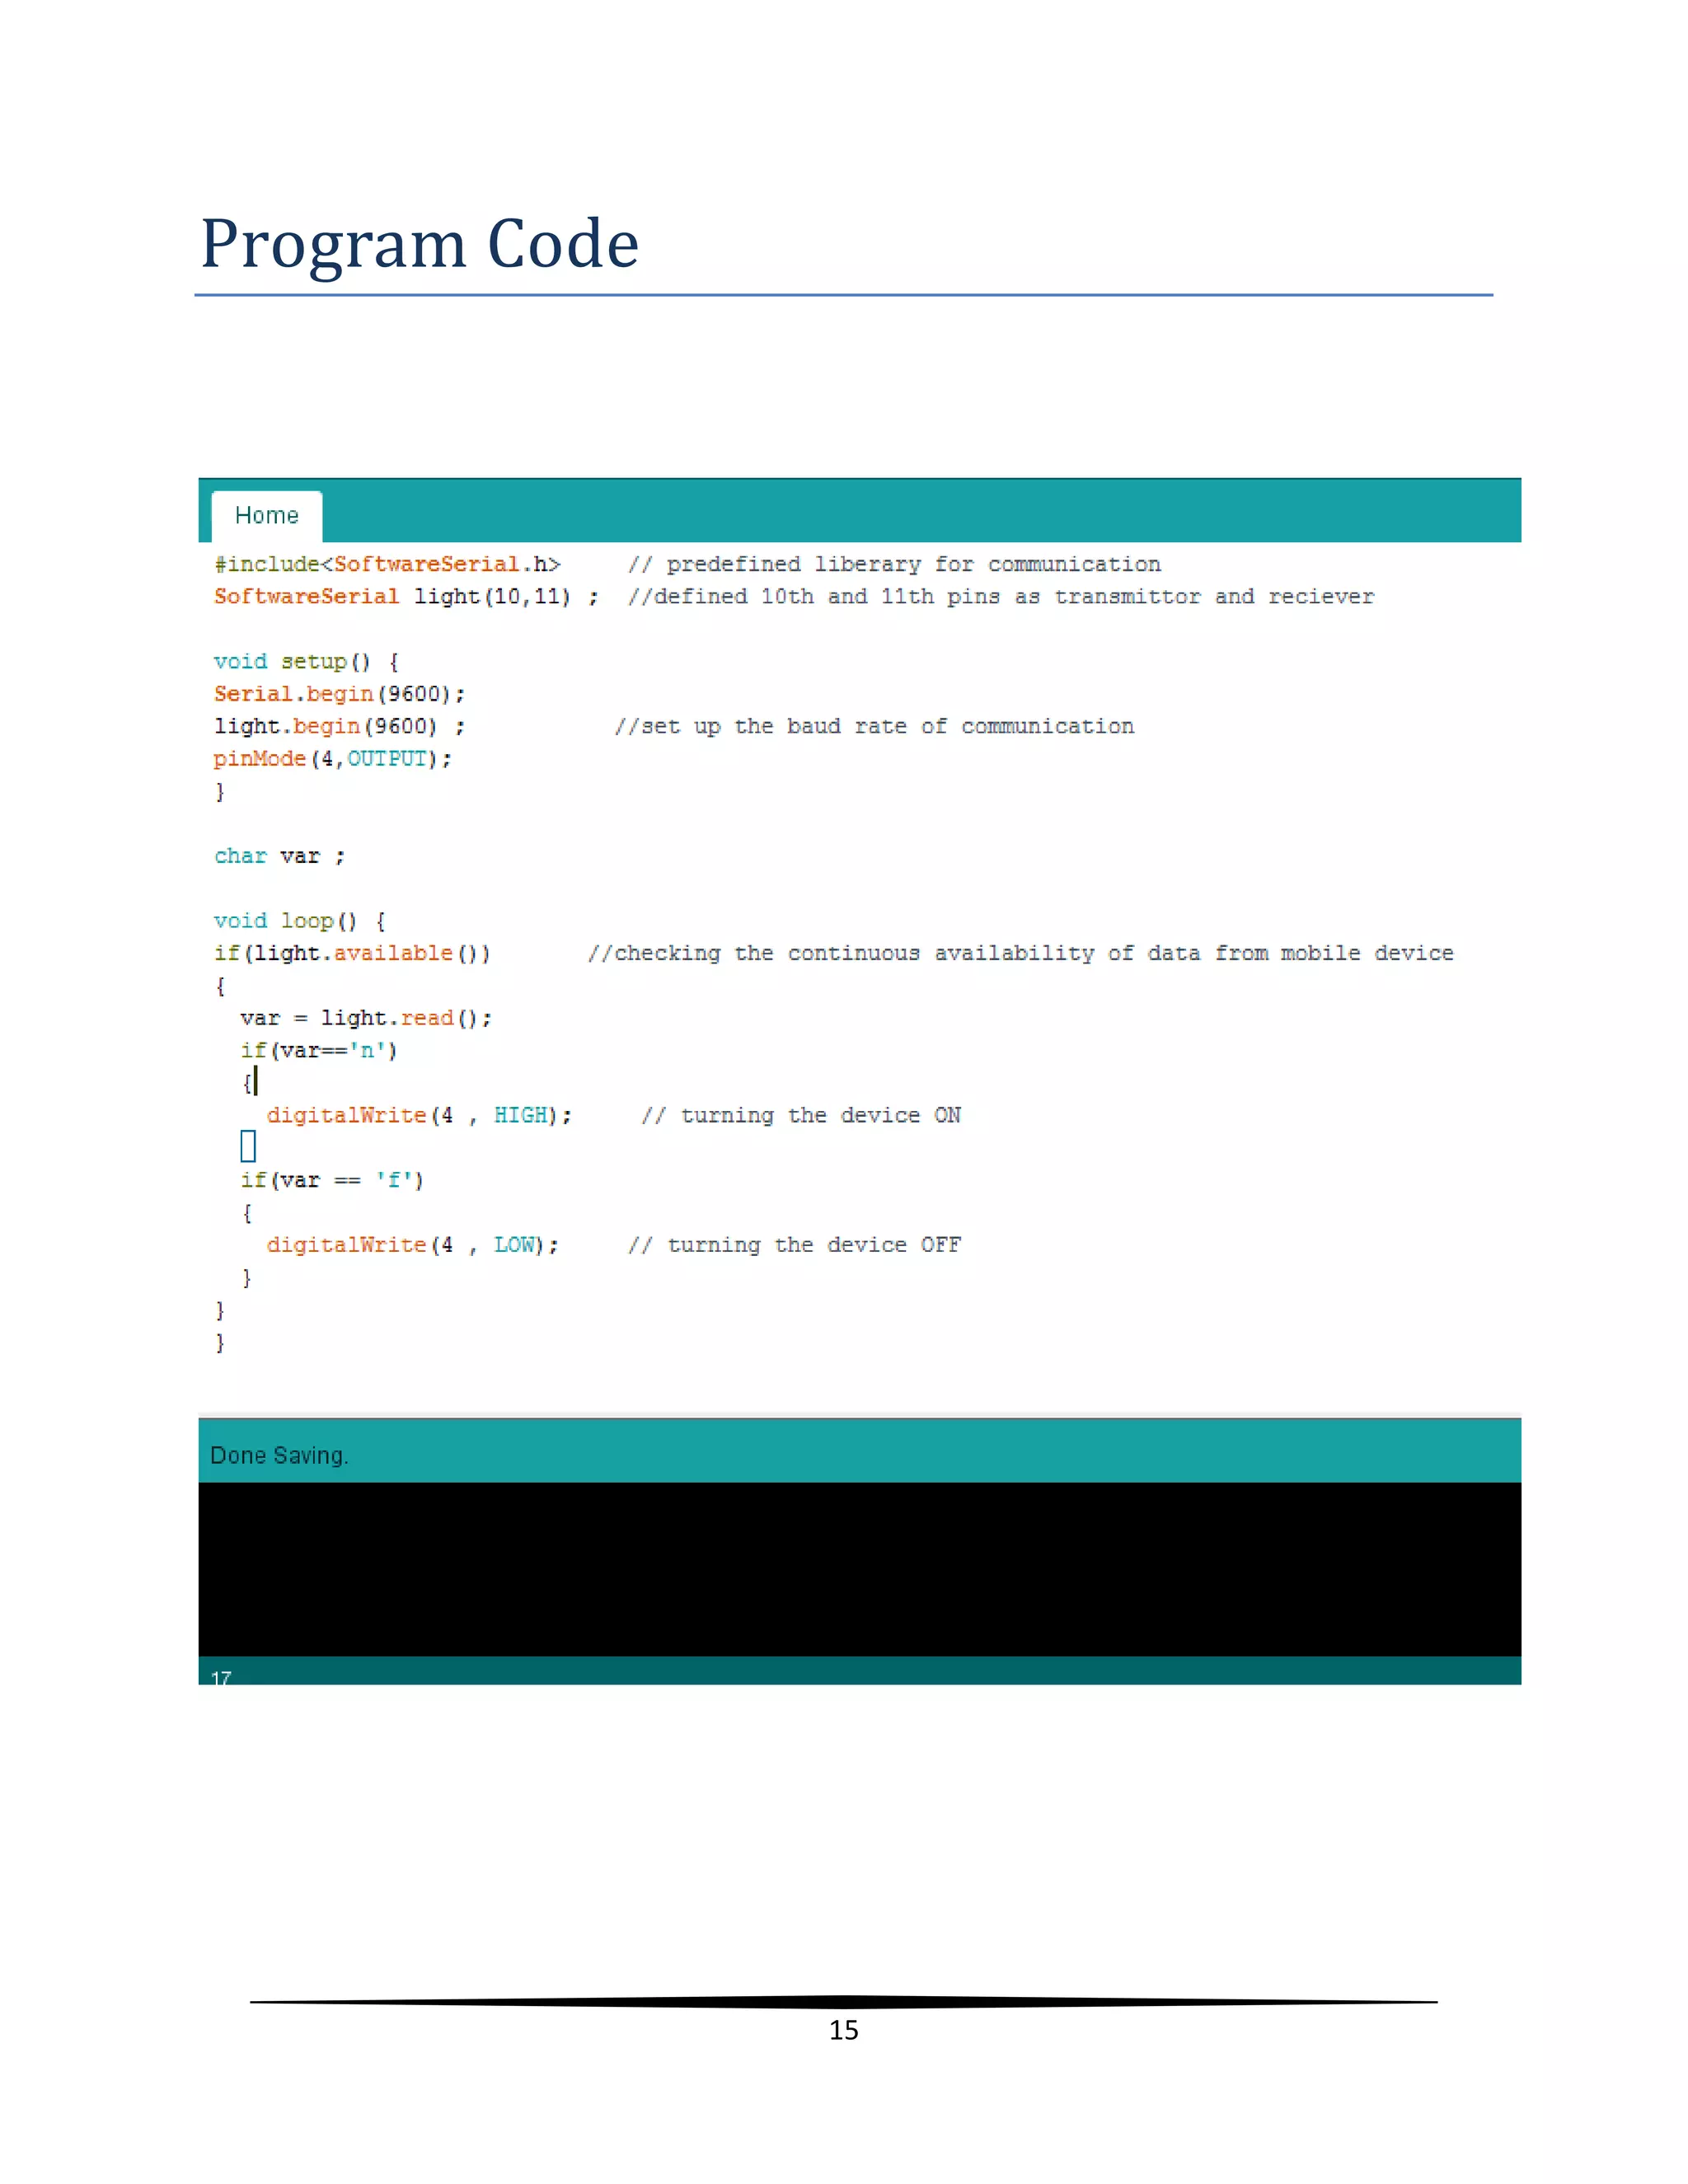
1 Abstract The main objective of this project is to develop a home automation system using an Arduino board with Bluetooth being remotely controlled by any Android OS smart phone. As technology is advancing so houses are also getting smarter. Modern houses are gradually shifting from conventional switches to centralized control system, involving remote controlled switches. Presently, conventional wall switches located in different parts of the house makes it difficult for the user to go near them to operate. Even more it becomes more difficult for the elderly or physically handicapped people to do so. Remote controlled home automation system provides a most modern solution with smart phones. In order to achieve this, a Bluetooth module is interfaced to the Arduino board at the receiver end while on the transmitter end, a GUI application on the cell phone sends ON/OFF commands to the receiver where loads are connected. By touching the specified location on the GUI, the loads can be turned ON/OFF remotely through this technology. The loads are operated by Arduino board through opto- isolators and thyristors using triacs.
2 Acknowledgement First and foremost, I would like to take this opportunity to thank our lecturer Mr. Monish Gupta for his guidance and advice on this project. At the same time I also won’t forget my group participant and also friends to because they quite good w i t h s ha r i ng s o m e o f t h e i r i nf o r ma t i o n t o c o m p l e t e t h i s f i na l y e a r pr o j e ct successfully. Last but not least, I am very grateful to our College, lecture sand friends where they gave us enough of time to complete this project and at the same time I would like to thank my friends and classmates who helps me a lot to complete this project. Thank You.
3 Contents ABSTRACT ............................................................................................................ 1 ACKNOWLEDGEMENT…………………………………………………….………………………………….2 INTRODUCTION ……………………............................................................................. 4 PROJECT AIM & SCOPE………………………................................................................5 DESCRIPTION OF PROJECT…................................................................................ 6 H/W & S/W REQUIREMENT.................................................................................7 DESCRIPTION OF H/W REQUIRED.......................................................................8 INTERFACING OF HC-05 MODULE......................................................................11 DESIGN & IMPLEMENTATION............................................................................13 PROS & CONS……………………………………………………………………………………………..……16 APPLICATION………..............................................................................................18 FUTURE DEVELOPMENT…………………………………………………………………………….……..18 CONCLUSION……………………………………………………………………………………………………19 REFERENCE………………………………………………………………………………………………………20
4 Introduction Nowadays, we have remote controls for our television sets and other electronic systems, which have made our lives real easy. Have you ever wondered about home automation which would give the facility of controlling tube lights, fans and other electrical appliances at home using a remote control? Off-course, Yes! But, are the available options cost-effective? If the answer is No, we have found a solution to it. We have come up with a new system called Arduino based home automation using Bluetooth. This system is super-cost effective and can give the user, the ability to control any electronic device without even spending for a remote control. This project helps the user to control all the electronic devices using his/her smartphone. Time is a very valuable thing. Everybody wants to save time as much as they can. New technologies are being introduced to save our time. To save people’s time we are introducing Home Automation system using Bluetooth . With the help of this system you can control your home appliances from your mobile phone. You can turn on/off your home appliances within the range of Bluetooth.
5 Project Aim The aim of the project is to design and construct a home automation system that will remotely switch on or off any household appliances connected to it, using a microcontroller , voice dial on phone , or Bluetooth based android application. Project Objective The objective of this project is to implement a low cost , reliable and scalable home automation system that can be used to remotely switch on or off any household appliance , using a microcontroller to achieve hardware simplicity ,low cost short messaging service for feedback and voice dial from any phone to toggle the switch state. Project scope and limitation This project work is complete on its own in remotely and automatically switching on or off of an electrical appliance not limited to household appliances and sends a feedback message indicating the new present state of the appliance.
6 Description of the Project This project is one of the important Arduino Projects. Arduino based home automation using Bluetooth project helps the user to control any electronic device using Device Control app on their Android Smartphone. The android app sends commands to the controller – Arduino, through wireless communication, namely, Bluetooth. The Arduino is connected to the main PCB which has five relays as shown in the block diagram. These relays can be connected to different electronic devices. As per the block diagram, Device 1 – Buzzer, Device 2- Fan, Device 3 – Lights. When the user presses on the ‘On’ button displayed on the app for the device 1, the Buzzer is switched on. This Buzzer can be switched off, by pressing the same button again. Similarly, when the user presses on the ‘On’ button displayed on the app for the device 2, the fan is switched on. The fan can be switched off, by pressing the same button again. This project of home automation using Bluetooth and Arduino can be used for controlling any AC or DC devices. In the demonstration, we have used DC Fan and DC Bulb. To drive this DC Fan and Light, a 9V battery is connected.
7 Hardware Requirement The list of components mentioned here are specifically for controlling 4 different loads.  Arduino Uno with Atmega 328P microcontroller  HC – 05 Bluetooth Module  10 KΩ Resistor  1 KΩ Resistor X 4  BC547 NPN Transistor X 4  1N4007 Diode X 4  5 V Relay X 4  Prototyping board (Bread board)  Connecting wires  9 V Power supply  Smartphone or tablet (Bluetooth enabled) Software Requirement   Arduino 1.6.9 compiler  Proteus 7  Android application
8 Description of Hardware Required Arduino uno The Arduino Uno is a microcontroller board based on the ATmega328P . It has 14 digital input/output pins (of which 6 can be used as PWM outputs), 6 analog inputs, a 16 MHz crystal oscillator, a USB connection, a power jack, an ICSP header, and a reset button. It contains everything needed to support the microcontroller; simply connect it to a computer with a USB cable or power it with a AC-to-DC adapter or battery to get started. The Uno differs from all preceding boards in that it does not use the FTDI USB-to- serial driver chip. Instead, it features the Atmega8U2 programmed as a USB-to- serial converter.  Some Technical Specification of Arduino Uno are: 1. Microcontroller ATmega328P 2. Operating Voltage 5V 3. Input Voltage (recommended) 7-12V 4. Input Voltage (limits) 6-20V 5. Digital I/O Pins 14 6. Analog Input Pins 6 7. DC Current per I/O Pin 40 mA 8. DC Current for 3.3V Pin 50 mA 9. Flash Memory 32 KB of which 0.5 KB used by bootloader 10.SRAM 2 KB 11.EEPROM 1 KB 12.Clock Speed 16 MHz
9 Circuit Diagram
10 HC-05 Bluetooth Module HC-05 module is an easy to use Bluetooth SPP (Serial Port Protocol) module, designed for transparent wireless serial connection setup. Serial port Bluetooth module is fully qualified Bluetooth V2.0+EDR (Enhanced Data Rate) 3Mbps Modulation with complete 2.4GHz radio transceiver and baseband. It uses CSR Bluecore 04-External single chip Bluetooth system with CMOS technology and with AFH(Adaptive Frequency Hopping Feature). It has the footprint as small as 12.7mmx27mm. Hope it will simplify your overall design/development cycle.
11 HC-05 Bluetooth Module Interfacing with Arduino UNO HC-05 is a Bluetooth device used for wireless communication with Bluetooth enabled devices (like smartphone). It communicates with microcontrollers using serial communication (USART). Default settings of HC-05 Bluetooth module can be changed using certain AT commands. As HC-05 Bluetooth module has 3.3 V level for RX/TX and microcontroller can detect 3.3 V level, so, there is no need to shift TX voltage level of HC-05 module. But we need to shift the transmit voltage level from microcontroller to RX of HC- 05 module.
12 Sketch for Displaying Data Received Via Bluetooth On Serial Monitor #include<SoftwareSerial.h> /* Create object named bt of the class SoftwareSerial */ SoftwareSerial bt(2,3); /* (Rx,Tx) */ void setup() { bt.begin(9600); /* Define baud rate for software serial communication */ Serial.begin(9600); /* Define baud rate for serial communication */ } void loop() { if (bt.available()) /* If data is available on serial port */ { Serial.write(bt.read()); /* Print character received on to the serial moni tor */ } }
13 Design And Implementation A low cost and efficient smart home system is presented in our design. This system has two main modules: the hardware interface module and the software communication module. At the heart of this system is the Arduino Mega 2560 microcontroller which is also capable of functioning as a micro web server and the interface for all the hardware modules. All communication and controls in this system pass through the microcontroller. Designing the Circuit
14 Technical Specification for this project 1) A smartphone or an Android mobile which should have the android app installed in it. 2) Bluetooth receiver module – Our project will be connected to the smartphone using Bluetooth technology. 3) Controller or the main processing circuit- In this project, Arduino Uno is the main controlling / processing unit. Also, this project can be developed using PIC18F4550, AVR ATmega32 and 8051 series like: 89s51, 89c51, 89s52, 89v51RD2. 4) LCD Display – The Liquid Crystal Display is optional but shows important messages like device status once command is received from Bluetooth. 5) Relays to control devices – We have used 12volt Single push single throw relays. 6) Output devices – For the demo purpose, we connected a DC devices to a relay (12 volt DC bulb). You can connect any AC/DC devices to the remaining 3 relays. Also, Device 6 is a Buzzer.
15 Program Code
16 Pros of Home Automation 1. Security Tap your finger to turn on the lights when you get home so you worried about what’s hiding in the shadows, or in your pathways. Or automate to turn on when you aren’t home to look like you are to ward off potential robbers. Door locks are another automated home product that can increase your home security. 2. Energy Efficiency Increase your home’s energy efficiency by remotely powering off systems and appliances when they aren’t in use. In addition to the standard home automation products that give you active control, some products actively monitor systems and arm the homeowner with knowledge, insight and guidance to achieve greater control and energy efficiency. 3. Savings Home automation literally pays off. When you are able to use home systems and appliances only when needed, the savings will be apparent in the first utility bill. No more wasting money on lights left on when you aren’t home, or spending money on gas to drive home because you forgot to lock the door. Monetary savings are apparent, but you’ll also be saving time. No wasted trips home, no running through the house turning everything off, no time spent worrying about what was or wasn’t turned off. 4. Convenience Don’t you hate having to rely on neighbors to watch your house when you’re gone? With home automation, convenient control of your home is at your fingertips. You don’t have to trust someone else with your most valued possessions. 5. Comfort Ever leave for work in the morning when it was a comfortable 68° outside only to come home to a sweltering house because the temperature shot up to 90°? Connected home products like the Sensi™ Wi-Fi Thermostats let you conveniently adjust your home temperature from the mobile app so your family is always comfortable.
17 Cons of Home Automation 1. Cost of Intelligence Installing state-of-the-art features inside a home results in a higher price tag for the property. The cost of an intelligent home that makes our lives convenient is high because some of the technology is relatively new. The cost of living expenses such as utilities, maintenance and repair of the technology can be expensive as well. 2. Technology Learning Curve Owning a smart home means having to learn how to use your home. Unlike traditional homes, smart home technology requires you to adapt to the innovations within your living area such as security systems, air units and a remote that controls your entire house. For the technology-savvy family, the smart home will help achieve convenience faster, but for others, it will take reading manuals and learning how-to before the benefits of convenience pay off. 3. Video Surveillance Video surveillance can be a wonderful tool in heightening security and deterring crime, but when the technology falls into the wrong hands, issues of privacy can occur. Security sensors within the doors and walls of a smart home use wireless technology to transfer signals to a central control unit that notifies emergency officials of any foreign activity.
18 Applications  Using this project, we can turn on or off appliances remotely i.e. using a phone or tablet.  The project can be further expanded to a smart home automation system by including some sensors like light sensors, temperature sensors, safety sensors etc. and automatically adjust different parameters like room lighting, air conditioning (room temperature), door locks etc. and transmit the information to our phone.  Additionally, we can connect to internet and control the home from remote location over internet and also monitor the safety. Future Development of the project  Arduino based device control using Bluetooth on Smartphone project can be enhanced to control the speed of the fan or volume of the buzzer etc.  Home automation and Device controlling can be done using Internet of Things – IOT technology.  We can replace Bluetooth by GSM modem so that we can achieve device controlling by sending SMS using GSM modem.
19 Conclusion The home automation system has been experimentally proven to work satisfactorily by connecting sample appliances to it and the appliances were successfully controlled from a wireless mobile device. We learned many skills such as soldering, wiring the circuit and other tools that we use for this project and was able to work together as a team during this project. The Bluetooth client was successfully tested on a multitude of different mobile phones from different manufacturers, thus proving its portability and wide compatibility. Thus a low-cost home automation system was successfully designed, implemented and tested.
20 Reference The web sites that provide the information’s: www.autogates.com.my www.usautomatic.com www.amazinggates.com www.microchip.co.uk www.quora.com www.engineeringproject.com www.efy.com www.electronicsworldforyou.com 

Project report on home automation using Arduino

  • 1.
    1 Abstract The main objectiveof this project is to develop a home automation system using an Arduino board with Bluetooth being remotely controlled by any Android OS smart phone. As technology is advancing so houses are also getting smarter. Modern houses are gradually shifting from conventional switches to centralized control system, involving remote controlled switches. Presently, conventional wall switches located in different parts of the house makes it difficult for the user to go near them to operate. Even more it becomes more difficult for the elderly or physically handicapped people to do so. Remote controlled home automation system provides a most modern solution with smart phones. In order to achieve this, a Bluetooth module is interfaced to the Arduino board at the receiver end while on the transmitter end, a GUI application on the cell phone sends ON/OFF commands to the receiver where loads are connected. By touching the specified location on the GUI, the loads can be turned ON/OFF remotely through this technology. The loads are operated by Arduino board through opto- isolators and thyristors using triacs.
  • 2.
    2 Acknowledgement First and foremost,I would like to take this opportunity to thank our lecturer Mr. Monish Gupta for his guidance and advice on this project. At the same time I also won’t forget my group participant and also friends to because they quite good w i t h s ha r i ng s o m e o f t h e i r i nf o r ma t i o n t o c o m p l e t e t h i s f i na l y e a r pr o j e ct successfully. Last but not least, I am very grateful to our College, lecture sand friends where they gave us enough of time to complete this project and at the same time I would like to thank my friends and classmates who helps me a lot to complete this project. Thank You.
  • 3.
    3 Contents ABSTRACT ............................................................................................................ 1 ACKNOWLEDGEMENT…………………………………………………….………………………………….2 INTRODUCTION……………………............................................................................. 4 PROJECT AIM & SCOPE………………………................................................................5 DESCRIPTION OF PROJECT…................................................................................ 6 H/W & S/W REQUIREMENT.................................................................................7 DESCRIPTION OF H/W REQUIRED.......................................................................8 INTERFACING OF HC-05 MODULE......................................................................11 DESIGN & IMPLEMENTATION............................................................................13 PROS & CONS……………………………………………………………………………………………..……16 APPLICATION………..............................................................................................18 FUTURE DEVELOPMENT…………………………………………………………………………….……..18 CONCLUSION……………………………………………………………………………………………………19 REFERENCE………………………………………………………………………………………………………20
  • 4.
    4 Introduction Nowadays, we haveremote controls for our television sets and other electronic systems, which have made our lives real easy. Have you ever wondered about home automation which would give the facility of controlling tube lights, fans and other electrical appliances at home using a remote control? Off-course, Yes! But, are the available options cost-effective? If the answer is No, we have found a solution to it. We have come up with a new system called Arduino based home automation using Bluetooth. This system is super-cost effective and can give the user, the ability to control any electronic device without even spending for a remote control. This project helps the user to control all the electronic devices using his/her smartphone. Time is a very valuable thing. Everybody wants to save time as much as they can. New technologies are being introduced to save our time. To save people’s time we are introducing Home Automation system using Bluetooth . With the help of this system you can control your home appliances from your mobile phone. You can turn on/off your home appliances within the range of Bluetooth.
  • 5.
    5 Project Aim The aimof the project is to design and construct a home automation system that will remotely switch on or off any household appliances connected to it, using a microcontroller , voice dial on phone , or Bluetooth based android application. Project Objective The objective of this project is to implement a low cost , reliable and scalable home automation system that can be used to remotely switch on or off any household appliance , using a microcontroller to achieve hardware simplicity ,low cost short messaging service for feedback and voice dial from any phone to toggle the switch state. Project scope and limitation This project work is complete on its own in remotely and automatically switching on or off of an electrical appliance not limited to household appliances and sends a feedback message indicating the new present state of the appliance.
  • 6.
    6 Description of theProject This project is one of the important Arduino Projects. Arduino based home automation using Bluetooth project helps the user to control any electronic device using Device Control app on their Android Smartphone. The android app sends commands to the controller – Arduino, through wireless communication, namely, Bluetooth. The Arduino is connected to the main PCB which has five relays as shown in the block diagram. These relays can be connected to different electronic devices. As per the block diagram, Device 1 – Buzzer, Device 2- Fan, Device 3 – Lights. When the user presses on the ‘On’ button displayed on the app for the device 1, the Buzzer is switched on. This Buzzer can be switched off, by pressing the same button again. Similarly, when the user presses on the ‘On’ button displayed on the app for the device 2, the fan is switched on. The fan can be switched off, by pressing the same button again. This project of home automation using Bluetooth and Arduino can be used for controlling any AC or DC devices. In the demonstration, we have used DC Fan and DC Bulb. To drive this DC Fan and Light, a 9V battery is connected.
  • 7.
    7 Hardware Requirement The listof components mentioned here are specifically for controlling 4 different loads.  Arduino Uno with Atmega 328P microcontroller  HC – 05 Bluetooth Module  10 KΩ Resistor  1 KΩ Resistor X 4  BC547 NPN Transistor X 4  1N4007 Diode X 4  5 V Relay X 4  Prototyping board (Bread board)  Connecting wires  9 V Power supply  Smartphone or tablet (Bluetooth enabled) Software Requirement   Arduino 1.6.9 compiler  Proteus 7  Android application
  • 8.
    8 Description of HardwareRequired Arduino uno The Arduino Uno is a microcontroller board based on the ATmega328P . It has 14 digital input/output pins (of which 6 can be used as PWM outputs), 6 analog inputs, a 16 MHz crystal oscillator, a USB connection, a power jack, an ICSP header, and a reset button. It contains everything needed to support the microcontroller; simply connect it to a computer with a USB cable or power it with a AC-to-DC adapter or battery to get started. The Uno differs from all preceding boards in that it does not use the FTDI USB-to- serial driver chip. Instead, it features the Atmega8U2 programmed as a USB-to- serial converter.  Some Technical Specification of Arduino Uno are: 1. Microcontroller ATmega328P 2. Operating Voltage 5V 3. Input Voltage (recommended) 7-12V 4. Input Voltage (limits) 6-20V 5. Digital I/O Pins 14 6. Analog Input Pins 6 7. DC Current per I/O Pin 40 mA 8. DC Current for 3.3V Pin 50 mA 9. Flash Memory 32 KB of which 0.5 KB used by bootloader 10.SRAM 2 KB 11.EEPROM 1 KB 12.Clock Speed 16 MHz
  • 9.
  • 10.
    10 HC-05 Bluetooth Module HC-05module is an easy to use Bluetooth SPP (Serial Port Protocol) module, designed for transparent wireless serial connection setup. Serial port Bluetooth module is fully qualified Bluetooth V2.0+EDR (Enhanced Data Rate) 3Mbps Modulation with complete 2.4GHz radio transceiver and baseband. It uses CSR Bluecore 04-External single chip Bluetooth system with CMOS technology and with AFH(Adaptive Frequency Hopping Feature). It has the footprint as small as 12.7mmx27mm. Hope it will simplify your overall design/development cycle.
  • 11.
    11 HC-05 Bluetooth ModuleInterfacing with Arduino UNO HC-05 is a Bluetooth device used for wireless communication with Bluetooth enabled devices (like smartphone). It communicates with microcontrollers using serial communication (USART). Default settings of HC-05 Bluetooth module can be changed using certain AT commands. As HC-05 Bluetooth module has 3.3 V level for RX/TX and microcontroller can detect 3.3 V level, so, there is no need to shift TX voltage level of HC-05 module. But we need to shift the transmit voltage level from microcontroller to RX of HC- 05 module.
  • 12.
    12 Sketch for DisplayingData Received Via Bluetooth On Serial Monitor #include<SoftwareSerial.h> /* Create object named bt of the class SoftwareSerial */ SoftwareSerial bt(2,3); /* (Rx,Tx) */ void setup() { bt.begin(9600); /* Define baud rate for software serial communication */ Serial.begin(9600); /* Define baud rate for serial communication */ } void loop() { if (bt.available()) /* If data is available on serial port */ { Serial.write(bt.read()); /* Print character received on to the serial moni tor */ } }
  • 13.
    13 Design And Implementation Alow cost and efficient smart home system is presented in our design. This system has two main modules: the hardware interface module and the software communication module. At the heart of this system is the Arduino Mega 2560 microcontroller which is also capable of functioning as a micro web server and the interface for all the hardware modules. All communication and controls in this system pass through the microcontroller. Designing the Circuit
  • 14.
    14 Technical Specification forthis project 1) A smartphone or an Android mobile which should have the android app installed in it. 2) Bluetooth receiver module – Our project will be connected to the smartphone using Bluetooth technology. 3) Controller or the main processing circuit- In this project, Arduino Uno is the main controlling / processing unit. Also, this project can be developed using PIC18F4550, AVR ATmega32 and 8051 series like: 89s51, 89c51, 89s52, 89v51RD2. 4) LCD Display – The Liquid Crystal Display is optional but shows important messages like device status once command is received from Bluetooth. 5) Relays to control devices – We have used 12volt Single push single throw relays. 6) Output devices – For the demo purpose, we connected a DC devices to a relay (12 volt DC bulb). You can connect any AC/DC devices to the remaining 3 relays. Also, Device 6 is a Buzzer.
  • 15.
  • 16.
    16 Pros of HomeAutomation 1. Security Tap your finger to turn on the lights when you get home so you worried about what’s hiding in the shadows, or in your pathways. Or automate to turn on when you aren’t home to look like you are to ward off potential robbers. Door locks are another automated home product that can increase your home security. 2. Energy Efficiency Increase your home’s energy efficiency by remotely powering off systems and appliances when they aren’t in use. In addition to the standard home automation products that give you active control, some products actively monitor systems and arm the homeowner with knowledge, insight and guidance to achieve greater control and energy efficiency. 3. Savings Home automation literally pays off. When you are able to use home systems and appliances only when needed, the savings will be apparent in the first utility bill. No more wasting money on lights left on when you aren’t home, or spending money on gas to drive home because you forgot to lock the door. Monetary savings are apparent, but you’ll also be saving time. No wasted trips home, no running through the house turning everything off, no time spent worrying about what was or wasn’t turned off. 4. Convenience Don’t you hate having to rely on neighbors to watch your house when you’re gone? With home automation, convenient control of your home is at your fingertips. You don’t have to trust someone else with your most valued possessions. 5. Comfort Ever leave for work in the morning when it was a comfortable 68° outside only to come home to a sweltering house because the temperature shot up to 90°? Connected home products like the Sensi™ Wi-Fi Thermostats let you conveniently adjust your home temperature from the mobile app so your family is always comfortable.
  • 17.
    17 Cons of HomeAutomation 1. Cost of Intelligence Installing state-of-the-art features inside a home results in a higher price tag for the property. The cost of an intelligent home that makes our lives convenient is high because some of the technology is relatively new. The cost of living expenses such as utilities, maintenance and repair of the technology can be expensive as well. 2. Technology Learning Curve Owning a smart home means having to learn how to use your home. Unlike traditional homes, smart home technology requires you to adapt to the innovations within your living area such as security systems, air units and a remote that controls your entire house. For the technology-savvy family, the smart home will help achieve convenience faster, but for others, it will take reading manuals and learning how-to before the benefits of convenience pay off. 3. Video Surveillance Video surveillance can be a wonderful tool in heightening security and deterring crime, but when the technology falls into the wrong hands, issues of privacy can occur. Security sensors within the doors and walls of a smart home use wireless technology to transfer signals to a central control unit that notifies emergency officials of any foreign activity.
  • 18.
    18 Applications  Using thisproject, we can turn on or off appliances remotely i.e. using a phone or tablet.  The project can be further expanded to a smart home automation system by including some sensors like light sensors, temperature sensors, safety sensors etc. and automatically adjust different parameters like room lighting, air conditioning (room temperature), door locks etc. and transmit the information to our phone.  Additionally, we can connect to internet and control the home from remote location over internet and also monitor the safety. Future Development of the project  Arduino based device control using Bluetooth on Smartphone project can be enhanced to control the speed of the fan or volume of the buzzer etc.  Home automation and Device controlling can be done using Internet of Things – IOT technology.  We can replace Bluetooth by GSM modem so that we can achieve device controlling by sending SMS using GSM modem.
  • 19.
    19 Conclusion The home automationsystem has been experimentally proven to work satisfactorily by connecting sample appliances to it and the appliances were successfully controlled from a wireless mobile device. We learned many skills such as soldering, wiring the circuit and other tools that we use for this project and was able to work together as a team during this project. The Bluetooth client was successfully tested on a multitude of different mobile phones from different manufacturers, thus proving its portability and wide compatibility. Thus a low-cost home automation system was successfully designed, implemented and tested.
  • 20.
    20 Reference The web sitesthat provide the information’s: www.autogates.com.my www.usautomatic.com www.amazinggates.com www.microchip.co.uk www.quora.com www.engineeringproject.com www.efy.com www.electronicsworldforyou.com 