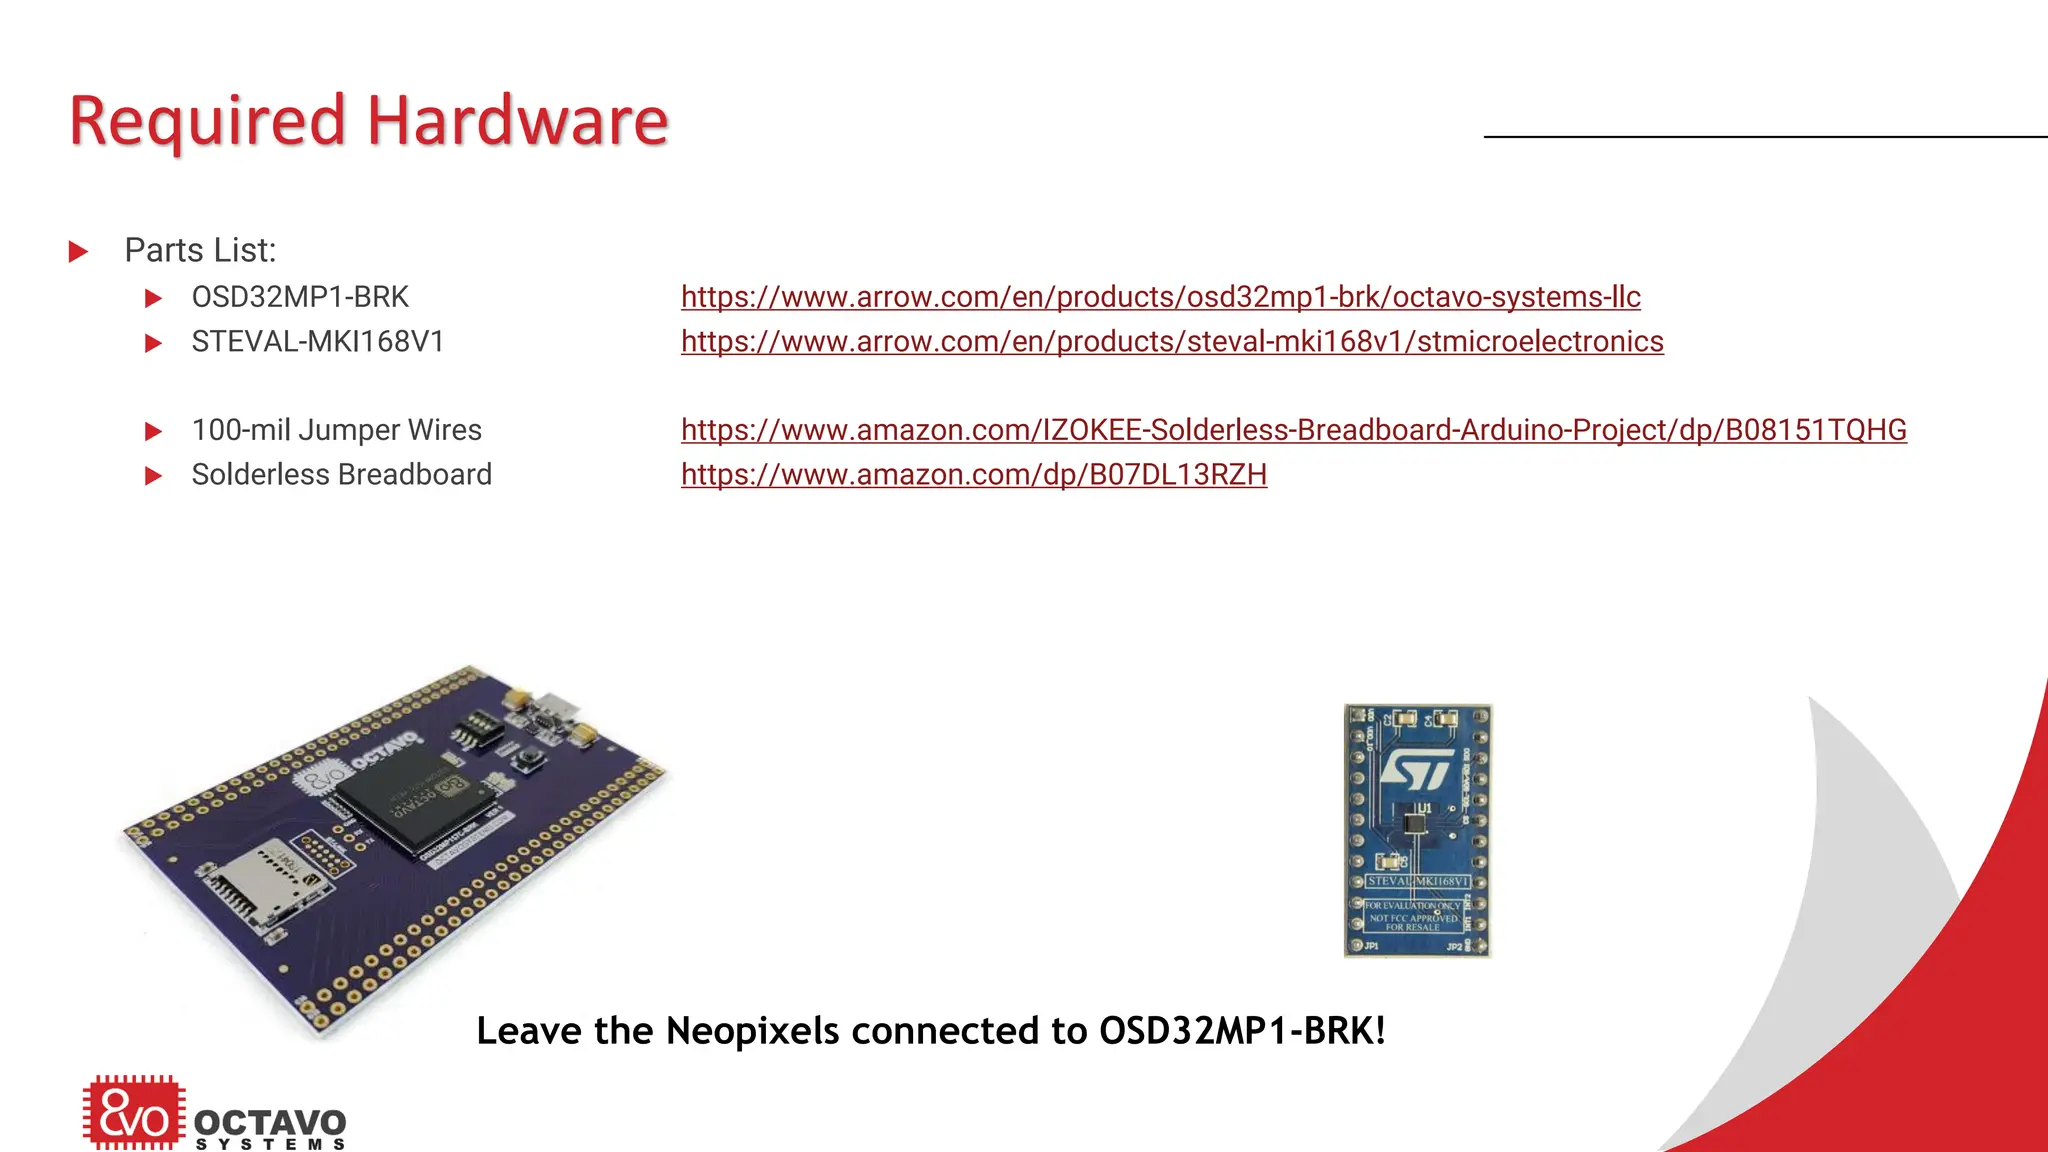
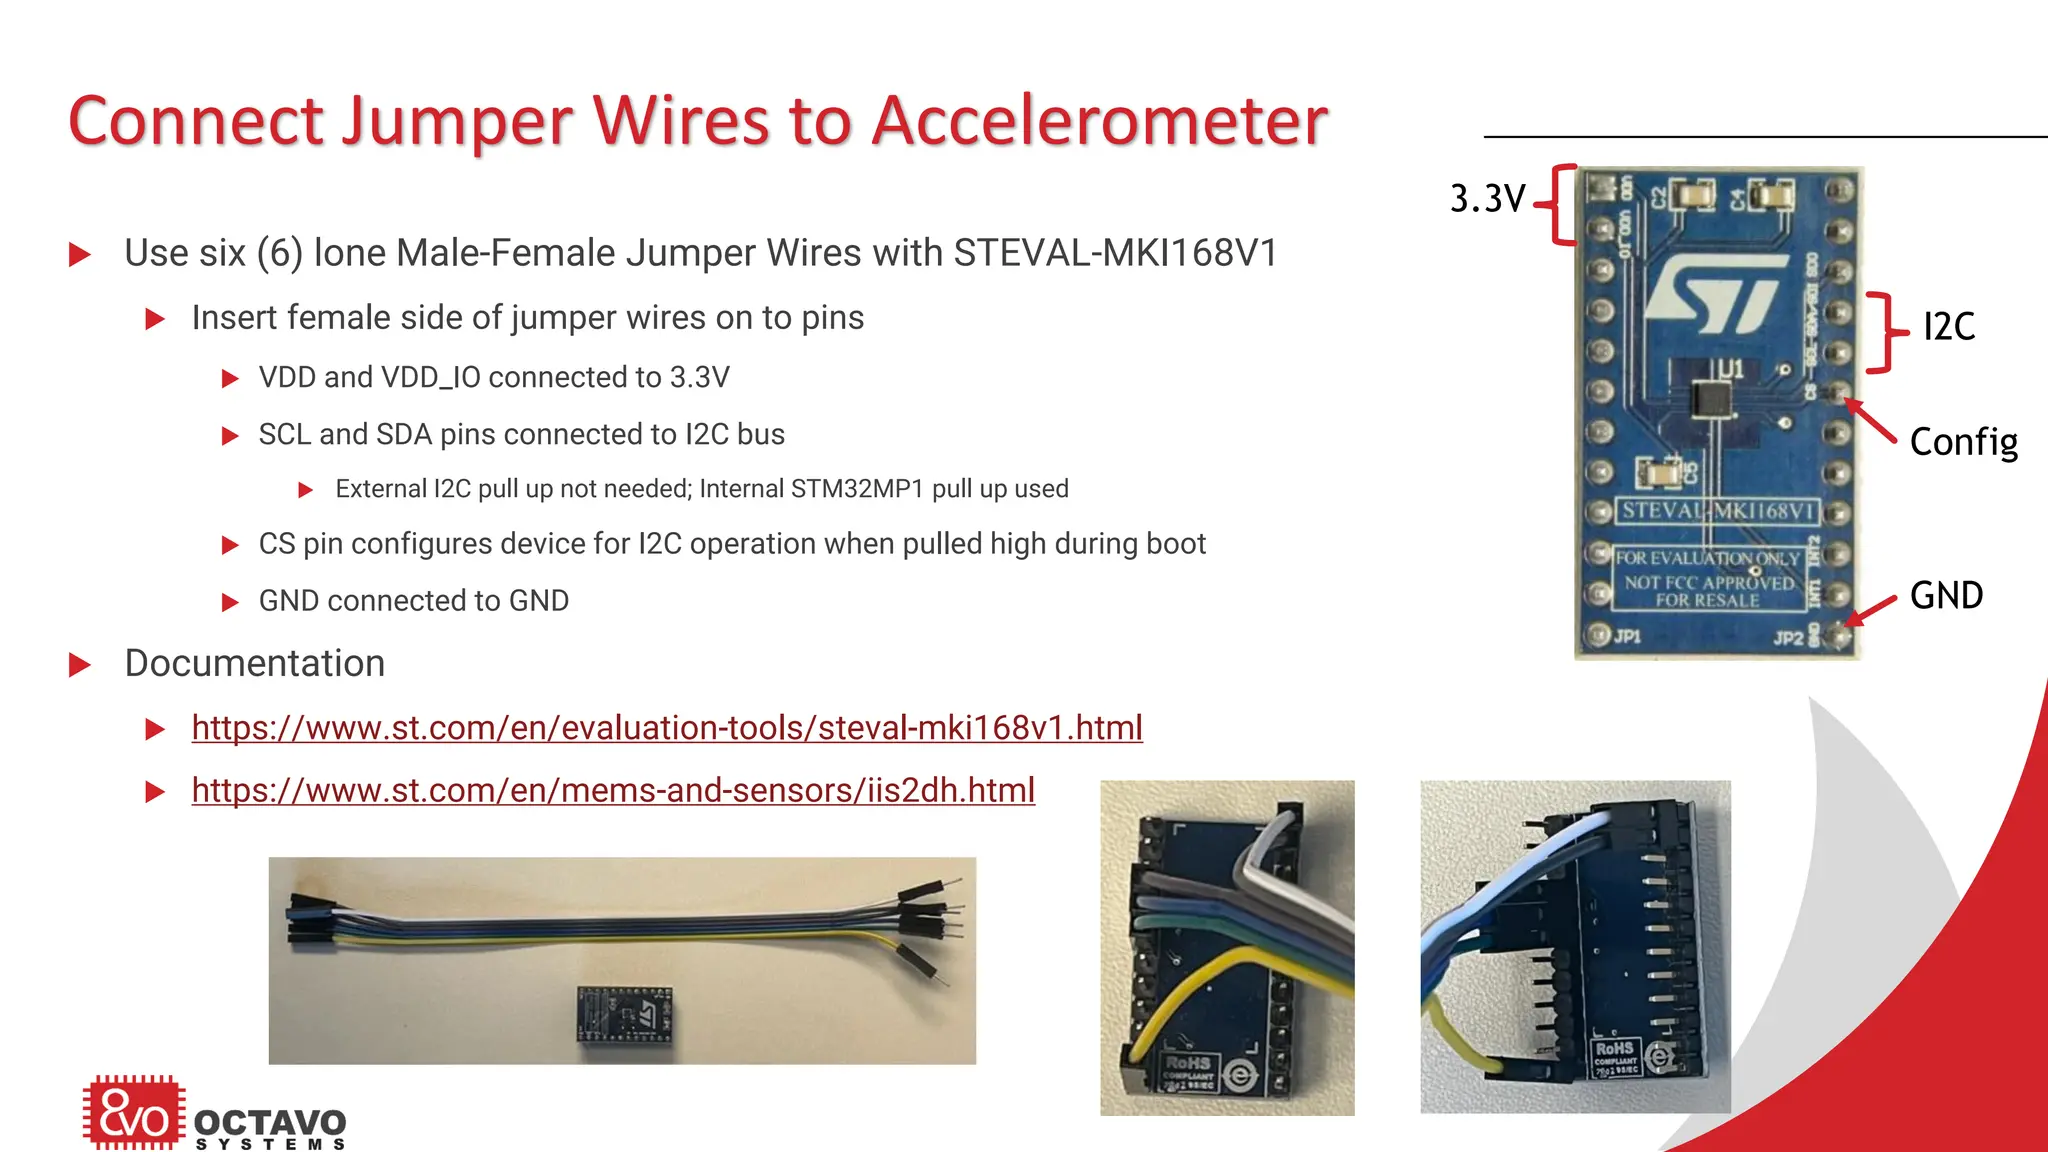
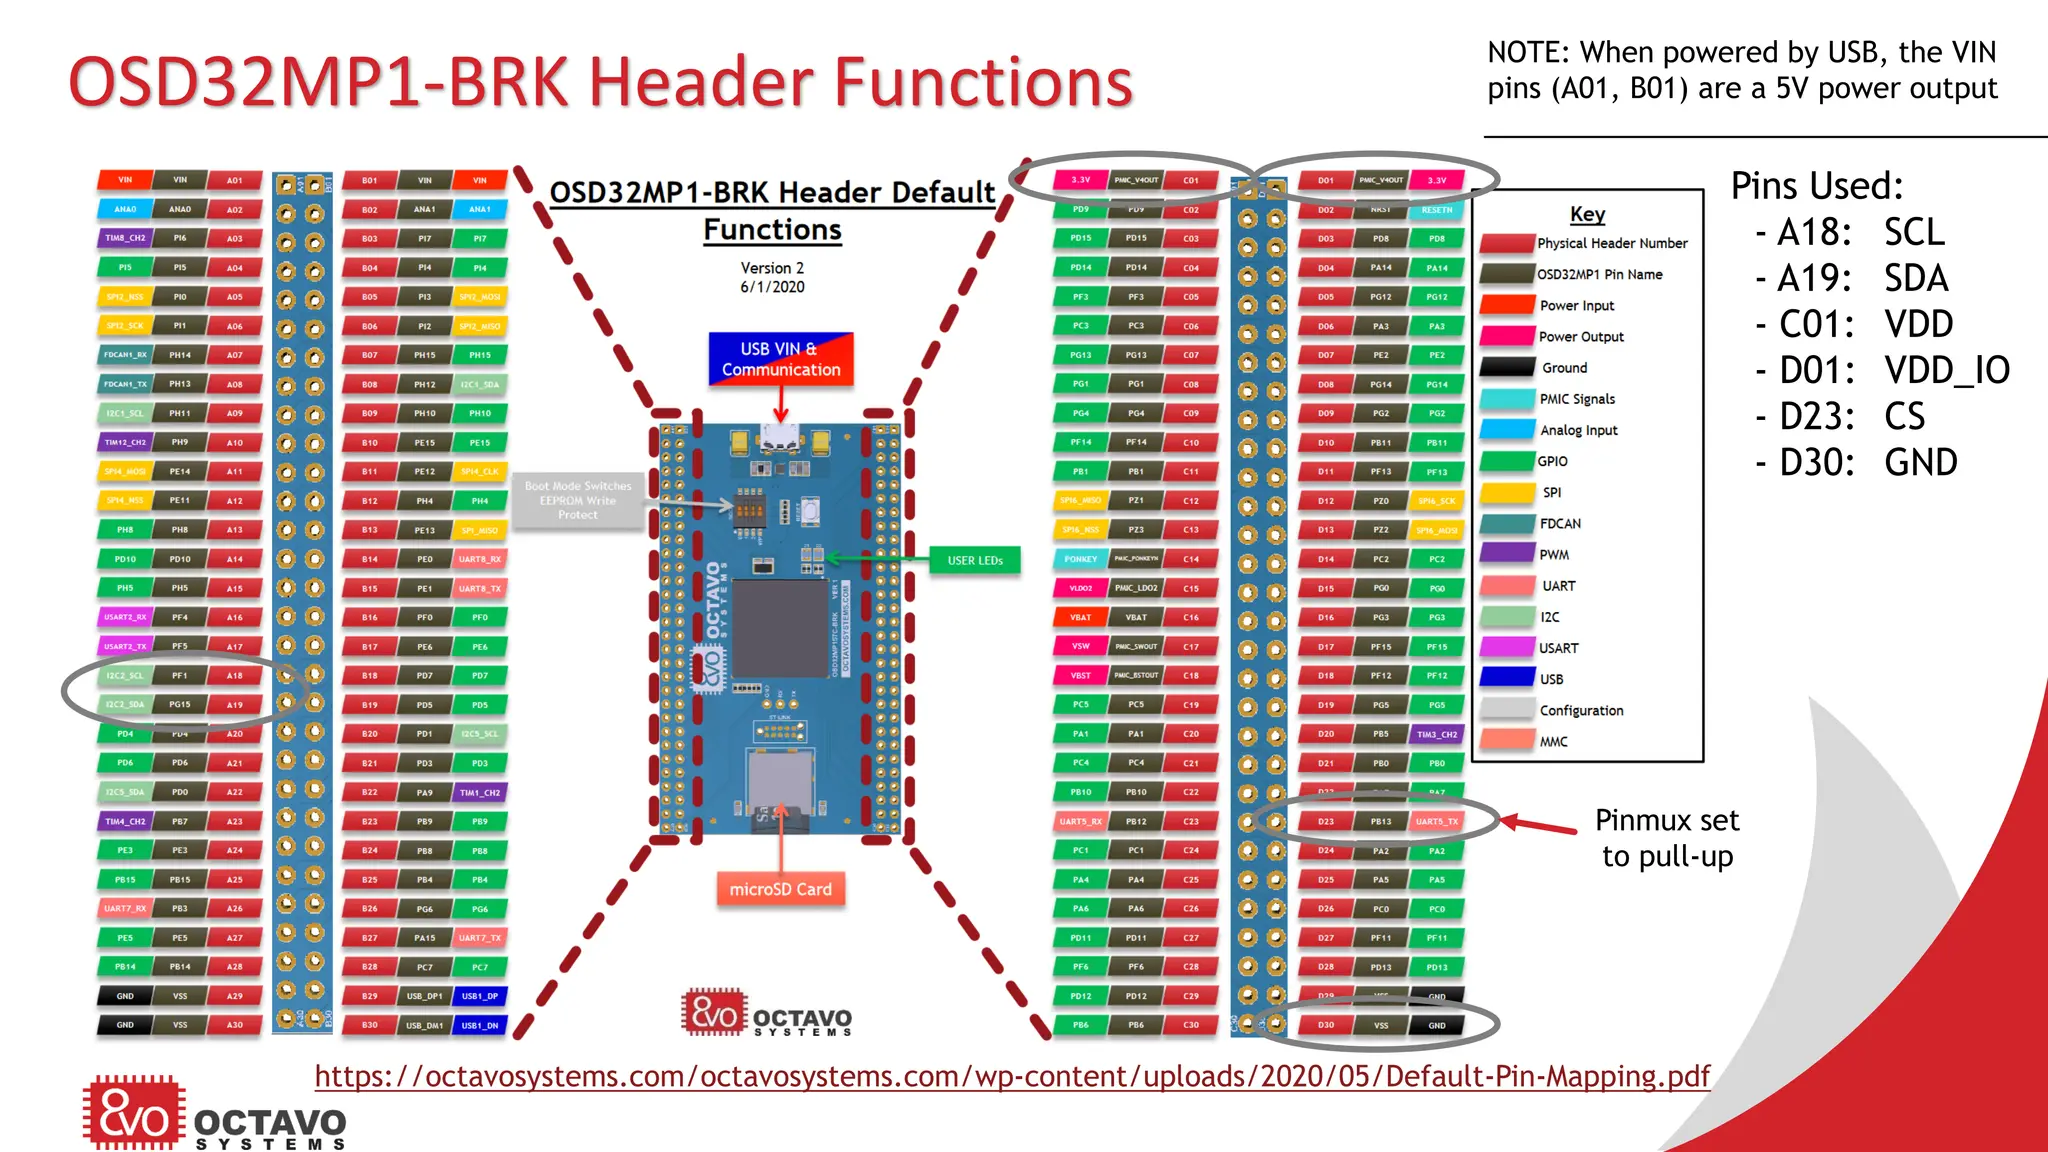
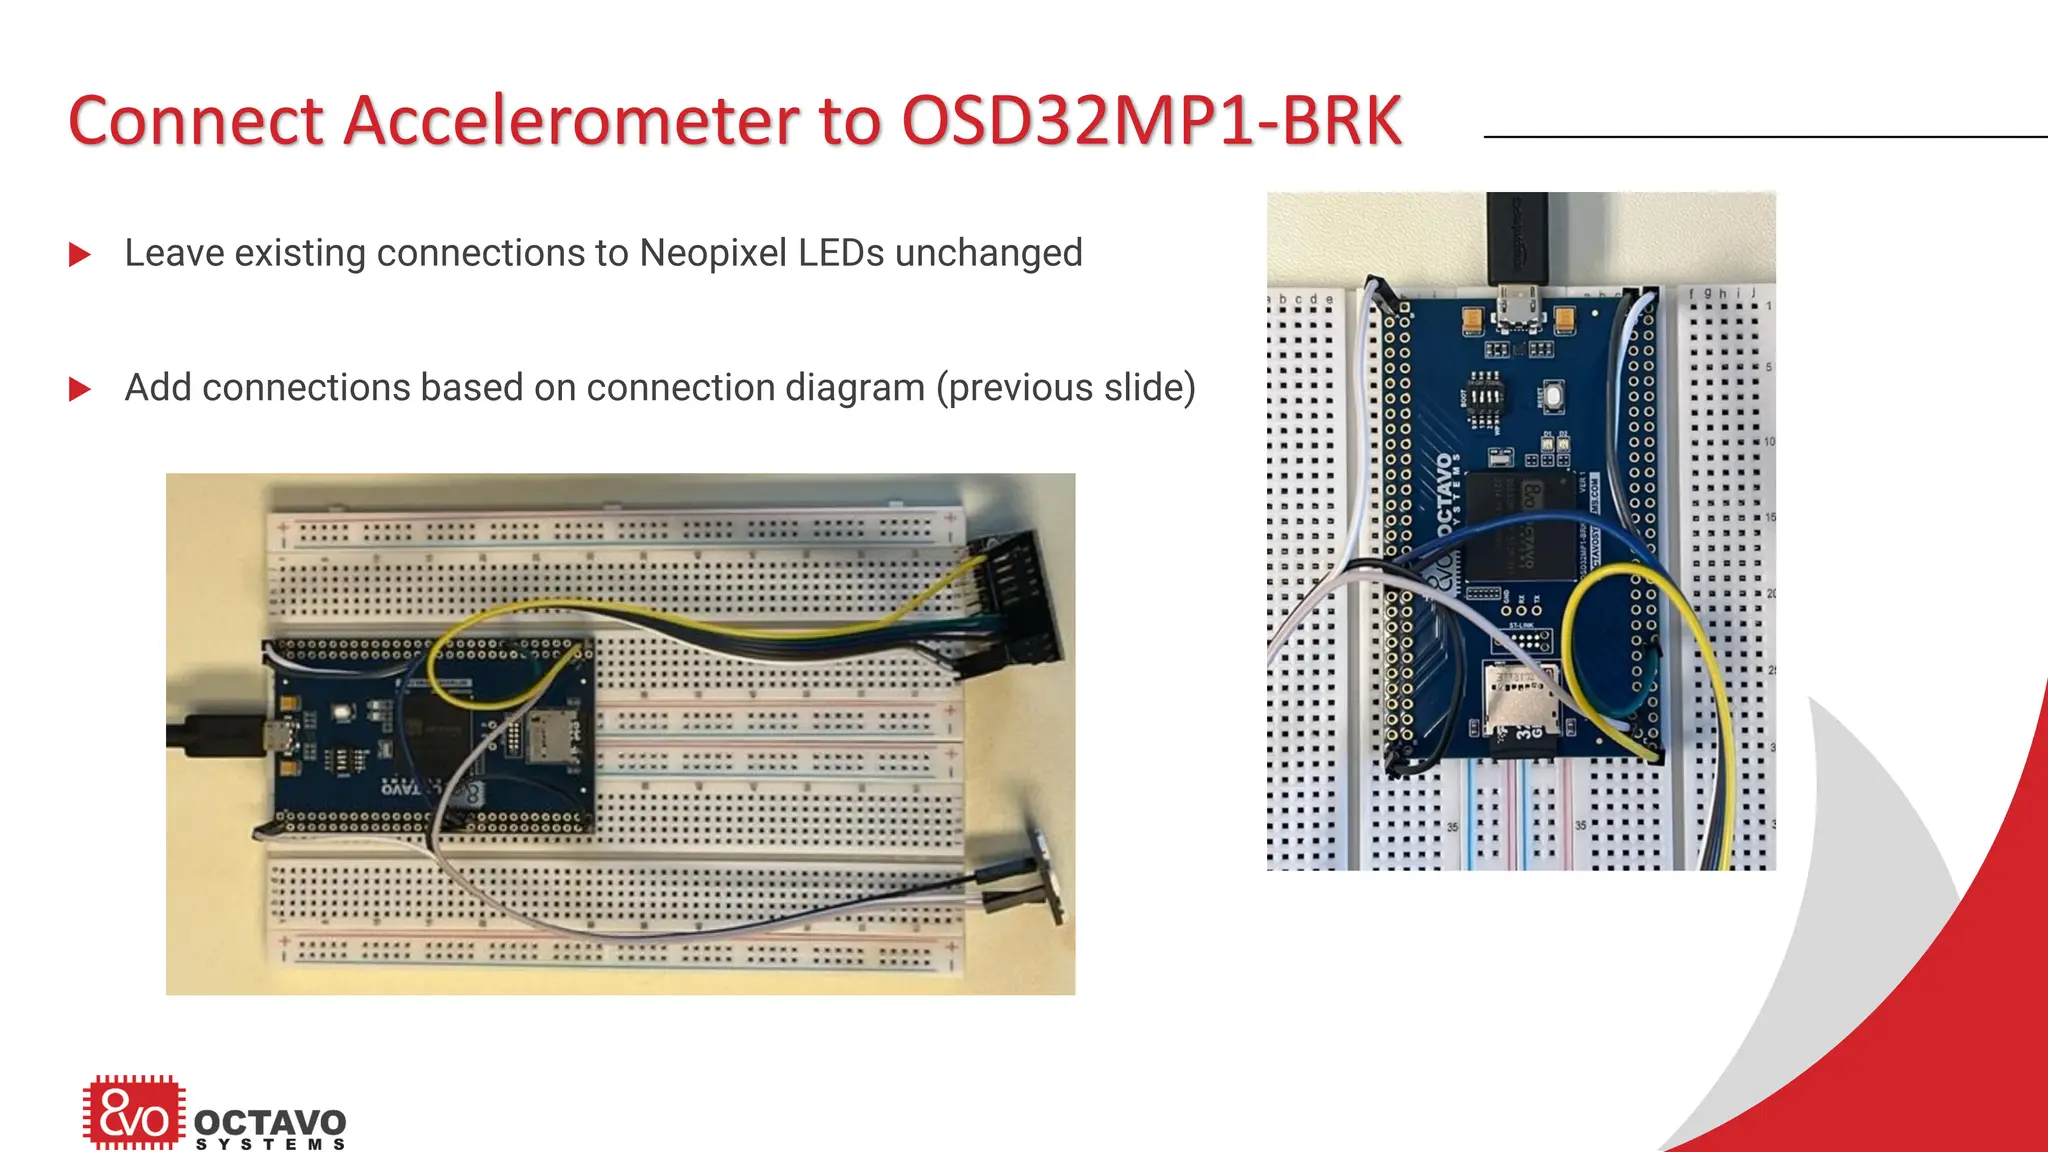
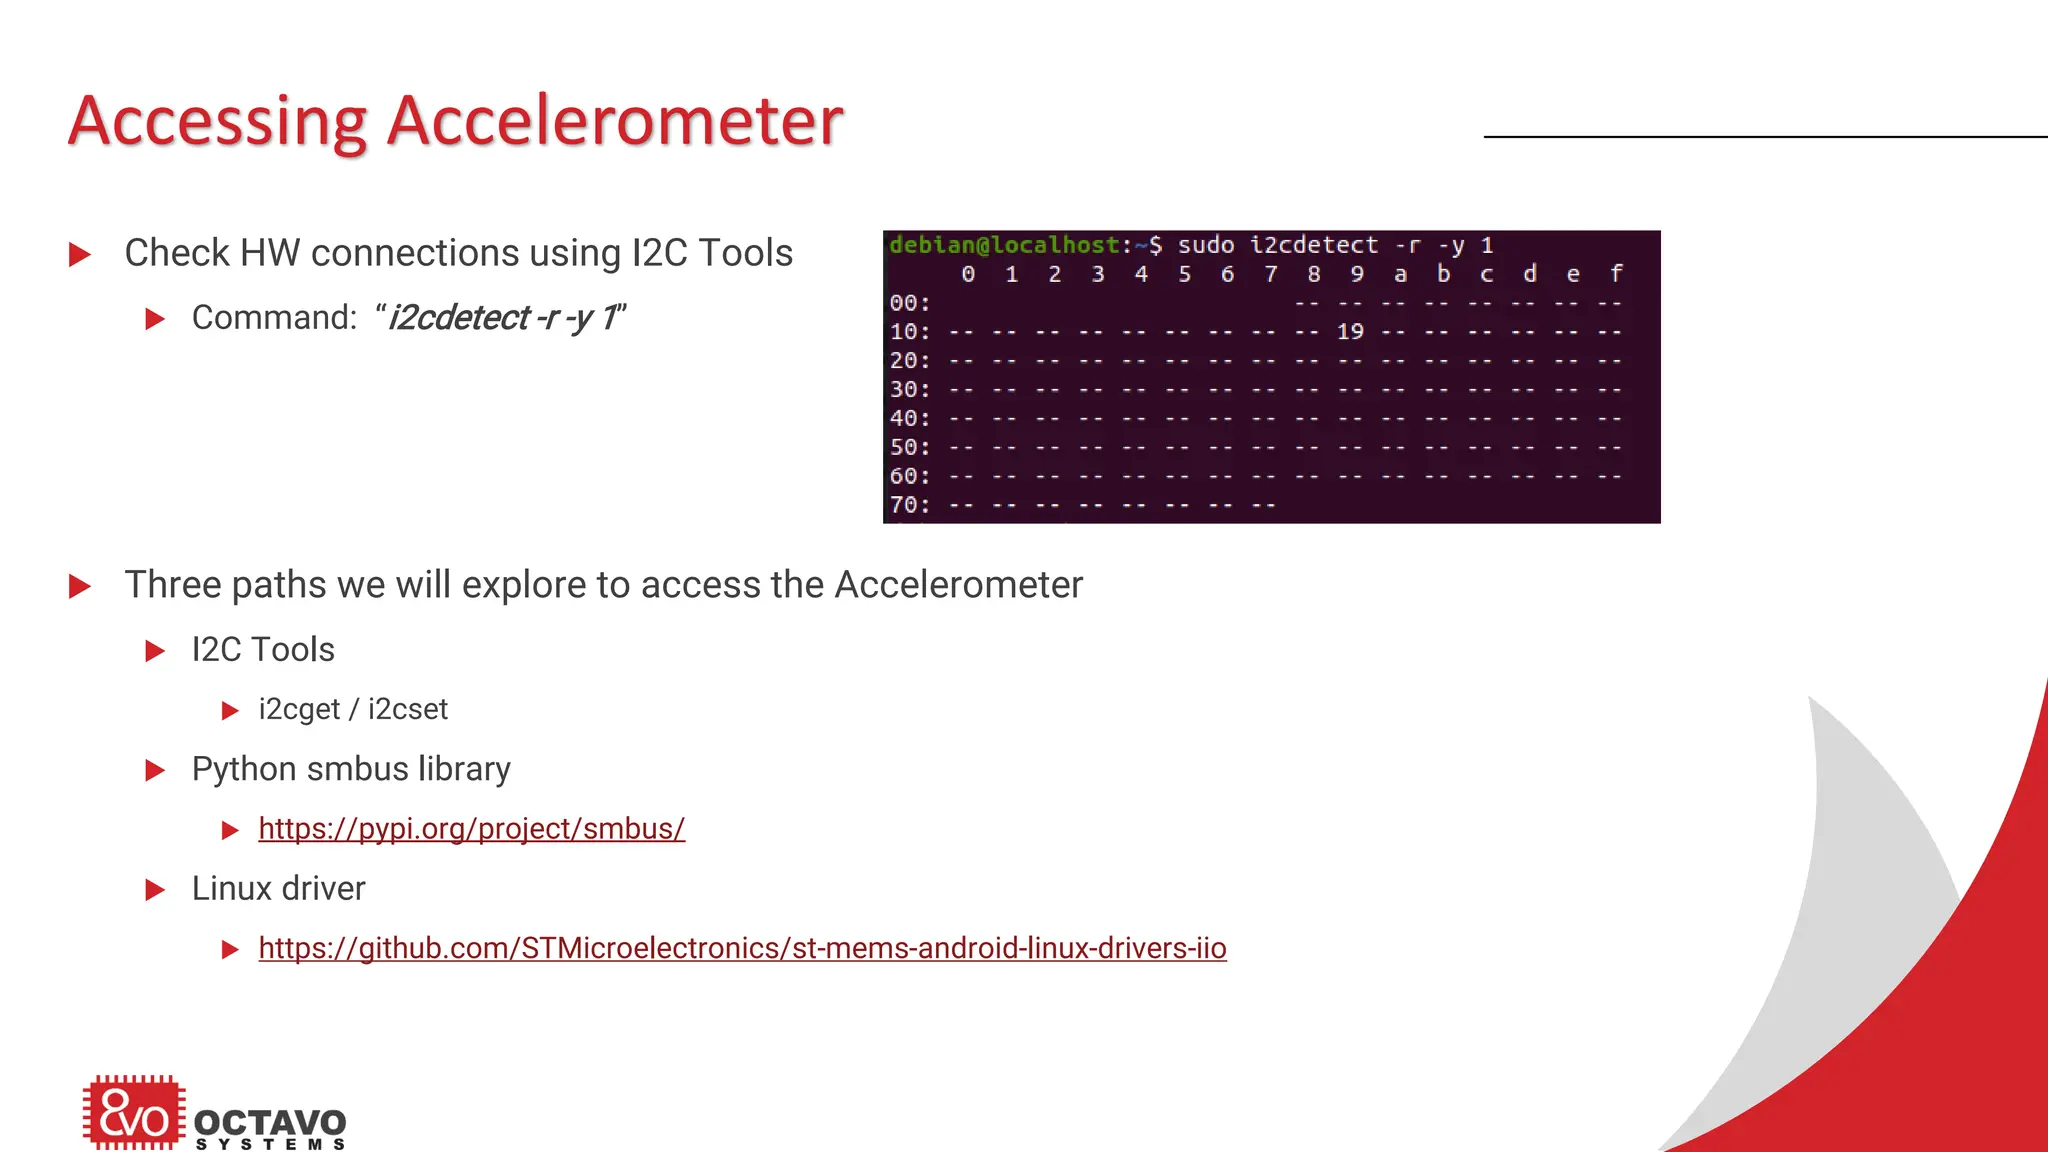
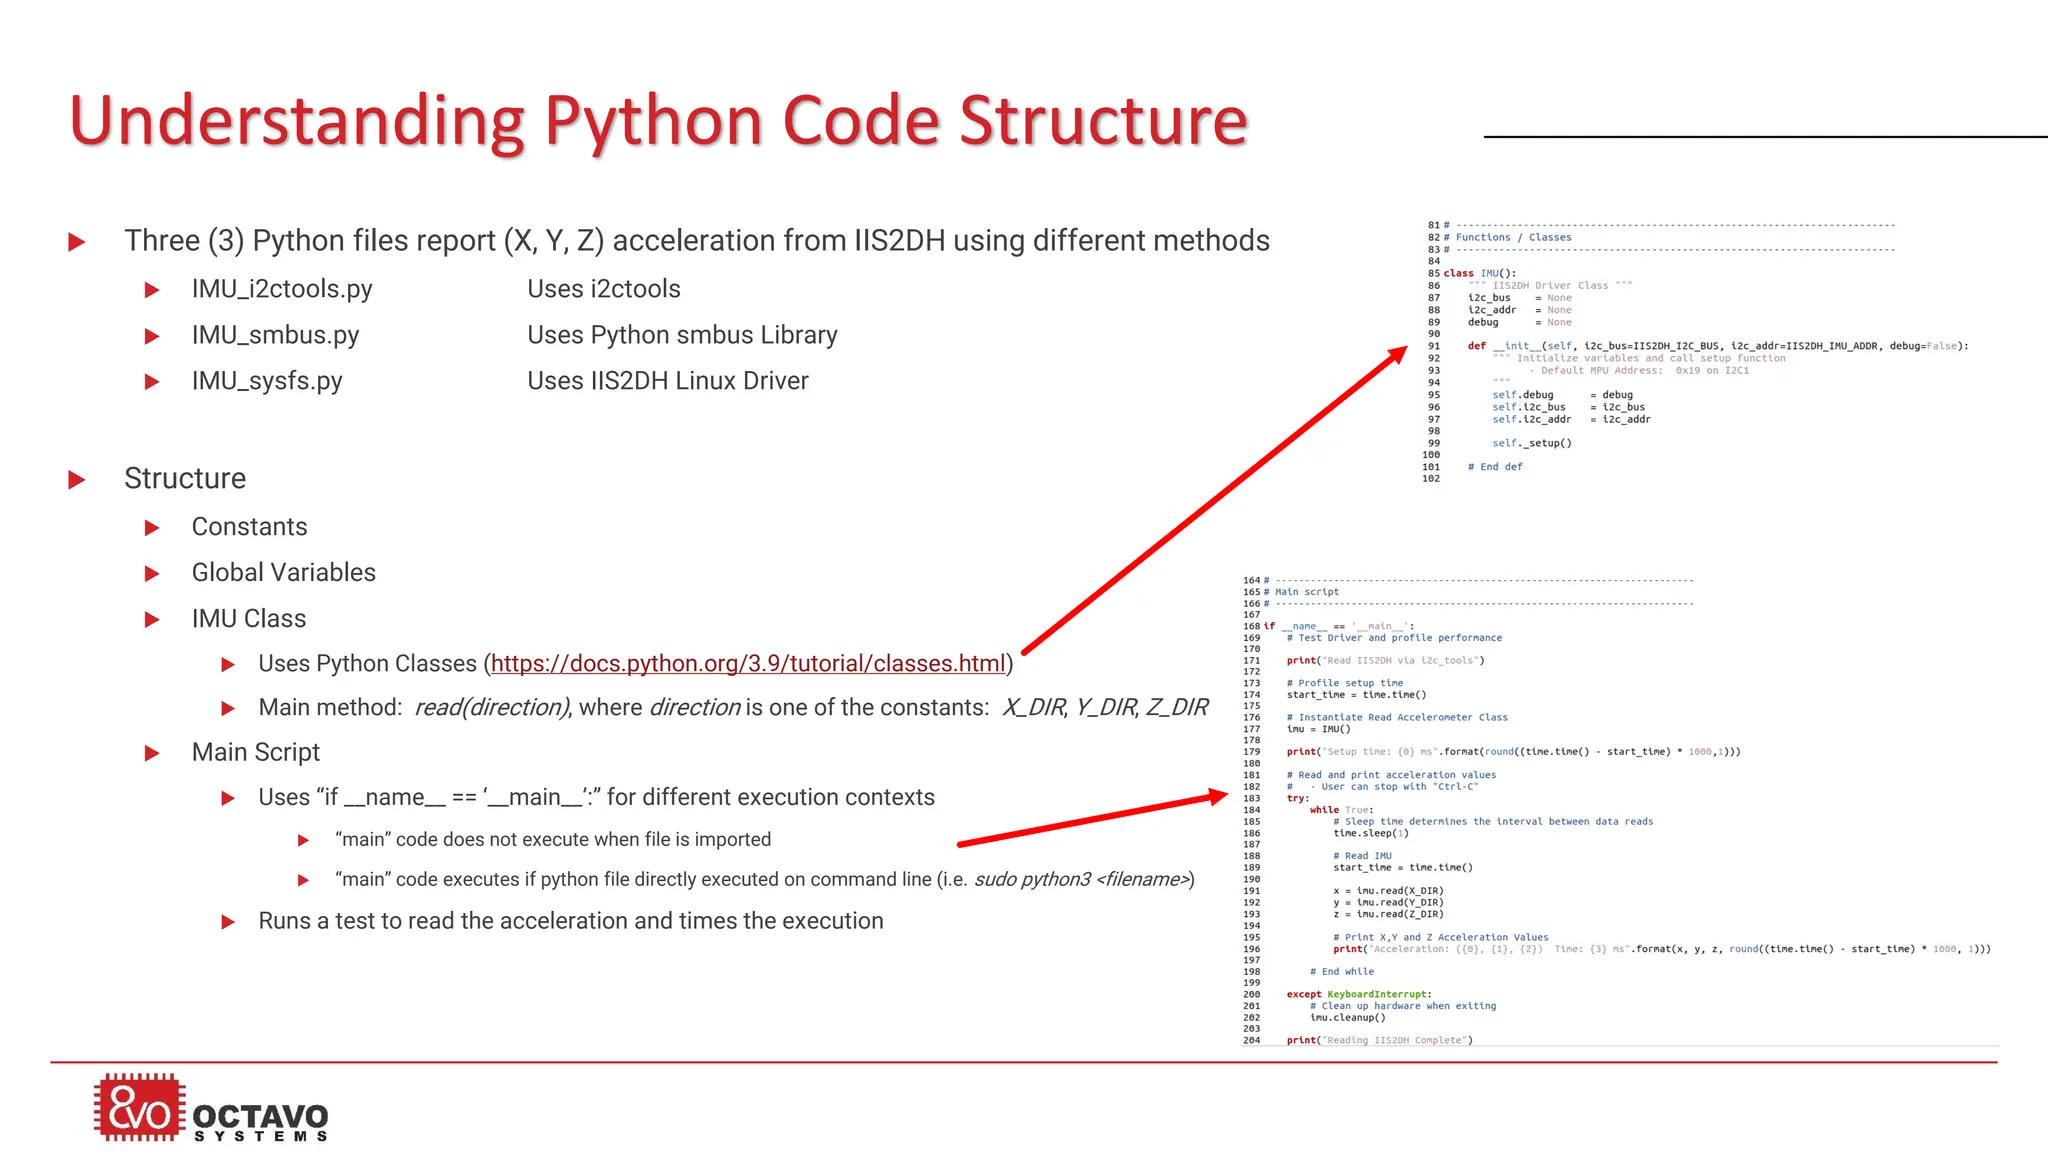
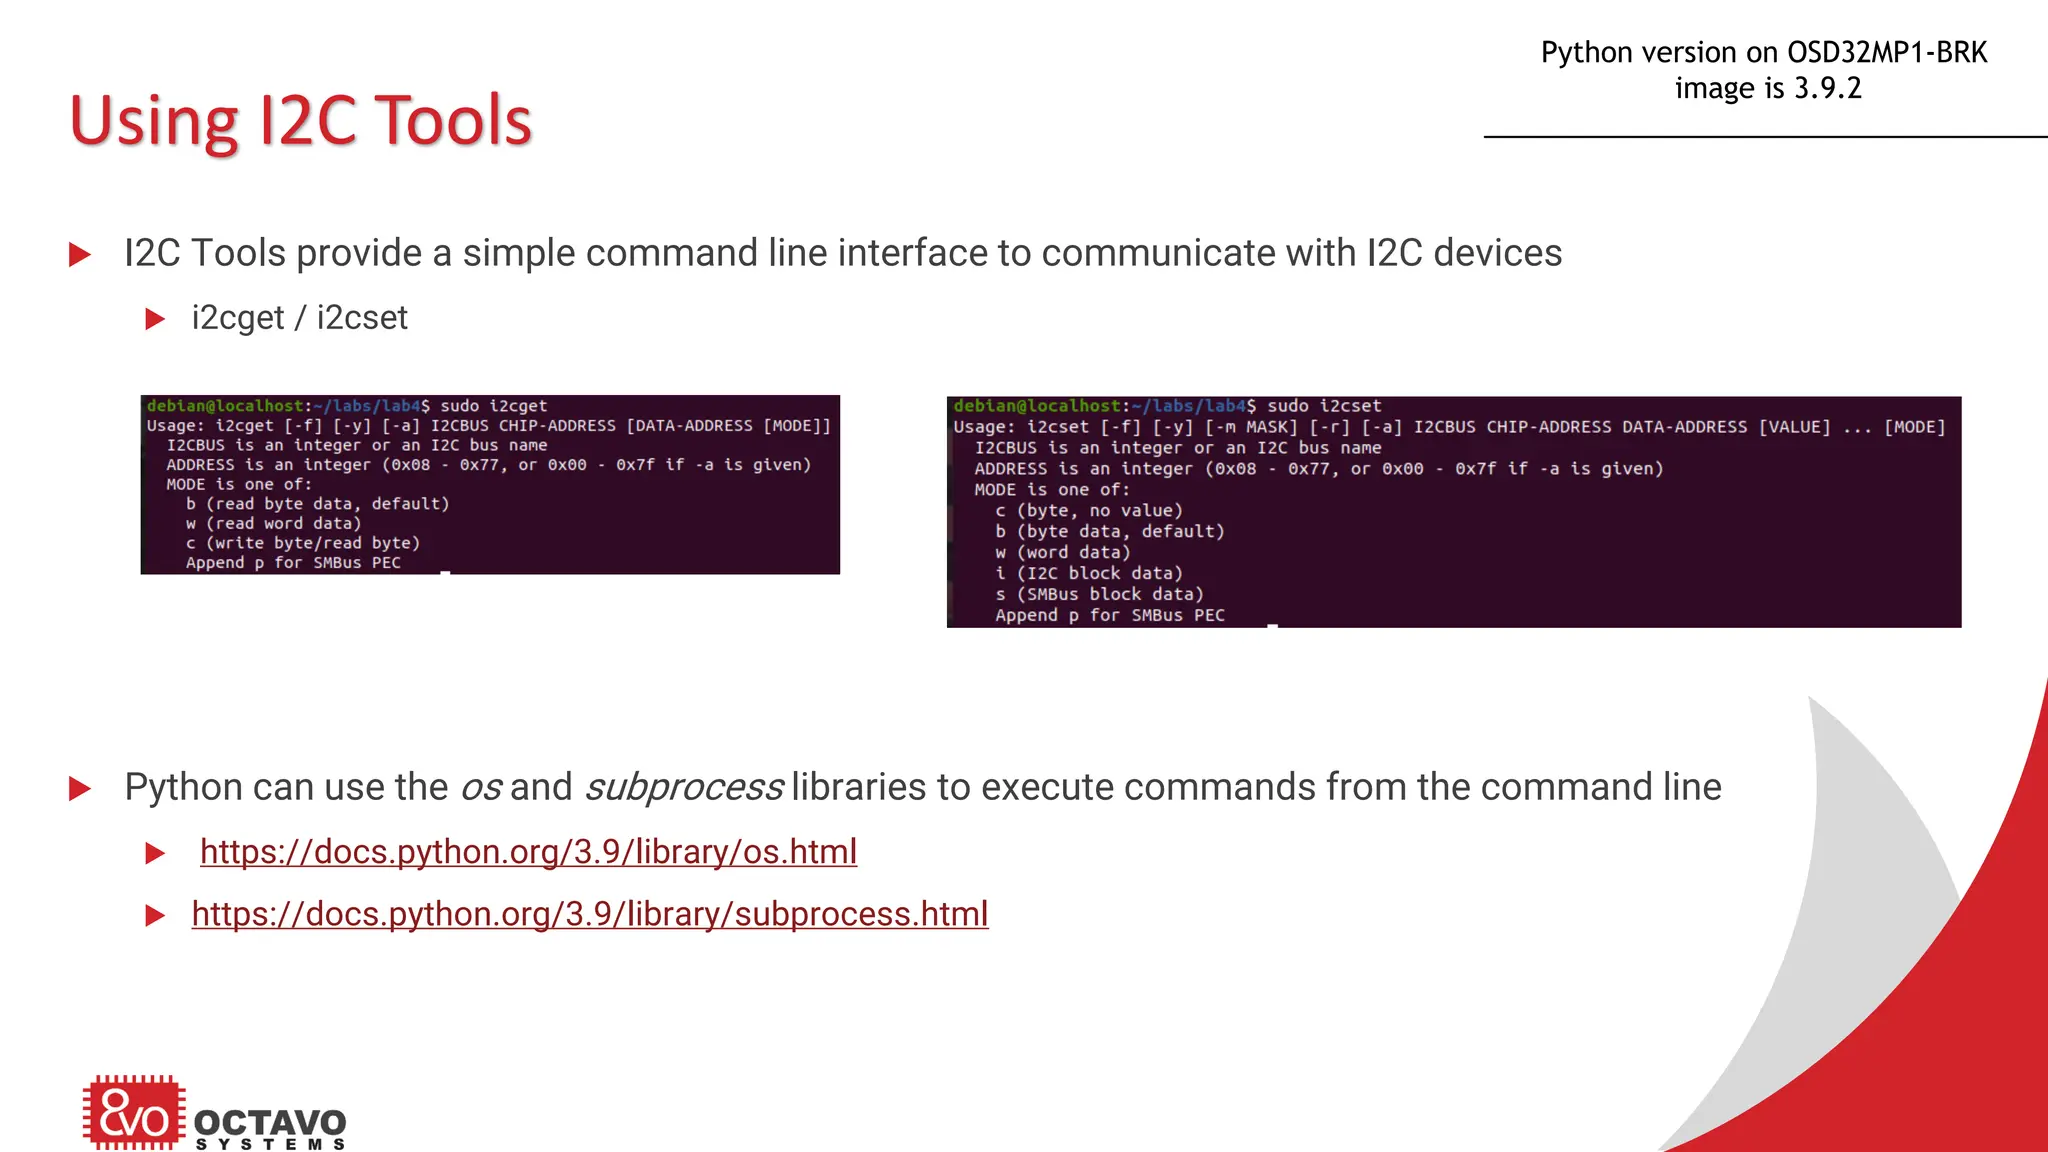
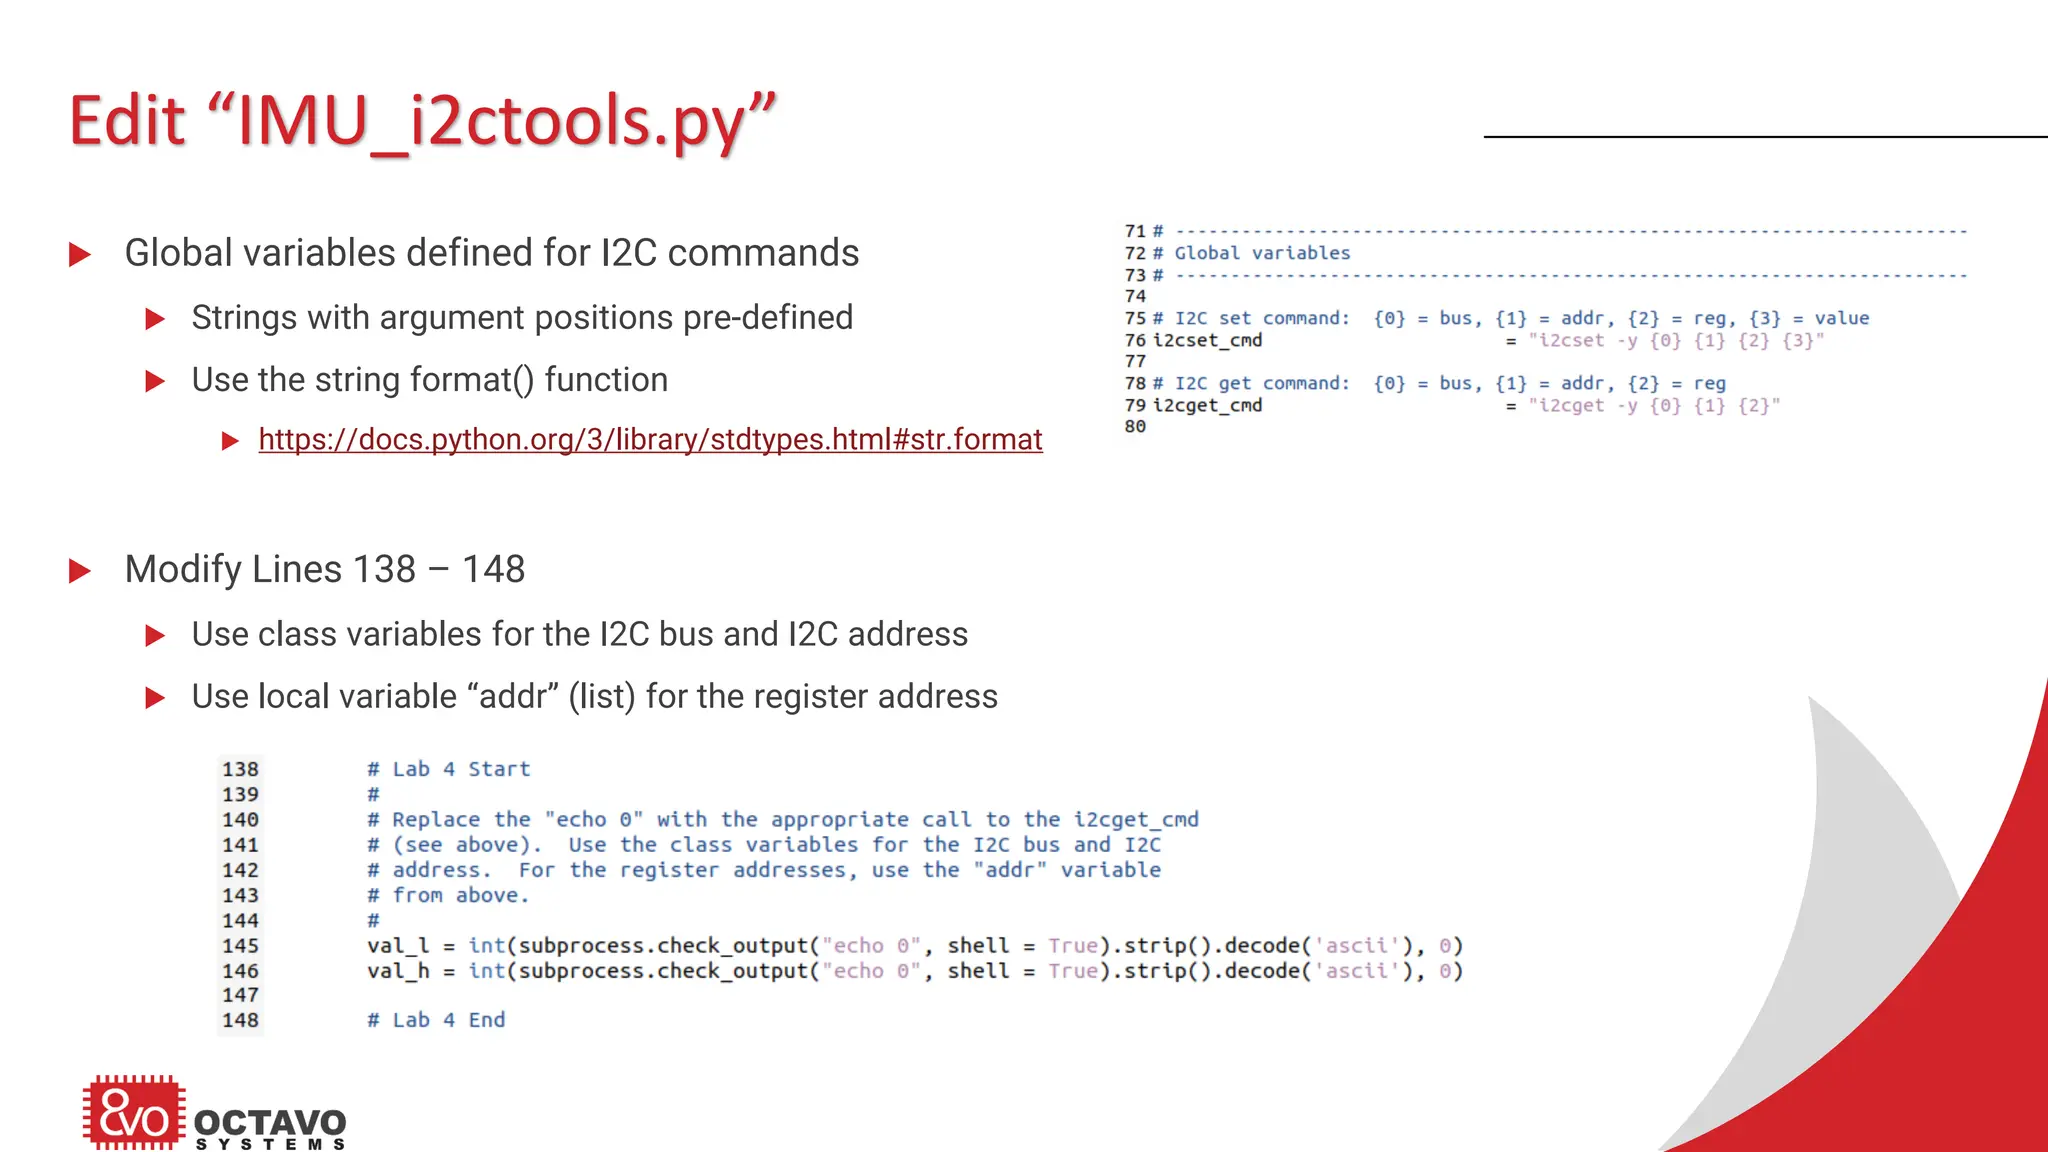
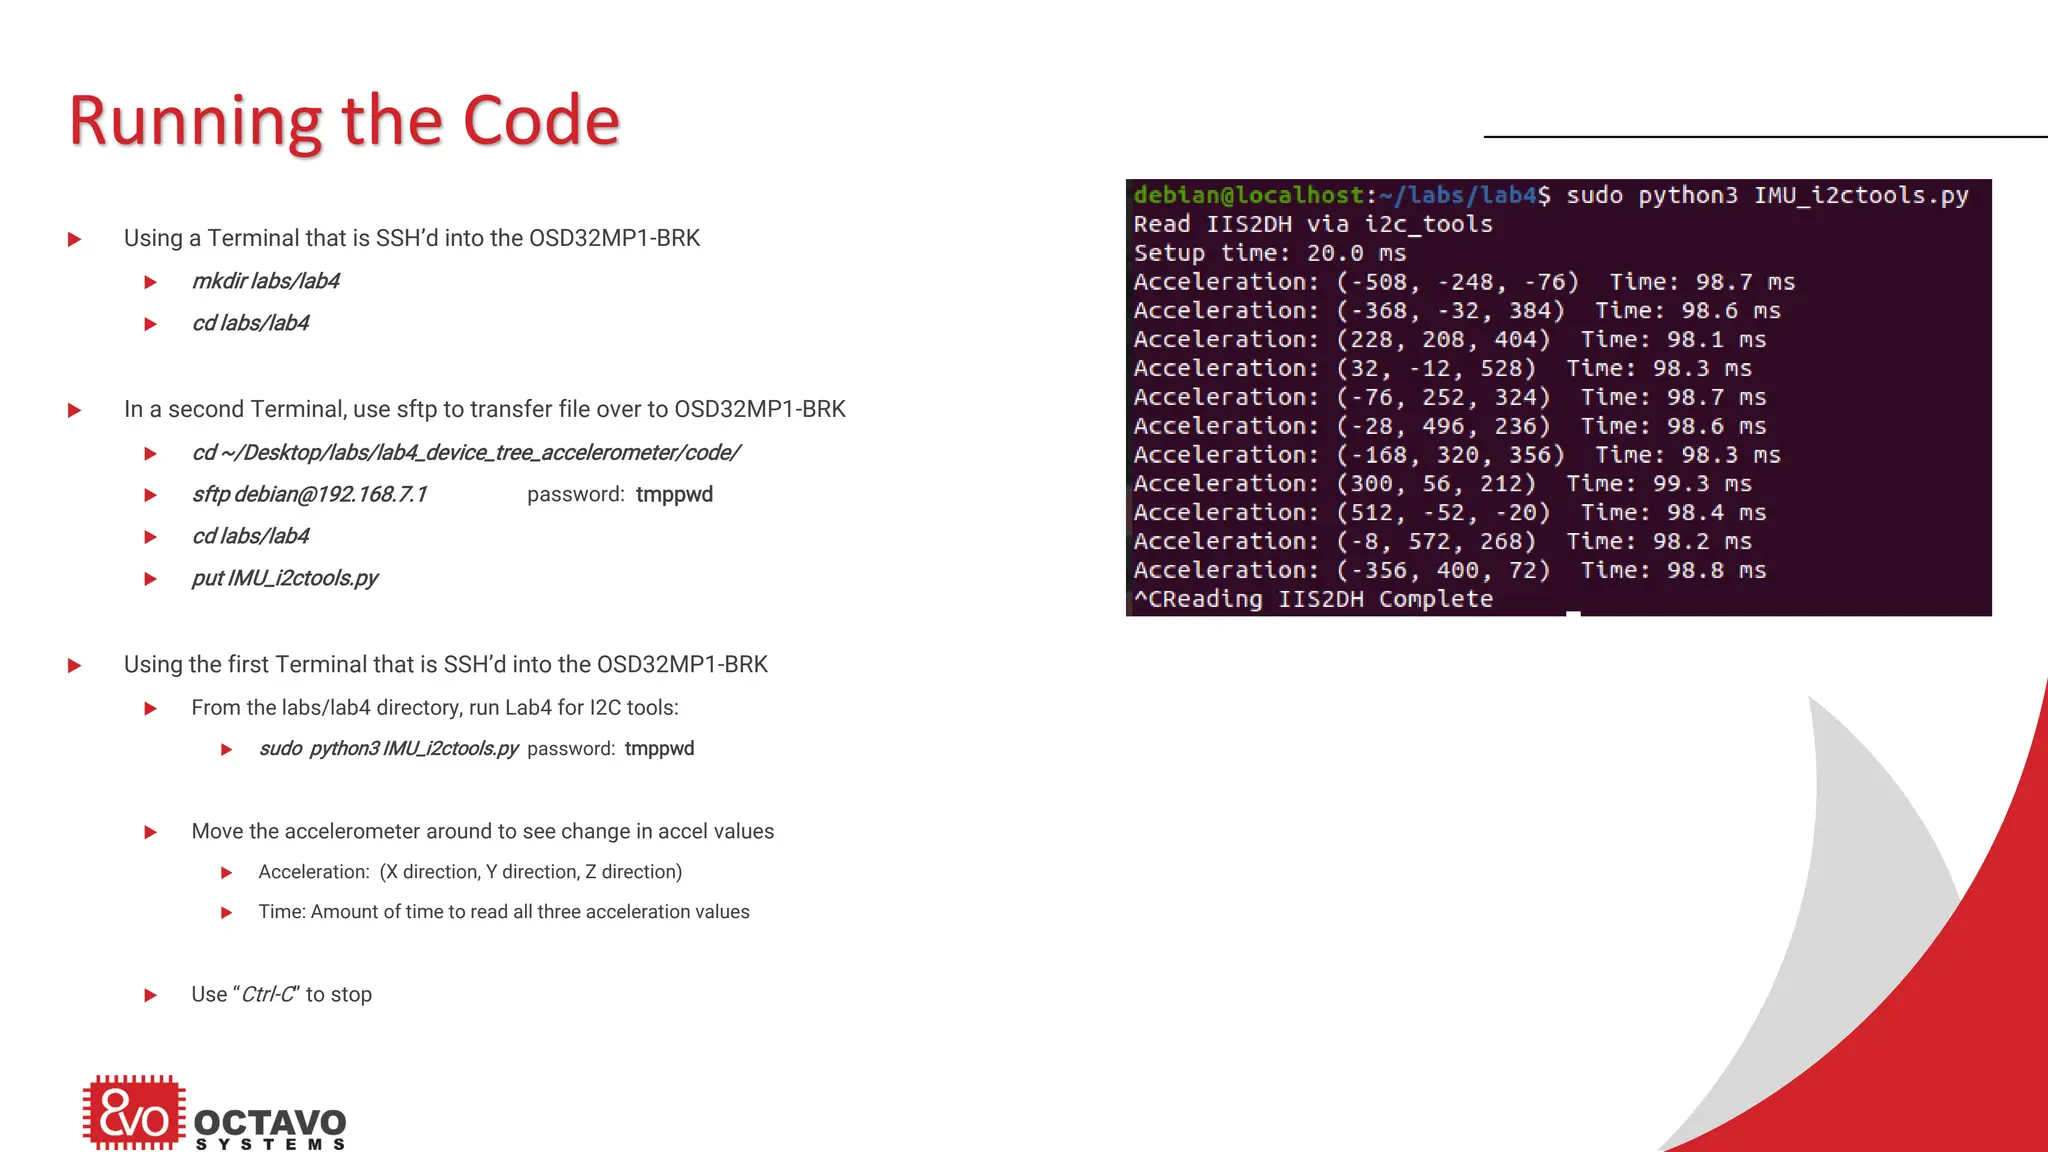
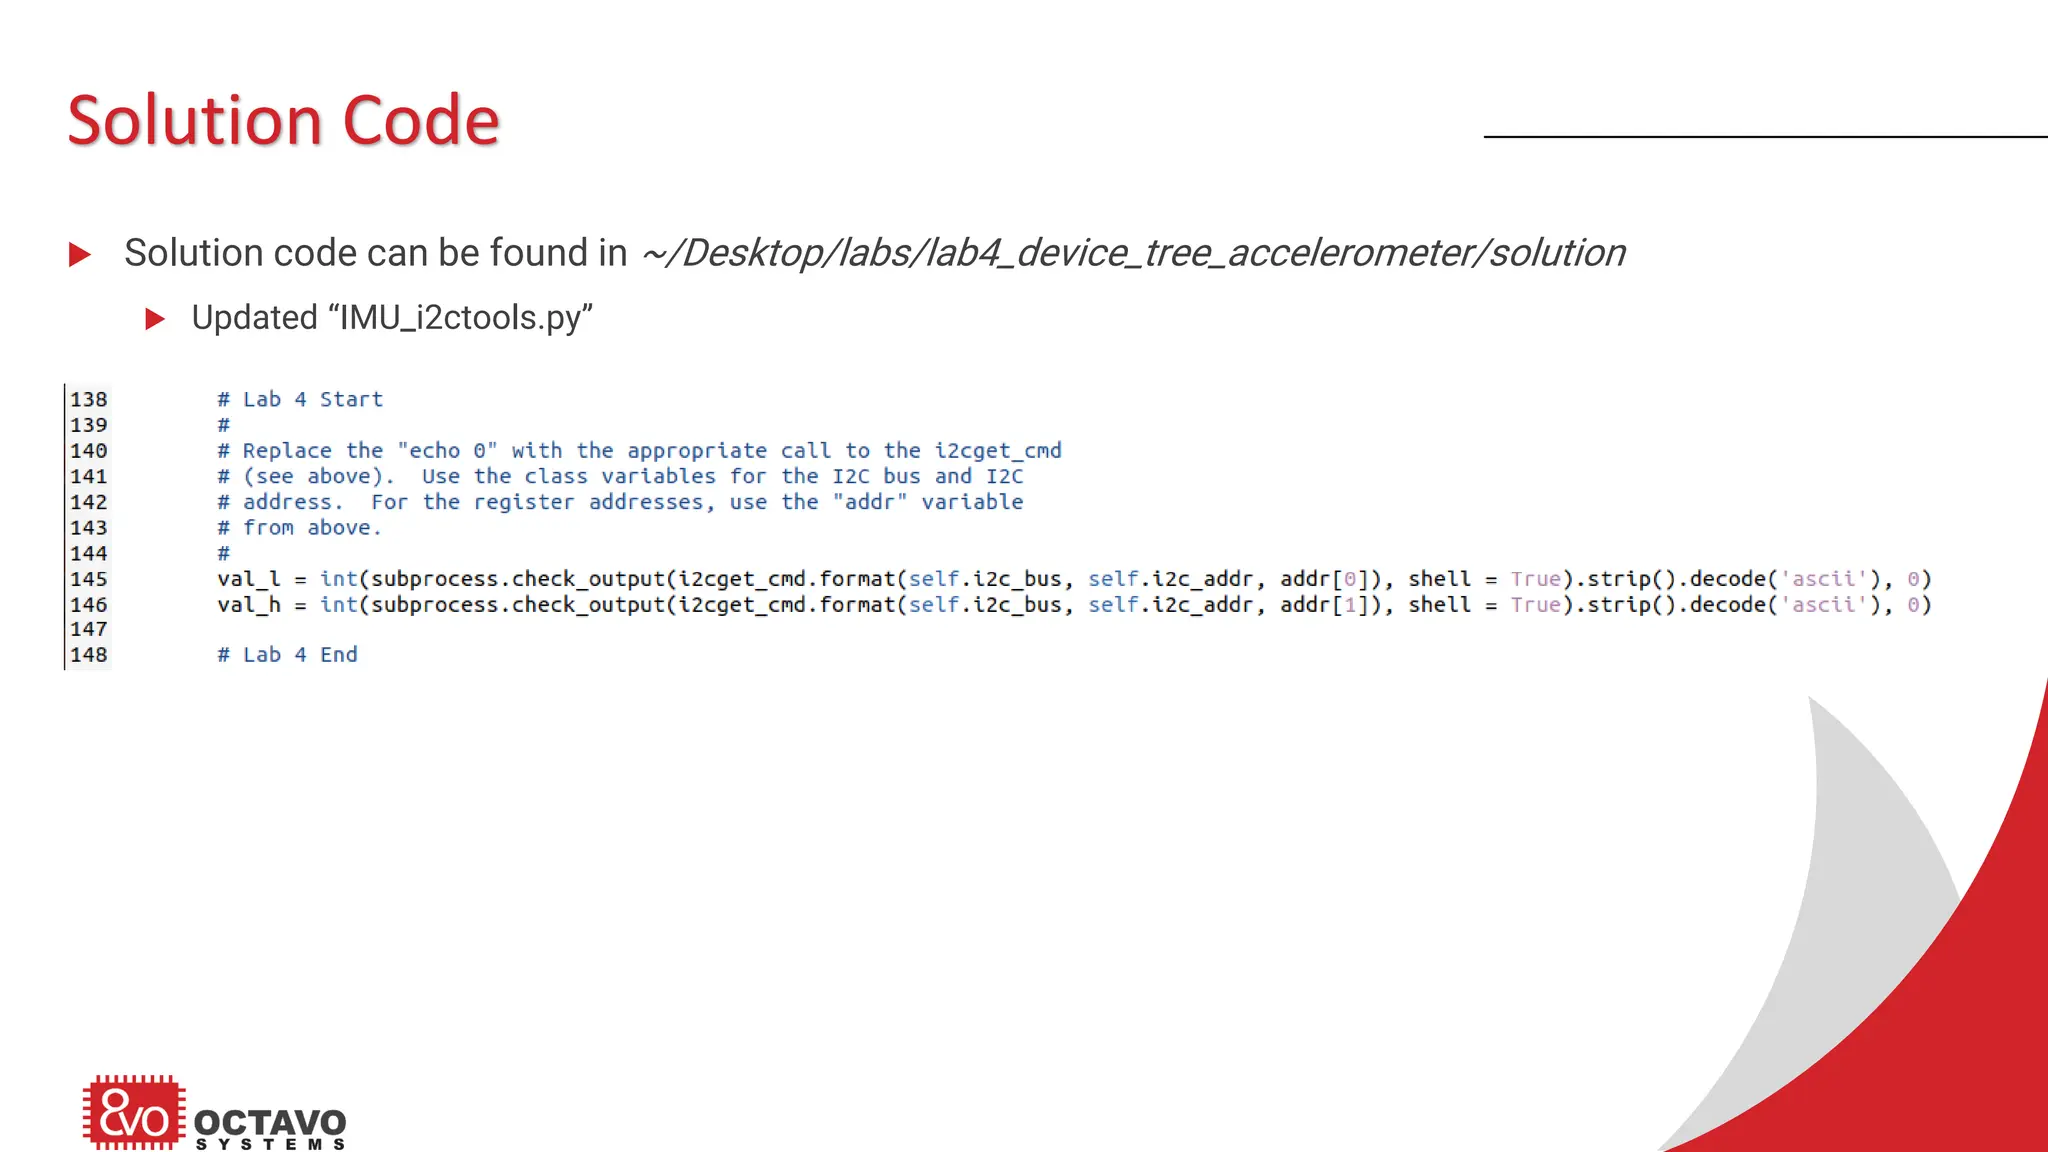
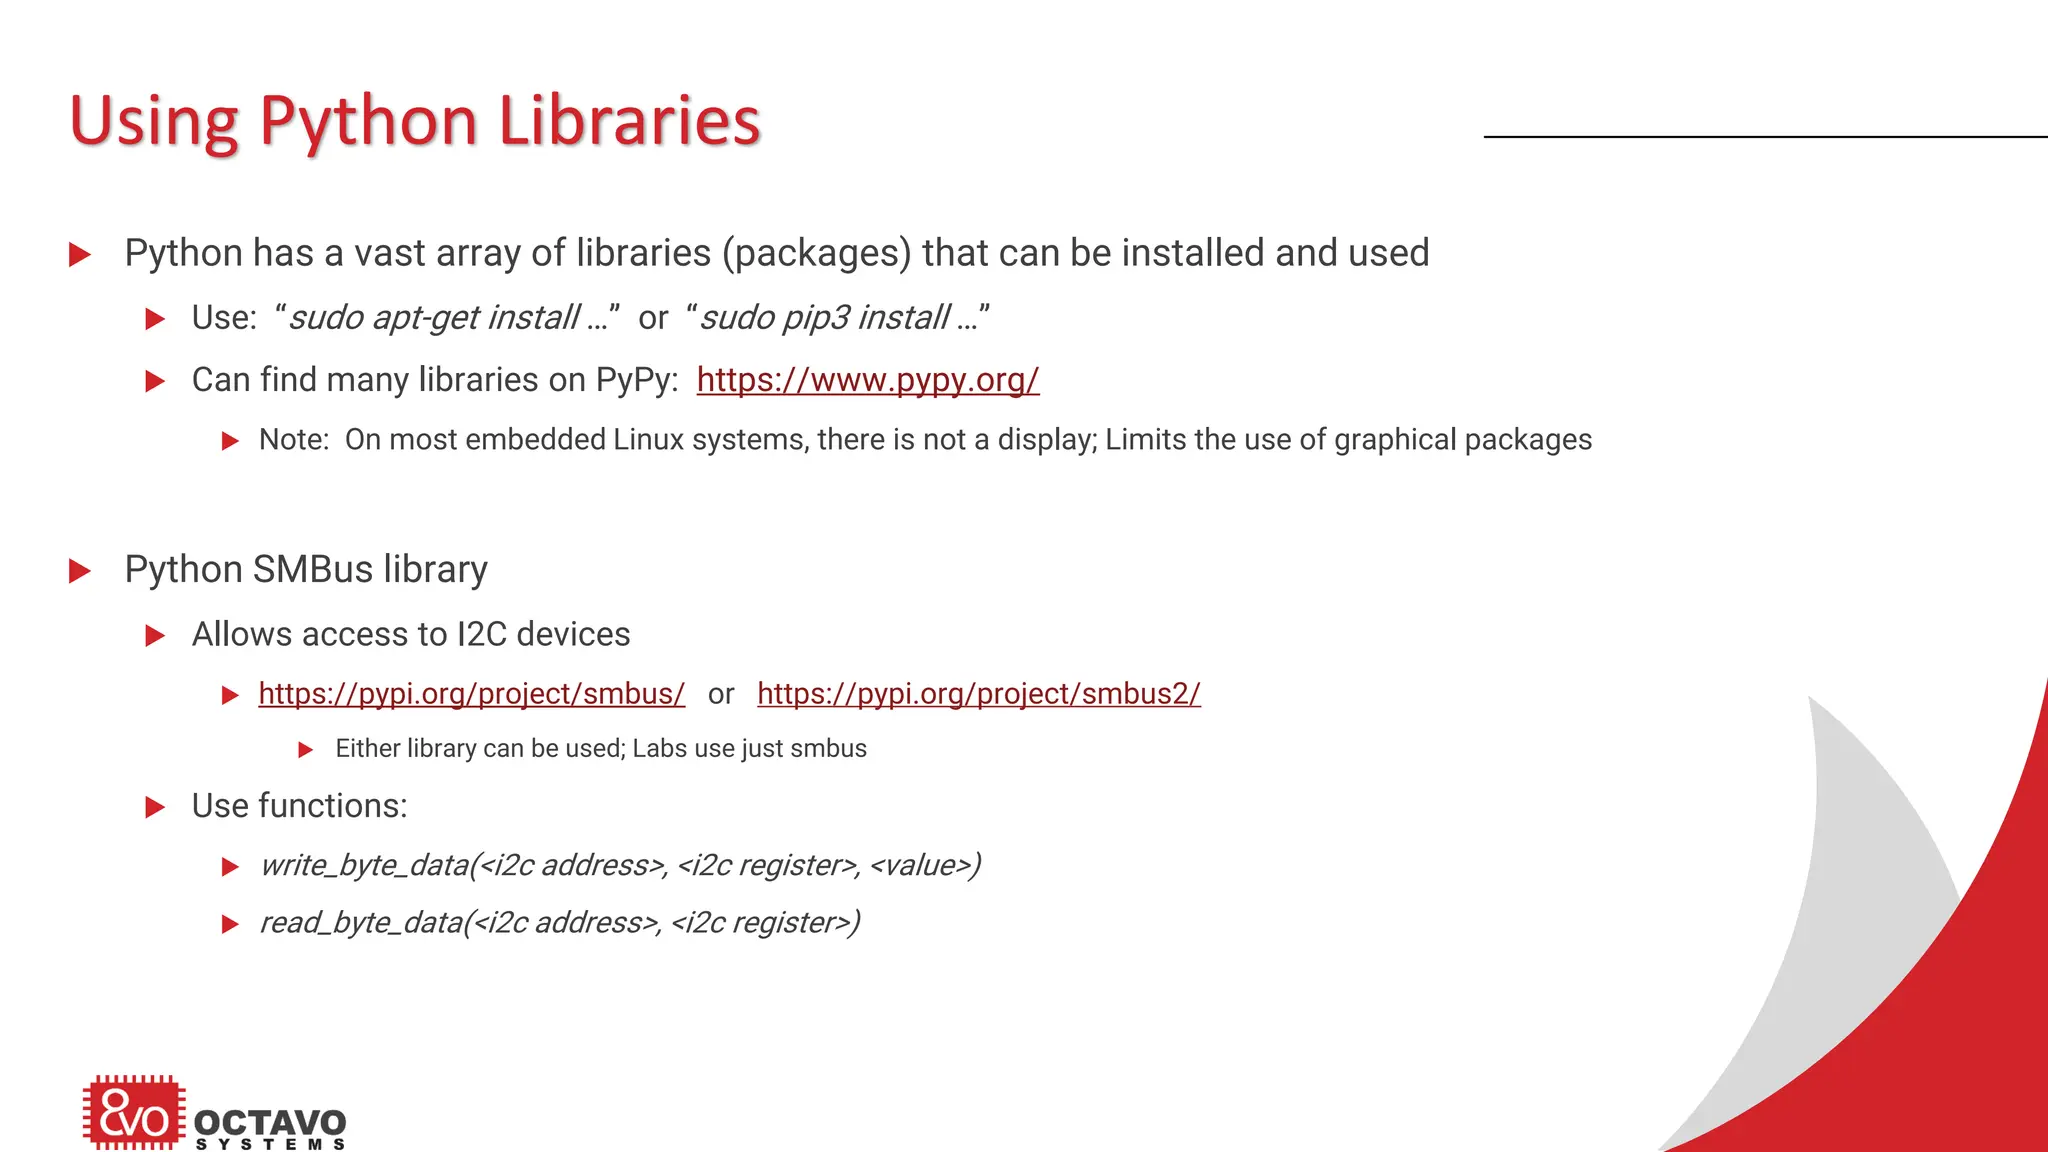
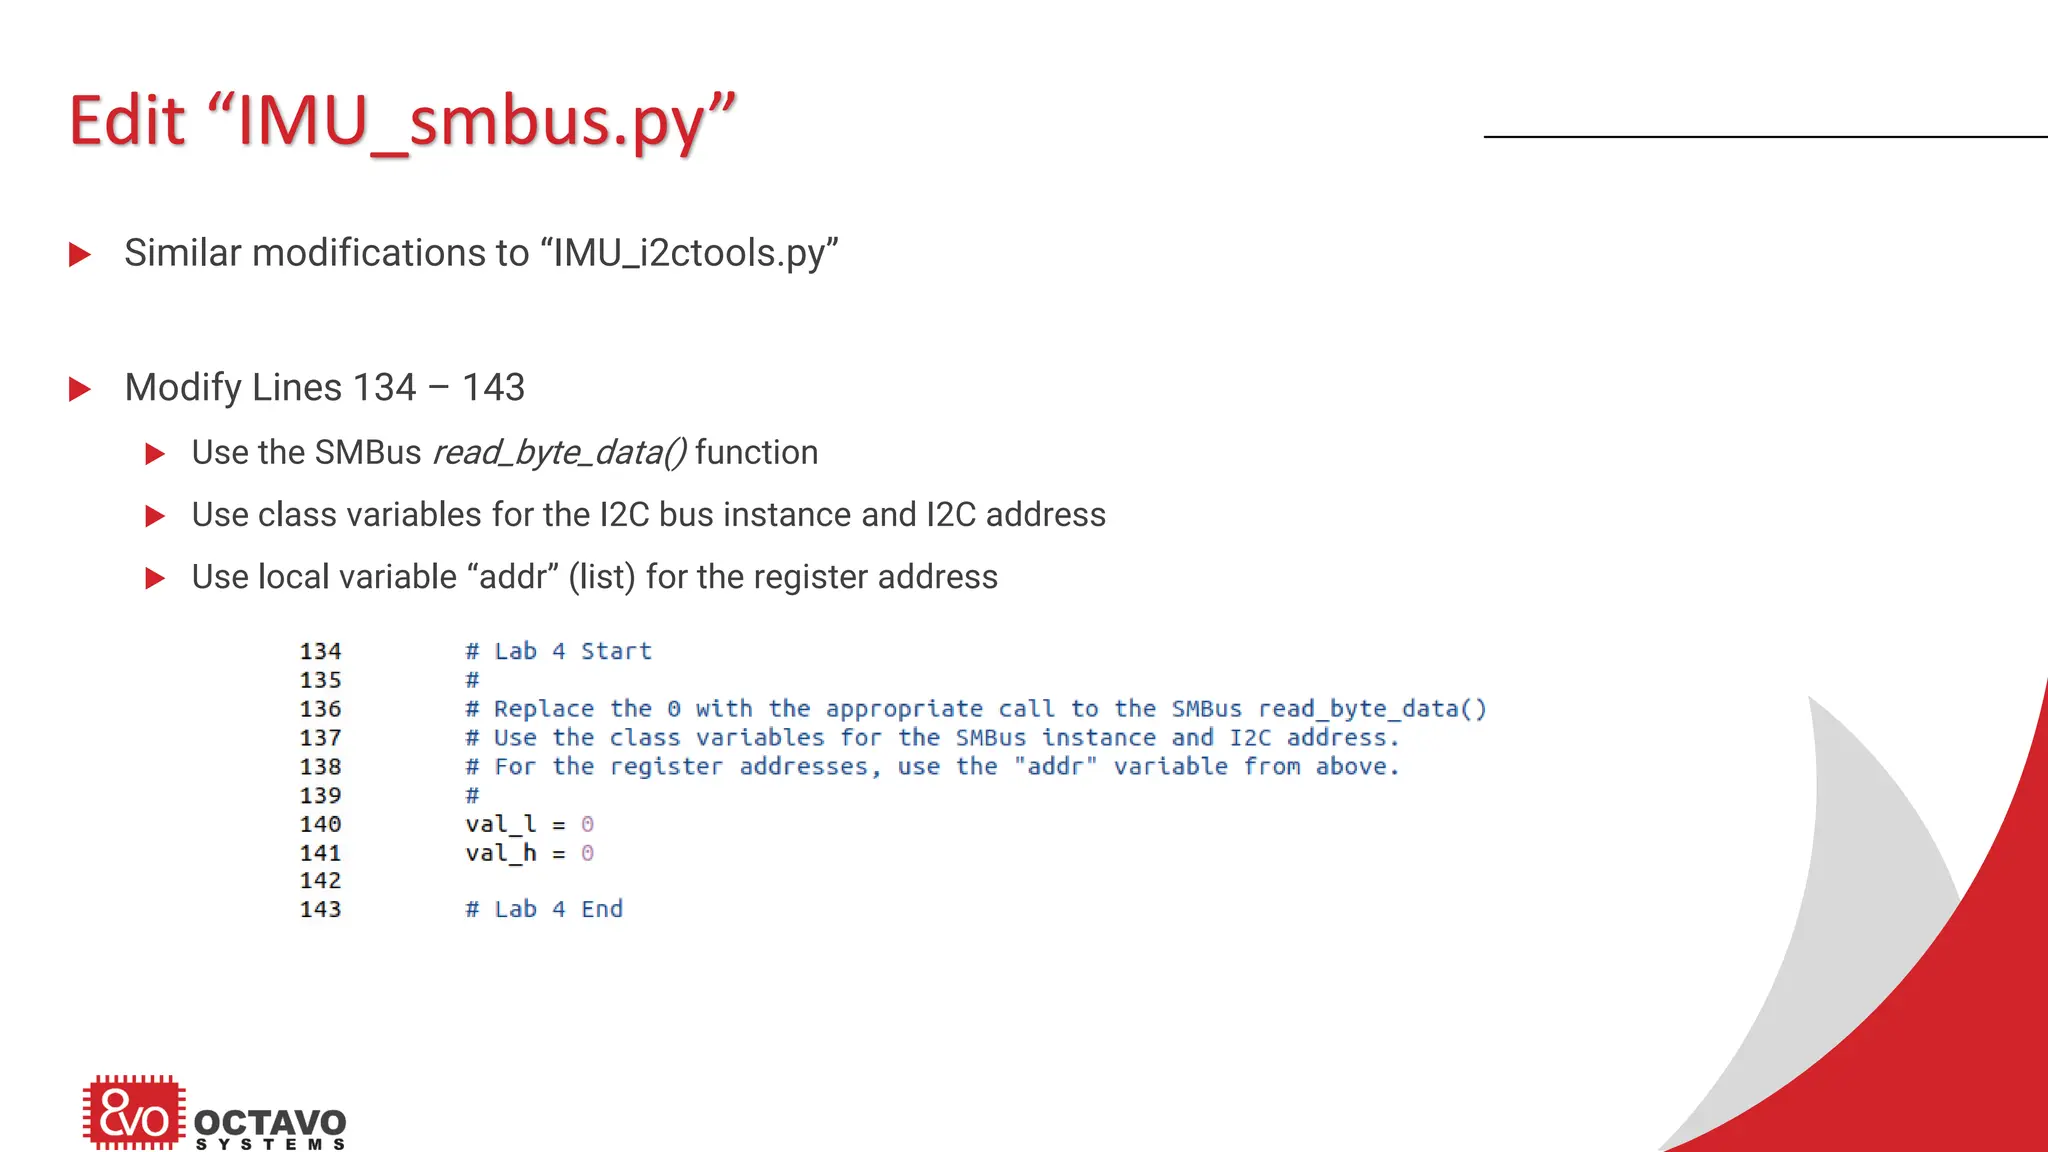
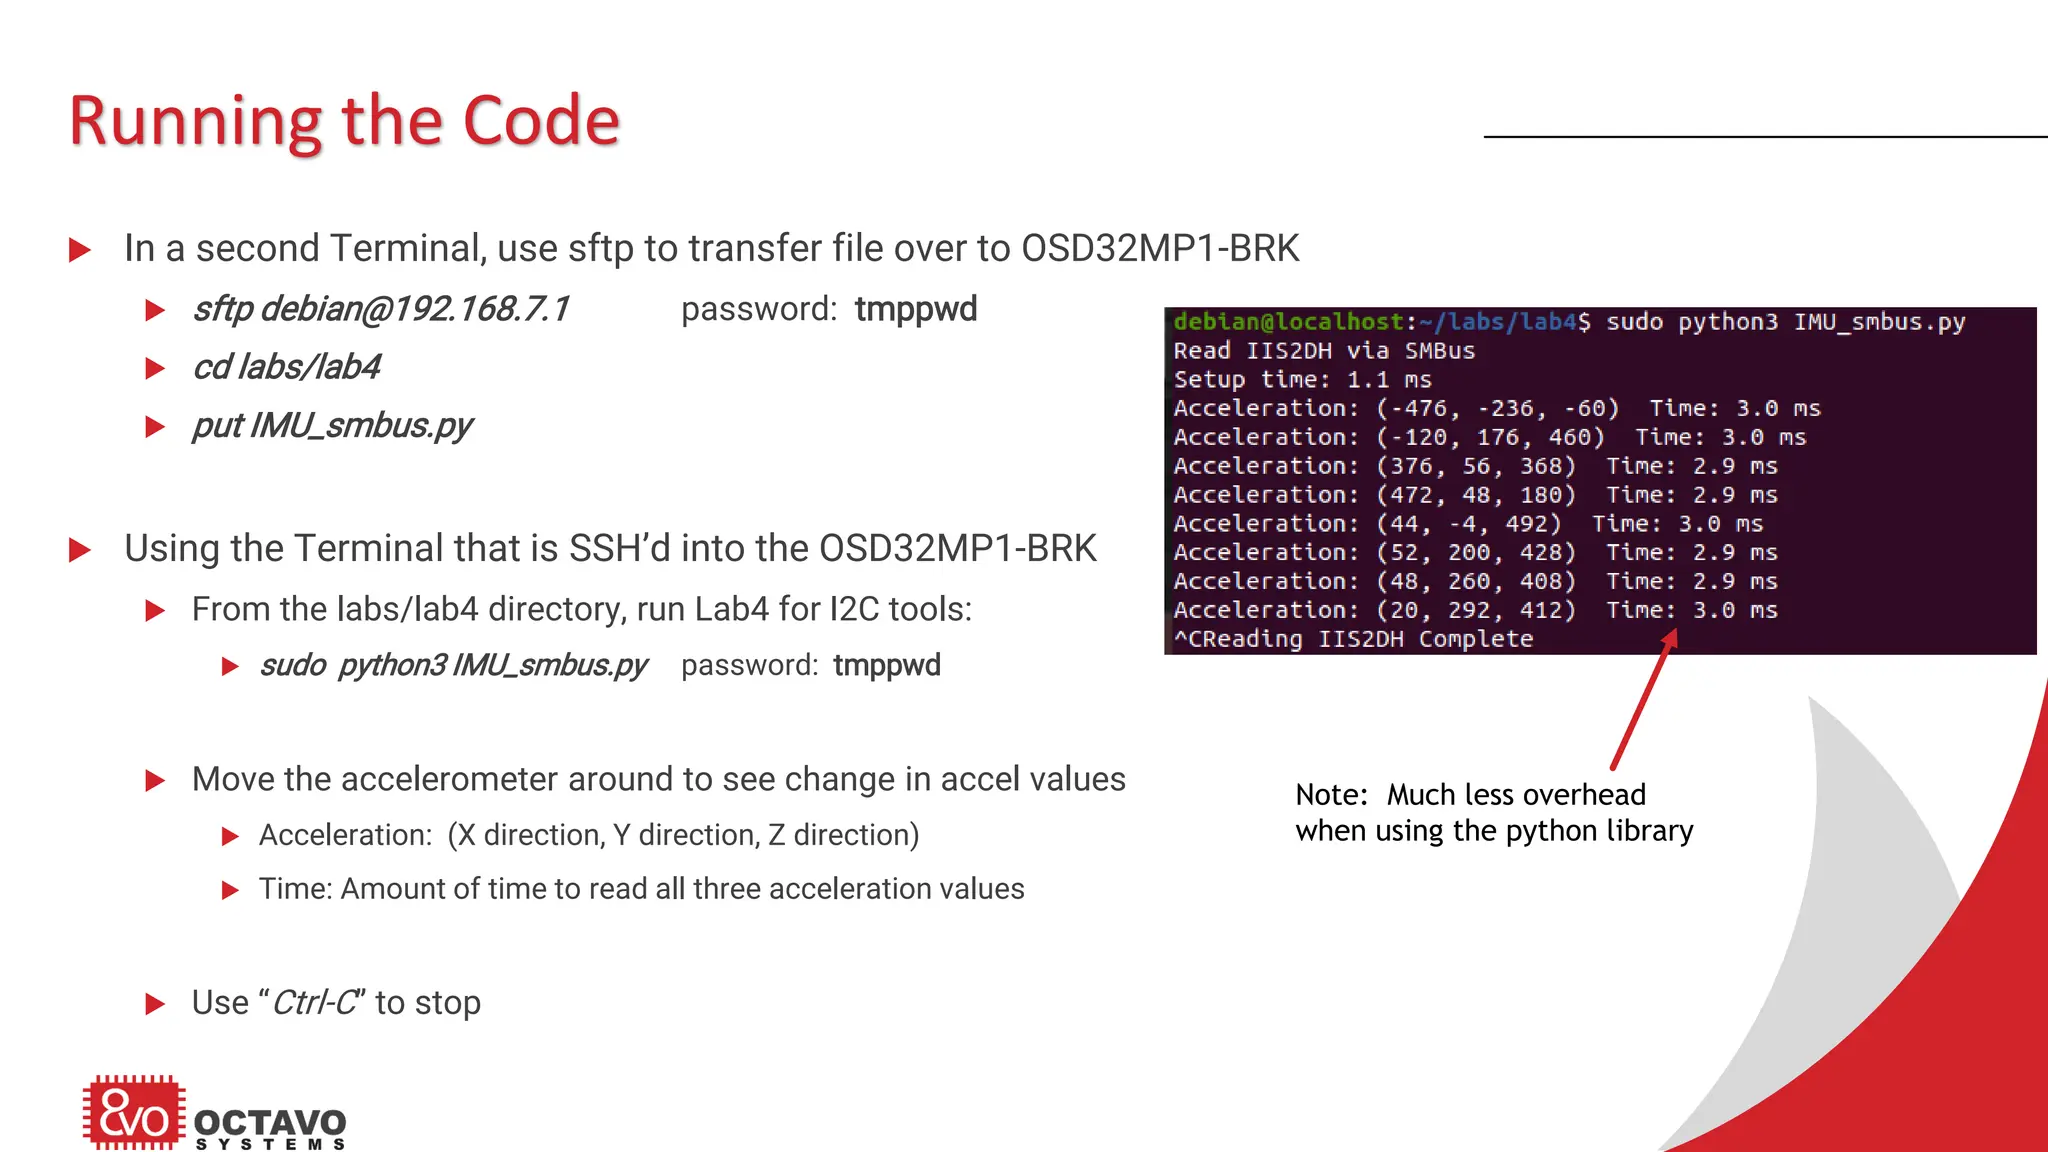
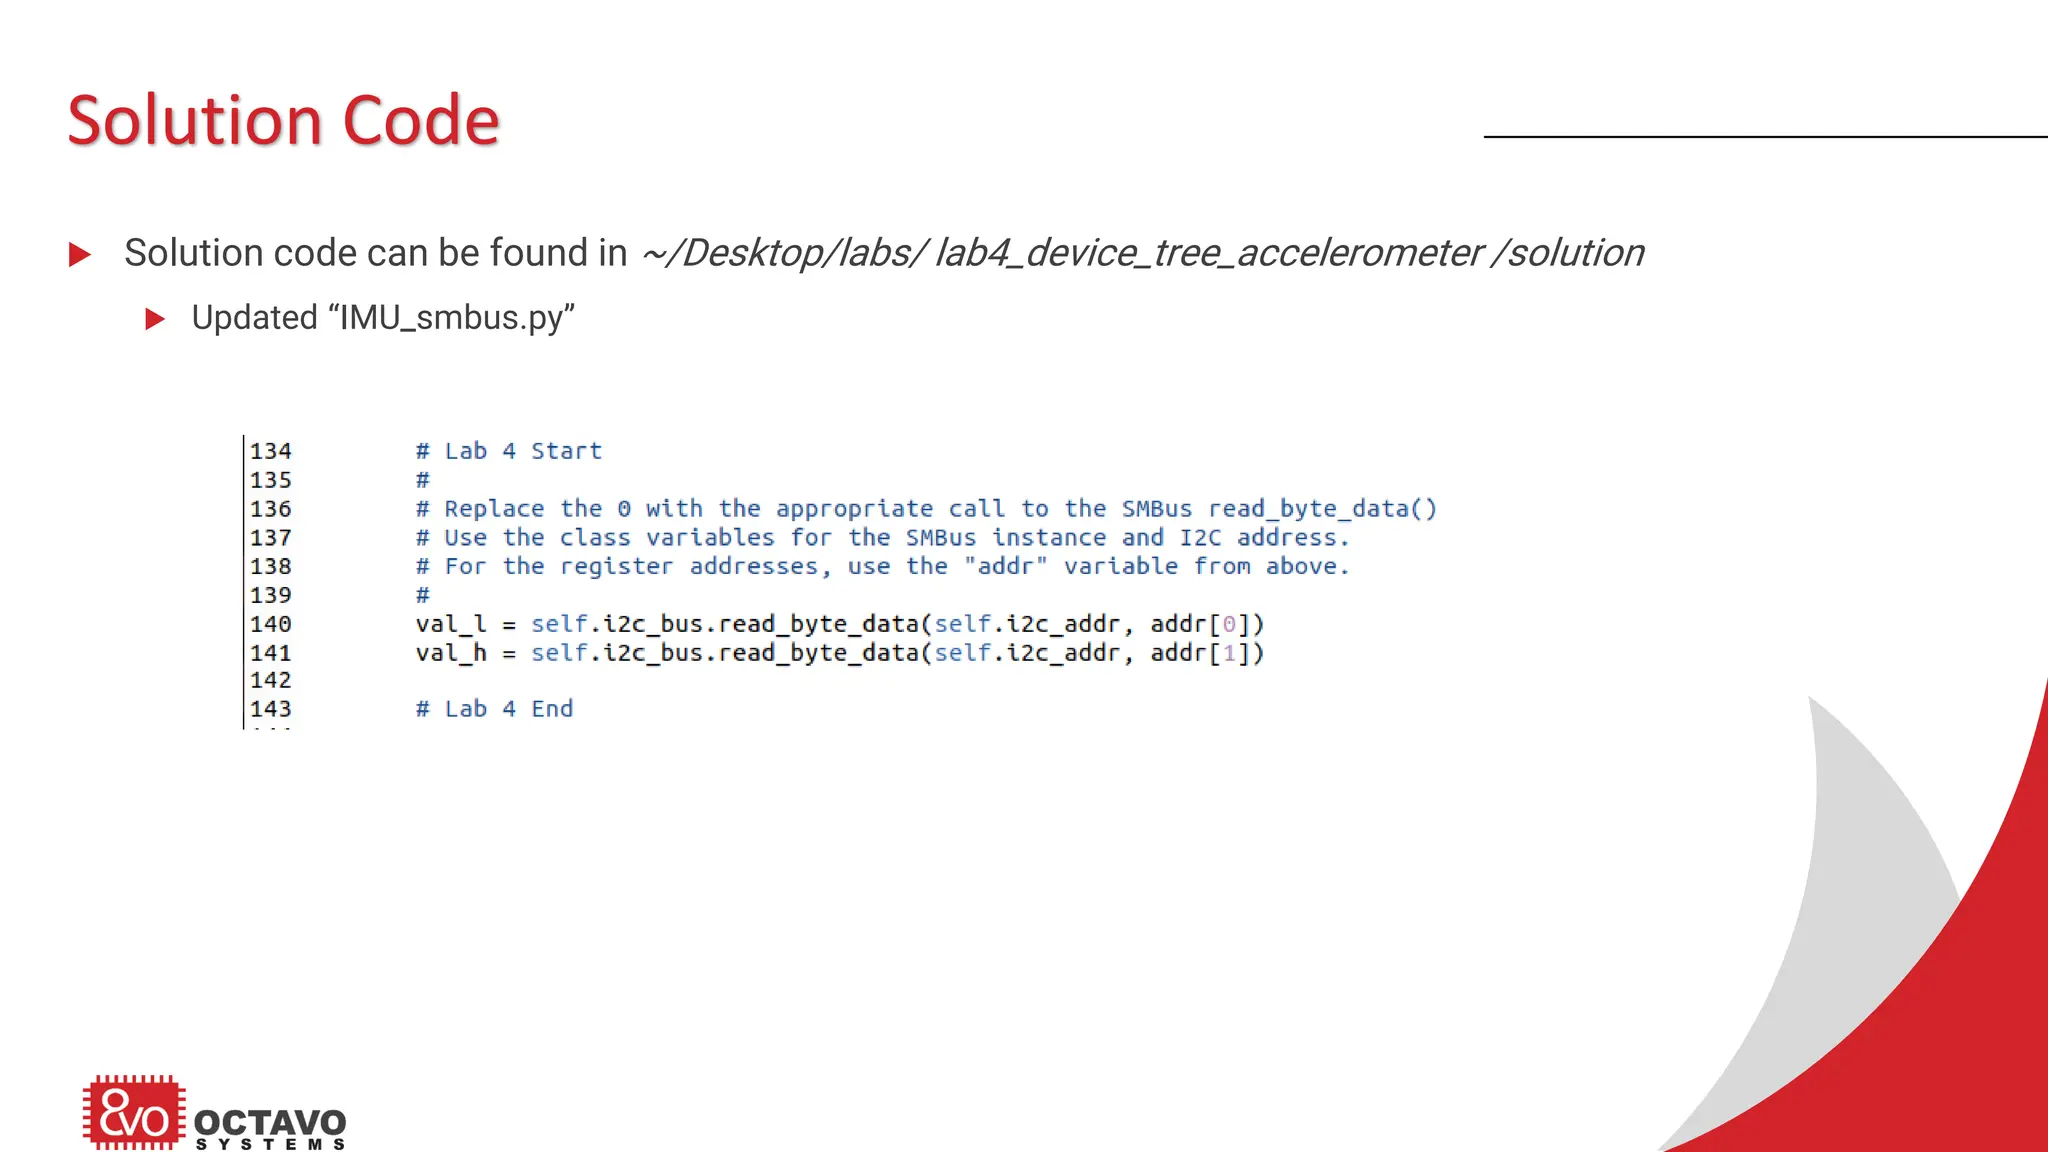
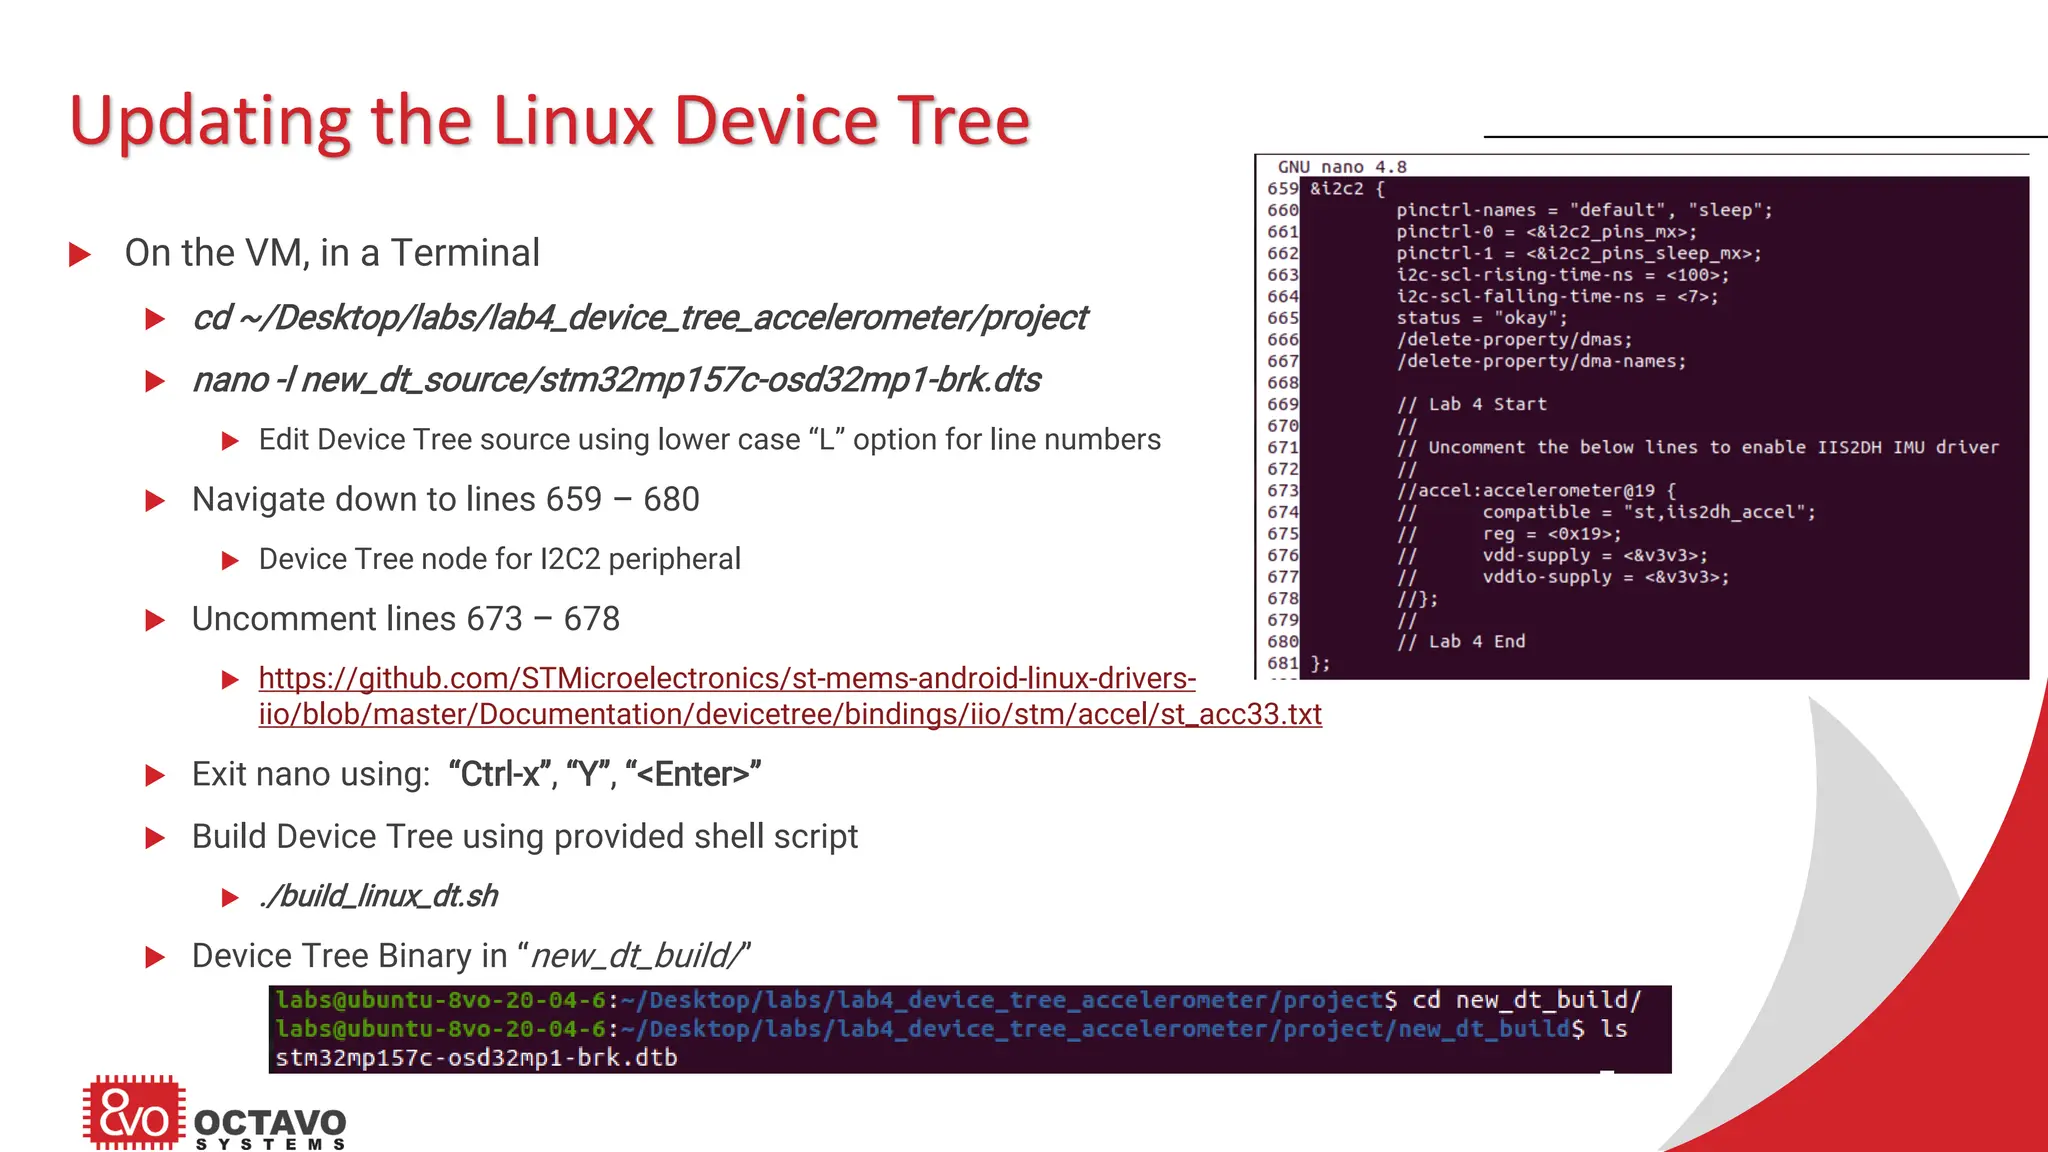
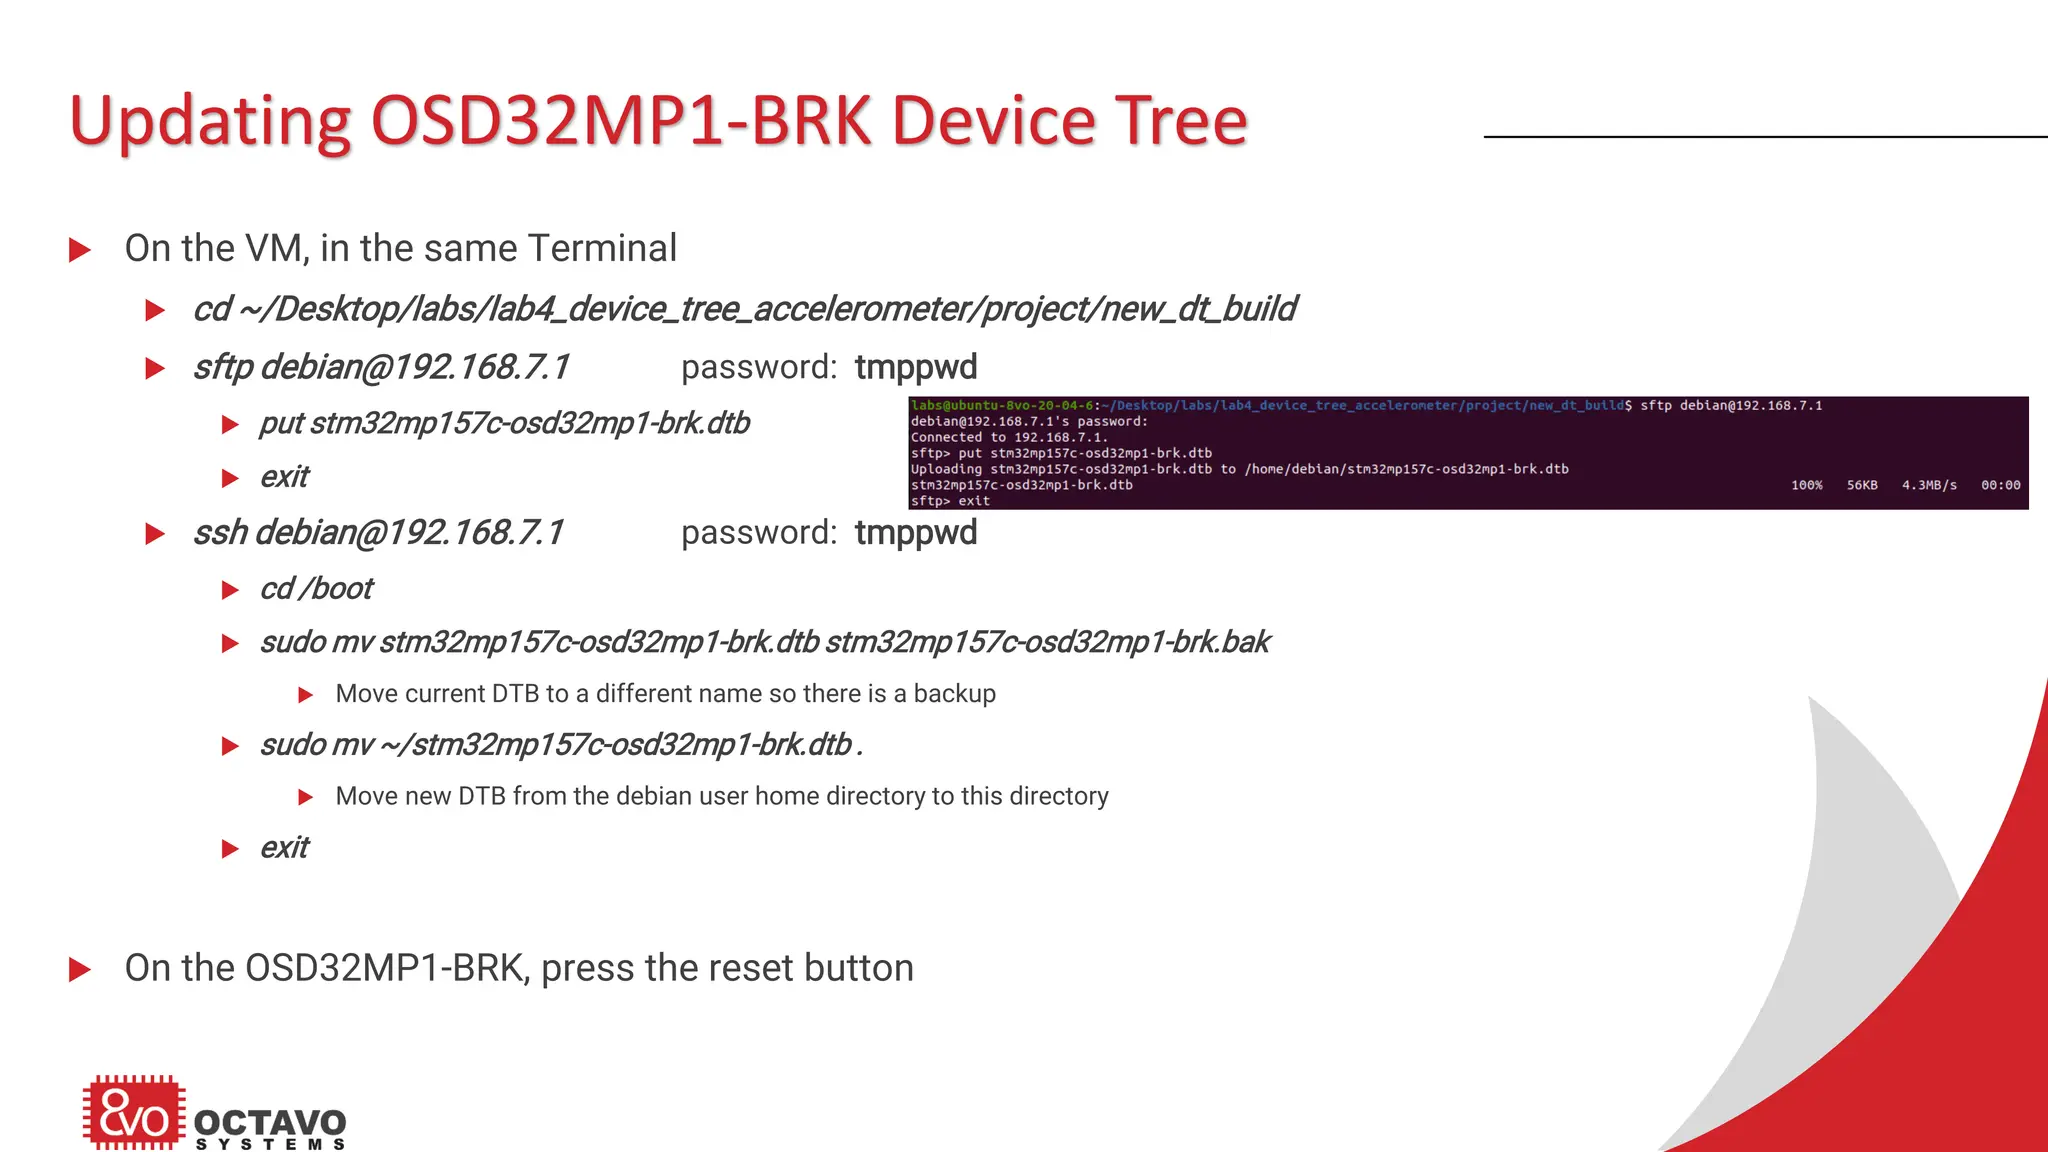
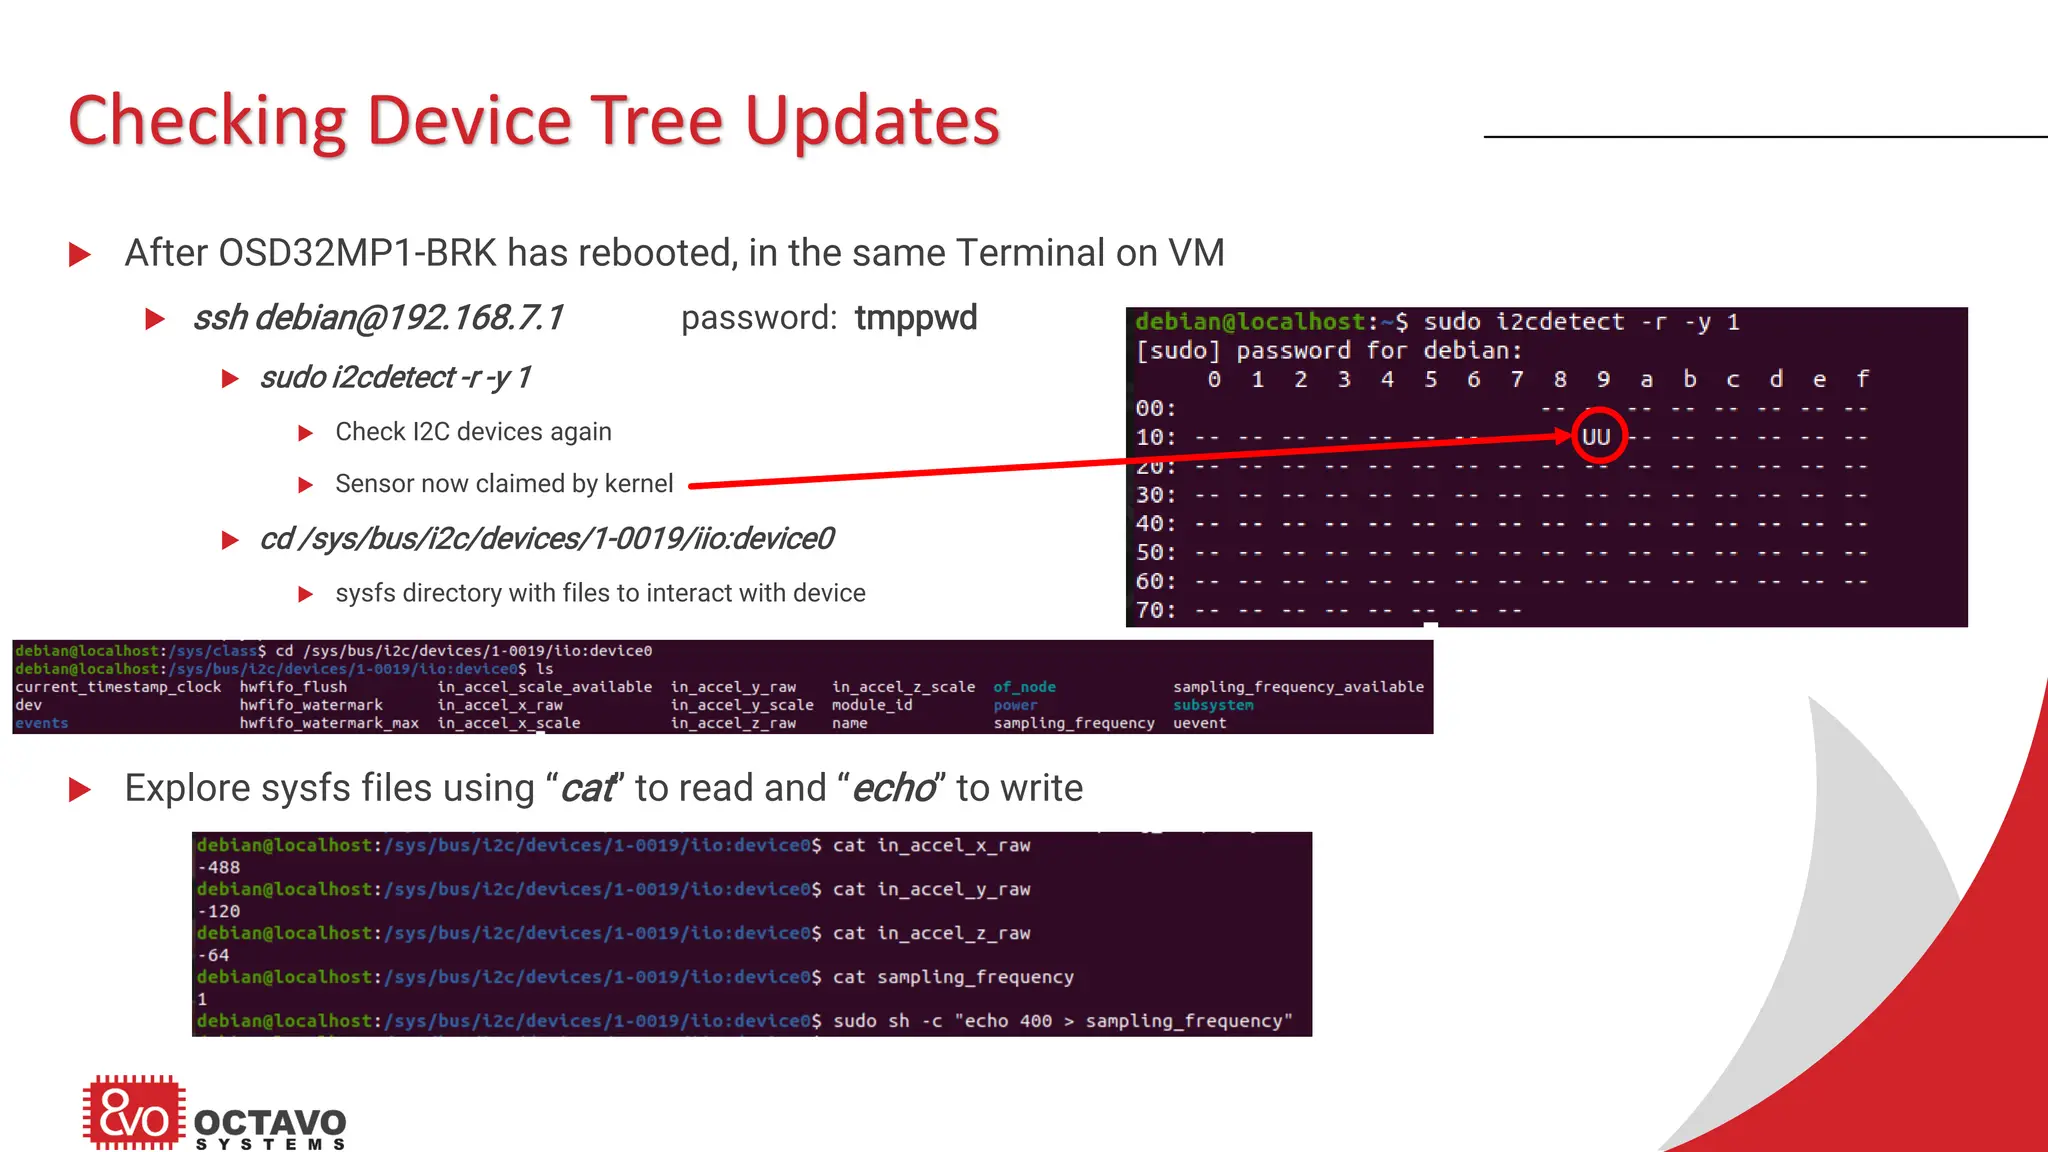
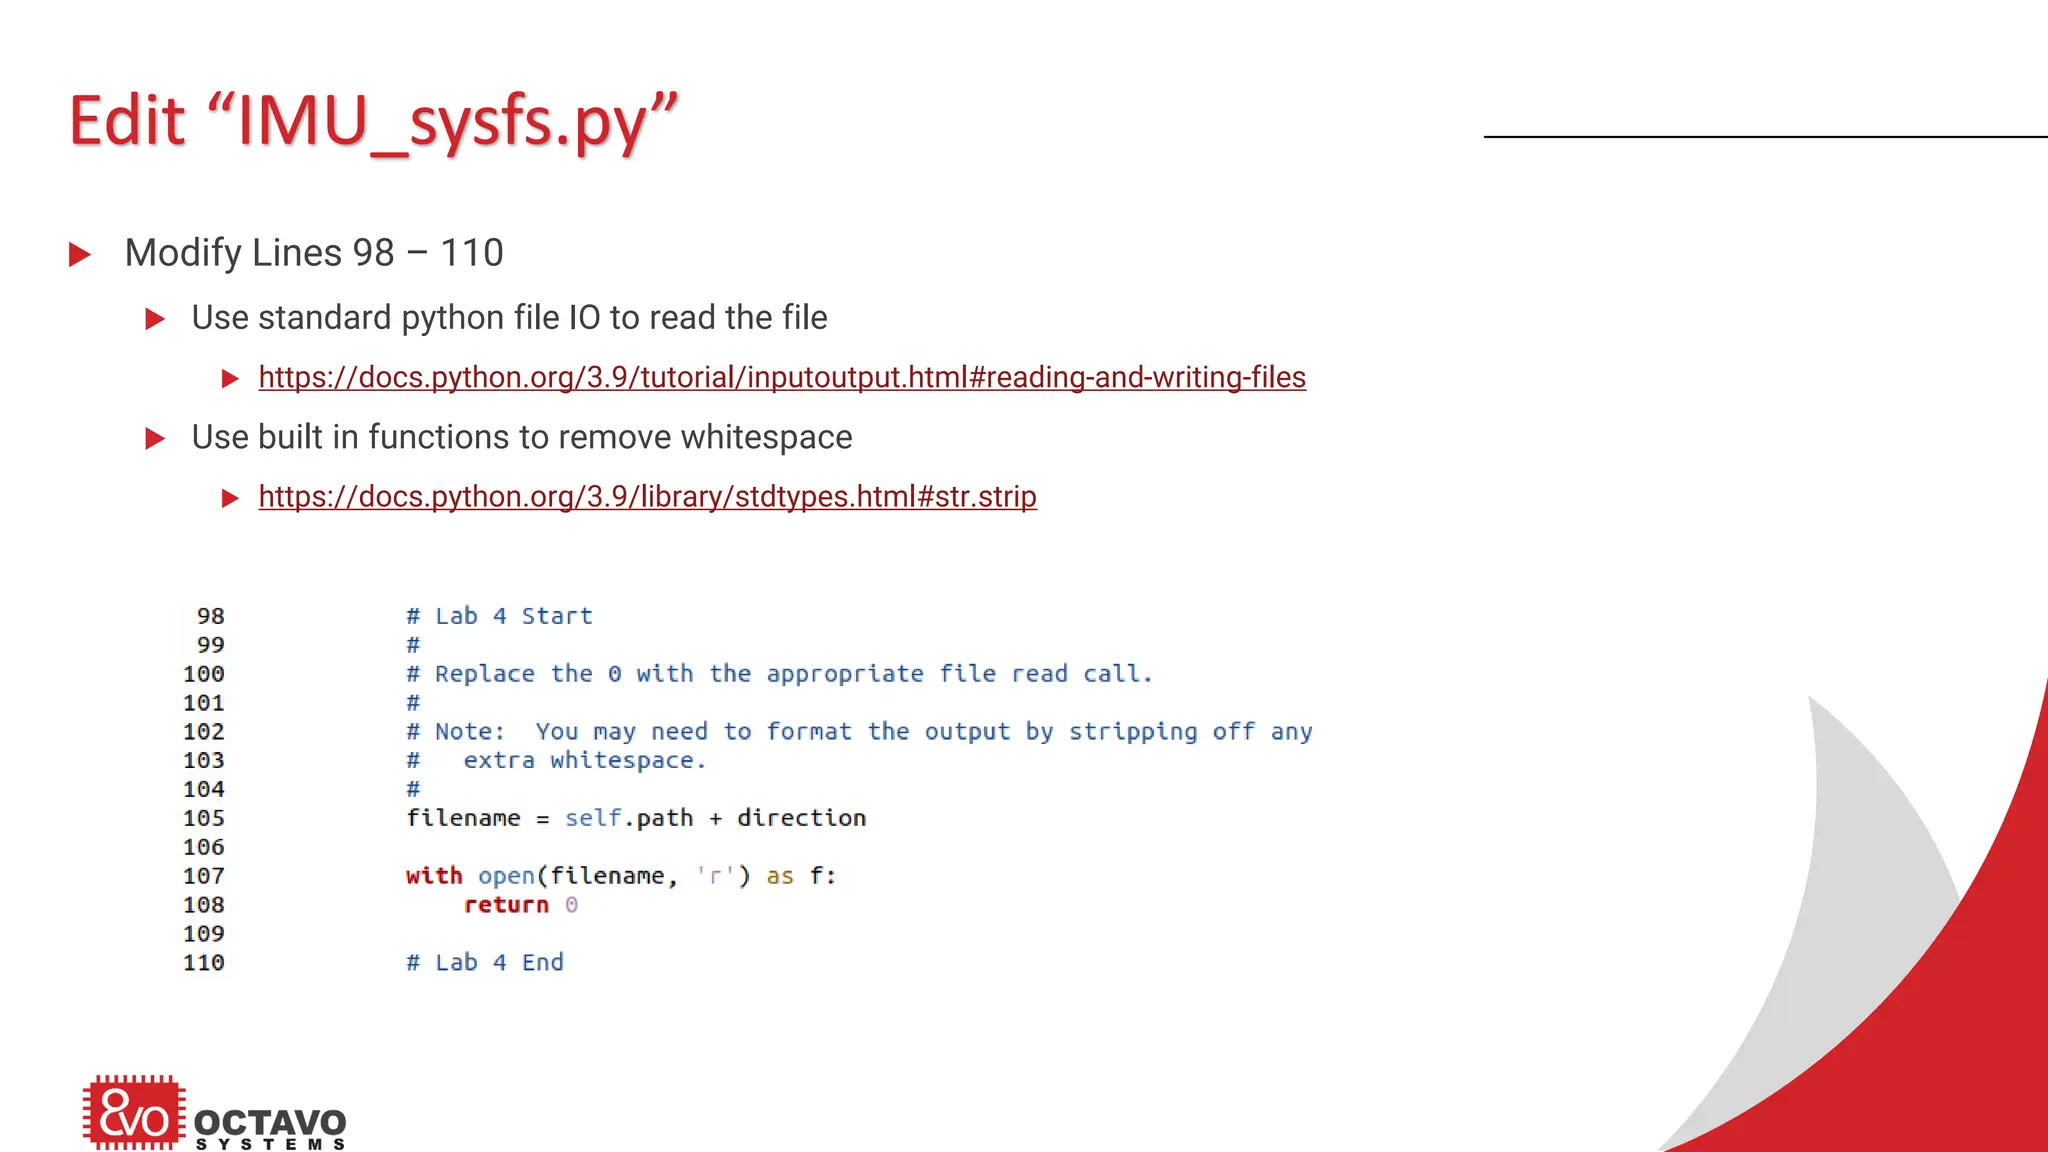
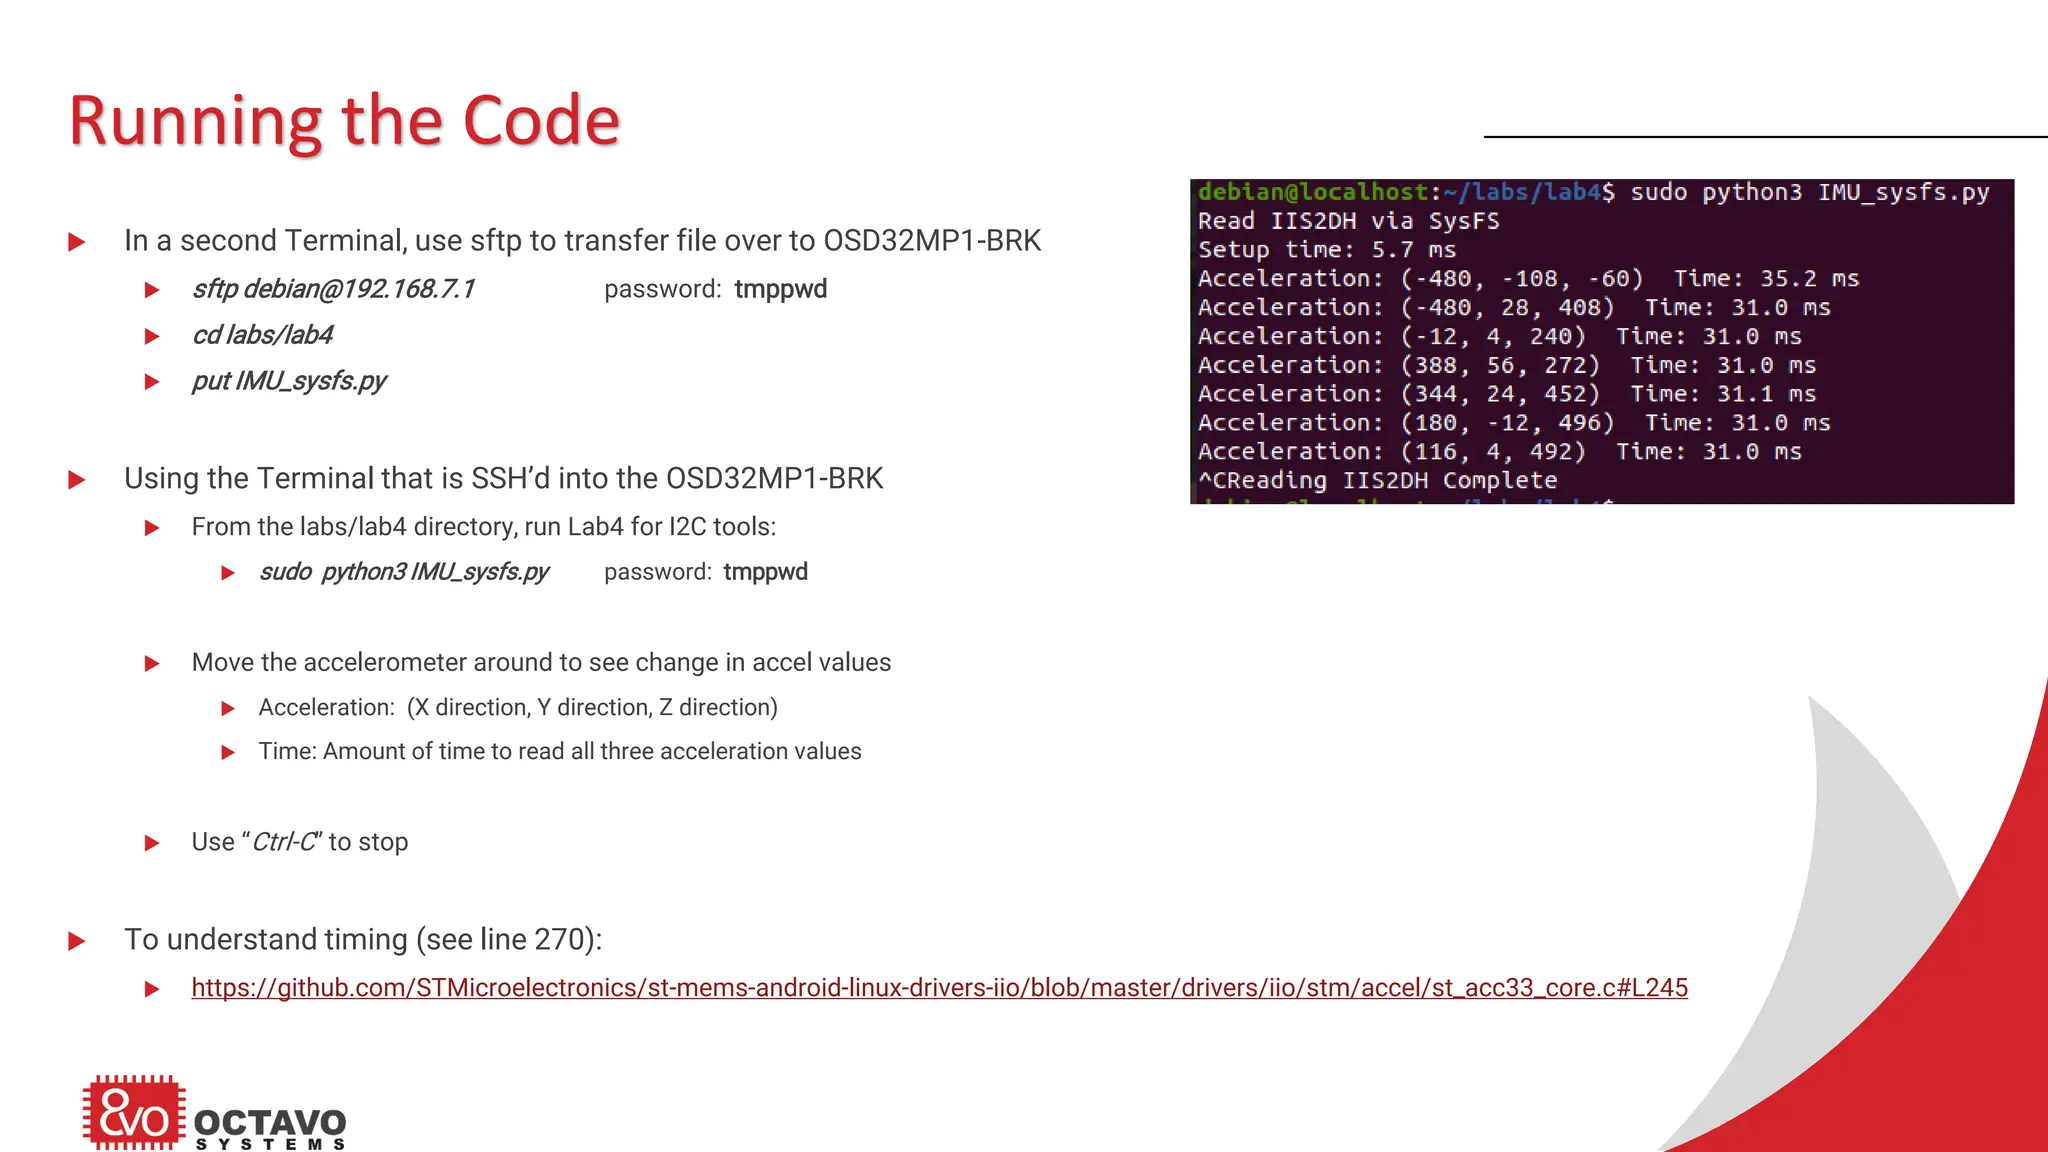
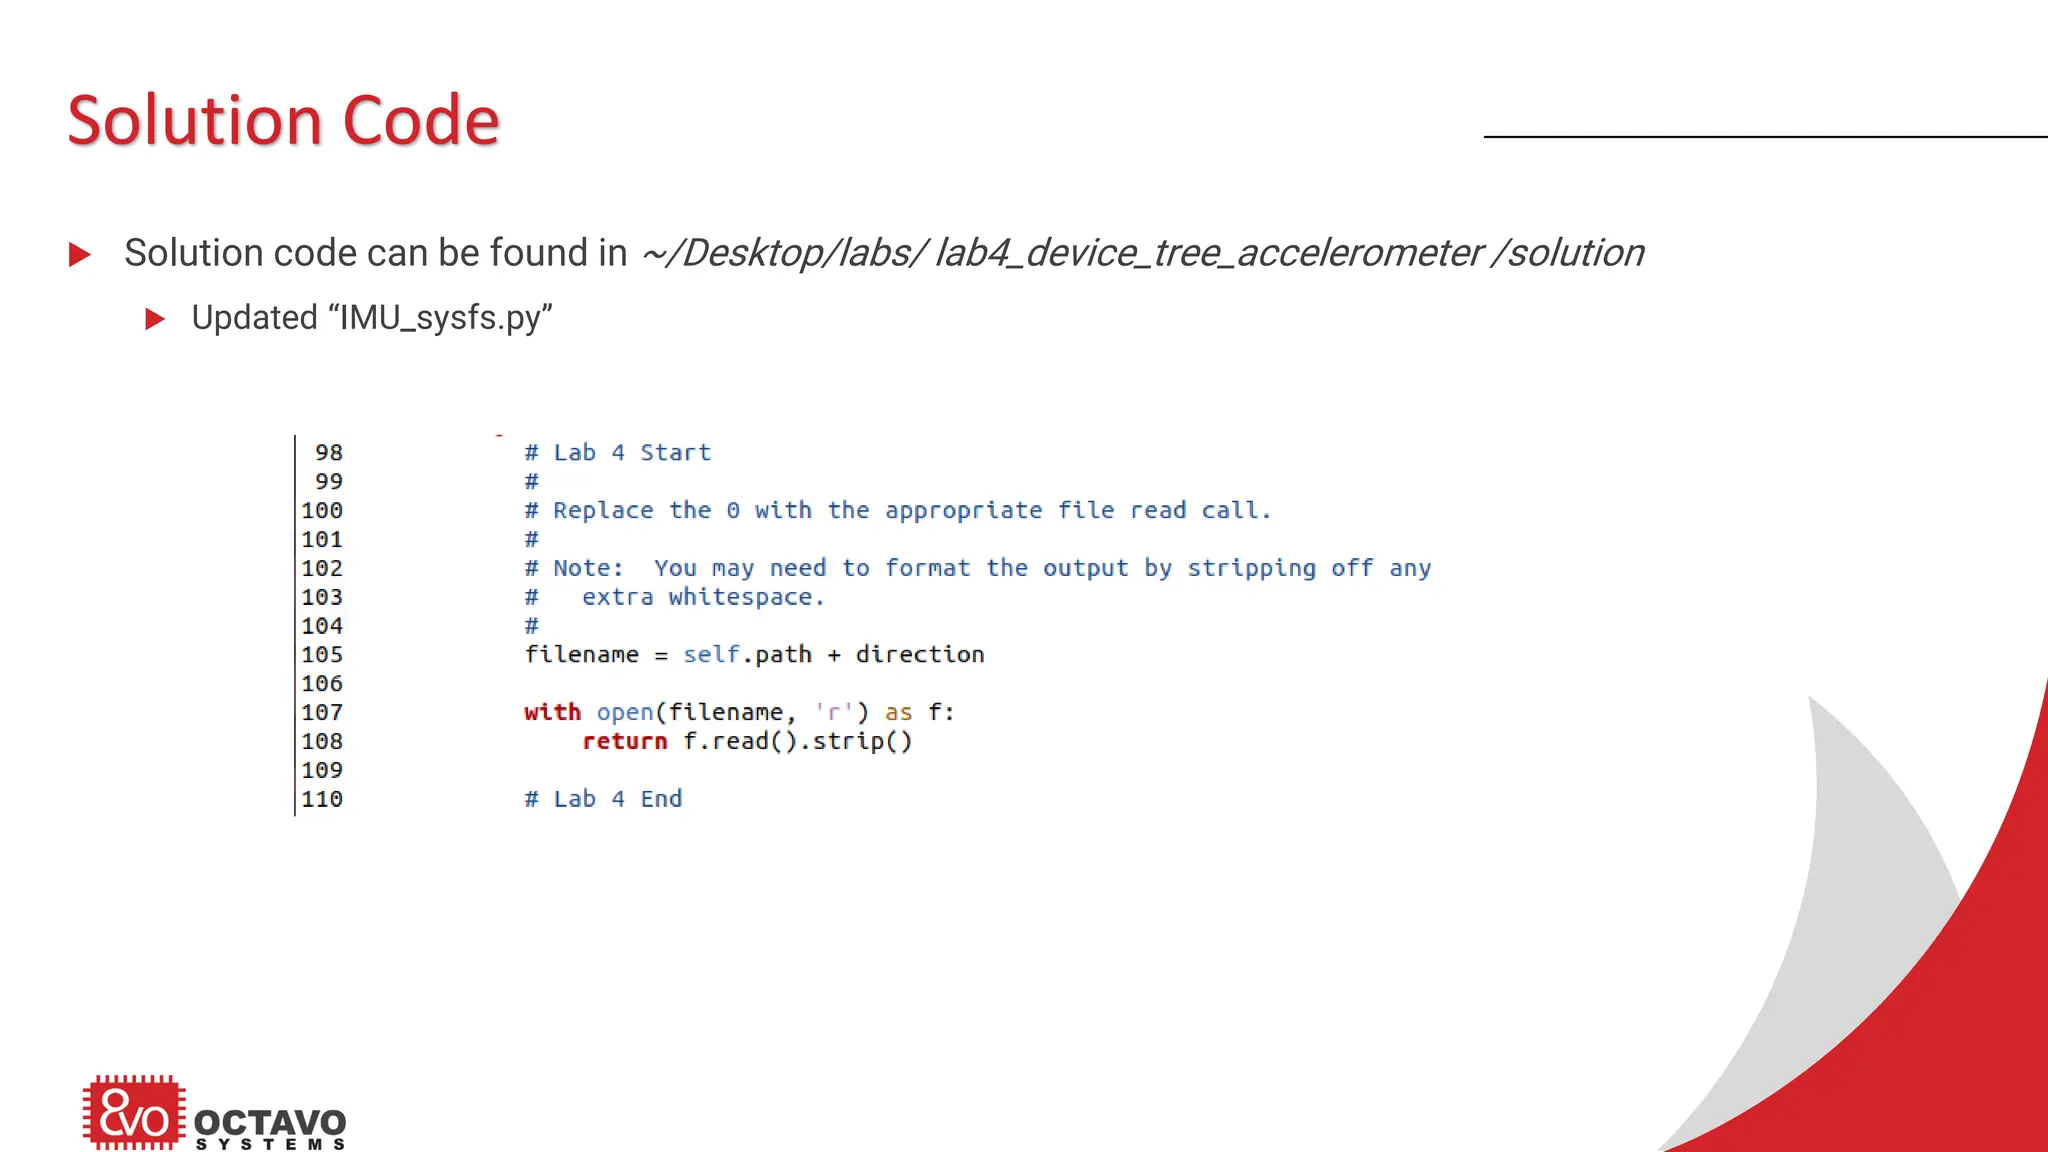
Getting Started with Embedded Linux Lab 4: Using External I2C Sensors Version 1
Objectives  Learning Objective:  Learn how to connect an I2C sensor to the OSD32MP1-BRK  Learn how to interact with an I2C device from the command line and Python libraries  Learn how to modify Linux Device Tree to initiate a driver and interact with an external sensor  Tasks:  Connect I2C Accelerometer to OSD32MP1-BRK  Configure I2C pins on OSD32MP1-BRK to have default pull-up behavior  Exercise Accelerometer over I2C using I2C command line tools and Python SMBus library  Initialize OpenSTLinux SDK  Copy custom Device Tree files (.dts) into kernel source code  Build Device Tree binary (.dtb)  Copy .dtb to Linux image on SD card  Boot the OSD32MP1-BRK and observe new boot logs  Exercise I2C Accelerometer with sysfs Note: In this lab, we will use the terms accelerometer and IMU (Inertial Motion Unit) interchangeably.
Connecting Accelerometer to OSD32MP1-BRK
Required Hardware  Parts List:  OSD32MP1-BRK https://www.arrow.com/en/products/osd32mp1-brk/octavo-systems-llc  STEVAL-MKI168V1 https://www.arrow.com/en/products/steval-mki168v1/stmicroelectronics  100-mil Jumper Wires https://www.amazon.com/IZOKEE-Solderless-Breadboard-Arduino-Project/dp/B08151TQHG  Solderless Breadboard https://www.amazon.com/dp/B07DL13RZH Leave the Neopixels connected to OSD32MP1-BRK!
Connect Jumper Wires to Accelerometer  Use six (6) lone Male-Female Jumper Wires with STEVAL-MKI168V1  Insert female side of jumper wires on to pins  VDD and VDD_IO connected to 3.3V  SCL and SDA pins connected to I2C bus  External I2C pull up not needed; Internal STM32MP1 pull up used  CS pin configures device for I2C operation when pulled high during boot  GND connected to GND  Documentation  https://www.st.com/en/evaluation-tools/steval-mki168v1.html  https://www.st.com/en/mems-and-sensors/iis2dh.html 3.3V I2C Config GND
OSD32MP1-BRK Header Functions https://octavosystems.com/octavosystems.com/wp-content/uploads/2020/05/Default-Pin-Mapping.pdf NOTE: When powered by USB, the VIN pins (A01, B01) are a 5V power output Pins Used: - A18: SCL - A19: SDA - C01: VDD - D01: VDD_IO - D23: CS - D30: GND Pinmux set to pull-up
Connect Accelerometer to OSD32MP1-BRK  Leave existing connections to Neopixel LEDs unchanged  Add connections based on connection diagram (previous slide)
Using the Accelerometer
Accessing Accelerometer  Check HW connections using I2C Tools  Command: “i2cdetect -r -y 1”  Three paths we will explore to access the Accelerometer  I2C Tools  i2cget / i2cset  Python smbus library  https://pypi.org/project/smbus/  Linux driver  https://github.com/STMicroelectronics/st-mems-android-linux-drivers-iio
Understanding Python Code Structure  Three (3) Python files report (X, Y, Z) acceleration from IIS2DH using different methods  IMU_i2ctools.py Uses i2ctools  IMU_smbus.py Uses Python smbus Library  IMU_sysfs.py Uses IIS2DH Linux Driver  Structure  Constants  Global Variables  IMU Class  Uses Python Classes (https://docs.python.org/3.9/tutorial/classes.html)  Main method: read(direction), where direction is one of the constants: X_DIR, Y_DIR, Z_DIR  Main Script  Uses “if __name__ == ‘__main__’:” for different execution contexts  “main” code does not execute when file is imported  “main” code executes if python file directly executed on command line (i.e. sudo python3 <filename>)  Runs a test to read the acceleration and times the execution
I2C Tools
Using I2C Tools  I2C Tools provide a simple command line interface to communicate with I2C devices  i2cget / i2cset  Python can use the os and subprocess libraries to execute commands from the command line  https://docs.python.org/3.9/library/os.html  https://docs.python.org/3.9/library/subprocess.html Python version on OSD32MP1-BRK image is 3.9.2
Edit “IMU_i2ctools.py”  Global variables defined for I2C commands  Strings with argument positions pre-defined  Use the string format() function  https://docs.python.org/3/library/stdtypes.html#str.format  Modify Lines 138 – 148  Use class variables for the I2C bus and I2C address  Use local variable “addr” (list) for the register address
Running the Code  Using a Terminal that is SSH’d into the OSD32MP1-BRK  mkdir labs/lab4  cd labs/lab4  In a second Terminal, use sftp to transfer file over to OSD32MP1-BRK  cd ~/Desktop/labs/lab4_device_tree_accelerometer/code/  sftp debian@192.168.7.1 password: tmppwd  cd labs/lab4  put IMU_i2ctools.py  Using the first Terminal that is SSH’d into the OSD32MP1-BRK  From the labs/lab4 directory, run Lab4 for I2C tools:  sudo python3 IMU_i2ctools.py password: tmppwd  Move the accelerometer around to see change in accel values  Acceleration: (X direction, Y direction, Z direction)  Time: Amount of time to read all three acceleration values  Use “Ctrl-C” to stop
Solution Code  Solution code can be found in ~/Desktop/labs/lab4_device_tree_accelerometer/solution  Updated “IMU_i2ctools.py”
SMBus Python Library
Using Python Libraries  Python has a vast array of libraries (packages) that can be installed and used  Use: “sudo apt-get install …” or “sudo pip3 install …”  Can find many libraries on PyPy: https://www.pypy.org/  Note: On most embedded Linux systems, there is not a display; Limits the use of graphical packages  Python SMBus library  Allows access to I2C devices  https://pypi.org/project/smbus/ or https://pypi.org/project/smbus2/  Either library can be used; Labs use just smbus  Use functions:  write_byte_data(<i2c address>, <i2c register>, <value>)  read_byte_data(<i2c address>, <i2c register>)
Edit “IMU_smbus.py”  Similar modifications to “IMU_i2ctools.py”  Modify Lines 134 – 143  Use the SMBus read_byte_data() function  Use class variables for the I2C bus instance and I2C address  Use local variable “addr” (list) for the register address
Running the Code  In a second Terminal, use sftp to transfer file over to OSD32MP1-BRK  sftp debian@192.168.7.1 password: tmppwd  cd labs/lab4  put IMU_smbus.py  Using the Terminal that is SSH’d into the OSD32MP1-BRK  From the labs/lab4 directory, run Lab4 for I2C tools:  sudo python3 IMU_smbus.py password: tmppwd  Move the accelerometer around to see change in accel values  Acceleration: (X direction, Y direction, Z direction)  Time: Amount of time to read all three acceleration values  Use “Ctrl-C” to stop Note: Much less overhead when using the python library
Solution Code  Solution code can be found in ~/Desktop/labs/ lab4_device_tree_accelerometer /solution  Updated “IMU_smbus.py”
Linux Drivers and Device Tree
Using Linux Device Drivers  Linux has many kernel / device drivers to support a wide array of devices  ST provided an IIO Linux Driver  https://github.com/STMicroelectronics/st-mems-android-linux-drivers-iio  Contains build documentation  This driver has already been compiled into the OSD32MP1-BRK image  Access the device driver in the Linux kernel by declaring hardware in the device tree  Update the device tree to declare sensor  Compile device tree from .dts (device tree source) to .dtb (device tree binary)  Update the device tree binary on the OSD32MP1-BRK  Reboot to allow new device tree to take effect
Updating the Linux Device Tree  On the VM, in a Terminal  cd ~/Desktop/labs/lab4_device_tree_accelerometer/project  nano -l new_dt_source/stm32mp157c-osd32mp1-brk.dts  Edit Device Tree source using lower case “L” option for line numbers  Navigate down to lines 659 – 680  Device Tree node for I2C2 peripheral  Uncomment lines 673 – 678  https://github.com/STMicroelectronics/st-mems-android-linux-drivers- iio/blob/master/Documentation/devicetree/bindings/iio/stm/accel/st_acc33.txt  Exit nano using: “Ctrl-x”, “Y”, “<Enter>”  Build Device Tree using provided shell script  ./build_linux_dt.sh  Device Tree Binary in “new_dt_build/”
Updating OSD32MP1-BRK Device Tree  On the VM, in the same Terminal  cd ~/Desktop/labs/lab4_device_tree_accelerometer/project/new_dt_build  sftp debian@192.168.7.1 password: tmppwd  put stm32mp157c-osd32mp1-brk.dtb  exit  ssh debian@192.168.7.1 password: tmppwd  cd /boot  sudo mv stm32mp157c-osd32mp1-brk.dtb stm32mp157c-osd32mp1-brk.bak  Move current DTB to a different name so there is a backup  sudo mv ~/stm32mp157c-osd32mp1-brk.dtb .  Move new DTB from the debian user home directory to this directory  exit  On the OSD32MP1-BRK, press the reset button
Checking Device Tree Updates  After OSD32MP1-BRK has rebooted, in the same Terminal on VM  ssh debian@192.168.7.1 password: tmppwd  sudo i2cdetect -r -y 1  Check I2C devices again  Sensor now claimed by kernel  cd /sys/bus/i2c/devices/1-0019/iio:device0  sysfs directory with files to interact with device  Explore sysfs files using “cat” to read and “echo” to write
Edit “IMU_sysfs.py”  Modify Lines 98 – 110  Use standard python file IO to read the file  https://docs.python.org/3.9/tutorial/inputoutput.html#reading-and-writing-files  Use built in functions to remove whitespace  https://docs.python.org/3.9/library/stdtypes.html#str.strip
Running the Code  In a second Terminal, use sftp to transfer file over to OSD32MP1-BRK  sftp debian@192.168.7.1 password: tmppwd  cd labs/lab4  put IMU_sysfs.py  Using the Terminal that is SSH’d into the OSD32MP1-BRK  From the labs/lab4 directory, run Lab4 for I2C tools:  sudo python3 IMU_sysfs.py password: tmppwd  Move the accelerometer around to see change in accel values  Acceleration: (X direction, Y direction, Z direction)  Time: Amount of time to read all three acceleration values  Use “Ctrl-C” to stop  To understand timing (see line 270):  https://github.com/STMicroelectronics/st-mems-android-linux-drivers-iio/blob/master/drivers/iio/stm/accel/st_acc33_core.c#L245
Solution Code  Solution code can be found in ~/Desktop/labs/ lab4_device_tree_accelerometer /solution  Updated “IMU_sysfs.py”

Programming exercises I2C for STM32mp157

  • 1.
    Getting Started withEmbedded Linux Lab 4: Using External I2C Sensors Version 1
  • 2.
    Objectives  Learning Objective: Learn how to connect an I2C sensor to the OSD32MP1-BRK  Learn how to interact with an I2C device from the command line and Python libraries  Learn how to modify Linux Device Tree to initiate a driver and interact with an external sensor  Tasks:  Connect I2C Accelerometer to OSD32MP1-BRK  Configure I2C pins on OSD32MP1-BRK to have default pull-up behavior  Exercise Accelerometer over I2C using I2C command line tools and Python SMBus library  Initialize OpenSTLinux SDK  Copy custom Device Tree files (.dts) into kernel source code  Build Device Tree binary (.dtb)  Copy .dtb to Linux image on SD card  Boot the OSD32MP1-BRK and observe new boot logs  Exercise I2C Accelerometer with sysfs Note: In this lab, we will use the terms accelerometer and IMU (Inertial Motion Unit) interchangeably.
  • 3.
  • 4.
    Required Hardware  PartsList:  OSD32MP1-BRK https://www.arrow.com/en/products/osd32mp1-brk/octavo-systems-llc  STEVAL-MKI168V1 https://www.arrow.com/en/products/steval-mki168v1/stmicroelectronics  100-mil Jumper Wires https://www.amazon.com/IZOKEE-Solderless-Breadboard-Arduino-Project/dp/B08151TQHG  Solderless Breadboard https://www.amazon.com/dp/B07DL13RZH Leave the Neopixels connected to OSD32MP1-BRK!
  • 5.
    Connect Jumper Wiresto Accelerometer  Use six (6) lone Male-Female Jumper Wires with STEVAL-MKI168V1  Insert female side of jumper wires on to pins  VDD and VDD_IO connected to 3.3V  SCL and SDA pins connected to I2C bus  External I2C pull up not needed; Internal STM32MP1 pull up used  CS pin configures device for I2C operation when pulled high during boot  GND connected to GND  Documentation  https://www.st.com/en/evaluation-tools/steval-mki168v1.html  https://www.st.com/en/mems-and-sensors/iis2dh.html 3.3V I2C Config GND
  • 6.
    OSD32MP1-BRK Header Functions https://octavosystems.com/octavosystems.com/wp-content/uploads/2020/05/Default-Pin-Mapping.pdf NOTE:When powered by USB, the VIN pins (A01, B01) are a 5V power output Pins Used: - A18: SCL - A19: SDA - C01: VDD - D01: VDD_IO - D23: CS - D30: GND Pinmux set to pull-up
  • 7.
    Connect Accelerometer toOSD32MP1-BRK  Leave existing connections to Neopixel LEDs unchanged  Add connections based on connection diagram (previous slide)
  • 8.
  • 9.
    Accessing Accelerometer  CheckHW connections using I2C Tools  Command: “i2cdetect -r -y 1”  Three paths we will explore to access the Accelerometer  I2C Tools  i2cget / i2cset  Python smbus library  https://pypi.org/project/smbus/  Linux driver  https://github.com/STMicroelectronics/st-mems-android-linux-drivers-iio
  • 10.
    Understanding Python CodeStructure  Three (3) Python files report (X, Y, Z) acceleration from IIS2DH using different methods  IMU_i2ctools.py Uses i2ctools  IMU_smbus.py Uses Python smbus Library  IMU_sysfs.py Uses IIS2DH Linux Driver  Structure  Constants  Global Variables  IMU Class  Uses Python Classes (https://docs.python.org/3.9/tutorial/classes.html)  Main method: read(direction), where direction is one of the constants: X_DIR, Y_DIR, Z_DIR  Main Script  Uses “if __name__ == ‘__main__’:” for different execution contexts  “main” code does not execute when file is imported  “main” code executes if python file directly executed on command line (i.e. sudo python3 <filename>)  Runs a test to read the acceleration and times the execution
  • 11.
  • 12.
    Using I2C Tools I2C Tools provide a simple command line interface to communicate with I2C devices  i2cget / i2cset  Python can use the os and subprocess libraries to execute commands from the command line  https://docs.python.org/3.9/library/os.html  https://docs.python.org/3.9/library/subprocess.html Python version on OSD32MP1-BRK image is 3.9.2
  • 13.
    Edit “IMU_i2ctools.py”  Globalvariables defined for I2C commands  Strings with argument positions pre-defined  Use the string format() function  https://docs.python.org/3/library/stdtypes.html#str.format  Modify Lines 138 – 148  Use class variables for the I2C bus and I2C address  Use local variable “addr” (list) for the register address
  • 14.
    Running the Code Using a Terminal that is SSH’d into the OSD32MP1-BRK  mkdir labs/lab4  cd labs/lab4  In a second Terminal, use sftp to transfer file over to OSD32MP1-BRK  cd ~/Desktop/labs/lab4_device_tree_accelerometer/code/  sftp debian@192.168.7.1 password: tmppwd  cd labs/lab4  put IMU_i2ctools.py  Using the first Terminal that is SSH’d into the OSD32MP1-BRK  From the labs/lab4 directory, run Lab4 for I2C tools:  sudo python3 IMU_i2ctools.py password: tmppwd  Move the accelerometer around to see change in accel values  Acceleration: (X direction, Y direction, Z direction)  Time: Amount of time to read all three acceleration values  Use “Ctrl-C” to stop
  • 15.
    Solution Code  Solutioncode can be found in ~/Desktop/labs/lab4_device_tree_accelerometer/solution  Updated “IMU_i2ctools.py”
  • 16.
  • 17.
    Using Python Libraries Python has a vast array of libraries (packages) that can be installed and used  Use: “sudo apt-get install …” or “sudo pip3 install …”  Can find many libraries on PyPy: https://www.pypy.org/  Note: On most embedded Linux systems, there is not a display; Limits the use of graphical packages  Python SMBus library  Allows access to I2C devices  https://pypi.org/project/smbus/ or https://pypi.org/project/smbus2/  Either library can be used; Labs use just smbus  Use functions:  write_byte_data(<i2c address>, <i2c register>, <value>)  read_byte_data(<i2c address>, <i2c register>)
  • 18.
    Edit “IMU_smbus.py”  Similarmodifications to “IMU_i2ctools.py”  Modify Lines 134 – 143  Use the SMBus read_byte_data() function  Use class variables for the I2C bus instance and I2C address  Use local variable “addr” (list) for the register address
  • 19.
    Running the Code In a second Terminal, use sftp to transfer file over to OSD32MP1-BRK  sftp debian@192.168.7.1 password: tmppwd  cd labs/lab4  put IMU_smbus.py  Using the Terminal that is SSH’d into the OSD32MP1-BRK  From the labs/lab4 directory, run Lab4 for I2C tools:  sudo python3 IMU_smbus.py password: tmppwd  Move the accelerometer around to see change in accel values  Acceleration: (X direction, Y direction, Z direction)  Time: Amount of time to read all three acceleration values  Use “Ctrl-C” to stop Note: Much less overhead when using the python library
  • 20.
    Solution Code  Solutioncode can be found in ~/Desktop/labs/ lab4_device_tree_accelerometer /solution  Updated “IMU_smbus.py”
  • 21.
    Linux Drivers andDevice Tree
  • 22.
    Using Linux DeviceDrivers  Linux has many kernel / device drivers to support a wide array of devices  ST provided an IIO Linux Driver  https://github.com/STMicroelectronics/st-mems-android-linux-drivers-iio  Contains build documentation  This driver has already been compiled into the OSD32MP1-BRK image  Access the device driver in the Linux kernel by declaring hardware in the device tree  Update the device tree to declare sensor  Compile device tree from .dts (device tree source) to .dtb (device tree binary)  Update the device tree binary on the OSD32MP1-BRK  Reboot to allow new device tree to take effect
  • 23.
    Updating the LinuxDevice Tree  On the VM, in a Terminal  cd ~/Desktop/labs/lab4_device_tree_accelerometer/project  nano -l new_dt_source/stm32mp157c-osd32mp1-brk.dts  Edit Device Tree source using lower case “L” option for line numbers  Navigate down to lines 659 – 680  Device Tree node for I2C2 peripheral  Uncomment lines 673 – 678  https://github.com/STMicroelectronics/st-mems-android-linux-drivers- iio/blob/master/Documentation/devicetree/bindings/iio/stm/accel/st_acc33.txt  Exit nano using: “Ctrl-x”, “Y”, “<Enter>”  Build Device Tree using provided shell script  ./build_linux_dt.sh  Device Tree Binary in “new_dt_build/”
  • 24.
    Updating OSD32MP1-BRK DeviceTree  On the VM, in the same Terminal  cd ~/Desktop/labs/lab4_device_tree_accelerometer/project/new_dt_build  sftp debian@192.168.7.1 password: tmppwd  put stm32mp157c-osd32mp1-brk.dtb  exit  ssh debian@192.168.7.1 password: tmppwd  cd /boot  sudo mv stm32mp157c-osd32mp1-brk.dtb stm32mp157c-osd32mp1-brk.bak  Move current DTB to a different name so there is a backup  sudo mv ~/stm32mp157c-osd32mp1-brk.dtb .  Move new DTB from the debian user home directory to this directory  exit  On the OSD32MP1-BRK, press the reset button
  • 25.
    Checking Device TreeUpdates  After OSD32MP1-BRK has rebooted, in the same Terminal on VM  ssh debian@192.168.7.1 password: tmppwd  sudo i2cdetect -r -y 1  Check I2C devices again  Sensor now claimed by kernel  cd /sys/bus/i2c/devices/1-0019/iio:device0  sysfs directory with files to interact with device  Explore sysfs files using “cat” to read and “echo” to write
  • 26.
    Edit “IMU_sysfs.py”  ModifyLines 98 – 110  Use standard python file IO to read the file  https://docs.python.org/3.9/tutorial/inputoutput.html#reading-and-writing-files  Use built in functions to remove whitespace  https://docs.python.org/3.9/library/stdtypes.html#str.strip
  • 27.
    Running the Code In a second Terminal, use sftp to transfer file over to OSD32MP1-BRK  sftp debian@192.168.7.1 password: tmppwd  cd labs/lab4  put IMU_sysfs.py  Using the Terminal that is SSH’d into the OSD32MP1-BRK  From the labs/lab4 directory, run Lab4 for I2C tools:  sudo python3 IMU_sysfs.py password: tmppwd  Move the accelerometer around to see change in accel values  Acceleration: (X direction, Y direction, Z direction)  Time: Amount of time to read all three acceleration values  Use “Ctrl-C” to stop  To understand timing (see line 270):  https://github.com/STMicroelectronics/st-mems-android-linux-drivers-iio/blob/master/drivers/iio/stm/accel/st_acc33_core.c#L245
  • 28.
    Solution Code  Solutioncode can be found in ~/Desktop/labs/ lab4_device_tree_accelerometer /solution  Updated “IMU_sysfs.py”