Download to read offline


![import android.os.Bundle; import android.view.LayoutInflater; import android.view.View; import android.view.ViewGroup; import android.widget.TextView; /** * Created by tutlane on 06-08-2017. */ public class DetailsFragment extends Fragment { TextView name,location; @Override public View onCreateView(LayoutInflater inflater, ViewGroup container, Bundle savedInstanceState) { View view = inflater.inflate(R.layout.details_info, container, fal se); name = (TextView)view.findViewById(R.id.Name); location = (TextView)view.findViewById(R.id.Location); return view; } public void change(String uname, String ulocation){ name.setText(uname); location.setText(ulocation); } } If you observe above code we extended class with Fragment and used LayoutInflater to show the details of fragment. We defined a function change() to change the text in textview. Same way create another file ListMenuFragment.java, open it and write the code like as shown below ListMenuFragment.java package com.tutlane.fragmentsexample; import android.app.ListFragment; import android.os.Bundle; import android.view.LayoutInflater; import android.view.View; import android.view.ViewGroup; import android.widget.ArrayAdapter; import android.widget.ListView; /** * Created by tutlane on 06-08-2017. */ public class ListMenuFragment extends ListFragment { String[] users = new String[] { "Suresh","Rohini","Trishika","Praveen" ,"Sateesh","Madhav" }; String[] location = new String[]{"Hyderabad","Guntur","Hyderabad","Ban galore","Vizag","Nagpur"};](https://image.slidesharecdn.com/chapter-5-240509111424-ac575d20/75/Android-Application-Components-with-Implementation-Examples-24-2048.jpg)
![@Override public View onCreateView(LayoutInflater inflater, ViewGroup container, Bundle savedInstanceState) { View view =inflater.inflate(R.layout.listitems_info, container, fa lse); ArrayAdapter<String> adapter = new ArrayAdapter<String>(getActivit y(), android.R.layout.simple_list_item_1, users); setListAdapter(adapter); return view; } @Override public void onListItemClick(ListView l, View v, int position, long id) { DetailsFragment txt = (DetailsFragment)getFragmentManager().findFr agmentById(R.id.fragment2); txt.change("Name: "+ users[position],"Location : "+ location[posit ion]); getListView().setSelector(android.R.color.holo_blue_dark); } } If you observe above code we extended our class using ListFragment and we defined two array of strings users, location which contains names and locations. We defined onListItemClick event to update the name and location in DetailsFragment based on the list item which we clicked. Now we need to display our fragments horizontally side by side in main layout for that open activity_main.xml file and write code like as shown below activity_main.xml <?xml version="1.0" encoding="utf-8"?> <LinearLayout xmlns:android="http://schemas.android.com/apk/res/android" xmlns:tools="http://schemas.android.com/tools" android:layout_width="match_parent" android:layout_height="match_parent" android:orientation="horizontal" tools:context="com.tutlane.fragmentsexample.MainActivity"> <fragment android:layout_height="match_parent" android:layout_width="350px" class="com.tutlane.fragmentsexample.ListMenuFragment" android:id="@+id/fragment"/> <fragment android:layout_width="match_parent" android:layout_height="match_parent" class="com.tutlane.fragmentsexample.DetailsFragment" android:id="@+id/fragment2"/> </LinearLayout> We are not going to make any modifications for our main activity file (MainActivity.java) and manifest file (AndroidMainfest.xml).](https://image.slidesharecdn.com/chapter-5-240509111424-ac575d20/75/Android-Application-Components-with-Implementation-Examples-25-2048.jpg)

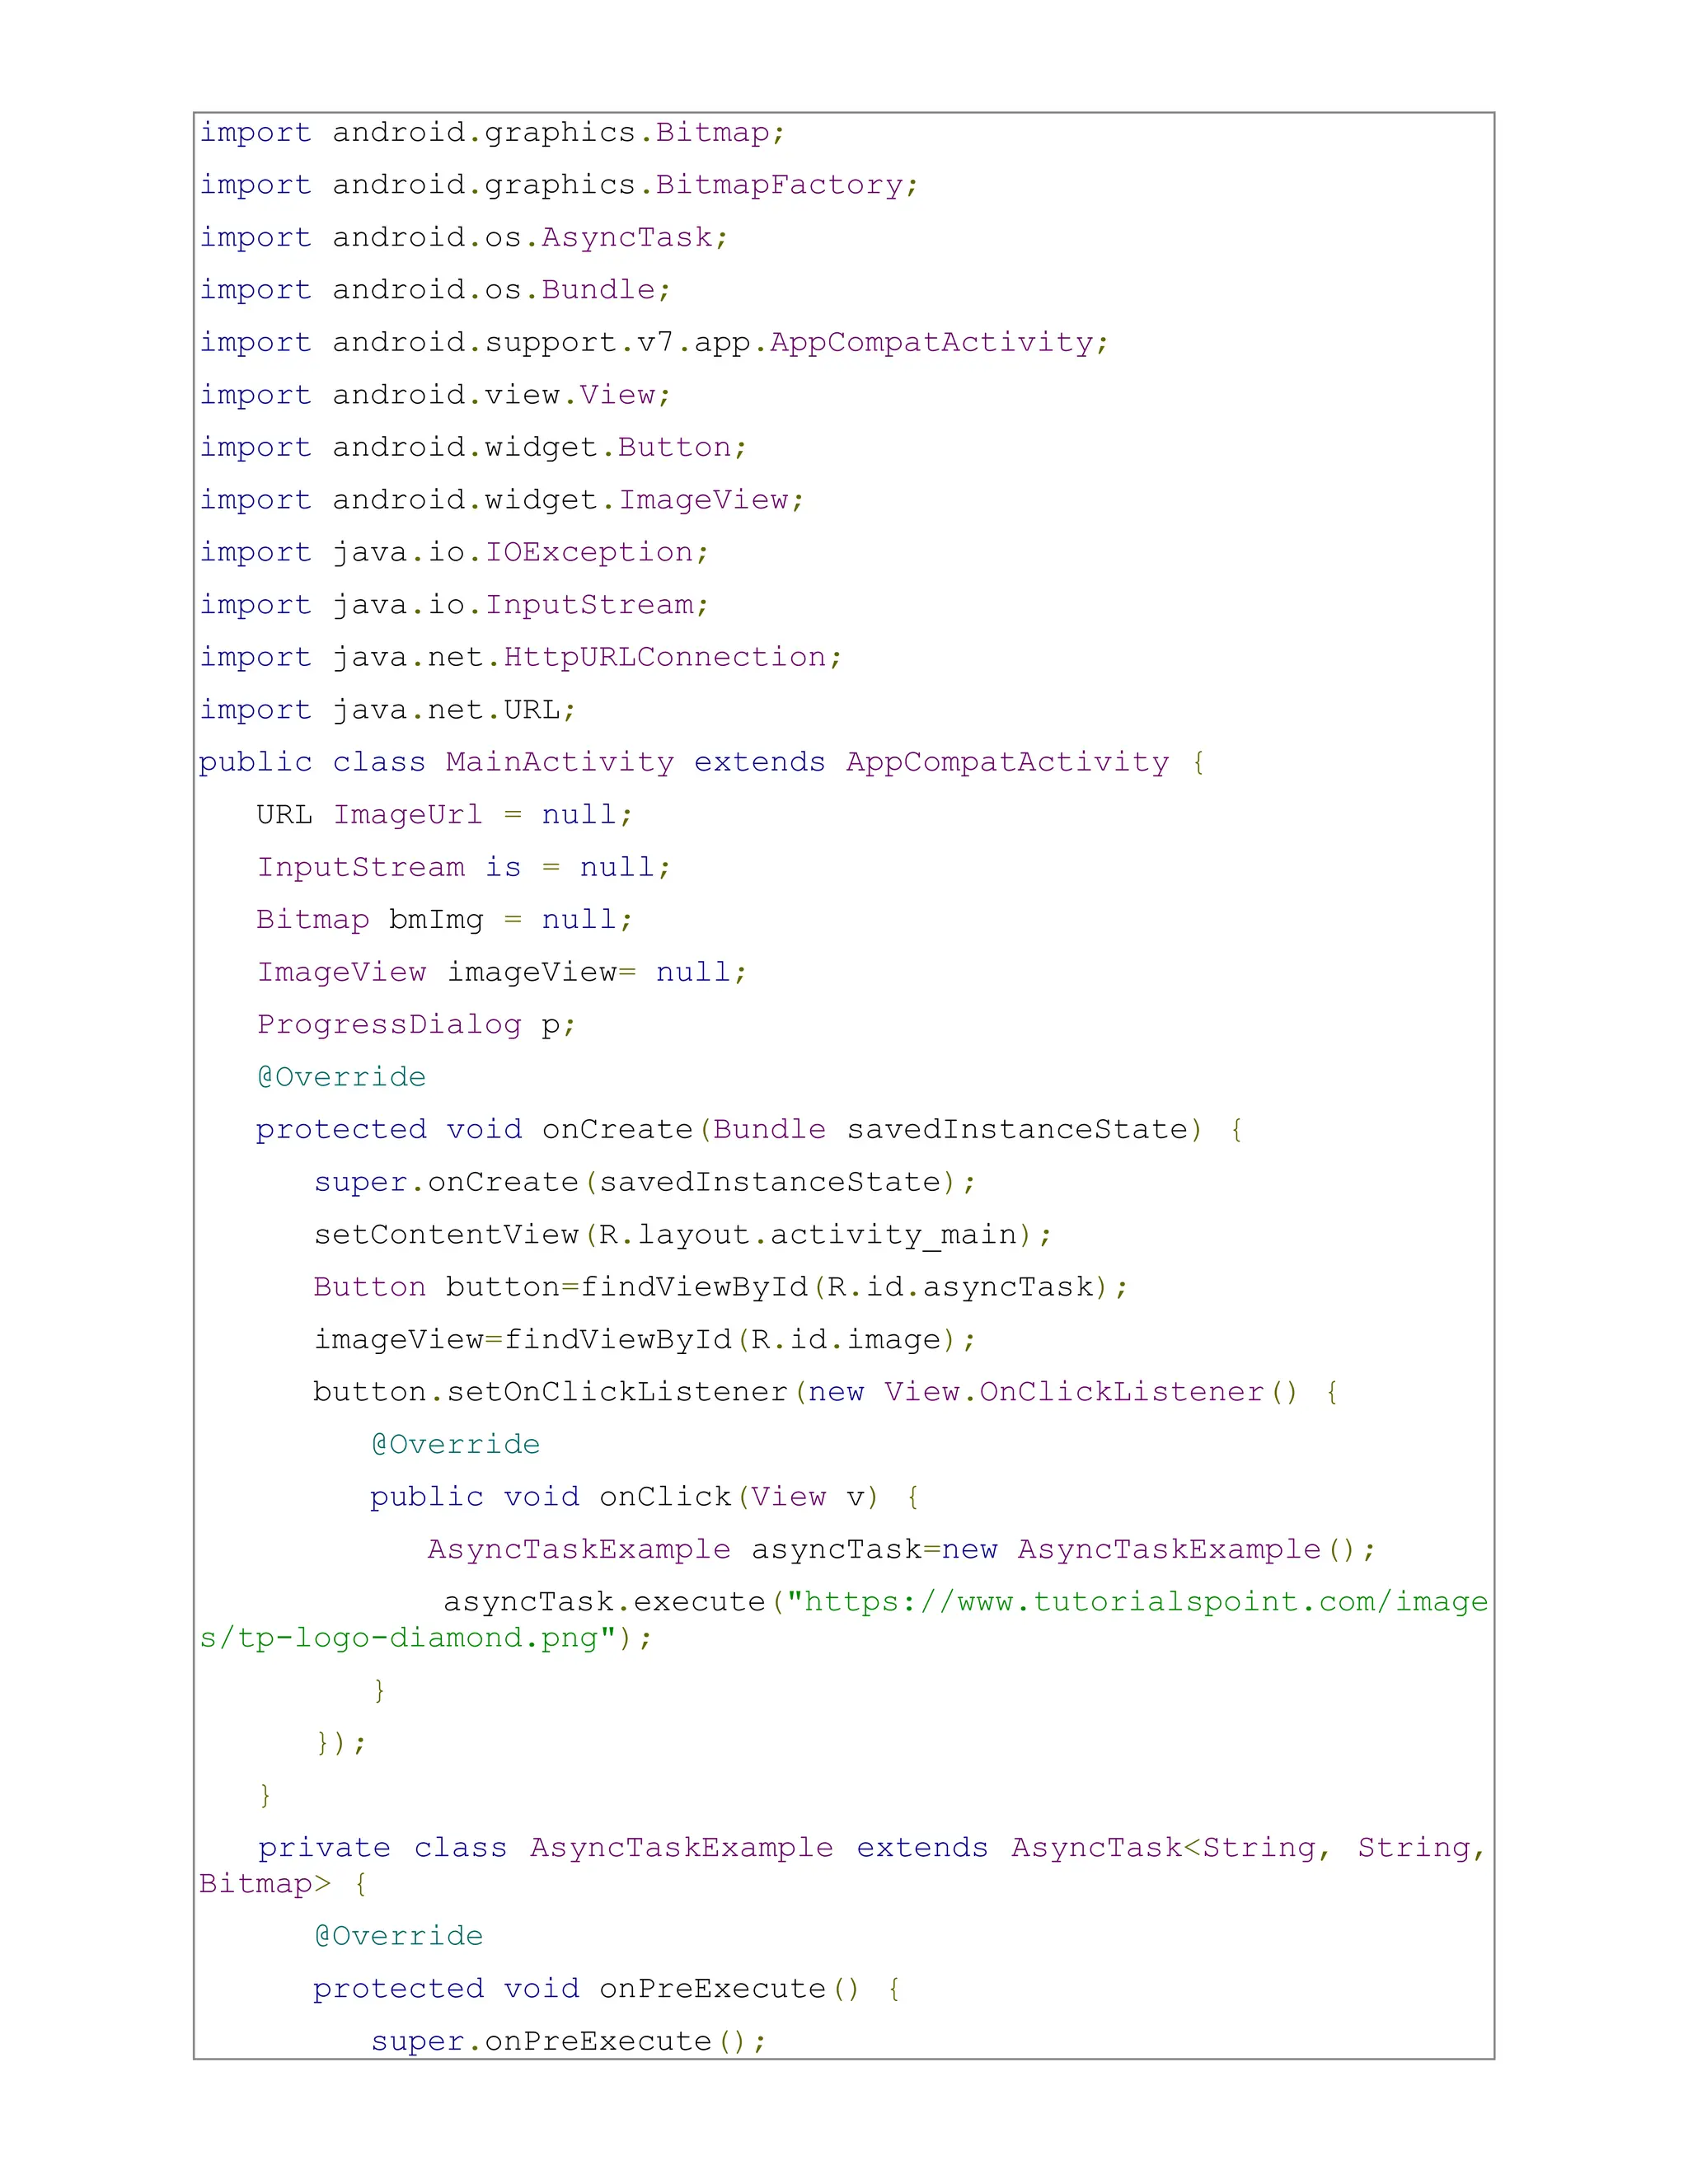
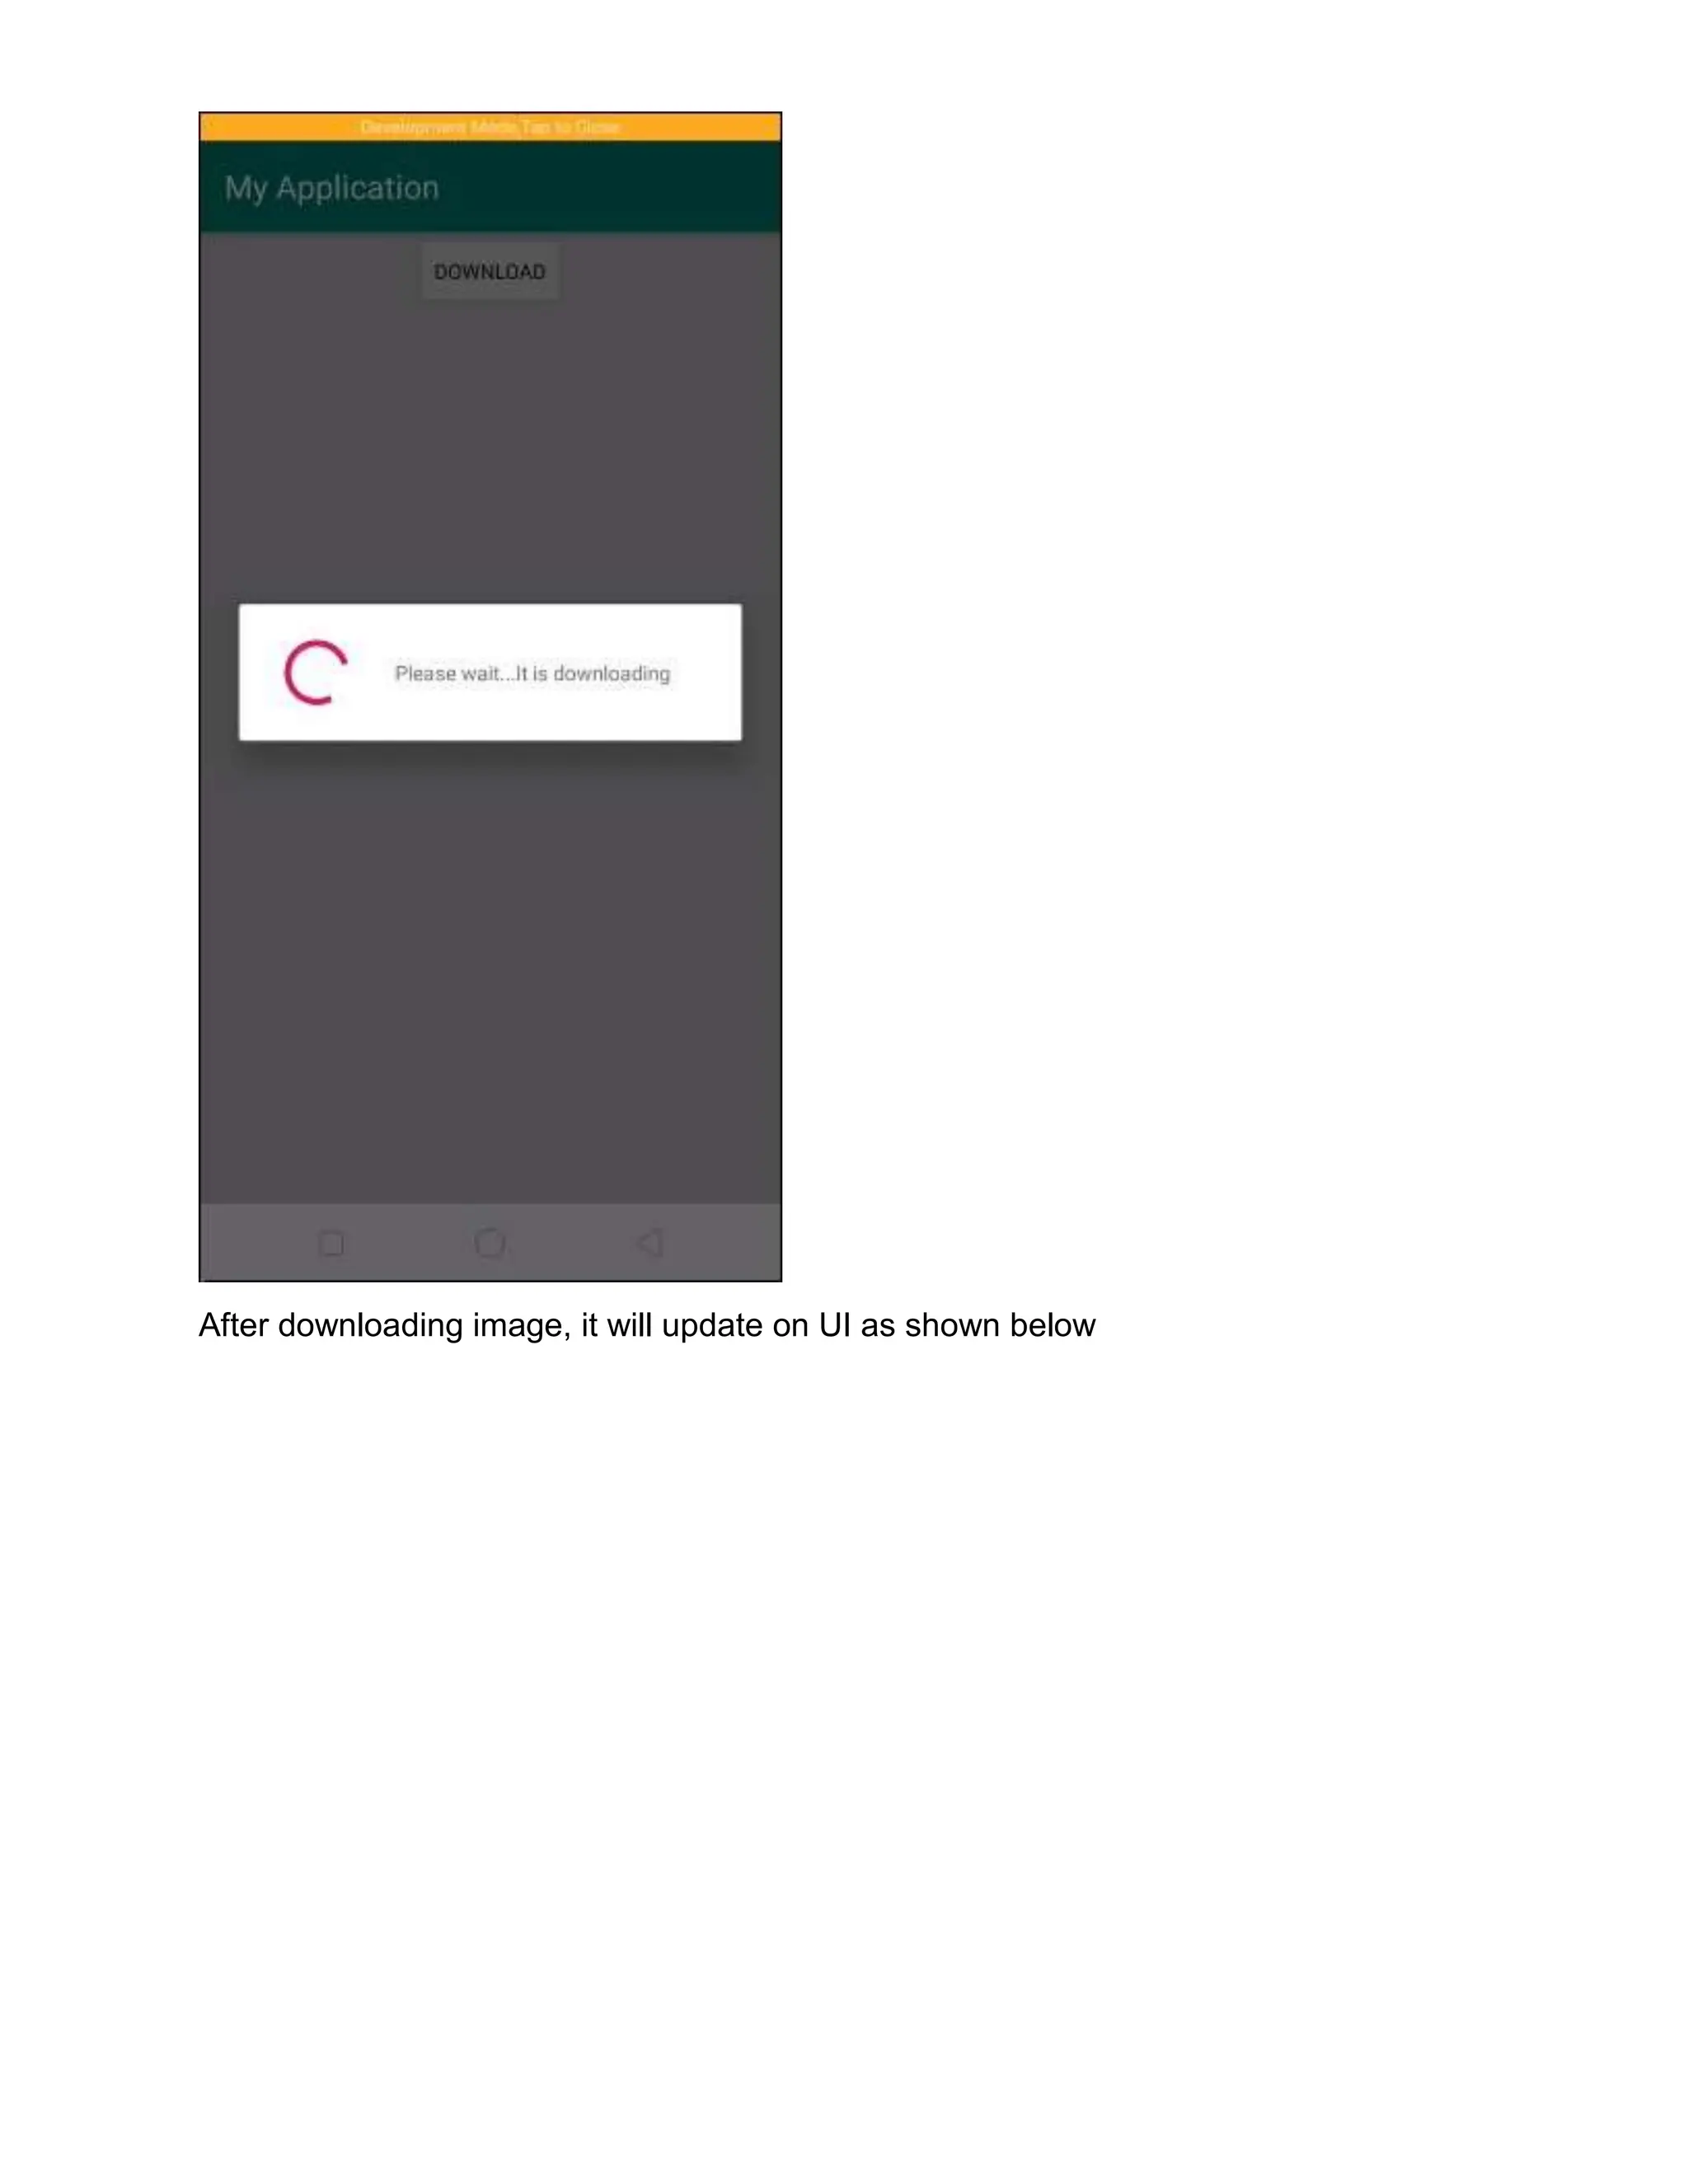
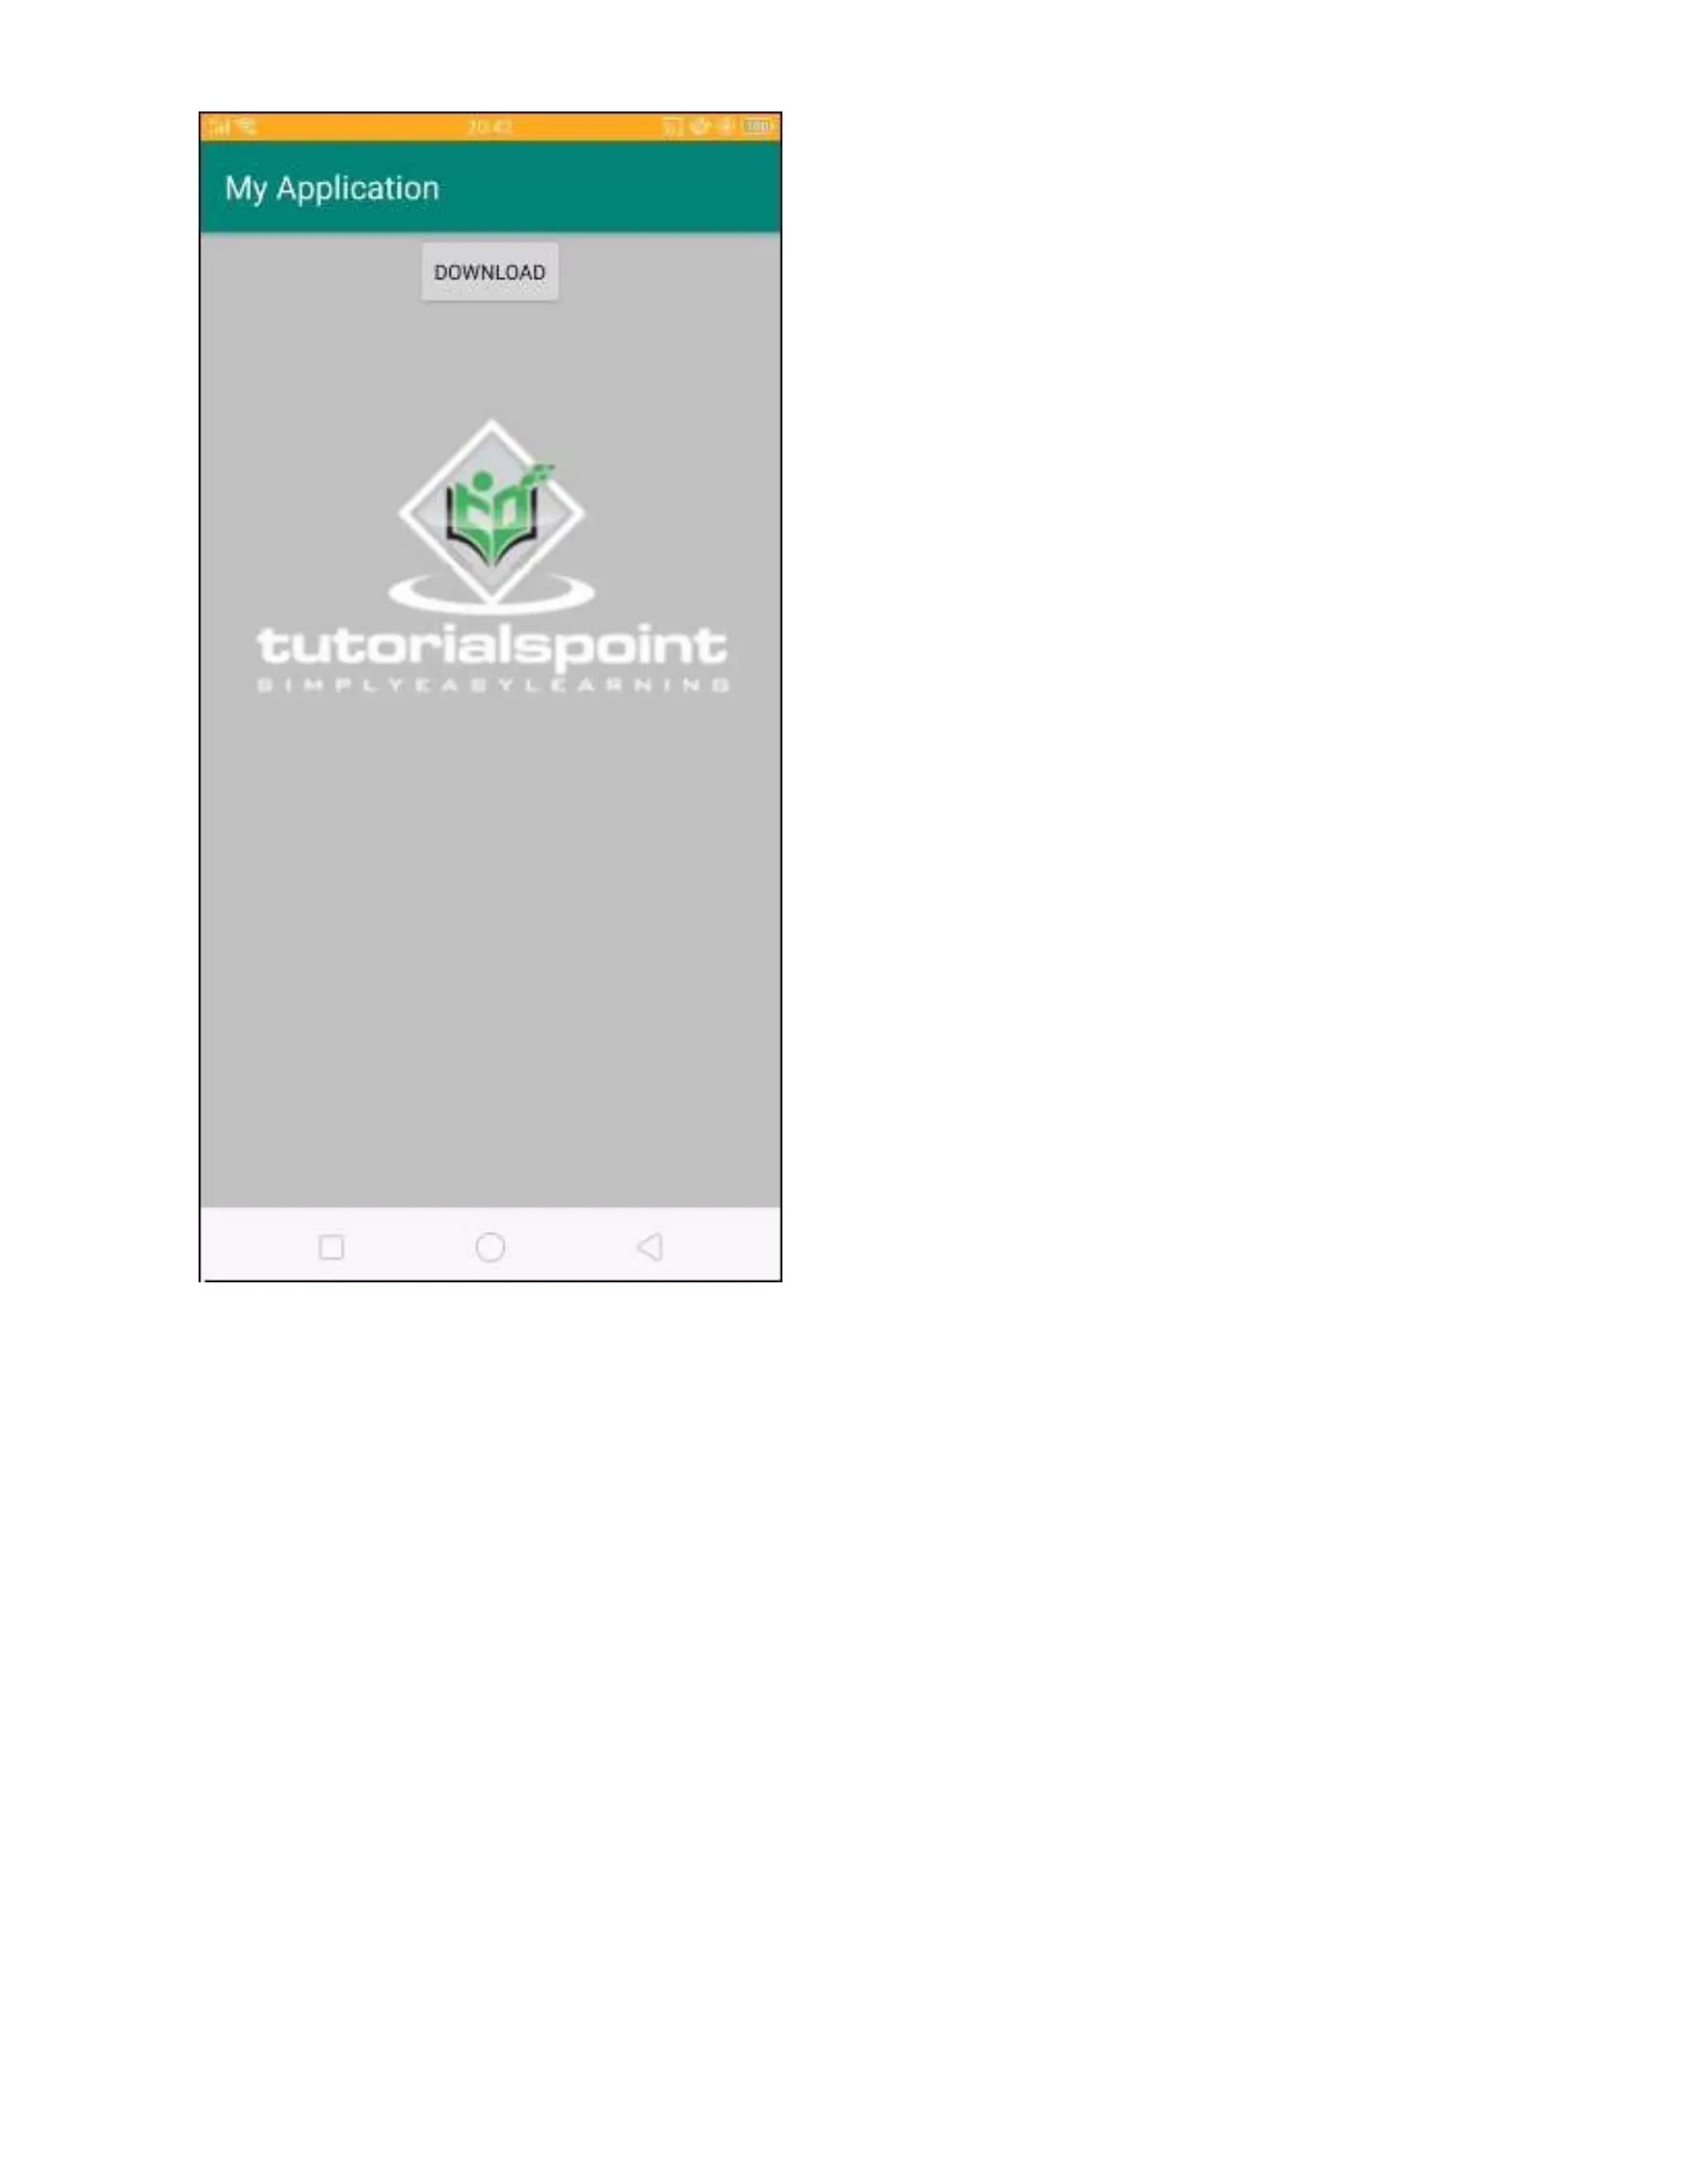
![p = new ProgressDialog(MainActivity.this); p.setMessage("Please wait...It is downloading"); p.setIndeterminate(false); p.setCancelable(false); p.show(); } @Override protected Bitmap doInBackground(String... strings) { try { ImageUrl = new URL(strings[0]); HttpURLConnection conn = (HttpURLConnection) ImageUrl.openConnection(); conn.setDoInput(true); conn.connect(); is = conn.getInputStream(); BitmapFactory.Options options = new BitmapFactory.Options(); options.inPreferredConfig = Bitmap.Config.RGB_565; bmImg = BitmapFactory.decodeStream(is, null, options); } catch (IOException e) { e.printStackTrace(); } return bmImg; } @Override protected void onPostExecute(Bitmap bitmap) { super.onPostExecute(bitmap); if(imageView!=null) { p.hide(); imageView.setImageBitmap(bitmap); }else { p.show(); } } } } In the above code we are downloading image using asyncTask and appending image to imageview.](https://image.slidesharecdn.com/chapter-5-240509111424-ac575d20/75/Android-Application-Components-with-Implementation-Examples-42-2048.jpg)
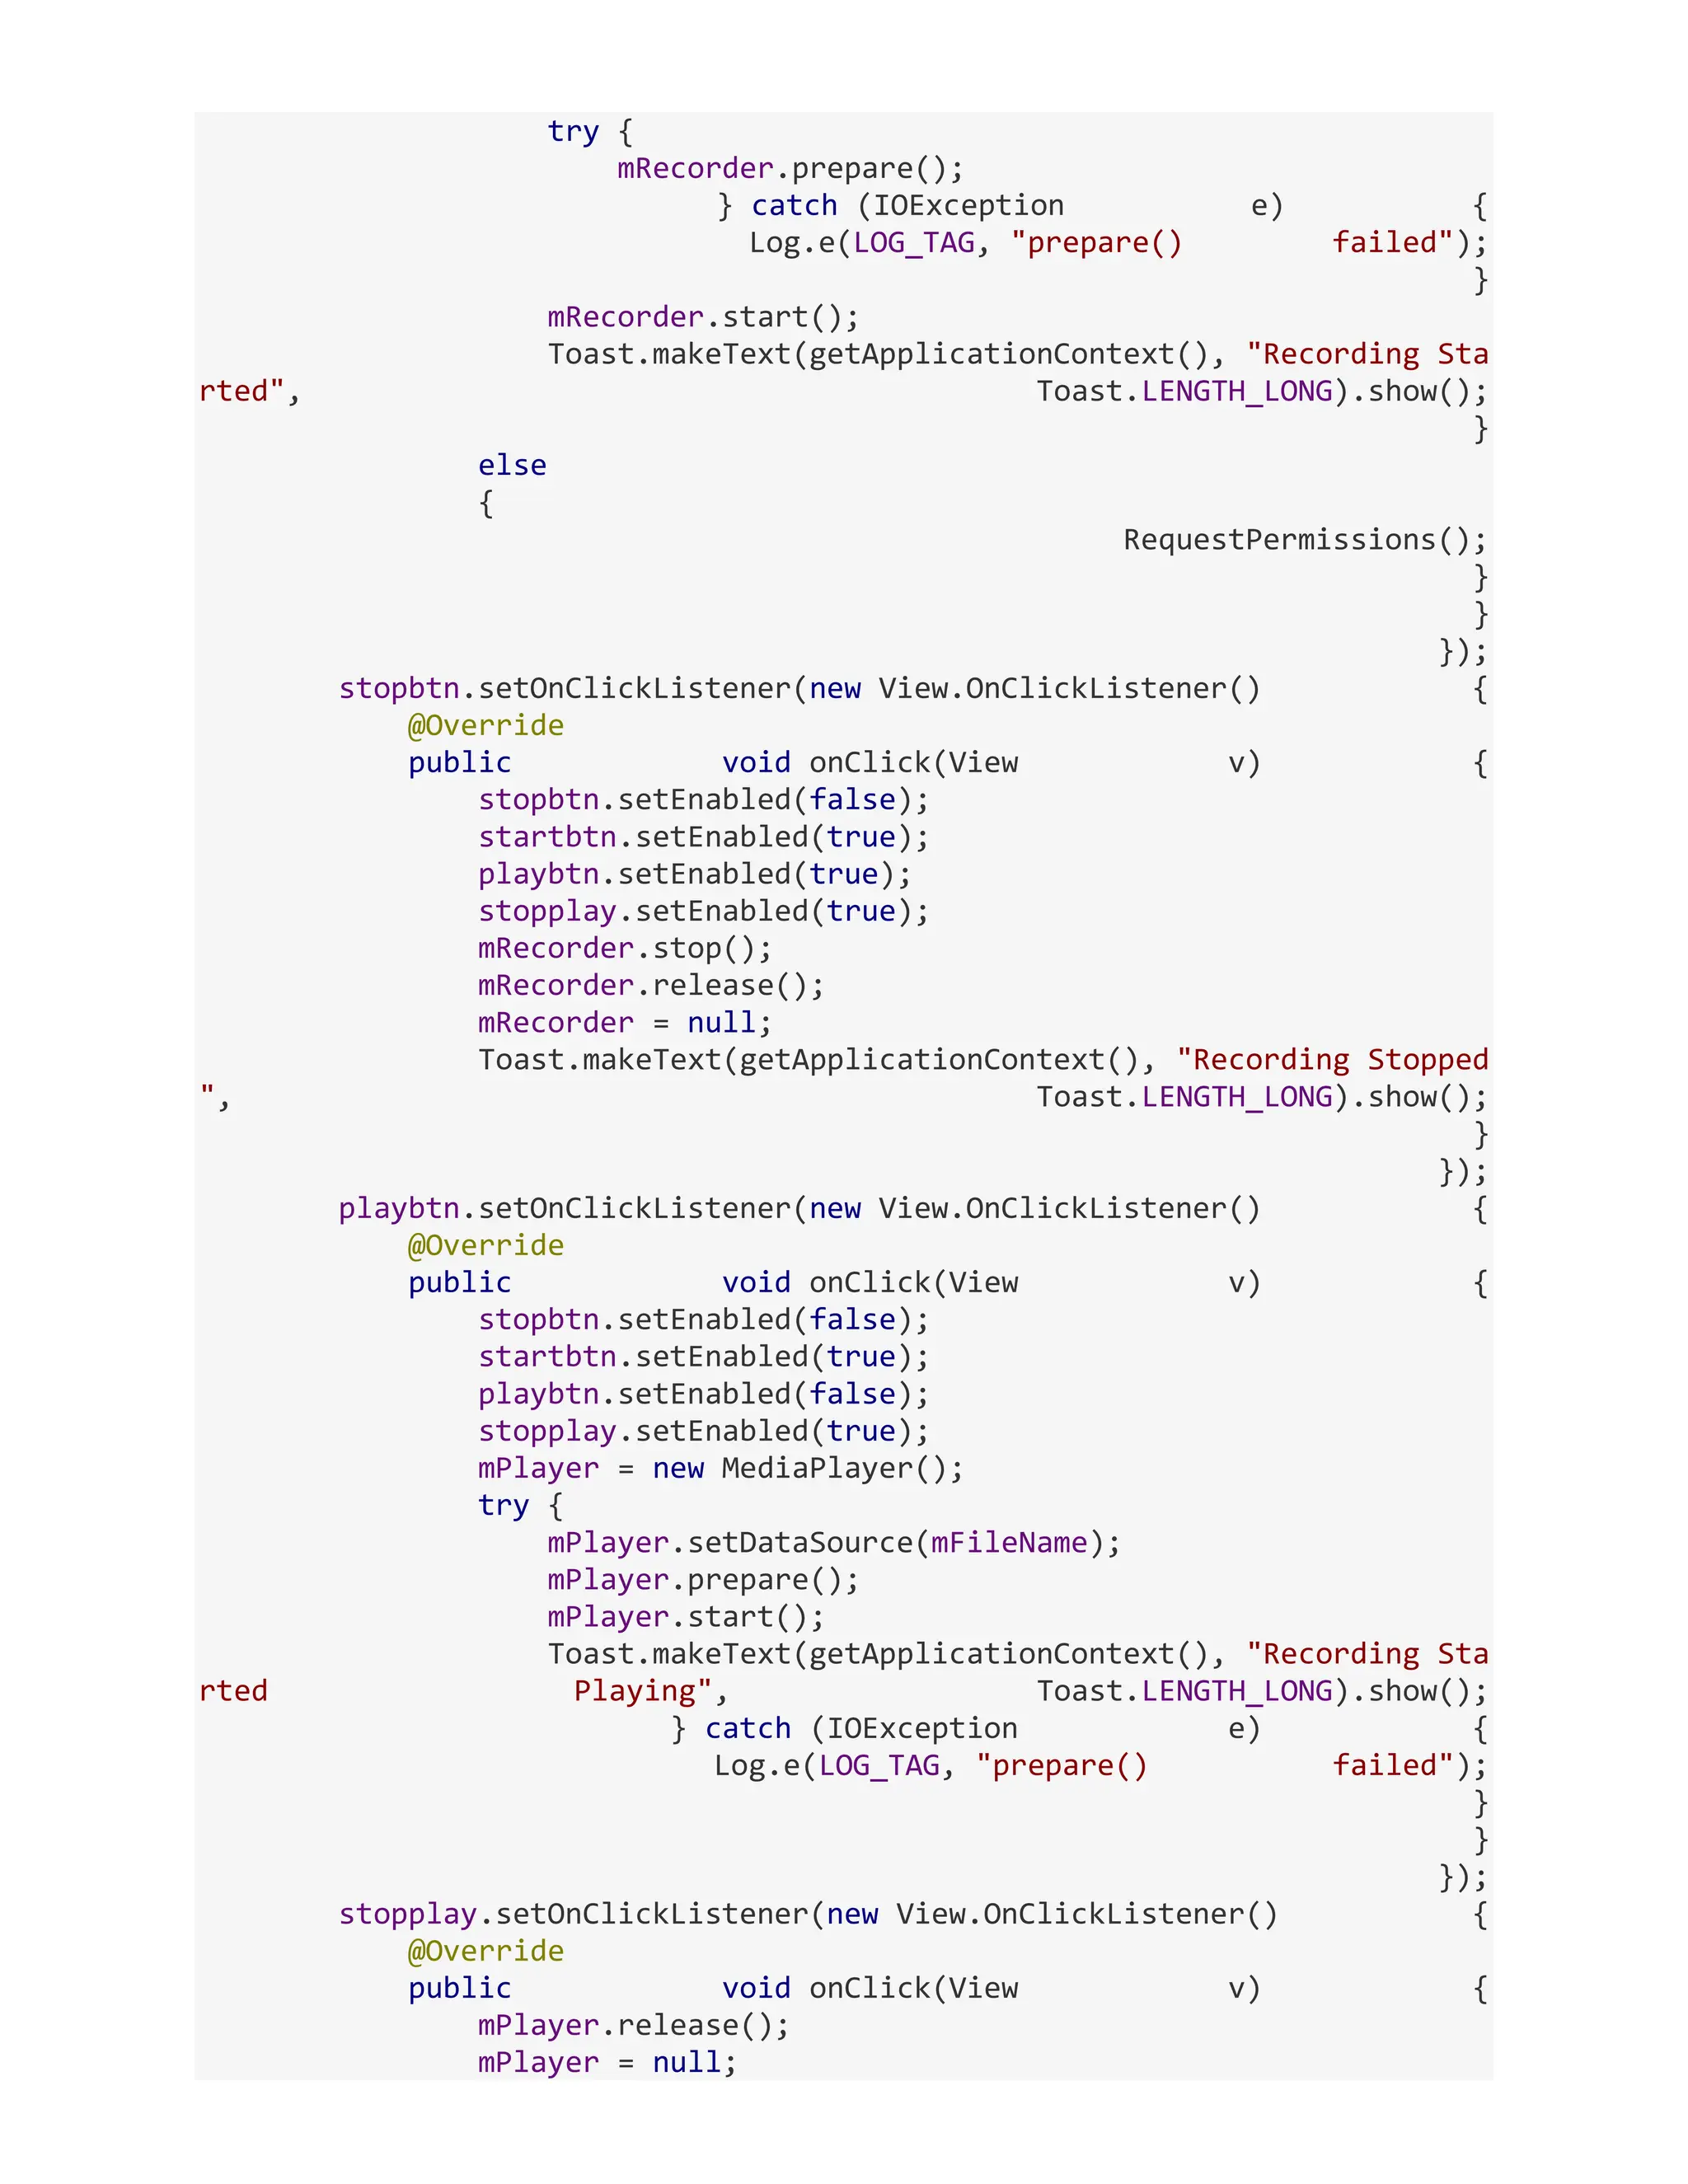
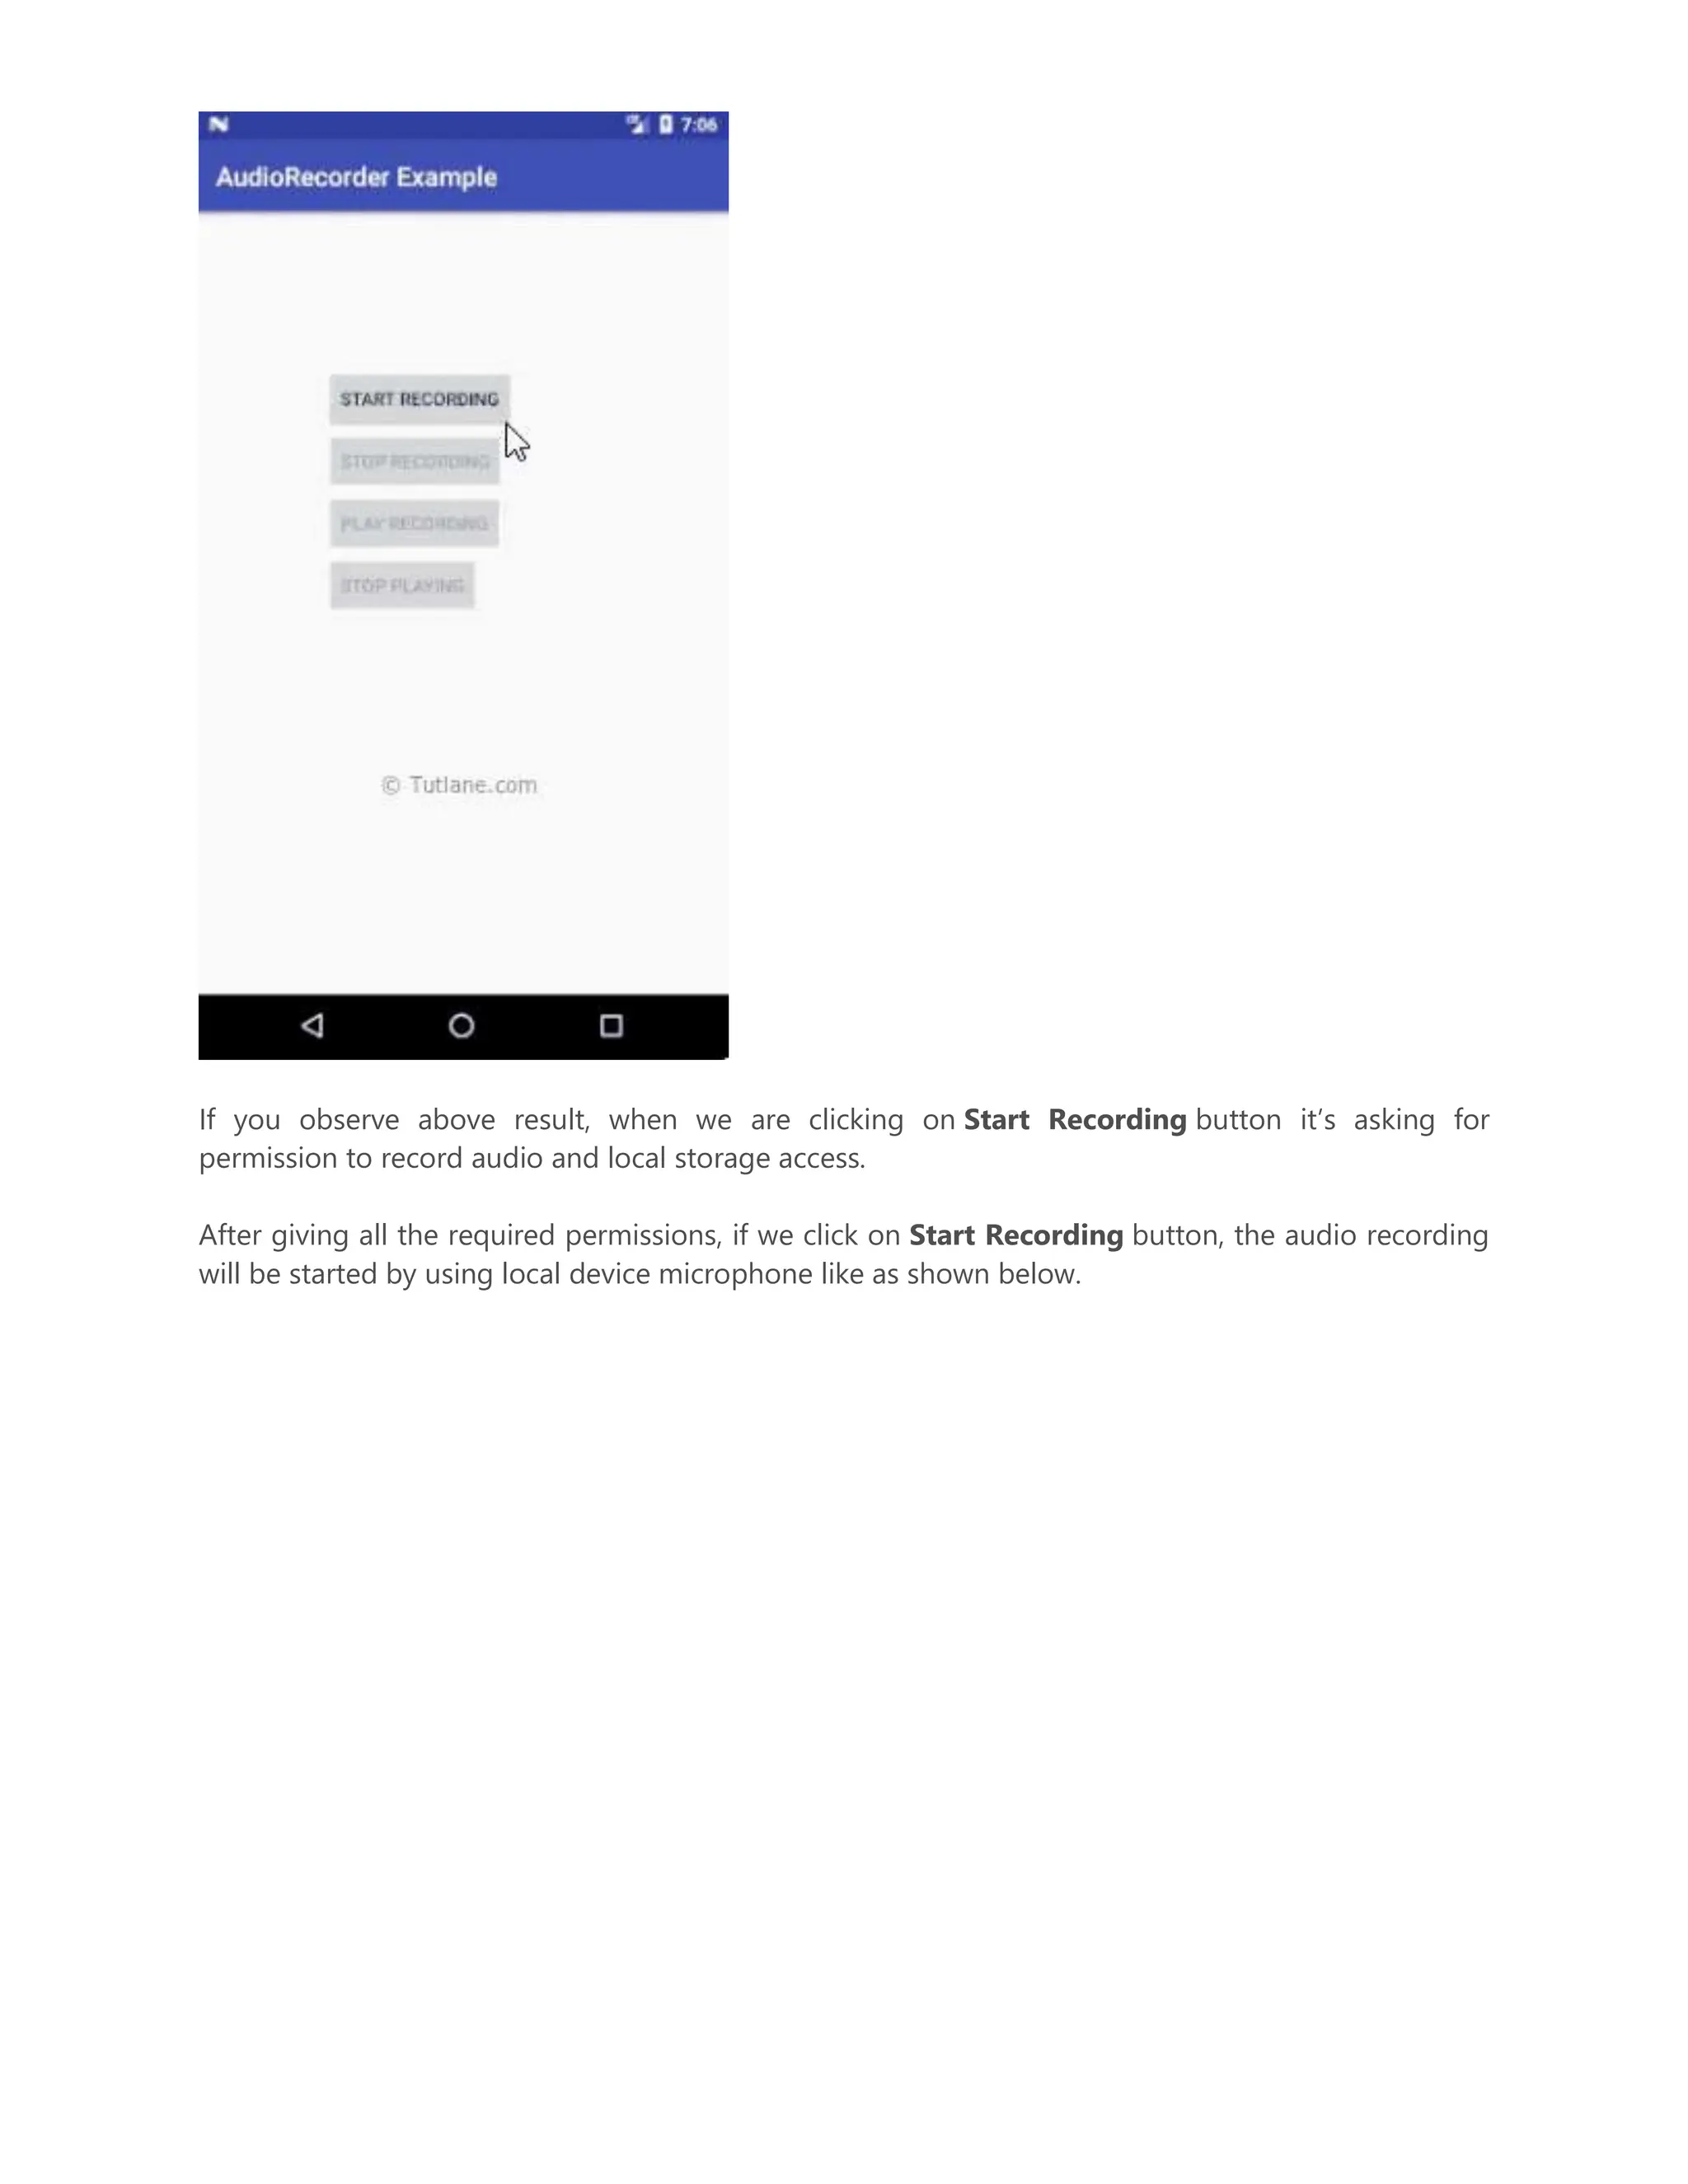
![stopbtn.setEnabled(false); startbtn.setEnabled(true); playbtn.setEnabled(true); stopplay.setEnabled(false); Toast.makeText(getApplicationContext(),"Playing Audio Stop ped", Toast.LENGTH_SHORT).show(); } }); } @Override public void onRequestPermissionsResult(int requestCode, String[] permi ssions, int[] grantResults) { switch (requestCode) { case REQUEST_AUDIO_PERMISSION_CODE: if (grantResults.length> 0) { boolean permissionToRecord = grantResults[0] == Packag eManager.PERMISSION_GRANTED; boolean permissionToStore = grantResults[1] == Packag eManager.PERMISSION_GRANTED; if (permissionToRecord && permissionToStore) { Toast.makeText(getApplicationContext(), "Permissio n Granted", Toast.LENGTH_LONG).show(); } else { Toast.makeText(getApplicationContext(),"Permission Denied",Toast.LENGTH_LONG).show(); } } break; } } public boolean CheckPermissions() { int result = ContextCompat.checkSelfPermission(getApplicationConte xt(), WRITE_EXTERNAL_STORAGE); int result1 = ContextCompat.checkSelfPermission(getApplicationCont ext(), RECORD_AUDIO); return result == PackageManager.PERMISSION_GRANTED && result1 == P ackageManager.PERMISSION_GRANTED; } private void RequestPermissions() { ActivityCompat.requestPermissions(MainActivity.this, new String[]{ RECORD_AUDIO, WRITE_EXTERNAL_STORAGE}, REQUEST_AUDIO_PERMISSION_CODE); } } If you observe above code, we are requesting permissions from user to record audio and store recorded files in device using onRequestPermissionResult method and added required functionality for audio recording and playing audio using mediaplayer based on our requirements. As discussed, we need to set permissions in android manifest file (AndroidManifest.xml) to record audio and stored record audio files in device. Now open android manifest file (AndroidManifest.xml) and write the code like as shown below](https://image.slidesharecdn.com/chapter-5-240509111424-ac575d20/75/Android-Application-Components-with-Implementation-Examples-52-2048.jpg)


![// Insert the new row, returning the primary key value of the new row long newRowId = db.insert(TABLE_Users,null, cValues); If you observe above code, we are getting the data repository in write mode and adding required values to columns and inserting into database. Read the Data from SQLite Database In android, we can read the data from the SQLite database using the query() method in android applications. Following is the code snippet to read the data from the SQLite Database using a query() method in the android application. //Get the Data Repository in write mode SQLiteDatabase db = this.getWritableDatabase(); Cursor cursor = db.query(TABLE_Users, new String[]{KEY_NAME, KEY_LOC, KEY_ DESG}, KEY_ID+ "=?",new String[]{String.valueOf(userid)},null, null, null , null); If you observe above code, we are getting the details from required table using query() method based on our requirements. Update Data in SQLite Database In android, we can update the data in the SQLite database using an update() method in android applications. Following is the code snippet to update the data in the SQLite database using an update() method in the android application. //Get the Data Repository in write mode SQLiteDatabase db = this.getWritableDatabase(); ContentValues cVals = new ContentValues(); cVals.put(KEY_LOC, location); cVals.put(KEY_DESG, designation); int count = db.update(TABLE_Users, cVals, KEY_ID+" = ?",new String[]{Strin g.valueOf(id)}); If you observe above code, we are updating the details using update() method based on our requirements. Delete Data from SQLite Database In android, we can delete data from the SQLite database using the delete() method in android applications. Following is the code snippet to delete the data from the SQLite database using the delete() method in the android application.](https://image.slidesharecdn.com/chapter-5-240509111424-ac575d20/75/Android-Application-Components-with-Implementation-Examples-72-2048.jpg)
![//Get the Data Repository in write mode SQLiteDatabase db = this.getWritableDatabase(); db.delete(TABLE_Users, KEY_ID+" = ?",new String[]{String.valueOf(userid)}) ; If you observe above code, we are deleting the details using delete() method based on our requirements. Now we will see how to create sqlite database and perform CRUD (insert, update, delete, select) operations on SQLite Database in android application with examples. Android SQLite Database Example Following is the example of creating the SQLite database, insert and show the details from the SQLite database into an android listview using the SQLiteOpenHelper class. Create a new android application using android studio and give names as SQLiteExample. In case if you are not aware of creating an app in android studio check this article Android Hello World App. Once we create an application, create a class file DbHandler.java in javacom.tutlane.sqliteexample path to implement SQLite database related activities for that right-click on your application folder Go to New select Java Class and give name as DbHandler.java. Once we create a new class file DbHandler.java, open it and write the code like as shown below DbHandler.java package com.tutlane.sqliteexample; import android.content.ContentValues; import android.content.Context; import android.database.Cursor; import android.database.sqlite.SQLiteDatabase; import android.database.sqlite.SQLiteOpenHelper; import java.util.ArrayList; import java.util.HashMap; /** * Created by tutlane on 06-01-2018. */ public class DbHandler extends SQLiteOpenHelper { private static final int DB_VERSION = 1; private static final String DB_NAME = "usersdb"; private static final String TABLE_Users = "userdetails"; private static final String KEY_ID = "id"; private static final String KEY_NAME = "name"; private static final String KEY_LOC = "location"; private static final String KEY_DESG = "designation"; public DbHandler(Context context){ super(context,DB_NAME, null, DB_VERSION);](https://image.slidesharecdn.com/chapter-5-240509111424-ac575d20/75/Android-Application-Components-with-Implementation-Examples-73-2048.jpg)
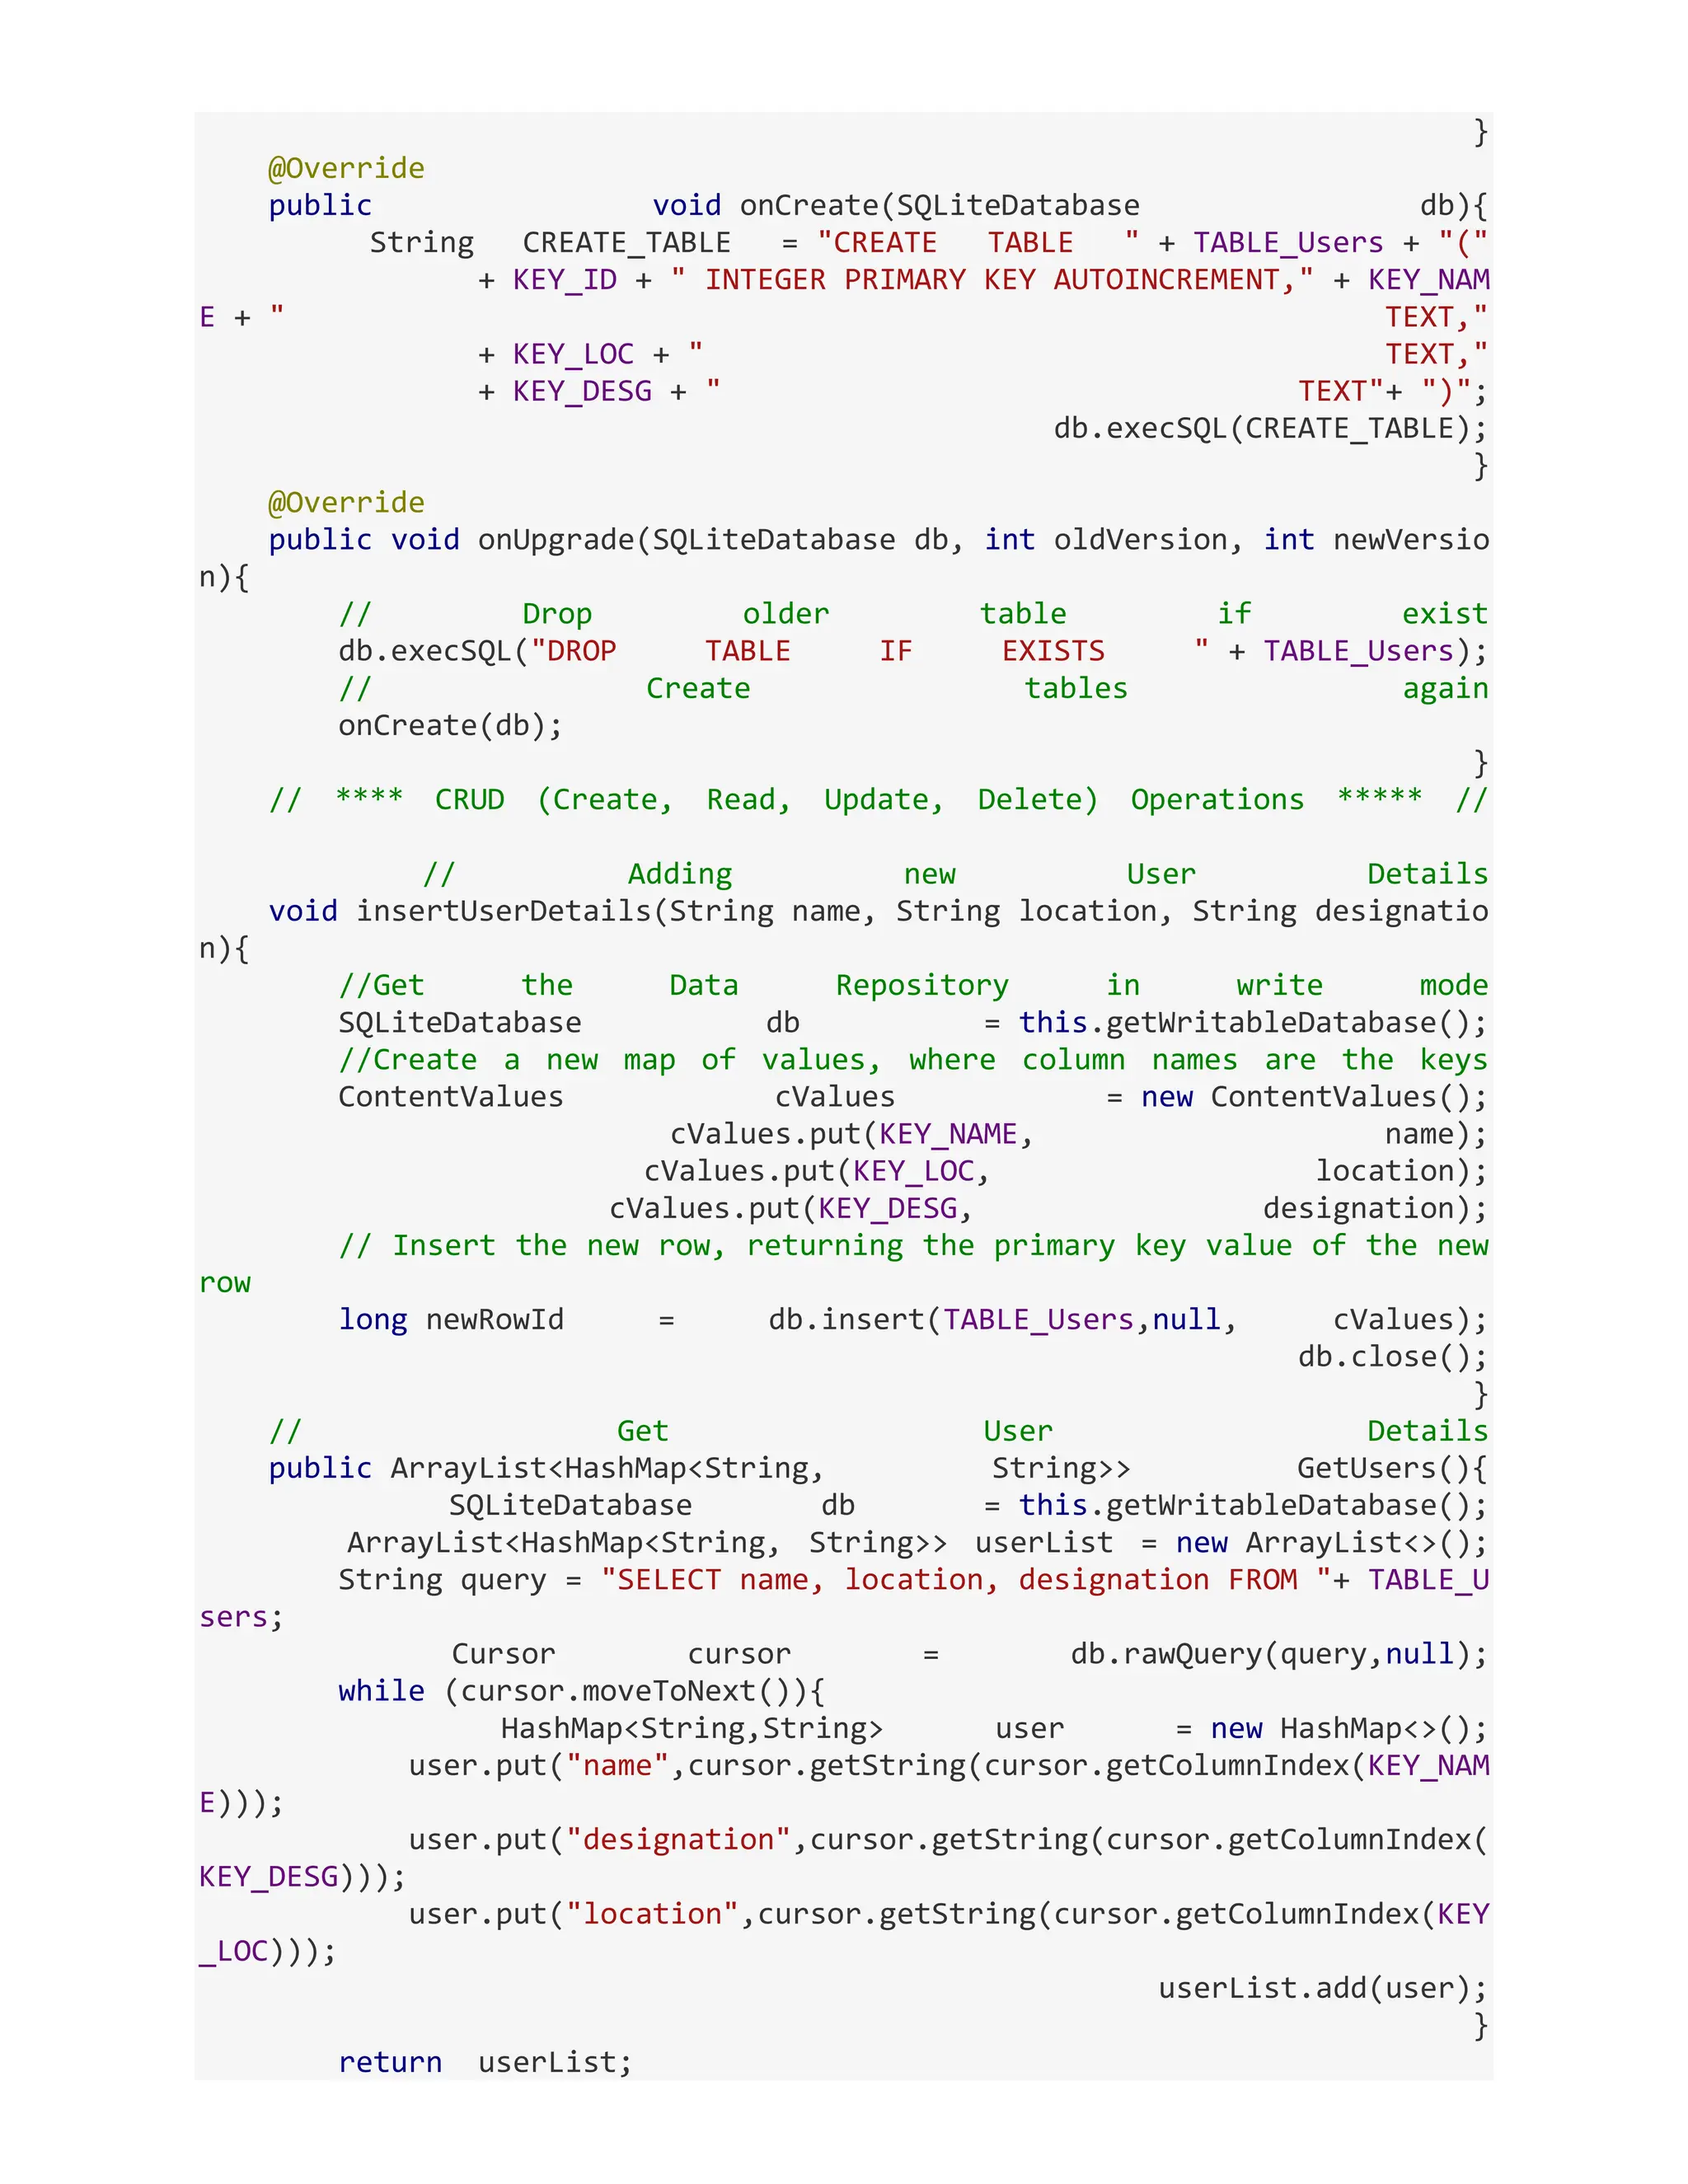
![} // Get User Details based on userid public ArrayList<HashMap<String, String>> GetUserByUserId(int userid){ SQLiteDatabase db = this.getWritableDatabase(); ArrayList<HashMap<String, String>> userList = new ArrayList<>(); String query = "SELECT name, location, designation FROM "+ TABLE_U sers; Cursor cursor = db.query(TABLE_Users, new String[]{KEY_NAME, KEY_L OC, KEY_DESG}, KEY_ID+ "=?",new String[]{String.valueOf(userid)},null, nul l, null, null); if (cursor.moveToNext()){ HashMap<String,String> user = new HashMap<>(); user.put("name",cursor.getString(cursor.getColumnIndex(KEY_NAM E))); user.put("designation",cursor.getString(cursor.getColumnIndex( KEY_DESG))); user.put("location",cursor.getString(cursor.getColumnIndex(KEY _LOC))); userList.add(user); } return userList; } // Delete User Details public void DeleteUser(int userid){ SQLiteDatabase db = this.getWritableDatabase(); db.delete(TABLE_Users, KEY_ID+" = ?",new String[]{String.valueOf(u serid)}); db.close(); } // Update User Details public int UpdateUserDetails(String location, String designation, in t id){ SQLiteDatabase db = this.getWritableDatabase(); ContentValues cVals = new ContentValues(); cVals.put(KEY_LOC, location); cVals.put(KEY_DESG, designation); int count = db.update(TABLE_Users, cVals, KEY_ID+" = ?",new String []{String.valueOf(id)}); return count; } } If you observe above code, we implemented all SQLite Database related activities to perform CRUD operations in android application. Now open activity_main.xml file from reslayout folder path and write the code like as shown below. activity_main.xml <?xml version="1.0" encoding="utf-8"?> <LinearLayout xmlns:android="http://schemas.android.com/apk/res/android"](https://image.slidesharecdn.com/chapter-5-240509111424-ac575d20/75/Android-Application-Components-with-Implementation-Examples-75-2048.jpg)


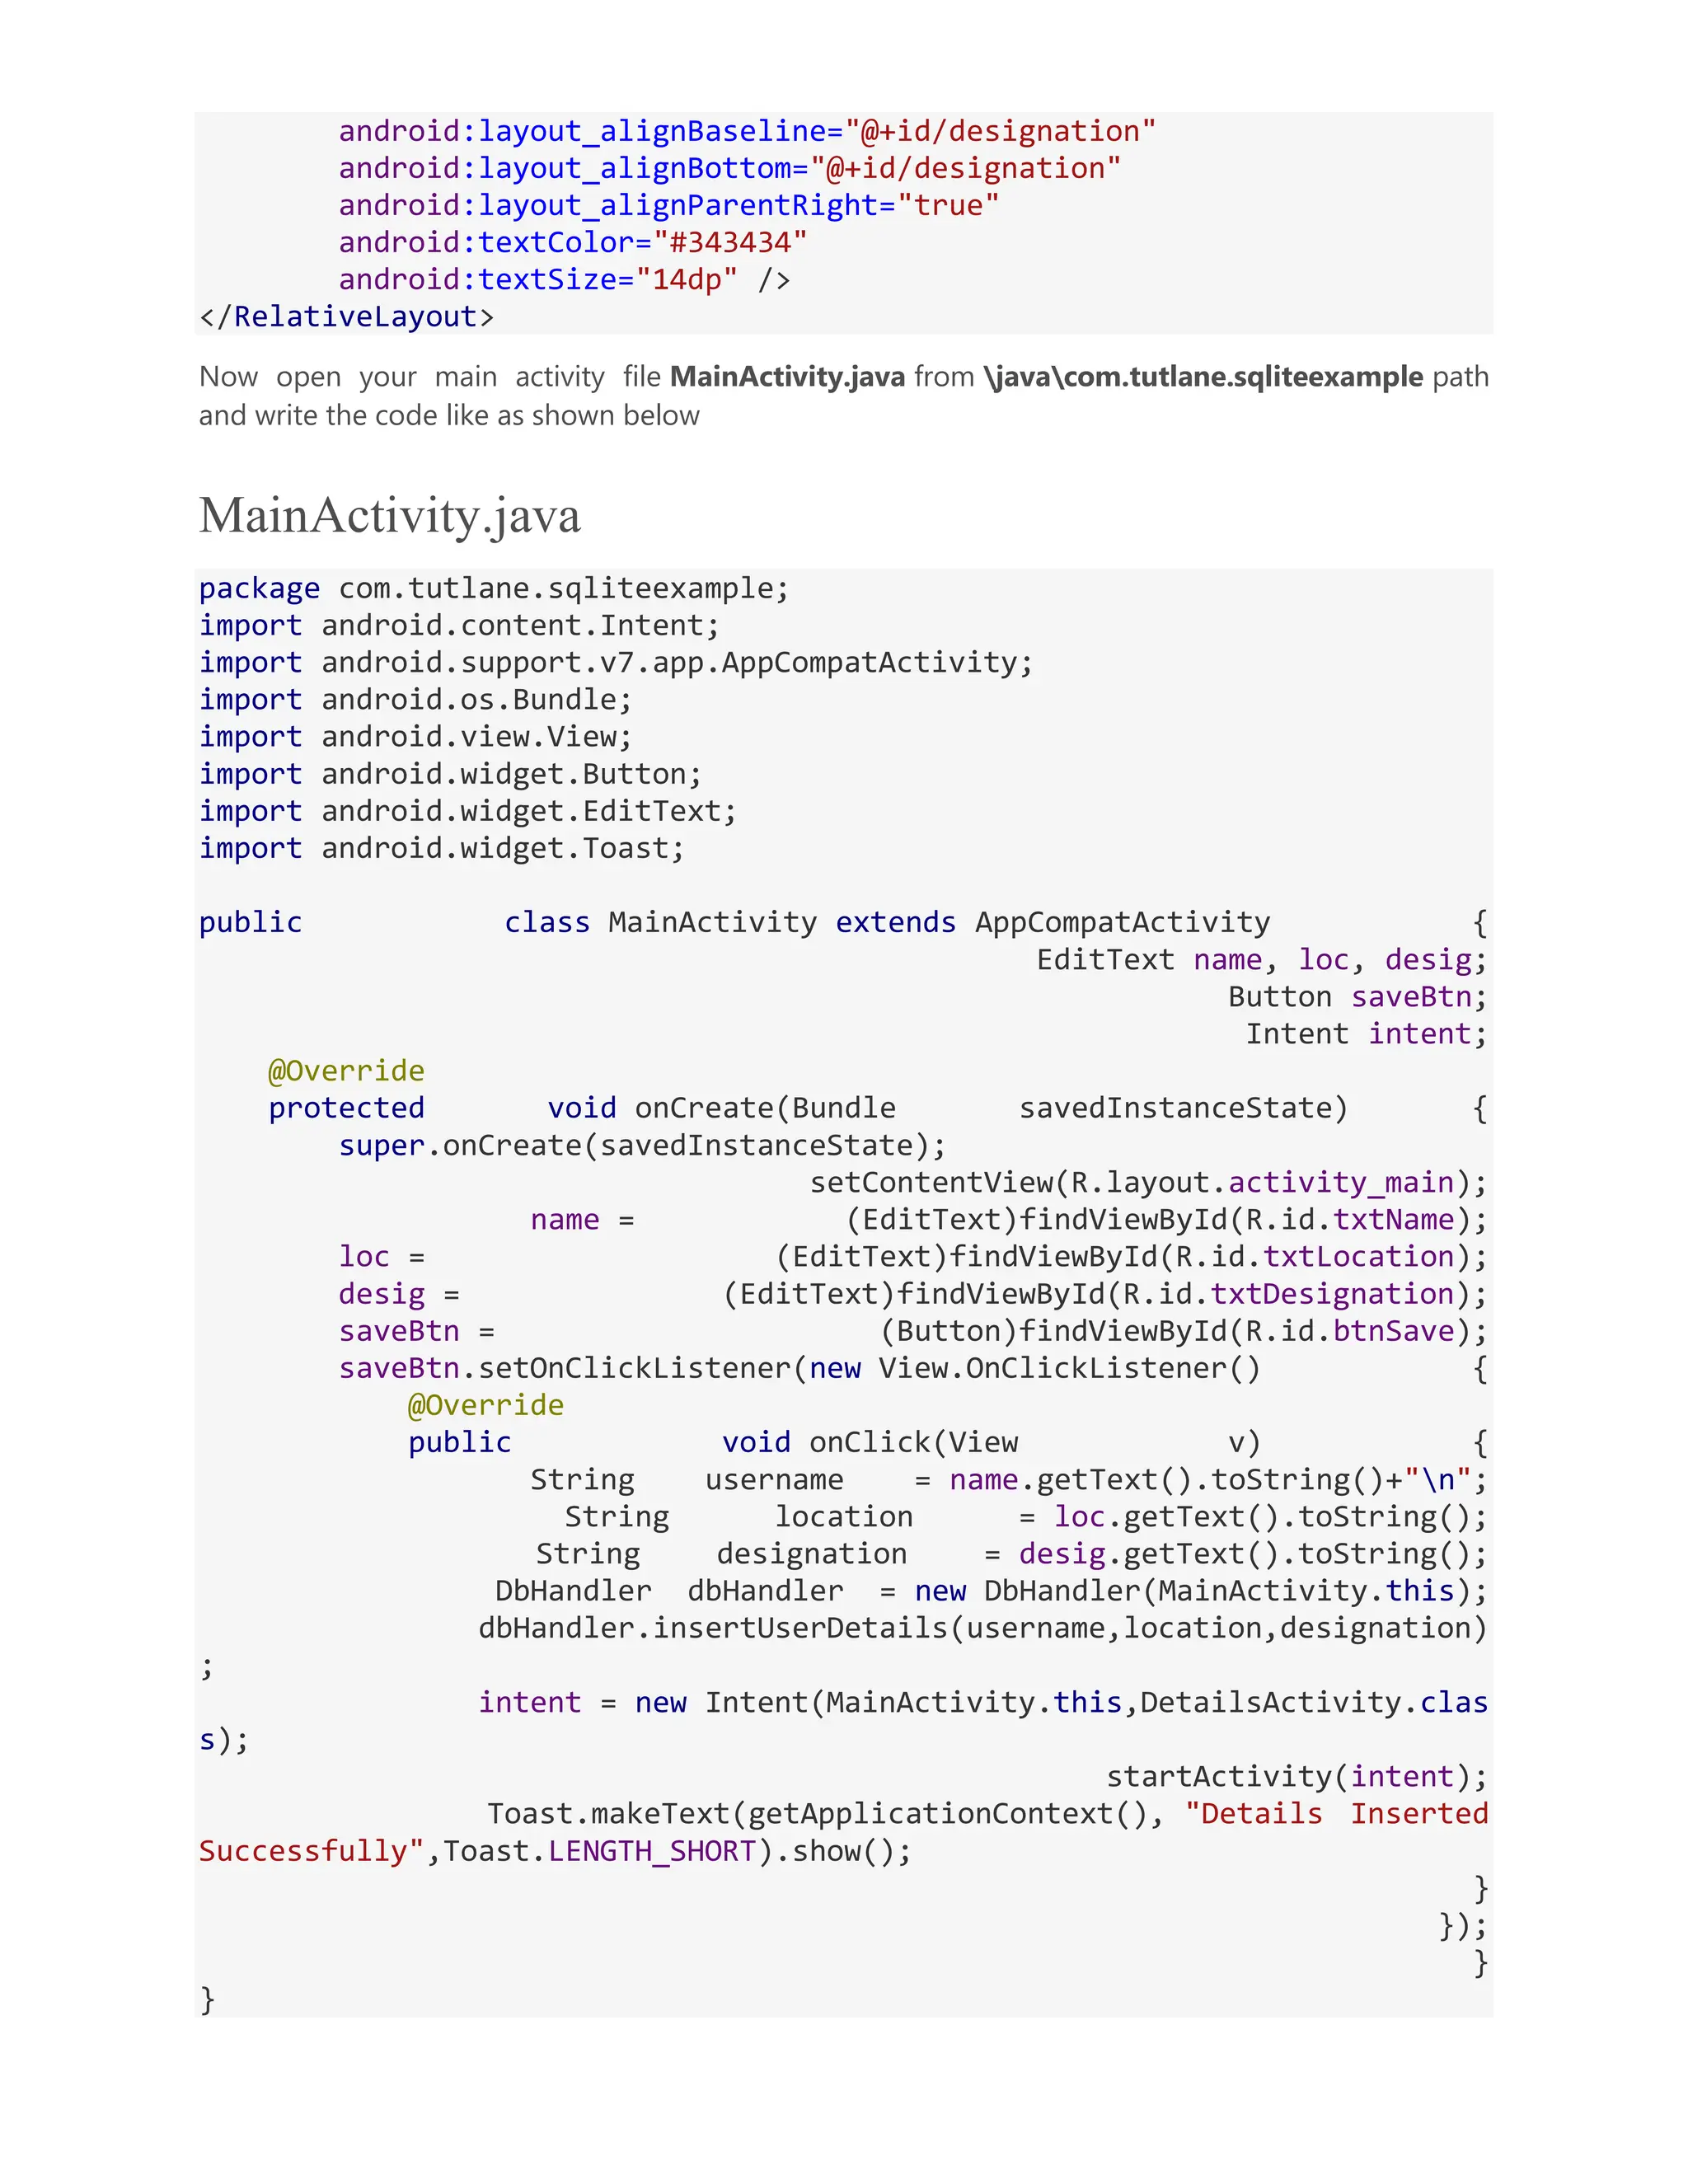
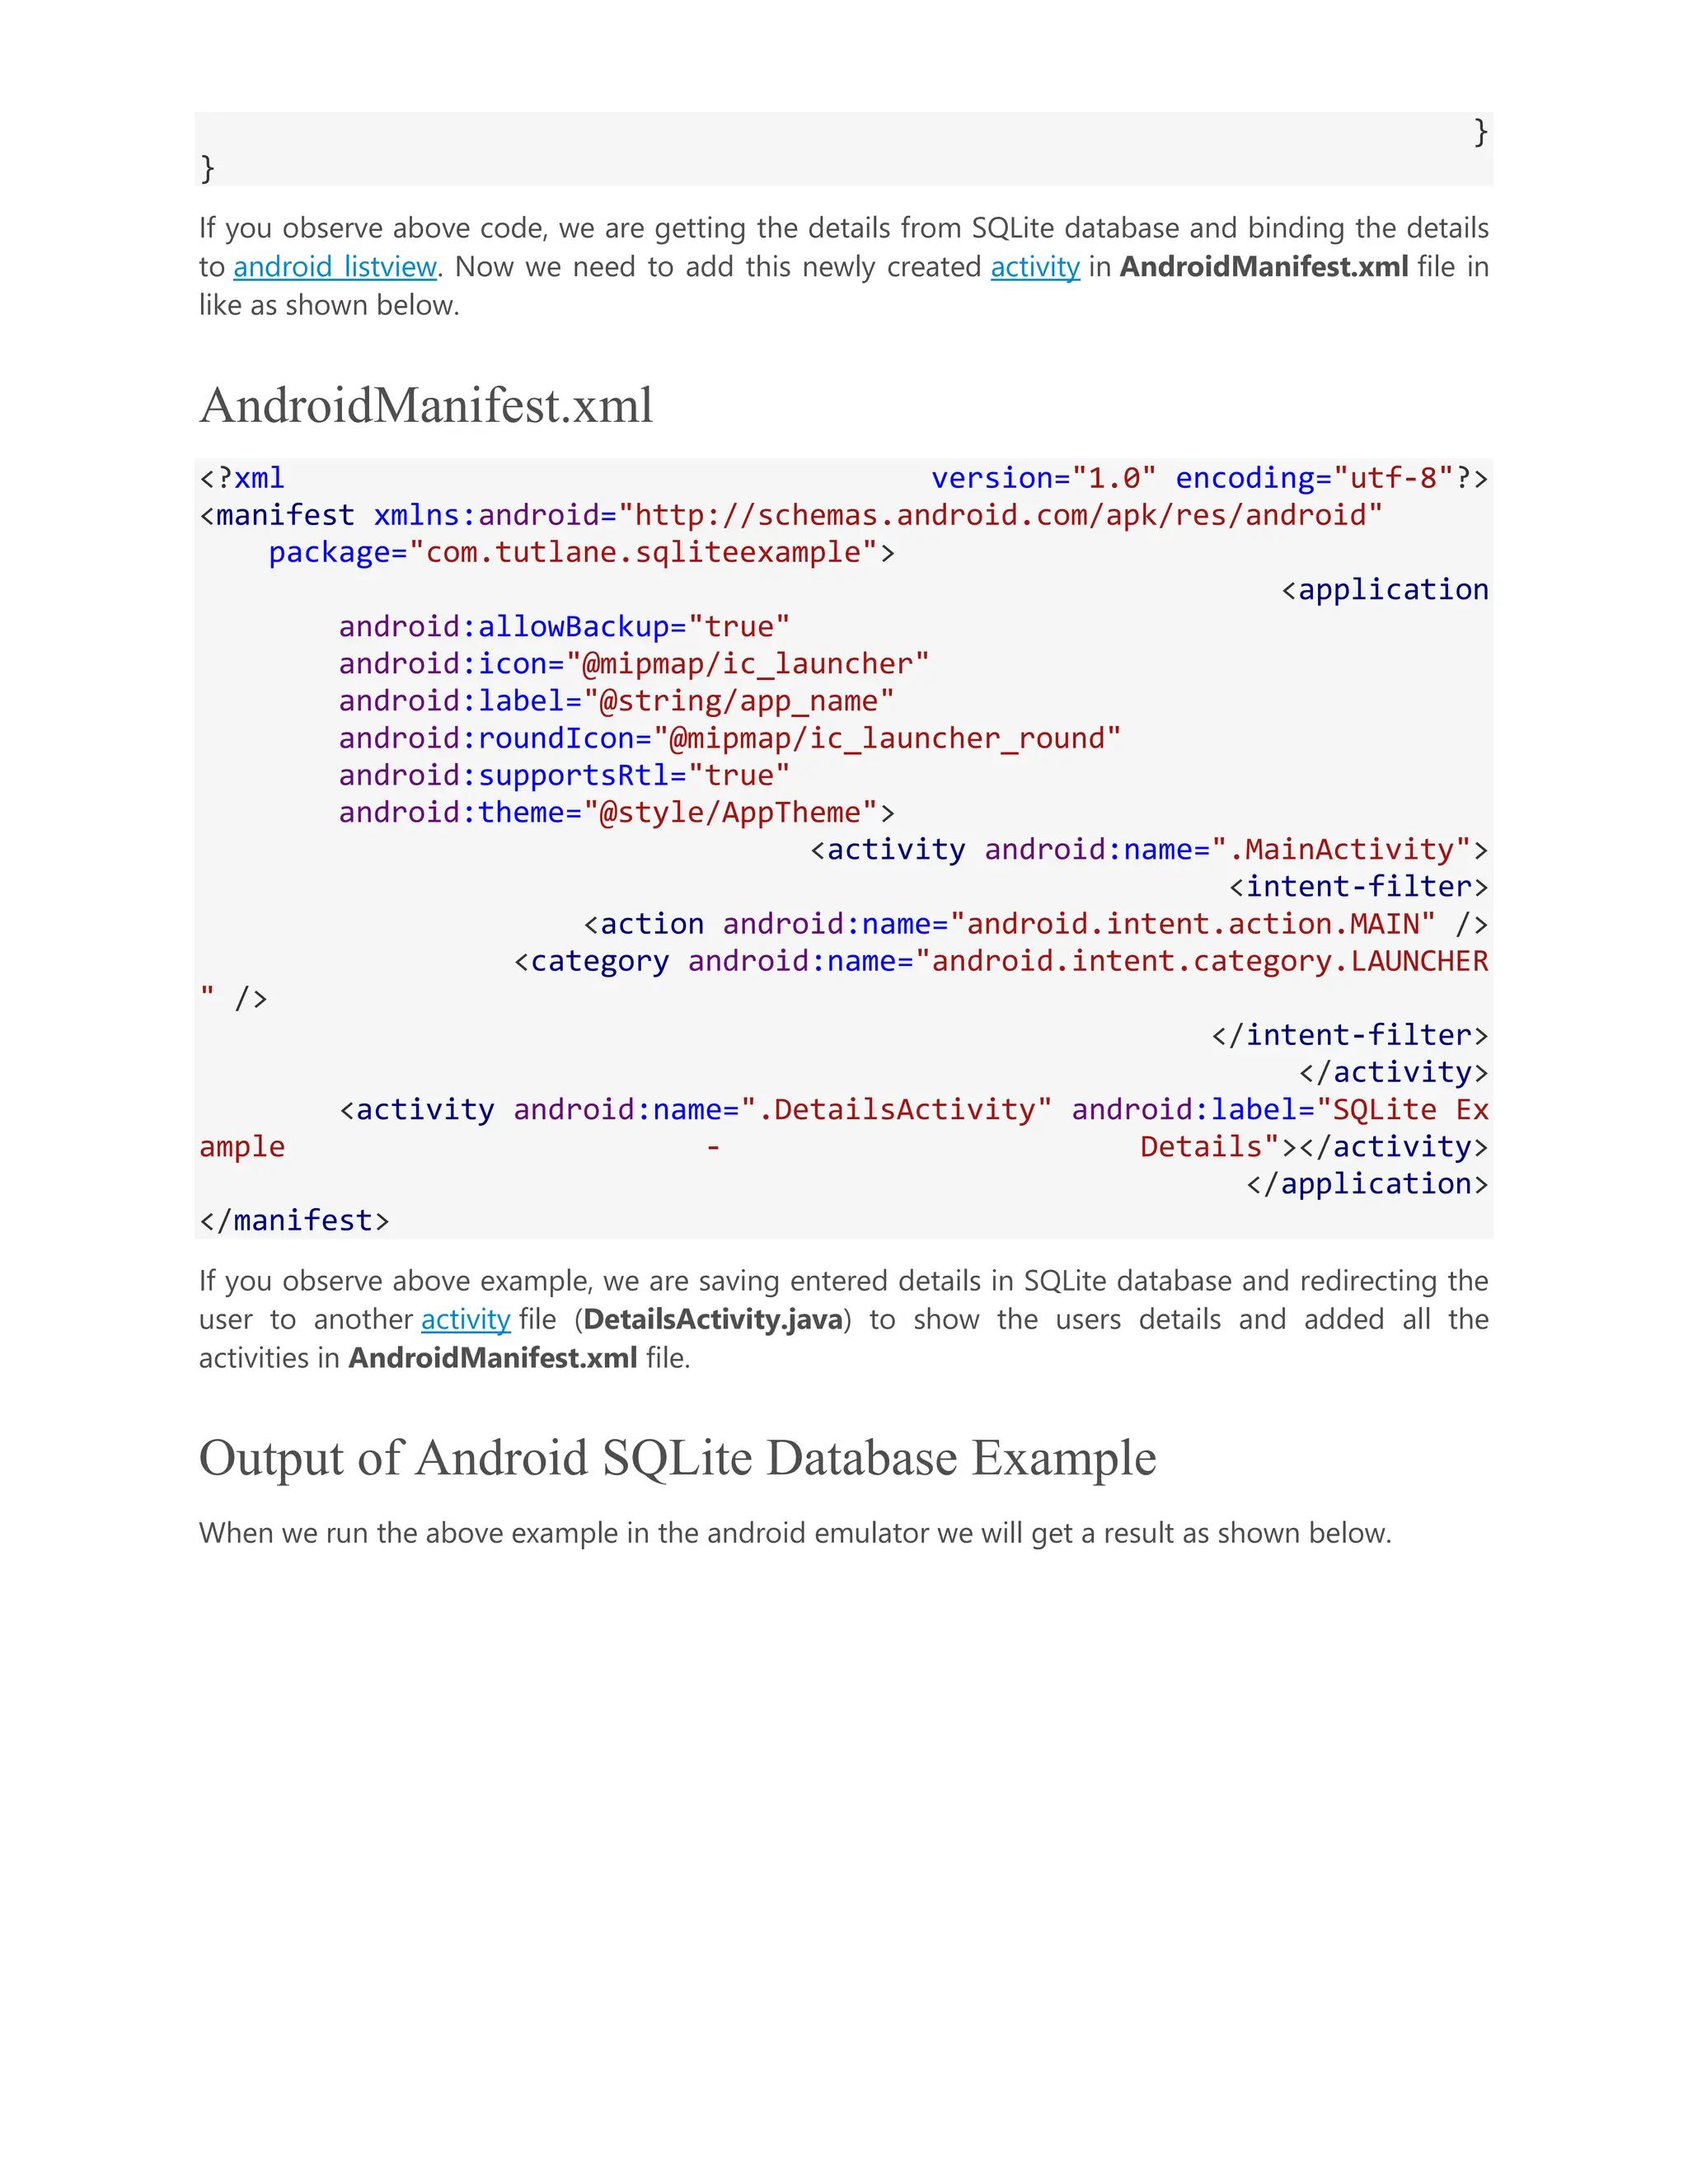
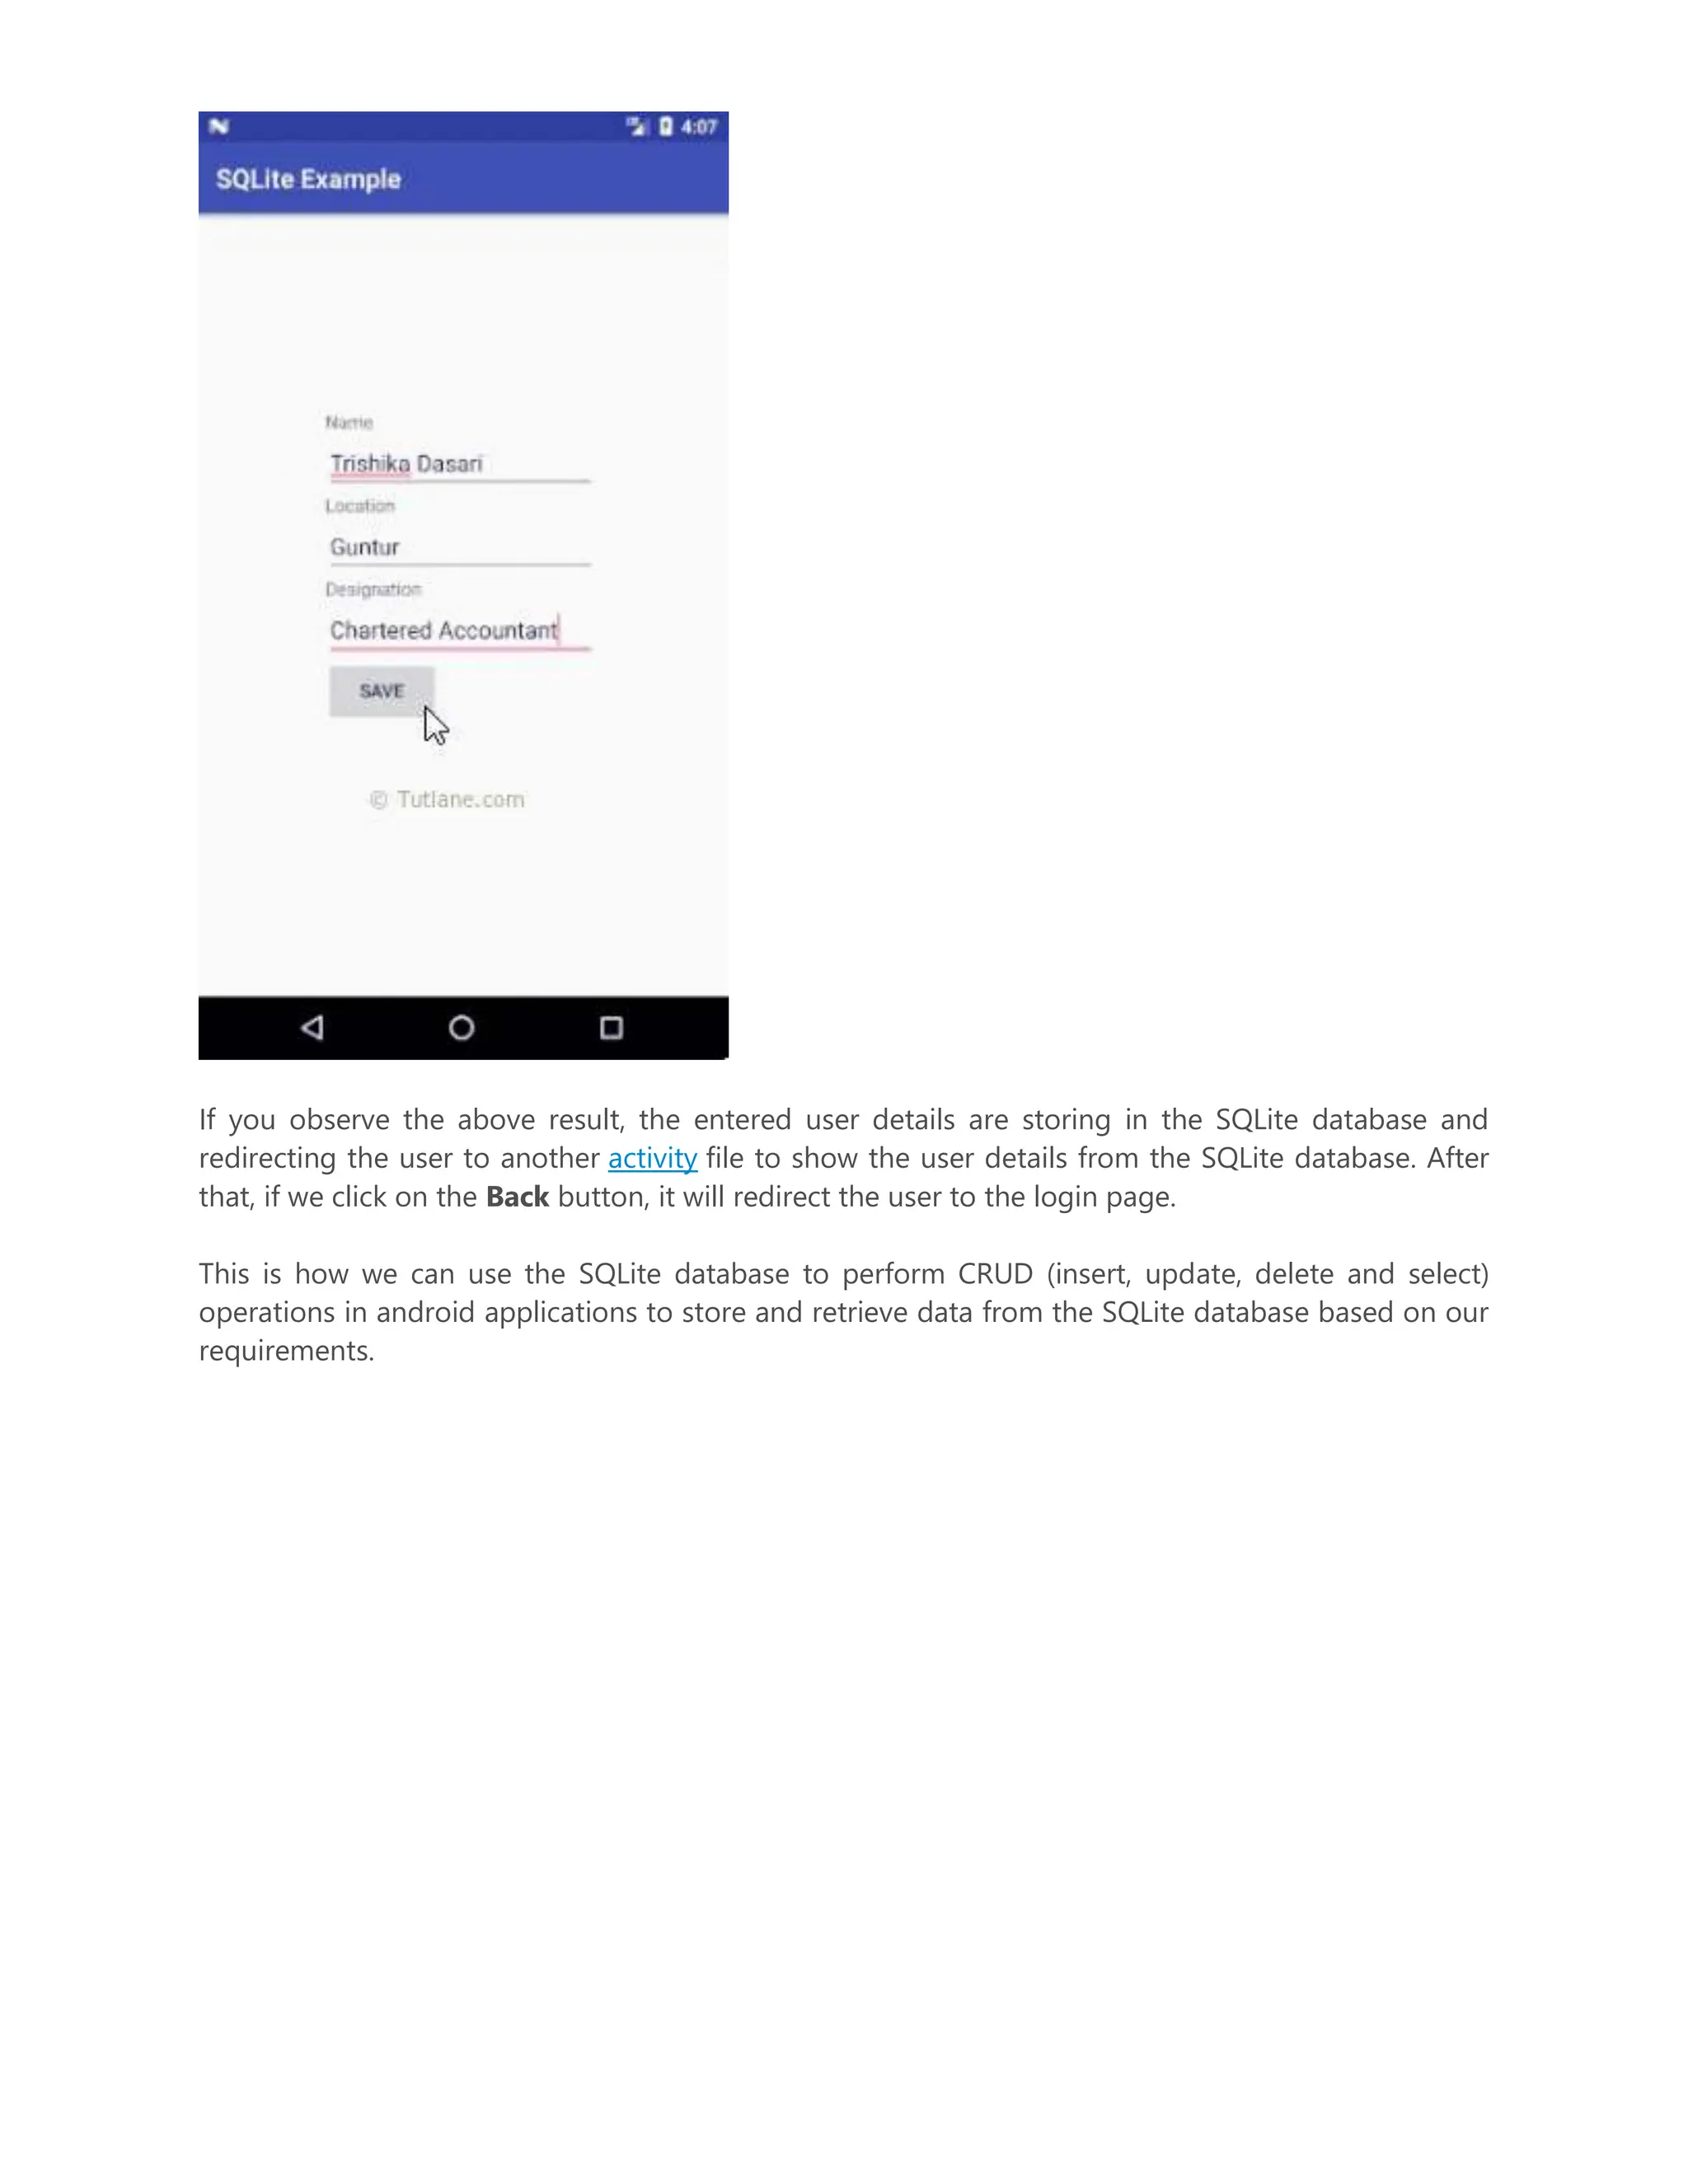
![If you observe above code, we are taking entered user details and inserting into SQLite database and redirecting the user to another activity. Now we will create another activity file DetailsActivity.java in javacom.tutlane.sqliteexample path to show the details from the SQLite database for that right-click on your application folder Go to New select Java Class and give name as DetailsActivity.java. Once we create a new activity file DetailsActivity.java, open it and write the code like as shown below DetailsActivity.java package com.tutlane.sqliteexample; import android.content.Intent; import android.os.Bundle; import android.support.v7.app.AppCompatActivity; import android.view.View; import android.widget.Button; import android.widget.ListAdapter; import android.widget.ListView; import android.widget.SimpleAdapter; import java.util.ArrayList; import java.util.HashMap; /** * Created by tutlane on 05-01-2018. */ public class DetailsActivity extends AppCompatActivity { Intent intent; @Override protected void onCreate(Bundle savedInstanceState) { super.onCreate(savedInstanceState); setContentView(R.layout.details); DbHandler db = new DbHandler(this); ArrayList<HashMap<String, String>> userList = db.GetUsers(); ListView lv = (ListView) findViewById(R.id.user_list); ListAdapter adapter = new SimpleAdapter(DetailsActivity.this, user List, R.layout.list_row,new String[]{"name","designation","location"}, new int[]{R.id.name, R.id.designation, R.id.location}); lv.setAdapter(adapter); Button back = (Button)findViewById(R.id.btnBack); back.setOnClickListener(new View.OnClickListener() { @Override public void onClick(View v) { intent = new Intent(DetailsActivity.this,MainActivity.clas s); startActivity(intent); } });](https://image.slidesharecdn.com/chapter-5-240509111424-ac575d20/75/Android-Application-Components-with-Implementation-Examples-79-2048.jpg)

This document provides a comprehensive overview of Android application components, including activities, services, content providers, and broadcast receivers, detailing their roles and lifecycle processes. It explains the functional aspects of these components, alongside the additional components like intents, widgets, views, and notifications crucial for application development. The document further elaborates on the Android activity lifecycle, the lifecycle of services, and essential methods tied to each component, along with practical implementation code examples.
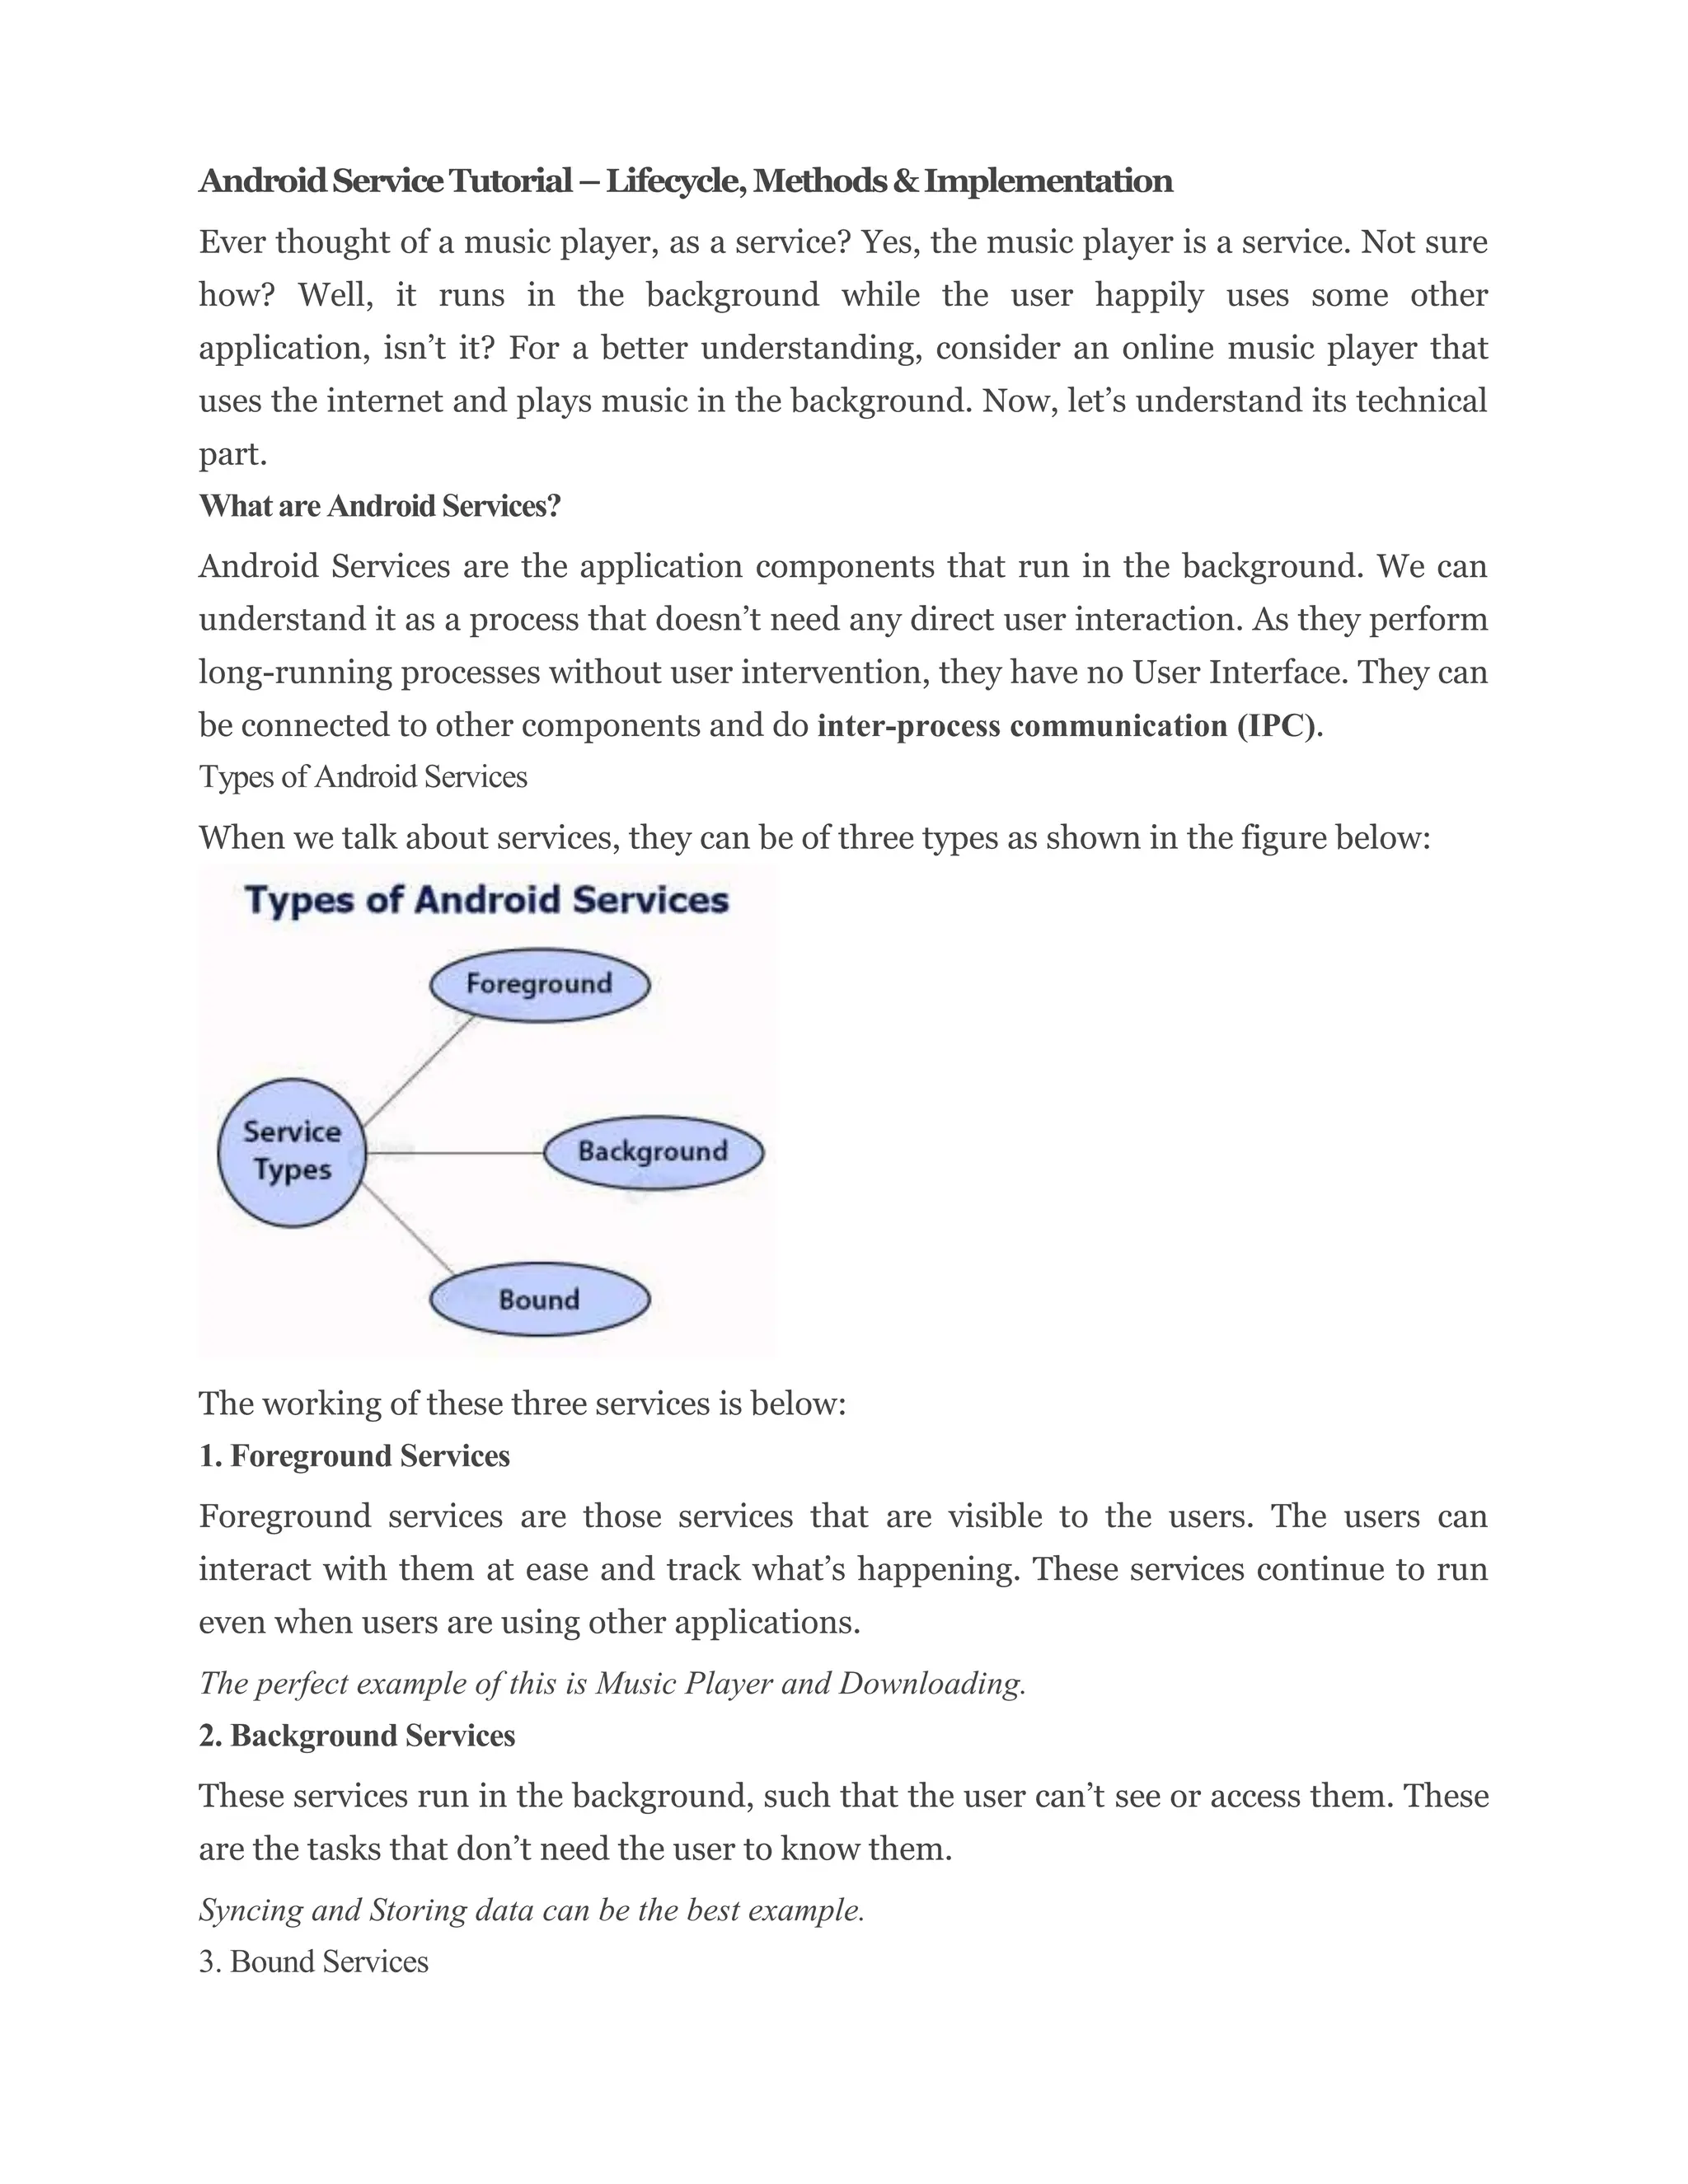
Description of the basic Android application components: Activities, Services, Content Providers, and Broadcast Receivers. Each component's role and implementation details are discussed.
Explanation of the Android Activity Lifecycle, including lifecycle states (Running, Paused, Resumed, Stopped) and callback methods (onCreate, onStart, etc.) used in managing activities.
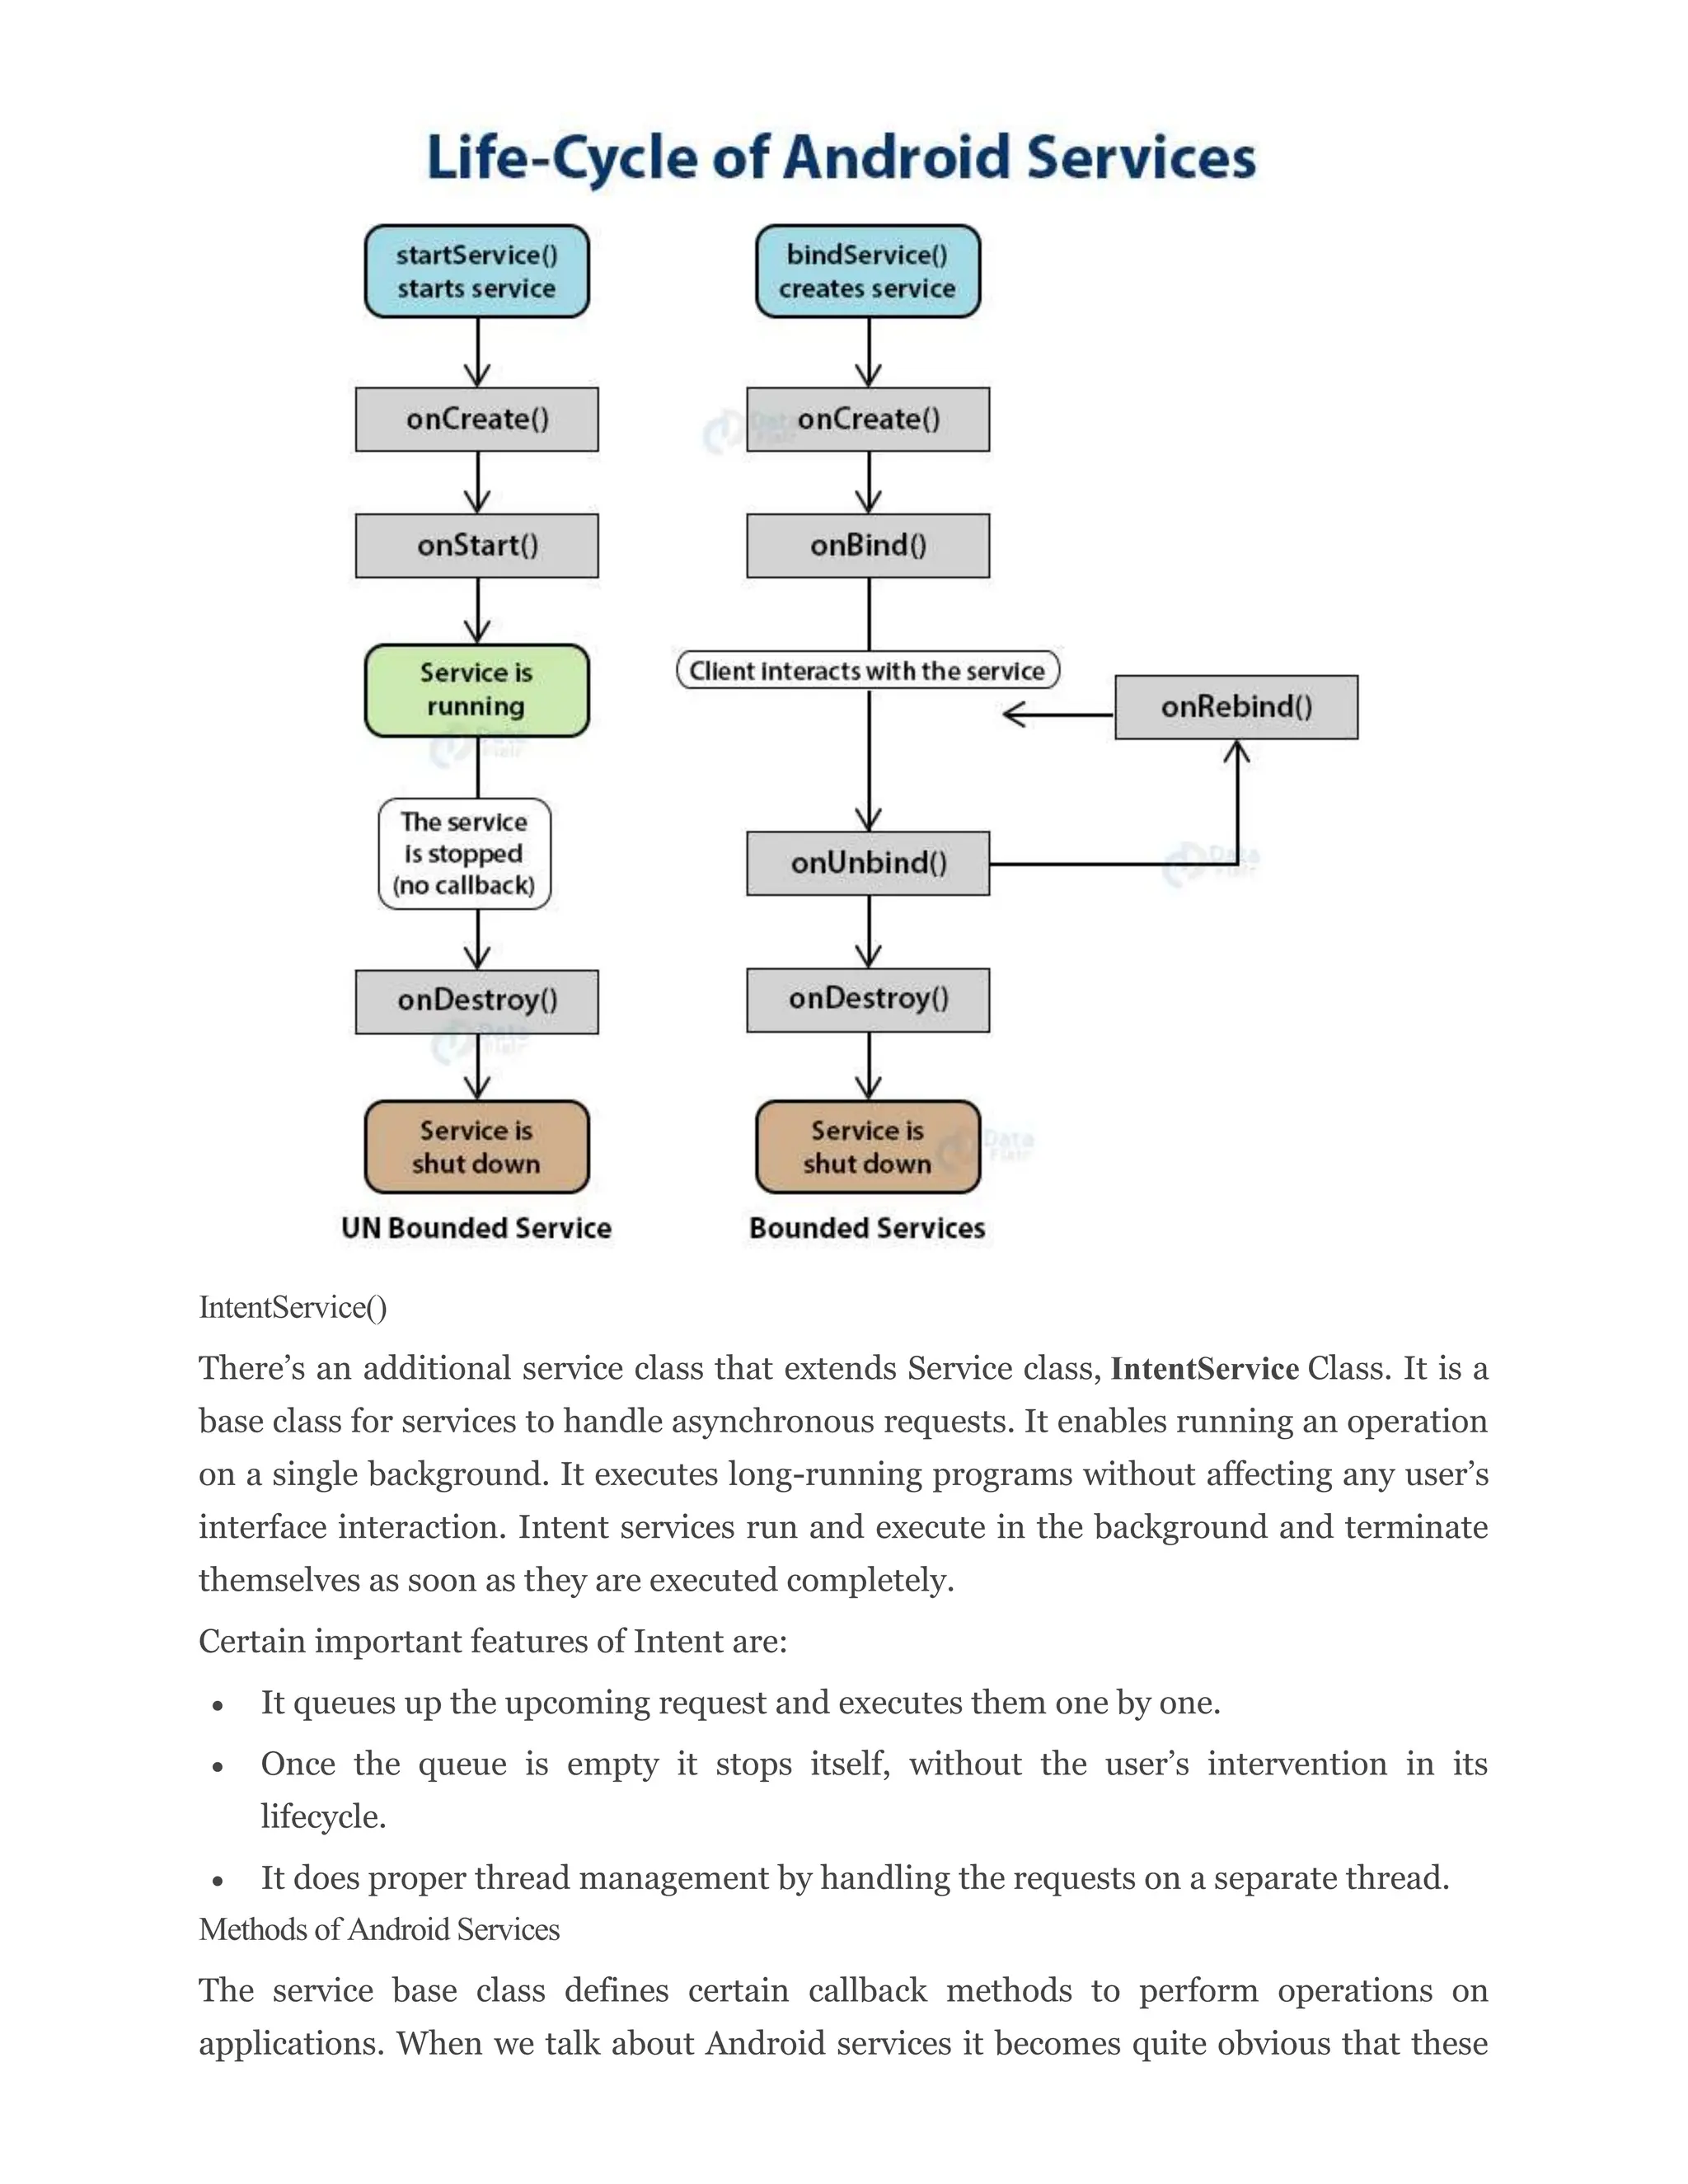
Understanding Android Services, including Foreground, Background, and Bound Services. Explanation of lifecycle and callback methods like onStartCommand and onBind.
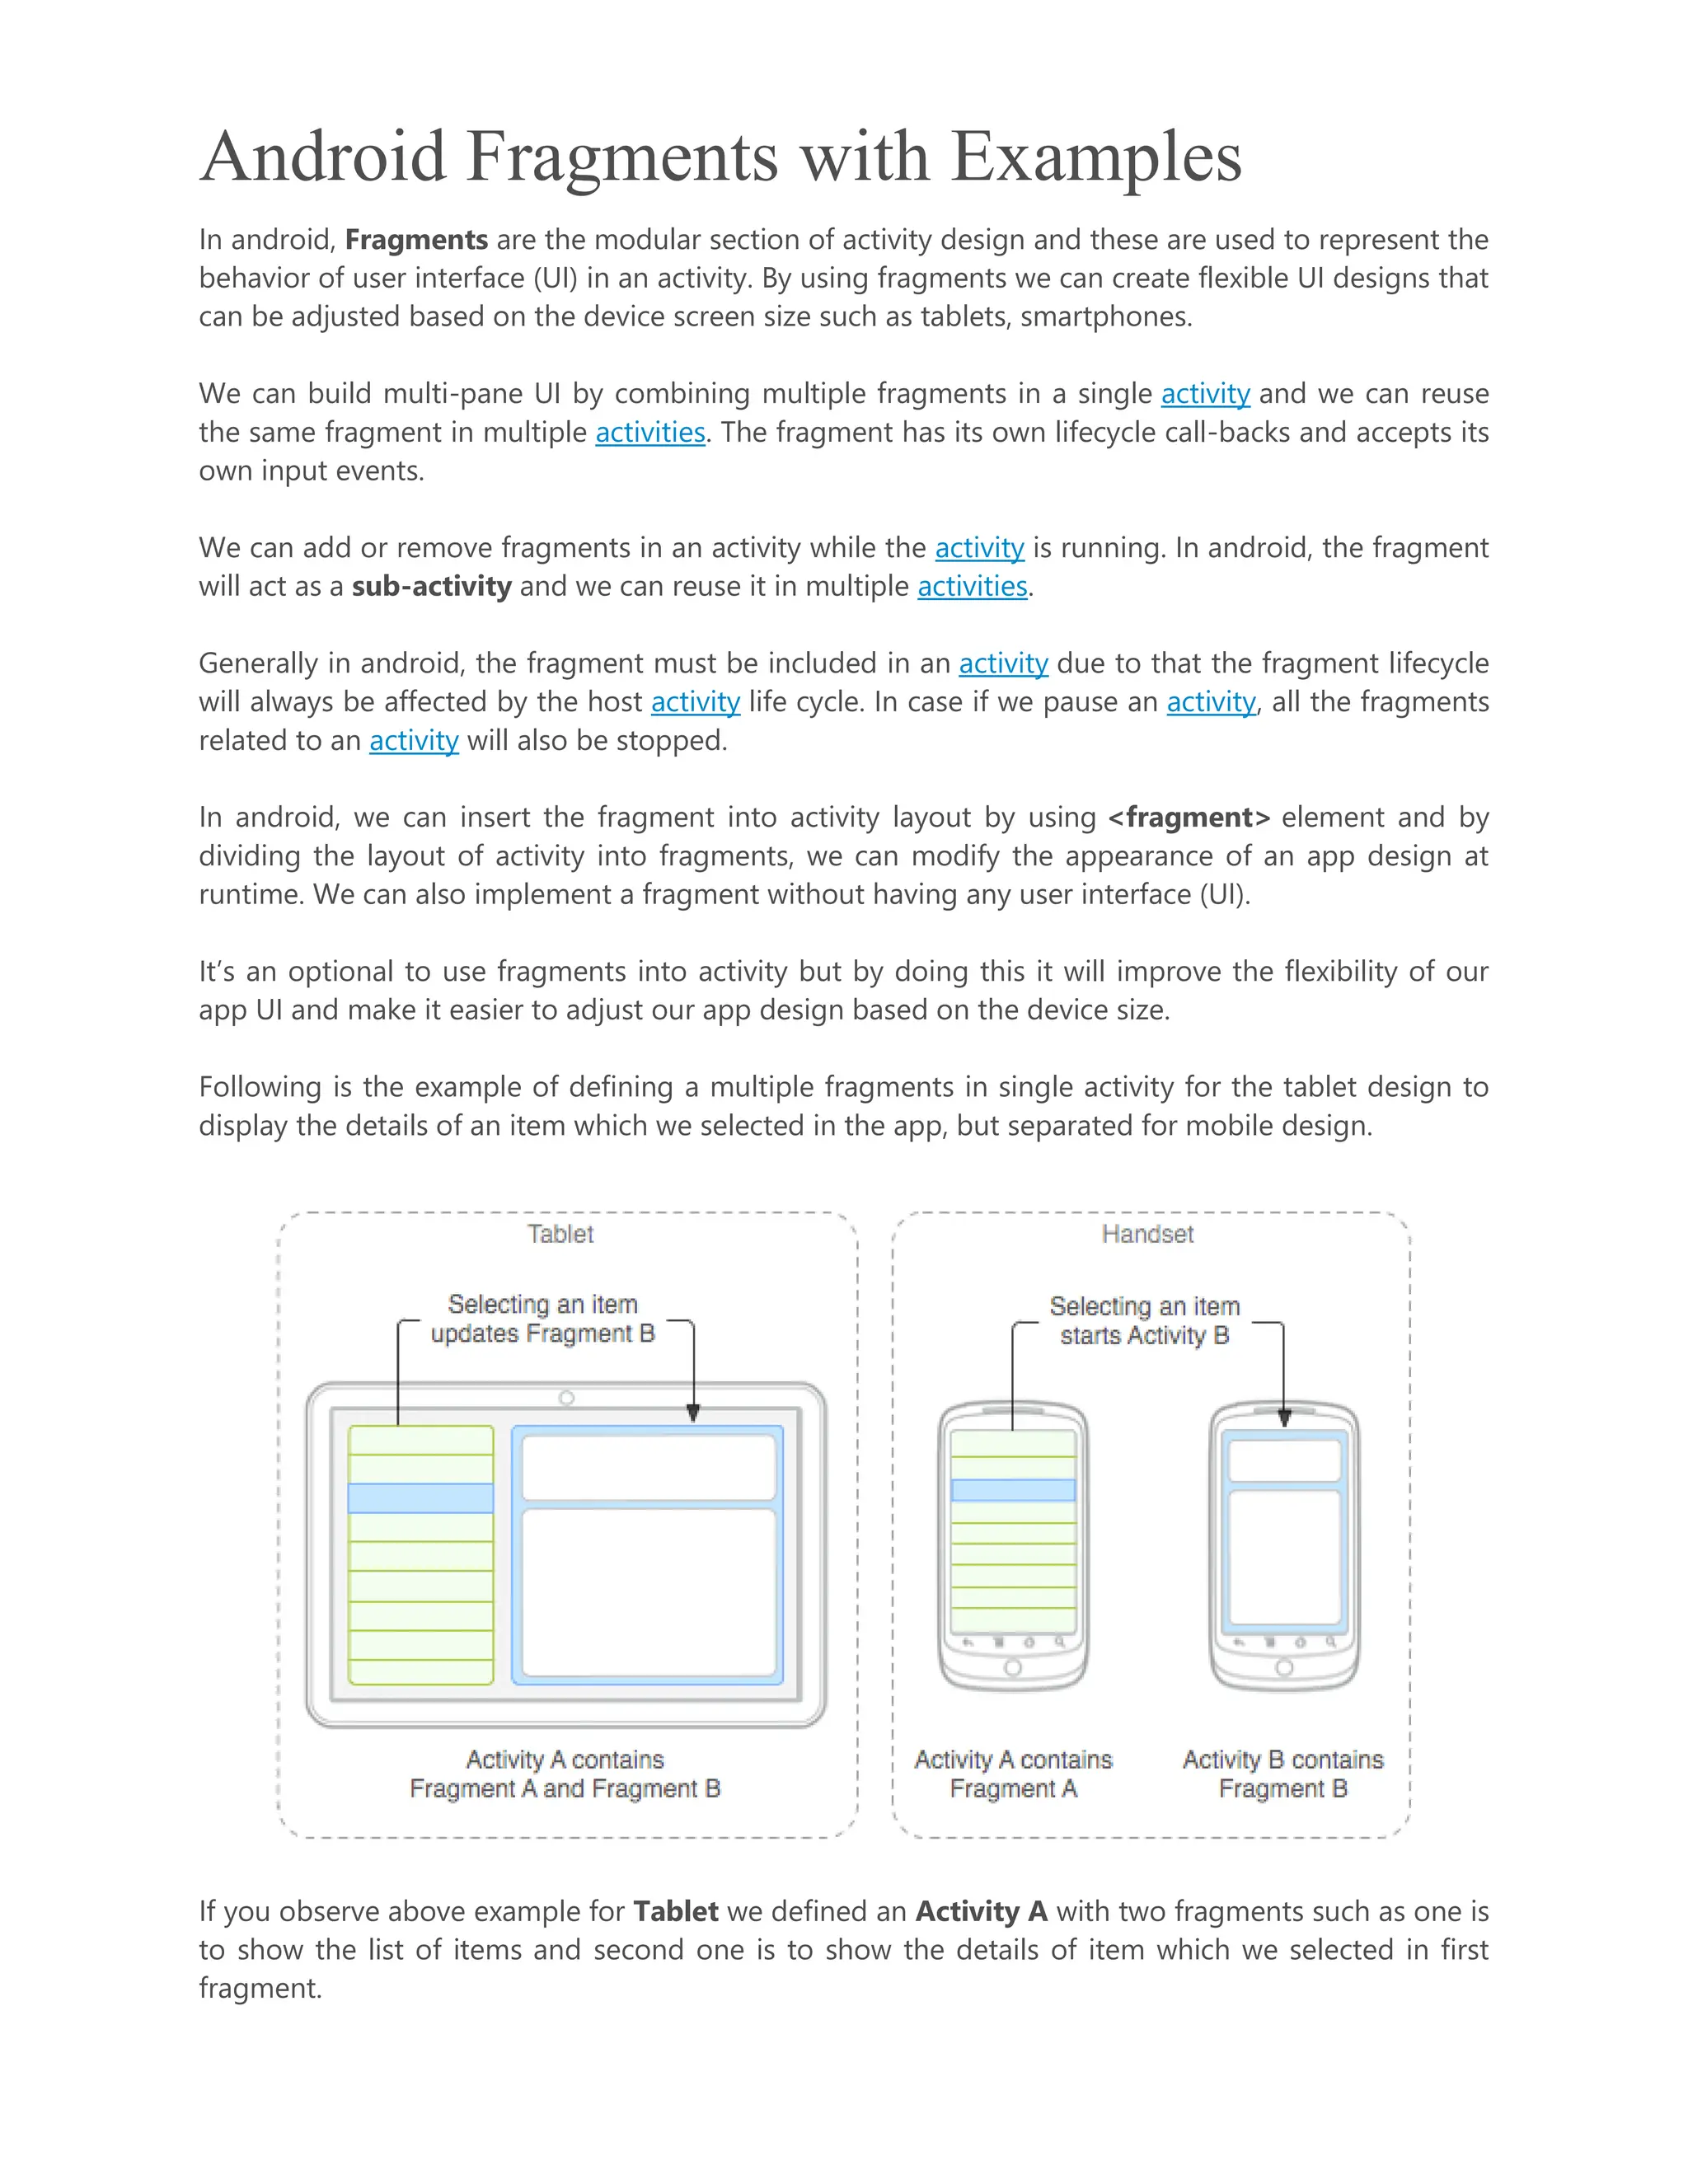
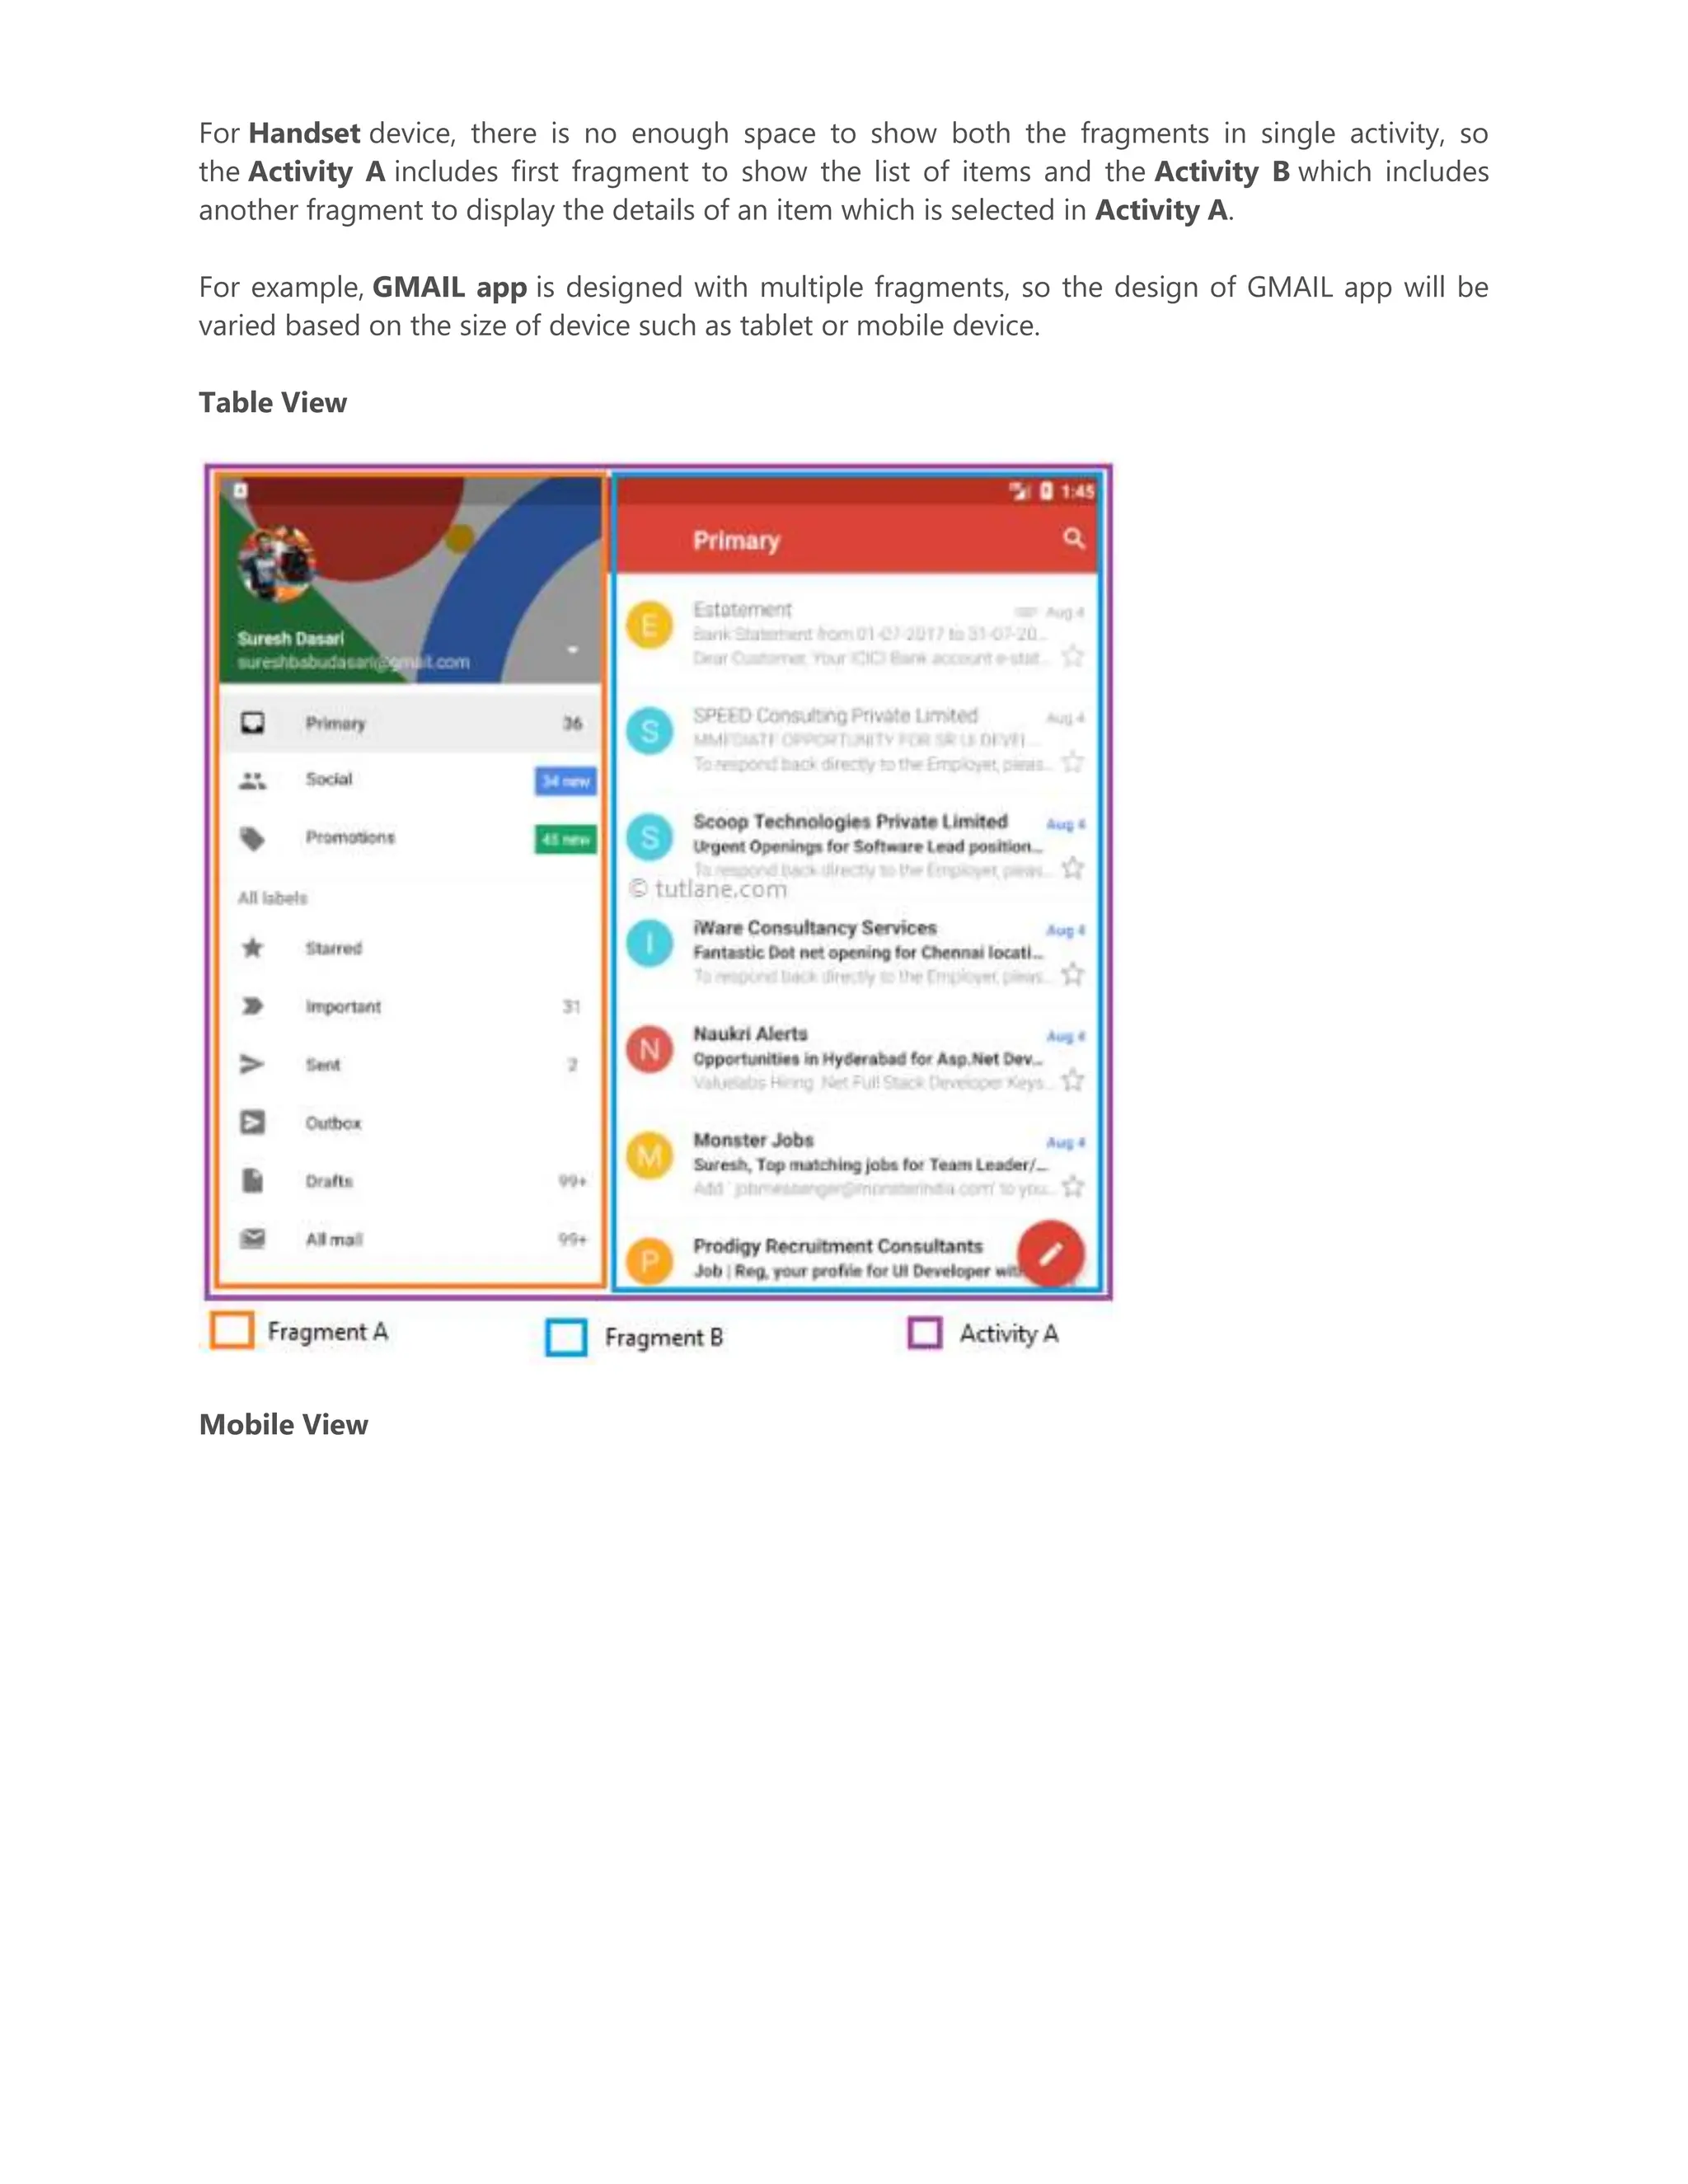
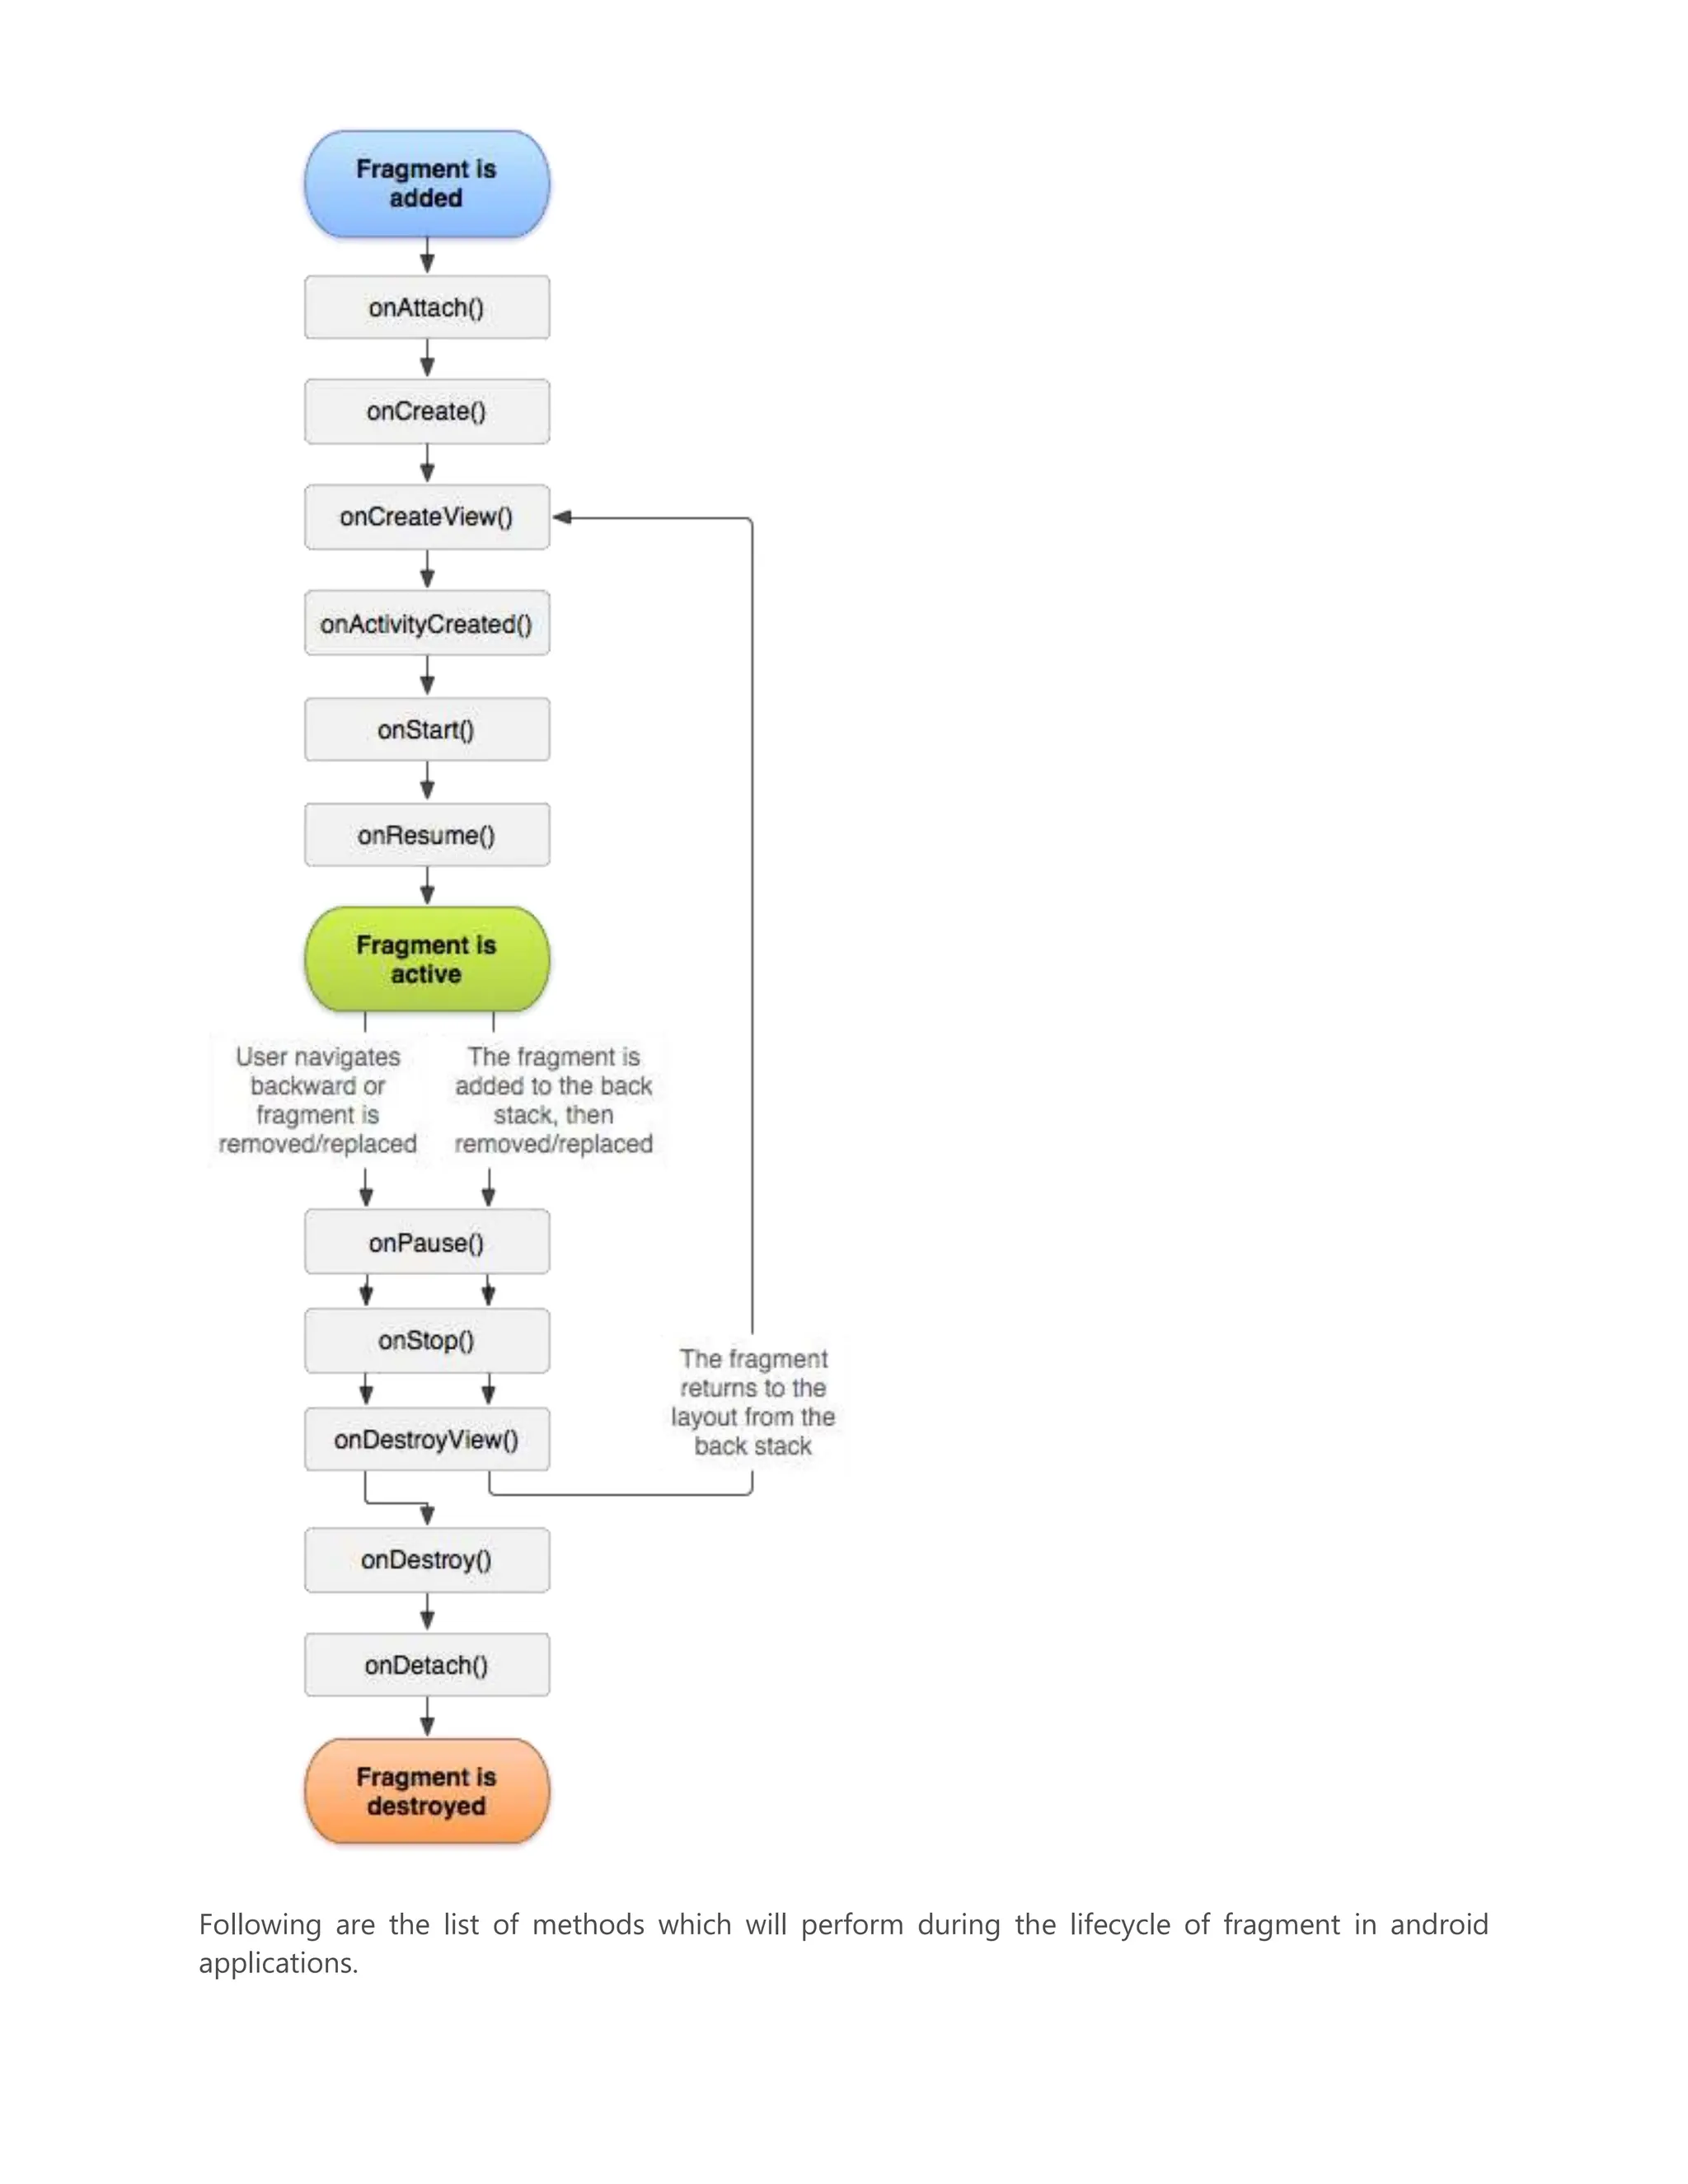
Step-by-step guide to implement a basic service in Android Studio, including service code snippets, UI elements for starting/stopping the service.Introduction to fragments in Android, their lifecycle, and implementation examples showing how to create and manage fragments within activities.
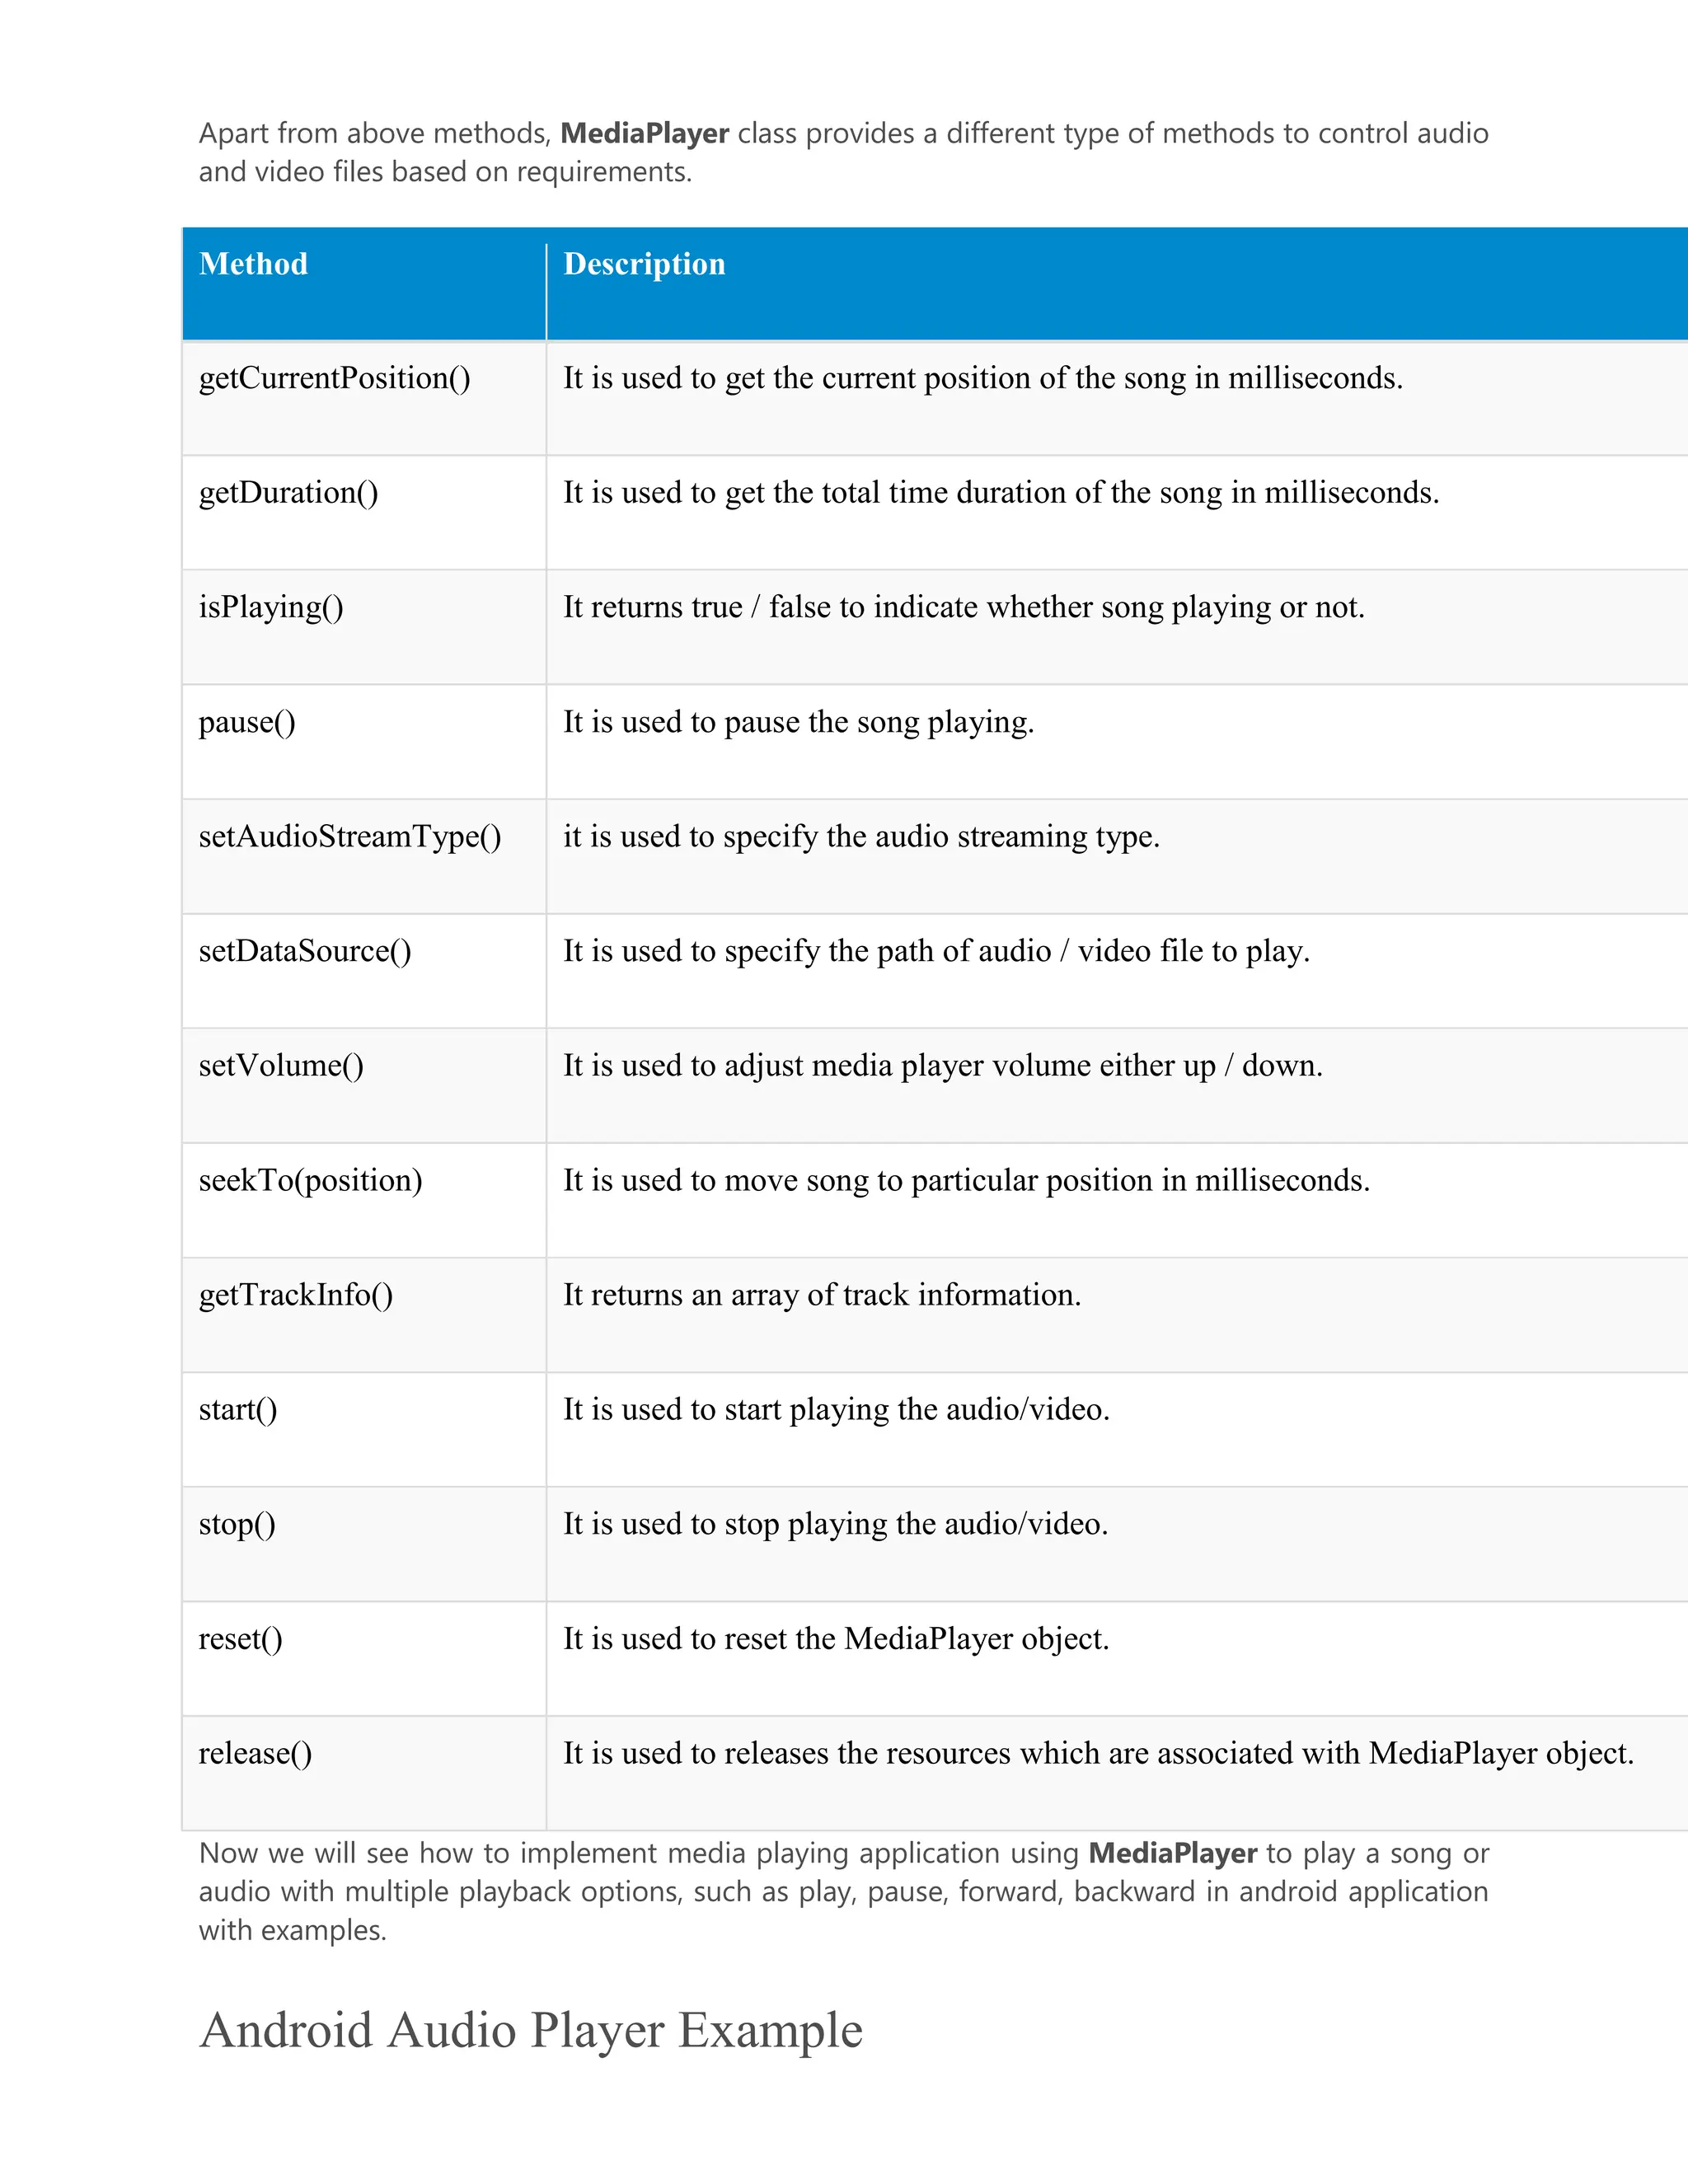
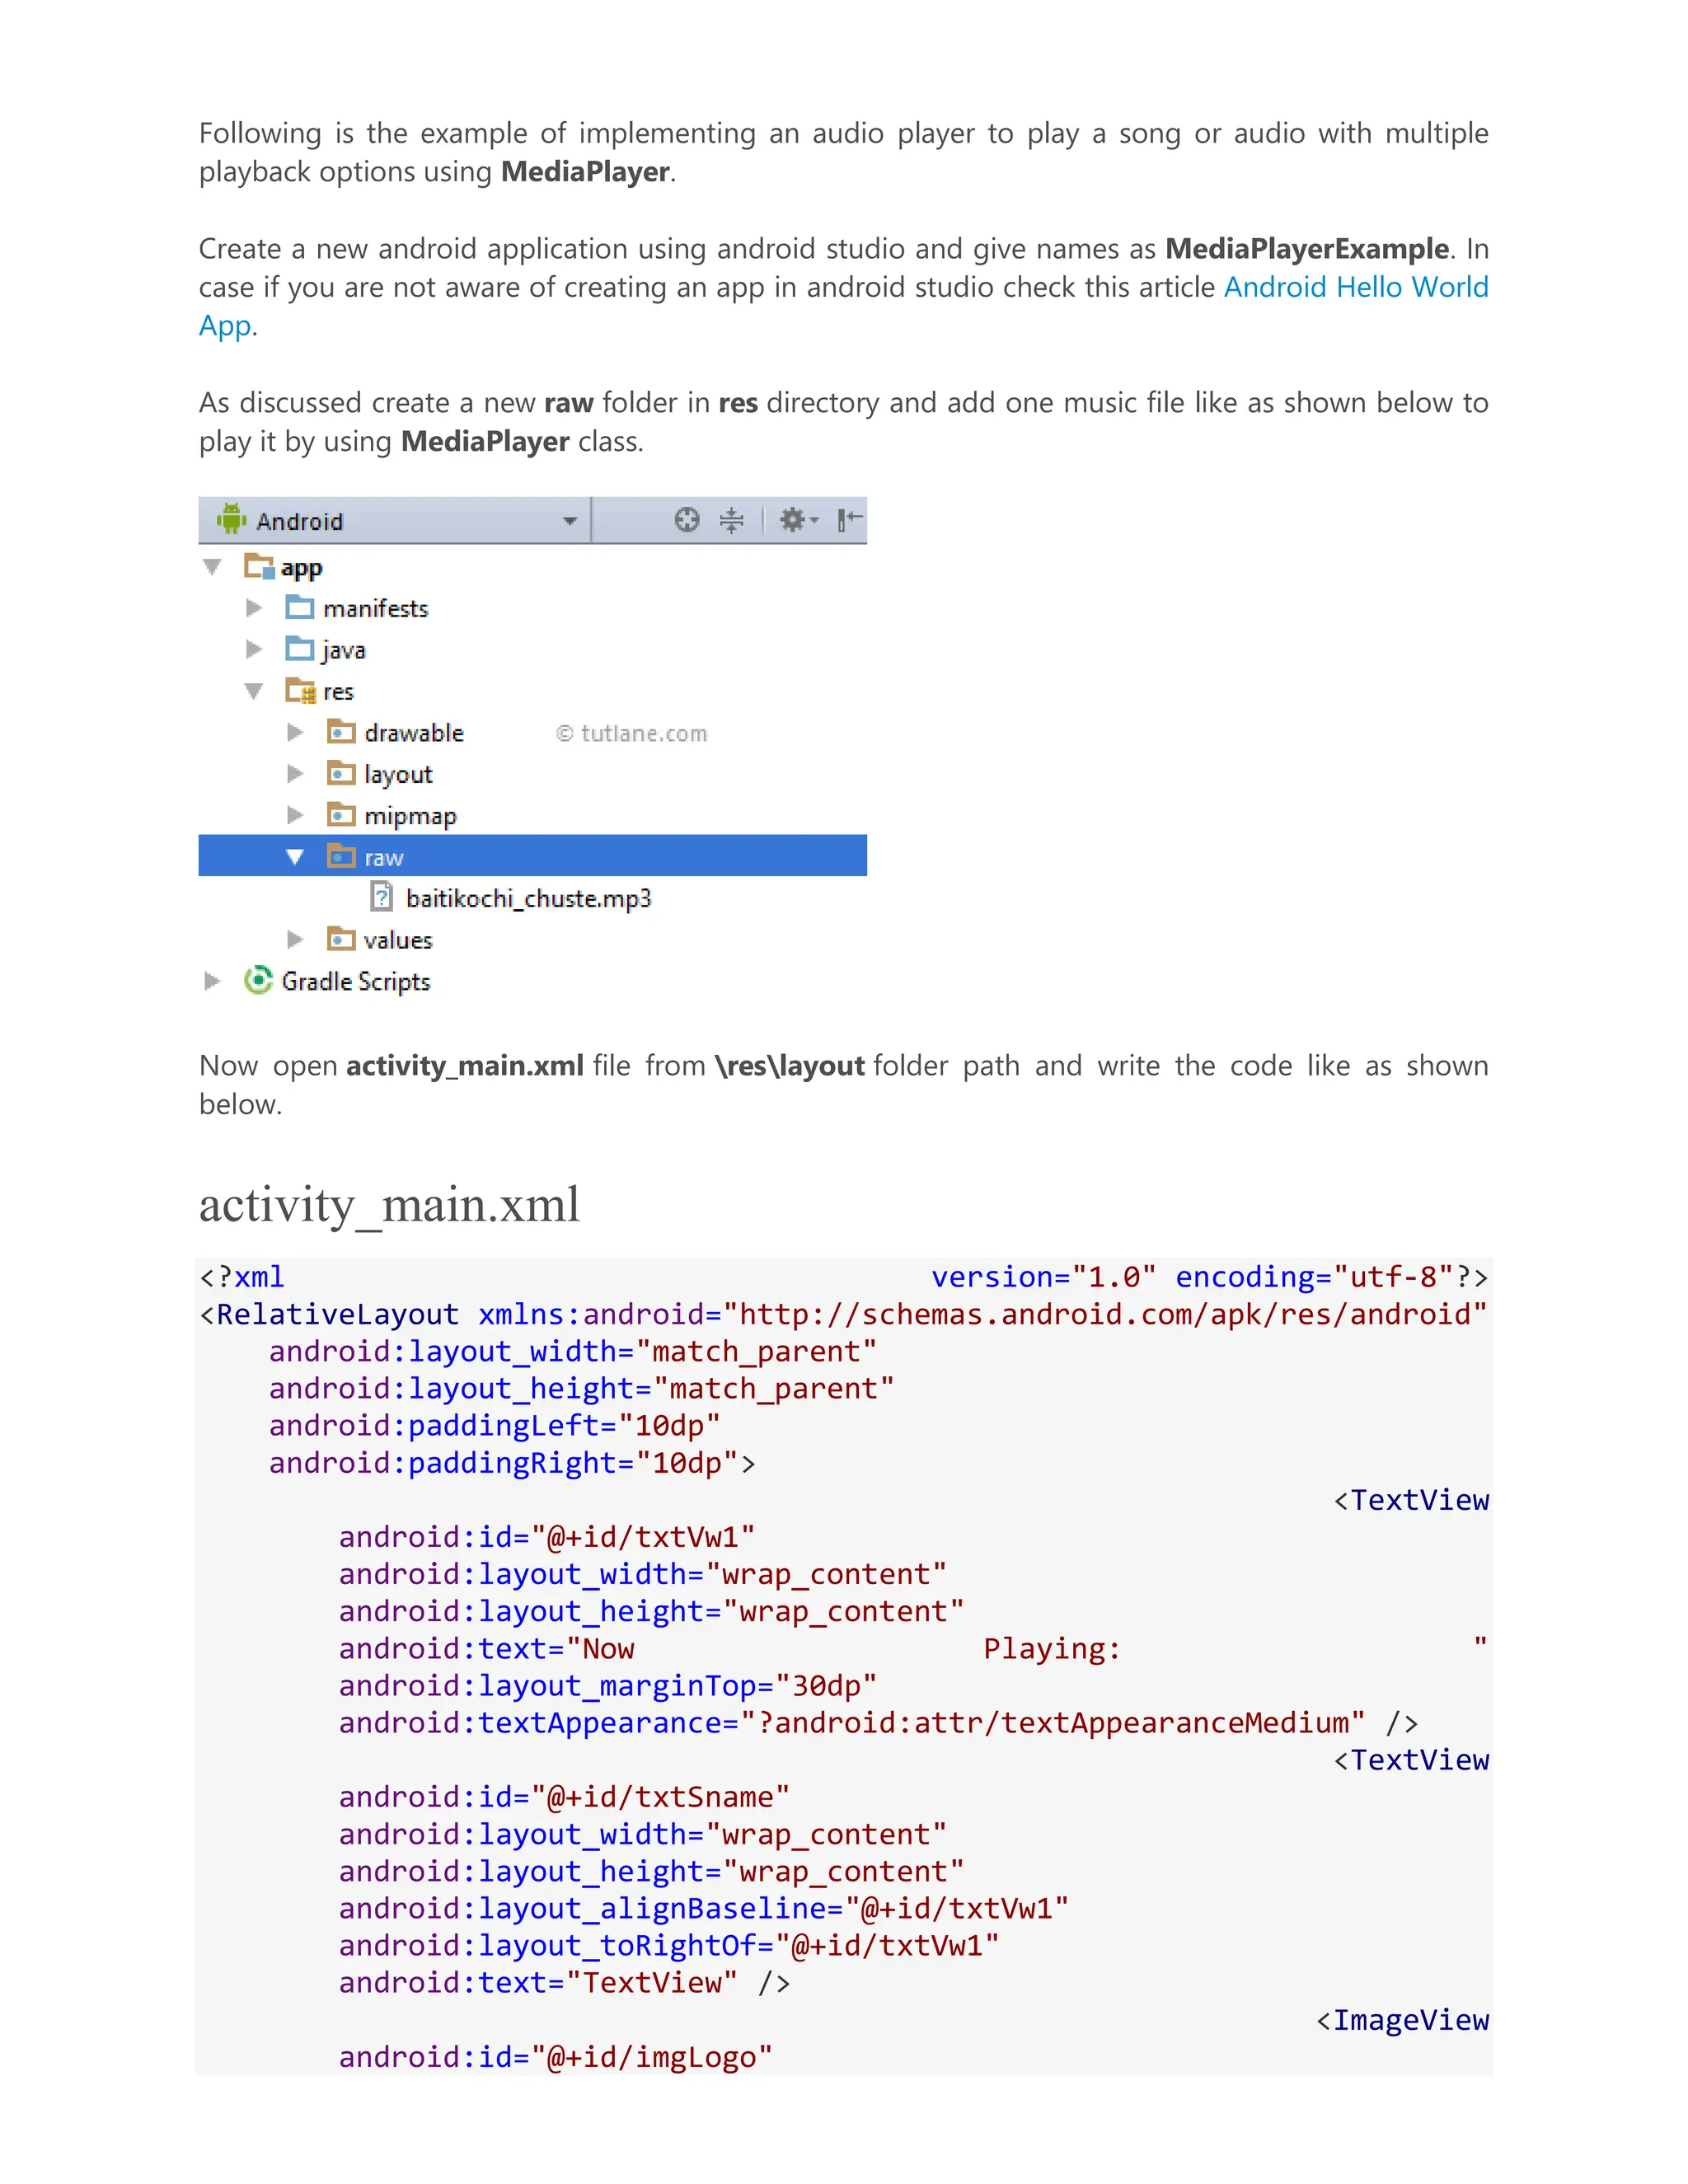
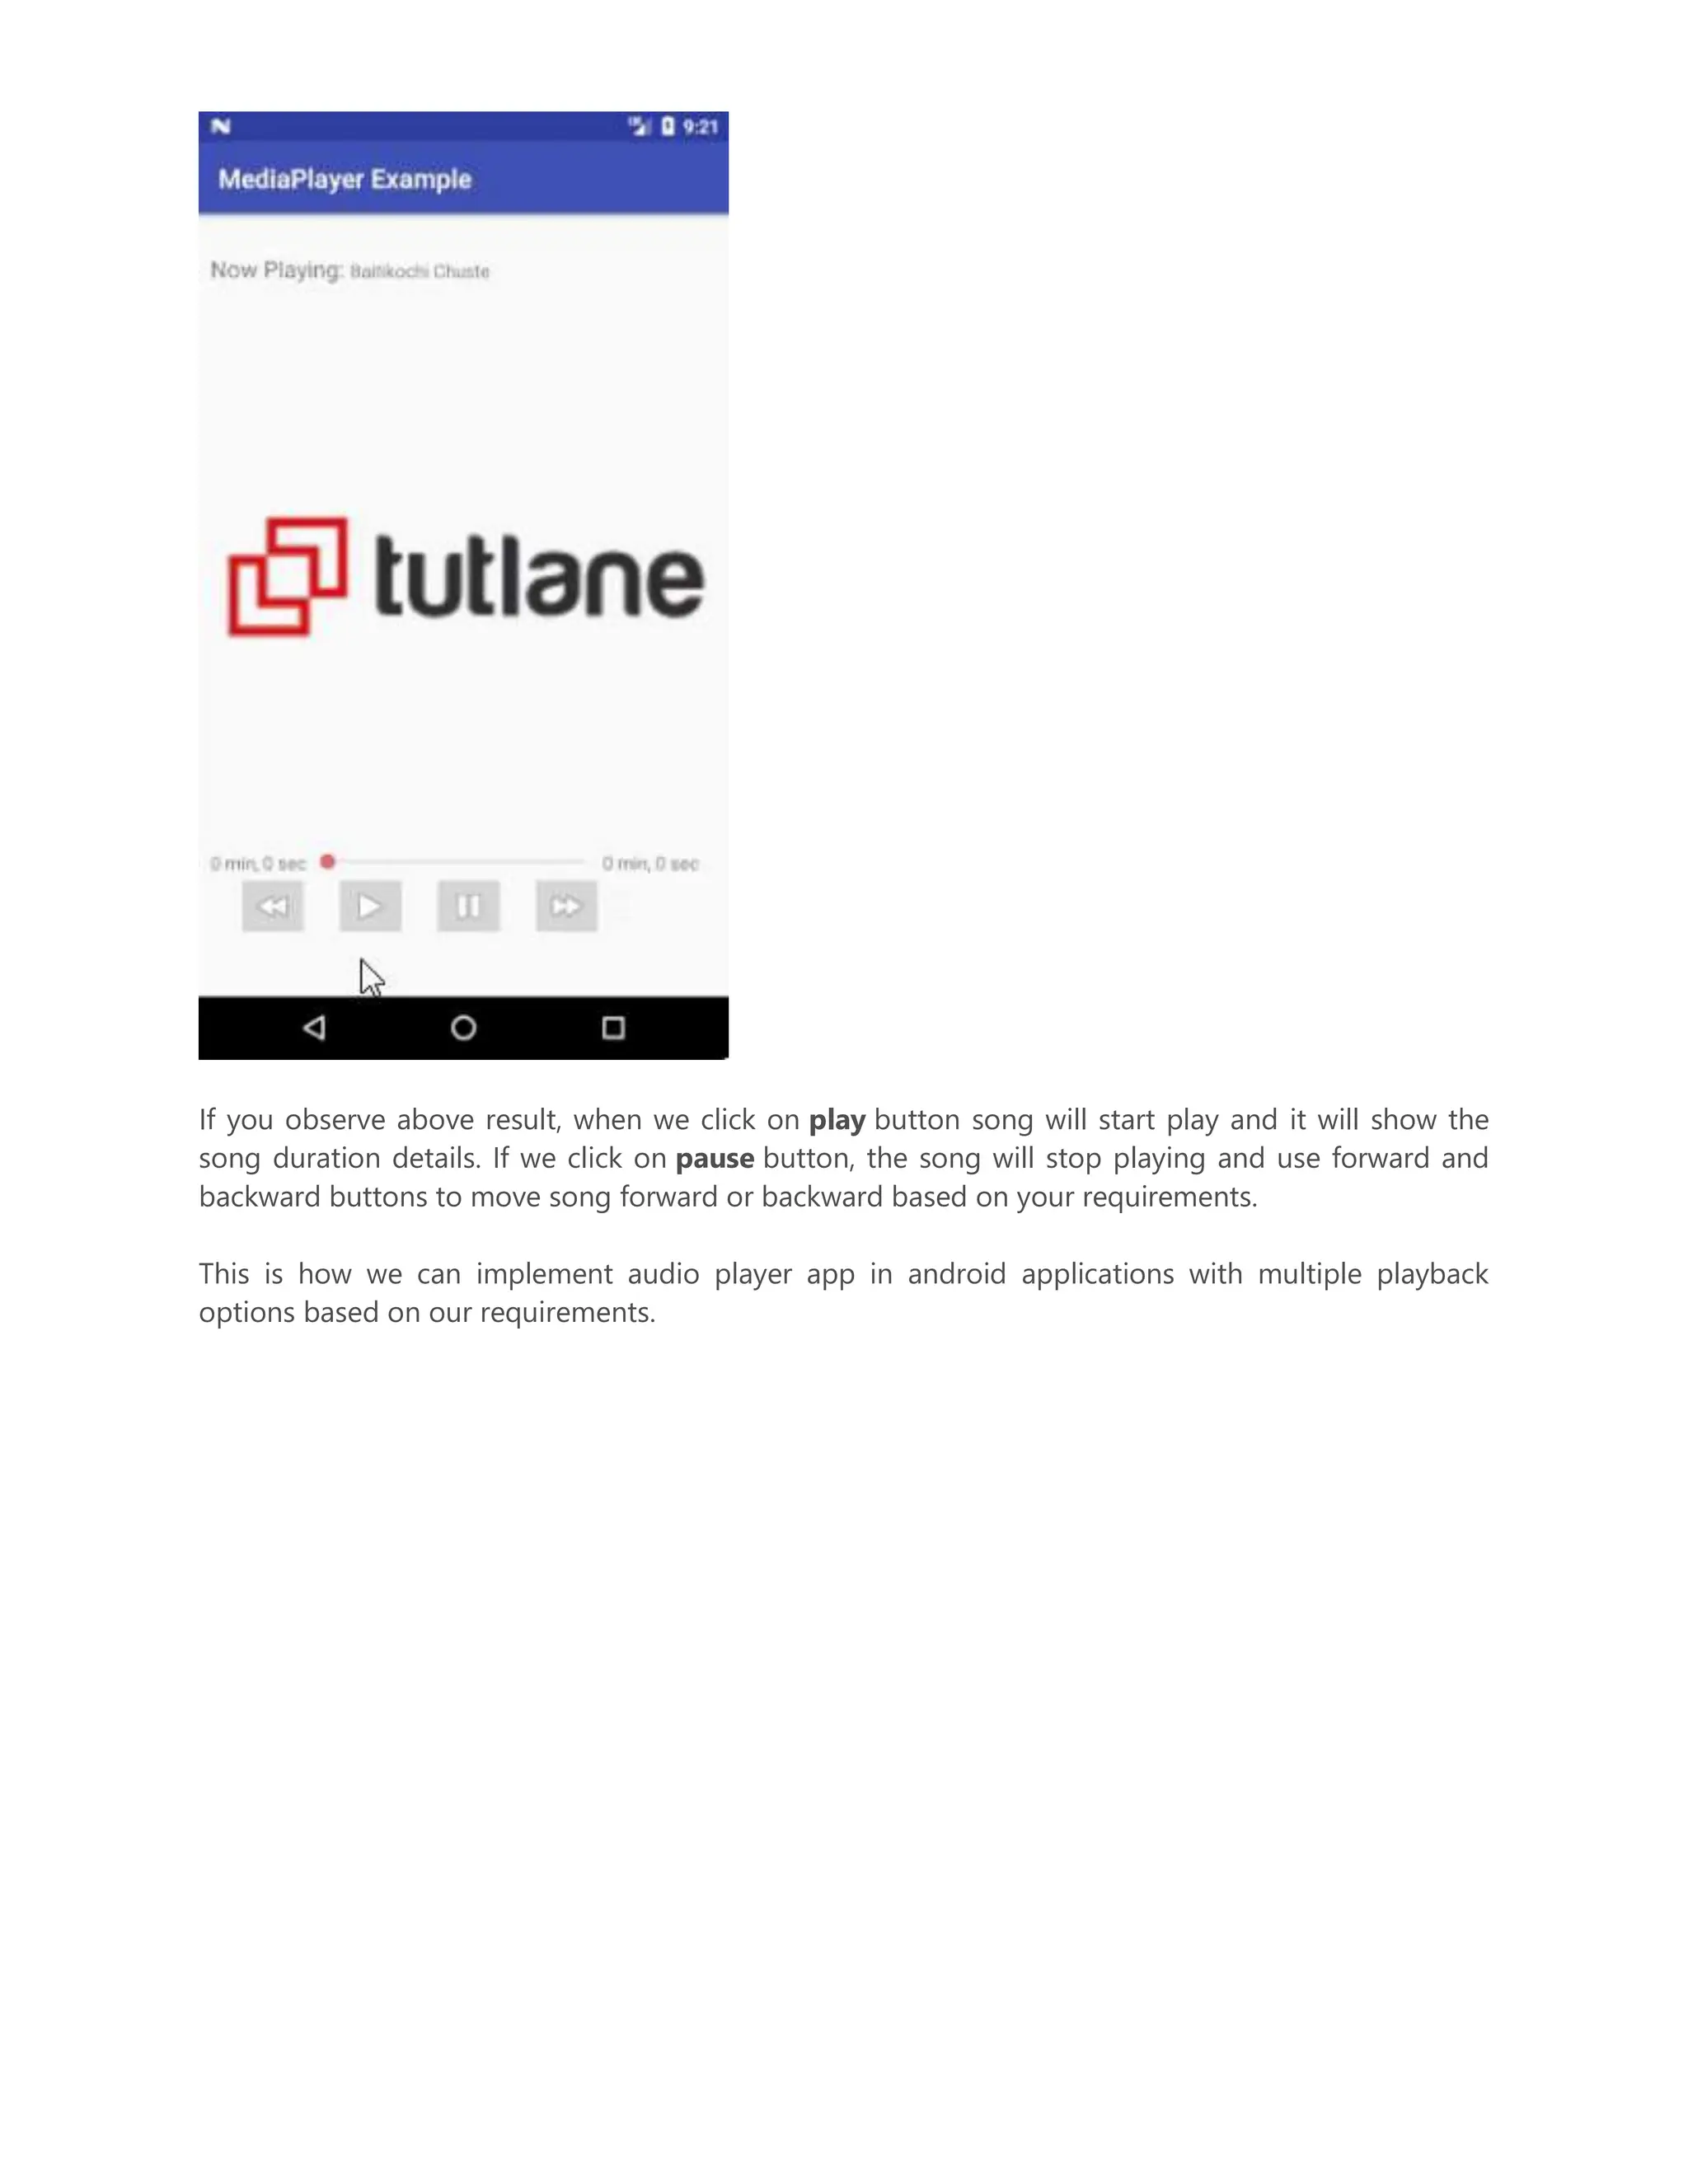
Overview of the MediaPlayer class for audio/video playback, with code examples for implementing media controls like play, pause, stop, and how to set audio sources.
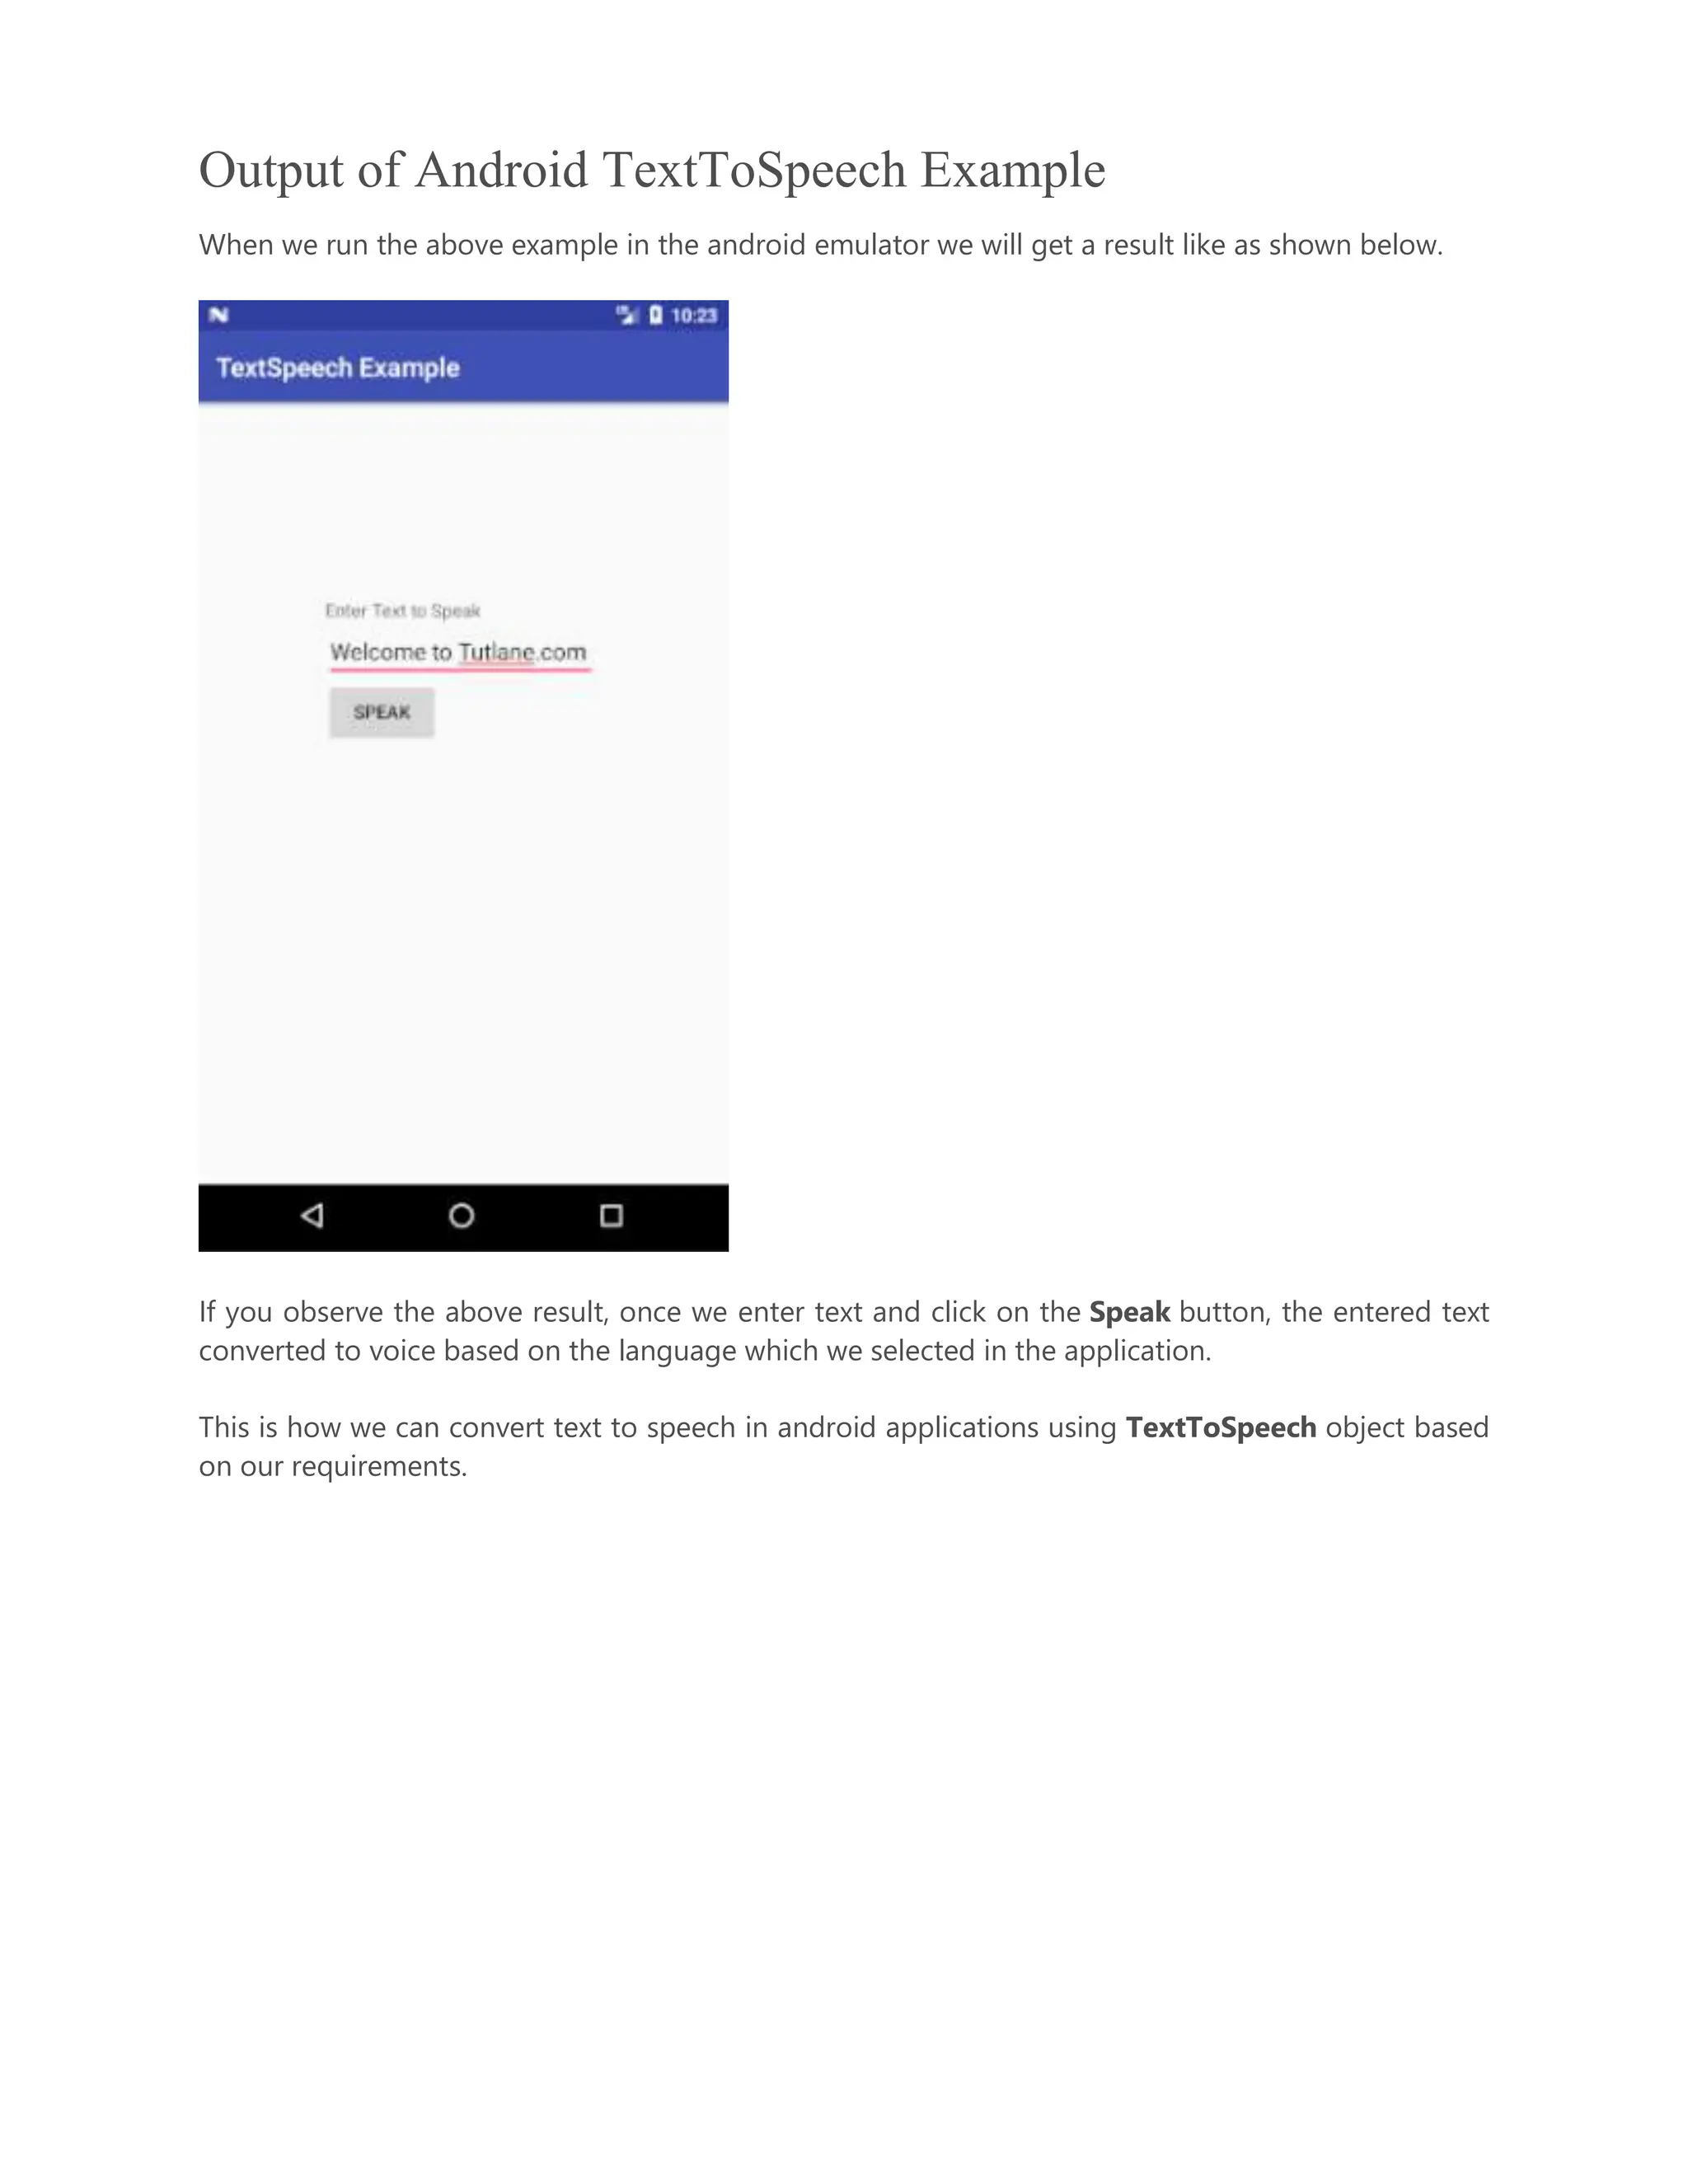
Guide on using Android's TextToSpeech class to convert text input to voice, including initialization and handling user input.
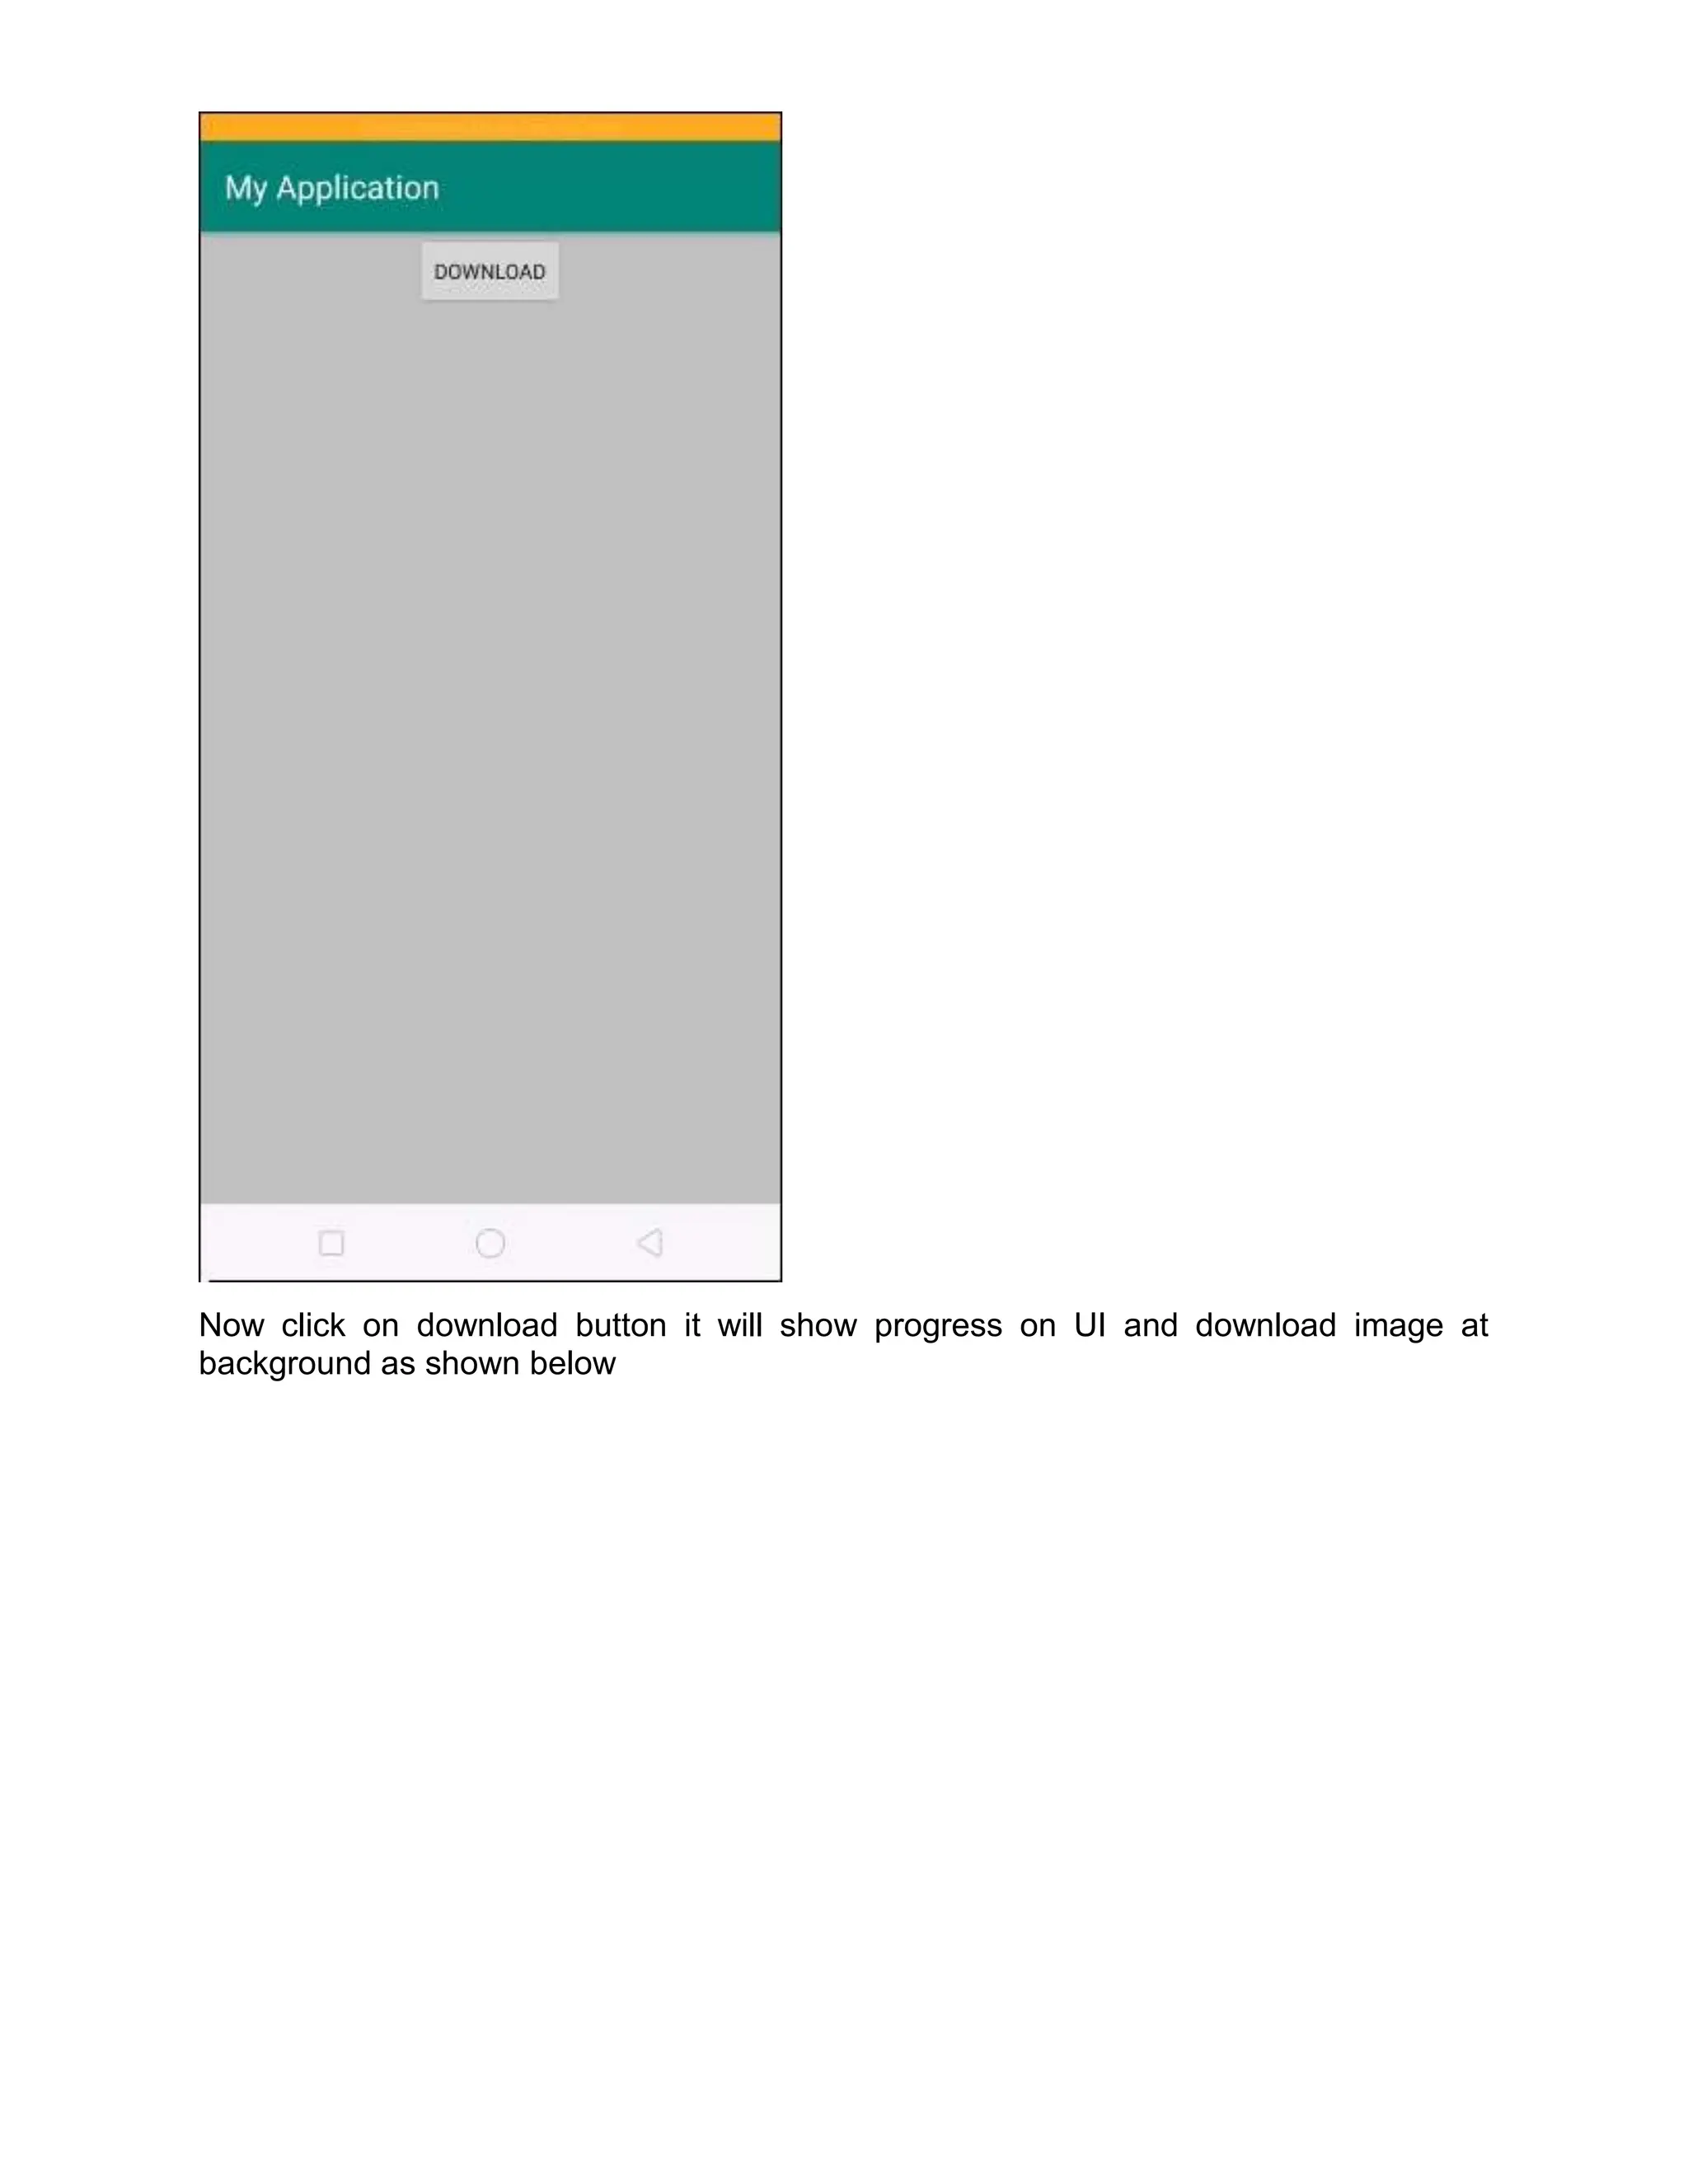
Explanation of AsyncTask for background operations and UI updates. Example provided for downloading images and updating UI without freezing the main thread.
Steps to implement audio recording using MediaRecorder class, including permissions, recording, playback, and stopping recordings with code examples.
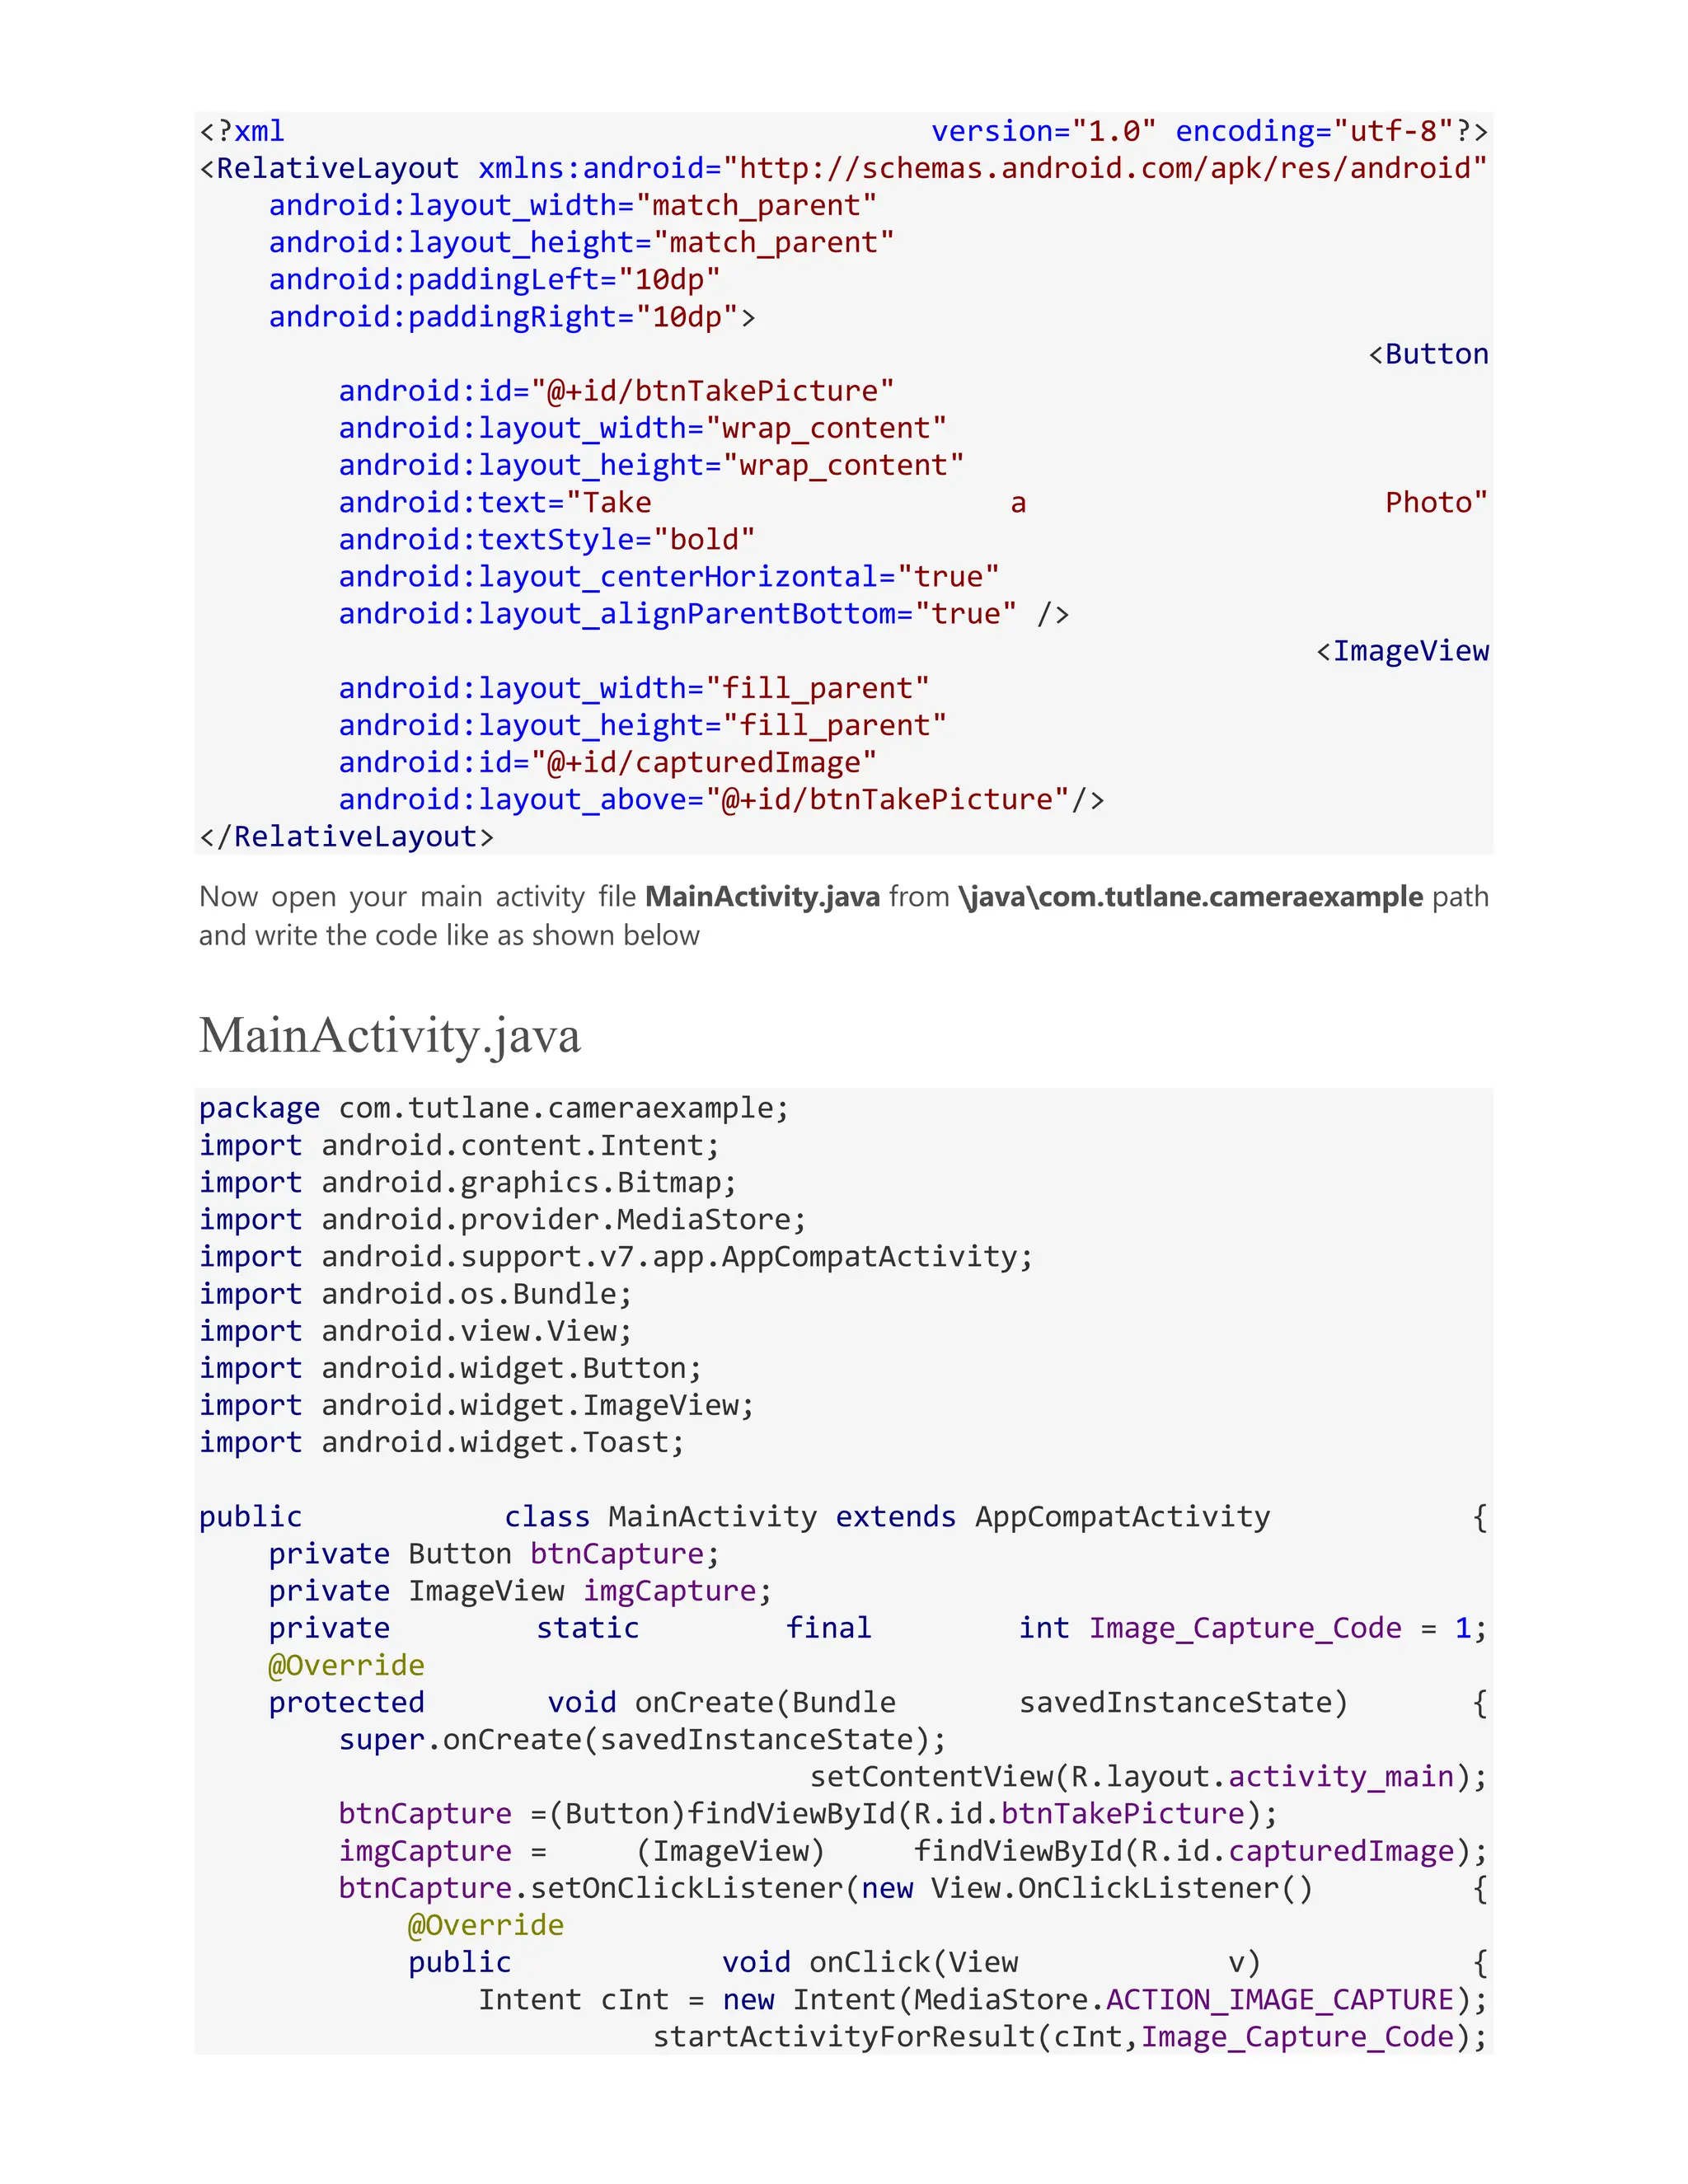
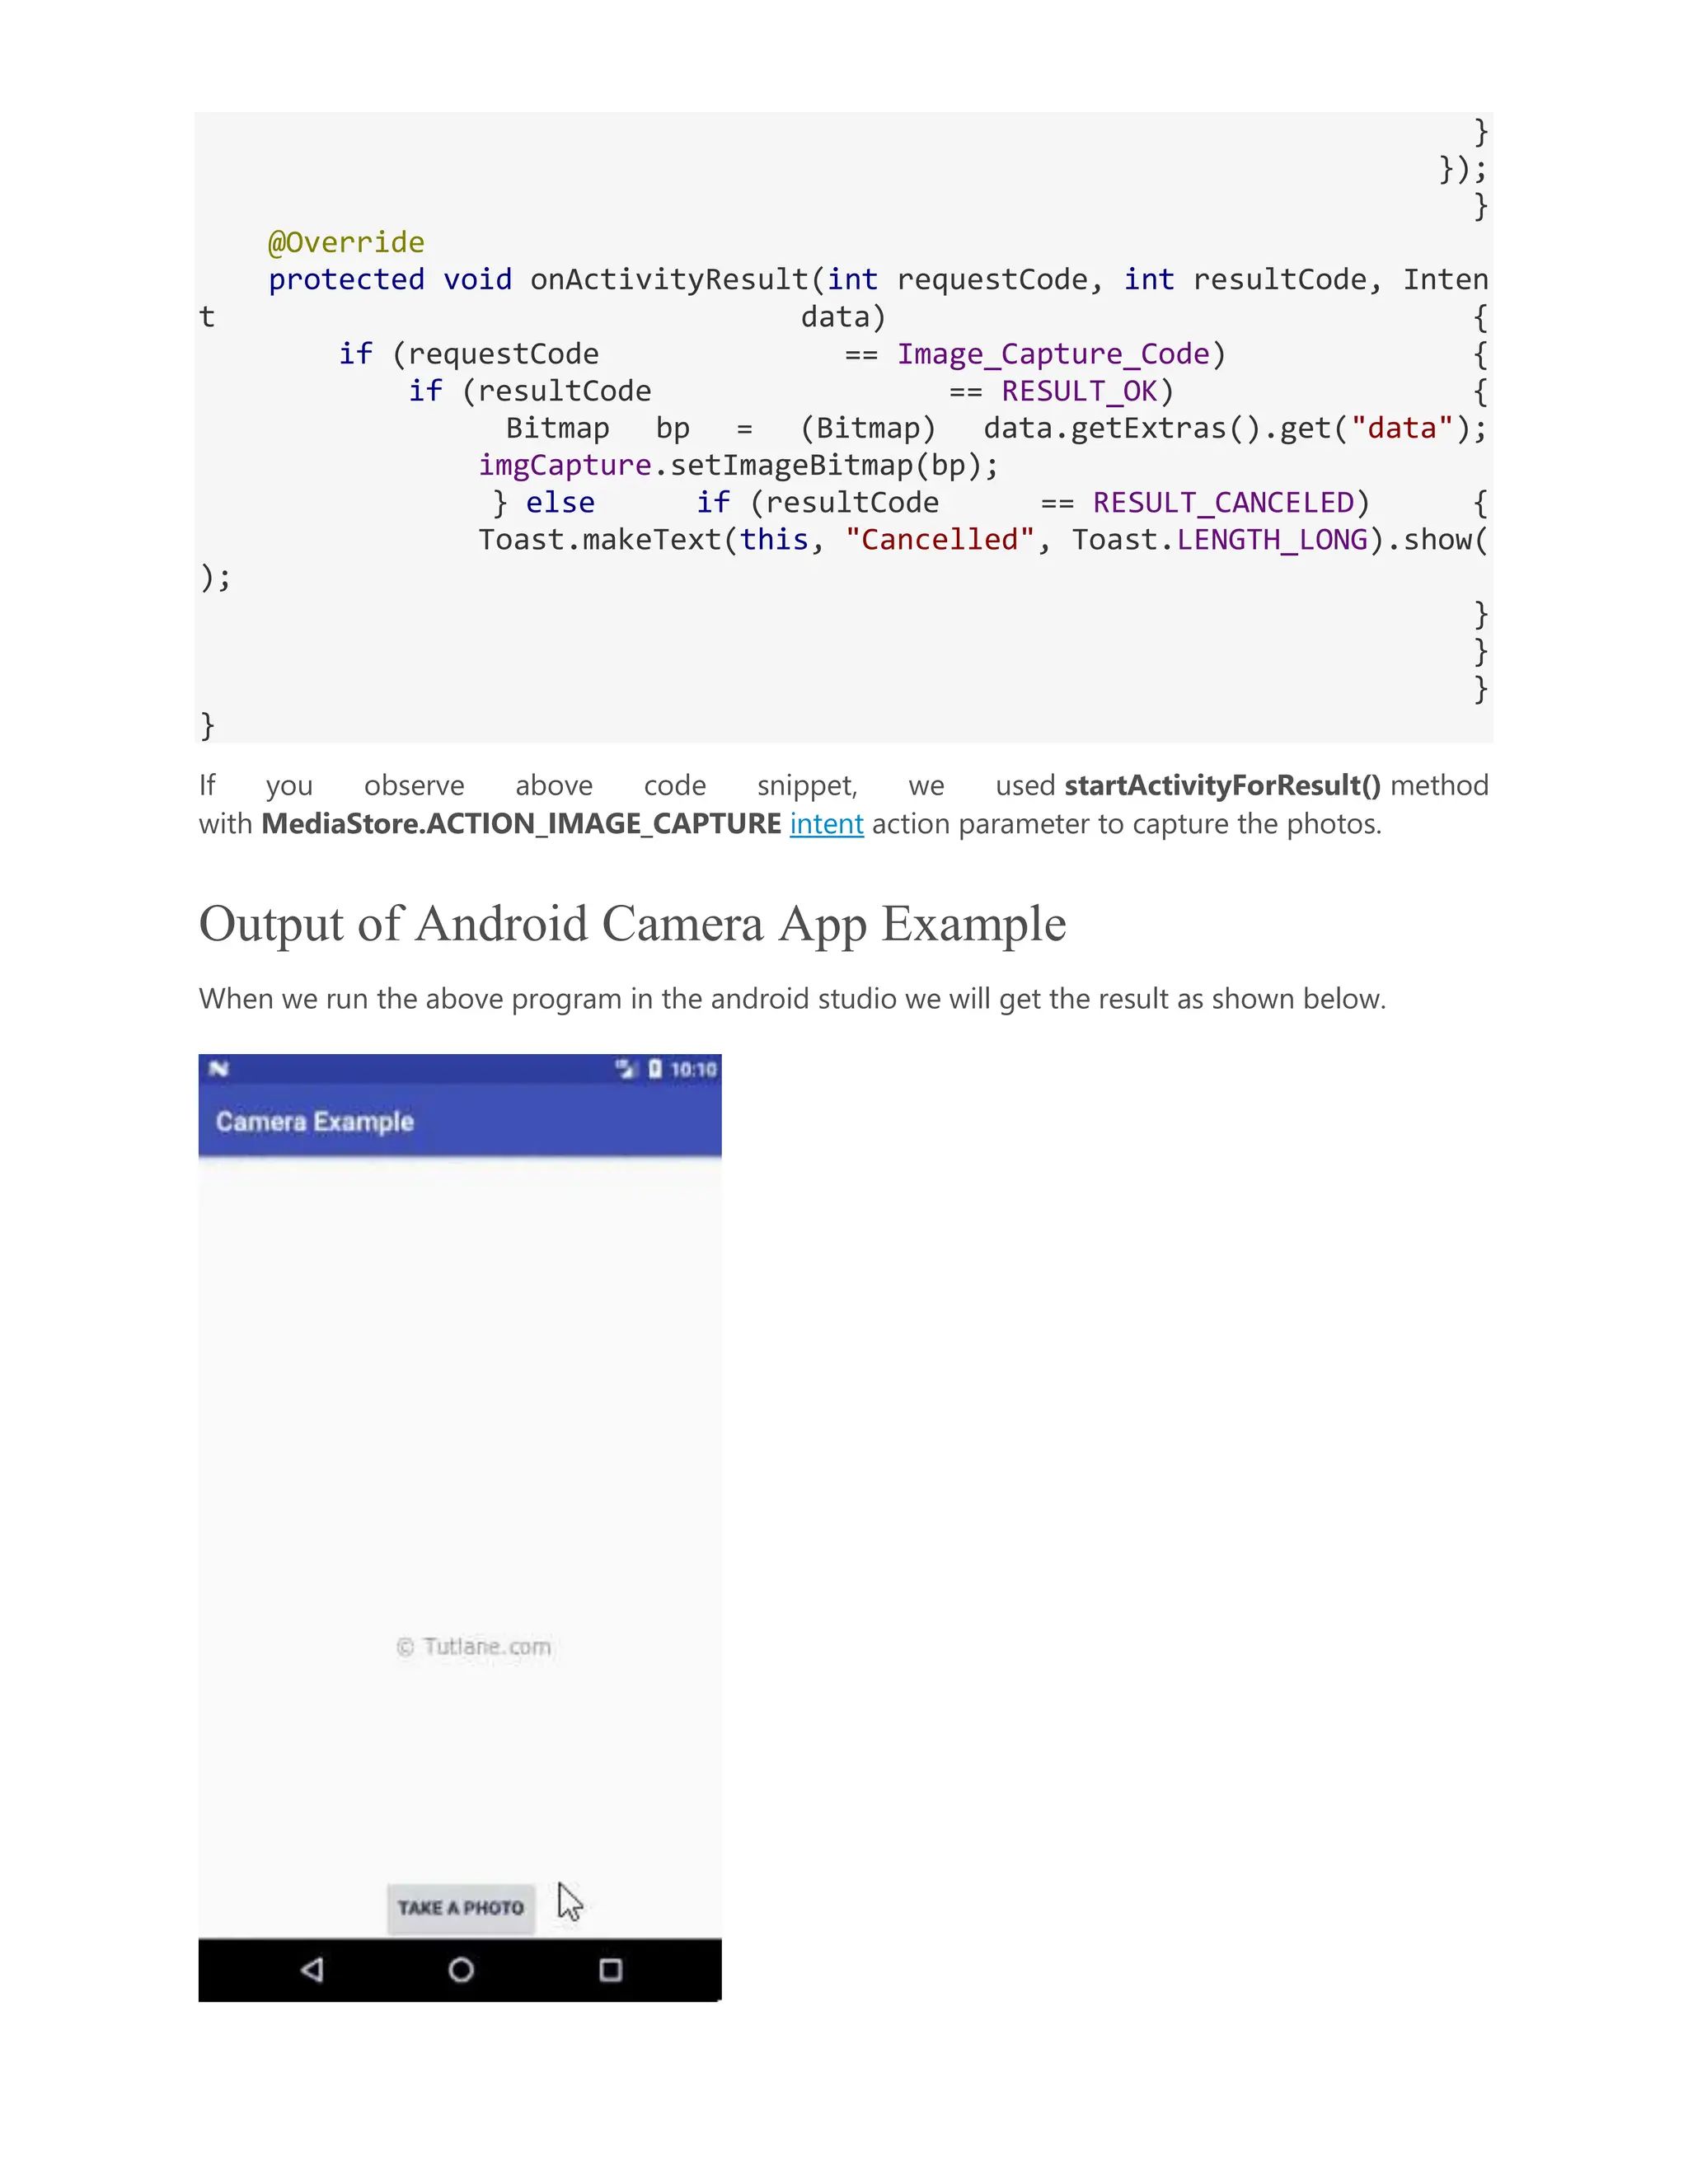
Guide on capturing images with Android's camera API using intents, and displaying captured images in the application.
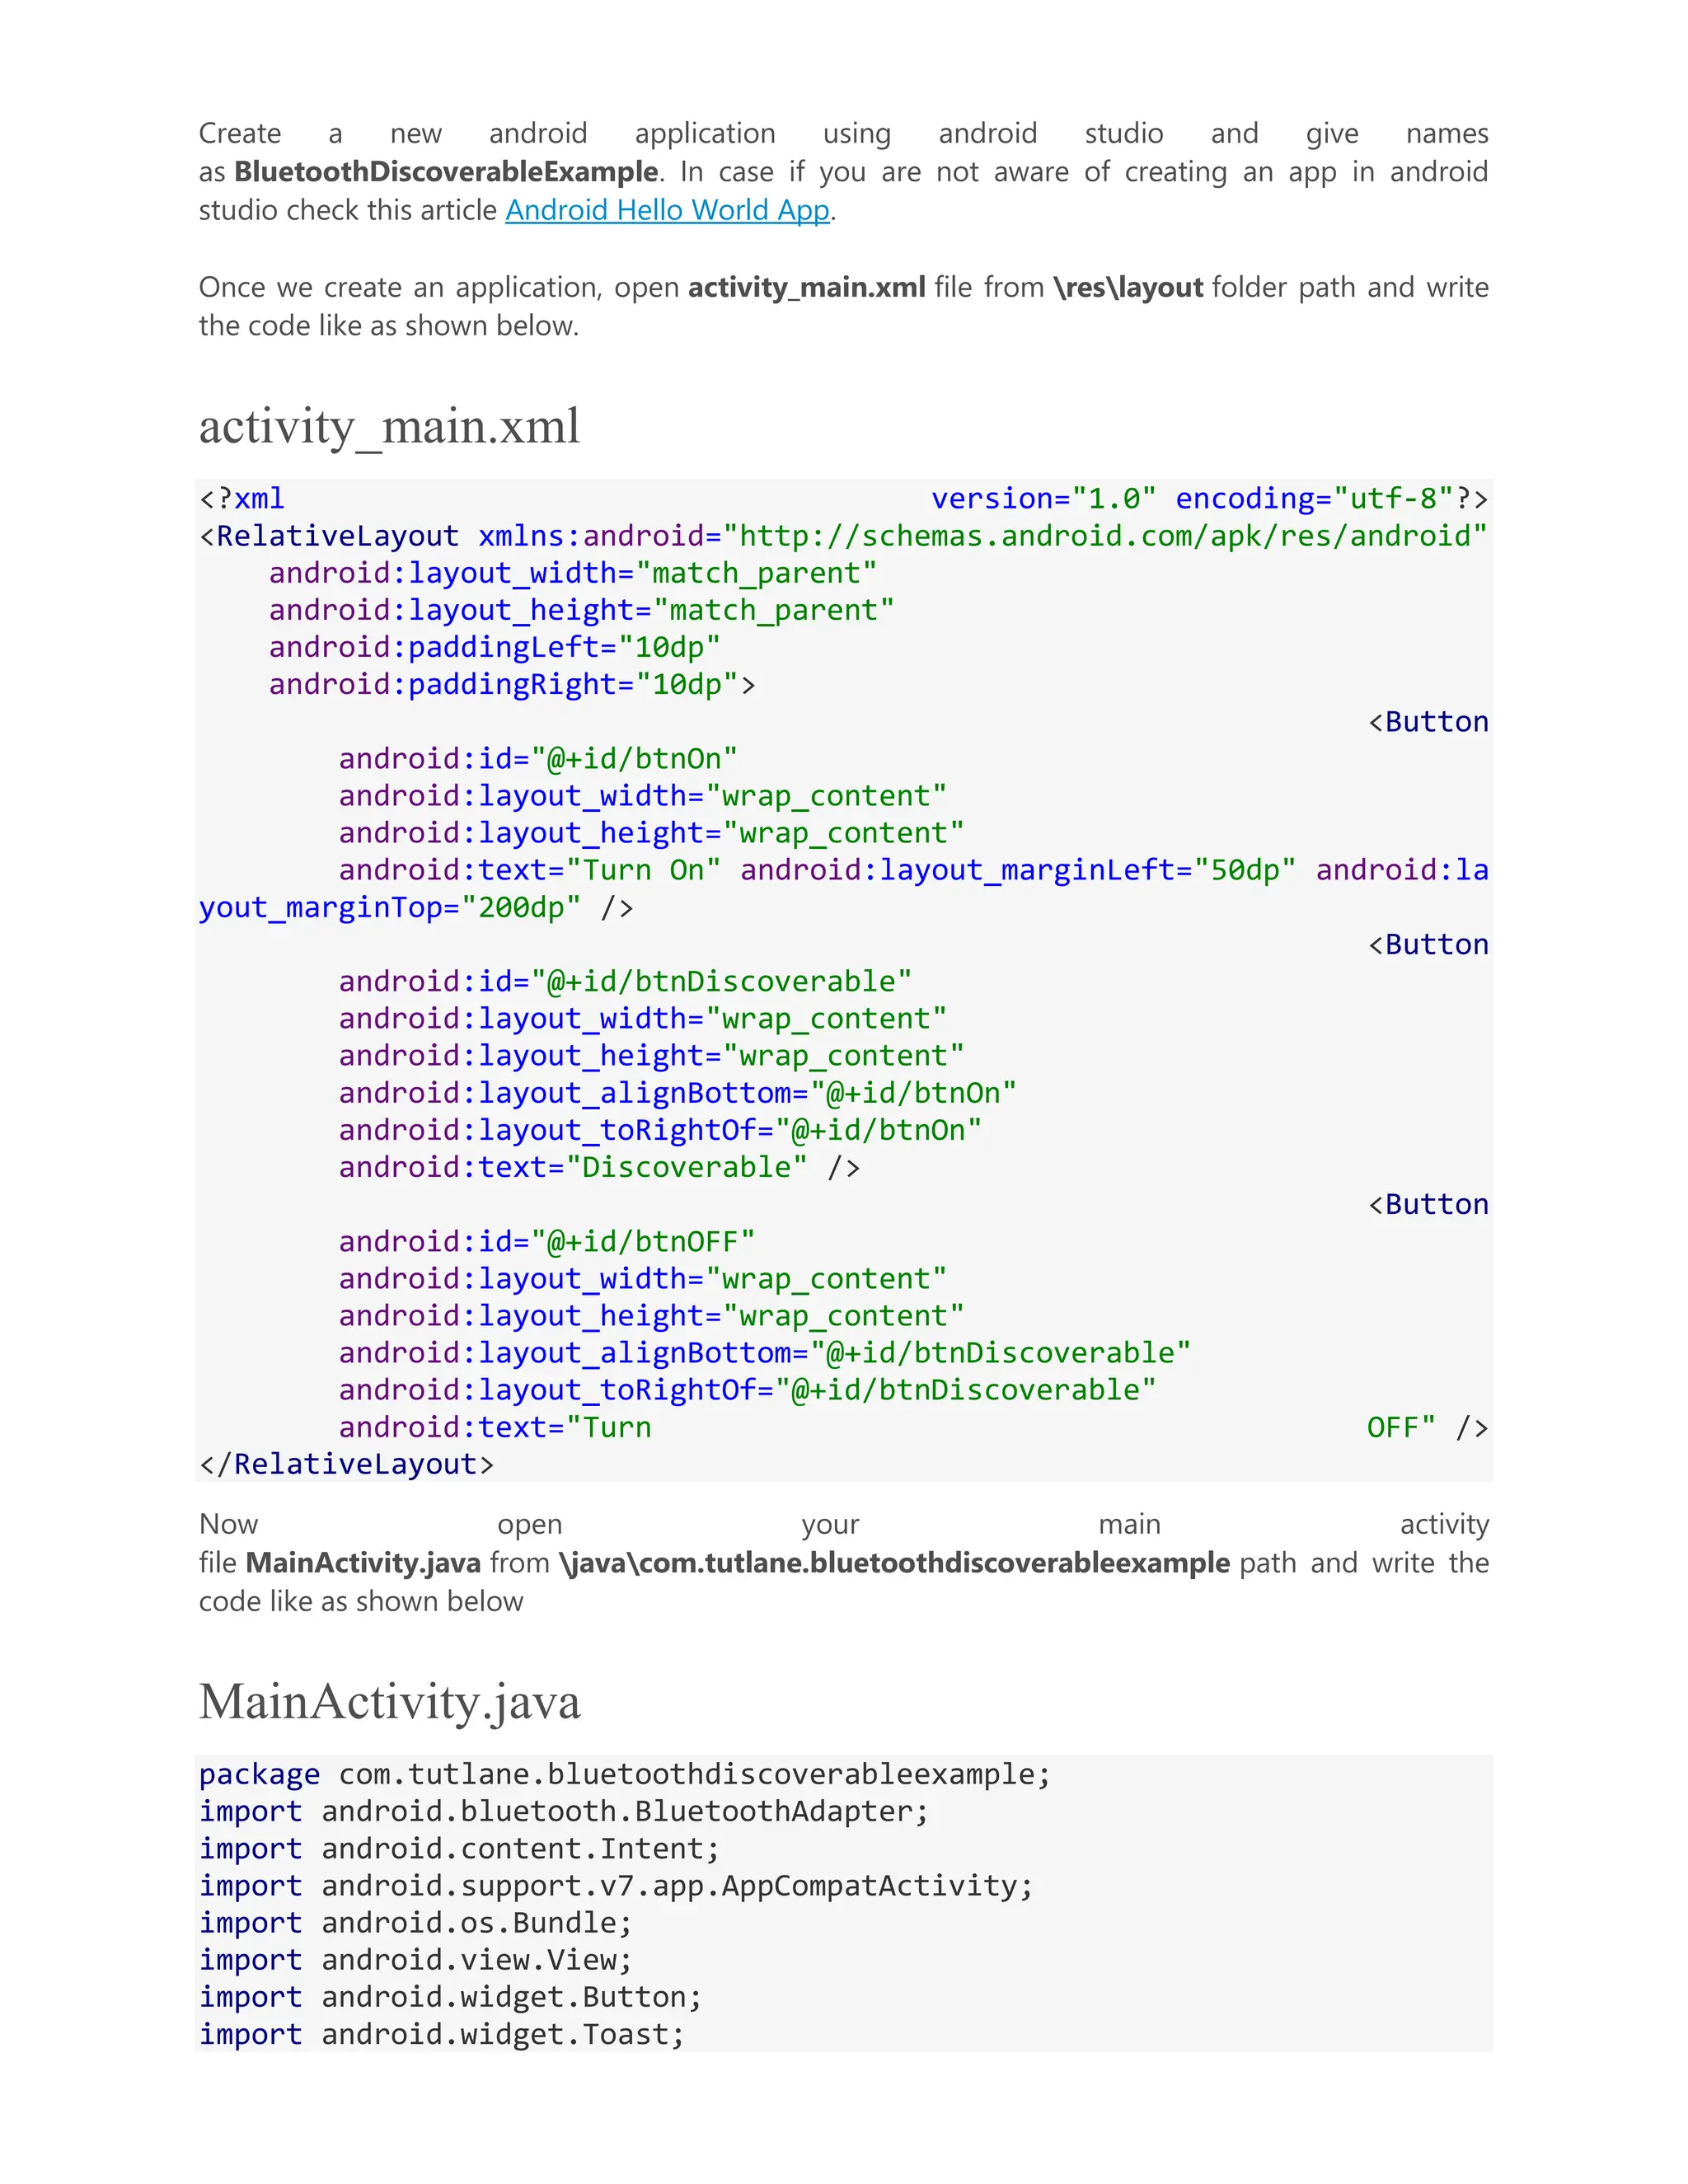
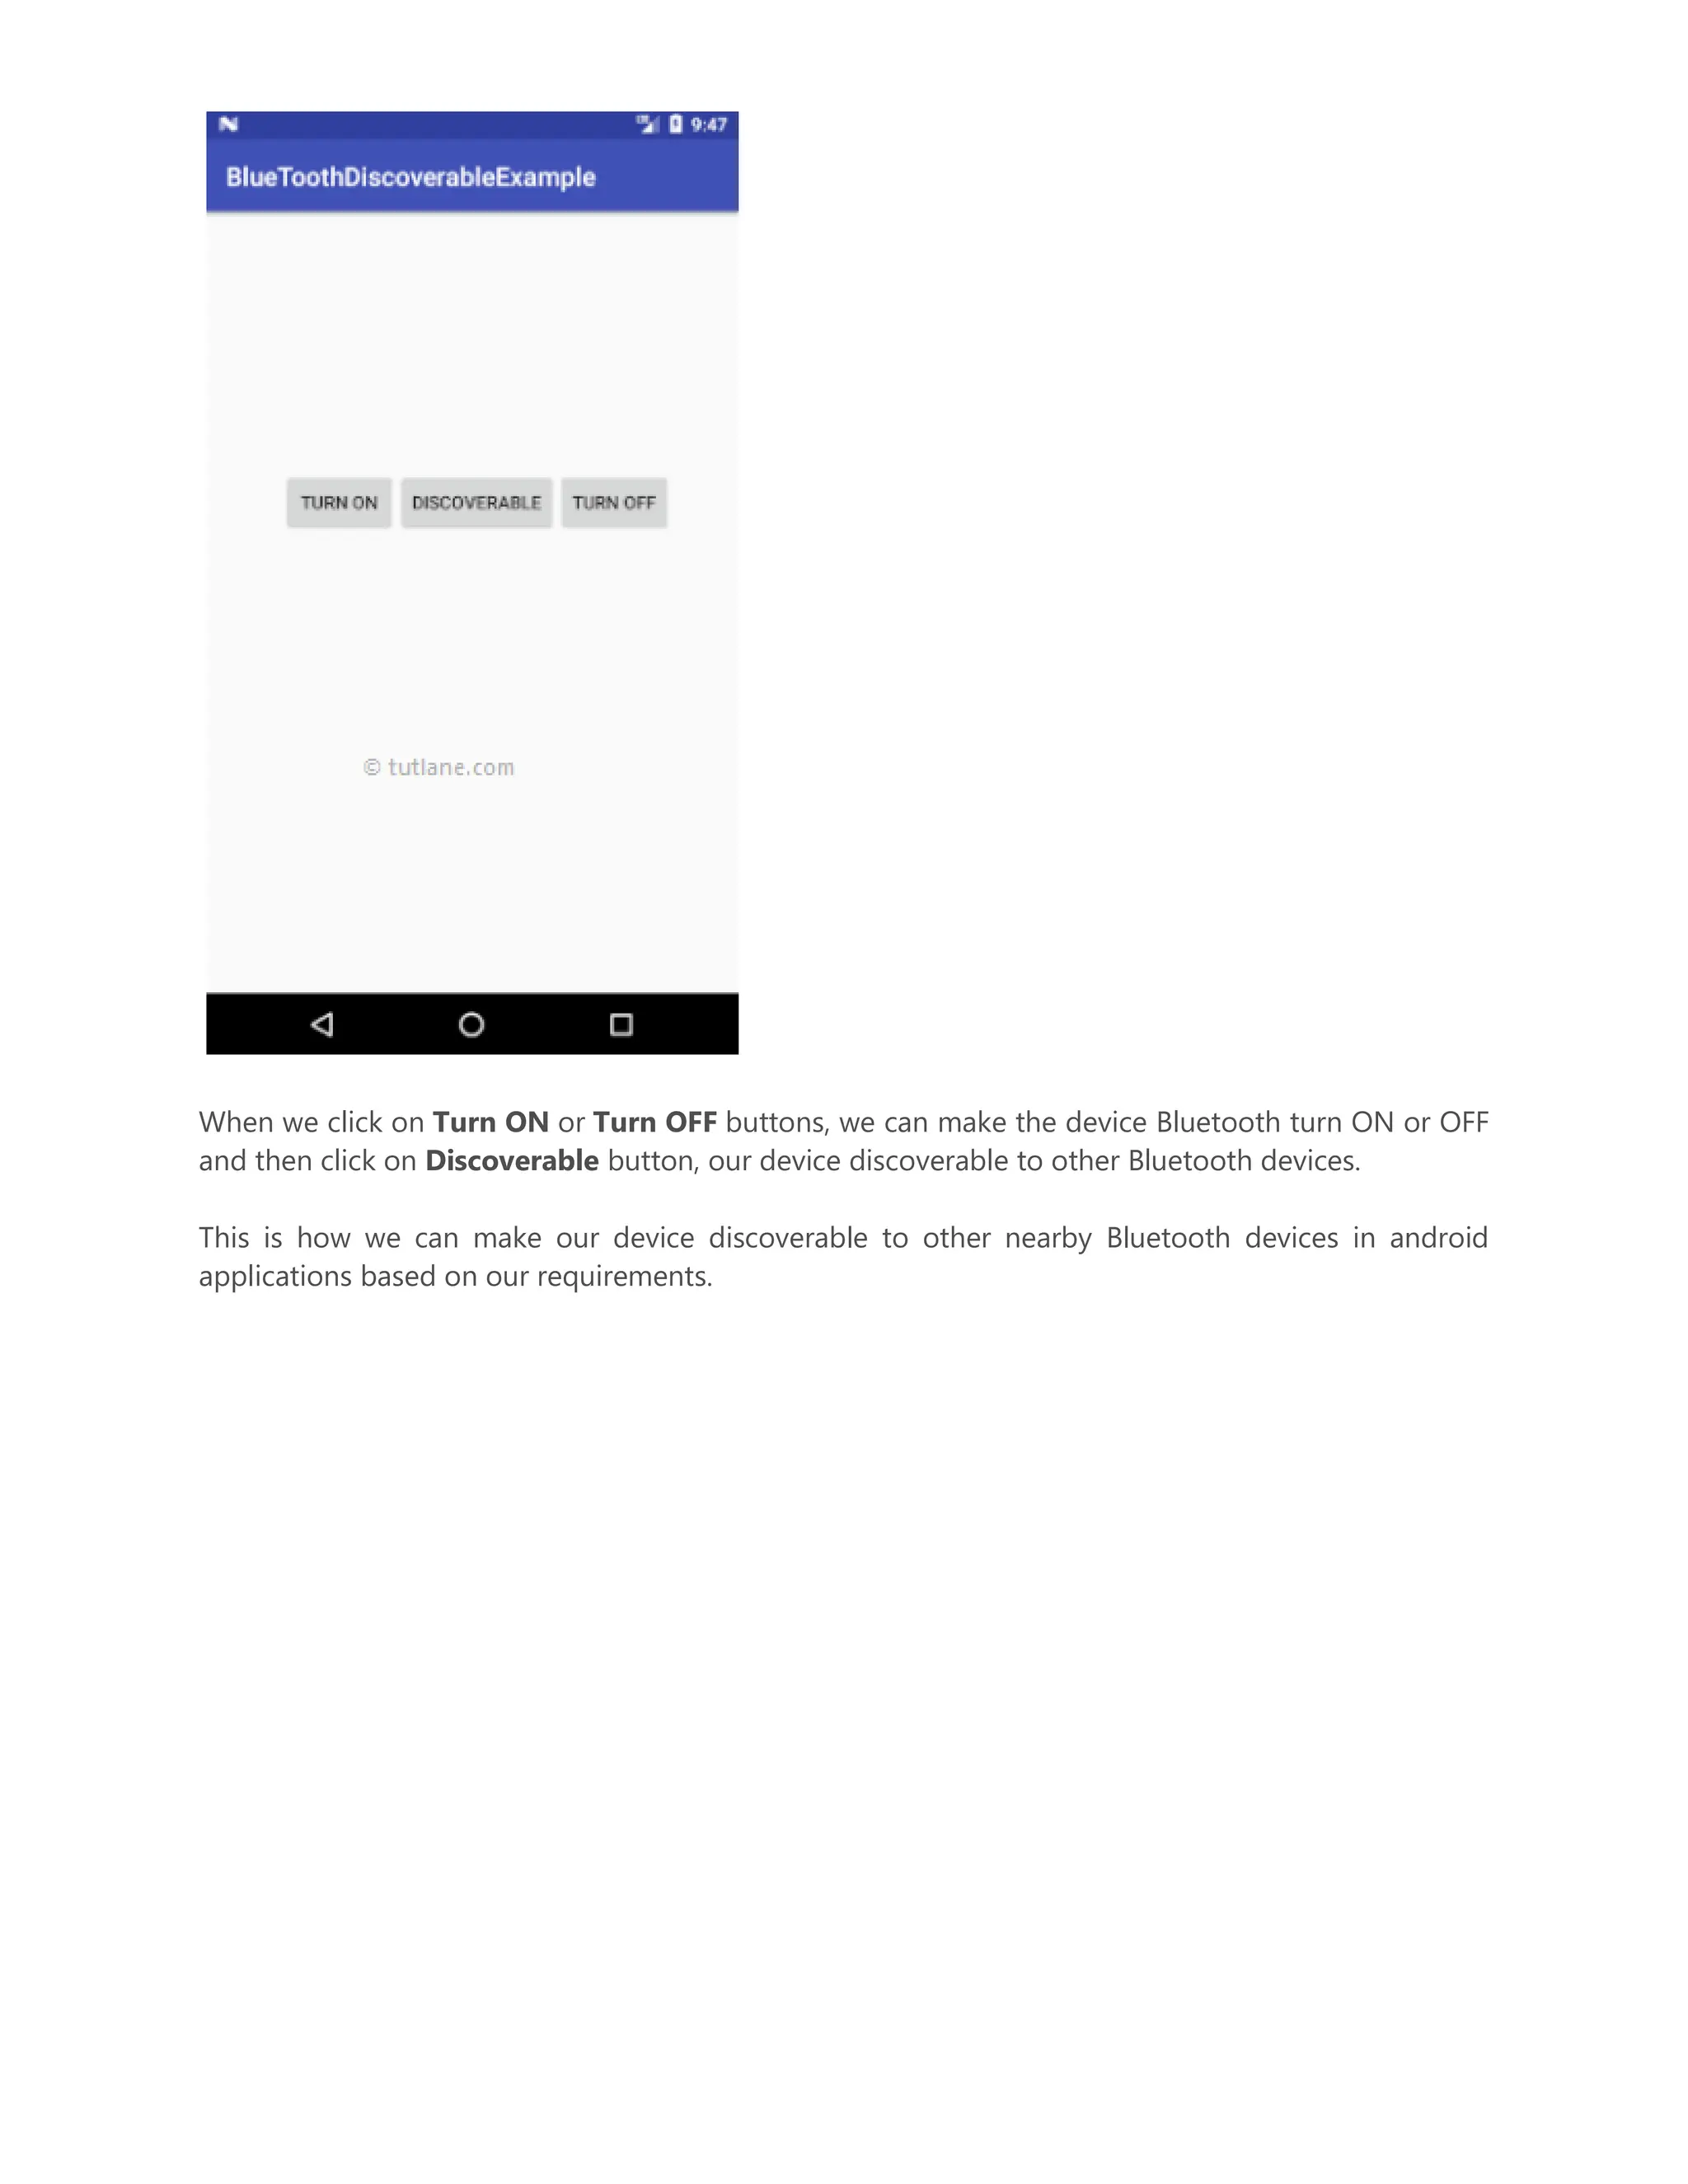
Overview of implementing Bluetooth features in Android apps, including enabling Bluetooth and making the device discoverable.
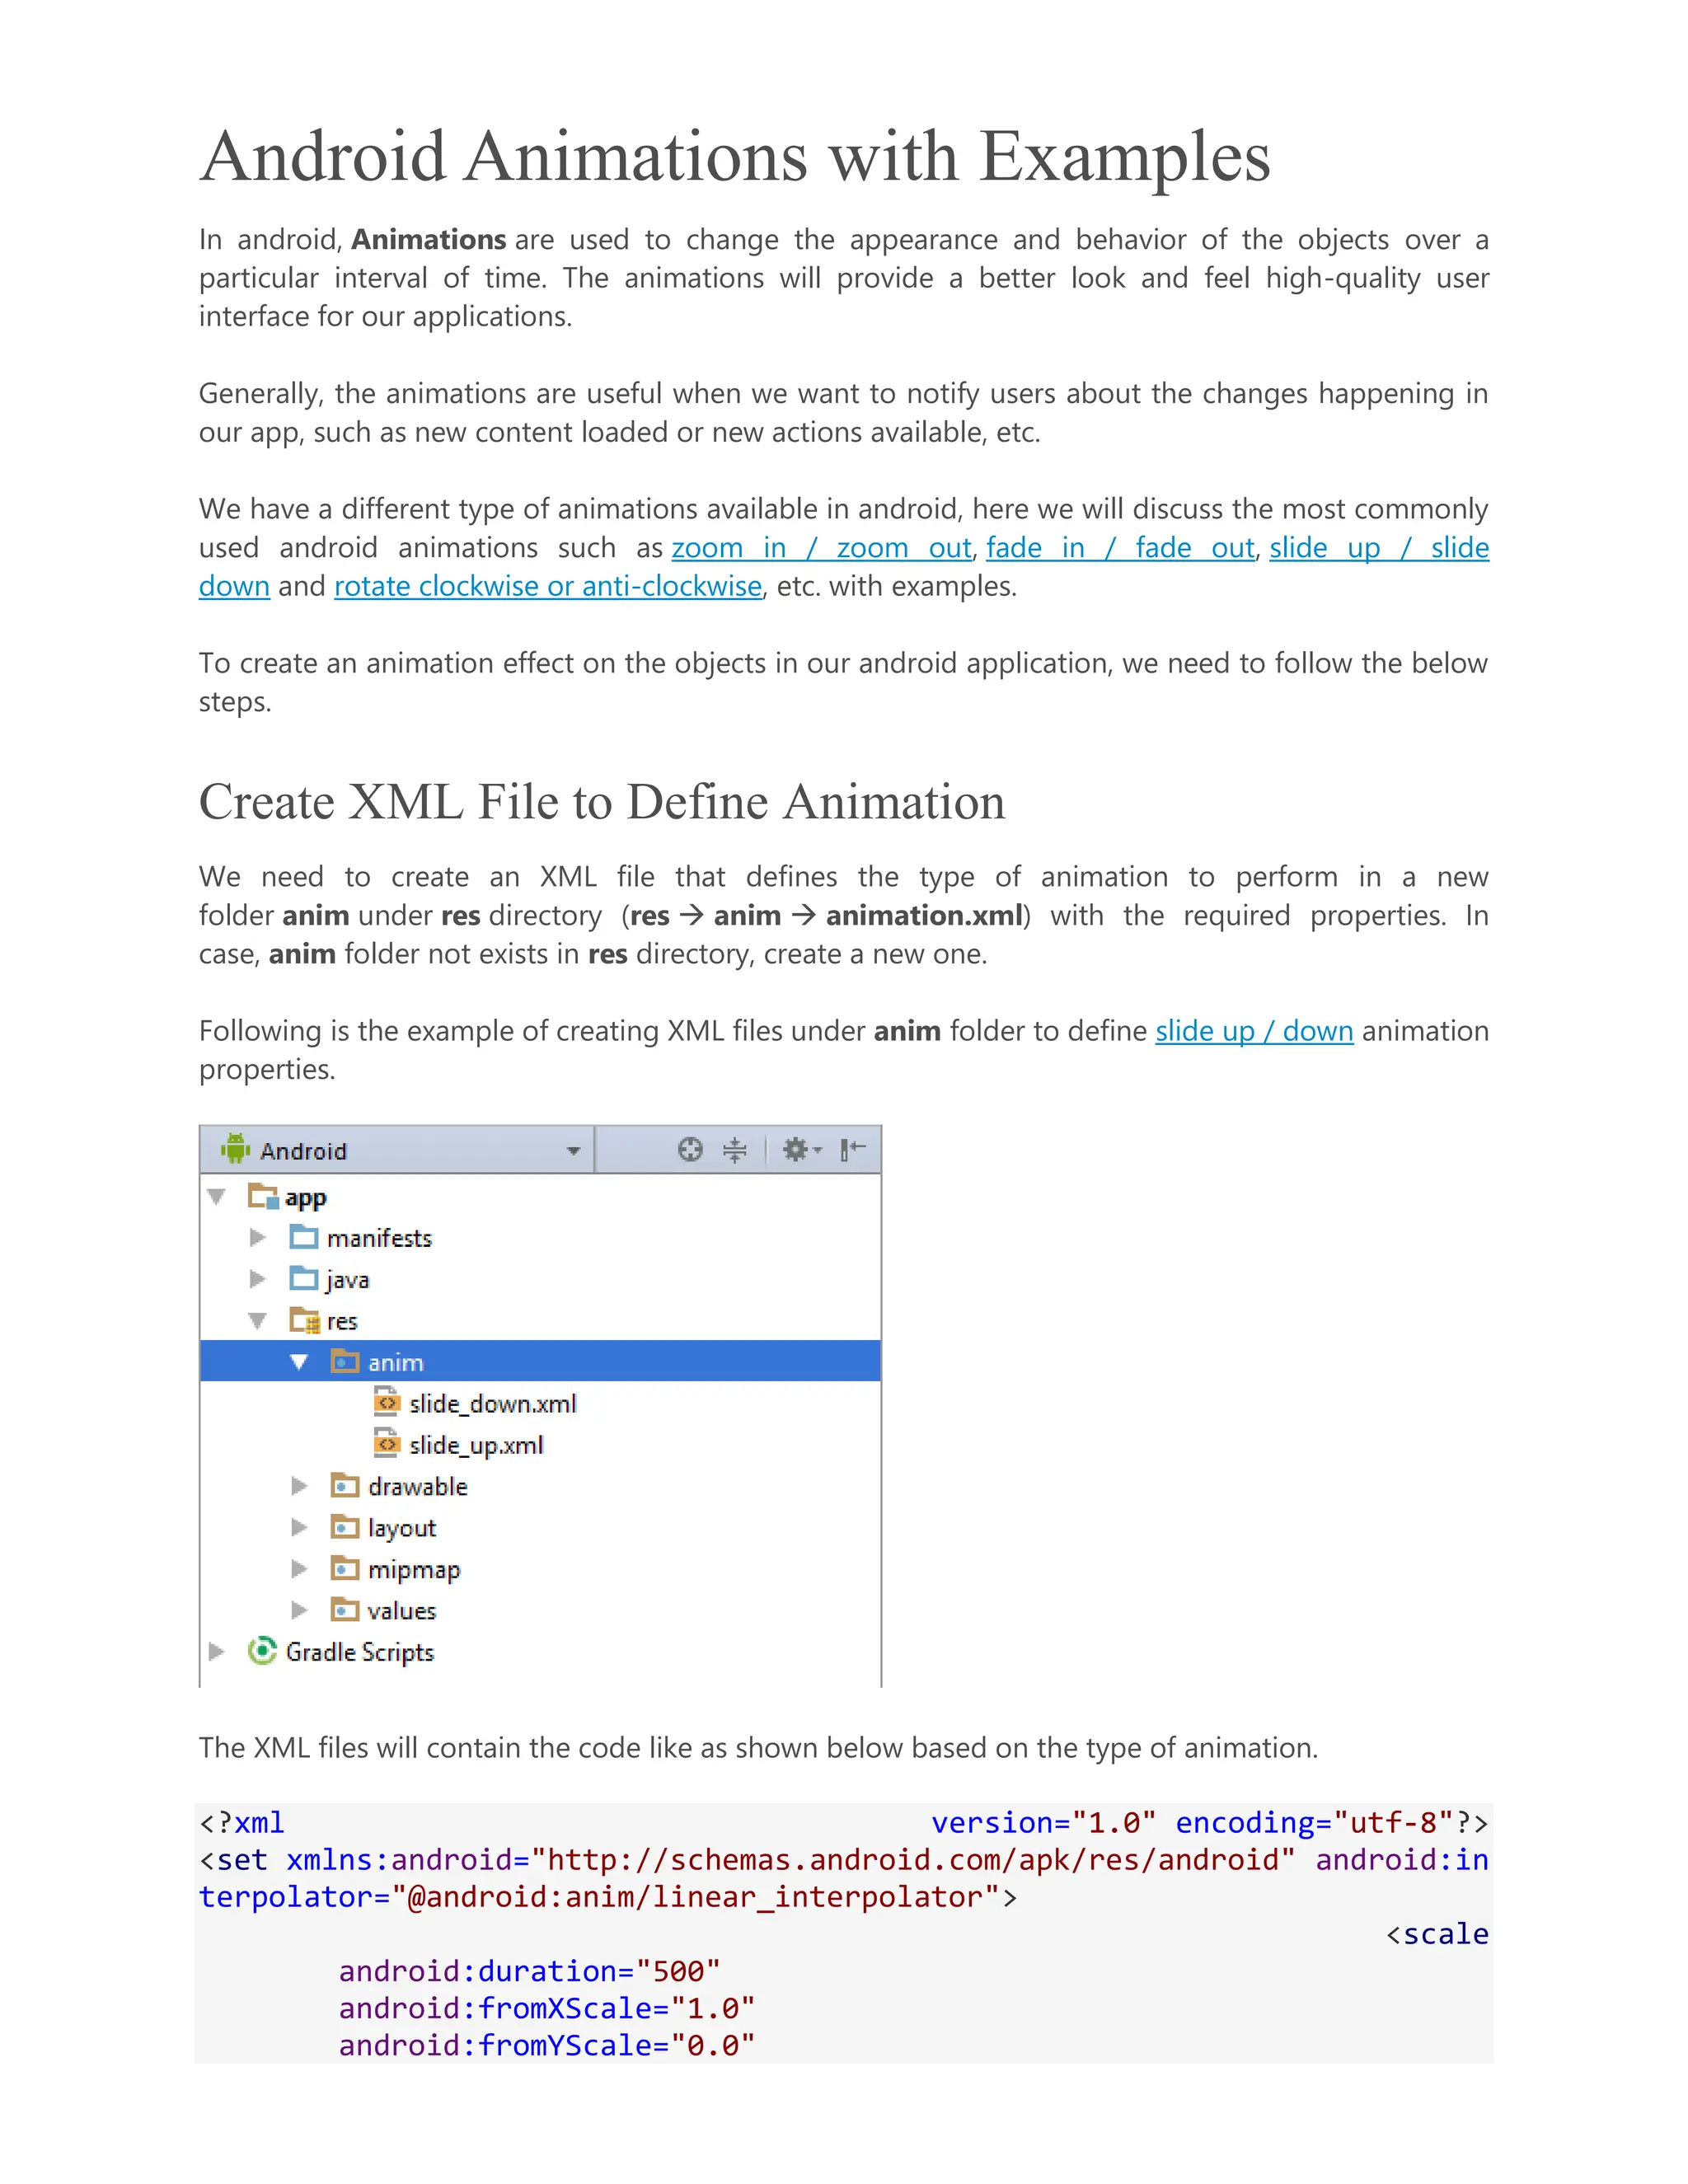
Description of various animation types in Android, their implementation, and how to enhance UI interactions using animations.Comprehensive guide on CRUD operations in SQLite database using SQLiteOpenHelper, including creating a database, tables, and performing queries.