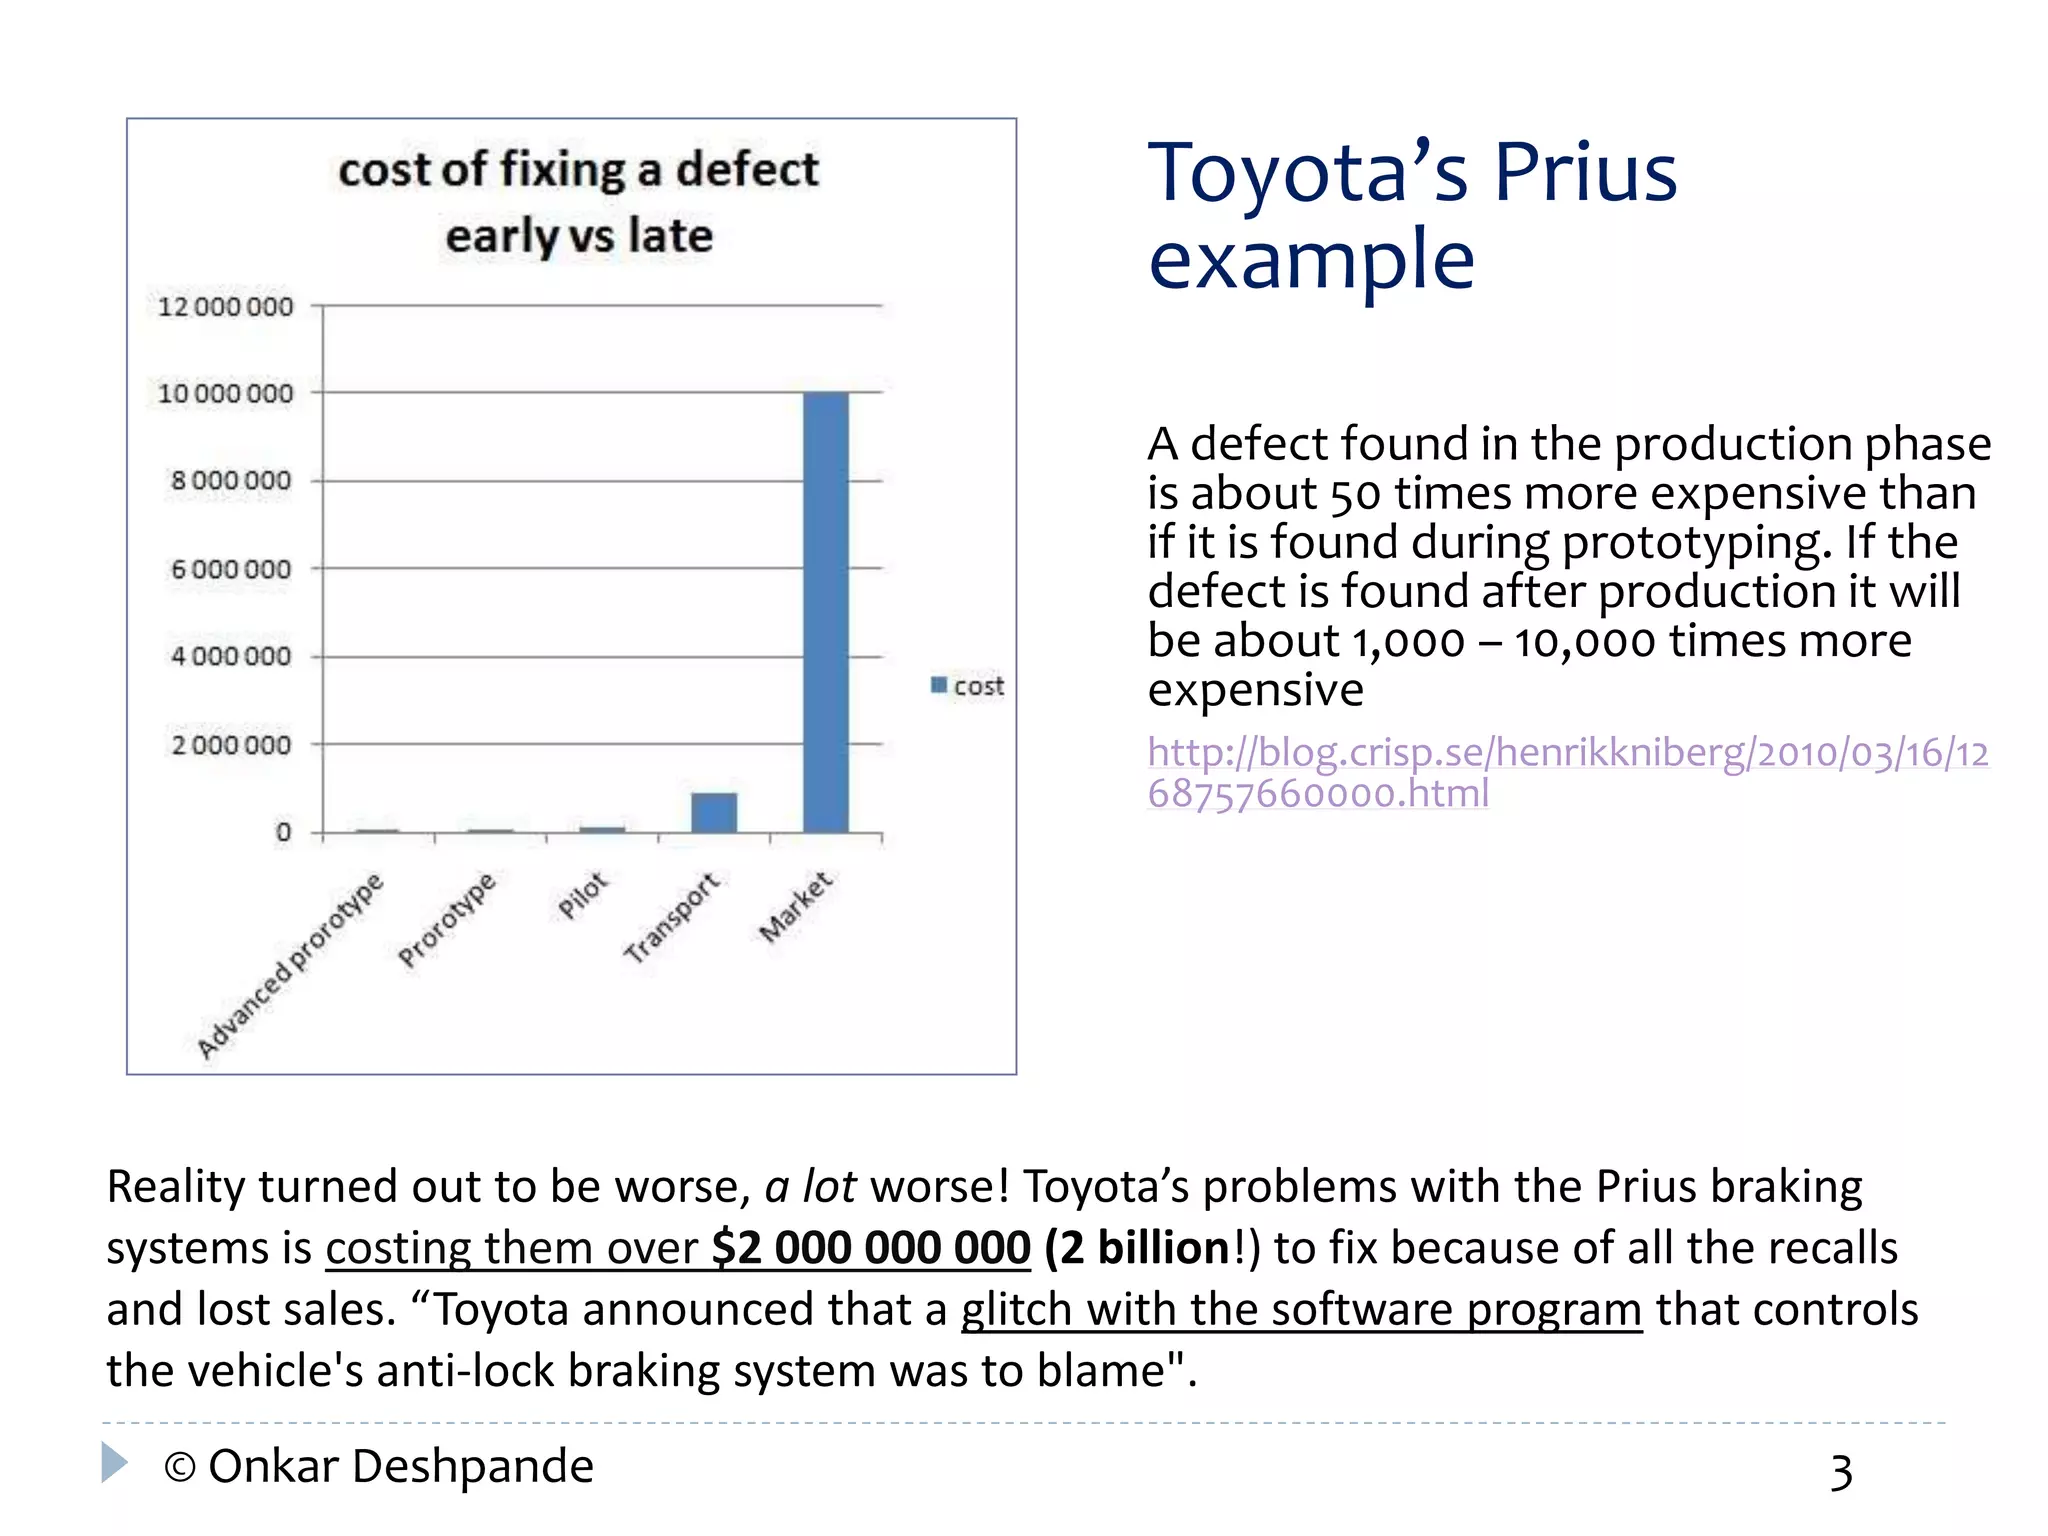
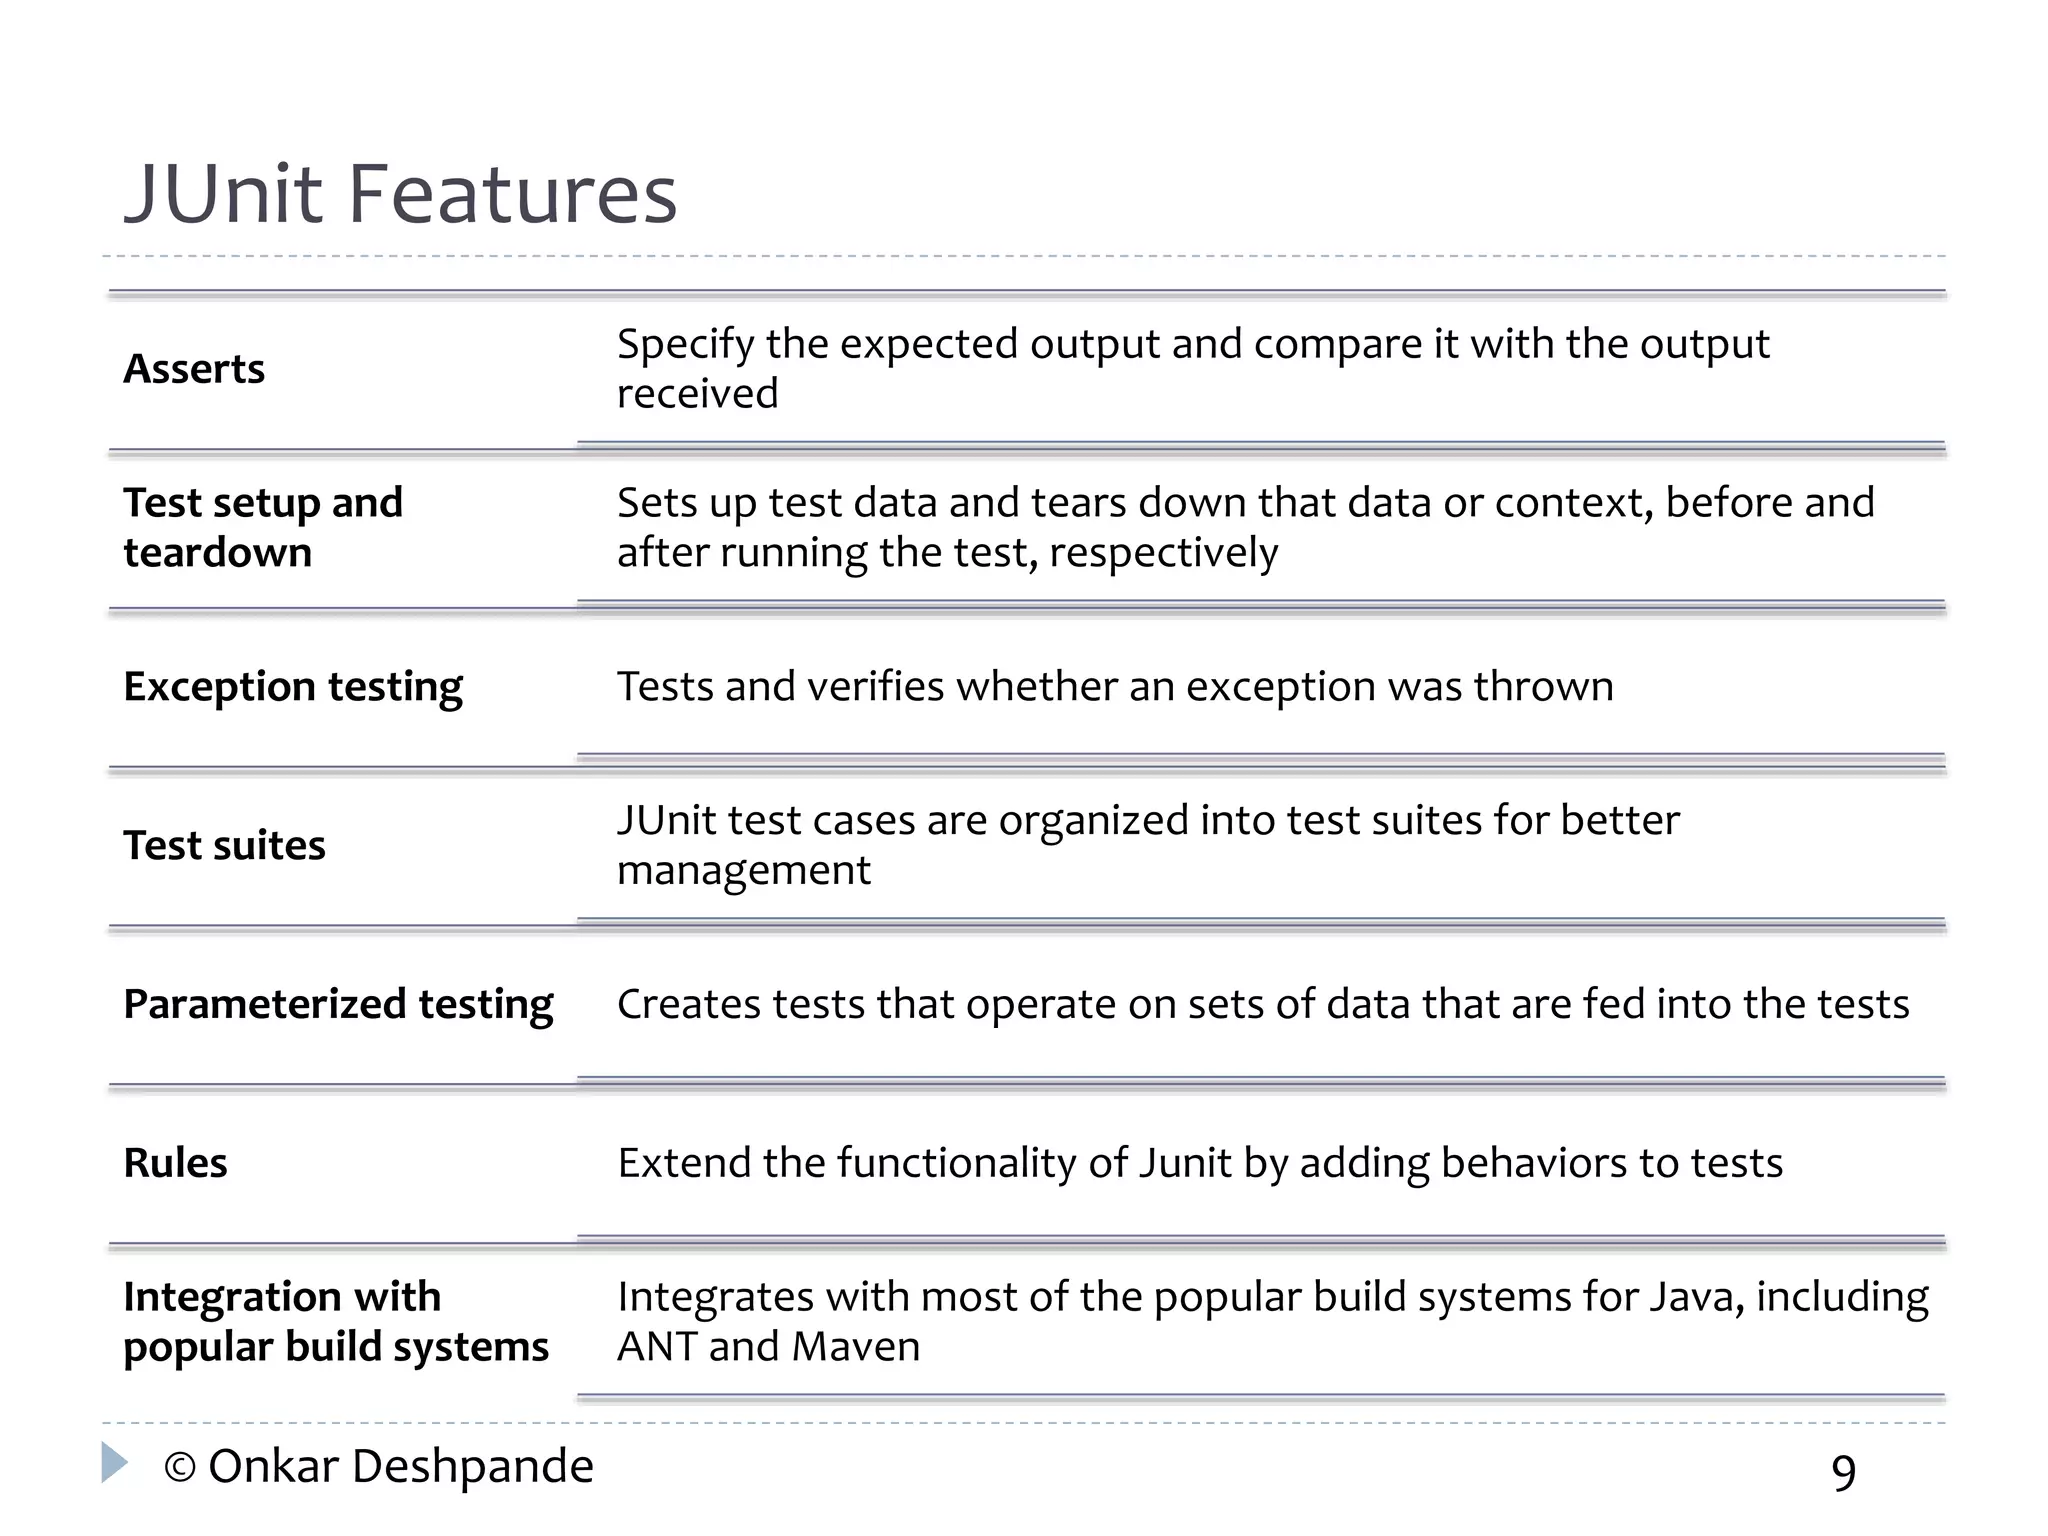
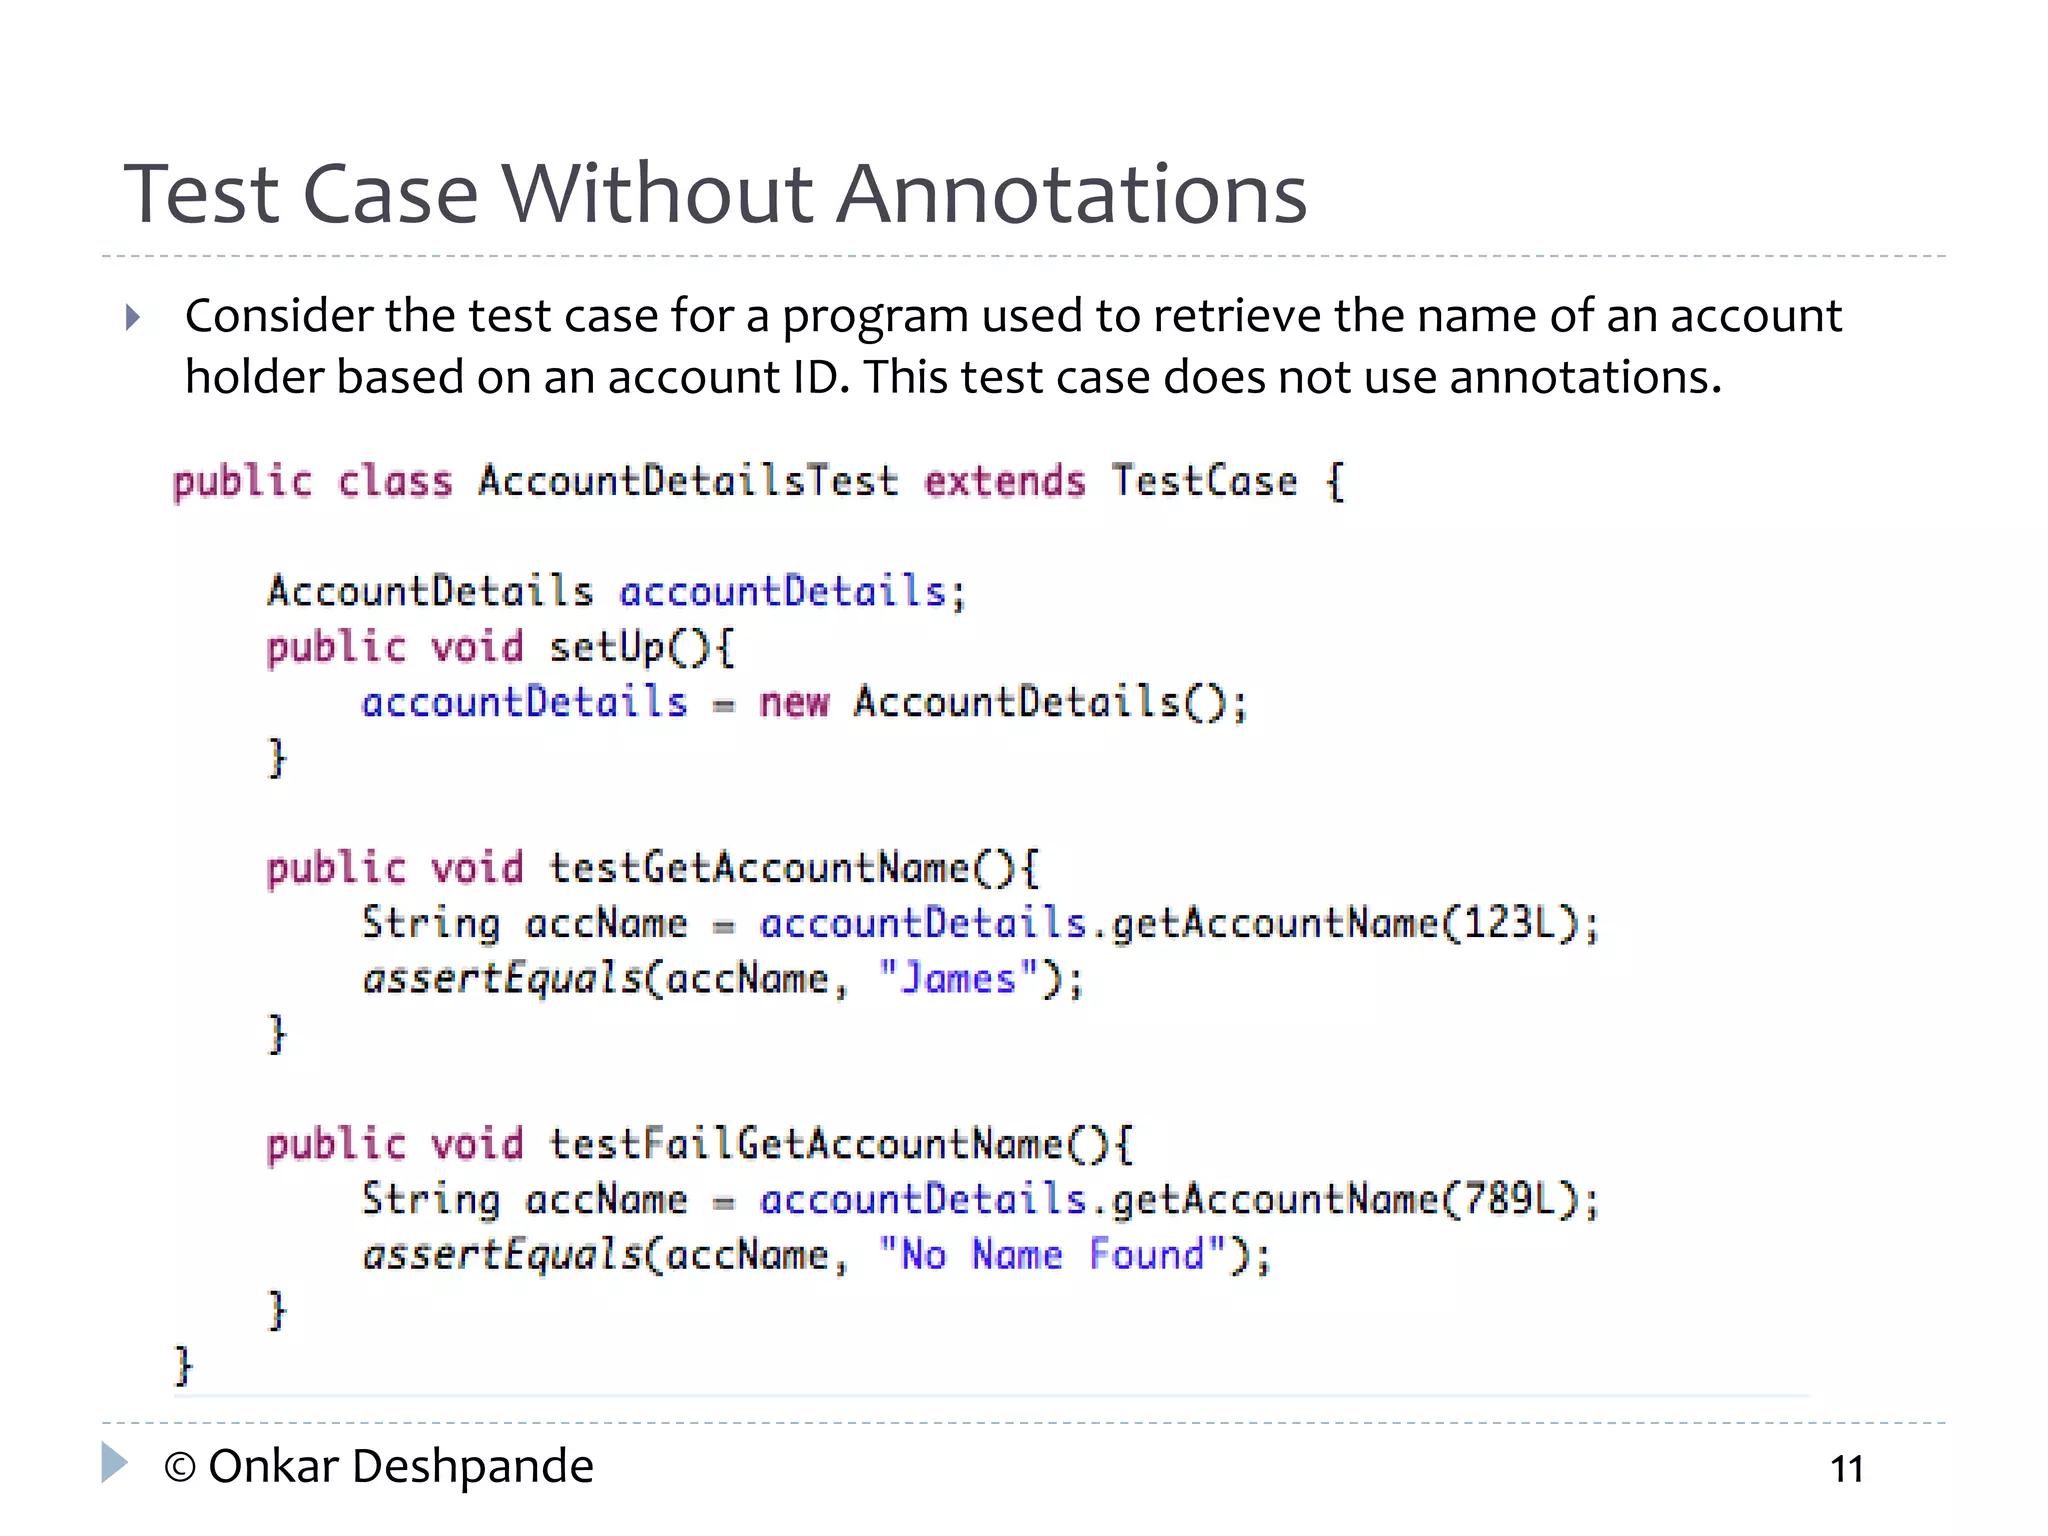
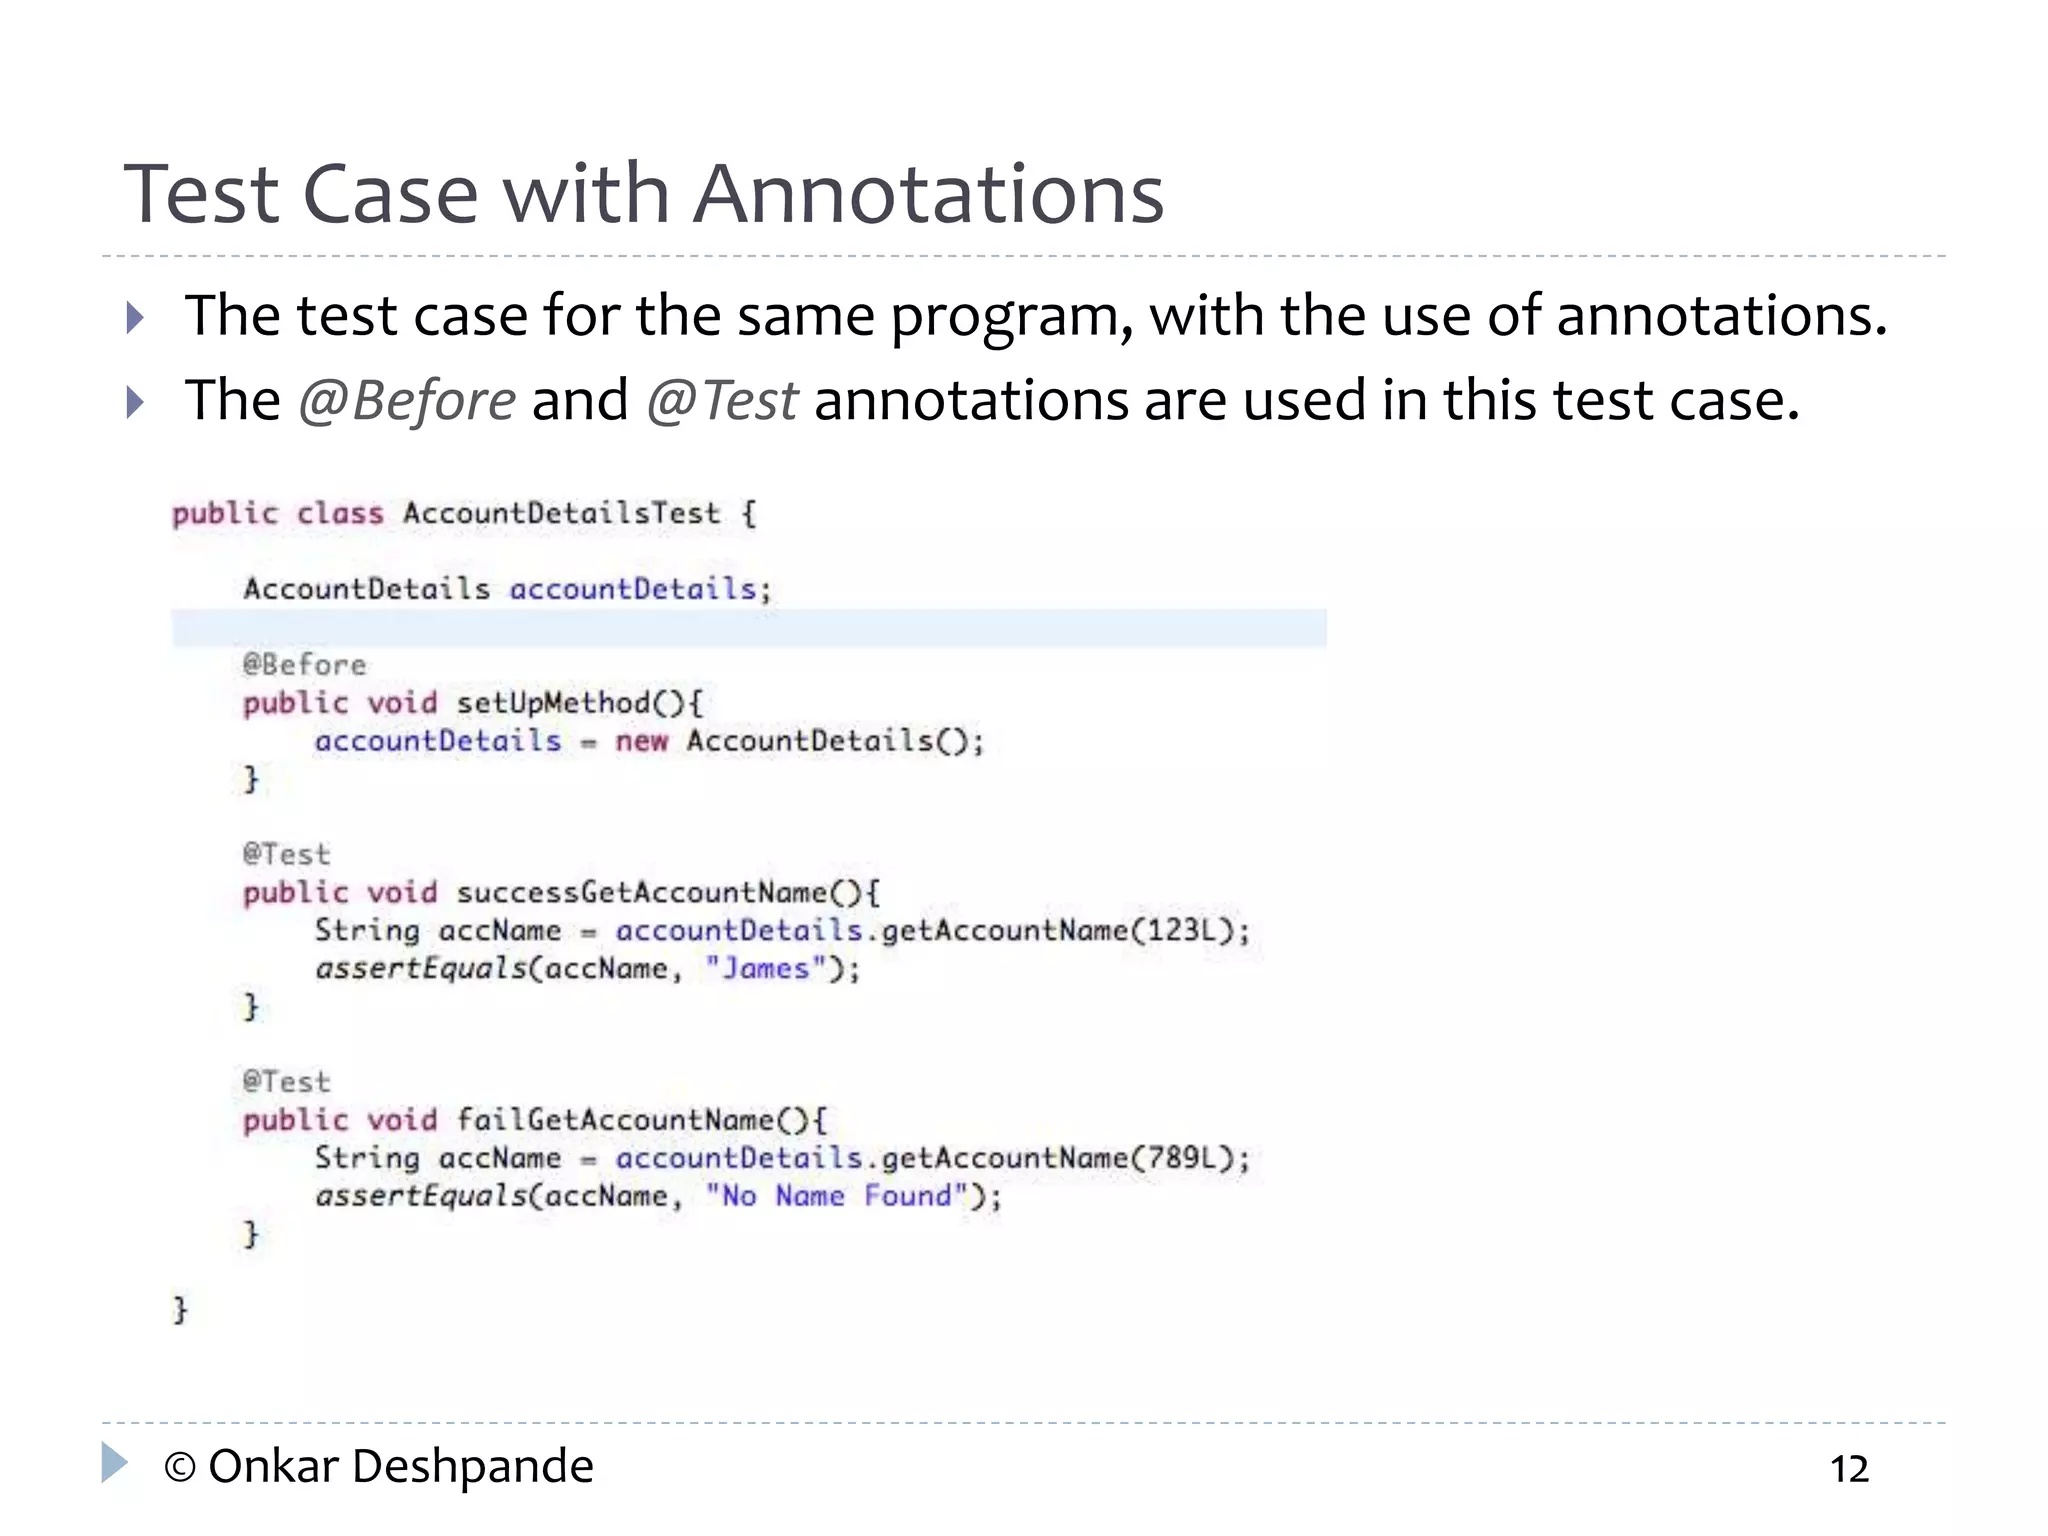
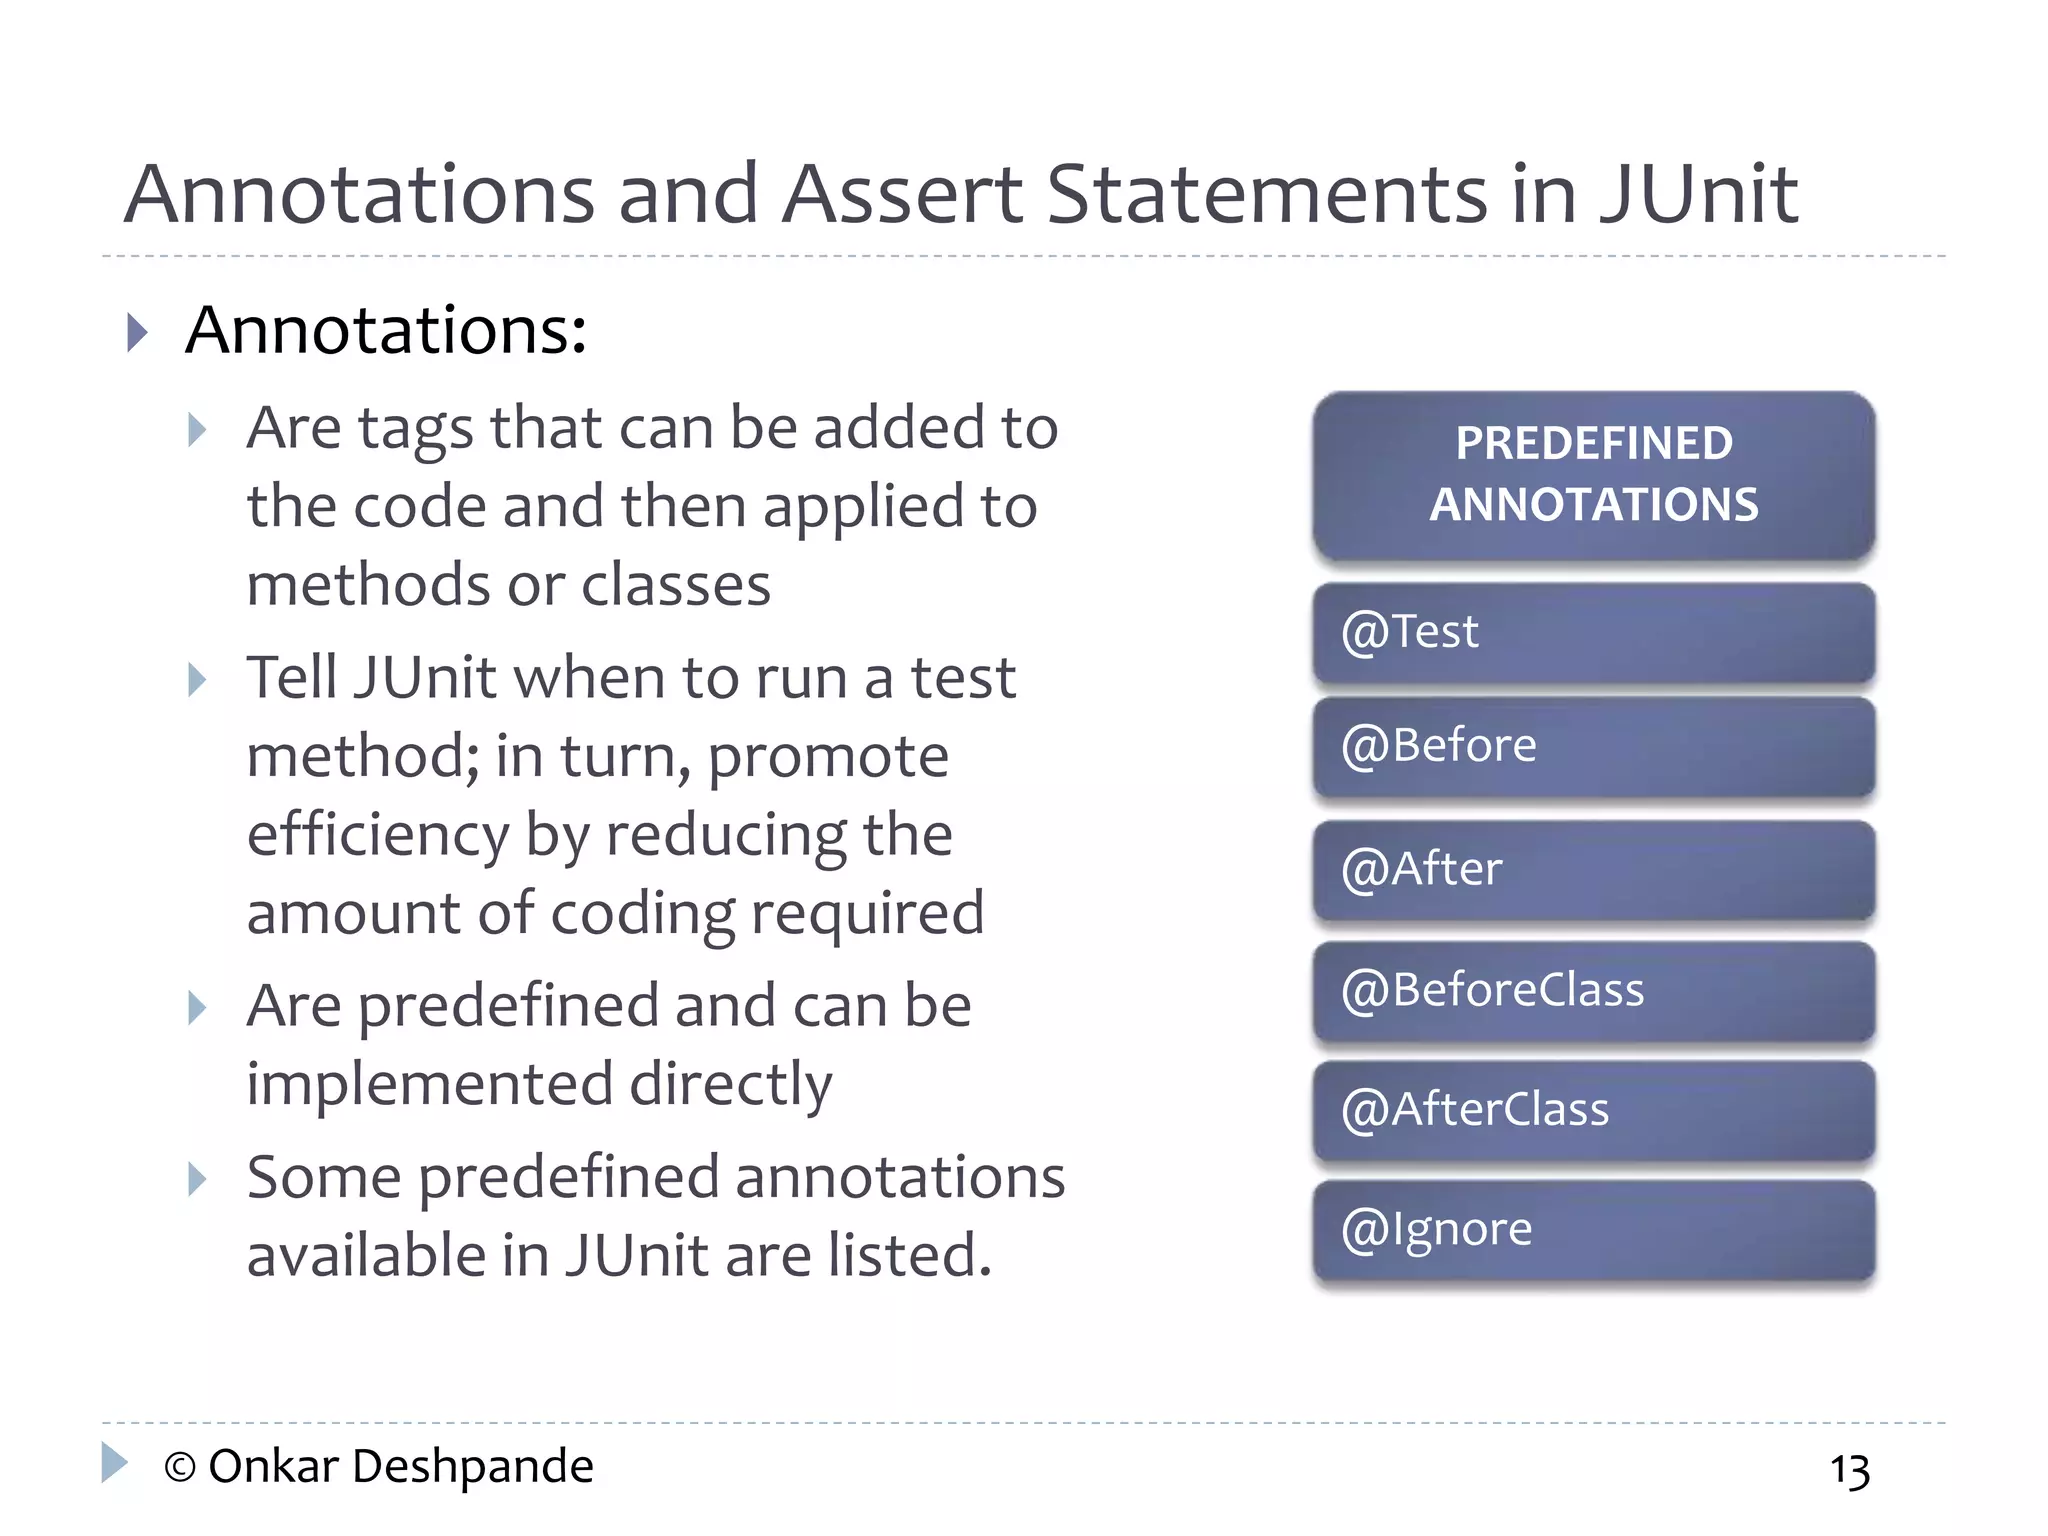
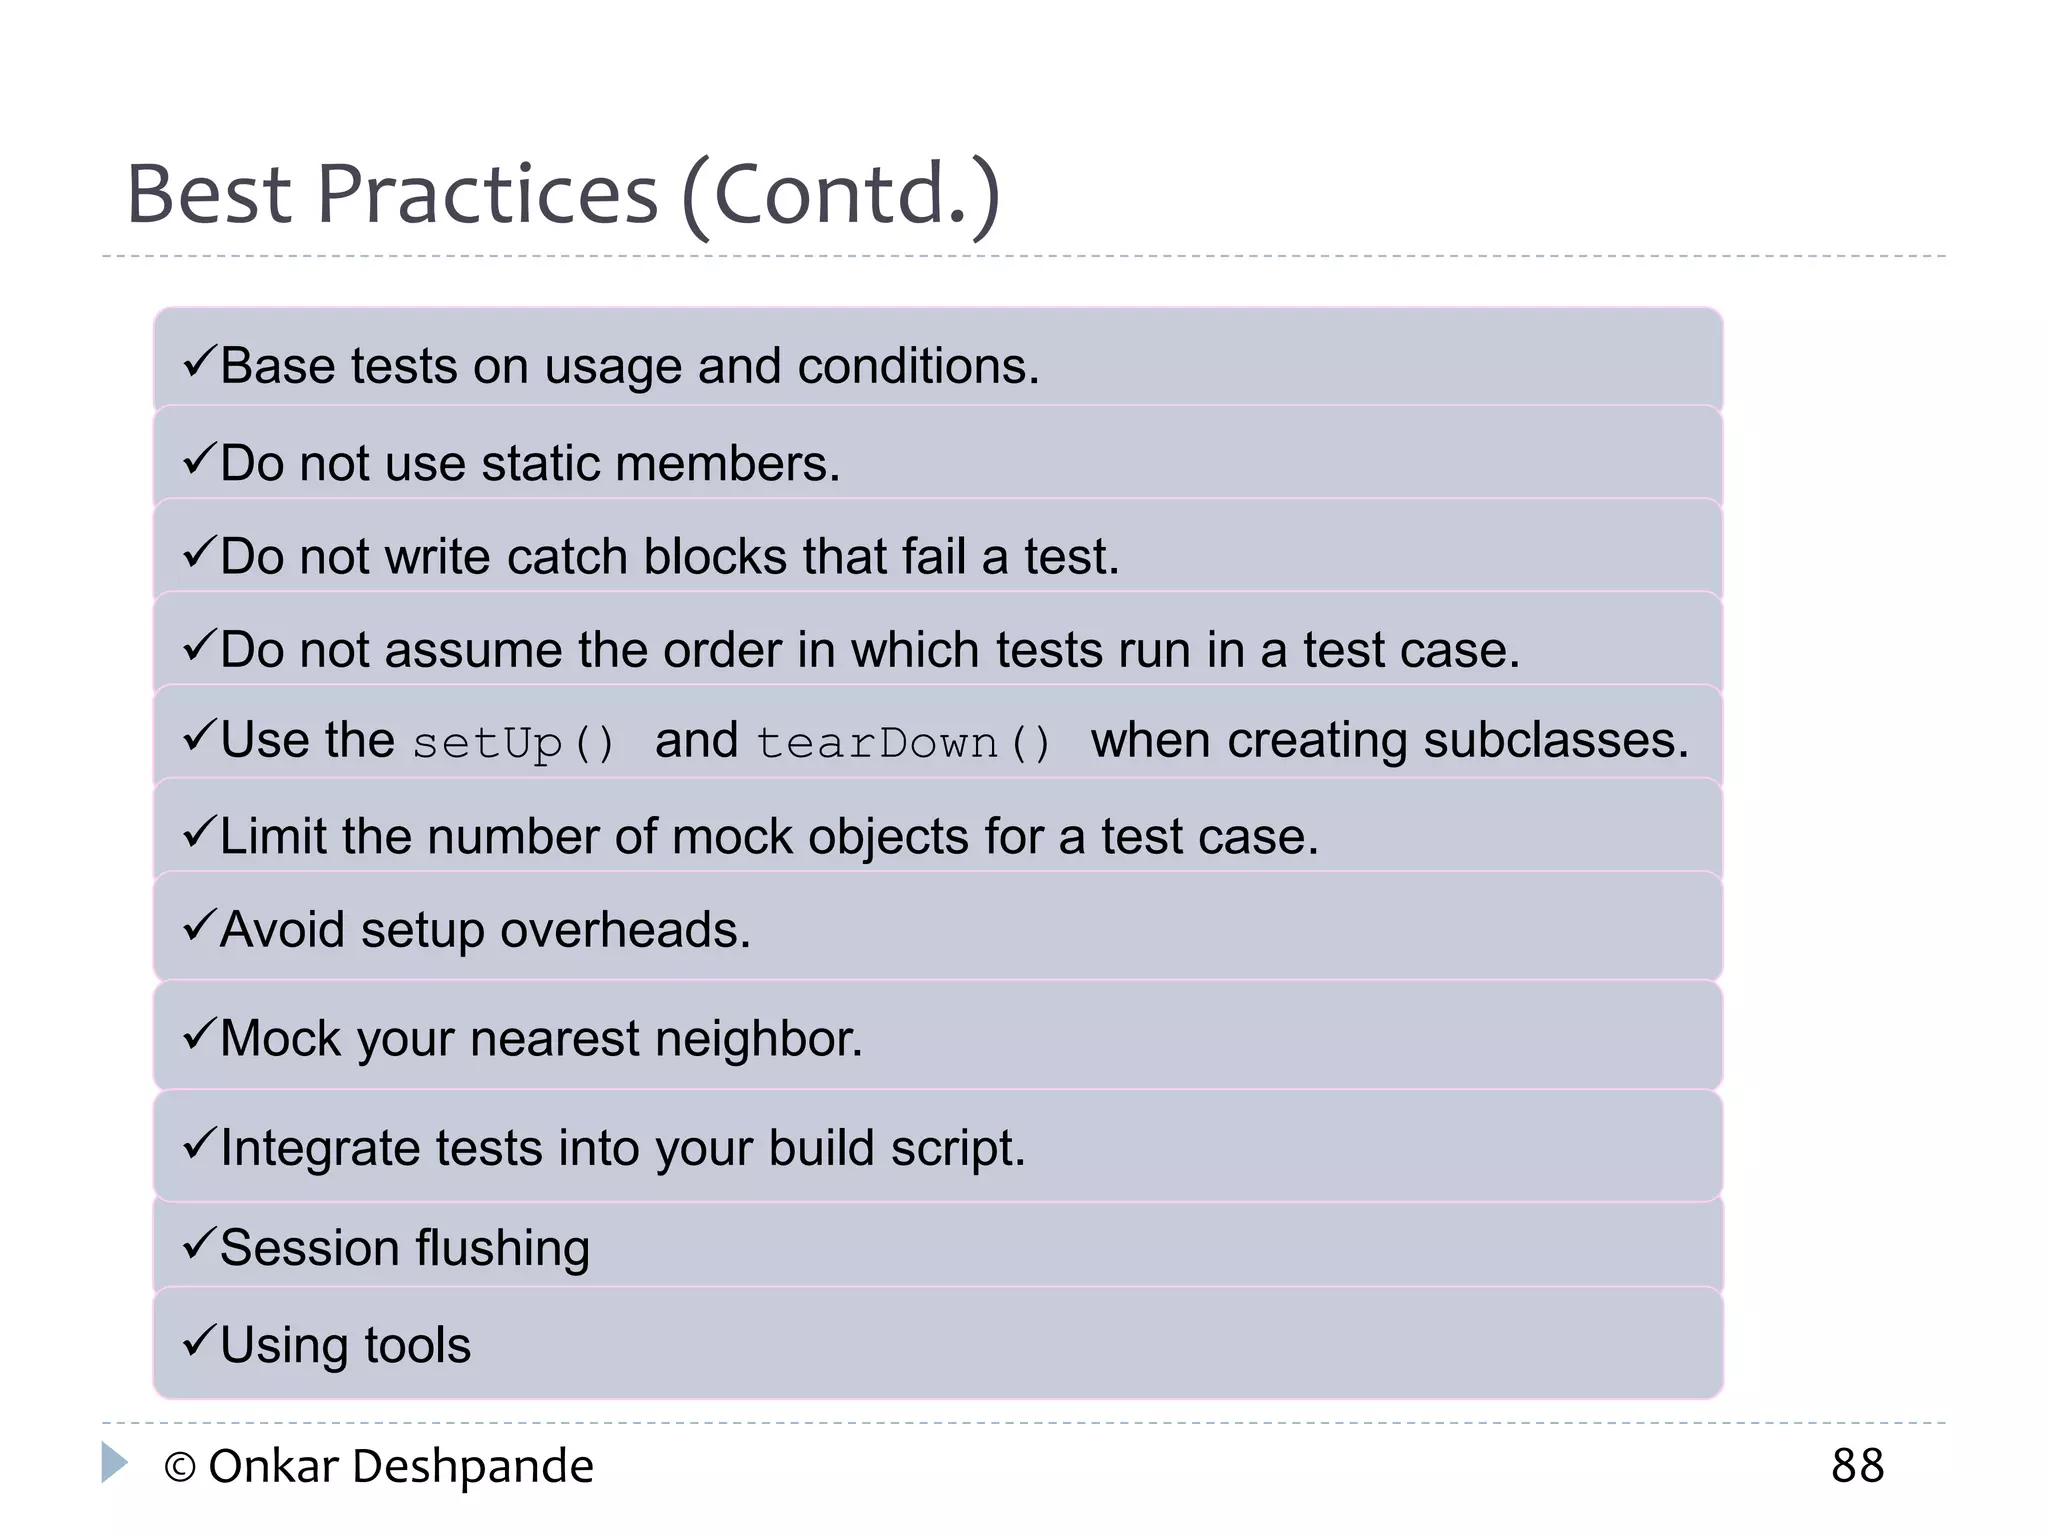
JUnit- A Unit Testing Framework Onkar Deshpande © Onkar Deshpande 1
Outline of Session  Overview on Unit Testing  Introduction to JUnit  JUnit Features  Annotations and Assert Statements in JUnit  Test Suites in JUnit  JUnit and the Build Process  Testing Strategies © Onkar Deshpande 2
Toyota’s Prius example A defect found in the production phase is about 50 times more expensive than if it is found during prototyping. If the defect is found after production it will be about 1,000 – 10,000 times more expensive http://blog.crisp.se/henrikkniberg/2010/03/16/12 68757660000.html Reality turned out to be worse, a lot worse! Toyota’s problems with the Prius braking systems is costing them over $2 000 000 000 (2 billion!) to fix because of all the recalls and lost sales. “Toyota announced that a glitch with the software program that controls the vehicle's anti-lock braking system was to blame". © Onkar Deshpande 3
Why write tests?  Write a lot of code, and one day something will stop working!  Fixing a bug is easy, but how about pinning it down?  You never know where the ripples of your fixes can go.  Are you sure the demon is dead? © Onkar Deshpande 4
Test Driven Development An evolutionary approach to development where first you write a Test and then add Functionality to pass the test. Image courtesy: http://en.wikipedia.org/wiki/Test-driven_development © Onkar Deshpande 5
What is Unit Testing?  Unit testing:  Is performed to validate the tester’s assumptions about the code design.  Is an effective method of testing. Each part of the program is isolated to determine which individual parts are correct  Involves testing the smallest unit of code under a variety of input conditions. Class - Smallest Unit in Java © Onkar Deshpande 6
Benefits of Unit Testing  The key benefits of unit testing are:  Ability to re-factor code with confidence  Proof that your code actually works  Availability of a regression-test suite  Demonstration of concrete progress © Onkar Deshpande 7
Introduction to JUnit and Software Testing Regression Testing Beta Testing Acceptance Testing Functional Testing System Testing Unit Testing Integration Testing Performance Testing Usability Testing JUnit: A unit testing framework that is extensively used to test the code written in Java. Unit testing is a type of software testing. Software testing: The process of examining whether the software and its components meet the specified requirements Other types of software testing are as shown. © Onkar Deshpande 8
JUnit Features Asserts Specify the expected output and compare it with the output received Test setup and teardown Sets up test data and tears down that data or context, before and after running the test, respectively Exception testing Tests and verifies whether an exception was thrown Test suites JUnit test cases are organized into test suites for better management Parameterized testing Creates tests that operate on sets of data that are fed into the tests Rules Extend the functionality of Junit by adding behaviors to tests Integration with popular build systems Integrates with most of the popular build systems for Java, including ANT and Maven © Onkar Deshpande 9
How JUnit Works To test using JUnit: 1. Create a separate project for writing tests that test an SUT. 2. Use a JUnit runner to execute the test code. The runner:  Determines the tests that exist in the test code  Executes the tests  Reports the results, including reporting to a graphical view Writing JUnit tests in an IDE helps you to get quick feedback regarding a test passing or failing. Testing Using JUnit © Onkar Deshpande 10
Test Case Without Annotations  Consider the test case for a program used to retrieve the name of an account holder based on an account ID. This test case does not use annotations. © Onkar Deshpande 11
Test Case with Annotations  The test case for the same program, with the use of annotations.  The @Before and @Test annotations are used in this test case. © Onkar Deshpande 12
Annotations and Assert Statements in JUnit  Annotations:  Are tags that can be added to the code and then applied to methods or classes  Tell JUnit when to run a test method; in turn, promote efficiency by reducing the amount of coding required  Are predefined and can be implemented directly  Some predefined annotations available in JUnit are listed. PREDEFINED ANNOTATIONS @Test @Before @After @BeforeClass @AfterClass @Ignore © Onkar Deshpande 13
The @Test Annotation  Attached to a public void method  Informs JUnit that this method can be run as a test  Supports two optional parameters, expected and timeout @Test Expected Timeout Specifies that the test should throw a particular exception Declares that a test has failed if it does not run within the given time limit © Onkar Deshpande 14
The @Before and @After Annotations  These annotations are used when multiple tests need similar objects to run smoothly.  These objects are created in a superclass whose public void methods are annotated with @Before. As a result, the @Before methods of the superclass run before any of the Test class methods.  Annotating a public void method with @After causes it to run once after executing each test method, even if any of the @Before or Test class methods throw exceptions or fail. © Onkar Deshpande 15
The @BeforeClass & @AfterClass Annotations  These annotations are used when several tests need to share expensive resources such as servers or databases.  A public static no argument method is annotated with @BeforeClass so that it runs once before any of the test methods in the current class are run.  A public static void method annotated with @AfterClass runs after all the other tests have run and releases the resources. © Onkar Deshpande 16
The @Ignore Annotation  While testing, certain situations may not require a particular test or a group of tests.  All methods annotated with @Ignore are not executed, even if they are also annotated with @Test.  Annotating a class containing test methods with @Ignore will prevent all tests in that class from running. © Onkar Deshpande 17
The Assert Class  Contains a set of assertion methods or assert statements that are used to write tests.  Assertion methods are statements that assert a condition set in the method.  Some important methods of the Assert class are: Methods Description void assertEquals(boolean expected, boolean actual) Checks if two primitives or objects are equal. void assertFalse(boolean condition) Checks if a condition set is false. void assertNotNull(Object object) Checks if an object is not null. void assertNull(Object object) Checks if an object is null. void assertTrue(boolean condition) Checks if a condition set is true. void fail() Fails a test that has no messages. © Onkar Deshpande 18
Composing Test Cases into Test Suites  In JUnit, when you group multiple test cases into a test suite, these test cases can be run together.  If bugs are detected on running the test suite, only the specific test case can be changed. © Onkar Deshpande 19
Test Suites  Use the @RunWith and @SuiteClasses annotations to run the tests in a suite.  @RunWith: When you annotate a class with @RunWith or create a class that extends a class annotated with @RunWith, JUnit invokes the runner class mentioned in the annotation to run the tests.  @SuiteClasses: Specifies the list of test classes to be run.  An example of suites written using @RunWith and @SuiteClasses in JUnit is shown: @RunWith(Suite.class) @SuiteClasses(ATest.class, BTest.class) public class ABCSuite{ ….. } © Onkar Deshpande 20
Combining Test Suites  Multiple suites can be combined into a master suite.  Combining test suites logically and functionally helps in calling nested tests within each of the suites with just one invocation.  Suppose you are working with two test suites, and each suite contains two test classes, as listed: OverAllCounterTester(Suite) • DecrementCounterTest • IncrementCounterTest OverallBankingTester(Suite) • AccountTest • SavingsAccountTest How do you combine these two test suites? © Onkar Deshpande 21
Combining Test Suites (Contd.) DecrementCounter IncrementCounter Account SavingsAccount DecrementCounter Test IncrementCounter Test AccountTest SavingsAccount Test OverAllCounterTester OverallBankingTester OverallCombiningSuites Classes Test Classes Suites Master Suite © Onkar Deshpande 22
Best Practices  Run tests completely in memory.  Write each test such that it is independent of others.  Run every test.  Write each test to perform only one assertion.  Write tests with the strongest assertion possible.  Use the most appropriate assertion methods.  Use assertion parameters in the proper order.  Ensure that the test code is separate from the production code.  Rewrite before debugging  Add a timeout.  Name your tests well.  Target exceptions.  Do not use static members.  Keep the test hard to pass. © Onkar Deshpande 23
© Onkar Deshpande 24
Maven and Its Features  Is a simple project setup, that gets you started in seconds  Enables dependency management  Works and tracks multiple projects at the same time  Has a large library and metadata bank (repositories) that can be used for out-of-the-box use  Has repositories connected to open sources to let you access the latest updates and features with minimum configuration  Is extensible and allows you to write Java plug-ins easily  Follows “Convention over Configuration”  Can create standard reports, websites, and PDF documents © Onkar Deshpande 25
Project Object Model  Project Object Model (POM) is the fundamental unit of work in Maven.  It is contained in the base directory of any project as pom.xml file.  POM contains project information and configuration details that Maven uses to build JUnit projects.  POM lets you complete the entire build process with a few simple commands.  Each Maven project contains a single POM file. © Onkar Deshpande 26
Project Object Model (Contd.)  All POM files contain the project element and three mandatory fields:  groupId: Defines the group the project belongs to  artifactId: Is the name of the project  version: Is the version of the project  The project address in the repository is groupId:artifactId:version. <project> <modelVersion>4.0.0</modelVersion> <groupId>com.companyname.project-group</ groupId> <artifactId>project</artifactId> <version>1.0</version> </project> POM for a JUnit Project  You need to configure JUnit to Maven so that you can run Maven tasks in JUnit. © Onkar Deshpande 27
Running Maven Tasks  Maven is used in the test phase of your JUnit build.  When you run JUnit tests in Maven, the test results are documented as reports, (in the HTML or XML file format).  Maven provides two directories to write the application and test code:  src/main/java: Holds the application code  src/test.java: Hold the test code  To run JUnit tests: A goal in Maven is a task that Maven executes and is specified just before running a task.  Right-click pom.xml in the file tree.  From context menu, select Run as > Run configurations.  In the Create, manage and run configurations screen, add the appropriate conditions in the Goals column. © Onkar Deshpande 28
Running Maven Tasks (Contd.)  The Create, manage and run configurations screen where goals are specified. Create, manage and run configurations Screen © Onkar Deshpande 29
Running Maven Tasks (Contd.) Different Conditions for Running Tests Run All the Tests in the Test Folder: Specify “clean compile install” Run All the Tests from a Specified Test Class: Specify “clean compile install” and then specify the class name. Run the Specified Test from the Specified Class: Specify “clean compile install” and then specify the test name and class name. Run all the Tests with the name test* from the Specified Class: Specify “clean compile install” and then specify test* and class name. © Onkar Deshpande 30
Using the Maven Plug-in for Deploying the WAR/EAR Package  WAR: Web Application archive file is a collection of Jars used to distribute Java-based components of a web application.  EAR: Enterprise Archive files package multiple files and modules into a single archive so that they can be deployed simultaneously. These files exclude test files.  Maven plug-in called mvn install-Dskiptests are used to Deploy WAR/EAR by skipping all contained test methods.  maven.test.skip.property can also be used to deploy the WAR/EAR files © Onkar Deshpande 31
Using the Corbetura-Maven Plug-In to Test Code Coverage  Maven-Corbetura plug-in is used to measure and calculate the percentage of your application code covered by the test code.  Key features of Corbetura are:  It can be executed in the command line  It instruments Java byte code after compilation  It can generate XML or HTML reports  It shows percent of lines and branches coverage for each class and package and the overall project  It shows the McCabe cyclic code complexities in every class, package, and overall project  It can sort HTML results by class name, percent of lines covered, and percent of branches covered and in ascending or descending order © Onkar Deshpande 32
JUnit Attachment Plug-ins: Continuous Integration Continuous Integration (CI) is the practice that requires you to integrate your code into a shared repository multiple times during development. CI is used in Java build because of specific reasons:  Helps in quick problem solving: Significantly less back tracking required to locate source of errors  Provides an inexpensive process: CI requires you to integrate code several times during development Benefits Reduces integration time Have greater code visibility Catch and fix errors quickly Verify and test every check-in Reduce integration problems within your system © Onkar Deshpande 33
Jenkins and How to Use It  Jenkins is an open source tool used to perform CI by:  Monitoring version control system  Starting and monitoring a build system for changes in versions  To use Jenkins, you need:  An accessible source code repository, such as an SVN repository, with your code checked in.  A working build script, such as a Maven script, checked into the repository.  To install and integrate Jenkins, the main steps are: 1. Download Jenkins web archive from http://jenkins-ci.org/. 2. Configure Jenkins. 3. Configure Maven. 4. Secure the Jenkins console. © Onkar Deshpande 34
JUnit Attachment Plug-ins: Jenkins (Contd.) To use Jenkins: 1. Create a New Maven Project. 2. Customize your job by filling out job GUI and set Source Code Management to None. 3. Specify Maven goals in the Build section and select Install Test. 4. Locate the Maven project in the Advanced button by selecting Use Custom Workspace and specify project location in your directory. © Onkar Deshpande 35
JUnit Attachment Plug-ins: Sonar  Sonar is an open-source product used to:  Gather metrics about the quality of your code and display it on a single dashboard  Provides suggestions for making your code reliable and reducing errors  To use Sonar, enable the Sonar plug-in on Jenkins job or run mvn sonar:sonar from Maven Build. This will trigger the following actions:  Sonar will locally analyze code and generate reports from multiple analyses. This will include the JUnit test coverage.  Sonar will push those reports to the Sonar dashboard. © Onkar Deshpande 36
HTML Reports  HTML is a markup language to create web pages.  Reports generated in the HTML format are read-only reports that can be viewed in a web browser, saved, and distributed.  The functionalities of Maven are extended by many plug-ins, which enable faster, easier, and more flexible report generation.  The Apache Maven Surefire Report Plugin is a collection of one or more goals.  The plug-in generates two raw reports at ${basedir}/target/surefire-reports in two formats:  Plain text files (*.test): Contains a statistic line for all test cases  XML files (*.xml): Contains the output © Onkar Deshpande 37
Creating HTML Reports  To convert the test results report into the HTML format, use the surefire-report: report goal.  To build the report without running the tests, use the surefire-report:report-only goal. A neatly formatted Surefire Test Report is created in the HTML format.  To generate the Surefire Test report in the HTML format, add plug-in dependencies and parameters to the <plugin> section of the POM. Parameters The data type assigned The basic description of the parameter The default value of the parameter The user property © Onkar Deshpande 38
Creating HTML Reports (Contd.)  To generate HTML reports after JUnit tests are run, set the Goal field in the Create, manage and run configurations screen as clean surefire-report:report. Run Configuration with surefire-report:report goal © Onkar Deshpande 39
Creating HTML Reports (Contd.) An Example of an HTML Report Generated Using Maven Surefire Plugin Generated HTML Report © Onkar Deshpande 40
Creating XML Reports  An XML report is created to keep track of the passed or failed test results generated.  In JUnit, generate XML reports when you want to save reports in a database. Parsing the generated XML file saves the reports.  To convert the test reports into the XML format, use the surefire:test goal of the Surefire Plugin.  To the <plugin> section of the POM, you can add dependencies and parameters.  Design test cases after the plug-in and its versions in the <plugin> section are initialized. Adding Code to POM’s <plugin> Section to Generate an XML Report © Onkar Deshpande 41
Creating XML Reports (Contd.)  Test cases are designed after the plug-in and its version in the <plugin> section are initialized.  The test cases are executed using the Maven goal.  The XML report is generated and saved under test>target>surefire-reports> TEST-org. sample.test.test.A ppTest.xml.  The project structure under which the generated XML report is saved is shown in the figure. Project Structure Showing the Generated XML Report © Onkar Deshpande 42
Creating XML Reports (Cont.)  XML reports contain test results, including:  The detailed number of tests run  The number of successful executions  The number of failed test cases and their details Generated XML Report © Onkar Deshpande 43
Creating XML Reports (Contd.)  Some of the Required and Optional Parameters for XML Reports © Onkar Deshpande 44
Best Practices These best practices will enable you to write JUnit tests that run quickly and are extremely reliable:  Use a unique file naming convention for test cases (*Test.java).  Run the JUnit test suite before delivering, merging, or committing code  Separate test code from production code  Use CI that provides the following benefits:  Commit the code frequently.  Categorize developer tests.  Use a dedicated integration build machine.  Use continuous feedback mechanisms.  Stage builds. © Onkar Deshpande 45
© Onkar Deshpande 46
Introduction to Stubs  Stubs:  Are stand-in pieces of code used for programs that are inserted at run  Act as a replacement to the real code, where they simulate the complex behavior of:  Existing code  Yet-to-be-developed code  Used to test the smallest pieces of code, which might be a class, a method, or a function  Can help to control the run-time environment  Replace the real code at run time, replacing a complex behavior (drivers, database access layers, or web service clients) with a simple one for testing a part of the real code independently. © Onkar Deshpande 47
Benefits of Stubs Benefits Isolate the class or SUT Fake the behavior of code not yet created to test a part of the code even if it is incomplete Allows testing of portions of code, as parts that make up the whole Can be added to the test code remotely Edit configuration files of your environment to customize it Record information about method calls Represent original objects to allow testing without modifying the original objects © Onkar Deshpande 48
Using Stubs When to Use Stubs • When the original system is too complex • For course-grained testing (such as integration testing) • When replacing an entire file system or database When Not to Use Stubs • When writing and maintaining stubs gets too complex • When stubs may require debugging • When you need to perform fine-grained testing Note: To use stubs, your application code has to be properly designed based on object-oriented principles. © Onkar Deshpande 49
Testing with Stubs  Using stubs is helpful when the run-time environment restricts or affects your implementation.  Using stubs for testing helps to simulate an external environment like a remote application.  When using a fake object like a stub or a mock, the class or method that is being tested is called the SUT. To use stubs in JUnit code: © Onkar Deshpande 50
Stubbing an HTTP Connection Stubbing an HTTP Connection 1. Establish an HTTP connection between the two systems. 2. Open the established HTTP connection to a remote web resource. 3. Create a test class that calls the SUT. 4. Read the content found in the URL. HTTP Connection Between WebClient and WebServer © Onkar Deshpande 51
Introduction to Mockito Mockito: Is an open source mocking framework Uses the mock testing strategy (called mocking); uses substitutes of objects to validate code Has a simple coding language Has extensive error location Can mock classes and interfaces, resulting in better coding Is used to write clean and simple Application Programming Interface, enabling creation and modification of test code Is user friendly (tests are readable and verification of errors is clean) © Onkar Deshpande 52
Concept of Mocking  Mocking:  Is based on the concept that the mock object replaces the real object  Fakes dependencies  Tests objects and interactions with dependencies  Example of mocking: In a bank, there is an account, a teller (SUT), and a customer, as shown. Using Mocking © Onkar Deshpande 53
Key Phases of Mocking Phase – I: Stubbing • Specify how your mock object must behave when involved in an interaction Phase – II: Setting Expectations • Set a mock object such that it tells what to expect when a test is run • It is done before invoking a function of the SUT Phase – III: Verification • Verify that the expectations have been met. • It is done after invoking a function of the SUT. © Onkar Deshpande 54
Benefits of Mocking  In unit testing, mock objects can simulate the behavior of complex, real objects and are especially useful when a real object is impractical. Benefits Helps to create tests in advance Enables working with multiple teams (write test code for source not yet written) Provides proof of concepts or demos Interact with customers while ensuring confidentiality Isolate systems where dependencies exist Simulate complex, real objects © Onkar Deshpande 55
Stubs Vs. Mocks Stubs Mocks Stubs are used to mimic a real object. Mock is an object used to mimic a domain object. JUnit tests using stubs have assertions against the method. JUnit tests using mocks have assertions against mock objects. Stubs are designed not to fail a test. Mocks can fail a test. Stubs do not return any value. Mocks record test information, which can be retrieved later. Stub methods do not contain code. Mock can contain code in their method. Stubs provide input for the SUT so that a test can be performed on some other object. Mocks provide information to the test to decide on the passing/failure of a test. © Onkar Deshpande 56
Stubs Vs. Mocks (Contd.) © Onkar Deshpande 57
Testing with Mock Using Mockito  Mock objects:  Are stand-ins or fakes used to test dependencies of SUT  Mimic the implementation of a class or an interface  Deliver JUnit test results, without disturbing the original source  Keep the test focused on the SUT  Are created:  Manually or using the mock testing framework  At run time to define their behavior Mock objects are used: • When real objects are always changing • When real objects are slow, difficult to set up, or have a user interface or behaviors that are hard to duplicate • When real objects do not avail queries or do not exist © Onkar Deshpande 58
Mockito Implementation in JUnit Testing To create JUnit test cases using Mockito: 1. Creating Mock Objects 2. Using Stubs to Set Expectations 3. Verifying Using Mockito © Onkar Deshpande 59
Mockito Implementation in JUnit Testing (Contd.) 1. Creating Mock Objects  Create mock objects in JUnit by using:  Static mock() method call  @Mock annotation  Mock object is created and used to test the service.  Use the verify() method to ensure that a method is called in a JUnit mock test.  Use the when() thenReturn() syntax to set condition and return a value if true.  If several return values are specified, these will be returned in sequence until the last specified value is returned. © Onkar Deshpande 60
Mockito Implementation in JUnit Testing (Contd.) 2. Using Stubs to Set Expectations  Create a stub and pass an argument to the method as a mock.  Use the anyInt() method when you cannot predict arguments.  For stubbing void method calls: The when() method cannot be used. Use doReturn(result).when(mock_object).void_method_call() Returns a specific value for the void method  Exceptions using thenThrow() or doThrow() © Onkar Deshpande 61
Mockito Implementation in JUnit Testing (Contd.) 3. Verifying Using Mockito  Use the verify() method to verify whether the set expectations are met.  The verify() method can check whether a behavior happened: Once or twice Multiple times Never  By verifying the set expectations, errors in the code being detected can be determined.  Debug code if the expectations are not met. © Onkar Deshpande 62
Examples of Using Mockito Using Mockito to Mock an Iterator To mock an iterator, use the when() thenReturn() method: Example of Using a Mock Iterator © Onkar Deshpande 63
Examples of Using Mockito (Contd.) The Matchers Class in Mockito Use the Matcher class that contains methods for verifying the arguments that are passed in a method. Method Description any(), anyBoolean(), anyChar(), anyDouble(), anyFloat(), anyString(), anyCollection(), anyList(),… Compares the argument to see if it matches to any specified object or null. isNull(), isNotNull() Compares the argument to see if it is equal or unequal to the null value. Matches(String string) Compares the argument to see if it matches the given regular string expression. startsWith(string) and endsWith(String), Compares to see if a string expression starts or ends with the specified argument. aryEq() Compares to see if an array matches the given array longThat(org.hamcrest.Matcher<java.lang .Long> matcher) Allows creating custom argument matchers. © Onkar Deshpande 64
JUnit Extensions © Onkar Deshpande 65
Testing Entity Mappings - Data Access Objects  Data Access Object:  Handles the mechanism needed to read from and write data to the database.  Presents a single interface without affecting its client or business components.  ORM tools such as Hibernate are used in JPA mode to handle data transfers for Java-based applications. DAO – A Bridge Between the Application and the Data Source © Onkar Deshpande 66
Object Relational Mapping  ORM:  An automated and transparent persistence of objects in a Java application  Automatically changes the property of data so that the data lives beyond the application that created it.  Works by transforming data to a form compatible to your application. ORM contains four parts: API – To perform basic CRUD operations API – To handle requests that refer to classes and properties of classes A facility – To specify metadata mapping A method – To interact with transactional objects to perform optimization tasks © Onkar Deshpande 67
Hibernate Application: What to Test and How to Test It  Hibernate:  An ORM tool that helps to develop applications containing persistent data  Works with data persistence in the context of relational databases such as RDBMS  JUnit tests are written to test both the functions of an ORM (refer to the figure). Hibernate Programming Entity mapping The application relates one set of data to another. API calls The API calls on the ORM to retrieve specified data. © Onkar Deshpande 68
Sample Hibernate Application Test with JUnit  While testing data mapping using JUnit, every Hibernate transaction needs an instance of the Session interface to begin, manage, and end a session.  Session is the API class that handles persistence services in Java.  To create a database and test Hibernate to check whether it retrieves data from the database accurately: 1. Create a database. 2. Create a Maven project. 3. Access the database. 4. Create a Hibernate session. 5. Retrieve records from the database. 6. Write a test class. © Onkar Deshpande 69
Using JPA-Based DAOs  Writing test cases for JPA-based DAO code versus normal JUnit tests:  Use DAO code instead of JPA calls  Write multiple test cases for your application  The key problem involved while testing DAOs is:  Problem: Lazy initialization  Description: Data requested by an application is not loaded by the database until the time that it is actually needed by the application  Possible solution: Using Hibernate in the “Lazy” mode Testing DAO Pattern Classes Using JUnit 1. Create an embedded database using SQL. 2. Create DAO classes. 3. Write JUnit test case classes. 4. Run test cases. © Onkar Deshpande 70
XML Validation  XML validation:  Ensures that the XML response generated for an XML document or an application involving XML data transfer is correct.  Provides experience of testing real-time applications to a developer, to ensure applications are error-free and as per design specifications. © Onkar Deshpande 71
Calling an XML Service Calling an XML Service Invoking the service You need: • A client that raises a service request • A server that services the response Simulating the AJAX request for a JUnit test • A service request needs to be made • Involves writing a client program in JUnit • Written using the Apache Maven Commons HttpClient project © Onkar Deshpande 72
Calling an XML Service - Example 1. The test method starts with the creation of Apache Commons HttpClient, which defines the Http Get method. 2. Write a URL in the GetMethod constructor. 3. The test executes the HTTP Get method and reads the data or the response stream using the Apache Commons IO API IOUtils.toString. 4. In the finally block, once the required response is obtained, the get.releaseConnection () is used to release the HttpClient resources from the third-party system. Using the Commons HttpClient to Call an XML Service © Onkar Deshpande 73
Testing a Mock XML Response  Testing the XML response is a core part of XML validation.  XML validation reports whether a document follows or does not follow the rules specified in the XML schema.  An XML schema describes the structure of an XML document.  Different schema languages are supported by different parsers and tools.  Java introduced the JAXP.  Java 5 introduced a javax.xml.validation package. Schema Language Description Schematron A rule-based XML schema language DTDs A set of markup declarations RELAX NG A pattern-based user-friendly XML schema language NVDL An XML schema language for validating XML documents that integrate with multiple namespaces CREPDL Describes the CREPDL namespace XSD Specifies how to formally describe the elements in an XML document © Onkar Deshpande 74
The javax.xml.validation API  The javax.xml.validation API:  Checks documents for conformance to the defined XML schemas  Provides an interface to validate services independent of the schema languages used  Compares XML documents written in any of the different schema languages Classes Description Functions Schema factory Abstract factories, which provide interfaces to create a group of related objects without specifying their classes Reads the schema document from which the schema object is created Schema object Database objects created from schema factories Creates a validator object Validator Programs that validate the syntactical correctness of an XML document Validates an XML object represented as source © Onkar Deshpande 75
The javax.xml.validation API  XML validation against a schema ensures that an XML document is well-formed and conforms to the defined XML data structure and the syntactic rules. Executing XML Validation 1. Loading a schema factory for the schema language used. 2. Compiling schema from its source 3. Creating a validator from the compiled schema 4. Creating a source object for the document to be validated 5. Validating the input source © Onkar Deshpande 76
Validation Against a Document-Specified Schema  Some documents specify the schema against which they need to be validated.  These documents use the xsi: noNamespaceSchemaLocation and/or xsi: schemaLocation attributes. Using the xsi: noNamespaceSchemaLocation Attribute © Onkar Deshpande 77
Introduction to Testing Data Structures  Testing data structures is in contrast to testing a Java object where you pass some data in JUnit code to test the object’s function.  When you test data structures, you modify the data held in them.  Testing a data structure involves testing its object states before and after a test is run. © Onkar Deshpande 78
Testing Simple Data Structures  Testing data structures confirm that:  The communication between an application and the data structure is precise  The data structure is maintaining the integrity of the data it holds  Data structures hold the algorithms or behaviors to handle or test their data.  To test the linked list, first create a linked list and then write the test code.  A simple data structure is tested using its own methods to ensure that it works according to requirements. Creating a Linked List Testing a New Object Using JUnit’s Assert Statement © Onkar Deshpande 79
Testing Complex Data Structures  The complexity of complex data structures is because of the arrangement of data in the form of tables and indexes.  A relation key is present, which helps to identify the different fields of the same object.  Use JUnit to test whether the custom implementation meets the requirements.  Test involves in testing complex data structures are explained using a scenario. Scenario: A business application that accepts a list of account holder objects.  These objects must have their firstName and lastName fields completed.  Optional fields of account number and phone number for any account type are required. To test this application: 1. Create the AccountDetails class. 2. Implement the data structure by adding it to a new class. 3. Test the data structure for a negative response. 4. Test a positive scenario. 5. Test the object state for the data structure. 6. Add an object. © Onkar Deshpande 80
Unit Testing Frameworks  A testing framework is an object-oriented approach to writing software tests.  A framework contains an object, which manages the execution of a test.  A test framework has three objects:  A test case  A test suite or collection  Test results  The key unit testing frameworks that extend JUnit are:  HTMLUnit framework  XMLUnit framework  SQLUnit framework  DBUnit framework © Onkar Deshpande 81
HTMLUnit Framework The HTMLUnit framework:  Is an open source web browser  Allows high-level manipulation of websites by using Java code  Is used for unit testing the GUI  Is used by writing code that mimics the action of the user of a web browser  Can be used to perform tasks such as:  Create an instance of the WebClient class  Retrieve a web page source  Access HTML page elements  Use anchors  Retrieve the response status  Use assertions © Onkar Deshpande 82
XMLUnit Framework The XMLUnit framework:  Is an open source framework developed for testing a system that generates and receives XML messages  Extends JUnit to allow unit testing of XML  Provides test classes to validate or compare XML files  Provides a single JUnit extension class XMLTestCase and a set of supporting classes for writing test cases with assertions. Class Name Assertion Description Diff & DetailedDiff Provide assertions to differentiate between two pieces of XML. Validator Provides assertions to validate an XML message. Transform Provides assertions to test the outcome of transforming XML messages using XSLT. XPathEngineInte rface Provides assertions to evaluate an XPath expression on a piece of XML message. NodeTest Provides assertions for evaluating individual nodes in a piece of XML document that are exposed by DOM Traversal. © Onkar Deshpande 83
XMLUnit Framework (Contd.)  Some of the common classes used for comparing XML documents are:  The Diff class  The DetailedDiff class  The DifferenceEngine class  The ElementQualifier class, which has the subclasses:  ElementNameQualifier  ELementNameandAttrubiteQualifier  ElementNameandTextQualifier © Onkar Deshpande 84
SQLUnit Framework  The SQL framework:  Is a regression and unit testing harness used to test database stored procedures  Can be used as an extension of JUnit to test the data transfer layer  SQLUnit test suites are XML files and SQLUnit harness written in Java using the JUnit testing framework to convert XML tests to JDBC calls. © Onkar Deshpande 85
DBUnit Framework  The DBUnit framework:  Is an open source framework created by Manuel Laflamme  Provides a solution that enables you to control database dependency within your application by managing the state of the database during testing  Allows you to automate the process, and thus obtain tests that are efficient and save time.  Is used to test projects that depend on a database in such a way that the testing process does not change or alter the database in any way. Also, the integrity of the data stored in the database is protected. Testing a Database-Driven Project 1. Generate a database schema file. 2. Employ DBUnit in JUnit tests. 3. Write JUnit tests. © Onkar Deshpande 86
Best Practices  The best practices that will help you to create extensive, effective test cases are: Test one code at a time. Do not make unnecessary assertions. Mock all external services and states. Do not unit test configuration settings. Set what to expect. Treat test code according to design requirements. Decide the code coverage. Test case class package Target exceptions. © Onkar Deshpande 87
Best Practices (Contd.) Base tests on usage and conditions. Do not use static members. Do not write catch blocks that fail a test. Do not assume the order in which tests run in a test case. Use the setUp() and tearDown() when creating subclasses. Limit the number of mock objects for a test case. Avoid setup overheads. Mock your nearest neighbor. Integrate tests into your build script. Session flushing Using tools © Onkar Deshpande 88
© Onkar Deshpande 89

JUnit- A Unit Testing Framework

  • 1.
    JUnit- A UnitTesting Framework Onkar Deshpande © Onkar Deshpande 1
  • 2.
    Outline of Session  Overview on Unit Testing  Introduction to JUnit  JUnit Features  Annotations and Assert Statements in JUnit  Test Suites in JUnit  JUnit and the Build Process  Testing Strategies © Onkar Deshpande 2
  • 3.
    Toyota’s Prius example A defect found in the production phase is about 50 times more expensive than if it is found during prototyping. If the defect is found after production it will be about 1,000 – 10,000 times more expensive http://blog.crisp.se/henrikkniberg/2010/03/16/12 68757660000.html Reality turned out to be worse, a lot worse! Toyota’s problems with the Prius braking systems is costing them over $2 000 000 000 (2 billion!) to fix because of all the recalls and lost sales. “Toyota announced that a glitch with the software program that controls the vehicle's anti-lock braking system was to blame". © Onkar Deshpande 3
  • 4.
    Why write tests?  Write a lot of code, and one day something will stop working!  Fixing a bug is easy, but how about pinning it down?  You never know where the ripples of your fixes can go.  Are you sure the demon is dead? © Onkar Deshpande 4
  • 5.
    Test Driven Development An evolutionary approach to development where first you write a Test and then add Functionality to pass the test. Image courtesy: http://en.wikipedia.org/wiki/Test-driven_development © Onkar Deshpande 5
  • 6.
    What is UnitTesting?  Unit testing:  Is performed to validate the tester’s assumptions about the code design.  Is an effective method of testing. Each part of the program is isolated to determine which individual parts are correct  Involves testing the smallest unit of code under a variety of input conditions. Class - Smallest Unit in Java © Onkar Deshpande 6
  • 7.
    Benefits of UnitTesting  The key benefits of unit testing are:  Ability to re-factor code with confidence  Proof that your code actually works  Availability of a regression-test suite  Demonstration of concrete progress © Onkar Deshpande 7
  • 8.
    Introduction to JUnitand Software Testing Regression Testing Beta Testing Acceptance Testing Functional Testing System Testing Unit Testing Integration Testing Performance Testing Usability Testing JUnit: A unit testing framework that is extensively used to test the code written in Java. Unit testing is a type of software testing. Software testing: The process of examining whether the software and its components meet the specified requirements Other types of software testing are as shown. © Onkar Deshpande 8
  • 9.
    JUnit Features Asserts Specify the expected output and compare it with the output received Test setup and teardown Sets up test data and tears down that data or context, before and after running the test, respectively Exception testing Tests and verifies whether an exception was thrown Test suites JUnit test cases are organized into test suites for better management Parameterized testing Creates tests that operate on sets of data that are fed into the tests Rules Extend the functionality of Junit by adding behaviors to tests Integration with popular build systems Integrates with most of the popular build systems for Java, including ANT and Maven © Onkar Deshpande 9
  • 10.
    How JUnit Works To test using JUnit: 1. Create a separate project for writing tests that test an SUT. 2. Use a JUnit runner to execute the test code. The runner:  Determines the tests that exist in the test code  Executes the tests  Reports the results, including reporting to a graphical view Writing JUnit tests in an IDE helps you to get quick feedback regarding a test passing or failing. Testing Using JUnit © Onkar Deshpande 10
  • 11.
    Test Case WithoutAnnotations  Consider the test case for a program used to retrieve the name of an account holder based on an account ID. This test case does not use annotations. © Onkar Deshpande 11
  • 12.
    Test Case withAnnotations  The test case for the same program, with the use of annotations.  The @Before and @Test annotations are used in this test case. © Onkar Deshpande 12
  • 13.
    Annotations and AssertStatements in JUnit  Annotations:  Are tags that can be added to the code and then applied to methods or classes  Tell JUnit when to run a test method; in turn, promote efficiency by reducing the amount of coding required  Are predefined and can be implemented directly  Some predefined annotations available in JUnit are listed. PREDEFINED ANNOTATIONS @Test @Before @After @BeforeClass @AfterClass @Ignore © Onkar Deshpande 13
  • 14.
    The @Test Annotation  Attached to a public void method  Informs JUnit that this method can be run as a test  Supports two optional parameters, expected and timeout @Test Expected Timeout Specifies that the test should throw a particular exception Declares that a test has failed if it does not run within the given time limit © Onkar Deshpande 14
  • 15.
    The @Before and@After Annotations  These annotations are used when multiple tests need similar objects to run smoothly.  These objects are created in a superclass whose public void methods are annotated with @Before. As a result, the @Before methods of the superclass run before any of the Test class methods.  Annotating a public void method with @After causes it to run once after executing each test method, even if any of the @Before or Test class methods throw exceptions or fail. © Onkar Deshpande 15
  • 16.
    The @BeforeClass &@AfterClass Annotations  These annotations are used when several tests need to share expensive resources such as servers or databases.  A public static no argument method is annotated with @BeforeClass so that it runs once before any of the test methods in the current class are run.  A public static void method annotated with @AfterClass runs after all the other tests have run and releases the resources. © Onkar Deshpande 16
  • 17.
    The @Ignore Annotation  While testing, certain situations may not require a particular test or a group of tests.  All methods annotated with @Ignore are not executed, even if they are also annotated with @Test.  Annotating a class containing test methods with @Ignore will prevent all tests in that class from running. © Onkar Deshpande 17
  • 18.
    The Assert Class  Contains a set of assertion methods or assert statements that are used to write tests.  Assertion methods are statements that assert a condition set in the method.  Some important methods of the Assert class are: Methods Description void assertEquals(boolean expected, boolean actual) Checks if two primitives or objects are equal. void assertFalse(boolean condition) Checks if a condition set is false. void assertNotNull(Object object) Checks if an object is not null. void assertNull(Object object) Checks if an object is null. void assertTrue(boolean condition) Checks if a condition set is true. void fail() Fails a test that has no messages. © Onkar Deshpande 18
  • 19.
    Composing Test Casesinto Test Suites  In JUnit, when you group multiple test cases into a test suite, these test cases can be run together.  If bugs are detected on running the test suite, only the specific test case can be changed. © Onkar Deshpande 19
  • 20.
    Test Suites Use the @RunWith and @SuiteClasses annotations to run the tests in a suite.  @RunWith: When you annotate a class with @RunWith or create a class that extends a class annotated with @RunWith, JUnit invokes the runner class mentioned in the annotation to run the tests.  @SuiteClasses: Specifies the list of test classes to be run.  An example of suites written using @RunWith and @SuiteClasses in JUnit is shown: @RunWith(Suite.class) @SuiteClasses(ATest.class, BTest.class) public class ABCSuite{ ….. } © Onkar Deshpande 20
  • 21.
    Combining Test Suites  Multiple suites can be combined into a master suite.  Combining test suites logically and functionally helps in calling nested tests within each of the suites with just one invocation.  Suppose you are working with two test suites, and each suite contains two test classes, as listed: OverAllCounterTester(Suite) • DecrementCounterTest • IncrementCounterTest OverallBankingTester(Suite) • AccountTest • SavingsAccountTest How do you combine these two test suites? © Onkar Deshpande 21
  • 22.
    Combining Test Suites(Contd.) DecrementCounter IncrementCounter Account SavingsAccount DecrementCounter Test IncrementCounter Test AccountTest SavingsAccount Test OverAllCounterTester OverallBankingTester OverallCombiningSuites Classes Test Classes Suites Master Suite © Onkar Deshpande 22
  • 23.
    Best Practices Run tests completely in memory.  Write each test such that it is independent of others.  Run every test.  Write each test to perform only one assertion.  Write tests with the strongest assertion possible.  Use the most appropriate assertion methods.  Use assertion parameters in the proper order.  Ensure that the test code is separate from the production code.  Rewrite before debugging  Add a timeout.  Name your tests well.  Target exceptions.  Do not use static members.  Keep the test hard to pass. © Onkar Deshpande 23
  • 24.
  • 25.
    Maven and ItsFeatures  Is a simple project setup, that gets you started in seconds  Enables dependency management  Works and tracks multiple projects at the same time  Has a large library and metadata bank (repositories) that can be used for out-of-the-box use  Has repositories connected to open sources to let you access the latest updates and features with minimum configuration  Is extensible and allows you to write Java plug-ins easily  Follows “Convention over Configuration”  Can create standard reports, websites, and PDF documents © Onkar Deshpande 25
  • 26.
    Project Object Model  Project Object Model (POM) is the fundamental unit of work in Maven.  It is contained in the base directory of any project as pom.xml file.  POM contains project information and configuration details that Maven uses to build JUnit projects.  POM lets you complete the entire build process with a few simple commands.  Each Maven project contains a single POM file. © Onkar Deshpande 26
  • 27.
    Project Object Model(Contd.)  All POM files contain the project element and three mandatory fields:  groupId: Defines the group the project belongs to  artifactId: Is the name of the project  version: Is the version of the project  The project address in the repository is groupId:artifactId:version. <project> <modelVersion>4.0.0</modelVersion> <groupId>com.companyname.project-group</ groupId> <artifactId>project</artifactId> <version>1.0</version> </project> POM for a JUnit Project  You need to configure JUnit to Maven so that you can run Maven tasks in JUnit. © Onkar Deshpande 27
  • 28.
    Running Maven Tasks  Maven is used in the test phase of your JUnit build.  When you run JUnit tests in Maven, the test results are documented as reports, (in the HTML or XML file format).  Maven provides two directories to write the application and test code:  src/main/java: Holds the application code  src/test.java: Hold the test code  To run JUnit tests: A goal in Maven is a task that Maven executes and is specified just before running a task.  Right-click pom.xml in the file tree.  From context menu, select Run as > Run configurations.  In the Create, manage and run configurations screen, add the appropriate conditions in the Goals column. © Onkar Deshpande 28
  • 29.
    Running Maven Tasks(Contd.)  The Create, manage and run configurations screen where goals are specified. Create, manage and run configurations Screen © Onkar Deshpande 29
  • 30.
    Running Maven Tasks(Contd.) Different Conditions for Running Tests Run All the Tests in the Test Folder: Specify “clean compile install” Run All the Tests from a Specified Test Class: Specify “clean compile install” and then specify the class name. Run the Specified Test from the Specified Class: Specify “clean compile install” and then specify the test name and class name. Run all the Tests with the name test* from the Specified Class: Specify “clean compile install” and then specify test* and class name. © Onkar Deshpande 30
  • 31.
    Using the MavenPlug-in for Deploying the WAR/EAR Package  WAR: Web Application archive file is a collection of Jars used to distribute Java-based components of a web application.  EAR: Enterprise Archive files package multiple files and modules into a single archive so that they can be deployed simultaneously. These files exclude test files.  Maven plug-in called mvn install-Dskiptests are used to Deploy WAR/EAR by skipping all contained test methods.  maven.test.skip.property can also be used to deploy the WAR/EAR files © Onkar Deshpande 31
  • 32.
    Using the Corbetura-MavenPlug-In to Test Code Coverage  Maven-Corbetura plug-in is used to measure and calculate the percentage of your application code covered by the test code.  Key features of Corbetura are:  It can be executed in the command line  It instruments Java byte code after compilation  It can generate XML or HTML reports  It shows percent of lines and branches coverage for each class and package and the overall project  It shows the McCabe cyclic code complexities in every class, package, and overall project  It can sort HTML results by class name, percent of lines covered, and percent of branches covered and in ascending or descending order © Onkar Deshpande 32
  • 33.
    JUnit Attachment Plug-ins:Continuous Integration Continuous Integration (CI) is the practice that requires you to integrate your code into a shared repository multiple times during development. CI is used in Java build because of specific reasons:  Helps in quick problem solving: Significantly less back tracking required to locate source of errors  Provides an inexpensive process: CI requires you to integrate code several times during development Benefits Reduces integration time Have greater code visibility Catch and fix errors quickly Verify and test every check-in Reduce integration problems within your system © Onkar Deshpande 33
  • 34.
    Jenkins and Howto Use It  Jenkins is an open source tool used to perform CI by:  Monitoring version control system  Starting and monitoring a build system for changes in versions  To use Jenkins, you need:  An accessible source code repository, such as an SVN repository, with your code checked in.  A working build script, such as a Maven script, checked into the repository.  To install and integrate Jenkins, the main steps are: 1. Download Jenkins web archive from http://jenkins-ci.org/. 2. Configure Jenkins. 3. Configure Maven. 4. Secure the Jenkins console. © Onkar Deshpande 34
  • 35.
    JUnit Attachment Plug-ins:Jenkins (Contd.) To use Jenkins: 1. Create a New Maven Project. 2. Customize your job by filling out job GUI and set Source Code Management to None. 3. Specify Maven goals in the Build section and select Install Test. 4. Locate the Maven project in the Advanced button by selecting Use Custom Workspace and specify project location in your directory. © Onkar Deshpande 35
  • 36.
    JUnit Attachment Plug-ins:Sonar  Sonar is an open-source product used to:  Gather metrics about the quality of your code and display it on a single dashboard  Provides suggestions for making your code reliable and reducing errors  To use Sonar, enable the Sonar plug-in on Jenkins job or run mvn sonar:sonar from Maven Build. This will trigger the following actions:  Sonar will locally analyze code and generate reports from multiple analyses. This will include the JUnit test coverage.  Sonar will push those reports to the Sonar dashboard. © Onkar Deshpande 36
  • 37.
    HTML Reports HTML is a markup language to create web pages.  Reports generated in the HTML format are read-only reports that can be viewed in a web browser, saved, and distributed.  The functionalities of Maven are extended by many plug-ins, which enable faster, easier, and more flexible report generation.  The Apache Maven Surefire Report Plugin is a collection of one or more goals.  The plug-in generates two raw reports at ${basedir}/target/surefire-reports in two formats:  Plain text files (*.test): Contains a statistic line for all test cases  XML files (*.xml): Contains the output © Onkar Deshpande 37
  • 38.
    Creating HTML Reports  To convert the test results report into the HTML format, use the surefire-report: report goal.  To build the report without running the tests, use the surefire-report:report-only goal. A neatly formatted Surefire Test Report is created in the HTML format.  To generate the Surefire Test report in the HTML format, add plug-in dependencies and parameters to the <plugin> section of the POM. Parameters The data type assigned The basic description of the parameter The default value of the parameter The user property © Onkar Deshpande 38
  • 39.
    Creating HTML Reports(Contd.)  To generate HTML reports after JUnit tests are run, set the Goal field in the Create, manage and run configurations screen as clean surefire-report:report. Run Configuration with surefire-report:report goal © Onkar Deshpande 39
  • 40.
    Creating HTML Reports(Contd.) An Example of an HTML Report Generated Using Maven Surefire Plugin Generated HTML Report © Onkar Deshpande 40
  • 41.
    Creating XML Reports  An XML report is created to keep track of the passed or failed test results generated.  In JUnit, generate XML reports when you want to save reports in a database. Parsing the generated XML file saves the reports.  To convert the test reports into the XML format, use the surefire:test goal of the Surefire Plugin.  To the <plugin> section of the POM, you can add dependencies and parameters.  Design test cases after the plug-in and its versions in the <plugin> section are initialized. Adding Code to POM’s <plugin> Section to Generate an XML Report © Onkar Deshpande 41
  • 42.
    Creating XML Reports(Contd.)  Test cases are designed after the plug-in and its version in the <plugin> section are initialized.  The test cases are executed using the Maven goal.  The XML report is generated and saved under test>target>surefire-reports> TEST-org. sample.test.test.A ppTest.xml.  The project structure under which the generated XML report is saved is shown in the figure. Project Structure Showing the Generated XML Report © Onkar Deshpande 42
  • 43.
    Creating XML Reports(Cont.)  XML reports contain test results, including:  The detailed number of tests run  The number of successful executions  The number of failed test cases and their details Generated XML Report © Onkar Deshpande 43
  • 44.
    Creating XML Reports(Contd.)  Some of the Required and Optional Parameters for XML Reports © Onkar Deshpande 44
  • 45.
    Best Practices Thesebest practices will enable you to write JUnit tests that run quickly and are extremely reliable:  Use a unique file naming convention for test cases (*Test.java).  Run the JUnit test suite before delivering, merging, or committing code  Separate test code from production code  Use CI that provides the following benefits:  Commit the code frequently.  Categorize developer tests.  Use a dedicated integration build machine.  Use continuous feedback mechanisms.  Stage builds. © Onkar Deshpande 45
  • 46.
  • 47.
    Introduction to Stubs  Stubs:  Are stand-in pieces of code used for programs that are inserted at run  Act as a replacement to the real code, where they simulate the complex behavior of:  Existing code  Yet-to-be-developed code  Used to test the smallest pieces of code, which might be a class, a method, or a function  Can help to control the run-time environment  Replace the real code at run time, replacing a complex behavior (drivers, database access layers, or web service clients) with a simple one for testing a part of the real code independently. © Onkar Deshpande 47
  • 48.
    Benefits of Stubs Benefits Isolate the class or SUT Fake the behavior of code not yet created to test a part of the code even if it is incomplete Allows testing of portions of code, as parts that make up the whole Can be added to the test code remotely Edit configuration files of your environment to customize it Record information about method calls Represent original objects to allow testing without modifying the original objects © Onkar Deshpande 48
  • 49.
    Using Stubs Whento Use Stubs • When the original system is too complex • For course-grained testing (such as integration testing) • When replacing an entire file system or database When Not to Use Stubs • When writing and maintaining stubs gets too complex • When stubs may require debugging • When you need to perform fine-grained testing Note: To use stubs, your application code has to be properly designed based on object-oriented principles. © Onkar Deshpande 49
  • 50.
    Testing with Stubs  Using stubs is helpful when the run-time environment restricts or affects your implementation.  Using stubs for testing helps to simulate an external environment like a remote application.  When using a fake object like a stub or a mock, the class or method that is being tested is called the SUT. To use stubs in JUnit code: © Onkar Deshpande 50
  • 51.
    Stubbing an HTTPConnection Stubbing an HTTP Connection 1. Establish an HTTP connection between the two systems. 2. Open the established HTTP connection to a remote web resource. 3. Create a test class that calls the SUT. 4. Read the content found in the URL. HTTP Connection Between WebClient and WebServer © Onkar Deshpande 51
  • 52.
    Introduction to Mockito Mockito: Is an open source mocking framework Uses the mock testing strategy (called mocking); uses substitutes of objects to validate code Has a simple coding language Has extensive error location Can mock classes and interfaces, resulting in better coding Is used to write clean and simple Application Programming Interface, enabling creation and modification of test code Is user friendly (tests are readable and verification of errors is clean) © Onkar Deshpande 52
  • 53.
    Concept of Mocking  Mocking:  Is based on the concept that the mock object replaces the real object  Fakes dependencies  Tests objects and interactions with dependencies  Example of mocking: In a bank, there is an account, a teller (SUT), and a customer, as shown. Using Mocking © Onkar Deshpande 53
  • 54.
    Key Phases ofMocking Phase – I: Stubbing • Specify how your mock object must behave when involved in an interaction Phase – II: Setting Expectations • Set a mock object such that it tells what to expect when a test is run • It is done before invoking a function of the SUT Phase – III: Verification • Verify that the expectations have been met. • It is done after invoking a function of the SUT. © Onkar Deshpande 54
  • 55.
    Benefits of Mocking  In unit testing, mock objects can simulate the behavior of complex, real objects and are especially useful when a real object is impractical. Benefits Helps to create tests in advance Enables working with multiple teams (write test code for source not yet written) Provides proof of concepts or demos Interact with customers while ensuring confidentiality Isolate systems where dependencies exist Simulate complex, real objects © Onkar Deshpande 55
  • 56.
    Stubs Vs. Mocks Stubs Mocks Stubs are used to mimic a real object. Mock is an object used to mimic a domain object. JUnit tests using stubs have assertions against the method. JUnit tests using mocks have assertions against mock objects. Stubs are designed not to fail a test. Mocks can fail a test. Stubs do not return any value. Mocks record test information, which can be retrieved later. Stub methods do not contain code. Mock can contain code in their method. Stubs provide input for the SUT so that a test can be performed on some other object. Mocks provide information to the test to decide on the passing/failure of a test. © Onkar Deshpande 56
  • 57.
    Stubs Vs. Mocks(Contd.) © Onkar Deshpande 57
  • 58.
    Testing with MockUsing Mockito  Mock objects:  Are stand-ins or fakes used to test dependencies of SUT  Mimic the implementation of a class or an interface  Deliver JUnit test results, without disturbing the original source  Keep the test focused on the SUT  Are created:  Manually or using the mock testing framework  At run time to define their behavior Mock objects are used: • When real objects are always changing • When real objects are slow, difficult to set up, or have a user interface or behaviors that are hard to duplicate • When real objects do not avail queries or do not exist © Onkar Deshpande 58
  • 59.
    Mockito Implementation inJUnit Testing To create JUnit test cases using Mockito: 1. Creating Mock Objects 2. Using Stubs to Set Expectations 3. Verifying Using Mockito © Onkar Deshpande 59
  • 60.
    Mockito Implementation inJUnit Testing (Contd.) 1. Creating Mock Objects  Create mock objects in JUnit by using:  Static mock() method call  @Mock annotation  Mock object is created and used to test the service.  Use the verify() method to ensure that a method is called in a JUnit mock test.  Use the when() thenReturn() syntax to set condition and return a value if true.  If several return values are specified, these will be returned in sequence until the last specified value is returned. © Onkar Deshpande 60
  • 61.
    Mockito Implementation inJUnit Testing (Contd.) 2. Using Stubs to Set Expectations  Create a stub and pass an argument to the method as a mock.  Use the anyInt() method when you cannot predict arguments.  For stubbing void method calls: The when() method cannot be used. Use doReturn(result).when(mock_object).void_method_call() Returns a specific value for the void method  Exceptions using thenThrow() or doThrow() © Onkar Deshpande 61
  • 62.
    Mockito Implementation inJUnit Testing (Contd.) 3. Verifying Using Mockito  Use the verify() method to verify whether the set expectations are met.  The verify() method can check whether a behavior happened: Once or twice Multiple times Never  By verifying the set expectations, errors in the code being detected can be determined.  Debug code if the expectations are not met. © Onkar Deshpande 62
  • 63.
    Examples of UsingMockito Using Mockito to Mock an Iterator To mock an iterator, use the when() thenReturn() method: Example of Using a Mock Iterator © Onkar Deshpande 63
  • 64.
    Examples of UsingMockito (Contd.) The Matchers Class in Mockito Use the Matcher class that contains methods for verifying the arguments that are passed in a method. Method Description any(), anyBoolean(), anyChar(), anyDouble(), anyFloat(), anyString(), anyCollection(), anyList(),… Compares the argument to see if it matches to any specified object or null. isNull(), isNotNull() Compares the argument to see if it is equal or unequal to the null value. Matches(String string) Compares the argument to see if it matches the given regular string expression. startsWith(string) and endsWith(String), Compares to see if a string expression starts or ends with the specified argument. aryEq() Compares to see if an array matches the given array longThat(org.hamcrest.Matcher<java.lang .Long> matcher) Allows creating custom argument matchers. © Onkar Deshpande 64
  • 65.
    JUnit Extensions ©Onkar Deshpande 65
  • 66.
    Testing Entity Mappings- Data Access Objects  Data Access Object:  Handles the mechanism needed to read from and write data to the database.  Presents a single interface without affecting its client or business components.  ORM tools such as Hibernate are used in JPA mode to handle data transfers for Java-based applications. DAO – A Bridge Between the Application and the Data Source © Onkar Deshpande 66
  • 67.
    Object Relational Mapping  ORM:  An automated and transparent persistence of objects in a Java application  Automatically changes the property of data so that the data lives beyond the application that created it.  Works by transforming data to a form compatible to your application. ORM contains four parts: API – To perform basic CRUD operations API – To handle requests that refer to classes and properties of classes A facility – To specify metadata mapping A method – To interact with transactional objects to perform optimization tasks © Onkar Deshpande 67
  • 68.
    Hibernate Application: Whatto Test and How to Test It  Hibernate:  An ORM tool that helps to develop applications containing persistent data  Works with data persistence in the context of relational databases such as RDBMS  JUnit tests are written to test both the functions of an ORM (refer to the figure). Hibernate Programming Entity mapping The application relates one set of data to another. API calls The API calls on the ORM to retrieve specified data. © Onkar Deshpande 68
  • 69.
    Sample Hibernate ApplicationTest with JUnit  While testing data mapping using JUnit, every Hibernate transaction needs an instance of the Session interface to begin, manage, and end a session.  Session is the API class that handles persistence services in Java.  To create a database and test Hibernate to check whether it retrieves data from the database accurately: 1. Create a database. 2. Create a Maven project. 3. Access the database. 4. Create a Hibernate session. 5. Retrieve records from the database. 6. Write a test class. © Onkar Deshpande 69
  • 70.
    Using JPA-Based DAOs  Writing test cases for JPA-based DAO code versus normal JUnit tests:  Use DAO code instead of JPA calls  Write multiple test cases for your application  The key problem involved while testing DAOs is:  Problem: Lazy initialization  Description: Data requested by an application is not loaded by the database until the time that it is actually needed by the application  Possible solution: Using Hibernate in the “Lazy” mode Testing DAO Pattern Classes Using JUnit 1. Create an embedded database using SQL. 2. Create DAO classes. 3. Write JUnit test case classes. 4. Run test cases. © Onkar Deshpande 70
  • 71.
    XML Validation XML validation:  Ensures that the XML response generated for an XML document or an application involving XML data transfer is correct.  Provides experience of testing real-time applications to a developer, to ensure applications are error-free and as per design specifications. © Onkar Deshpande 71
  • 72.
    Calling an XMLService Calling an XML Service Invoking the service You need: • A client that raises a service request • A server that services the response Simulating the AJAX request for a JUnit test • A service request needs to be made • Involves writing a client program in JUnit • Written using the Apache Maven Commons HttpClient project © Onkar Deshpande 72
  • 73.
    Calling an XMLService - Example 1. The test method starts with the creation of Apache Commons HttpClient, which defines the Http Get method. 2. Write a URL in the GetMethod constructor. 3. The test executes the HTTP Get method and reads the data or the response stream using the Apache Commons IO API IOUtils.toString. 4. In the finally block, once the required response is obtained, the get.releaseConnection () is used to release the HttpClient resources from the third-party system. Using the Commons HttpClient to Call an XML Service © Onkar Deshpande 73
  • 74.
    Testing a MockXML Response  Testing the XML response is a core part of XML validation.  XML validation reports whether a document follows or does not follow the rules specified in the XML schema.  An XML schema describes the structure of an XML document.  Different schema languages are supported by different parsers and tools.  Java introduced the JAXP.  Java 5 introduced a javax.xml.validation package. Schema Language Description Schematron A rule-based XML schema language DTDs A set of markup declarations RELAX NG A pattern-based user-friendly XML schema language NVDL An XML schema language for validating XML documents that integrate with multiple namespaces CREPDL Describes the CREPDL namespace XSD Specifies how to formally describe the elements in an XML document © Onkar Deshpande 74
  • 75.
    The javax.xml.validation API  The javax.xml.validation API:  Checks documents for conformance to the defined XML schemas  Provides an interface to validate services independent of the schema languages used  Compares XML documents written in any of the different schema languages Classes Description Functions Schema factory Abstract factories, which provide interfaces to create a group of related objects without specifying their classes Reads the schema document from which the schema object is created Schema object Database objects created from schema factories Creates a validator object Validator Programs that validate the syntactical correctness of an XML document Validates an XML object represented as source © Onkar Deshpande 75
  • 76.
    The javax.xml.validation API  XML validation against a schema ensures that an XML document is well-formed and conforms to the defined XML data structure and the syntactic rules. Executing XML Validation 1. Loading a schema factory for the schema language used. 2. Compiling schema from its source 3. Creating a validator from the compiled schema 4. Creating a source object for the document to be validated 5. Validating the input source © Onkar Deshpande 76
  • 77.
    Validation Against aDocument-Specified Schema  Some documents specify the schema against which they need to be validated.  These documents use the xsi: noNamespaceSchemaLocation and/or xsi: schemaLocation attributes. Using the xsi: noNamespaceSchemaLocation Attribute © Onkar Deshpande 77
  • 78.
    Introduction to TestingData Structures  Testing data structures is in contrast to testing a Java object where you pass some data in JUnit code to test the object’s function.  When you test data structures, you modify the data held in them.  Testing a data structure involves testing its object states before and after a test is run. © Onkar Deshpande 78
  • 79.
    Testing Simple DataStructures  Testing data structures confirm that:  The communication between an application and the data structure is precise  The data structure is maintaining the integrity of the data it holds  Data structures hold the algorithms or behaviors to handle or test their data.  To test the linked list, first create a linked list and then write the test code.  A simple data structure is tested using its own methods to ensure that it works according to requirements. Creating a Linked List Testing a New Object Using JUnit’s Assert Statement © Onkar Deshpande 79
  • 80.
    Testing Complex DataStructures  The complexity of complex data structures is because of the arrangement of data in the form of tables and indexes.  A relation key is present, which helps to identify the different fields of the same object.  Use JUnit to test whether the custom implementation meets the requirements.  Test involves in testing complex data structures are explained using a scenario. Scenario: A business application that accepts a list of account holder objects.  These objects must have their firstName and lastName fields completed.  Optional fields of account number and phone number for any account type are required. To test this application: 1. Create the AccountDetails class. 2. Implement the data structure by adding it to a new class. 3. Test the data structure for a negative response. 4. Test a positive scenario. 5. Test the object state for the data structure. 6. Add an object. © Onkar Deshpande 80
  • 81.
    Unit Testing Frameworks  A testing framework is an object-oriented approach to writing software tests.  A framework contains an object, which manages the execution of a test.  A test framework has three objects:  A test case  A test suite or collection  Test results  The key unit testing frameworks that extend JUnit are:  HTMLUnit framework  XMLUnit framework  SQLUnit framework  DBUnit framework © Onkar Deshpande 81
  • 82.
    HTMLUnit Framework TheHTMLUnit framework:  Is an open source web browser  Allows high-level manipulation of websites by using Java code  Is used for unit testing the GUI  Is used by writing code that mimics the action of the user of a web browser  Can be used to perform tasks such as:  Create an instance of the WebClient class  Retrieve a web page source  Access HTML page elements  Use anchors  Retrieve the response status  Use assertions © Onkar Deshpande 82
  • 83.
    XMLUnit Framework TheXMLUnit framework:  Is an open source framework developed for testing a system that generates and receives XML messages  Extends JUnit to allow unit testing of XML  Provides test classes to validate or compare XML files  Provides a single JUnit extension class XMLTestCase and a set of supporting classes for writing test cases with assertions. Class Name Assertion Description Diff & DetailedDiff Provide assertions to differentiate between two pieces of XML. Validator Provides assertions to validate an XML message. Transform Provides assertions to test the outcome of transforming XML messages using XSLT. XPathEngineInte rface Provides assertions to evaluate an XPath expression on a piece of XML message. NodeTest Provides assertions for evaluating individual nodes in a piece of XML document that are exposed by DOM Traversal. © Onkar Deshpande 83
  • 84.
    XMLUnit Framework (Contd.)  Some of the common classes used for comparing XML documents are:  The Diff class  The DetailedDiff class  The DifferenceEngine class  The ElementQualifier class, which has the subclasses:  ElementNameQualifier  ELementNameandAttrubiteQualifier  ElementNameandTextQualifier © Onkar Deshpande 84
  • 85.
    SQLUnit Framework The SQL framework:  Is a regression and unit testing harness used to test database stored procedures  Can be used as an extension of JUnit to test the data transfer layer  SQLUnit test suites are XML files and SQLUnit harness written in Java using the JUnit testing framework to convert XML tests to JDBC calls. © Onkar Deshpande 85
  • 86.
    DBUnit Framework The DBUnit framework:  Is an open source framework created by Manuel Laflamme  Provides a solution that enables you to control database dependency within your application by managing the state of the database during testing  Allows you to automate the process, and thus obtain tests that are efficient and save time.  Is used to test projects that depend on a database in such a way that the testing process does not change or alter the database in any way. Also, the integrity of the data stored in the database is protected. Testing a Database-Driven Project 1. Generate a database schema file. 2. Employ DBUnit in JUnit tests. 3. Write JUnit tests. © Onkar Deshpande 86
  • 87.
    Best Practices The best practices that will help you to create extensive, effective test cases are: Test one code at a time. Do not make unnecessary assertions. Mock all external services and states. Do not unit test configuration settings. Set what to expect. Treat test code according to design requirements. Decide the code coverage. Test case class package Target exceptions. © Onkar Deshpande 87
  • 88.
    Best Practices (Contd.) Base tests on usage and conditions. Do not use static members. Do not write catch blocks that fail a test. Do not assume the order in which tests run in a test case. Use the setUp() and tearDown() when creating subclasses. Limit the number of mock objects for a test case. Avoid setup overheads. Mock your nearest neighbor. Integrate tests into your build script. Session flushing Using tools © Onkar Deshpande 88
  • 89.