How to Implement Micro Frontend Architecture using Angular Framework Presented by: Unnikrishnan M, Software Engineer
How to Implement Micro Frontend Architecture using Angular Framework © RapidValue Solutions Confidential 2 Micro Frontend Architecture in Angular The Angular team introduced the concept of workspaces in their 7.0.0 version which was released in Oct, 2018. With this update, Angular gave developers a new --create-application flag feature during creation of the application. By default the --create-application flag will be false. Example:- ng new <workspaceName> --create-application=<true/false> With this addition, the developers now have the option to easily create an application, library or workspace. The following is the Angular CLI command to generate/modify the files based on schematics:- ng generate <schematic> [options] This schematic can take one of the following values: • appShell • application • class • component • directive • enum • guard • interceptor • interface • library • module • pipe • service • serviceWorker • webWorker Workspace Setup-Basic Angular CLI Commands How to Implement Micro Frontend Architecture using Angular Framework We will be looking into the basic commands used for generating:- 1. Application ng generate application <name> [options] ng g application <name> [options] OPTION DESCRIPTION --inlineStyle=true|false True -> Includes styles inline in the root component.ts file. Only CSS styles can be included inline. False -> External styles file is created and referenced in the root component.ts file. Default: false Aliases: -s
How to Implement Micro Frontend Architecture using Angular Framework © RapidValue Solutions Confidential 3 --inlineTemplate=true|false True -> Includes template inline in the root component.ts file. False ->External template file is created and referenced in the root component.ts file. Default: false Aliases: -t --lintFix=true|false True -> Applies lint fixes after generating the application. Default: false --minimal=true|false True -> Creates a bare-bones project without any testing frameworks. (Used for learning purposes only.) Default: false --prefix=prefix A prefix to apply to generated selectors. Default: app Aliases: -p --routing=true|false True -> Creates a routing NgModule. Default: false --skipInstall=true|false Skips installing dependency packages. Default: false --skipPackageJson=true|false True -> Does not add dependencies to the "package.json" file. Default: false --skipTests=true|false True -> Does not create "spec.ts" test files for the app. Default: false Aliases: -S --style= css|scss|sass|less|styl File extension/preprocessor to use for style files. Default: css --viewEncapsulation= Emulated|Native|None|ShadowDom View encapsulation strategy to use in the new app. 2. Component ng generate component <name> [options] ng g component <name> [options] OPTION DESCRIPTION --changeDetection=Default|OnPush Change detection strategy to use in the new component. Default: Default Aliases: -c --displayBlock=true|false Specifies if the style will contain :host { display: block; }. Default: false Aliases: -b --export=true|false True -> Declaring NgModule exports this component. Default: false --flat=true|false True -> Creates the new files at the top level of the current project. Default: false
How to Implement Micro Frontend Architecture using Angular Framework © RapidValue Solutions Confidential 4 --inlineStyle=true|false True -> Includes styles inline in the root component.ts file. Only CSS styles can be included inline. False -> External styles file is created and referenced in the root component.ts file. Default: false Aliases: -s --inlineTemplate=true|false True -> Includes template inline in the root component.ts file. False ->External template file is created and referenced in the root component.ts file. Default: false Aliases: -t --lintFix=true|false True -> Applies lint fixes after generating the application. Default: false --module=module Declaring NgModule. Aliases: -m --prefix=prefix Prefix to apply to the generated component selector. Aliases: -p --project=project Name of the project. --selector=selector HTML selector to use for this component. --skipImport=true|false True -> Does not import this component into the owning NgModule. Default: false --skipSelector=true|false True -> Specifies if the component should have a selector. Default: false --skipTests=true|false True -> Does not create "spec.ts" test files for the new component. Default: false --style= css|scss|sass|less|styl File extension or preprocessor to use for style files. Default: css --type=type Adds a developer-defined type to the filename, in the format "name.type.ts". Default: Component --viewEncapsulation= Emulated|Native|None|ShadowDom View encapsulation strategy to use in the new component. Aliases: -v 3. Library ng generate library <name> [options] ng g library <name> [options] OPTION DESCRIPTION --entryFile=entryFile Path in which the library's public API file is created, relative to the workspace root. Default: public-api --lintFix=true|false True -> Applies lint fixes after generating the library. Default: false
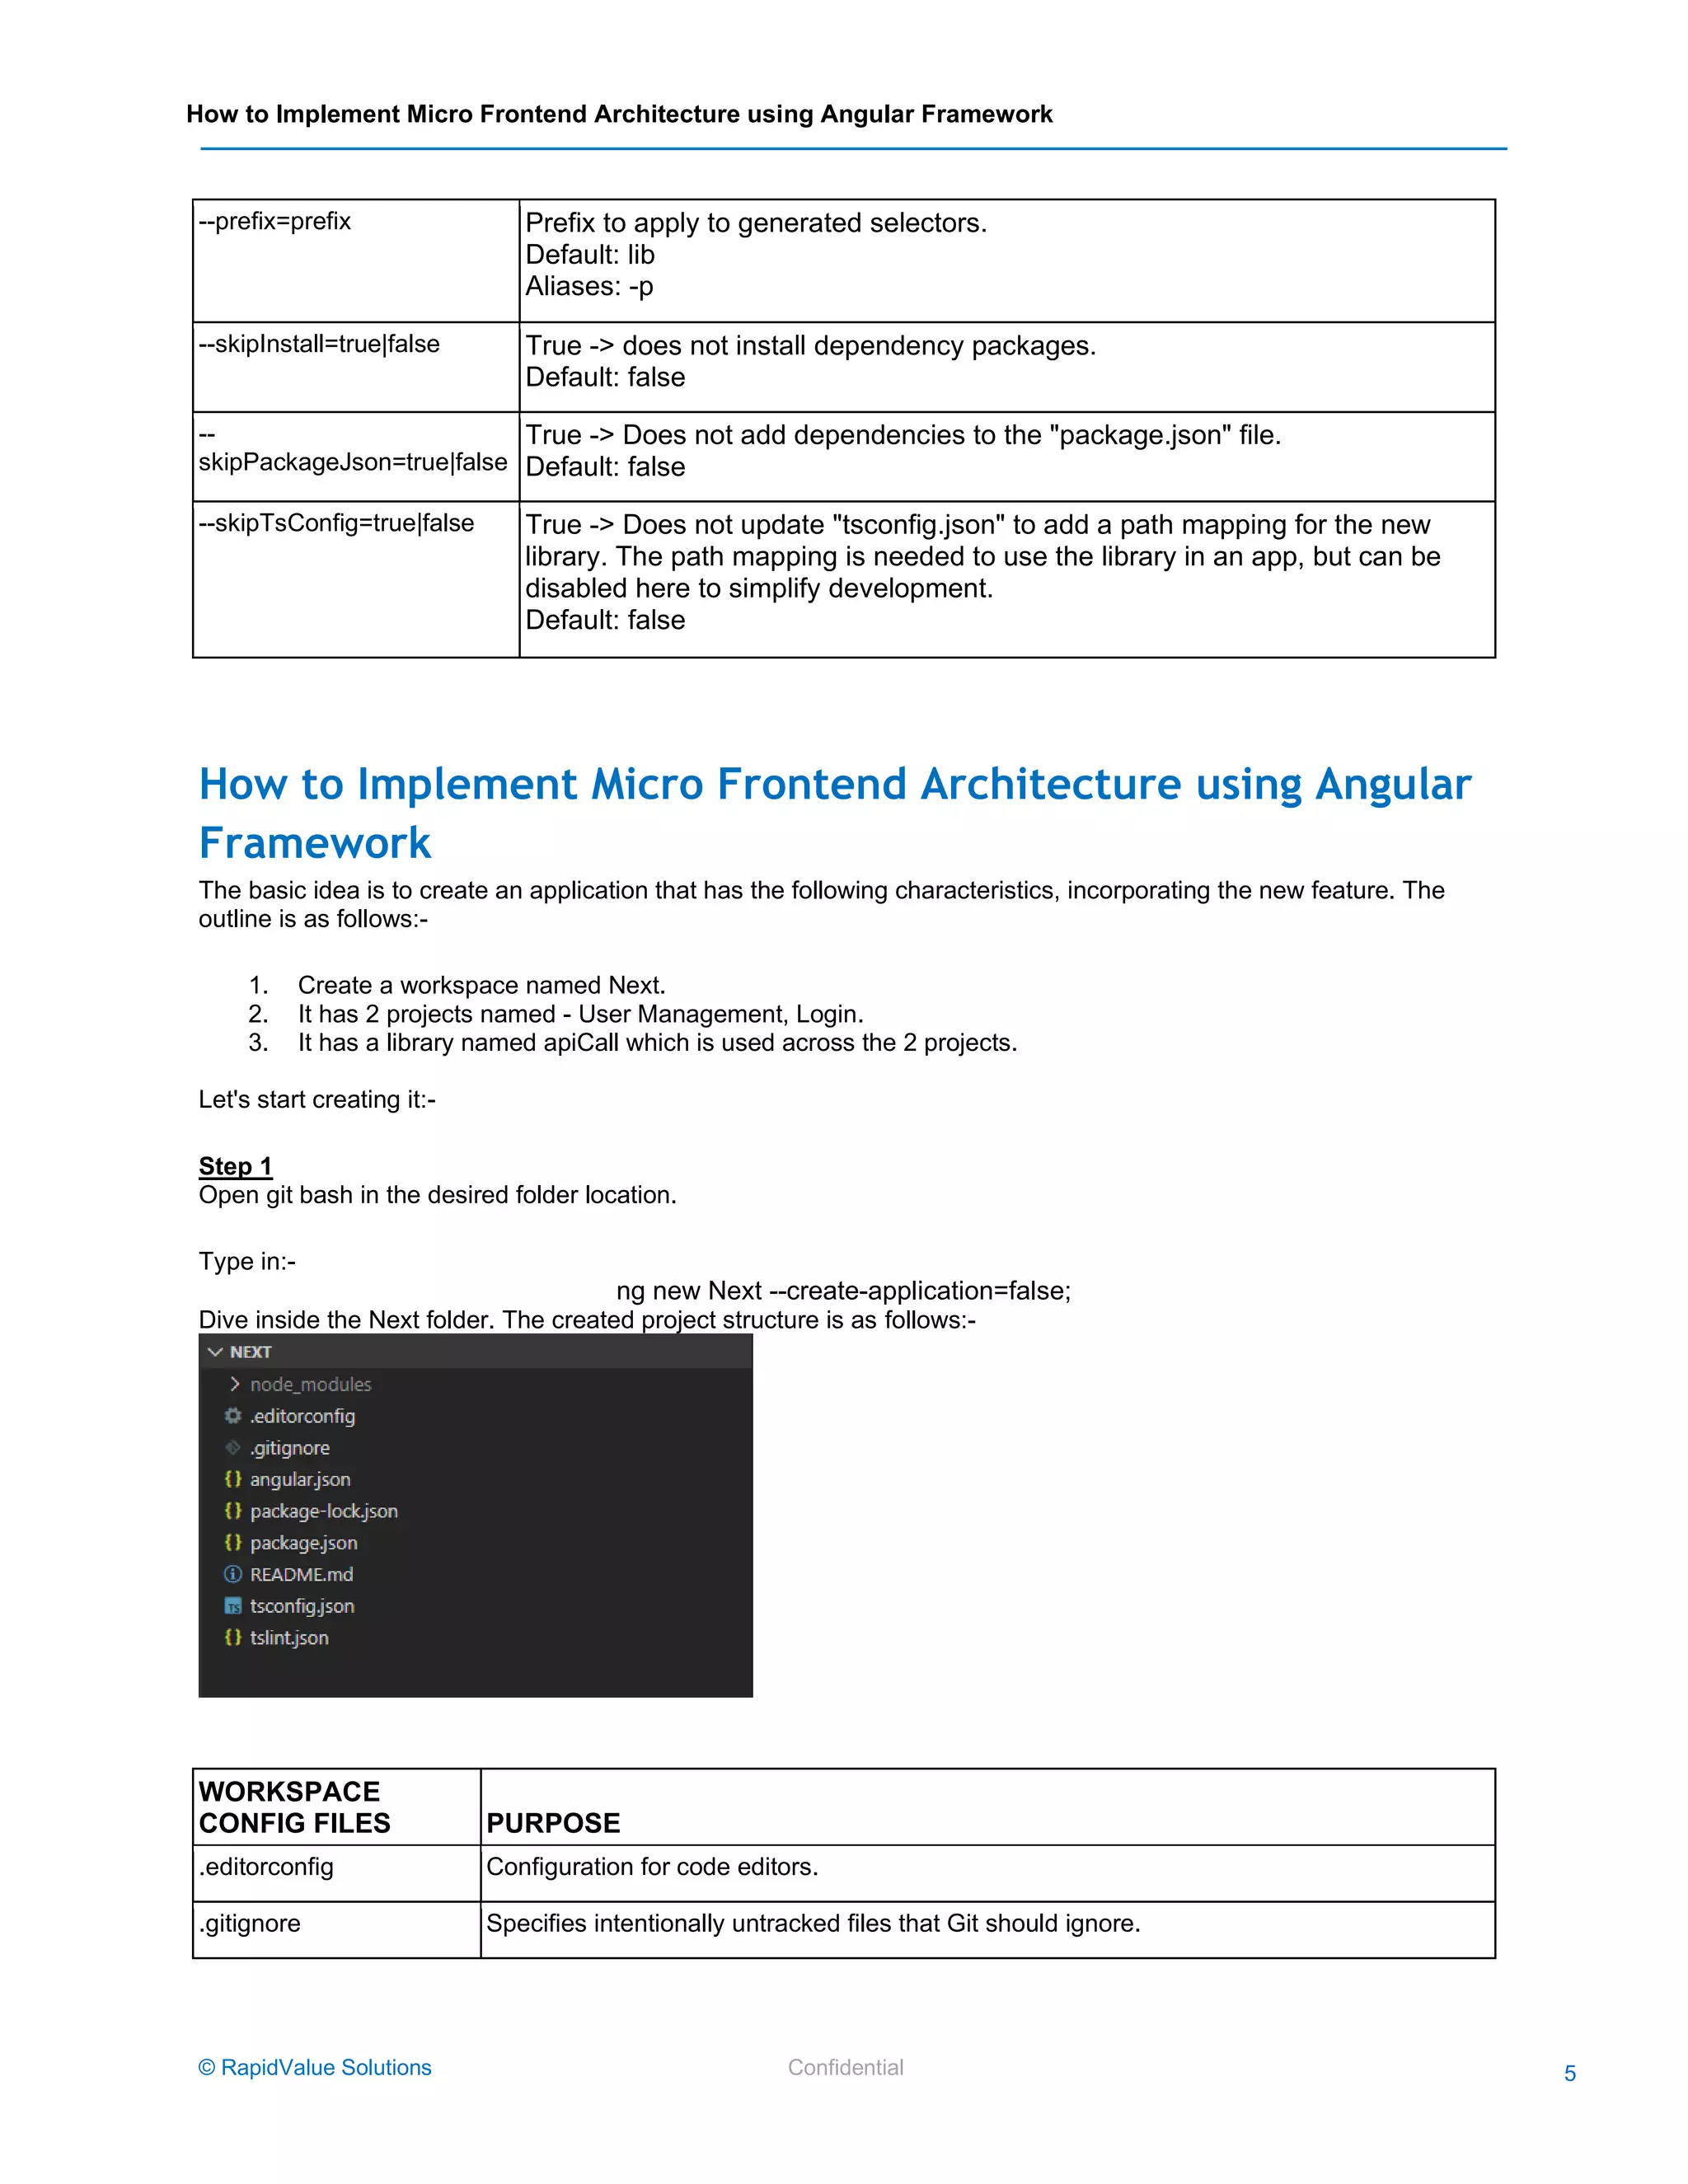
How to Implement Micro Frontend Architecture using Angular Framework © RapidValue Solutions Confidential 5 --prefix=prefix Prefix to apply to generated selectors. Default: lib Aliases: -p --skipInstall=true|false True -> does not install dependency packages. Default: false -- skipPackageJson=true|false True -> Does not add dependencies to the "package.json" file. Default: false --skipTsConfig=true|false True -> Does not update "tsconfig.json" to add a path mapping for the new library. The path mapping is needed to use the library in an app, but can be disabled here to simplify development. Default: false How to Implement Micro Frontend Architecture using Angular Framework The basic idea is to create an application that has the following characteristics, incorporating the new feature. The outline is as follows:- 1. Create a workspace named Next. 2. It has 2 projects named - User Management, Login. 3. It has a library named apiCall which is used across the 2 projects. Let's start creating it:- Step 1 Open git bash in the desired folder location. Type in:- ng new Next --create-application=false; Dive inside the Next folder. The created project structure is as follows:- WORKSPACE CONFIG FILES PURPOSE .editorconfig Configuration for code editors. .gitignore Specifies intentionally untracked files that Git should ignore.
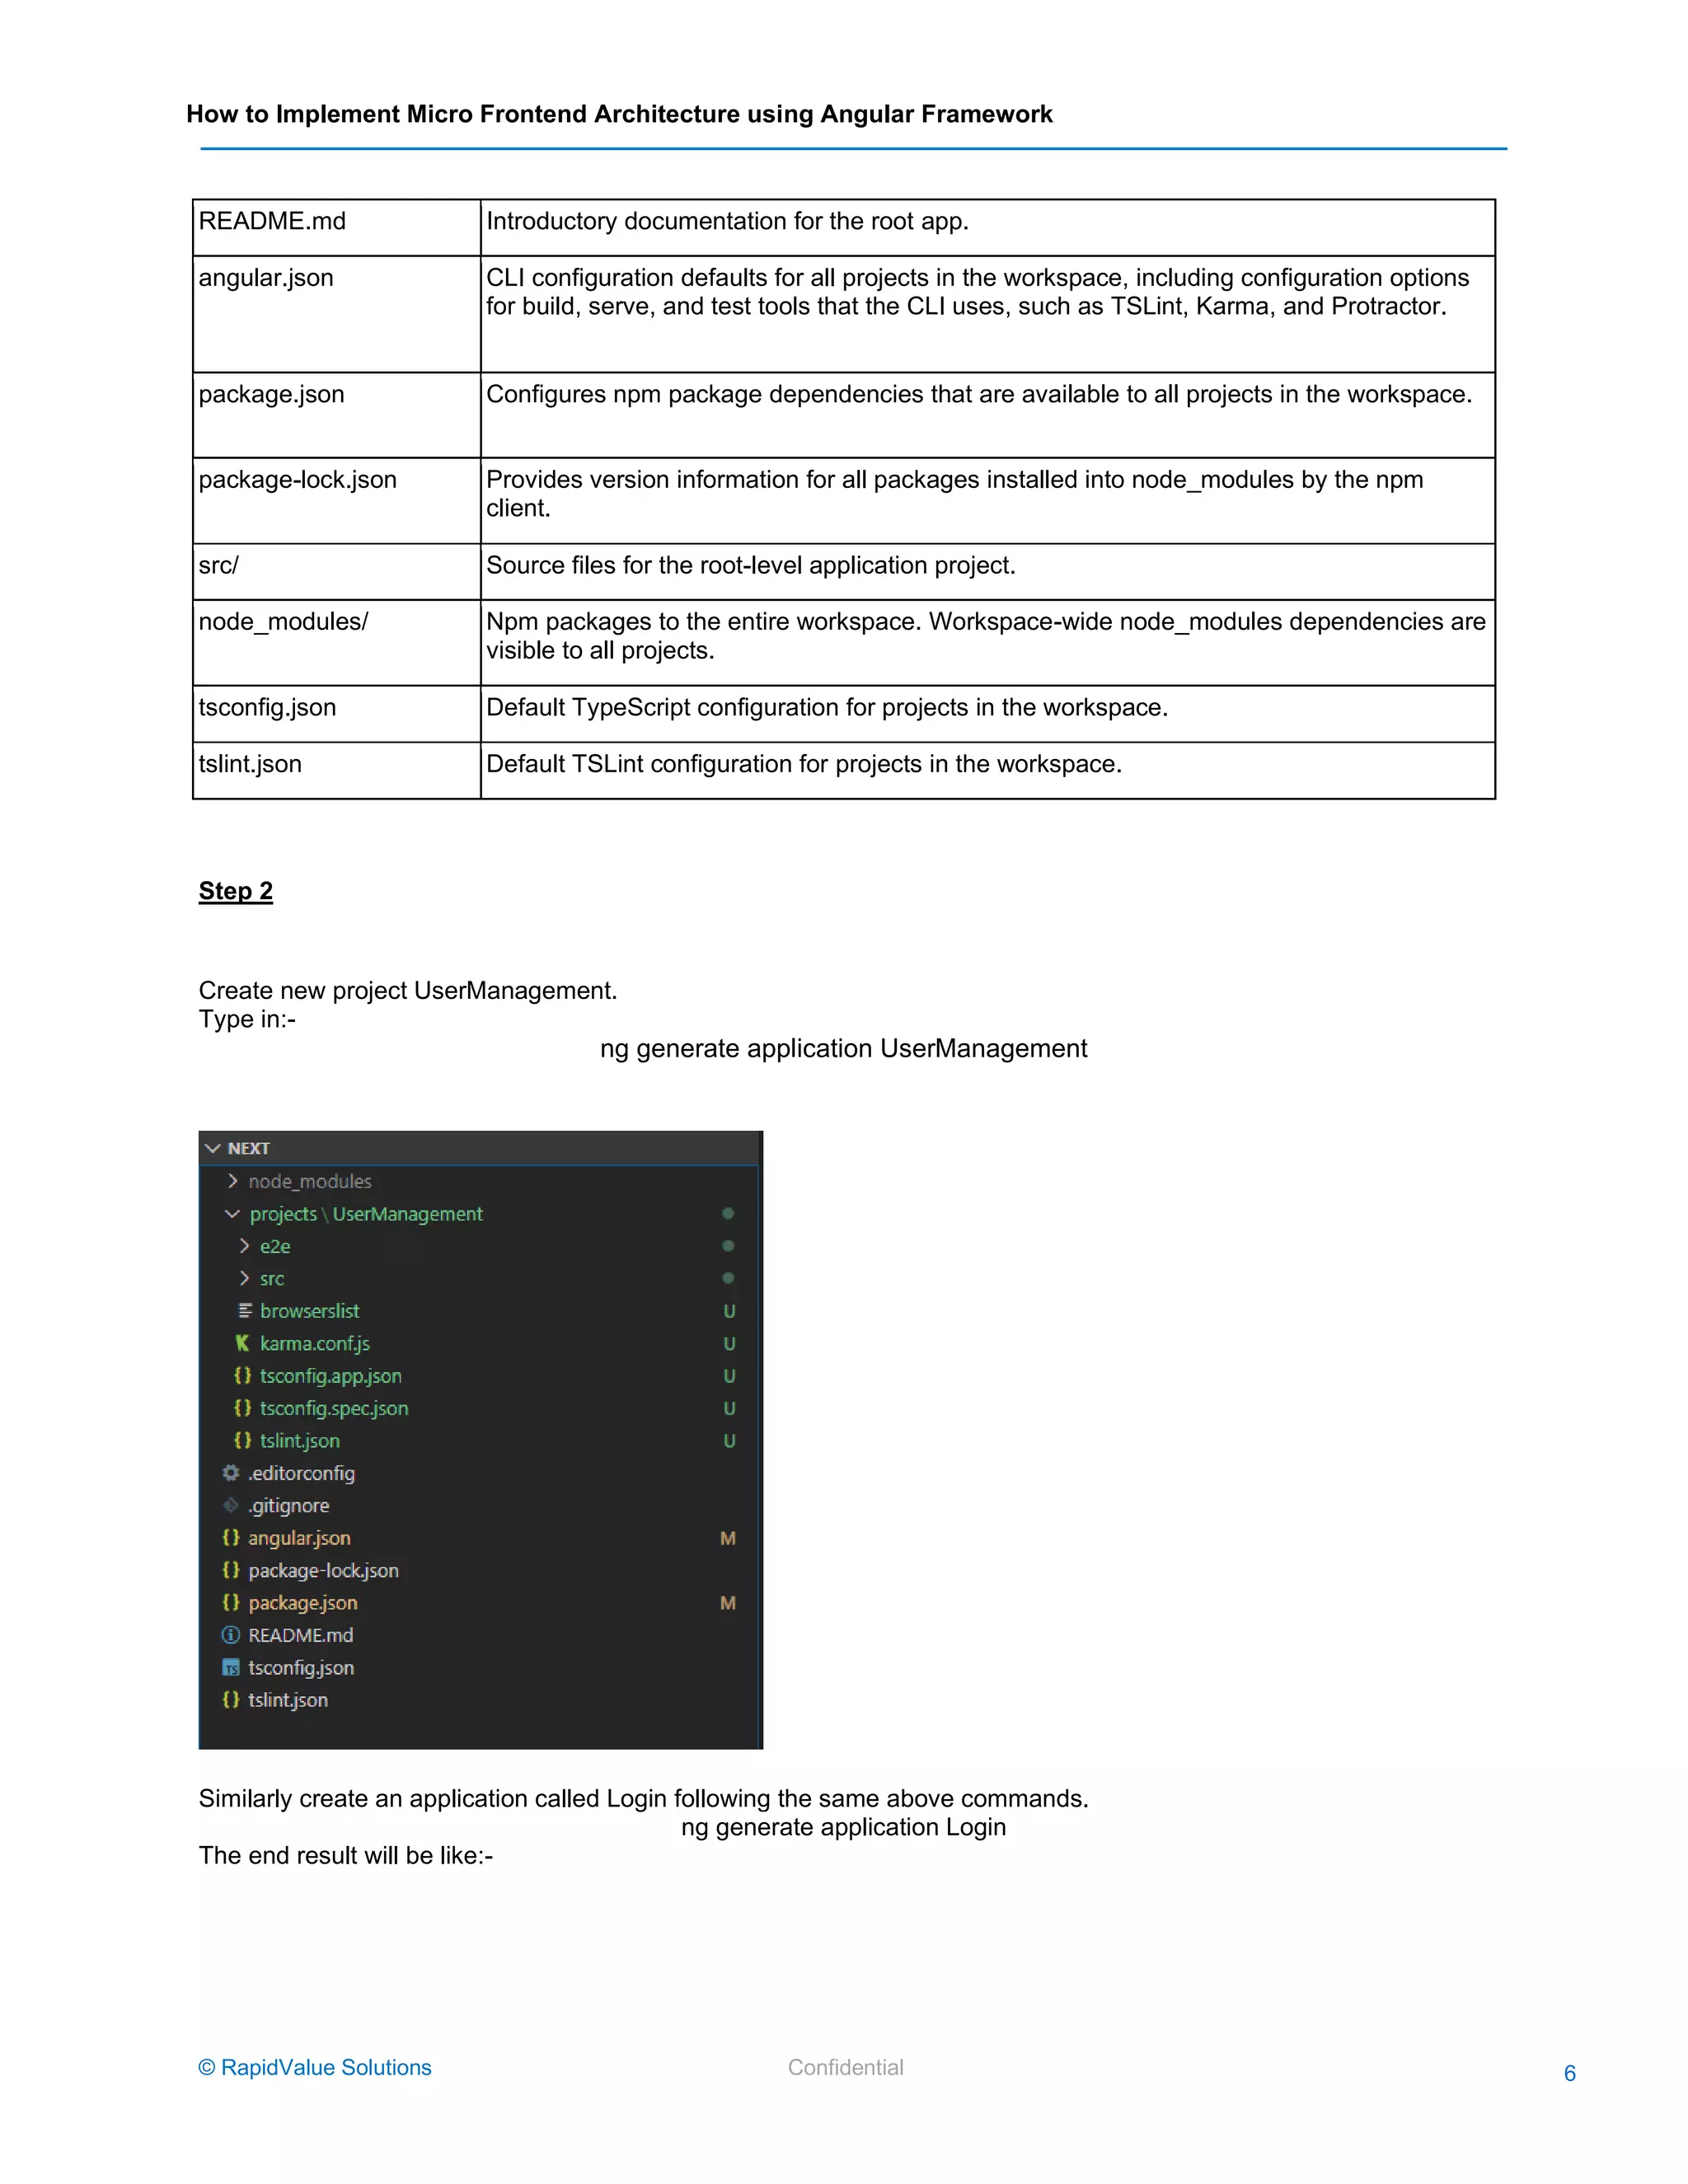
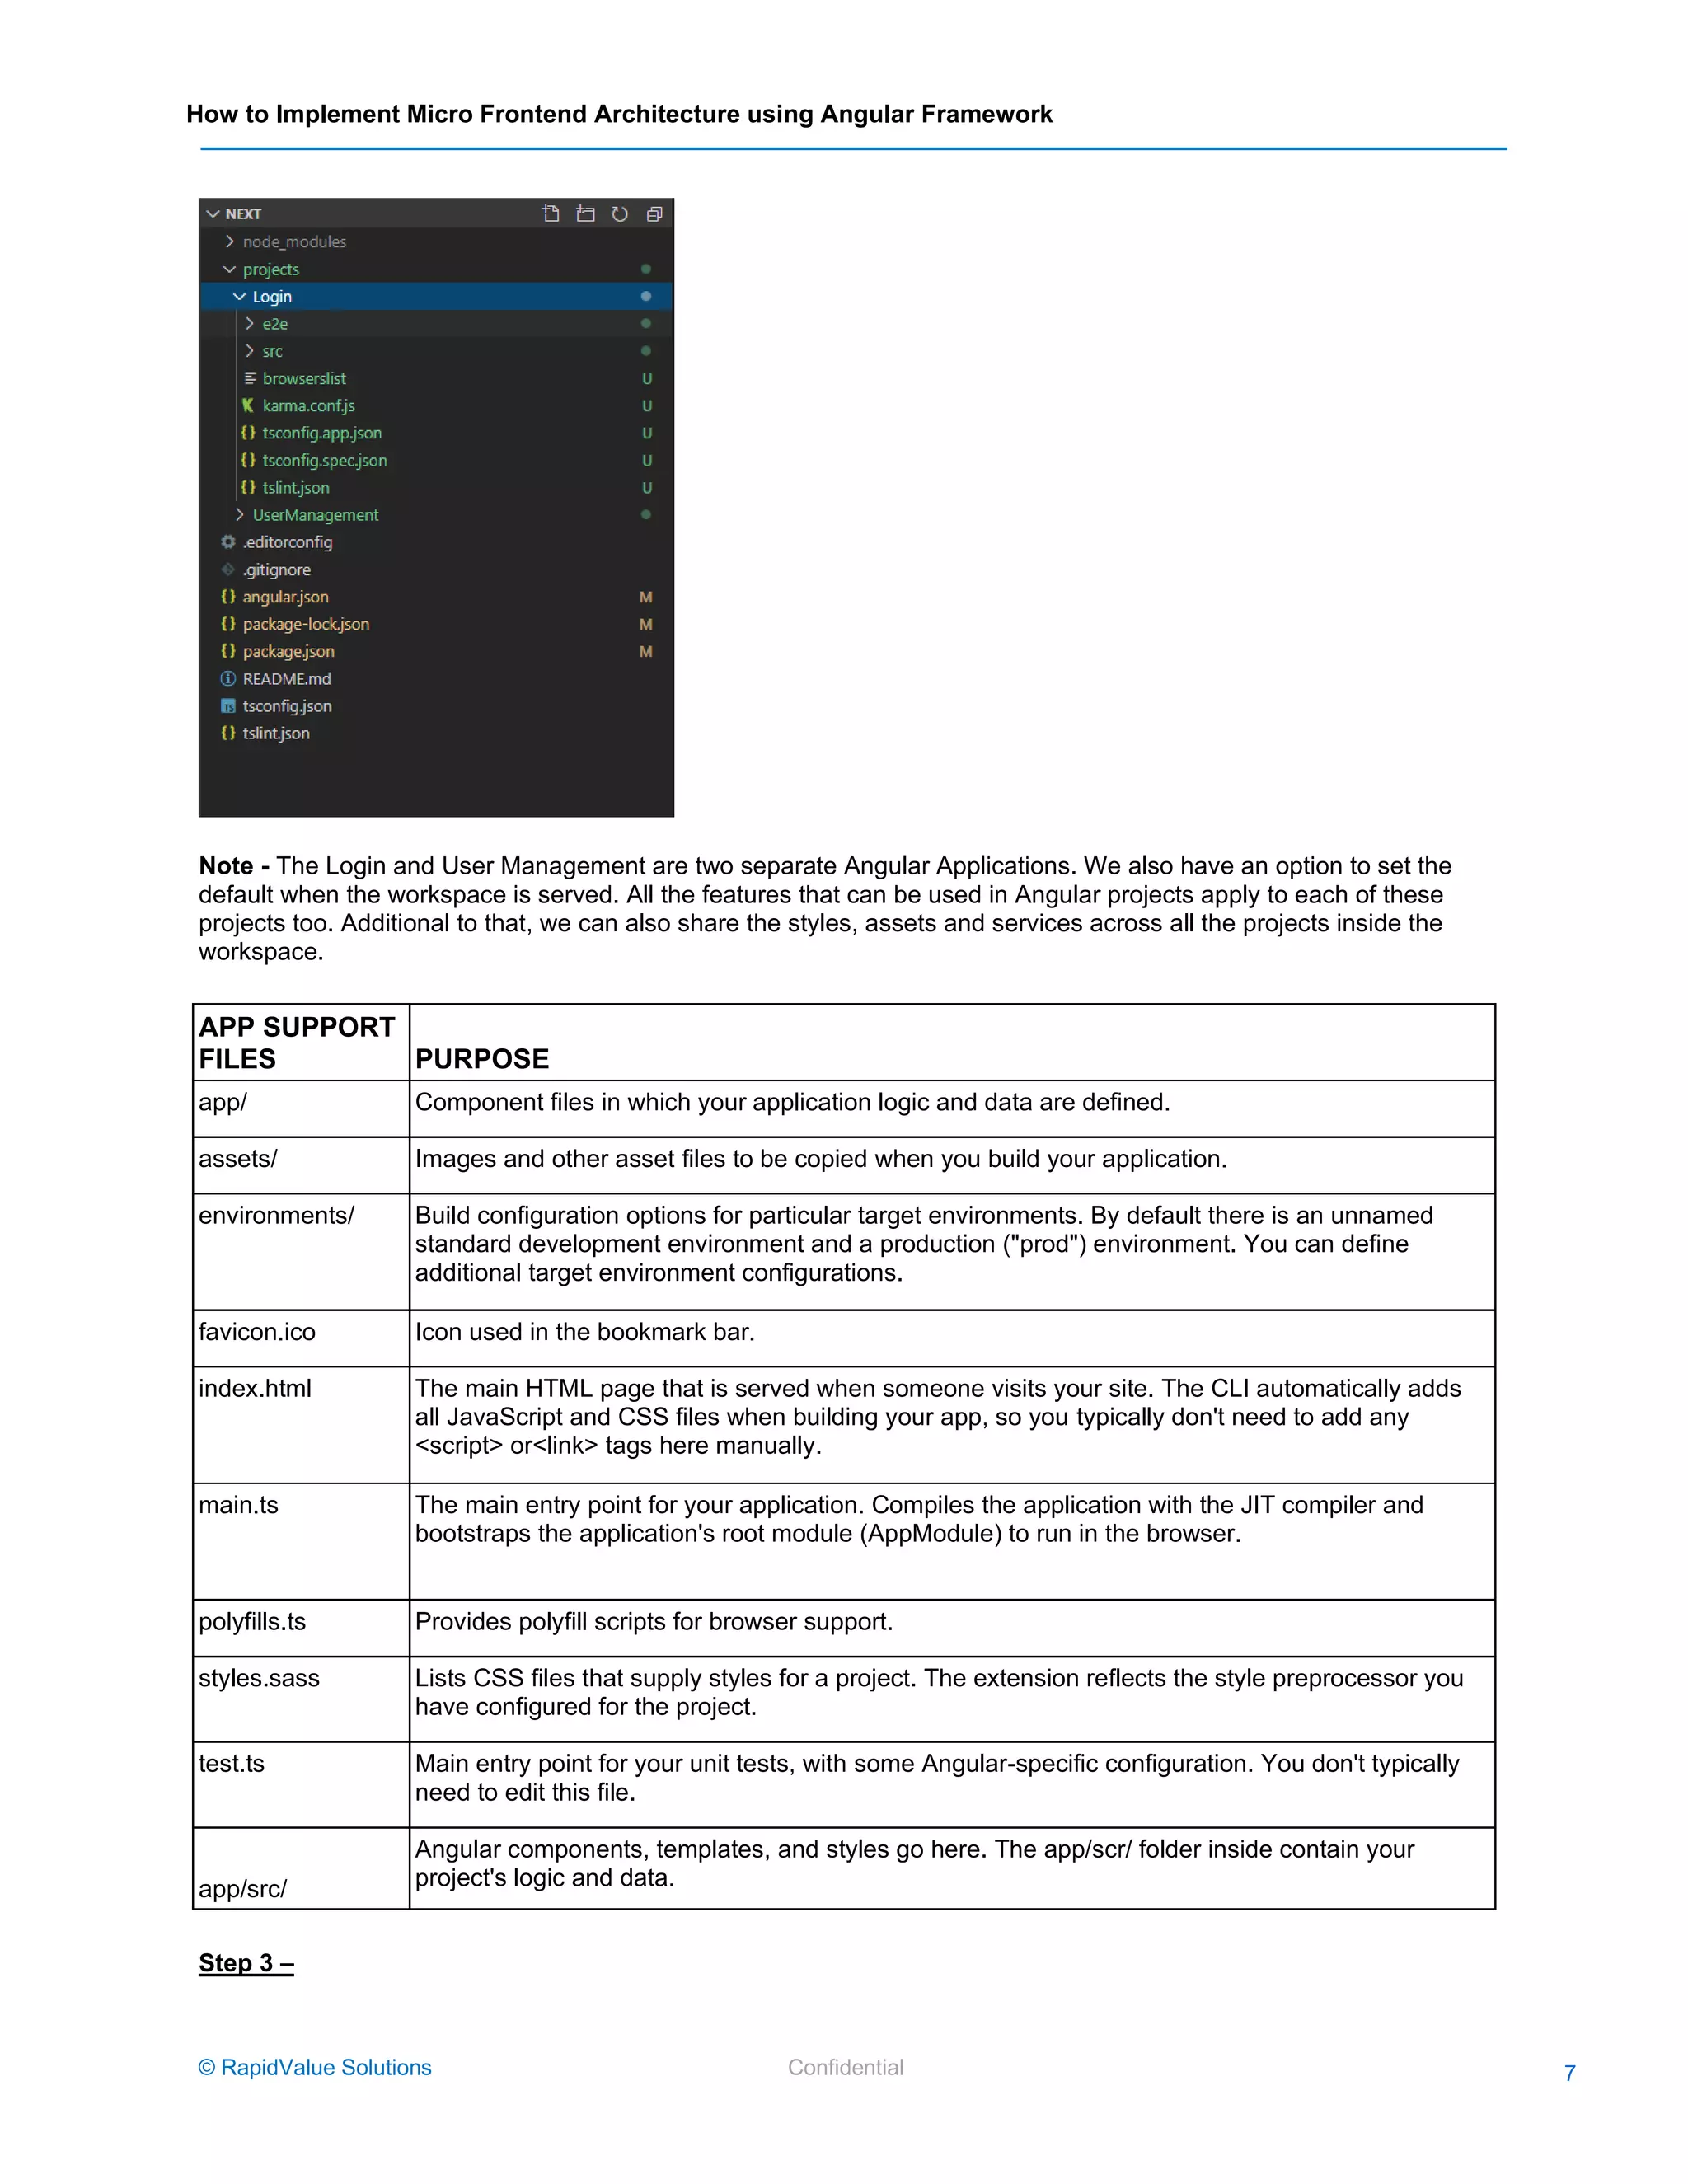
How to Implement Micro Frontend Architecture using Angular Framework © RapidValue Solutions Confidential 6 README.md Introductory documentation for the root app. angular.json CLI configuration defaults for all projects in the workspace, including configuration options for build, serve, and test tools that the CLI uses, such as TSLint, Karma, and Protractor. package.json Configures npm package dependencies that are available to all projects in the workspace. package-lock.json Provides version information for all packages installed into node_modules by the npm client. src/ Source files for the root-level application project. node_modules/ Npm packages to the entire workspace. Workspace-wide node_modules dependencies are visible to all projects. tsconfig.json Default TypeScript configuration for projects in the workspace. tslint.json Default TSLint configuration for projects in the workspace. Step 2 Create new project UserManagement. Type in:- ng generate application UserManagement Similarly create an application called Login following the same above commands. ng generate application Login The end result will be like:-
How to Implement Micro Frontend Architecture using Angular Framework © RapidValue Solutions Confidential 7 Note - The Login and User Management are two separate Angular Applications. We also have an option to set the default when the workspace is served. All the features that can be used in Angular projects apply to each of these projects too. Additional to that, we can also share the styles, assets and services across all the projects inside the workspace. APP SUPPORT FILES PURPOSE app/ Component files in which your application logic and data are defined. assets/ Images and other asset files to be copied when you build your application. environments/ Build configuration options for particular target environments. By default there is an unnamed standard development environment and a production ("prod") environment. You can define additional target environment configurations. favicon.ico Icon used in the bookmark bar. index.html The main HTML page that is served when someone visits your site. The CLI automatically adds all JavaScript and CSS files when building your app, so you typically don't need to add any <script> or<link> tags here manually. main.ts The main entry point for your application. Compiles the application with the JIT compiler and bootstraps the application's root module (AppModule) to run in the browser. polyfills.ts Provides polyfill scripts for browser support. styles.sass Lists CSS files that supply styles for a project. The extension reflects the style preprocessor you have configured for the project. test.ts Main entry point for your unit tests, with some Angular-specific configuration. You don't typically need to edit this file. app/src/ Angular components, templates, and styles go here. The app/scr/ folder inside contain your project's logic and data. Step 3 –
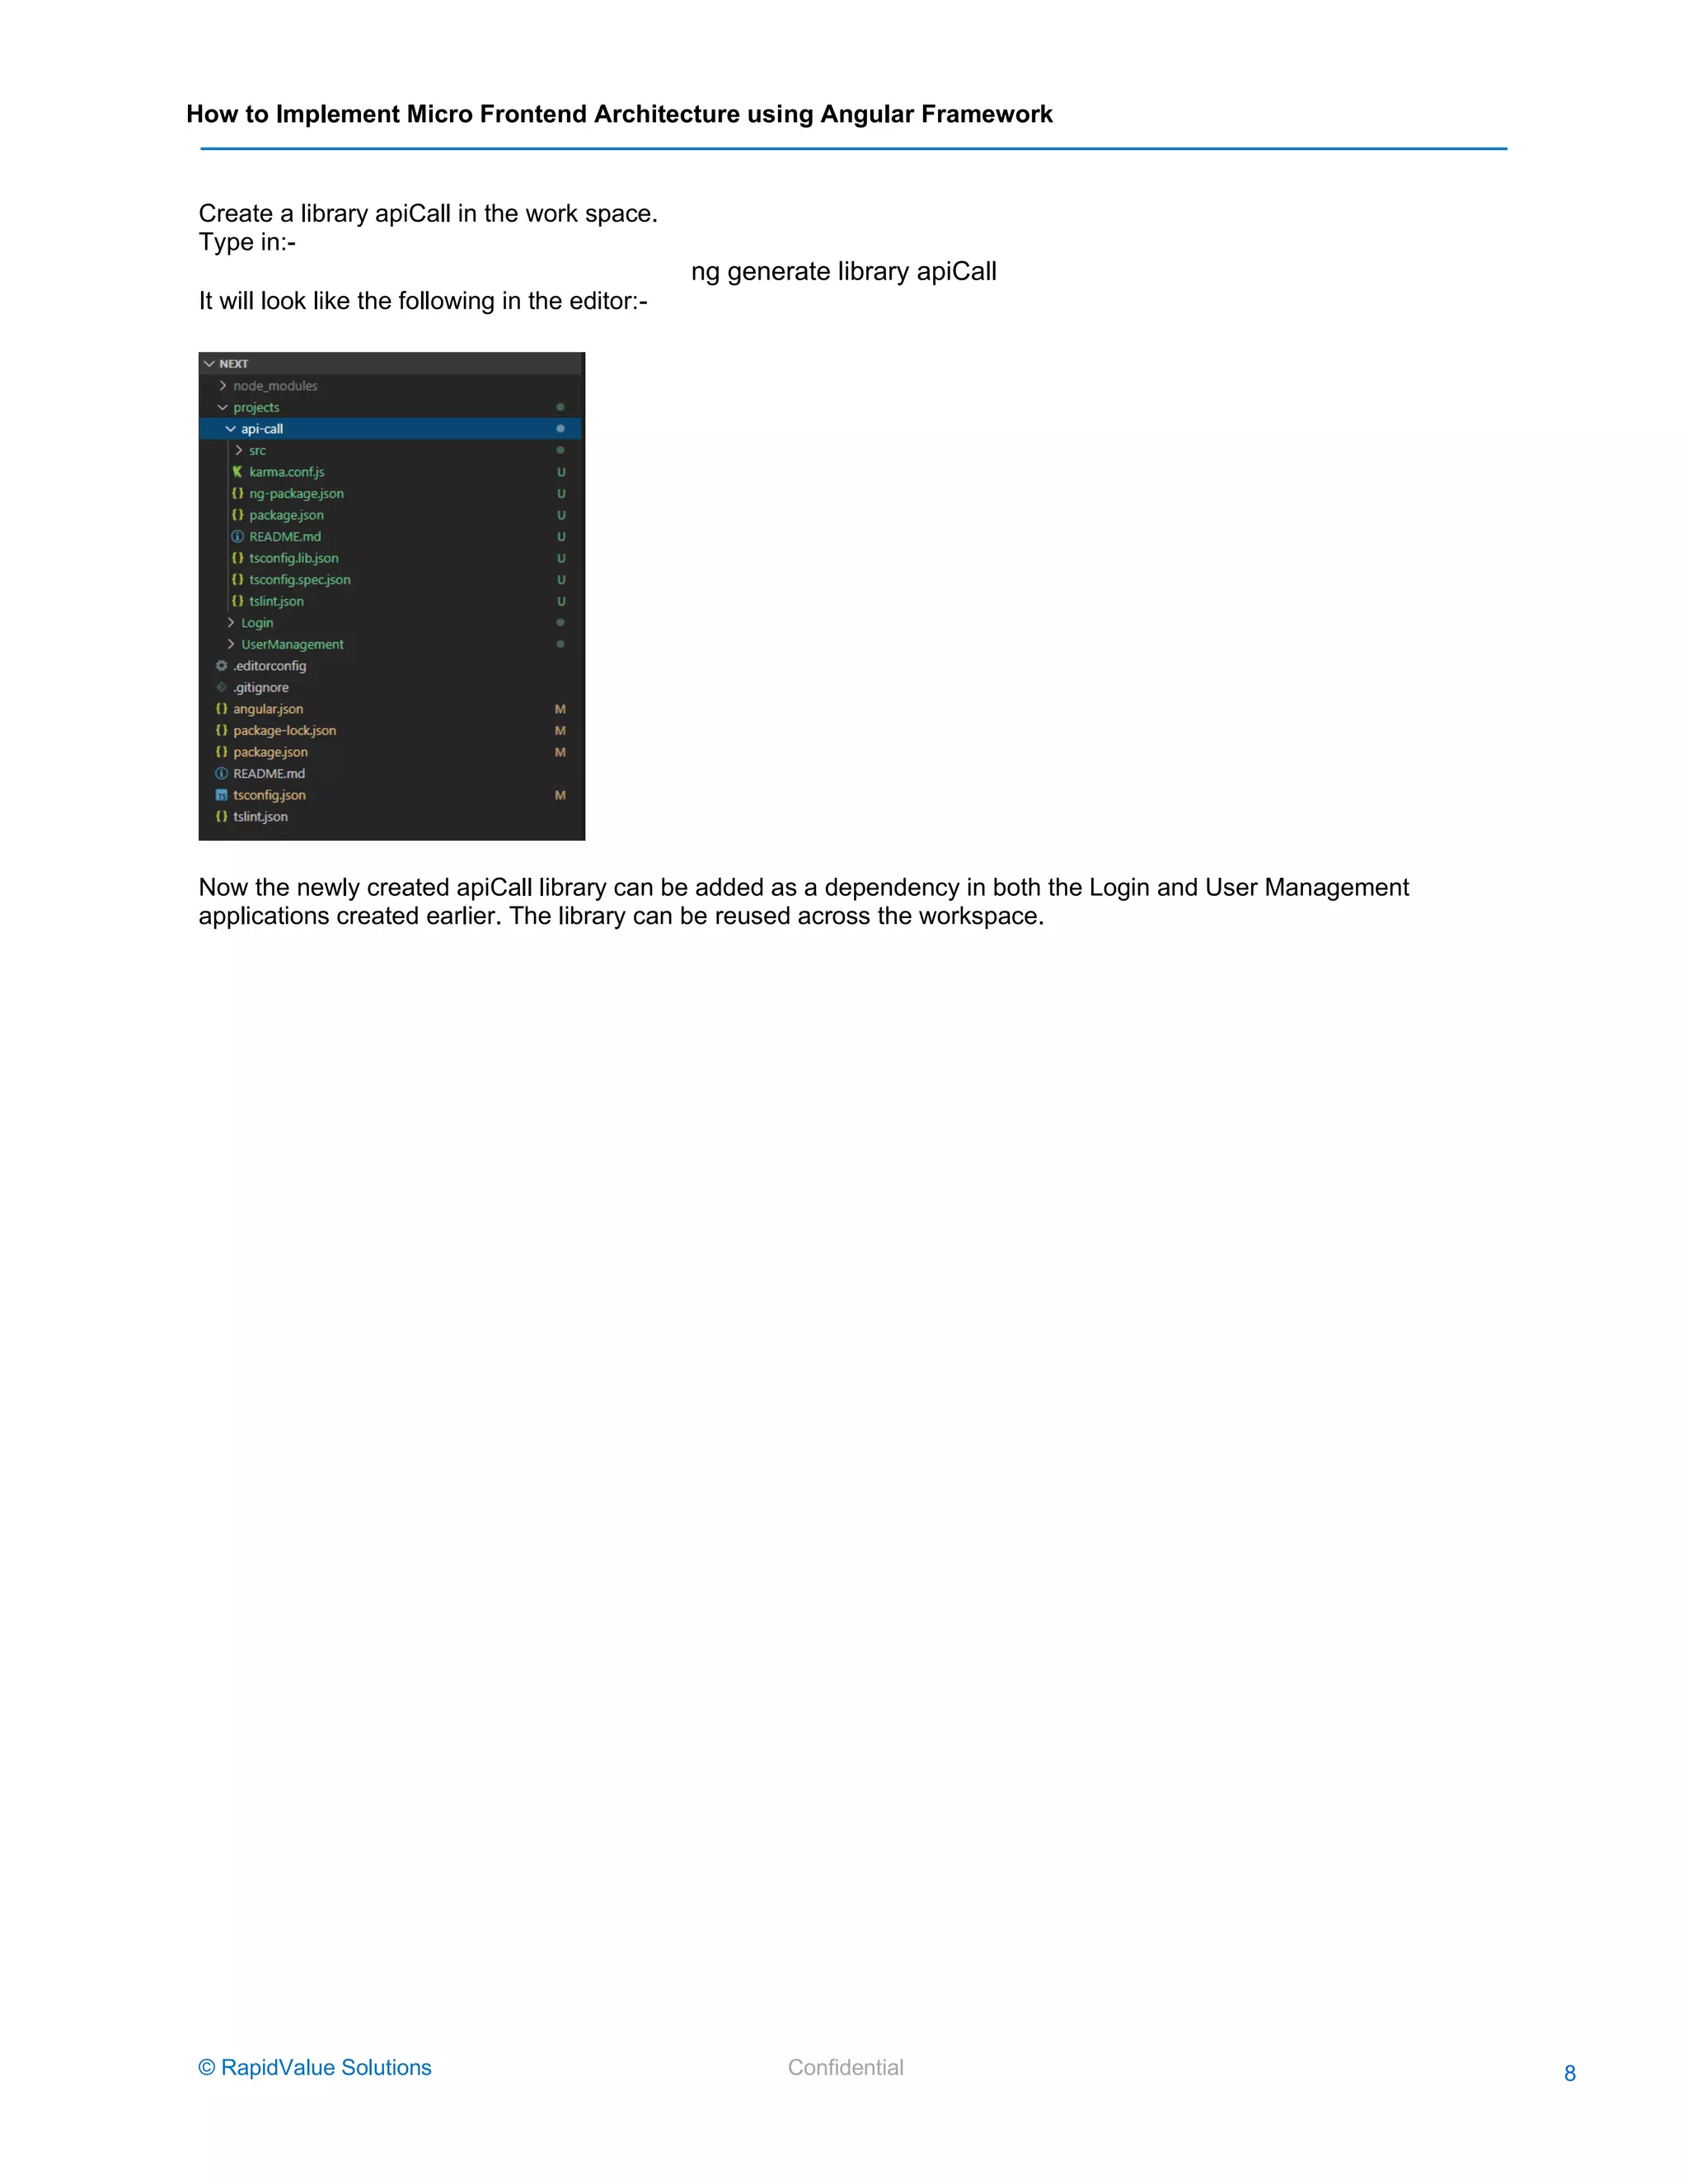
How to Implement Micro Frontend Architecture using Angular Framework © RapidValue Solutions Confidential 8 Create a library apiCall in the work space. Type in:- ng generate library apiCall It will look like the following in the editor:- Now the newly created apiCall library can be added as a dependency in both the Login and User Management applications created earlier. The library can be reused across the workspace.
How to Implement Micro Frontend Architecture using Angular Framework © RapidValue Solutions Confidential 9 About RapidValue RapidValue is a global leader in providing digital product engineering solutions including Mobility, Cloud, Omni-channel, IoT and RPA to enterprises worldwide. RapidValue offers its digital services to the world’s top brands, Fortune 1000 companies, and innovative emerging start-ups. With offices in the United States, the United Kingdom, Germany, and India and operations spread across the Middle-East, Europe, and Canada, RapidValue delivers enterprise service and solutions across various industry verticals. Disclaimer: This document contains information that is confidential and proprietary to RapidValue Solutions Inc. No part of it may be used, circulated, quoted, or reproduced for distribution outside RapidValue. If you are not the intended recipient of this report, you are hereby notified that the use, circulation, quoting, or reproducing of this report is strictly prohibited and may be unlawful. © RapidValue Solutions www.rapidvaluesolutions.com/blogwww.rapidvaluesolutions.com +1 877.643.1850 contactus@rapidvaluesolutions.com

How to Implement Micro Frontend Architecture using Angular Framework

  • 1.
    How to ImplementMicro Frontend Architecture using Angular Framework Presented by: Unnikrishnan M, Software Engineer
  • 2.
    How to ImplementMicro Frontend Architecture using Angular Framework © RapidValue Solutions Confidential 2 Micro Frontend Architecture in Angular The Angular team introduced the concept of workspaces in their 7.0.0 version which was released in Oct, 2018. With this update, Angular gave developers a new --create-application flag feature during creation of the application. By default the --create-application flag will be false. Example:- ng new <workspaceName> --create-application=<true/false> With this addition, the developers now have the option to easily create an application, library or workspace. The following is the Angular CLI command to generate/modify the files based on schematics:- ng generate <schematic> [options] This schematic can take one of the following values: • appShell • application • class • component • directive • enum • guard • interceptor • interface • library • module • pipe • service • serviceWorker • webWorker Workspace Setup-Basic Angular CLI Commands How to Implement Micro Frontend Architecture using Angular Framework We will be looking into the basic commands used for generating:- 1. Application ng generate application <name> [options] ng g application <name> [options] OPTION DESCRIPTION --inlineStyle=true|false True -> Includes styles inline in the root component.ts file. Only CSS styles can be included inline. False -> External styles file is created and referenced in the root component.ts file. Default: false Aliases: -s
  • 3.
    How to ImplementMicro Frontend Architecture using Angular Framework © RapidValue Solutions Confidential 3 --inlineTemplate=true|false True -> Includes template inline in the root component.ts file. False ->External template file is created and referenced in the root component.ts file. Default: false Aliases: -t --lintFix=true|false True -> Applies lint fixes after generating the application. Default: false --minimal=true|false True -> Creates a bare-bones project without any testing frameworks. (Used for learning purposes only.) Default: false --prefix=prefix A prefix to apply to generated selectors. Default: app Aliases: -p --routing=true|false True -> Creates a routing NgModule. Default: false --skipInstall=true|false Skips installing dependency packages. Default: false --skipPackageJson=true|false True -> Does not add dependencies to the "package.json" file. Default: false --skipTests=true|false True -> Does not create "spec.ts" test files for the app. Default: false Aliases: -S --style= css|scss|sass|less|styl File extension/preprocessor to use for style files. Default: css --viewEncapsulation= Emulated|Native|None|ShadowDom View encapsulation strategy to use in the new app. 2. Component ng generate component <name> [options] ng g component <name> [options] OPTION DESCRIPTION --changeDetection=Default|OnPush Change detection strategy to use in the new component. Default: Default Aliases: -c --displayBlock=true|false Specifies if the style will contain :host { display: block; }. Default: false Aliases: -b --export=true|false True -> Declaring NgModule exports this component. Default: false --flat=true|false True -> Creates the new files at the top level of the current project. Default: false
  • 4.
    How to ImplementMicro Frontend Architecture using Angular Framework © RapidValue Solutions Confidential 4 --inlineStyle=true|false True -> Includes styles inline in the root component.ts file. Only CSS styles can be included inline. False -> External styles file is created and referenced in the root component.ts file. Default: false Aliases: -s --inlineTemplate=true|false True -> Includes template inline in the root component.ts file. False ->External template file is created and referenced in the root component.ts file. Default: false Aliases: -t --lintFix=true|false True -> Applies lint fixes after generating the application. Default: false --module=module Declaring NgModule. Aliases: -m --prefix=prefix Prefix to apply to the generated component selector. Aliases: -p --project=project Name of the project. --selector=selector HTML selector to use for this component. --skipImport=true|false True -> Does not import this component into the owning NgModule. Default: false --skipSelector=true|false True -> Specifies if the component should have a selector. Default: false --skipTests=true|false True -> Does not create "spec.ts" test files for the new component. Default: false --style= css|scss|sass|less|styl File extension or preprocessor to use for style files. Default: css --type=type Adds a developer-defined type to the filename, in the format "name.type.ts". Default: Component --viewEncapsulation= Emulated|Native|None|ShadowDom View encapsulation strategy to use in the new component. Aliases: -v 3. Library ng generate library <name> [options] ng g library <name> [options] OPTION DESCRIPTION --entryFile=entryFile Path in which the library's public API file is created, relative to the workspace root. Default: public-api --lintFix=true|false True -> Applies lint fixes after generating the library. Default: false
  • 5.
    How to ImplementMicro Frontend Architecture using Angular Framework © RapidValue Solutions Confidential 5 --prefix=prefix Prefix to apply to generated selectors. Default: lib Aliases: -p --skipInstall=true|false True -> does not install dependency packages. Default: false -- skipPackageJson=true|false True -> Does not add dependencies to the "package.json" file. Default: false --skipTsConfig=true|false True -> Does not update "tsconfig.json" to add a path mapping for the new library. The path mapping is needed to use the library in an app, but can be disabled here to simplify development. Default: false How to Implement Micro Frontend Architecture using Angular Framework The basic idea is to create an application that has the following characteristics, incorporating the new feature. The outline is as follows:- 1. Create a workspace named Next. 2. It has 2 projects named - User Management, Login. 3. It has a library named apiCall which is used across the 2 projects. Let's start creating it:- Step 1 Open git bash in the desired folder location. Type in:- ng new Next --create-application=false; Dive inside the Next folder. The created project structure is as follows:- WORKSPACE CONFIG FILES PURPOSE .editorconfig Configuration for code editors. .gitignore Specifies intentionally untracked files that Git should ignore.
  • 6.
    How to ImplementMicro Frontend Architecture using Angular Framework © RapidValue Solutions Confidential 6 README.md Introductory documentation for the root app. angular.json CLI configuration defaults for all projects in the workspace, including configuration options for build, serve, and test tools that the CLI uses, such as TSLint, Karma, and Protractor. package.json Configures npm package dependencies that are available to all projects in the workspace. package-lock.json Provides version information for all packages installed into node_modules by the npm client. src/ Source files for the root-level application project. node_modules/ Npm packages to the entire workspace. Workspace-wide node_modules dependencies are visible to all projects. tsconfig.json Default TypeScript configuration for projects in the workspace. tslint.json Default TSLint configuration for projects in the workspace. Step 2 Create new project UserManagement. Type in:- ng generate application UserManagement Similarly create an application called Login following the same above commands. ng generate application Login The end result will be like:-
  • 7.
    How to ImplementMicro Frontend Architecture using Angular Framework © RapidValue Solutions Confidential 7 Note - The Login and User Management are two separate Angular Applications. We also have an option to set the default when the workspace is served. All the features that can be used in Angular projects apply to each of these projects too. Additional to that, we can also share the styles, assets and services across all the projects inside the workspace. APP SUPPORT FILES PURPOSE app/ Component files in which your application logic and data are defined. assets/ Images and other asset files to be copied when you build your application. environments/ Build configuration options for particular target environments. By default there is an unnamed standard development environment and a production ("prod") environment. You can define additional target environment configurations. favicon.ico Icon used in the bookmark bar. index.html The main HTML page that is served when someone visits your site. The CLI automatically adds all JavaScript and CSS files when building your app, so you typically don't need to add any <script> or<link> tags here manually. main.ts The main entry point for your application. Compiles the application with the JIT compiler and bootstraps the application's root module (AppModule) to run in the browser. polyfills.ts Provides polyfill scripts for browser support. styles.sass Lists CSS files that supply styles for a project. The extension reflects the style preprocessor you have configured for the project. test.ts Main entry point for your unit tests, with some Angular-specific configuration. You don't typically need to edit this file. app/src/ Angular components, templates, and styles go here. The app/scr/ folder inside contain your project's logic and data. Step 3 –
  • 8.
    How to ImplementMicro Frontend Architecture using Angular Framework © RapidValue Solutions Confidential 8 Create a library apiCall in the work space. Type in:- ng generate library apiCall It will look like the following in the editor:- Now the newly created apiCall library can be added as a dependency in both the Login and User Management applications created earlier. The library can be reused across the workspace.
  • 9.
    How to ImplementMicro Frontend Architecture using Angular Framework © RapidValue Solutions Confidential 9 About RapidValue RapidValue is a global leader in providing digital product engineering solutions including Mobility, Cloud, Omni-channel, IoT and RPA to enterprises worldwide. RapidValue offers its digital services to the world’s top brands, Fortune 1000 companies, and innovative emerging start-ups. With offices in the United States, the United Kingdom, Germany, and India and operations spread across the Middle-East, Europe, and Canada, RapidValue delivers enterprise service and solutions across various industry verticals. Disclaimer: This document contains information that is confidential and proprietary to RapidValue Solutions Inc. No part of it may be used, circulated, quoted, or reproduced for distribution outside RapidValue. If you are not the intended recipient of this report, you are hereby notified that the use, circulation, quoting, or reproducing of this report is strictly prohibited and may be unlawful. © RapidValue Solutions www.rapidvaluesolutions.com/blogwww.rapidvaluesolutions.com +1 877.643.1850 contactus@rapidvaluesolutions.com