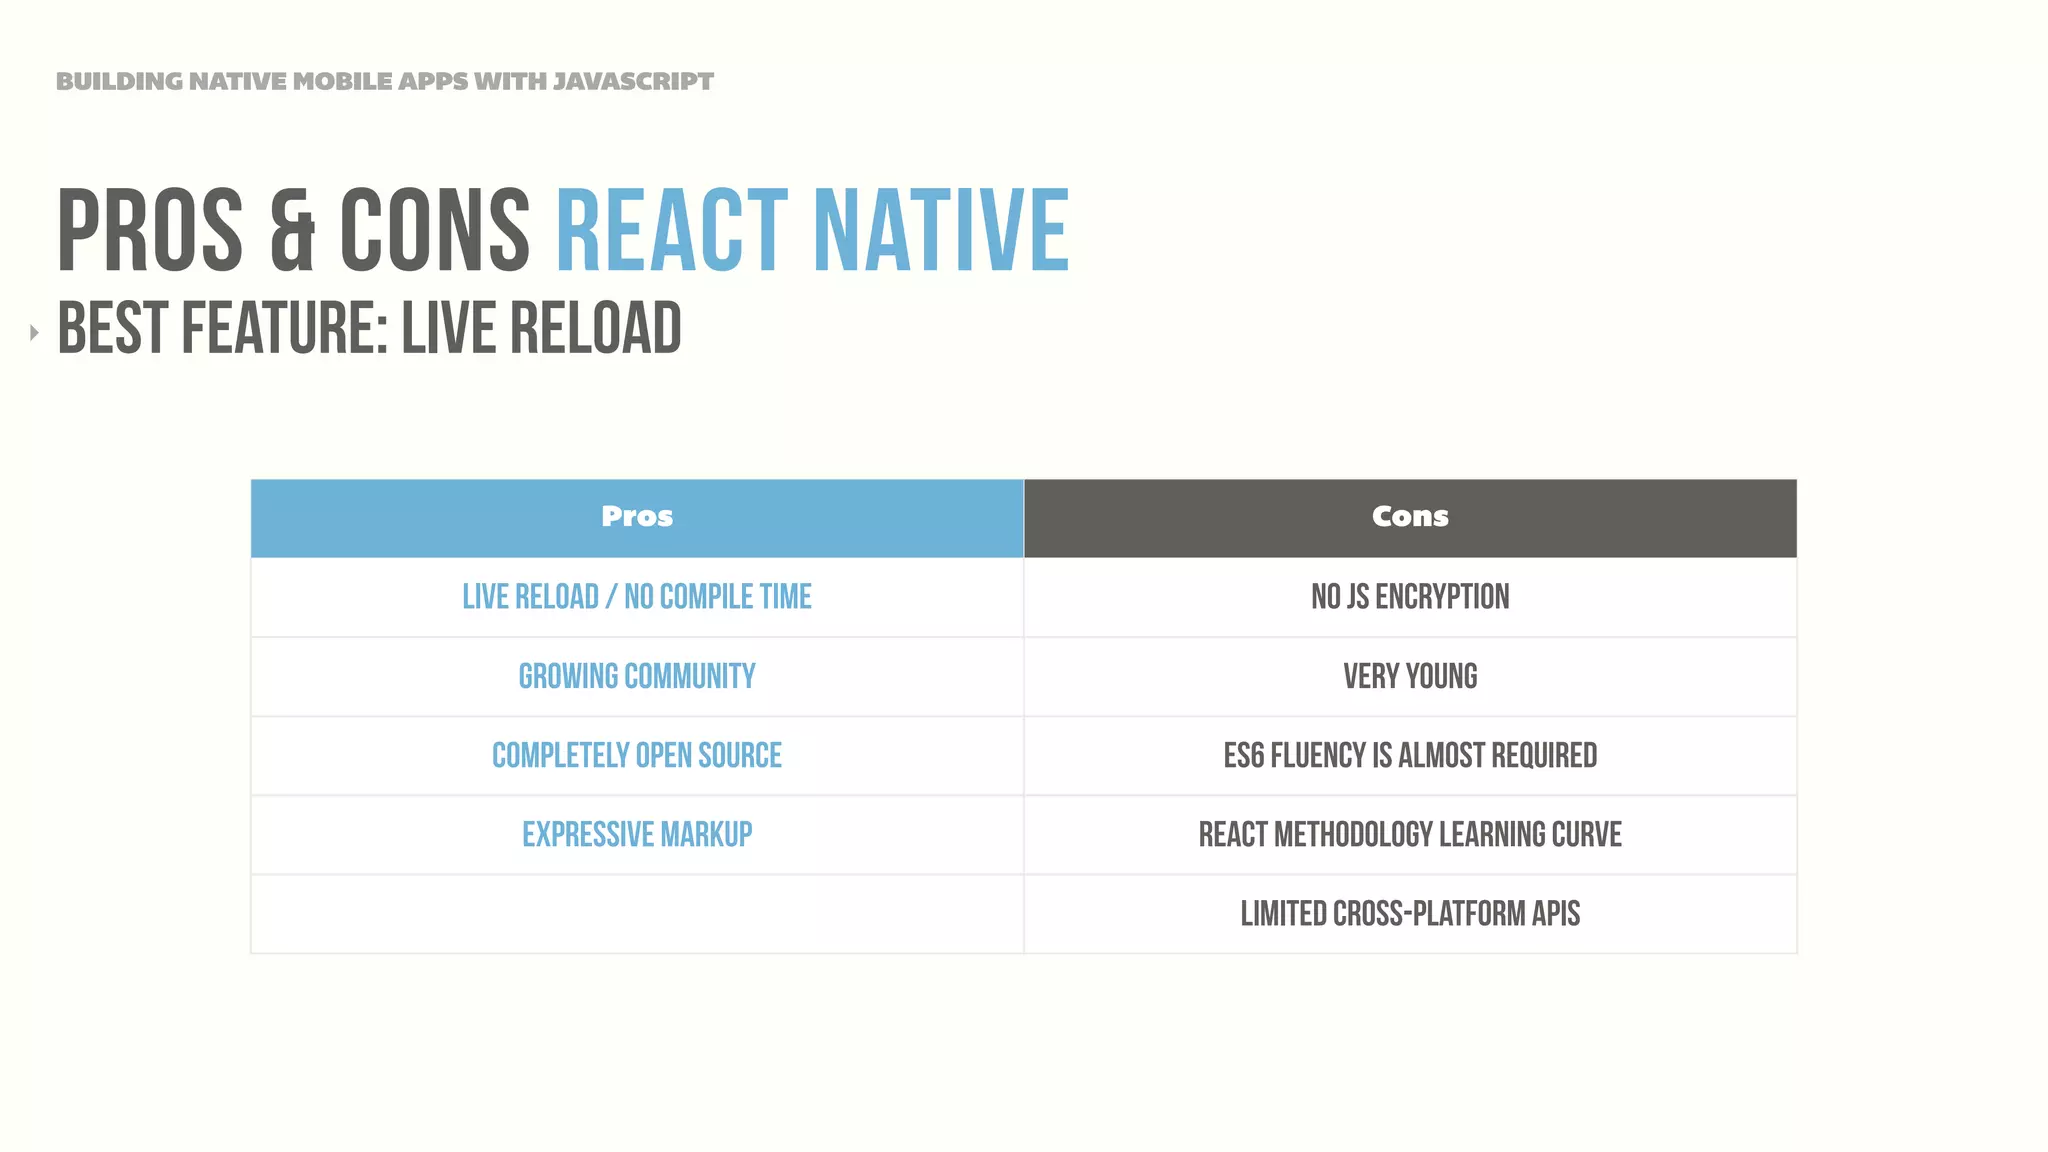
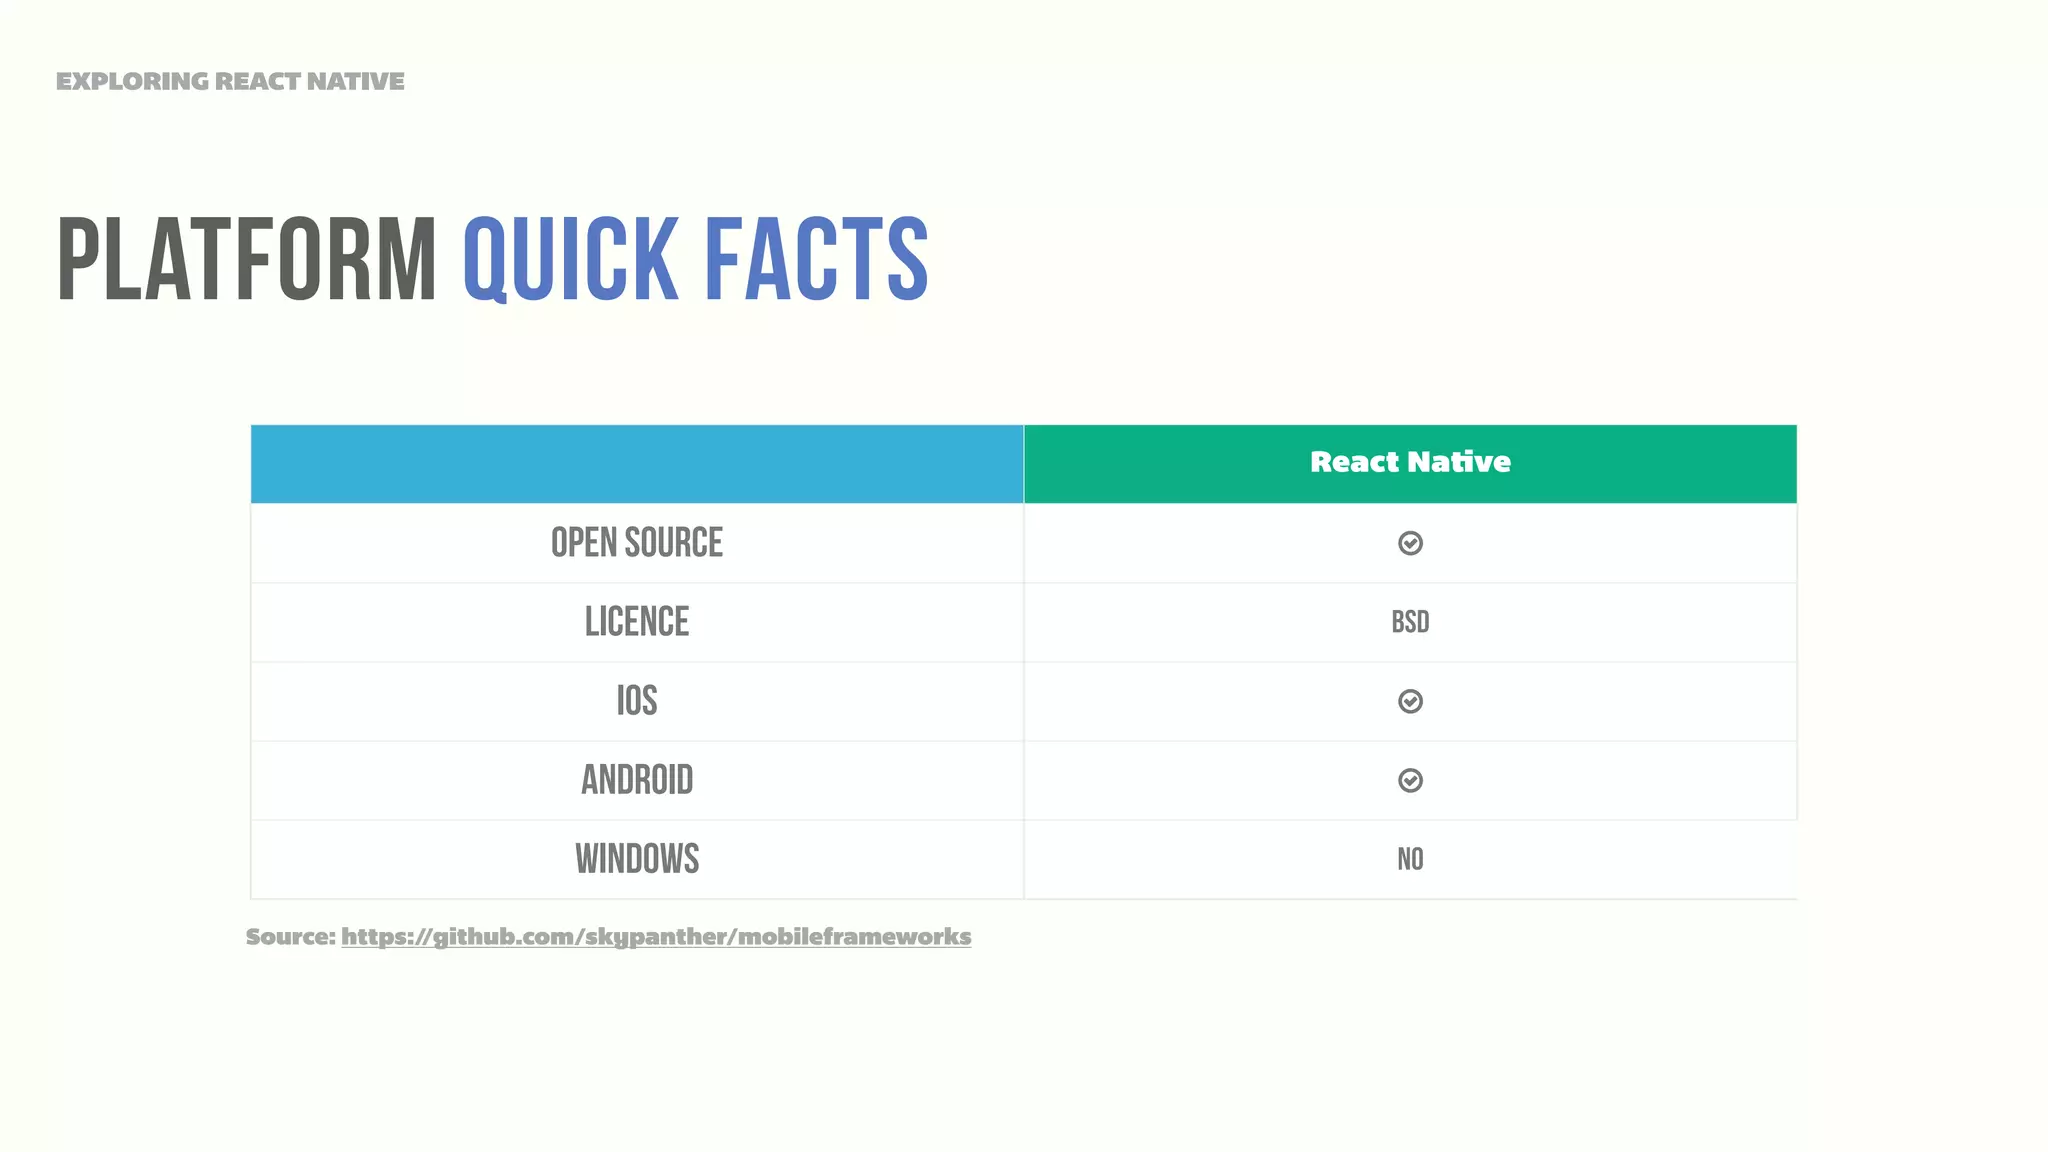
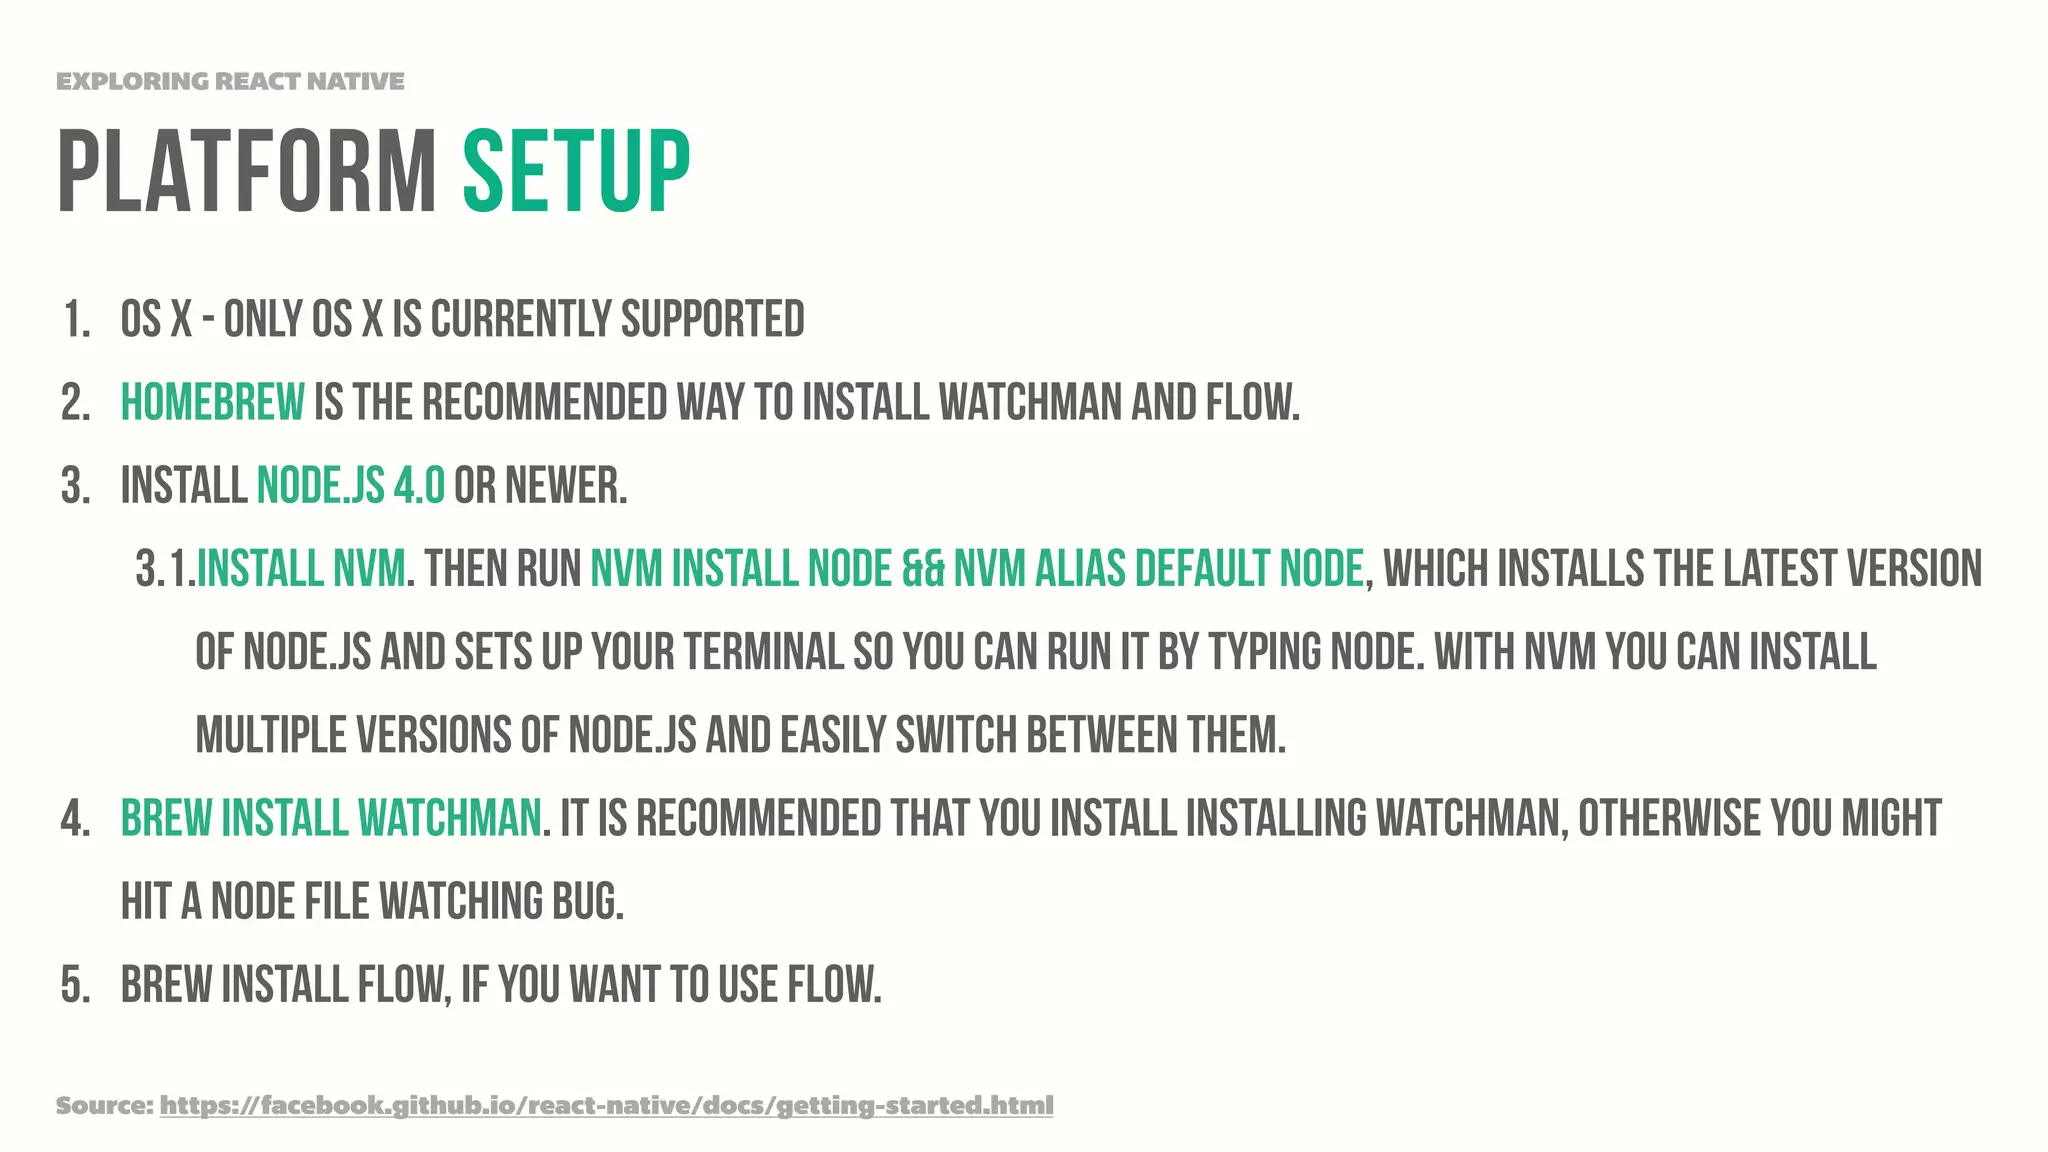
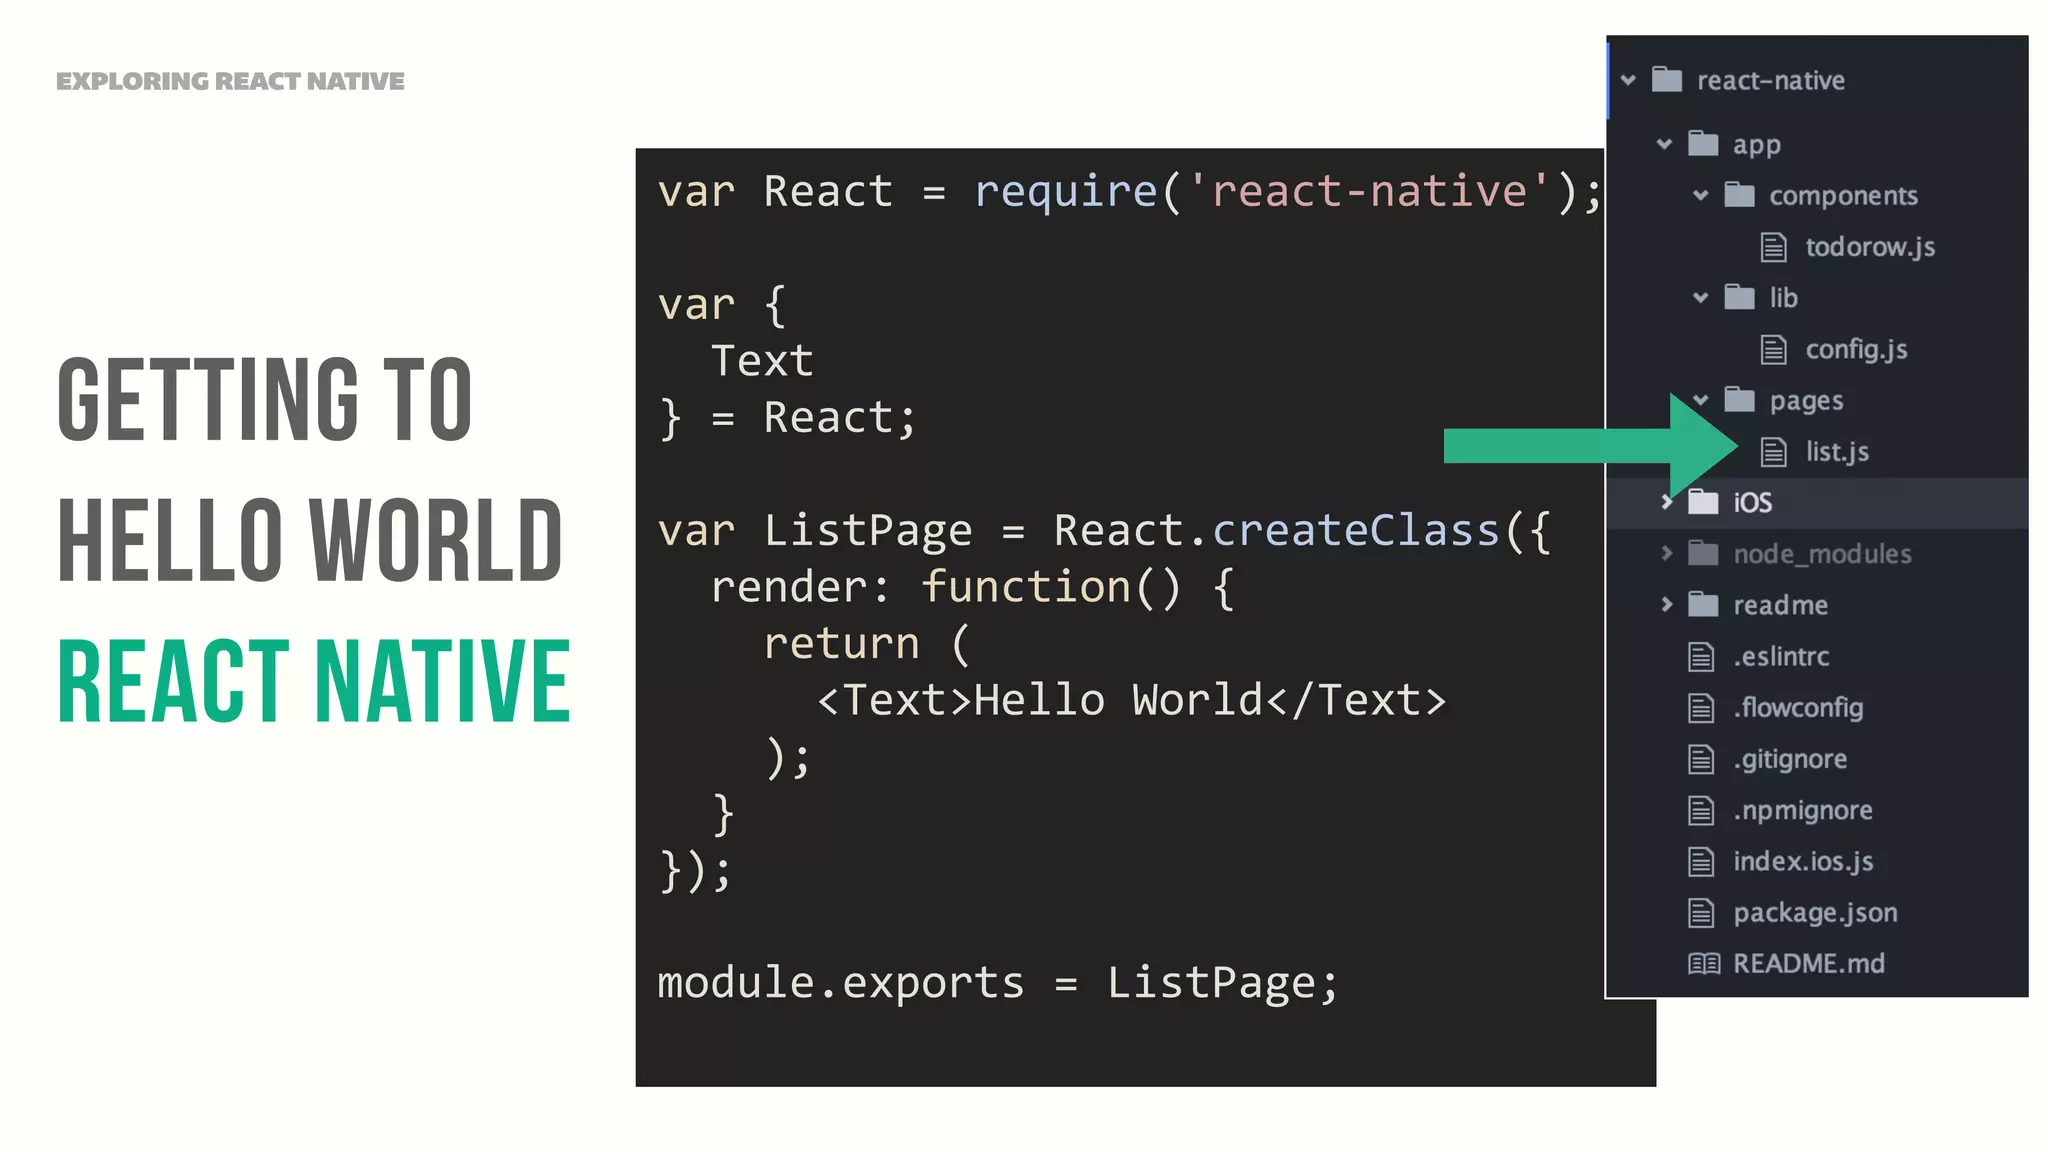
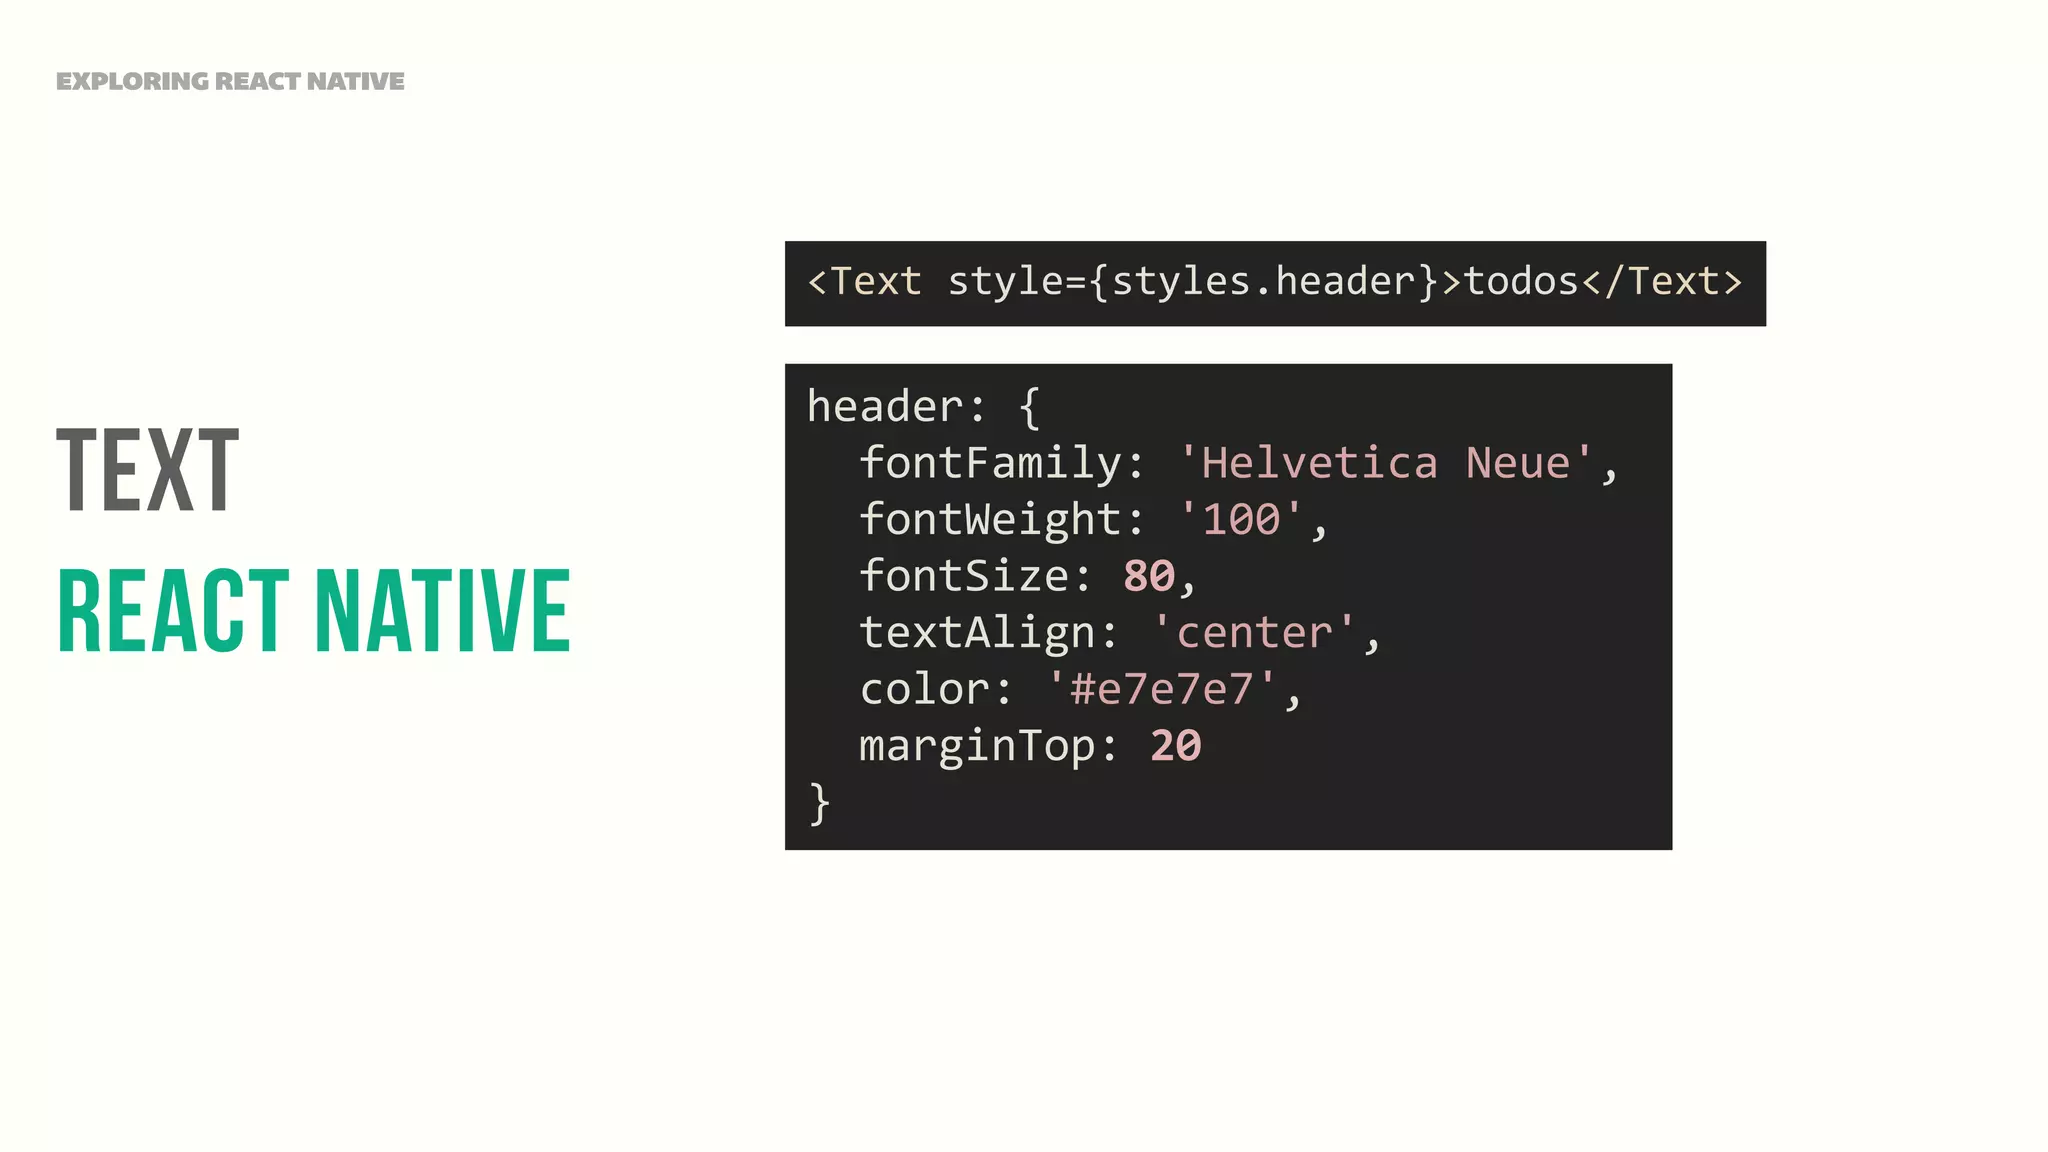
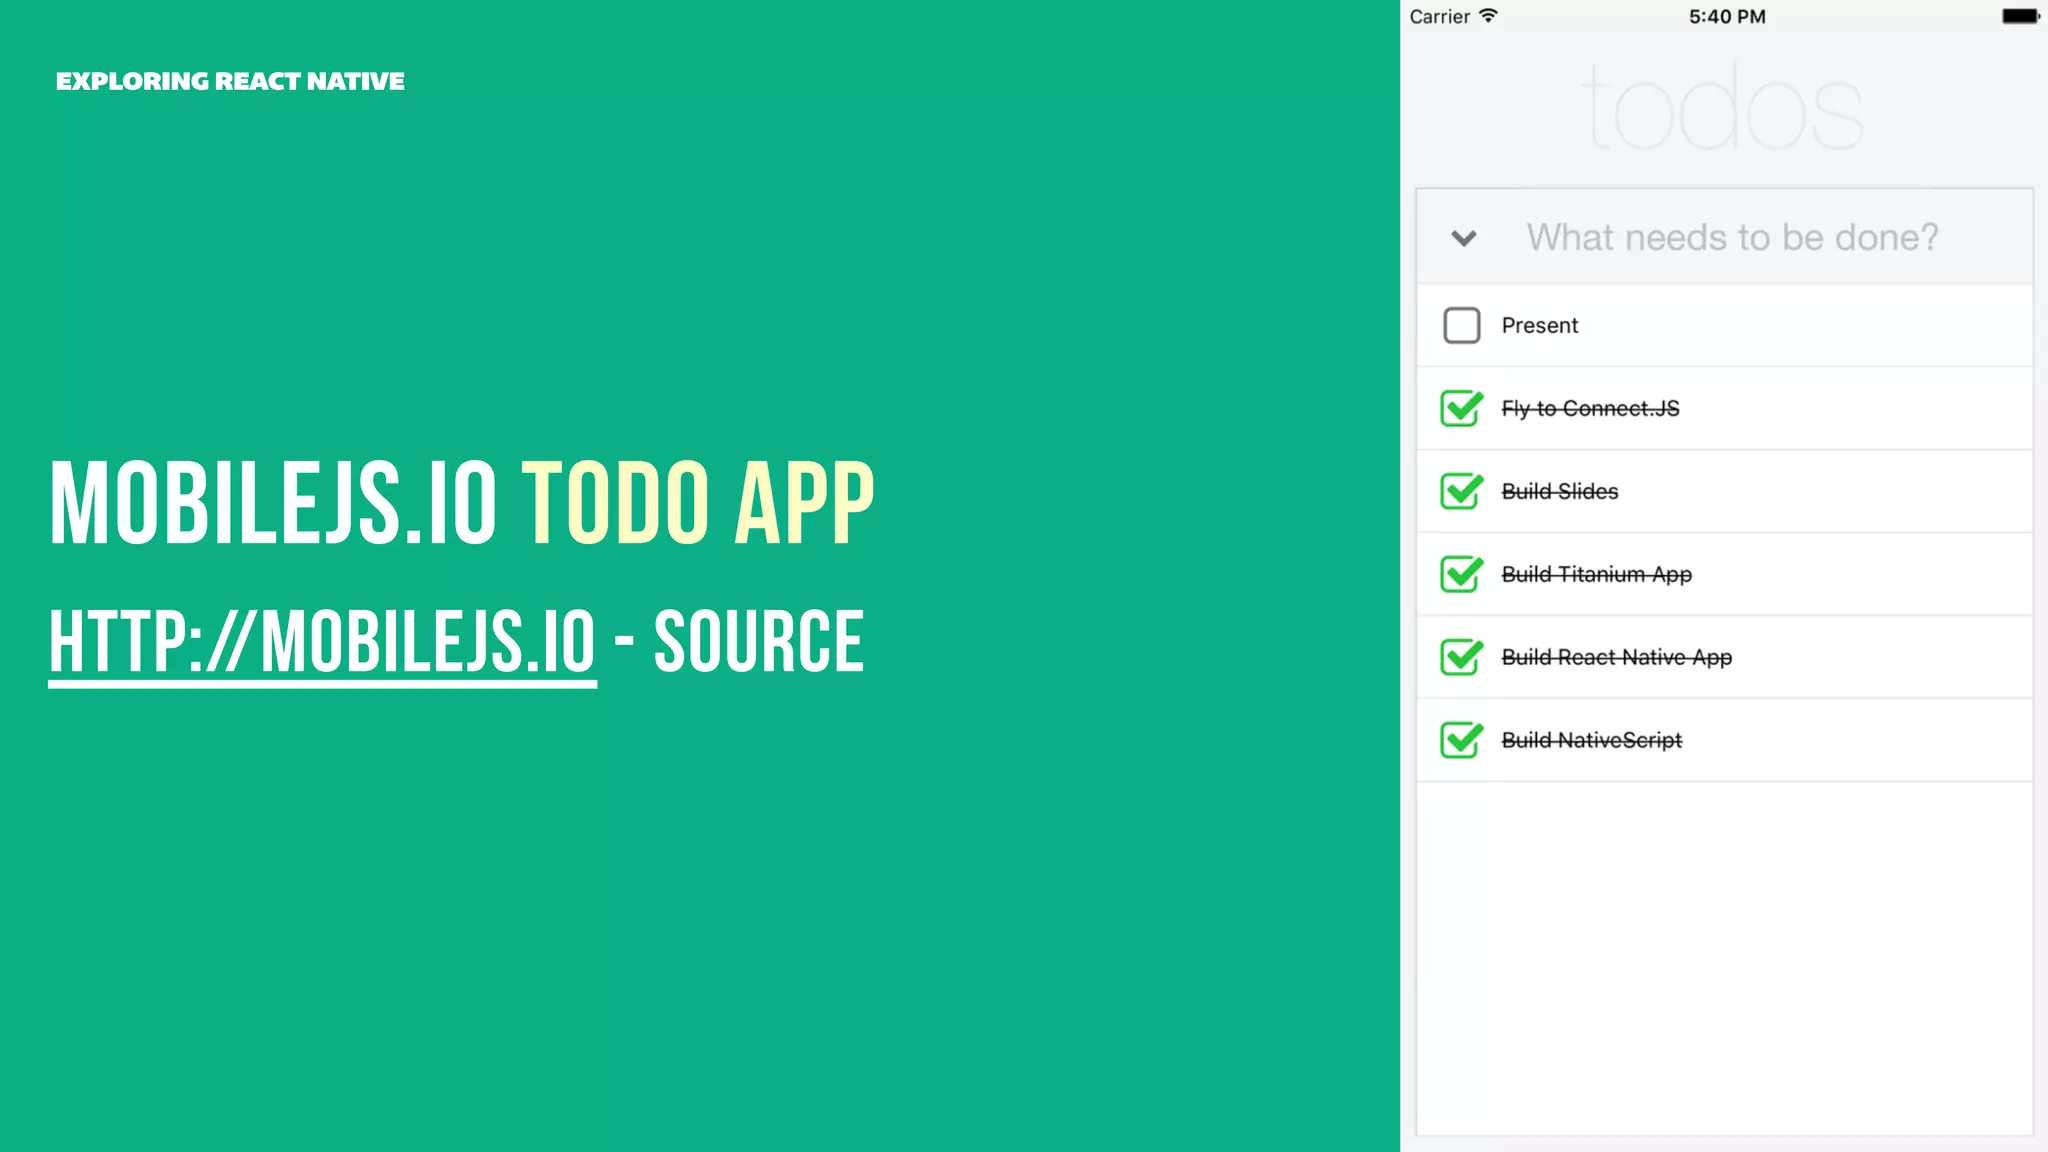
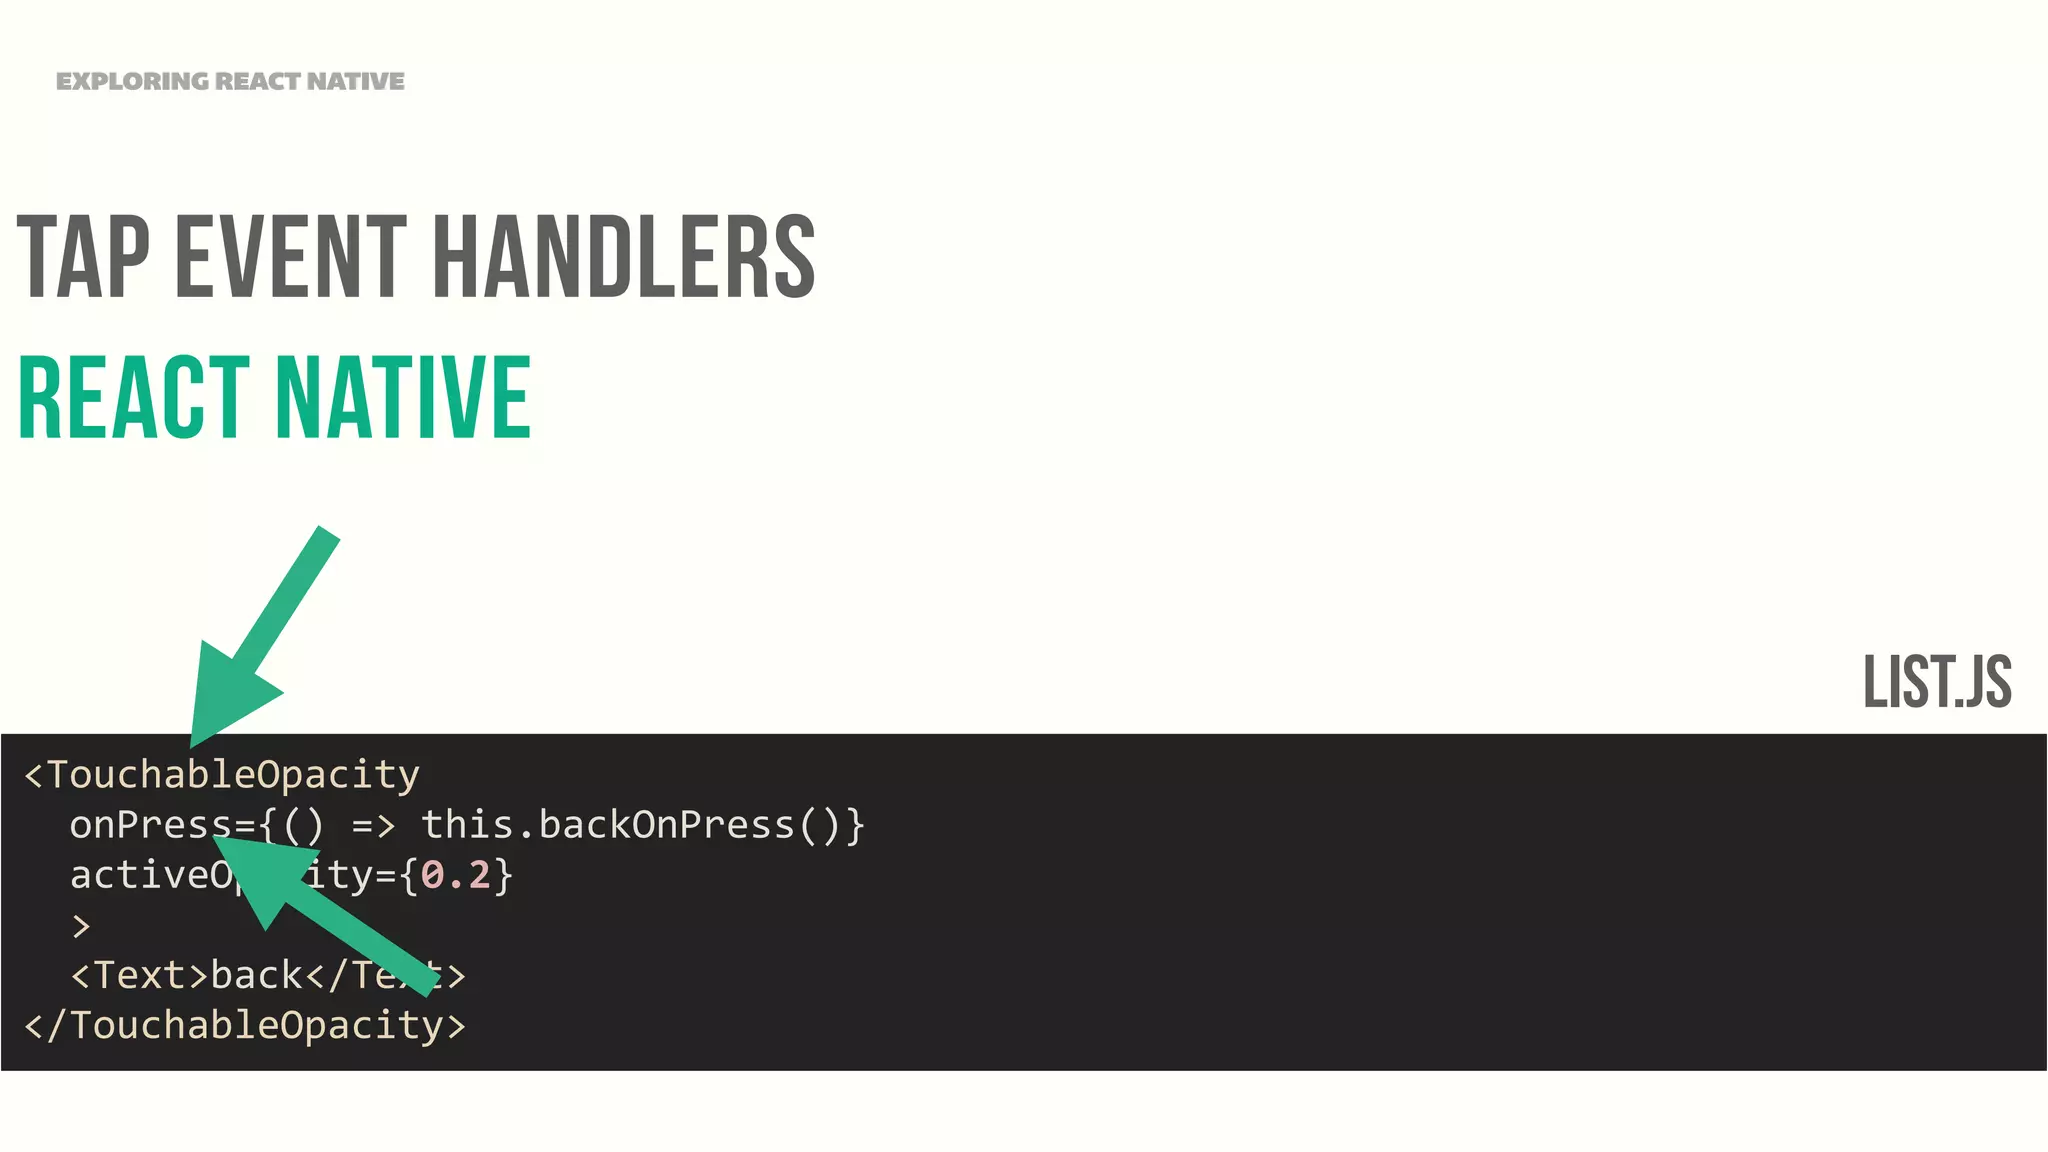
Exporing React Native
Josh JEnsen ABOUT Me mobile application consultant, entrepreneur, Technology Addict, OCR enthusiast, Beer Drinker. @joshJ EXPLORING REACT NATIVE
Define ab·stract·ed consider (something) theoretically or separately from something else EXPLORING REACT NATIVE
Define: Abstracted Platform A platform where an API is abstracted away from or separated from the primary language by proxy and/or runtime. EXPLORING REACT NATIVE UIView  *  myView  =  [[UIView  alloc]  init];Obj c React Native <View></View>
EXPLORING REACT NATIVE React Native Open Source ○ Licence BSD iOS ○ Android ○ Windows No Platform Quick Facts Source: https://github.com/skypanther/mobileframeworks
EXPLORING REACT NATIVE platform Tooling React Native Node.JS 4.x Xcode 6.3+ Gradle N/A ANT N/A JDK Latest HomeBrew Recommended
Build Times 0 4 8 12 16 Build Times 0.68 14.345 Initial Subsequent
platform Setup EXPLORING REACT NATIVE 1. OS X - Only OS X is currently supported 2. Homebrew is the recommended way to install Watchman and Flow. 3. Install Node.js 4.0 or newer. 3.1.Install nvm. Then run nvm install node && nvm alias default node, which installs the latest version of Node.js and sets up your terminal so you can run it by typing node. With nvm you can install multiple versions of Node.js and easily switch between them. 4. brew install watchman. It is recommended that you install installing watchman, otherwise you might hit a node file watching bug. 5. brew install flow, if you want to use flow. Source: https://facebook.github.io/react-native/docs/getting-started.html
Mobilejs.io Todo App EXPLORING REACT NATIVE http://mobilejs.io - Source
Create Todo App EXPLORING REACT NATIVE 1. $ cd todomjs 2. Open ios/todomjs.xcodeproj and hit run in Xcode. 3. Open index.ios.js in your text editor of choice and edit some lines. 4. Hit ⌘-R in your iOS simulator to reload the app and see your change! Source: https://facebook.github.io/react-native/docs/getting-started.html $  npm  install  -­‐g  react-­‐native-­‐cli   $  react-­‐native  init  todomjs
Initializing an Application EXPLORING REACT NATIVE
Initializing an Application EXPLORING REACT NATIVE var  {      AppRegistry,      StyleSheet,      Text,      View,   }  =  React;   var  todomjs  =  React.createClass({      render:  function()  {          return  (              <View  style={styles.container}>                  <Text  style={styles.welcome}>                      Welcome  to  React  Native!                  </Text>              </View>          );      }   });   AppRegistry.registerComponent('todomjs',  ()  =>  todomjs); Base File
Layout Methods EXPLORING REACT NATIVE
Layouts React NAtive EXPLORING REACT NATIVE <View  style={styles.formWrapper}>        <Icon          name='fontawesome|chevron-­‐down'          style={styles.selectAllIcon}          />          <TextInput          ref="textInput"          style={styles.textInput}      />   </View>   formWrapper:  {      flexDirection:  'row'   },   selectAllIcon:  {      alignSelf:  'center',      width:  40,      height:  40   },     textInput:  {      flex:  1,      height:  60,      padding:  10,   }
Navigator EXPLORING REACT NATIVE
Navigator React NAtive EXPLORING REACT NATIVE <NavigatorIOS      style={styles.topLevelNavigator}      navigationBarHidden={true}      initialRoute={{          title:  '',          component:  require('./app/pages/list')      }}   />  
Getting to Hello World EXPLORING REACT NATIVE
Getting to Hello World React Native EXPLORING REACT NATIVE var  React  =  require('react-­‐native');   var  {      Text   }  =  React;   var  ListPage  =  React.createClass({      render:  function()  {          return  (              <Text>Hello  World</Text>          );      }   });   module.exports  =  ListPage;  
Adding A Native Module EXPLORING REACT NATIVE
Adding Native Icons EXPLORING REACT NATIVE Source: https://github.com/corymsmith/react-native-icons npm  install  react-­‐native-­‐icons@latest  -­‐-­‐save •In XCode, in the project navigator right click Libraries ➜ Add Files to [your project's name] •Go to node_modules ➜ react-native-icons➜ ios and add ReactNativeIcons.xcodeproj •Add libReactNativeIcons.a (from 'Products' under ReactNativeIcons.xcodeproj) to your project's Build Phases ➜ Link Binary With Libraries phase •Add the font files you want to use into the Copy Bundle Resources build phase of your project (click the '+' and click 'Add Other...' then choose the font files from node_modules/ react-native-icons/ios/ReactNativeIcons/Libraries/FontAwesomeKit). •Run your project (Cmd+R)
Text EXPLORING REACT NATIVE
Text React Native EXPLORING REACT NATIVE <Text  style={styles.header}>todos</Text> header:  {      fontFamily:  'Helvetica  Neue',      fontWeight:  '100',      fontSize:  80,      textAlign:  'center',      color:  '#e7e7e7',      marginTop:  20   }
Mobilejs.io Todo App EXPLORING REACT NATIVE http://mobilejs.io - Source
ListView EXPLORING REACT NATIVE
ListView React Native EXPLORING REACT NATIVE var  ListPage  =  React.createClass({      getInitialState:  function()  {          this.ds  =  new  ListView.DataSource({rowHasChanged:  (r1,  r2)  =>   r1.rowID  !==  r2.rowID});          return  {              todoItems:  this.props.todoItems  ||  [],              dataSource:  this.ds.cloneWithRows(this.props.todoItems  ||  []),          };      }   }
ListView React Native EXPLORING REACT NATIVE <ListView      style={styles.todoListView}      initialListSize={15}      dataSource={this.state.dataSource}      renderRow={(rowData,  sectionID,  rowID,  highlightRow)  =>  (          <TodoRow  rowParams={{              sectionID,              rowID,              highlightRow,              updateRow:  this.updateRow,              deleteRow:  this.deleteRow,              rowOnPress:  this.rowOnPress          }}  rowData={rowData}  />      )}    automaticallyAdjustContentInsets={false}   />
ListView React Native EXPLORING REACT NATIVE this.state.todoItems.unshift(_.extend({      rowID:  new  Date().getTime(),      text:  e.nativeEvent.text,      children:  []   },  config.rowTypes.notDone));   this.setState({      dataSource:  this.ds.cloneWithRows(this.state.todoItems)   },  function()  {      this.clearTextInput();   });  
Tap Event Handlers EXPLORING REACT NATIVE
Tap Event Handlers React Native EXPLORING REACT NATIVE <TouchableOpacity      onPress={()  =>  this.backOnPress()}      activeOpacity={0.2}      >      <Text>back</Text>   </TouchableOpacity> List.JS
Code Reuse EXPLORING REACT NATIVE
Code Reuse React NAtive EXPLORING REACT NATIVE renderBackButton:  function()  {      if  (this.props.showBack)  {          return  (              <TouchableOpacity                  style={styles.touchableAreaBackIcon}                  onPress={()  =>  this.backOnPress()}                  activeOpacity={0.2}                  >                  <Icon                      name='fontawesome|arrow-­‐circle-­‐o-­‐left'                      size={30}                      color='#ead7d7'                      style={styles.backButtonIcon}                      />              </TouchableOpacity>          );      }   } {this.renderBackButton()}
Code Reuse React NAtive EXPLORING REACT NATIVE <TodoRow  rowParams={{      sectionID,      rowID,      highlightRow,      updateRow:  this.updateRow,      deleteRow:  this.deleteRow,      rowOnPress:  this.rowOnPress   }}  rowData={rowData}  /> var  TodoRow  =  require('./../components/todorow'); this.props
Navigation EXPLORING REACT NATIVE
NAvigation REact NAtive EXPLORING REACT NATIVE        this.props.navigator.push({              title:  '',              component:  require('./list'),              passProps:  {                  rowID:  rowID,                  showBack:  true,                  todoItems:  this.state.todoItems[rowID].children,                  updateRowChildren:  this.updateRowChildren              }          });  
Extending React Native EXPLORING REACT NATIVE
Extending React Native EXPLORING REACT NATIVE var  React  =  require('react-­‐native');   var  {  NativeModules  }  =  React;   var  {  RNControlFlashlight  }  =  NativeModules;   RNControlFlashlight.turnFlashlight("flashlightOn",  function   errorCallback(results)  {            console.log('JS  Error:  '  +  results['errMsg']);     },  function  successCallback(results)  {            console.log('JS  Success:  '  +  results['successMsg']);     }   ); Source: https://github.com/rhaker/react-native-control-flashlight-ios
Pros & Cons BUILDING NATIVE MOBILE APPS WITH JAVASCRIPT
Pros & CONS React Native BUILDING NATIVE MOBILE APPS WITH JAVASCRIPT ‣ Best Feature: Live Reload Pros Cons Live Reload / No compile Time No JS Encryption Growing Community Very Young Completely Open Source ES6 Fluency is almost required Expressive Markup React Methodology Learning Curve Limited Cross-platform Apis
THANK YOU Questions? 646.876.2777 Josh@pixelflavor.com @joshJ EXPLORING REACT NATIVE Mobilejs.IO techmatters.fm

Connect.js - Exploring React.Native

  • 1.
  • 2.
    Josh JEnsen ABOUTMe mobile application consultant, entrepreneur, Technology Addict, OCR enthusiast, Beer Drinker. @joshJ EXPLORING REACT NATIVE
  • 3.
    Define ab·stract·ed consider (something) theoreticallyor separately from something else EXPLORING REACT NATIVE
  • 4.
    Define: Abstracted Platform Aplatform where an API is abstracted away from or separated from the primary language by proxy and/or runtime. EXPLORING REACT NATIVE UIView  *  myView  =  [[UIView  alloc]  init];Obj c React Native <View></View>
  • 5.
    EXPLORING REACT NATIVE ReactNative Open Source ○ Licence BSD iOS ○ Android ○ Windows No Platform Quick Facts Source: https://github.com/skypanther/mobileframeworks
  • 6.
    EXPLORING REACT NATIVE platformTooling React Native Node.JS 4.x Xcode 6.3+ Gradle N/A ANT N/A JDK Latest HomeBrew Recommended
  • 7.
  • 8.
    platform Setup EXPLORING REACTNATIVE 1. OS X - Only OS X is currently supported 2. Homebrew is the recommended way to install Watchman and Flow. 3. Install Node.js 4.0 or newer. 3.1.Install nvm. Then run nvm install node && nvm alias default node, which installs the latest version of Node.js and sets up your terminal so you can run it by typing node. With nvm you can install multiple versions of Node.js and easily switch between them. 4. brew install watchman. It is recommended that you install installing watchman, otherwise you might hit a node file watching bug. 5. brew install flow, if you want to use flow. Source: https://facebook.github.io/react-native/docs/getting-started.html
  • 9.
    Mobilejs.io Todo App EXPLORINGREACT NATIVE http://mobilejs.io - Source
  • 10.
    Create Todo App EXPLORINGREACT NATIVE 1. $ cd todomjs 2. Open ios/todomjs.xcodeproj and hit run in Xcode. 3. Open index.ios.js in your text editor of choice and edit some lines. 4. Hit ⌘-R in your iOS simulator to reload the app and see your change! Source: https://facebook.github.io/react-native/docs/getting-started.html $  npm  install  -­‐g  react-­‐native-­‐cli   $  react-­‐native  init  todomjs
  • 11.
  • 12.
    Initializing an Application EXPLORING REACT NATIVE var  {      AppRegistry,      StyleSheet,      Text,      View,   }  =  React;   var  todomjs  =  React.createClass({      render:  function()  {          return  (              <View  style={styles.container}>                  <Text  style={styles.welcome}>                      Welcome  to  React  Native!                  </Text>              </View>          );      }   });   AppRegistry.registerComponent('todomjs',  ()  =>  todomjs); Base File
  • 13.
  • 14.
    Layouts React NAtive EXPLORINGREACT NATIVE <View  style={styles.formWrapper}>        <Icon          name='fontawesome|chevron-­‐down'          style={styles.selectAllIcon}          />          <TextInput          ref="textInput"          style={styles.textInput}      />   </View>   formWrapper:  {      flexDirection:  'row'   },   selectAllIcon:  {      alignSelf:  'center',      width:  40,      height:  40   },     textInput:  {      flex:  1,      height:  60,      padding:  10,   }
  • 15.
  • 16.
    Navigator React NAtive EXPLORINGREACT NATIVE <NavigatorIOS      style={styles.topLevelNavigator}      navigationBarHidden={true}      initialRoute={{          title:  '',          component:  require('./app/pages/list')      }}   />  
  • 17.
    Getting to HelloWorld EXPLORING REACT NATIVE
  • 18.
    Getting to Hello World ReactNative EXPLORING REACT NATIVE var  React  =  require('react-­‐native');   var  {      Text   }  =  React;   var  ListPage  =  React.createClass({      render:  function()  {          return  (              <Text>Hello  World</Text>          );      }   });   module.exports  =  ListPage;  
  • 19.
    Adding A NativeModule EXPLORING REACT NATIVE
  • 20.
    Adding Native Icons EXPLORING REACTNATIVE Source: https://github.com/corymsmith/react-native-icons npm  install  react-­‐native-­‐icons@latest  -­‐-­‐save •In XCode, in the project navigator right click Libraries ➜ Add Files to [your project's name] •Go to node_modules ➜ react-native-icons➜ ios and add ReactNativeIcons.xcodeproj •Add libReactNativeIcons.a (from 'Products' under ReactNativeIcons.xcodeproj) to your project's Build Phases ➜ Link Binary With Libraries phase •Add the font files you want to use into the Copy Bundle Resources build phase of your project (click the '+' and click 'Add Other...' then choose the font files from node_modules/ react-native-icons/ios/ReactNativeIcons/Libraries/FontAwesomeKit). •Run your project (Cmd+R)
  • 21.
  • 22.
    Text React Native EXPLORING REACTNATIVE <Text  style={styles.header}>todos</Text> header:  {      fontFamily:  'Helvetica  Neue',      fontWeight:  '100',      fontSize:  80,      textAlign:  'center',      color:  '#e7e7e7',      marginTop:  20   }
  • 23.
    Mobilejs.io Todo App EXPLORINGREACT NATIVE http://mobilejs.io - Source
  • 24.
  • 25.
    ListView React Native EXPLORINGREACT NATIVE var  ListPage  =  React.createClass({      getInitialState:  function()  {          this.ds  =  new  ListView.DataSource({rowHasChanged:  (r1,  r2)  =>   r1.rowID  !==  r2.rowID});          return  {              todoItems:  this.props.todoItems  ||  [],              dataSource:  this.ds.cloneWithRows(this.props.todoItems  ||  []),          };      }   }
  • 26.
    ListView React Native EXPLORINGREACT NATIVE <ListView      style={styles.todoListView}      initialListSize={15}      dataSource={this.state.dataSource}      renderRow={(rowData,  sectionID,  rowID,  highlightRow)  =>  (          <TodoRow  rowParams={{              sectionID,              rowID,              highlightRow,              updateRow:  this.updateRow,              deleteRow:  this.deleteRow,              rowOnPress:  this.rowOnPress          }}  rowData={rowData}  />      )}    automaticallyAdjustContentInsets={false}   />
  • 27.
    ListView React Native EXPLORINGREACT NATIVE this.state.todoItems.unshift(_.extend({      rowID:  new  Date().getTime(),      text:  e.nativeEvent.text,      children:  []   },  config.rowTypes.notDone));   this.setState({      dataSource:  this.ds.cloneWithRows(this.state.todoItems)   },  function()  {      this.clearTextInput();   });  
  • 28.
  • 29.
    Tap Event Handlers ReactNative EXPLORING REACT NATIVE <TouchableOpacity      onPress={()  =>  this.backOnPress()}      activeOpacity={0.2}      >      <Text>back</Text>   </TouchableOpacity> List.JS
  • 30.
  • 31.
    Code Reuse React NAtive EXPLORINGREACT NATIVE renderBackButton:  function()  {      if  (this.props.showBack)  {          return  (              <TouchableOpacity                  style={styles.touchableAreaBackIcon}                  onPress={()  =>  this.backOnPress()}                  activeOpacity={0.2}                  >                  <Icon                      name='fontawesome|arrow-­‐circle-­‐o-­‐left'                      size={30}                      color='#ead7d7'                      style={styles.backButtonIcon}                      />              </TouchableOpacity>          );      }   } {this.renderBackButton()}
  • 32.
    Code Reuse React NAtive EXPLORINGREACT NATIVE <TodoRow  rowParams={{      sectionID,      rowID,      highlightRow,      updateRow:  this.updateRow,      deleteRow:  this.deleteRow,      rowOnPress:  this.rowOnPress   }}  rowData={rowData}  /> var  TodoRow  =  require('./../components/todorow'); this.props
  • 33.
  • 34.
    NAvigation REact NAtive EXPLORING REACTNATIVE        this.props.navigator.push({              title:  '',              component:  require('./list'),              passProps:  {                  rowID:  rowID,                  showBack:  true,                  todoItems:  this.state.todoItems[rowID].children,                  updateRowChildren:  this.updateRowChildren              }          });  
  • 35.
  • 36.
    Extending React Native EXPLORINGREACT NATIVE var  React  =  require('react-­‐native');   var  {  NativeModules  }  =  React;   var  {  RNControlFlashlight  }  =  NativeModules;   RNControlFlashlight.turnFlashlight("flashlightOn",  function   errorCallback(results)  {            console.log('JS  Error:  '  +  results['errMsg']);     },  function  successCallback(results)  {            console.log('JS  Success:  '  +  results['successMsg']);     }   ); Source: https://github.com/rhaker/react-native-control-flashlight-ios
  • 37.
    Pros & Cons BUILDINGNATIVE MOBILE APPS WITH JAVASCRIPT
  • 38.
    Pros & CONSReact Native BUILDING NATIVE MOBILE APPS WITH JAVASCRIPT ‣ Best Feature: Live Reload Pros Cons Live Reload / No compile Time No JS Encryption Growing Community Very Young Completely Open Source ES6 Fluency is almost required Expressive Markup React Methodology Learning Curve Limited Cross-platform Apis
  • 39.