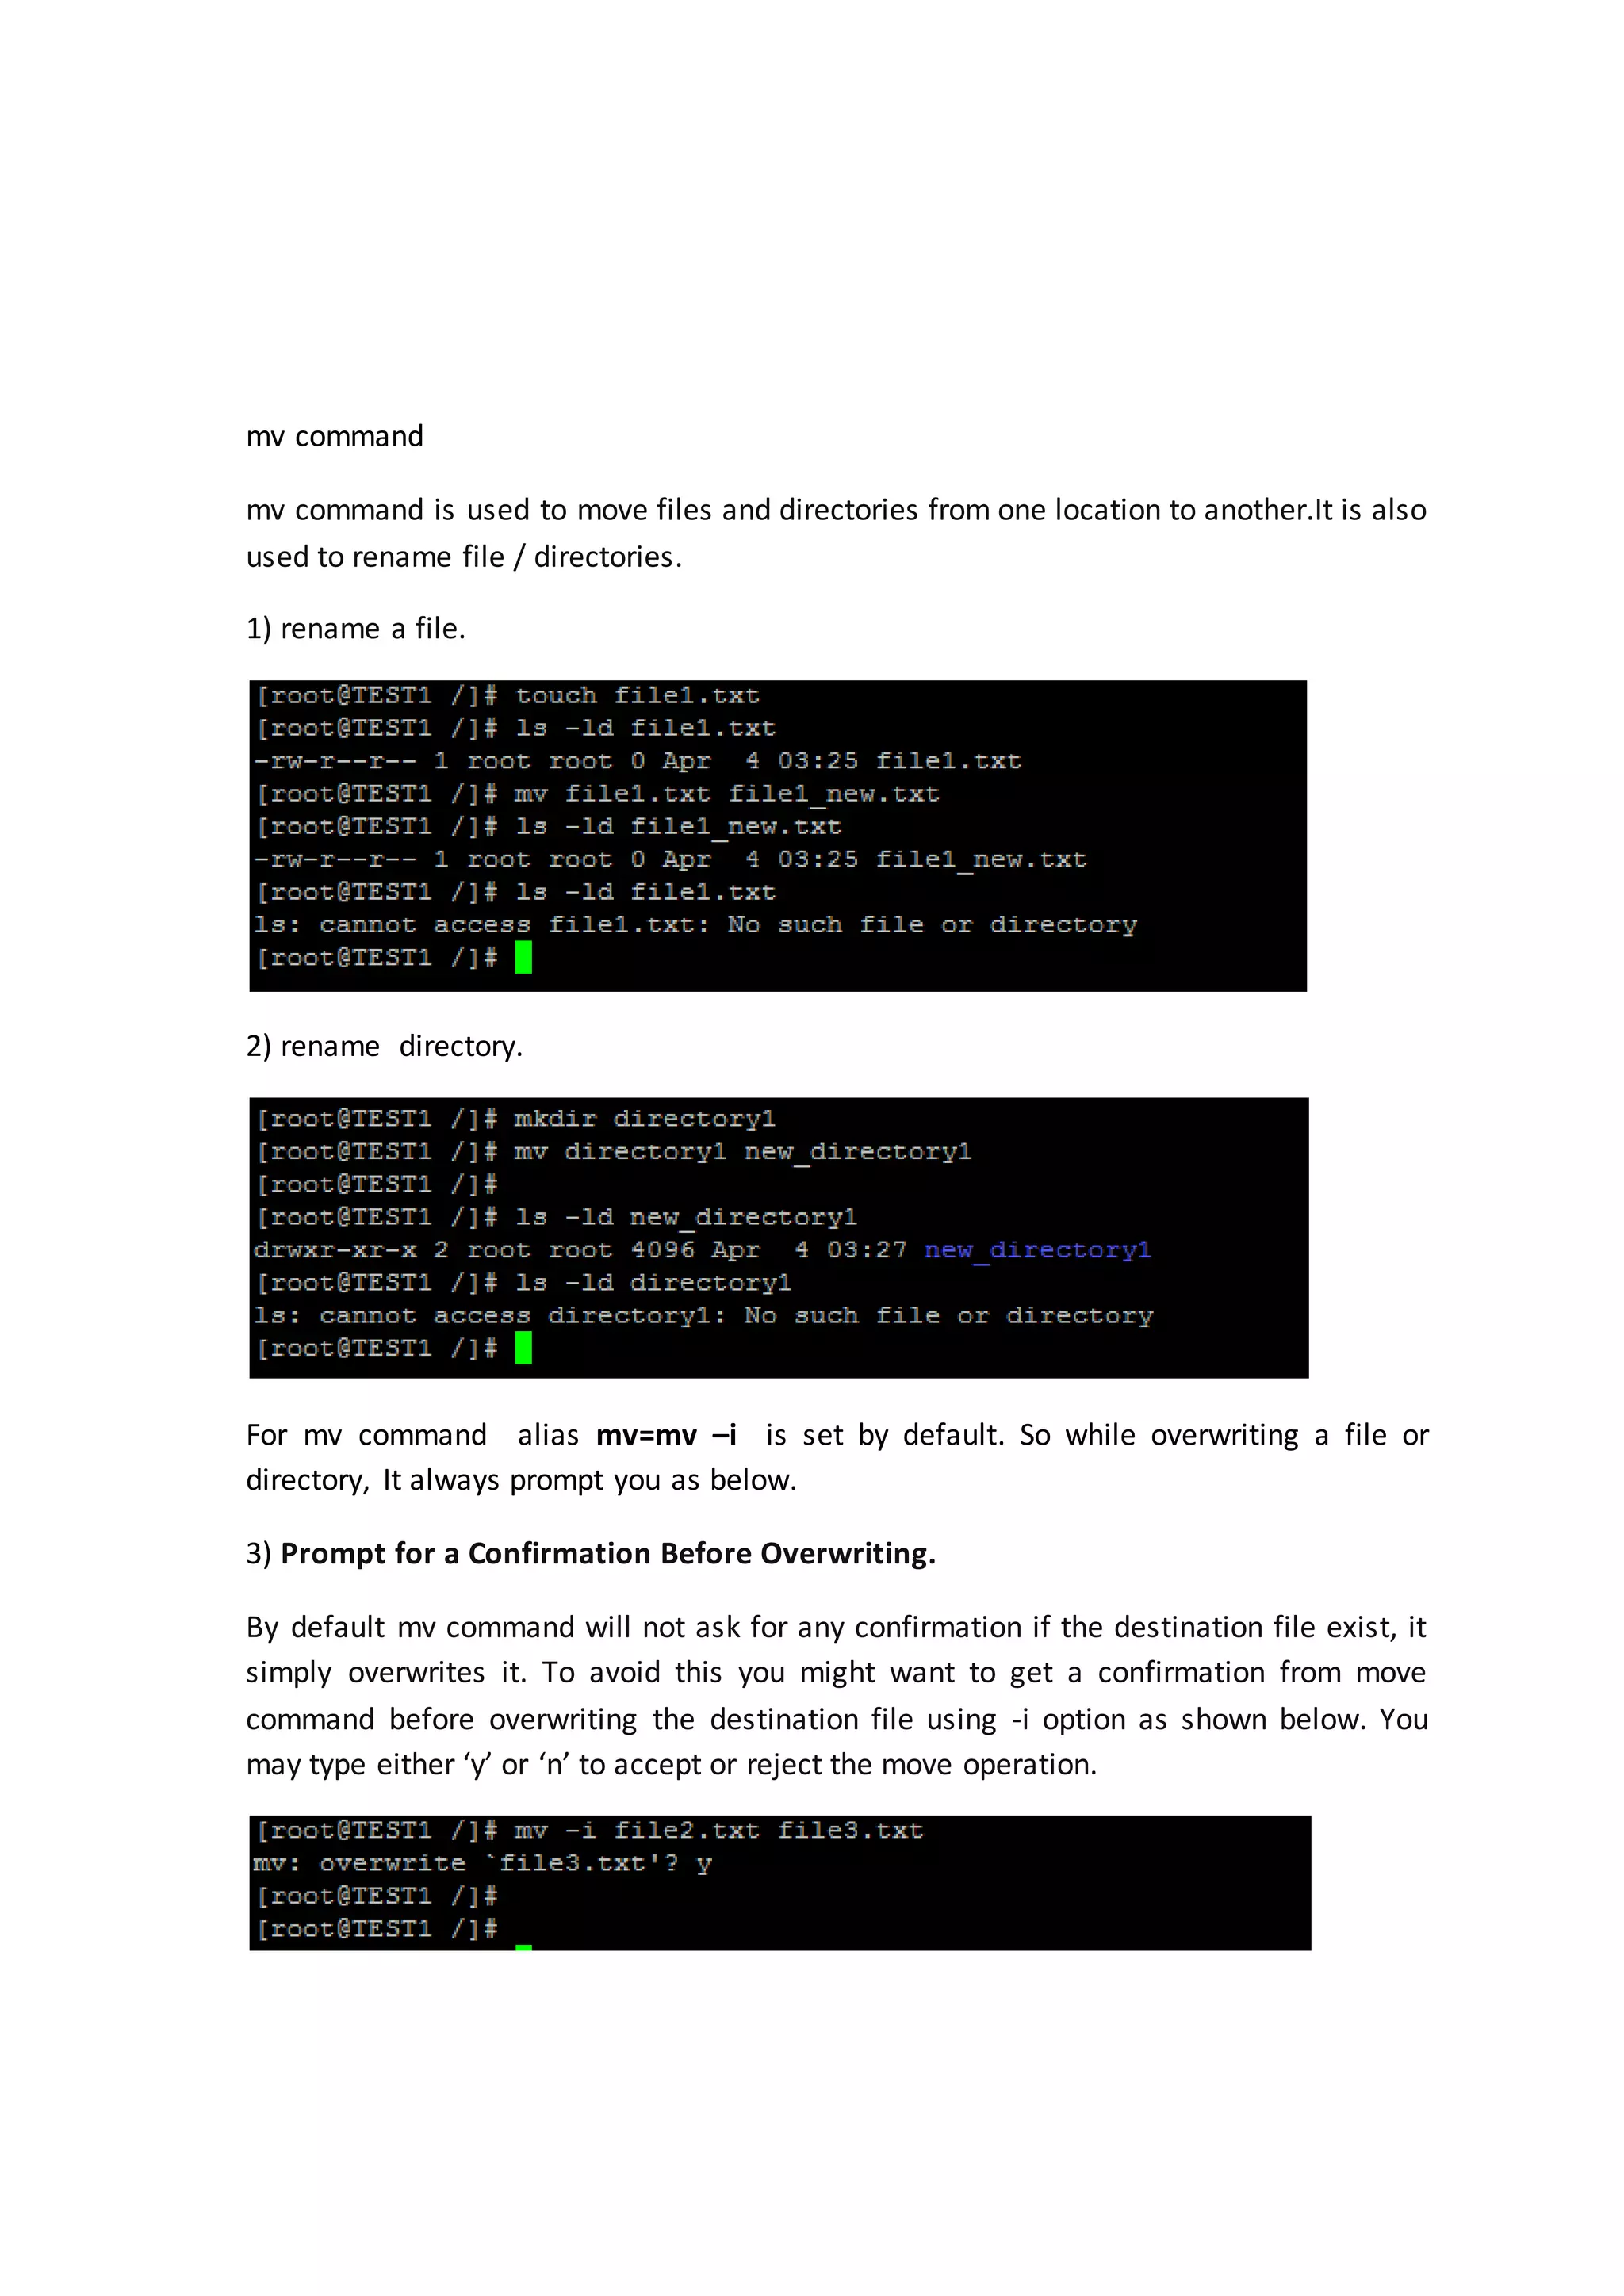
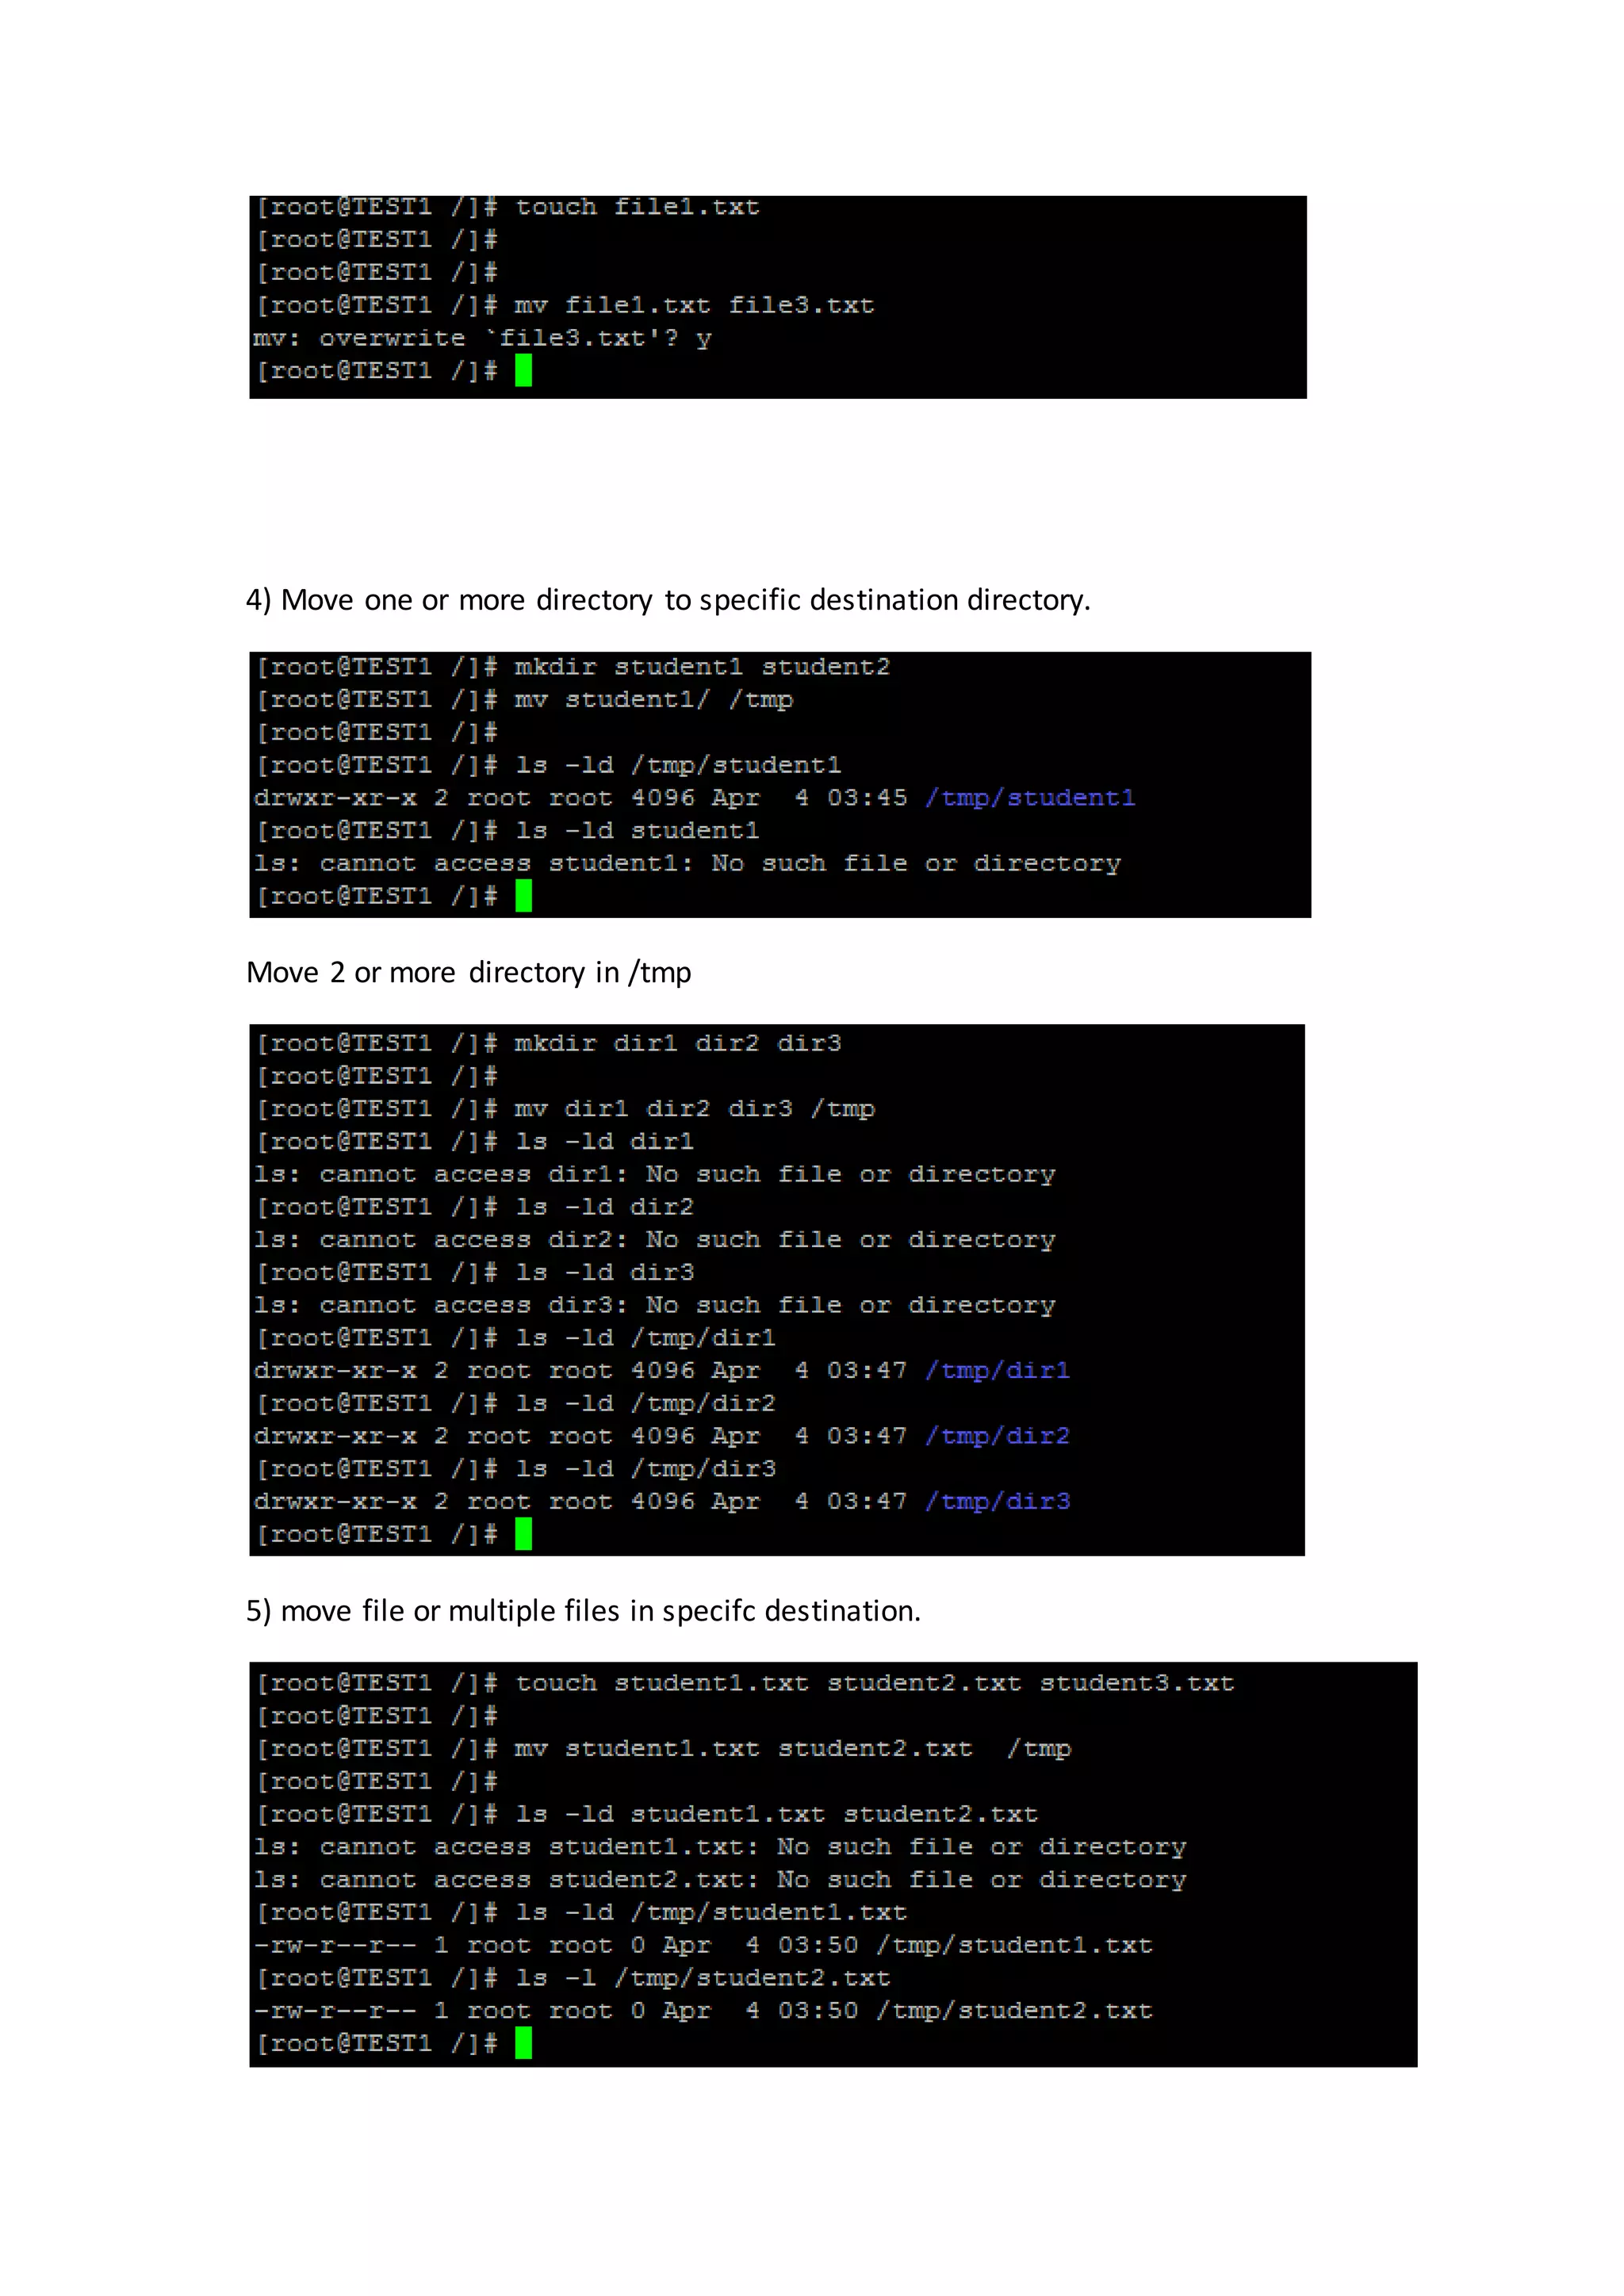
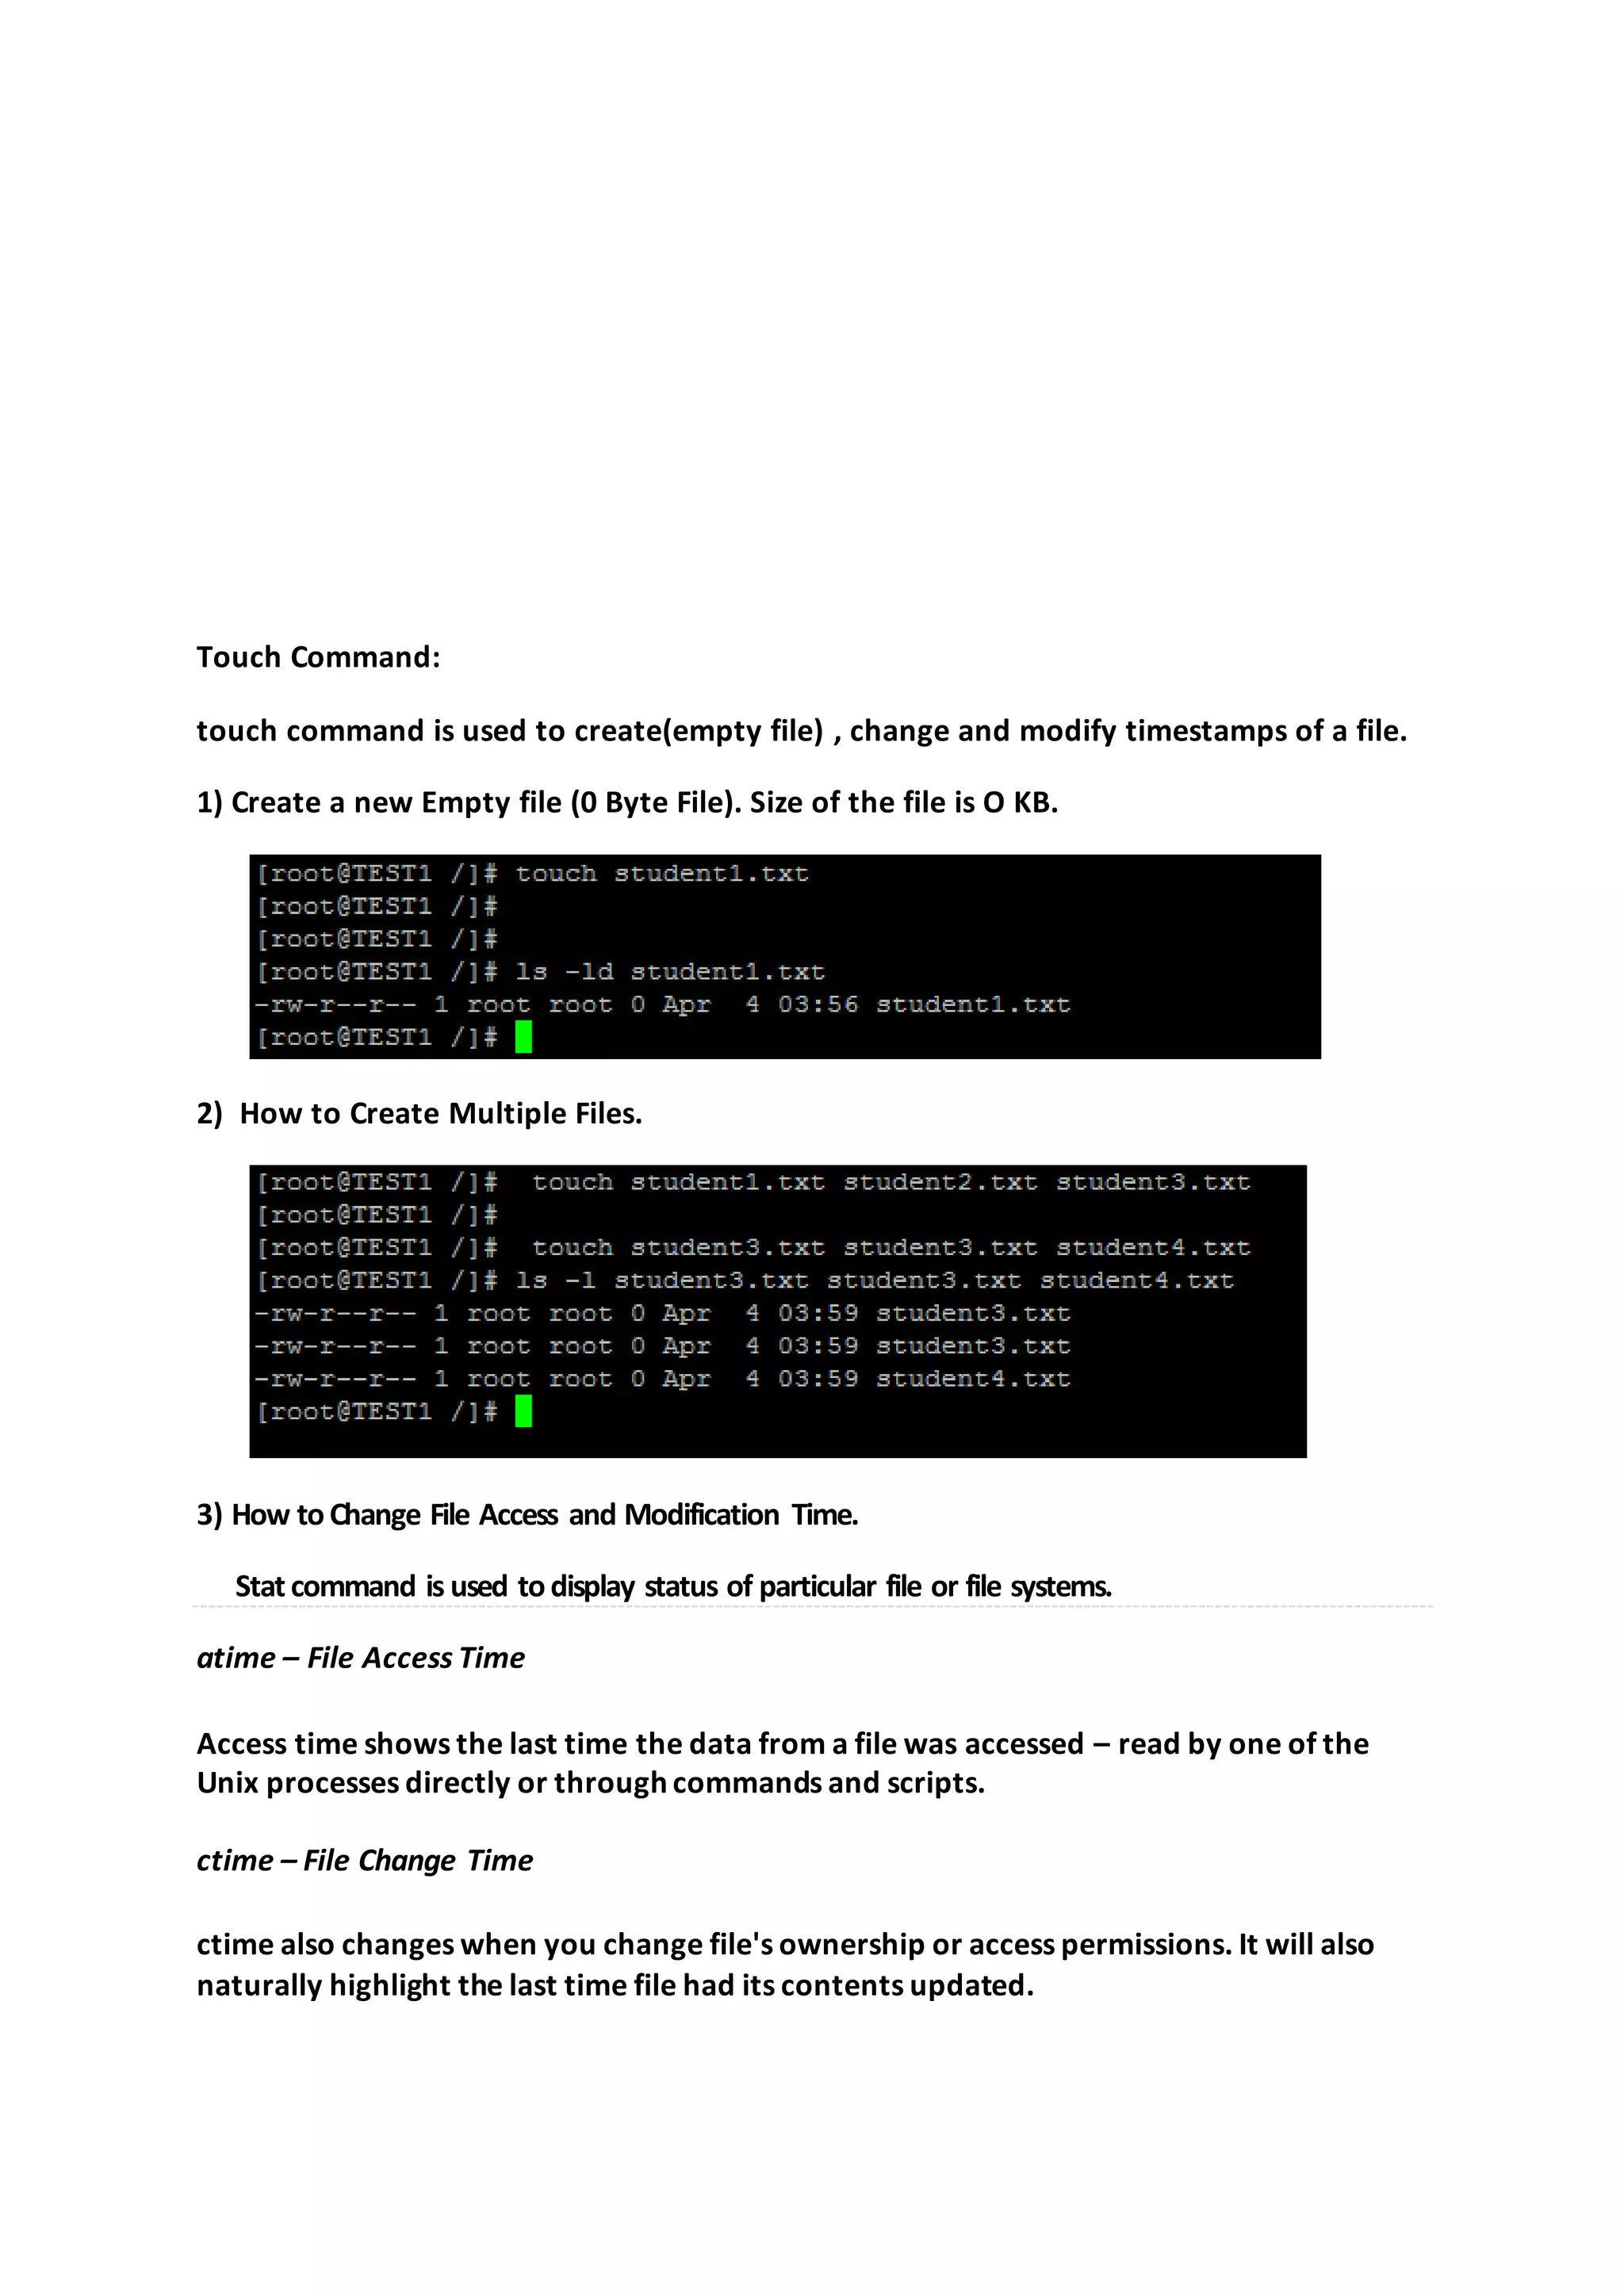
This document provides summaries of common Linux commands, including ls, mkdir, cd, rmdir, rm, cp, mv, touch, echo, head, tail, less, more, grep, find, man, wc, pipe (|), cat, and mv. It describes the basic syntax and common examples for using each command to list, create, delete, copy, move, view, and filter files and directories from the command line.
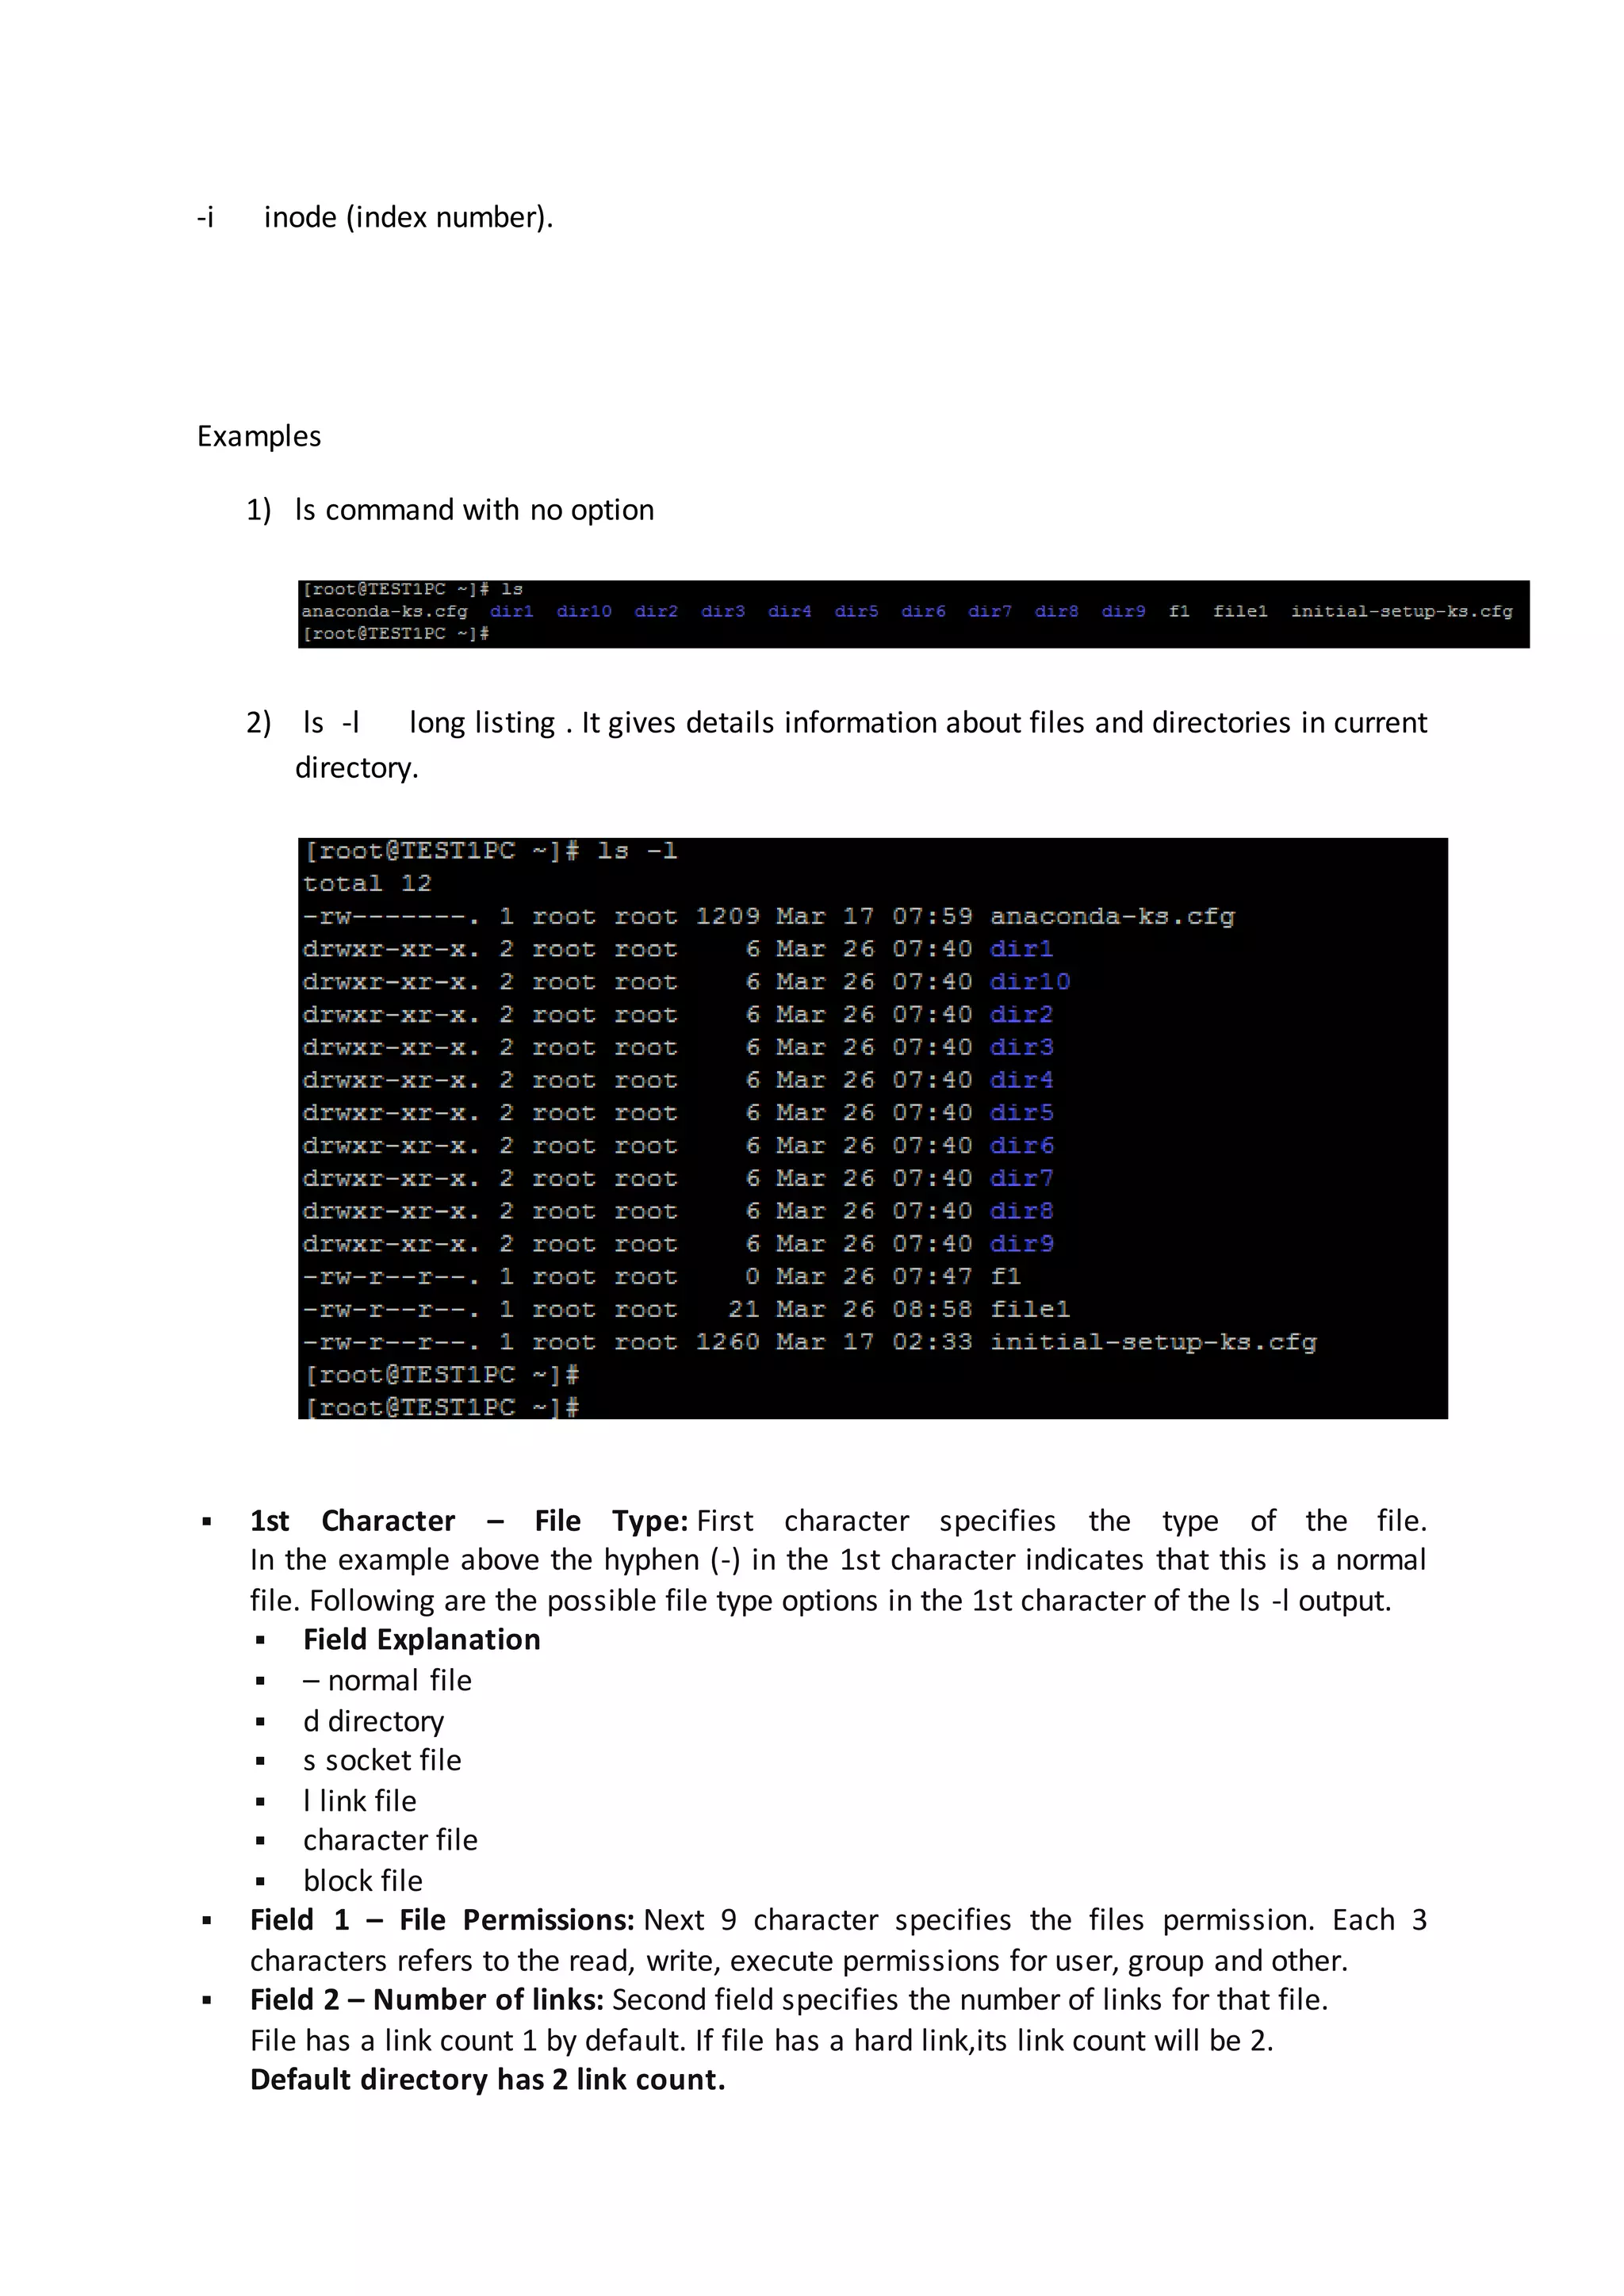
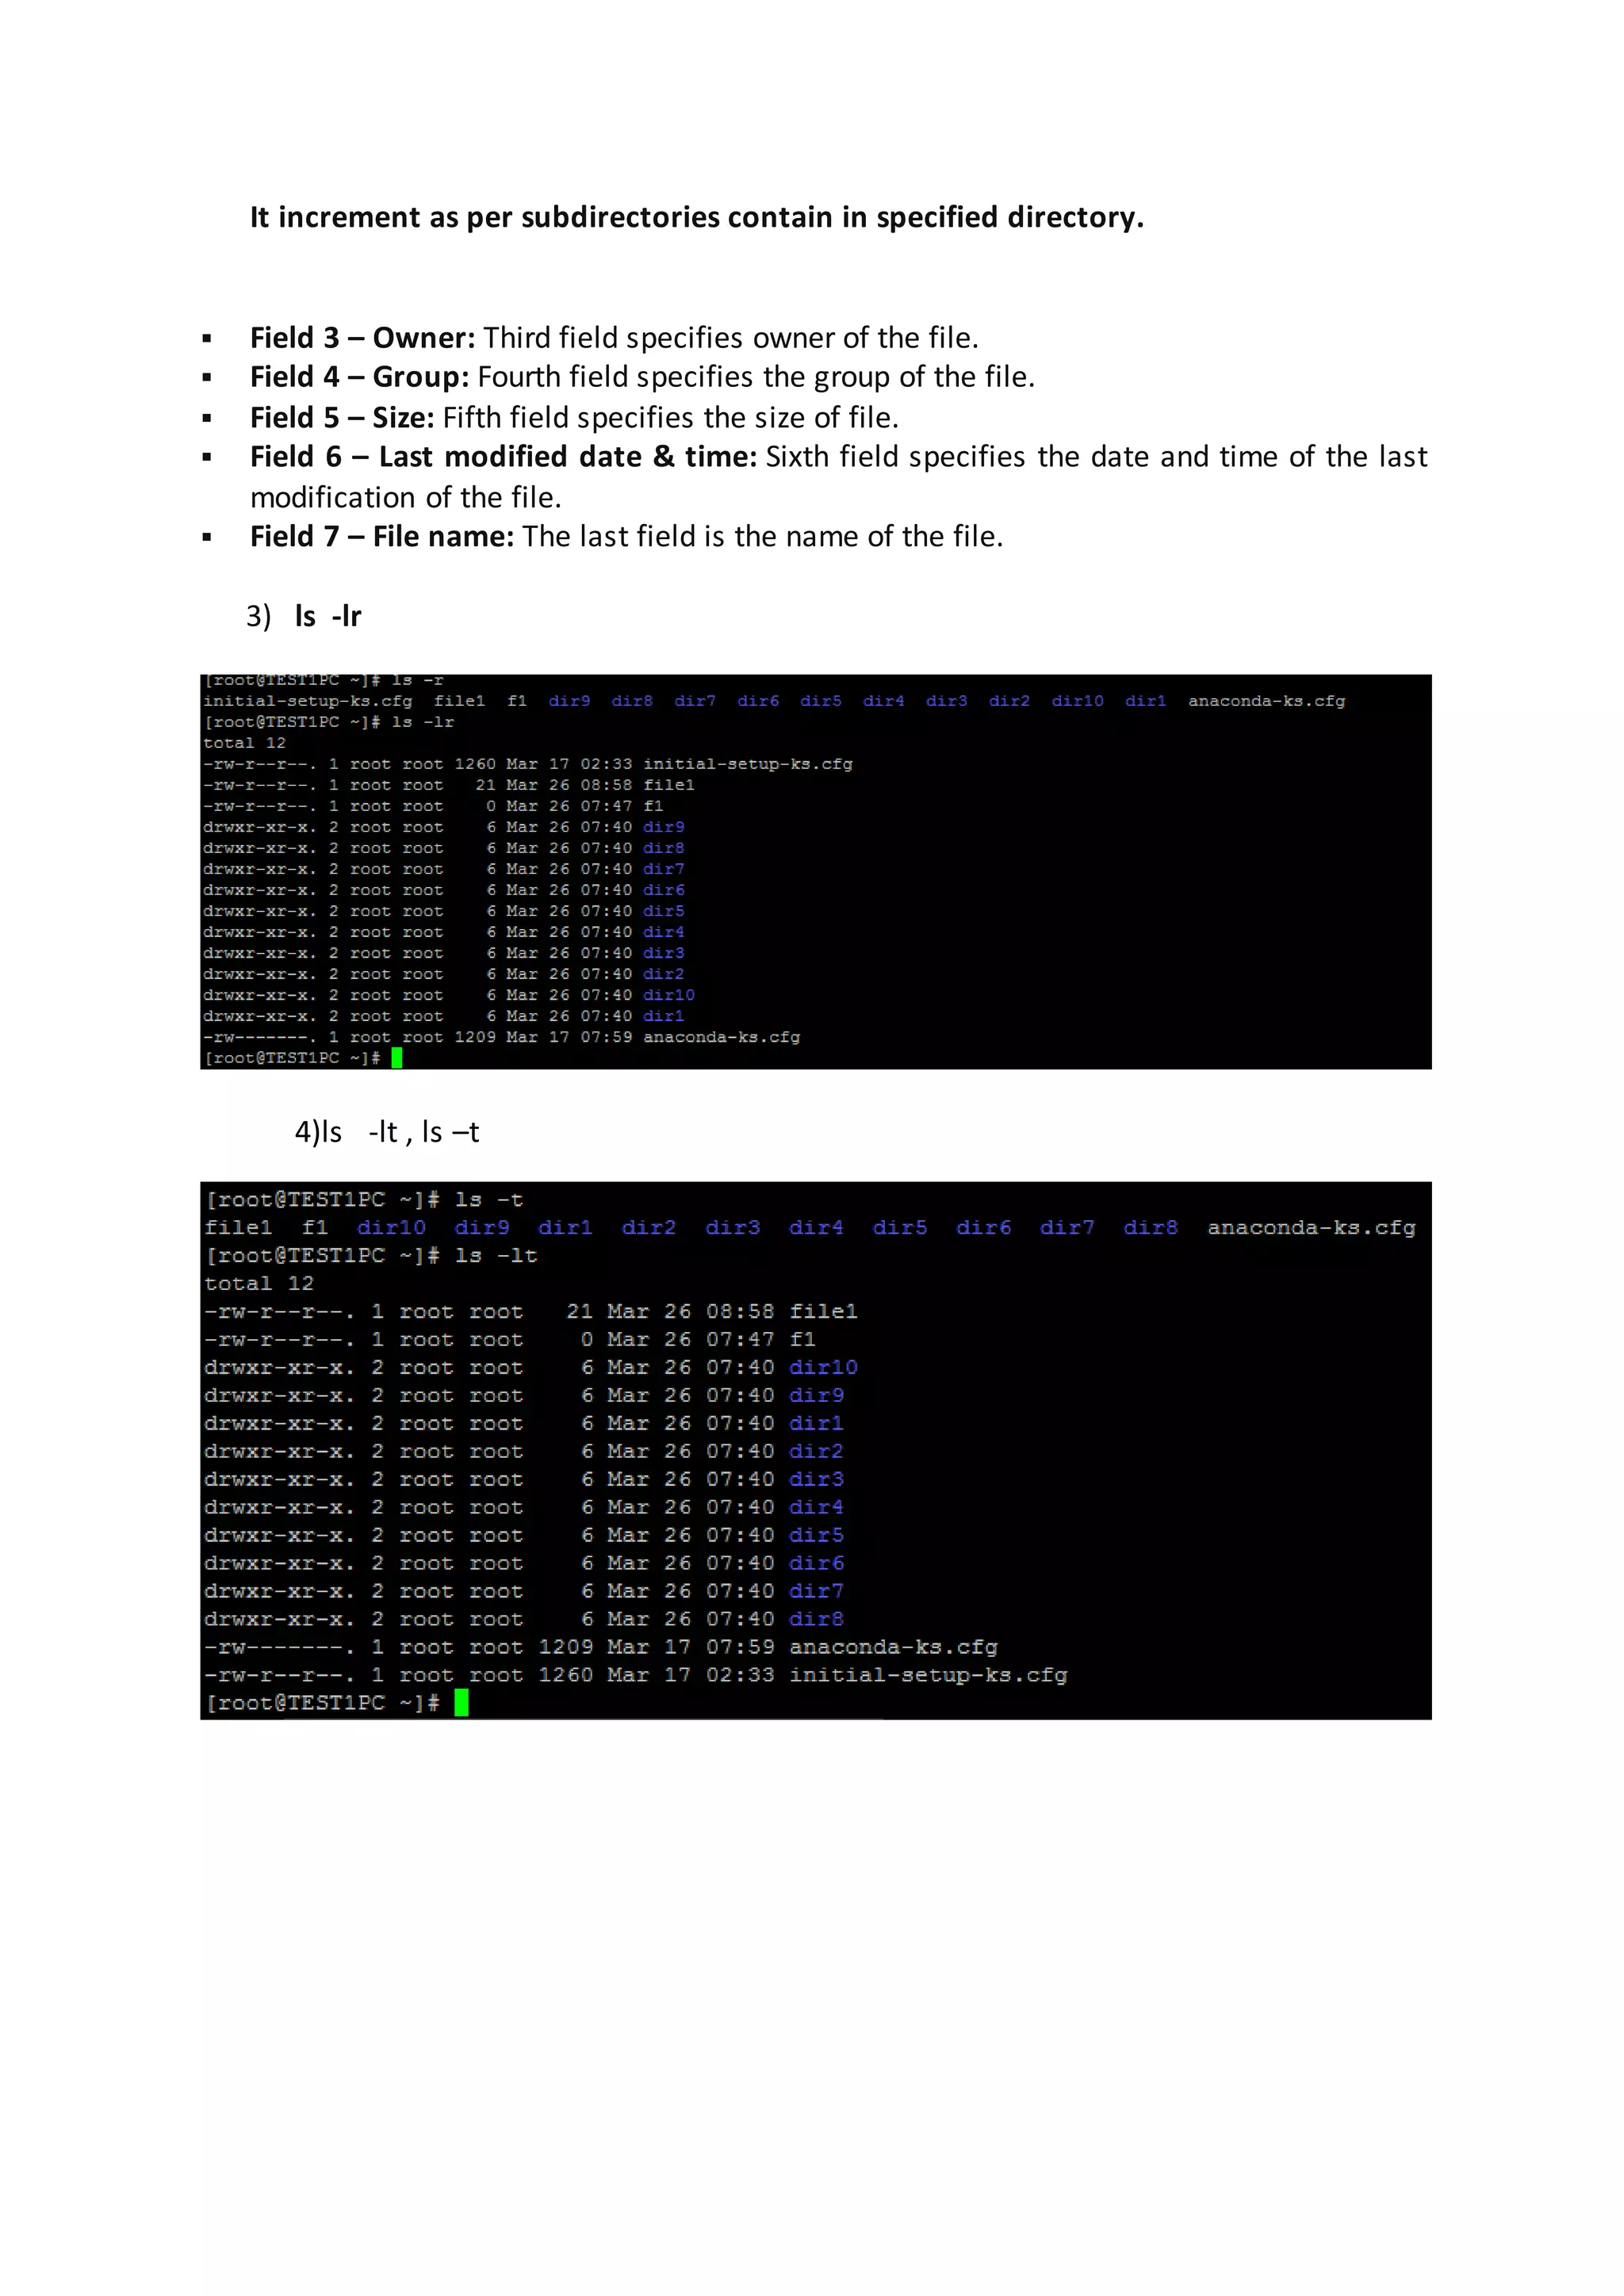
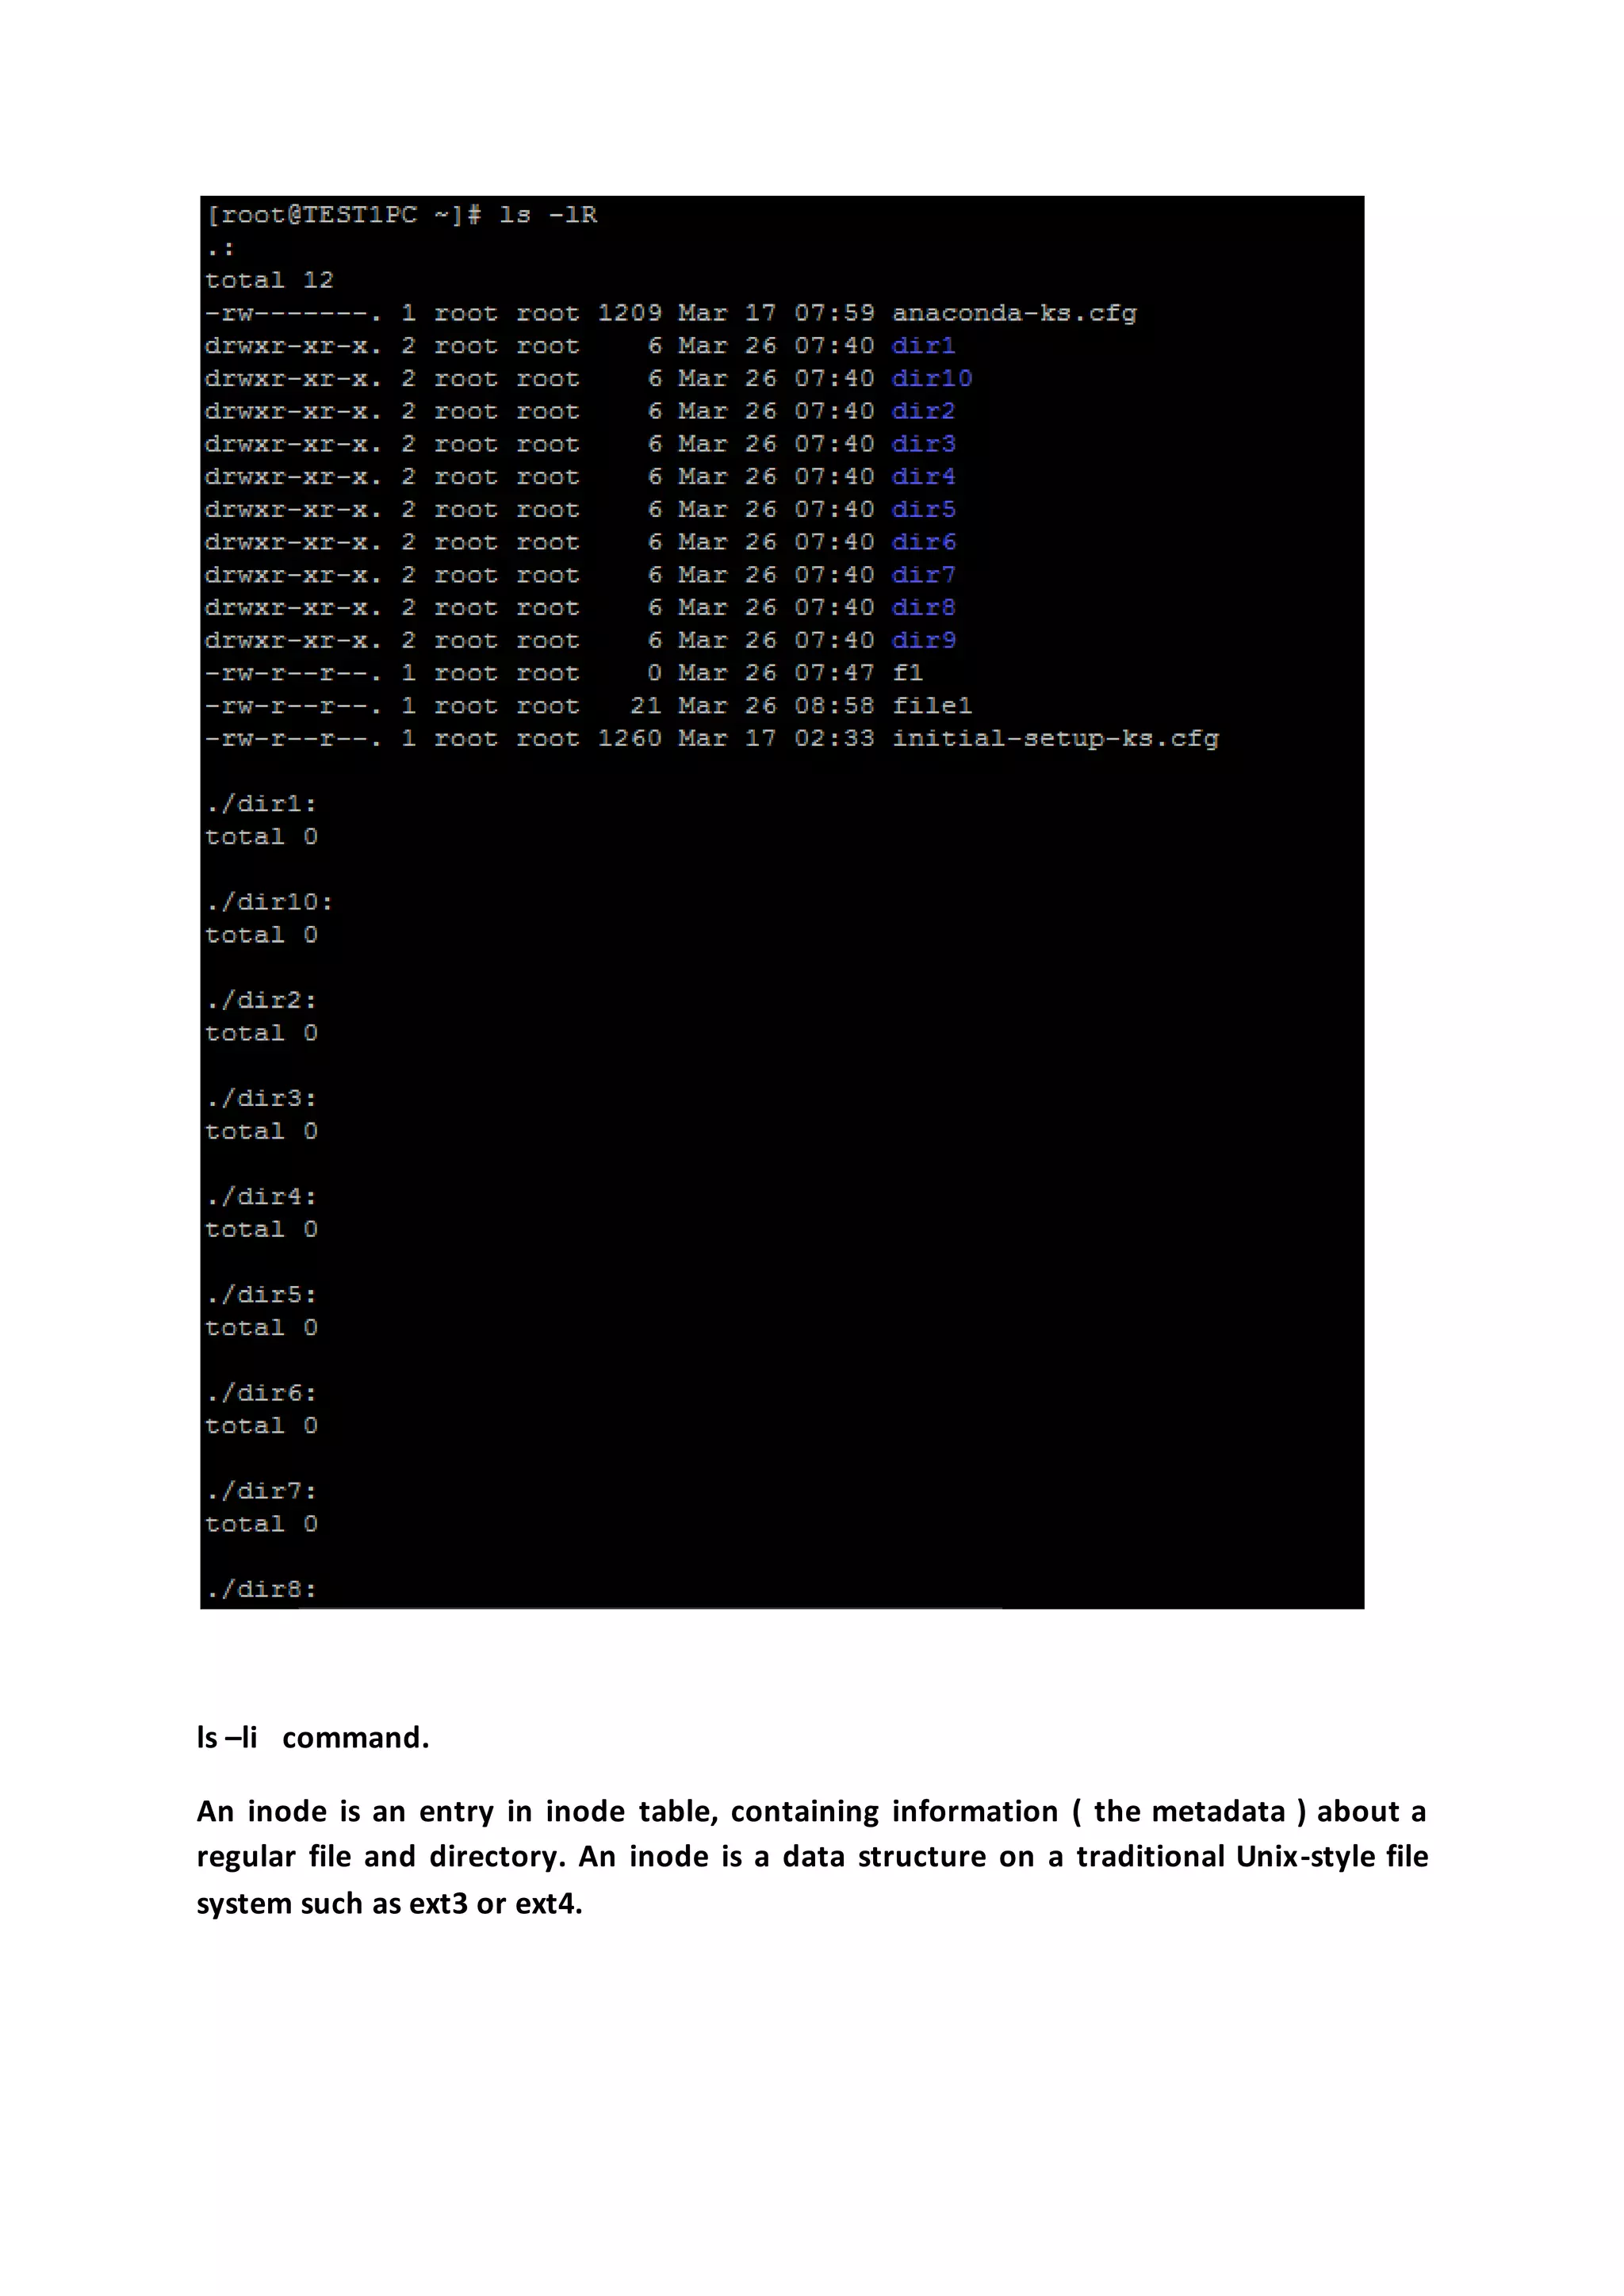
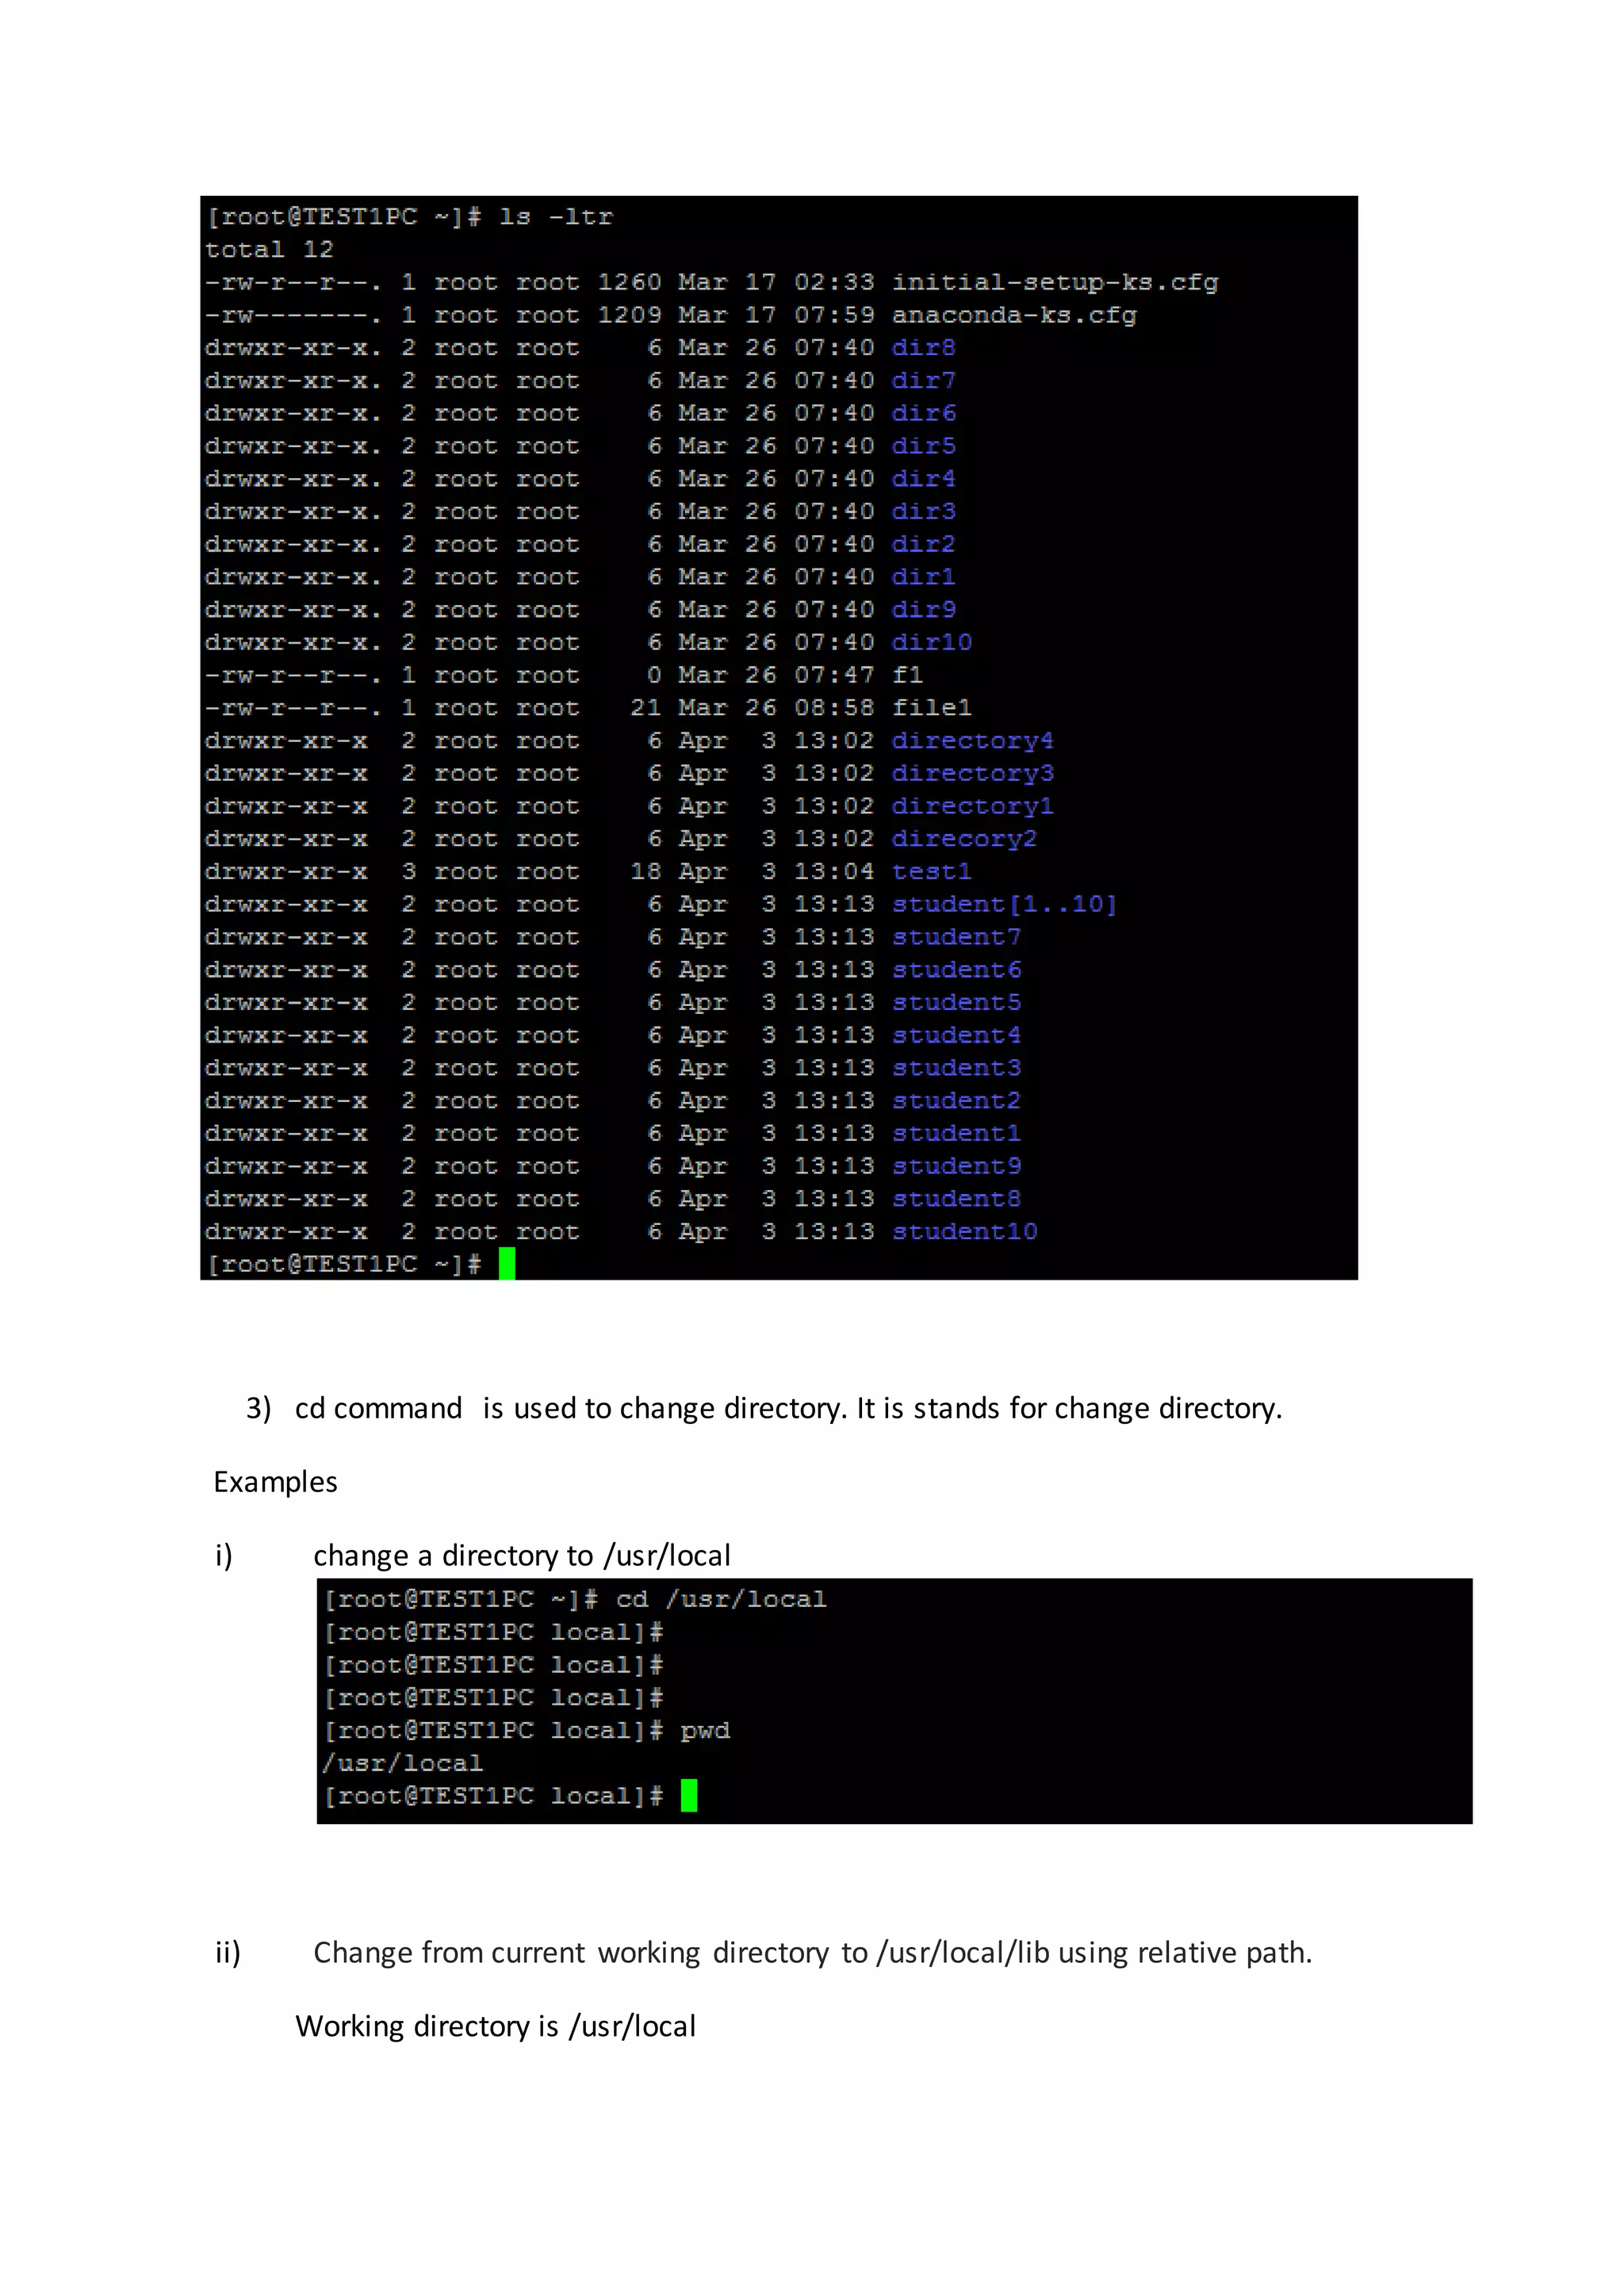
![Chapter 4 Basic Commands 1) ls 2) mkdir 3) cd 4) rmdir 5) rm 6) cp 7) mv 8) touch 9) echo 10) head 11) tail 12) less 13) more 14) grep 15) find 16) man 17) wc 18) | pipe 19) Cat 1) ls command ls command is used to list directory contents. It gives information about files. Syntax ls [option] ---[FILE]----- Options -a It display all the files including hidden files which is start with . -l long listing format about contents in the current directory. Display files in alphabetical order from a ---to---z. -r It display files in reverse order...for example from z to a order. -t sort by modification time....newest first. -R list subdirectories recursively.](https://image.slidesharecdn.com/chapter3linuxbasiccommands-170414153108/75/Chapter-4-Linux-Basic-Commands-1-2048.jpg)

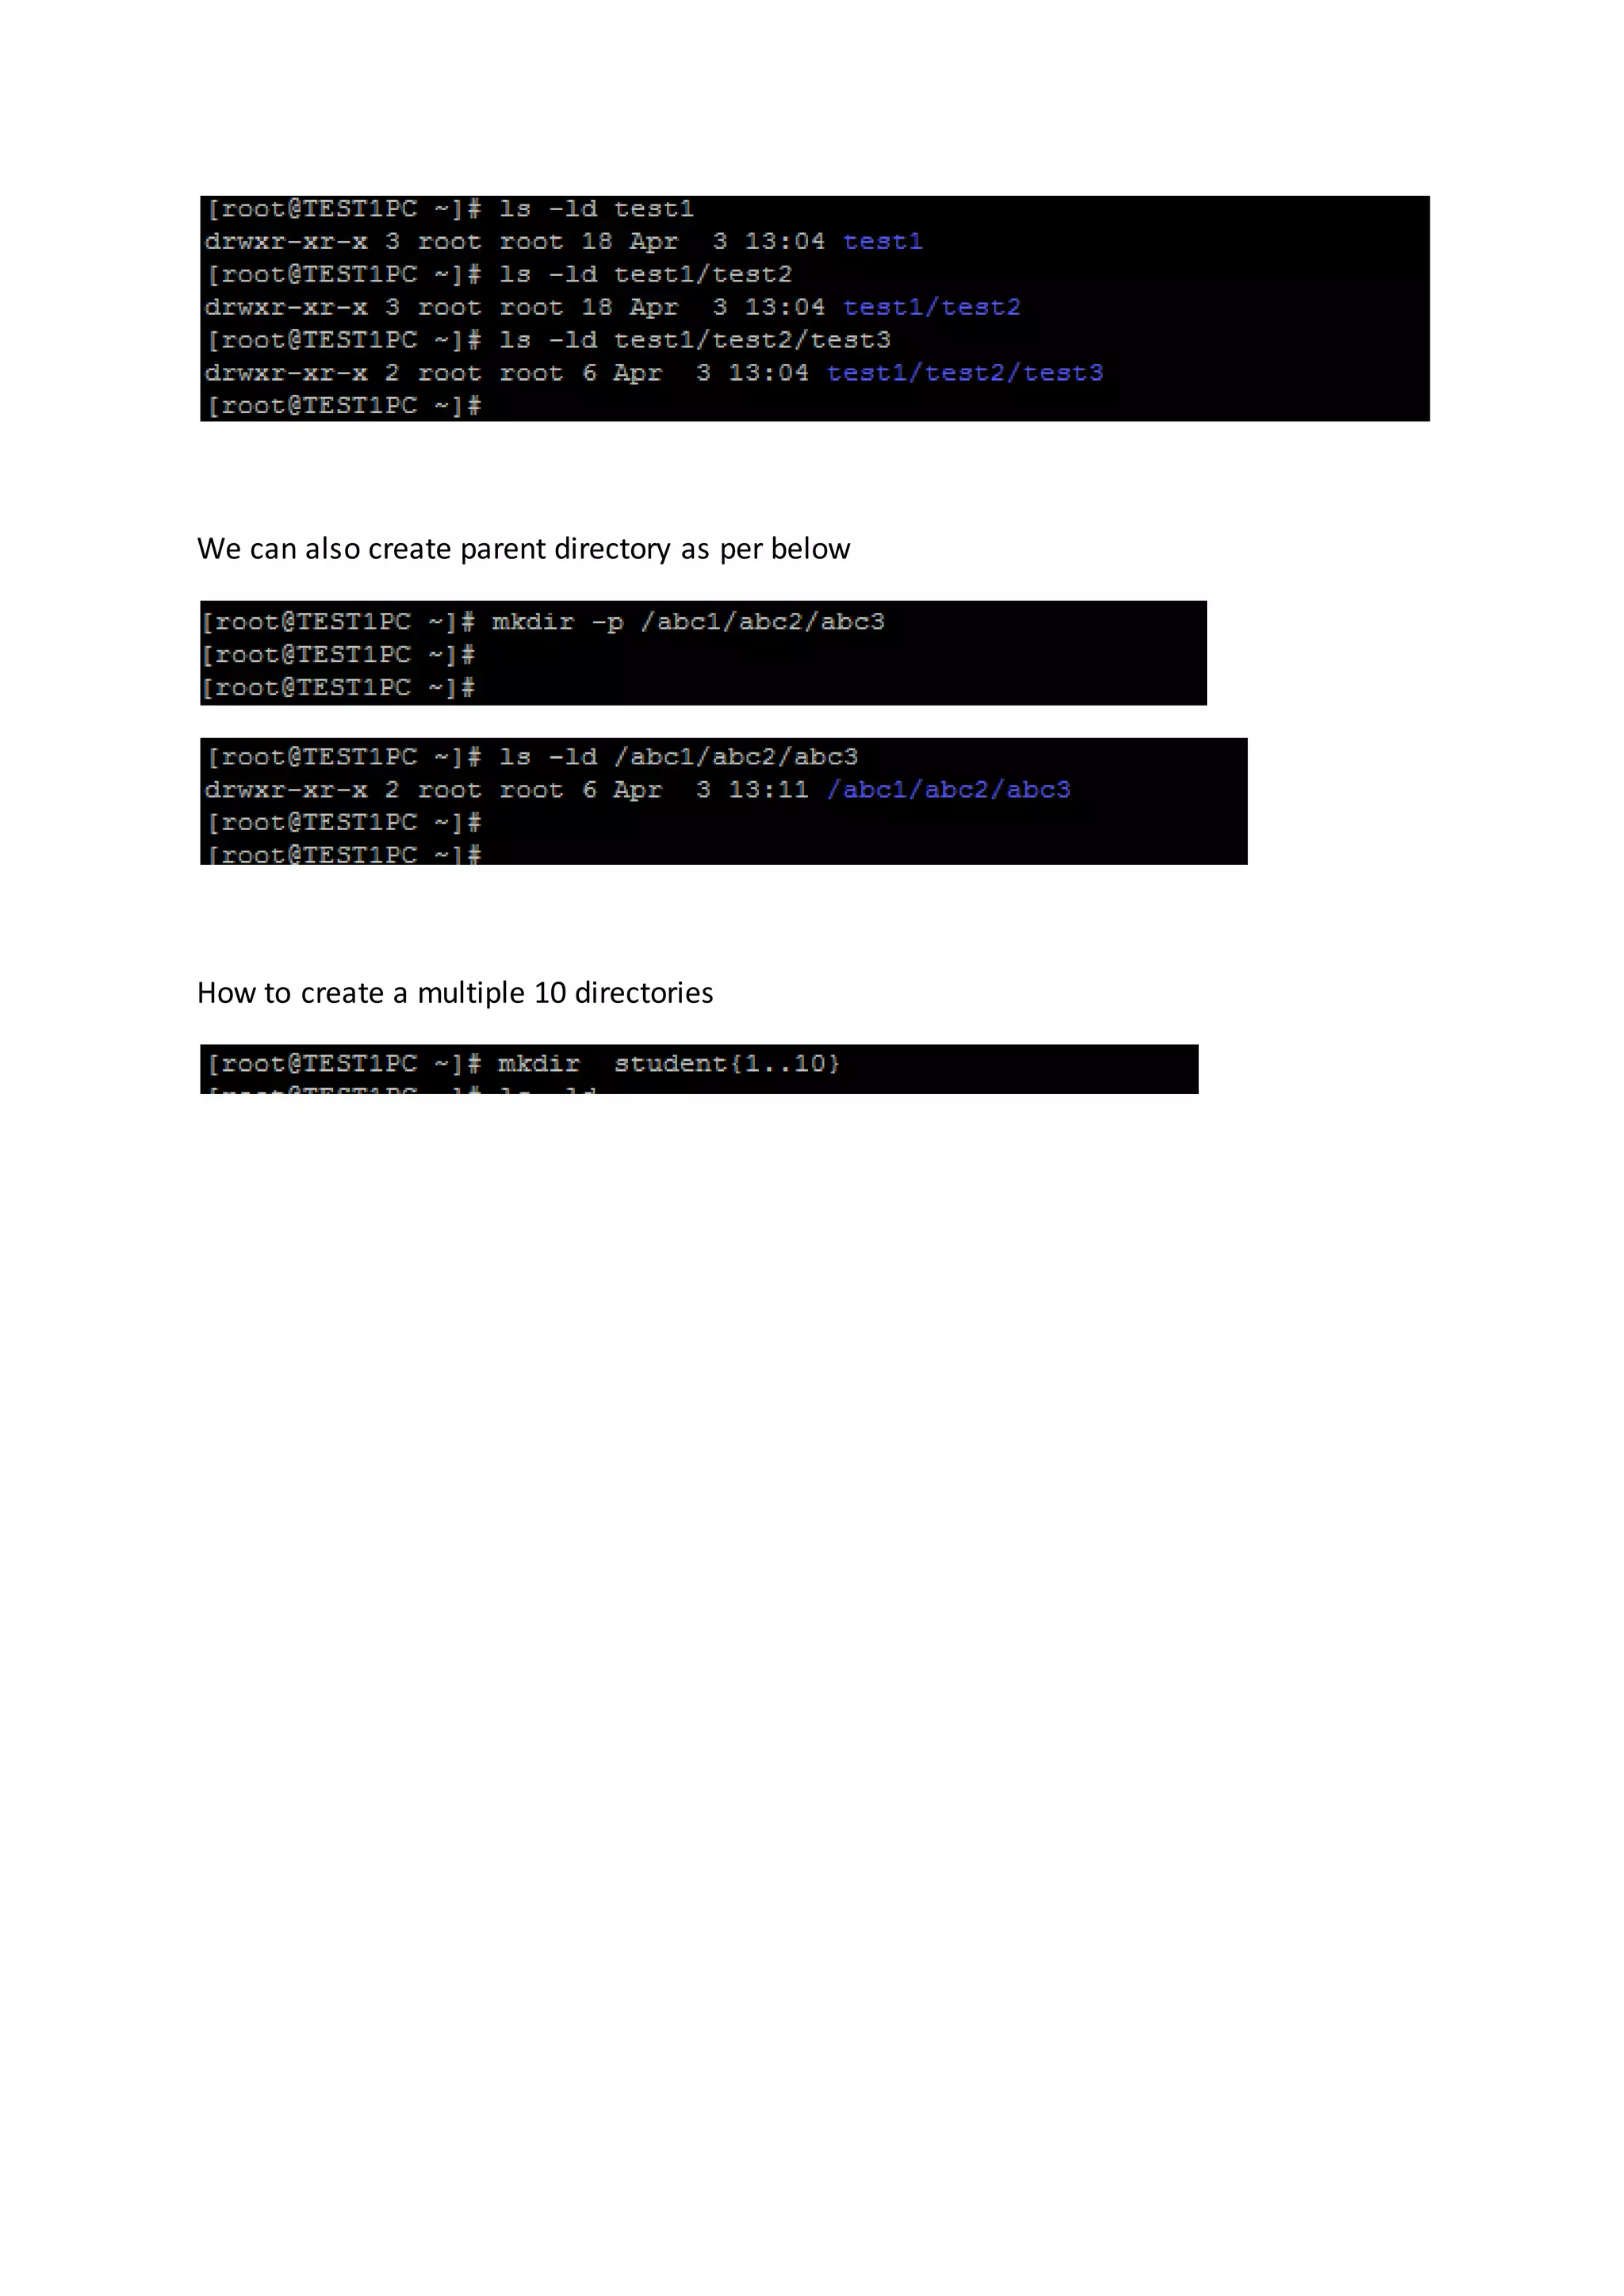
![2) mkdir command mkdir command is used to create a directory Syntax mkdir [option] ----DIRECTORY------ Option -m set file mode -p make parent directory as needed -v print message for each created directory. Examples: 1) Create multiple directory 2) To create parent directories using the mkdir command pass the -p option.](https://image.slidesharecdn.com/chapter3linuxbasiccommands-170414153108/75/Chapter-4-Linux-Basic-Commands-6-2048.jpg)
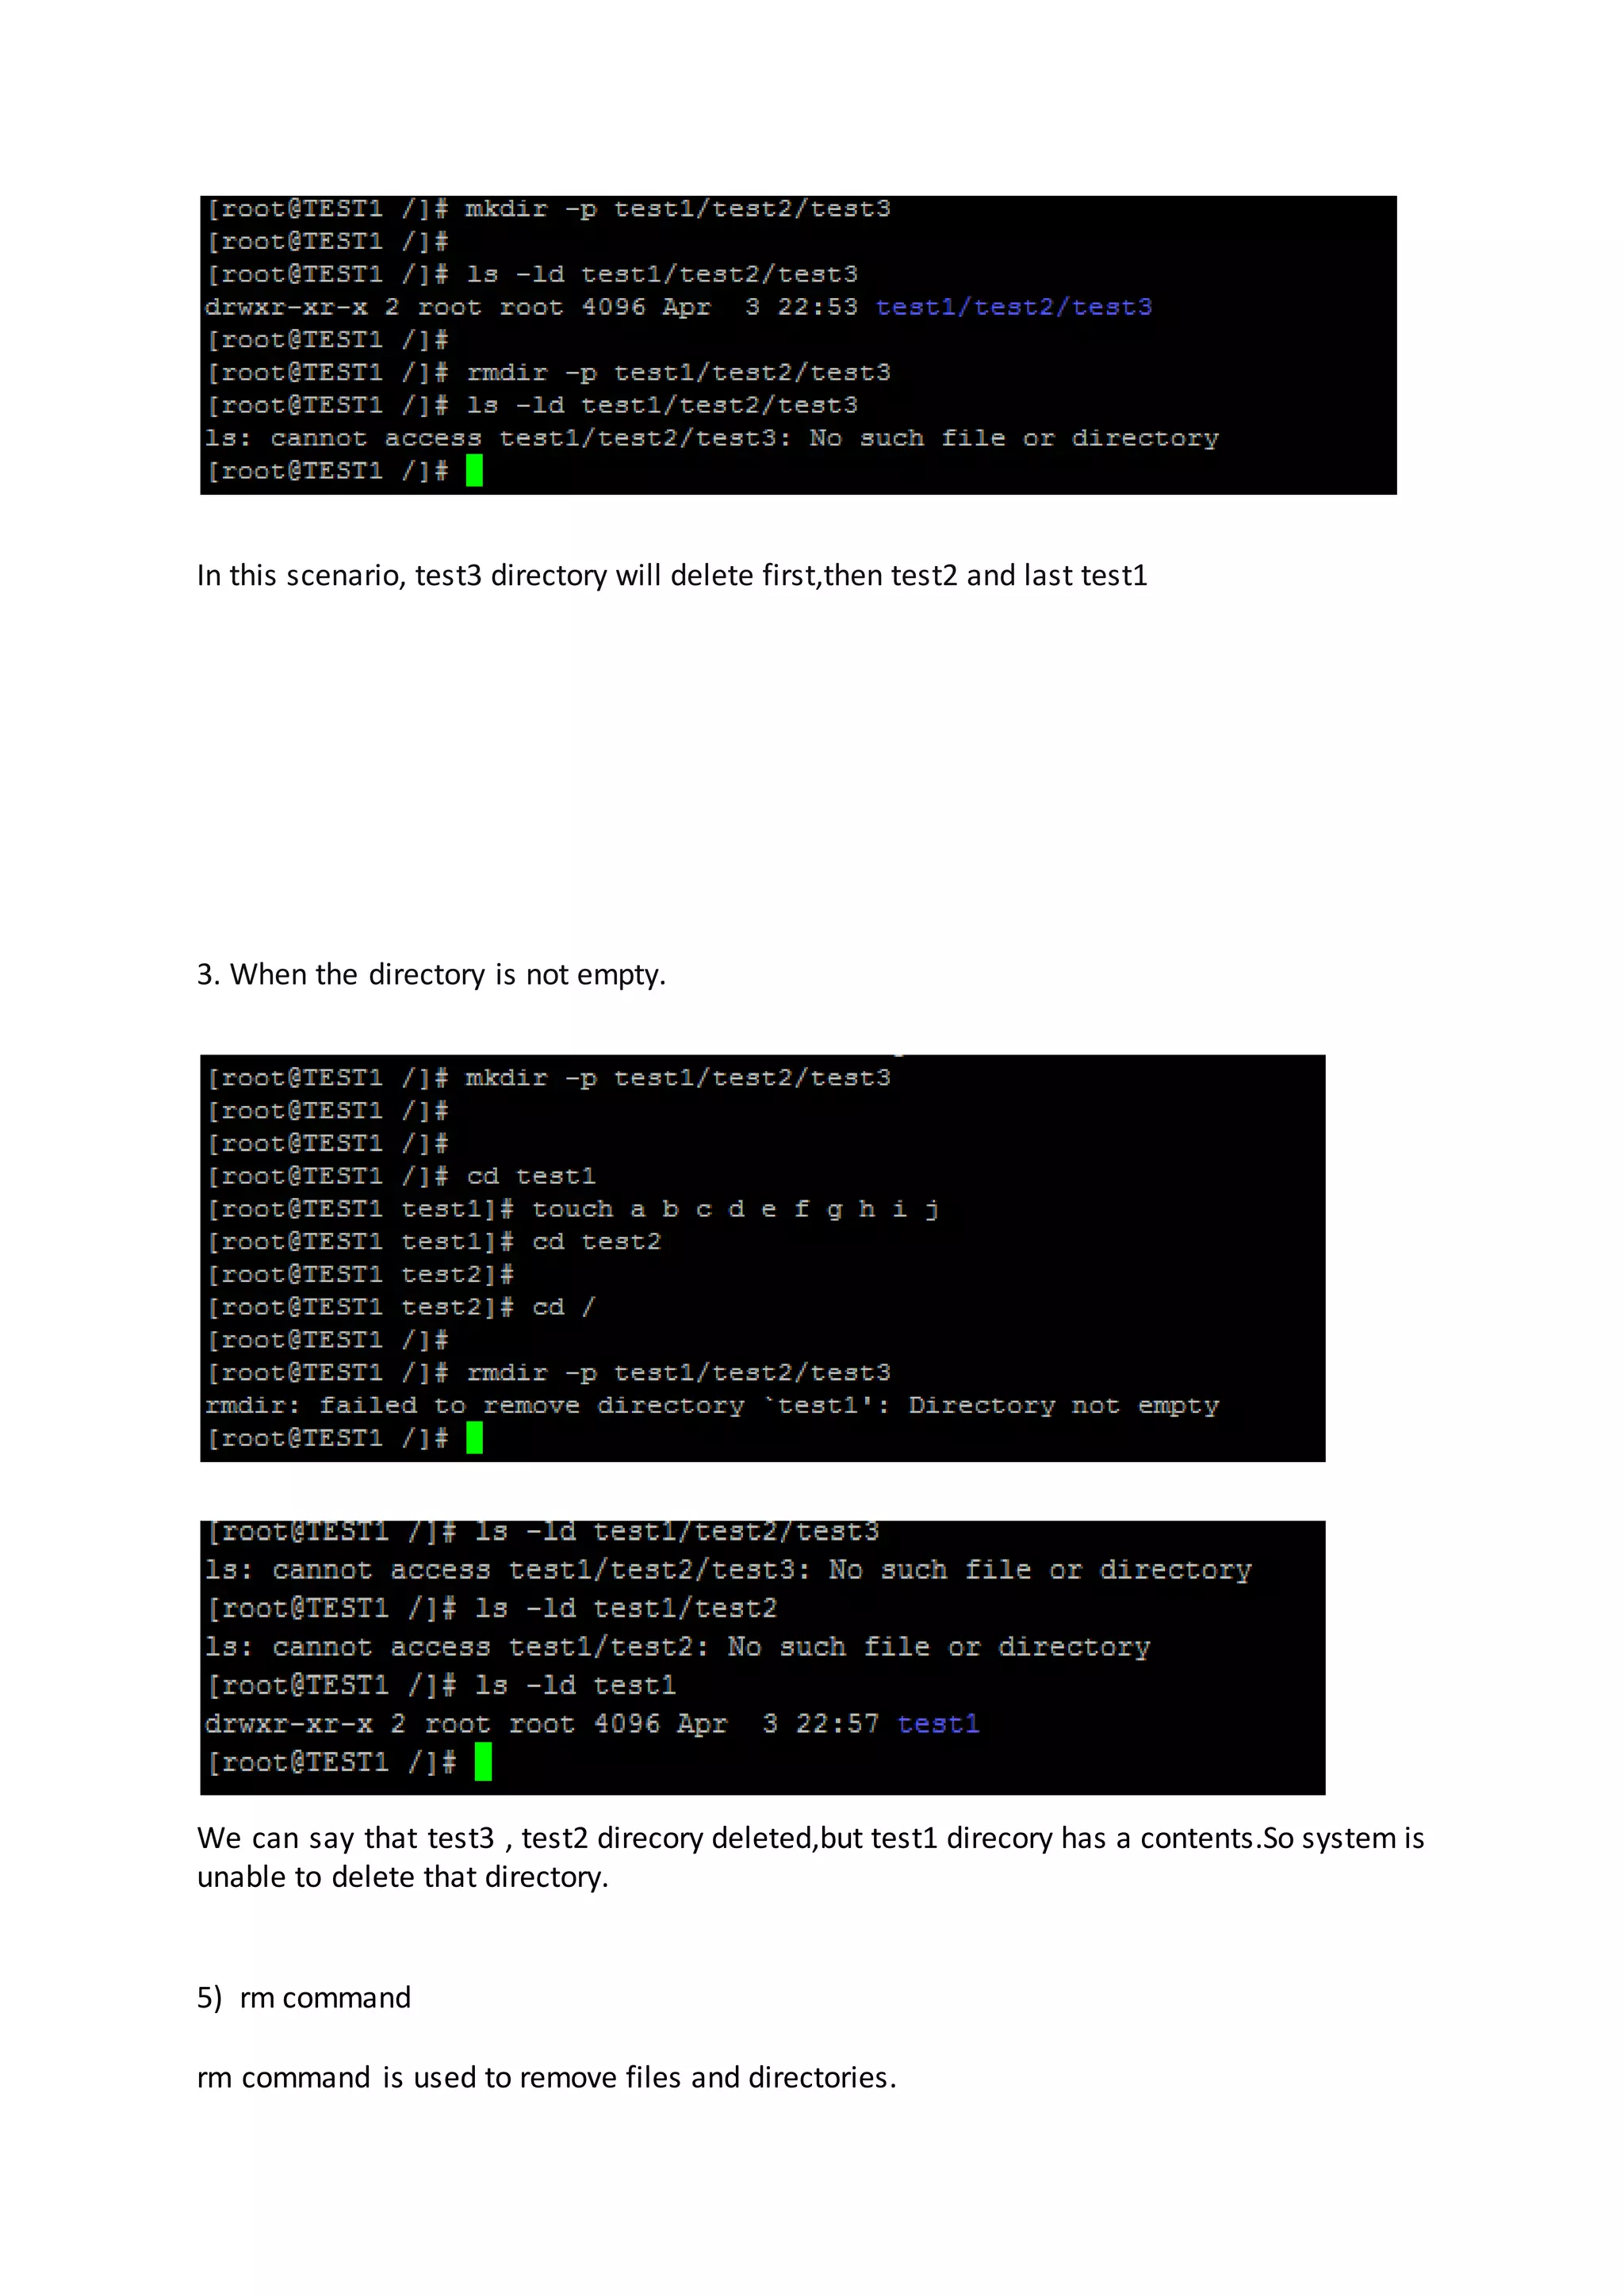
![4) rmdir command rmdir command is used to delete the directories which is empty. (only empty directories). Syntac : rmdir [OPTION]... DIRECTORY... 1. To ensure that you are deleting an empty directory you should use rmdir command. If there is any files / directories in that directory it will display the following error. Now We need to delete the contents from student1 direcory,then we will be able to delete the student1 directory. 2. How to Delete Nested Empty Directories in Linux?](https://image.slidesharecdn.com/chapter3linuxbasiccommands-170414153108/75/Chapter-4-Linux-Basic-Commands-11-2048.jpg)
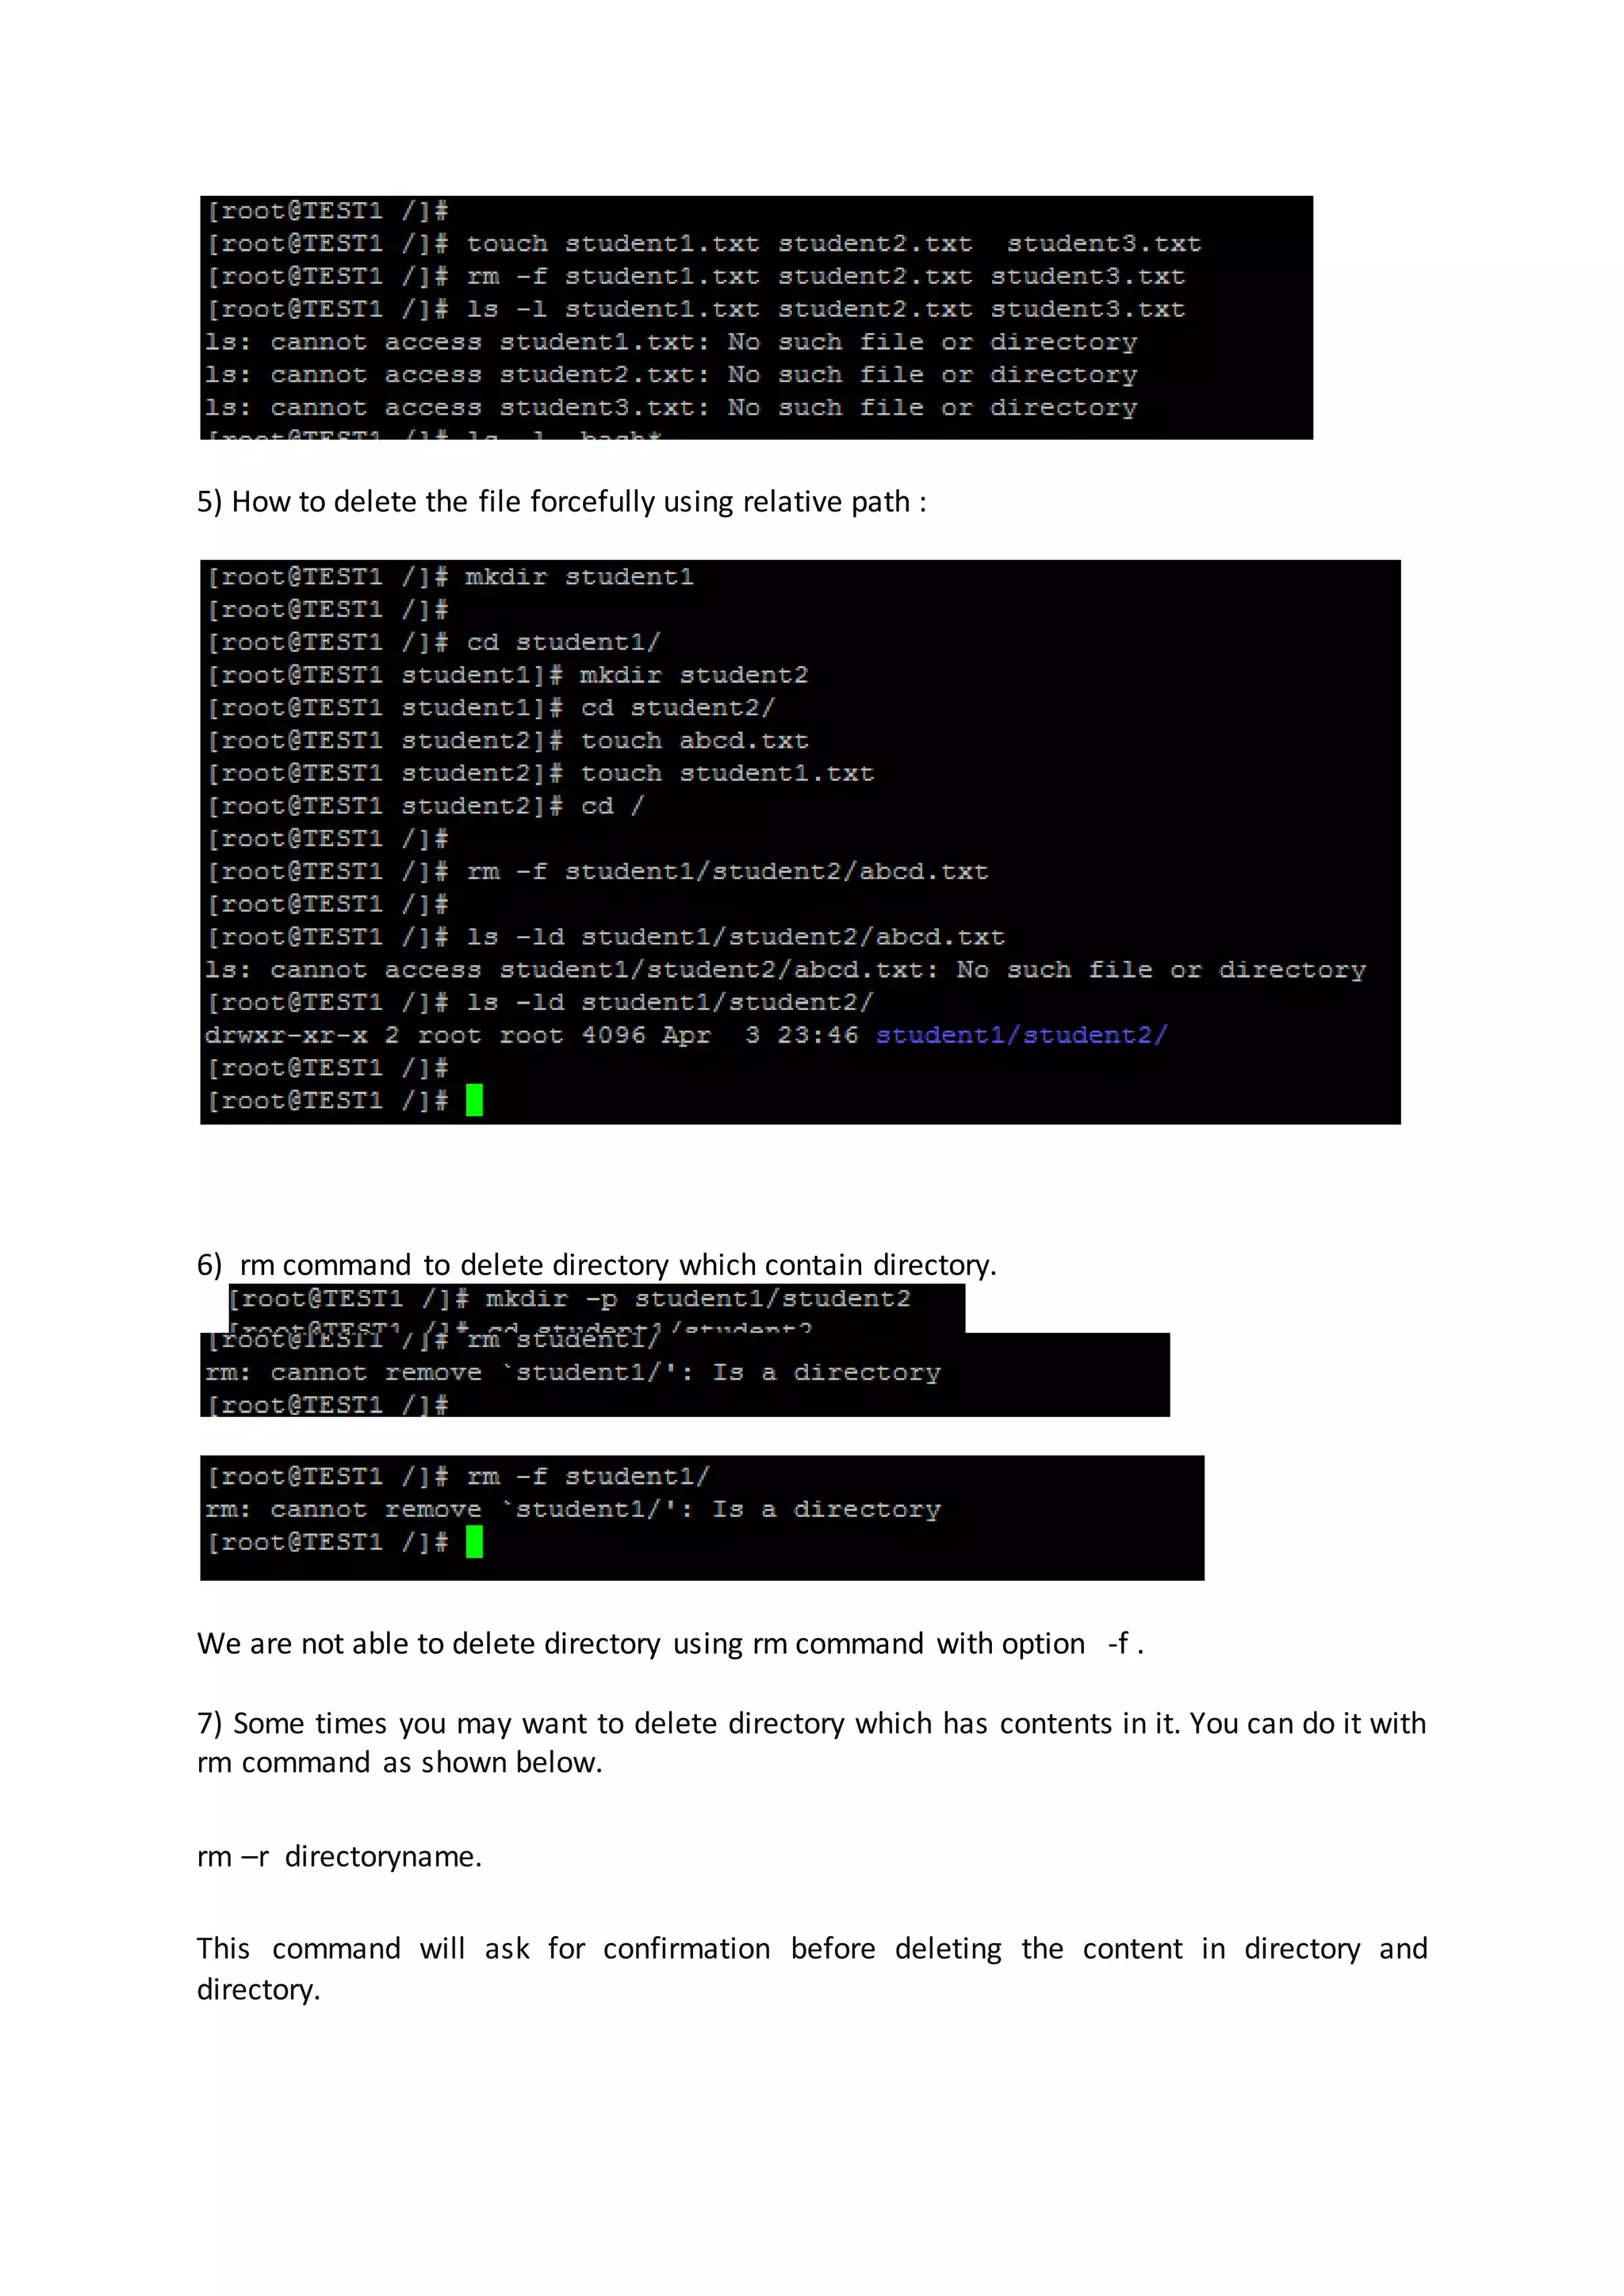
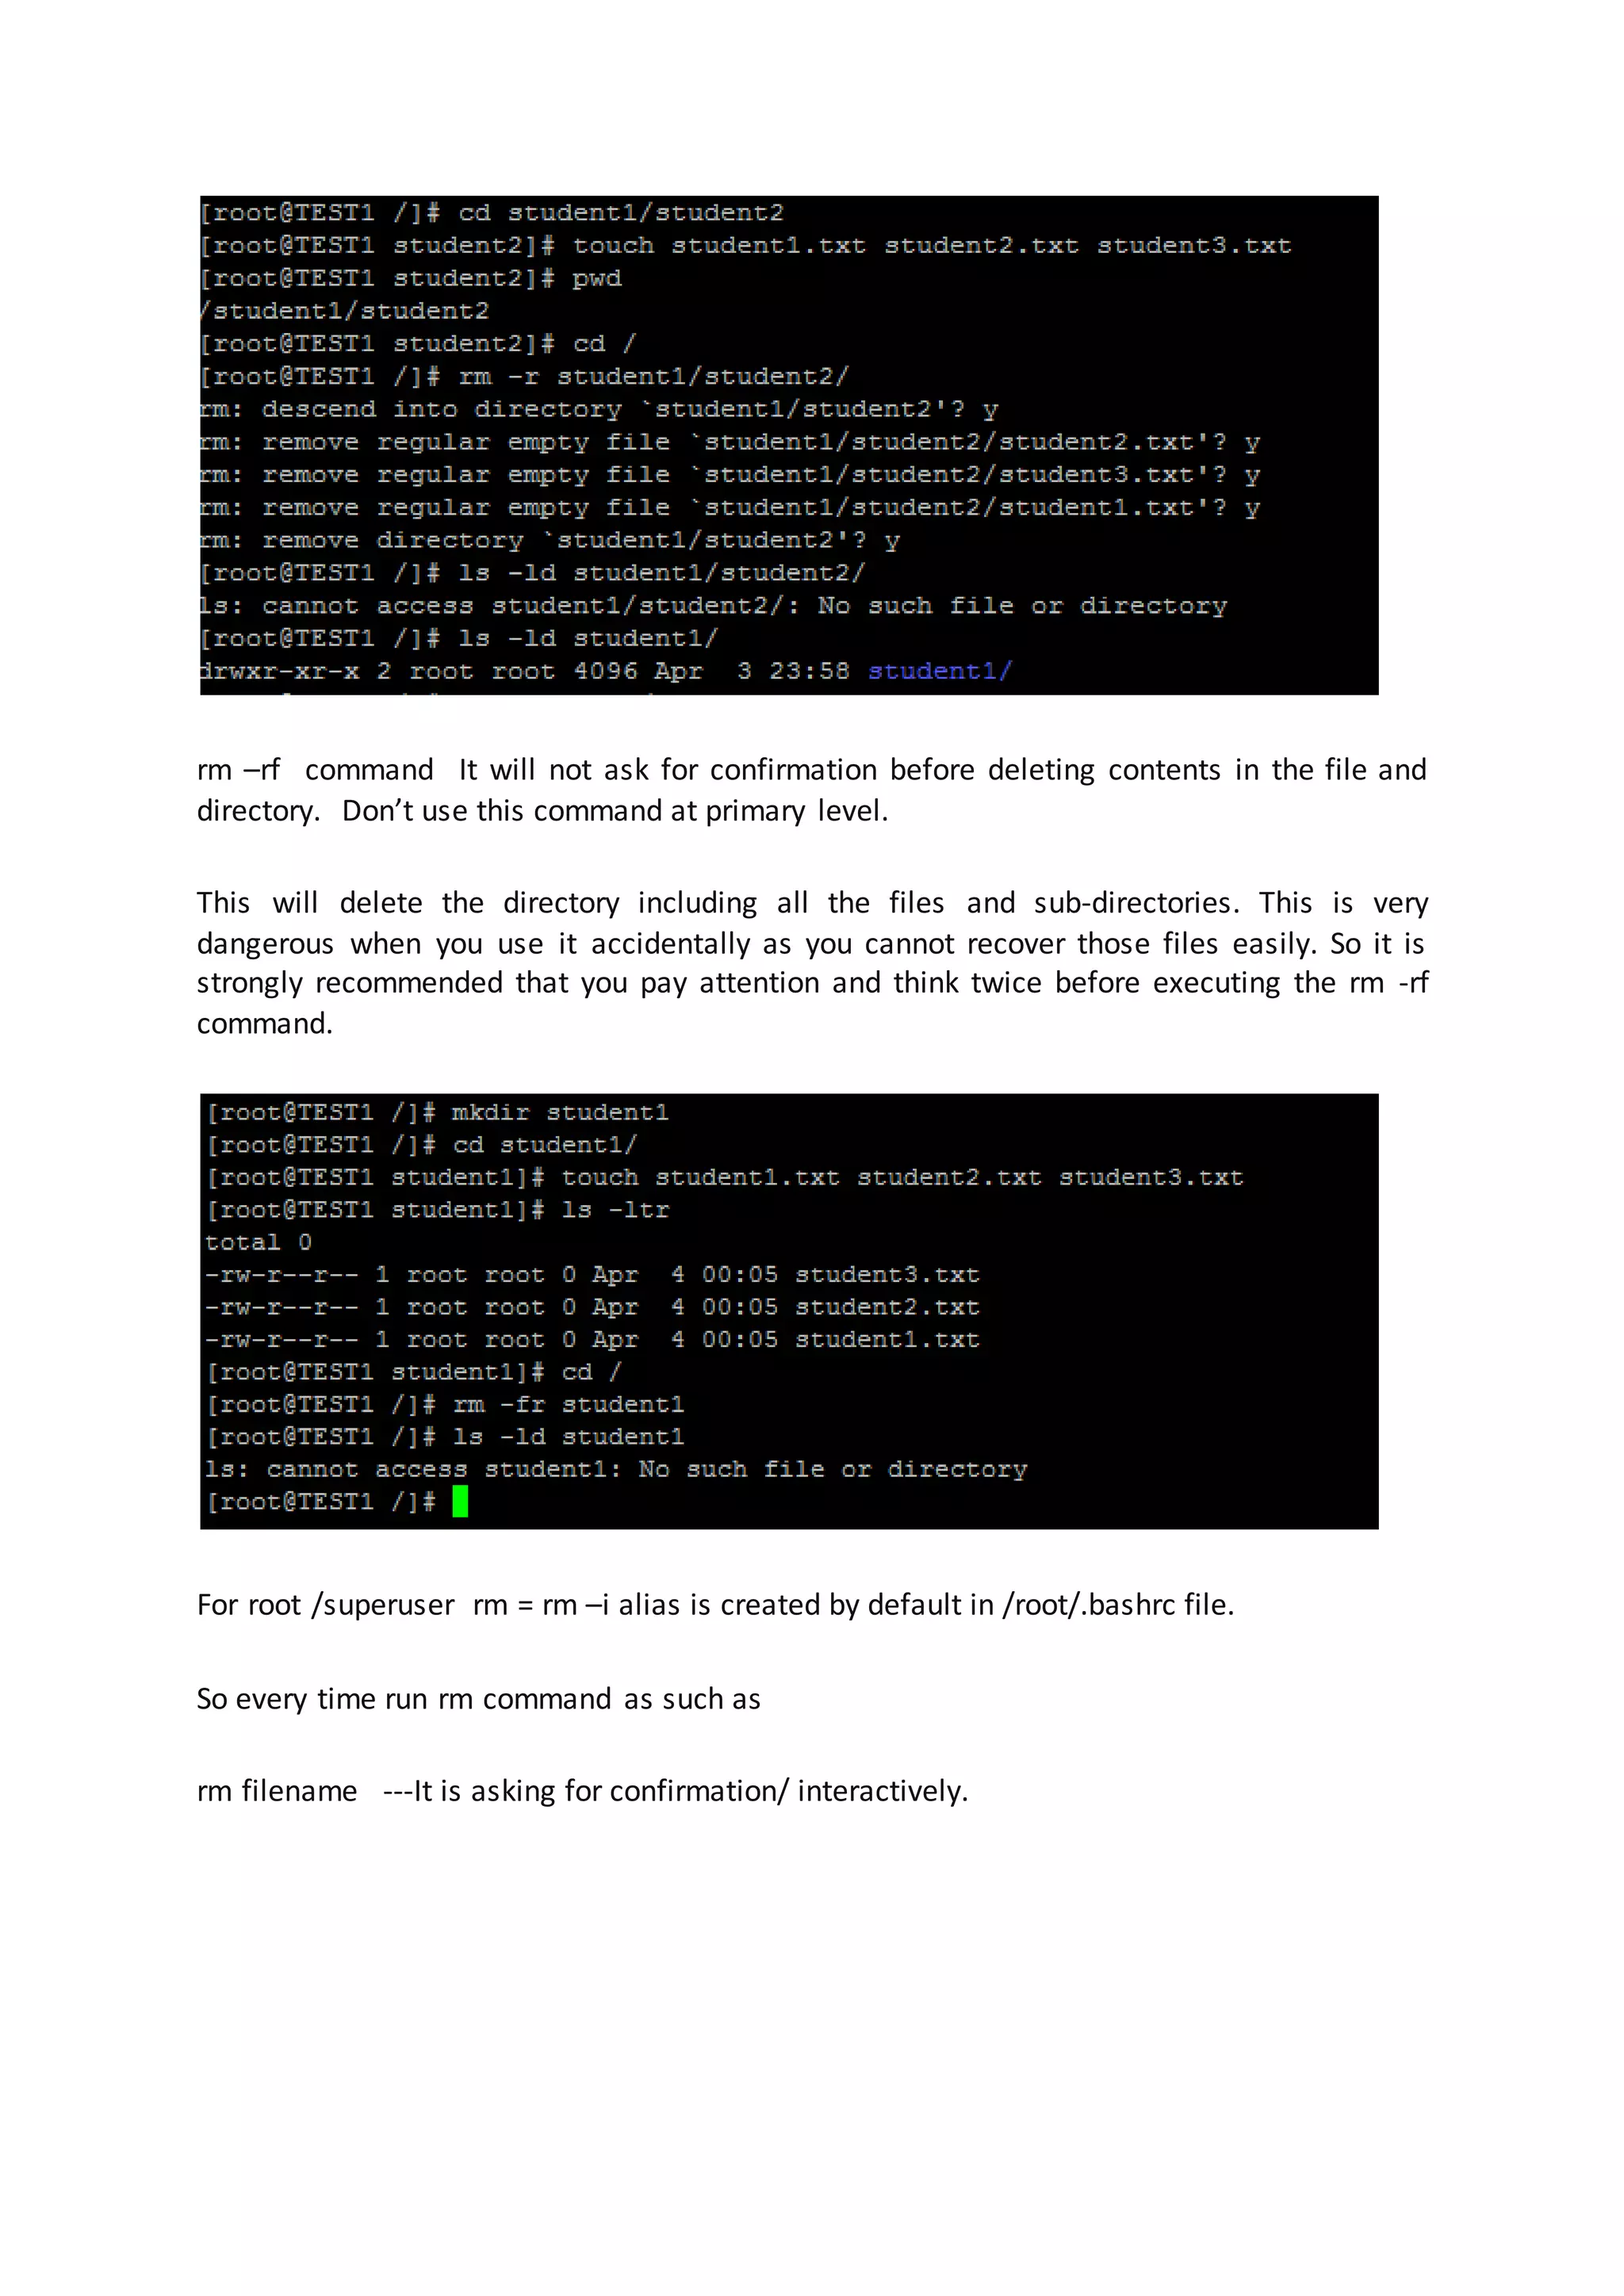
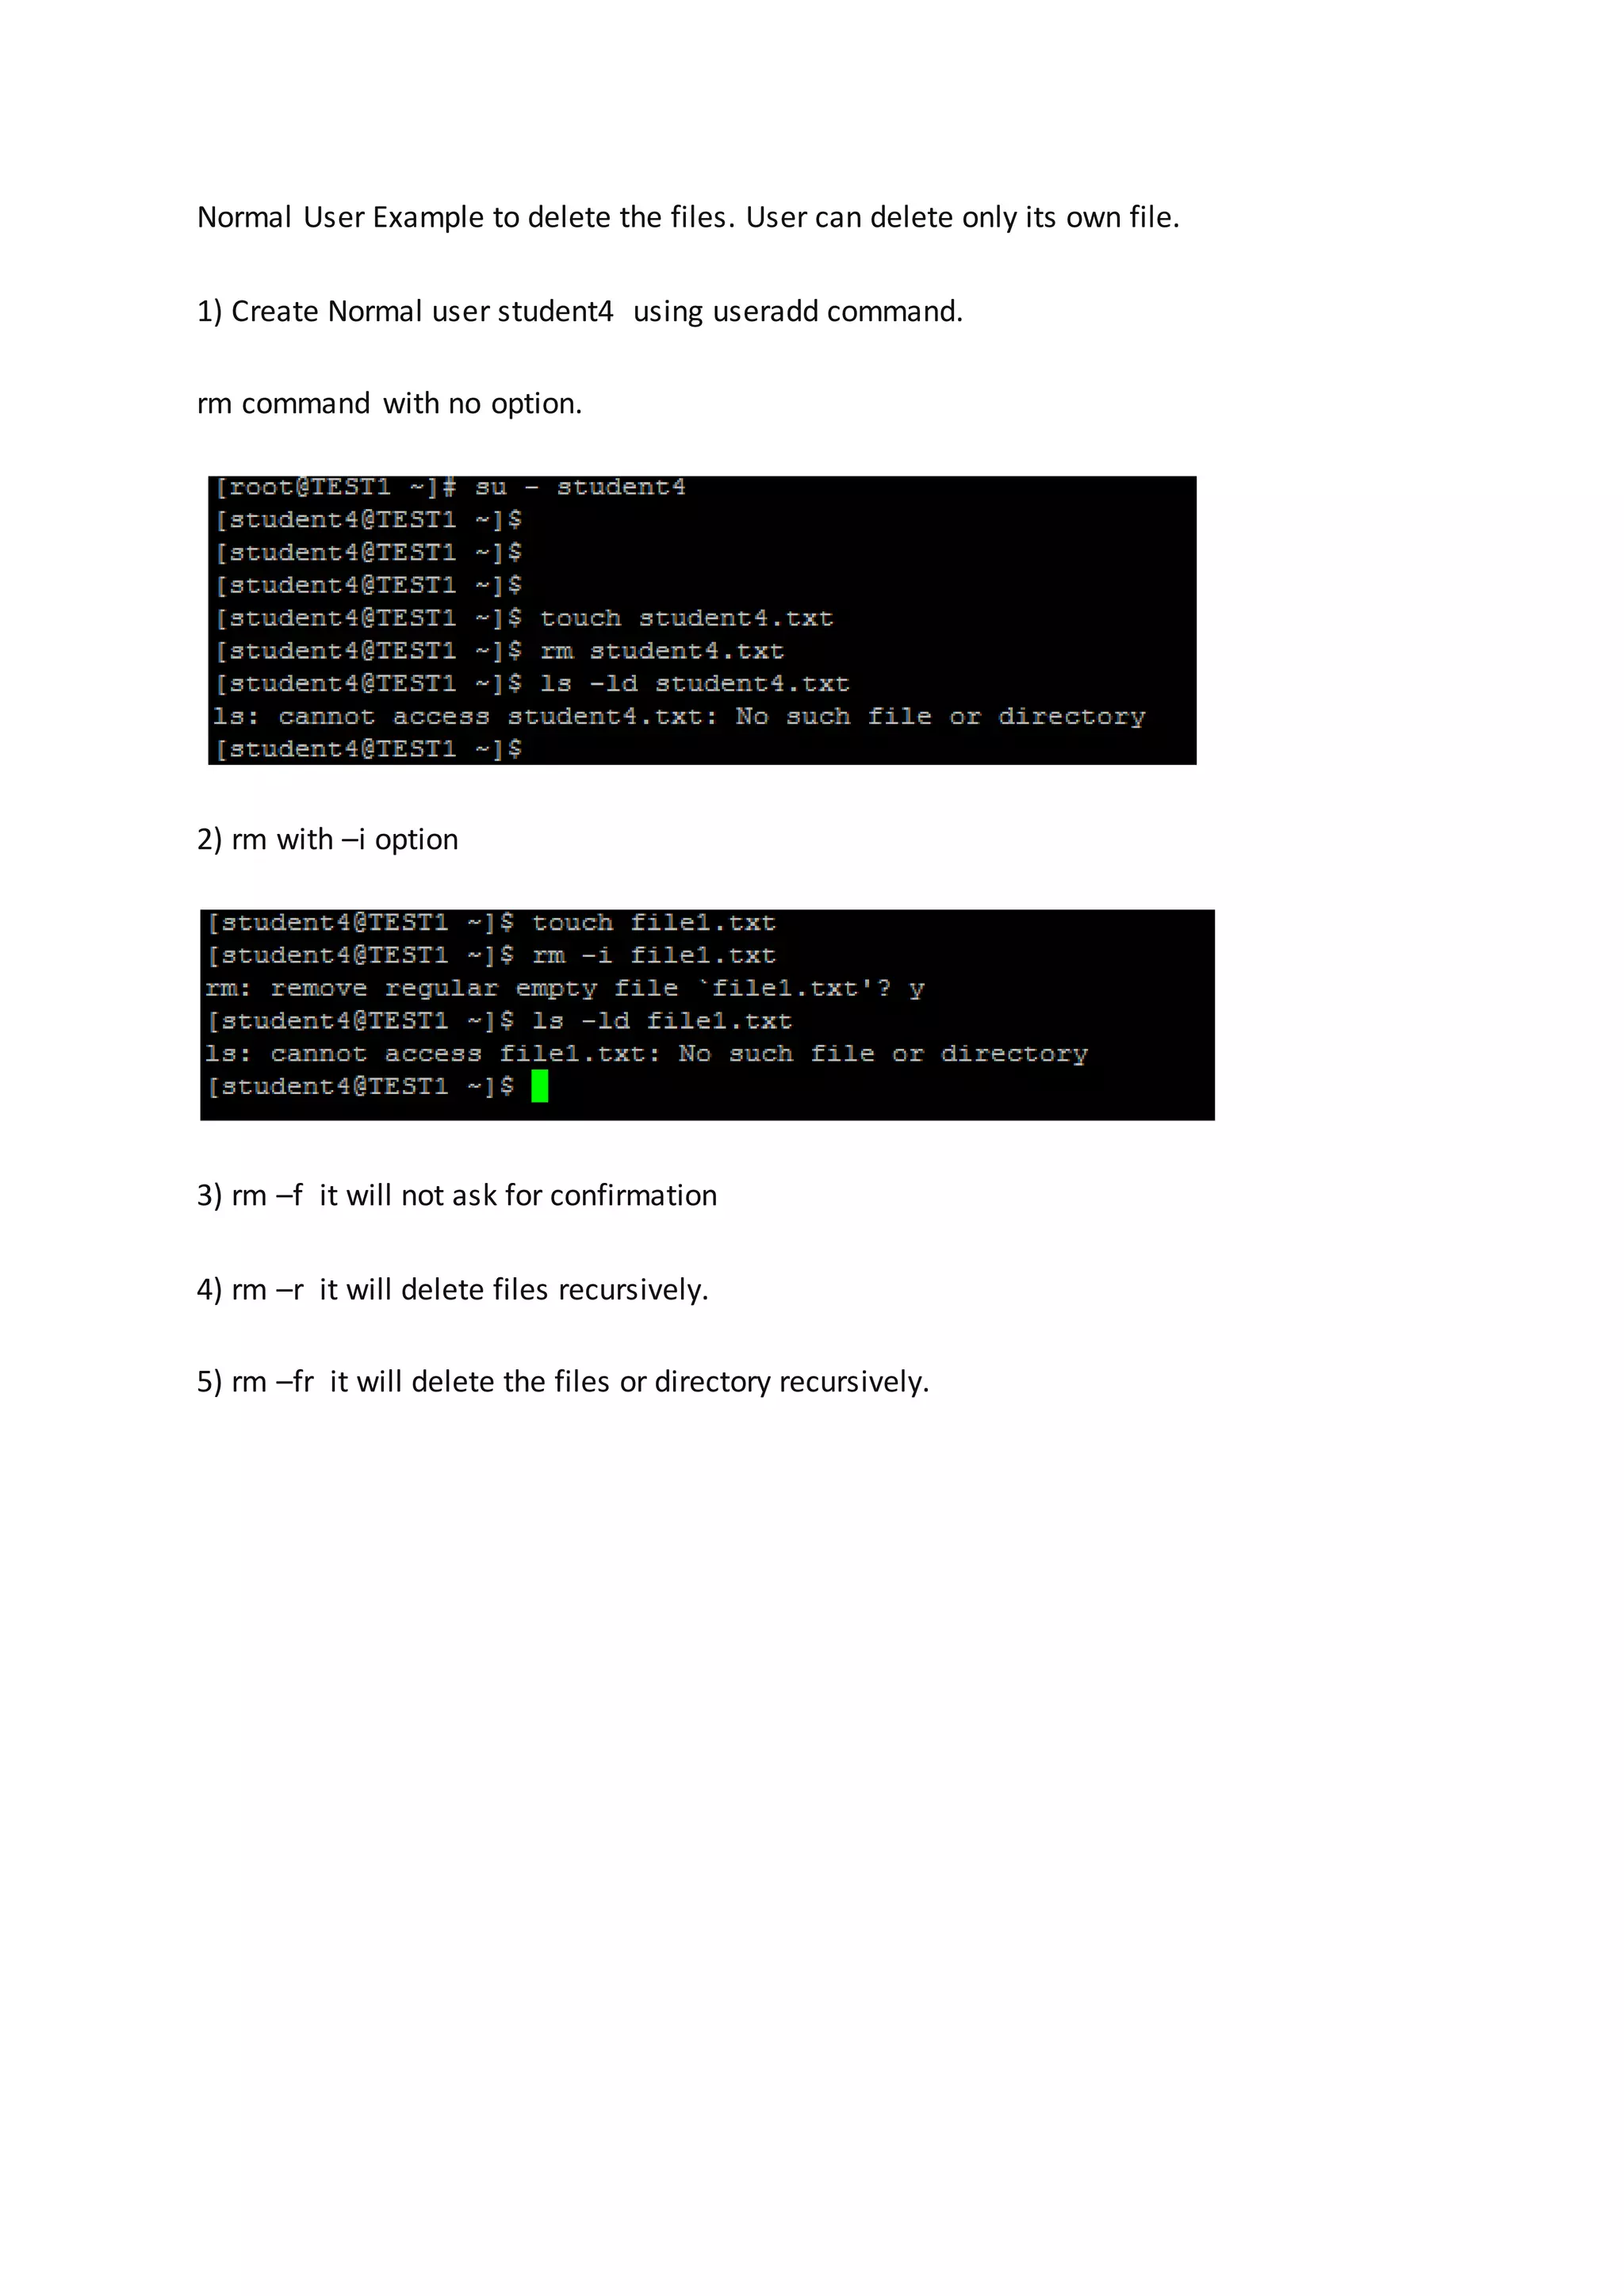
![Syntax : rm [OPTION]... FILE/directory... Options: -f forcefully -i interactively -r recursively For root /superuser rm = rm –i alias is created by default in /root/.bashrc file. Examples 1) delete files with no option 2) delete multiple files 3) rm command with –f option. It will not ask for confirmation before deleting any file or directory. 4)](https://image.slidesharecdn.com/chapter3linuxbasiccommands-170414153108/75/Chapter-4-Linux-Basic-Commands-13-2048.jpg)
![cat Command: cat command is used to display file contents, create one or more files and concatenates files and redirect output in file. Syntax : cat [OPTION] ---file-- 1. Display contents of file 2. View Contents of Multiple files. Cat file1.txt file2.txt 3. Create a New File. After Typing Line in a File, At last press Ctl +d to save contents in a file. 4. Sometimes you may have to append the content to a file, use >> redirection symbol as shown below. To verify: 5. Copy File Content](https://image.slidesharecdn.com/chapter3linuxbasiccommands-170414153108/75/Chapter-4-Linux-Basic-Commands-17-2048.jpg)


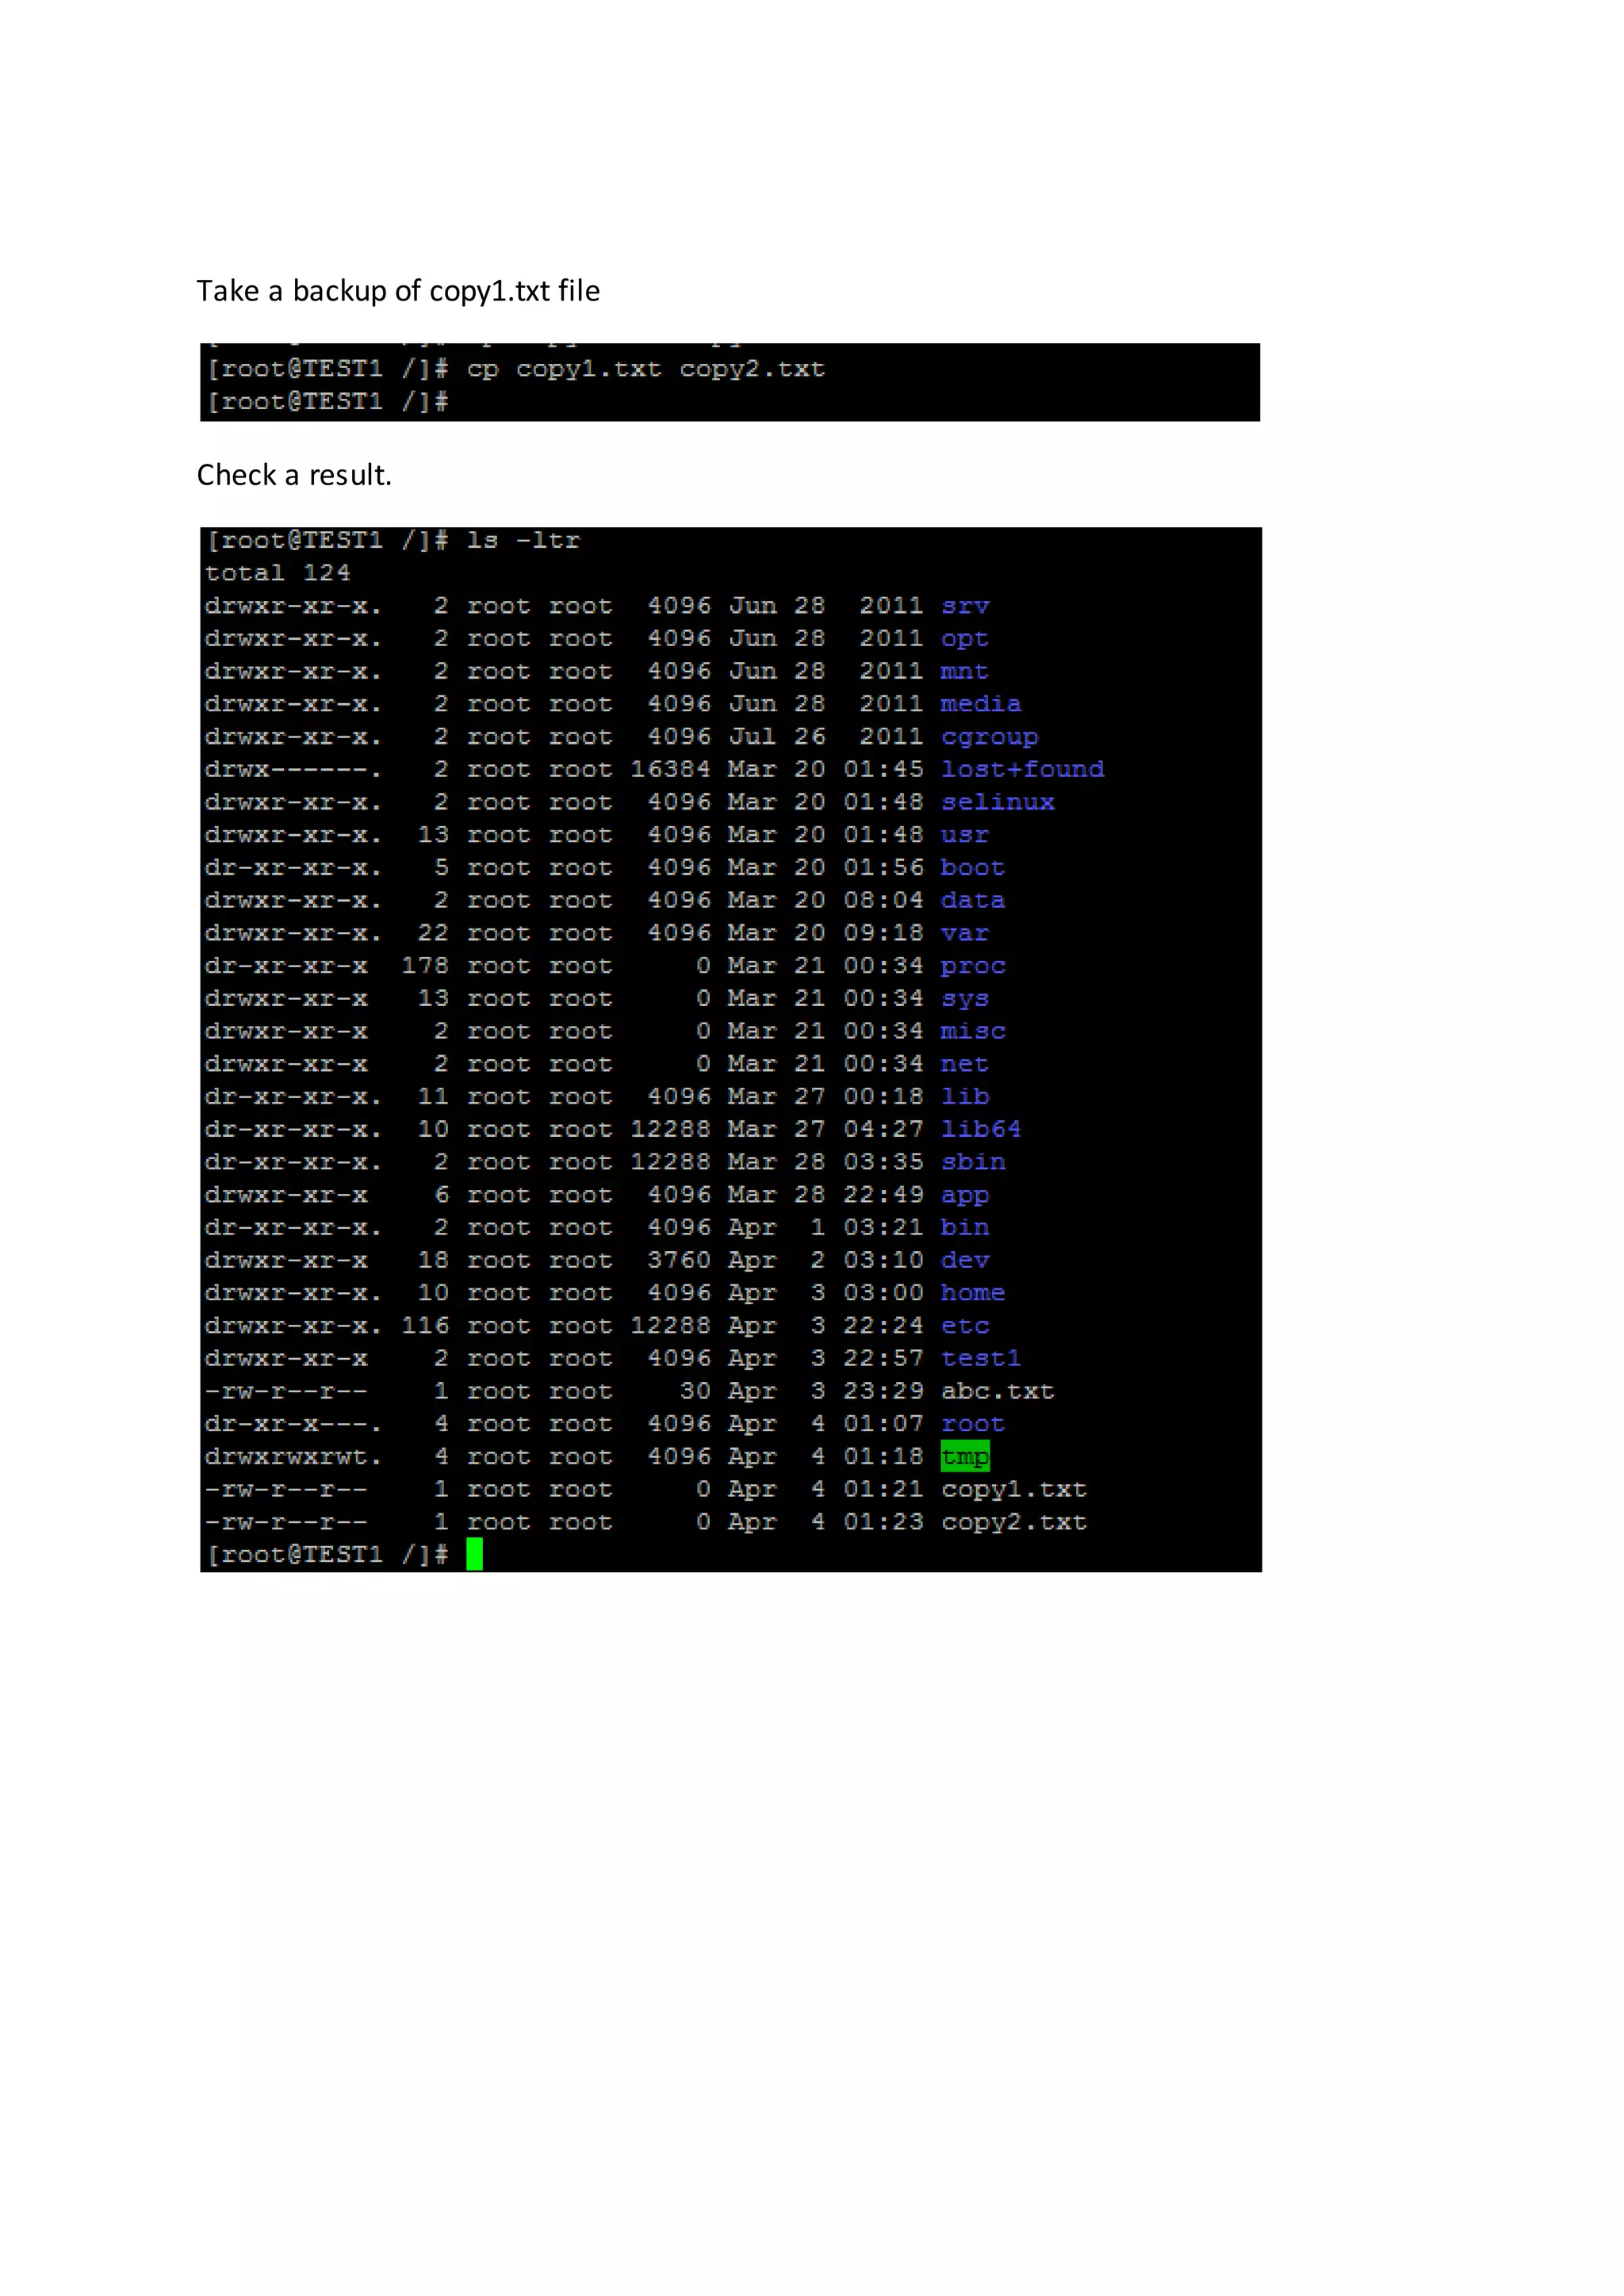
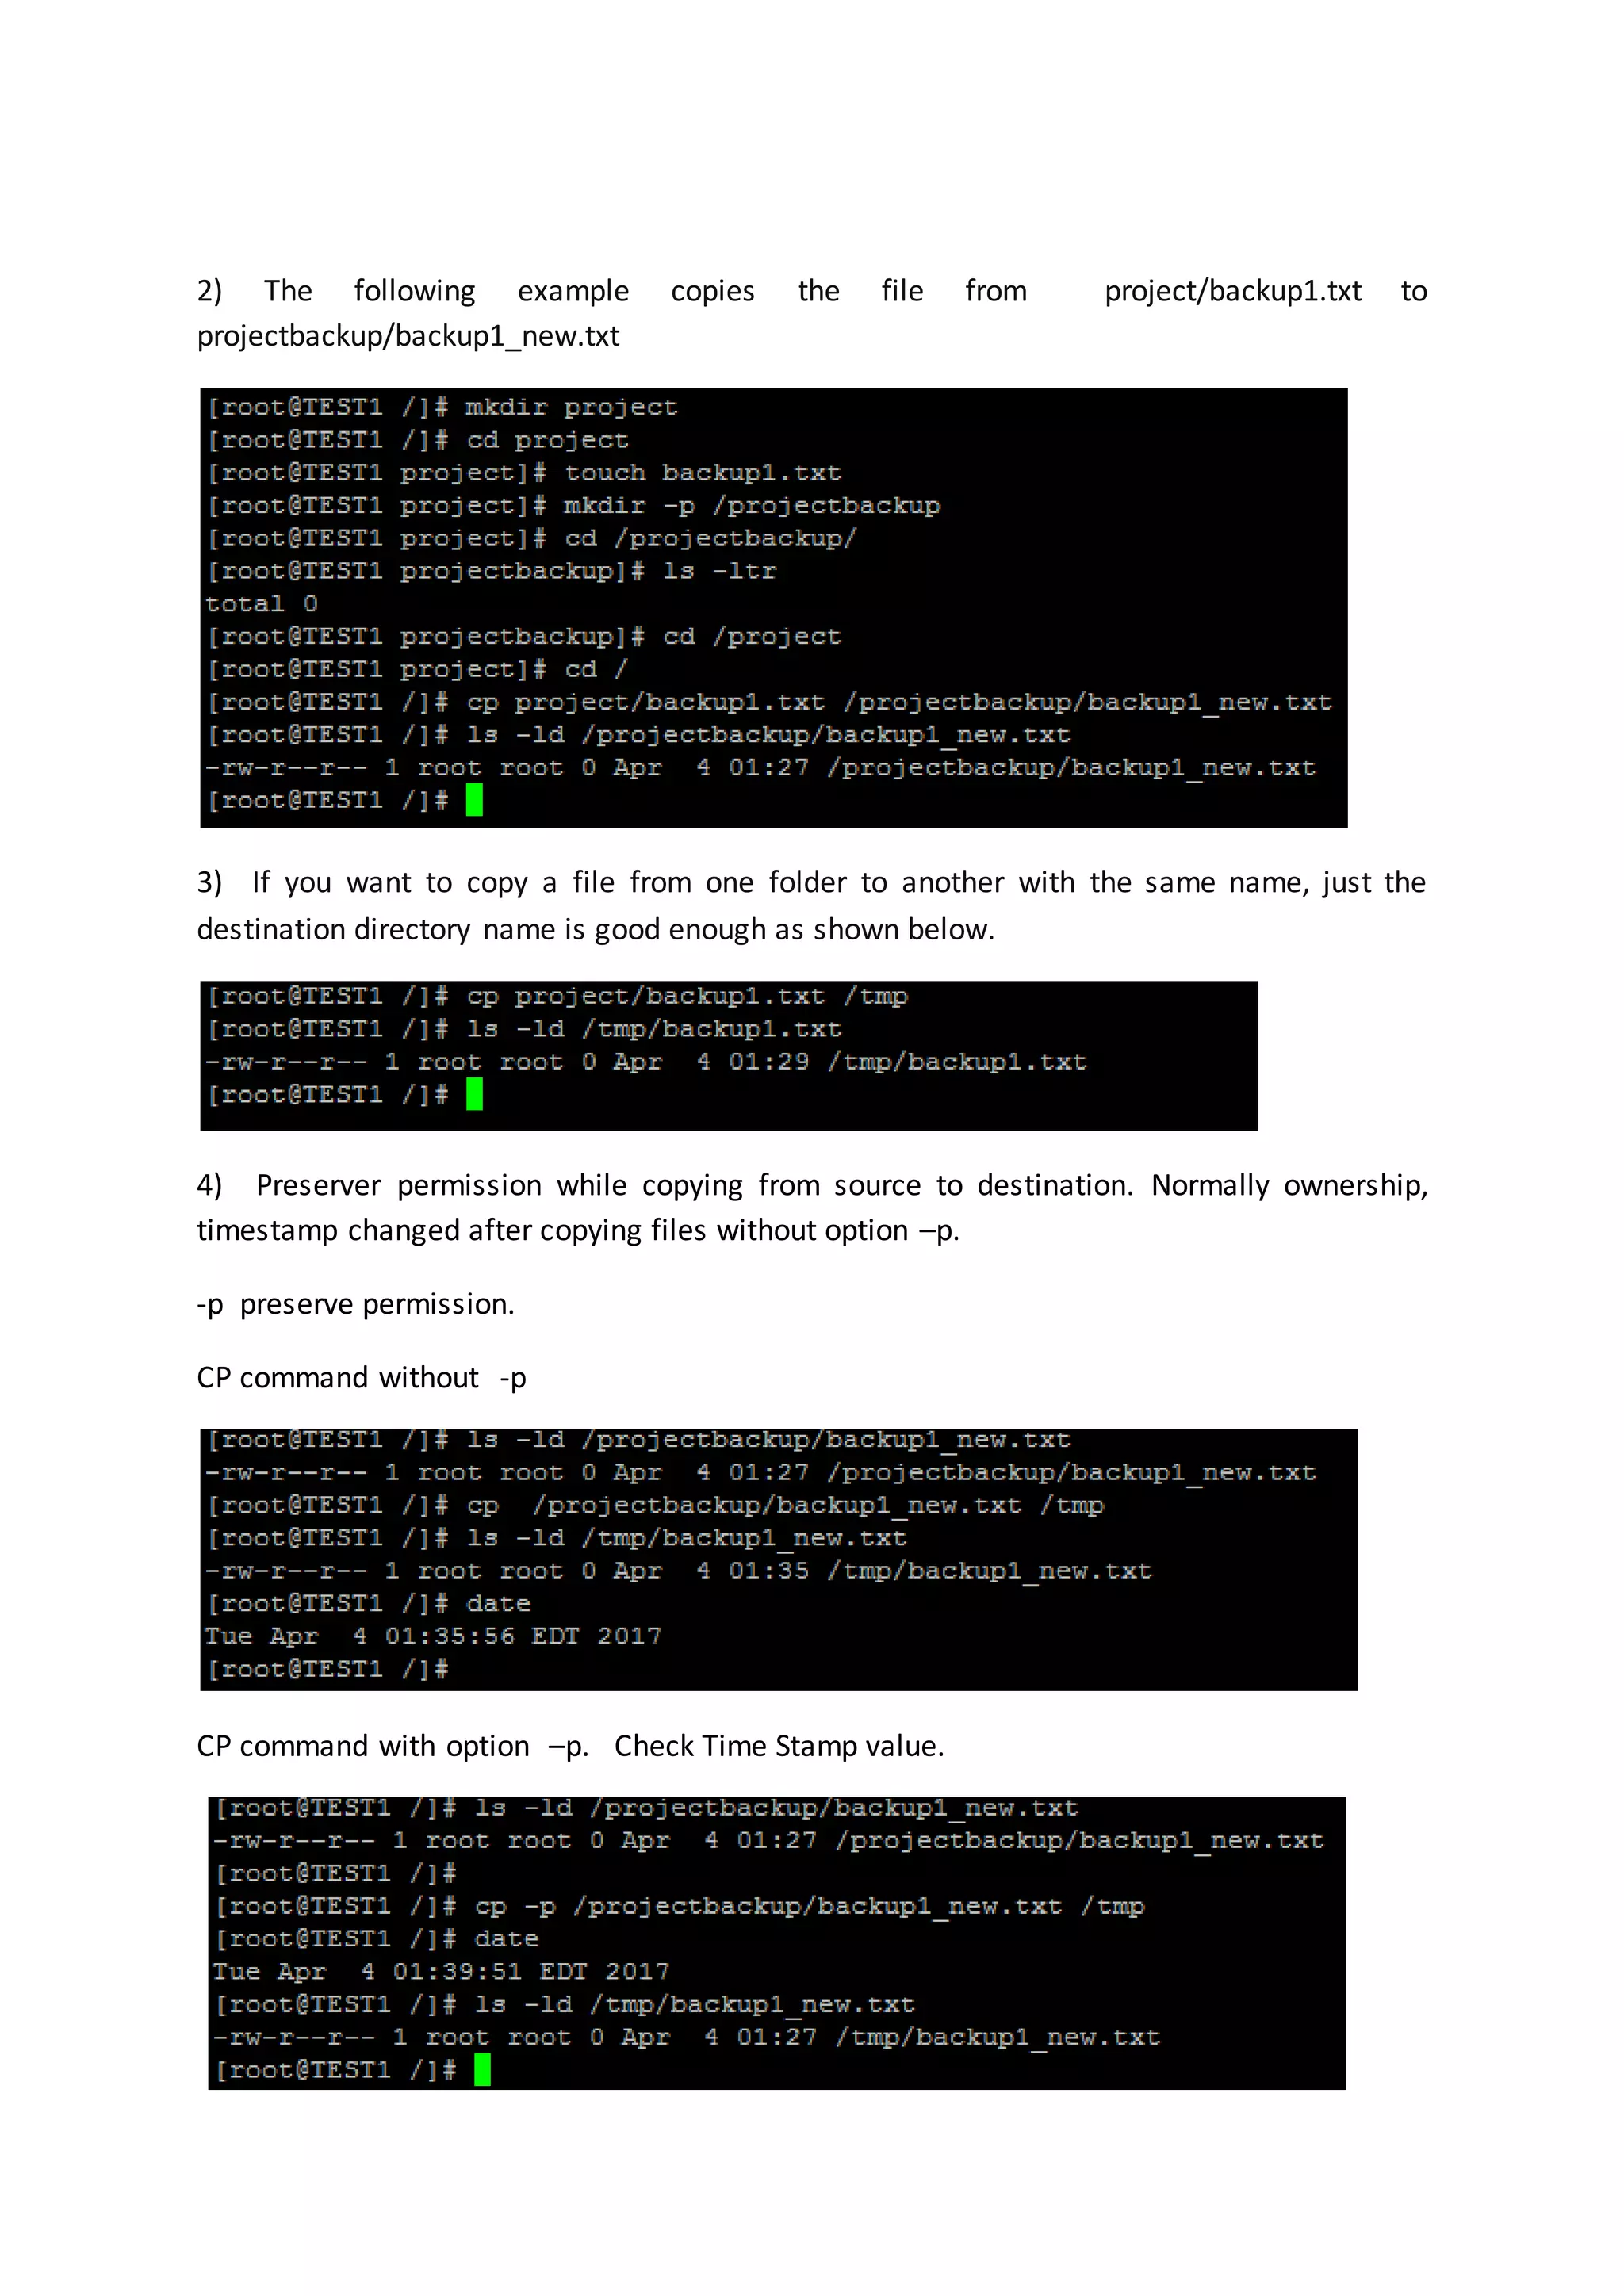
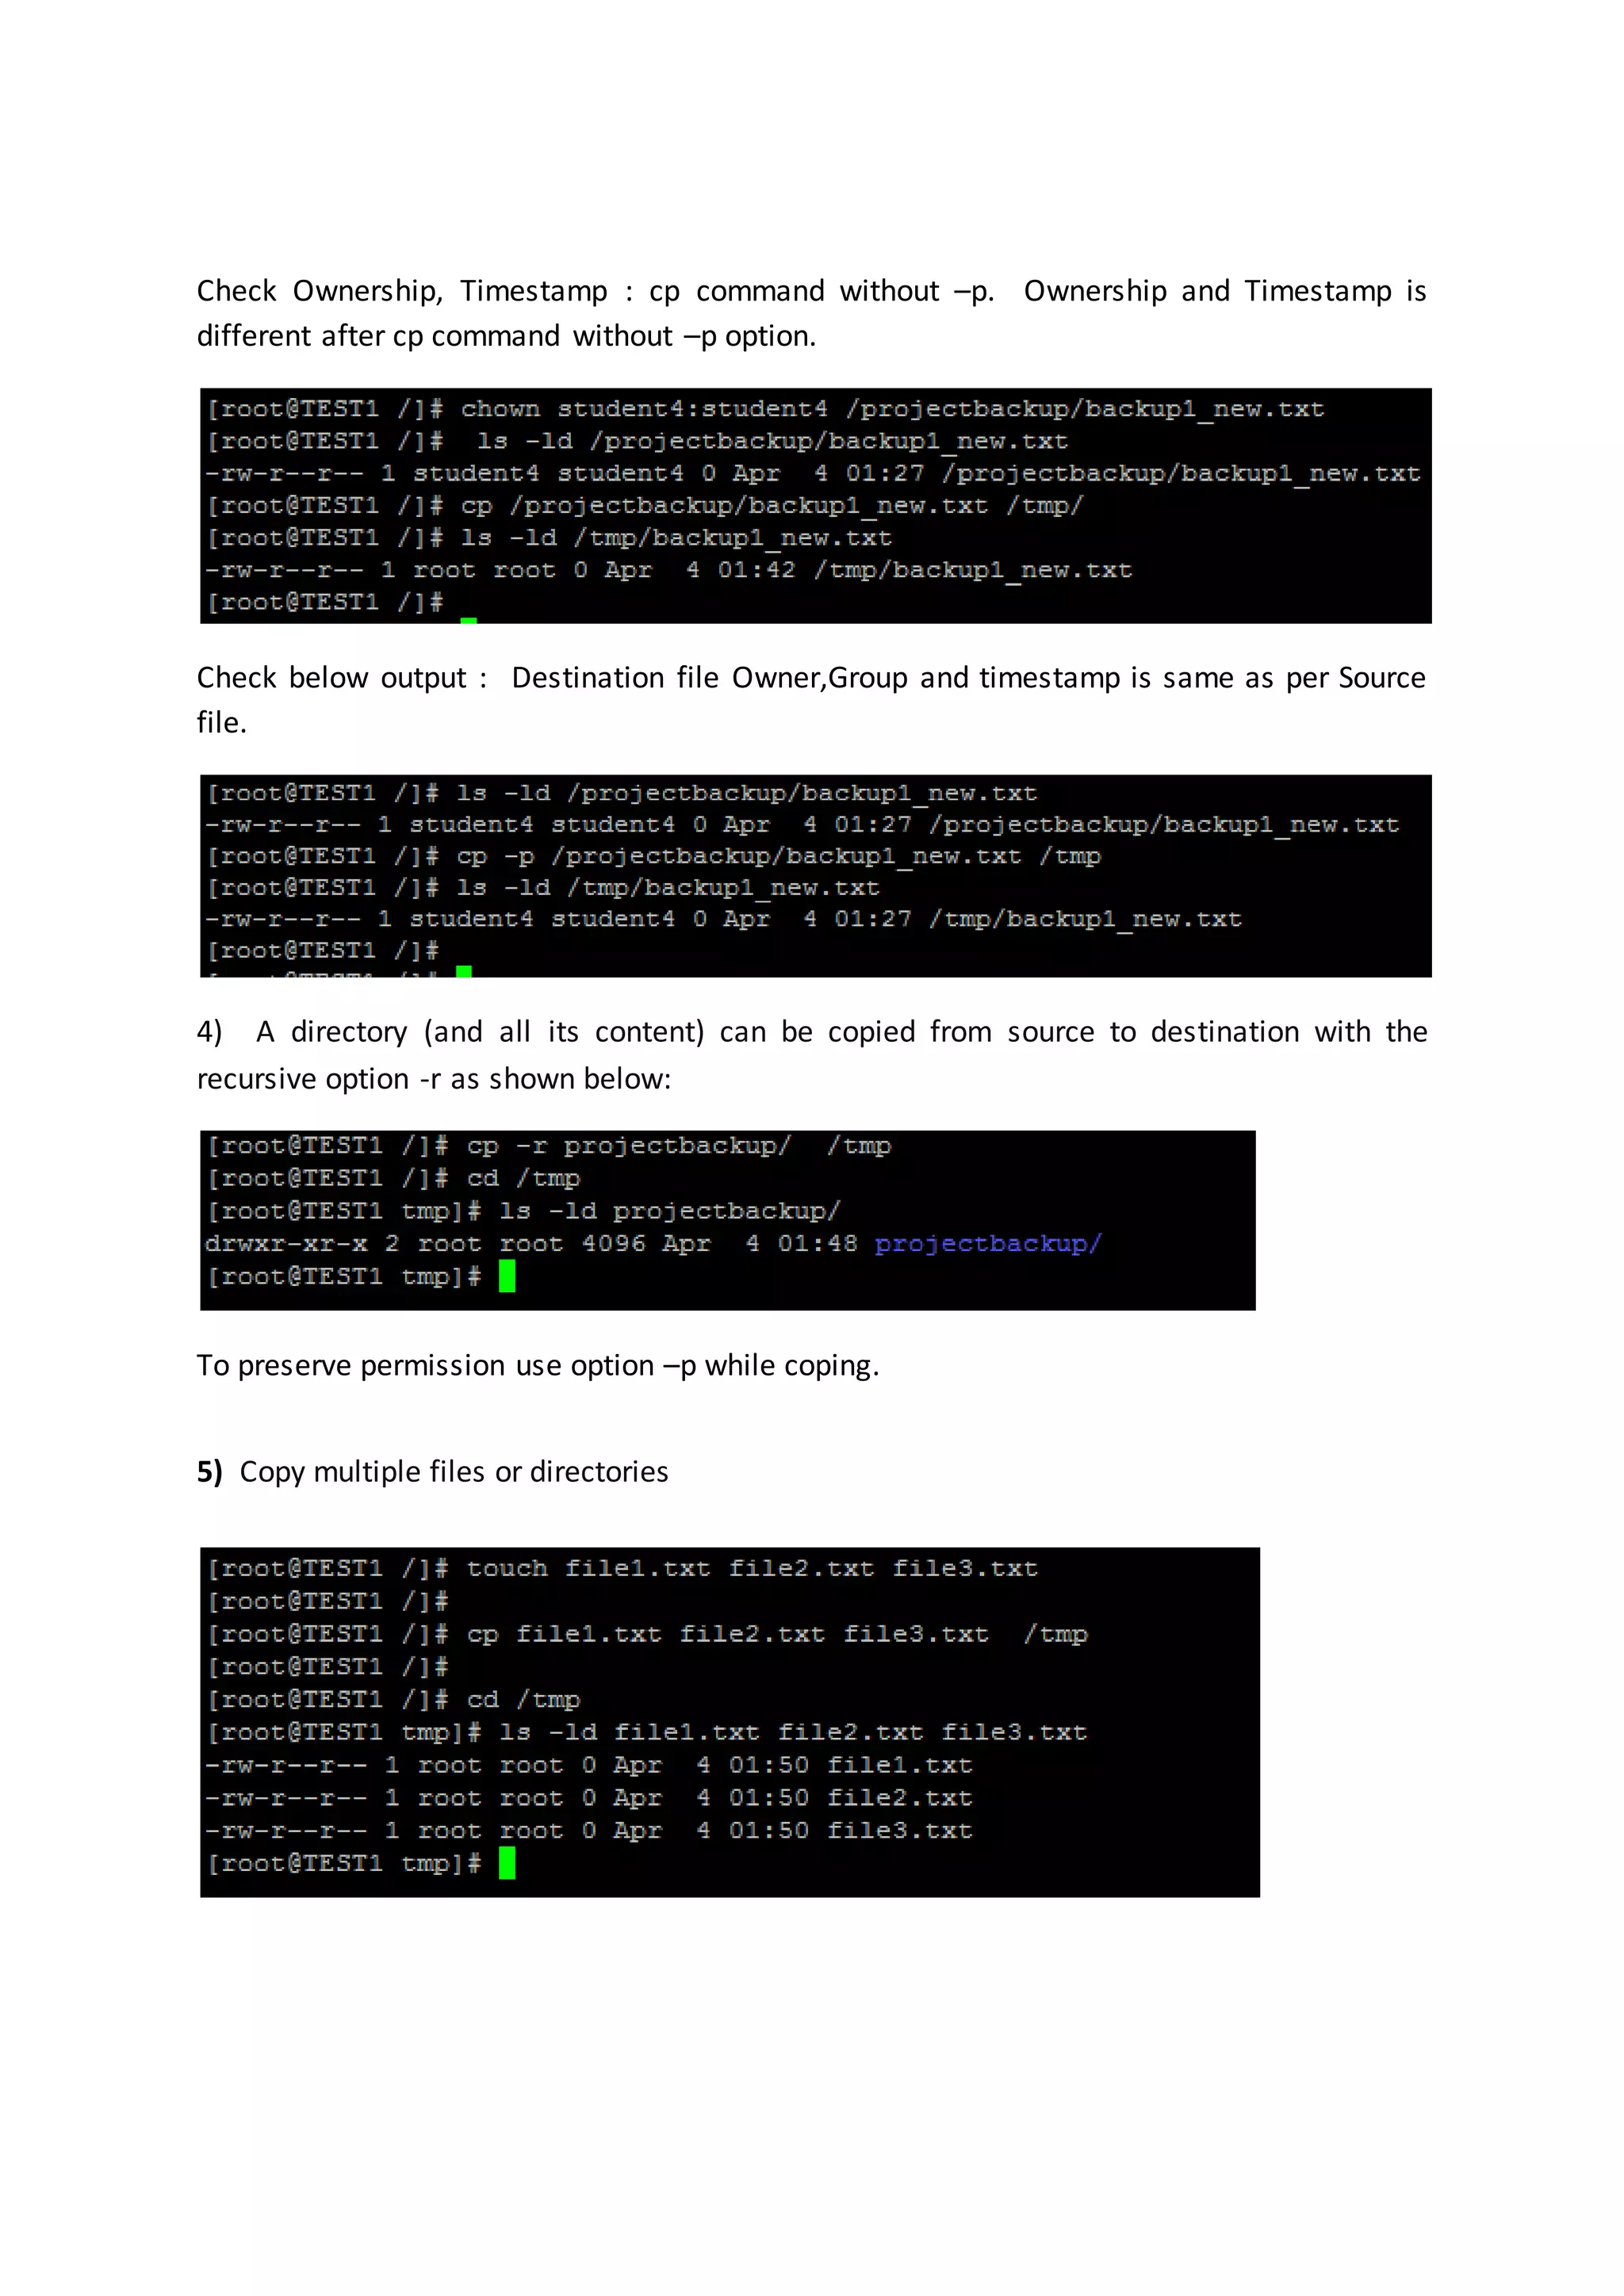
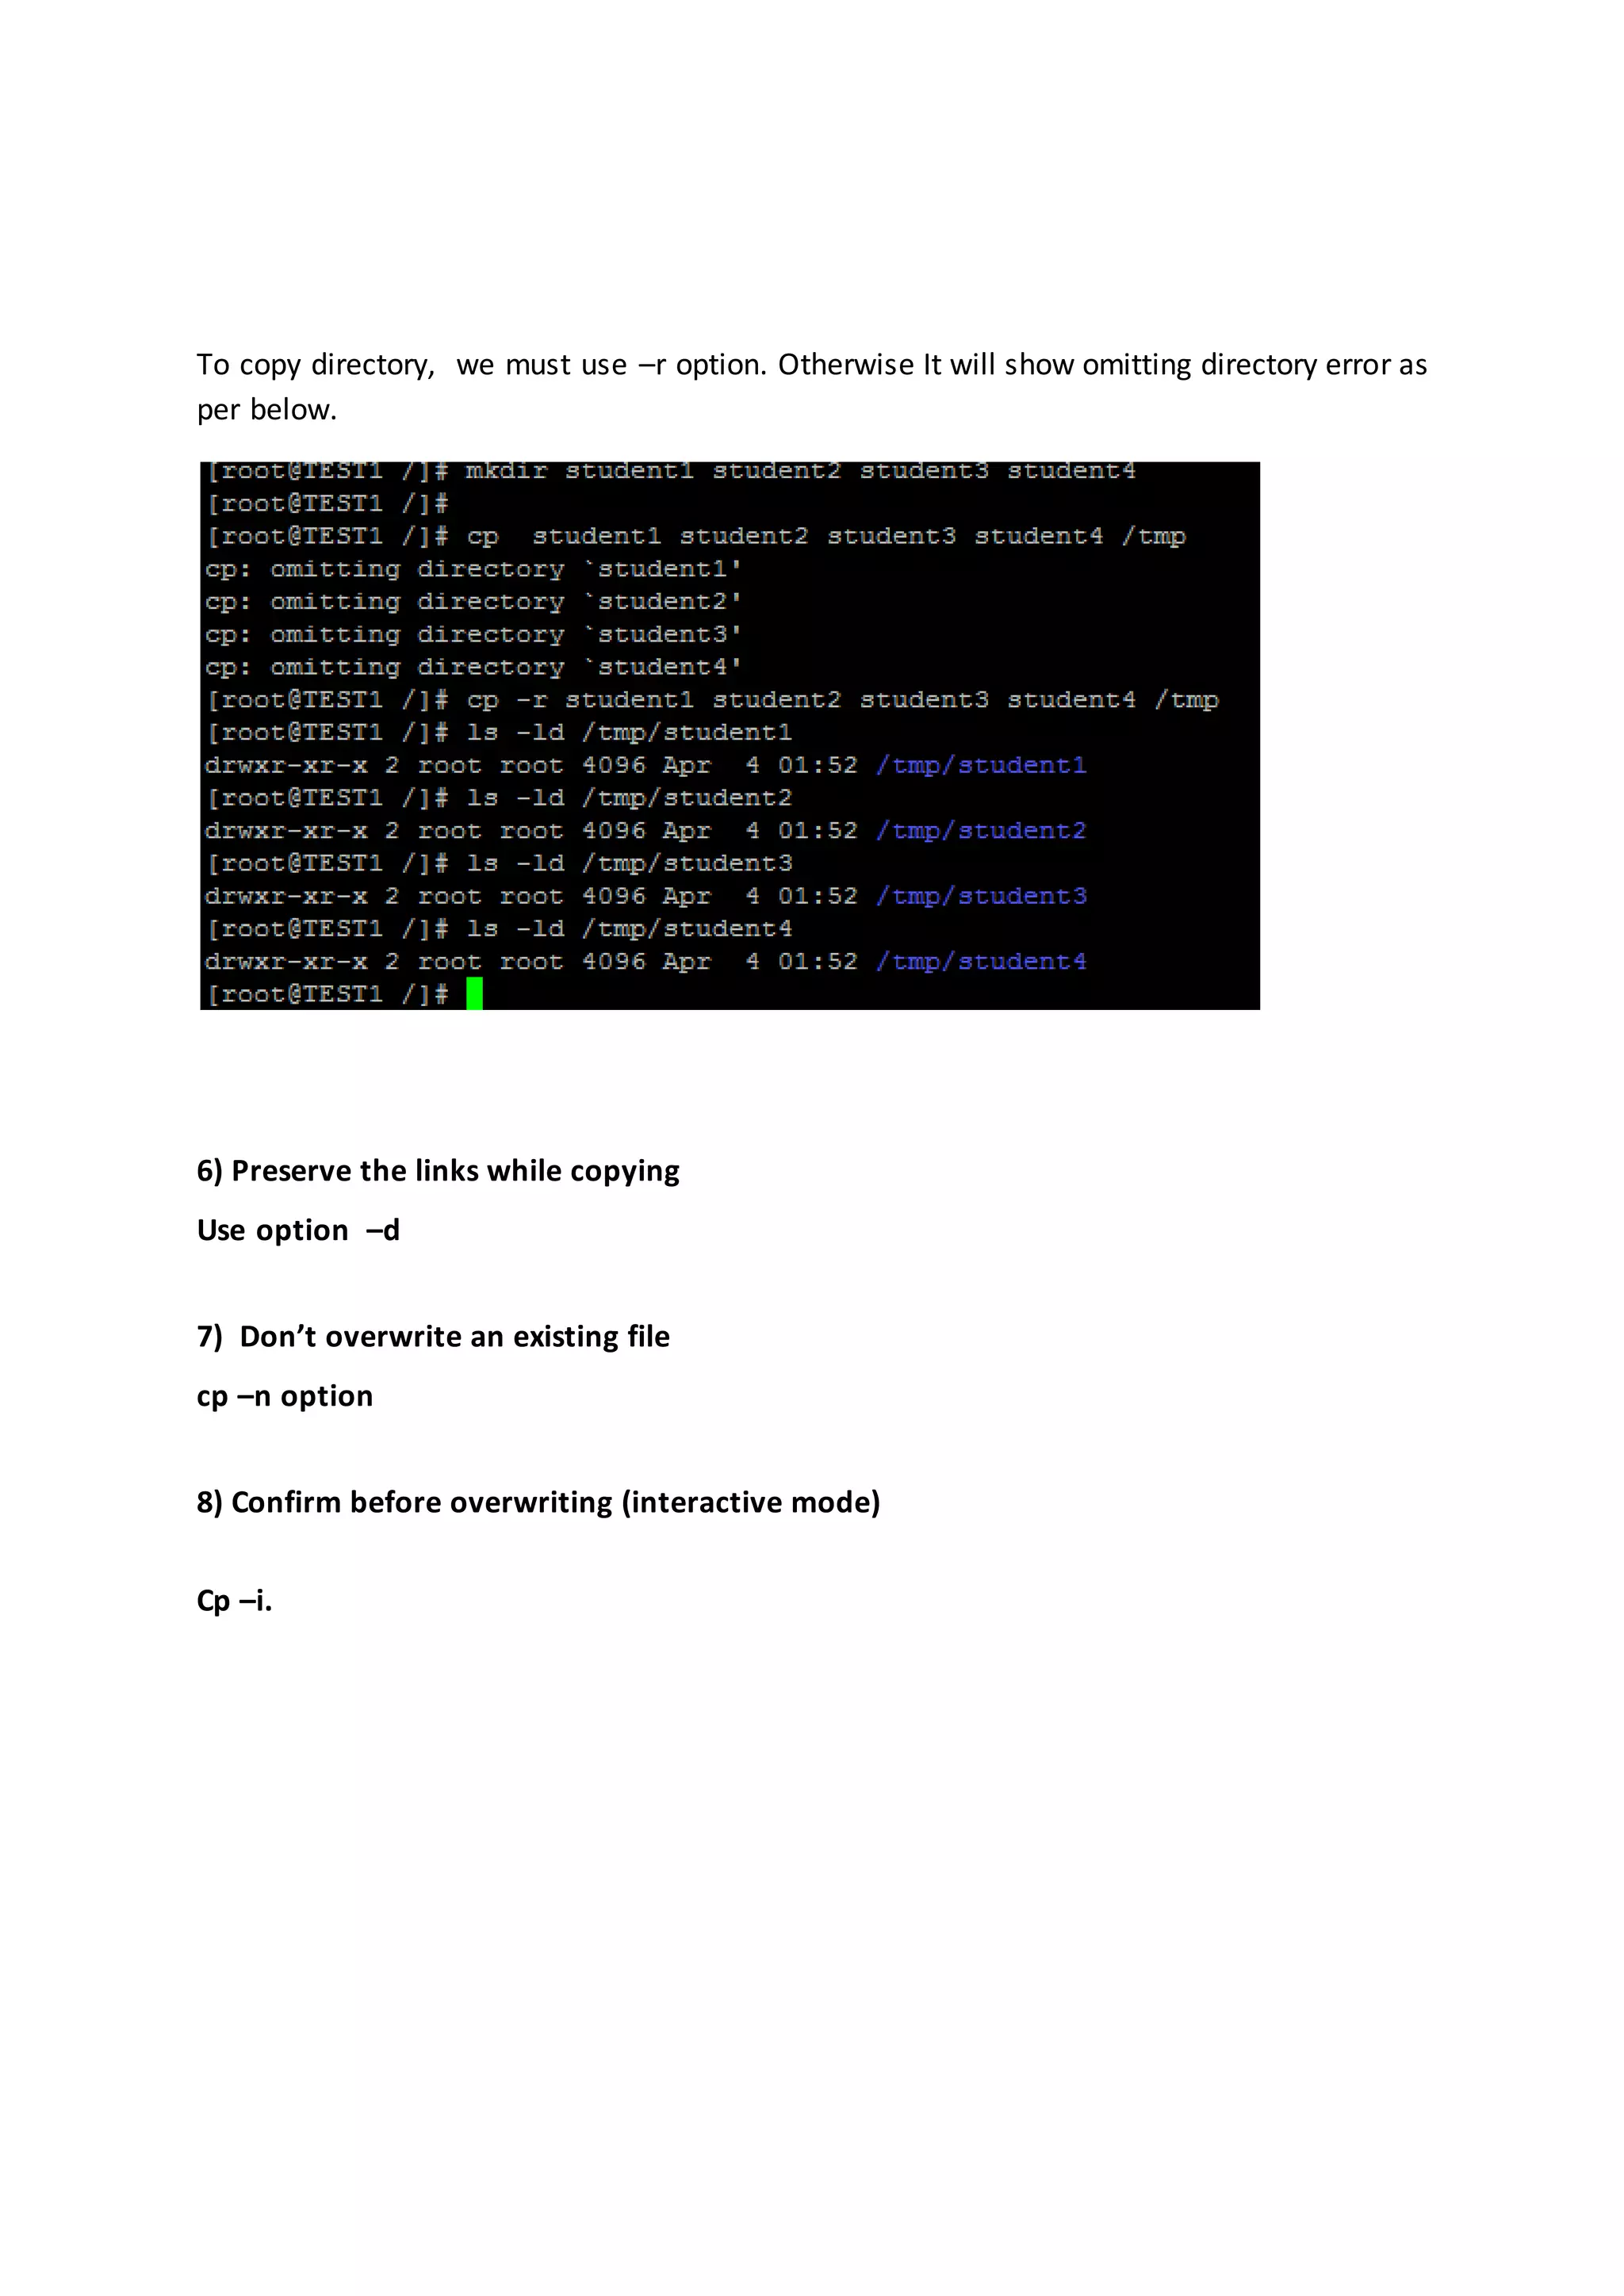
![cp Command: cp command is used to copy one or more files or directories from source to destination. Syntax cp [OPTION]... SOURCE... DIRECTORY -r , -R copy directories recursively -p same as --preserve=mode, ownership, timestamps 1) cp command with no option i) to take a backup of the file](https://image.slidesharecdn.com/chapter3linuxbasiccommands-170414153108/75/Chapter-4-Linux-Basic-Commands-22-2048.jpg)
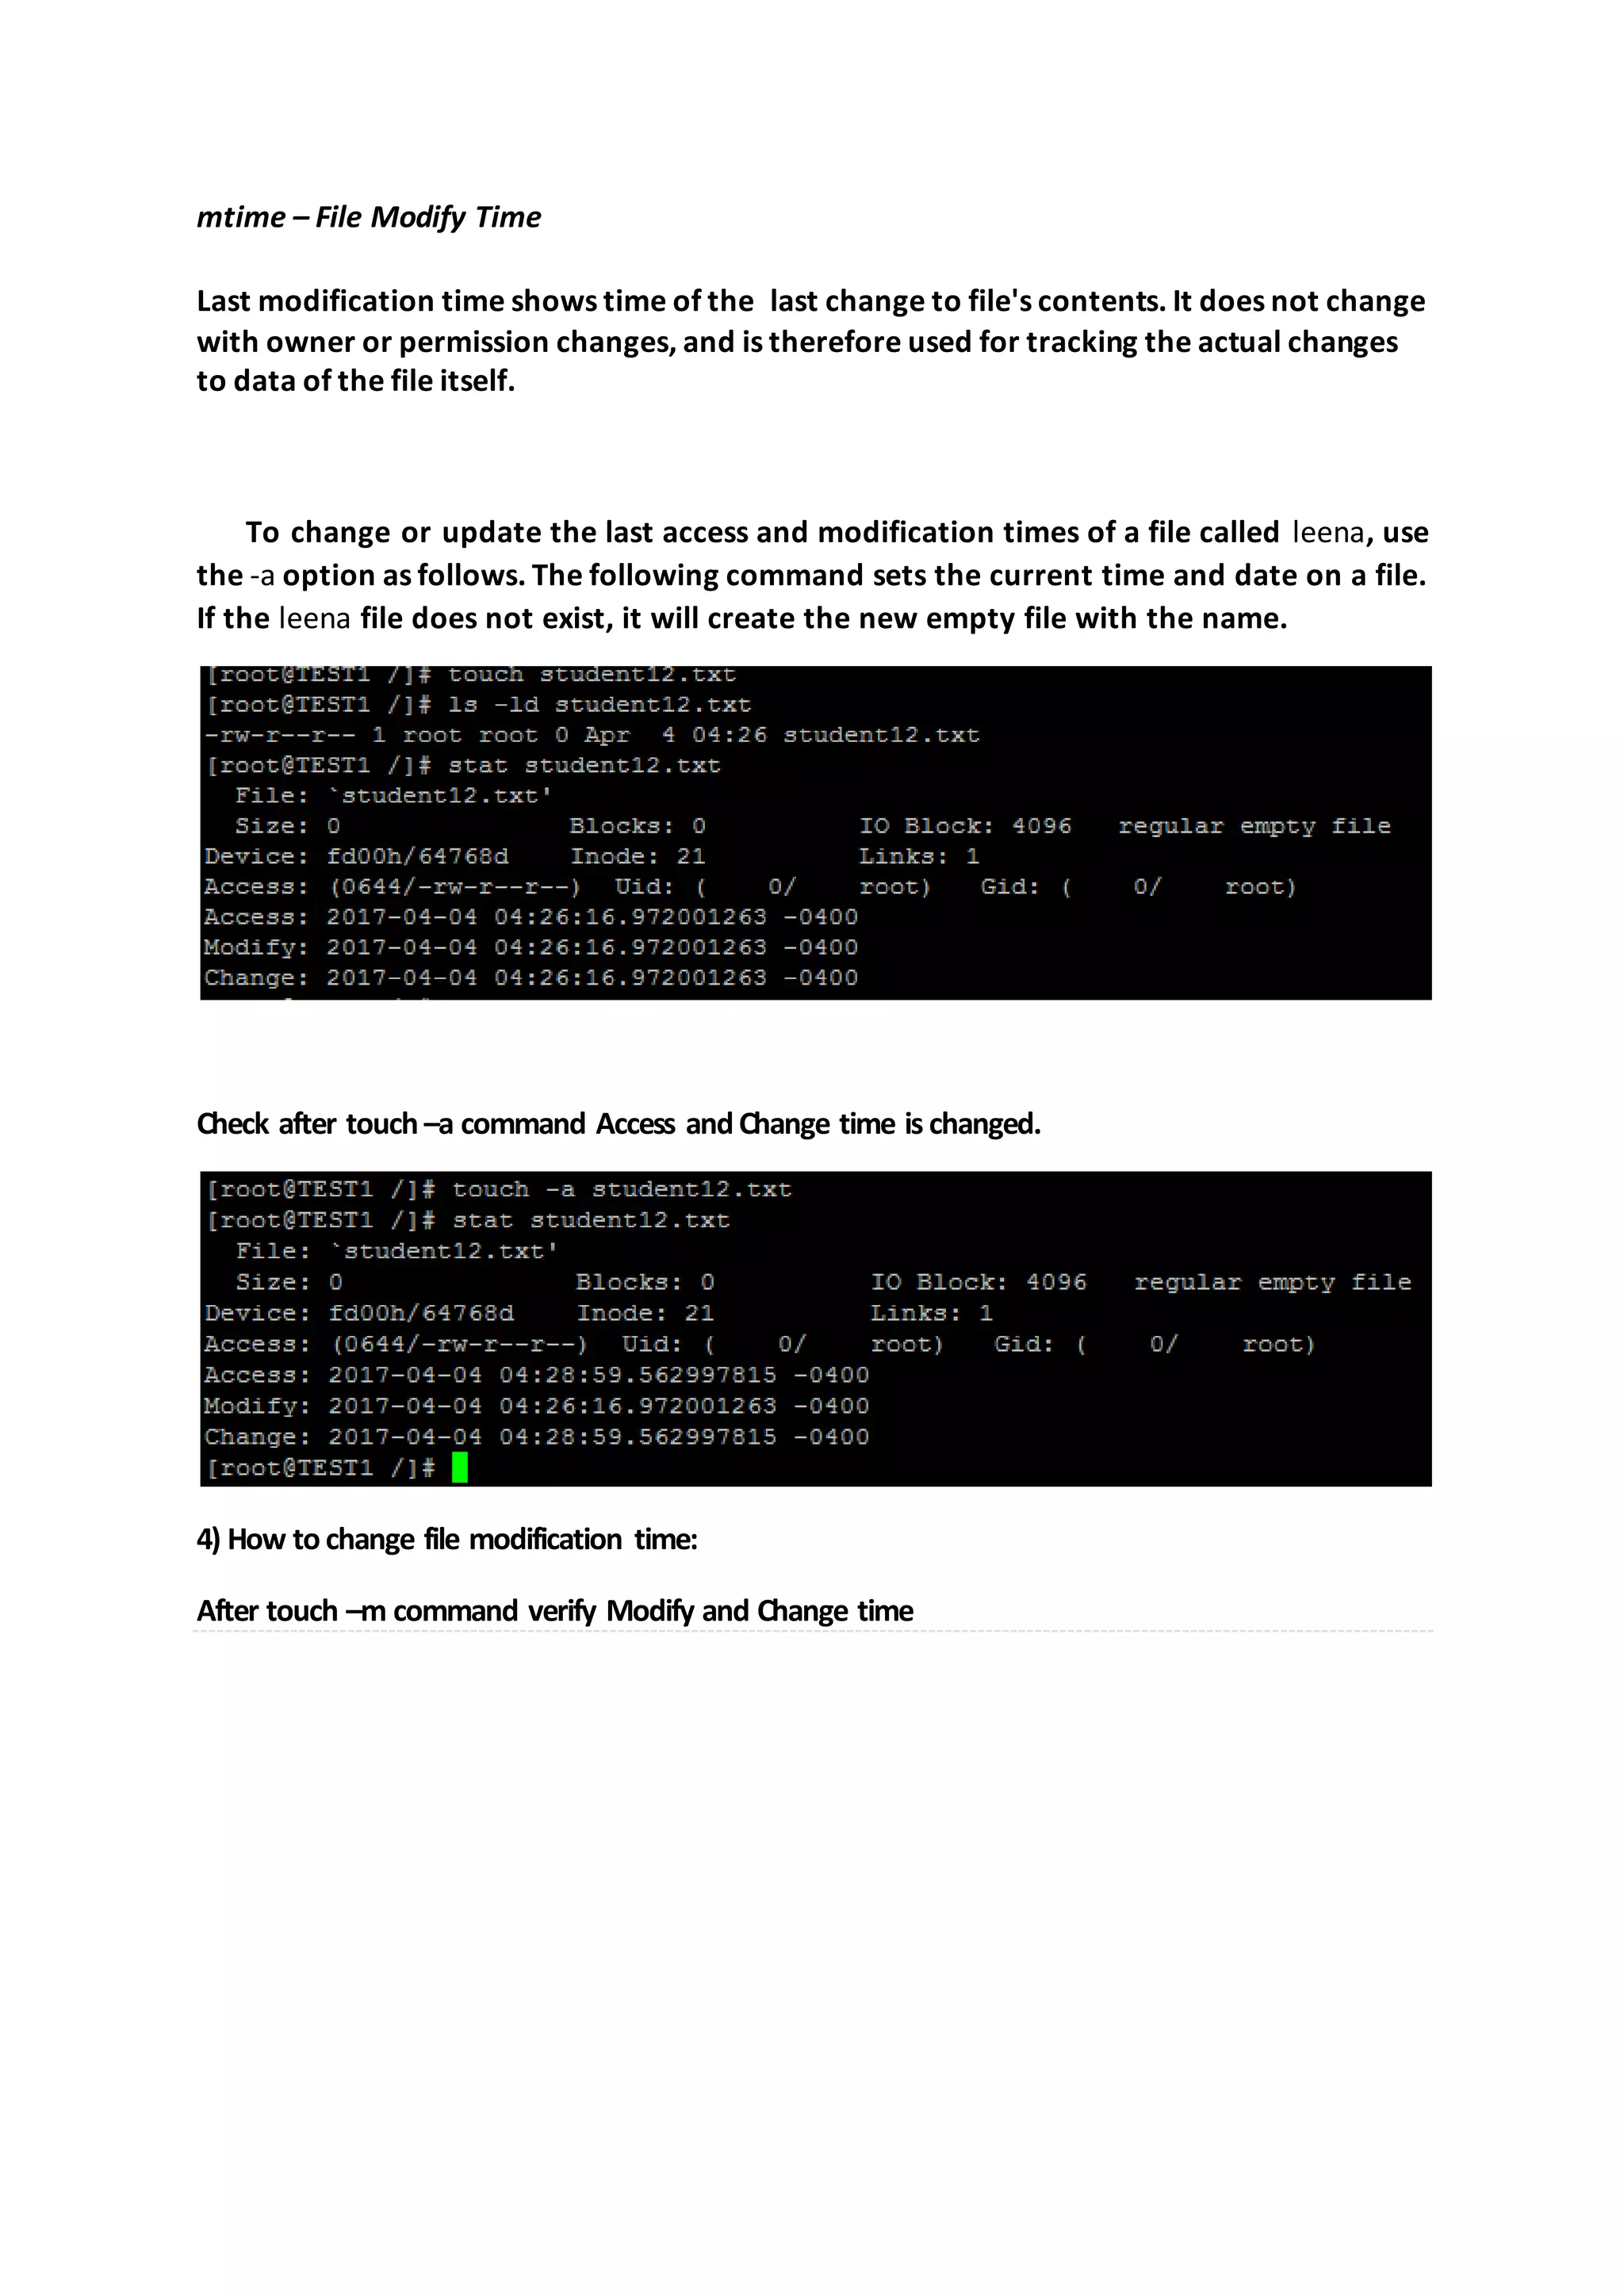
![5) How touse timestamp of another file (-r option). The following touch command with -r option, will update the time-stamp of file student12 with the time-stamp of student1 file. So, both the file holds the same time stamp. echo command: echo command is used to display text/strings on standard output or file. It is mostly used in shell scripting. Syntax : echo [options] [strings] 1) Input a line of text and display on standard output Output the Following text:](https://image.slidesharecdn.com/chapter3linuxbasiccommands-170414153108/75/Chapter-4-Linux-Basic-Commands-31-2048.jpg)
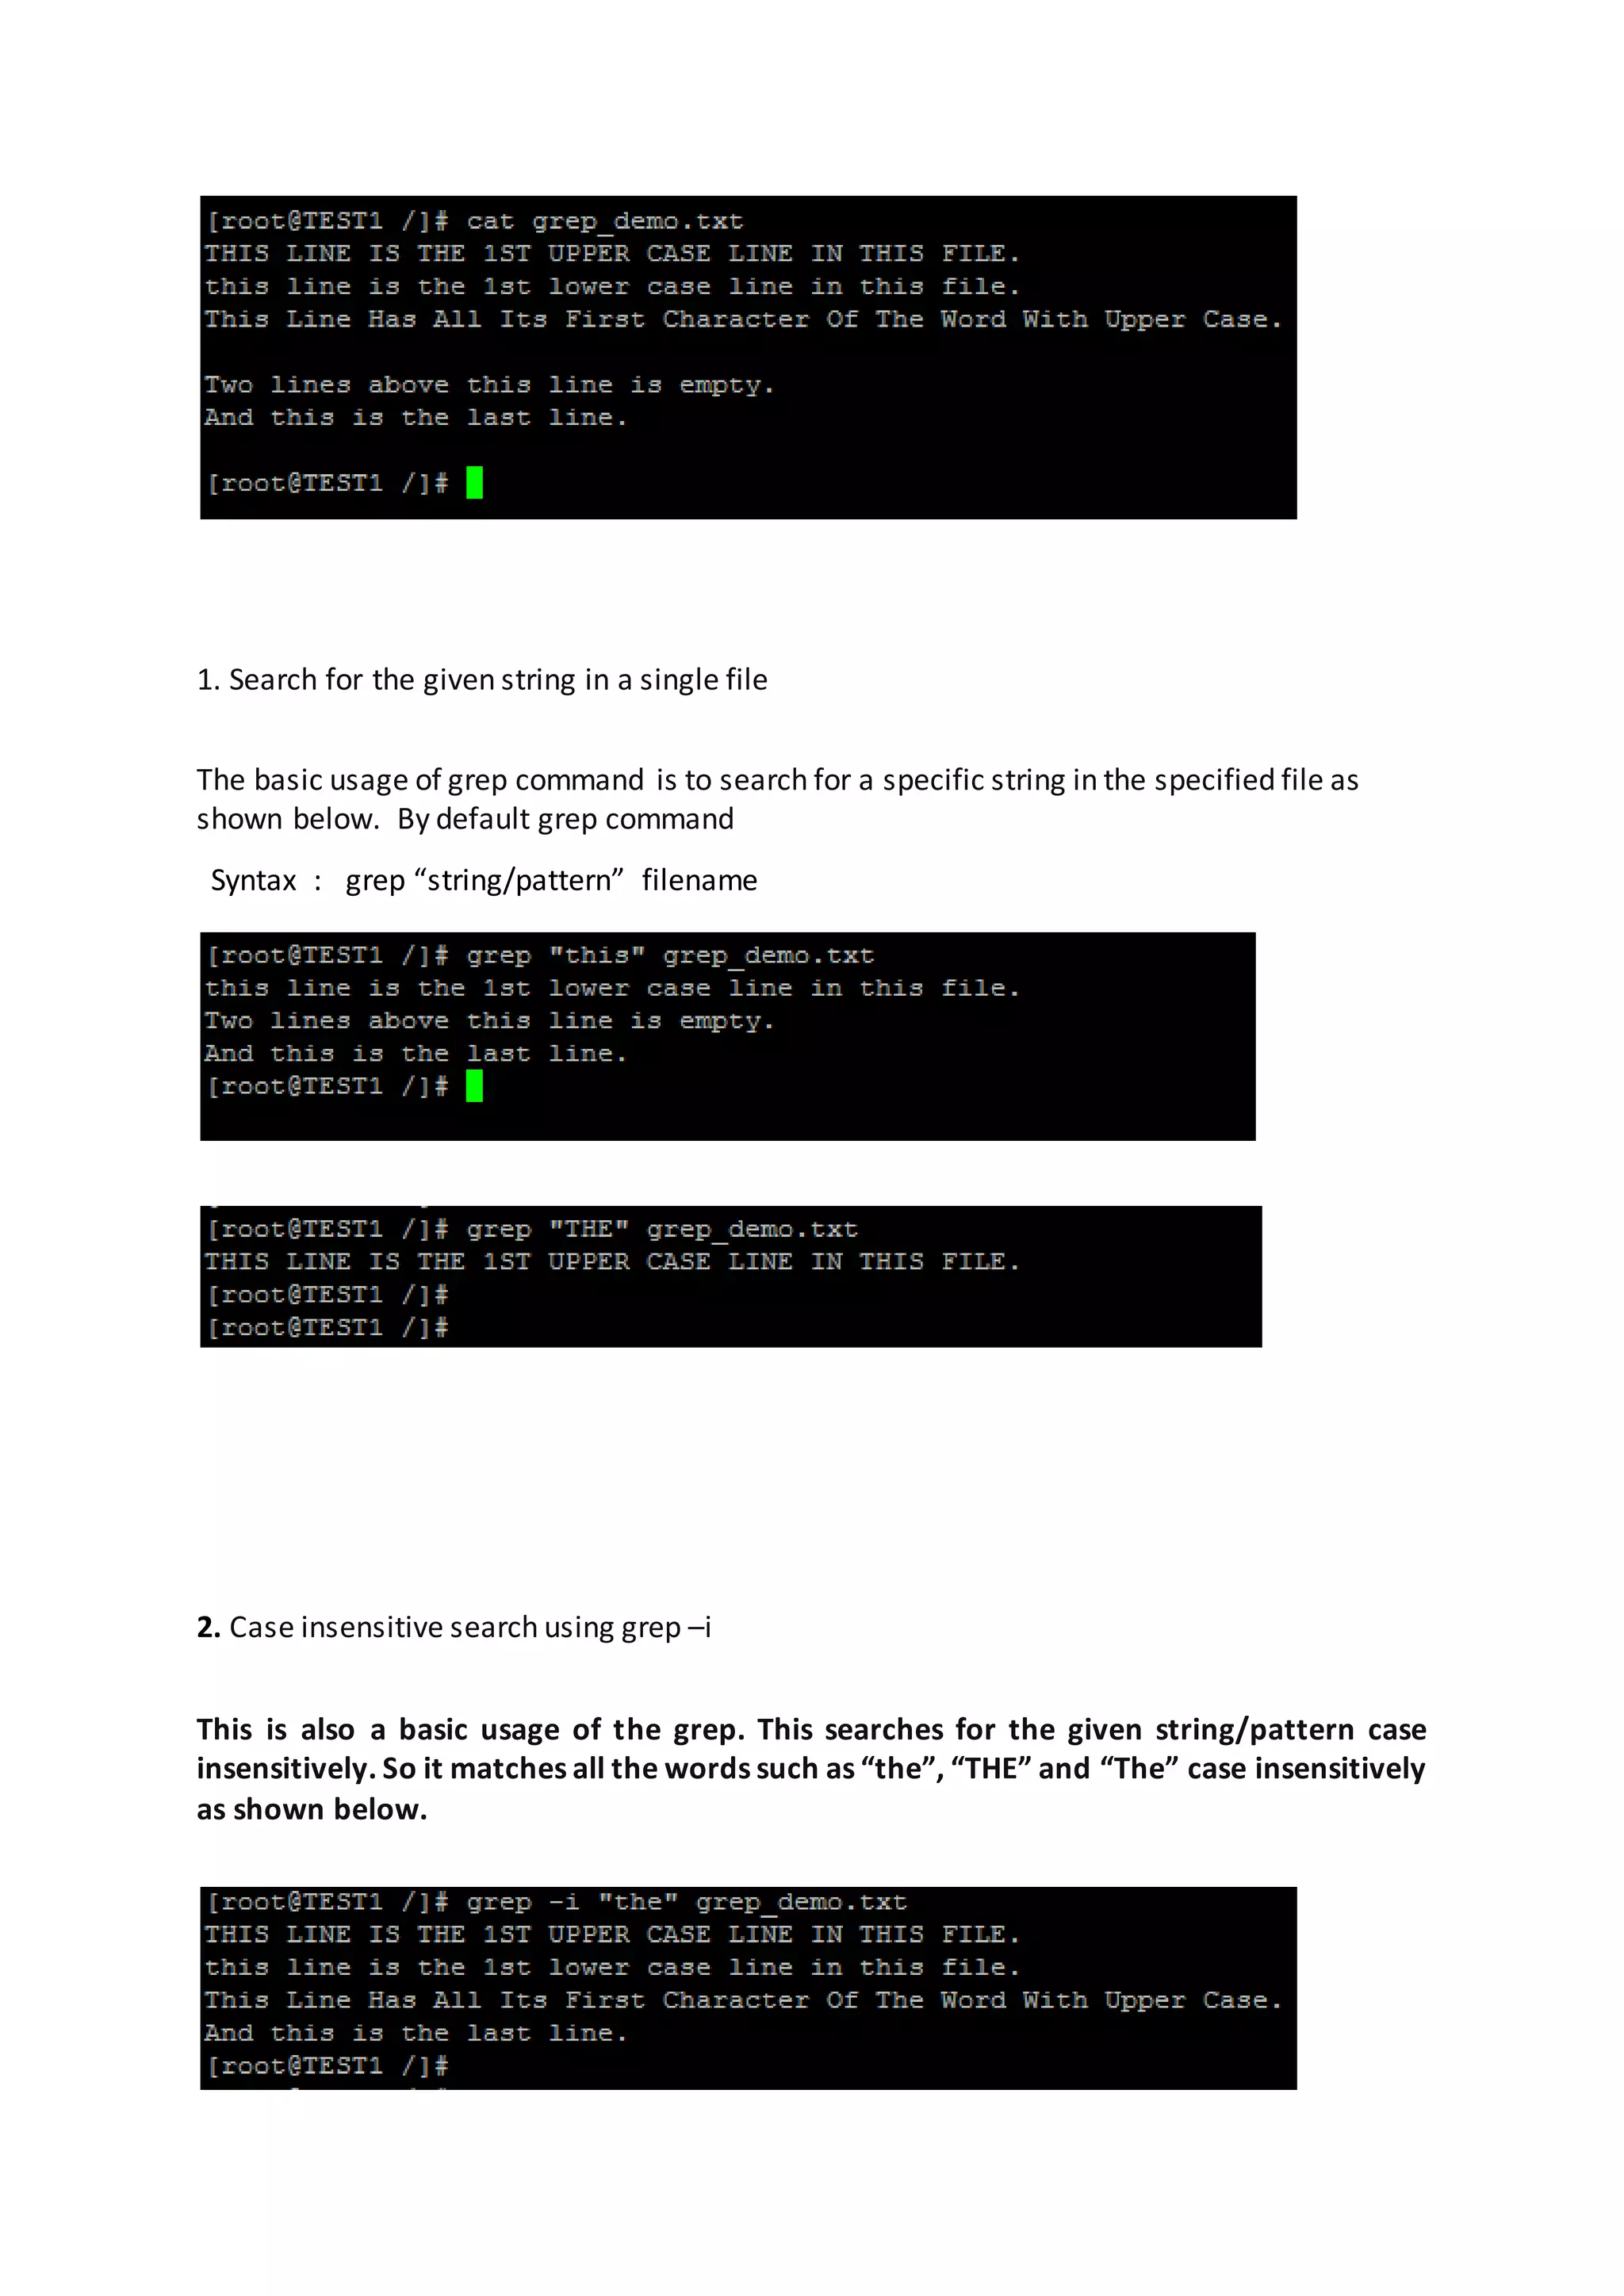
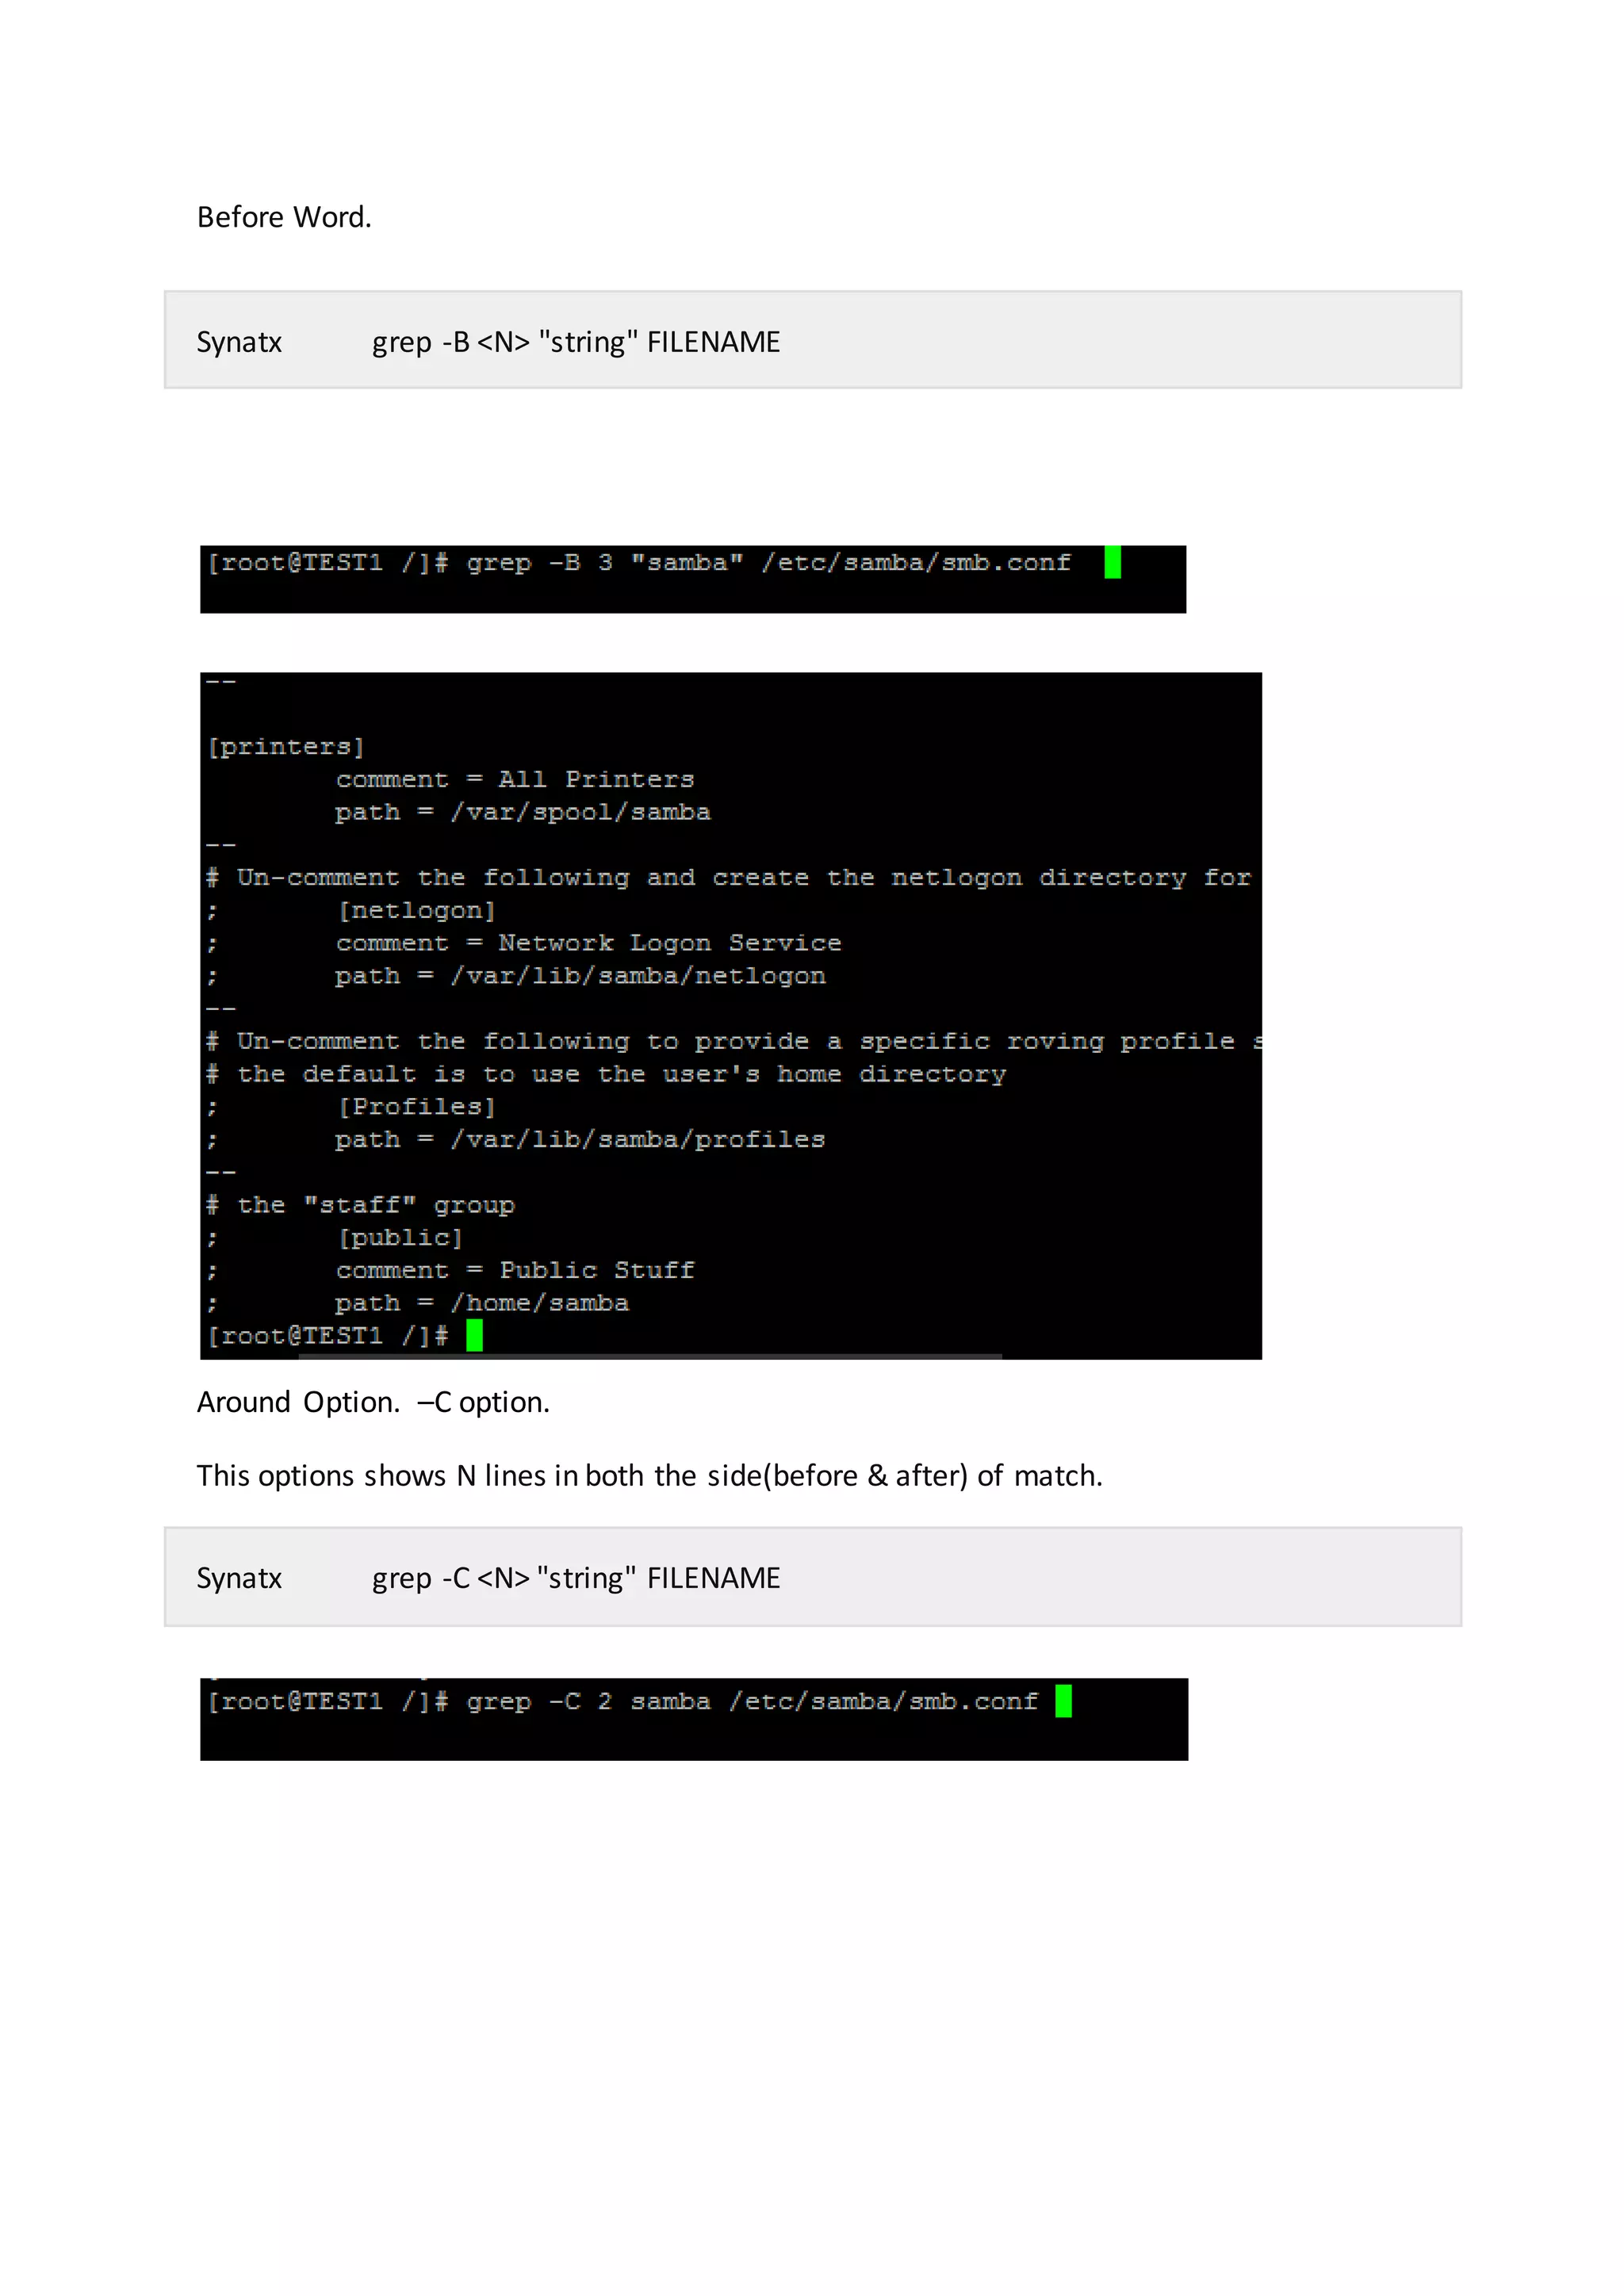
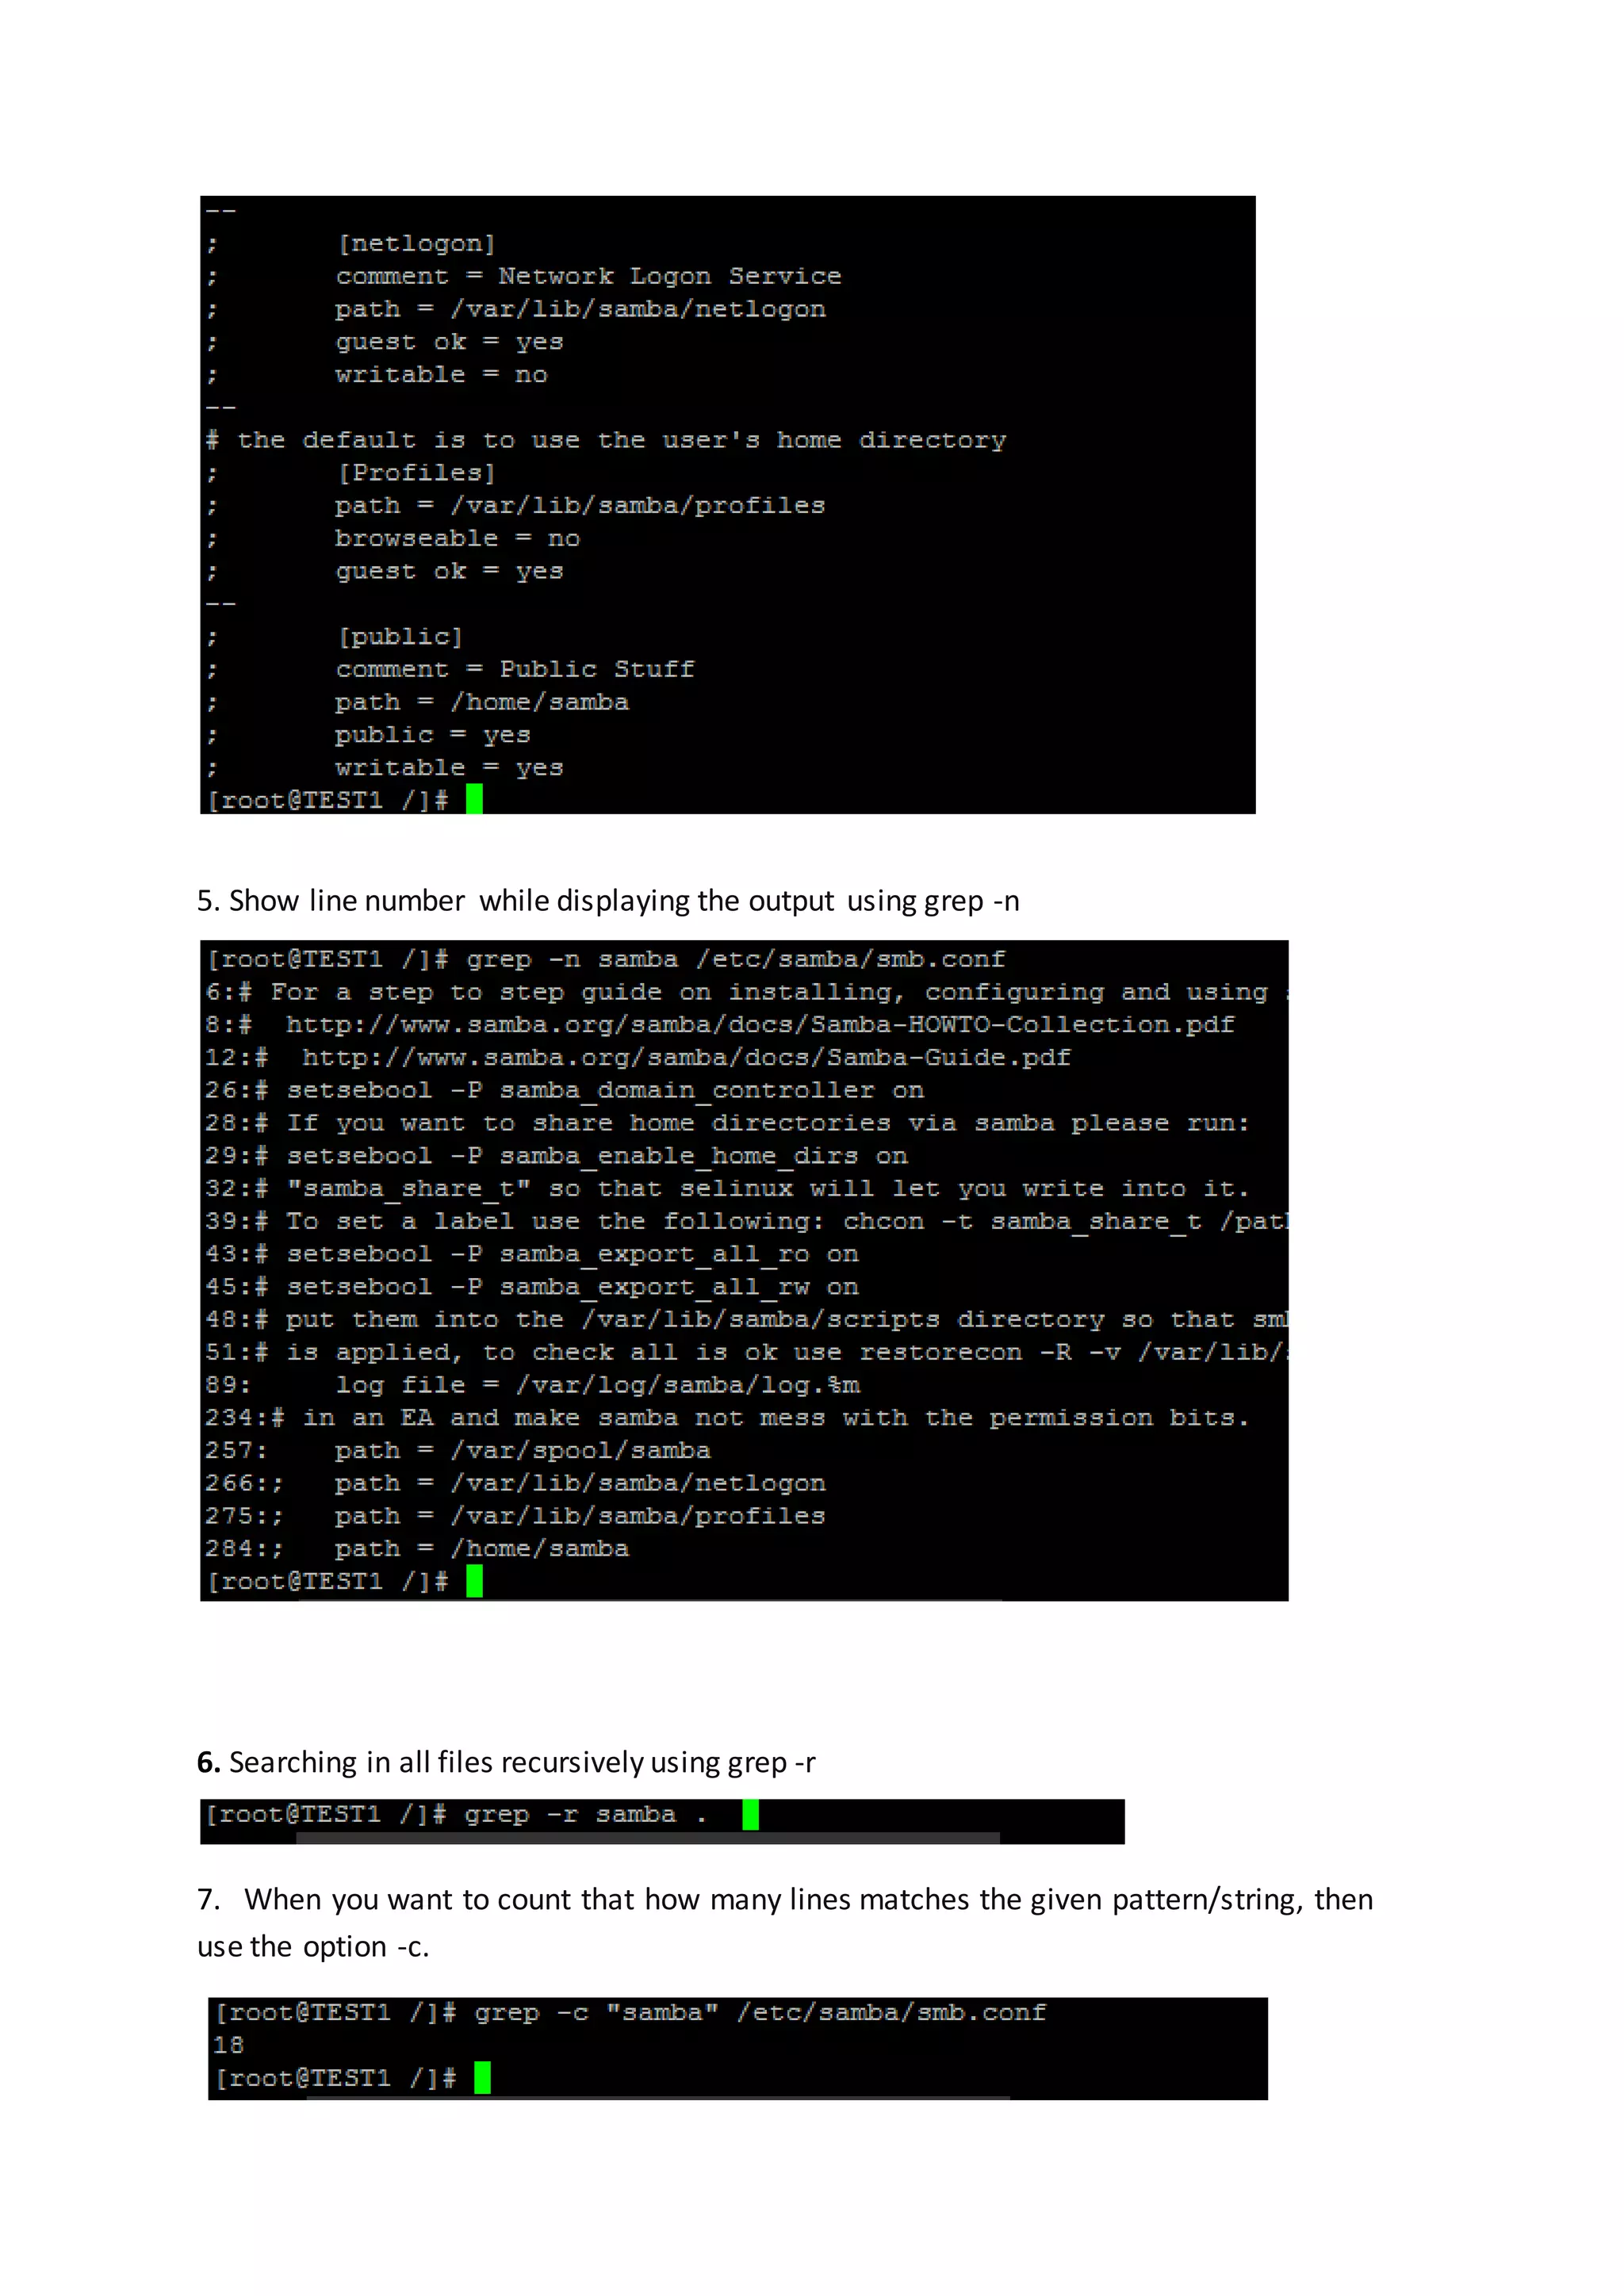
![2) Declare a variable and echo its value. For example, Declare a variable of x and assign its value=10. Echo x value Note: The ‘-e‘ option in Linux acts as interpretation of escaped characters that are backslashed. 3) Using option ‘b‘ – backspace with backslash interpretor ‘-e‘ which removes all the spaces in between. 4) ‘n‘ – New line with backspace. 5) ‘t‘ – horizontal tab. 6) ‘v - vertical tab. grep command: grep command is used to print lines matching a pattern. Syntax : grep [OPTIONS] PATTERN [FILE...] Create grep_demo.txt file and add below contents in file THIS LINE IS THE 1ST UPPER CASE LINE IN THIS FILE. this line is the 1st lower case line in this file. This Line Has All Its First Character Of The Word With Upper Case. Two lines above this line is empty. And this is the last line.](https://image.slidesharecdn.com/chapter3linuxbasiccommands-170414153108/75/Chapter-4-Linux-Basic-Commands-32-2048.jpg)
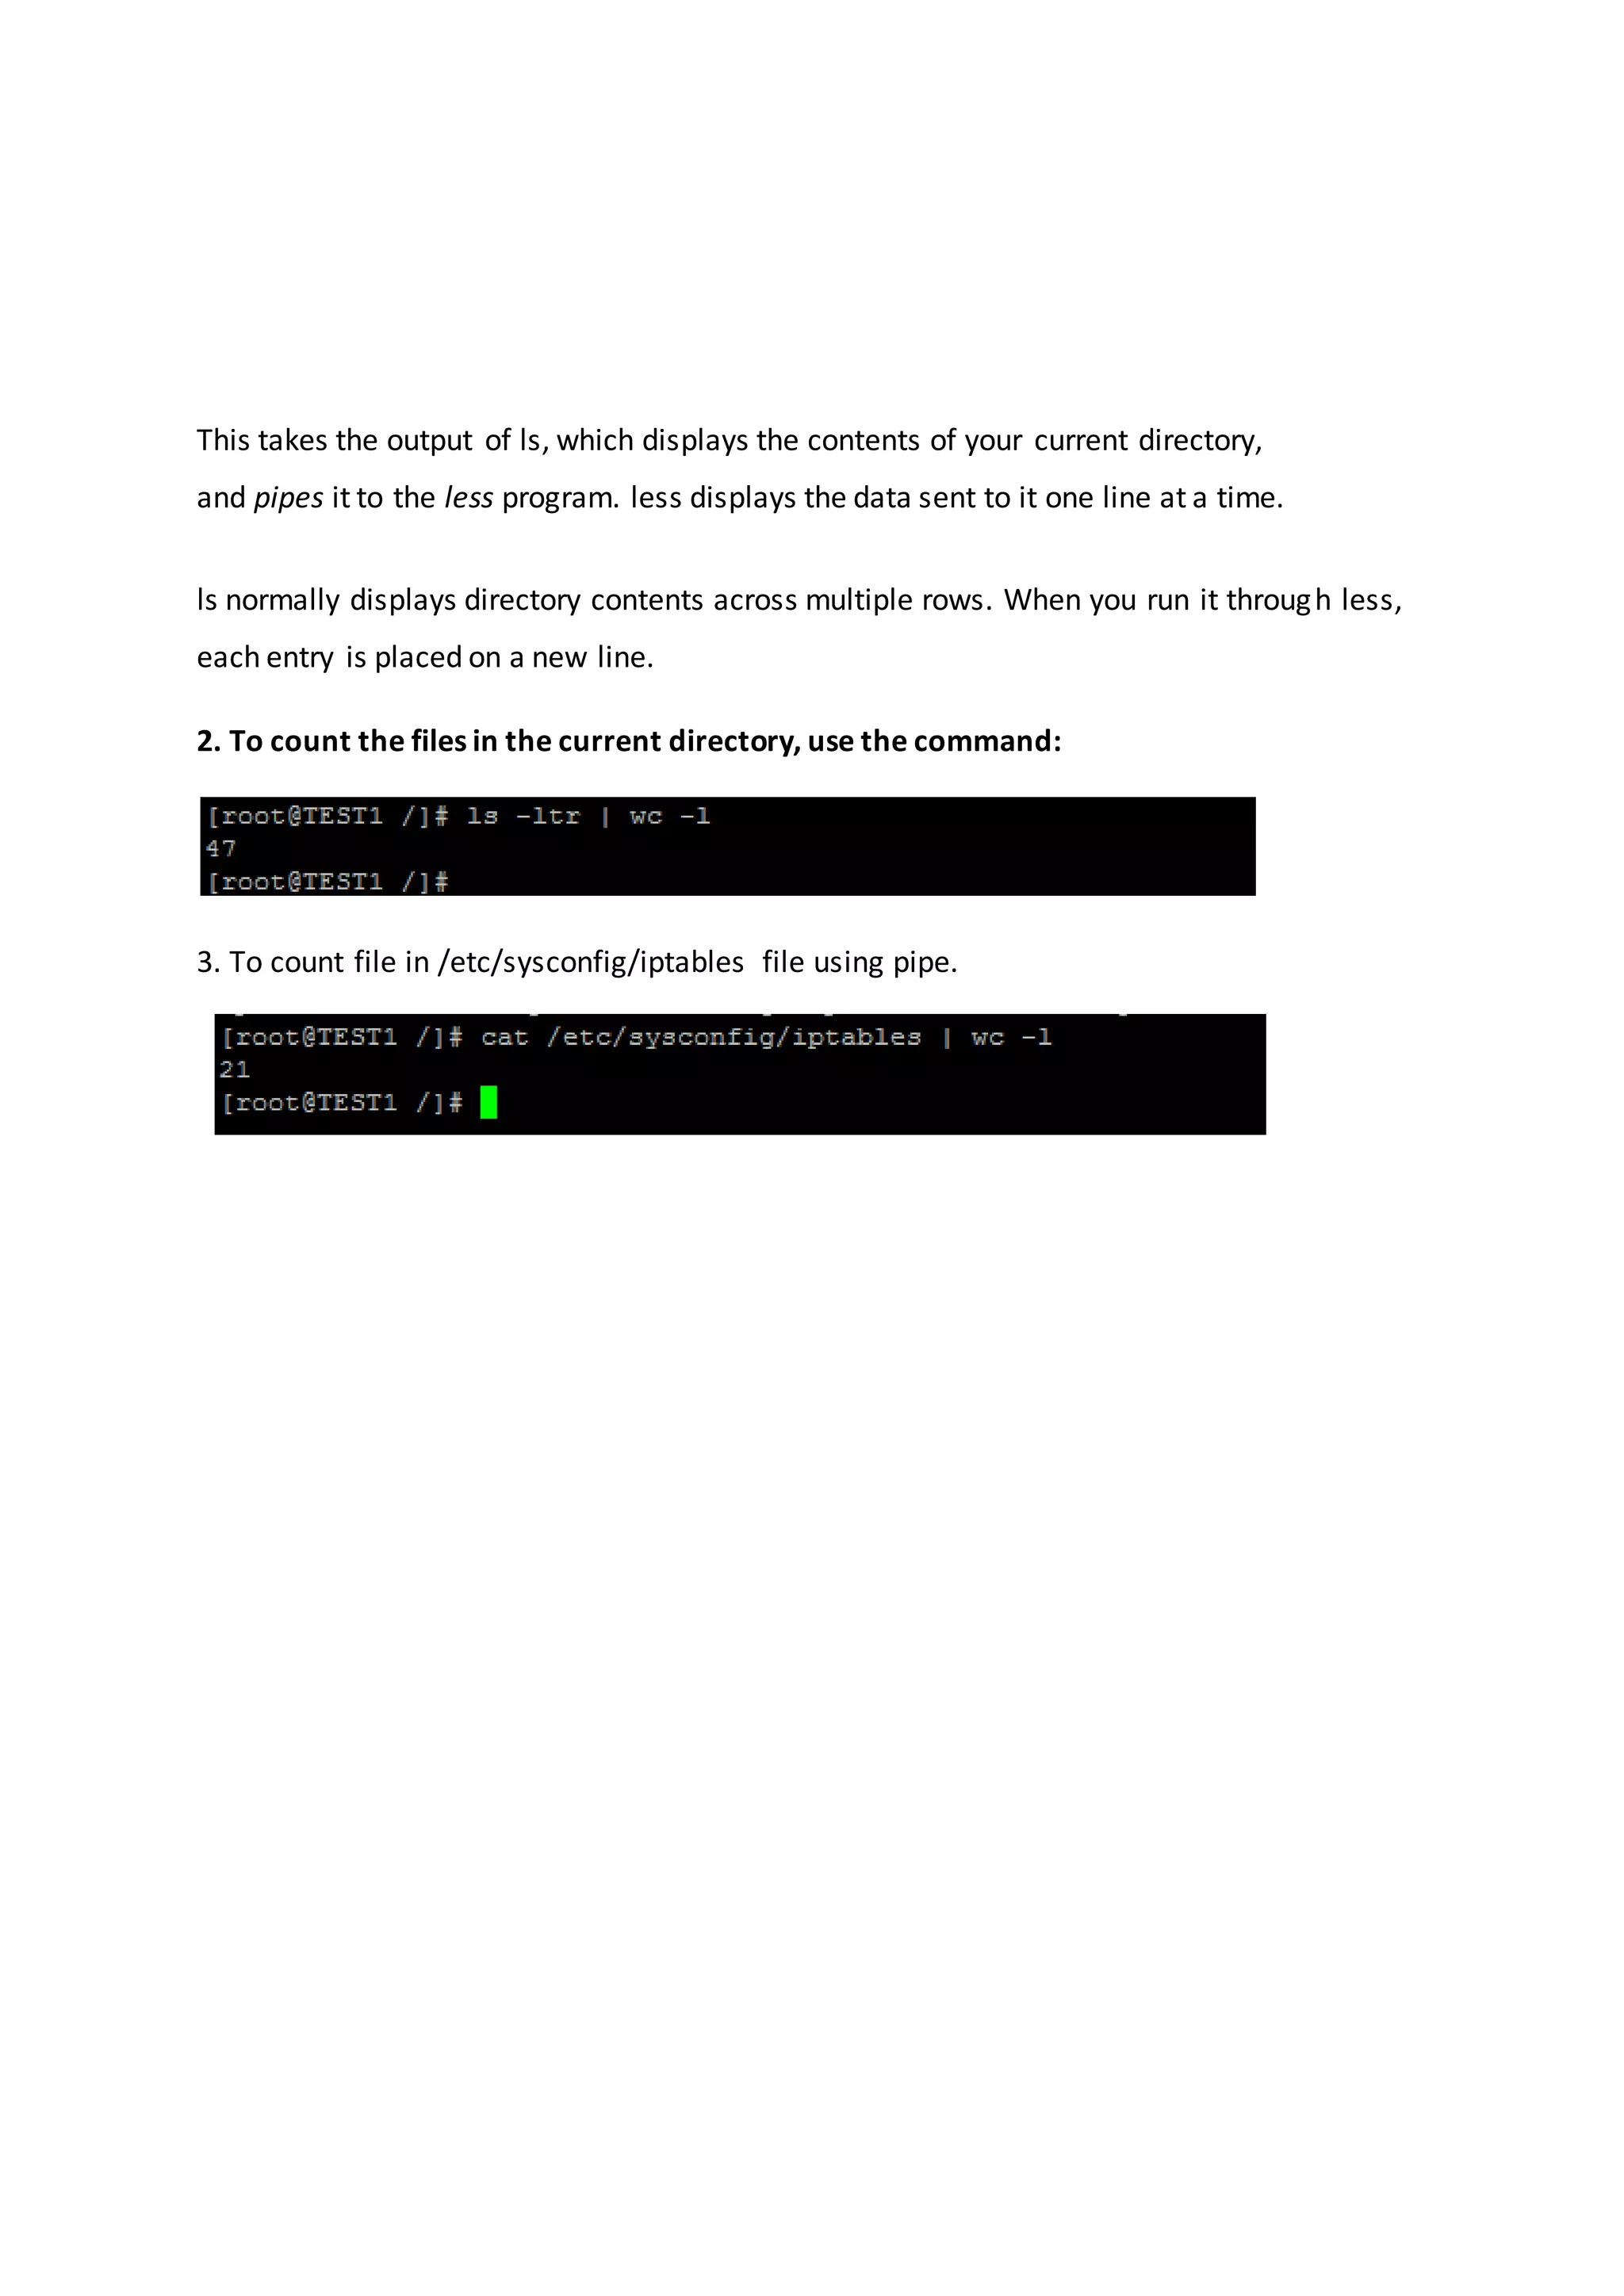
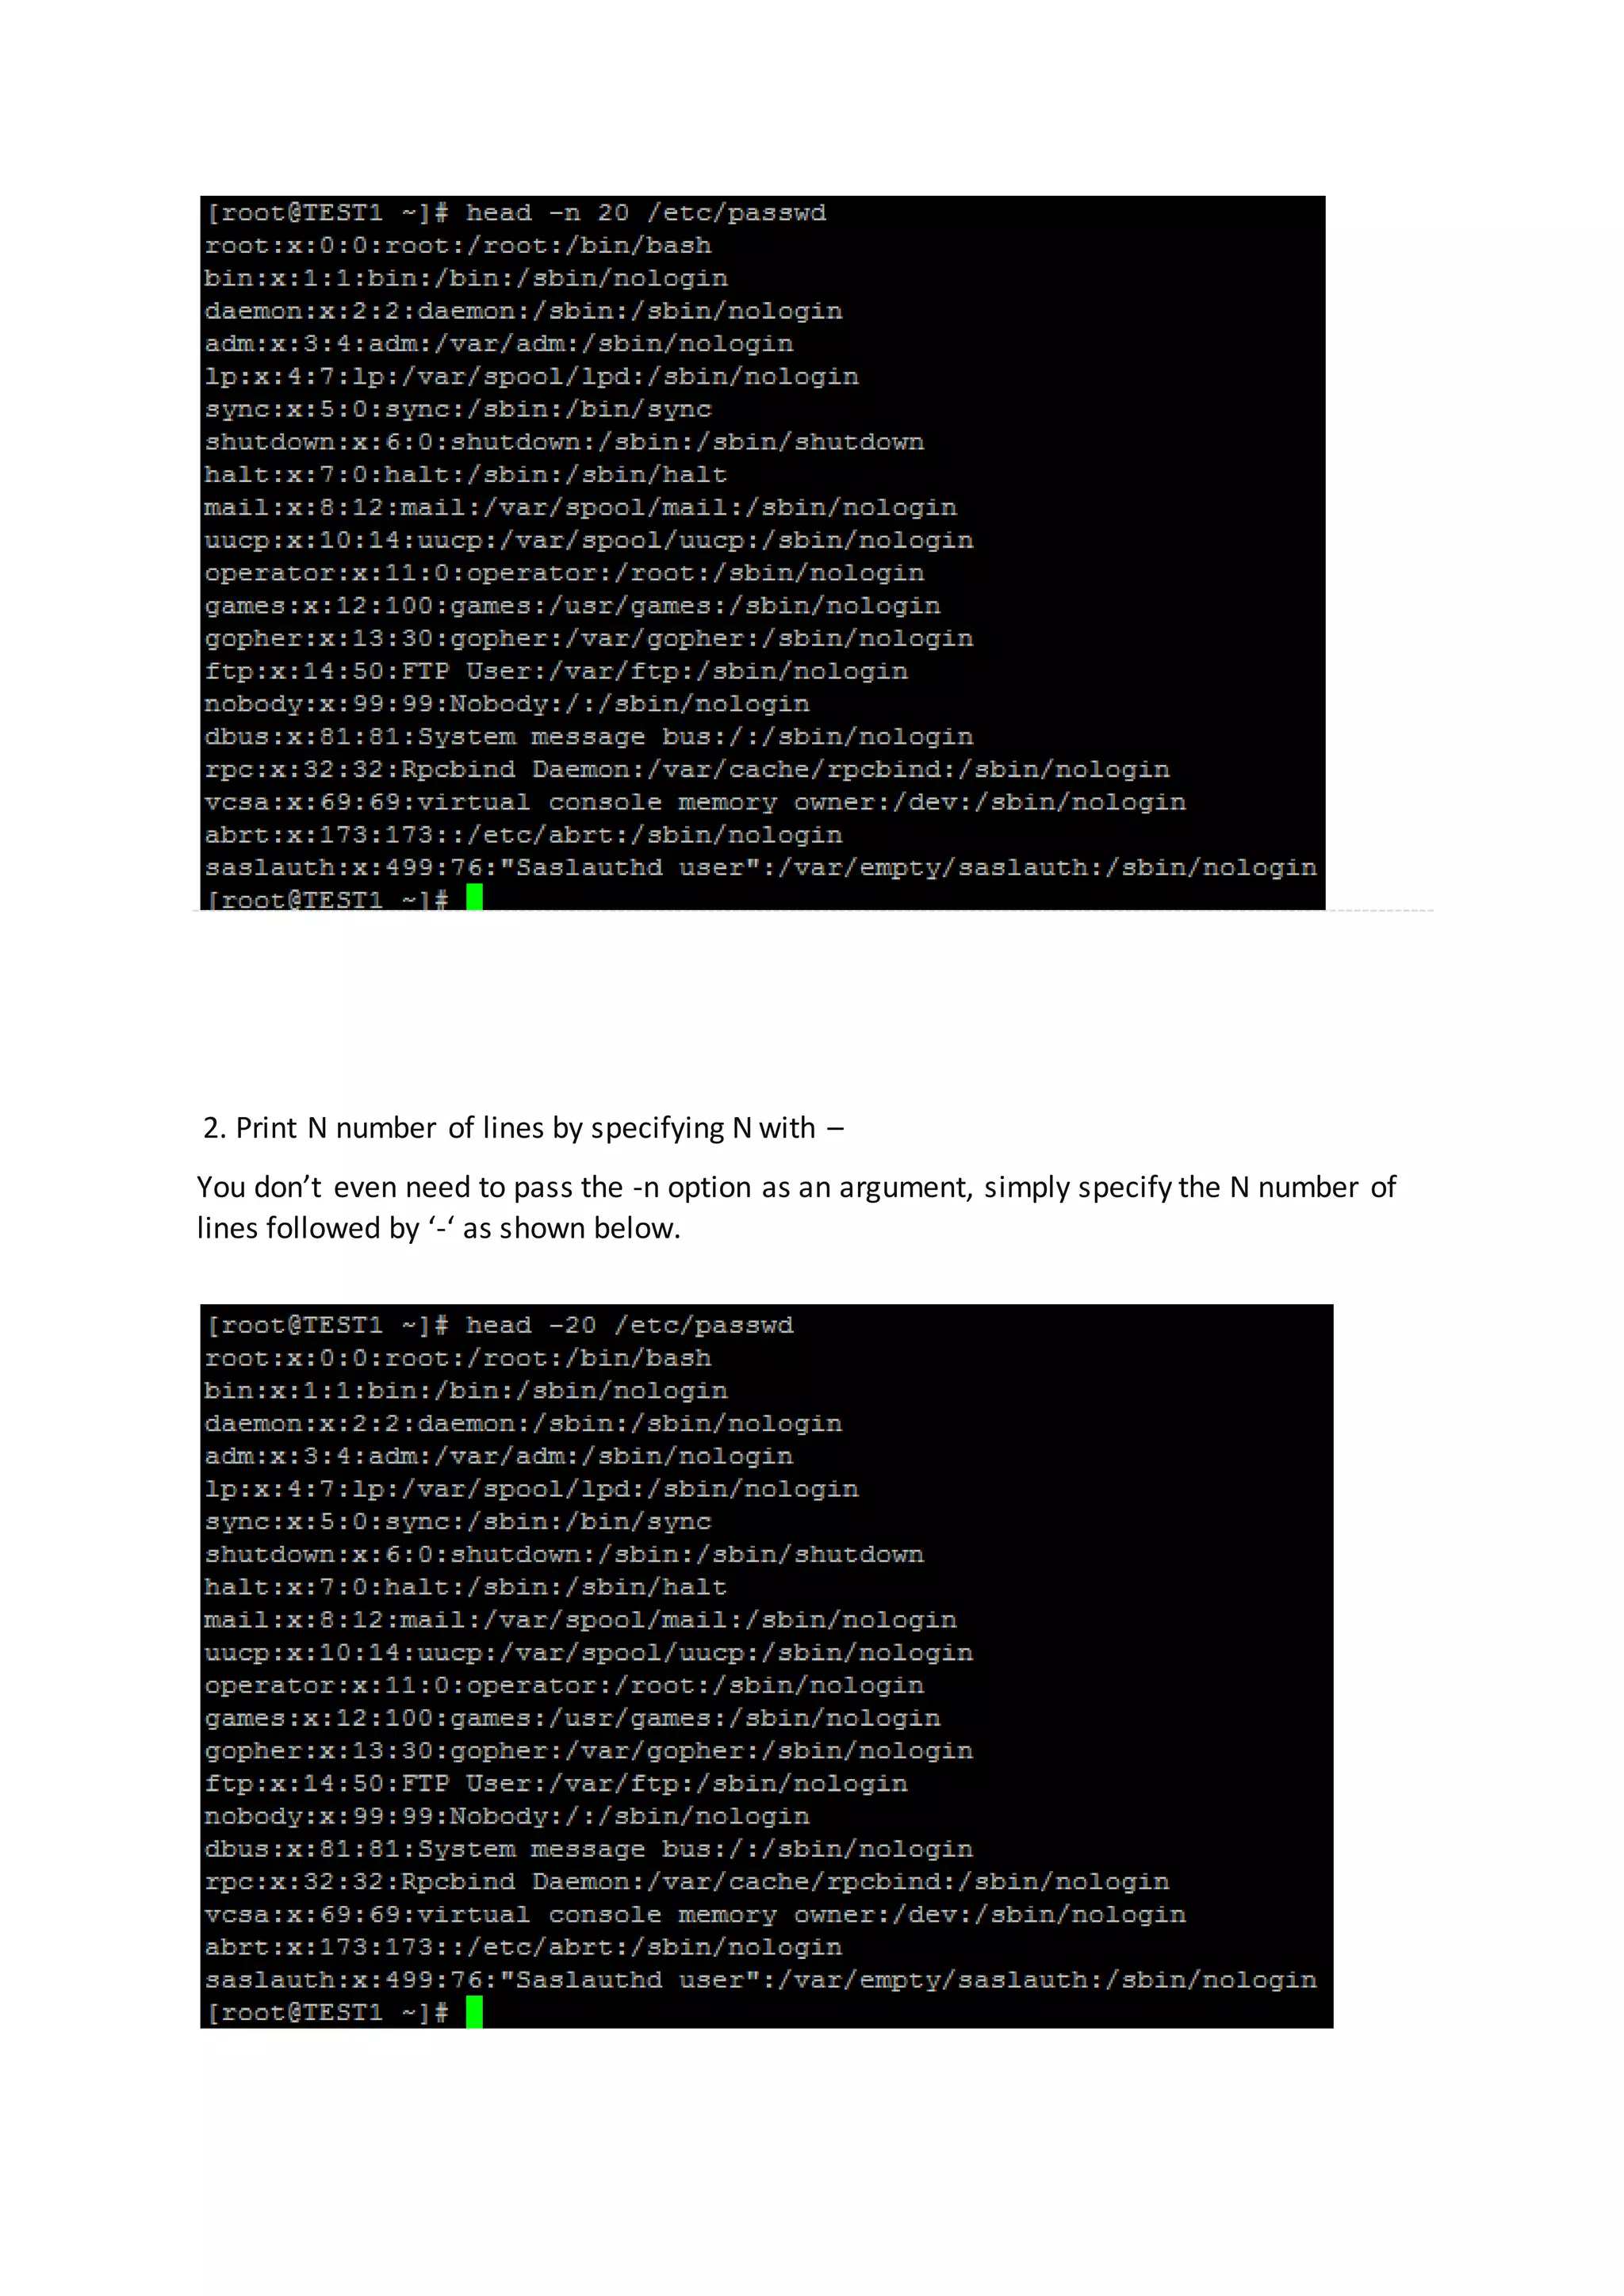
![WC command: wc command is used to count word, lines and bytes in a file. Syntax : wc [OPTION] .... FILE... Options -c, print the byte counts -m, print the character counts -l, print the newline counts -w, print the word counts Examples: head comamnd head command is used to prints the first N number of data of the given (file). By default, it prints first 10 lines of each given file. Syntax : head [option] filename Option –n Prints first N lines; Example 1. Print the first N number of lines](https://image.slidesharecdn.com/chapter3linuxbasiccommands-170414153108/75/Chapter-4-Linux-Basic-Commands-37-2048.jpg)
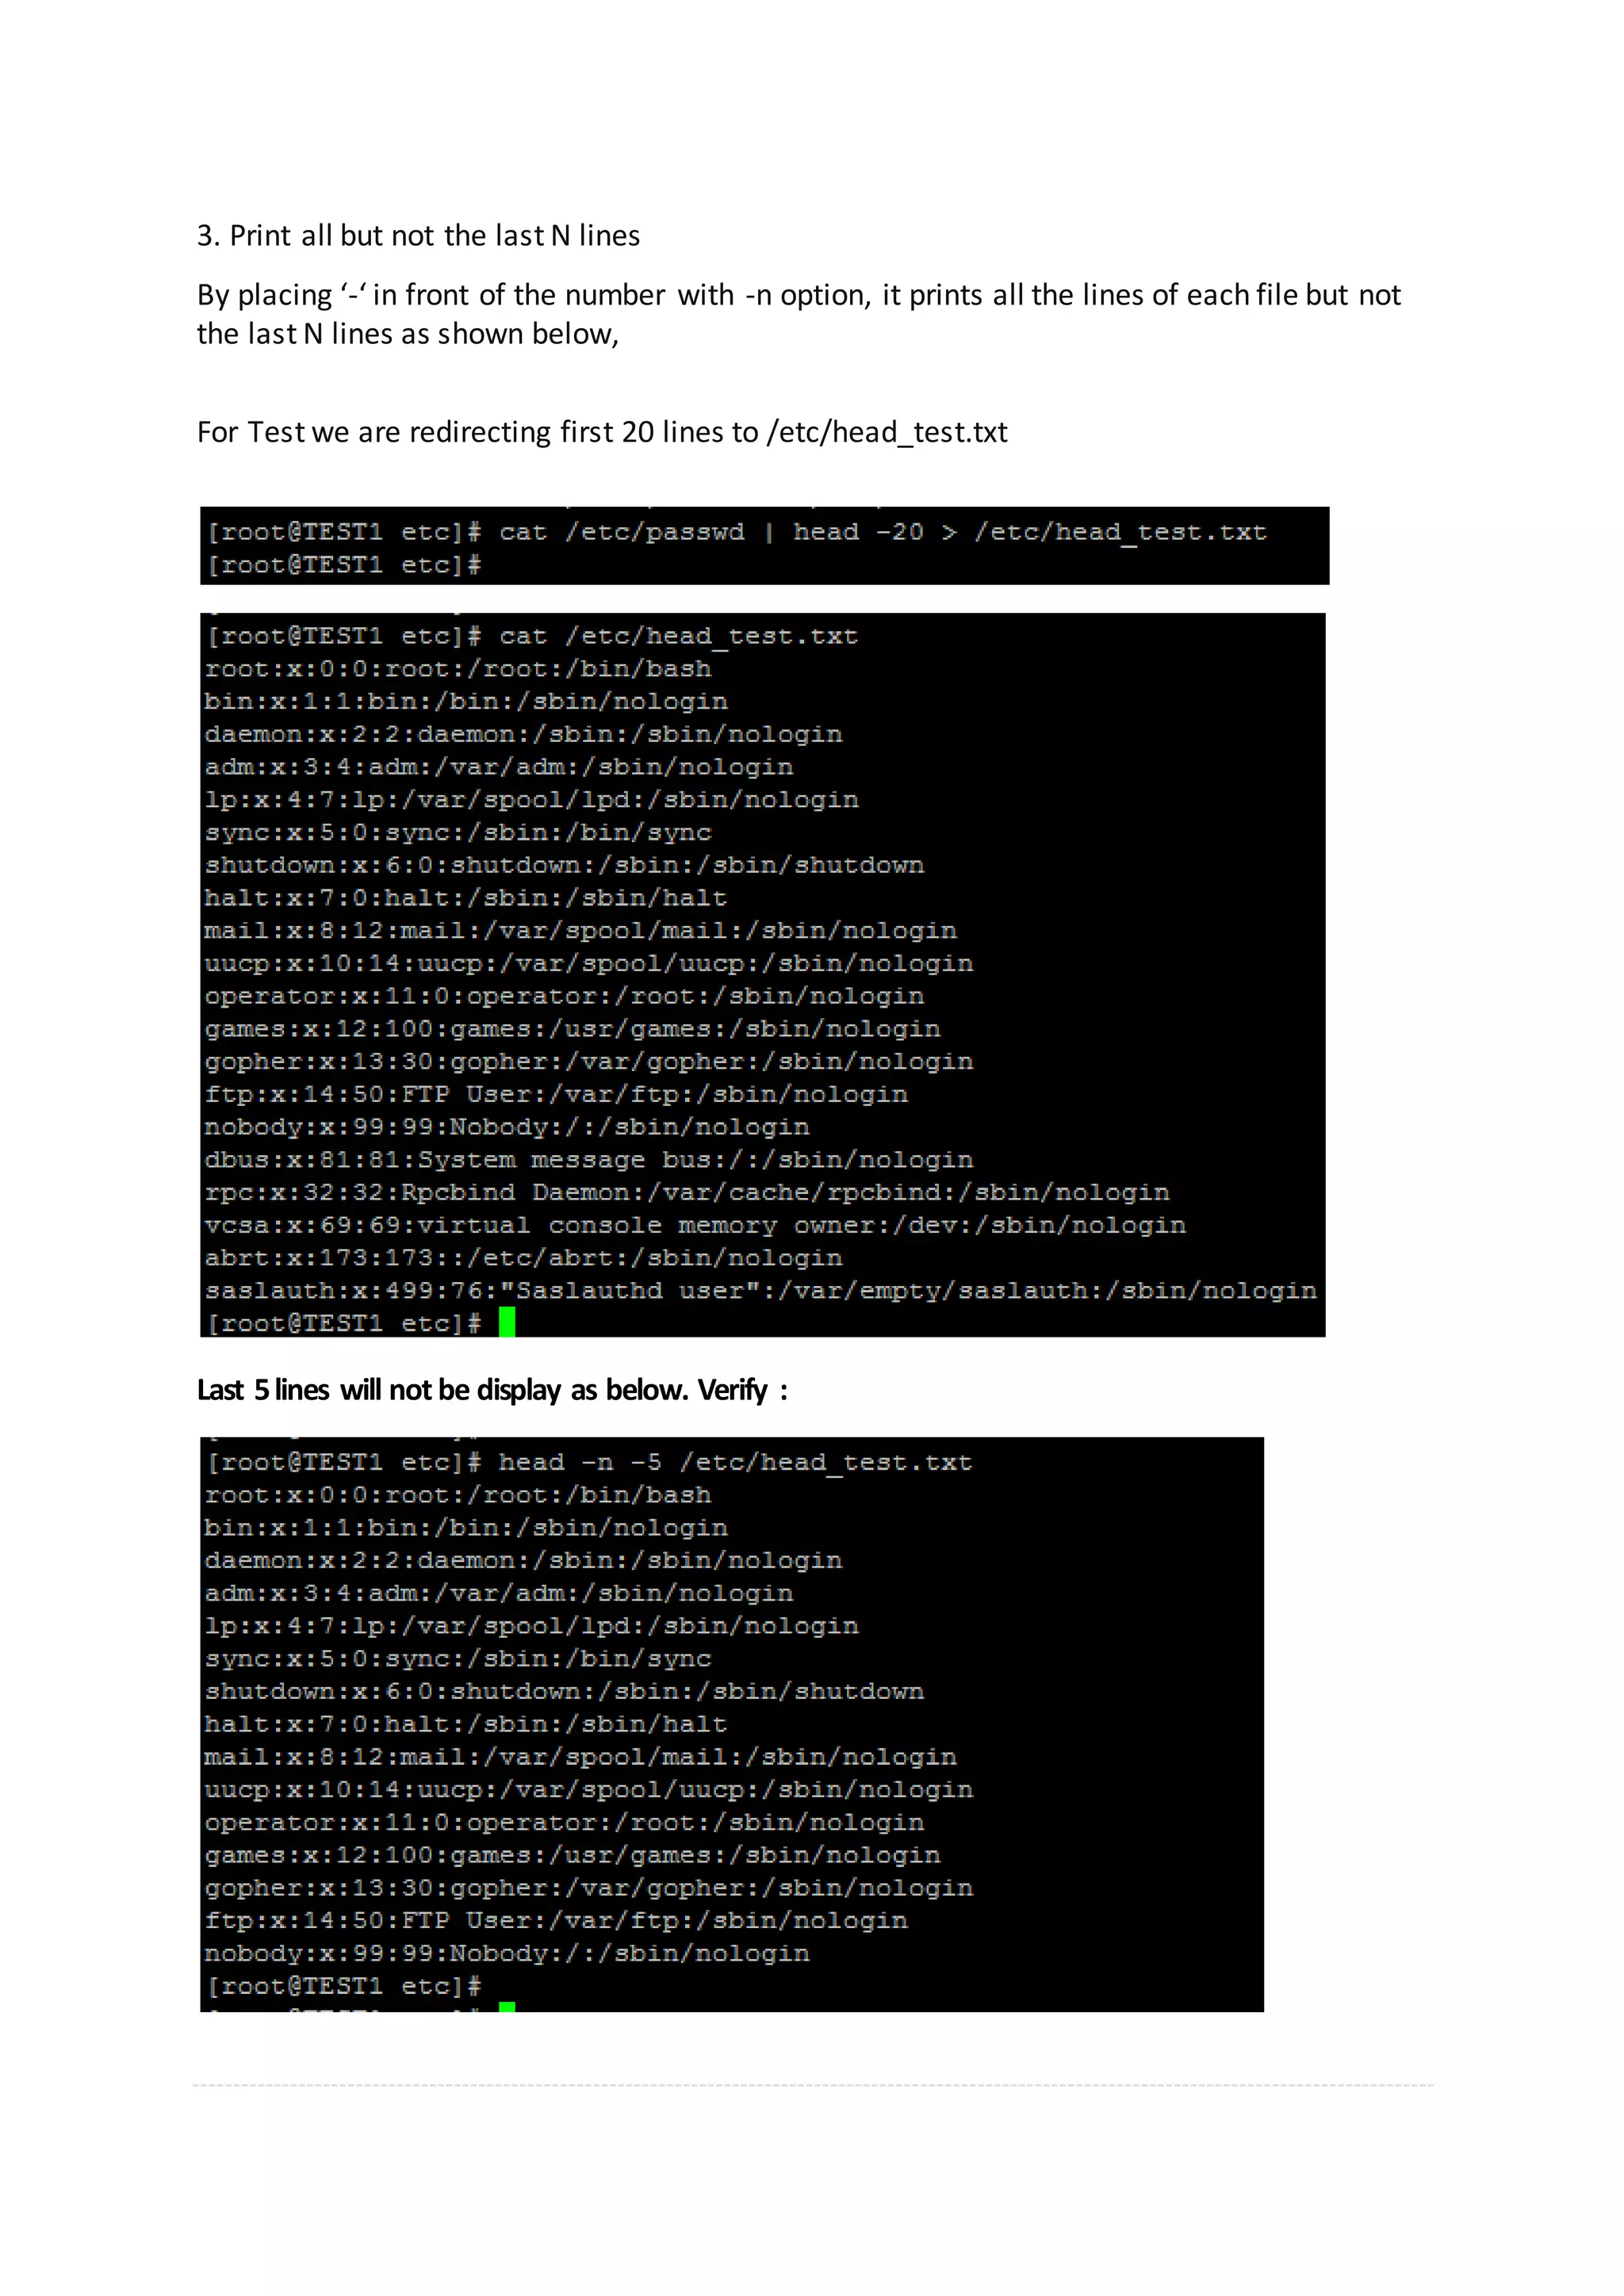
![Tail Command Tail command is used to prints the last N number of data of the given (file). By default, it prints last 10 lines of each given file. Syntax : tail [option] filename Option –n Prints last N lines; -f To print appended data as and when the file grows Example: 1. To print last 5 lines 2. Print N number of lines by specifying N with – You don’t even need to pass the -n option as an argument, simply specify the N numberof lines followed by ‘-‘ as shown below. 3. Print the appended lines as and when the file grows](https://image.slidesharecdn.com/chapter3linuxbasiccommands-170414153108/75/Chapter-4-Linux-Basic-Commands-40-2048.jpg)
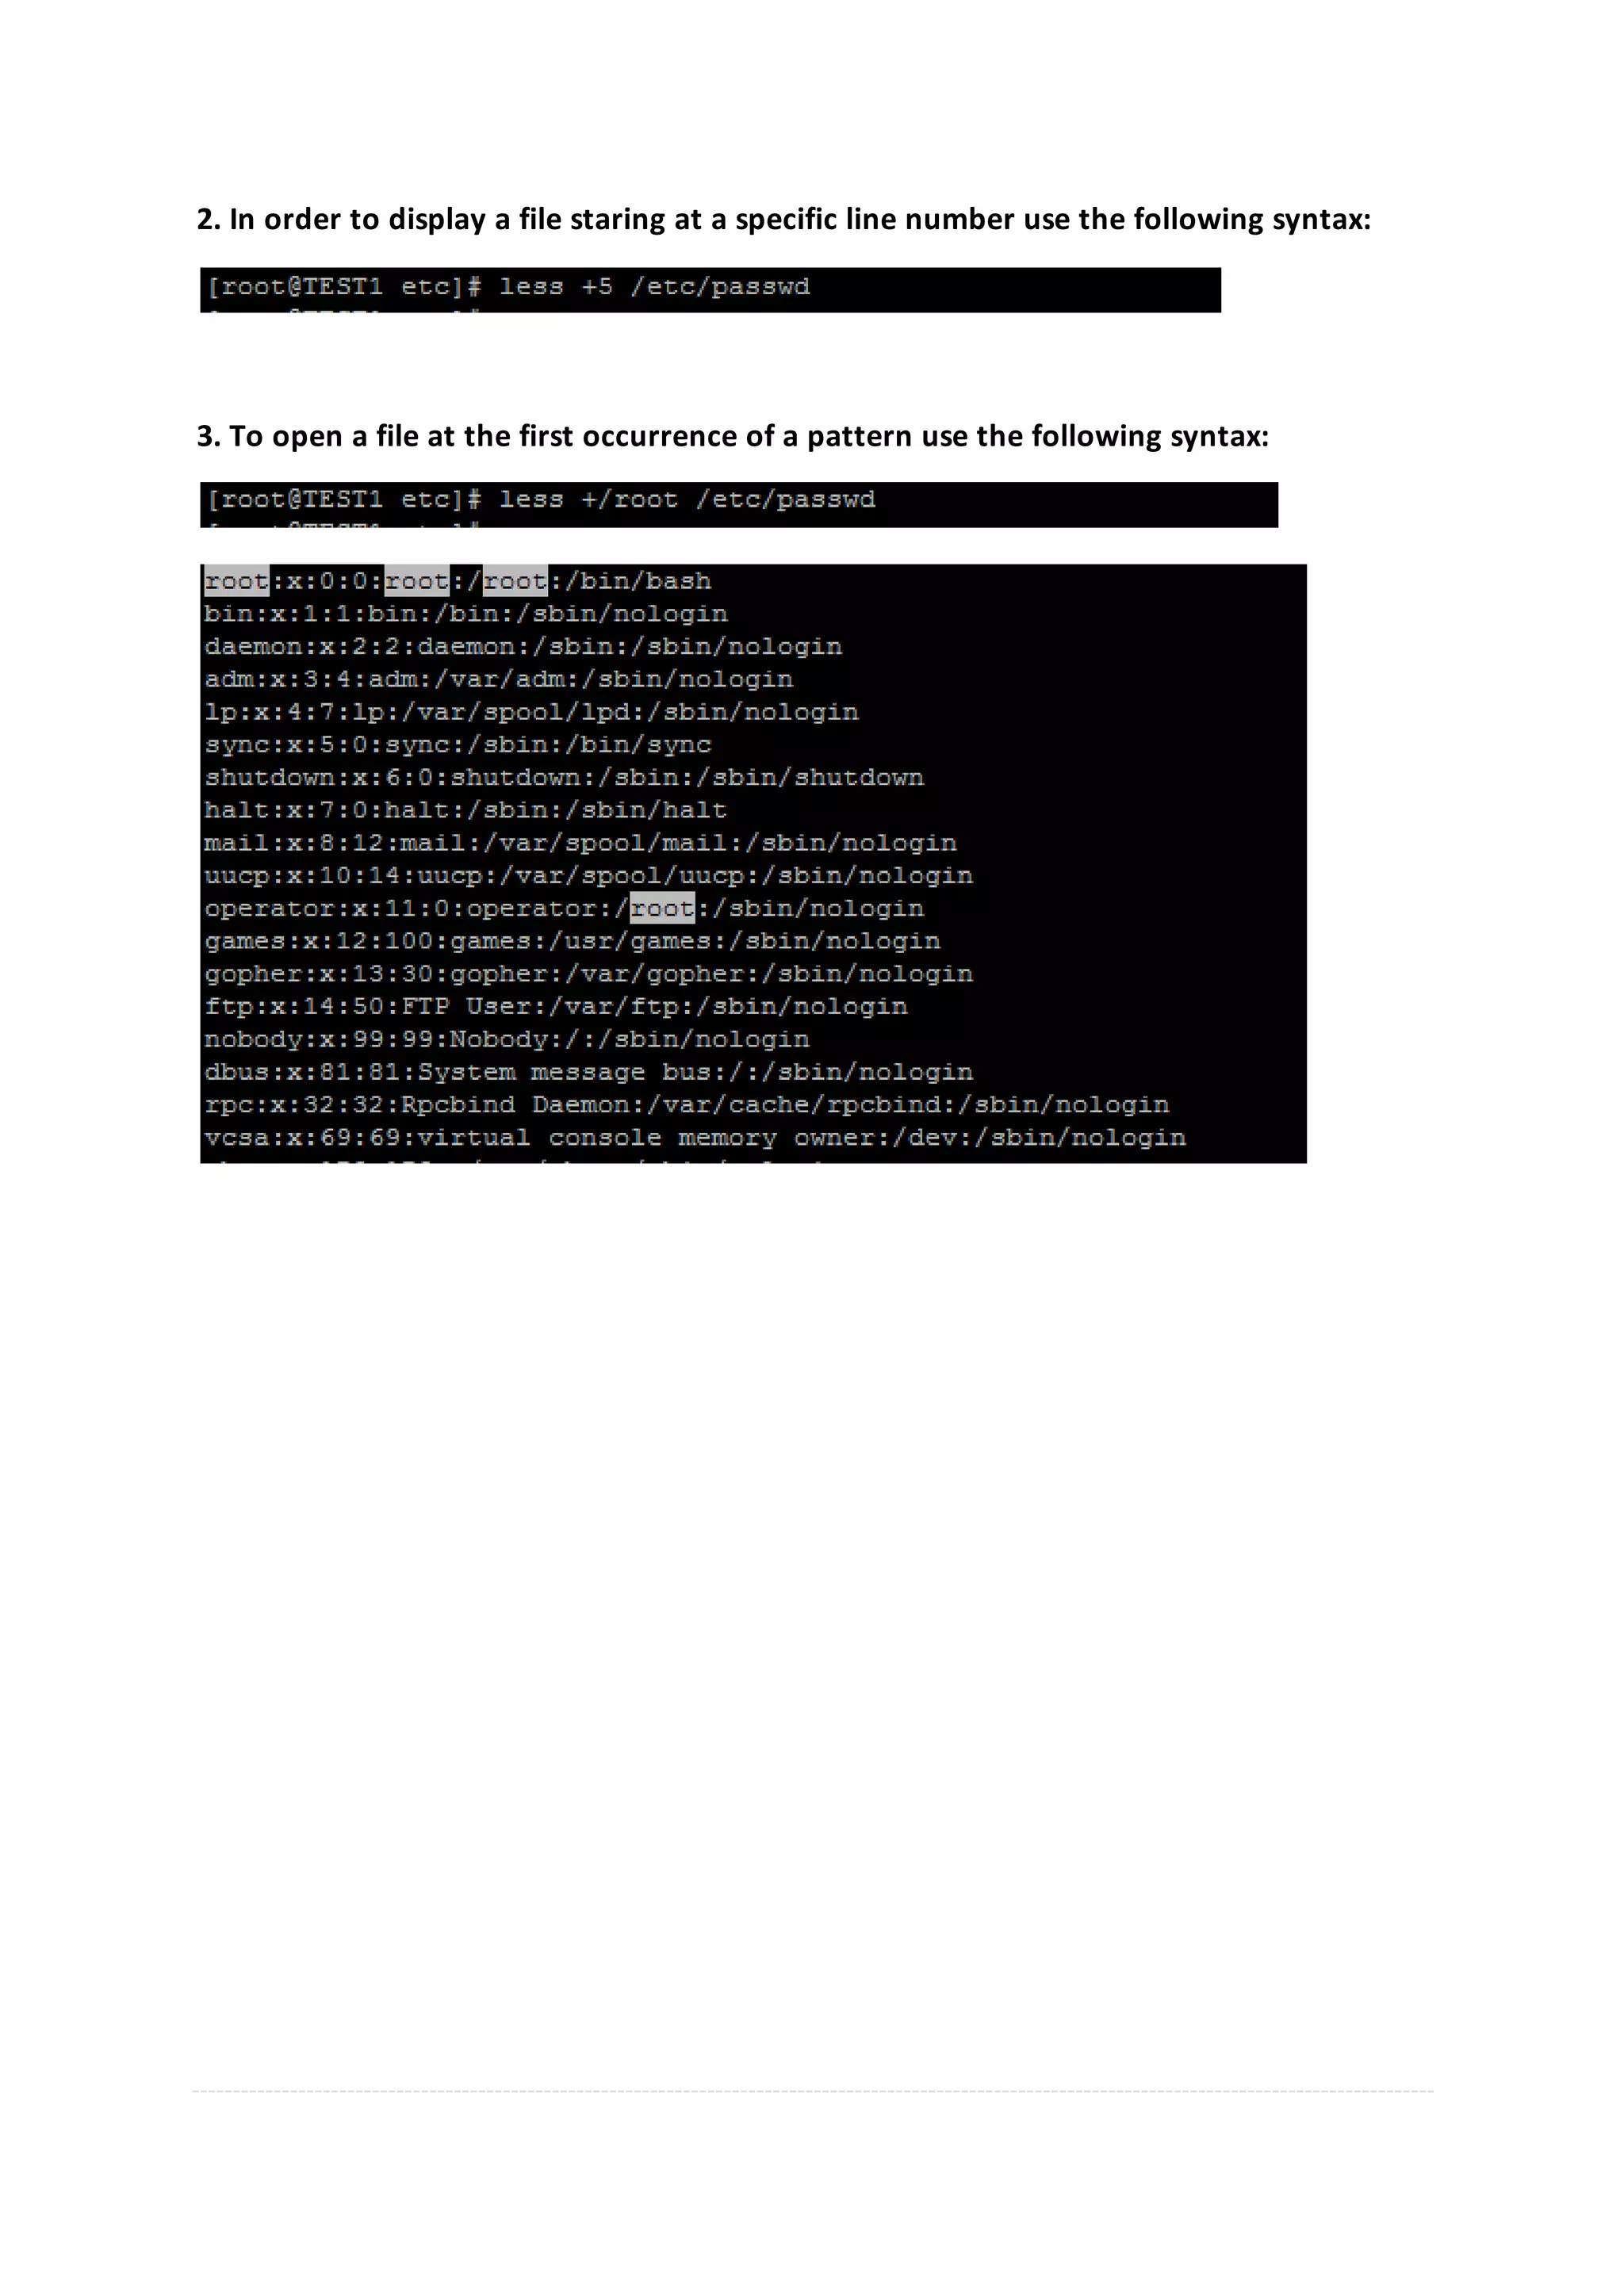
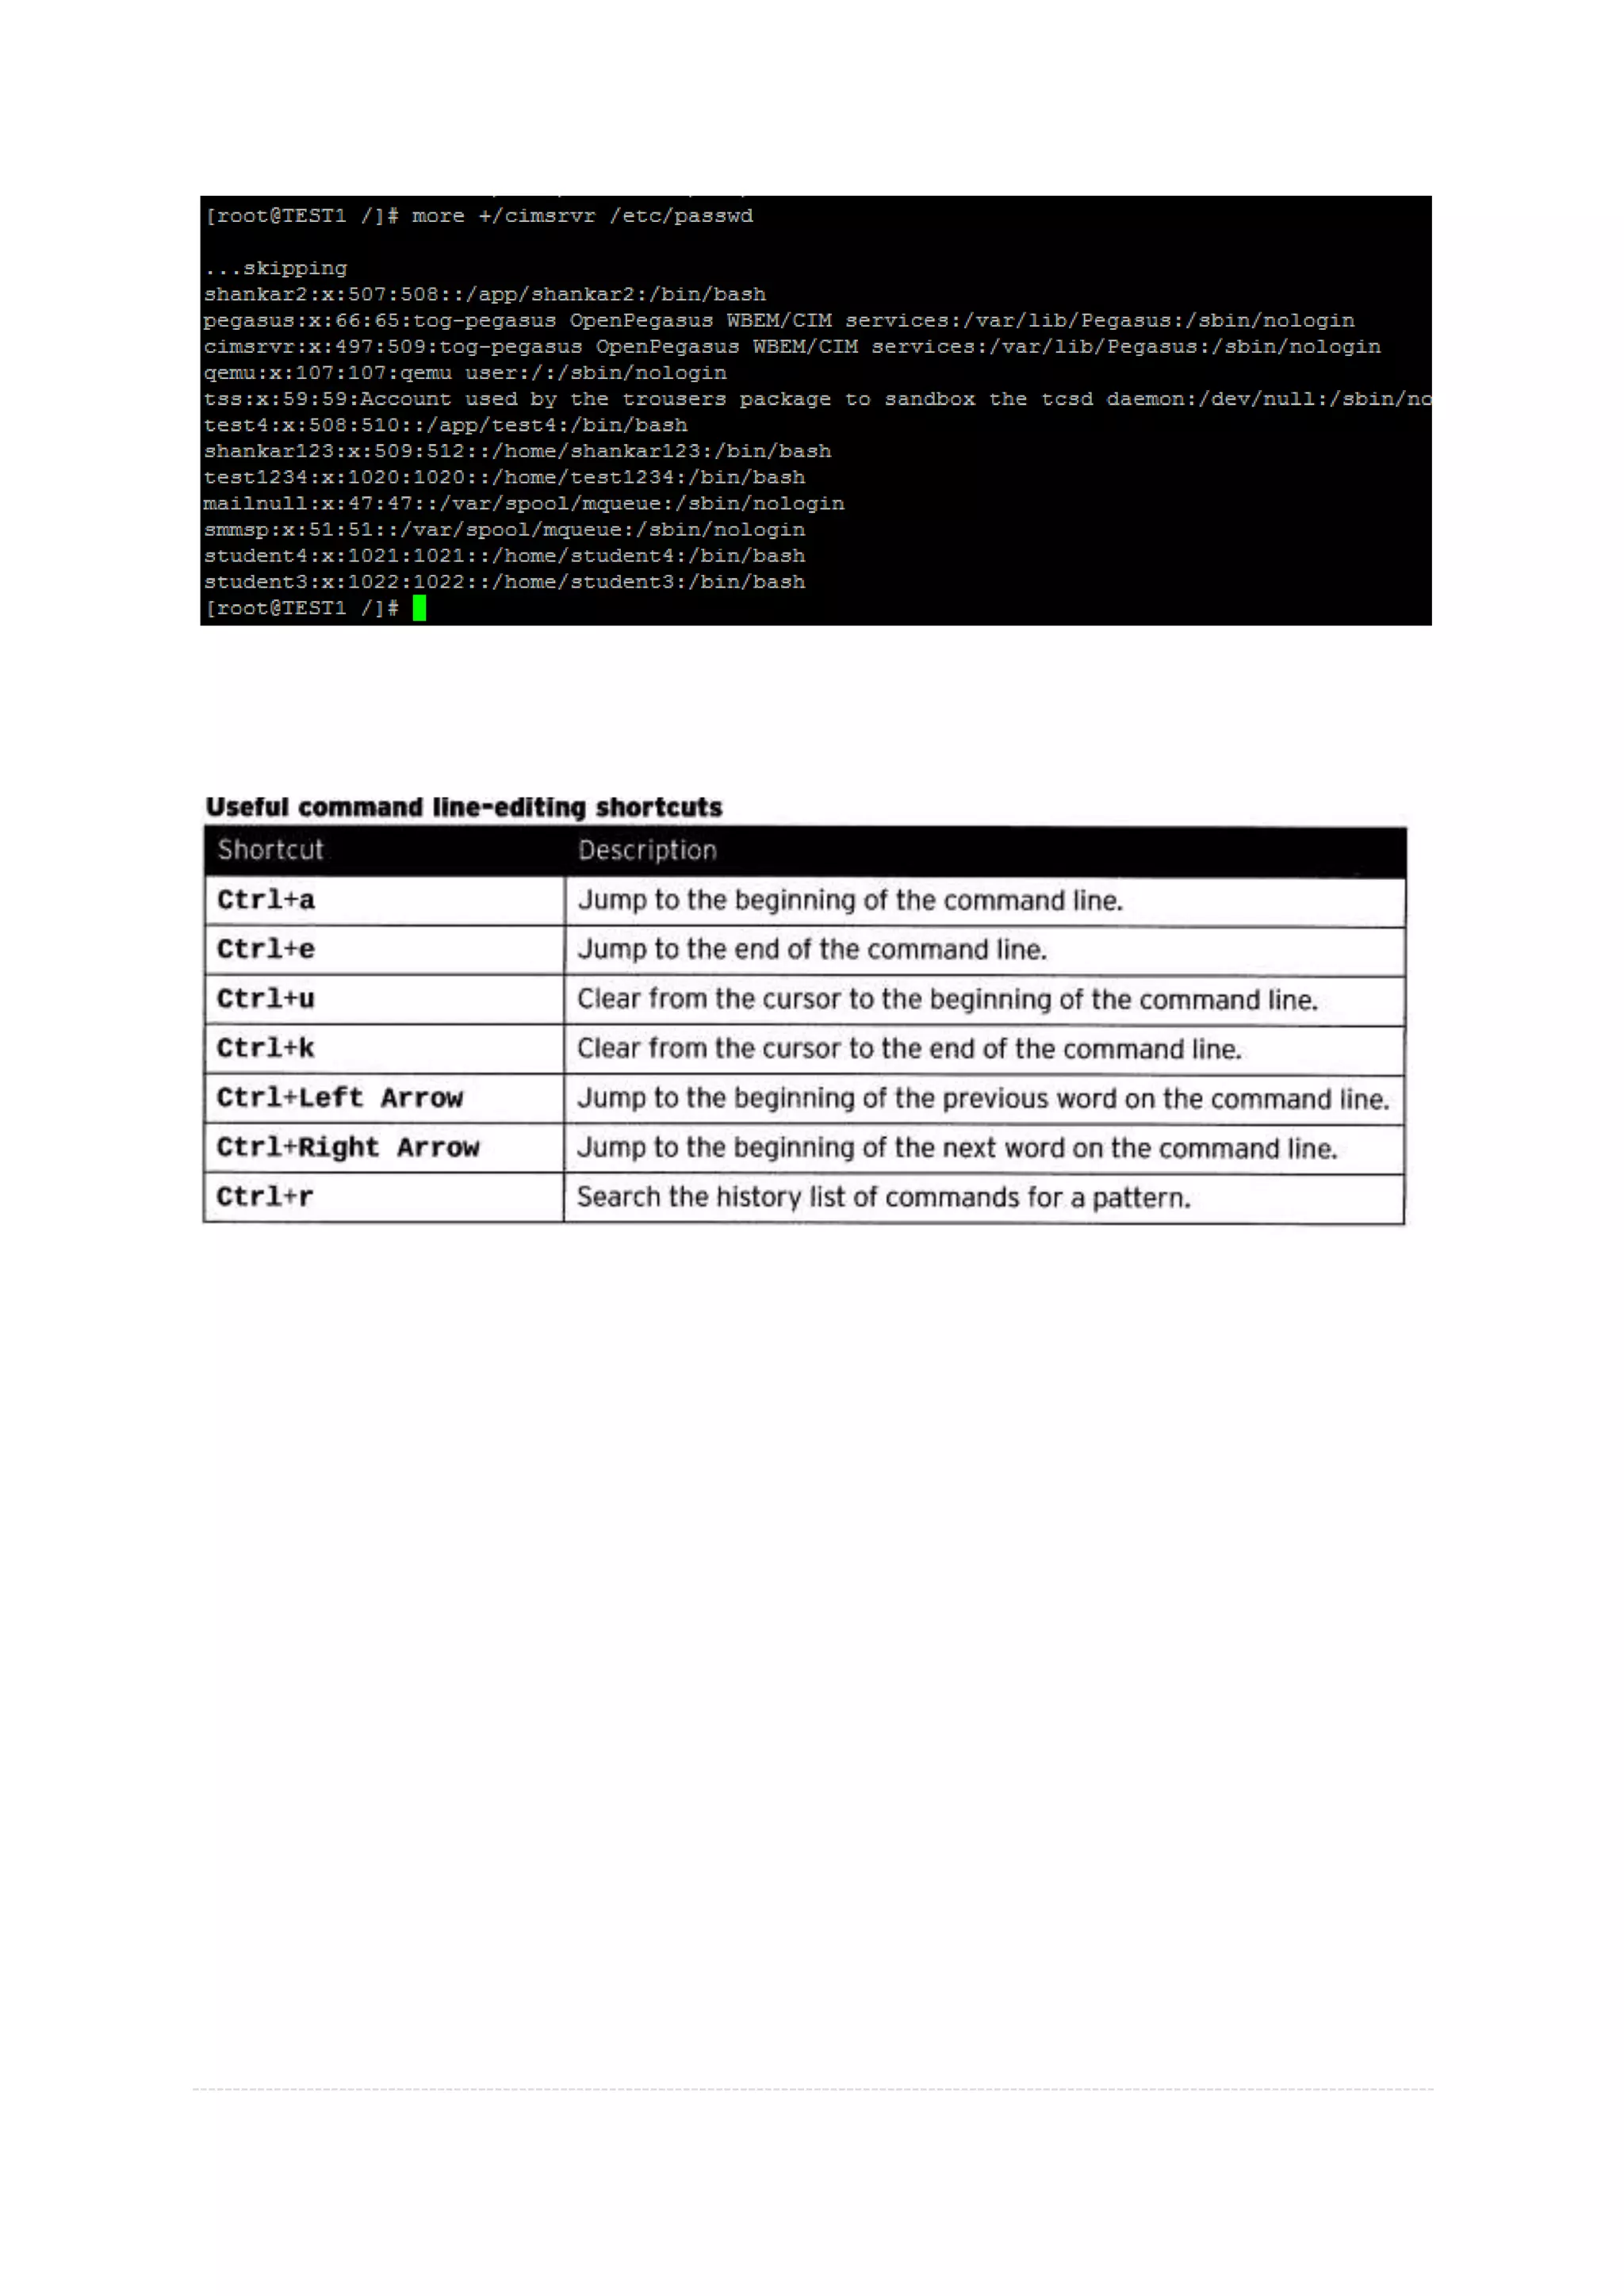
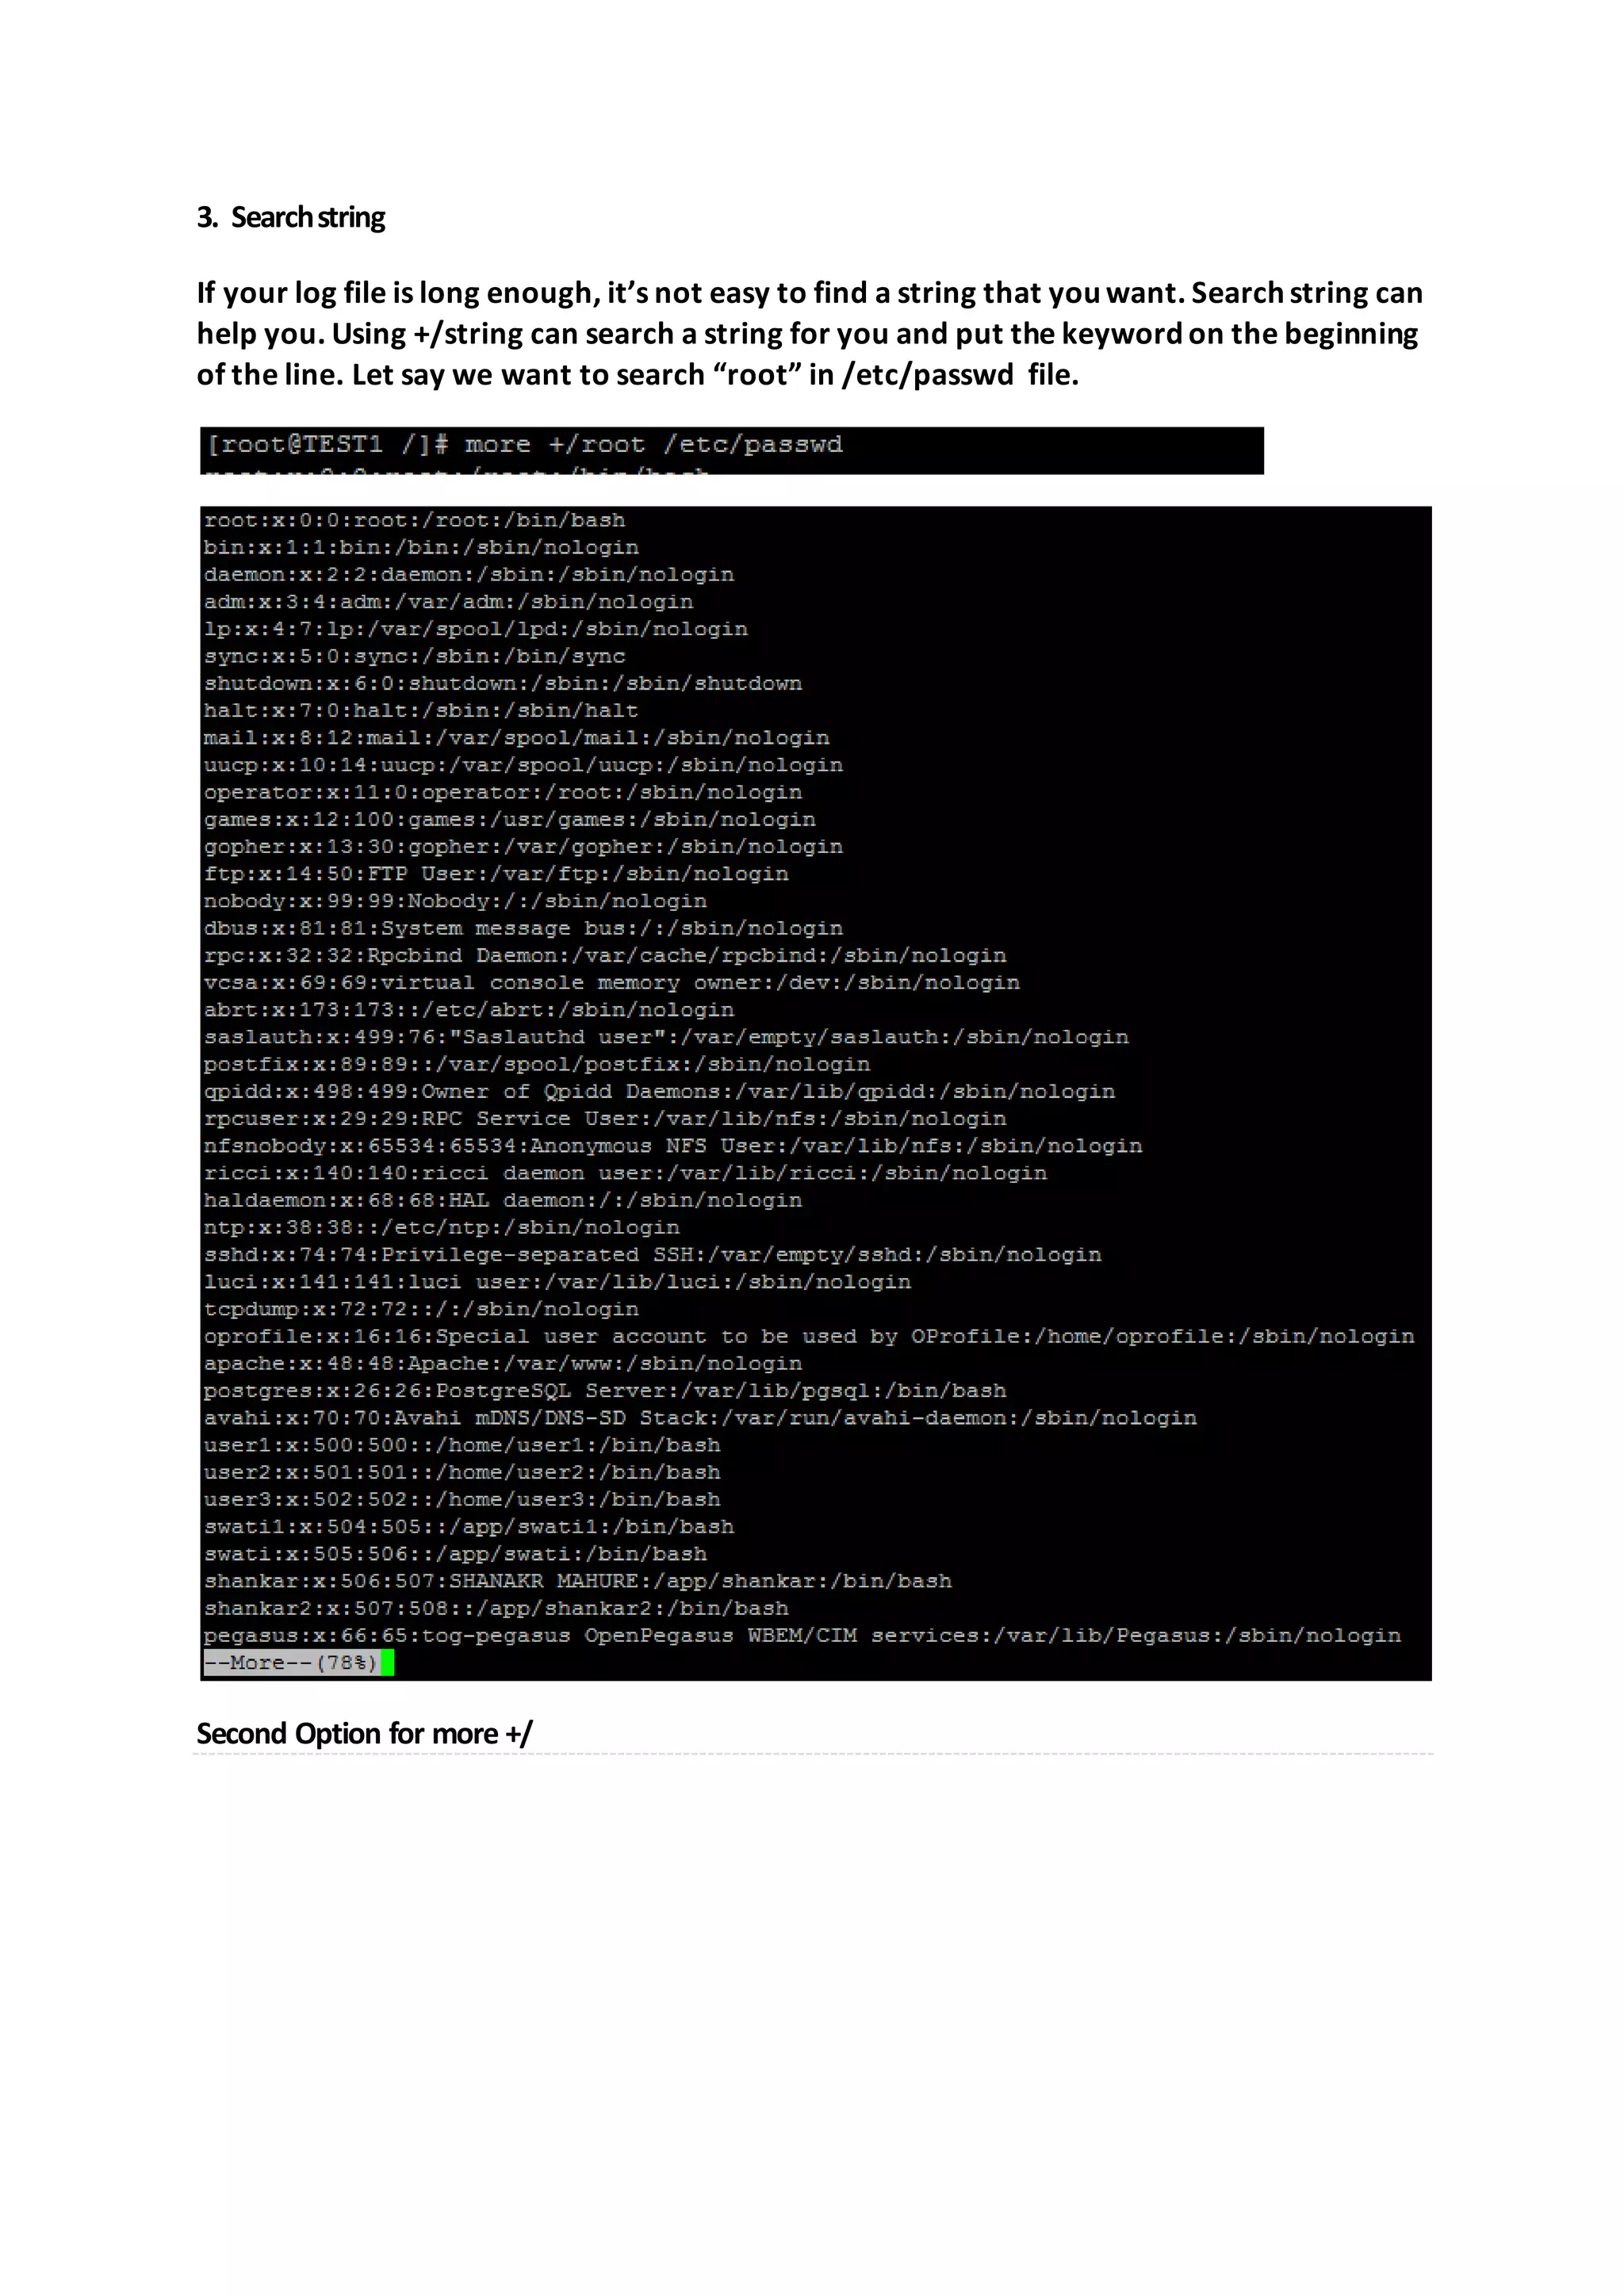
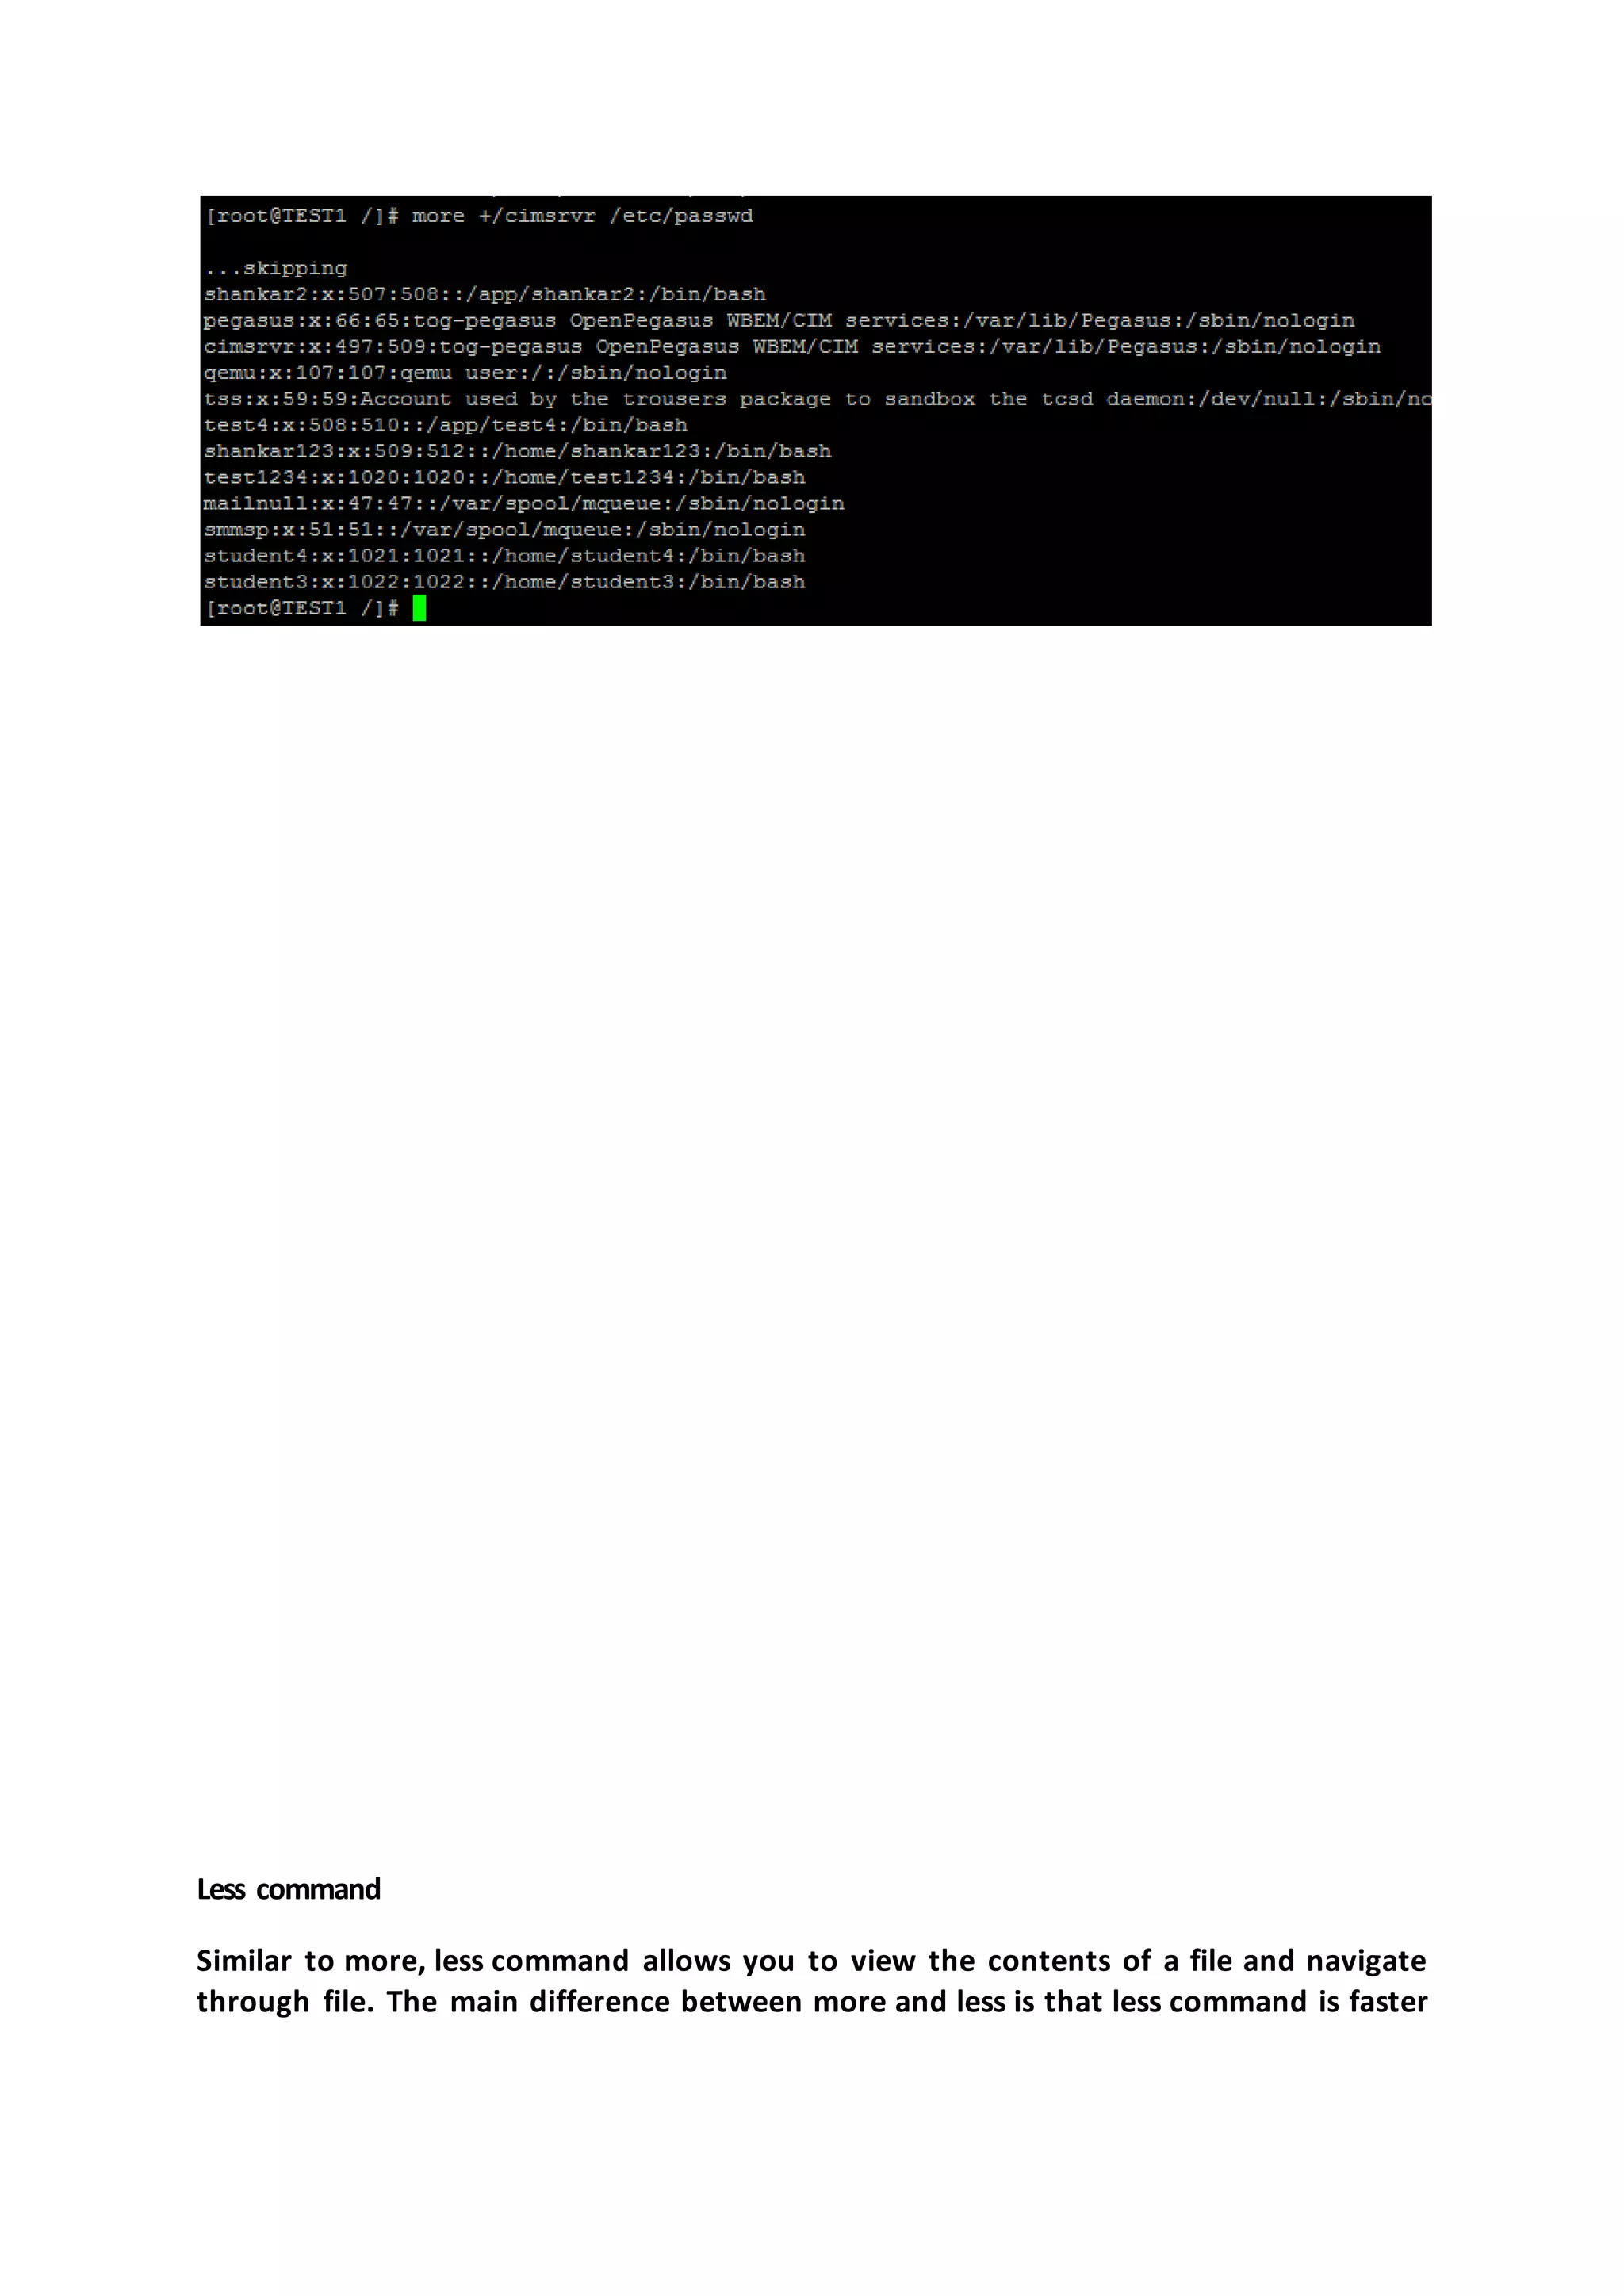
![You can use -f option to output the appended lines of file instantly as shown below. More Command Displays file contents one screen at a time. It shows page in %. The command-syntax is: more [options] [file_name] 1. more We see that an indicator on the bottom left. It show us number 78%. It means that the file is long enough, so the first page is 78% of the total page. To scroll down, use space button. Then we see that the indicator number is increased. 2. In order to display a file staring at a specific line number use the following syntax:](https://image.slidesharecdn.com/chapter3linuxbasiccommands-170414153108/75/Chapter-4-Linux-Basic-Commands-41-2048.jpg)
![because it does not load the entire file at once and allows navigation though file using page up/down keys. Syntax : less [option] filename Forward Search / – search for a pattern which will take you to the next occurrence. n – for next match in forward N – for previous match in backward G - go to end of file g - go to beginning of file q - to exit from file Screen Navigation * CTRL+D – forward half window * CTRL+U – backward half window * CTRL+F – forward one window * CTRL+B – backward one window 1. less command](https://image.slidesharecdn.com/chapter3linuxbasiccommands-170414153108/75/Chapter-4-Linux-Basic-Commands-44-2048.jpg)