Tinker源码解析-代码修复和资源修复
对于Tinker 的原理认识, 一直停留在粗放的认知层面上, 但是对于代码修复的细节原理, 关于资源修复原理, dex差分包的算法原理都没有亲自看一遍源码, 因此关于Tinker 会分为两篇进行源码解读工作.
Tinker 代码修复原理
补丁生效, 是在我们应用重启后生效的, 我们可以从TinkerApplication开始看下源码
private void onBaseContextAttached(Context base) { try { ... loadTinker(); mCurrentClassLoader = base.getClassLoader(); mInlineFence = createInlineFence(this, tinkerFlags, delegateClassName, tinkerLoadVerifyFlag, applicationStartElapsedTime, applicationStartMillisTime, tinkerResultIntent); TinkerInlineFenceAction.callOnBaseContextAttached(mInlineFence, base); //reset save mode if (useSafeMode) { ShareTinkerInternals.setSafeModeCount(this, 0); } } catch (TinkerRuntimeException e) { throw e; } catch (Throwable thr) { throw new TinkerRuntimeException(thr.getMessage(), thr); } } Tinker在application启动走到attachBaseContext 时, 会调用onBaseContextAttached , 最后走到loadTinker .loadTinker 主要做的就是通过TinkerApplication 的类加载器去加载loaderClassName, 如果开发者没有自定义配置, 那么这里加载的类就是TinkerLoader , 然后调用他的tryLoad 方法
// TinkerApplication.java private void loadTinker() { try { //reflect tinker loader, because loaderClass may be define by user! Class<?> tinkerLoadClass = Class.forName(loaderClassName, false, TinkerApplication.class.getClassLoader()); Method loadMethod = tinkerLoadClass.getMethod(TINKER_LOADER_METHOD, TinkerApplication.class); Constructor<?> constructor = tinkerLoadClass.getConstructor(); tinkerResultIntent = (Intent) loadMethod.invoke(constructor.newInstance(), this); } catch (Throwable e) { //has exception, put exception error code tinkerResultIntent = new Intent(); ShareIntentUtil.setIntentReturnCode(tinkerResultIntent, ShareConstants.ERROR_LOAD_PATCH_UNKNOWN_EXCEPTION); tinkerResultIntent.putExtra(INTENT_PATCH_EXCEPTION, e); } } // TinkerLoader.java public Intent tryLoad(TinkerApplication app) { Log.d(TAG, "tryLoad test test"); Intent resultIntent = new Intent(); long begin = SystemClock.elapsedRealtime(); tryLoadPatchFilesInternal(app, resultIntent); long cost = SystemClock.elapsedRealtime() - begin; ShareIntentUtil.setIntentPatchCostTime(resultIntent, cost); return resultIntent; } // TinkerLoader.java private void tryLoadPatchFilesInternal(TinkerApplication app, Intent resultIntent) { // 补丁加载前一些校验代码 ... final boolean isEnabledForDex = ShareTinkerInternals.isTinkerEnabledForDex(tinkerFlag); // 是否华为鸿蒙OS final boolean isArkHotRuning = ShareTinkerInternals.isArkHotRuning(); // 资源, dex, so的校验 ... //only work for art platform oat,because of interpret, refuse 4.4 art oat //android o use quicken default, we don't need to use interpret mode boolean isSystemOTA = ShareTinkerInternals.isVmArt() && ShareTinkerInternals.isSystemOTA(patchInfo.fingerPrint) && Build.VERSION.SDK_INT >= 21 && !ShareTinkerInternals.isAfterAndroidO(); //now we can load patch jar if (!isArkHotRuning && isEnabledForDex) { // 代码补丁加载 boolean loadTinkerJars = TinkerDexLoader.loadTinkerJars(app, patchVersionDirectory, oatDex, resultIntent, isSystemOTA, isProtectedApp); if (isSystemOTA) { // update fingerprint after load success patchInfo.fingerPrint = Build.FINGERPRINT; patchInfo.oatDir = loadTinkerJars ? ShareConstants.INTERPRET_DEX_OPTIMIZE_PATH : ShareConstants.DEFAULT_DEX_OPTIMIZE_PATH; // reset to false oatModeChanged = false; if (!SharePatchInfo.rewritePatchInfoFileWithLock(patchInfoFile, patchInfo, patchInfoLockFile)) { ShareIntentUtil.setIntentReturnCode(resultIntent, ShareConstants.ERROR_LOAD_PATCH_REWRITE_PATCH_INFO_FAIL); Log.w(TAG, "tryLoadPatchFiles:onReWritePatchInfoCorrupted"); return; } // update oat dir resultIntent.putExtra(ShareIntentUtil.INTENT_PATCH_OAT_DIR, patchInfo.oatDir); } if (!loadTinkerJars) { Log.w(TAG, "tryLoadPatchFiles:onPatchLoadDexesFail"); return; } } // 忽略鸿蒙适配代码 ... //now we can load patch resource if (isEnabledForResource) { // 资源补丁加载 boolean loadTinkerResources = TinkerResourceLoader.loadTinkerResources(app, patchVersionDirectory, resultIntent); if (!loadTinkerResources) { Log.w(TAG, "tryLoadPatchFiles:onPatchLoadResourcesFail"); return; } } // Init component hotplug support. if ((isEnabledForDex || isEnabledForArkHot) && isEnabledForResource) { ComponentHotplug.install(app, securityCheck); } // 省略部分代码 // 包括 杀死主进程以外tinker相关的进程 // 回调加载成功的通知 ... return; } TinkerLoader#tryLoadPatchFilesInternal 主要是做以下几件事情:
- Tinker 功能的验证(包括 Tinker是否打开, 清单文件的获取和校验)
- 当前执行进程的判断, 当前执行路径需要在主进程内
- 补丁文件, 补丁内容(包括dex, resource, so)与清单的校验, 并将相关信息对象存入对应列表对象
- 代码补丁的加载(TinkerDexLoader.loadTinkerJars)
- 资源补丁的加载(TinkerResourceLoader.loadTinkerResources)
- 杀死主进程以外的进程
基于大量代码, 这里就不列出来了, 在TinkerDexLoader.loadTinkerJars 主要是针对如果设置了tinkerLoadVerifyFlag , 则会进行一些md5安全校验, 然后针对OAT做的一些补丁优化处理, 然后通过SystemClassLoaderAdder.installDexes 执行安装补丁的工作
// SystemClassLoaderAdder.java public static void installDexes(Application application, ClassLoader loader, File dexOptDir, List<File> files, boolean isProtectedApp) throws Throwable { Log.i(TAG, "installDexes dexOptDir: " + dexOptDir.getAbsolutePath() + ", dex size:" + files.size()); if (!files.isEmpty()) { // 针对dex进行排序 files = createSortedAdditionalPathEntries(files); // 获取TinkerDexLoader的类加载器, 因为没有指定特定的类加载器处理, 所以用的应该是DVM下的PathClassloade ClassLoader classLoader = loader; // 非加固应用的apk并且sdk大于等于24 if (Build.VERSION.SDK_INT >= 24 && !isProtectedApp) { classLoader = NewClassLoaderInjector.inject(application, loader, dexOptDir, files); } else { //because in dalvik, if inner class is not the same classloader with it wrapper class. //it won't fail at dex2opt if (Build.VERSION.SDK_INT >= 23) { V23.install(classLoader, files, dexOptDir); } else if (Build.VERSION.SDK_INT >= 19) { V19.install(classLoader, files, dexOptDir); } else if (Build.VERSION.SDK_INT >= 14) { V14.install(classLoader, files, dexOptDir); } else { V4.install(classLoader, files, dexOptDir); } } //install done sPatchDexCount = files.size(); Log.i(TAG, "after loaded classloader: " + classLoader + ", dex size:" + sPatchDexCount); if (!checkDexInstall(classLoader)) { //reset patch dex SystemClassLoaderAdder.uninstallPatchDex(classLoader); throw new TinkerRuntimeException(ShareConstants.CHECK_DEX_INSTALL_FAIL); } } } 根据不同的sdk编译版本, tinker做了适配处理, 我们看下V23.install(classLoader, files, dexOptDir)
// V23.java private static void install(ClassLoader loader, List<File> additionalClassPathEntries, File optimizedDirectory) throws IllegalArgumentException, IllegalAccessException, NoSuchFieldException, InvocationTargetException, NoSuchMethodException, IOException { /* The patched class loader is expected to be a descendant of * dalvik.system.BaseDexClassLoader. We modify its * dalvik.system.DexPathList pathList field to append additional DEX * file entries. */ Field pathListField = ShareReflectUtil.findField(loader, "pathList"); Object dexPathList = pathListField.get(loader); ArrayList<IOException> suppressedExceptions = new ArrayList<IOException>(); ShareReflectUtil.expandFieldArray(dexPathList, "dexElements", makePathElements(dexPathList, new ArrayList<File>(additionalClassPathEntries), optimizedDirectory, suppressedExceptions)); if (suppressedExceptions.size() > 0) { for (IOException e : suppressedExceptions) { Log.w(TAG, "Exception in makePathElement", e); throw e; } } } 可以看到, 最终, Tinker是通过hook 类加载器内的的pathList对象, 通过调用`DexPathList#makeDexElements, 替换DexPathList对象内的dexElements集合对象, 至此就算Dex补丁加载完成.
Tinker 的代码补丁加载代码流程我们已经过了一遍, 回头我们再看下为什么代码补丁修复的原理, 首先我们需要理解类加载机制以及Android中的类加载器.
类加载机制以及Android的类加载器
我们都知道Android的类加载机制, 都是沿用了JVM的双亲委派模型, 那么什么是双亲委派模型?
双亲委派模型要求除了顶层的启动类加载器外, 其余的类加载器都应有自己的父类加载器. 当一个类加载器收到了类加载的请求, 它首先不会自己去尝试加载这个类, 而是把这个请求委派给父类加载器去完成, 每一个层次的类加载器都是如此, 因此所有的加载请求最终都应该传送到最顶层的启动类加载器中, 只有当父加载器反馈自己无法完成这个加载请求(它的搜索范围中没有找到所需的类)时, 子加载器才会尝试自己去完成加载. –<深入理解Java虚拟机>
要知道DVM中是否也是沿用双亲委派机制, 我们可以看下代码
// /libcore/ojluni/src/main/java/java/lang/ClassLoader.java protected Class<?> loadClass(String name, boolean resolve) throws ClassNotFoundException { // 检查对应的类是否已经被加载过了 // First, check if the class has already been loaded Class<?> c = findLoadedClass(name); if (c == null) { try { if (parent != null) { c = parent.loadClass(name, false); } else { c = findBootstrapClassOrNull(name); } } catch (ClassNotFoundException e) { // ClassNotFoundException thrown if class not found // from the non-null parent class loader // 如果父类加载器抛出, 说明父类加载器无法完成加载请求 } if (c == null) { // If still not found, then invoke findClass in order // to find the class. // 在父类加载器无法加载时 // 再调用本身的findClass方法来进行加载 c = findClass(name); } } return c; } 可以看出, 在Android中当需要加载一个类的时候, 也是沿用一样的机制, 当类已经加载, 则使用被加载的类, 否则调用父加载器的loadClass, 如果父加载器为空, 则使用启动类加载器作为父加载器, 如果父类加载器加载失败, 才调用自己的findClass方法进行加载.
Android的类加载器与JVM中的类加载器区别在于, 它加载的是Dex, 而不是Class文件, 我们看下8.0系统下Android类加载器的继承情况
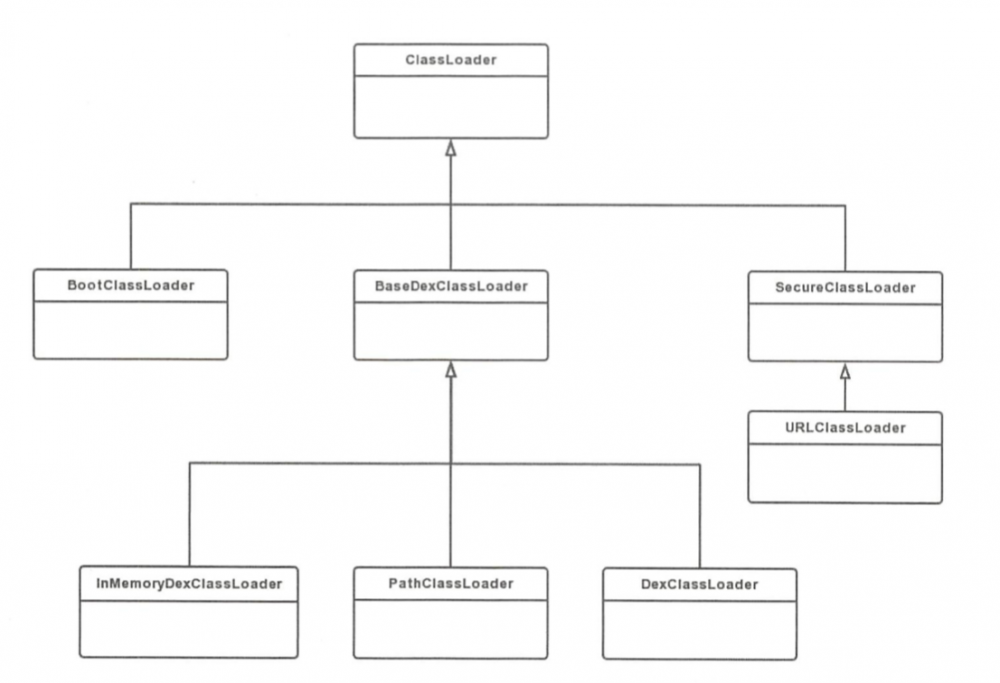
通过日志打印, 我们可以看到我们主要用到的ClassLoader是PathClassLoader
// /libcore/dalvik/src/main/java/dalvik/system/PathClassLoader.java public class PathClassLoader extends BaseDexClassLoader { public PathClassLoader(String dexPath, ClassLoader parent) { super(dexPath, null, null, parent); } public PathClassLoader(String dexPath, String librarySearchPath, ClassLoader parent) { super(dexPath, null, librarySearchPath, parent); } } PathClassLoader 是用来Android用来加载应用类和系统类的加载类, 构造函数的第一个入参dexPath 是dex相关文件路径集合, 通过”:”分隔,
librarySearchPath 表示so文件路径集合, 用文件分隔符分隔, 可能为空.它继承于BaseDexClassLoader , 具体方法由父类实现, 以下截取了部分代码,具体源码可以看 这里
public class BaseDexClassLoader extends ClassLoader { private final DexPathList pathList; public BaseDexClassLoader(String dexPath, File optimizedDirectory, String librarySearchPath, ClassLoader parent) { super(parent); this.pathList = new DexPathList(this, dexPath, librarySearchPath, null); } @Override protected Class<?> findClass(String name) throws ClassNotFoundException { List<Throwable> suppressedExceptions = new ArrayList<Throwable>(); // 通过DexPathList查找类 Class c = pathList.findClass(name, suppressedExceptions); if (c == null) { ClassNotFoundException cnfe = new ClassNotFoundException( "Didn't find class /"" + name + "/" on path: " + pathList); for (Throwable t : suppressedExceptions) { cnfe.addSuppressed(t); } throw cnfe; } return c; } @Override public String toString() { return getClass().getName() + "[" + pathList + "]"; } } 根据源码可以看到,BaseDexClassLoader 在创建的时候, 内部维护了一个DexPathList 对象, 当查找类, Resource, Dex或So的时候, 都是通过DexPathList 间接获取
// /libcore/dalvik/src/main/java/dalvik/system/DexPathList.java final class DexPathList { private Element[] dexElements; public DexPathList(ClassLoader definingContext, String dexPath, String librarySearchPath, File optimizedDirectory) { ... ArrayList<IOException> suppressedExceptions = new ArrayList<IOException>(); // save dexPath for BaseDexClassLoader this.dexElements = makeDexElements(splitDexPath(dexPath), optimizedDirectory, suppressedExceptions, definingContext); ... // 省略其他代码 } /** * 返回一个dex资源集合 * Makes an array of dex/resource path elements, one per element of * the given array. */ private static Element[] makeDexElements(List<File> files, File optimizedDirectory, List<IOException> suppressedExceptions, ClassLoader loader) { Element[] elements = new Element[files.size()]; int elementsPos = 0; /* * Open all files and load the (direct or contained) dex files up front. */ for (File file : files) { if (file.isDirectory()) { // We support directories for looking up resources. Looking up resources in // directories is useful for running libcore tests. elements[elementsPos++] = new Element(file); } else if (file.isFile()) { String name = file.getName(); if (name.endsWith(DEX_SUFFIX)) { // Raw dex file (not inside a zip/jar). try { DexFile dex = loadDexFile(file, optimizedDirectory, loader, elements); if (dex != null) { elements[elementsPos++] = new Element(dex, null); } } catch (IOException suppressed) { System.logE("Unable to load dex file: " + file, suppressed); suppressedExceptions.add(suppressed); } } else { DexFile dex = null; try { dex = loadDexFile(file, optimizedDirectory, loader, elements); } catch (IOException suppressed) { /* * IOException might get thrown "legitimately" by the DexFile constructor if * the zip file turns out to be resource-only (that is, no classes.dex file * in it). * Let dex == null and hang on to the exception to add to the tea-leaves for * when findClass returns null. */ suppressedExceptions.add(suppressed); } if (dex == null) { elements[elementsPos++] = new Element(file); } else { elements[elementsPos++] = new Element(dex, file); } } } else { System.logW("ClassLoader referenced unknown path: " + file); } } if (elementsPos != elements.length) { elements = Arrays.copyOf(elements, elementsPos); } return elements; } private static DexFile loadDexFile(File file, File optimizedDirectory, ClassLoader loader, Element[] elements) throws IOException { if (optimizedDirectory == null) { return new DexFile(file, loader, elements); } else { String optimizedPath = optimizedPathFor(file, optimizedDirectory); return DexFile.loadDex(file.getPath(), optimizedPath, 0, loader, elements); } } /** * Finds the named class in one of the dex files pointed at by * this instance. This will find the one in the earliest listed * path element. If the class is found but has not yet been * defined, then this method will define it in the defining * context that this instance was constructed with. * * @param name of class to find * @param suppressed exceptions encountered whilst finding the class * @return the named class or {@code null} if the class is not * found in any of the dex files */ public Class<?> findClass(String name, List<Throwable> suppressed) { for (Element element : dexElements) { Class<?> clazz = element.findClass(name, definingContext, suppressed); if (clazz != null) { return clazz; } } if (dexElementsSuppressedExceptions != null) { suppressed.addAll(Arrays.asList(dexElementsSuppressedExceptions)); } return null; } } PathClassLoader在找一个类的时候, 通过DexPathList#findClass, 会内部对dexElements 数组进行遍历, 实际通过Element#findClass 去找类, 如果找到则立即返回, 而dexElements 数组对象, 在DexPathList 初始化时, 通过makeDexElements 方法构造对应数组, 这里Element 是DexPathList的静态内部类, 它的findClass方法最终调用到了DexFile#loadClassBinaryName 方法
/*package*/ static class Element { /** * A file denoting a zip file (in case of a resource jar or a dex jar), or a directory * (only when dexFile is null). */ private final File path; private final DexFile dexFile; private ClassPathURLStreamHandler urlHandler; private boolean initialized; /** * Element encapsulates a dex file. This may be a plain dex file (in which case dexZipPath * should be null), or a jar (in which case dexZipPath should denote the zip file). */ public Element(DexFile dexFile, File dexZipPath) { this.dexFile = dexFile; this.path = dexZipPath; } public Element(DexFile dexFile) { this.dexFile = dexFile; this.path = null; } public Element(File path) { this.path = path; this.dexFile = null; } public Class<?> findClass(String name, ClassLoader definingContext, List<Throwable> suppressed) { return dexFile != null ? dexFile.loadClassBinaryName(name, definingContext, suppressed) : null; } } 由此我们大概理顺了Tinker代码修复的原理:
- 根据类加载机制, 当一个类被加载后, 当再次请求加载类时, 会先判断对应请求类是否已加载, 如果已加载, 则直接返回
- 则Tinker只要保证包含修复代码的dex在原来的dex之前被加载, 即可保证修复生效
- 因为Tinker会针对dex进行排序, 新dex放在之前, 自行生成的testDex放在最后
- 通过hook获取
BaseDexClassLoader内部的pathList对象, 通过DexPathList的makeDexElements方法重新设置内部elements数组, 使得ClassLoader在调用findClass的时候, 可以首先去找到补丁相关的类, 使得后面orginal class不会被加载
Tinker 资源修复
资源加载与获取流程
在看Tinker 资源修复原理之前, 我们需要了解下资源的获取和加载原理.当我们在调用getResources 时, 实际调用的是内部mBase 的getResources , 已知, Activity继承于ContextWrapper , 它内部维护一个ContextImpl 类的mBase 对象(见下图), 所以我们主要看的是ContextImpl#getResource 方法

ContextImpl#getResource 是获取内部的mResources ,它是通过ContextImpl#createResources 赋值生成, 而它的内部是通过ResourceManager 去获取Resource
private static Resources createResources(IBinder activityToken, LoadedApk pi, String splitName, int displayId, Configuration overrideConfig, CompatibilityInfo compatInfo) { final String[] splitResDirs; final ClassLoader classLoader; try { splitResDirs = pi.getSplitPaths(splitName); classLoader = pi.getSplitClassLoader(splitName); } catch (NameNotFoundException e) { throw new RuntimeException(e); } return ResourcesManager.getInstance().getResources(activityToken, pi.getResDir(), splitResDirs, pi.getOverlayDirs(), pi.getApplicationInfo().sharedLibraryFiles, displayId, overrideConfig, compatInfo, classLoader); } ResourceManager 是个单例, 内部维护了以ResourcesKey 为key的ResourcesImpl 缓存集合, 当调用getResources 的时候, 首先会去match缓存中的resourceImpl, 当无法命中的情况下, 则创建新的ResourceImpl 对象,ResourceImpl 是Resource 的具体实现
public @Nullable Resources getResources(@Nullable IBinder activityToken, @Nullable String resDir, @Nullable String[] splitResDirs, @Nullable String[] overlayDirs, @Nullable String[] libDirs, int displayId, @Nullable Configuration overrideConfig, @NonNull CompatibilityInfo compatInfo, @Nullable ClassLoader classLoader) { final ResourcesKey key = new ResourcesKey( resDir, splitResDirs, overlayDirs, libDirs, displayId, overrideConfig != null ? new Configuration(overrideConfig) : null, // Copy compatInfo); classLoader = classLoader != null ? classLoader : ClassLoader.getSystemClassLoader(); return getOrCreateResources(activityToken, key, classLoader); } 我们可以看下新建Resource的相关代码
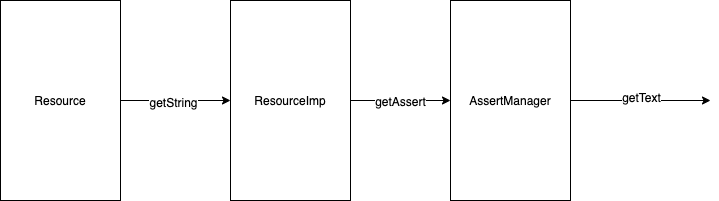
private @Nullable Resources getOrCreateResources(@Nullable IBinder activityToken, @NonNull ResourcesKey key, @NonNull ClassLoader classLoader) { synchronized (this) { // 省略掉通过getOrCreateResourcesForActivityLocked / getOrCreateResourcesLocked查找缓存的相关代码逻辑 ... // If we're here, we didn't find a suitable ResourcesImpl to use, so create one now. // 如果不存在对应的缓存, 则新建ResourcesImpl对象 ResourcesImpl resourcesImpl = createResourcesImpl(key); if (resourcesImpl == null) { return null; } synchronized (this) { ResourcesImpl existingResourcesImpl = findResourcesImplForKeyLocked(key); if (existingResourcesImpl != null) { resourcesImpl.getAssets().close(); resourcesImpl = existingResourcesImpl; } else { // Add this ResourcesImpl to the cache. // 缓存更新 mResourceImpls.put(key, new WeakReference<>(resourcesImpl)); } final Resources resources; if (activityToken != null) { resources = getOrCreateResourcesForActivityLocked(activityToken, classLoader, resourcesImpl, key.mCompatInfo); } else { resources = getOrCreateResourcesLocked(classLoader, resourcesImpl, key.mCompatInfo); } return resources; } } private @Nullable ResourcesImpl createResourcesImpl(@NonNull ResourcesKey key) { final DisplayAdjustments daj = new DisplayAdjustments(key.mOverrideConfiguration); daj.setCompatibilityInfo(key.mCompatInfo); // 创建AssertManager final AssetManager assets = createAssetManager(key); if (assets == null) { return null; } final DisplayMetrics dm = getDisplayMetrics(key.mDisplayId, daj); final Configuration config = generateConfig(key, dm); // 创建新的 ResourcesImpl 对象, 并持有AssetManager对象引用 final ResourcesImpl impl = new ResourcesImpl(assets, dm, config, daj); return impl; } protected @Nullable AssetManager createAssetManager(@NonNull final ResourcesKey key) { AssetManager assets = new AssetManager(); // resDir can be null if the 'android' package is creating a new Resources object. // This is fine, since each AssetManager automatically loads the 'android' package // already. if (key.mResDir != null) { if (assets.addAssetPath(key.mResDir) == 0) { Log.e(TAG, "failed to add asset path " + key.mResDir); return null; } } if (key.mSplitResDirs != null) { for (final String splitResDir : key.mSplitResDirs) { if (assets.addAssetPath(splitResDir) == 0) { Log.e(TAG, "failed to add split asset path " + splitResDir); return null; } } } if (key.mOverlayDirs != null) { for (final String idmapPath : key.mOverlayDirs) { assets.addOverlayPath(idmapPath); } } if (key.mLibDirs != null) { for (final String libDir : key.mLibDirs) { if (libDir.endsWith(".apk")) { // Avoid opening files we know do not have resources, // like code-only .jar files. if (assets.addAssetPathAsSharedLibrary(libDir) == 0) { Log.w(TAG, "Asset path '" + libDir + "' does not exist or contains no resources."); } } } } return assets; } 可以看到, 创建Resource, 主要是新建AssertManager对象, 通过addAssetPath 方法新增资源对应路径维护, 并将对应实例由新建的ResourceImpl 对象内部持有. 而Resource 的真正实现类为ResourceImpl , 以Resource#getString 为例, 它通过mResourcesImpl.getAssets().getResourceText(id) 实现, 可以看出, 针对资源的访问, 最终都是与AssertManager有关, 相关简化流程可看下图
那么如果我们来做资源修复, 应该就是需要针对ResourceManager单例里维护的Resources缓存进行处理, 使得对应创建Resource的时候, 可以通过AssertManager#addAssetPath 新增新的资源路径达到资源修复的效果.下面我们来看下Tinker 是怎么做的.
Tinker 资源修复
上一大节, 我们知道资源修复相关入口代码在TinkerResourceLoader#loadTinkerResources
public static boolean loadTinkerResources(TinkerApplication application, String directory, Intent intentResult) { if (resPatchInfo == null || resPatchInfo.resArscMd5 == null) { return true; } String resourceString = directory + "/" + RESOURCE_PATH + "/" + RESOURCE_FILE; File resourceFile = new File(resourceString); // 省略安全校验代码 ... // 删除加载失败情况下卸载补丁的相关catch代码 TinkerResourcePatcher.monkeyPatchExistingResources(application, resourceString); // 忽略tiker针对运行时资源加载的监控相关代码 ... return true; } 然后是资源修复的核心代码, 继续往下看
public static void monkeyPatchExistingResources(Context context, String externalResourceFile) throws Throwable { final ApplicationInfo appInfo = context.getApplicationInfo(); final Field[] packagesFields; // packagesFiled 为 ActivityThread里的mPackages对象, 为ArrayMap类型, key为包名, value为LoadedApk // resourcePackagesFiled 为 ActivityThread里的mResourcePackages对象, 为ArrayMap类型, key为包名, value为LoadedApk if (Build.VERSION.SDK_INT < 27) { packagesFields = new Field[]{packagesFiled, resourcePackagesFiled}; } else { packagesFields = new Field[]{packagesFiled}; } // 遍历 packagesFields, 获取所有loadedApk for (Field field : packagesFields) { final Object value = field.get(currentActivityThread); for (Map.Entry<String, WeakReference<?>> entry : ((Map<String, WeakReference<?>>) value).entrySet()) { final Object loadedApk = entry.getValue().get(); if (loadedApk == null) { continue; } // resDir 为LoadedApk内mResDir对象, 即资源文件路径 final String resDirPath = (String) resDir.get(loadedApk); if (appInfo.sourceDir.equals(resDirPath)) { // 通过hook 将resDir设置为补丁资源文件路径 resDir.set(loadedApk, externalResourceFile); } } } // Create a new AssetManager instance and point it to the resources installed under // 创建新的assetManager对象, 并且通过反射调用addAssetPath方法, 添加补丁资源路径 if (((Integer) addAssetPathMethod.invoke(newAssetManager, externalResourceFile)) == 0) { throw new IllegalStateException("Could not create new AssetManager"); } // Kitkat needs this method call, Lollipop doesn't. However, it doesn't seem to cause any harm // in L, so we do it unconditionally. if (stringBlocksField != null && ensureStringBlocksMethod != null) { stringBlocksField.set(newAssetManager, null); ensureStringBlocksMethod.invoke(newAssetManager); } // 遍历ResourceManager内的resource缓存集合 // 进行遍历 for (WeakReference<Resources> wr : references) { final Resources resources = wr.get(); if (resources == null) { continue; } // Set the AssetManager of the Resources instance to our brand new one // 将resourceImpl内的mAssets对象通过hook设置为上面新建的assertManager try { //pre-N // assetsFiled 为 resourceImpl内的mAssets // 将resourceImpl内的assertManager对象替换为我们新建的对象 assetsFiled.set(resources, newAssetManager); } catch (Throwable ignore) { // N final Object resourceImpl = resourcesImplFiled.get(resources); // for Huawei HwResourcesImpl final Field implAssets = findField(resourceImpl, "mAssets"); implAssets.set(resourceImpl, newAssetManager); } // Resources内部存在针对TypedArrays的缓存池, 需要清除, 防止获取到的还是老的资源 clearPreloadTypedArrayIssue(resources); // 更新资源 resources.updateConfiguration(resources.getConfiguration(), resources.getDisplayMetrics()); } // 忽略Android N上针对webview的问题适配 ... // 通过打开补丁里的only_use_to_test_tinker_resource.txt tinker内部测试资源文件, 来验证资源是否加载成功 if (!checkResUpdate(context)) { throw new TinkerRuntimeException(ShareConstants.CHECK_RES_INSTALL_FAIL); } } 可以看出Tinker的资源修复步骤如下:
AssetManager#addAssetPath
参考
- 《Android 进阶解密》
- 《深入理解JVM 第三版》
- Tinker Github Wiki
- Android 热修复 Tinker接入及源码浅析
- Android 资源加载机制剖析
- 插件化资源处理
正文到此结束
- 本文标签: 安全 Security GitHub ArrayList update tab key rand Ipo src 配置 cache Android 类加载器 ssl struct REST expat message Bootstrap token ssh 源码 实例 tk tar lib 安装 ORM App synchronized web ip 插件 cat 删除 IDE 模型 java URLs tag classpath build map constant CTO JVM rewrite db list 进程 http 开发者 id 遍历 stream 测试 https final HBase Action 代码 equals zip cmd value find core UI IO 解析 缓存 编译 git 开发
- 版权声明: 本文为互联网转载文章,出处已在文章中说明(部分除外)。如果侵权,请联系本站长删除,谢谢。
- 本文海报: 生成海报一 生成海报二
热门推荐


相关文章

近期评论
-
不会英语啊。
-
前100名用户会展示特殊的纪念徽章
-
-
https://pplx.ai/floraliu4199466 这个链接打不开是什么原因?
-
-
-
-
来看看,最近更新了一波,顺着友联过来的,几年过去了,网站越搞越好,厉害
-
哥太牛了
-
是呀,看您的IP显示在美国,还以为您移民了
Loading...
![[HBLOG]公众号](https://www.liuhaihua.cn/img/qrcode_gzh.jpg)

