用 Spring Boot 打包你的 React 应用
先讲一讲这篇文章的背景故事。之前我的团队需要在我们需求的基础架构上节省一些资金,并且由于我们要构建的这个应用程序中,大部分负载都会在客户端而非服务端上,所以我们决定试验一下能否将一个 Spring 应用程序与一个 React 应用结合起来,并打包成一个 war 文件。
这篇文章会告诉你如何将 Create React App 与 Spring Boot 结合使用,从而为你打包出单个 war 文件。
Spring Boot 和 Create React App 的基本功能介绍
- Create React App 可帮助你非常快速地启动 React 项目。它为你提供了启动并尽快运行项目所需的全部基本功能。
- Spring Boot 可以帮助你快速而轻松地启动和维护 Spring 应用程序。
步骤
1. 目标
- 在单一 war 文件中包含前端和后端,具有优化的生产构建
- 保留 Create React App 所提供的好处,如热重载等
2. 设置
- 必须安装 Java。前往此处下载( https://www.oracle.com/java/technologies/javase-downloads.html )
- 必须安装 Maven。对于 Mac,我使用的是 Homebrew(brew install maven);其他情况请转到此处( https://maven.apache.org/install.html )
- 必须安装 Node。对于 Mac,我使用的是 Homebrew(brew install node);其他情况请转到此处( https://nodejs.org/en/download/ )
附注:我选择的 IDE 是 IntelliJ。当使用 React 代码时,我通常会切换到 VS Code。你可以随意使用自己习惯的方法
- 在 Github 上创建一个空的仓库,并添加自述文件、gitignore 和许可证等。
- 转到( https://start.spring.io )创建你的 Spring 应用程序,并下载到本地。Group 和 Artifact 也可以随意设置。
GroupId:e.the.awesome
Artifact:spring-react-combo-app
3. 将下载的项目解压缩到你的 git 目录中并提交。
你的 SpringReactComboAppApplication 看起来应该像这样。
复制代码
packagee.the.awesome.springreactcomboapp; importorg.springframework.boot.SpringApplication; importorg.springframework.boot.autoconfigure.SpringBootApplication; importorg.springframework.boot.web.servlet.support.SpringBootServletInitializer; @SpringBootApplication publicclassSpringReactComboAppApplicationextendsSpringBootServletInitializer{ public static void main(String[] args) { SpringApplication.run(SpringReactComboAppApplication.class,args); } } 4. 现在创建一个基本服务。
我们将其称为 DadJokesController。这应该在与 SpringReactComboAppApplication 文件所在的文件夹中创建。我知道这不是正确的 Rest API 格式,但现在暂时忽略它。
复制代码
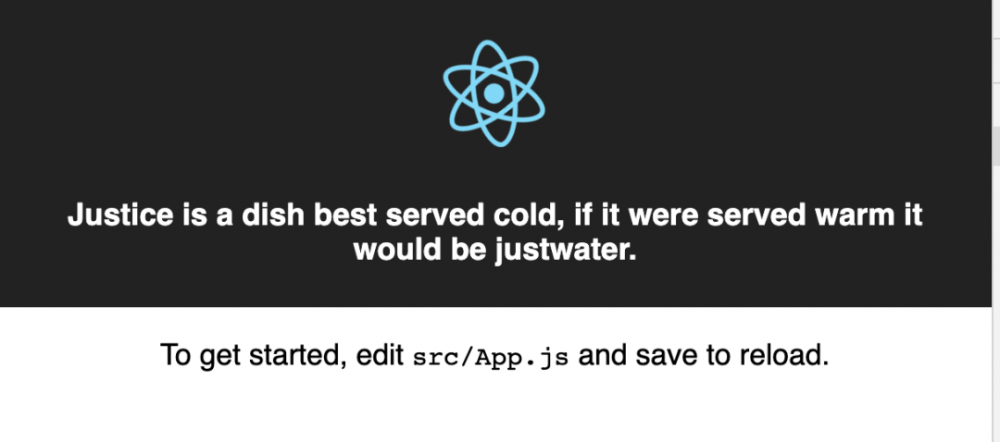
package e.the.awesome.springreactcomboapp; import org.springframework.web.bind.annotation.GetMapping; import org.springframework.web.bind.annotation.RestController; @RestController publicclassDadJokesController{ @GetMapping("/api/dadjokes") public String dadJokes() { return"Justice is a dish best served cold, if it were served warm it would be just water."; } } 5. 在你的终端运行
复制代码
mvnspring-boot:run
然后在浏览器中检查 http://localhost:8080/api/dadjokes 。你应该会看到我们添加到控制器中的 dad joke。
6. 要创建你的 React 应用,只需在根目录中运行
复制代码
npxcreate-react-appbasic-frontend-app
你可以随心所欲地调用它,我这里只调用我的 basic-frontend-app
7. 要运行前端应用程序:
复制代码
cdbasic-frontend-app<br>npm start
8. 解决代理问题
由于我们要将 Dad Jokes 服务集成到前端,因此首先我们要解决代理问题。你可能已经注意到了,你的服务从 localhost:8080 开始,而前端从 localhost:3000 开始。如果我们尝试从前端调用服务,具体取决于你的浏览器,你可能会收到一个 CORS 错误。

解决此问题的最简单方法是让前端代理处理从端口 3000 到 8080 的所有请求。此更改将在 package.json 文件中进行:
复制代码
{ "name":"basic-frontend-app", "version":"0.1.0", "private":true, "dependencies": { "react":"^16.3.1", "react-dom":"^16.3.1", "react-scripts":"1.1.4" }, "scripts": { "start":"react-scripts start", "build":"react-scripts build", "test":"react-scripts test --env=jsdom", "eject":"react-scripts eject" }, "proxy": { "/api": { "target":"http://localhost:8080", "ws":true } } } 将以下内容添加到你的前端 App.js 文件中
复制代码
importReact, {Component}from'react'; importlogofrom'./logo.svg'; import'./App.css'; classAppextendsComponent{ state = {}; componentDidMount() { this.dadJokes() } dadJokes =()=>{ fetch('/api/dadjokes') .then(response=>response.text()) .then(message=>{ this.setState({message: message}); }); }; render() { return( <divclassName="App"> <headerclassName="App-header"> <imgsrc={logo}className="App-logo"alt="logo"/> <h3className="App-title">{this.state.message}</h3> </header> <pclassName="App-intro"> To get started, edit<code>src/App.js</code>and save to reload. </p> </div> ); } } export default App; 如果你也遇到了下图的这个错误,我的做法是:首先删除了 package-lock.json 文件;其次在 node_modules 文件夹中重新安装了 npm 包并再次运行;然后重新启动前端,问题就解决了。

9. 你的应用程序现在应该看起来像这样。
你可以看到 dad jokes API 调用的结果。
10. 创建生产版本
现在我们的基本前端和后端已经完成,该创建生产版本和单个 war 文件了。
在< dependencies>下添加
复制代码
<!-- https://mvnrepository.com/artifact/com.github.eirslett/frontend-maven-plugin --> <dependency> <groupId>com.github.eirslett</groupId> <artifactId>frontend-maven-plugin</artifactId> <version>1.6</version> </dependency>
在 pom 文件的 < plugins> 部分下,我们将添加以下命令,这些命令将在运行 mvn clean install 时执行以下操作。
- npm 安装指定版本的 node
- 运行我们前端的生产构建
- 存放生产构建
复制代码
<plugin> <groupId>com.github.eirslett</groupId> <artifactId>frontend-maven-plugin</artifactId> <version>1.6</version> <configuration> <workingDirectory>basic-frontend-app</workingDirectory> <installDirectory>target</installDirectory> </configuration> <executions> <execution> <id>install node and npm</id> <goals> <goal>install-node-and-npm</goal> </goals> <configuration> <nodeVersion>v8.9.4</nodeVersion> <npmVersion>5.6.0</npmVersion> </configuration> </execution> <execution> <id>npm install</id> <goals> <goal>npm</goal> </goals> <configuration> <arguments>install</arguments> </configuration> </execution> <execution> <id>npm run build</id> <goals> <goal>npm</goal> </goals> <configuration> <arguments>run build</arguments> </configuration> </execution> </executions> </plugin> <plugin> <artifactId>maven-antrun-plugin</artifactId> <executions> <execution> <phase>generate-resources</phase> <configuration> <target> <copytodir="${project.build.directory}/classes/public"> <filesetdir="${project.basedir}/basic-frontend-app/build"/> </copy> </target> </configuration> <goals> <goal>run</goal> </goals> </execution> </executions> </plugin> 附注:对于你的插件来说,顺序正确是很重要的,因此请确保在复制构建文件执行之前执行 node/npm 安装
11. 运行 mvn clean install
添加此命令后,运行 mvn clean install,并验证 target/classes 目录同时包含了前端文件和 Java 文件。这里你应该是一路畅通的。
最后看一下我的 pom 文件:
https://github.com/Emmanuella-Aninye/Spring-Boot-ReactJS-Starter/blob/master/pom.xml
这就是我的方法。如果你想看看 repo 或使用它,可以在我的 Github 上找到它:
https://github.com/Emmanuella-Aninye/Spring-Boot-ReactJS-Starter
延伸阅读:
https://hackernoon.com/package-your-react-app-with-spring-boot-a-how-to-guide-cdfm329w
正文到此结束
- 本文标签: servlet 下载 map springboot CTO node build js MQ CSS spring json 文章 cat Spring Boot 需求 端口 dependencies https IO IDE 目录 DOM pom 删除 资金 id 代码 web REST git plugin UI logo HTML maven http Oracle 服务端 GitHub apache 插件 ip message 安装 Proxy App db src tar Master API java XML
- 版权声明: 本文为互联网转载文章,出处已在文章中说明(部分除外)。如果侵权,请联系本站长删除,谢谢。
- 本文海报: 生成海报一 生成海报二
热门推荐


相关文章

近期评论
-
不会英语啊。
-
前100名用户会展示特殊的纪念徽章
-
-
https://pplx.ai/floraliu4199466 这个链接打不开是什么原因?
-
-
-
-
来看看,最近更新了一波,顺着友联过来的,几年过去了,网站越搞越好,厉害
-
哥太牛了
-
是呀,看您的IP显示在美国,还以为您移民了
Loading...
![[HBLOG]公众号](https://www.liuhaihua.cn/img/qrcode_gzh.jpg)

