Well bakers… another advent calendar is coming to an end. I hope you enjoyed all of the topics covered each day. We are also closing the year with so much gratitude. 2025 was the 20th year of CakePHP, can you believe it? We had an amazing year with our team, the community and the CakePHP core. It was great connecting with those who attended CakeFest in Madrid, and we hope to have the opportunity to see more of you in 2026. I cannot let the year end without getting a little sentimental. There is no better way to say it… THANK YOU. Thank you to the team who worked so hard, the core team that keeps pumping out releases, and most of all … thank you to our clients that trust us with their projects. CakeDC is successful because of the strong relationships we build with our network, and we hope to continue working with all of you for many years. There are a lot of great things still to come in year 21! Could 2026 will be bringing us CakePHP 6?! Considering 2 is rhe legal drinking age in the US, maybe CakePHP 6 should be beer cake? Delicious. Stay tuned to find out. Before I go, I am leaving you with something special. A note from Larry! As we close out this year, I just want to say thank you from the bottom of my heart. Twenty years ago, CakePHP started as a simple idea shared by a few of us who wanted to make building on the web easier and more enjoyable. Seeing how far it has come, and more importantly, seeing how many lives and careers it has impacted, is something I never take for granted. I am deeply grateful for our team, the core contributors, the community, and our clients who continue to believe in what we do. You are the reason CakePHP and CakeDC are still here, still growing, and still relevant after two decades. Here is to what we have built together, and to what is still ahead. Thank you for being part of this journey. Larry
CakeDC Blog
TIPS, INSIGHTS AND THE LATEST FROM THE EXPERTS BEHIND CAKEPHP
Pagination of multiple queries in CakePHP
Written by Rperez on December 23, 2025 •
45 VIEWS
Pagination of multiple queries in CakePHP
A less typical use case for pagination in an appication is the need to paginate multiples queries. In CakePHP you can achieve this with pagination scopes.Users list
Lest use as an example a simple users list.// src/Controller/UsersController.php class UsersController extends AppController { protected array $paginate = [ 'limit' => 25, ]; public function index() { // Default model pagination $this->set('users', $this->paginate($this->Users)); } } // templates/Users/index.php <h2><?= __('Users list') ?>/h2> <table> <thead> <tr> <th><?= $this->Paginator->sort('name', __('Name')) ?></th> <th><?= $this->Paginator->sort('email', __('Email')) ?></th> <th><?= $this->Paginator->sort('active', __('Active')) ?></th> </tr> </thead> <tbody> <?php foreach ($users as $user): ?> <tr> <td><?= h($user->name) ?></td> <td><?= h($user->email) ?></td> <td><?= $user->active ? 'Yes' : 'No' ?></td> </tr> <?php endforeach; ?> </tbody> </table> <?= $this->Paginator->counter() ?> <?= $this->Paginator->prev('« Previous') ?> <?= $this->Paginator->numbers() ?> <?= $this->Paginator->next('Next »') ?> Pagination of multiple queries
Now, we want to display two paginated tables, one with the active users and the other with the inactive ones.// src/Controller/UsersController.php class UsersController extends AppController { protected array $paginate = [ 'Users' => [ 'scope' => 'active_users', 'limit' => 25, ], 'InactiveUsers' => [ 'scope' => 'inactive_users', 'limit' => 10, ], ]; public function index() { $activeUsers = $this->paginate( $this->Users->find()->where(['active' => true]), [scope: 'active_users'] ); // Load an additional table object with the custom alias set in the paginate property $inactiveUsersTable = $this->fetchTable('InactiveUsers', [ 'className' => \App\Model\Table\UsersTable::class, 'table' => 'users', 'entityClass' => 'App\Model\Entity\User', ]); $inactiveUsers = $this->paginate( $inactiveUsersTable->find()->where(['active' => false]), [scope: 'inactive_users'] ); $this->set(compact('users', 'inactiveUsers')); } } // templates/Users/index.php <?php // call `setPaginated` first with the results to be displayed next, so the paginator use the correct scope for the links $this->Paginator->setPaginated($users); ?> <h2><?= __('Active Users') ?>/h2> <table> <thead> <tr> <th><?= $this->Paginator->sort('name', __('Name')) ?></th> <th><?= $this->Paginator->sort('email', __('Email')) ?></th> <th><?= $this->Paginator->sort('active', __('Active')) ?></th> </tr> </thead> <tbody> <?php foreach ($users as $user): ?> <tr> <td><?= h($user->name) ?></td> <td><?= h($user->email) ?></td> <td><?= $user->active ? 'Yes' : 'No' ?></td> </tr> <?php endforeach; ?> </tbody> </table> <?= $this->Paginator->counter() ?> <?= $this->Paginator->prev('« Previous') ?> <?= $this->Paginator->numbers() ?> <?= $this->Paginator->next('Next »') ?> <?php // call `setPaginated` first with the results to be displayed next, so the paginator use the correct scope for the links $this->Paginator->setPaginated($inactiveUsers); ?> <h2><?= __('Inactive Users') ?>/h2> <table> <thead> <tr> <th><?= $this->Paginator->sort('name', __('Name')) ?></th> <th><?= $this->Paginator->sort('email', __('Email')) ?></th> <th><?= $this->Paginator->sort('active', __('Active')) ?></th> </tr> </thead> <tbody> <?php foreach ($inactiveUsers as $inactiveUser): ?> <tr> <td><?= h($inactiveUser->name) ?></td> <td><?= h($inactiveUser->email) ?></td> <td><?= $inactiveUser->active ? 'Yes' : 'No' ?></td> </tr> <?php endforeach; ?> </tbody> </table> <?= $this->Paginator->counter() ?> <?= $this->Paginator->prev('« Previous') ?> <?= $this->Paginator->numbers() ?> <?= $this->Paginator->next('Next »') ?> And with this you have two paginated tables in the same request. Clean DI in CakePHP 5.3: Say Goodbye t...
Written by Arusinowski on December 23, 2025 •
113 VIEWS
This article is part of the CakeDC Advent Calendar 2025 (December 23rd, 2025)
Introduction: The Death of the "Hidden" Dependency
For years, accessing data in CakePHP meant "grabbing" it from the global state. Whether usingTableRegistry::getTableLocator()->get() or the LocatorAwareTrait’s $this->fetchTable(), your classes reached out to a locator to find what they needed. While convenient, this created hidden dependencies. A class constructor might look empty, despite the class being secretly reliant on multiple database tables. This made unit testing cumbersome, forcing you to stub the global TableLocator just to inject a mock. CakePHP 5.3 changes the game with Inversion of Control. With the framework currently in its Release Candidate (RC) stage and a stable release expected soon, now is the perfect time to explore these architectural improvements. By using the new TableContainer as a delegate for your PSR-11 container, tables can now be automatically injected directly into your constructors. This shift to explicit dependencies makes your code cleaner, fully type-hinted, and ready for modern testing standards. The Old Way (Hidden Dependency): public function execute() { $users = $this->fetchTable('Users'); // Where did this come from? } The 5.3 Way (Explicit Dependency): public function __construct(protected UsersTable $users) {} public function execute() { $this->users->find(); // Explicit and testable. } Enabling the Delegate
Opensrc/Application.php and update the services() method by delegating table resolution to the TableContainer. // src/Application.php use Cake\ORM\TableContainer; public function services(ContainerInterface $container): void { // Register the TableContainer as a delegate $container->delegate(new TableContainer()); } How it works under the hood
When you type-hint a class ending inTable (e.g., UsersTable), the main PSR-11 container doesn't initially know how to instantiate it. Because you've registered a delegate, it passes the request to the TableContainer, which then: - Validates: It verifies the class name and ensures it is a subclass of
\Cake\ORM\Table. - Locates: It uses the
TableLocatorto fetch the correct instance (handling all the usual CakePHP ORM configuration behind the scenes). - Resolves: It returns the fully configured Table object back to the main container to be injected.
TableContainer specifically looks for the Table suffix. If you have a custom class that extends the base Table class but is named UsersRepository, the delegate will skip it, and the container will fail to resolve the dependency. Practical Example: Cleaner Services
Now, your domain services no longer need to know about theLocatorAwareTrait. They simply ask for what they need. namespace App\Service; use App\Model\Table\UsersTable; class UserManagerService { // No more TableRegistry::get() or $this->fetchTable() public function __construct( protected UsersTable $users ) {} public function activateUser(int $id): void { $user = $this->users->get($id); // ... logic } } Next, open src/Application.php and update the services() method by delegating table resolution to the TableContainer. // src/Application.php use App\Model\Table\UsersTable; use App\Service\UserManagerService; use Cake\ORM\TableContainer; public function services(ContainerInterface $container): void { // Register the TableContainer as a delegate $container->delegate(new TableContainer()); // Register your service with the table as constructor argument $container ->add(UserManagerService::class) ->addArgument(UsersTable::class); } Why this is a game changer for Testing
Because the table is injected via the constructor, you can now swap it for a mock effortlessly in your test suite without touching the global state of the application.$mockUsers = $this->createMock(UsersTable::class); $service = new UserManagerService($mockUsers); // Pure injection! Conclusion: Small Change, Big Impact
At first glance, adding a single line to your Application::services() method might seem like a minor update. However, TableContainer represents a significant shift in how we approach CakePHP architecture. By delegating table resolution to the container, we gain:- True Type-Safety: Your IDE and static analysis tools now recognize the exact Table class being used. This is a massive win for PHPStan users—no more "Call to an undefined method" errors or messy
@vardocblock workarounds just to prove to your CI that a method exists. - Zero-Effort Mocking: Testing a service no longer requires manipulating the global TableRegistry state. Simply pass a mock object into the constructor and move on.
- Standardization: Your CakePHP code now aligns with modern PHP practices found in any PSR-compliant ecosystem, making your application more maintainable and easier for new developers to understand.
The new CakePHP RateLimitMiddleware
Written by Jorge on December 21, 2025 •
221 VIEWS
This article is part of the CakeDC Advent Calendar 2025 (December 21st 2025) Rate limiting a specific endpoint of your application can be a life saver. Sometimes you can't optimize the endpoint and it'll be expensive in time or CPU, or the endpoint has a business restriction for a given user. In the past, I've been using https://github.com/UseMuffin/Throttle a number of times to provide rate limiting features to CakePHP. Recently, I've been watching the addition of the RateLimitMiddleware to CakePHP 5.3, I think it was a great idea to incorporate these features into the core and I'll bring you a quick example about how to use it in your projects. Let's imagine you have a CakePHP application with an export feature that will take some extra CPU to produce an output, you want to ensure the endpoint is not abused by your users. In order to limit the access to the endpoint, add the following configuration to your config/app.php // define a cache configuration, Redis could be a good option for a fast and distributed approach 'rate_limit' => [ 'className' => \Cake\Cache\Engine\RedisEngine::class, 'path' => CACHE, 'url' => env('CACHE_RATE_LIMIT_URL', null), ], Then, in your src/Application.php middleware method, create one or many configurations for your rate limits. The middleware allows a lot of customization, for example to select the strategy, or how are you going to identify the owner of the rate limit. ->add(new RateLimitMiddleware([ 'strategy' => RateLimitMiddleware::STRATEGY_FIXED_WINDOW, 'identifier' => RateLimitMiddleware::IDENTIFIER_IP, 'limit' => 5, 'window' => 10, 'cache' => 'rate_limit', 'skipCheck' => function ($request) { return !( $request->getParam('controller') === 'Reports' && $request->getParam('action') === 'index' ); } ])) In this particular configuration we are going to limit the access to the /reports/index endpoint (we skip everything else) to 5 requests every 10 seconds. You can learn more about the middleware configuration here https://github.com/cakephp/docs/pull/8063 while the final documentation is being finished. This article is part of the CakeDC Advent Calendar 2025 (December 21st 2025)
Real-Time Notifications? You Might Not...
Written by Arodriguez on December 19, 2025 •
111 VIEWS
This article is part of the CakeDC Advent Calendar 2025 (December 20th 2025) As PHP developers, when we hear "real-time," our minds immediately jump to WebSockets. We think of complex setups with Ratchet, long-running server processes, and tricky Nginx proxy configurations. And for many applications (like live chats or collaborative editing) WebSockets are absolutely the right tool. But, if you don't need all that complexity or if you just want to push data from your server to the client? Think of a new notification, a "users online" counter, or a live dashboard update. For these one-way-street use cases, WebSockets are often overkill. Enter Server-Sent Events (SSE). It's a simple, elegant, and surprisingly powerful W3C standard that lets your server stream updates to a client over a single, long-lasting HTTP connection.
SSE vs. WebSockets: The Showdown
The most important difference is direction.- WebSockets (WS): Bidirectional. The client and server can both send messages to each other at any time. It's a two-way conversation.
- Server-Sent Events (SSE): Unidirectional. Only the server can send messages to the client. It's a one-way broadcast.
| Feature | Server-Sent Events (SSE) | WebSockets (WS) |
|---|---|---|
| Direction | Unidirectional (Server ➔ Client) | Bidirectional (Client ⟺ Server) |
| Protocol | Just plain HTTP/S | A new protocol (ws://, wss://) |
| Simplicity | High. simple API, complex ops at scale | Low. Requires a special server. |
| Reconnection | Automatic! The browser handles it. | Manual. You must write JS to reconnect. |
| Browser API | Native EventSource object. | Native WebSocket object. |
| Best For | Notifications, dashboards, live feeds. | Live chats, multiplayer games, co-editing. |
- It's just HTTP. No new protocol, no special ports.
- Automatic reconnection is a life-saver.
- The server-side implementation can be a simple controller action.
- Strictly one-way. The client can't send data back on the same connection.
- Some older proxies or servers might buffer the response, which can be tricky.
Infrastructure Note: Since SSE keeps a persistent connection open, each active client will occupy one PHP-FPM worker. For high-traffic applications, ensure your server is configured to handle the concurrent load or consider a non-blocking server like RoadRunner. Additionally, using HTTP/2 is strongly recommended to bypass the 6-connection-per-domain limit found in older HTTP/1.1 protocols
The Implementation: A Smart, Reusable SSE System in CakePHP
We're not going to build a naivewhile(true) loop that hammers our database every 2 seconds. That's inefficient. Instead, we'll build an event-driven system. The while(true) loop will only check a cache key. This is lightning-fast. A separate "trigger" class will update that cache key's timestamp only when a new notification is actually created. This design is clean, decoupled, and highly performant. Note: This example uses CakePHP, but the principles (a component, a trigger, and a controller) can be adapted to any framework like Laravel or Symfony.
1. The Explicit SseTrigger Class
First, we need a clean, obvious way to "poke" our SSE stream. We'll create a simple class whose only job is to update a cache timestamp. This is far better than a "magic" Cache::write() call hidden in a model. src/Sse/SseTrigger.php <?php namespace App\Sse; use Cake\Cache\Cache; /** * Provides an explicit, static method to "push" an SSE event. * This simply updates a cache key's timestamp, which the * SseComponent is watching. */ class SseTrigger { /** * Pushes an update for a given SSE cache key. * * @param string $cacheKey The key to "touch". * @return bool */ public static function push(string $cacheKey): bool { // We just write the current time. The content doesn't // matter, only the timestamp. return Cache::write($cacheKey, microtime(true)); } } CRITICAL PERFORMANCE WARNING: The PHP-FPM Bottleneck
In a standard PHP-FPM environment, each SSE connection is synchronous and blocking. This means one active SSE stream = one locked PHP-FPM worker. If your max_children setting is 50, and 50 users open your dashboard, your entire website will stop responding because there are no workers left to handle regular requests. How to mitigate this: Dedicated Pool: Set up a separate PHP-FPM pool specifically for SSE requests. Go Asynchronous: Use a non-blocking server like RoadRunner, Swoole or FrankenPHP. These can handle thousands of concurrent SSE connections with minimal memory footprint. HTTP/2: Always serve SSE over HTTP/2 to bypass the browser's 6-connection limit per domain.
2. The SseComponent (The Engine)
This component encapsulates all the SSE logic. It handles the loop, the cache-checking, the CallbackStream, and even building the final Response object. The controller will be left perfectly clean. To handle the stream, we utilize CakePHP's CallbackStream. Unlike a standard response that sends all data at once, CallbackStream allows us to emit data in chunks over time. It wraps our while(true) loop into a PSR-7 compliant stream, enabling the server to push updates to the browser as they happen without terminating the request. src/Controller/Component/SseComponent.php <?php namespace App\Controller\Component; use Cake\Controller\Component; use Cake\Http\CallbackStream; use Cake\Cache\Cache; use Cake\Http\Response; class SseComponent extends Component { protected $_defaultConfig = [ 'poll' => 2, // How often to check the cache (in seconds) 'eventName' => 'message', // Default SSE event name 'heartbeat' => 30, // Keep-alive to prevent proxy timeouts ]; /** * Main public method. * Builds the stream and returns a fully configured Response. */ public function stream(callable $dataCallback, string $watchCacheKey, array $options = []): Response { $stream = $this->_buildStream($dataCallback, $watchCacheKey, $options); // Get and configure the controller's response $response = $this->getController()->getResponse(); $response = $response ->withHeader('Content-Type', 'text/event-stream') ->withHeader('Cache-Control', 'no-cache') ->withHeader('Connection', 'keep-alive') ->withHeader('X-Accel-Buffering', 'no') // For Nginx: disable response buffering ->withBody($stream); return $response; } /** * Protected method to build the actual CallbackStream. */ protected function _buildStream(callable $dataCallback, string $watchCacheKey, array $options = []): CallbackStream { $config = $this->getConfig() + $options; return new CallbackStream(function () use ($dataCallback, $watchCacheKey, $config) { set_time_limit(0); $lastSentTimestamp = null; $lastHeartbeat = time(); while (true) { if (connection_aborted()) { break; } // 1. THE FAST CHECK: Read the cache. $currentTimestamp = Cache::read($watchCacheKey); // 2. THE COMPARE: Has it been updated? if ($currentTimestamp > $lastSentTimestamp) { // 3. THE SLOW CHECK: Cache is new, so run the data callback. $data = $dataCallback(); // 4. THE PUSH: Send the data. echo "event: " . $config['eventName'] . "\n"; echo "data: " . json_encode($data) . "\n\n"; $lastSentTimestamp = $currentTimestamp; $lastHeartbeat = time(); } else if (time() - $lastHeartbeat > $config['heartbeat']) { // 5. THE HEARTBEAT: Send a comment to keep connection alive. echo ": \n\n"; $lastHeartbeat = time(); } if (ob_get_level() > 0) { ob_flush(); } flush(); // Wait before the next check sleep($config['poll']); } }); } } 3. Connecting the Logic (Model & Controller)
First, we use ourSseTrigger in the afterSave hook of our NotificationsTable. This makes it clear: "After saving a notification, push an update." src/Model/Table/NotificationsTable.php (Partial) use App\Sse\SseTrigger; // Don't forget to import! public function afterSave(EventInterface $event, Entity $entity, ArrayObject $options) { // Check if the entity has a user_id if ($entity->has('user_id') && !empty($entity->user_id)) { // Build the user-specific cache key $userCacheKey = 'notifications_timestamp_user_' . $entity->user_id; // Explicitly trigger the push! SseTrigger::push($userCacheKey); } } Now, our controller action becomes incredibly simple. Its only jobs are to get the current user, define the data callback, and return the component's stream. src/Controller/NotificationsController.php <?php namespace App\Controller; use App\Controller\AppController; use Cake\Http\Exception\ForbiddenException; class NotificationsController extends AppController { public function initialize(): void { parent::initialize(); $this->loadComponent('Sse'); $this->loadComponent('Authentication.Authentication'); } public function stream() { $this->autoRender = false; // 1. Get authenticated user $identity = $this->Authentication->getIdentity(); if (!$identity) { throw new ForbiddenException('Authentication required'); } // 2. Define user-specific parameters $userId = $identity->get('id'); $userCacheKey = 'notifications_timestamp_user_' . $userId; // 3. Define the data callback (what to run when there's an update) $dataCallback = function () use ($userId) { return $this->Notifications->find() ->where(['user_id' => $userId, 'read' => false]) ->order(['created' => 'DESC']) ->limit(5) ->all(); }; // 4. Return the stream. That's it! return $this->Sse->stream( $dataCallback, $userCacheKey, [ 'eventName' => 'new_notification', // Custom event name for JS 'poll' => 2 ] ); } } 4. The Frontend (The Easy Part)
Thanks to the nativeEventSource API, the client-side JavaScript is trivial. No libraries. No complex connection management. <script> // 1. Point to your controller action const sseUrl = '/notifications/stream'; const eventSource = new EventSource(sseUrl); // 2. Listen for your custom event eventSource.addEventListener('new_notification', (event) => { console.log('New data received!'); const notifications = JSON.parse(event.data); // Do something with the data... // e.g., update a <ul> list or a notification counter updateNotificationBell(notifications); }); // 3. (Optional) Handle errors eventSource.onerror = (error) => { console.error('EventSource failed:', error); // The browser will automatically try to reconnect. }; // (Optional) Handle the initial connection eventSource.onopen = () => { console.log('SSE connection established.'); }; </script> Ideas for Your Projects
You can use this exact pattern for so much more than just notifications:- Live Admin Dashboard: A "Recent Sales" feed or a "Users Online" list that updates automatically.
- Activity Feeds: Show "John recently commented..." in real-time.
- Progress Indicators: For a long-running background process (like video encoding), push status updates (
"20% complete","50% complete", etc.). - Live Sports Scores: Push new scores as they happen.
- Stock or Crypto Tickers: Stream new price data from your server.
When NOT to Use SSE: Know Your Limits
While SSE is an elegant solution for many problems, it isn't a silver bullet. You should avoid SSE and stick with WebSockets or standard Polling when:- True Bidirectional Communication is Required: If your app involves heavy "back-and-forth" (like a fast-paced multiplayer game or a collaborative whiteboarding tool), WebSockets are the correct choice.
- Binary Data Streams: SSE is a text-based protocol. If you need to stream raw binary data (like audio or video frames), WebSockets or WebRTC are better suited.
- Legacy Browser Support (IE11): If you must support older browsers that lack EventSource and you don't want to rely on polyfills, SSE will not work.
- Strict Connection Limits: If you are on a restricted shared hosting environment with very few PHP-FPM workers and no support for HTTP/2, the persistent nature of SSE will quickly exhaust your server's resources.
Conclusion
WebSockets are a powerful tool, but they aren't the only tool. For the wide array of use cases that only require one-way, server-to-client communication, Server-Sent Events are a simpler, more robust, and more maintainable solution. It integrates perfectly with the standard PHP request cycle, requires no extra daemons, and is handled natively by the browser. So the next time you need real-time updates, ask yourself: "Do I really need a two-way conversation?" If the answer is no, give SSE a try. This article is part of the CakeDC Advent Calendar 2025 (December 20th 2025)QA vs. Devs: a MEME tale of the IT env...
Written by Rcardoso on December 17, 2025 •
99 VIEWS
QA testing requires knowledge in computer science but still many devs think of us like  BUT...
  It is not like we want to detroy what you have created but...
  And we have to report it, it is our job...
  It is not like we think
  I mean
  Plaeas do not consider us a thread :)

Sometimes we are kind of lost seeing the application...
And sometimes your don't believe the crazy results we get...
 I know you think
  But remmember we are here to help xD
  Happy Holidays to ya'll folks!
  PS. Enjoy some more memes


The Inflector (Or why CakePHP speaks b...
Written by Ajibarra on December 16, 2025 •
106 VIEWS
This article is part of the CakeDC Advent Calendar 2025 (December 18th 2025) I have been working with CakePHP for more than 15 years now. I love the conventions. I also love that I don't have to configure every single XML file, like in the old Java days. But let's be honest: as a Spanish native speaker, naming things in English can sometimes be a nightmare. In Spanish, life is simple. You have a Casa (house), you add an "s", you have Casas (houses). You have a Camión (truck), you add "es", you have Camiones (trucks). Logic! But in English? You have a mouse, and suddenly you have mice. You have a person, and it becomes people. You have a woman and it becomes women. This is why the Inflector class is not just a utility for me. It is my personal English teacher living inside the /vendor folder.
It covers my back
When I started with CakePHP 15 years ago, I was always scared to name a database table categories. I was 100% sure that I would break the framework because I would name the model Categorys or something wrong. But! CakePHP knows better. It knows irregular verbs and weird nouns better than I do.use Cake\\Utility\\Inflector; // The stuff I usually get right echo Inflector::pluralize('User'); // Users // The stuff I would definitely get wrong without coffee echo Inflector::pluralize('Person'); // People echo Inflector::pluralize('Child'); // Children Variable Naming (CamelCase vs underscore)
The other battle I have fought for 15 years is the variable naming convention. Is itcamelCase? Is it PascalCase? Is it underscore_case? My brain thinks in Spanish, translates to English, and then tries to apply PSR-12 standards. It is a lot of processing power. Fortunately, when I am building dynamic tools, I just let the Inflector handle the formatting: // Converting my database column to a nice label echo Inflector::humanize('published_date'); // Output: Published Date // Converting a string to a valid variable name echo Inflector::variable('My Client ID'); // Output: myClientId When Spanglish happens
Of course, after so many years, sometimes a Spanish word slips into the database schema. It happens to the best of us. If I create a table called alumnos (students), CakePHP tries its best, but it assumes it is English.Inflector::singularize('alumnos') -> Alumno (It actually works! Lucky.)
But sometimes it fails funny. If I have a Jamon (Ham), Cake thinks the plural is Jamons. So, for those rare moments where my English fails, I can teach the Inflector a bit of Spanish in bootstrap.php:
Inflector::rules('plural', \[ '/on$/i' \=\> 'ones' // Fixing words ending in 'on' like Cajon, Jamon... \]); Conclusion
We talk a lot about the ORM, Dependency Injection, and Plugins. Today however, I wanted to say "Gracias" to the humble Inflector. It has saved me from typos and grammar mistakes since 2008. Challenge for today: Go check your code. Are you manually formatting strings? Stop working so hard and let the Inflector do it for you. This article is part of the CakeDC Advent Calendar 2025 (December 18th 2025)Uploading Files with CakePHP and Uppy ...
Written by Areveron on December 15, 2025 •
107 VIEWS
Uploading Files with CakePHP and Uppy: Direct to S3
Modern web applications increasingly require fast, resilient, and user‑friendly file uploads. Whether it’s profile photos, documents, or large media files, users expect progress indicators, drag‑and‑drop, and reliable uploads even on unstable connections. In this article, we’ll look at how to combine CakePHP on the backend with Uppy on the frontend, and how to upload files directly to Amazon S3 using signed requests.Why Uppy for Direct S3 Uploads??
Uppy is a modular JavaScript file uploader built by the team behind Transloadit. It provides a polished upload experience out of the box and integrates well with modern backends.Key advantages
- Direct-to-Cloud Uploads: File data flows directly from the user's browser to the S3 bucket, without passing through your CakePHP server.
- Lower Server Load and Cost: Your server only generates a short-lived, secure pre-signed URL. The actual file transfer avoids the “double handling,” drastically reducing your application's bandwidth consumption and infrastructure footprint.
- Better Performance: By eliminating your application server as a middleman, uploads complete faster. Uppy can also utilize S3's multipart upload capabilities for improved throughput and reliability for large files.
- Excellent UX: Drag-and-drop support, progress bars, previews, and retry support.
- Modular Architecture: Only load the necessary plugins.
- Framework‑agnostic: Works seamlessly with CakePHP.
Architecture Overview
- This scalable and production-friendly approach uses the following flow:
- The browser initializes Uppy.
- CakePHP provides temporary S3 credentials or signed URLs (Authorization).
- Uppy uploads files directly to S3 (Data Transfer).
- CakePHP stores metadata (filename, path, size, etc.) if needed (Database Record).
Architecture Overview
This scalable and production-friendly approach uses the following flow:- The browser initializes Uppy
- CakePHP provides temporary S3 credentials or signed URLs (Authorization)
- Uppy uploads files directly to S3 (Data Transfer).
- CakePHP stores metadata (filename, path, size, etc.) if needed (Database Record).
Prerequisites
- CakePHP 5.x (or 4.x with minor adjustments)
- AWS account with an S3 bucket
- AWS SDK for PHP
- A modern browser to use Uppy's MJS modules
Installing Dependencies
Backend (CakePHP)
Install the required AWS SDK for PHP via Composer:composer require aws/aws-sdk-php Configure your AWS credentials (environment variables recommended): AWS_ACCESS_KEY_ID=your-key AWS_SECRET_ACCESS_KEY=your-secret AWS_REGION=eu-west-1 AWS_BUCKET=your-bucket-name Frontend (Uppy)
Instead of a build step, we will use Uppy's modular JS files directly from a Content Delivery Network (CDN), which is simpler for many CakePHP applications. We will load the required modules—Uppy, Dashboard, and AwsS3—directly within the<script type="module"> tag in your view. Creating the CakePHP Endpoint
We need a CakePHP endpoint to securely generate and return the necessary S3 upload parameters (the pre-signed URL) to the browser.Controller
// src/Controller/UploadsController.php namespace App\Controller; use Aws\S3\S3Client; use Cake\Http\Exception\UnauthorizedException; class UploadsController extends AppController { public function sign() { $this->getRequest()->allowMethod(['post']); // 1. Initialize S3 Client using credentials from environment $s3Client = new S3Client([ 'version' => 'latest', 'region' => env('AWS_REGION'), 'credentials' => [ 'key' => env('AWS_ACCESS_KEY_ID'), 'secret' => env('AWS_SECRET_ACCESS_KEY'), ], ]); // Define a unique path with a placeholder for the actual filename $path = 'uploads/' . uniqid() . '/${filename}'; // 2. Create the command for a PutObject request $command = $s3->getCommand('PutObject', [ 'Bucket' => env('AWS_BUCKET');, 'Key' => $path, 'ACL' => 'private', 'ContentType' => '${contentType}', ]); // 3. Generate the pre-signed URL (valid for 15 minutes) $presignedRequest = $s3->createPresignedRequest($command, '+15 minutes'); $this->set([ 'method' => 'PUT', 'url' => (string)$presignedRequest->getUri(), '_serialize' => ['method', 'url'], ]); } } Add a route: // config/routes.php $routes->post('/uploads/s3-sign', ['controller' => 'Uploads', 'action' => 'sign']); Frontend: Initializing Uppy and the S3 Plugin
Place the following code in your CakePHP view along with the HTML container for the uploader:<div id="uploader"></div> <script type="module"> // Load Uppy modules directly from CDN (v5.2.1 example) import { Uppy, Dashboard, AwsS3 } from 'https://releases.transloadit.com/uppy/v5.2.1/uppy.min.mjs' const uppy = new Uppy({ autoProceed: false, restrictions: { maxNumberOfFiles: 5, allowedFileTypes: ['image/*', 'application/pdf'], }, }) uppy.use(Dashboard, { inline: true, target: '#uploader', }) // Configure the AwsS3 plugin to fetch parameters from the CakePHP endpoint uppy.use(AwsS3, { async getUploadParameters(file) { const response = await fetch('/uploads/s3-sign', { method: 'POST', headers: { 'Content-Type': 'application/json', }, }) const data = await response.json() // 2. Return the parameters Uppy needs for the direct upload return { method: data.method, url: data.url, headers: { 'Content-Type': file.type, }, } }, }) uppy.on('complete', (result) => { console.log('Upload complete:', result.successful) }) </script> Storing File Metadata (Optional but Recommended)
Once the direct S3 upload is successful, you must notify your CakePHP application to save the file's metadata (e.g., the S3 key) in your database.uppy.on('upload-success', (file, response) => { fetch('/files/save', { method: 'POST', headers: { 'Content-Type': 'application/json' }, body: JSON.stringify({ name: file.name, size: file.size, type: file.type, s3_key: response.uploadURL, }), }) }) Security Considerations
Remember to implement robust security checks in yoursign controller action: - Authenticate users: Ensure the user is logged in and authorized before issuing S3 parameters.
- Restrict Input: Restrict allowed MIME types and maximum file size.
- Access Control: Use private S3 buckets and serve files via signed URLs to maintain security.
- Time Limit: Set short expiration times for the pre-signed requests (e.g., the
+15 minutesin the example).
Conclusion
Combining CakePHP and Uppy gives you the best of both worlds: a robust PHP backend and a modern, user‑friendly upload experience. By uploading directly to Amazon S3, you reduce server load, successfully reduce server load, improve scalability, and ensure reliable, fast large file uploads. This setup allows your backend to focus on validation, authorization, and business logic rather than raw data transfer.Window functions
Written by Jorge on December 14, 2025 •
107 VIEWS
This article is part of the CakeDC Advent Calendar 2025 (December 15th 2025) Did you ever wanted to provide a partial result as part of an existing report? Window functions were added in CakePHP 4.1 and provide a way to pull a rolling result expressed naturally using the ORM. We'll use CakePHP 5 code in this article. Apart from the examples described in the book https://book.cakephp.org/5/en/orm/query-builder.html#window-functions One common scenario where window functions are very useful are rolling results. Imagine we have a transactions table, where account transactions are stored including a dollar amount of the transaction. The following migration would describe an example transactions table class CreateTransactions extends \Migrations\BaseMigration { public function change(): void { $table = $this->table('transactions'); $table ->addColumn('occurred_on', 'date', [ 'null' => false, ]) ->addColumn('debit_account', 'string', [ 'limit' => 255, 'null' => false, ]) ->addColumn('credit_account', 'string', [ 'limit' => 255, 'null' => false, ]) ->addColumn('amount_cents', 'biginteger', [ 'null' => false, 'signed' => false, ]) ->addColumn('currency', 'string', [ 'limit' => 3, 'null' => false, 'default' => 'USD', ]) ->addColumn('reference', 'string', [ 'limit' => 255, 'null' => true, ]) ->addColumn('description', 'string', [ 'limit' => 255, 'null' => true, ]) ->addTimestamps('created', 'modified') ->addIndex(['occurred_on'], ['name' => 'idx_transactions_occurred_on']) ->addIndex(['debit_account'], ['name' => 'idx_transactions_debit_account']) ->addIndex(['credit_account'], ['name' => 'idx_transactions_credit_account']) ->addIndex(['reference'], ['name' => 'idx_transactions_reference']) ->create(); } } Now, let's imagine we want to build a report to render the transaction amounts, but we also want a rolling total. Using a window function, we could define a custom finder like this one: public function findWindowReport( SelectQuery $query, ?string $account, ?Date $from, ?Date $to ): SelectQuery { $q = $query ->select([ 'id', 'occurred_on', 'debit_account', 'credit_account', 'amount_cents', 'currency', 'reference', 'description', ]); // Optional filters if ($account) { $q->where(['debit_account' => $account]); } if ($from) { $q->where(['occurred_on >=' => $from]); } if ($to) { $q->where(['occurred_on <=' => $to]); } $runningWin = (new WindowExpression()) ->partition('debit_account') ->orderBy([ 'occurred_on' => 'ASC', 'id' => 'ASC' ]); $q->window('running_win', $runningWin); $q->select([ 'running_total_cents' => $q ->func()->sum('amount_cents') ->over('running_win'), ]); return $q->orderBy([ 'debit_account' => 'ASC', 'occurred_on' => 'ASC', 'id' => 'ASC' ]); } Note the WindowExpression defined will sum the amount for each debit_account to produce the running_total_cents. The result of the report, after formatting will look like this Occurred On Debit Account Credit Account Amount (USD) Running Total (USD) 1/3/25 assets:bank:checking income:services $2,095.75 $2,095.75 1/3/25 assets:bank:checking income:sales $2,241.42 $4,337.17 1/7/25 assets:bank:checking income:services $467.53 $4,804.70 1/10/25 assets:bank:checking income:subscriptions $2,973.41 $7,778.11 1/12/25 assets:bank:checking income:sales $2,747.07 $10,525.18 1/17/25 assets:bank:checking income:subscriptions $2,790.36 $13,315.54 1/21/25 assets:bank:checking income:subscriptions $1,891.35 $15,206.89 1/28/25 assets:bank:checking equity:owner $353.00 $15,559.89 Other typical applications of window functions are leaderboards (building paginated rankins with scores, sales, activities), analytics for cumulative metrics (like inventory evolution) and comparison between rows (to compute deltas) and de-duplication (to pick the most recent record for example). This is a very useful tool to provide a solution for these cases, fully integrated into the CakePHP ORM. This article is part of the CakeDC Advent Calendar 2025 (December 15th 2025)
CounterCacheBehavior in CakePHP
Written by Fhernandez on December 14, 2025 •
69 VIEWS
This article is part of the CakeDC Advent Calendar 2025 (December 2th 2025)
CounterCacheBehavior in CakePHP: what it is, when to use it, and what’s new in CakePHP 5.2
As your application grows, a very common pattern appears: you need to display things like “number of comments”, “number of tasks”, or “number of orders”, and you need to do it fast. Calculating these values with COUNT() queries can work until performance starts to suffer (and complexity increases because of filters, states, or joins). This is exactly where CounterCacheBehavior* becomes useful.What is CounterCacheBehavior?
CounterCacheBehavior is a CakePHP ORM behavior that keeps a counter field in a “parent” table synchronized based on the records in a related table. Typical example:- Articles hasMany Comments
- You want to store the number of comments in articles.comment_count
When should you use it?
Common use cases include:- Listings with counters (e.g. “Posts (123 comments)”).
- Sorting by counters (most commented, most active, etc.).
- Filtering by counters (categories with more than X products).
- Avoiding repeated and expensive COUNT( ) queries.
Basic configuration
CounterCache is configured in the child table (the one that belongs to the parent). If Comments belongsTo Articles, the behavior lives in CommentsTable.// src/Model/Table/CommentsTable.php namespace App\Model\Table; use Cake\ORM\Table; class CommentsTable extends Table { public function initialize(array $config): void { parent::initialize($config); $this->belongsTo('Articles'); $this->addBehavior('CounterCache', [ 'Articles' => ['comment_count'] ]); } } Doing this, CakePHP will automatically keep articles.comment_count up to date. CounterCache with conditions (scoped counters)
Often you don’t want to count everything, but only a subset: published comments, active records, non-spam items, etc.$this->addBehavior('CounterCache', [ 'Articles' => [ 'published_comment_count' => [ 'conditions' => ['Comments.is_published' => true] ] ] ]); This pattern is very useful for dashboards such as: - open issues.
- completed tasks.
- approved records.
CounterCache with callbacks (custom calculations)
In some cases, conditions are not enough and you need more complex logic (joins, dynamic filters, or advanced queries). CounterCacheBehavior allows you to define a callable to calculate the counter value. Important: when using callbacks, bulk updates with updateCounterCache() will not update counters defined with closures. This is an important limitation to keep in mind.What’s new in CakePHP 5.2: rebuild counters from the console
Before CakePHP 5.2, rebuilding counters often meant writing your own scripts or commands, especially after:- bulk imports done directly in the database.
- manual data fixes.
- adding a new counter cache in production.
- data becoming out of sync.
bashbin/cake counter_cache CakePHP 5.2 introduced an official command to rebuild counter caches: bin/cake counter_cache --assoc Comments Articles This command recalculates all counters related to Comments in the Articles table. Processing large tables in batches For large datasets, you can rebuild counters in chunks: bin/cake counter_cache --assoc Comments --limit 100 --page 2 Articles When using --limit and --page, records are processed ordered by the table’s primary key. This command is ideal for maintenance tasks and for safely backfilling new counter caches without custom tooling. What’s new in CakePHP 5.2: bulk updates from the ORM
In addition to the console command, CakePHP 5.2 added a new ORM method:CounterCacheBehavior::updateCounterCache() This allows you to update counters programmatically, in batches: // Update all configured counter caches in batches $this->Comments->updateCounterCache(); // Update only a specific association, 200 records per batch $this->Comments->updateCounterCache('Articles', 200); // Update only the first page $this->Comments->updateCounterCache('Articles', page: 1); This is available since CakePHP 5.2.0. Complete practical example: Articles and Comments
Assume the following database structure:- articles: id, title, comment_count (int, default 0), published_comment_count (int, default 0).
- comments: id, article_id, body, is_published.
1) Behavior configuration in CommentsTable:
$this->addBehavior('CounterCache', [ 'Articles' => [ 'comment_count', 'published_comment_count' => [ 'conditions' => ['Comments.is_published' => true] ] ] ]); 2) Populate existing data (production)
After deploying, rebuild counters:bin/cake counter_cache --assoc Comments Articles From that point on, counters will stay synchronized automatically. Best practices and Common Mistakes
Here you have some best practices and common mistakes:- Add indexes to foreign keys (comments.article_id) and fields used in conditions (comments.is_published) for large datasets.
- If you perform direct database imports (bypassing the ORM), remember to rebuild counters using bin/cake counter_cache or updateCounterCache().
- Counters defined using closures are not updated by updateCounterCache().
- If a record changes its foreign key (e.g. moving a comment from one article to another), CounterCache handles the increments and decrements safely.
The Generational Perception of Work an...
Written by Rcardoso on December 10, 2025 •
109 VIEWS

The Generational Perception of Work and Productivity in the Remote-Work Era
In the year 2020, everything changed when the world stopped completely during COVID-19. The perception of safety, health, mental health, work, and private life completely turned around and led to a different conception of the world we knew. As the global pandemic thrived, we saw how many jobs could be done from home, because people had to reinvent themselves as we were not able to go to our workplaces. And it settled a statement, changing the perception of work dramatically. Before it, and for older generations, work was associated with physical presence, rigid schedules, and productivity measured by visible hours. But after it, younger generations saw the potential of working from home or being a so-called digital nomad, giving more priority to flexibility, emotional well-being, and measuring efficiency through results. This change reflects a social evolution guided by new technologies, new expectations, and a more connected workforce. Remote work has been key in this transformation. For thousands of professionals, the ability to work from home meant reclaiming personal time, reducing stress, and achieving a healthier work--life balance (for example, by reducing commuting time most people get almost 2 extra hours of personal time). Productivity did not decrease --- in many cases, it actually improved --- because the focus shifted from "time spent" to "goals achieved." This model has also shown that trust and autonomy can lead to more engaged teams. However, despite all of the perks, many companies are apparently eager to return to traditional workplaces. Maybe it is the fear of losing control or a lack of understanding of the new work dynamics, but this tendency threatens to undo meaningful progress for generations that have already experienced the freedom and effectiveness of remote work. Going back to the old-fashioned way of work feels like a step backward. So now, the challenge is to find a middle ground that acknowledges the cultural and technological changes of our time, passing the torch to a new generation of workers. Because productivity is no longer measured by how many people are sitting in a chair, but by the value of the final results. And if we want organizations truly prepared for the future, we must listen to younger generations and build work models that prioritize both results and workers' well-being. In CakeDC we do believe in remote work! Proving through the years that work can be done remotely no matter the timezone or language.CakePHP E2E Testing with Cypress
Written by Areveron on December 09, 2025 •
138 VIEWS
End-to-End Testing CakePHP Applications with Cypress
End-to-end (E2E) testing has increasingly become a critical part of modern web development workflows. Unit and integration tests are vital, but only End-to-End (E2E) testing accurately verifies the complete user flow, from the browser interface down to the database. For robust applications built with CakePHP 5, E2E tests provide the ultimate safety net. In this article, we explore how to introduce Cypress, a popular JavaScript-based E2E testing framework, into a CakePHP 5 project. Our goal is to deliver a practical, standards-oriented approach that keeps your application maintainable, predictable, and testable at scale.1. Why Cypress for CakePHP?
E2E testing has historically been considered slow, brittle, and difficult to maintain. Tools like Selenium or PhantomJS brought automation, but at the cost of complex setup, inconsistent execution, and poor debugging capabilities. Cypress solves many of these challenges:- Runs inside the browser, providing native access to DOM events
- Offers time-travel debugging for better visibility
- Ships with a stable execution model — no explicit waits, fewer flaky tests
- Integrates easily with JavaScript-enabled CakePHP frontends (HTMX, Vue, React, Stimulus, etc.)
- Provides first-class tools for network mocking, API testing, and fixtures
2. Setting up the Environment: CakePHP 5 & Cypress
Ensure you have a functioning CakePHP 5 application and Cypress installed as a development dependency:npm init -y npm install cypress --save-dev Open Cypress: npx cypress open Folder structure: cypress/ e2e/ fixtures/ support/ 2.0. Understanding the Cypress Directory Structure
Runningnpx cypress open creates the cypress/ folder in the root of your CakePHP project. Understanding its purpose is key to organizing your tests: | Directory | Purpose | Relevance to CakePHP E2E |
|---|---|---|
| cypress/e2e | Main tests. Stores all your primary test files (e.g., cart_flow.cy.js). | This is where you test your CakePHP routes and UI. |
| cypress/fixtures | Static data such as JSON files for mocking API responses. | Useful for mocking external services or complex input data. |
| cypress/support | Reusable code, custom commands, environment config, and global hooks. | Crucial for defining the cy.login command using cy.session. |
| cypress.config.js | Main Cypress configuration file. | Necessary to integrate Cypress with CakePHP server and DB tasks. |
2.1. The Critical E2E Test Selector: data-cy
In E2E testing, relying on standard CSS selectors like id or class is a fragile practice. Designers or frontend developers frequently change these attributes for styling or layout, which immediately breaks your tests. The best practice is to introduce a dedicated test attribute, such as data-cy. This attribute serves one purpose: E2E testing. It makes your tests resilient to UI changes. Example in a CakePHP template (.php): <button type="submit" class="btn btn-primary" data-cy="add-to-cart-button"> Add to Cart </button> Using the selector in Cypress: cy.get('[data-cy="add-to-cart-button"]').click(); 3. E2E Test Case: The Shopping Cart Flow
This section details the construction of our critical E2E test, focusing on the end-user experience: Authentication, Product Addition, and Cart Verification. To ensure test reliability, we prioritize maintaining a clean and known state before execution.3.1. Resetting the Database (beforeEach)
We must ensure a clean state for every test. Use Cypress tasks to call a CakePHP shell command that drops, migrates, and seeds your dedicated test database. // In cypress.config.js setupNodeEvents on('task', { resetDb() { console.log('Test database reset completed.'); return null; } }); // In the test file beforeEach(() => { cy.task('resetDb'); }); 3.2. Shopping Cart Test (cypress/e2e/cart_flow.cy.js)
This test verifies the successful user journey from browsing to checkout initiation, using the resilient data-cy attributes. The beforeEach hook ensures that for every test, the database is reset and a user is quickly logged in via session caching. The it() Block: Core Actions and Assertions - Product Selection: Navigate to a specific product page.
cy.visit('/products/view/1'); - Add to Cart Action: Locate the "Add to Cart" button using data-cy and click it.
cy.get('[data-cy="add-to-cart-button"]').click(); - Confirmation Check: Assert that a visible confirmation message appears.
cy.get('[data-cy="notification-message"]').should('contain', 'Product added to cart!'); - Cart Navigation: Navigate to the cart summary page.
cy.visit('/cart'); - Content Verification (Assertions): Verify the presence of the product and the correct total price.
cy.get('[data-cy="cart-item-name-1"]').should('contain', 'Product A'); cy.get('[data-cy="cart-total-price"]').should('contain', '100.00'); - Checkout Initiation: Click the link to proceed.
cy.get('[data-cy="checkout-link"]').should('be.visible').click(); - Final Navigation Check: Assert that the URL has successfully changed to the checkout route.
cy.url().should('include', '/checkout');
cypress/e2e/cart_flow.cy.js): /// cypress/e2e/cart_flow.cy.js describe('E-commerce Shopping Cart Flow', () => { beforeEach(() => { cy.task('resetDb'); cy.login('[email protected]', 'secure-password'); }); it('Should successfully add an item to the cart and verify the total price', () => { cy.visit('/products/view/1'); cy.get('[data-cy="add-to-cart-button"]').click(); cy.get('[data-cy="notification-message"]').should('contain', 'Product added to cart!'); cy.visit('/cart'); cy.get('[data-cy="cart-item-name-1"]').should('contain', 'Product A'); cy.get('[data-cy="cart-total-price"]').should('contain', '100.00'); cy.get('[data-cy="checkout-link"]').should('be.visible').click(); cy.url().should('include', '/checkout'); }); }); 4. Advanced Good Practices: Optimizing Cypress and E2E Testing
While functional E2E tests are essential, achieving a high-quality, maintainable, and fast test suite requires adopting several advanced practices.4.1. Fast Authentication with cy.session
A standard E2E test logs in by interacting with the UI (cy.type, cy.click). While accurate, repeating this for every test is slow and inefficient. For subsequent tests in the same flow, we should skip the UI login using Cypress's cy.session. The cy.session command caches the browser session (cookies, local storage, etc.) after the first successful login. For every test that follows, Cypress restores the session state, avoiding the slow UI login process and drastically reducing execution time. Implementing the Custom cy.login Command (in cypress/support/commands.js): Cypress.Commands.add('login', (email, password) => { // 1. Define the session identifier (e.g., the user's email) const sessionName = email; // 2. Use cy.session to cache the login process cy.session(sessionName, () => { // This function only runs the first time the sessionName is encountered cy.visit('/users/login'); cy.get('[data-cy="login-email-input"]').type(email); cy.get('[data-cy="login-password-input"]').type(password); cy.get('[data-cy="login-submit-button"]').click(); // Assert that the login was successful and the session is ready cy.url().should('not.include', '/users/login'); }); // After the session is restored/created, navigate to the base URL cy.visit('/'); }); 4.2. Essential Good Practices for Robust E2E Tests
Here is a list of best practices to ensure your CakePHP 5 E2E tests remain fast, stable, and easy to maintain:- Prioritize data-cy Selectors: As discussed, never rely on dynamic attributes like generated IDs, CSS classes (which are prone to styling changes), or nth-child selectors. Use the dedicated data-cy attribute for guaranteed stability.
- Use Custom Commands for Repetitive Actions: Beyond login, create custom commands (e.g., cy.addItemToCart(itemId)) for any sequence of user actions repeated across multiple tests. This improves readability and reusability.
- Avoid UI Waiting: Do not use hard-coded waiting times like
cy.wait(5000). Cypress is designed to wait automatically for elements to exist and become actionable. If you need to wait for an API call, usecy.intercept()to stub or monitor network requests and then wait specifically for that request to complete (cy.wait('@api-call')). - Limit Scope (Test What You Own): E2E tests should focus on your application's logic, not external services (like third-party payment gateways). Use
cy.stub()orcy.intercept()to mock these external interactions. If you can test a function at the unit or integration level, avoid duplicating that logic in the slower E2E layer. - Test Isolation is Non-Negotiable: Always use the database reset task (
cy.task('resetDb')) in a beforeEach hook. Never let one test affect the state of another. - Break Down Large Tests: Keep individual it() blocks focused on a single logical assertion or small user journey (e.g., "Add a single item," not "Add item, change quantity, apply coupon, and checkout"). This makes debugging failure points much faster.
5. Conclusion
By combining the architectural strength of CakePHP 5 with the efficiency of Cypress, you build a highly reliable testing pipeline. Utilizingdata-cy ensures your tests are stable against UI changes, and leveraging cy.session drastically reduces execution time, making E2E testing a fast and sustainable practice for your development team. Scaling Task Processing in CakePHP: Ac...
Written by Arusinowski on December 08, 2025 •
419 VIEWS
This article is part of the CakeDC Advent Calendar 2025 (December 9th 2025)
Introduction: need of Concurrency
While offloading long-running tasks to an asynchronous queue solves the initial web request bottleneck, relying on a single queue worker introduces a new, serious point of failure and bottleneck. This single-threaded approach transfers the issue from the web server to the queue system itself.Bottlenecks of Single-Worker Queue Processing
The fundamental limitation in the standard web request lifecycle is its synchronous, single-threaded architecture. This design mandates that a user's request must wait for all associated processing to fully complete before a response can be returned. The Problem: Single-Lane Processing Imagine a queue worker as a single cashier at a very busy bank . Each item in the queue (the "job") represents a customer.- Job Blocking (The Long Transaction): If the single cashier encounters a customer with an extremely long or slow transaction (e.g., generating a massive report, bulk sending 100,000 emails, or waiting for a slow API), every other customer must wait for that transaction to complete.
- Queue Backlog Accumulation: New incoming jobs (customers) pile up rapidly in the queue. This is known as a queue backlog. The time between a job being put on the queue and it starting to execute (Job Latency) skyrockets.
- Real-Time Failure: If a job requires an action to happen now (like sending a password reset email), the backlog means that action is critically delayed, potentially breaking the user experience or application logic.
- Worker Vulnerability and Downtime: If this single worker crashes (due to a memory limit or unhandled error) or is temporarily taken offline for maintenance, queue processing stops entirely. The application suddenly loses its entire asynchronous capability until the worker is manually restarted, resulting in a complete system freeze of all background operations.
Improved System Throughput and Reliability with Multiple Workers
While introducing a queue solves the initial issue of synchronous blocking, scaling the queue consumption with multiple concurrent workers is what unlocks significant performance gains and reliability for the application's background processes.Key Benefits of Multi-Worker Queue Consumption
- Consistent, Low Latency: Multiple workers process jobs in parallel, preventing any single slow or heavy job (e.g., report generation) from causing a queue backlog. This ensures time-sensitive tasks, like password resets, are processed quickly, maintaining instant user feedback.
- Enhanced Reliability and Resilience: If one worker crashes, the other workers instantly take over** the remaining jobs. This prevents a complete system freeze and ensures queue processing remains continuous.
- Decoupling and Effortless Scaling: The queue facilitates decoupling. When background load increases, you simply deploy more CakePHP queue workers. This horizontal scaling is simple, cost-effective, and far more efficient than scaling the entire web server layer.
Workflows that Benefit from Multi-Worker Concurrency
These examples show why using multiple concurrent workers with the CakePHP Queue plugin (https://github.com/cakephp/queue) is essential for performance and reliability:- Mass Email Campaigns (Throughput): Workers process thousands of emails simultaneously, drastically cutting the time for large campaigns and ensuring the entire list is delivered fast.
- Large Media Processing (Parallelism): Multiple workers handle concurrent user uploads or divide up thumbnail generation tasks. This speeds up content delivery by preventing one heavy image from blocking all others.
- High-Volume API Synchronization (Consistency): Workers ensure that unpredictable external API latency from one service doesn't paralyze updates to another. This maintains a consistent, uninterrupted flow of data across all integrations.
The Job
Lets say that you have the queue job like this:<?php declare(strict_types=1); namespace App\Job; use Cake\Mailer\Mailer; use Cake\ORM\TableRegistry; use Cake\Queue\Job\JobInterface; use Cake\Queue\Job\Message; use Interop\Queue\Processor; /** * SendBatchNotification job */ class SendBatchNotificationJob implements JobInterface { /** * The maximum number of times the job may be attempted. * * @var int|null */ public static $maxAttempts = 10; /** * We need to set the shouldBeUnique to true to avoid race condition with multiple queue workers * * @var bool */ public static $shouldBeUnique = true; /** * Executes logic for SendBatchNotificationJob * * @param \Cake\Queue\Job\Message $message job message * @return string|null */ public function execute(Message $message): ?string { // 1. Retrieve job data from the message object $data = $message->getArgument('data'); $userId = $data['user_id'] ?? null; if (!$userId) { // Log error or skip, but return ACK to remove from queue return Processor::ACK; } try { // 2. Load user and prepare email $usersTable = TableRegistry::getTableLocator()->get('Users'); $user = $usersTable->get($userId); $mailer = new Mailer('default'); $mailer ->setTo($user->email) ->setSubject('Your batch update is complete!') ->setBodyString("Hello {$user->username}, \n\nThe recent batch process for your account has finished."); // 3. Send the email (I/O operation that can benefit from concurrency) $mailer->send(); } catch (\Exception $e) { // If the email server fails, we can tell the worker to try again later // The queue system will handle the delay and retry count. return Processor::REQUEUE; } // Success: Acknowledge the job to remove it from the queue return Processor::ACK; } } Setting $shouldBeUnique = true; in a CakePHP Queue Job class is crucial for preventing a race condition when multiple queue workers consume the same queue, as it ensures only one instance of the job is processed at any given time, thus avoiding duplicate execution or conflicting updates. In another part of the application you have code that enqueues the job like this: // In a Controller, Command, or Service Layer: use Cake\ORM\TableRegistry; use Cake\Queue\QueueManager; use App\Job\SendBatchNotificationJob; // Our new Job class // Find all users who need notification (e.g., 500 users) $usersToNotify = TableRegistry::getTableLocator()->get('Users')->find()->where(['is_notified' => false]); foreach ($usersToNotify as $user) { // Each loop iteration dispatches a distinct, lightweight job $data = [ 'user_id' => $user->id, ]; // Dispatch the job using the JobInterface class name QueueManager::push(SendBatchNotificationJob::class, $data); } // Result: 500 jobs are ready in the queue. By pushing 500 separate jobs, you allow 10, 20, or even 50 concurrent workers to pick up these small jobs and run the email sending logic in parallel, drastically reducing the total time it takes for all 500 users to receive their notification. Implementing Concurrency with multiple queue workers
In modern Linux distributions, systemd is the preferred init and service manager. By leveraging User Sessions and the Lingering feature, we can run the CakePHP worker as a dedicated, managed service without needing root privileges for the process itself, offering excellent stability and integration.SystemD User Sessions
Prerequisite: The Lingering User Session
For a service to run continuously in the background, even after the user logs out, we must enable the lingering feature for the user account that will run the workers (e.g., a service user namedappuser). Enabling Lingering: Bash sudo loginctl enable-linger appuser This ensures the appuser's systemd user session remains active indefinitely, allowing the worker processes to survive server reboots and user logouts. Creating the Systemd User Unit File
We define the worker service using a unit file, placed in the user's systemd configuration directory (~/.config/systemd/user/). - File Location:
~appuser/.config/systemd/user/[email protected] - Purpose of
@: The@symbol makes this a template unit. This allows us to use a single file to create multiple, distinct worker processes, which is key to achieving concurrency.
[email protected] Content: Ini, TOML [Unit] Description=CakePHP Queue Worker #%i After=network.target [Service] # We use the full path to the PHP executable ExecStart=/usr/bin/php /path/to/your/app/bin/cake queue worker # Set the current working directory to the application root WorkingDirectory=/path/to/your/app # Restart the worker if it fails (crashes, memory limit exceeded, etc.) Restart=always # Wait a few seconds before attempting a restart RestartSec=5 # Output logs to the systemd journal StandardOutput=journal StandardError=journal # Ensure permissions are correct and process runs as the user User=appuser [Install] WantedBy=default.target Achieving Concurrency (Scaling the Workers)
Concurrency is achieved by enabling multiple instances of this service template, distinguished by the suffix provided in the instance name (e.g.,-1, -2, -3). Reload and Start Instances: After creating the file, the user session must be reloaded, and the worker instances must be started and enabled: Reload Daemon (as appuser): Bash systemctl --user daemon-reload Start and Enable Concurrent Workers (as appuser): To run three workers concurrently: Bash # Start Worker Instance 1 systemctl --user enable --now [email protected] # Start Worker Instance 2 systemctl --user enable --now [email protected] # Start Worker Instance 3 systemctl --user enable --now [email protected] Result: The system now has three independent and managed processes running the bin/cake queue worker command, achieving a concurrent processing pool of three jobs. Monitoring and Management
systemd provides powerful tools for managing and debugging the worker pool: Check Concurrency Status: Bashsystemctl --user status 'cakephp-worker@*' This command displays the status of all concurrent worker instances, showing which are running or if any have failed and been automatically restarted. Viewing Worker Logs: All output is directed to the systemd journal: Bash journalctl --user -u 'cakephp-worker@*' -f This allows developers to inspect errors and task completion messages across all concurrent workers from a single, centralized log. Using systemd and lingering is highly advantageous as it eliminates the need for a third-party tool, integrates naturally with system logging, and provides reliable process management for a robust, concurrent task environment. Summary
Shifting from a single worker to multiple concurrent workers is essential to prevent bottlenecks and system freezes caused by slow jobs, ensuring high reliability and low latency for asynchronous tasks. One robust way to achieve this concurrency in CakePHP applications is by using Systemd User Sessions and template unit files (e.g.,[email protected]) to easily manage and horizontally scale the worker processes. This article is part of the CakeDC Advent Calendar 2025 (December 9th 2025) Notifications That Actually Work
Written by Yevgeny on December 08, 2025 •
145 VIEWS
This article is part of the CakeDC Advent Calendar 2025 (December 8th 2025) Building a modern application without notifications is like running a restaurant without telling customers their food is ready. Users need to know what's happening. An order shipped. A payment went through. Someone mentioned them in a comment. These moments matter, and how you communicate them matters even more. I've built notification systems before. They always started simple. Send an email when something happens. Easy enough. Then someone wants in-app notifications. Then someone needs Slack alerts. Then the mobile team wants push notifications. Before you know it, you're maintaining five different notification implementations, each with its own bugs and quirks. That's exactly why the CakePHP Notification plugin exists. It brings order to the chaos by giving you one consistent way to send notifications, regardless of where they're going or how they're being delivered. The core notification system (crustum/notification) provides the foundation with database and email support built in.
Two Worlds of Notifications
Notifications naturally fall into two categories, and understanding this split helps you architect your system correctly. The first category is what I call presence notifications. These are for users actively using your application. They're sitting there, browser open, working away. You want to tell them something right now. A new message arrived. Someone approved their request. The background job finished. These notifications need to appear instantly in the UI, update the notification bell, and maybe play a sound. They live in your database and get pushed to the browser through WebSockets. The second category is reach-out notifications. These go find users wherever they are. Email reaches them in their inbox. SMS hits their phone. Slack pings them in their workspace. Telegram messages appear on every device they own. These notifications cross boundaries, reaching into other platforms and services to deliver your message. Understanding this distinction is crucial because these two types of notifications serve different purposes and require different technical approaches. Presence notifications need a database to store history and WebSocket connections for real-time delivery. Reach-out notifications need API integrations and reliable delivery mechanisms.The Beautiful Part: One Interface
Here's where it gets good. Despite these two worlds being completely different, you write the same code to send both types. Your application doesn't care whether a notification goes to the database, WebSocket, email, or Slack. You just say "notify this user" and the system handles the rest.$user = $this->Users->get($userId); $user->notify(new OrderShipped($order)); That's it. The OrderShipped notification might go to the database for the in-app notification bell, get broadcast via WebSocket for instant delivery, and send an email with tracking information. All from that one line of code. Web interface for notifications
Let's talk about the in-app notification experience first. This is what most users interact with daily. That little bell icon in the corner of your application. Click it, see your notifications. It's so common now that users expect it. The NotificationUI plugin (crustum/notification-ui) provides a complete notification interface out of the box. There's a bell widget that you drop into your layout, and it just works. It shows the unread count, displays notifications in a clean interface, marks them as read when clicked, and supports actions like buttons in the notification. You have two display modes to choose from. Dropdown mode gives you the traditional experience where clicking the bell opens a menu below it. Panel mode creates a sticky side panel that slides in from the edge of your screen, similar to what you see in modern admin panels. Setting it up takes just a few lines in your layout template. <?= $this->element('Crustum/NotificationUI.notifications/bell_icon', [ 'mode' => 'panel', 'pollInterval' => 30000, ]) ?> The widget automatically polls the server for new notifications every 30 seconds by default. This works perfectly fine for most applications. Users see new notifications within a reasonable time, and your server isn't overwhelmed with requests. But sometimes 30 seconds feels like forever. When someone sends you a direct message, you want to see it immediately. That's where real-time broadcasting comes in. Real-Time Broadcasting for Instant Delivery
Adding real-time broadcasting transforms the notification experience. Instead of polling every 30 seconds, new notifications appear instantly through WebSocket connections. The moment someone triggers a notification for you, it pops up in your interface. The beautiful thing is you can combine both approaches. Keep database polling as a fallback, add real-time broadcasting for instant delivery. If the WebSocket connection drops, polling keeps working. When the connection comes back, broadcasting takes over again. Users get reliability and instant feedback.<?php $authUser = $this->request->getAttribute('identity'); ?> <?= $this->element('Crustum/NotificationUI.notifications/bell_icon', [ 'mode' => 'panel', 'enablePolling' => true, 'broadcasting' => [ 'userId' => $authUser->getIdentifier(), 'userName' => $authUser->username, 'pusherKey' => 'app-key', 'pusherHost' => '127.0.0.1', 'pusherPort' => 8080, ], ]) ?> This hybrid approach gives you the best of both worlds. Real-time when possible, reliable fallback always available. Behind the scenes, this uses the Broadcasting (crustum/broadcasting) and BroadcastingNotification (crustum/notification-broadcasting) plugins working together. When you broadcast a notification, it goes through the same WebSocket infrastructure. The NotificationUI plugin handles subscribing to the right channels and updating the interface when broadcasts arrive. Creating Your Notification Classes
Notifications in CakePHP are just classes. Each notification type gets its own class that defines where it goes and what it contains. This keeps everything organized and makes notifications easy to test.namespace App\Notification; use Crustum\Notification\Notification; use Crustum\Notification\Message\DatabaseMessage; use Crustum\Notification\Message\MailMessage; use Crustum\BroadcastingNotification\Message\BroadcastMessage; use Crustum\BroadcastingNotification\Trait\BroadcastableNotificationTrait; class OrderShipped extends Notification { use BroadcastableNotificationTrait; public function __construct( private $order ) {} public function via($notifiable): array { return ['database', 'broadcast', 'mail']; } public function toDatabase($notifiable): DatabaseMessage { return DatabaseMessage::new() ->title('Order Shipped') ->message("Your order #{$this->order->id} has shipped!") ->actionUrl(Router::url(['controller' => 'Orders', 'action' => 'view', $this->order->id], true)) ->icon('check'); } public function toMail($notifiable): MailMessage { return MailMessage::create() ->subject('Your Order Has Shipped') ->greeting("Hello {$notifiable->name}!") ->line("Great news! Your order #{$this->order->id} has shipped.") ->line("Tracking: {$this->order->tracking_number}") ->action('Track Your Order', ['controller' => 'Orders', 'action' => 'track', $this->order->id]); } public function toBroadcast(EntityInterface|AnonymousNotifiable $notifiable): BroadcastMessage|array { return new BroadcastMessage([ 'title' => 'Order Shipped', 'message' => "Your order #{$this->order->id} has shipped!", 'order_id' => $this->order->id, 'order_title' => $this->order->title, 'tracking_number' => $this->order->tracking_number, 'action_url' => Router::url(['controller' => 'Orders', 'action' => 'view', $this->order->id], true), ]); } public function broadcastOn(): array { return [new PrivateChannel('users.' . $notifiable->id)]; } } The via method tells the system which channels to use. The toDatabase method formats the notification for display in your app. The toMail method creates an email. The toBroadcast method formats the notification for broadcast. The broadcastOn method specifies which WebSocket channels to broadcast to. One notification class, three different formats, all sent automatically when you call notify. That's the power of this approach. Reach-Out Notifications
Now let's talk about reaching users outside your application. This is where the plugin really shines because there are so many channels available. Email is the classic. Everyone has email. The base notification plugin gives you a fluent API for building beautiful transactional emails. You describe what you want to say using simple methods, and it generates a responsive HTML email with a plain text version automatically. Slack integration (crustum/notification-slack) lets you send notifications to team channels. Perfect for internal alerts, deployment notifications, or monitoring events. You get full support for Slack's Block Kit, so you can create rich, interactive messages with buttons, images, and formatted sections. Telegram (crustum/notification-telegram) reaches users on their phones. Since Telegram has a bot API, you can send notifications directly to users who've connected their Telegram account. The messages support formatting, buttons, and even images. SMS through Seven.io (crustum/notification-seven) gets messages to phones as text messages. This is great for critical alerts, verification codes, or appointment reminders. Things that need immediate attention and work even without internet access. RocketChat (crustum/notification-rocketchat) is perfect if you're using RocketChat for team communication. Send notifications to channels or direct messages, complete with attachments and formatting. The plugin system allows you to add new notification channels easily. You can create a new plugin for a new channel and install it like any other plugin. The brilliant part is that adding any of these channels to a notification is just adding a string to the via array and implementing one method. Want to add Slack to that OrderShipped notification? Add 'slack' to the array and implement toSlack. Done. public function via($notifiable): array { return ['database', 'broadcast', 'mail', 'slack']; } public function toSlack($notifiable): BlockKitMessage { return (new BlockKitMessage()) ->text('Order Shipped') ->headerBlock('Order Shipped') ->sectionBlock(function ($block) { $block->text("Order #{$this->order->id} has shipped!"); $block->field("*Customer:*\n{$notifiable->name}"); $block->field("*Tracking:*\n{$this->order->tracking_number}"); }); } Now when someone's order ships, they get an in-app notification with real-time delivery, an email with full details, and your team gets a Slack message in the orders channel. All automatic. The Database as Your Notification Store
Every notification sent through the database channel gets stored in a notifications table. This gives you a complete history of what users were notified about and when. The NotifiableBehavior adds methods to your tables for working with notifications.$user = $usersTable->get($userId); $unreadNotifications = $usersTable->unreadNotifications($user)->all(); $readNotifications = $usersTable->readNotifications($user)->all(); $usersTable->markNotificationAsRead($user, $notificationId); $usersTable->markAllNotificationsAsRead($user); The UI widget uses these methods to display notifications and mark them as read. But you can use them anywhere in your application. Maybe you want to show recent notifications on a user's dashboard. Maybe you want to delete old notifications. The methods are there. Queuing for Performance
Sending notifications, especially external ones, takes time. Making API calls to Slack, Seven.io, or Pusher adds latency to your request. If you're sending to multiple channels, that latency multiplies. The solution is queuing. Implement the ShouldQueueInterface on your notification class, and the system automatically queues notification sending as background jobs.use Crustum\Notification\ShouldQueueInterface; class OrderShipped extends Notification implements ShouldQueueInterface { protected ?string $queue = 'notifications'; } Now when you call notify, it returns immediately. The actual notification sending happens in a background worker. Your application stays fast, users don't wait, and notifications still get delivered reliably. Testing Your Notifications
Testing notification systems used to be painful. You'd either send test notifications to real services (annoying) or mock everything (fragile). The NotificationTrait makes testing clean and simple.use Crustum\Notification\TestSuite\NotificationTrait; class OrderTest extends TestCase { use NotificationTrait; public function testOrderShippedNotification() { $user = $this->Users->get(1); $order = $this->Orders->get(1); $user->notify(new OrderShipped($order)); $this->assertNotificationSentTo($user, OrderShipped::class); $this->assertNotificationSentToChannel('mail', OrderShipped::class); $this->assertNotificationSentToChannel('database', OrderShipped::class); } } The trait captures all notifications instead of sending them. You can assert that the right notifications were sent to the right users through the right channels. You can even inspect the notification data to verify it contains the correct information. There are many diferent assertions you can use to test your notifications. You can assert that the right notifications were sent to the right users through the right channels. You can even inspect the notification data to verify it contains the correct information. Localization
Applications serve users in different languages, and your notifications should respect that. The notification system integrates with CakePHP's localization system.$user->notify((new OrderShipped($order))->locale('es')); Even better, users can have a preferred locale stored on their entity. Implement a preferredLocale method or property, and notifications automatically use it. class User extends Entity { public function getPreferredLocale(): string { return $this->locale; } } Now you don't even need to specify the locale. The system figures it out automatically and sends notifications in each user's preferred language. Bringing It Together
What I like about this notification system is how it scales with your needs. Start simple. Just database notifications. Add real-time broadcasting when you want instant delivery. Add email when you need to reach users outside your app. Add Slack when your team wants internal alerts. Add SMS for critical notifications. Each addition is incremental. You're not rewriting your notification system each time. You're adding channels to the via array and implementing format methods. The core logic stays the same. The separation between presence notifications and reach-out notifications makes architectural sense. They serve different purposes, use different infrastructure, but share the same interface. This makes your code clean, your system maintainable, and your notifications reliable. Whether you're building a small application with basic email notifications or a complex system with real-time updates, database history, email, SMS, and team chat integration, you're using the same patterns. The same notification classes. The same notify method. That consistency is what makes the system powerful. You're not context switching between different notification implementations. You're just describing what should be notified, who should receive it, and how it should be formatted. The system handles the rest. This article is part of the CakeDC Advent Calendar 2025 (December 8th 2025)Advanced Exports in CakePHP and Style...
Written by Acampanario on December 05, 2025 •
148 VIEWS
This article is part of the CakeDC Advent Calendar 2025 (December 14th 2025) You can see the complete code in [https://github.com/ACampanario/advent2025]
1.- Requirements
Add with composer the phpoffice librarycomposer require "phpoffice/phpspreadsheet" And another to fill a the sale table with 1000 rows composer require "fakerphp/faker" 2.- Create sales table an fill with 10000 rows
config/Migrations/20251201101023_CreateSales.phppublic function change(): void { $table = $this->table('sales'); $table ->addColumn('order_number', 'string', ['limit' => 20]) ->addColumn('customer_name', 'string', ['limit' => 50]) ->addColumn('product', 'string', ['limit' => 50]) ->addColumn('quantity', 'integer') ->addColumn('price', 'decimal', ['precision' => 10, 'scale' => 2]) ->addColumn('created', 'datetime', ['default' => 'CURRENT_TIMESTAMP']) ->create(); $faker = \Faker\Factory::create(); $rows = []; for ($i = 0; $i < 10000; $i++) { $rows[] = [ 'order_number' => 'ORD' . str_pad((string)($i + 1), 5, '0', STR_PAD_LEFT), 'customer_name' => $faker->name(), 'product' => $faker->word(), 'quantity' => rand(1, 5), 'price' => $faker->randomFloat(2, 10, 500), 'created' => $faker->dateTimeBetween('-1 year', 'now')->format('Y-m-d H:i:s'), ]; } $this->table('sales')->insert($rows)->save(); } 3.- Create a function called export
This function uses two services: one to fetch the data and another to generate the file that will be exported. This function returns a JSON with the statistics. Add to config/routes.php$builder->connect('/export', ['controller' => 'Pages', 'action' => 'export']); src/Controller/PagesController.php public function export(): Response { // Measure start time and memory $startTime = microtime(true); // Query params $format = $this->getRequest()->getQuery('format') ?? 'xlsx'; // 'csv' o 'xlsx' $filters['quantity'] = $this->getRequest()->getQuery('quantity'); $cache = $this->getRequest()->getQuery('cache') != null; // Get data $service = new SalesService($filters); $sales = $service->getSales(); // Create spreadsheet $service = new SpreadsheetService($cache); $filename = $service->generate($sales, $format); // Measure memory and final time $endTime = microtime(true); $endMem = memory_get_usage(); $peakMem = memory_get_peak_usage(); $cacheFiles = 0; if ($cache) { clearstatcache(true, TMP . 'cache/phpspreadsheet/'); $cacheFiles = count(glob(TMP . 'cache/phpspreadsheet/*.cache')); } // Return JSON stats and filename $data = [ 'cache' => $cache ? 'ON' : 'OFF', 'memory' => round($endMem/1024/1024,2), 'peakMemory' => round($peakMem/1024/1024,2), 'time' => round($endTime-$startTime,2), 'cacheFiles' => $cacheFiles, 'filename' => $filename ]; $this->response = $this->response ->withType('application/json') ->withStringBody(json_encode($data)); return $this->response; } 4.- Create a service to fetch the data from the table
src/Service/SalesService.php<?php declare(strict_types=1); namespace App\Service; use Cake\ORM\Table; use Cake\ORM\TableRegistry; class SalesService { protected Table $salesTable; protected array $options = []; public function __construct(array $params) { $this->salesTable = TableRegistry::getTableLocator()->get('Sales'); $this->options = $params; } /** * Retrieves sales grouped by product * The data is already cached by the finder * * @return array [['product' => 'Product A', 'total' => 10], ...] */ public function getSales(): array { /** @uses \App\Model\Table\SalesTable::findSales() */ return $this->salesTable->find('sales', $this->options)->toArray(); } } 5.- Create a finder in the Sales table that retrieves data based on the passed parameters
src/Model/Table/SalesTable.php public function findSales(Query $query, array $options): Query { $query->orderBy(['Sales.id' => 'ASC']); if ($options['quantity'] !== null) { $query->where(['Sales.quantity' => (int)$options['quantity']]); } return $query; } 6.- Create the service to generate the file
This service can receive in the constructor whether caching should be used or not. This service generates, according to the format, a CSV or Excel file with styling, as well as a chart. src/Service/SpreadsheetService.php<?php declare(strict_types=1); namespace App\Service; use App\Lib\BlockFileCache; use Cake\ORM\Table; use PhpOffice\PhpSpreadsheet\Chart\Chart; use PhpOffice\PhpSpreadsheet\Chart\DataSeries; use PhpOffice\PhpSpreadsheet\Chart\DataSeriesValues; use PhpOffice\PhpSpreadsheet\Chart\PlotArea; use PhpOffice\PhpSpreadsheet\Chart\Title; use PhpOffice\PhpSpreadsheet\Settings; use PhpOffice\PhpSpreadsheet\Spreadsheet; use PhpOffice\PhpSpreadsheet\Style\Fill; use PhpOffice\PhpSpreadsheet\Writer\Csv; use PhpOffice\PhpSpreadsheet\Writer\Xlsx; class SpreadsheetService { public function __construct(bool $cache) { if ($cache) { $cachePath = TMP . 'cache' . DS . 'phpspreadsheet' . DS; $cache = new BlockFileCache($cachePath, 100); Settings::setCache($cache); } } public function generate(array $sales, $format) { // Create spreadsheet $spreadsheet = new Spreadsheet(); $sheet = $spreadsheet->getActiveSheet(); // Headers $headers = ['Order Number', 'Customer Name', 'Product', 'Quantity', 'Price', 'Created']; $sheet->fromArray($headers, null, 'A1'); // Header styles $sheet->getStyle('A1:F1')->getFont()->setBold(true)->getColor()->setRGB('FFFFFF'); $sheet->getStyle('A1:F1')->getFill() ->setFillType(Fill::FILL_SOLID) ->getStartColor()->setRGB('4CAF50'); // Data with alternating rows $rowNum = 2; foreach ($sales as $sale) { $sheet->setCellValue("A{$rowNum}", $sale->order_number) ->setCellValue("B{$rowNum}", $sale->customer_name) ->setCellValue("C{$rowNum}", $sale->product) ->setCellValue("D{$rowNum}", $sale->quantity) ->setCellValue("E{$rowNum}", $sale->price) ->setCellValue("F{$rowNum}", $sale->created->format('Y-m-d H:i:s')); if ($rowNum % 2 === 0) { $sheet->getStyle("A{$rowNum}:F{$rowNum}") ->getFill() ->setFillType(Fill::FILL_SOLID) ->getStartColor()->setRGB('E8F5E9'); } $rowNum++; } // Graph $labels = [ new DataSeriesValues('String', "Worksheet!A2:A10001", null, 100) ]; $quantityValues = new DataSeriesValues('Number', "Worksheet!D2:D101", null, 100); $priceValues = new DataSeriesValues('Number', "Worksheet!E2:E101", null, 100); $quantityName = new DataSeriesValues('String', "Worksheet!D1", null, 1); $priceName = new DataSeriesValues('String', "Worksheet!E1", null, 1); $series = new DataSeries( DataSeries::TYPE_BARCHART, DataSeries::GROUPING_CLUSTERED, [0, 1], [$quantityName, $priceName], $labels, [$quantityValues, $priceValues] ); $series->setPlotDirection(DataSeries::DIRECTION_COL); $plotArea = new PlotArea(null, [$series]); $title = new Title('Quantity & Price per Order'); $chart = new Chart( 'Sales Chart', $title, null, $plotArea ); $chart->setTopLeftPosition('I2'); $chart->setBottomRightPosition('U30'); $sheet->addChart($chart); // Save file $filename = 'sales_export_' . date('Ymd_His') . '.' . $format; $tempPath = TMP . $filename; if ($format === 'csv') { $writer = new Csv($spreadsheet); } else { $writer = new Xlsx($spreadsheet); $writer->setIncludeCharts(true); } $writer->save($tempPath); return $filename; } } 7.- Create a function for downloading the file
Add to config/routes.php$builder->connect('/download', ['controller' => 'Pages', 'action' => 'download']); src/Controller/PagesController.php public function download() { $filename = $this->getRequest()->getQuery('filename'); $tempPath = TMP . $filename; if (!file_exists($tempPath)) { throw new NotFoundException("File not found"); } $ext = pathinfo($tempPath, PATHINFO_EXTENSION); $type = $ext === 'csv' ? 'text/csv' : 'application/vnd.openxmlformats-officedocument.spreadsheetml.sheet'; return $this->response ->withType($type) ->withDownload($filename) ->withFile($tempPath); } 3.- Create a class to use as cache
This class is based on Psr\SimpleCache\CacheInterface Is used to write a file on disk in a minimum blockSize of 100, you can change by parameters, this affects memory and time src/Lib/BlockFileCache.phpnamespace App\Lib; use Psr\SimpleCache\CacheInterface; class BlockFileCache implements CacheInterface { protected string $cacheDir; protected int $blockSize; public function __construct(string $cacheDir, int $blockSize = 100) { $this->cacheDir = rtrim($cacheDir, DIRECTORY_SEPARATOR) . DIRECTORY_SEPARATOR; $this->blockSize = $blockSize; if (!is_dir($this->cacheDir)) { mkdir($this->cacheDir, 0777, true); } } protected function getPath(string $key): string { return $this->cacheDir . md5($key) . '.cache'; } public function get($key, $default = null): mixed { $file = $this->getPath($key); if (!file_exists($file)) { return $default; } $data = file_get_contents($file); return $data !== false ? unserialize($data) : $default; } public function set($key, $value, $ttl = null): bool { $file = $this->getPath($key); return file_put_contents($file, serialize($value)) !== false; } public function delete($key): bool { $file = $this->getPath($key); if (file_exists($file)) { unlink($file); } return true; } public function clear(): bool { $files = glob($this->cacheDir . '*.cache'); foreach ($files as $file) { unlink($file); } return true; } public function getMultiple($keys, $default = null): iterable { $results = []; foreach ($keys as $key) { $results[$key] = $this->get($key, $default); } return $results; } public function setMultiple($values, $ttl = null): bool { foreach ($values as $key => $value) { $this->set($key, $value, $ttl); } return true; } public function deleteMultiple($keys): bool { foreach ($keys as $key) { $this->delete($key); } return true; } public function has($key): bool { return file_exists($this->getPath($key)); } } Frontend of the Application
templates/Pages/exports.php- There are several calls to the
exportmethod to:- Export all
- Export to CSV
- Export applying a filter sent in the URL
- When clicking on a link, a request is made to generate the file in a temporary directory and return information about the process.
- Once the information is displayed on the right side, the file download is triggered.
 The displayed information relates to memory usage and execution time. Cache handling can be delegated and therefore separated from the business logic without issues. For a large amount of data, it is necessary to use a cache implementation to reduce memory consumption. However, depending on the implementation, the processing time increases — for example, in this case, when using disk-based cache.
 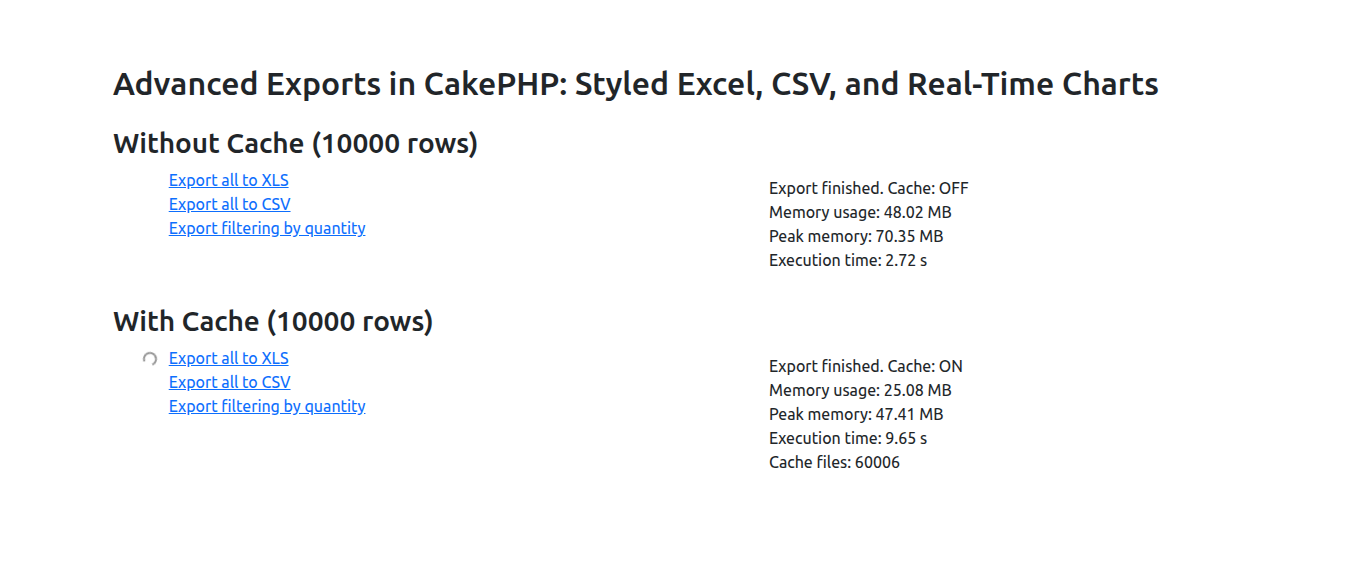 This article is part of the CakeDC Advent Calendar 2025 (December 14th 2025)
 Scaling Your CakePHP App: From Monolit...
Written by Arodriguez on December 05, 2025 •
161 VIEWS
This article is part of the CakeDC Advent Calendar 2025 (December 7th 2025) Your CakePHP application is a success story – users love it, and traffic is booming! But what happens when that single, mighty server starts to groan under the load? That's when you need to think about scaling. In this article, we'll dive into the world of application scaling, focusing on how to transform your regular CakePHP project into a horizontally scalable powerhouse. We'll cover why, when, and how to make the necessary changes to your application and infrastructure.
Vertical vs. Horizontal Scaling: What's the Difference?
Before we jump into the "how," let's clarify the two fundamental ways to scale any application:- Vertical Scaling (Scaling Up):
- Concept: Adding more resources (CPU, RAM, faster storage) to your existing server. Think of it as upgrading your car's engine.
- Pros: Simpler to implement initially, no major architectural changes needed.
- Cons: Hits a hard limit (you can only get so much RAM or CPU on a single machine), higher cost for diminishing returns, and still a single point of failure.
- Horizontal Scaling (Scaling Out):
- Concept: Adding more servers to distribute the load. This is like adding more cars to your fleet.
- Pros: Virtually limitless scalability (add as many servers as needed), high availability (if one server fails, others take over), better cost-efficiency at large scales.
- Cons: Requires significant architectural changes, more complex to set up and manage.
When Do You Need to Scale Horizontally?
While vertical scaling can buy you time, here are the key indicators that it's time to invest in horizontal scaling for your CakePHP application:- Hitting Performance Ceilings: Your server's CPU or RAM regularly maxes out, even after vertical upgrades.
- Single Point of Failure Anxiety: You dread a server crash because it means your entire application goes down.
- Inconsistent Performance: Your application's response times are erratic during peak hours.
- Anticipated Growth: You're expecting a marketing campaign or feature launch that will significantly increase traffic.
- High Availability Requirements: Your business demands minimal downtime, making a single server unacceptable.
From Regular to Resilient: Necessary Changes for CakePHP
The core principle for horizontal scaling is that your application servers must become "stateless." This means any server should be able to handle any user's request at any time, without relying on local data. If a user lands onApp Server A for one request and App Server B for the next, both servers must act identically. Here's what needs to change in a typical CakePHP, MySQL, cache, and logs setup: 1. Sessions: The Single Most Critical Change
- Problem: By default, CakePHP stores session files locally (
tmp/sessions). If a user's request is handled by a different server, their session is lost. - Solution: Centralize session storage using a distributed cache system like Redis or Memcached.
- CakePHP Action: Modify
config/app.phpto tell CakePHP to use acachehandler for sessions, pointing to your centralized Redis instance, Consult the official RedisEngine Options documentation.
// config/app.php 'Session' => [ 'defaults' => 'cache', // Use 'cache' instead of 'php' (file-based) 'handler' => [ 'config' => 'session_cache' // Name of the cache config to use ], ], // ... 'Cache' => [ 'session_cache' => [ 'className' => 'Redis', 'host' => 'your_redis_server_ip_or_hostname', 'port' => 6379, 'duration' => '+1 days', 'prefix' => 'cake_session_', ], // ... (ensure 'default' and '_cake_core_' also use Redis) ] 2. Application Cache
- Problem: Local cache (
tmp/cache) means each server builds its own cache, leading to inefficiency and potential inconsistencies. - Solution: Just like sessions, point all your CakePHP cache configurations (
default,_cake_core_, etc.) to your centralized Redis or Memcached server.
3. User Uploaded Files
- Problem: If a user uploads a profile picture to
App Server A's local storage (webroot/img/uploads/),App Server Bwon't find it. - Solution: Use a shared, centralized file storage system.
- CakePHP Action:
- Recommended: Implement Object Storage (e.g., AWS S3, DigitalOcean Spaces). This involves changing your file upload logic to send files directly to S3 via an SDK or plugin, and serving them from there.
- Alternative: Mount a Network File System (NFS) share (e.g., AWS EFS) at your upload directory (
webroot/img/uploads) across all app servers. This requires no code changes but can introduce performance bottlenecks and complexity at scale.
4. Application Logs
- Problem: Log files (
logs/error.log) are scattered across multiple servers, making debugging a nightmare. - Solution: Centralize your logging.
- CakePHP Action: Configure CakePHP's
Logengine to usesyslog(a standard logging protocol).To configure this, see the Logging to Syslog section in the documentation. Then, deploy a log collector (like Fluentd, Logstash) on each app server to forward these logs to a centralized logging system (e.g., Elasticsearch/Kibana, Papertrail, DataDog).
The Database Bottleneck: Database Replication (MySQL & PostgreSQL)
At this stage, your CakePHP application is fully stateless. However, your single database server now becomes the bottleneck. Whether you are using MySQL or PostgreSQL, the solution is Replication.Understanding Replication
- Primary (Writer): Handles all write operations (INSERT, UPDATE, DELETE).
- Replica (Reader): Handles read operations (SELECT).
- For MySQL: The Primary copies data changes to Replicas using the Binary Log (Binlog).
- For PostgreSQL: It uses Streaming Replication via WAL (Write-Ahead Logging) files to keep replicas in sync.
CakePHP Configuration Note: CakePHP makes switching easy. In yourconfig/app.php, you simply define your roles. The driver (Cake\Database\Driver\MysqlorCake\Database\Driver\Postgres) handles the specific connection protocol underneath. You don't need to change your query logic.
The Challenge: "Replica Lag"
Because replication is typically asynchronous, there's always a delay (lag) between a write on the Primary and when it becomes available on the Replicas. The Immediate Consistency Problem:- User updates their profile (write to Primary).
- App immediately redirects to the profile page (read from Replica).
- Due to lag, the Replica might not yet have the updated data. The user sees old information or a "not found" error.
Solutions for the Database Bottleneck
While your initial focus should be separating reads and writes in CakePHP, the Primary server will eventually hit its limits for write volume. Future solutions for database scaling depend heavily on the type of database server you use (Standard MySQL, Managed Cloud DB, MySQL Cluster, etc.). Here are common advanced solutions for when the Primary MySQL server becomes the final performance constraint:- Database Proxies (Connection Pooling):
- For MySQL: Tools like ProxySQL route queries automatically and split reads/writes.
- For PostgreSQL: PgBouncer is the industry standard for connection pooling to prevent overhead, often paired with Pgpool-II for load balancing and read/write splitting.
- High Availability Clusters:
- MySQL: Uses Group Replication or Galera Cluster.
- PostgreSQL: Tools like Patroni are widely used to manage high availability and automatic failover.
Local Testing: Scaling Your CakePHP App with Docker
Now that we understand the theory, let's see it in action with your actual CakePHP application. We will use Docker Compose to spin up a cluster of 3 application nodes, a Load Balancer, Redis, and MySQL. To make this easy, we won't even build a custom Docker image. We will use the popularwebdevops/php-nginx image, which comes pre-configured for PHP applications, if you already have a Docker container in your project, you can use that. You only need to add two files to the root of your CakePHP project. nginx.conf(The Load Balancer Config) This file configures an external Nginx container to distribute traffic among your 3 CakePHP application nodes.
upstream backend_hosts { # 'app' matches the service name in docker-compose # Docker resolves this to the IPs of all 3 replicas server app:80; } server { listen 80; location / { proxy_pass http://backend_hosts; # Pass necessary headers so CakePHP knows it's behind a proxy proxy_set_header Host $host; proxy_set_header X-Real-IP $remote_addr; proxy_set_header X-Forwarded-For $proxy_add_x_forwarded_for; proxy_set_header X-Forwarded-Proto $scheme; } } docker-compose.yml(The Cluster Infrastructure) Here we define the architecture. We mount your current local code into the containers so you don't need to rebuild anything.
version: '3.8' services: # Your CakePHP Application Nodes app: image: webdevops/php-nginx:8.2 # Pre-built image with PHP 8.2 & Nginx # We do NOT map ports here (e.g., "80:80") to avoid conflicts between replicas deploy: replicas: 3 # <--- Runs 3 instances of your CakePHP app volumes: - ./:/app # Mount your current project code into the container environment: # 1. Tell the image where CakePHP's webroot is WEB_DOCUMENT_ROOT: /app/webroot # 2. Inject configuration for app.php DEBUG: "true" SECURITY_SALT: "ensure-this-is-long-and-identical-across-nodes" # 3. Database Config (Connecting to the 'db' service) MYSQL_HOST: db MYSQL_USERNAME: my_user MYSQL_PASSWORD: my_password MYSQL_DATABASE: my_cake_app # 4. Redis Config (Session & Cache) REDIS_HOST: redis depends_on: - db - redis networks: - cake_cluster # The Main Load Balancer (Nginx) lb: image: nginx:alpine volumes: - ./nginx.conf:/etc/nginx/conf.d/default.conf:ro ports: - "8080:80" # Access your app at localhost:8080 depends_on: - app networks: - cake_cluster # Shared Services redis: image: redis:alpine networks: - cake_cluster db: image: mysql:8.0 environment: MYSQL_ROOT_PASSWORD: root MYSQL_DATABASE: my_cake_app MYSQL_USER: my_user MYSQL_PASSWORD: my_password networks: - cake_cluster networks: cake_cluster: How to Run the Test
- Configure
app.php: Ensure yourconfig/app.phpis reading the environment variables (e.g.,getenv('MYSQL_HOST')andgetenv('REDIS_HOST')) as discussed earlier. - Launch: Run the cluster:
docker compose up -d - Migrate: Run your database migrations on one of the containers (since they all share the same DB, you only need to do this once):
docker compose exec app-1 bin/cake migrations migrate _(Note: Docker might name the container slightly differently, e.g., project_app_1. Use docker ps to check the name)._ - Test: Open
http://localhost:8080.
app containers. Because you are using Redis for sessions, you can browse seamlessly, even though different servers are handling your requests! Moving to Production
Simulating this locally with Docker Compose is great for understanding the concepts, but in the real world, we rarely manage scaling by manually editing a YAML file and restarting containers. In a professional environment, more advanced tools take over to manage what we just simulated:- Container Orchestrators (Kubernetes / K8s): The industry standard. Instead of
docker-compose, you use Kubernetes. It monitors the health of your containers (Pods). If a CakePHP node stops responding due to memory leaks, Kubernetes kills it and creates a fresh one automatically to ensure you always have your desired number of replicas. - Cloud Load Balancers (AWS ALB / Google Cloud Load Balancing): Instead of configuring your own Nginx container as we did above, you use managed services from your cloud provider (like AWS Application Load Balancer). These are powerful hardware/software solutions that handle traffic distribution, SSL termination, and security before the request even hits your servers.
- Auto-Scaling Groups: This is the ultimate goal. You configure rules like: "If average CPU usage exceeds 70%, launch 2 new CakePHP servers. If it drops below 30%, destroy them." This allows your infrastructure to "breathe"—expanding during Black Friday traffic and shrinking (saving money) at night.
Conclusion
Scaling a CakePHP application horizontally is a journey, not a destination. It means shifting from managing a single server to orchestrating a distributed system. By making your application stateless with Redis and leveraging database replication (for either MySQL or PostgreSQL), you empower your CakePHP app to handle massive traffic, offer high availability, and grow far beyond the limits of a single machine. Are you ready to build a truly robust and scalable CakePHP powerhouse? This article is part of the CakeDC Advent Calendar 2025 (December 7th 2025)Login into your application with a Lin...
Written by Rperez on December 05, 2025 •
198 VIEWS
This article is part of the CakeDC Advent Calendar 2025 (December 6th 2025) With the 9.1.0 version of CakeDC/auth plugin, a new social service has been added to be able to authenticate into your application using a Linkedin account. This will be available with in the 13.x version of CakeDC/users for CakePHP 4.x application, and will be available for the the CakePHP 5.x versions soon.
Setting up a CakePHP 4 application
The fist step is to have a CakePHP application in any 4.x version. If you dont have one already, follow the quick start guide from the documetation: https://book.cakephp.org/4/en/quickstart.htmlInstalling the CakeDC/users plugin with linkedin Oauth
We start by requiring the plugin depedencies:composer require cakedc/users:^13.0 league/oauth2-linkedin:@stable firebase/php-jwt:@stable Create the file "config/users.php" and add the following content: <?php use Cake\Routing\Router; return [ 'Users.Social.login' => true, 'OAuth.providers.linkedInOpenIDConnect' => [ 'service' => \CakeDC\Auth\Social\Service\OpenIDConnectService::class, 'className' => \League\OAuth2\Client\Provider\LinkedIn::class, 'mapper' => \CakeDC\Auth\Social\Mapper\LinkedInOpenIDConnect::class, 'options' => [ 'redirectUri' => Router::fullBaseUrl() . '/auth/linkedInOpenIDConnect', 'linkSocialUri' => Router::fullBaseUrl() . '/link-social/linkedInOpenIDConnect', 'callbackLinkSocialUri' => Router::fullBaseUrl() . '/callback-link-social/linkedInOpenIDConnect', 'defaultScopes' => ['email', 'openid', 'profile'], // you can check your credentials in the "Auth" tab of your application dashboard in LinkedIn developers page 'clientId' => 'CLIENT_ID', 'clientSecret' => 'CLIENT_SECRET', ], ], ]; We can ignore the credentials for now. Ensure the Users plugin is loaded in your "src/Application.php" file and load your custom users config file. /** * {@inheritdoc} */ public function bootstrap() { parent::bootstrap(); $this->addPlugin(\CakeDC\Users\Plugin::class); Configure::write('Users.config', ['users']); } Run the plugin migrations to create the necesary tables. bin/cake migrations migrate -p CakeDC/Users In the routes file, update the root page to be the users profile from the plugin: // config/routes.php $builder->connect('/', ['plugin' => 'CakeDC/Users', 'controller' => 'Users', 'action' => 'profile']); You can create the first user, the super user by issuing the following command: bin/cake users add_superuser Now reload your application and try to login with the created user to make sure its working correctly. Configuring the Linkedin Oauth service.
How to get a LinkedIn OAuth Client ID & Client Secret
- Go to LinkedIn Developer Portal: https://www.linkedin.com/developers/
- Click “Create app”
- Log in with your LinkedIn account.
- Fill in required details:
- App name
- Company / personal profile
- Logo (required – upload anything like a placeholder)
- Agree to the terms
- Click "Create app"
- Open your app dashboard
- Click the "Auth" tab
- Client ID
- Client Secret (click “Show” to reveal)
Configure OAuth 2.0 / OIDC Redirect URLs
In the "Auth" tab of the linkedin application, scroll to "OAuth 2.0 settings" and add the following redirect urls:- https://{your-local-domain}/auth/linkedInOpenIDConnect
- https://{your-local-domain}/link-social/linkedInOpenIDConnect
- https://{your-local-domain}/callback-link-social/linkedInOpenIDConnect
Enable OpenID Connect (Very Important)
LinkedIn requires that you explicitly request the “OpenID” product.- Navigate to: "Products" Tab → "Sign In with LinkedIn using OpenID Connect"
- Click "Request access".
Login in your application.
Everything should be ready now.- In the login page of your applicaiton, click the link “Sign in with LinkedInOpenIDConnect”.
- Enter your login LinkedIn credentials.
- In the consent page, click “Allow”.
PHP 8.5 Pipe Operator: A New Era of Re...
Written by Yevgeny on December 03, 2025 •
319 VIEWS
This article is part of the CakeDC Technical Blog Series (5th December 2025)
PHP 8.5 Pipe Operator: A New Era of Readable Code
The PHP 8.5 pipe operator brings a powerful new way to write clear, maintainable code. Drawing inspiration from functional programming languages and Unix command-line tools, this feature transforms how we chain operations and handle data flow in our applications.Background: What is Piping and the Pipe Operator
The concept of piping originates from Unix systems in the 1960s, where Douglas McIlroy introduced the pipe symbol (|) to connect commands together. Each command processes data and passes the result to the next command, creating a smooth flow of information: cat users.txt | grep "active" | sort | uniq This simple pattern revolutionized how programmers think about data transformation. Instead of storing intermediate results in variables or nesting function calls, piping lets us read code from left to right, following the natural flow of data as it transforms step by step. Modern programming languages embraced this concept through the pipe operator. Elixir uses |>, F# has its pipe-forward operator, and R provides the %>% pipe from the magrittr package. Each implementation shares the same core idea: take the result from one expression and feed it as input to the next function. The Journey to PHP 8.5
PHP developers have long wanted a native pipe operator. Before PHP 8.5, we worked around this limitation using various creative approaches. One common pattern involved custom pipe functions using closures and array reduction:function pipe(...$functions) { return fn($input) => array_reduce( $functions, fn($carry, $fn) => $fn($carry), $input ); } $transform = pipe( fn($text) => trim($text), fn($text) => strtoupper($text), fn($text) => str_replace('HELLO', 'GOODBYE', $text) ); echo $transform(" hello world "); This approach works, but it requires extra boilerplate and doesn't feel as natural as a language-level operator. The PHP 8.5 pipe operator (|>) changes everything by making piping a first-class language feature. Understanding the Pipe Operator Syntax
The pipe operator in PHP 8.5 uses the|> symbol to pass values through a chain of transformations. Here's the basic pattern: $result = " hello world " |> (fn($text) => trim($text)) |> (fn($text) => strtoupper($text)) |> (fn($text) => str_replace('HELLO', 'GOODBYE', $text)); // Result: "GOODBYE WORLD" Each closure receives the result from the previous step and returns a new value. The pipe operator automatically passes this value to the next closure in the chain. Notice how we wrap each closure in parentheses - this is required by the PHP 8.5 implementation to ensure proper parsing. The Short Syntax with Spread Operator
When a pipe step simply passes its input directly to a function without transformation, spread operator provides a cleaner syntax:// Verbose: wrapping in a closure $result = " hello " |> (fn($text) => trim($text)) |> (fn($text) => strtoupper($text)); // Clean: using spread operator $result = " hello " |> trim(...) |> strtoupper(...); The ... syntax tells PHP "pass whatever comes from the pipe as arguments to this function." This works beautifully when you're not transforming the data between steps, making your pipelines even more readable. The real power emerges when we combine pipes with pattern matching and result types, creating clear, maintainable code that handles both success and failure cases elegantly. Adopting Elixir Phoenix Style in CakePHP Controllers
This article demonstrates a particular approach: bringing the elegant functional patterns from Elixir's Phoenix framework to CakePHP's controller layer. Phoenix developers are familiar with piping data through transformations, using pattern matching for control flow, and explicitly handling success and error cases through result types. These patterns have proven themselves in production applications, making code more maintainable and easier to reason about. By combining PHP 8.5's pipe operator with custom result types, we can write CakePHP controllers that feel similar to Phoenix controllers while staying true to PHP's object-oriented nature. Instead of nested conditionals and scattered error checks, we create clear pipelines where data flows from one transformation to the next. TheResult and FormResult classes mirror Elixir's tagged tuples ({:ok, data} and {:error, reason}), giving us the same expressiveness for handling outcomes. This isn't about replacing CakePHP's conventions - it's about enhancing them. We still use CakePHP's ORM, validation, and view rendering, but we organize the control flow in a more functional style. The result is controller code that reads like a story: fetch the data, validate it, save it, send notifications, redirect the user. Each step is explicit, each error case is handled, and the overall flow is immediately clear to anyone reading the code. Building Blocks: Result Types for Functional Flow
Before diving into practical examples, we need to establish our foundation: result types that represent success and failure outcomes. These classes work hand-in-hand with the pipe operator to create robust, type-safe data flows.The Result Class: Success or Error
TheResult class represents any operation that can succeed or fail. It's a simple but powerful abstraction that eliminates messy error handling and null checks: <?php declare(strict_types=1); namespace App\Result; use Exception; /** * Result type for functional programming pattern * * @template T */ class Result { public function __construct( public readonly string $status, public readonly mixed $data = null ) { } public static function ok(mixed $data): self { return new self('ok', $data); } public static function error(mixed $data): self { return new self('error', $data); } public function match(callable $ok, callable $error): mixed { return match ($this->status) { 'ok' => $ok($this->data), 'error' => $error($this->data), default => throw new Exception('Unknown result status') }; } public function isOk(): bool { return $this->status === 'ok'; } public function isError(): bool { return $this->status === 'error'; } } The Result class uses PHP 8.0's constructor property promotion and readonly properties to create an immutable container. We can create results using static factory methods: Result::ok($data) for success cases and Result::error($data) for failures. The match() method provides pattern matching - we give it two functions (one for success, one for error) and it automatically calls the right one based on the result's status. This eliminates conditional logic and makes our code more declarative. The FormResult Class: Rendering Responses
WhileResult handles business logic outcomes, FormResult specializes in web application responses. It represents the two main actions a controller can take: redirect to another page or render a template: <?php declare(strict_types=1); namespace App\Result; use Exception; /** * Form result type for controller actions */ class FormResult { private ?string $flashMessage = null; private string $flashType = 'success'; public function __construct( public readonly string $type, public readonly mixed $data = null ) { } public static function redirect(string $url): self { return new self('redirect', $url); } public static function render(string $template, array $vars): self { return new self('render', ['template' => $template, 'vars' => $vars]); } public function withFlash(string $message, string $type = 'success'): self { $this->flashMessage = $message; $this->flashType = $type; return $this; } public function getFlashMessage(): ?string { return $this->flashMessage; } public function getFlashType(): string { return $this->flashType; } public function match(callable $onRedirect, callable $onRender): mixed { return match ($this->type) { 'redirect' => $onRedirect($this->data), 'render' => $onRender($this->data['template'], $this->data['vars']), default => throw new Exception('Unknown result type') }; } } FormResult includes a fluent interface for adding flash messages through withFlash(). This method returns $this, allowing us to chain the flash message directly onto the result creation: FormResult::redirect('/posts') ->withFlash('Post created successfully!', 'success') Both result types use the same pattern matching approach, creating a consistent programming model throughout our application. Viewing a Post: Simple Pipe Flow
Let's start with a straightforward example: viewing a single post. This action demonstrates the basic pipe operator pattern and howFormResult handles different outcomes. The View Action
public function view($id = null) { return $id |> $this->findPost(...) |> (fn($post) => $post ? FormResult::render('view', ['post' => $post]) : FormResult::redirect('/posts') ->withFlash('Post not found', 'error')) |> $this->handleFormResult(...); } This compact method demonstrates the elegance of pipe-based programming. Let's trace how data flows through each step. Step 1: Starting with the ID
return $id |> $this->findPost(...) We begin with the post ID parameter. The pipe operator passes this ID directly to findPost() using the spread operator syntax. This clean notation means "take the piped value and pass it as the argument to findPost()". The method attempts to retrieve the post from the database. The findPost Helper
private function findPost(string|int $id): mixed { try { return $this->Posts->get($id); } catch (\Exception $e) { return null; } } This helper method wraps the database query in a try-catch block. If the post exists, we return the entity. If it doesn't exist or any error occurs, we return null. This simple pattern converts exceptions into nullable returns, making them easier to handle in our pipe flow. Step 2: Making a Decision
|> (fn($post) => $post ? FormResult::render('view', ['post' => $post]) : FormResult::redirect('/posts') ->withFlash('Post not found', 'error')) The second step receives either a Post entity or null. Using a ternary operator, we create different FormResult objects based on what we received. When the post exists, we create a render result containing the post data. When the post is null, we create a redirect result with an error message. Notice how the flash message chains directly onto the redirect using withFlash() - this fluent interface keeps the code clean and expressive. Step 3: Converting to HTTP Response
|> $this->handleFormResult(...); The final step takes our FormResult and converts it into a CakePHP HTTP response. Let's look at this helper method: private function handleFormResult(FormResult $result): Response|null { if ($result->getFlashMessage()) { $this->Flash->{$result->getFlashType()}(__($result->getFlashMessage())); } return $result->match( onRedirect: fn($url) => $this->redirect($url), onRender: fn($template, $vars) => $this->renderResponse($template, $vars) ); } First, we check if the result contains a flash message. If it does, we set it using CakePHP's Flash component. The dynamic method call $this->Flash->{$result->getFlashType()} allows us to call success(), error(), or warning() based on the flash type. Then we use pattern matching to handle the two possible result types. For redirects, we call CakePHP's redirect() method. For renders, we delegate to another helper: private function renderResponse(string $template, array $vars): Response|null { foreach ($vars as $key => $value) { $this->set($key, $value); } return $this->render($template); } This helper extracts all variables from the FormResult and sets them as view variables, then renders the specified template. The Complete Data Flow
Let's visualize how data flows through the view action:Input: $id (e.g., "123") ↓ findPost($id) ↓ Post entity or null ↓ Ternary decision: - If Post: FormResult::render('view', ['post' => $post]) - If null: FormResult::redirect('/posts')->withFlash('...') ↓ handleFormResult($result) ↓ - Set flash message (if present) - Pattern match on result type: * redirect: return $this->redirect($url) * render: return $this->renderResponse($template, $vars) ↓ HTTP Response to browser Each step in this flow has a single responsibility, making the code easy to understand and test. The pipe operator connects these steps without requiring intermediate variables or nested function calls. Editing a Post: Complex Pipeline with Validation
Editing a post involves more complexity: we need to find the post, validate the submitted data, save changes, and provide appropriate feedback. This scenario showcases the real power of combining pipes with result types.The Edit Action
public function edit($id = null) { if ($this->request->is(['patch', 'post', 'put'])) { return [$id, $this->request->getData()] |> (fn($context) => $this->findAndValidate(...$context)) |> (fn($result) => $result->match( ok: fn($data) => $this->savePost($data), error: fn($error) => Result::error($error))) |> (fn($result) => $result->match( ok: fn($post) => FormResult::redirect('/posts') ->withFlash('The post has been updated!', 'success'), error: fn($error) => FormResult::render('edit', $error) ->withFlash('The post could not be saved. Please, try again.', 'error'))) |> $this->handleFormResult(...); } return $id |> $this->findPost(...) |> (fn($post) => $post ? FormResult::render('edit', ['post' => $post]) : FormResult::redirect('/posts') ->withFlash('Post not found', 'error')) |> $this->handleFormResult(...); } This method handles two scenarios: GET requests to display the edit form, and POST/PUT requests to save changes. Let's explore the POST request flow in detail. Step 1: Creating the Context
return [$id, $this->request->getData()] |> (fn($context) => $this->findAndValidate(...$context)) We start by creating an array containing both the post ID and the form data. The pipe operator passes this array to the next step, where we use the spread operator (...$ctx) to unpack it into individual arguments for findAndValidate(). This makes it clear that we're passing the ID and data as separate parameters rather than working with array indexes like $context[0] and $context[1]. Finding and Validating Together
private function findAndValidate(string|int $id, array $data): Result { $post = $this->findPost($id); if (!$post) { return Result::error([ 'post' => null, 'errors' => ['Post not found'], ]); } $validation = $this->validatePost($data); if ($validation->isError()) { return Result::error([ 'post' => $post, 'errors' => $validation->data, ]); } return Result::ok([ 'post' => $post, 'data' => $validation->data, ]); } This method performs two checks in sequence. First, we verify the post exists. If it doesn't, we return an error Result immediately. If the post exists, we validate the submitted data: private function validatePost(array $data): Result { $post = $this->Posts->newEmptyEntity(); $post = $this->Posts->patchEntity($post, $data); if ($post->hasErrors()) { return Result::error($post->getErrors()); } return Result::ok($data); } The validation creates a new entity and patches it with the submitted data. If CakePHP's validation rules find any problems, we return a Result::error() with the validation errors. Otherwise, we return Result::ok() with the validated data. This two-step validation ensures we have both a valid post ID and valid form data before proceeding. The Result type makes it easy to handle errors at each step without nested if-else blocks. Step 2: Saving the Post
|> (fn($result) => $result->match( ok: fn($data) => $this->savePost($data), error: fn($error) => Result::error($error))) Now we have a Result that either contains our post and validated data, or an error. Pattern matching handles both cases elegantly. On the success path, we call savePost() with the validated data. On the error path, we simply pass the error through unchanged. This is a key pattern in pipe-based programming: errors propagate automatically through the pipeline without special handling. The match() call ensures type consistency since both branches return a Result object. The savePost Helper
private function savePost(array $context): Result { $post = $this->Posts->patchEntity($context['post'], $context['data']); if ($this->Posts->save($post)) { return Result::ok($post); } return Result::error([ 'post' => $post, 'errors' => $post->getErrors() ?: ['Save failed'], ]); } This method patches the existing post entity with the validated data and attempts to save it. If saving succeeds, we return Result::ok() with the updated post. If saving fails, we return Result::error() with any validation errors from the database. Step 3: Creating the Response
|> (fn($result) => $result->match( ok: fn($post) => FormResult::redirect('/posts') ->withFlash('The post has been updated!', 'success'), error: fn($error) => FormResult::render('edit', $error) ->withFlash('The post could not be saved. Please, try again.', 'error'))) The third step transforms our Result into a FormResult. Again, pattern matching handles both cases. On success, we create a redirect with a success message. On error, we re-render the edit form with the error data and an error message. Notice how errors from any previous step automatically flow to this error handler. Whether validation failed in step 1 or saving failed in step 2, we end up here with the appropriate error information to show the user. Step 4: Converting to HTTP Response
|> $this->handleFormResult(...); The final step uses the same handleFormResult() method we saw in the view action, converting our FormResult into an HTTP response. The spread operator syntax keeps this final step clean and readable. Visualizing the Edit Flow
The complexity of the edit action becomes clearer with a sequence diagram showing how data flows through each transformation: sequenceDiagram participant User participant Controller participant Pipeline participant Helpers participant Database User->>Controller: POST /posts/edit/123 Controller->>Pipeline: [$id, $data] Note over Pipeline: Step 1: Find & Validate Pipeline->>Helpers: findAndValidate(123, $data) Helpers->>Database: Get post by ID alt Post not found Database-->>Helpers: null Helpers-->>Pipeline: Result::error(['Post not found']) Pipeline->>Pipeline: Skip to Step 3 (error path) else Post found Database-->>Helpers: Post entity Helpers->>Helpers: Validate form data alt Validation failed Helpers-->>Pipeline: Result::error(['errors' => [...]]) Pipeline->>Pipeline: Skip to Step 3 (error path) else Validation passed Helpers-->>Pipeline: Result::ok(['post' => $post, 'data' => $validData]) Note over Pipeline: Step 2: Save Post Pipeline->>Helpers: savePost(['post' => $post, 'data' => $validData]) Helpers->>Database: Save updated post alt Save failed Database-->>Helpers: false Helpers-->>Pipeline: Result::error(['errors' => [...]]) Pipeline->>Pipeline: Continue to Step 3 (error path) else Save successful Database-->>Helpers: true Helpers-->>Pipeline: Result::ok($updatedPost) Note over Pipeline: Step 3: Create Response Pipeline->>Pipeline: FormResult::redirect('/posts') Pipeline->>Pipeline: ->withFlash('Success!', 'success') end end end Note over Pipeline: Step 4: Handle Result Pipeline->>Helpers: handleFormResult($formResult) Helpers->>Controller: HTTP Response Controller->>User: Redirect or render edit form This diagram illustrates several important aspects of our pipeline: Error Propagation: When an error occurs at any step, it flows through the remaining steps until reaching the error handler in Step 3. We don't need explicit error checking at each level. Type Transformations: Notice how data types evolve through the pipeline:- Start:
[int, array](ID and form data) - After Step 1:
Result<array>(post and validated data, or errors) - After Step 2:
Result<Post>(saved post, or errors) - After Step 3:
FormResult(redirect or render decision) - After Step 4:
Response(HTTP response)
match() call represents a decision point where the pipeline branches based on success or failure. These branches merge back into a common FormResult type, ensuring consistent handling at the end. The GET Request Flow
The GET request handling in the edit action is simpler, following the same pattern we saw in the view action:return $id |> $this->findPost(...) |> (fn($post) => $post ? FormResult::render('edit', ['post' => $post]) : FormResult::redirect('/posts') ->withFlash('Post not found', 'error')) |> $this->handleFormResult(...); We find the post, create a FormResult based on whether it exists, and convert it to an HTTP response. The pipe operator makes this three-step process read naturally from top to bottom. Benefits and Patterns
Working with the pipe operator reveals several powerful patterns that improve our code quality.Linear Reading Flow
Traditional nested function calls or method chains force us to read code inside-out or bottom-up:// Without pipes: read from inside to outside return $this->handleFormResult( $this->findPost($id) ? FormResult::render('view', ['post' => $this->findPost($id)]) : FormResult::redirect('/posts')->withFlash('Not found', 'error') ); The pipe operator lets us read top-to-bottom, following the natural flow of data: // With pipes: read from top to bottom return $id |> $this->findPost(...) |> (fn($post) => $post ? FormResult::render(...) : FormResult::redirect(...)) |> $this->handleFormResult(...); Debugging Made Easy
When debugging a pipeline, we can easily insert atap() function to inspect values at any point without disrupting the flow: private function tap(mixed $value, string $label = 'Debug'): mixed { debug("{$label}: " . json_encode($value, JSON_PRETTY_PRINT)); return $value; } Then add it anywhere in the pipeline: return [$id, $this->request->getData()] |> (fn($context) => $this->tap($context, 'Context')) |> (fn($context) => $this->findAndValidate(...$context)) |> (fn($result) => $this->tap($result, 'After validation')) |> (fn($result) => $result->match(...)) The tap() function logs the value and returns it unchanged, letting us peek into the pipeline without modifying its behavior. Type Safety Through the Pipeline
Each step in our pipeline has clear input and output types. TheResult and FormResult classes enforce type consistency, making it impossible to accidentally pass the wrong data type to the next step. PHP's type system, combined with these result types, catches errors at development time rather than runtime. Separation of Concerns
Each helper method has a single, clear purpose. ThefindPost() method handles database retrieval, while validatePost() focuses on data validation. The savePost() method takes care of database persistence, and handleFormResult() manages HTTP response generation. The pipe operator connects these focused functions into a complete workflow. This separation makes each function easy to test in isolation while maintaining a clear picture of the overall process. Error Handling Without Try-Catch
TheResult type eliminates the need for try-catch blocks throughout our code. Instead of throwing and catching exceptions, we return Result::error() and use pattern matching to handle failures. This approach makes error handling explicit and forces us to consider both success and failure paths. Practical Considerations
Performance
You might wonder if all these function calls and object creations impact performance. In practice, the overhead is negligible. Modern PHP's opcache optimizes these patterns effectively, and the benefits in code maintainability far outweigh any microscopic performance difference.Learning Curve
Developers new to functional programming patterns might initially find pipes and result types unfamiliar. However, once the concepts click, most developers find this style more intuitive than traditional imperative code. The linear flow and explicit error handling reduce cognitive load compared to nested conditionals and scattered error checks.When to Use Pipes
The pipe operator shines in scenarios with multiple sequential transformations. Form processing workflows benefit greatly from pipes as they typically involve validating data, saving it to the database, sending notifications, and finally redirecting the user. Data transformation pipelines that fetch, filter, transform, and format information also work beautifully with pipes. Multi-step business processes like checking inventory, calculating prices, creating orders, and sending confirmations become more readable when expressed as pipe chains. For simple operations with just one or two steps, traditional code often reads better. Consider a basic calculation that needs no error handling:// Overkill with pipes - harder to read $total = $items |> (fn($items) => array_sum(array_column($items, 'price'))) |> (fn($sum) => $sum * 1.2); // Clearer without pipes $subtotal = array_sum(array_column($items, 'price')); $total = $subtotal * 1.2; Similarly, simple database queries don't benefit from piping: // Unnecessary complexity with pipes $posts = [] |> (fn() => $this->Posts->find()) |> (fn($query) => $query->where(['status' => 'published'])) |> (fn($query) => $query->all()); // Much clearer as method chain $posts = $this->Posts->find() ->where(['status' => 'published']) ->all(); Use pipes when they genuinely improve readability and maintainability, particularly when handling multiple transformations with different return types or error handling needs. Conclusion
The PHP 8.5 pipe operator brings functional programming elegance to PHP without sacrificing the language's pragmatic, object-oriented roots. By combining pipes with result types and pattern matching, we can write code that clearly expresses intent, handles errors gracefully, and remains easy to test and maintain. The examples in this article demonstrate how pipes transform complex controller actions into readable, step-by-step transformations. Each step has a clear purpose, errors flow naturally through the pipeline, and the final code reads like a description of what happens rather than a series of imperative commands. As PHP continues to evolve, features like the pipe operator show the language's commitment to adopting the best ideas from functional programming while staying true to its accessible, practical nature. Whether you're building simple CRUD applications or complex business workflows, the pipe operator gives you a powerful new tool for writing better code. This article is part of the CakeDC Technical Blog Series (5th December 2025)CakePHP and the Power of Artificial In...
Written by Fhernandez on December 01, 2025 •
257 VIEWS
This article is part of the CakeDC Advent Calendar 2025 (December 2th 2025)
Bringing smart automation to modern web development
When we talk about Artificial Intelligence today, we are not talking about the future, we are talking about tools we already use every day, such as our phones, code editors, browsers and productivity apps. For developers, AI represents a new wave of innovation that allows us to embed intelligence directly into our projects to build smarter, more adaptive, and more valuable digital products. At CakeDC, we’ve been exploring how CakePHP 5 can be seamlessly integrated with AI to deliver powerful, automated, and intelligent solutions.Why combine CakePHP and AI?
Both technologies share a core philosophy: efficiency and structure. CakePHP offers a clean MVC framework, robust validation, and an ORM that keeps your data organized and secure. On the other hand, AI brings reasoning, summarization, and contextual understanding to your application. By combining them, we can:- Automate repetitive processes.
- Enhance user experience.
- Add value to existing products.
- Unlock new opportunities for digital innovation.
What AI means today
AI enhances productivity not by replacing people, but by amplifying human capabilities. It helps analyze data, generate content, automate workflows, and make better decisions faster. And thanks to APIs like OpenAI’s, this power is now accessible to every PHP developer. Imagine a world where your CakePHP app can:- Understand natural language input.
- Summarize uploaded reports.
- Classify customer feedback.
- Generate tailored content or recommendations.
Real use cases with CakePHP + AI
Here are some real examples of how we’re integrating AI into CakePHP projects:- Document upload with automatic summaries or data extraction.
- Customer support chatbots directly embedded in web portals.
- Image analysis for quality control or content tagging.
- Smart products or content recommendations.
- Automated reporting and document generation.
Technical integration made simple
Here’s how easy it is to call an AI model directly from your CakePHP app:use Cake\Http\Client; $http = new \http\Client(); $response = $http->post( 'https://api.openai.com/v1/chat/completions', [ 'model' => 'gpt-4o-mini', 'messages' => [ ['role' => 'system', 'content' => 'You are an assistant.'], ['role' => 'user', 'content' => 'Summarize this text...'], ], ], [ 'headers' => [ 'Authorization' => 'Bearer ' . Configure::Read('OPENAI_API_KEY'), 'Content-Type' => 'application/json', ], ], ); $result = $response->getJson(); From there, you simply parse the JSON response, store or display the data, and integrate it into your workflow. The simplicity of CakePHP’s Http Client makes this process smooth and reliable. Challenges and best practices
As with any emerging technology, integrating AI comes with responsibilities and considerations:- Manage API costs efficiently by batching requests or caching responses.
- Respect user privacy and comply with GDPR, especially when handling sensitive data.
- Implement robust error handling and retry logic for API calls.
- Log and monitor AI interactions for transparency and quality assurance.
- Use AI responsibly — as a tool to empower developers and users, not to replace them.
Looking ahead
The combination of CakePHP and AI opens exciting possibilities for the next generation of web applications: fast, smart, and secure. AI is not a replacement, it’s an enhancement. And with CakePHP’s solid foundation, developers can bring these intelligent capabilities to life faster than ever. This article is part of the CakeDC Advent Calendar 2025 (December 2th 2025)The CakeDC Advent Calendar is BACK!
Written by Amanda on December 01, 2025 •
296 VIEWS
It’s the most wonderful time of the year! I don’t just mean the holidays… I’m talking about the CakeDC Advent Calendar! If you missed it last year, we put together a series of blog posts in the form of a holiday advent calendar. Each day, you will get to open the gift of a new article written by one of our team members. You can wake up every morning in December with Cake(PHP). Does it get any better? So what can you expect this year? Great topics like:
- CakePHP upgrades
- Security tips
- CakePHP and the power of AI
- Supabase + CakePHP
- CakePHP Horizontal Scaling
- CakePHP and FrankenPHP
- Advanced Exports in CakePHP 5
- + so much more!
Enjoy our gift to you that lasts the whole month through (maybe I should write poems instead of blogs?). While you wait, here are some links from last year’s calendar to hold you over: https://www.cakedc.com/yevgeny_tomenko/2024/12/21/cakedc-search-filter-plugin https://www.cakedc.com/ajibarra/2024/12/12/almost-20-years-a-bit-of-history-about-cakephp https://www.cakedc.com/jorge_gonzalez/2024/12/20/5-cakephp-security-tips
See you tomorrow!