Elastic Algorithm Service (EAS) provides preset images for deploying community models and includes acceleration mechanisms for model distribution and image startup. You can quickly deploy community models to the EAS platform by configuring only a few parameters. This topic describes how to deploy community models from Hugging Face.
Background information
Open model communities, such as Hugging Face, offer a wide range of machine learning models and code implementations. Their library interfaces encapsulate the models, frameworks, and related processing logic. These interfaces allow you to perform end-to-end operations, such as model training and invocation, using only a few lines of code. This eliminates the need to handle complex issues such as environment dependencies, pre-processing and post-processing logic, or framework types during model use and deployment. This ecosystem improves upon the framework-model paradigm of TensorFlow and PyTorch.
EAS also provides optimized support for this paradigm, allowing you to deploy community models with a single click.
Deploy a Hugging Face model
Platform for AI (PAI) lets you quickly deploy models from the Hugging Face tasks library as online model services in EAS. The procedure is as follows:
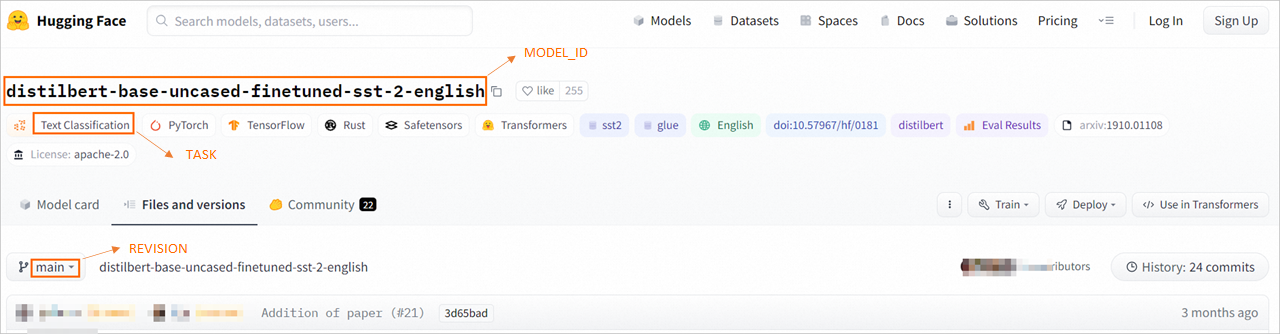
Select a model to deploy from the official tasks library. This topic uses a text classification model as an example. Go to the distilbert-base-uncased-finetuned-sst-2-english model page. Obtain the values for MODEL_ID, TASK, and REVISION as shown in the following figure, and save them locally.
Refer to the following table for the required TASK value for deploying an EAS service. Only the listed TASK types are supported.
TASK displayed on the Hugging Face page
TASK to specify in EAS
Audio Classification
audio-classification
Automatic Speech Recognition(ASR)
automatic-speech-recognition
Feature Extraction
feature-extraction
Fill Mask
fill-mask
Image Classification
image-classification
Question Answering
question-answering
Summarization
summarization
Text Classification
text-classification
Sentiment Analysis
sentiment-analysis
Text Generation
text-generation
Translation
translation
Translation (xx-to-yy)
translation_xx_to_yy
Text-to-Text Generation
text2text-generation
Zero-Shot Classification
zero-shot-classification
Document Question Answering
document-question-answering
Visual Question Answering
visual-question-answering
Image-to-Text
image-to-text
Deploy the Hugging Face model on the EAS Model Online Service page.
Log on to the PAI console. Select a region on the top of the page. Then, select the desired workspace and click Elastic Algorithm Service (EAS).
Click Deploy Service. In the Custom Model Deployment section, click Custom Deployment.
On the Custom Deployment page, configure the following key parameters. For more information about other parameters, see Custom deployment.
Parameter
Description
Basic Information
Service Name
Enter a custom service name as prompted.
Environment Information
Deployment Method
Select Image Deployment and select Enable Web App.
Image Configuration
From the Official Image list, select huggingface-inference. Then, select an image name based on the version.
Environment Variable
Click Add and configure the following parameters with the results from Step 1:
MODEL_ID: distilbert-base-uncased-finetuned-sst-2-english.
TASK: text-classification.
REVISION: main.
Run Command
After you select an image, the system automatically configures the run command. You do not need to modify the configuration.
Resource Information
Configure System Disk
Set the system disk to 130 GB.
Click Deploy. When the Service Status changes to Running, the service is deployed.
Call the deployed model service.
Use the console to call the service
Click the name of the target service to go to the service details page. In the upper-right corner, click View Web App.
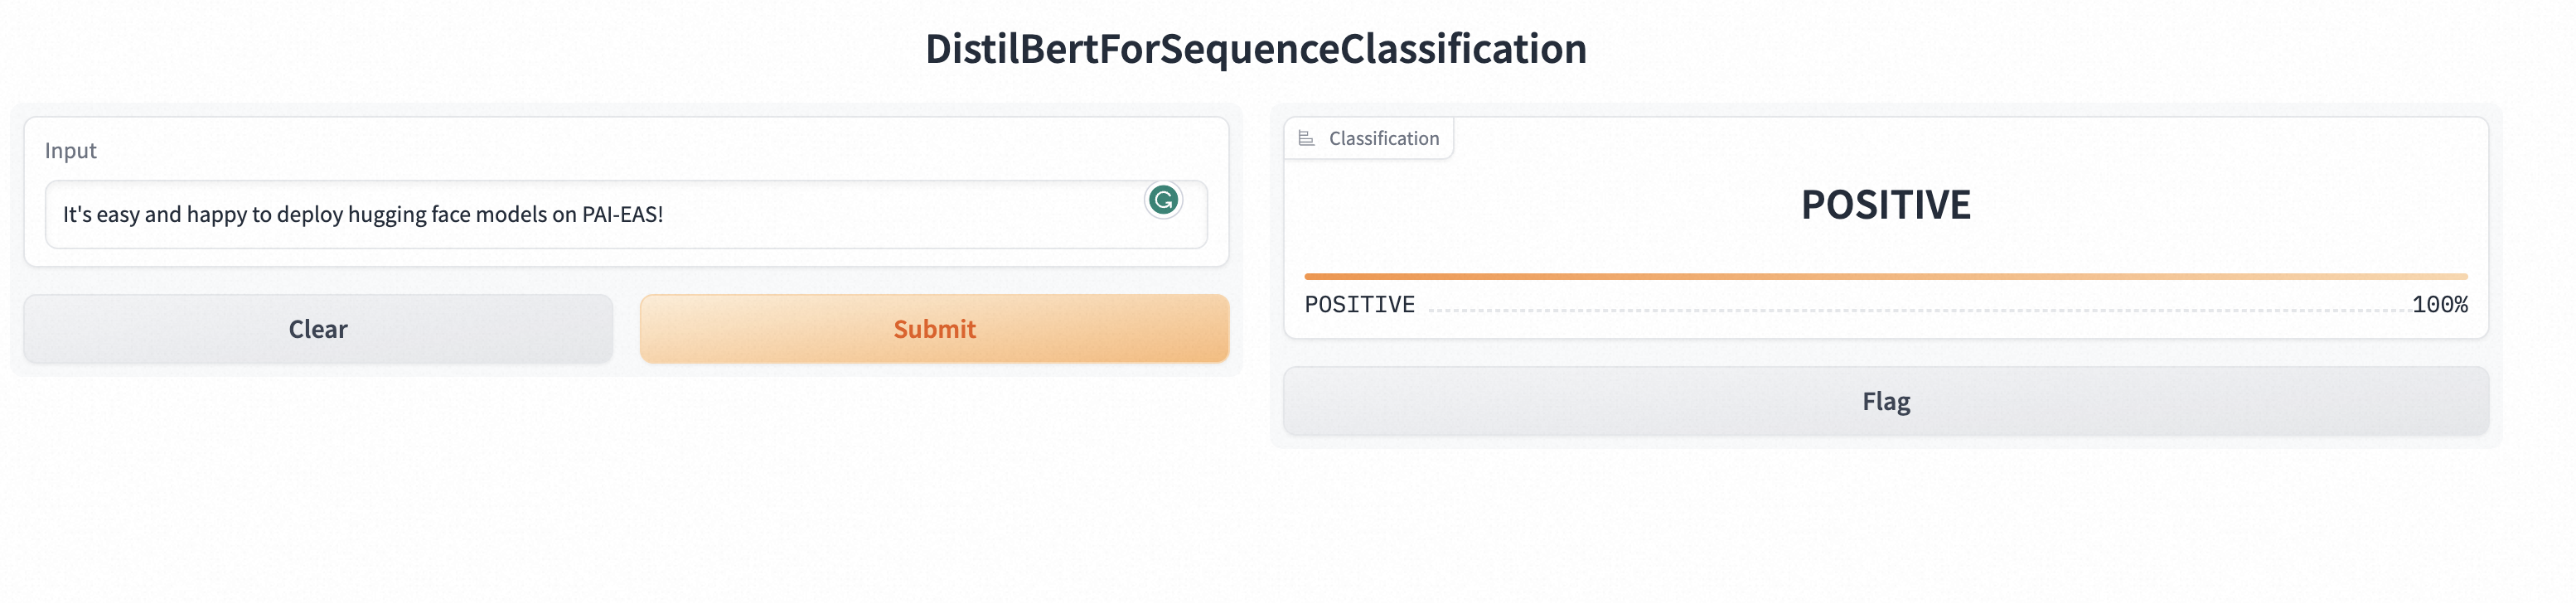
In the Actions column of the target service, click Online Debugging. On the Body tab, enter the request data, such as
{"data": ["hello"]}, and then click Send Request. Note
NoteThe input data format (
{"data": ["XXX"]}) for the text classification model is defined by/api/predictof the Gradio framework. If you use other model types, such as image classification or speech data processing, you can construct the request data based on the/api/predictdefinition.
Use an API to call the service
Click the service name to go to the service details page. On the Overview tab, click View Invocation Information.
In the Invocation Information dialog box, go to the Shared Gateway tab. View and copy the values for Endpoint and Token.
Use the following code to call the service. Replace <service_url> and <token> with the endpoint and token that you obtained in the previous step.
import requests resp = requests.post(url="<service_url>", headers={"Authorization": "<token>"}, json={"data": ["hello"]}) print(resp.json())Output:
{ "data": [ { "label": "POSITIVE", "confidences": [ { "label": "POSITIVE", "confidence": 0.9995185136795044 } ] } ], "is_generating": false, "duration": 0.280987024307251, "average_duration": 0.280987024307251 }