If you plan to use a custom image to deploy services on an ECS instance and want to enhance storage performance with the Non-Volatile Memory Express (NVMe) protocol, follow the steps in this topic to install the NVMe driver for the custom image.
Non-Volatile Memory Express (NVMe) is a high-speed interface protocol designed for solid-state storage, such as flash-based SSDs. It provides faster response times and higher bandwidth than traditional storage protocols such as SCSI and virtio-blk.
Scenarios
You may need to install the NVMe driver as described in this topic if your custom image does not have the driver installed in the following scenarios:
When you import a custom image to Alibaba Cloud, the Image Check feature detects that the NVMe driver is not installed on the image.
When you create an ECS instance of an instance type that supports the NVMe protocol, you cannot select your custom image. This may be because the NVMe attributes of the image do not match those of the instance type.
NoteFor more information about instance families that support the NVMe protocol, see Instance families. To determine whether an instance family supports NVMe, you can also use the
NvmeSupportparameter of the DescribeInstanceTypes API operation.You can use the
NvmeSupportparameter of the DescribeImages API operation to confirm whether an image supports NVMe.For more information, see Why am I unable to find specific images when I create ECS instances?.
Procedure
Create an ECS instance from your existing custom image. This instance serves as an intermediate environment. Then, remotely connect to the instance.
ImportantYou are charged for the intermediate instance that you create. After the new custom image is created, we recommend that you promptly release the instance to avoid ongoing charges.
Check for the NVMe driver and install it based on the operating system of the instance.
Automatic configuration using Cloud Assistant
Cloud Assistant provides the
ecs_nvme_configplugin to help you quickly configure NVMe drives. However, the plugin has operating system limitations.Run the following command to check whether the Cloud Assistant Agent is installed on the instance and whether the
ecs_nvme_configplugin is available in the client.acs-plugin-manager --list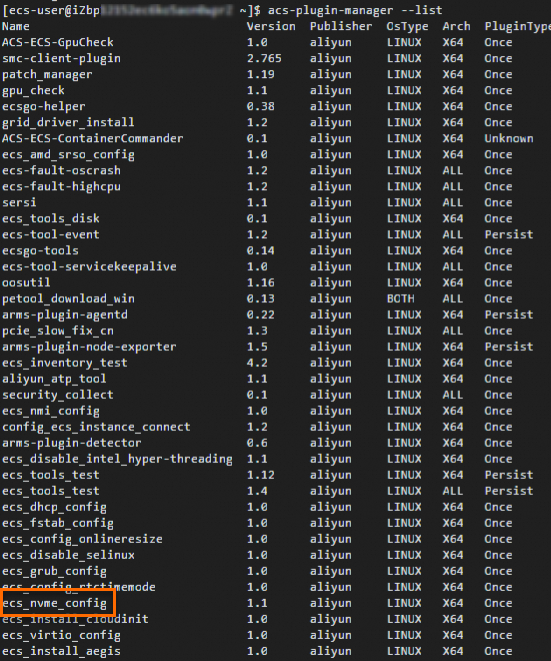
If no Cloud Assistant information is returned, you must first install the Cloud Assistant Agent on the instance.
If a list of Cloud Assistant plugins is returned and includes the
ecs_nvme_configplugin, proceed to the next step.
Use the
ecs_nvme_configplugin to complete the NVMe configuration.Run the following command to use the
ecs_nvme_configplugin to check whether an NVMe module exists on the current instance and whether it can be configured.sudo acs-plugin-manager --exec --plugin ecs_nvme_config --params --checkIf the following message is returned, the NVMe driver is already installed on the instance. You do not need to perform any NVMe-related configuration and can create a custom image directly.
[SUCCESS] Summary: Your image can run on an NVMe instance.If the result contains a message similar to the following
[ERROR], you need to proceed to the next step.[ERROR] 1.nvme module missing from initrd/initramfs, please run acs-plugin-manager --exec --plugin ecs_nvme_config --params -f/--fix to enable nvme;
Based on the message in the check result, configure the NVMe driver and related parameters.
sudo acs-plugin-manager --exec --plugin ecs_nvme_config --params --fixAfter the configuration is complete, run the following command to restart the instance.
sudo rebootAfter restarting the instance, check whether the NVMe module is configured successfully.
sudo acs-plugin-manager --exec --plugin ecs_nvme_config --params --checkThe following is a sample success response:
[OK] 1.initrd/initramfs already contains the nvme module; [OK] 2.fstab file looks fine and does not contain any device names; [OK] 3.The nvme parameters are already included. [SUCCESS] Summary: Your image can run on an nvme instance
Manual configuration (CentOS/Alibaba Cloud Linux)
Run the following command to check whether the system kernel has loaded the NVMe driver.
cat /boot/config-`uname -r` | grep -i nvme | grep -v "^#"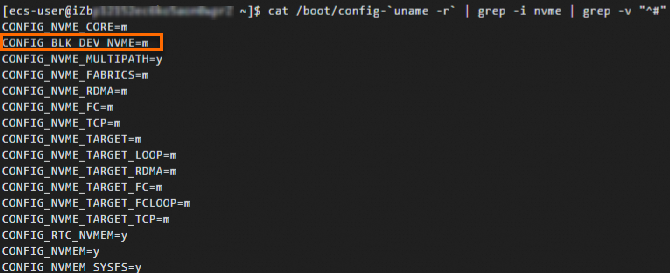
If the result is
CONFIG_BLK_DEV_NVME=y, the operating system can boot directly on instance families that support the NVMe protocol. You can then proceed to automatic configuration using Cloud Assistant.If the result is
CONFIG_BLK_DEV_NVME=m, perform the following steps.
Run the following command to check whether the initial RAM file system (initramfs) contains the NVMe driver.
sudo lsinitrd /boot/initramfs-`uname -r`.img | grep -i nvme | awk '{print $NF}'
If a result similar to the one in the figure is returned, the operating system can start on an instance from an instance family that supports the NVMe protocol. You can proceed directly to step d.
If no such result is returned, proceed to the next step (step c).
Run the following command to add NVMe driver support to initramfs.
mkdir -p /etc/dracut.conf.d echo 'add_drivers+=" nvme nvme-core "' | sudo tee /etc/dracut.conf.d/nvme.conf > /dev/null sudo dracut -v -fNoteIf the dracut tool is not installed on your operating system, run sudo yum -y install dracut to install the tool.
Add the NVMe-related
io_timeoutparameter to the GRand Unified Bootloader (GRUB).NoteAdding the
io_timeoutparameter to the GRand Unified Bootloader (GRUB) helps prevent timeout faults related to NVMe devices in Linux. Setting this parameter to the maximum value prevents the system from failing when it processes I/O requests for NVMe devices.In most Linux distributions, the
io_timeoutparameter is set to 30 seconds by default. Before you set theio_timeoutparameter, you need to run theecho 4294967295 > /sys/module/nvme_core/parameters/io_timeoutorecho 4294967295 > /sys/module/nvme/parameters/io_timeoutcommand to verify whether theio_timeoutparameter can be set to the maximum value of 4,294,967,295 seconds. If the command returns-bash: echo: write error: Invalid argument, this indicates that your current Linux version supports a maximum value of only 255 seconds.Method 1: Use the grubby command
Check whether the system supports the
grubbycommand.which grubbyIf the output shows the path for
grubby(such as/usr/sbin/grubby), the system supportsgrubby. Proceed to the next step.If no output is returned, the system does not support
grubby. To add the parameters, see Method 2.
Use the
grubbycommand to add kernel parameters.sudo grubby --update-kernel=ALL --args="nvme_core.io_timeout=4294967295 nvme_core.admin_timeout=4294967295"
Method 2: Modify the GRUB configuration file
Run the following command to open the grub file.
sudo vi /etc/default/grubPress the i key to enter edit mode. In the
GRUB_CMDLINE_LINUX=line, add thenvme_core.io_timeout=4294967295 nvme_core.admin_timeout=4294967295parameters.After you add the parameters, the file content looks similar to the following:
 Note
NoteIf the configuration file already contains these parameters, you do not need to add them again.
Press the Esc key to exit edit mode, enter
:wq, and press the Enter key to save and exit the file.Run the following command to apply the GRUB configuration.
Depending on the instance startup mode of the ECS instance, run the corresponding command:
Legacy BIOS boot mode
sudo grub2-mkconfig -o /boot/grub2/grub.cfgUEFI boot mode
View the grub configuration file.
cat /boot/efi/EFI/centos/grub.cfgRun the corresponding command based on the content of the grub configuration file.
If the configuration file content specifies another path for configfile, such as
/boot/grub/grub.cfgas shown in the following figure, run the following command to apply the configuration.
sudo grub2-mkconfig -o /boot/grub2/grub.cfgOtherwise, run the following command to apply the configuration.
sudo grub2-mkconfig -o /boot/efi/EFI/centos/grub.cfg
Run the following command again to verify that the NVMe driver is included in the initramfs.
sudo lsinitrd /boot/initramfs-`uname -r`.img | grep -i nvme | awk '{print $NF}'If a result similar to the one in the following figure is returned, the configuration is complete. The operating system can now start on an instance from an instance family that supports the NVMe protocol.

Manual configuration (Ubuntu/Debian)
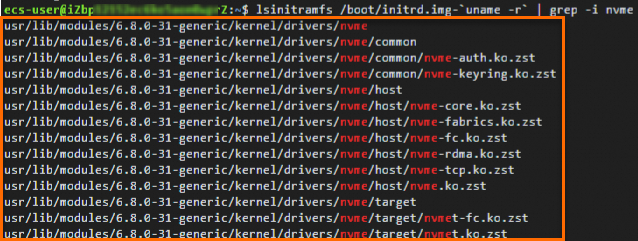
(Optional) You can run the following command to view the NVMe drivers included in the initrd.
lsinitramfs /boot/initrd.img-`uname -r` | grep -i nvmeThe following output shows that the NVMe driver is loaded by default in the initrd for Ubuntu operating systems.
Add the NVMe-related
io_timeoutparameter to GRUB.NoteThe primary purpose of adding the NVMe-related
io_timeoutparameter to the GRand Unified Bootloader (GRUB) is to prevent timeout faults related to NVMe devices in Linux. Setting the timeout value to the maximum prevents the operating system from failing due to a timeout when it processes I/O requests from NVMe devices.In most Linux distributions, the
io_timeoutparameter is set to 30 seconds by default. Before you set theio_timeoutparameter, run theecho 4294967295 > /sys/module/nvme_core/parameters/io_timeoutorecho 4294967295 > /sys/module/nvme/parameters/io_timeoutcommand to verify whether theio_timeoutparameter can be set to the maximum value of 4,294,967,295 seconds. If the command returns-bash: echo: write error: Invalid argument, this indicates that your current Linux version supports a maximum value of only 255 seconds.Run the following command to open the /etc/default/grub file.
sudo vi /etc/default/grubPress the i key to enter edit mode. In the
GRUB_CMDLINE_LINUX=line, add thenvme_core.multipath=n nvme_core.io_timeout=4294967295 nvme_core.admin_timeout=4294967295parameters.After you add the parameters, the file content looks similar to the following:
 Note
NoteIf the configuration file already contains these parameters, you do not need to add them again.
Press Esc to exit edit mode, enter
:wq, and press Enter to save and exit the file.
Run the following command to apply the GRUB configuration.
Depending on the instance boot mode of your ECS instance, run one of the following commands:
Any boot mode (This command applies only to Ubuntu/Debian systems)
sudo update-grub2Legacy BIOS boot mode
sudo grub-mkconfig -o /boot/grub/grub.cfgUEFI boot mode
sudo grub-mkconfig -o /boot/efi/EFI/debian/grub.cfg
After you install the driver on the instance, create a new custom image from the instance. Then, modify the properties of the new custom image and set the NVMe Driver property to Supported.
If you do not set the NVMe property to Supported, you cannot use this custom image to create instances of instance types that require the NVMe feature.
(Optional) Redeploy your services by creating an instance from the new custom image that supports NVMe, as described in Create an instance using a custom image. When you create the ECS instance, select an instance type that supports NVMe.
After the service deployment is complete, we recommend that you promptly delete the old custom image to avoid incurring costs for unused resources.
References
You can attach only Enterprise SSDs (ESSDs) and ESSD AutoPL disks to NVMe-based ECS instance types. You can enable the Multi-attach for cloud disks feature for these disks to share data by attaching them to multiple ECS instances.
If the
io_timeoutparameter of an NVMe disk on an ECS instance is improperly configured, the disk may become unavailable. For more information about how to resolve this issue, see What do I do if an NVMe disk on a Linux ECS instance is unavailable due to an improperly configured I/O timeout parameter?