Posts

Showing posts with the label JavaScript

🧩 Tailwind + React + Vite: A Full Setup and Starter Template

Image
πŸš€ Build blazing-fast modern UIs with React, Tailwind CSS, and Vite in 2025. πŸ” Why Use React + Tailwind + Vite in 2025? Q: What’s so special about this stack? Vite : Super fast dev server, instant HMR (Hot Module Reloading), optimized builds. React : Component-based architecture, JSX syntax, robust ecosystem. Tailwind CSS : Utility-first CSS framework for building UIs with speed and precision. πŸ’‘ Real-world analogy: Think of Vite as a high-speed kitchen, React as your recipe book, and Tailwind as a set of prepared ingredients ready to mix and match. ⚙️ Step-by-Step Setup for Tailwind + React + Vite ✅ 1. Create the Vite + React Project npm create vite@latest my-app -- --template react cd my-app npm install ✅ 2. Install Tailwind CSS npm install -D tailwindcss postcss autoprefixer npx tailwindcss init -p This creates two files: tailwind.config.js postcss.config.js ✅ 3. Configure Tailwind in tailwind.config.js export default { content: [ ...

πŸš€ What’s New in React Router 7 ? Features & Setup Guide (2025)

Image
React Router 7 is finally here — and it’s packed with smart features to simplify routing in modern React apps. If you’ve worked with react-router-dom before, version 7 takes things further with enhanced routing, smarter layouts, better route-based code splitting, and full support for Suspense. This guide walks you through: πŸ†• What’s new in React Router 7 ⚙️ How to install and set it up πŸ’‘ Real-world examples with code ❓ Common Q&A for developers upgrading from v6 ✨ Why React Router 7 Matters in 2025 React Router has always been the go-to solution for client-side routing in React apps. But React Router 7 is more than just an update — it's optimized for modern React features like Suspense , lazy loading , and concurrent rendering . πŸ” Core Updates in React Router 7 Built-in Suspense support for route-level code-splitting Data routers extended with better loader and action patterns Improved nested routing with layou...

πŸ› ️ How to Create a React App with Vite and Tailwind (Beginner Guide)

Image
Creating modern, fast-loading, and highly customizable web apps has never been easier with React , Vite , and Tailwind CSS . If you're a beginner , this guide will walk you through every step to set up a new project from scratch in 2025 using these cutting-edge technologies. πŸš€ Why Use Vite + React + Tailwind? ⚡ Vite : A modern, ultra-fast build tool and development server for React. ⚛ React : A powerful library for building user interfaces. πŸ’¨ Tailwind CSS : A utility-first CSS framework for fast and responsive UI development. 🧰 Prerequisites Before we begin, make sure you have: Node.js installed (v18 or higher recommended) npm or yarn A code editor like VS Code Basic understanding of JavaScript and React πŸ“¦ Step 1: Create a React App Using Vite Run the following in your terminal: npm create vite@latest my-react-app --template react Or with yarn: yarn create vite my-react-app --template react Then in...

How to Fix npx tailwindcss init Error: “Could Not Determine Executable to Run”

Image
How to Fix npx tailwindcss init Error: “Could Not Determine Executable to Run” Are you getting this error while trying to initialize Tailwind CSS? npx tailwindcss init npm ERR! could not determine executable to run Don’t worry — this is a common issue that’s easy to fix if you understand what’s causing it. This post will guide you step-by-step on how to resolve it. πŸ” Why This Error Happens You haven’t installed the tailwindcss package. You don’t have a package.json file in your project. npx doesn’t know what to run because the executable is missing. ✅ Fix 1: Install Tailwind CSS Before Running the Command First, install Tailwind CLI in your project: npm install -D tailwindcss Now run the init command: npx tailwindcss init ✅ Fix 2: Make Sure You Have package.json If your project is missing package.json , run: npm init -y npm install -D tailwindcss npx tailwindcss init ✅ Fix 3: Clear NPX Cache Sometimes cle...

🧠 Understanding filter() as a Higher-Order Function in JavaScript

Image
πŸ“Œ Introduction JavaScript is a language designed to treat functions as first-class citizens. This means you can pass functions as arguments, return them from other functions, and assign them to variables — opening the door to higher-order functions . One of the most widely used higher-order functions is filter() . In this blog, we'll take a deep dive into: What is a higher-order function in JavaScript? What is filter() and why it's considered a higher-order function? Real-world examples of using filter() Code snippets to boost your learning Q&A to answer common developer queries πŸ” What is a Higher-Order Function in JavaScript? A higher-order function is any function that does at least one of the following: Takes another function as an argument (callback function) Returns a function as its result function greetUser(greetingFn) { greetingFn(); } function sayHello() { console.log...

🧠 Mastering useCallback in React: Boost Performance by Preventing Unnecessary Re-Renders

Image
πŸ” Introduction: Why Care About useCallback in React? In modern React development, optimizing performance is critical — especially as your app scales. Ever encountered laggy UI or unnecessary component re-renders when passing functions as props? That’s where the useCallback hook steps in. The useCallback hook is often misunderstood or misused, yet it plays a crucial role in ensuring your components don't re-render more than they need to. In this post, we’ll break down everything you need to know about useCallback — with code examples , real-world analogies , and answers to frequently asked developer questions . πŸ”§ What is useCallback in React? useCallback is a React Hook that returns a memoized version of a callback function. This means the function won’t be recreated on every render , unless its dependencies change. const memoizedCallback = useCallback(() => { doSomething(a, b); }, [a, b]); This becomes essential when you’re passing functions to child compone...

🌟 Mastering Promises in JavaScript: The Ultimate Beginner-to-Pro Guide

“Why should I use Promises instead of callbacks?” This is one of the most frequently asked questions by JavaScript learners. In this guide, we’ll answer it completely — with real-world examples, visuals, and deep explanation. πŸ“¦ What is a Promise in JavaScript? A Promise is a built-in JavaScript object that represents the eventual completion (or failure) of an asynchronous operation — and its resulting value. 🀯 Think of it like this: You order a pizza πŸ• (an async task). The restaurant gives you a promise — "We'll deliver it!" While the pizza is being prepared, you do other things . Eventually, you get the pizza (success ✅) or a refund (failure ❌). That’s exactly how Promises work in JavaScript. They’re a smarter way to deal with asynchronous code , without falling into callback hell. ⏳ Why Do We Need Promises? Before Promises, developers used callback functions to handle async tasks like data fetching or timers. But as tasks grew in c...

πŸ” What is Closure in JavaScript? ? Explained with Simple Examples

Image
In JavaScript, a closure is created when a function "remembers" the variables from its outer scope even after the outer function has finished executing . This concept allows functions to access variables from an enclosing scope or function — even after that outer function has returned. Closures are a powerful feature in JavaScript that enable data encapsulation, callback handling, and the creation of private variables. πŸ’‘ Let's Understand with an Example function outerFunction() { let outerVariable = "I am from outer scope!"; function innerFunction() { console.log(outerVariable); // Accessing variable from outer scope } return innerFunction; } const closureFunc = outerFunction(); closureFunc(); // Output: I am from outer scope! πŸ” Explanation: outerFunction defines a variable outerVariable . innerFunction is declared inside outerFunction and uses that variable. Even after outerFunction() has finished executing, innerFunc...

🎯 What is the Event Loop in JavaScript? A Complete Guide with Diagrams

Image
πŸ” What is the Event Loop in JavaScript? A Complete Guide with Diagrams Have you ever wondered how JavaScript handles asynchronous operations like setTimeout , Promises, or fetch() ? The secret lies in something called the Event Loop . In this blog post, we’ll break down: ✅ What the JavaScript Event Loop is ✅ How the Call Stack, Web APIs, and Queues work together ✅ A visual diagram to understand the flow ✅ A practical code example to clear your doubts πŸ”„ What is the Event Loop? JavaScript is a single-threaded language , meaning it can only do one thing at a time. But it still handles asynchronous tasks efficiently thanks to the Event Loop . Let’s understand how it works through its key components. πŸ“Š Components of the Event Loop Call Stack: Where JavaScript tracks which function is currently running. Web APIs: Browser-provided functionalities like setTimeout , DOM Events , etc. Callback Queue: Holds callbacks from Web APIs waiting to be execut...

🧩 Event Delegation in JavaScript – Write Cleaner, More Efficient Code

Image
When building modern web applications, adding event listeners to multiple DOM elements can quickly become a hassle — and impact performance. But what if you could use just one event listener to control many elements? That’s the power of Event Delegation in JavaScript! πŸ” What is Event Delegation? Event Delegation is a JavaScript technique where a single event listener is attached to a parent element , and events from child elements are caught during the bubbling phase . Instead of assigning handlers to each item individually, you delegate the event to the parent, checking the event’s target to determine what was clicked or interacted with. 🌟 Benefits of Using Event Delegation ✅ Better Performance πŸ“‰ Reduce memory usage by attaching fewer event listeners. ✅ Simplified Code 🧹 Cleaner, more maintainable code by avoiding repetition. ✅ Dynamic Element Handling ⚙️ Easily manage elements added to the DOM after the initial page load. ✅ Improved Scalability πŸ“ˆ...

πŸš€ Unlock the Power of React JS: Build a Functional Component in Minutes!

Image
React JS has revolutionized the way we build modern web applications. If you’re new to React or want a refresher on creating functional components , this post will guide you through it step by step—with a live example included! 🎯 Why React JS? 🧠 Component-based architecture ⚡ Fast performance with Virtual DOM πŸ” Reusable code 🎨 Rich ecosystem for UI/UX πŸ“¦ What is a Functional Component? A functional component is a JavaScript function that returns a React element (JSX). It’s the simplest way to create components in React. πŸ’» Example: Creating a Simple Functional Component import React from 'react'; function Greeting(props) { return <h1>Hello, {props.name}!</h1>; } export default Greeting; Now, use this component in your main app file: import React from 'react'; import ReactDOM from 'react-dom'; import Greeting from './Greeting'; ReactDOM.render( <Greeting name="Ankur...

⚡ Throttling in JavaScript Explained with Examples

Image
Have you ever wondered how to control how often a function runs when triggered frequently — like on scroll, resize, or button click? That's where Throttling in JavaScript comes in. πŸ“Œ What is Throttling? Throttling is a technique used to limit the number of times a function gets called over time. Instead of calling the function every time an event fires, it ensures the function executes only once every specified interval. Use Case: Window resize , scroll tracking, infinite scroll, button spam protection, etc. 🧠 How Throttling Works Let’s say an event is triggered 50 times per second. With throttling, you can restrict the callback to run only once every 300ms or any interval you decide. πŸ› ️ Simple Example of Throttling function throttle(func, limit) { let lastFunc; let lastRan; return function(...args) { const context = this; if (!lastRan) { func.apply(context, args); lastRan = Date.now(); } else { clearTime...

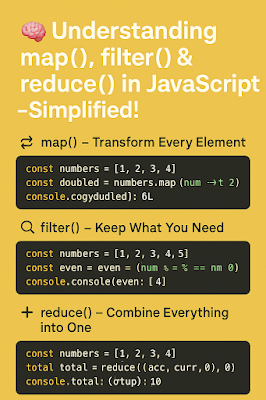
🧠 Master JavaScript's map(), filter(), and reduce() Methods with Easy Examples!

Image
🧠 Understanding map() , filter() & reduce() in JavaScript - Simplified! JavaScript offers powerful array methods to work with data efficiently. Among them, the trio of map() , filter() , and reduce() are must-know tools for every developer. This guide will break them down with simple examples that you can copy and run in your browser or code editor. πŸ” map() – Transform Every Element The map() method creates a new array by transforming each element of the original array. const numbers = [1, 2, 3, 4]; const doubled = numbers.map(num => num * 2); console.log(doubled); // Output: [2, 4, 6, 8] πŸ’‘ Use map() when you want to apply a function to each item and return a new array. πŸ” filter() – Keep What You Need The filter() method returns a new array containing elements that match a condition. const numbers = [1, 2, 3, 4, 5]; const even = numbers.filter(num => num % 2 === 0); console.log(even); // Output: [2, 4] πŸ’‘ Use fil...

πŸš€ “JavaScript Debounce Made Simple + Live Example!”

Image
🧠 Debounce in JavaScript — Explained Simply! Have you ever noticed a search box firing too many requests as you type? Or a button that triggers a function multiple times when clicked repeatedly? That’s where Debounce becomes your best friend! πŸš€ What is Debounce? Debounce is a programming pattern used to limit the rate at which a function is executed. It ensures that a function runs only once after a specific delay , and only if the event hasn’t occurred again during that delay. "Debounce waits… and if no new event happens during that wait, it triggers the function!" πŸ›  Why Do We Need Debounce? Without debounce, continuous user actions like: Typing in a search input Resizing the window Scrolling the page …can flood your application with function calls, degrading performance and user experience. ✅ With debounce: Smooth performance Controlled API calls Reduced CPU load πŸ“¦ Real-Life Example: Search Bar <input type=...

What is Hoisting in JavaScript? πŸ”„ Explained with Example

Image
πŸ“Œ What is Hoisting in JavaScript? In this post, we’ll understand one of the most commonly asked JavaScript interview questions: What is Hoisting? I’ve also added a video below that explains hoisting visually. πŸ‘‡ πŸ” What is Hoisting? Hoisting is a JavaScript mechanism where variables and function declarations are moved to the top of their scope before code execution. 🧠 Think of it like this: Even if you declare your variables or functions at the bottom of the file, JavaScript will act as if they were declared at the top — but only the declarations, not initializations. πŸ“‚ Example 1: Variable Hoisting console.log(x); // undefined var x = 10; πŸ”Ž Explanation: The declaration var x is hoisted to the top, but the assignment = 10 is not. So x exists but is undefined at the time of the console.log . ⚠️ Let’s Try with let or const console.log(y); // ReferenceError let y = 20; Note: Variables declared with let and const are also hoisted but are not initi...