Configuring Neovim for Swift Development
Neovim is a modern reimplementation of Vim, a popular terminal-based text editor. Neovim adds new features like asynchronous operations and powerful Lua bindings for a snappy editing experience, in addition to the improvements Vim brings to the original Vi editor.
This article walks you through configuring Neovim for Swift development, providing configurations for various plugins to build a working Swift editing experience. The configuration files are built up step by step and the end of the article contains the fully assembled versions of those files. It is not a tutorial on how to use Neovim and assumes some familiarity with modal text editors like Neovim, Vim, or Vi. We are also assuming that you have already installed a Swift toolchain on your computer. If not, please see the Swift installation instructions.
Although the article references Ubuntu 22.04, the configuration itself works on any operating system where a recent version of Neovim and a Swift toolchain is available.
Basic setup and configuration includes:
- Installing Neovim.
- Installing
lazy.nvimto manage our plugins. - Configuring the SourceKit-LSP server.
- Setting up Language-Server-driven code completion with nvim-cmp.
- Setting up snippets with LuaSnip.
The following sections are provided to help guide you through the setup:
- Prerequisites
- Package Management
- Language Server Support
- Code Completion
- Snippets
- Fully Assembled Configuration Files
Tip: If you already have Neovim, Swift, and a package manager installed, you can skip to setting up Language Server support.
Note: If you are bypassing the Prerequisites section, make sure your copy of Neovim is version v0.9.4 or higher, or you may experience issues with some of the Language Server Protocol (LSP) Lua APIs.
Prerequisites
To get started, you’ll need to install Neovim. The Lua APIs exposed by Neovim are under rapid development. We will want to take advantage of the recent improvements in the integrated support for Language Server Protocol (LSP), so we will need a fairly recent version of Neovim.
I’m running Ubuntu 22.04 on an x86_64 machine. Unfortunately, the version of Neovim shipped in the Ubuntu 22.04 apt repository is too old to support many of the APIs that we will be using.
For this install, I used snap to install Neovim v0.9.4. Ubuntu 24.04 has a new enough version of Neovim, so a normal apt install neovim invocation will work. For installing Neovim on other operating systems and Linux distributions, please see the Neovim install page.
$ sudo snap install nvim --classic $ nvim --version NVIM v0.9.4 Build type: RelWithDebInfo LuaJIT 2.1.1692716794 Compilation: /usr/bin/cc -O2 -g -Og -g -Wall -Wextra -pedantic -Wno-unused-pa... system vimrc file: "$VIM/sysinit.vim" fall-back for $VIM: "/usr/share/nvim" Run :checkhealth for more info Getting Started
We have working copies of Neovim and Swift on our path. While we can start with a vimrc file, Neovim is transitioning from using vimscript to Lua. Lua is easier to find documentation for since it’s an actual programming language, tends to run faster, and pulls your configuration out of the main runloop so your editor stays nice and snappy. You can still use a vimrc with vimscript, but we’ll use Lua.
The main Neovim configuration file goes in ~/.config/nvim. The other Lua files go in ~/.config/nvim/lua. Go ahead and create an init.lua now;
$ mkdir -p ~/.config/nvim/lua && cd ~/.config/nvim $ nvim init.lua Note: The examples below contain a GitHub link to the plugin to help you readily access the documentation. You can also explore the plugin itself.
Packaging with lazy.nvim
While it’s possible to set everything up manually, using a package manager helps keep your packages up-to-date, and ensures that everything is installed correctly when copy your configuration to a new computer. Neovim also has a built-in plugin manager, but I have found lazy.nvim to work well.
We will start with a little bootstrapping script to install lazy.nvim if it isn’t installed already, add it to our runtime path, and finally configure our packages.
At the top of your init.lua write:
local lazypath = vim.fn.stdpath("data") .. "/lazy/lazy.nvim" if not vim.loop.fs_stat(lazypath) then vim.fn.system({ "git", "clone", "--filter=blob:none", "https://github.com/folke/lazy.nvim.git", "--branch=stable", lazypath }) end vim.opt.rtp:prepend(lazypath) This snippet clones lazy.nvim if it doesn’t already exist, and then adds it to the runtime path. Now we initialize lazy.nvim and tell it where to look for the plugin specs.
require("lazy").setup("plugins") This configures lazy.nvim to look in a plugins/ directory under our lua/ directory for each plugin. We’ll also want a place to put our own non-plugin related configurations, so we’ll stick it in config/. Go ahead and create those directories now.
$ mkdir lua/plugins lua/config See lazy.nvim Configuration for details on configuring lazy.nvim.

Note that your configuration won’t look exactly like this. We have only installed lazy.nvim, so that is the only plugin that is listed on your configuration at the moment. That’s not very exciting to look at, so I’ve added a few additional plugins to make it look more appealing.
To check that it’s working:
-
Launch Neovim.
You should first see an error saying that there were no specs found for module plugins. This just means that there aren’t any plugins.
-
Press Enter and type,
:Lazy.lazy.nvim lists the plugins installed. There should only be one right now: “lazy.nvim”. This is lazy.nvim tracking and updating itself.
-
We can manage our plugins through the lazy.nvim menu.
- Pressing
Iwill install new plugins. - Pressing
Uwill update installed plugins. - Pressing
Xwill delete any plugins that lazy.nvim installed, but are no longer tracked in your configuration.
- Pressing
Language Server Support
Language servers respond to editor requests providing language-specific support. Neovim has support for Language Server Protocol (LSP) built-in, so you don’t need an external package for LSP, but adding a configuration for each LSP server manually is a lot of work. Neovim has a package for configuring LSP servers, nvim-lspconfig.
Go ahead and create a new file under lua/plugins/lsp.lua. In it, we’ll start by adding the following snippet.
return { { "neovim/nvim-lspconfig", config = function() local lspconfig = require('lspconfig') lspconfig.sourcekit.setup {} end, } } While this gives us LSP support through SourceKit-LSP, there are no keybindings, so it’s not very practical. Let’s hook those up now.
We’ll set up an auto command that fires when an LSP server attaches in the config function under where we set up the sourcekit server. The keybindings are applied to all LSP servers so you end up with a consistent experience across languages.
config = function() local lspconfig = require('lspconfig') lspconfig.sourcekit.setup {} vim.api.nvim_create_autocmd('LspAttach', { desc = 'LSP Actions', callback = function(args) vim.keymap.set('n', 'K', vim.lsp.buf.hover, {noremap = true, silent = true}) vim.keymap.set('n', 'gd', vim.lsp.buf.definition, {noremap = true, silent = true}) end, }) end, 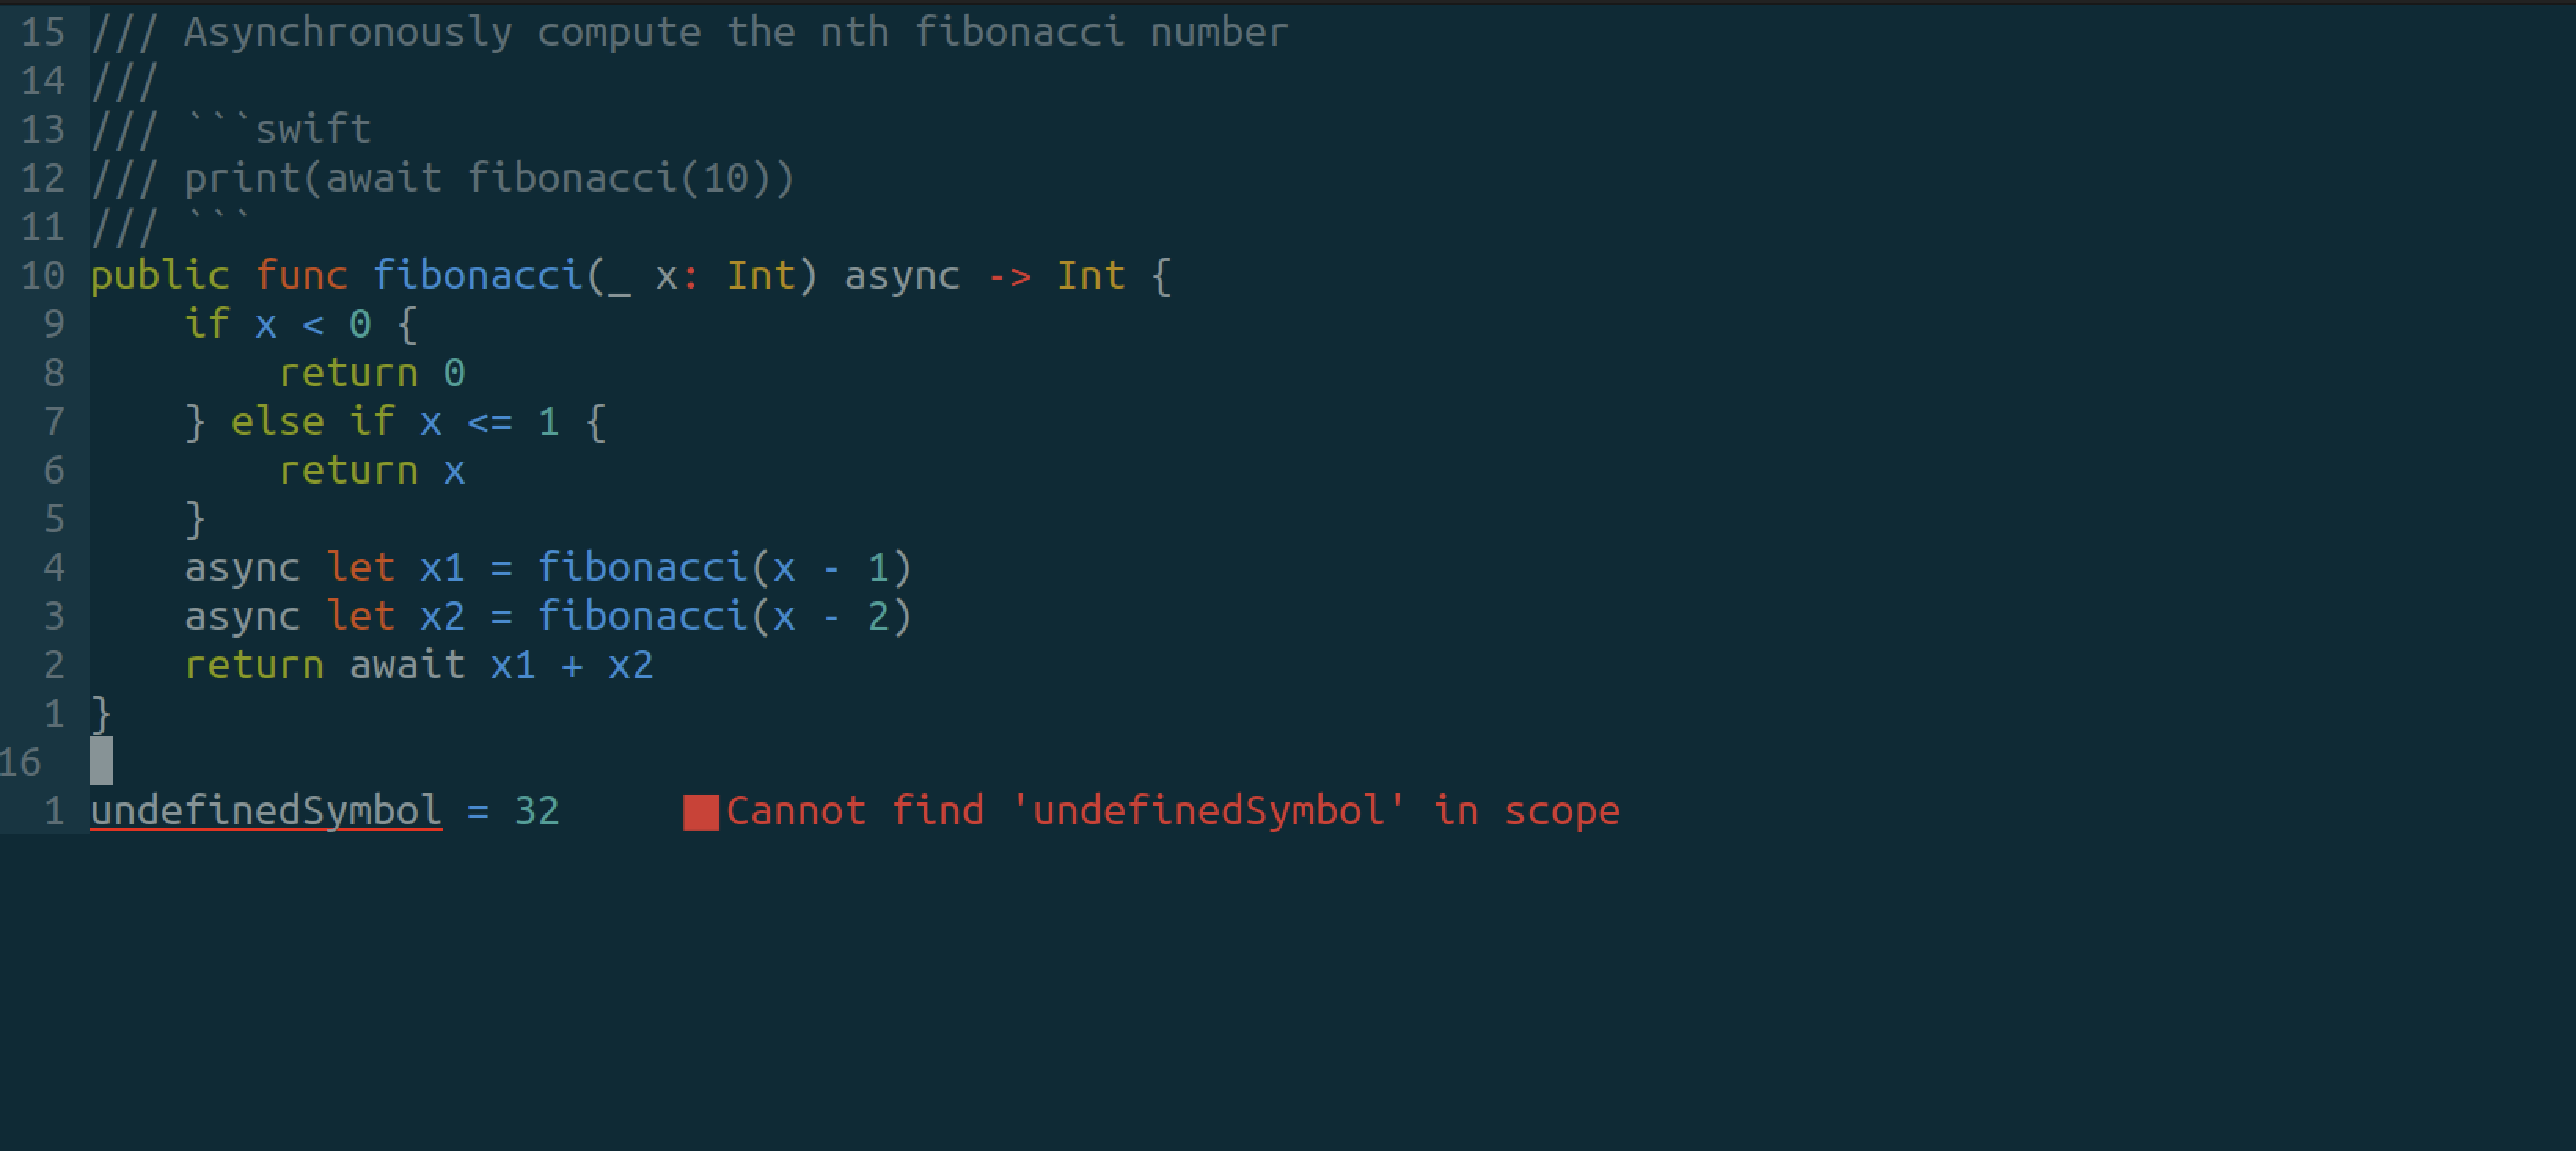
I’ve created a little example Swift package that computes Fibonacci numbers asynchronously. Pressing shift + k on one of the references to the fibonacci function shows the documentation for that function, along with the function signature. The LSP integration is also showing that we have an error in the code.
File Updating
SourceKit-LSP increasingly relies on the editor informing the server when certain files change. This need is communicated through dynamic registration. You don’t have to understand what that means, but Neovim doesn’t implement dynamic registration. You’ll notice this when you update your package manifest, or add new files to your compile_commands.json file and LSP doesn’t work without restarting Neovim.
Instead, we know that SourceKit-LSP needs this functionality, so we’ll enable it statically. We’ll update our sourcekit setup configuration to manually set the didChangeWatchedFiles capability.
lspconfig.sourcekit.setup { capabilities = { workspace = { didChangeWatchedFiles = { dynamicRegistration = true, }, }, }, } If you’re interested in reading more about this issue, the conversations in the following issues describe the issue in more detail:
Code Completion

We will use nvim-cmp to act as the code completion mechanism. We’ll start by telling lazy.nvim to download the package and to load it lazily when we enter insert mode since you don’t need code completion if you’re not editing the file.
-- lua/plugins/codecompletion.lua return { { "hrsh7th/nvim-cmp", version = false, event = "InsertEnter", }, } Next, we’ll configure some completion sources to provide code completion results. nvim-cmp doesn’t come with completion sources, those are additional plugins. For this configuration, I want results based on LSP, filepath completion, and the text in my current buffer. For more, the nvim-cmp Wiki has a list of sources.
To start, we will tell lazy.nvim about the new plugins and that nvim-cmp depends on them. This ensures that lazy.nvim will initialize each of them when nvim-cmp is loaded.
-- lua/plugins/codecompletion.lua return { { "hrsh7th/nvim-cmp", version = false, event = "InsertEnter", dependencies = { "hrsh7th/cmp-nvim-lsp", "hrsh7th/cmp-path", "hrsh7th/cmp-buffer", }, }, { "hrsh7th/cmp-nvim-lsp", lazy = true }, { "hrsh7th/cmp-path", lazy = true }, { "hrsh7th/cmp-buffer", lazy = true }, } Now we need to configure nvim-cmp to take advantage of the code completion sources. Unlike many other plugins, nvim-cmp hides many of its inner-workings, so configuring it is a little different from other plugins. Specifically, you’ll notice the differences around setting key-bindings. We start out by requiring the module from within its own configuration function and will call the setup function explicitly.
{ "hrsh7th/nvim-cmp", version = false, event = "InsertEnter", dependencies = { "hrsh7th/cmp-nvim-lsp", "hrsh7th/cmp-path", "hrsh7th/cmp-buffer", }, config = function() local cmp = require('cmp') local opts = { -- Where to get completion results from sources = cmp.config.sources { { name = "nvim_lsp" }, { name = "buffer"}, { name = "path" }, }, -- Make 'enter' key select the completion mapping = cmp.mapping.preset.insert({ ["<CR>"] = cmp.mapping.confirm({ select = true }) }), } cmp.setup(opts) end, }, Using the tab key to select completions is a fairly popular option, so we’ll go ahead and set that up now.
mapping = cmp.mapping.preset.insert({ ["<CR>"] = cmp.mapping.confirm({ select = true }), ["<tab>"] = cmp.mapping(function(original) if cmp.visible() then cmp.select_next_item() -- run completion selection if completing else original() -- run the original behavior if not completing end end, {"i", "s"}), ["<S-tab>"] = cmp.mapping(function(original) if cmp.visible() then cmp.select_prev_item() else original() end end, {"i", "s"}), }), Pressing tab while the completion menu is visible will select the next completion and shift + tab will select the previous item. The tab behavior falls back on whatever pre-defined behavior was there originally if the menu isn’t visible.
Snippets
Snippets are a great way to improve your workflow by expanding short pieces of text into anything you like. Lets hook those up now. We’ll use LuaSnip as our snippet plugin.
Create a new file in your plugins directory for configuring the snippet plugin.
-- lua/plugins/snippets.lua return { { 'L3MON4D3/LuaSnip', conifg = function(opts) require('luasnip').setup(opts) require('luasnip.loaders.from_snipmate').load({ paths = "./snippets" }) end, }, } Now we’ll wire the snippet expansions into nvim-cmp. First, we’ll add LuaSnip as a dependency of nvim-cmp to ensure that it gets loaded before nvim-cmp. Then we’ll wire it into the tab key expansion behavior.
{ "hrsh7th/nvim-cmp", version = false, event = "InsertEnter", dependencies = { "hrsh7th/cmp-nvim-lsp", "hrsh7th/cmp-path", "hrsh7th/cmp-buffer", "L3MON4D3/LuaSnip", }, config = function() local cmp = require('cmp') local luasnip = require('cmp') local opts = { -- Where to get completion results from sources = cmp.config.sources { { name = "nvim_lsp" }, { name = "buffer"}, { name = "path" }, }, mapping = cmp.mapping.preset.insert({ -- Make 'enter' key select the completion ["<CR>"] = cmp.mapping.confirm({ select = true }), -- Super-tab behavior ["<tab>"] = cmp.mapping(function(original) if cmp.visible() then cmp.select_next_item() -- run completion selection if completing elseif luasnip.expand_or_jumpable() then luasnip.expand_or_jump() -- expand snippets else original() -- run the original behavior if not completing end end, {"i", "s"}), ["<S-tab>"] = cmp.mapping(function(original) if cmp.visible() then cmp.select_prev_item() elseif luasnip.expand_or_jumpable() then luasnip.jump(-1) else original() end end, {"i", "s"}), }), snippets = { expand = function(args) luasnip.lsp_expand(args) end, }, } cmp.setup(opts) end, }, Now our tab-key is thoroughly overloaded in super-tab fashion.
- If the completion window is open, pressing tab selects the next item in the list.
- If you press tab over a snippet, the snippet will expand, and continuing to press tab moves the cursor to the next selection point.
- If you’re neither code completing nor expanding a snippet, it will behave like a normal
tabkey.
Now we need to write up some snippets. LuaSnip supports several snippet formats, including a subset of the popular TextMate, Visual Studio Code snippet format, and its own Lua-based API.
Here are some snippets that I’ve found to be useful:
snippet pub "public access control" public $0 snippet priv "private access control" private $0 snippet if "if statement" if $1 { $2 }$0 snippet ifl "if let" if let $1 = ${2:$1} { $3 }$0 snippet ifcl "if case let" if case let $1 = ${2:$1} { $3 }$0 snippet func "function declaration" func $1($2) $3{ $0 } snippet funca "async function declaration" func $1($2) async $3{ $0 } snippet guard guard $1 else { $2 }$0 snippet guardl guard let $1 else { $2 }$0 snippet main @main public struct ${1:App} { public static func main() { $2 } }$0 Another popular snippet plugin worth mentioning is UltiSnips which allows you to use inline Python while defining the snippet, allowing you to write some very powerful snippets.
Conclusion
Swift development with Neovim is a solid experience once everything is configured correctly. There are thousands of plugins for you to explore, this article gives you a solid foundation for building up your Swift development experience in Neovim.
Files
Here are the files for this configuration in their final form.
-- init.lua local lazypath = vim.fn.stdpath("data") .. "/lazy/lazy.nvim" if not vim.loop.fs_stat(lazypath) then vim.fn.system({ "git", "clone", "--filter=blob:none", "https://github.com/folke/lazy.nvim.git", "--branch=stable", lazypath }) end vim.opt.rtp:prepend(lazypath) require("lazy").setup("plugins", { ui = { icons = { cmd = "", config = "", event = "", ft = "", init = "", keys = "", plugin = "", runtime = "", require = "", source = "", start = "", task = "", lazy = "", }, }, }) vim.opt.wildmenu = true vim.opt.wildmode = "list:longest,list:full" -- don't insert, show options -- line numbers vim.opt.nu = true vim.opt.rnu = true -- textwrap at 80 cols vim.opt.tw = 80 -- set solarized colorscheme. -- NOTE: Uncomment this if you have installed solarized, otherwise you'll see -- errors. -- vim.cmd.background = "dark" -- vim.cmd.colorscheme("solarized") -- vim.api.nvim_set_hl(0, "NormalFloat", { bg = "none" }) -- lua/plugins/codecompletion.lua return { { "hrsh7th/nvim-cmp", version = false, event = "InsertEnter", dependencies = { "hrsh7th/cmp-nvim-lsp", "hrsh7th/cmp-path", "hrsh7th/cmp-buffer", }, config = function() local cmp = require('cmp') local luasnip = require('luasnip') local opts = { sources = cmp.config.sources { { name = "nvim_lsp", }, { name = "path", }, { name = "buffer", }, }, mapping = cmp.mapping.preset.insert({ ["<CR>"] = cmp.mapping.confirm({ select = true }), ["<tab>"] = cmp.mapping(function(original) print("tab pressed") if cmp.visible() then print("cmp expand") cmp.select_next_item() elseif luasnip.expand_or_jumpable() then print("snippet expand") luasnip.expand_or_jump() else print("fallback") original() end end, {"i", "s"}), ["<S-tab>"] = cmp.mapping(function(original) if cmp.visible() then cmp.select_prev_item() elseif luasnip.expand_or_jumpable() then luasnip.jump(-1) else original() end end, {"i", "s"}), }) } cmp.setup(opts) end, }, { "hrsh7th/cmp-nvim-lsp", lazy = true }, { "hrsh7th/cmp-path", lazy = true }, { "hrsh7th/cmp-buffer", lazy = true }, } -- lua/plugins/lsp.lua return { { "neovim/nvim-lspconfig", config = function() local lspconfig = require('lspconfig') lspconfig.sourcekit.setup { capabilities = { workspace = { didChangeWatchedFiles = { dynamicRegistration = true, }, }, }, } vim.api.nvim_create_autocmd('LspAttach', { desc = "LSP Actions", callback = function(args) vim.keymap.set("n", "K", vim.lsp.buf.hover, {noremap = true, silent = true}) vim.keymap.set("n", "gd", vim.lsp.buf.definition, {noremap = true, silent = true}) end, }) end, }, } -- lua/plugins/snippets.lua return { { 'L3MON4D3/LuaSnip', lazy = false, config = function(opts) local luasnip = require('luasnip') luasnip.setup(opts) require('luasnip.loaders.from_snipmate').load({ paths = "./snippets"}) end, } } # snippets/swift.snippets snippet pub "public access control" public $0 snippet priv "private access control" private $0 snippet if "if statement" if $1 { $2 }$0 snippet ifl "if let" if let $1 = ${2:$1} { $3 }$0 snippet ifcl "if case let" if case let $1 = ${2:$1} { $3 }$0 snippet func "function declaration" func $1($2) $3{ $0 } snippet funca "async function declaration" func $1($2) async $3{ $0 } snippet guard guard $1 else { $2 }$0 snippet guardl guard let $1 else { $2 }$0 snippet main @main public struct ${1:App} { public static func main() { $2 } }$0