Conclusion: Final Thoughts

In this blog entry, I’d like to discuss:

  • What worked well and what didn’t in my project
  • The pros and cons
  • What I would like to do if I were given the chance to continue work on this project, such as what I would change, expand on or do differently
  • Questions that arose during my work that I haven’t been able to answer (doesn’t mean they are open questions, they’ve probably already been solved)
  • What other models I would liked to consider and all the ideas I had and would have done if I had infinite time
  • And more…

Observations

  • The normalization method chosen to convert pixels data between a uint8 and a float32 is particularly important. I’m not sure why, but in all my models I observed that:
    • Mapping pixels values to the interval [-1, 1] and using tanh as the final layer’s activation function consistently provided poor results.
    • Using the interval [0, 1] and a sigmoid activation for the final layer resulted in significantly improved results.

Summary

  • In practice, the fully convolutional model (made up of a convolutional part followed by a transposed convolutional part) gave the best results. It was particularly good at guessing human shape when given sufficient contextual cues.
    • This model, like the simple fully-connected model, still gave fairly blurry results, which we attribute to the L2 loss function we used.
  • In theory,  we think that training a GAN-based model would give the best results. That is, given a sufficiently well trained GAN, which can generate images that look like they came from the training dataset, then we could solve the image inpainting problem by optimizing the latent variables z over an objective function based with the goal of minimizing the outer frame distance between the generator’s prediction and the input.
    • Unfortunately, the GANs that I managed to train did not produce images of sufficient quality to be able to do this last part.

Results: Fully-Convolutional conv_deconv model

We described the “conv_deconv” model earlier in this post: Architecture: The Convolution-Deconvolution “conv_deconv” Model.

This model produced the best results (among the successful models – it’s certainly not the best in theory).

It had the following properties:

  • MSE training loss = 0.0273
  • MSE val_loss = 0.0338
  • Trained in 20 epochs (early-aborted)

Below are some samples of image predictions from the testing dataset. Even more sample images have been posted on the corresponding GitHub results page!

conv_deconv_results

Final Results for GANs: Putting it all together

Tackling the Image Inpainting problem with GANs

Okay, so we have a GAN that can produce okay-ish pictures – that look like they came from the training dataset (and then were run over by a bus, perhaps). But let’s assume for the sake of the following argument that we trained a very good GAN, with high sample output diversity and high image quality (which would be possible given more time for the project, but this was my first experience with GANs and they turned out to be much trickier and slower to train than expected, when they manage to train successfully at all).

GANs can be used to generate random sample images of size 64×64 pixels, so how can they solve the image inpainting task?

In short, discuss that we start with an input test image X, that is a 64×64 image with the 32×32 center removed. Then, we generate random latent variables z and a random 64×64 image G(z).

Next, we mention that we need to use a mask M and define a loss function on the difference between the outer frames of the two images.

Finally, we backprop through the G, while keeping all layers of G frozen, in order to adjust the latent variables z in order to minimize the loss function. This can be done using Theano, for example:

T.grad(norm(x_pred - x_true), latent_z)

Finally, there’s a few more important subtle details about how the loss function should be a weighted sum of possibly 2 to 3 other terms in addition to what was mentioned above.

Now, once the optimization is complete with z* being the result, one simply applies the opposite mask (1 – M) to the G(z*), in order to extract its 32×32 center. This is our output Y.

Project: Python architecture

A relatively complex Python framework was developed for this project, in order to automate and make the development and testing of new models as easy and efficient as possible. The code contains approximately 3000 lines of Python code (plus a couple of bash scripts) and supports models written in 3 deep learning libraries: Theano, Lasagne and Keras. Some of the features include:

  • Automated dataset management
  • Automated checkpointing of models and automated resuming of training
  • Colorized terminal output and simultaneous output to log files
  • Extensible and modular
  • Automatically produce HTML output

Getting started in a few lines

The following should be enough to get you started and train a successful model:

git clone https://github.com/philparadis/ift6266-h17-project cd ift6266-h17-project

If needed, activate your python virtual environment and install the dependencies:

pip install -r requirements.txt

Finally, launch a “conv_deconv” model named “test1”.

./run.py conv_deconv test1

Existing models

The first parameter must be the type of model and has to be chosen among the following:

  • mlp
  • conv_mlp
  • conv_deconv
  • dcgan
  • wgan
  • lsgan
    • Takes the –architecture argument (values: 0, 1 or 2)

Defining a new model

Defining a new model is as simple as creating a class derived from the desired base class and defining a “build” method that constructs the model. A few other details need to be setup, such as the model’s name.

How to run an experiment

After having given a name to your new model, such as, let’s say, “conv_mlp”, then it suffices to launch “run.py” with the appropriate arguments.

To know the exact usage of “run.py”, type “run.py –help”. You will get the following information:


usage: run.py [-h] [-v VERBOSE] [-e EPOCHS] [-b BATCH_SIZE] [-l LEARNING_RATE]              [-g GAN_LEARNING_RATE] [-f] [-c              EPOCHS_PER_CHECKPOINT] [-s EPOCHS_PER_SAMPLES]              [-k] [-a ARCHITECTURE] [-u UPDATES_PER_EPOCH] [-m]              [-t] model exp_name_prefix positional arguments:  model                 Model choice (current options: test,  mlp, conv_mlp,                        conv_deconv, vgg16*, conv_lstm*, lstm*,                        vae*, conv_autoencoder*, dcgan, wgan,                        lsgan (*: Models with * may not be fully                        implemented yet).)  exp_name_prefix       Prefix used at the beginning of the name  of the                        experiment. Your results will be stored                        in various subfolders and files which                        start with this prefix. The exact name                        of the experiment depends on the model                        used and various hyperparameters. optional arguments:  -h, --help            show this help message and exit -v  VERBOSE, --verbose VERBOSE                        0 means quiet, 1 means verbose and 2                        means limited verbosity. (default: 2)  -e EPOCHS, --epochs EPOCHS                        Number of epochs to train (either for a                        new model or *extra* epochs when resuming                        an experiment. (default: 20)  -b BATCH_SIZE, --batch_size BATCH_SIZE                        Only use this if you want to override                        the default hyper parameter value                        for your model. It may be better to                        create an experiment directory with an                        'hyperparameters.json' file and tweak                        the parameters there. (default: 128)  -l LEARNING_RATE, --learning_rate LEARNING_RATE                        Only set this if you want to override                        the default hyper parameter value                        for your model. It may be better to                        create an experiment directory with an                        'hyperparameters.json' file and tweak                        the parameters there. (default: 0.0001)  -g GAN_LEARNING_RATE, --gan_learning_rate GAN_LEARNING_RATE                        Only set this if you want to override                        the default hyper parameter value for                        your GAN model. It may be better to                        create an experiment directory with an                        'hyperparameters.json' file and tweak                        the parameters there. (default: 0.0001)  -f, --force           Force the experiment to run even if a  STOP file is                        present. This will also delete the                        STOP file.  (default: False)  -c EPOCHS_PER_CHECKPOINT, --epochs_per_checkpoint  EPOCHS_PER_CHECKPOINT                        Amount of epochs to perform                        during training between every                        checkpoint. (default: 20)  -s EPOCHS_PER_SAMPLES, --epochs_per_samples EPOCHS_PER_SAMPLES                        Amount of epochs to perform during                        training between every generation of image                        samples (typically 100 images in a 10x10                        grid). If your epochs are rather short,                        you might want to increase this value, as                        generating images and saving them to disk                        can be relatively costly. (default: 1)  -k, --keep_all_checkpoints                        By default, only the model saved during                        the last checkpoint is saved. Pass this                        flag if you want to keep a models on disk                        with its associated epoch in the filename                        at every checkpoint. (default: False)  -a ARCHITECTURE, --architecture ARCHITECTURE                        Architecture type, only applies to the                        LSGAN critic's neural network (values:                        0, 1 or 2). (default: 1)  -u UPDATES_PER_EPOCH, --updates_per_epoch UPDATES_PER_EPOCH                        Number of times to update the                        generator and discriminator/critic                        per epoch. Applies to GAN models                        only. (default: 10)  -m, --feature_matching                        By default, feature matching is not used                        (equivalently, it is set to 0, meaning                        that the loss function uses the last                        layer's output). You can set this value                        to 1 to use the output of the second-to-                        last layer, or a value of 2 to use the                        output of the third-to-last layer,                        and so on. This technique is called                        'feature matching' and many provide                        benefits in some cases. Note that it                        is not currently implemented in all                        models and you will receive a message                        indicating if feature matching is used                        for your model.  (default: False)  -t, --tiny            Use a tiny dataset containing only  5000 training                        samples and 500 test samples, for                        testing purposes.  (default: False)

DCGAN, WGAN and LSGAN: Various interesting network architectures compared

Starting point: DCGAN

As a starting point, I decided to use a DCGAN implementation written in Lasagne for MNIST (source).

I had to modify slightly the generator and discriminator’s network so that they could handle 64×64 colour images. I found the DCGAN to be very unreliable and  it would occasionally manage to learn to generate something that looks like the dataset somewhat only a small fraction of the time. Otherwise, it could spend hundreds or thousands of epochs learning nothing useful.

Here is a set of random sample images produced by the generator of the best DCGAN model I trained:

dcgan

Next model: WGAN

Since the Wasserstein GAN  is reputed to be much more stable under training, I decided to try an implementation. It worked more often than the DCGAN, but still had a high failure rate and was slow to train. Moreover, it had a strange behavior where it would frequently start to learn something for a few hundred epochs and then all of a sudden the critics loss would crash towards 0 in a few epochs and the generator would unlearn everything it had learned and went back to produce garbage.

Problem: limited time and computational resources

In order to save precious time, I implemented a system that would detect when the  critics loss went very low for more than 20 epochs and then abort training. This allowed me to search over a grid of hyperparameters more efficiently.

I did not end up spending much time on WGAN and DCGAN, because I decided to try an even more recent GAN implementation called the LSGAN (Least-Squares GAN). It turned out to produce better results compared to the other 2 implementations.

LSGAN: Best architecture

I tried numerous architectures for the generator and critic’s neural network, but I obtrained the best results with the simplest architecture that I considered, both in terms of training stability and image quality.

Sample images from LSGAN

This is a sample image from my LSGAN. It uses the simplest architecture I tried, with only 3 transpose convolutions.

samples_082

Issues with the LSGAN generator

As you can see from this sample, there is definitely an issue with image quality and noticeable although not too severe mode collapse.

  • Avoiding the checkboard artifacts issue by selecting our transpose convolutions wisely in our generator or by using upsampling via interpolation.
  • Feature Matching, perhaps by changing our loss function or adding an additional weighted term which is based on a distance in an intermediate layer of the discriminator (feature maps space instead of pixels space).

There are known solutions to explore and help with the mode collapse, in particular:

  • Minibatch Discrimination

This will be attempted if time permits.

Improved sample

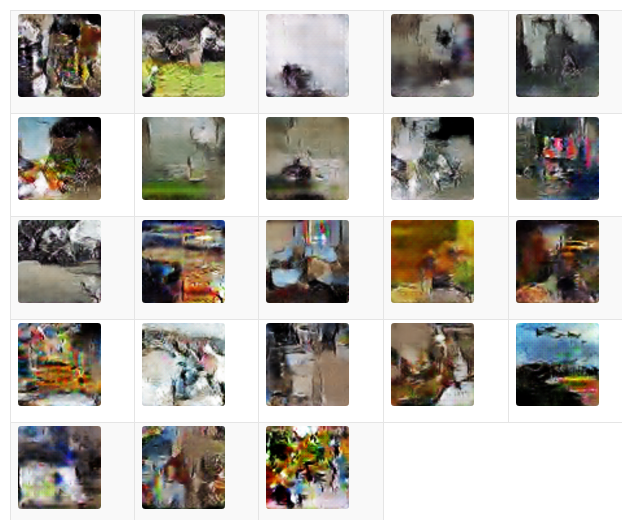
Here is a sample image. It was produced with the LSGAN architecture #1 using the following parameters:

  • Total training epochs: 1500
  • Learning rate eta: 0.0001
  • Optimizer: RMSProp
  • Batch size: 128
  • Sample images produced at epoch: 254

The image contains 100 samples of size 64×64 pixels each, arranged in a 10×10 grid.

samples_epoch_00254

Artifacts are still present

Even though this image is a lot smoother, the checkerboard artifact mentioned above is still present in every single image, although not very obvious, it can be seen clearly by zooming in and scaling up one of the images in the sample above:

zoomed_samples_epoch_00254


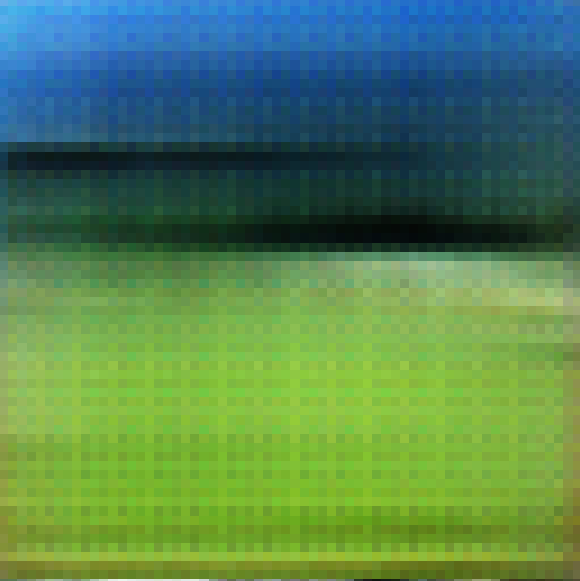
Notice that the checkerboard pattern contains a very high-frequency pattern: the intensity alternates every other pixel. Another pattern can be seen to be repeated every 5 pixels and yet another every 9 pixels.

This phenomenon is caused by the filters of transposed convolutions interfering with themselves in constructive and destructive patterns, as explained in this blog post.

In order to tackle this issue, we replaced every transposed convolution with a regular convolution with stride 1 and “same” padding, in order for the convolution layer to preserve the image dimension. Then, we added an upsampling layer smoothing the scaling output via bilinear interpolation.

Unfortunately, this seems to have severely reduced the capacity of the model and severely reduced the sharpness of the images. Moreover, the checkerboard pattern problem was replaced by a new edges artifact issue, as can be seen in the samples below (one of the best result from this architecture):

samples_99

To obtain good results from such an architecture, it is therefore probably necessary to increase the neural network’s complexity and therefore its capacity. We attempted doing so, using additional convolution layers, fully-connected layers, greater number of filters, and many other tricks, but they all came with their own set of issues, including a much slower training and a significantly higher probability of total failure to improve during training.

Training generative models can be hard! How poor output space makes for poor loss functions. Ideas to solve this and intro to Feature Matching.

What is Feature Matching?

Feature Matching is the idea to look not at the network’s final layer’s output, but instead, look at the second-to-last or some other intermediate layer’s output.

As seen previously…

This idea is very important and shall appear later in more sophisticated architectures. We already saw an analogous idea in the previous blog post where any if the feed-forward generative neural network we considered, such as fully-connected, partially-convolutional or fully-convolutional, all produced output directly in pixel space. This proved to be an inherent difficulty as pixel space is too shallow and limited for any good loss function to be designed. Instead, we mapped our images using a highly complex transformation – via the model VGG-16 – that provides a rich representation, from which a wealth of simple, yet very powerful, abstract and flexible visual features.

To appear on your screens soon…

We will see later that a similar scenario appears with Generative Adversarial Networks (GANs). In fact, the discriminator D of a GAN is a neural network whose output – no matter the network’s architecture complexity – is simply a floating point number in the interval (0,\ 1). As we know, training GANs involves the generator G trying to fool D as often as possible, by passing fake (generated) data as real data. But basically, the objective loss functions are all ultimately dependent on some formula that uses terms the D(x_i) and D(G(z_i)), which correspond to a number between 0 and 1 for each sample from the mini-batch. This is a fairly poor amount of information, making GANs very hard to train. Optimization of the loss functions is generally highly unstable and frequently fails to converge or make any significant improvement, collapses to a very poor local minimum or goes very well for a certain number of epochs, before either the discriminator or the generator overpowers the other and then lead to massive unrecoverable imbalance or to a deterioration of one of the networks and eventual training failure.

Optimization of the GAN loss functions is generally highly unstable and frequently fails to converge or make any significant improvement, collapses to a very poor local minimum or goes very well for a certain number of epochs, before either the discriminator or the generator overpowers the other and then lead to massive unrecoverable imbalance or to a deterioration of one of the networks and eventual training failure.

Again, a solution to this problem is to move away from the $\textit{(0,\ 1)}$ interval space, which is inherently too weak for our purposes. Instead of training G to mislead D as often as possible, the idea is to pick the second-to-last layer of D (i.e. before what is typically a final sigmoid activation)  or some other intermediate layer k of D. Then, the new objective for training G is to minimize the distance (using Euclidean distance or some other norm) between the tensor of features from layer k of D activated by the real images and the tensor of features from layer k of D activated by the fake (generated) images.

The concept of feature matching as applied to GANs was first suggested in the following paper.

Salimans, T., Goodfellow, I. J., Zaremba, W., Cheung, V., Radford, A., & Chen, X. (2016). Improved Techniques for Training GANs. CoRR, abs/1606.0. Retrieved from http://arxiv.org/abs/1606.03498

The key message to remember

The key concept to remember, in my own words, is the following:

Designing a better loss function:

Given a neural network and a loss function, it may be possible to find a better loss function if the neural network output lies in a space with low information content. Either (1) replace the loss function or add additional terms based on one or many intermediate layers’ activation outputs (feature matching) or (2) find a way to leverage or extract additional information content from your output.

Pre-trained VGG-16 and a new, shiny and improved loss function!

We downloaded code (in other words, the VGG-16 exact architecture) as well as a 528 MB HDF5-encoded file containing the weights of a pre-trained VGG-16 on the ILSVRC2012 dataset. This model was designed and trained by K. Simonyan and A. Zisserman for the ILSVRC2012 competition and performed brilliantly, quickly becoming one of the most famous deep neural networks of its time, along with its variants such as VGG-19 and others. The authors published their VGG-16 results in the following paper:

Very Deep Convolutional Networks for Large-Scale Image Recognition
K. Simonyan, A. Zisserman
arXiv:1409.1556

Moreover, the authors generously shared the model’s weights; training the model on the ILSVRC2012 dataset with optimal accuracy would take tremendous computing resources. To cite their paper:

Our implementation is derived from the publicly available C++ Caffe toolbox […], but contains a number of significant modifications, allowing us to perform training and evaluation on multiple GPUs installed in a single system […]. We have found that our conceptually much simpler scheme already provides a speedup of 3.75 times on an off-the-shelf 4-GPU system, as compared to using a single GPU. On a system equipped with four NVIDIA Titan Black GPUs, training a single net took 2–3 weeks depending on the architecture.

We used VGG-16 in order to define a much better loss function. That is, instead of our typical L_2 loss function:

L_2(\textbf{y},\ \hat{\textbf{y}}) = \lVert \textbf{y} - \hat{\textbf{y}} \rVert_2.

We can pass y and \hat{y} to VGG-16, denoting by \textbf{h}^{(k)}(\textbf{x}) the activation outputs of VGG-16’s intermediate layer k when given input \textbf{x}. Then, we define the new loss function as:

L_\text{VGG-16}(\textbf{y},\ \hat{\textbf{y}}) = \lVert\textbf{h}^{(k)}(\textbf{y}) -\textbf{h}^{(k)}(\hat{\textbf{y}}) \rVert_2.

Now, the reason we defined this new loss function is because:

  • Out first loss function is problematic and inherently cannot produce very good results. It generates very blurry predictions.
  • The reason the L_2 loss function is so poor is not because of the Euclidean distance. In fact, using any p-norm would result in similar issues. The problem arises because we are computing our distance function in pixel space.
  • On the other hand, L_\text{VGG-16} computes a distance in the very abstract space of feature maps. Given that k is sufficiently well-chosen, then our loss function would cause our model to optimize over predicting the correct abstract concepts based on the input’s abstract concepts that were detected.
    • To make this more concrete, consider this. VGG-16 is able to detect very abstract features at certain layers, such as human parts, like legs, arms, torsos and heads that make up a person. As such, if the input image only shows the legs of a tennis player, there will be a very strong activation within the feature maps that corresponds to a “leg detector”. As such, our model will try to produce a target image that also tries to produce the same strong activations. Now, since our model has learned during the training phase that two legs beside one another are almost always followed by a person’s upper body above them in the target image, it is reasonable that our model will easily deduce this.
  • Moreover, with L_2, because we are working in pixel space only, all the model can do is try to minimize the average distance of all pixel intensity for each of the 3 color channels. As such, the model is reduced to doing simple interpolation.

Hyperparameter k

Note that k can be considered a hyper parameter. Moreover, a loss function could be chosen by selecting multiple layer’s activation outputs by selecting more hyper parameters k_1,\ \ldots,\ k_m. Finally, weights could be associated to the various layers w_1,\ \ldots,\ w_m.

A simple experiment could allow us to figure out the optimal choice. However, trying all combinations would be much too computationally expensive. As such, it is better to try and make some clever choices.


Architecture: The Convolution-Deconvolution “conv_deconv” Model

This time, we started again with the simple Convolution model. But we wanted to increase the capacity of the model and make it much deeper. As such, we had many repeated convolutions that reduced the target size below (3, 32, 32) and in fact reached (64, 4, 4), where 64 is the number of feature maps. Thus, it was necessary to use transpose convolutions (“deconvolutions”) to re-increase the target size to (64, 32, 32), then finally to (3, 64, 64).

Model’s structure

  • 3 layers of convolutions with strides of 2 and 64 filters of size of size 5×5 each
  • 1 layer of transpose convolution with stride of 1 and 64 filters of size 5×5 each
  • 2 layers of transpose convolutions with stride of 2 and 64 filters of size 5×5 each
  • 1 layer of transpose convolution with stride of 1 and 64 filters of size 5×5 each
  • 1 final layer of transpose convolution with stride of 1 and 3 filters of size 5×5 each

Each layer uses “same” padding. Hence, the image dimension goes like this through the layers: 64×64 –> 32×32 –> 16×16 –> 8×8 –> 8×8 -> 16×16 -> 32×32 -> 32×32 -> 32×32.

The model was trained with mean loss squared error and it has proven to be the most successful model.

Results: The Conv_MLP (Convolutional + fully-connected) model

We expanded upon our first very rudimentary fully-connected MLP model with 2 hidden layers. This time, we use a few convolutions to start with and then a dense (fully-connected) layer before the output.

TODO: Add methodology + example picture + link to full results + analysis

Architecture of Conv_MLP

  • Input is a 4-tensor of shape (None, 3, 64, 64).
    1. Convolution with 64 filters and 5×5 pixels kernel sizes.
    2. Dropout with probability p=0.2.
    3. Downsample by a factor of 2, using max-pooling with 2×2 pixels filter sizes.
  • The output of the previous step has size (None, 64, 32, 32). Repeat almost the exact same three steps:
    1. Convolution with 128 filters and 5×5 pixels kernel sizes.
    2. Dropout with probability p=0.5.
    3. Downsample by a factor of 2, using max-pooling with 2×2 pixels filter sizes.
  • The output of the previous step has size (None, 128, 16, 16). Repeat almost the exact same three steps:
    1. Convolution with 256 filters and 5×5 pixels kernel sizes
    2. Dropout with probability p=0.5
    3. Downsample by a factor of 2, using max-pooling with 2×2 pixels filter sizes
  • The output of the previous step has size (None, 256, 8, 8).
  • Finally, we finish with the fully-connected part of the network:
    1. Reshape the 4-tensor representing the 256 activation maps of size 8×8 each to a flat vector of dimension batch_size×16384.
    2. Add a dense (fully-connected) layer with 4096 units and tanh activation.
    3. Add the output layer, a dense layer of dimension 3×32×32 = 3072.

Code to build Conv_MLP in Keras:

from keras.models import Sequential from keras.layers import Conv2D, MaxPooling2D, Flatten, Dense, Activation self.keras_model = Sequential() self.keras_model.add(Conv2D(64, (5, 5), input_shape=(3, 64, 64), activation='relu')) # num_units: 32*64*64 self.keras_model.add(Dropout(0.2)) self.keras_model.add(MaxPooling2D(pool_size=(2, 2))) # out: 32x32 self.keras_model.add(Conv2D(128, (5, 5), padding='same', activation='relu')) # num_units: 64*32*32 self.keras_model.add(Dropout(0.5)) self.keras_model.add(MaxPooling2D(pool_size=(2, 2))) # out: 16x16 self.feature_matching_layers.append(Conv2D(256, (5, 5), padding='same', activation='relu')) self.keras_model.add(self.feature_matching_layer[-1]) # num_units: 128x16x16 self.keras_model.add(Dropout(0.5)) self.keras_model.add(MaxPooling2D(pool_size=(2, 2))) # out: 8x8 self.keras_model.add(Flatten()) self.keras_model.add(Dense(units=4096, activation='tanh')) self.keras_model.add(Dense(units=self.hyper['output_dim'])) # output_dim = 3*32*32 = 3072

Small sample of predictions

results_conv_mlp