Setting up the Input System
Tutorial
·
Beginner
·
+0XP
·
10 mins
·
(1680)
Unity Technologies
In this series of tutorials, you will first learn how to install the Input System Package and quickly get set up with game-ready inputs. Next, you will learn how to script player movements as well as control your player using the game-ready inputs. Then, you will learn how to customize your own input actions, tailoring the input system to your own gamepad and keyboard devices. Finally, you will learn how to script player movement that especially takes advantage of the Input System API.
1. Overview
Unity's built-in Input Manager has remained relatively consistent for a long while, even throughout recent Editor version updates. While the built-in Input Manager does a great job of handling player input, it was designed before many of the current platforms and devices in use today became available. The built-in input API can certainly be improved upon, especially in the areas of device configuration. Fortunately, the Input System Package offers improvements in setting up, configuring, and handling player input in a more efficient way. The Input System Package works for all platforms, and can easily be extended to support custom or future devices.
In this series of tutorials, you will first learn how to install the Input System Package and quickly get set up with game-ready inputs. Next, you will learn how to script player movements as well as control your player using the game-ready inputs. Then, you will learn how to customize your own input actions, tailoring the input system to your own gamepad and keyboard devices. Finally, you will learn how to script player movement that especially takes advantage of the Input System API.
2. Setting up the Input System
When using a game controller or other device, make sure that your game controller or specific device’s driver is properly installed for your operating system. Look up the specifications including the make and model of your device, download the appropriate driver for your operating system, and then run the installation process. You may need to restart your computer after the installation is completed. Double-check to verify if your device is recognized by opening up either your computer’s settings panel or system preferences window, and making sure that your specific device is shown and available. In this tutorial’s example, an Xbox wireless controller will be used, as well as standard keyboard inputs. You will be able to work with your own specific or custom installed device.
In order to get set up with the Input System Package for Unity, first ensure that you have installed a Unity Editor version newer than 2019.1+, and that your Project’s API compatibility level is set to the .NET 4.x runtime.
1. Open up a new or existing project from the Unity Hub. To check whether your Project’s API is compatible, select from the top menu drop-down: Edit > Project Settings to open up the Project Settings window. Select the Player option from the left column, and then select the triangle to expand the options for Other Settings in the main Project Settings window. Scroll down to the Configuration option, and ensure that the setting for API Compatibility Level field is set to .NET 4.x.
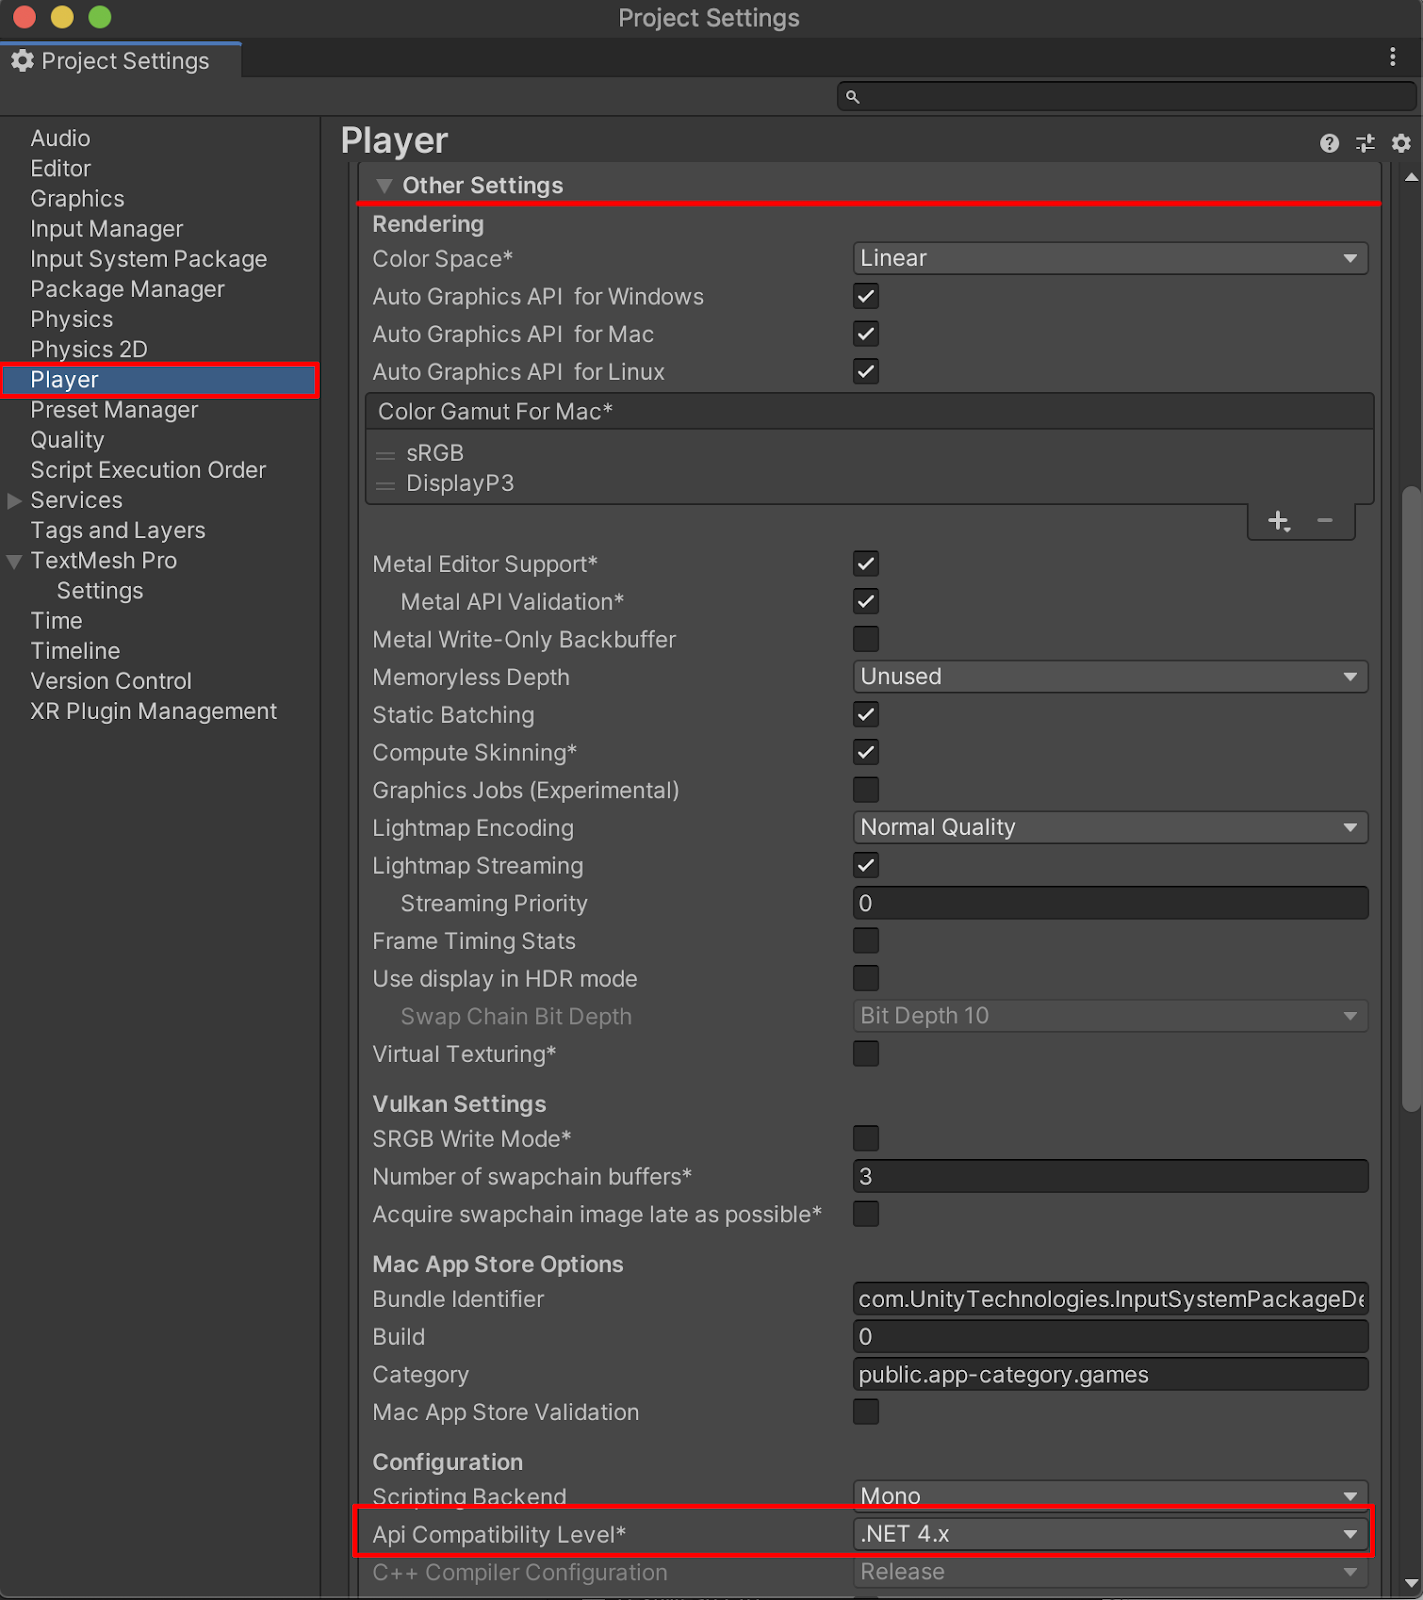
The Project Settings window
This tutorial will demonstrate setting up the Input System with the example shown in the Roll-a-Ball project. You can refer to the Roll-a-Ball project for further details on setting up primitive objects such as a ground plane and a sphere, adding materials, and a Rigidbody component. Alternatively, you can work with an existing player you have already set up in your own project.
2. Set up a GameObject in your Scene to be designated as the player you will control through your device.
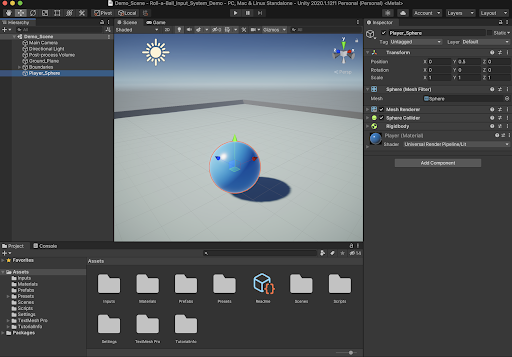
The Roll-a-Ball Project open in the Unity Editor
In this example Scene, a sphere GameObject is placed in the center of a ground plane and is designated as the controllable player. The player sphere will be programmed with commands to enable movement using a C# script. The C# script commands will be explained further in this tutorial.
3. Open up the Package Manager window by selecting from the top menu drop-down:
Window > Package Manager. Select the arrow to the right of the Packages: In Project option, and then select Unity Registry from the drop-down menu. Search for the Input System in the Unity Registry by typing “input” in the search field, select the Input System package, and then select the Install button to install the package. This tutorial is verified with the Input System version 1.0.0.
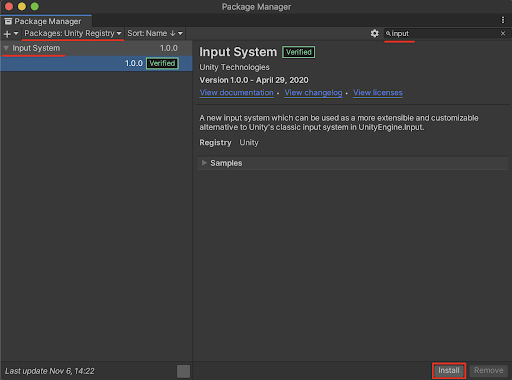
Installing the Input System in the Package Manager
4. After the Input System package installs, a pop-up warning will appear, notifying that the Unity Editor will need to be restarted in order to enable the new Input System. Select Yes to restart the Unity Editor.
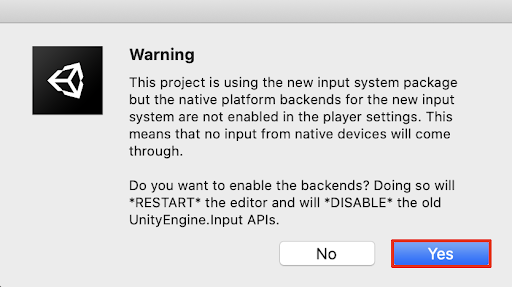
The pop-up warning window
5. After restarting the Unity Editor, check to see that the original built-in Input Manager is disabled. Open the Project Settings window by selecting from the top menu drop-down:
Edit > Project Settings. Select the built-in Input Manager from the left column, and ensure that a red warning indicates that it is now disabled.
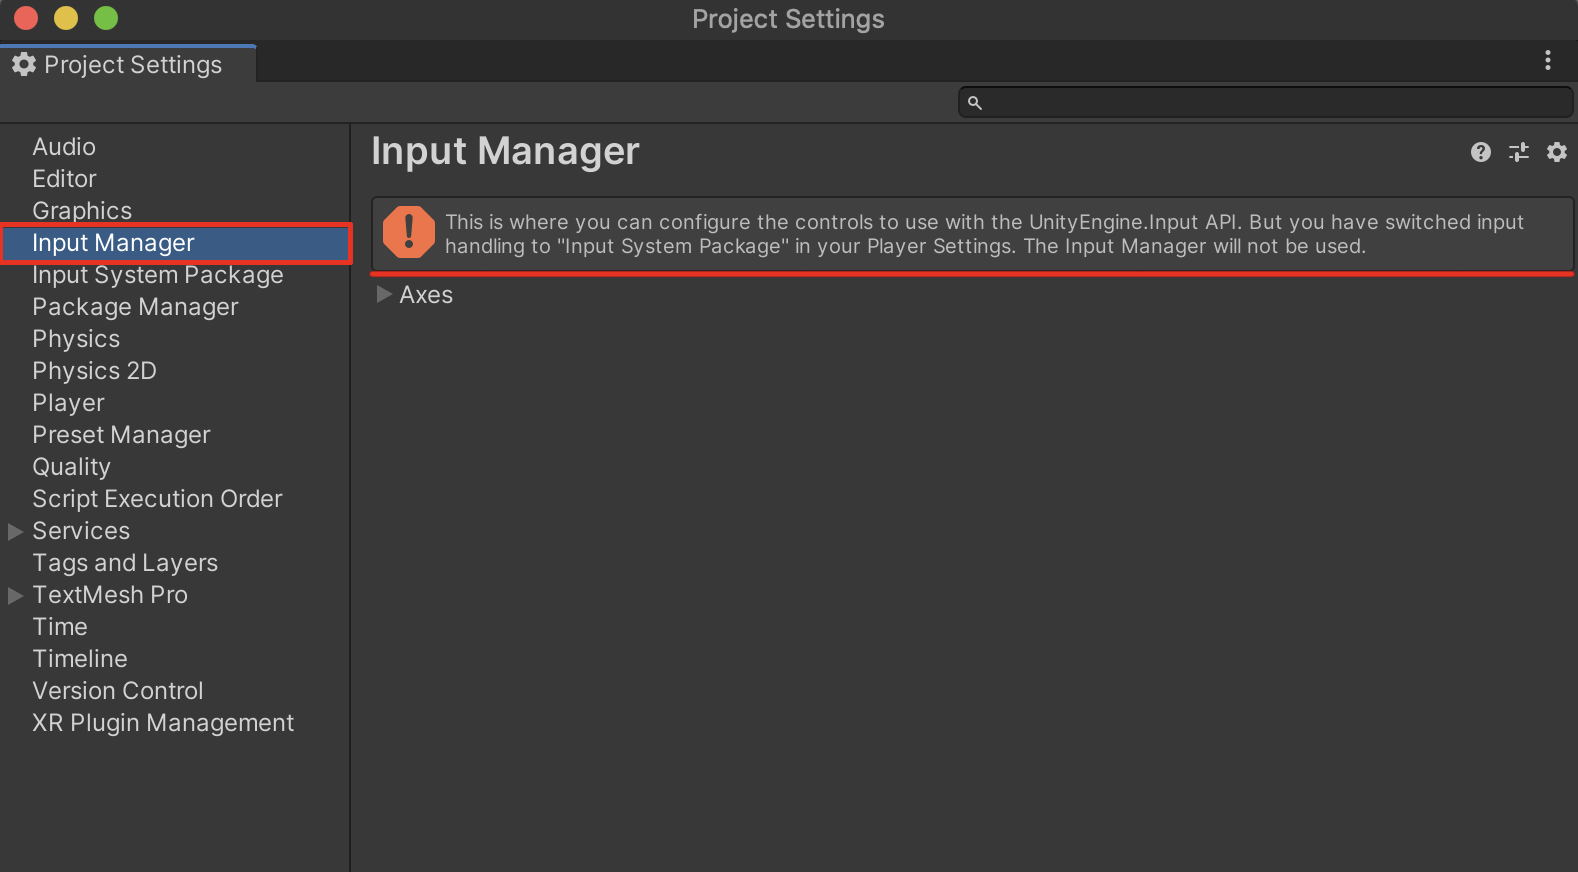
The built-in Input Manager is now disabled in the Project Settings
If you’ve started with a new project, you will not need the built-in Input Manager anymore. However, if you are working with an existing project that takes advantage of player inputs using the built-in Input Manager, and you do not want to break your existing player controller scripts, there are steps to migrate from the old system to the new system. Before migrating, it is also possible to optionally keep both systems enabled. To keep the active input handling enabled for both systems, proceed to the next step; otherwise, skip to step number 7.
6. Optionally, to enable the active input handling for both systems, select the Player option from the left column in the Project Settings window, and select to expand the Other Settings options.
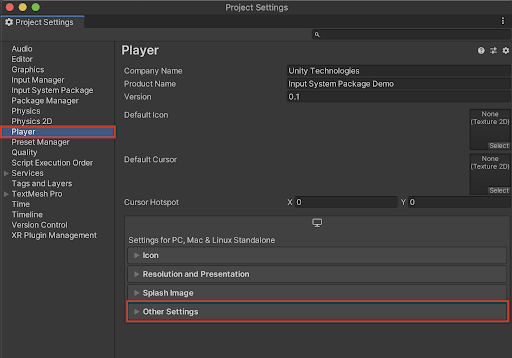
Selecting to expand the Player option’s Other Settings
7. Scroll down to Active Input Handling, and select Both from the drop-down menu. You will then need to perform a restart of the Unity Editor.
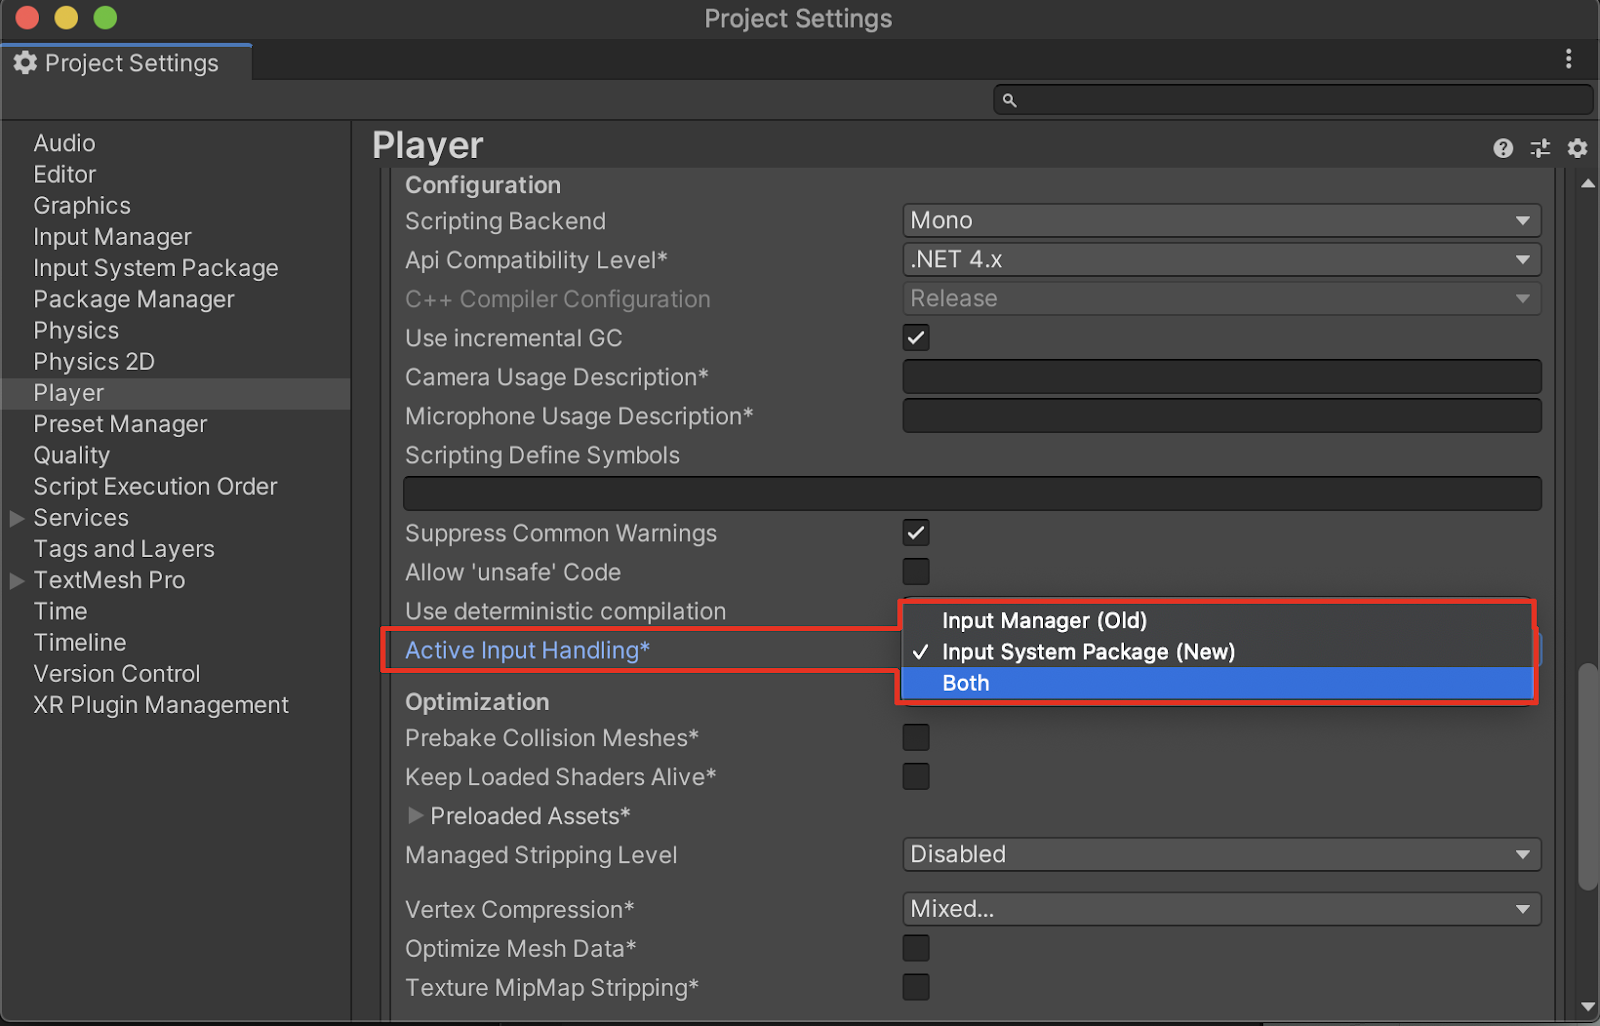
The Active Input Handling is set to Both
Optionally, you may want to test the Input System Preview Package updates in development. As packages undergo developments, certain features are improved upon and known-issues are often addressed. Preview packages are designed for testing purposes and generally not advised for production. To optionally install the latest Input System Preview Package, proceed to the next step, otherwise skip ahead to step 12.
8. Optionally, to enable Preview Packages, select the gear icon in the Package Manager window, and select Advanced Project Settings from the drop-down menu.
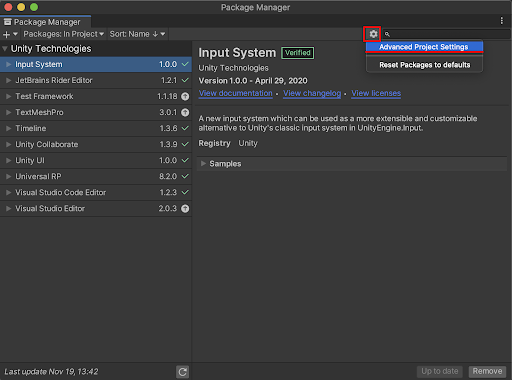
The Advanced Project Settings Gear Icon
9. The Project Settings window will open with the Package Manager option selected in the left column. Select the checkbox to Enable Preview Packages, and then confirm the popup warning dialogue by selecting the I Understand button.
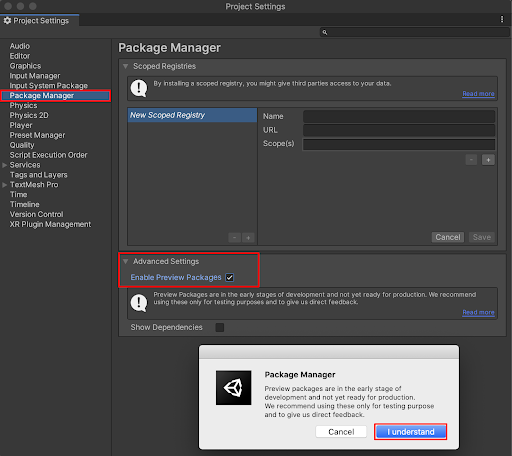
The Enable Preview Packages checkbox
10. Close out the Project Settings window, and switch back to the Package Manager window. Select the triangle to expand the options for the Input System in the left column of the Package Manager window, and then select the line reading: See other versions.
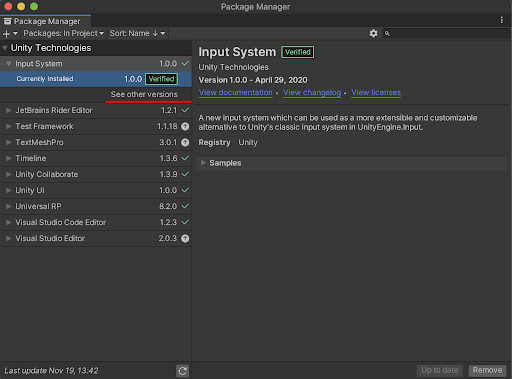
The option to See other versions
11. Select the newest Input System preview package, and then select the Update to 1.x.x-preview button at the lower right of the Package Manager window.
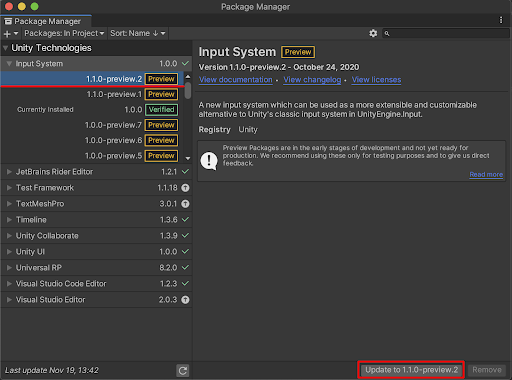
The latest Input System preview package
Now you are ready to ensure that the newly installed Input System Package is properly installed and ready to be configured.
12. Select the Input System Package from the left column of the Project Settings window, and then select the Create settings asset button in the Project Settings window to create an editable settings asset.
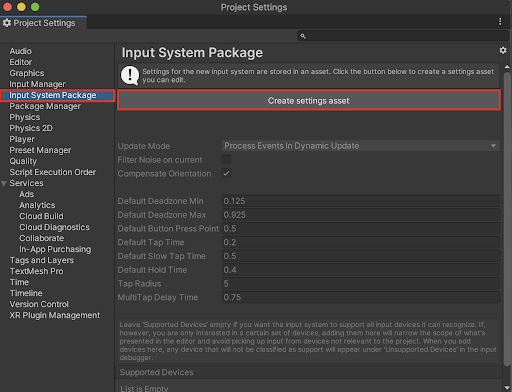
The Input System Package Create settings asset button in the Project Settings
13. A newly created input settings asset is now saved in your Project as: InputSystem.inputsettings.asset. You are able to customize settings that pertain to how events are processed in either dynamic update, or fixed update methods, and the default timings of button taps. Leave the Input System Package settings unchanged with their default settings for now, and close the Project Settings window. To edit any of these settings later on, you can either open up the Project Settings window again, or first select the InputSystem asset in the Project window, and then select the Open Input Settings Window button in the Inspector to open the Project Settings window.
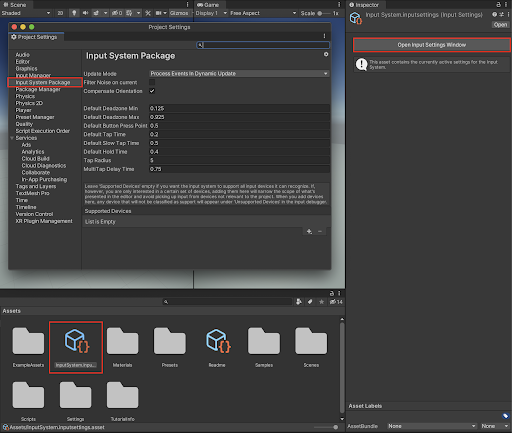
With the InputSystem.inputsettings.asset selected in the Project window, The Open Input Settings Window button in the Inspector opens up the Project Settings window
14. Your game controller should now be properly connected to the Unity Editor. Check to see if your specific game controller is connected, by selecting from the top menu drop-down:
Window > Analysis > Input Debugger. Your connected devices will appear, listed under the Devices category.
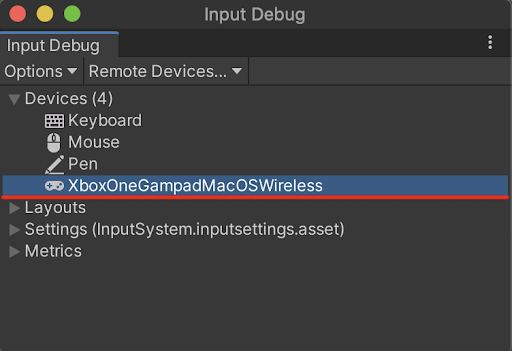
The connected devices are shown in the Input Debug window
3. Getting Started with a Game-Ready Input Action Asset
In order to control the player’s movements, you must first add the Player input component to your player, and create a new Input Action Asset. Fortunately, Unity provides a game-ready Input Action asset with common keyboard and game controller button bindings automatically added.
1. Select your player GameObject in the Hierarchy window. Next, select the Add Component button in the Inspector, type “input” in the search field, and then select Player Input from the drop-down menu.

Adding the Player Input component
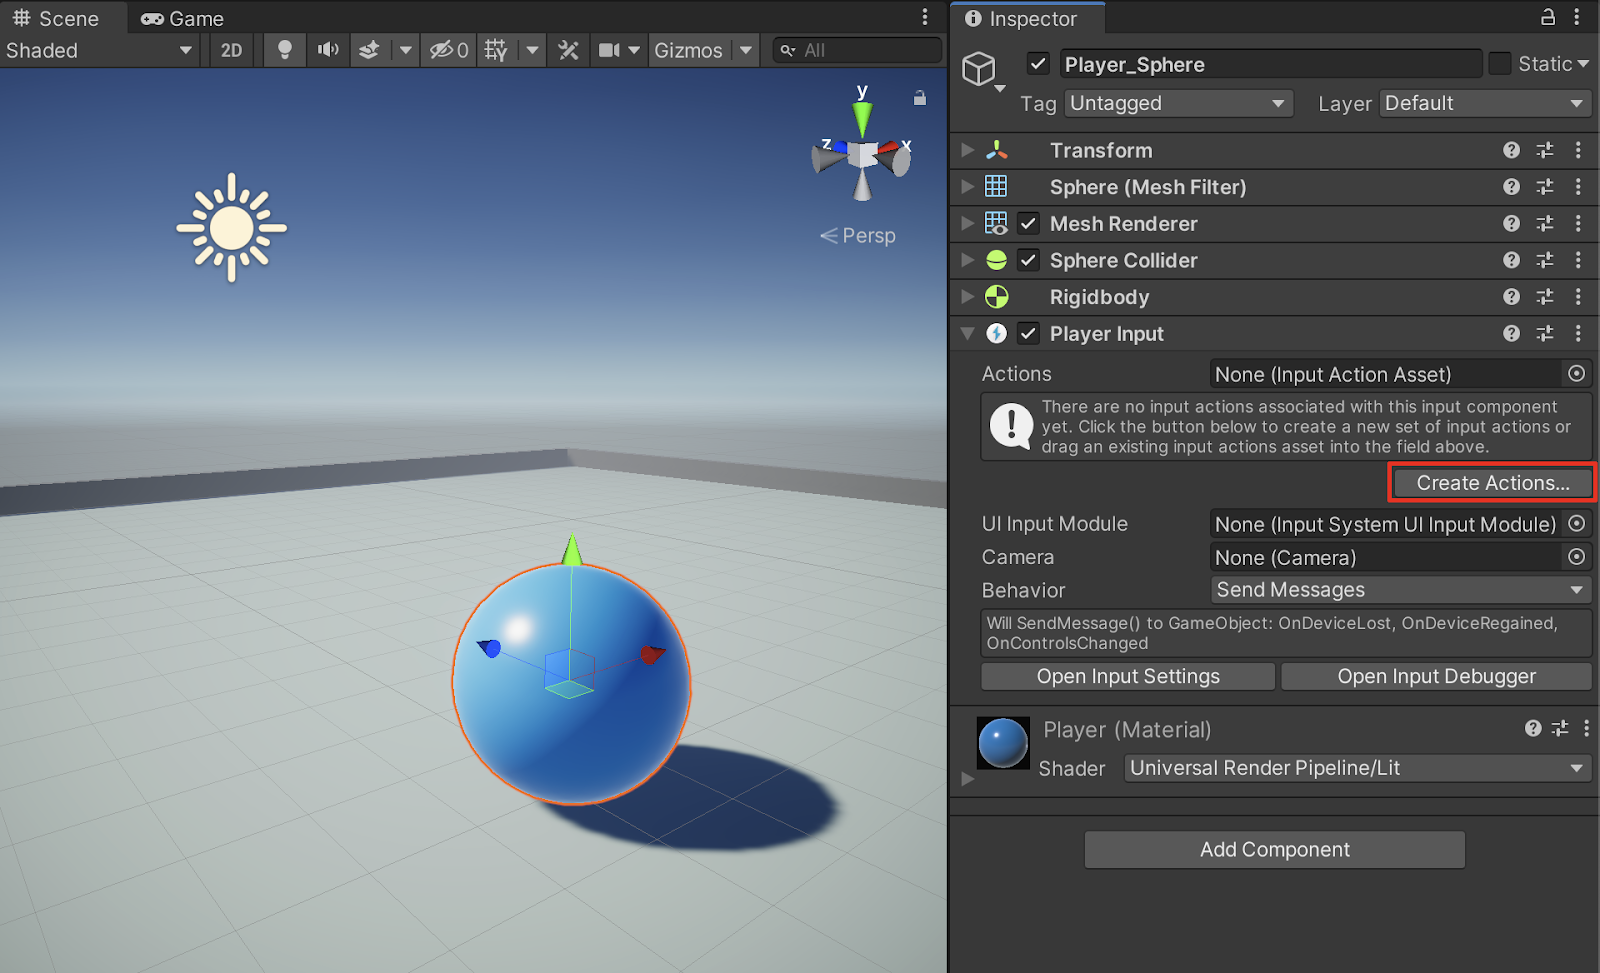
2. Within the Player Input component, select the Create Actions button to create a game-ready Input Action asset.

Creating a new Input Action
3. A popup window will open, prompting you to save the new Input Asset. Create a new folder inside your project’s Assets folder named “Inputs”, and select Save.
A new game-ready Input Action asset is created. If you have the verified Input System Package version 1.0.0, a warning error will appear in the Console window. You can ignore this warning, and clear the Console window warning without any further problems. If you have the Input System Preview Package version 1.1.0 preview.2 installed, there will be no warning, and a new Input Actions window will automatically open. If that is the case, skip ahead to step 6.
4. To connect the newly created Input Action asset to the Player Input component, select the object loader circle button to the right of the Actions field, and then select the Input Action from the Select InputActionAsset popup window. Alternatively, you may select the Input Action asset directly from the project window, and drag it into the Player Input component’s Actions field in the Inspector.
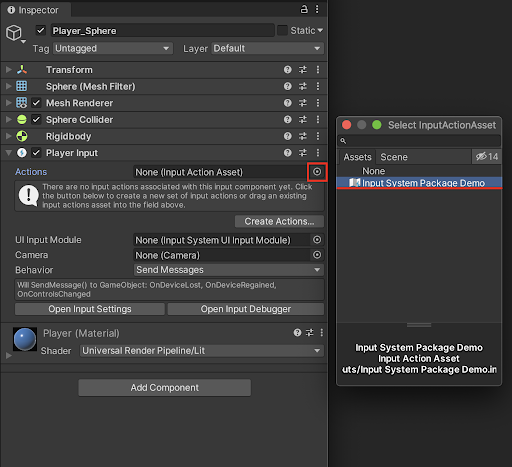
Connecting the new Input Action asset to the Player Input
5. Select the newly created Input Actions asset in the Project window, and then select the Edit asset button in the Inspector, to open up the Input Actions window.
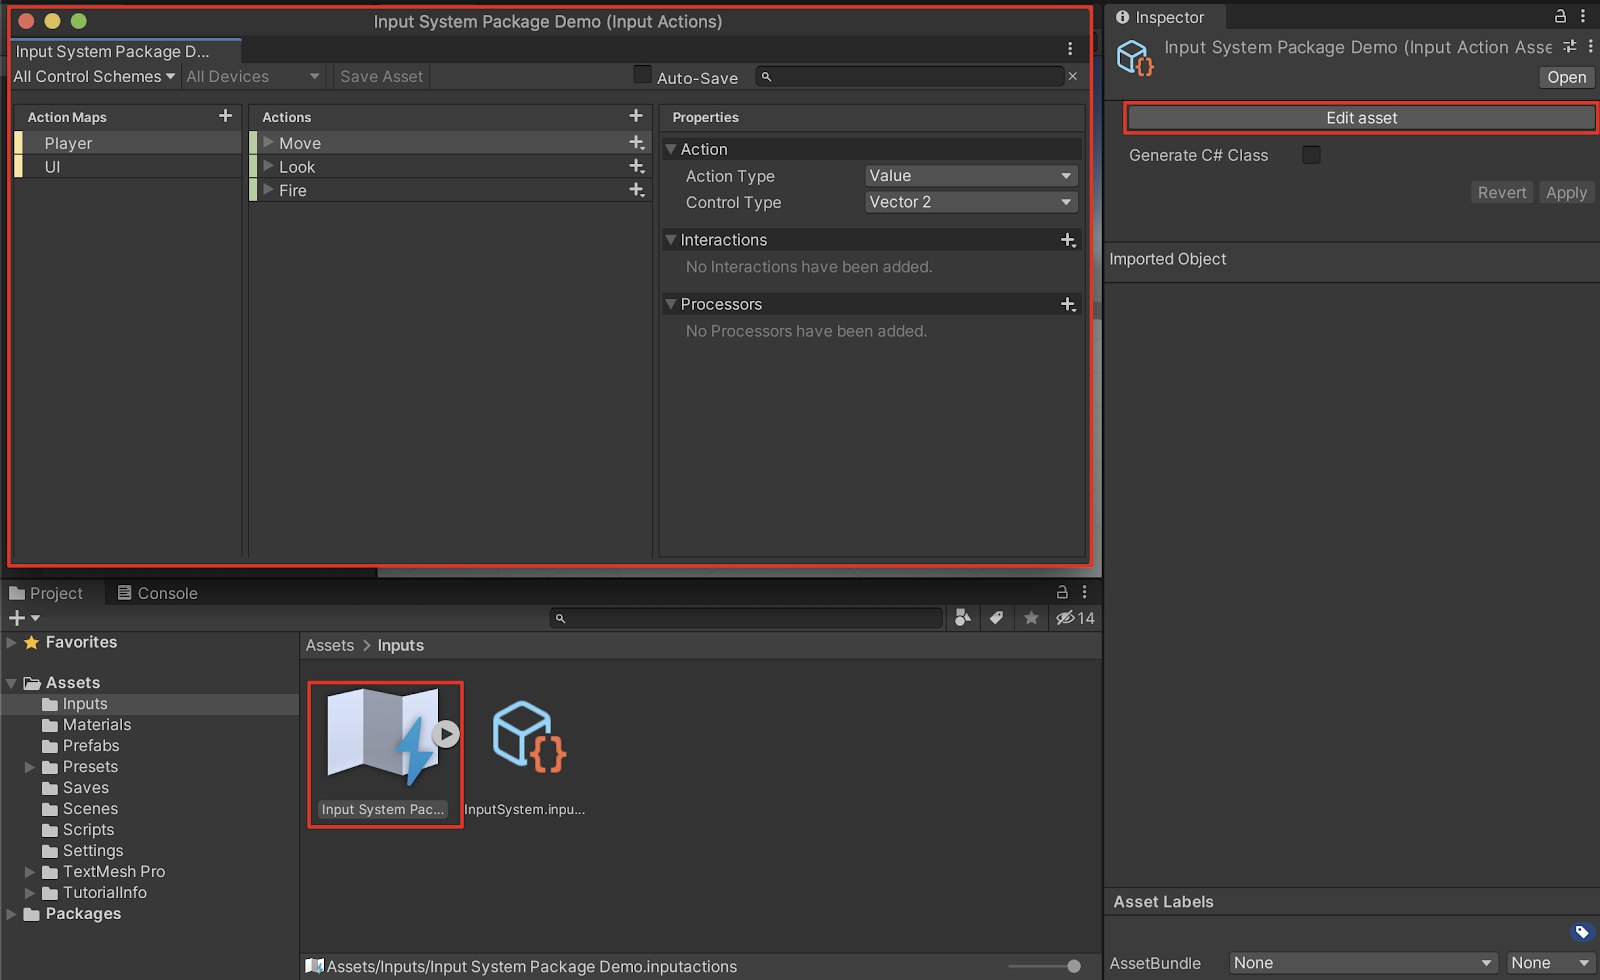
With the Input System Package Input Actions asset selected in the Project window, the Edit asset button in the Inspector opens up the Input Actions window
6. With the default game-ready Input System asset open in the Input Actions window, examine the list of commonly used player inputs that are automatically set up for your project.
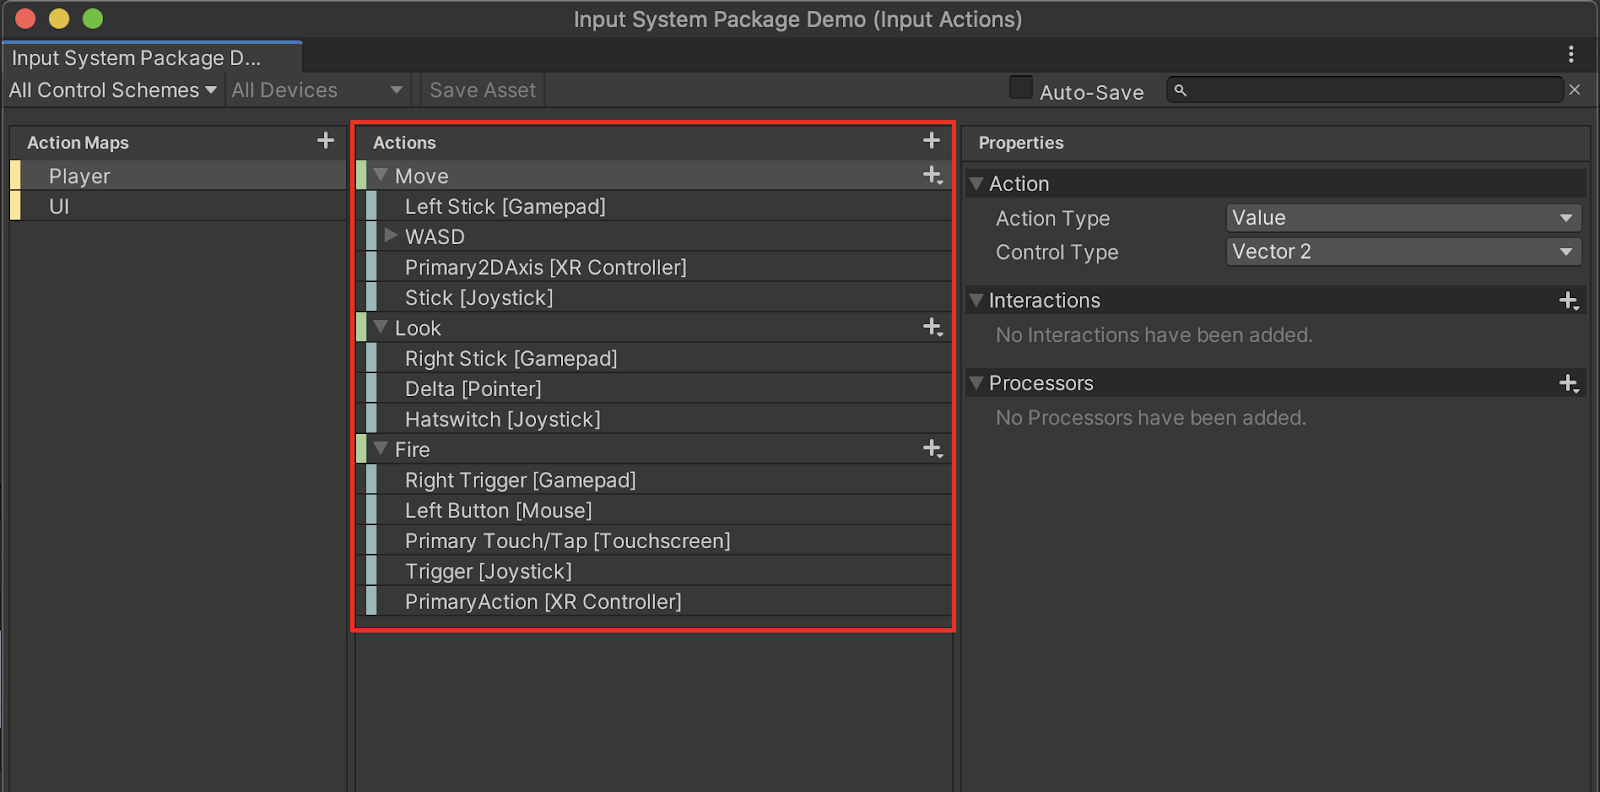
The game-ready Actions
7. Close the Input Actions window. You will learn how to customize Input Actions later on in the tutorial. In the next section, you will create a player movement script, and test out the controls in Play mode.
4. Next Steps
The Input System Package offers support for a wide range of device inputs. After installing and setting up the Input System Package, You are now able to quickly apply a game-ready default input action to start working with your project.