A Python wrapper for the Dynamsoft Document Normalizer SDK, providing simple and user-friendly APIs across Windows, Linux, and macOS. Compatible with desktop PCs, embedded devices, Raspberry Pi, and Jetson Nano.
Note: This is an unofficial, community-maintained wrapper. For official support and full feature coverage, consider the Dynamsoft Capture Vision Bundle on PyPI.
| Feature | Community Wrapper | Official Dynamsoft SDK |
|---|---|---|
| Support | Community-driven | ✅ Official Dynamsoft support |
| Documentation | Basic README and limited examples | ✅ Comprehensive online documentation |
| API Coverage | Core features only | ✅ Full API coverage |
| Updates | May lag behind | ✅ Always includes the latest features |
| Testing | Tested in limited environments | ✅ Thoroughly tested |
| API Usage | ✅ Simple and intuitive | More complex and verbose |
-
Python 3.x
-
OpenCV (for UI display)
pip install opencv-python
-
Dynamsoft Capture Vision Bundle SDK
pip install dynamsoft-capture-vision-bundle
# Source distribution python setup.py sdist # Build wheel python setup.py bdist_wheelAfter installation, you can use the built-in command-line interface:
# Scan document from image file scandocument -f <file-name> -l <license-key> # Scan documents from camera (camera index 0) scandocument -c 1 -l <license-key>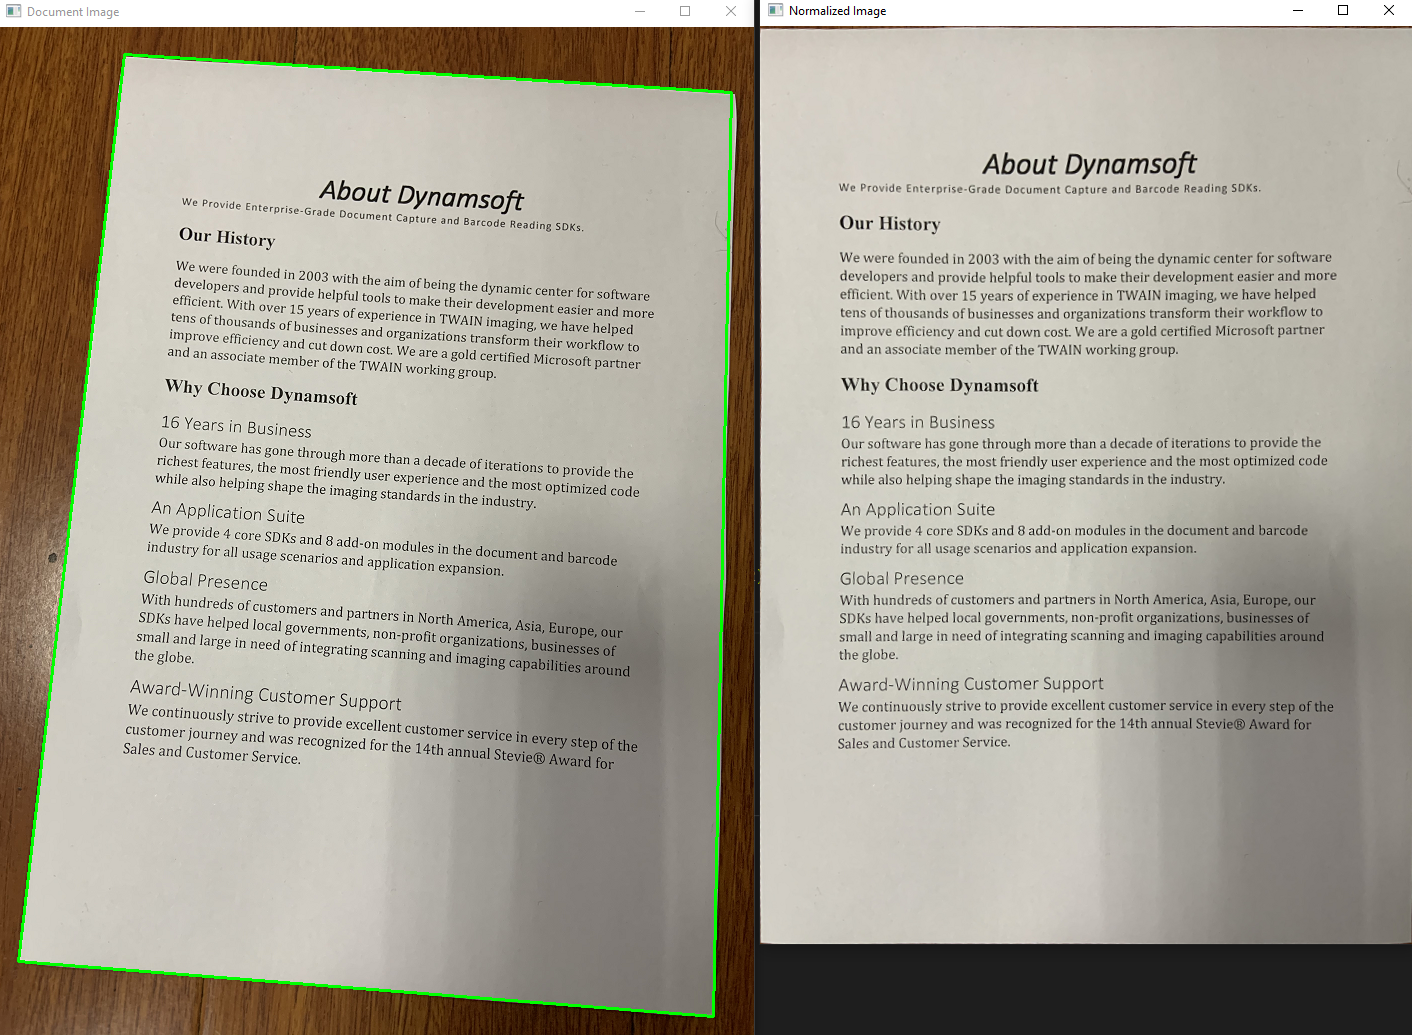
import docscanner import cv2 # Initialize license (required) docscanner.initLicense("YOUR_LICENSE_KEY") # Get trial key from Dynamsoft # Create scanner instance scanner = docscanner.createInstance() # Detect from image file results = scanner.detect("document.jpg") # OR detect from OpenCV image matrix image = cv2.imread("document.jpg") results = scanner.detect(image) # Process results for result in results: print(f"Document found:") print(f" Top-left: ({result.x1}, {result.y1})") print(f" Top-right: ({result.x2}, {result.y2})") print(f" Bottom-right: ({result.x3}, {result.y3})") print(f" Bottom-left: ({result.x4}, {result.y4})") # Draw detection rectangle import numpy as np corners = np.array([(result.x1, result.y1), (result.x2, result.y2), (result.x3, result.y3), (result.x4, result.y4)]) cv2.drawContours(image, [corners.astype(int)], -1, (0, 255, 0), 2) cv2.imshow("Detected Documents", image) cv2.waitKey(0)import docscanner import cv2 from docscanner import * # Setup (license + scanner) docscanner.initLicense("YOUR_LICENSE_KEY") scanner = docscanner.createInstance() # Detect documents results = scanner.detect("skewed_document.jpg") if results: result = results[0] # Process first detected document # Normalize the document (correct perspective) - now returns the image normalized_img = scanner.normalize(result, EnumImageColourMode.ICM_COLOUR) # Use the returned normalized image directly if normalized_img is not None: cv2.imshow("Original", cv2.imread("skewed_document.jpg")) cv2.imshow("Normalized", normalized_img) cv2.waitKey(0) # Save normalized image cv2.imwrite("normalized_document.jpg", normalized_img) print("Normalized document saved!") import docscanner import cv2 import numpy as np def on_document_detected(results): """Callback function for async document detection""" for result in results: print(f"Document detected at ({result.x1},{result.y1}), ({result.x2},{result.y2}), ({result.x3},{result.y3}), ({result.x4},{result.y4})") # Setup docscanner.initLicense("YOUR_LICENSE_KEY") scanner = docscanner.createInstance() # Start async detection scanner.addAsyncListener(on_document_detected) # Camera loop cap = cv2.VideoCapture(0) while True: ret, frame = cap.read() if not ret: break # Queue frame for async processing scanner.detectMatAsync(frame) # Display frame cv2.imshow("Document Scanner", frame) key = cv2.waitKey(1) & 0xFF if key == ord('q'): break # Cleanup scanner.clearAsyncListener() cap.release() cv2.destroyAllWindows()Initialize the Dynamsoft license. Required before using any other functions.
Parameters:
license_key: Your Dynamsoft license key
Returns:
(error_code, error_message): License initialization result
Example:
error_code, error_msg = docscanner.initLicense("YOUR_LICENSE_KEY") if error_code != 0: print(f"License error: {error_msg}")Create a new DocumentScanner instance.
Returns:
DocumentScanner: Ready-to-use scanner instance
Detect documents from various input sources (unified detection method).
Parameters:
input: Input source for document detection:str: File path to image (JPEG, PNG, BMP, TIFF, etc.)numpy.ndarray: OpenCV image matrix (BGR or grayscale)
Returns:
List[DocumentResult]: List of detected documents with boundary coordinates
Examples:
# Detect from file path results = scanner.detect("document.jpg") # Detect from OpenCV matrix import cv2 image = cv2.imread("document.jpg") results = scanner.detect(image) # Process results for result in results: print(f"Found document at ({result.x1},{result.y1}), ({result.x2},{result.y2}), ({result.x3},{result.y3}), ({result.x4},{result.y4})")Start asynchronous document detection with callback.
Parameters:
callback: Function called with detection results
Example:
def on_documents_found(results): print(f"Found {len(results)} documents") scanner.addAsyncListener(on_documents_found)Queue an image for asynchronous processing.
Parameters:
image: OpenCV image to process
Stop asynchronous processing and remove callback.
Perform document normalization (perspective correction) on a detected document.
Parameters:
document: DocumentResult containing boundary coordinates and source imagecolor: Color mode for output (ICM_COLOUR, ICM_GRAYSCALE, or ICM_BINARY)
Returns:
numpy.ndarray or None: The normalized document image as numpy array, or None if normalization fails
Usage Patterns:
# Method 1: Use return value directly normalized_img = scanner.normalize(result, EnumImageColourMode.ICM_COLOUR) if normalized_img is not None: cv2.imshow("Normalized", normalized_img) # Method 2: Access from document object (also available) scanner.normalize(result, EnumImageColourMode.ICM_COLOUR) if result.normalized_image is not None: cv2.imwrite("output.jpg", result.normalized_image)Container for document detection results.
Attributes:
x1, y1: Top-left corner coordinatesx2, y2: Top-right corner coordinatesx3, y3: Bottom-right corner coordinatesx4, y4: Bottom-left corner coordinatessource: Original image (file path or numpy array)normalized_image: Perspective-corrected image (numpy array)
Convert OpenCV matrix to Dynamsoft ImageData format.
Parameters:
mat: OpenCV image (RGB, BGR, or grayscale)
Returns:
ImageData: SDK-compatible image data
Convert Dynamsoft ImageData back to OpenCV-compatible numpy array.
Parameters:
normalized_image: ImageData object from SDK normalization results
Returns:
numpy.ndarray: OpenCV-compatible image matrix
Supported Formats:
- Binary images (1-bit): Converted to 8-bit grayscale
- Grayscale images: Single channel 8-bit
- Color images: 3-channel RGB format