A reverse proxy server with built-in WebUI, supporting TCP/UDP/HTTP/TLS/WebSocket, written in Rust.


![]()

Taxy is currently in early development. Please be aware that breaking changes may occur frequently, particularly when upgrading between minor versions (e.g., from 0.3.x to 0.4.x).
- Built with Rust for optimal performance and safety, powered by tokio and hyper
- Supports TCP, UDP, TLS, HTTP1, and HTTP2, including HTTP upgrading and WebSocket functionality
- Partial HTTP/3 support (incoming QUIC connections only; WebTransport not supported)
- Easily deployable single binary with a built-in WebUI
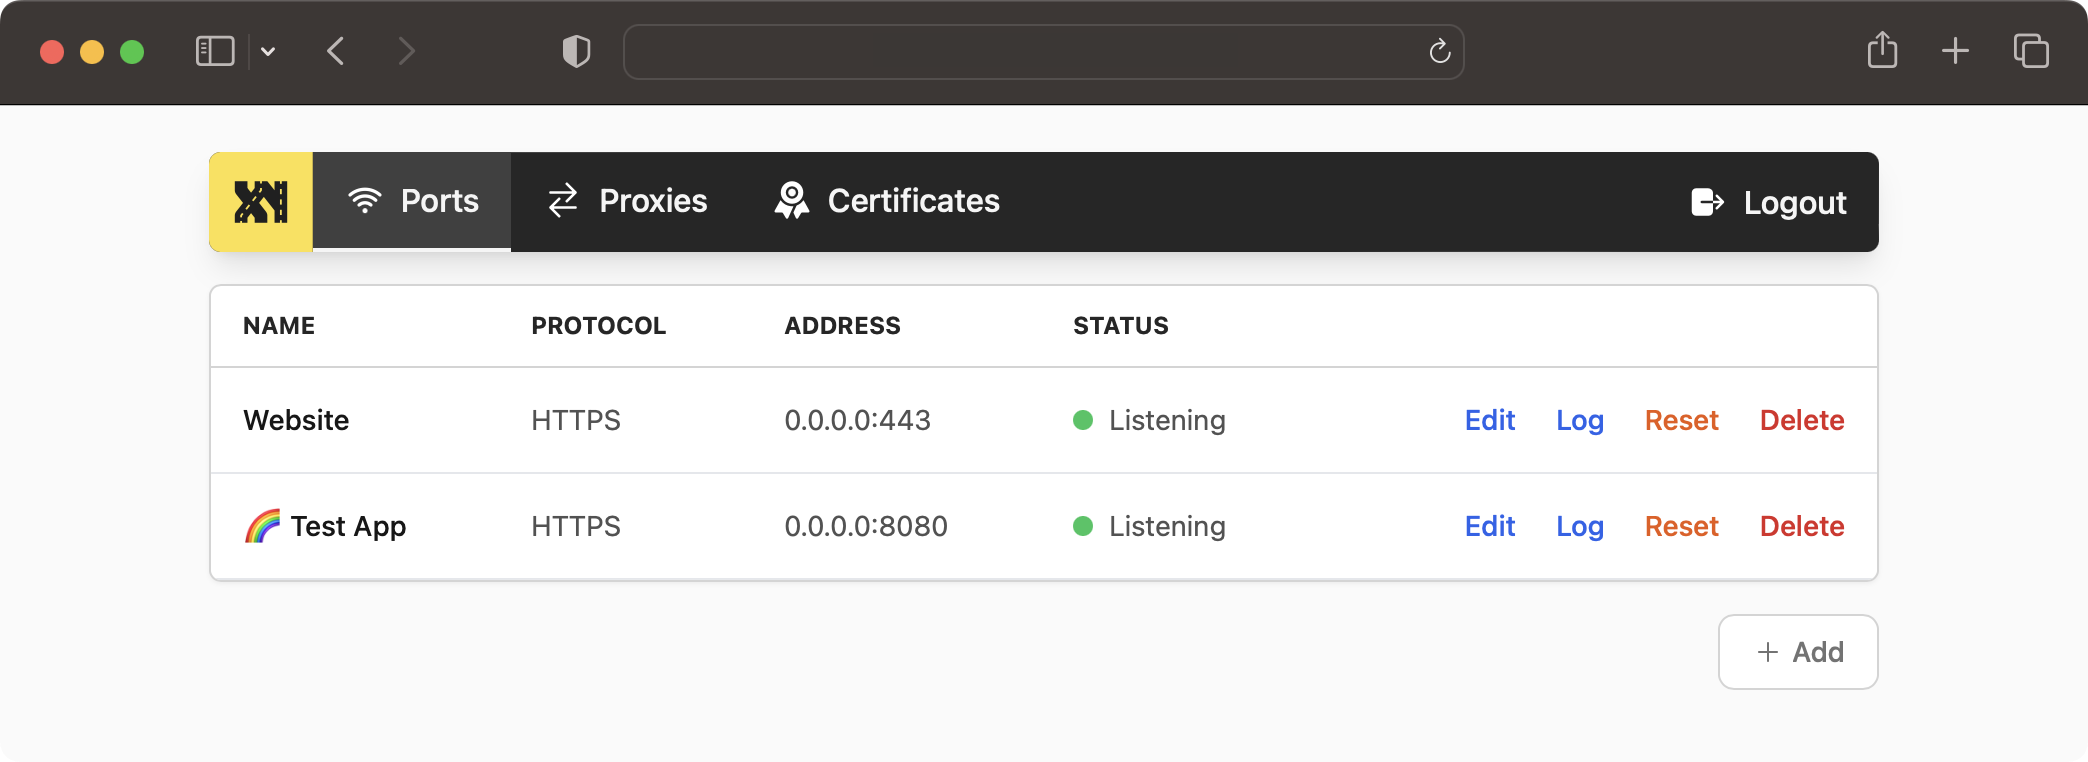
- Allows live configuration updates via a REST API without restarting the service
- Imports TLS certificates from the GUI or can generate a self-signed certificate
- Provides Let's Encrypt support (ACME v2, HTTP challenge only) for seamless certificate provisioning
Visit https://demo.taxy.dev/. (username: admin, password: admin)
Please note, you can change the configuration freely, but due to the instance being behind a firewall, the configured proxies are not accessible from the outside.
There are multiple ways to install Taxy.
Run the following command to start Taxy using Docker:
docker run -d \ -v taxy-config:/root/.config/taxy \ -p 80:80 \ -p 443:443 \ -p 127.0.0.1:46492:46492 \ --restart unless-stopped \ --name taxy \ ghcr.io/picohz/taxy:latestTo log in to the admin panel, you'll first need to create a user. Follow the steps below to create an admin user:
docker exec -t -i taxy taxy add-user admin password?: ******Create a file named docker-compose.yml with the following content:
version: "3" services: taxy: image: ghcr.io/picohz/taxy:latest container_name: taxy volumes: - taxy-config:/root/.config/taxy ports: # Add ports here if you want to expose them to the host - 80:80 - 443:443 - 127.0.0.1:46492:46492 # Admin panel restart: unless-stopped volumes: taxy-config:Run the following command to start Taxy:
$ docker-compose up -dTo log in to the admin panel, you'll first need to create a user. Follow the steps below to create an admin user:
$ docker-compose exec taxy taxy add-user admin password?: ******Then, you can access the admin panel at http://localhost:46492/.
cargo-binstall automatically downloads and installs pre-built binaries for your platform. If there is no pre-built binary available, it will fall back to cargo install.
You need to install cargo-binstall first.
Then you can install Taxy with:
$ cargo binstall taxyYou need to have the Rust toolchain installed. If you don't, please follow the instructions on rustup.rs.
The package on crates.io comes bundled with the WebUI as a static asset. Thus, you don't need to build it yourself (which would require trunk and wasm toolchain).
$ cargo install taxyAlternatively, you can directly download the latest pre-built binaries from the releases page.
You simply put the extracted binary somewhere in your $PATH and you're good to go.
First, you need to create a user to access the admin panel. You will be prompted for a password.
# Create a user $ taxy add-user admin $ password?: ******Then, you can start the server.
$ taxy startOnce the server is running, you can access the admin panel at http://localhost:46492/.
To contribute or develop Taxy, follow these steps:
# Clone the repository git clone https://github.com/picoHz/taxy # Start the server cd taxy cargo run # In a separate terminal, start `trunk serve` for the WebUI cd taxy-webui trunk serveYou can instantly start developing Taxy in your browser using Gitpod.

HTTP reverse proxies written in Rust:
The social preview image uses the photo by cal gao on Unsplash.