![]()
This is an auto-generated repository for use in DVC Get Started. It is a step-by-step quick introduction into basic DVC concepts.
The project is a natural language processing (NLP) binary classifier problem of predicting tags for a given StackOverflow question. For example, we want one classifier which can predict a post that is about the R language by tagging it R.
🐛 Please report any issues found in this project here - example-repos-dev.
Python 3.7+ is required to run code from this repo.
$ git clone https://github.com/iterative/example-get-started $ cd example-get-startedNow let's install the requirements. But before we do that, we strongly recommend creating a virtual environment with a tool such as virtualenv:
$ virtualenv -p python3 .venv $ source .venv/bin/activate $ pip install -r src/requirements.txtThis instruction assumes that DVC is already installed, as it is frequently used as a global tool like Git. If DVC is not installed, see the DVC installation guide on how to install DVC.
This DVC project comes with a preconfigured DVC remote storage that holds raw data (input), intermediate, and final results that are produced. This is a read-only HTTP remote.
$ dvc remote list storage https://remote.dvc.org/get-startedYou can run dvc pull to download the data:
$ dvc pullRun dvc exp run to reproduce the pipeline and create a new experiment.
$ dvc exp run Ran experiment(s): rapid-cane Experiment results have been applied to your workspace.If you'd like to test commands like dvc push, that require write access to the remote storage, the easiest way would be to set up a "local remote" on your file system:
This kind of remote is located in the local file system, but is external to the DVC project.
$ mkdir -p /tmp/dvc-storage $ dvc remote add local /tmp/dvc-storageYou should now be able to run:
$ dvc push -r localThis project with the help of the Git tags reflects the sequence of actions that are run in the DVC get started guide. Feel free to checkout one of them and play with the DVC commands having the playground ready.
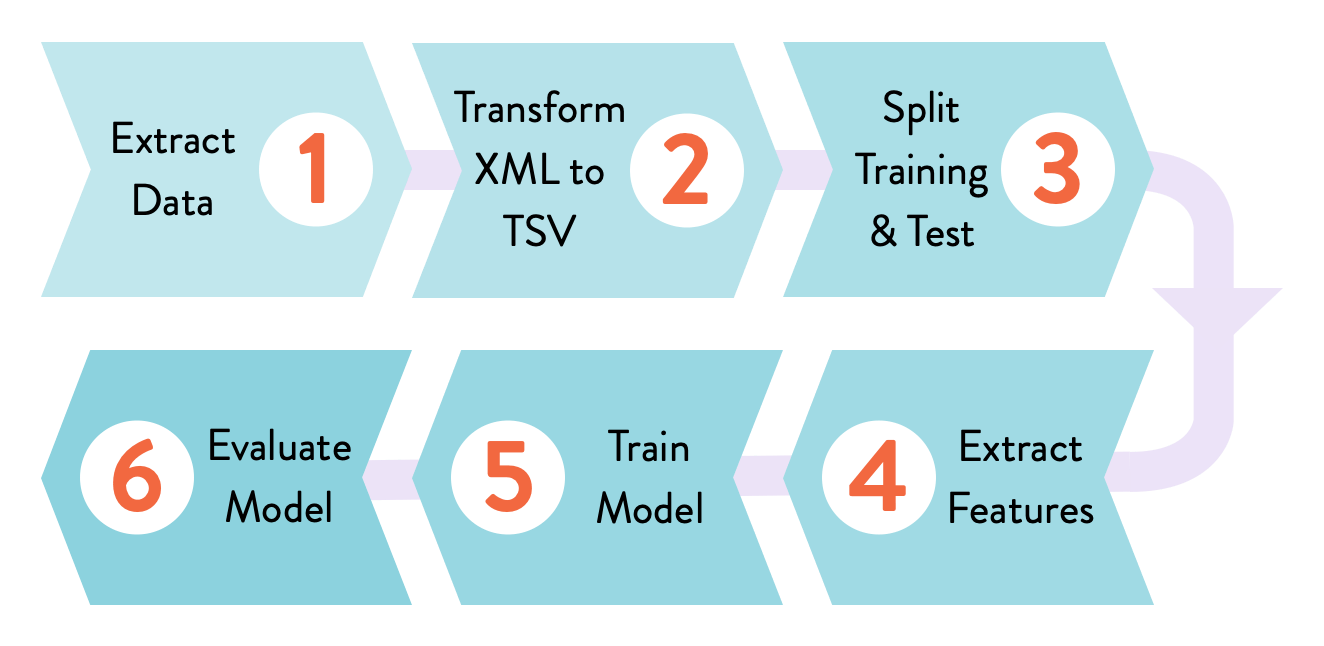
0-git-init: Empty Git repository initialized.1-dvc-init: DVC has been initialized..dvc/with the cache directory created.2-track-data: Raw data filedata.xmldownloaded and tracked with DVC usingdvc add. First.dvcfile created.3-config-remote: Remote HTTP storage initialized. It's a shared read only storage that contains all data artifacts produced during next steps.4-import-data: Usedvc importto get the samedata.xmlfrom the DVC data registry.5-source-code: Source code downloaded and put into Git.6-prepare-stage: Createdvc.yamland the first pipeline stage withdvc run. It transforms XML data into TSV.7-ml-pipeline: Feature extraction and train stages created. It takes data in TSV format and produces two.pklfiles that contain serialized feature matrices. Train runs random forest classifier and creates themodel.pklfile.8-evaluation: Evaluation stage. Runs the model on a test dataset to produce its performance AUC value. The result is dumped into a DVC metric file so that we can compare it with other experiments later.9-bigrams-model: Bigrams experiment, code has been modified to extract more features. We rundvc reprofor the first time to illustrate how DVC can reuse cached files and detect changes along the computational graph, regenerating the model with the updated data.10-bigrams-experiment: Reproduce the evaluation stage with the bigrams based model.11-random-forest-experiments: Reproduce experiments to tune the random forest classifier parameters and select the best experiment.
There are three additional tags:
baseline-experiment: First end-to-end result that we have performance metric for.bigrams-experiment: Second experiment (model trained using bigrams features).random-forest-experiments: Best of additional experiments tuning random forest parameters.
These tags can be used to illustrate -a or -T options across different DVC commands.
The data files, DVC files, and results change as stages are created one by one. After cloning and using dvc pull to download data, models, and plots tracked by DVC, the workspace should look like this:
$ tree . ├── README.md ├── data # <-- Directory with raw and intermediate data │ ├── data.xml # <-- Initial XML StackOverflow dataset (raw data) │ ├── data.xml.dvc # <-- .dvc file - a placeholder/pointer to raw data │ ├── features # <-- Extracted feature matrices │ │ ├── test.pkl │ │ └── train.pkl │ └── prepared # <-- Processed dataset (split and TSV formatted) │ ├── test.tsv │ └── train.tsv ├── dvc.lock ├── dvc.yaml # <-- DVC pipeline file ├── eval │ ├── metrics.json # <-- Binary classifier final metrics (e.g. AUC) │ └── plots │ ├── images │ │ └── importance.png # <-- Feature importance plot │ └── sklearn # <-- Data points for ROC, confusion matrix │ ├── cm │ │ ├── test.json │ │ └── train.json │ ├── prc │ │ ├── test.json │ │ └── train.json │ └── roc │ ├── test.json │ └── train.json ├── model.pkl # <-- Trained model file ├── params.yaml # <-- Parameters file └── src # <-- Source code to run the pipeline stages ├── evaluate.py ├── featurization.py ├── prepare.py ├── requirements.txt # <-- Python dependencies needed in the project └── train.py