Globalscale AWS IoT DevKit provide a sensor demo code and a demo UI which based on Node-Red dashboard. This setup-demo.sh will use AWS CloudFormation to help user to create below components.
- create an EC2 instance with Node-Red server
- create aws iot thing and policies
- deploy IoT device certificate to EC2 Node-Red server.
- deploy demo flow file to EC2 Node-Red server.
- install aws command line utility on your host PC, we will use aws command line to launch aws cloudformation.
sudo apt-get update sudo apt-get install awscli- modify credentials file to add your access id & key
vim ~/.aws/credentials [default] aws_access_key_id = xxxxxxxxx aws_secret_access_key = xxxxxxxxxxxxxxxxxxxxxxxxxxxxxxxxxxxBefore launch the demo script, we need prepare some information first.
-
find the device mac addres on the bottom of device
-
find the sensor type, for the demo code, currently we only support three sensors.
ht: Humidity & Temperature sensor (Si7021)lu: Ambient Light sensor (APDS-9301)pt: Digital pressure sensor (BMP180)
-
provide the Wi-Fi access point
SSID/Security/Passwordinformation -
download the demo sample code from our github
git clone https://github.com/globalscaletechnologies/aws-iot-devkit-examples.git- launch the setup-demo.sh to setup the EC2 and IoT thing policies
$ ./setup-demo.sh Setup aws iot sensor demo environment ./setup-demo.sh [arguments] -h | --help -t | --type [sensor type] type: ht : Humidity & Temperature sensor (Si7021) lu : Ambient Light sensor (APDS-9301) pt : Digital pressure sensor (BMP180) -m | --mac [mac address] mac address: xx:xx:xx:xx:xx:xx -u | --username [username] : Node-Red login username, default is 'admin' -p | --password [password] : Node-Red login password, default is '12345678' -c | --credential [ssid] [security] [password] : generate Amazon FreeRTOS Credential file ssid: WiFi SSID (only support 2.4GHz) security: WiFi security open : Open wep : WEP wpa : WPA wpa2 : WPA2 password: WiFi password -k | --keypair : path to exist certificate key file, if provide this key, script will doesn't create ec2 server -s | --sshserver : exist ssh server Ex. $./setup-demo.sh \ -t pt \ -m 12:34:56:78:90:12 \ -u demo \ -p 12345678 \ -c DemoAP-2.4GHz wpa2 zxcvbnmz- download amazon freertos source code from our github
git clone https://github.com/globalscaletechnologies/amazon-freertos.git -b gti-iotkit-202007.00-r1- modify the aws_demo_config.h file
modify vendors/marvell/boards/cu345_iot_dev_kit/aws_demos/config_files/aws_demo_config.h, for below diff, we enabled the custom demo runner to run sensor demo app, and also selected the BMP180 pressure sensor.
--- a/vendors/marvell/boards/cu345_iot_dev_kit/aws_demos/config_files/aws_demo_config.h +++ b/vendors/marvell/boards/cu345_iot_dev_kit/aws_demos/config_files/aws_demo_config.h @@ -110,7 +110,7 @@ to perform a TLS negotiation. */ #define democonfigDEMO_POLLING_INTERVAL 60000 /* Run custom demo runner for customization app */ -//#define CUSTOM_DEMO_RUNNER_ENABLED ( 1 ) +#define CUSTOM_DEMO_RUNNER_ENABLED ( 1 ) #ifdef CUSTOM_DEMO_RUNNER_ENABLED @@ -144,7 +144,7 @@ to perform a TLS negotiation. */ * SENSOR_AMBIENT_LIGHT_APDS9301 * SENSOR_DIGITAL_PRESSURE_BMP180 */ - #define SENSOR_HUMIDITY_TEMPERATURE_SI7021 + #define SENSOR_DIGITAL_PRESSURE_BMP180 #ifdef SENSOR_HUMIDITY_TEMPERATURE_SI7021 #endif- setup-demo.sh will generate aws_clientcredential header files to output folder, please copy aws-iot-devkit-examples/output/aws_clientcredential*.h to amazon-freertos/demo/include/
- build the amazon freertos source code
cd amazon-freertos cmake -DVENDOR=marvell -DBOARD=$board -DCOMPILER=arm-gcc -S . -B ./build -DAFR_ENABLE_TESTS=0 make -C ./build clean make -C ./build all -j4- flash the output image
aws_demo.binto device
cd amazon-freertos ./vendors/marvell/WMSDK/mw320/sdk/tools/OpenOCD/flashprog.py \ -l vendors/marvell/WMSDK/mw320/sdk/tools/OpenOCD/mw300/layout.txt \ -r \ --boot2 vendors/marvell/WMSDK/mw320/boot2/bin/boot2.bin \ --wififw vendors/marvell/WMSDK/mw320/wifi-firmware/mw30x/mw30x_uapsta_W14.88.36.p135.bin \ --mcufw build/aws_demos.binAfter run the demo-setup.sh, youc can see the below output information on console.
$ ./setup-demo.sh -t pt -m 12:34:56:78:90:12 -p 12345678 -c DemoAP-2.4GHz wpa2 zxcvbnmz generate ec2 key pair generate IoT device key and certificate create aws iot thing and policies stack { "StackId": "arn:aws:cloudformation:us-east-1:xxxxxxxxxxxx:stack/aws-iot-thing-policies-stack/xxxxxxxx-xxxx-xxxx-xxxx-xxxxxxxxxxxx" } create aws ec2 node-red server stack { "StackId": "arn:aws:cloudformation:us-east-1:xxxxxxxxxxxx:stack/aws-ec2-nodered-stack/xxxxxxxx-xxxx-xxxx-xxxx-xxxxxxxxxxxx" } Warning: Permanently added 'ec2-52-90-xxx-xx.compute-1.amazonaws.com,52.90.xxx.xx' (ECDSA) to the list of known hosts. setup completed! Node-Red url: http://ec2-52-90-xxx-xxx.compute-1.amazonaws.com:1880/ui EC2 ssh: ssh -i ./output/key-pt-123456789012.pem ec2-user@ec2-52-90-xxx-xx.compute-1.amazonaws.com Amazon FreeRTOS credential files - ./output/aws_clientcredential.h - ./output/aws_clientcredential_you can find the keys.hCheck the output message, You can find two information,
- "Node-Red url": the Node-Red Dashboard UI URL link.
http://ec2-52-90-xxx-xxx.compute-1.amazonaws.com:1880/ui
- "EC2 ssh": login to ec2 command via ssh.
ssh -i ./output/key-pt-123456789012.pem ec2-user@ec2-52-90-xxx-xx.compute-1.amazonaws.com
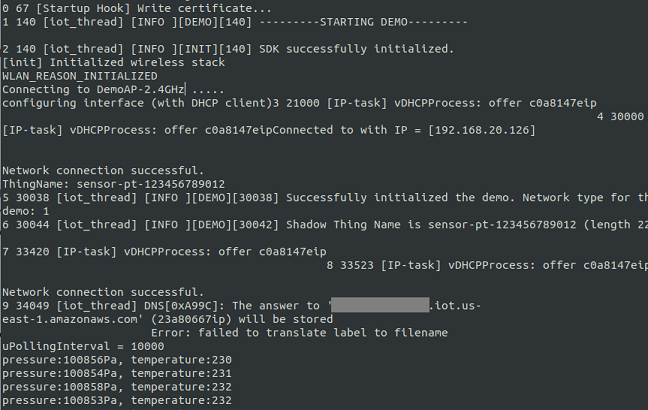
When you flash your device completed, power on or reset it. The device will try to connect wifi-ap, when connected successfully, the sensor demo app will get and send the sensor data to AWS IoT server.
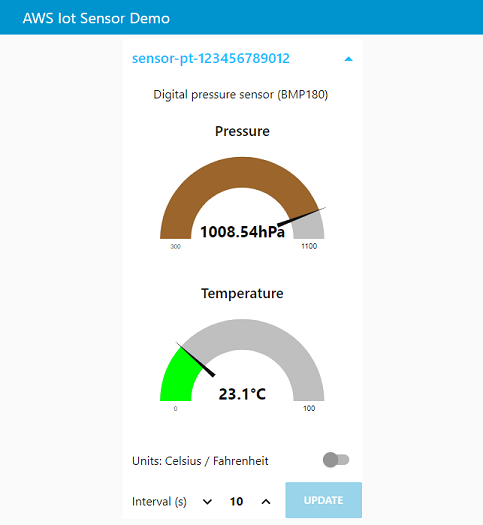
And you can use browser to visit the url (http://ec2-52-90-xxx-xxx.compute-1.amazonaws.com:1880/ui), you can see the Node-Red dashboard demo ui.
We also provided an uninstall script, if you don't need the demo code anymore, you can launch the uninstall.sh to free resources. The script will delete the cloudformation stack and other resources which we created.
$./uninstall.sh \ -t pt \ -m 12:34:56:78:90:12 \