


I wanted to create as simple as possible API without redundant use cases. Which allows you to create a simple command in less than a minute (counting installation time). Currently, there are a few libraries that provide something similar to this, but they violate your app's execution file with their code and require you to re-run the app's instance every time you want to execute a command.
So I decided to give you full control of where and when shell's instance should start and a way to execute commands in runtime.
For more examples, go there: https://github.com/bmstefanski/nestjs-shell-example
- 🙉 Non-blocking runtime console
- 🚚 No dependencies
- 🤠 Simple and stable API
- 🛡️ Well tested
- 🖥️ Modifiable error messages and prompt sign
- 🖨️ Elastic output printer (you can write own printer or use any logger you want)
- 📔 Optional, required and varargs parameters
- 📗 Travis or GitHub Actions based CI
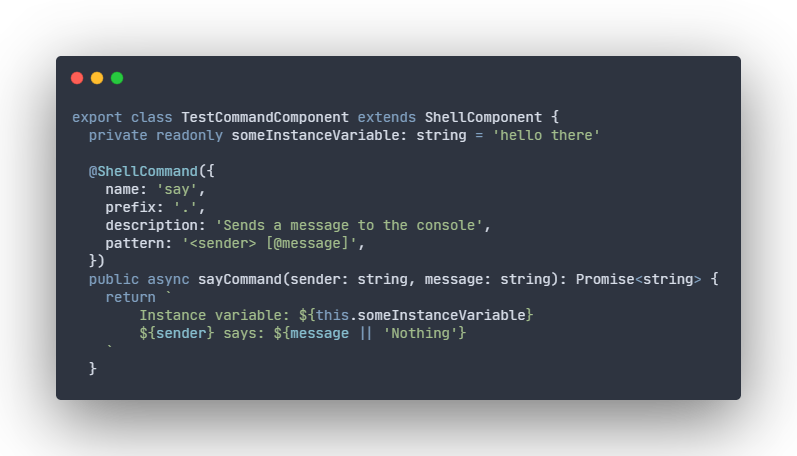
# production use $ yarn add nestjs-shell # development use $ yarn add -D nestjs-shell import { ShellModule, ShellFacade } from 'nestjs-shell' // `ShellModule` is Global, so please put it only in your main module and it will work flawlessly in others. @Module({ imports: [ShellModule] }) export class YourAppMainModule implements OnApplicationBootstrap { constructor(private readonly shellFacade: ShellFacade) {} public async onApplicationBootstrap(): Promise<void> { // You can use it without passing any arguments and use default configuration or configure it in your own way. await this.shellFacade.bootstrap() // It does not have to be here, you can register components anywhere you want and as many times as you need. this.shellFacade.registerComponents( new SayCommandComponent(), new AnotherSecondTestCommandComponent(new SomeDependency()), ) } }import { ShellCommand, ShellComponent } from 'nestjs-shell' /* Please do not put @Injectable() or any other decorator that creates a new instance of a class, it may cause bugs and it is definitely not going to work the way you want. */ export class SayCommandComponent extends ShellComponent { /* Only `name` property is required, so by default you have no prefix, no description and no pattern and it works fine! */ /* Pattern ideology is simple: if your parameter name is wrapped with `<` and `>` then it's required if your parameter name is wrapped with `[` and `]` then it's optional if there is `@` sign inside any brackets (`[` or `<`) then it's varargs. Same as in JavaScript varargs, they can only be placed in the last parameter. */ @ShellCommand({ name: 'say', prefix: '.', description: 'Sends a message to the console', pattern: '<sender> [@message]', }) public async sayCommand(sender: string, message: string): Promise<string> { return `${sender} says: ${message || 'Nothing'}` } // There is no limit to the amount of commands in one ShellComponent. @ShellCommand({ name: 'said', prefix: '/', description: 'Sends a message to the console that has been said', pattern: '<sender> <@message>', }) /* You don't have to keep function's parameters in the same order as pattern ones. They are applied by name, not order. */ public async saidCommand(sender: string, message: string): Promise<string> { return `${sender} said: ${message}` } }import { ShellCommand, ShellComponent } from 'nestjs-shell' export class AnotherSecondTestCommandComponent extends ShellComponent { constructor(private readonly someDependency: TestDependency) { super() } /* You can use as much prefixes as you want.. if you do not specify any then it uses the default, which is '' (empty string) */ @ShellCommand({ name: '.help', description: 'Displays all commands with description and usage', }) public async help(): Promise<string> { // Method's execution context is ALWAYS set to the actual class instance and so `this` keyword works as expected. return [ 'Here are all available commands: ', '-------------------------------------', ...this.someDependency, ...this.shellFacade.getAllCommands().map((command) => { return `-> ${command.name} ${command.pattern} - ${command.description || 'Description not available'}` }), '-------------------------------------', ].join('\n') } }The library shares its methods through the facade, named ShellFacade. In the table below, you can see a brief description of each method.
import { ShellFacade } from 'nestjs-shell'| Method | Description | Arguments |
|---|---|---|
bootstrap | Enables terminal | BootstrapOptions |
registerComponents | Adds command components to the registry | ...components: ShellComponent[] |
getAllCommands | Returns immutable (or to be more precise: deep copy of a) collection) | naught |
type BootstrapOptions = { prompt?: string = '⤳' messages?: { notFound?: string; wrongUsage?: string } = { notFound: 'Say what? I might have heard $input', wrongUsage: 'Wrong usage: $command $pattern', } shellPrinter?: ((value: any) => void) = (value: any) => console.log(value) }Note: If you want to contribute, please keep in mind that I don't want to support various use cases, it should remain as simple as it is. So if you desire to improve code rather than add features, then I would greatly appreciate it 🙏🏻🙏🏼🙏🏽🙏🏾🙏🏿.
Nestjs-shell is MIT licensed