Running Spring Boot in a Docker cluster #17
Description
前言
现在的应用服务基本都是部署在云服务上,但是很多公司还是没能够充分的利用好Cloud的优势,去做到快速、甚至是自动扩容,本篇博客就简单演示一下如何Docker Swarm部署应用。
实战
创建API服务
首先我们写一个简单的API服务,直接在Idea初始化一个简单的SpringBoot应用,创建个简单的接口:
@RestController @SpringBootApplication public class DemoApplication { @GetMapping("/hello") public String hello() throws UnknownHostException { return "Hello World:" + Inet4Address.getLocalHost().getHostName(); } public static void main(String[] args) { SpringApplication.run(DemoApplication.class, args); } }代码很简单,然后将端口改成9000,修改application.properties:
server.port=9000 创建Docker镜像
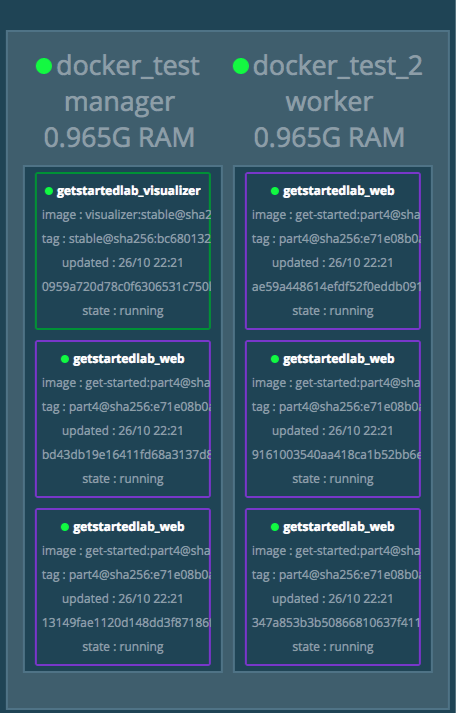
在项目根目录创建docker-compose.yml,注意visualizer这坨,这端会创建一个图形化界面,类似K8S自带的那个玩意,不过功能相对简单了点,
version: "3" services: web: # 换成你自己的,或者用我已经创建好的镜像也行 image: acoder2013/get-started:part4 deploy: replicas: 5 restart_policy: condition: on-failure resources: limits: cpus: "0.1" memory: 200M ports: - "9000:9000" networks: - webnet visualizer: image: dockersamples/visualizer:stable ports: - "8080:8080" volumes: - "/var/run/docker.sock:/var/run/docker.sock" deploy: placement: constraints: [node.role == manager] networks: - webnet networks: webnet: 下面执行命令,创建镜像:
mvn clean package -Dmaven.test.skip=true docker build -t demo8 . docker tag demo8 acoder2013/get-started:part4 docker push acoder2013/get-started:part4然后等待上传完成:
± % docker push acoder2013/get-started:part4 The push refers to a repository [docker.io/acoder2013/get-started] f879b4a743a5: Preparing 9e47d8741070: Preparing 35c20f26d188: Preparing c3fe59dd9556: Preparing 6ed1a81ba5b6: Preparing a3483ce177ce: Waiting ce6c8756685b: Waiting 30339f20ced0: Waiting 0eb22bfb707d: Waiting a2ae92ffcd29: Preparing 搭建Docker集群
由于网络原因,我这里直接购买两台1G内存的VPS,你也可以在本机操作,首先搭建Docker Swarm集群:
docker swarm init Swarm initialized: current node <node ID> is now a manager. To add a worker to this swarm, run the following command: docker swarm join \ --token <token> \ <myvm ip>:<port> To add a manager to this swarm, run 'docker swarm join-token manager' and follow the instructions.然后直接将这行命令拷贝到另一台机器上,接下来就开始实际部署服务:
#这个就是刚才编辑的那个文件 docker stack deploy -c docker-compose.yml getstarteddemo root@docker_test:~# docker service ls ID NAME MODE REPLICAS IMAGE PORTS qksmgjhs3byc getstartedlab_visualizer replicated 1/1 dockersamples/visualizer:stable *:8080->8080/tcp v34wty44x6hs getstartedlab_web replicated 5/5 acoder2013/get-started:part4 *:9000->9000/tcp等待几分钟服务会启动完成,然后根据VPS的外网IP地址访问,比如刚才那个图形化界面就是8080端口:
然后我们验证一下刚才的接口是否符合预期输出:
± % while true;do curl http://<IP>:9000/hello ; sleep 1;done; Hello World:9161003540aaHello World:347a853b3b50Hello World:13149fae1120Hello World:bd43db19e164Hello World:ae59a448614eHello World:9161003540aa^C%可以观察到,每个hostname都不一样,因为这里有一个负载均衡,会在我们设置的5台之间根据一定的策略转发。
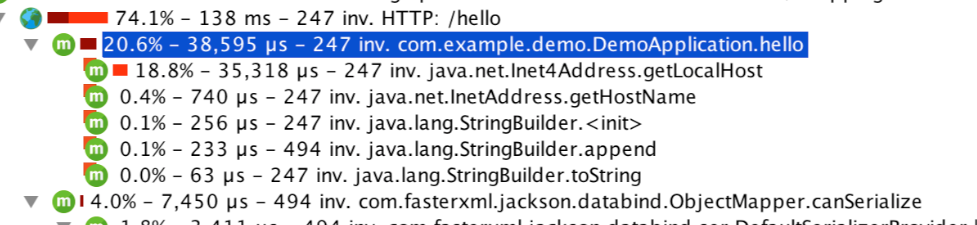
性能
虽然程序相当简单,这里也贴一个profile图
总结
总体来说,相对于传统的模式要方便很多,支持直接在配置文件中指定服务需要的资源,防止机器被一个应用拖垮,另外启动、扩容、缩容也支持命令直接操作,不用想像以前一样ssh到指定的服务器,而且容易出错。