mbed OS quickstart #363
There are no files selected for viewing
| Original file line number | Diff line number | Diff line change |
|---|---|---|
| @@ -1,128 +1,165 @@ | ||
| ## Offline - Mbed CLI | ||
| | ||
| ### Setup | ||
| Please skip to the sub section for your host OS. The setup instructions will walk you through how to get mbed CLI installed locally on your system. | ||
| | ||
| [**Windows**](#windows) | [**OSX**](#mac-osx) | [**Linux**](#linux) | ||
| | ||
| #### Windows | ||
| | ||
| There was a problem hiding this comment. For each section, it would be nice to see upfront any prereqs, time expected and so on. It feels like we may be getting ahead of ourselves jumping straight into installing a .exe. There was a problem hiding this comment. the .exe is the pre-reqs all wrapped up into one easy step, eventually want to have a similar thing for OSX too. but for now it doesnt exist There was a problem hiding this comment. Reviewed, amanda to add sentence and push. Git'er'done | ||
| ##### 1. Install mbed CLI | ||
| ||
| | ||
| Download and run the [mbed CLI Windows .exe installer](https://github.com/ARMmbed/mbed-cli-windows-installer/releases). | ||
| | ||
| You can check to make sure the mbed CLI installed correctly by running `mbed help`. | ||
| | ||
| **Note:** the Windows installer only installs the GNU Arm embedded toolchain, if you would like to compile using the ARM Compiler 5 or IAR visit the [supported compilers page](/docs/latest/tools/index.html#compiler-versions). | ||
| | ||
| ##### 2. Setup Environment | ||
| | ||
| For any toolchain that is installed make sure to add the Mbed CLI global config: | ||
| ``` | ||
| > mbed config -G ARM_PATH <path to ARM bin\>" | ||
| [mbed] <path to ARM bin\> now set as global ARM_PATH | ||
| > mbed config --list | ||
| [mbed] Global config: | ||
| ARM_PATH=<path to ARM bin\> | ||
| ``` | ||
| | ||
| **Note:** The same config can also be applied to IAR and GNU toolchains using `IAR_PATH` or `GCC_ARM_PATH` | ||
| | ||
| #### Mac OSX | ||
| | ||
| ##### 1. Install Python & Pip | ||
| | ||
| Mac OS X 10.8+ comes with Python 2.7 pre-installed by Apple. If you are running an earlier version of Mac OS X, download and install [Python 2.7.12+](https://www.python.org/downloads/mac-osx/). | ||
| | ||
| To install Pip, run `sudo easy_install pip` from your command line. | ||
| | ||
| ##### 2. Install a Compiler | ||
| | ||
| Download and install a compiler: | ||
| | ||
| **Note:** To download the latest toolchains visit the [supported compilers page](/docs/latest/tools/index.html#compiler-versions). | ||
| | ||
| ##### 3. Install mbed CLI | ||
| | ||
| To install the mbed CLI, run `pip install mbed-cli` from your command line. | ||
| | ||
| You can check to make sure the mbed CLI installed correctly by running `mbed help`. | ||
| | ||
| ##### 4. Setup Environment | ||
| | ||
| For any toolchain that is installed make sure to add the Mbed CLI global config: | ||
| ``` | ||
| $ mbed config -G ARM_PATH <path to ARM bin\>" | ||
| [mbed] <path to ARM bin\> now set as global ARM_PATH | ||
| $ mbed config --list | ||
| [mbed] Global config: | ||
| ARM_PATH=<path to ARM bin\> | ||
| ``` | ||
| | ||
| **Note:** The same config can also be applied to IAR and GNU toolchains using `IAR_PATH` or `GCC_ARM_PATH` | ||
| | ||
| #### Linux | ||
| | ||
| ##### 1. Install Python & Pip | ||
| | ||
| Download and install [Python 2.7.12+](https://www.python.org/downloads/source/) or run the following from your command line: | ||
| | ||
| ```console | ||
| $ sudo apt-get install python2.7 | ||
| $ sudo apt-get install python-pip | ||
| $ sudo apt-get update | ||
| ``` | ||
| | ||
| ##### 2. Install a Compiler | ||
| | ||
| Download and install a compiler: | ||
| | ||
| **Note:** To download the latest toolchains visit the [supported compilers page](/docs/latest/tools/index.html#compiler-versions). | ||
| | ||
| ##### 3. Install mbed CLI | ||
| | ||
| To install the mbed CLI, run `pip install mbed-cli` from your command line. | ||
| | ||
| You can check to make sure the mbed CLI installed correctly by running `mbed help`. | ||
| | ||
| ##### 4. Setup Environment | ||
| | ||
| For any toolchain that is installed make sure to add the Mbed CLI global config: | ||
| ``` | ||
| $ mbed config -G ARM_PATH <path to ARM bin\>" | ||
| [mbed] <path to ARM bin\> now set as global ARM_PATH | ||
| $ mbed config --list | ||
| [mbed] Global config: | ||
| ARM_PATH=<path to ARM bin\> | ||
| ``` | ||
| | ||
| **Note:** The same config can also be applied to IAR and GNU toolchains using `IAR_PATH` or `GCC_ARM_PATH` | ||
| | ||
| ### Code | ||
| | ||
| #### 1. Get the Code | ||
| | ||
| From your command line, import the example: | ||
| | ||
| ```console | ||
| $ mbed import https://github.com/ARMmbed/mbed-os-example-blinky | ||
| $ cd mbed-os-example-blinky | ||
| ``` | ||
| #### 2. Compile and Program Board | ||
| | ||
| Invoke `mbed compile` and specify the name of your platform and your installed toolchain (`GCC_ARM`, `ARM`, `IAR`). For example, for the K64F platform and ARM Compiler 5 toolchain: | ||
| | ||
| ```console | ||
| $ mbed compile --target K64F --toolchain ARM --flash | ||
| ``` | ||
| | ||
| The `--flash` argument will automatically flash the compiled program onto your board if it is connected to your computer. You can see which boards are connected with `mbed detect`. | ||
| | ||
| After the program has been flashed to the board, press the board's "reset" button and you should now see the LED blinking. | ||
| | ||
| **Note** : you can get the name of the board plugged into your computer by running `mbed detect` and you can get a full list of supported toolchains / targets by running the `mbed compile --supported` | ||
| | ||
| | ||
| ### Debug | ||
| There was a problem hiding this comment. Query: Should debugging be part of the quickstart? It feels out of scope to me. There was a problem hiding this comment. This is a light touch, there is a more in depth tutorial for debugging. I believe it is fine. | ||
| | ||
| #### Desktop IDE | ||
| | ||
| To debug using a desktop IDE such as Keil uVision, IAR, or Eclipse you can use the `mbed export` command to generate project files. For example, for a K64F and Keil uVision: | ||
| | ||
| ```console | ||
| $ mbed export --ide uvision --target K64F | ||
| ``` | ||
| **NOTE** for a full list of exporters supported run the `mbed export --supported` command. | ||
| | ||
| | ||
| #### Printf | ||
| | ||
| Another way to do basic debugging is to use the `printf` command in your code, then read the output using a serial terminal such as [PuTTY](http://www.putty.org/) or [CoolTerm](http://freeware.the-meiers.org/). For example, add `printf("Hello World!\n\r");` to the top of your main function, then recompile the program and flash it to your device. | ||
| | ||
| Invoke `mbed detect` from your command line to determine which communication port your board is connected to (i.e. `COM18`, `/dev/ttyACM0`, etc.). Unless otherwise specified, `printf` defaults to a baud rate/speed of `9600` on mbed OS. | ||
| | ||
| ### Further Reading | ||
| | ||
| - Documentation | ||
| - [Mbed OS API's](https://os.mbed.com/docs/v5.6/reference/apis.html) - List of all API's available in Mbed OS | ||
| - [Peripheral Drivers](https://os.mbed.com/docs/v5.6/reference/drivers.html) - IO Driver API's (I2C, SPI, UART, ... etc) | ||
| ||
| | ||
| - Tutorials | ||
| - [Advanced Debugging](https://os.mbed.com/docs/v5.6/tutorials/debugging.html) | ||
| - [Serial Communications](https://os.mbed.com/docs/v5.6/tutorials/serial-communication.html) | ||
| - [Optimizing binary size](https://os.mbed.com/docs/v5.6/tutorials/optimizing.html) | ||
| | ||
| - Other Resources | ||
| - [Components Database](https://os.mbed.com/components/) - libraries and example code for various hardware and software components | ||
| - [Mbed OS Forum](https://os.mbed.com/forum/) - great resource full of knowledge and active user community. Ask your questions here first! | ||
| - [Youtube Channel](http://youtube.com/armmbed) - videos and workshop content | ||
| Original file line number | Diff line number | Diff line change |
|---|---|---|
| @@ -1,70 +1,81 @@ | ||
| ## Online Compiler | ||
| | ||
| ### Setup | ||
| | ||
| #### Create an Mbed developer account | ||
| Go to os.mbed.com and [create an account](https://developer.mbed.org/account/signup/?next=%2F) | ||
| | ||
| #### Setup Environment | ||
| - Plug your mbed board into your computer and open its USB device folder | ||
| - Double click on the MBED.HTM file (this will add your mbed platform to the online compiler) | ||
| | ||
| If you do not have an Mbed board, go to [os.mbed.org/platforms](http://os.mbed.org/platforms), select a board and click the “Add to your mbed Compiler” button. | ||
| <span class="images"> | ||
| ||
| </span> | ||
| | ||
| ### Code | ||
| | ||
| #### Import | ||
| Visit the mbed-os [blinky example repository](https://developer.mbed.org/teams/mbed-os-examples/code/mbed-os-example-blinky/) and click the "Import into Compiler" button. | ||
| | ||
| <span class="images">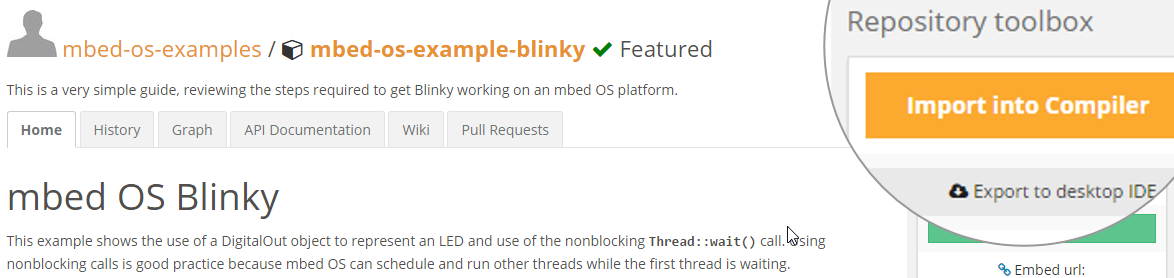 | ||
| ||
| </span> | ||
| | ||
| #### Compile | ||
| Click on the "Compile" button, your browser will then download the program as a executable file. | ||
| | ||
| <span class="images"> | ||
| ||
| </span> | ||
| | ||
| #### Program | ||
| Open the folder where the executable file was downloaded, then click and drag (or copy and paste) the file to your mbed board's USB device folder. | ||
| | ||
| Once the file has been flashed to the board, press the board's "reset" button and you should now see the LED blinking. | ||
| | ||
| | ||
| ### Debug | ||
| There was a problem hiding this comment. Again, is debugging part of the scope of the quickstart? There was a problem hiding this comment. yes, this is very limited in its scope, thus i feel it is appropriate | ||
| | ||
| #### Desktop IDE | ||
| | ||
| To debug using a desktop IDE such as Keil uVision, IAR, or Eclipse, click the "Export" button under "Program Details", select your export platform and IDE and click "Export". Your browser will then download a zip file with the project files. | ||
| | ||
| <span class="images">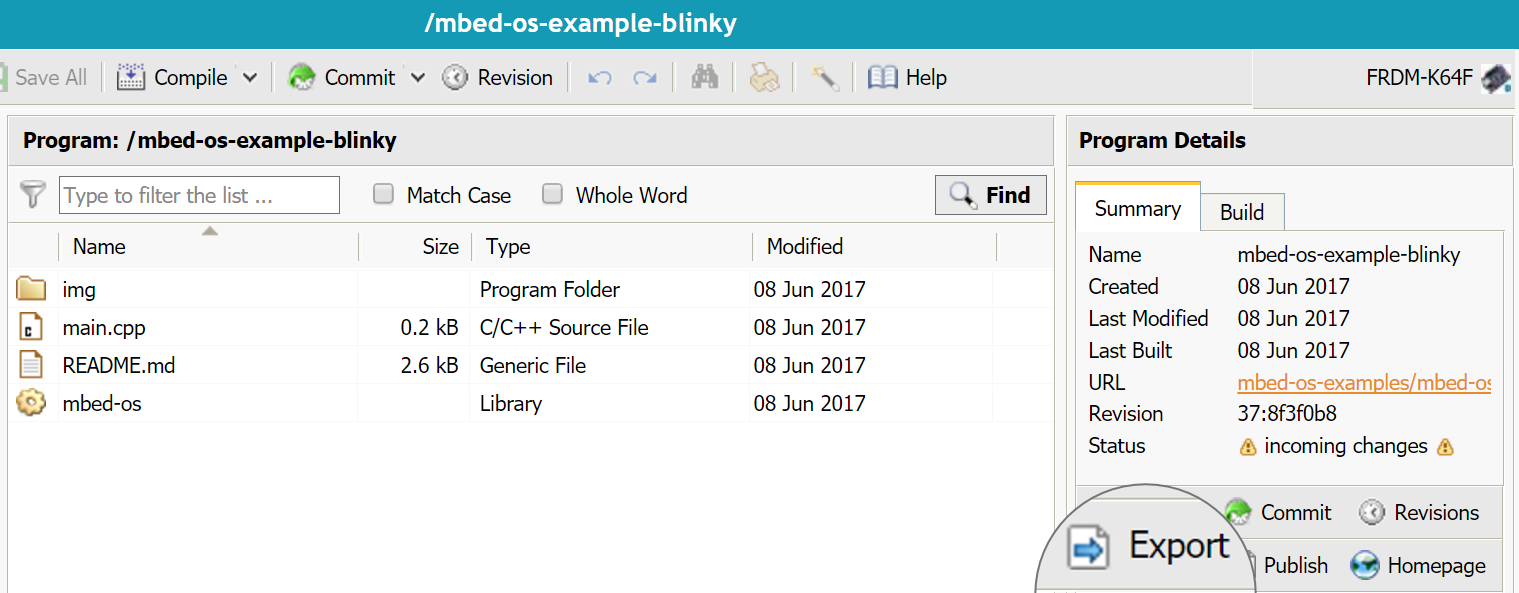 | ||
| ||
| </span> | ||
| | ||
| #### Printf | ||
| | ||
| Another way to do basic debugging is to use the `printf` command in your code, then read the output using a serial terminal such as [PuTTY](http://www.putty.org/) or [CoolTerm](http://freeware.the-meiers.org/). For example, add `printf("Hello World!\n\r");` to the top of your main function, then recompile the program and flash it to your device. | ||
| | ||
| Unless otherwise specified, `printf` defaults to a baud rate/speed of `9600` on mbed OS. To determine which communication port your board is connected to, follow the instructions for your operating system below: | ||
| | ||
| ##### Windows | ||
| There was a problem hiding this comment. This section feels out of place. In the offline section, we listed environment first. Here, we list it last. Also, I don't think we should talk about using the command-line in the section about the Mbed Online Compiler. There was a problem hiding this comment. Im not sure I understand what you are trying to say, lets discuss in person | ||
| | ||
| Open the Device Manager by pressing `Windows key + R`, type `devmgmt.msc` and click "OK." Under "Ports (COM & LPT)" your mbed board will be listed as a "USB Serial Device" next to its COM port. | ||
| | ||
| ##### Linux | ||
| | ||
| Run `dmesg | grep tty` from your command line. | ||
| | ||
| ##### Mac | ||
| | ||
| Run `ls /dev/tty.*` from your command line. | ||
| | ||
| | ||
| | ||
| ### Further Reading | ||
| | ||
| - Documentation | ||
| - [Mbed OS API's](https://os.mbed.com/docs/v5.6/reference/apis.html) - List of all API's available in Mbed OS | ||
| - [Peripheral Drivers](https://os.mbed.com/docs/v5.6/reference/drivers.html) - IO Driver API's (I2C, SPI, UART, ... etc) | ||
| ||
| | ||
| - Tutorials | ||
| - [Advanced Debugging](https://os.mbed.com/docs/v5.6/tutorials/debugging.html) | ||
| - [Serial Communications](https://os.mbed.com/docs/v5.6/tutorials/serial-communication.html) | ||
| - [Optimizing binary size](https://os.mbed.com/docs/v5.6/tutorials/optimizing.html) | ||
| | ||
| - Other Resources | ||
| - [Components Database](https://os.mbed.com/components/) - libraries and example code for various hardware and software components | ||
| - [Mbed OS Forum](https://os.mbed.com/forum/) - great resource full of knowledge and active user community. Ask your questions here first! | ||
| - [Youtube Channel](http://youtube.com/armmbed) - videos and workshop content | ||
| | ||
| | ||
There was a problem hiding this comment.
Choose a reason for hiding this comment
The reason will be displayed to describe this comment to others. Learn more.
It seems weird for the first content to tell the reader to skip ahead.
There was a problem hiding this comment.
Choose a reason for hiding this comment
The reason will be displayed to describe this comment to others. Learn more.
lets discuss in person
There was a problem hiding this comment.
Choose a reason for hiding this comment
The reason will be displayed to describe this comment to others. Learn more.
Reviewed togetehr, amanda to re-write sentence and git 'er done.