This repository involves designing, assembling, and testing an educational header board for the STM32F103C8 microcontroller, compatible with the Arduino UNO.

Important
Before sending the board files for PCB fabrication, always make sure you are using the latest released version of the project. Hardware issues or design flaws might exist in earlier versions and could be fixed in newer releases. To avoid costly mistakes and ensure the best performance, always refer to the Releases section, where all known issues, updates, and version-specific notes are clearly documented.
| Arduino Pin | STM32F103C8 Pin | Functionality |
|---|---|---|
| A0 | PA0 | ADC-IN0 |
| A1 | PA1 | ADC-IN1 |
| A2 | PA2 | ADC-IN2 |
| A3 | PA3 | ADC-IN3 |
| A4 | PA4 | ADC-IN4 |
| A5 | PA5 | ADC-IN5 |
| D0 | PB11 | UART3-RX |
| D1 | PB10 | UART3-TX |
| D2 | PB2 | GPIO |
| D3 | PA6 | TIM3-CH1 PWM |
| D4 | PA7 | TIM3-CH2 PWM |
| D5 | PB0 | TIM3-CH3 PWM |
| D6 | PB1 | TIM3-CH4 PWM |
| D7 | PA9 | GPIO |
| D8 | PA15 | TIM2-CH1 ICP |
| D9 | PA8 | TIM1-CH1 PWM |
| D10 | PB12 | SPI2 (NSS) |
| D11 | PB15 | SPI2 (MOSI) |
| D12 | PB14 | SPI2 (MISO) |
| D13 | PB13 | SPI2 (SCK) |
| SDA | PB9 | I2C1 (SDA) |
| SCL | PB8 | I2C1 (SCL) |
| LED | PB5 | Built-in LED |
| KEY | PA10 | Built-in Key |
| CH340-RX | PB6 | UART1-TX (CH340) |
| CH340-TX | PB7 | UART1-RX (CH340) |
| Arduino Pin | STM32 Pin | ADC Channel |
|---|---|---|
| A0 | PA0 | ADC_IN0 |
| A1 | PA1 | ADC_IN1 |
| A2 | PA2 | ADC_IN2 |
| A3 | PA3 | ADC_IN3 |
| A4 | PA4 | ADC_IN4 |
| A5 | PA5 | ADC_IN5 |
| Arduino Pin | STM32 Pin | PWM / Timer |
|---|---|---|
| D3 | PA6 | TIM3_CH1 (PWM) |
| D4 | PA7 | TIM3_CH2 (PWM) |
| D5 | PB0 | TIM3_CH3 (PWM) |
| D6 | PB1 | TIM3_CH4 (PWM) |
| D9 | PA8 | TIM1_CH1 (PWM) |
| Arduino Pin | STM32 Pin | Special Timer Function |
|---|---|---|
| D8 | PA15 | TIM2_CH1 (Input Capture) |
| Function | Arduino Pin | STM32 Pin | USART Function |
|---|---|---|---|
| UART3 RX | D0 | PB11 | USART3_RX |
| UART3 TX | D1 | PB10 | USART3_TX |
| CH340 RX (USB) | CH340-RX | PB6 | USART1_TX |
| CH340 TX (USB) | CH340-TX | PB7 | USART1_RX |
| Arduino Pin | STM32 Pin | I2C Signal |
|---|---|---|
| SDA | PB9 | I2C1_SDA |
| SCL | PB8 | I2C1_SCL |
| Arduino Pin | STM32 Pin | SPI Signal |
|---|---|---|
| D10 | PB12 | SPI2_NSS |
| D11 | PB15 | SPI2_MOSI |
| D12 | PB14 | SPI2_MISO |
| D13 | PB13 | SPI2_SCK |
| Arduino Pin | STM32 Pin | Functionality |
|---|---|---|
| LED | PB5 | Onboard LED |
| KEY | PA10 | User Key |
| D2 | PB2 | GPIO/eInt |
| D7 | PA9 | GPIO/TIM1_CH2 |
| Tip If you're looking to better understand how to navigate and use my GitHub repositories — including exploring their structure, downloading or cloning projects, submitting issues, and asking questions, |  | |
| Important Begin your embedded systems journey with clarity and purpose. This episode outlines a structured roadmap for mastering microcontrollers, communication protocols, hardware design, and project development. |  | |
| Caution It is absolutely critical that you carefully read every single word of this document, line by line, to ensure you don't miss any details. Nothing can be overlooked. | ||
- Core: ARM Cortex-M3 32-bit RISC core.
- Clock Speed: Up to 72 MHz.
- Flash Memory: 64 KB of flash memory for program storage.
- SRAM: 20 KB of static RAM.
- GPIO Pins: 37 general-purpose I/O pins.
- Communication Interfaces:
- USART: Up to 3 universal synchronous/asynchronous receivers/transmitters.
- SPI: Up to 2 Serial Peripheral Interfaces.
- I2C: Up to 2 Inter-Integrated Circuit interfaces.
- USB: Full-speed USB 2.0 interface.
- Timers:
- Advanced-control Timers: 1 x 16-bit.
- General-purpose Timers: 3 x 16-bit.
- SysTick Timer: 24-bit down counter.
- ADC: 2 x 12-bit Analog-to-Digital Converters with up to 10 channels.
- DAC: 2 x 12-bit Digital-to-Analog Converters.
- DMA: 7-channel Direct Memory Access controller.
- Operating Voltage: 2.0V to 3.6V.
- Power Consumption: Low-power modes for energy-efficient applications.
- High Performance: ARM Cortex-M3 core delivers high efficiency and performance.
- Rich Peripherals: Integrated peripherals like USB, ADC, DAC, and timers make it suitable for complex applications.
- Flexibility: Supports a wide range of applications, from simple control systems to advanced IoT devices.
- Ease of Development: Extensive support from STM32CubeMX, HAL libraries, and third-party tools like ST-Link.
- Community Support: Large community and extensive documentation available.
- Embedded Systems: Used in various embedded applications due to its robustness and flexibility.
- IoT Devices: Ideal for IoT applications with its low power consumption and communication interfaces.
- Industrial Automation: Suitable for industrial control systems and automation.
- Consumer Electronics: Found in various consumer electronic devices.
- Robotics: Commonly used in robotics for motor control and sensor interfacing.
- IDEs: Keil MDK.
- Programmers: STLINK-V3MINIE.
- Debuggers: STLINK-V3MINIE, Serial debugging via UART, print (using SWO).
| Aspect | Description |
|---|---|
| PCB Design Software | Altium V24.2.2 |
| PCB Layers | 2-Layer FR4 |
| Microcontroller | STM32F103C8 |
| Pin Type | Arduino UNO |
| Converter IC | CH340 |
| USB Port | TYPE-C |
Here you'll find a collection of useful links and documents related to the STM32 microcontroller and its applications.
These resources include datasheets, tutorials, and essential tools to get you started and guide you through.
Tip
The resources are detailed in the sections below.
To access any of them, simply click on the corresponding blue link.
-
All PCB designs across all repositories and projects are built using this Altium Designer component library. It contains a wide range of verified footprints, schematic symbols, and 3D models, ensuring consistency and accuracy in PCB designs. If you're working on a new PCB, using this library will save you time and minimize errors.
-
This repository is dedicated to learning PCB design and electronics from scratch. It covers everything from circuit theory to practical PCB layout techniques, including routing strategies, best practices, and component placement. Whether you're a beginner or an experienced designer, this resource will help you improve your PCB design skills and create professional-quality boards.
-
This repository offers a comprehensive guide to learning various microcontrollers and how to interface them with different shields. You’ll find tutorials on using and configuring shields, along with hands-on projects to help you get your microcontrollers up and running. Whether you're working with Arduino, STM32, ESP32, or others, this resource will help you understand how to integrate these platforms effectively for your projects.
-
This repository offers a comprehensive guide to STM32 microcontroller programming, focusing on the STM32F103C8T6. Explore STM32 architecture, peripheral configuration, timers, interrupts, communication protocols (UART, SPI, I2C), and real-time applications through practical examples and hands-on projects. Whether you're a beginner or an experienced developer, this resource will help you build a strong foundation and advance your skills in STM32 embedded development.
-
This document provides links to trusted suppliers where you can purchase all the essential components for this project, ensuring quality and reliability.
Educational Boards └── [aKaReZa 107 - eBoard, STM32F103C8] ├─ Design Review — Migrating from ATMEGA328 layout. ├─ Power Setup — Pin connections and safety. ├─ Oscillators — HSE and LSE integration. ├─ Boot Config — Pin modes and selection. ├─ Programmer — STLINK connection and setup. ├─ I/O Mapping — Practical pin assignments. └─ PCB Layout — Placement strategies for routing. | Step-by-step guide to designing an educational STM32F103C8 board, covering power supply, oscillator setup, boot pin configurations, STLINK connection, I/O mapping, and PCB layout tips—ideal for mastering STM32 hardware design through hands-on learning. | 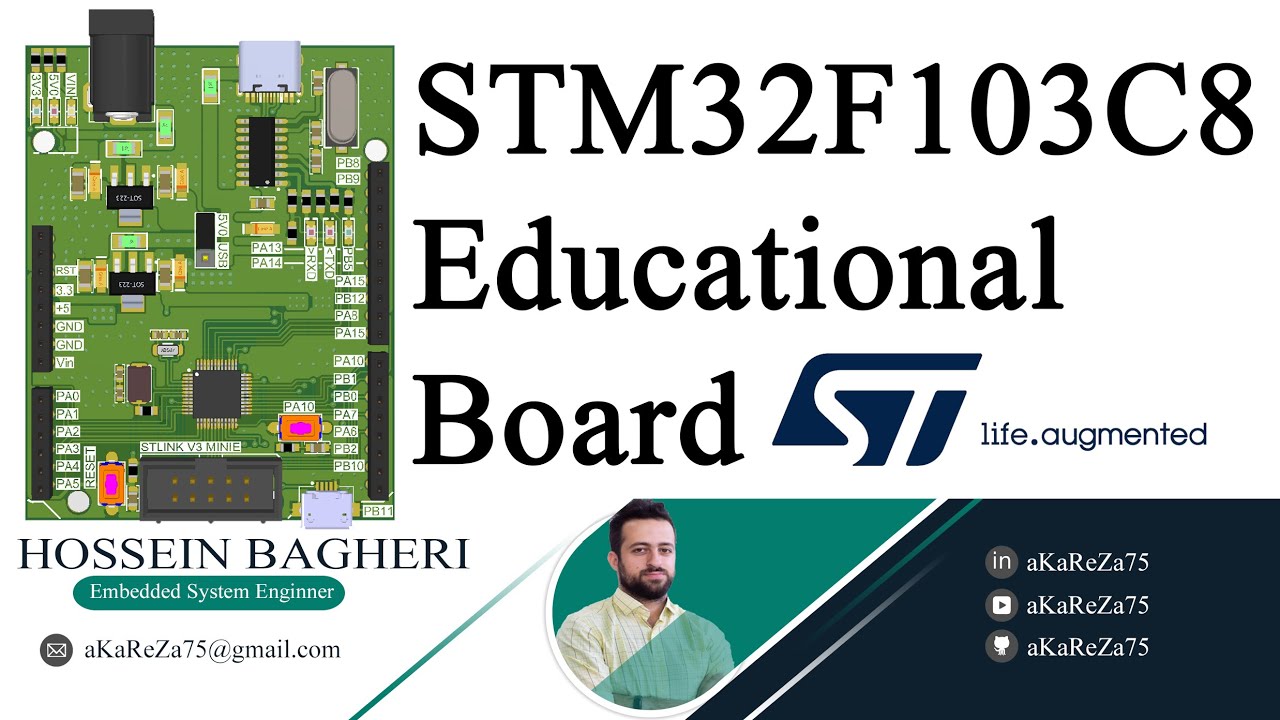 |
| Follow the complete soldering guide for the STM32F103C8 educational board, including power input setup, voltage regulator testing, microcontroller soldering, USB communication via CH340, THT connector mounting, and final board verification. | 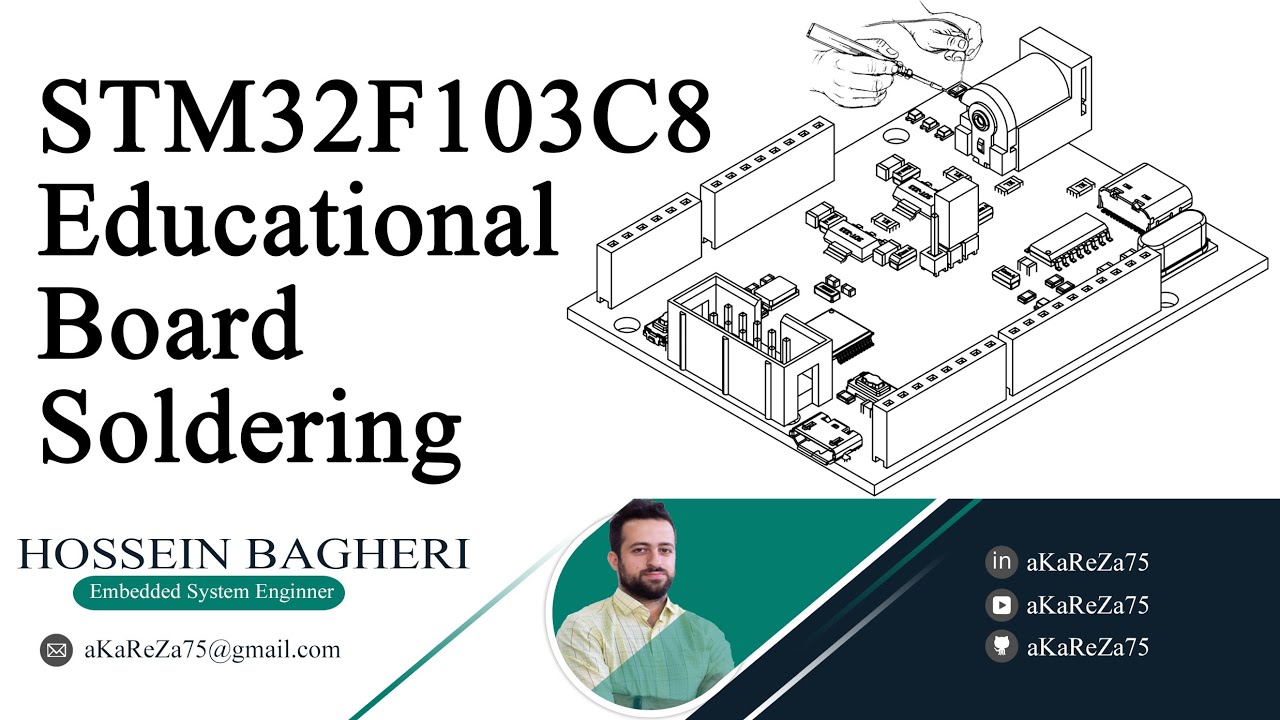 |
To access the repository files and save them on your computer, there are two methods available:
-
Using Git Bash and Cloning the Repository
- This method is more suitable for advanced users and those familiar with command-line tools.
- By using this method, you can easily receive updates for the repository.
-
Downloading the Repository as a ZIP file
- This method is simpler and suitable for users who are not comfortable with command-line tools.
- Note that with this method, you will not automatically receive updates for the repository and will need to manually download any new updates.
First, open Git Bash :
- Open the folder in File Explorer where you want the library to be stored.
- Right-click inside the folder and select the option "Open Git Bash here" to open Git Bash in that directory.

Note
If you do not see the "Open Git Bash here" option, it means that Git is not installed on your system.
You can download and install Git from this link.
For a tutorial on how to install and use Git, check out this video.
- Once Git Bash is open, run the following command to clone the repository:
git clone https://github.com/aKaReZa75/eBoard_STM32F103C8.git- You can copy the above command by either:
- Clicking on the Copy button on the right of the command.
- Or select the command text manually and press Ctrl + C to copy.
- To paste the command into your Git Bash terminal, use Shift + Insert.

- Then, press Enter to start the cloning operation and wait for the success message to appear.

Important
Please keep in mind that the numbers displayed in the image might vary when you perform the same actions.
This is because repositories are continuously being updated and expanded. Nevertheless, the overall process remains unchanged.
Note
Advantage of Cloning the Repository:
- Receiving Updates: By cloning the repository, you can easily and automatically receive new updates.
- Version Control: Using Git allows you to track changes and revert to previous versions.
- Team Collaboration: If you are working on a project with a team, you can easily sync changes from team members and collaborate more efficiently.
If you prefer not to use Git Bash or the command line, you can download the repository directly from GitHub as a ZIP file.
Follow these steps:
-
Navigate to the GitHub repository page and Locate the Code button:
- On the main page of the repository, you will see a green Code button near the top right corner.
-
Download the repository:
- Click the Code button to open a dropdown menu.
- Select Download ZIP from the menu.

-
Save the ZIP file:
- Choose a location on your computer to save the ZIP file and click Save.
-
Extract the ZIP file:
- Navigate to the folder where you saved the ZIP file.
- Right-click on the ZIP file and select Extract All... (Windows) or use your preferred extraction tool.
- Choose a destination folder and extract the contents.
-
Access the repository:
- Once extracted, you can access the repository files in the destination folder.
Important
- No Updates: Keep in mind that downloading the repository as a ZIP file does not allow you to receive updates.
If the repository is updated, you will need to download it again manually. - Ease of Use: This method is simpler and suitable for users who are not comfortable with Git or command-line tools.
If you have any questions or issues, you can raise them through the "Issues" section of this repository. Here's how you can do it:
- Navigate to the "Issues" tab at the top of the repository page.

- Click on the "New Issue" button.

-
In the Title field, write a short summary of your issue or question.
-
In the "Description" field, detail your question or issue as thoroughly as possible. You can use text formatting, attach files, and assign the issue to someone if needed. You can also use text formatting (like bullet points or code snippets) for better readability.
-
Optionally, you can add labels, type, projects, or milestones to your issue for better categorization.
-
Click on the "Submit new issue" button to post your question or issue.

I will review and respond to your issue as soon as possible. Your participation helps improve the repository for everyone!
Tip
- Before creating a new issue, please check the "Closed" section to see if your question has already been answered.

- Write your question clearly and respectfully to ensure a faster and better response.
- While the examples provided above are in English, feel free to ask your questions in Persian (فارسی) as well.
- There is no difference in how they will be handled!
Note
Pages and interfaces may change over time, but the steps to create an issue generally remain the same.
To contribute to this repository, please follow these steps:
- Fork the Repository
- Clone the Forked Repository
- Create a New Branch
- Make Your Changes
- Commit Your Changes
- Push Your Changes to Your Forked Repository
- Submit a Pull Request (PR)
Note
Please ensure your pull request includes a clear description of the changes you’ve made. Once submitted, I will review your contribution and provide feedback if necessary.
If you found this repository useful:
- Subscribe to my YouTube Channel.
- Share this repository with others.
- Give this repository and my other repositories a star.
- Follow my GitHub account.
This project is licensed under the GPL-3.0 License. This license grants you the freedom to use, modify, and distribute the project as long as you:
- Credit the original authors: Give proper attribution to the original creators.
- Disclose source code: If you distribute a modified version, you must make the source code available under the same GPL license.
- Maintain the same license: When you distribute derivative works, they must be licensed under the GPL-3.0 too.
- Feel free to use it in your projects, but make sure to comply with the terms of this license.
Feel free to reach out to me through any of the following platforms: