This guide shows how to integrate AutoGen agents with LangGraph to leverage features like persistence, streaming, and memory, and then deploy the integrated solution to LangSmith for scalable production use. In this guide we show how to build a LangGraph chatbot that integrates with AutoGen, but you can follow the same approach with other frameworks. Integrating AutoGen with LangGraph provides several benefits:

Prerequisites

  • Python 3.9+
  • Autogen: pip install autogen
  • LangGraph: pip install langgraph
  • OpenAI API key

Setup

Set your your environment:
import getpass import os   def _set_env(var: str):  if not os.environ.get(var):  os.environ[var] = getpass.getpass(f"{var}: ")   _set_env("OPENAI_API_KEY") 

1. Define AutoGen agent

Create an AutoGen agent that can execute code. This example is adapted from AutoGen’s official tutorials:
import autogen import os  config_list = [{"model": "gpt-4o", "api_key": os.environ["OPENAI_API_KEY"]}]  llm_config = {  "timeout": 600,  "cache_seed": 42,  "config_list": config_list,  "temperature": 0, }  autogen_agent = autogen.AssistantAgent(  name="assistant",  llm_config=llm_config, )  user_proxy = autogen.UserProxyAgent(  name="user_proxy",  human_input_mode="NEVER",  max_consecutive_auto_reply=10,  is_termination_msg=lambda x: x.get("content", "").rstrip().endswith("TERMINATE"),  code_execution_config={  "work_dir": "web",  "use_docker": False,  }, # Please set use_docker=True if docker is available to run the generated code. Using docker is safer than running the generated code directly.  llm_config=llm_config,  system_message="Reply TERMINATE if the task has been solved at full satisfaction. Otherwise, reply CONTINUE, or the reason why the task is not solved yet.", ) 

2. Create the graph

We will now create a LangGraph chatbot graph that calls AutoGen agent.
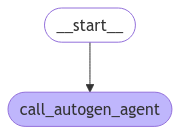
from langchain_core.messages import convert_to_openai_messages from langgraph.graph import StateGraph, MessagesState, START from langgraph.checkpoint.memory import MemorySaver  def call_autogen_agent(state: MessagesState):  # Convert LangGraph messages to OpenAI format for AutoGen  messages = convert_to_openai_messages(state["messages"])   # Get the last user message  last_message = messages[-1]   # Pass previous message history as context (excluding the last message)  carryover = messages[:-1] if len(messages) > 1 else []   # Initiate chat with AutoGen  response = user_proxy.initiate_chat(  autogen_agent,  message=last_message,  carryover=carryover  )   # Extract the final response from the agent  final_content = response.chat_history[-1]["content"]   # Return the response in LangGraph format  return {"messages": {"role": "assistant", "content": final_content}}  # Create the graph with memory for persistence checkpointer = MemorySaver()  # Build the graph builder = StateGraph(MessagesState) builder.add_node("autogen", call_autogen_agent) builder.add_edge(START, "autogen")  # Compile with checkpointer for persistence graph = builder.compile(checkpointer=checkpointer) 
from IPython.display import display, Image  display(Image(graph.get_graph().draw_mermaid_png())) 
LangGraph chatbot with one step: START routes to autogen, where call_autogen_agent sends the latest user message (with prior context) to the AutoGen agent.

3. Test the graph locally

Before deploying to LangSmith, you can test the graph locally:
# pass the thread ID to persist agent outputs for future interactions config = {"configurable": {"thread_id": "1"}}  for chunk in graph.stream(  {  "messages": [  {  "role": "user",  "content": "Find numbers between 10 and 30 in fibonacci sequence",  }  ]  },  config, ):  print(chunk) 
Output:
user_proxy (to assistant):  Find numbers between 10 and 30 in fibonacci sequence  -------------------------------------------------------------------------------- assistant (to user_proxy):  To find numbers between 10 and 30 in the Fibonacci sequence, we can generate the Fibonacci sequence and check which numbers fall within this range. Here's a plan:  1. Generate Fibonacci numbers starting from 0. 2. Continue generating until the numbers exceed 30. 3. Collect and print the numbers that are between 10 and 30.  ... 
Since we’re leveraging LangGraph’s persistence features we can now continue the conversation using the same thread ID — LangGraph will automatically pass previous history to the AutoGen agent:
for chunk in graph.stream(  {  "messages": [  {  "role": "user",  "content": "Multiply the last number by 3",  }  ]  },  config, ):  print(chunk) 
Output:
user_proxy (to assistant):  Multiply the last number by 3 Context: Find numbers between 10 and 30 in fibonacci sequence The Fibonacci numbers between 10 and 30 are 13 and 21.  These numbers are part of the Fibonacci sequence, which is generated by adding the two preceding numbers to get the next number, starting from 0 and 1.  The sequence goes: 0, 1, 1, 2, 3, 5, 8, 13, 21, 34, ...  As you can see, 13 and 21 are the only numbers in this sequence that fall between 10 and 30.  TERMINATE  -------------------------------------------------------------------------------- assistant (to user_proxy):  The last number in the Fibonacci sequence between 10 and 30 is 21. Multiplying 21 by 3 gives:  21 * 3 = 63  TERMINATE  -------------------------------------------------------------------------------- {'call_autogen_agent': {'messages': {'role': 'assistant', 'content': 'The last number in the Fibonacci sequence between 10 and 30 is 21. Multiplying 21 by 3 gives:\n\n21 * 3 = 63\n\nTERMINATE'}}} 

4. Prepare for deployment

To deploy to LangSmith, create a file structure like the following:
my-autogen-agent/ ├── agent.py # Your main agent code ├── requirements.txt # Python dependencies └── langgraph.json # LangGraph configuration 
  • agent.py
  • requirements.txt
  • langgraph.json
import os import autogen from langchain_core.messages import convert_to_openai_messages from langgraph.graph import StateGraph, MessagesState, START from langgraph.checkpoint.memory import MemorySaver  # AutoGen configuration config_list = [{"model": "gpt-4o", "api_key": os.environ["OPENAI_API_KEY"]}]  llm_config = {  "timeout": 600,  "cache_seed": 42,  "config_list": config_list,  "temperature": 0, }  # Create AutoGen agents autogen_agent = autogen.AssistantAgent(  name="assistant",  llm_config=llm_config, )  user_proxy = autogen.UserProxyAgent(  name="user_proxy",  human_input_mode="NEVER",  max_consecutive_auto_reply=10,  is_termination_msg=lambda x: x.get("content", "").rstrip().endswith("TERMINATE"),  code_execution_config={  "work_dir": "/tmp/autogen_work",  "use_docker": False,  },  llm_config=llm_config,  system_message="Reply TERMINATE if the task has been solved at full satisfaction.", )  def call_autogen_agent(state: MessagesState):  """Node function that calls the AutoGen agent"""  messages = convert_to_openai_messages(state["messages"])  last_message = messages[-1]  carryover = messages[:-1] if len(messages) > 1 else []   response = user_proxy.initiate_chat(  autogen_agent,  message=last_message,  carryover=carryover  )   final_content = response.chat_history[-1]["content"]  return {"messages": {"role": "assistant", "content": final_content}}  # Create and compile the graph def create_graph():  checkpointer = MemorySaver()  builder = StateGraph(MessagesState)  builder.add_node("autogen", call_autogen_agent)  builder.add_edge(START, "autogen")  return builder.compile(checkpointer=checkpointer)  # Export the graph for LangSmith graph = create_graph() 

5. Deploy to LangSmith

Deploy the graph with the LangSmith CLI:
pip install -U langgraph-cli 
langgraph deploy --config langgraph.json 

Connect these docs programmatically to Claude, VSCode, and more via MCP for real-time answers.