Introduction
Hello Roblox developers,
A few years ago, I created the “Game Checkpoints System v1.0”. Back then, it was extremely basic — it could save player checkpoints and respawn them, but the implementation was clunky, inefficient, and lacked flexibility. You can check out the original post here.
Recently, I revisited that system and rebuilt it from the ground up. The result is V2.0 — a faster, more efficient, and highly configurable checkpoint system, designed to be simple for developers to integrate into any game. It’s open source and free for anyone to use.
Whats New?
The original version did little more than save a checkpoint number and respawn the player there. V2.0 is a significant upgrade, with several major improvements that make it both developer-friendly and player-friendly:
Configurable Settings
V2.0 introduces a dedicated settings structure, giving you control over how checkpoints behave in your game. You can adjust the mechanics of progression, respawn timing, and data persistence without touching the core code.
CanGoBackwards– This setting lets you control whether players can regress to earlier checkpoints. If set totrue, players who accidentally touch a previous checkpoint will have their progress updated backward. If set tofalse, players are locked to the furthest checkpoint they’ve reached, which is useful for games where backward progress would break the intended challenge or flow.respawnTime– Determines how long it takes for a player to respawn after death. A setting of0allows instantaneous respawns, keeping the gameplay fast-paced. Longer values can allow for visual effects before respawning, giving developers flexibility to match the game’s pacing and feel.sequential– When enabled, this enforces strict linear progression through checkpoints. For example, players must move from checkpoint 1 → checkpoint 2 → checkpoint 3; skipping directly from 1 → 3 will be ignored. This is perfect for games that require step-by-step progression, such as story-driven obbies or adventure maps.saveData– Enables persistent checkpoint saving across sessions. Players who leave the game and return later will resume exactly where they left off. This makes the system ideal for longer experiences or games where progression matters over multiple play sessions.
Efficient Player Progression Tracking
The new system keeps an internal table of player progress, avoiding repeated scans or inefficient logic. This ensures that even in games with large numbers of players, checkpoint handling remains smooth and lag-free.
Flexible Death Handling
Players are automatically respawned at the correct checkpoint, with optional delays controlled by respawnTime. This works seamlessly with both sequential and non-sequential progression modes, and backward progression is respected if allowed.
Developer-Friendly Integration
V2.0 is designed so you can drop it into any game with minimal setup. All checkpoint models can be configured in the Workspace, and the system automatically finds and tracks the correct checkpoint for each player. With just a few function calls (join, leave, update, check, and onDeath), your game is ready to handle checkpoints reliably.
Open-Source and Extensible
Since the system is open-source, you can modify or extend it to suit your game’s unique needs. Whether you want to add visual effects on checkpoint triggers, integrate it with achievements, or create advanced sequencing rules, the framework is built to be flexible.
How does this benefit my game?
With these improvements, V2.0 gives you full control over player progression:
- You can prevent players from losing progress by disallowing backward movement, or let them replay sections by enabling it.
- Respawn timing can be tuned to match your game’s pacing. Fast respawns make obbies more fluid, while slightly delayed respawns can be utilised for cutscenes, or whatever other death effects you desire.
- Sequential mode ensures that players follow the intended order, which is crucial for story-based or challenge-based levels.
- Persistent save data means players won’t lose progress if they leave mid-game, which improves retention and makes longer experiences feasible.
INSTALLATION:
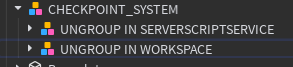
Installing the system itself is incredibly simple. Upon importing the model, there is 2 groups, one named “Ungroup in Workspace”, the other “Ungroup in ServerScriptService”. Thats right - you guessed it; you ungroup the models in the specified areas to make the system work.
How do I make checkpoints?
Inside the workspace group, you will find a folder named “Checkpoints” that includes one checkpoint model. All you need to do is simply duplicate this model as many times as you need, and then assign it an order value. The order value refers to which number checkpoint this is in the sequence - for example the first checkpoint in your game will have an order value of 1. There is no maximum limit.
The order value can be assigned by simply changing the attribute inside the model, as seen here:
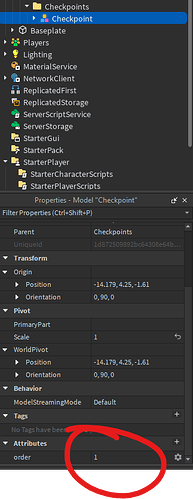
Thats all you have to do for the setup. Simply duplicate the checkpoint as many times as you need, and assign an
order value to each one.