
What is React?
React-lua is a Roblox-compatible Lua port of the well known React UI library that is widely used in web and mobile.
React-lua is maintained by Roblox. Currently most studio plugins and the Roblox Universal App (the desktop console and mobile app where you browse for your favorite Roblox games) are all written in react-lua.
In addition, we also maintain many libraries that extend or support react-lua. These libraries, including react-lua, are transpiled from from their JavaScript counterparts using js-to-lua.
Why should I use React?
Roblox already has plenty of awesome built-in tools for building UIs for your experiences. If you’re just starting out and your UI consists of just a few static buttons and dialogs, then sticking with just these tools is a great choice!! If you’re wanting to apply more structure to the ever growing complexity of your UI or just looking to learn something new, consider trying out React!
React is an industry standard for many web and mobile apps these days and modern React has never been easier to use. It will certainly be a top choice for any professional developer with prior web development experience.
Who is this guide for?
This guide is for experienced off-platform React devs looking to build UIs on Roblox and also for existing Roblox devs looking to up-level their UI/UX code. This guide assumes you are already familiar with building UI in Roblox.
Since react-lua is a port of React, all React resources apply. This guide highlights the key differences and is also a complete guide for those unfamiliar with React. For further reading, we suggest diving into the official React docs. There are also docs for react-lua.
Source Code
Source code for all examples are available on GitHub at react-lua-tutorial. Note that examples in the repository are written in Luau and are fully compatible with untyped Lua code. Type annotations have been omitted from the examples here for simplicity. I still highly recommended that you leverage typed Luau for all your Roblox scripts!
Getting Started
Installing the react-lua module in your Roblox project
If you are using Rojo and the Wally package management tool, react-lua is available on Wally. This is the recommended way to install React. Or, you can download an .rbxm file that can be imported into an existing project here. In either case, react-lua will be added to your ReplicatedStorage folder.

Setting up React
Typical UI development in Roblox usually entails building a tree of GUIObjects inside the StarterGui service. React-lua is an entirely code driven UI workflow so instead, we define a single entry point inside StarterPlayer > StarterPlayerScripts where we will declare React code that will ultimately construct the tree.

After following the installation steps above, you should be able to require the React ModuleScript in your LocalScripts to build your UI with React. Note that the package names may have different casing depending on which installation method you chose.
local ReplicatedStorage = game:GetService("ReplicatedStorage") local React = require(ReplicatedStorage.Shared.Packages.react) local ReactRoblox = require(ReplicatedStorage.Shared.Packages:FindFirstChild("react-roblox")) MyTestFrame
First let’s define a very basic UI element to test that everything works:
local function MyTestFrame() return React.createElement("Frame", { Size = UDim2.new(0,100,0,100), }) end To actually render the UI element, we need to “mount” the React “component tree.”
local handle = Instance.new("ScreenGui",Players.LocalPlayer.PlayerGui) local root = ReactRoblox.createRoot(handle) root:render(React.createElement(MyTestFrame, {}, {})) Hit Play to see that everything works as expected!

The render function is ultimately what converts your React tree into something you can see on screen. The render function call will be omitted in the rest of the exampes in this article.
What’s happening here?
React-lua internally stores a “tree” representing your UI.
React.createElement("Frame", {...}, {...}) defines a node in the tree.
- The first argument in this case is the
GUIObjectthat the node represents. It could also be user-defined React component or function - The second argument is a list of properties that modify the appearance or behavior of the
GUIObject - The final argument is a list of children nodes
Once the tree is defined, MyTestFrame in the example above, we need to “mount” so that it will ultimately render a Roblox UI for us. This means converting it into a GUIObject tree in the datamodel. When calling root:render with our component, react-lua will do the following things:
- Construct or update it’s internal representation of the UI tree.
- Derive the state of each component in the tree.
- Construct or update the matching Roblox
GUIObjectrepresentation of the UI (rendering). You can see the tree in the explorer widget in the screenshot above.
This is identical to the component-lifecycle of React.
Styling
React properties are matched to GUIObject styling properties by. For example, to create a cornflower blue 108x108 square in the center of the screen, we want to set the Size, Position, AnchorPoint and BackgroundColor3 property.

The React styling property always matches the instance property name you are trying to set. Only styling related properties can be set this way. Please see the “Advanced Styling” section below for more examples!
Component Trees
Of course you can’t have a cute frame without rounded corners! The third argument in React.createElement is for child elements. These will be children both in the React tree and the represented datamodel tree. Since Roblox uses child objects like UICorner to style they parent GUIObjects, we just need to instantiate a UICorner child element to round out the corners of the parent Frame!
local function MyMostCuteTestFrame() return React.createElement("Frame", { Position = UDim2.new(0.5,0,0.5,0), AnchorPoint = Vector2.new(0.5,0.5), Size = UDim2.new(0,100,0,100), BackgroundColor3 = Color3.fromRGB(193,179,142) }, { React.createElement("UICorner", { CornerRadius = UDim.new(0,30) }), }) end 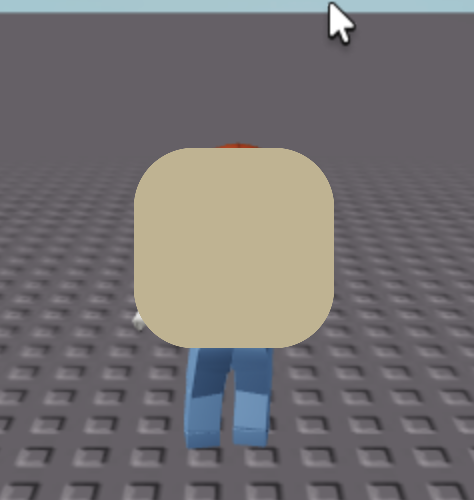
Building component trees are a key concept of React so you should get comfortable with it!
Properties
In addition to built in properties like the styling properties above, you can also define custom properties for your custom React components.
local function MyCustomTextLabel(props) return React.createElement("TextLabel", { Size = UDim2.new(0,100,0,100), BackgroundColor3 = Color3.fromRGB(193,179,142), TextColor3 = Color3.fromRGB(127,127,255), Text = props.MyText, }) end Now you can instantiate your MyCustomTextLabel with whatever text you want!
root:render(React.createElement(MyCustomTextLabel, { MyText = "I love Giraffes!" }, {})) 
Reusing Components
Properties can be used for just about anything including styling properties, text to display, callbacks (see next example) and even React components!
local function MyCustomFrame(props) return React.createElement("Frame", { Size = UDim2.new(0,100,0,100), BackgroundColor3 = Color3.fromRGB(193,179,142), }, { Child = props.child }) end local function MyCustomFrameWithContents() return React.createElement(MyCustomFrame, { child = React.createElement("TextLabel", { Text = "Hello from inside the frame!", BackgroundTransparency = 1, AutomaticSize = Enum.AutomaticSize.XY, }) }) end Note that we’re using our own MyCustomFrame component inside the MyCustomFrameWithContents component! The above is a very basic example of how you might build your own reuseable components.
Interacting
React can listen to events from the Roblox objects it represents. For example, to do something when a button is clicked, we can listen to the Activated event.
local function MyBasicButton() return React.createElement("TextButton", { Size = UDim2.new(0,100,0,100), BackgroundColor3 = Color3.fromRGB(0,255,0), Text = "Click me!", [React.Event.Activated] = function() print("You clicked me!") end }) end 
Property change events are handled separately with the React.Change key. For example, to listen to changes in the CanvasPosition property of a ScrollingFrame:
local function ColorfulScrollingFrame() return React.createElement("ScrollingFrame", { Size = UDim2.new(0,200,0,200), BackgroundColor3 = Color3.fromRGB(255,255,255), [React.Change.CanvasPosition] = function(instance: ScrollingFrame) print("you scrolled me to " .. tostring(instance.CanvasPosition)) end }, { React.createElement("UIListLayout", { FillDirection = Enum.FillDirection.Vertical, }), React.createElement("Frame", { Size = UDim2.new(0,200,0,150), BackgroundColor3 = Color3.fromRGB(255,0,0), }), React.createElement("Frame", { Size = UDim2.new(0,200,0,150), BackgroundColor3 = Color3.fromRGB(0,255,0), }), React.createElement("Frame", { Size = UDim2.new(0,200,0,150), BackgroundColor3 = Color3.fromRGB(0,0,255), }), }) end A common pattern is to pass in a callback as a property to the React component so that information can be passed up the hierarchy.
local function MyClickableButton(props) return React.createElement("TextButton", { Size = UDim2.new(0,100,0,100), BackgroundColor3 = Color3.fromRGB(0,0,255), Text = props.Text, [React.Event.Activated] = function() props.OnClick(tostring(os.date("%x %X"))) end }) end ... root:render(React.createElement(Tutorial.MyClickableButton, { OnClick = function(time: string) print("Clickaroo! It is " .. time) end })) Connecting with your Game
You can pass data into your React UI using properties when you call root:render. We saw a simple example of this earlier with MyCustomTextLabel and for a game it might look something like:
root:render(React.createElement(SnackTime, { NumPlayers = #game:GetService("Players"):GetPlayers(), PetsEnabled = true, GameMode = "Fruits & Vegetables" }, {})) If you need to update the properties, you can just call root:render again. To pull UI interactions back to your game, you will use events as outlined in the previous section. You can also pass in a callback as a property here which allows you to separate your UI code and your “side-effecting” game logic. We saw this in the MyClickableButton example.
Using properties is just one option. Another option is fetching the data directly inside of a useEffect call or connecting to signals. We will learn more about this in the “Effects” section.
Inspecting and Debugging your React GUI
React ultimately renders a GUIObject tree in the Roblox DataModel. You can inspect this tree by finding it in the Explorer window under Players > [Local Player Name] > PlayerGui. In the MyCuteTestFrame example, we can see react-lua has created a Frame instance for us and carried over all our desired styling properties. Frame is the closest Roblox equivalent to a div element in web BTW :D.

You can also update this tree in the properties widget. However changes here are only for testing and will likely be overridden the next time react-lua re-renders its component tree.
 Spicing things Up
State useState
To build dynamic UIs, you will need components with states that change from user interaction. This can be accomplished with the useState hook:
local function MyColorfulClickableSquare() local color, setColor = React.useState(Color3.new(255,255,255)) return React.createElement("TextButton", { Size = UDim2.new(0,200,0,200), BackgroundColor3 = color, TextXAlignment = Enum.TextXAlignment.Center, TextYAlignment = Enum.TextYAlignment.Center, Text = "Click me to change color!", [React.Event.Activated] = function() local newColor = Color3.fromRGB(math.random(0,255), math.random(0,255), math.random(0,255)) print("changing color to " .. tostring(newColor) .. "!") setColor(newColor) end }) end The useState function takes an initial value and returns the state value and a setter. In this example, the BackgroundColor3 property of TextButton is set to the color state variable, which is initialized to white. The second variable, setColor, is the function that we use to set change value of color, which is exactly what we do inside the [React.Event.Activated] event.
React carefully manages its component state so you must set the state through the state setter function returned by useState. Just setting the color variable directly in the above example won’t persist the state!
Note, if you capture the state value in a lambda (say), it will become stale when the setter gets called. The state value is just a regular lua variable and will not automatically update after its been captured. To fix this, you will need to capture it within hooks like useMemo or useCallback and add the state variable to the list of dependencies. See the “Understanding Dependencies” section below.
Ok, let’s take it a step further and compose with MyClickableButton that we defined earlier.
local function MyCounter() local count, setCount = React.useState(0) return React.createElement("Frame", { Size = UDim2.new(0,100,0,200), }, { Layout = React.createElement("UIListLayout", { FillDirection = Enum.FillDirection.Vertical, }), Label = React.createElement("TextLabel", { Size = UDim2.new(0,100,0,100), BackgroundColor3 = Color3.fromRGB(0,255,0), LayoutOrder = 1, Text = "I've been clicked " .. tostring(count) .. " times" }), Button = React.createElement(MyClickableButton, { Size = UDim2.new(0,100,0,100), Text = "Click me to increment!", LayoutOrder = 2, OnClick = function() setCount(count + 1) end }) }) end Effects useEffect
Ultimately, your react-lua UI code will need to connect to the world outside of the React component tree. The useEffect hook allows you to run effectful code in a controlled way.
local function MyClock() local text, setText = React.useState("") React.useEffect(function() print("connecting to Heartbeat") local timer = game:GetService("RunService").Heartbeat:Connect(function() setText(os.date("%x %X")) end) return function() print("disconnecting") timer:Disconnect() end end, {}) return React.createElement("TextLabel", { Size = UDim2.new(0,200,0,200), Text = text, }) end 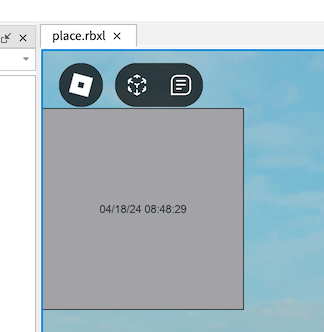
The function pass into useEffect will get run once (and only once) when the node first gets created in the react tree. Here we connect to the Heartbeat event of RunService inside the useEffect hook to update text to the current time each frame. When we destroy this component (for example, if it’s part of a UI dialog we just closed) we no longer want to be connected to this event. The method we pass into the useEffect hook allows you to optionally return a cleanup routine. So we return a function that calls the Disconnect method of the RBXScriptConnection object that is returned by the Connect method.
Another common event you might want to listen to is the InputEnded event of UserInputService which will allow you to capture keyboard input.
React.useEffect(function() print("connecting to keyboard signal") local UserInputService = game:GetService("UserInputService") local signal: RBXScriptConnection = UserInputService.InputEnded:Connect(function(input: InputObject, gameProcessedEvent: boolean) if input.UserInputType == Enum.UserInputType.Keyboard then setText("last key pressed: " .. UserInputService:GetStringForKeyCode(input.KeyCode)) end end) return function() print("disconnecting from keyboard signal") signal:Disconnect() end end, {}) -- empty dependency array means this effect only runs once Now you might ask, why do I need to wrap code around useEffect? React is a “declarative” UI model but its implementation is “imperative”. This means your code, which declares how your UI looks/behaves, may be executed multiple times and these executions may produce unpredictable “side-effects”. The useEffect hook precisely allows us to execute “effectful” code predictably within the declarative model.
local function UnderstandingUseEffectExample() local flavor, setFlavor = React.useState("vanilla") print("I might get run a lot!") React.useEffect(function() print("I only run once!") setFlavor("guava") end, {}) -- don't forget the {} return React.createElement("TextLabel", { Size = UDim2.new(0,100,0,100), BackgroundColor3 = Color3.fromRGB(255,216,1), Text = flavor, }) end If you run just this example, you’ll see “I might get run a lot!” print twice. In more complex react trees, this may get run many many times. Everytime a property or state changes (for example setFlavor gets called), React will rerun the code for that component and all of its descendants. This is called a rerender. Each call to React.createElement declares a node in the component tree. On re-renders, any node in the tree that shares the same location and type from the last time the tree was rendered will be considered the “same” node in the tree allowing state to be persisted. In this case, useEffect only runs the first time the node gets created in the tree.
Of course, sometimes, your effectful code might be dependent on other parts of your component (for example, fetching a URL that’s passed in as a property). In the above example, we pass in {} as the second argument to useEffect indicating there are no dependencies to the effect thus ensuring the effect only gets run once. DO NOT FORGET TO ADD THE {}. The next 2 sections will dive deeper into dependencies.
Memoization useMemo
Whereas effects are intended for controlled interactions with the world outside of React, sometimes, we’d also like to control code execution for optimization reasons. Remember that your functional component code may get run (rendered) many more times than the number of instances of that component in your tree. We can use the useMemo hook to cache expensive computations so that they run only once.
local function MyEggCounter(props) local numberEggs = React.useMemo(function() print("Counting eggs! I'm only going to do this once!") local numberEggs = 0 for i = 1, props.numberEggsToCount do numberEggs = numberEggs + 1 end return numberEggs end, {props.numberEggsToCount}) return React.createElement("TextLabel", { Size = UDim2.new(0,100,0,100), BackgroundColor3 = Color3.fromRGB(0,255,0), Text = "I counted " .. numberEggs .. " eggs!" }) end ... root:render(React.createElement(Tutorial.MyEggCounter, { numberEggsToCount = 9511245 })) Superficially, useMemo will take a function, run it, and return the value that the function produces. The next time your component node is rendered, it will use the previously computed value! However, the computed numberEggs value is dependent on props.numberEggsToCount. We pass this argument inside an array to the second argument of useMemo which indicates it is a dependency. Now, each time props.numberEggsToCount changes (and only when it changes), we will recompute numberEggs.
Understanding Dependencies
While in most cases, you can and should just stick any values captured inside the function passed into useMemo, it’s still important to understand what’s going on here. When a node is rendered, React will store each of the dependencies in the dependency array. On each subsequent render, it will compare the values on the current render and the previous render. If these values are different, then the dependencies have “changed” and the computation or effect will be run again.
Lua has both value types and reference types. In particular, tables are reference types and modifying a table will not change the reference to the table. Thus the following does not work.
local function MyBoopMachine() local boops, setBoops = React.useState({ nose = false, ears = false, tail = false, }) local whatToBoop = React.useMemo(function() if not boops.nose then return "nose" elseif not boops.ears then return "ears" elseif not boops.tail then return "tail" else return "all booped!" end end, {boops}) return React.createElement("TextButton", { Size = UDim2.new(0,200,0,200), BackgroundColor3 = Color3.fromRGB(255,255,0), Text = "boop " .. whatToBoop, [React.Event.Activated] = function() boops[whatToBoop] = true -- this will not update the `boops` table reference, so `whatToBoop` will not be updated setBoops(boops) end }) end To fix this issue, we need to rebuild the table
[React.Event.Activated] = function() local boopCopy = { nose = boops.nose, ears = boops.ears, tail = boops.tail, } boopCopy[whatToBoop] = true setBoops(boopCopy) end Table operations like this are very common and often cumbersome to do manually. Instead, you can use the join function avaliable in many lua libraies including Cryo and Dash (which are also available on Wally).
local boopCopy = join(boops, { [whatToBoop] = true }) If no dependency argument is passed in (i.e. it’s nil), then the function will be run every time the component code is run. This is almost never what you want to do.
local function MyInfiniteLoop() local myState, setMyState = React.useState({ content = "every new react developer be like" }) React.useEffect(function() print("I'm stuck in an infinite loop!") setMyState({ content = "This is fine" }) end) -- no explicit {} causes the effect to run every time the component code is executed! return React.createElement("TextLabel", { Size = UDim2.new(0,100,0,100), BackgroundColor3 = Color3.fromRGB(0,255,0), Text = myState.content }) end In the above example, the setText method prompts a state change which prompts react to run the component function again. Since useEffect has nil dependency, it will run the effect again, calling the setText function again, sending your program into an infinite loop.
Note that react can not tell that the state has not actually changed due to tables being compared by reference. Since the state here is a table, it’s reference changes each time call { content = "This is fine" }. Lua primitives like numbers and strings are compared by value so using a string directly as the state would not trigger the state change the second time setMyState({ content = "This is fine" }) is called (but you still shouldn’t do it).
References useRef
The useRef hook allows you to create “references” that can be assigned to anything you like in a React-compatible way. A common use case is to interact with child components. Functional components do not have class methods like the older style of class components. Instead, we can use the useImperativeHandle hook to bind a method to the functional component’s state modifiers.
local TextBoxWithSetter = function(props) local text, setText = React.useState("") -- binds `setText` to a function to the ref that can be called from the parent component React.useImperativeHandle(props.setTextRef, function() return { setText = setText } end, {}) return React.createElement("TextBox", { Size = UDim2.new(0,200,0,200), Text = text, }) end -- same as MyClock except uses TextBoxWithSetter -- this is totally silly and you can see how it might be useful for more complex components local function MySillyClock() local ref = React.useRef() React.useEffect(function() local timer = game:GetService("RunService").Heartbeat:Connect(function() ref.current.setText(os.date("%x %X")) end) return function() timer:Disconnect() end end, {}) return React.createElement(TextBoxWithSetter, { setTextRef = ref }) end This is a powerful tool and breaks the unidirectional data flow of the reactive UI paradigm which will make it harder to reason about your code. Accessing the underlying GUIObject that your React tree represents is especially discouraged but sometimes this is necessary to interact with its dynamic properties.
-- TW flashing colors local function ColorJumper() local ref = React.useRef() React.useEffect(function() local timer = game:GetService("RunService").Heartbeat:Connect(function() -- ref.current is the ScrollingFrame, it will be nil on the first render because the ref hasn't been set yet if ref.current then ref.current.CanvasPosition = Vector2.new(0, math.random(0, 800)) end end) return function() timer:Disconnect() end end, {}) return React.createElement("ScrollingFrame", { Size = UDim2.new(0,200,0,200), -- assign the ScrollingFrame instance to ref ref = ref }, { React.createElement("Frame", { Size = UDim2.new(1,0,0,200), BackgroundColor3 = Color3.fromRGB(255,194,132), }), React.createElement("Frame", { Size = UDim2.new(1,0,0,200), Position = UDim2.new(0,0,0,200) BackgroundColor3 = Color3.fromRGB(255,251,149), }), ... }) end In the example above, we use the magical ref reserved property ![]() . When React sees this property, it assigns the element being created itself to
. When React sees this property, it assigns the element being created itself to ref ![]() , which in this case it is the
, which in this case it is the ScrollingFrame instance ![]() .
.
Some of you may be familiar with the forwardRef method which allows to capture this magical ref inside the code for the functional component being created (simply props.ref will not work). Don’t ever use forwardRef. Instead, just pass in the ref as a property that is not named ref like we did in the first example.
More Hooks 
All React hooks are avaliable in react-lua. React-lua also has a few additional hooks which you can learn about in the react-lua docs.
A common pattern is to define your own custom hooks.
local function useToggleState(default: boolean): { enabled: boolean, enable: () -> (), disable: () -> (), } local enabled, setEnabled = React.useState(default) local enable = React.useCallback(function() setEnabled(true) end, {}) local disable = React.useCallback(function() setEnabled(false) end, {}) return { enabled = enabled, enable = enable, disable = disable, } end thanks Kampfkarren for the example above!
Advanced Styling
Styling primitives in react-lua + Roblox are different than the ones used by react-dom or react-native. In particular, Roblox has certain GUIObjects that apply styling to their parents. Ones you will want to use frequently include:
- UIListLayout for applying layouts
- UICorner for rounding corners
- UIPadding for padding content
- UIStroke for outlining
Thus in react-lua, we create a child
local function MyReallyReallyCuteFrame(props: MyReallyReallyCuteFrameProps) return React.createElement("Frame", { Size = UDim2.new(0,200,0,200), AnchorPoint = Vector2.new(0.5,0.5), Position = UDim2.new(0.5,0,0.5,0), BackgroundColor3 = Color3.fromRGB(255,194,132), }, { React.createElement("UIPadding", { PaddingTop = UDim.new(0,20), PaddingBottom = UDim.new(0,20), PaddingLeft = UDim.new(0,20), PaddingRight = UDim.new(0,20), }), React.createElement("UICorner", { CornerRadius = UDim.new(0,20) }), React.createElement("UIStroke", { Thickness = 8, Color = Color3.fromRGB(255,106,106), }), Content = React.createElement("Frame", { Size = UDim2.new(0,100,0,100), BackgroundColor3 = Color3.fromRGB(255,251,149), }) }) end 
Adding a UIListLayout will position all children in order based on their respective sizes. This is super useful for managing layout and it’s common to have your UI tree composed of multiple Frames with UIListLayouts.
local function MyLayoutExample() return React.createElement("Frame", { Size = UDim2.new(0,200,0,400), }, { React.createElement("UIListLayout", { FillDirection = Enum.FillDirection.Vertical, }), React.createElement("Frame", { Size = UDim2.new(1,0,0.5,0), }, { React.createElement("UIListLayout", { FillDirection = Enum.FillDirection.Horizontal, }), React.createElement("Frame", { Size = UDim2.new(0.5,0,1,0), BackgroundColor3 = Color3.fromRGB(255,194,132), }), React.createElement("Frame", { Size = UDim2.new(0.5,0,1,0), BackgroundColor3 = Color3.fromRGB(194,255,132), }), }), React.createElement("Frame", { Size = UDim2.new(1,0,0.5,0), BackgroundColor3 = Color3.fromRGB(255,251,149), }), }) end 
Note, if you are using explicit non integer table keys, you will also need to set the LayoutOrder property.
Typing your Props
When you’re writing Lua scripts in Roblox, you’re actually writing Luau! Luau is a superset of the Lua language that Roblox develops and maintains. Luau adds strict types to Lua which can really improve the safety and legibility of your code! To enable strict type checking, just add --!strict at the top of your scripts!
The entirety of react-lua is written in strictly typed Luau. You can and should use types in your own component props. In many of the above examples, we pass a nebulous props argument to the fuctional components we defined. We can add types to declare what we expect these props to be.
export type MyTypedComponentProps = { content: string, -- required fontSize: number? -- optional! } local function MyTypedComponent(props: MyTypedComponentProps) local newFontSize = props.fontSize or 24 local newContent = "the following content " .. props.content .. " is size " .. tostring(newFontSize) return React.createElement("TextLabel", { Size = UDim2.new(0,100,0,100), BackgroundColor3 = Color3.fromRGB(255,194,132), Text = newContent, TextSize = newFontSize, }) end If we had, for example, forgotten to give a defaut value to the optional fontSize before using it, we would have gotten an error!

A full tutorial on how to adopt Luau strict type checking is out of scope of this article.
Class Components
With the latest version of React, class components are discouraged. Functional components are largely simpler and easier to use and are sufficient 99.9% of the time.
Class components may offer some advantages in certain situations. Since the lua does not support native classes, the syntax for declaring class components is as follows:
local MyComponent = React.Component:extend("MyComponent") function MyComponent:render() return React.createElement("TextLabel", {Text = self.props.text}) end function MyComponent:componentDidMount() print("rendered with text " .. self.props.text .. " by the way, you could have just done this with useEffect") end Similarly, if you want to declare a PureComponent:
local MyPureComponent = React.PureComponent:extend("MyPureComponent") Roact Migration
Some of you may be familiar with Roact which is an earlier manual port of the react programming paradigm. Roact is no longer being maintained and does not support functional components. For the most part, migrating is just a matter of replacing require(...Roact) with require(...React). See the react-lua documentation for guidance on items that require more attention. Note that sometimes react-lua is still referred to as Roact (and indeed the repository is named roact-alignment). It’s a nominal difference. Just make sure you aren’t using the old Roact!!
Contributing to react-lua
JS.Lua hosts the community maintained fork of react-lua and is also the source from which the React Wally packages are built from. You may open issues and pull requests here. This is forked from the Roblox maintained React-lua repo which is currently not accepting community contributions. This is primarily due to 2 reasons:
- React-lua attempts to closely follow the upstream React code and therefore there are strict contribution guidelines that still need to defined
- Roblox’s internal CI/CD tools for lua development are not publicly available at this time and therefore changes can not be automatically verified.
In there future, things may change and there may be more collaboration and coherency here, but what we have right now is what we have. There is so much potential for a vibrant, diverse and collaborative open source ecosystem around Lua and Roblox!!


